 When you type the phrase “recover formatted sd card” into Google, you get 18,700,000 results. That’s an awful lot of results for something so specific. Apparently, many people often manage to format their SD cards by accident and are desperate to restore what was once on them.
While accidentally formatting an SD card can be a frustrating experience, there’s often a good chance to recover your lost data. In this guide, we’ll walk you through the process of recovering formatted SD cards on both Windows and Mac, using a combination of specialized data recovery software and readily available tools.
Quick Navigation
Is It Possible to Recover Deleted Files from a Formatted SD Card?
Yes, it’s possible to recover deleted files from a formatted SD card.
That’s because the most common formatting method (called Quick format in Windows) only marks the card’s storage space as available, without erasing the data. Essentially, the card appears empty, but the underlying files remain intact until new data overwrites them. Likewise, the default format option on Windows, macOS, cameras, and other devices that use memory cards resets the file system and marks the space as free, but they don’t actually wipe every sector on the card.
With that in mind, downloading an SD card recovery software capable of restoring data from a formatted SD card should be your first step because it’s more likely than other solutions to deliver great results.
There are two notable exceptions where recovery becomes impossible:
- The first is when a full format or secure format method is used. These methods go beyond just marking the storage space as empty. Instead, they overwrite the entire storage area with zeros or random data, leaving nothing to recover.
- The second exception catches a lot of people off guard: certain Sony cameras issue a low-level SD_ERASE command (using SD card controller commands CMD32, CMD33, and CMD38) when you format the card through the camera’s menu. Even though it looks like a normal format, this process wipes the card at the hardware level, and no recovery software can bring that data back. Not all Sony models behave this way, but enough do that it’s worth knowing about. If you’re unsure whether your camera performs a low-level erase, it’s always a good idea to scan the card with recovery software first and check. Better to spend a few minutes confirming than to assume the worst.
How Can an SD Card Become Formatted?
There are many ways a card can end up formatted. More often than not, the cause is user error, though not always. Some of the usual reasons your SD card can show up as formatted are:
- 🧹 Absent-mindedly formatting the wrong SD card. It’s easy to get distracted, especially when working with multiple SD cards. That’s why you should always double-check that you’re selecting the correct card before initiating a format process.
- 📛 Formatting to an incompatible file system. Different devices and operating systems work with different file systems (like FAT32, exFAT, NTFS). Formatting an SD card to a file system your other devices don’t recognize can make the card appear as if it needs to be formatted again.
- ⚠️ Abruptly removing the SD card or powering off the device. Disconnecting an SD card during an active read or write process can seriously corrupt the file system. This type of corruption often makes the card seem formatted.
- ⛓️💥 Formatting the card because of a file system error. Sometimes Windows, macOS, or a camera will tell you the SD card is unreadable and “needs to be formatted” before you can use it (maybe the file system is damaged or the connection is loose). A lot of users just click Format to get the card working again, and the result is that the card ends up “formatted” even though the real goal was fixing the error, not erasing files.
- 👾 Virus or malware attack. Malicious software can sometimes target storage devices, corrupting file systems or intentionally formatting your SD card.
- 📹 Digital cameras formatting the SD card. Not all digital cameras and camcorders are predictable and well-designed, and some make it way too easy to format a newly inserted SD card, or they do it on their own.
But regardless of the reason, formatting doesn’t always mean your files are completely gone. You can always attempt recovery using data recovery software. Let’s explain how that works in the next section.
How to Recover Data from a Formatted SD Card on Windows
We’ll explore 3 methods you can use to easily recover missing data from a formatted SD card on Windows.
Method 1: Recover Data from a Formatted SD Card using Software
If you want a straightforward, reliable way to get your files back, Disk Drill SD card recovery is a great place to start. It can scan your card even after a quick format, locate recoverable files, and let you preview everything before you commit to the full recovery. The whole process is simple and free to try, so you can see whether your photos and videos are still intact without any guesswork.

Steps to Recover Deleted Files from a Formatted SD Card
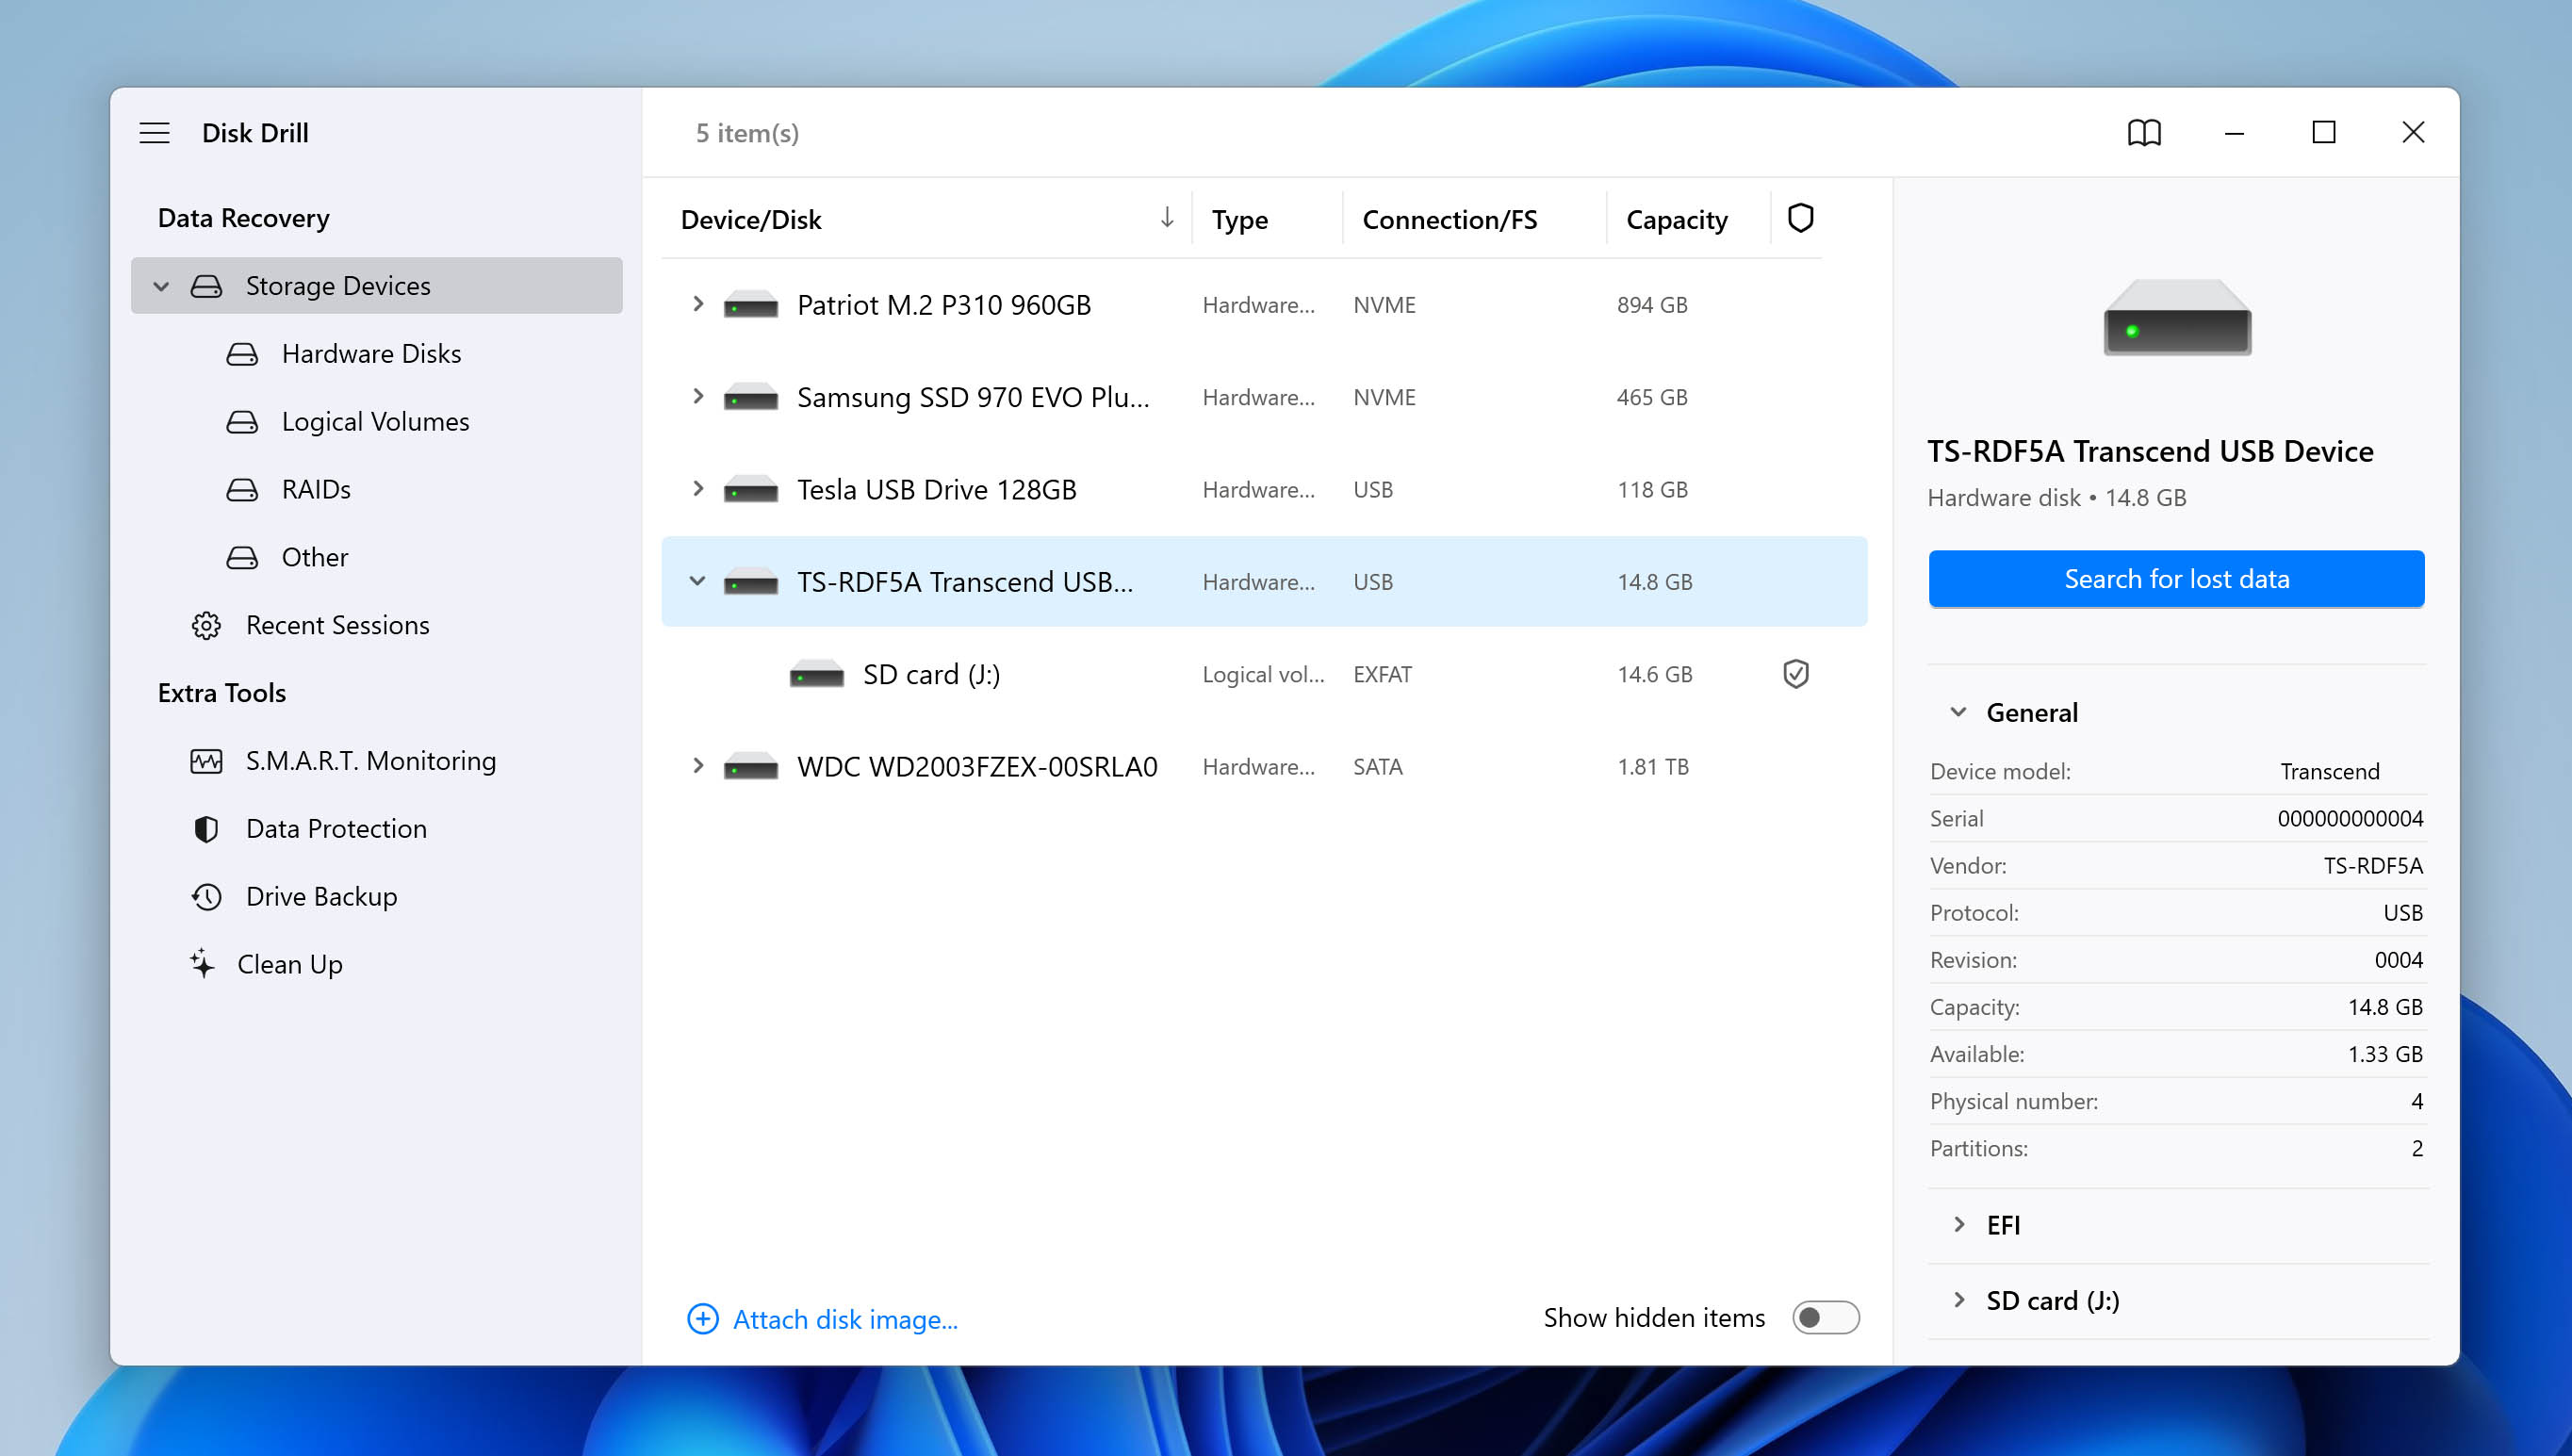
- Insert the formatted SD card into your computer. Disk Drill can detect and recover even SD cards that are not displayed in File Explorer, which may come in handy if your card hasn’t been assigned a drive letter or is without a file system.
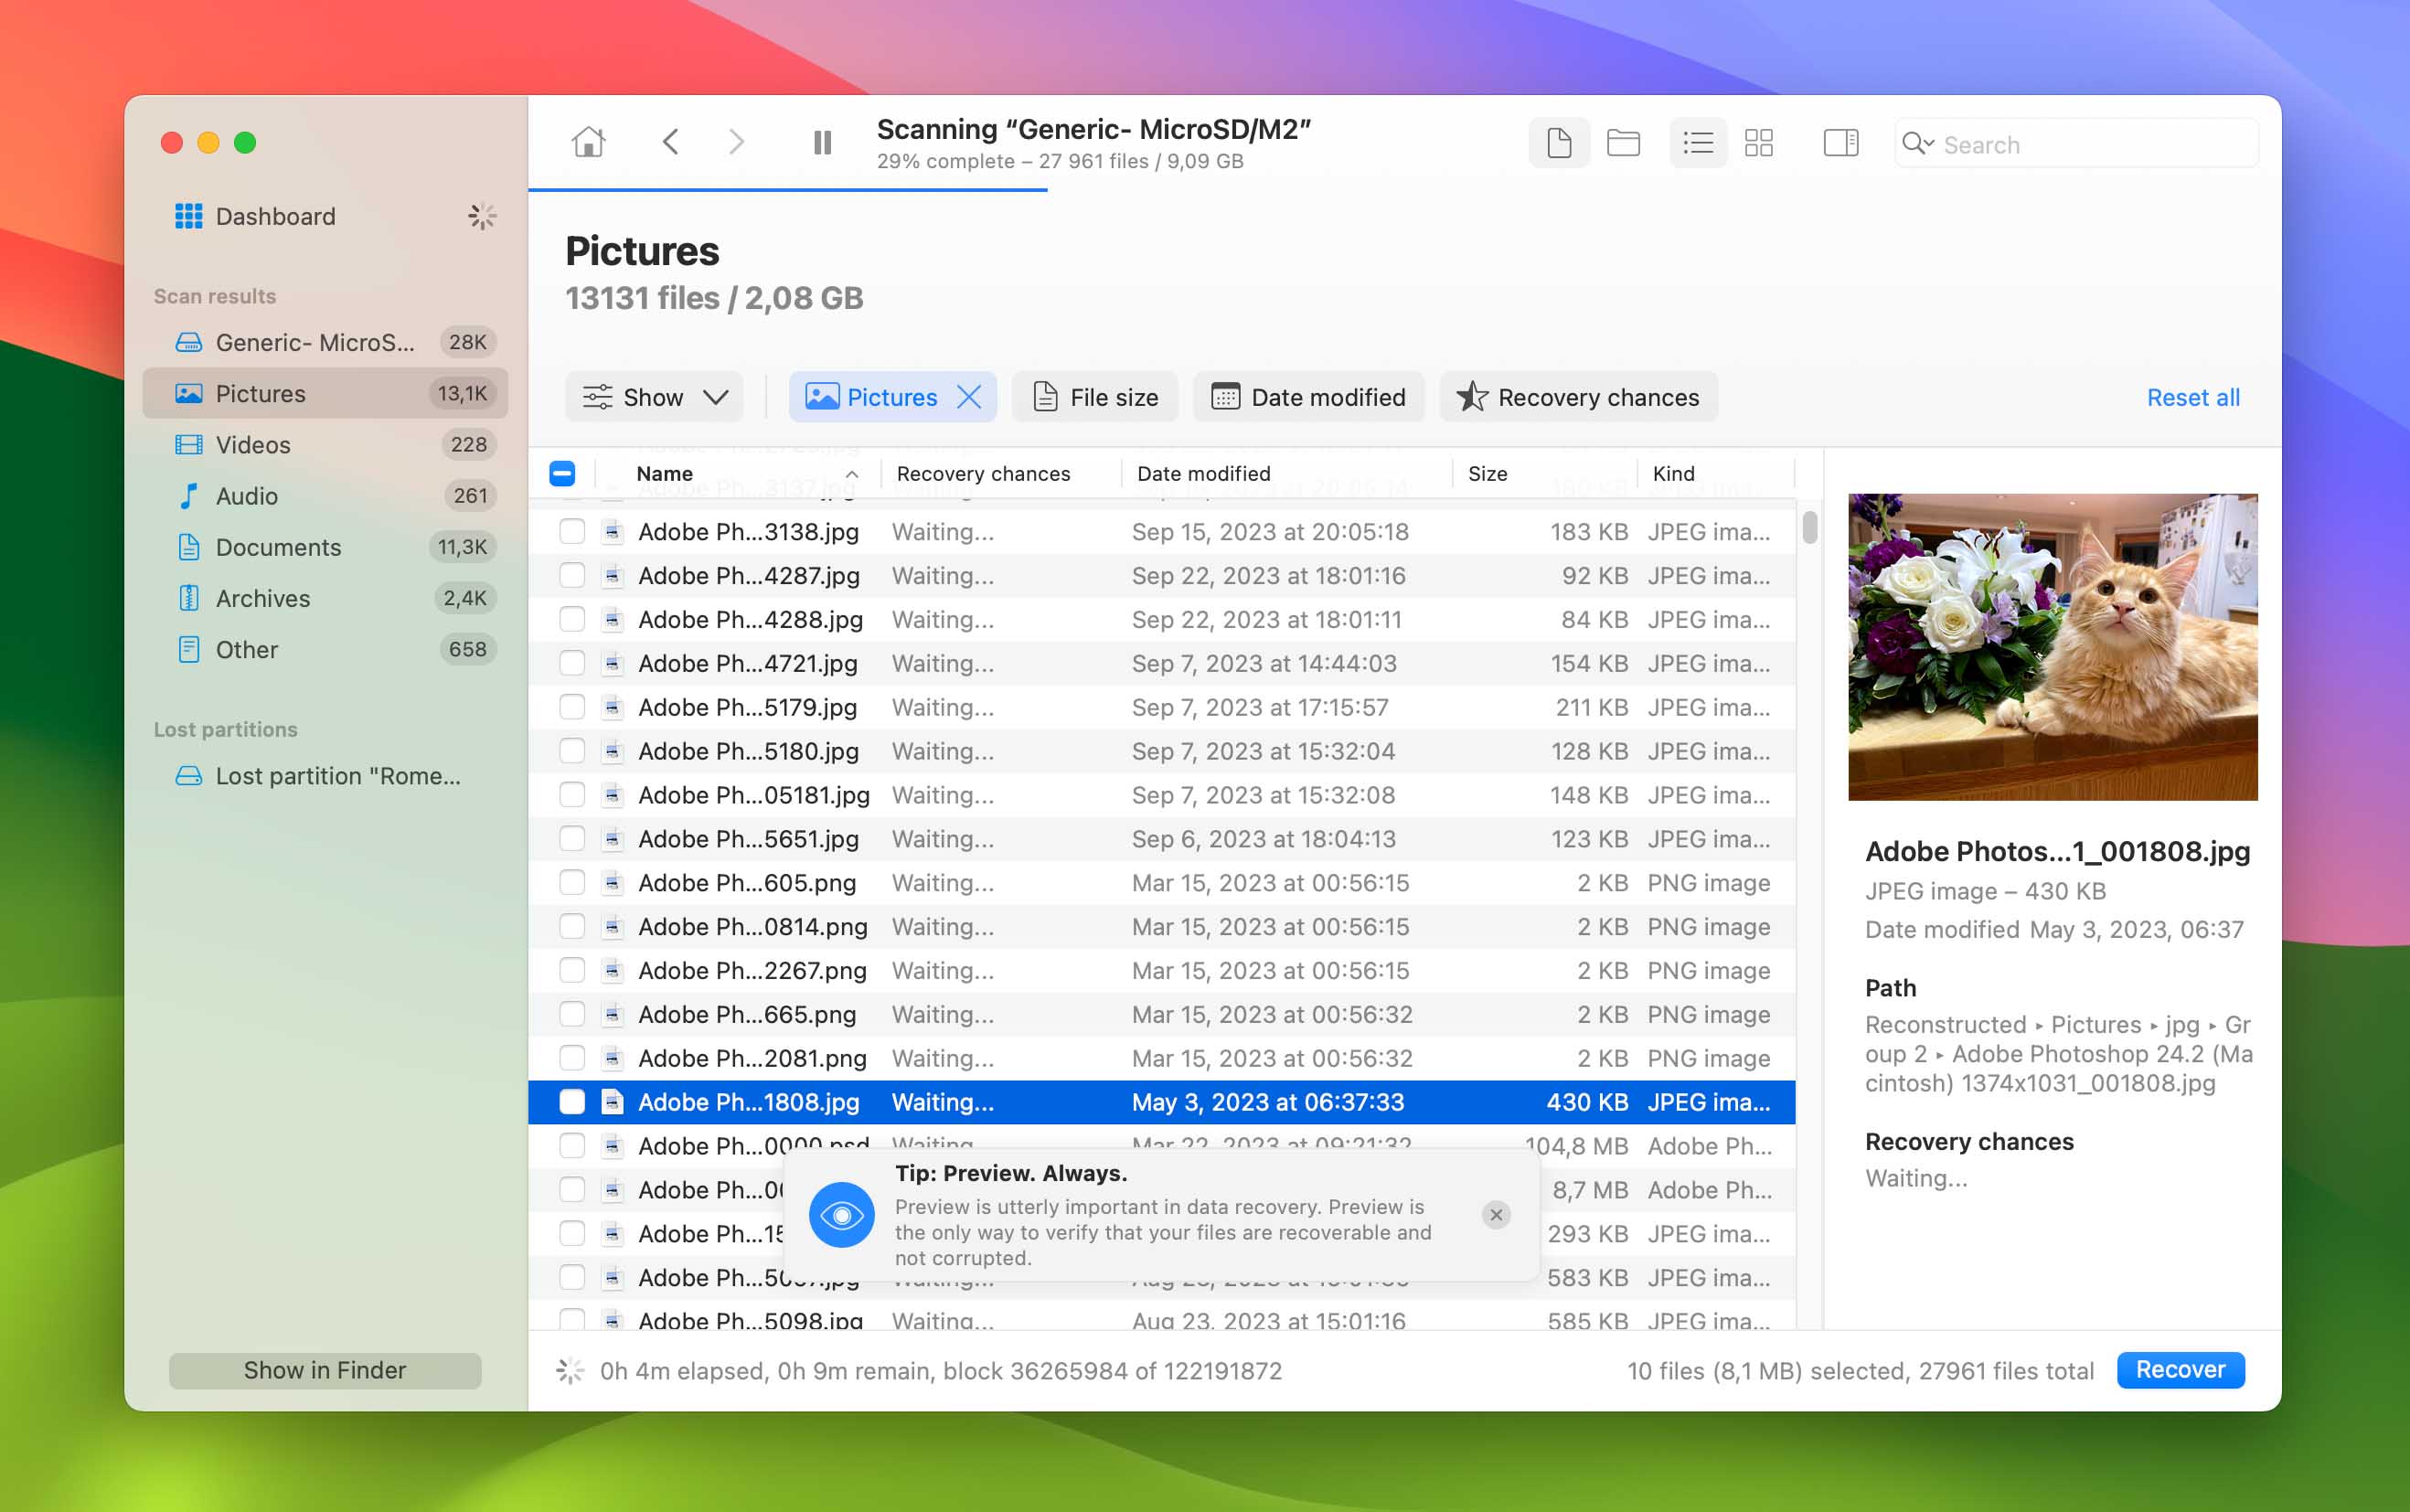
- Scan your SD card with Disk Drill. With your SD card inserted, launch Disk Drill and select the card from the list of available storage devices. Click the Search for lost data button to start the recovery process. Disk Drill will then present two scan options: Universal Scan and Advanced Camera Recovery. If your formatted SD card was used to store video footage, go with Advanced Camera Recovery. It’s built specifically to locate and reconstruct video files from camera and memory card media. For photos, documents, and other file types, Universal Scan is the way to go.
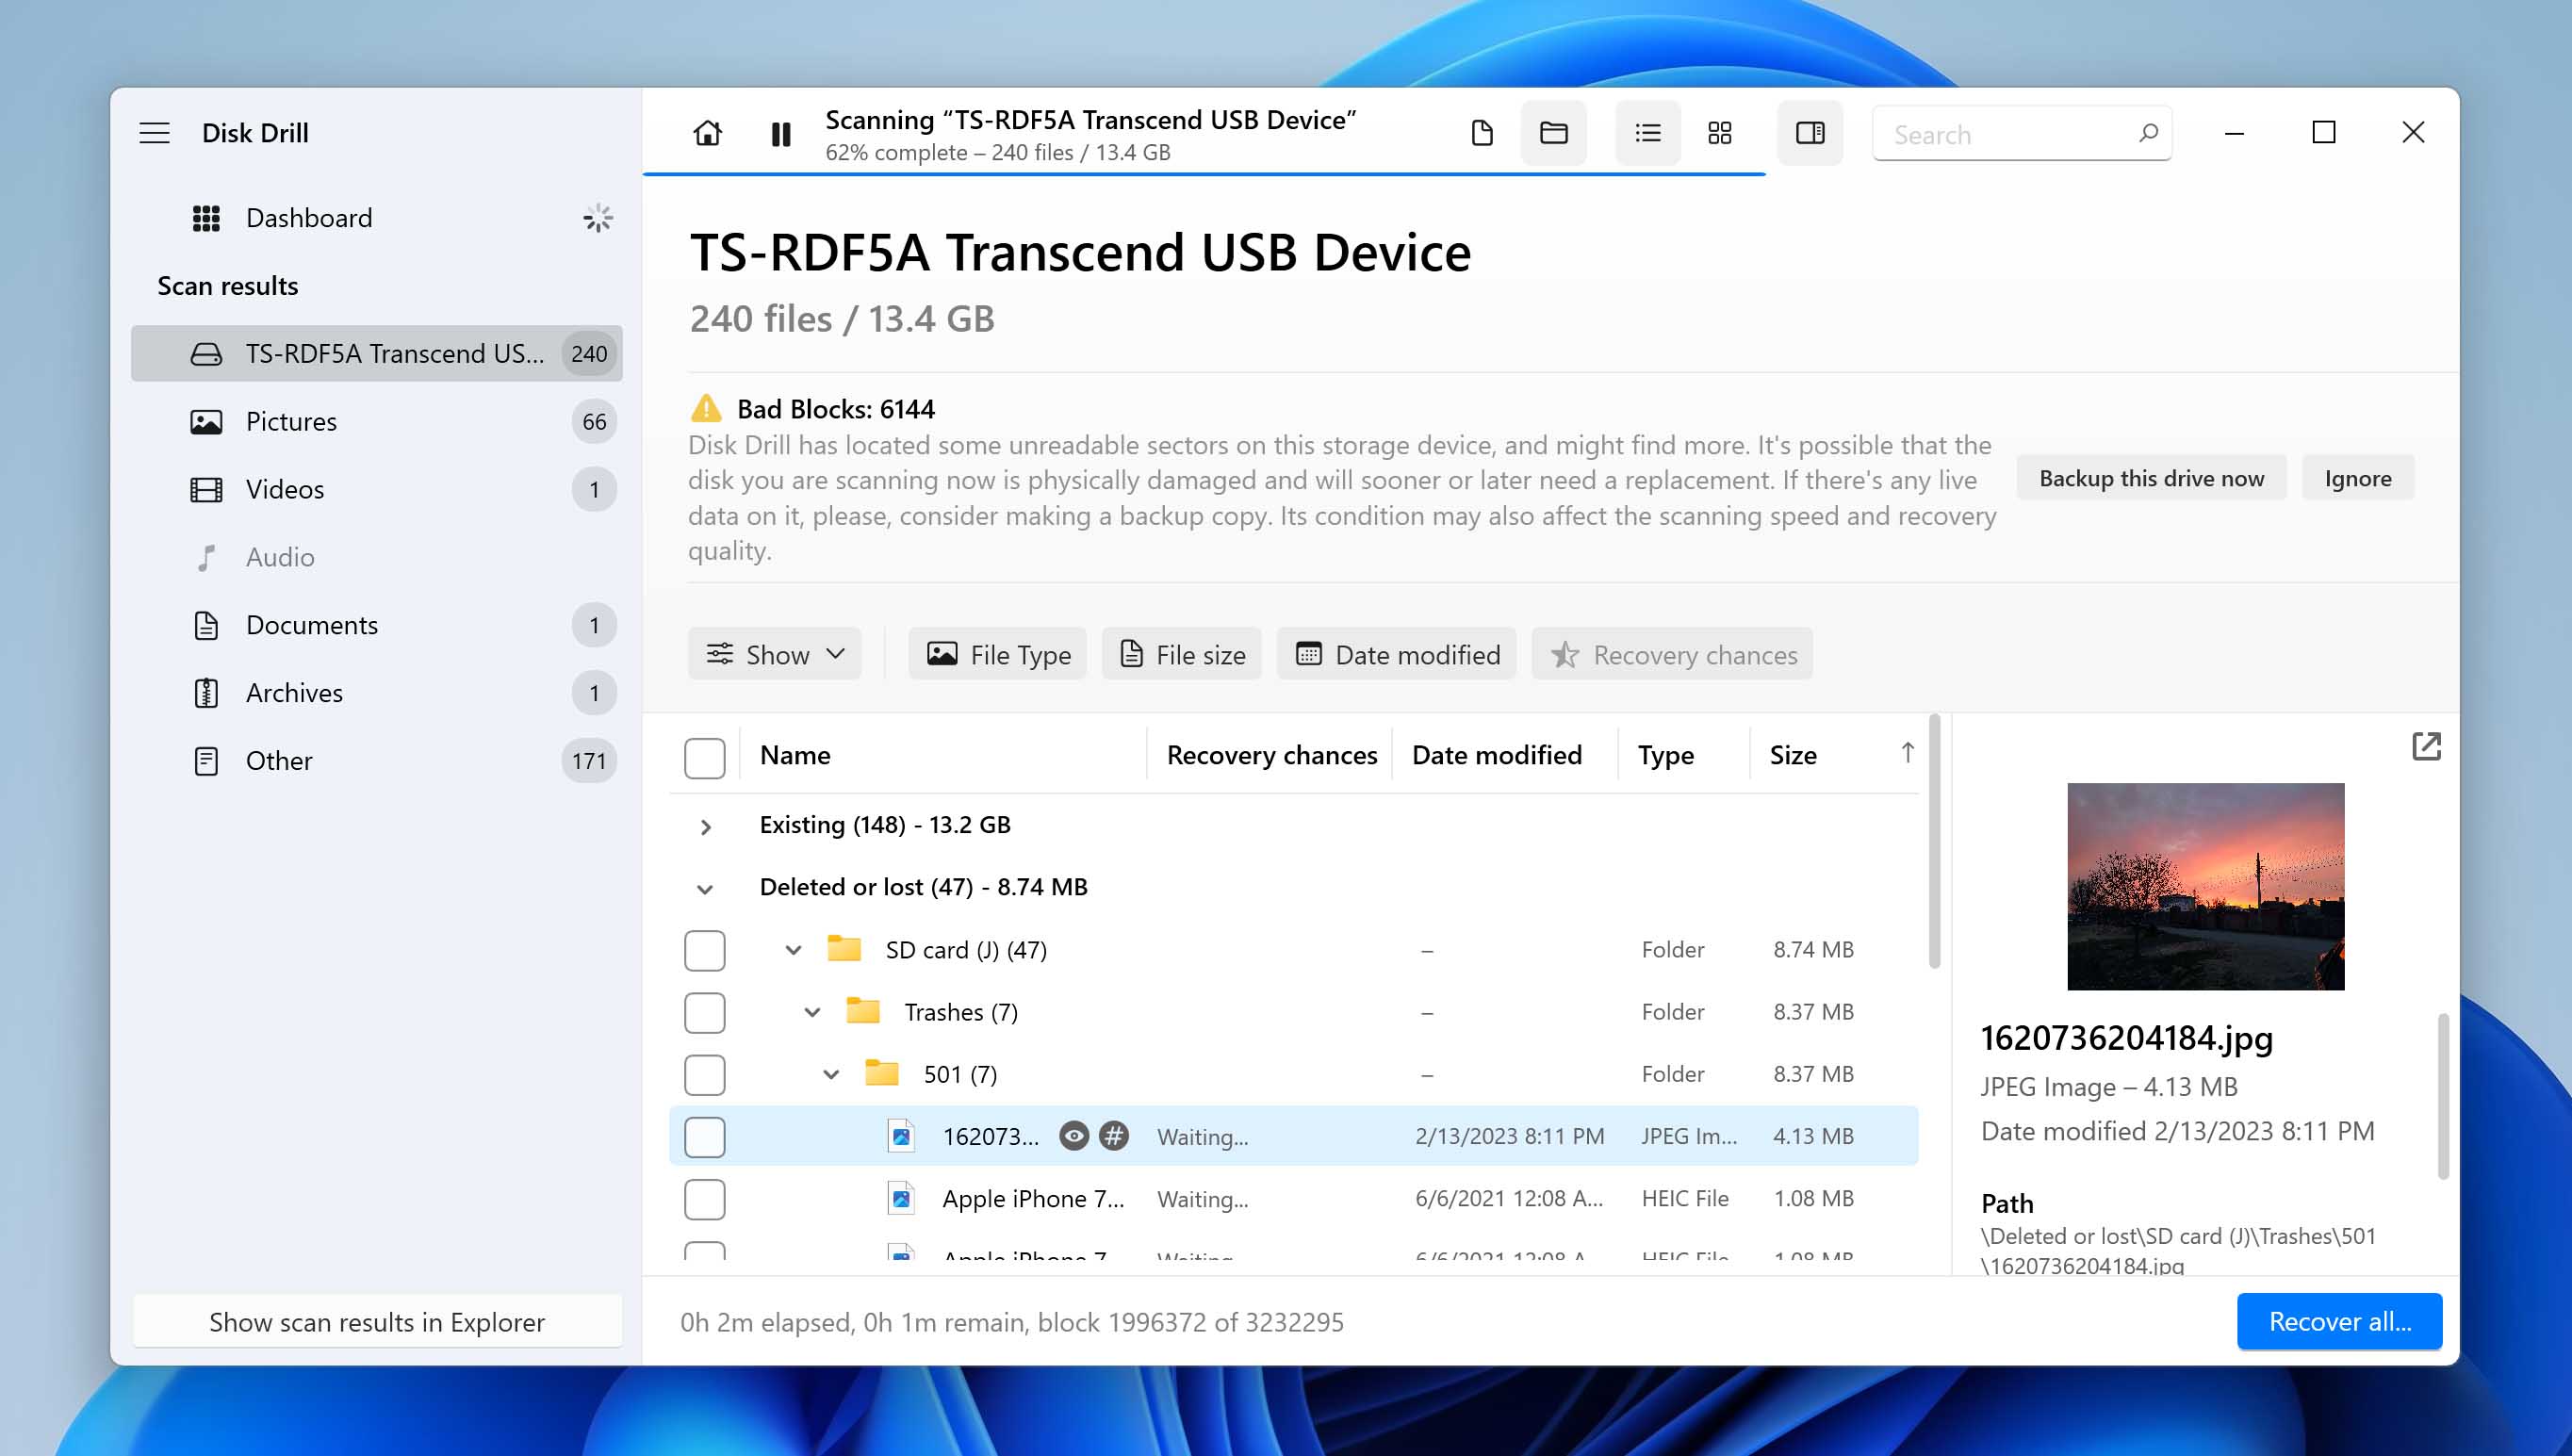
- Wait for the scan or browse early results. You can wait until Disk Drill finishes scanning or choose to review found files with scanning continuing in the background.
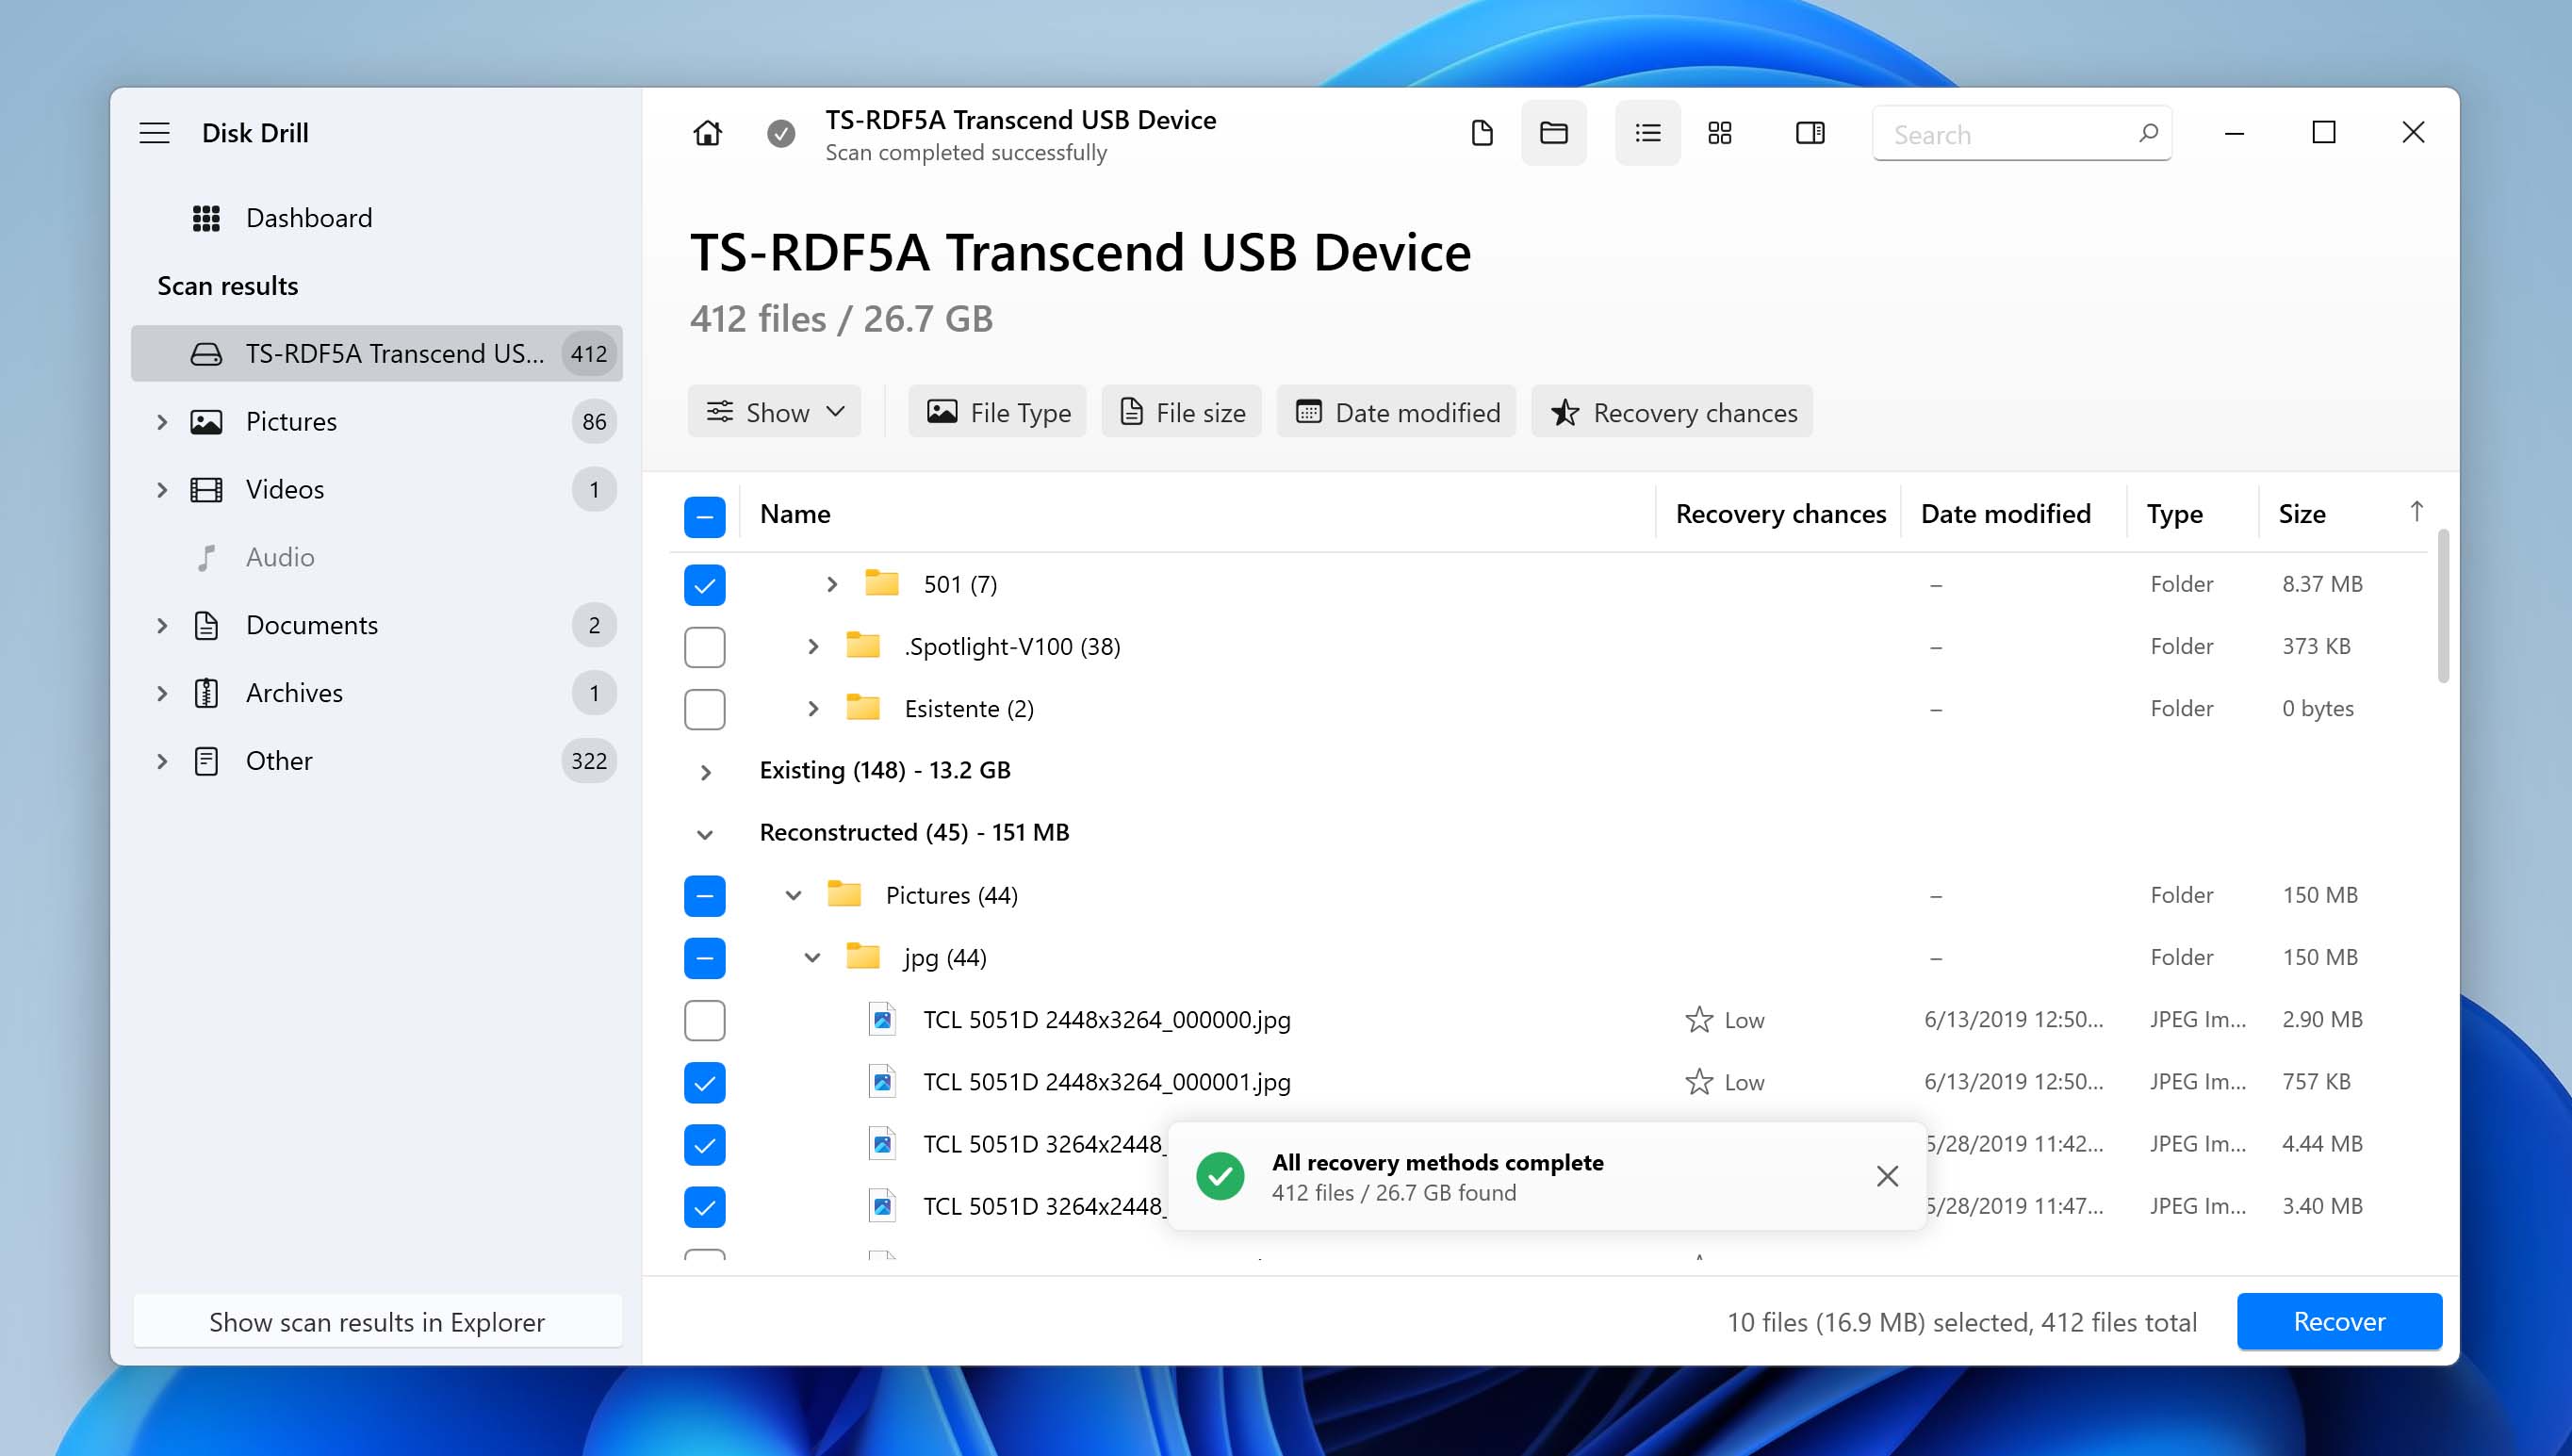
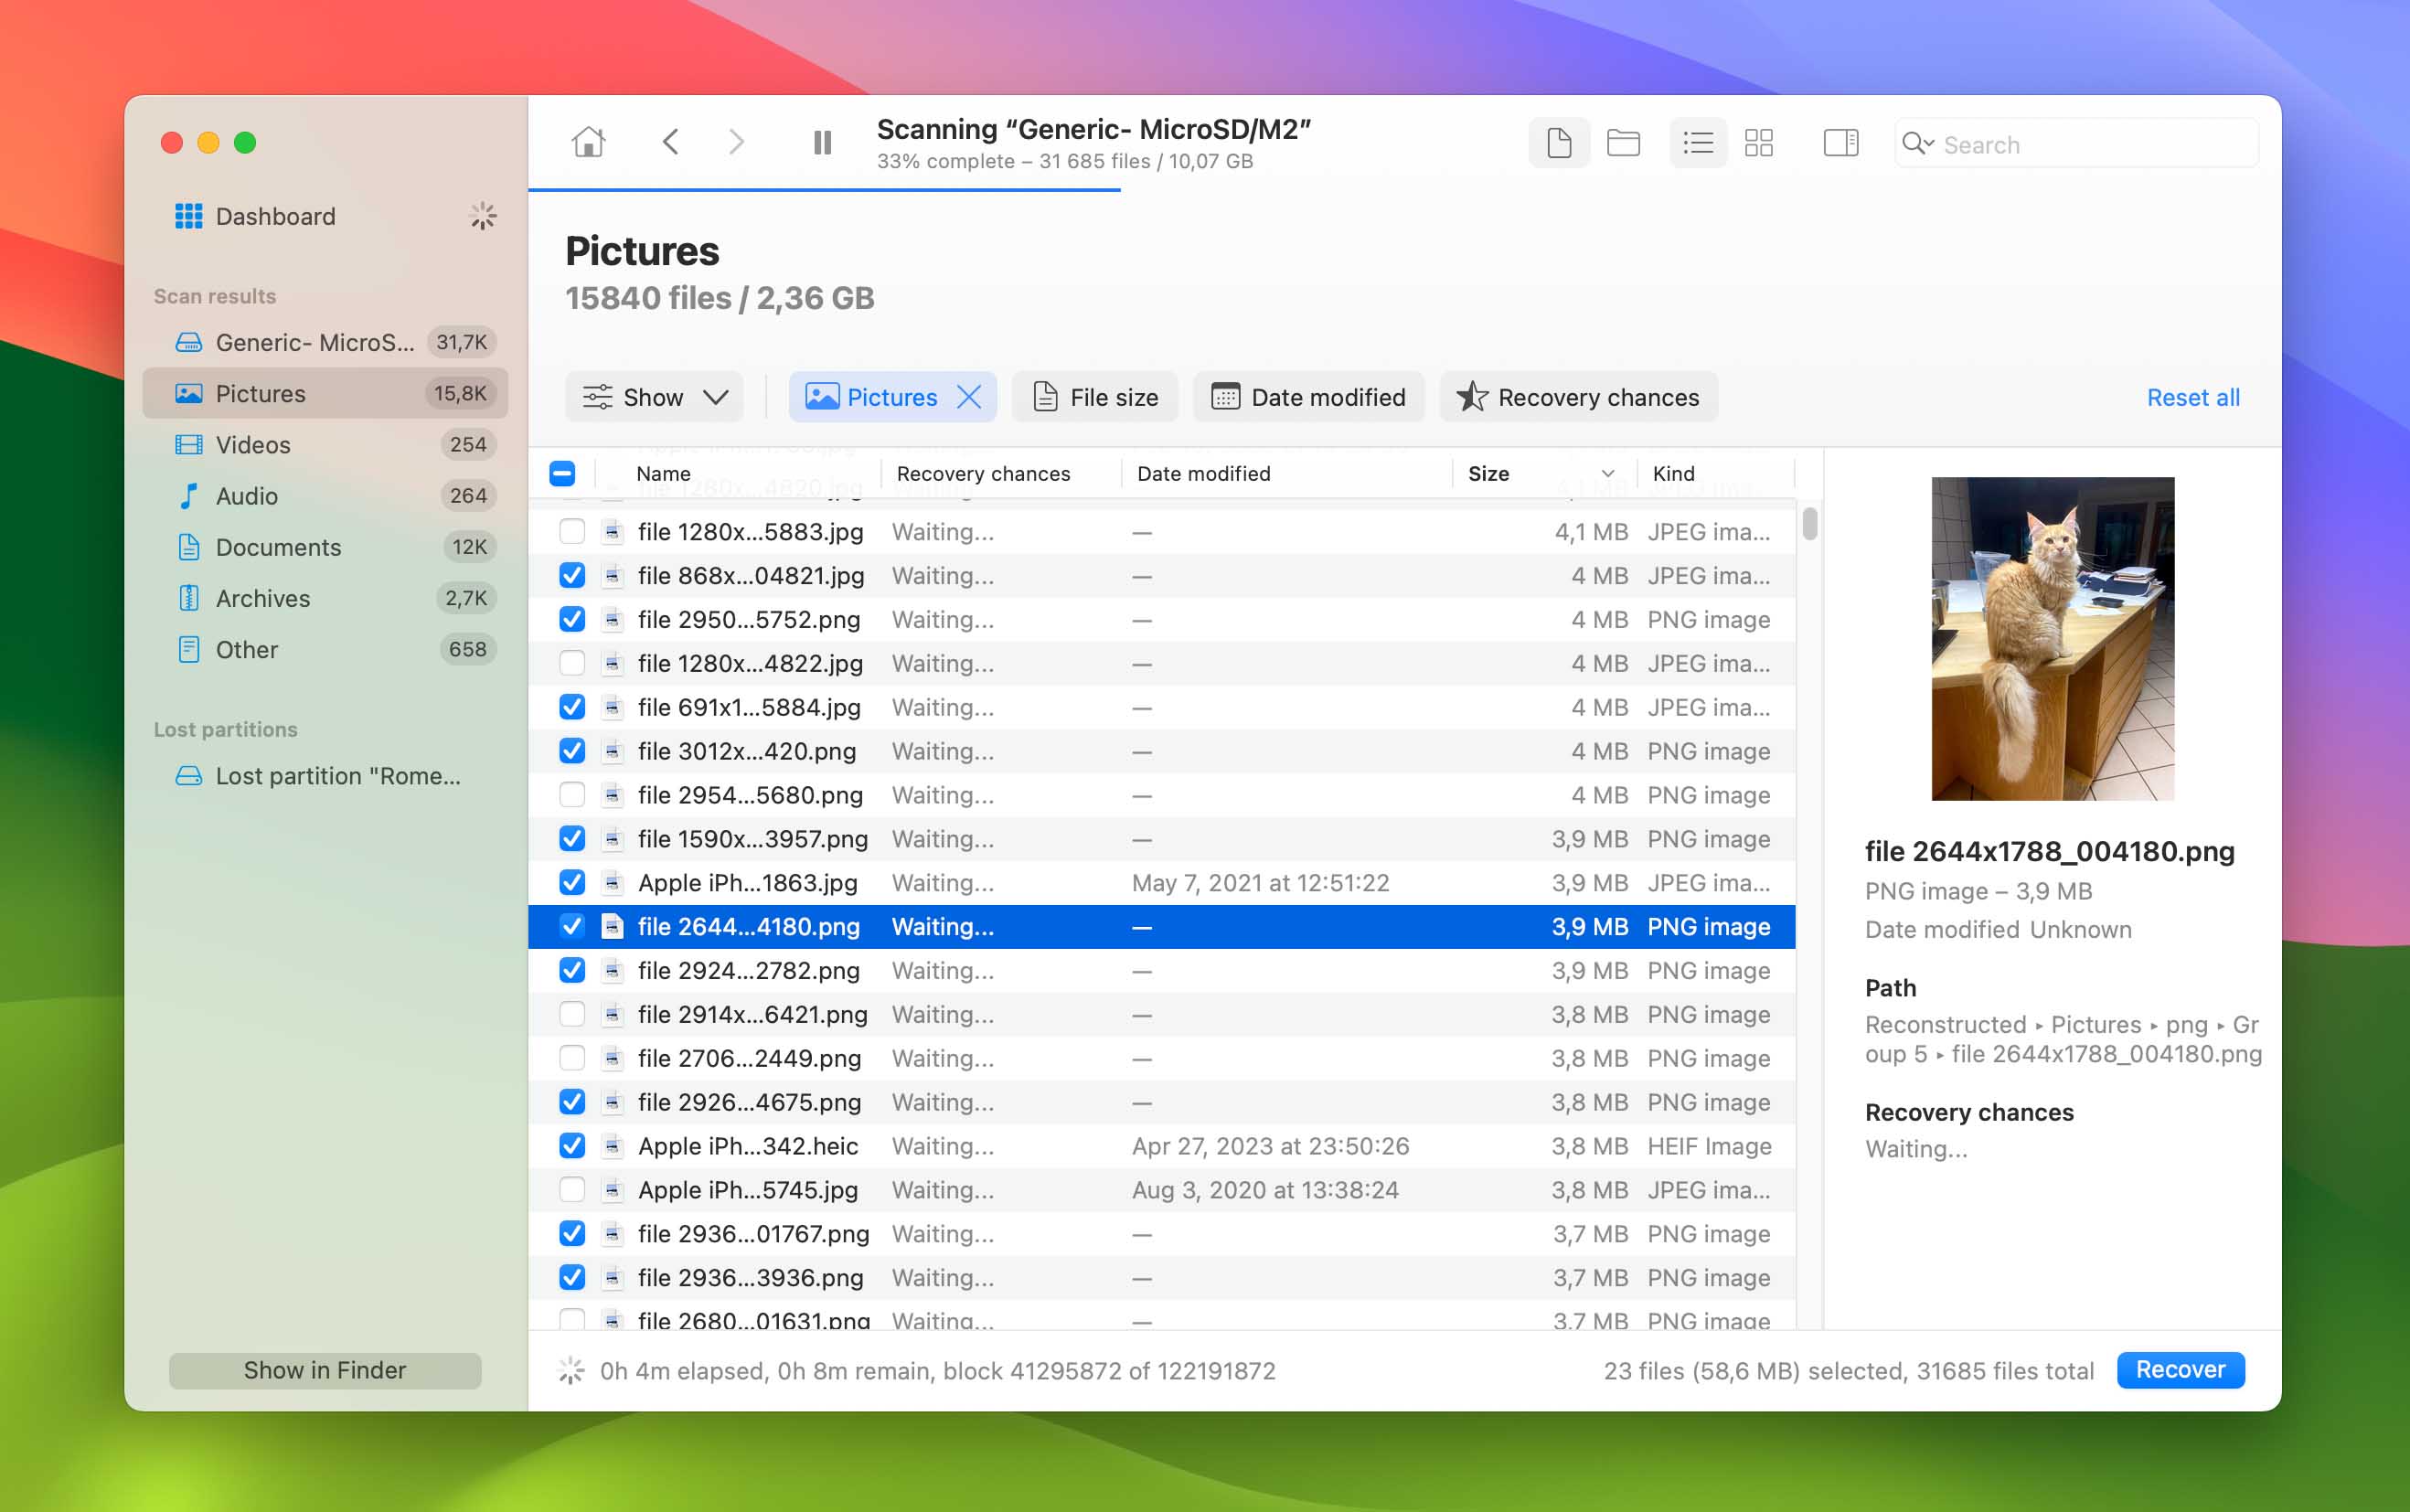
- Preview your files. When Disk Drill locates lost content on your formatted SD card, it will give you the option to either restore everything or prioritize the files you need the most. If you choose the manual route, you’ll then be able to preview and select the files you want to recover. You can also activate scan result filters to display only certain files, such as pictures or videos.
- Select files for recovery. If you’ve decided to recover only specific files, then you need to click the checkboxes next to them to tell Disk Drill that these are the items you wish to retrieve.
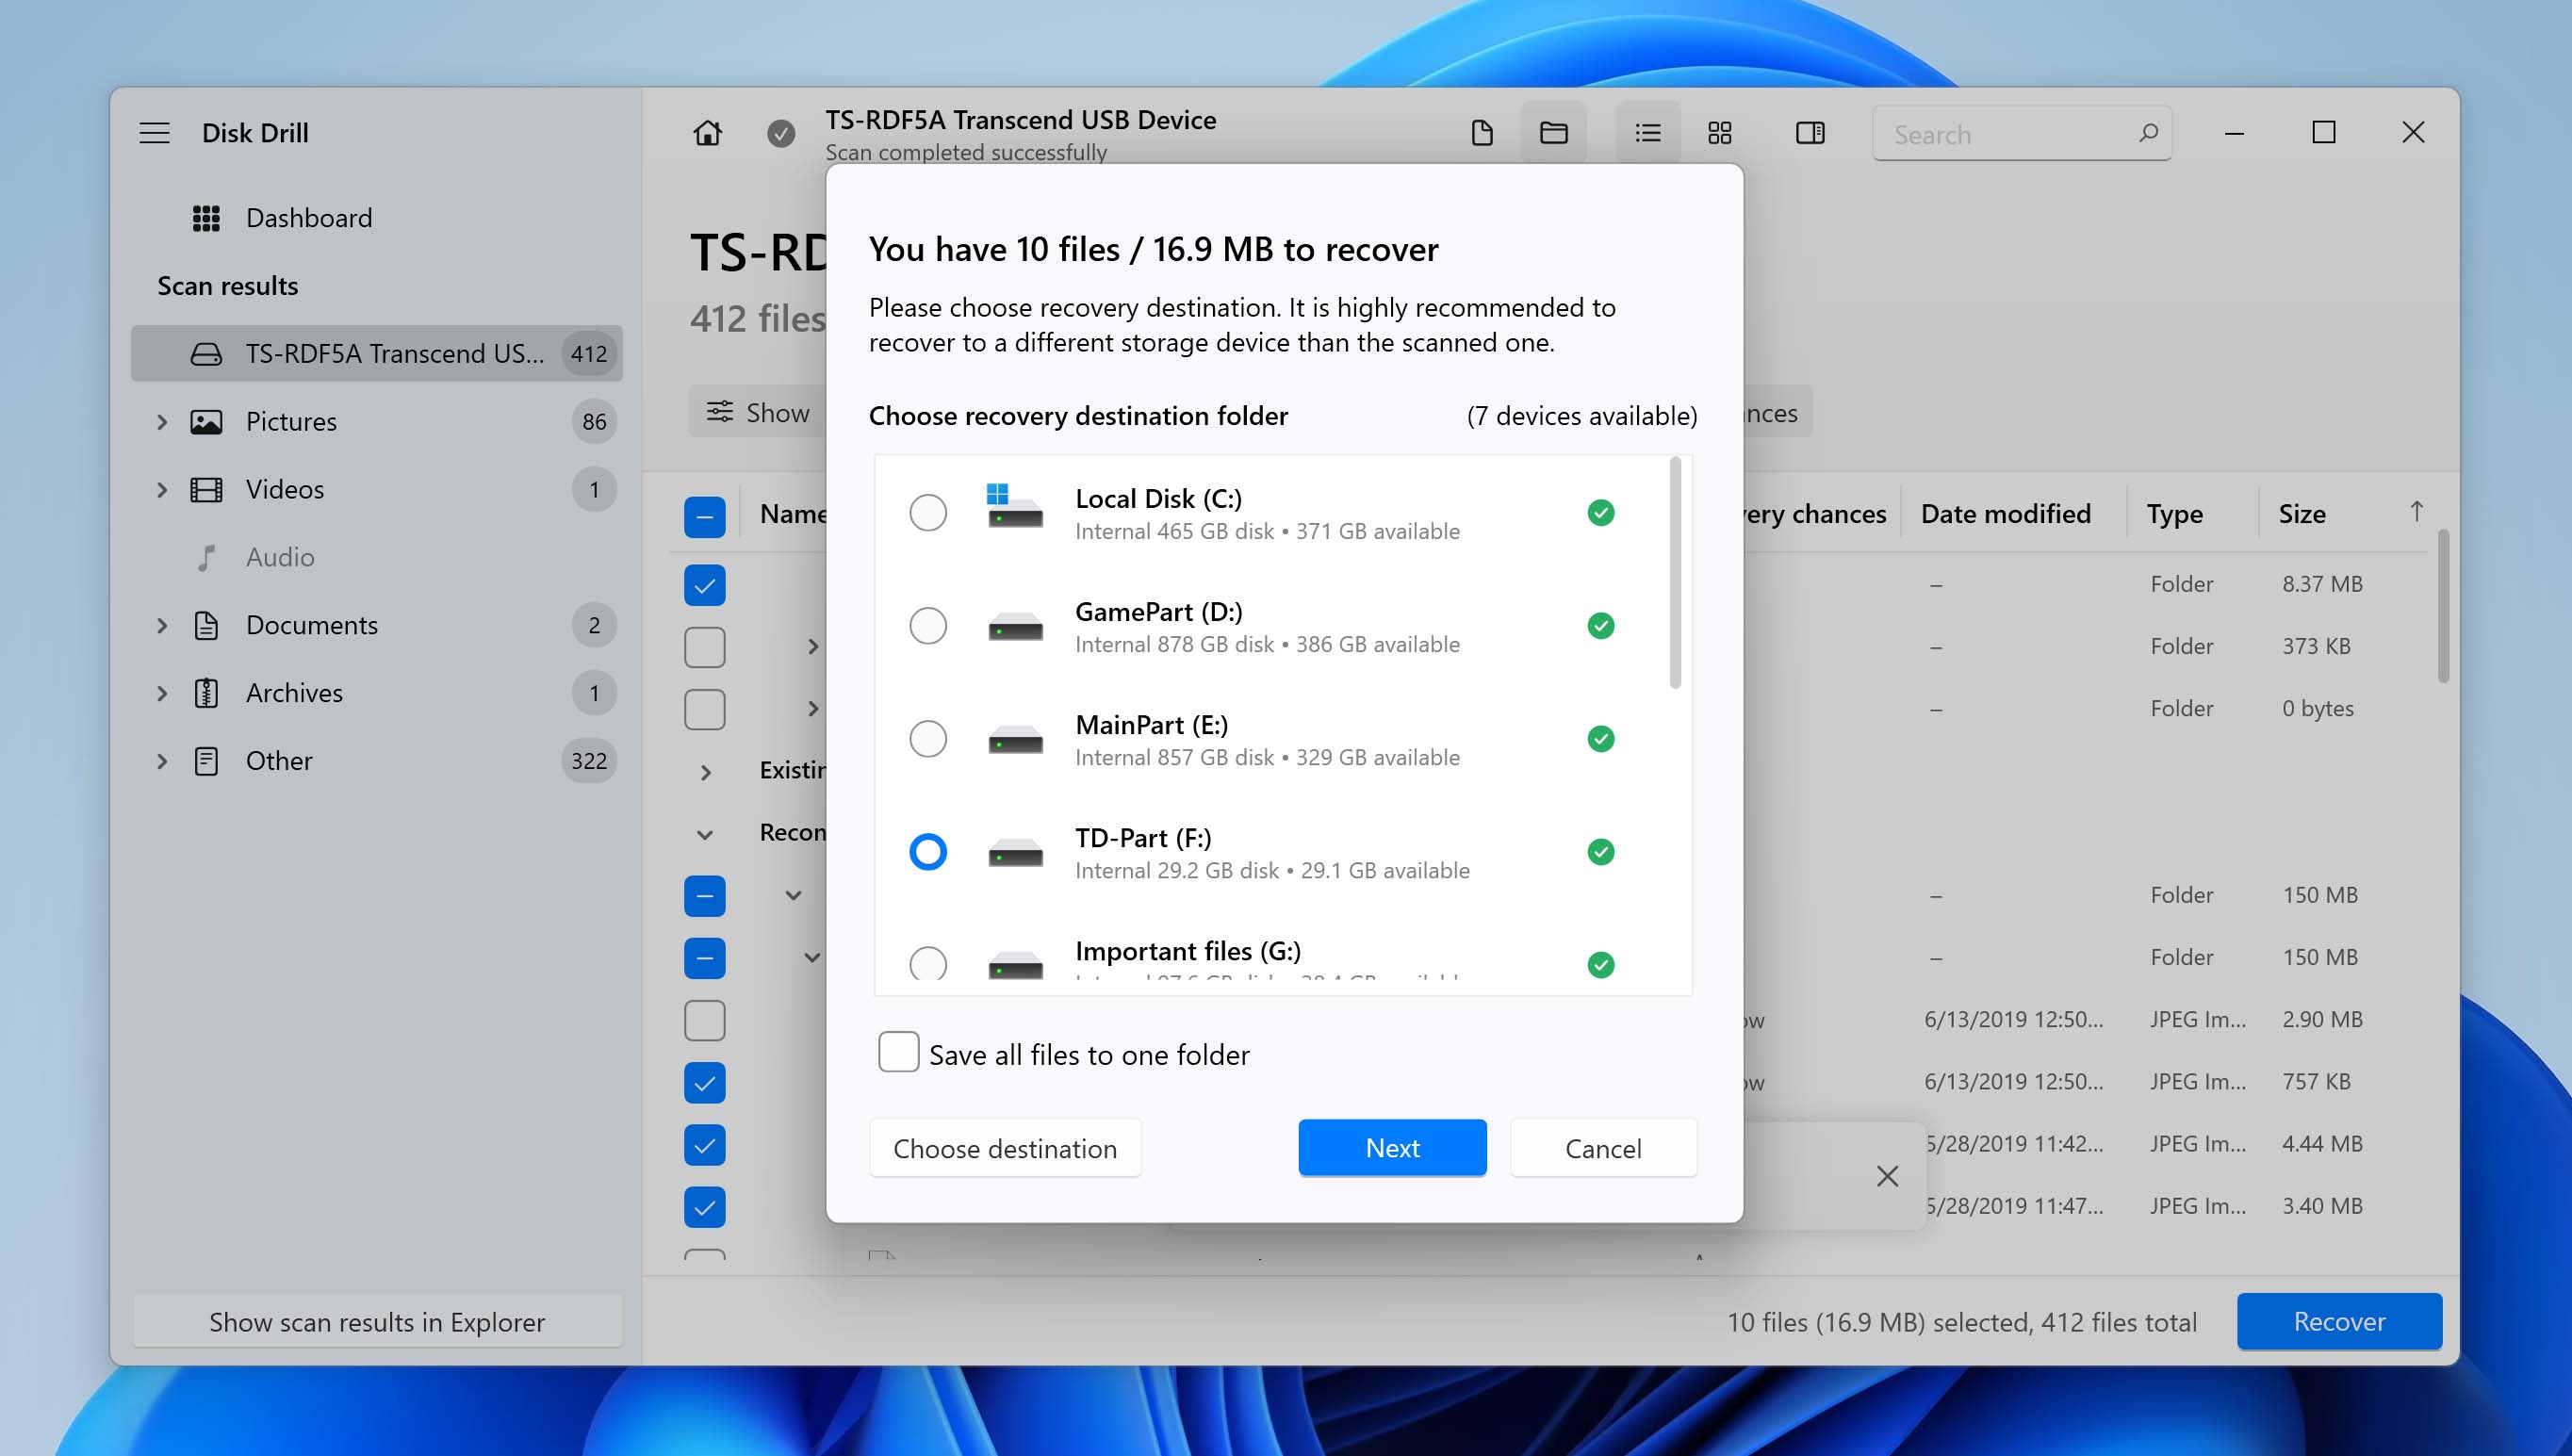
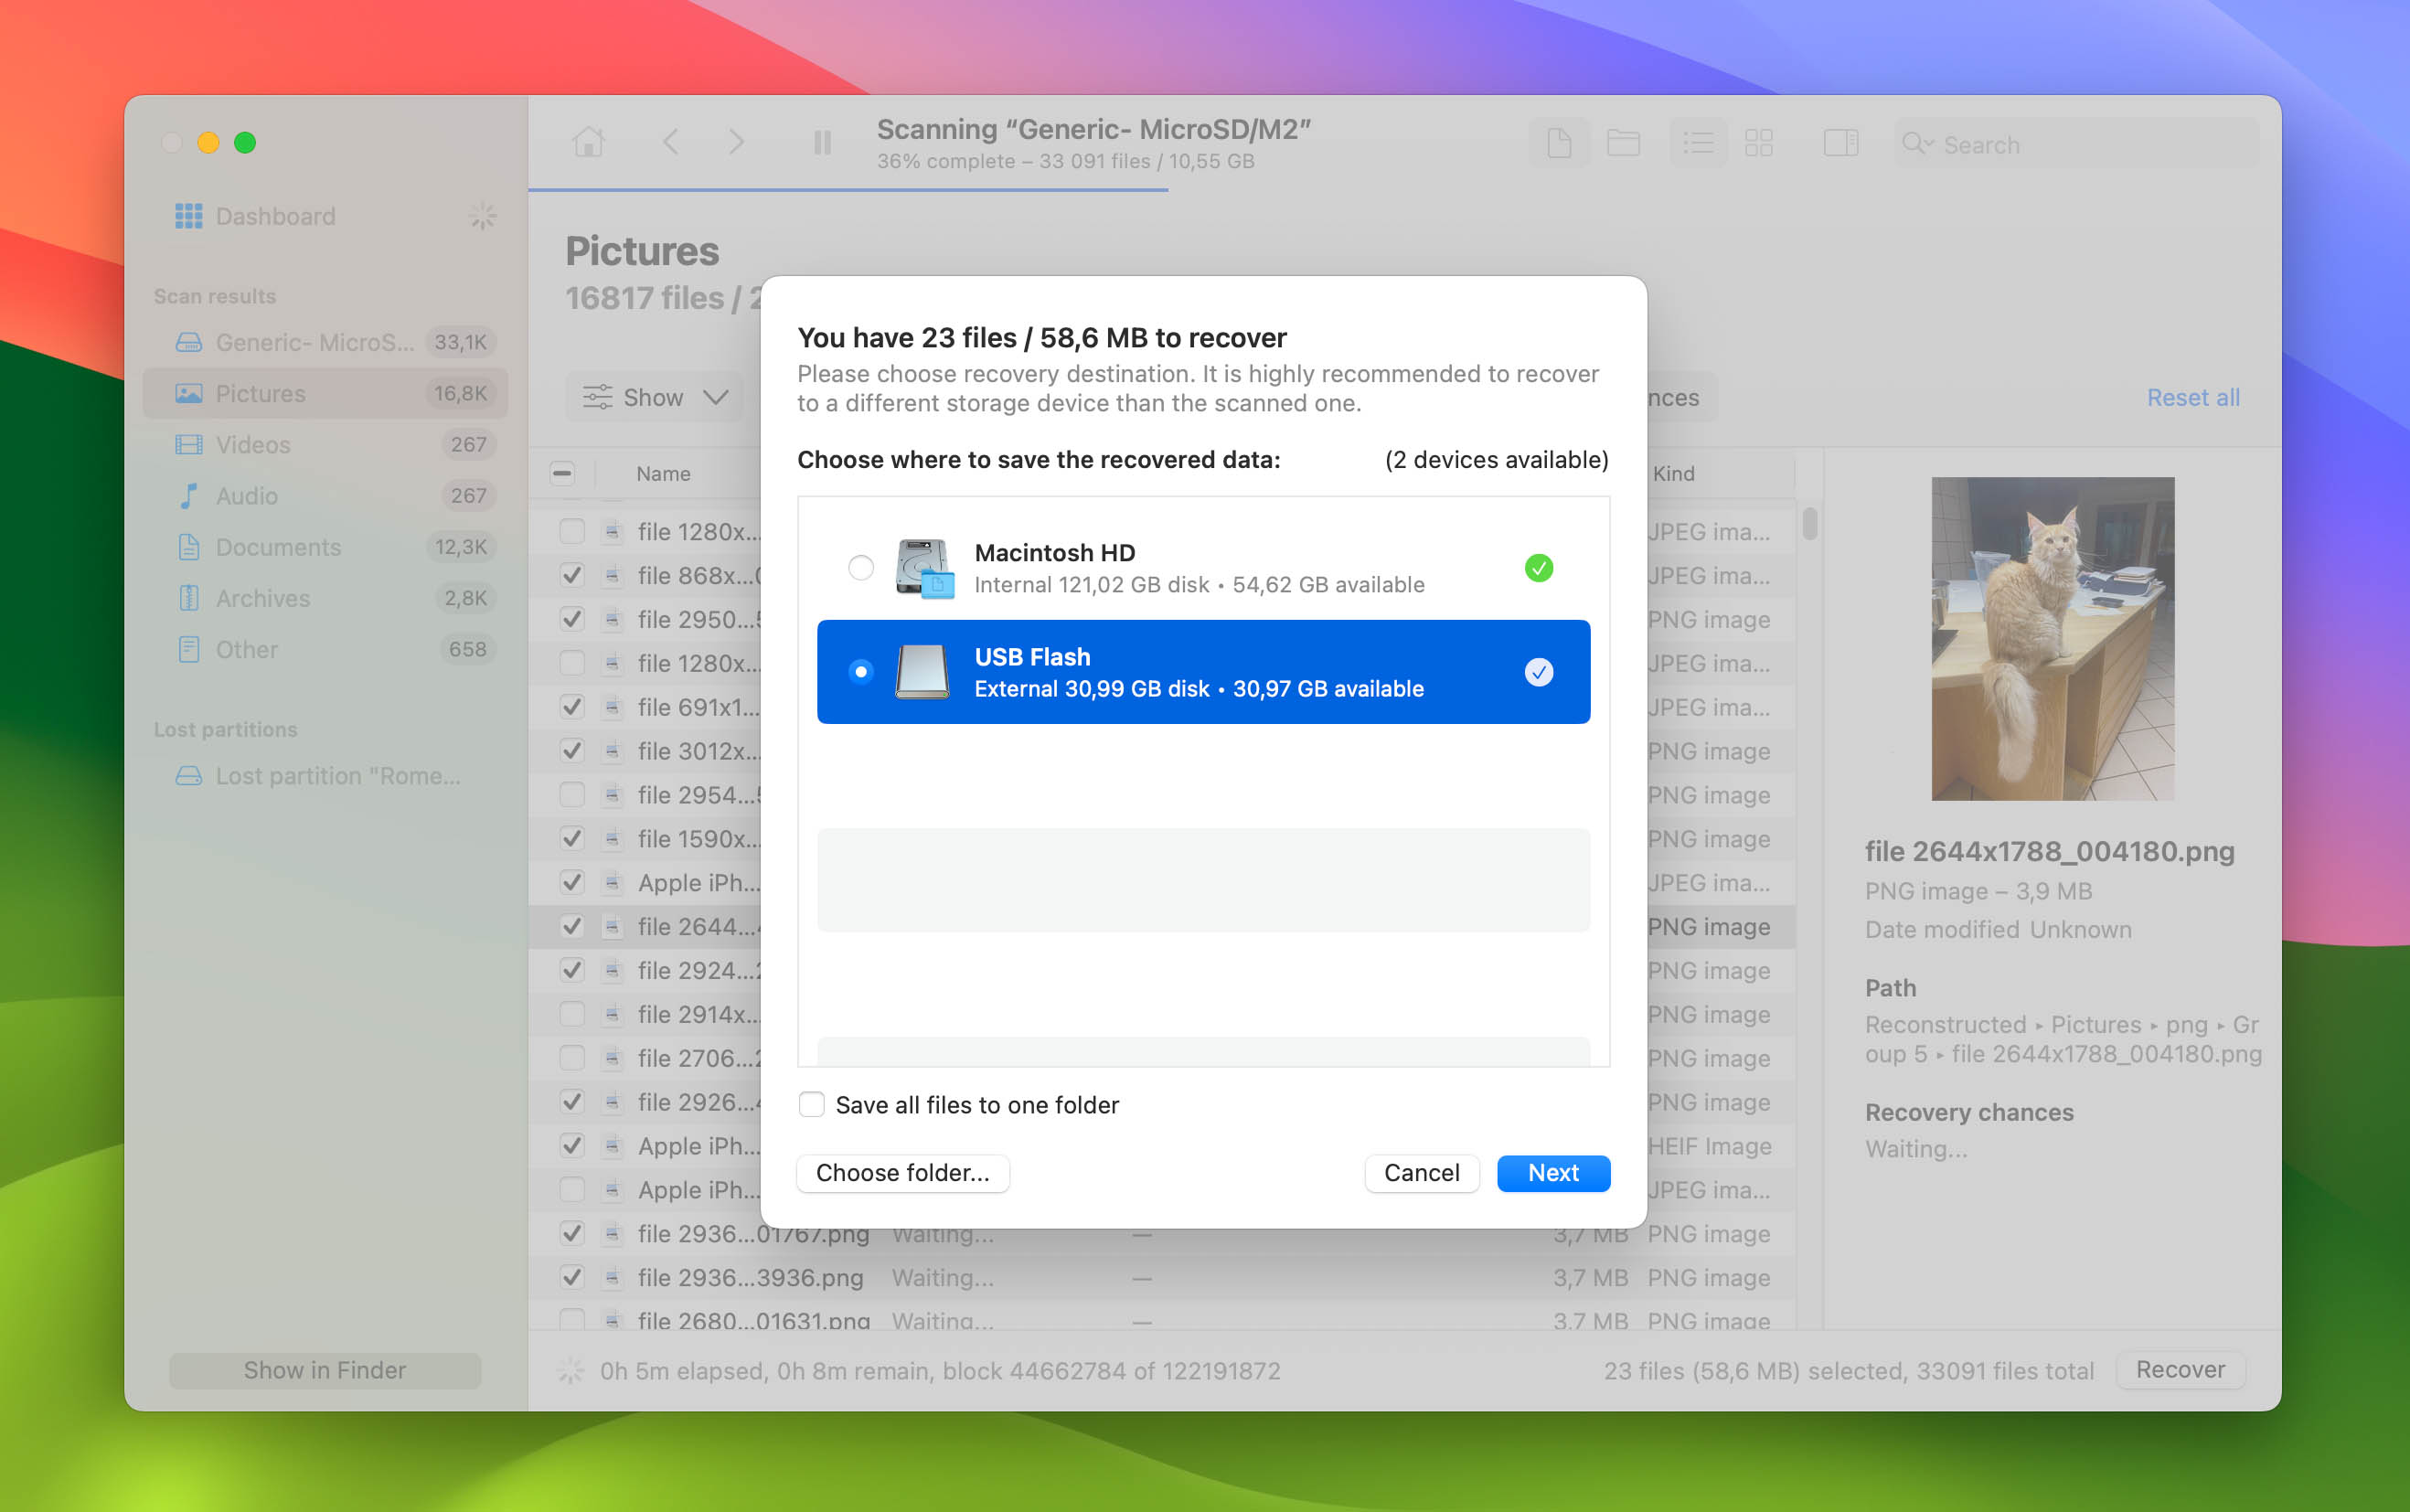
- Press the Recover button, and choose where you’d like Disk Drill to save the recovered files. Make sure to select a different storage device from the formatted SD card otherwise, you could overwrite the very same files you’re trying to recover.
With Disk Drill, recovering the content of a formatted SD card couldn’t be simpler. Best of all, you can download Disk Drill for free from the official website.
Currently, there are dozens if not hundreds of memory card data recovery programs available for Windows and macOS. Some of them will cost you an arm and a leg while others are free to download. Many handle only a few file formats, but the best support hundreds. There are data recovery solutions so complicated even IT professionals would struggle to use them, and alternatives so simple you can recover your files in a few clicks.
The challenge lies in finding software that’s both effective and easy-to-use (it also helps if it’s affordable and comes with a free version that you can use to determine the recoverability of your data before you whip out your credit card). One excellent option for both Windows and macOS users is Disk Drill. Here’s why Disk Drill stands out:
- 📄 Comprehensive file format support: Disk Drill recovers hundreds of file types, including photos, videos, documents, archives, and more. RAW photo and video file formats are supported especially well.
- 🦾 Powerful recovery algorithms: Disk Drill incorporates multiple recovery methods that enable it to perform in-depth scans of formatted SD cards. This includes its Advanced Camera Recovery module, which is specifically built to reconstruct fragmented video files from GoPro, DJI, Canon, and other cameras.
- 🤗 User-friendly interface: The software features an intuitive interface so even those without technical expertise can use it successfully.
- 💾 RAW SD card support: Disk Drill is great at handling RAW file systems, which is a common scenario when SD cards are corrupted or improperly formatted.
- 🖼️ Unlimited preview capabilities: Before proceeding with the full recovery process, Disk Drill allows users to preview recoverable files without any restrictions and for free.
FAM!! I DELETED SOME FILES BY ACCIDENT ON MY MEMORY CARD!! LITERALLY 15MINS WORTH OF FOOTAGE! I TRIED MANY RECOVER PROGRAMS ALLLLLL NIGHT! PROBABLY SPEND $300 ON SCAM ONES! FINALLY GOT ONE! BIG TIP FOR ANY YOUTUBERS WHO NEED THIS IN THE FUTURE! USE DISK DRILL!
— Cash ✌🏾HYPE (@CashNastyGaming) June 8, 2020
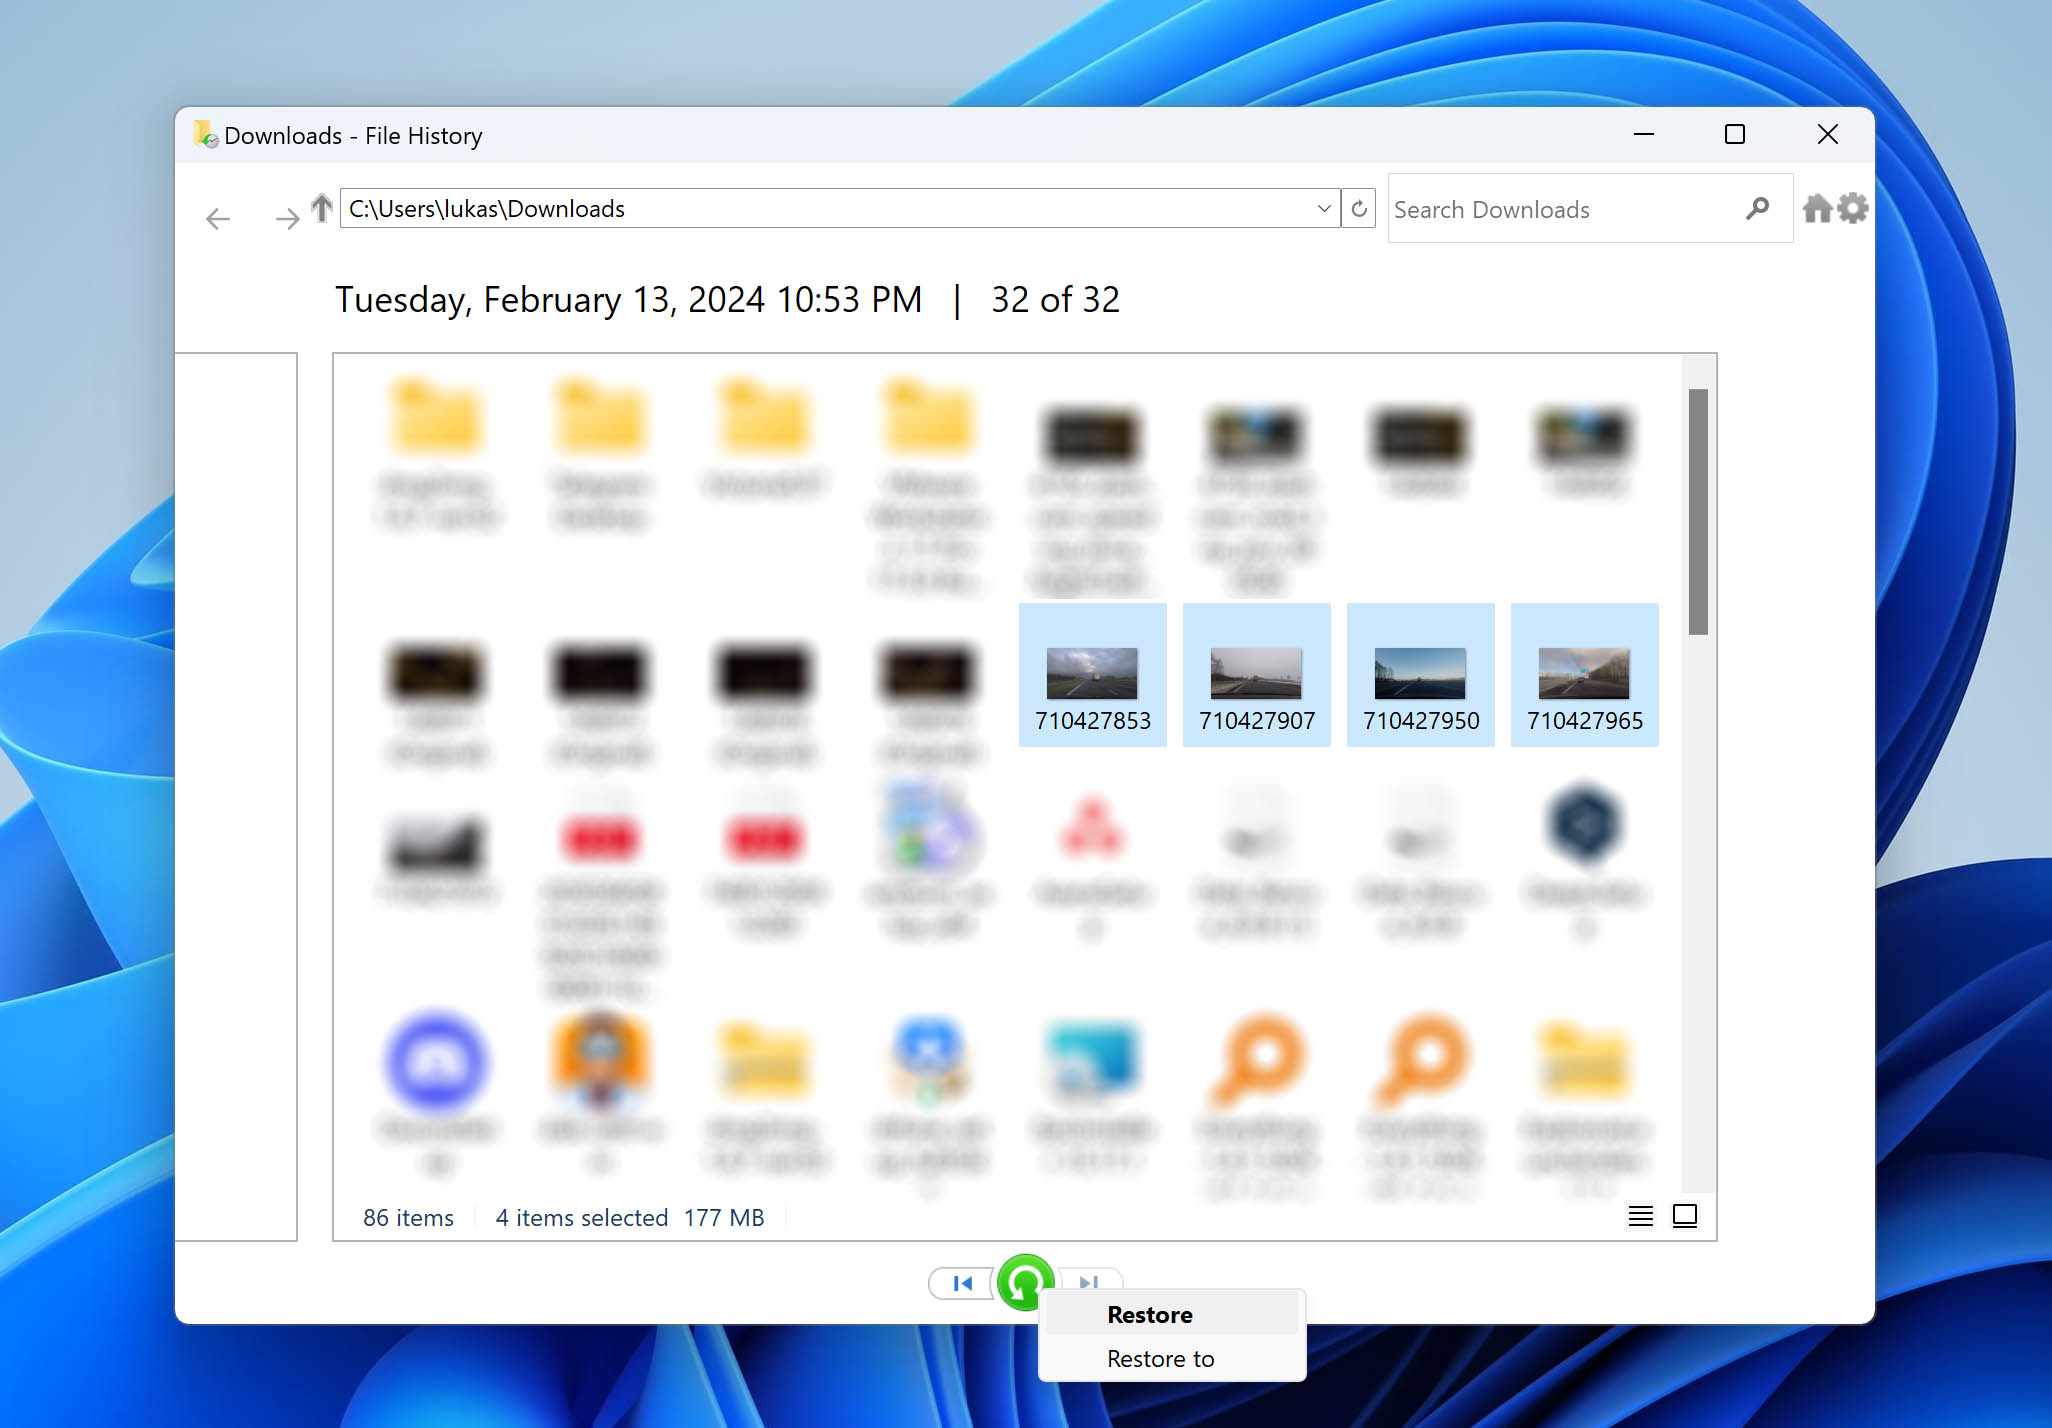
Method 2: Restore the Previous Backup
The backup solutions accompanying Windows usually work only for local storage devices. That means they don’t include removable devices like USB flash drives or SD cards. So, theoretically, they can’t help if you want to get data back from a formatted SD card. Still, if you had also stored the files you want to get back on such a local device, maybe you can salvage them from one of those backups.
Method 3: Recover Files with Windows File Recovery (WinFR)
If Disk Drill isn’t an option and you’d rather stick with a completely free tool, then Windows File Recovery is worth a try, and it’s developed by Microsoft, so you can trust it with your data. You can find this tool in the Microsoft Store, and you’ll need Windows 10 version 2004 or later (or Windows 11) to download it. However, the biggest obstacle to using Windows File Recovery is that there’s no graphical interface.
Instead of clicking buttons, you run everything through typed commands in Command Prompt, which can feel intimidating if you’re not used to working in the terminal. Windows File Recovery also won’t restore original file names or folder structures when scanning formatted drives, so you’ll end up with generically named files that need sorting. And its file format support is much more limited compared to Disk Drill, especially when it comes to RAW photo formats and certain video types.
Still, it’s free and comes straight from Microsoft, so it’s a legitimate fallback. Here’s how to use it:
- Open the Microsoft Store, search for Windows File Recovery, and install it.
- Connect your formatted SD card and note its drive letter (for example, E:).
- Open Command Prompt as administrator.
- Run the following command, replacing the drive letters with your own:
winfr E: D:\Recovery /extensive /n *.jpg /n *.mp4 /n *.png /n *.mov
In this example, E: is the SD card, D:\Recovery is where recovered files will be saved, and the /n flags specify which file types to look for. You can add more file types as needed.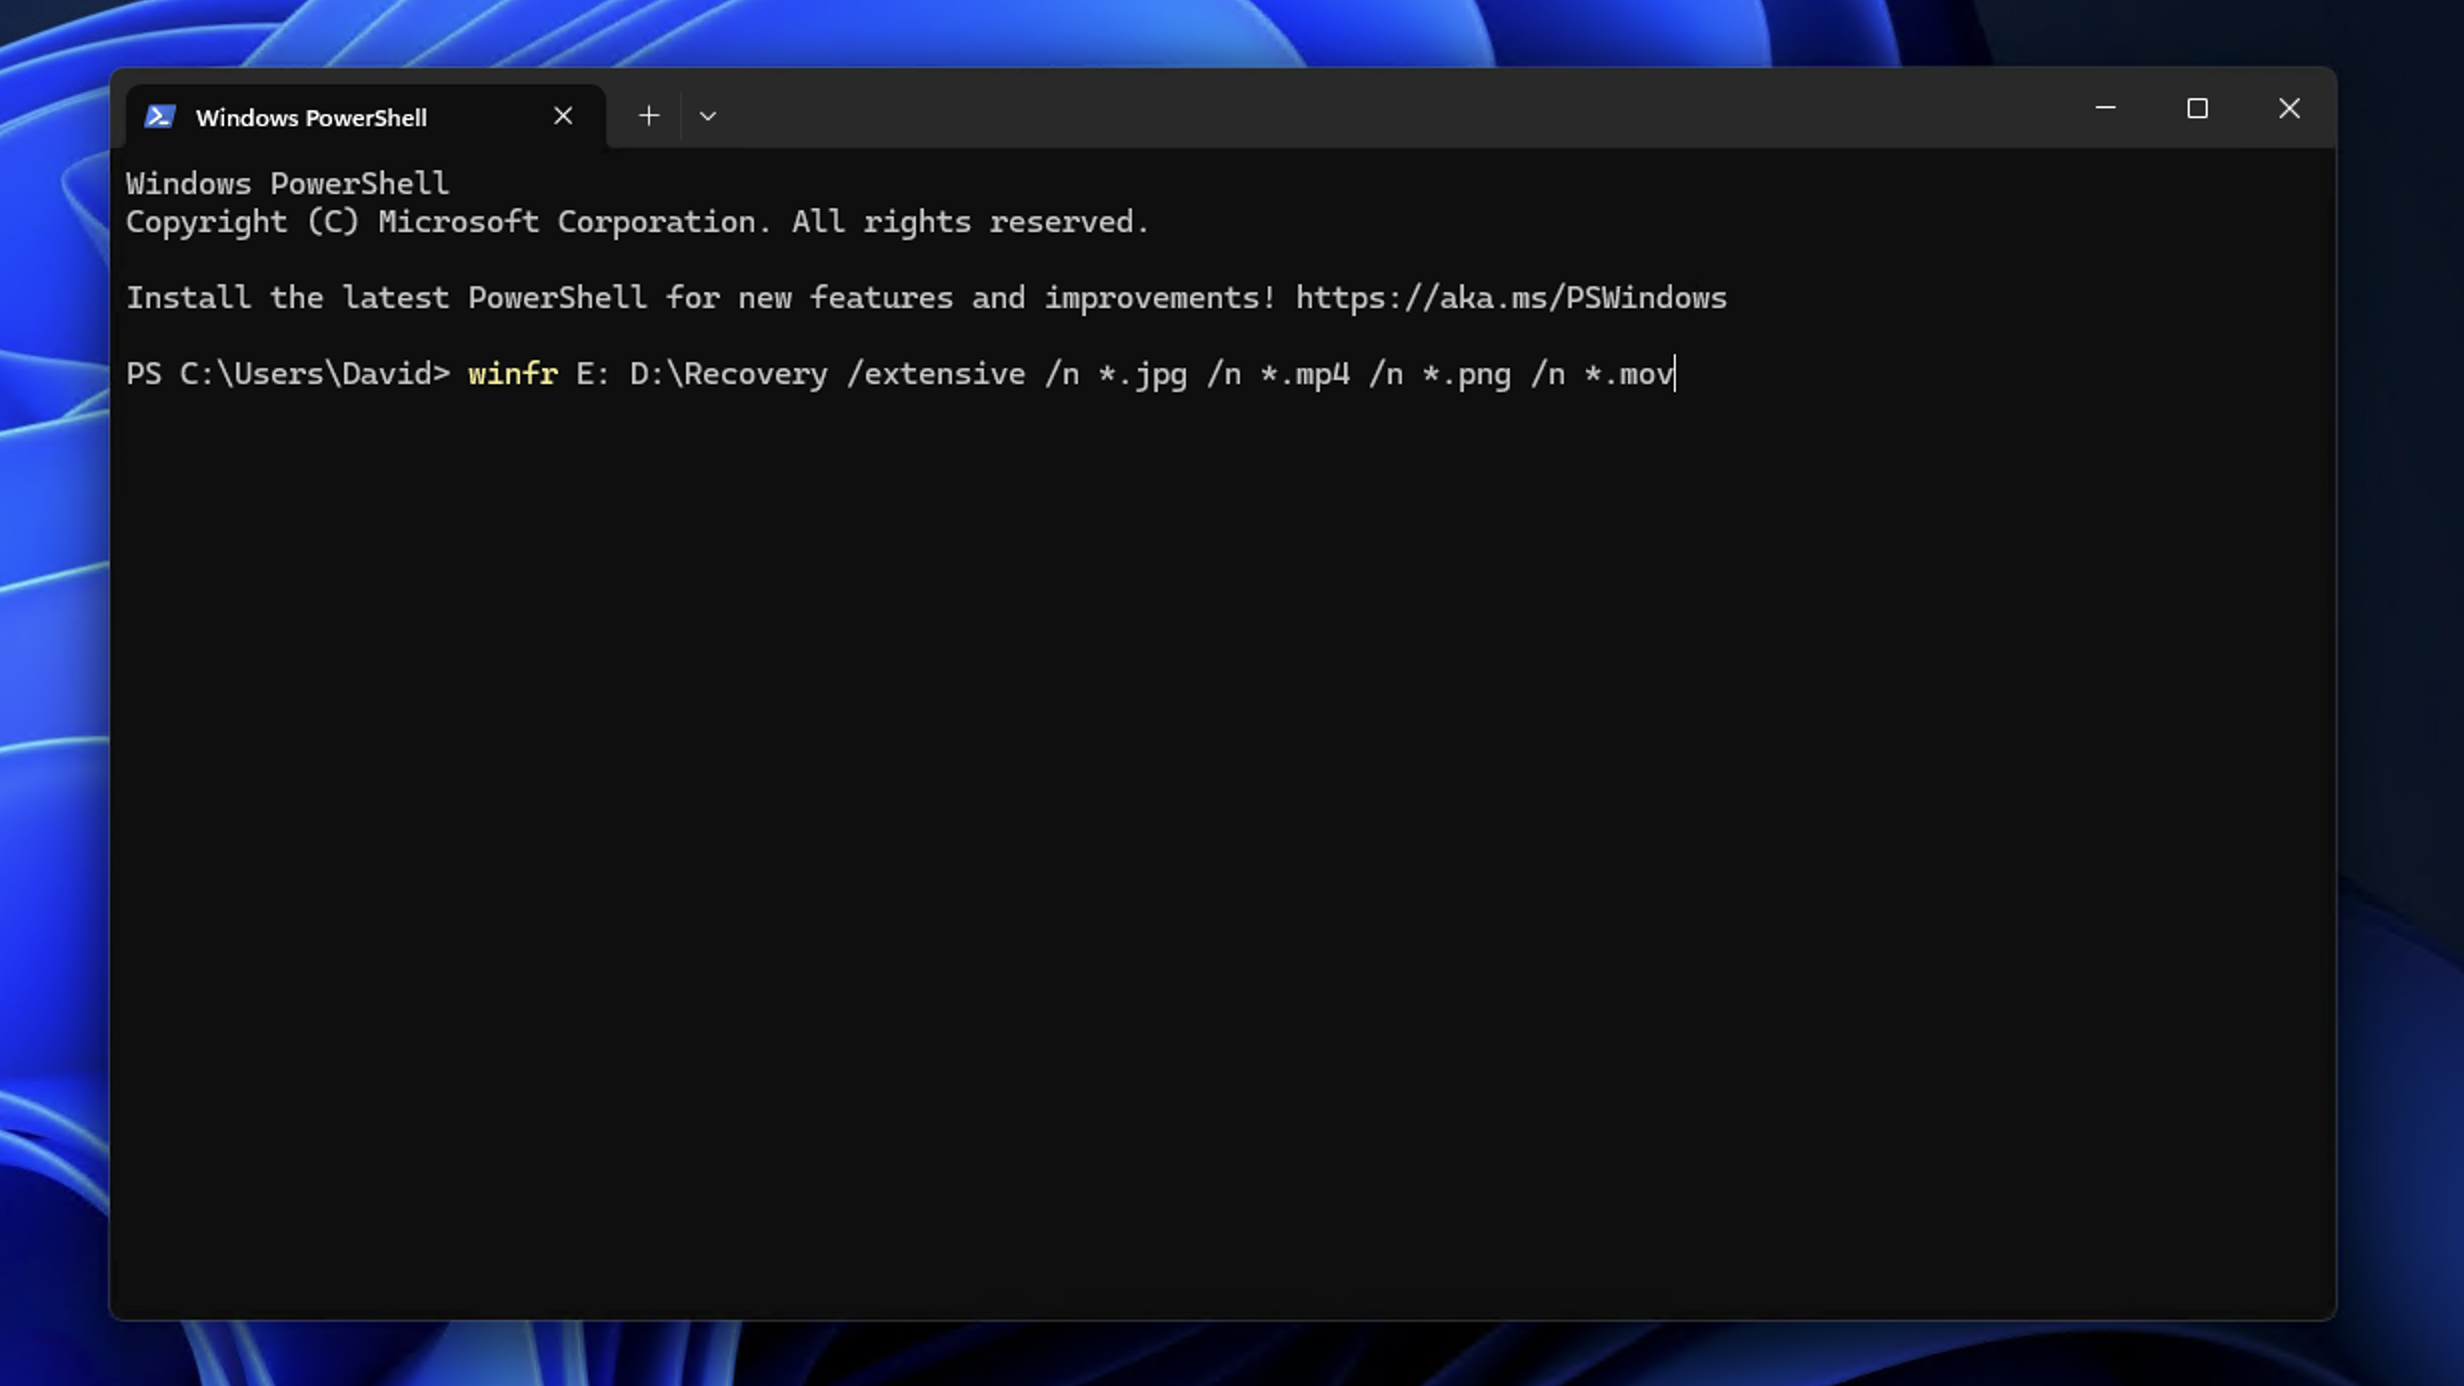
- When prompted, type Y to begin the recovery process.
- Once the scan completes, check the destination folder for your recovered files.
For most users, Disk Drill remains the better choice here. It offers a visual interface, previews before recovery, broader file format support, and its Advanced Camera Recovery module can reconstruct fragmented video files that command-line tools like winfr simply can’t handle. But if you want a zero-cost option and don’t mind working in the terminal, Windows File Recovery gets the job done for basic recoveries.
Recovering Data from Formatted SD Cards on Mac
Saving your files from a formatted SD card isn’t possible only on Windows PCs. If you’re on a Mac, you have a similar arsenal of options you can try out.
Method 1: Get Back Your Lost Data from a Formatted SD Card with Disk Drill
Disk Drill is one of the best solutions for getting your files back from a formatted SD card on a Mac. Start by downloading it from the official site and installing it like any other app. Then, run it.
Follow these steps to scan your SD card and restore lost files with Disk Drill:
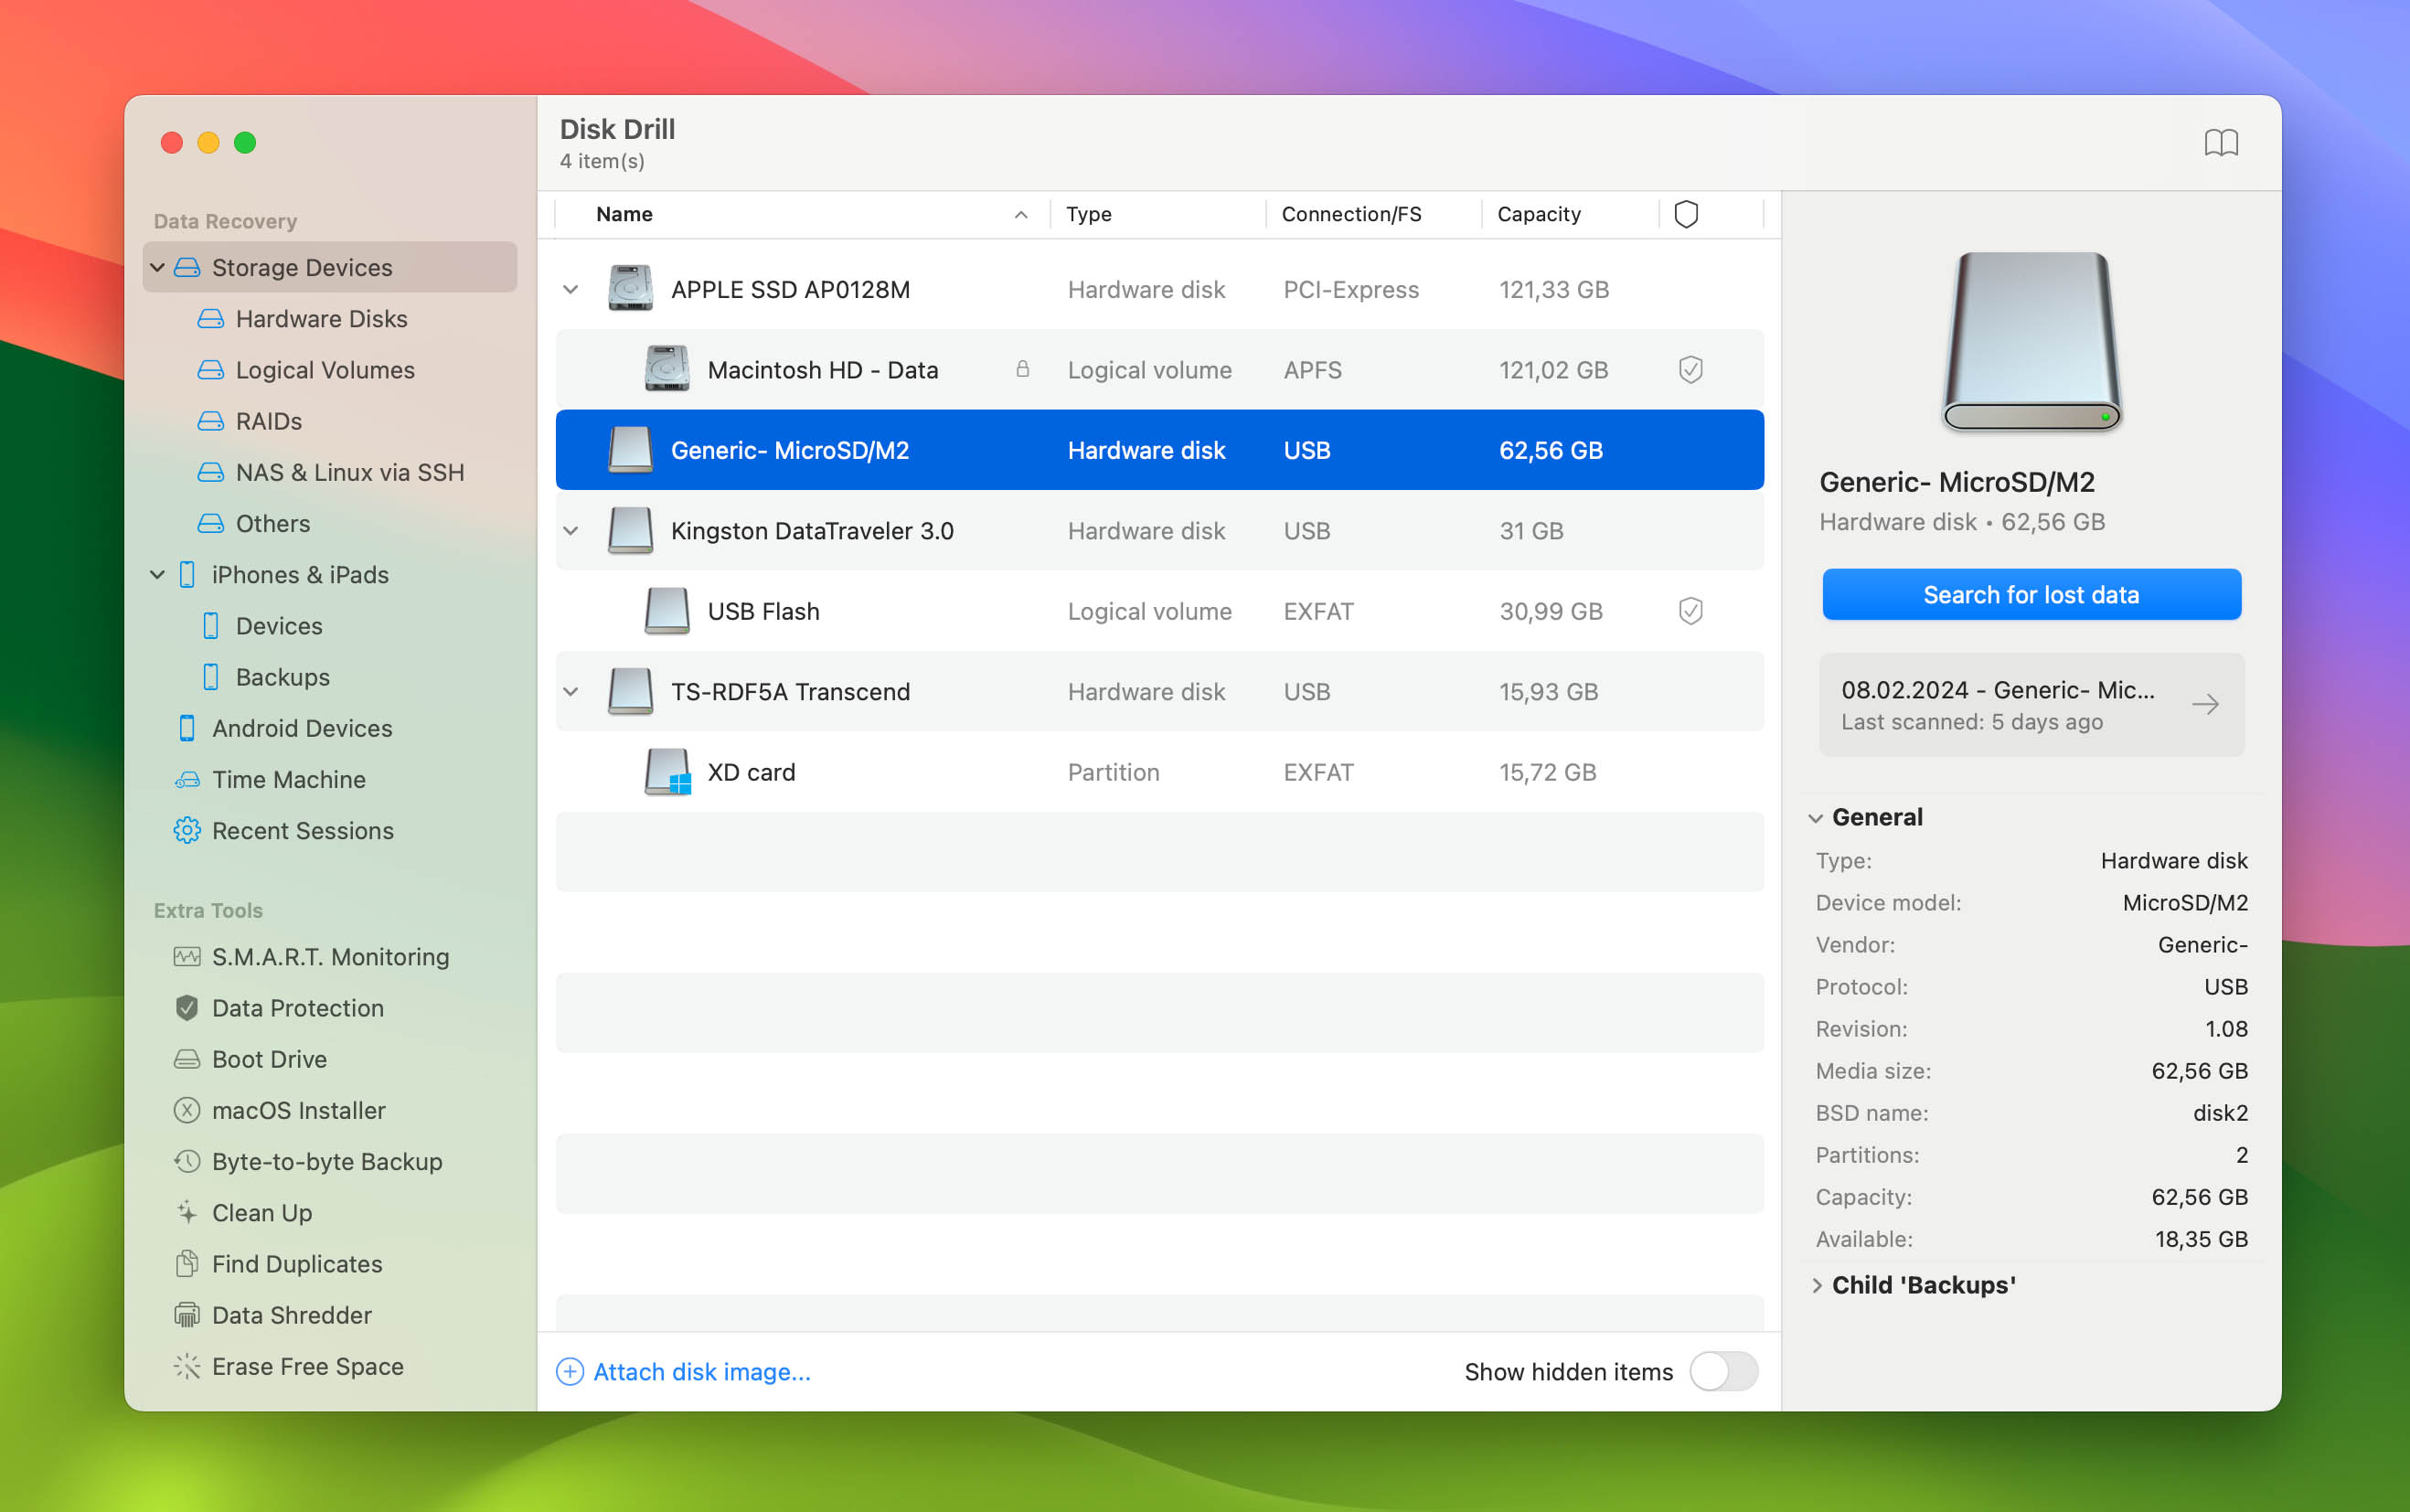
- Choose your SD card from Disk Drill’s main device list. Then, click on Search for lost data in the bottom right of its window. Disk Drill lets you choose between Universal Scan and Advanced Camera Recovery. If your SD card was used to record video (especially from a camera or drone), go with Advanced Camera Recovery, as it’s specifically built to find and reconstruct video files from camera media. For general file recovery like photos, documents, or mixed content, Universal Scan is your best bet.
- Click on Review found items in the top-right corner to check what Disk Drill has already found. That said, giving Disk Drill enough time to complete its scan will maximize the chances of locating as many files as possible.
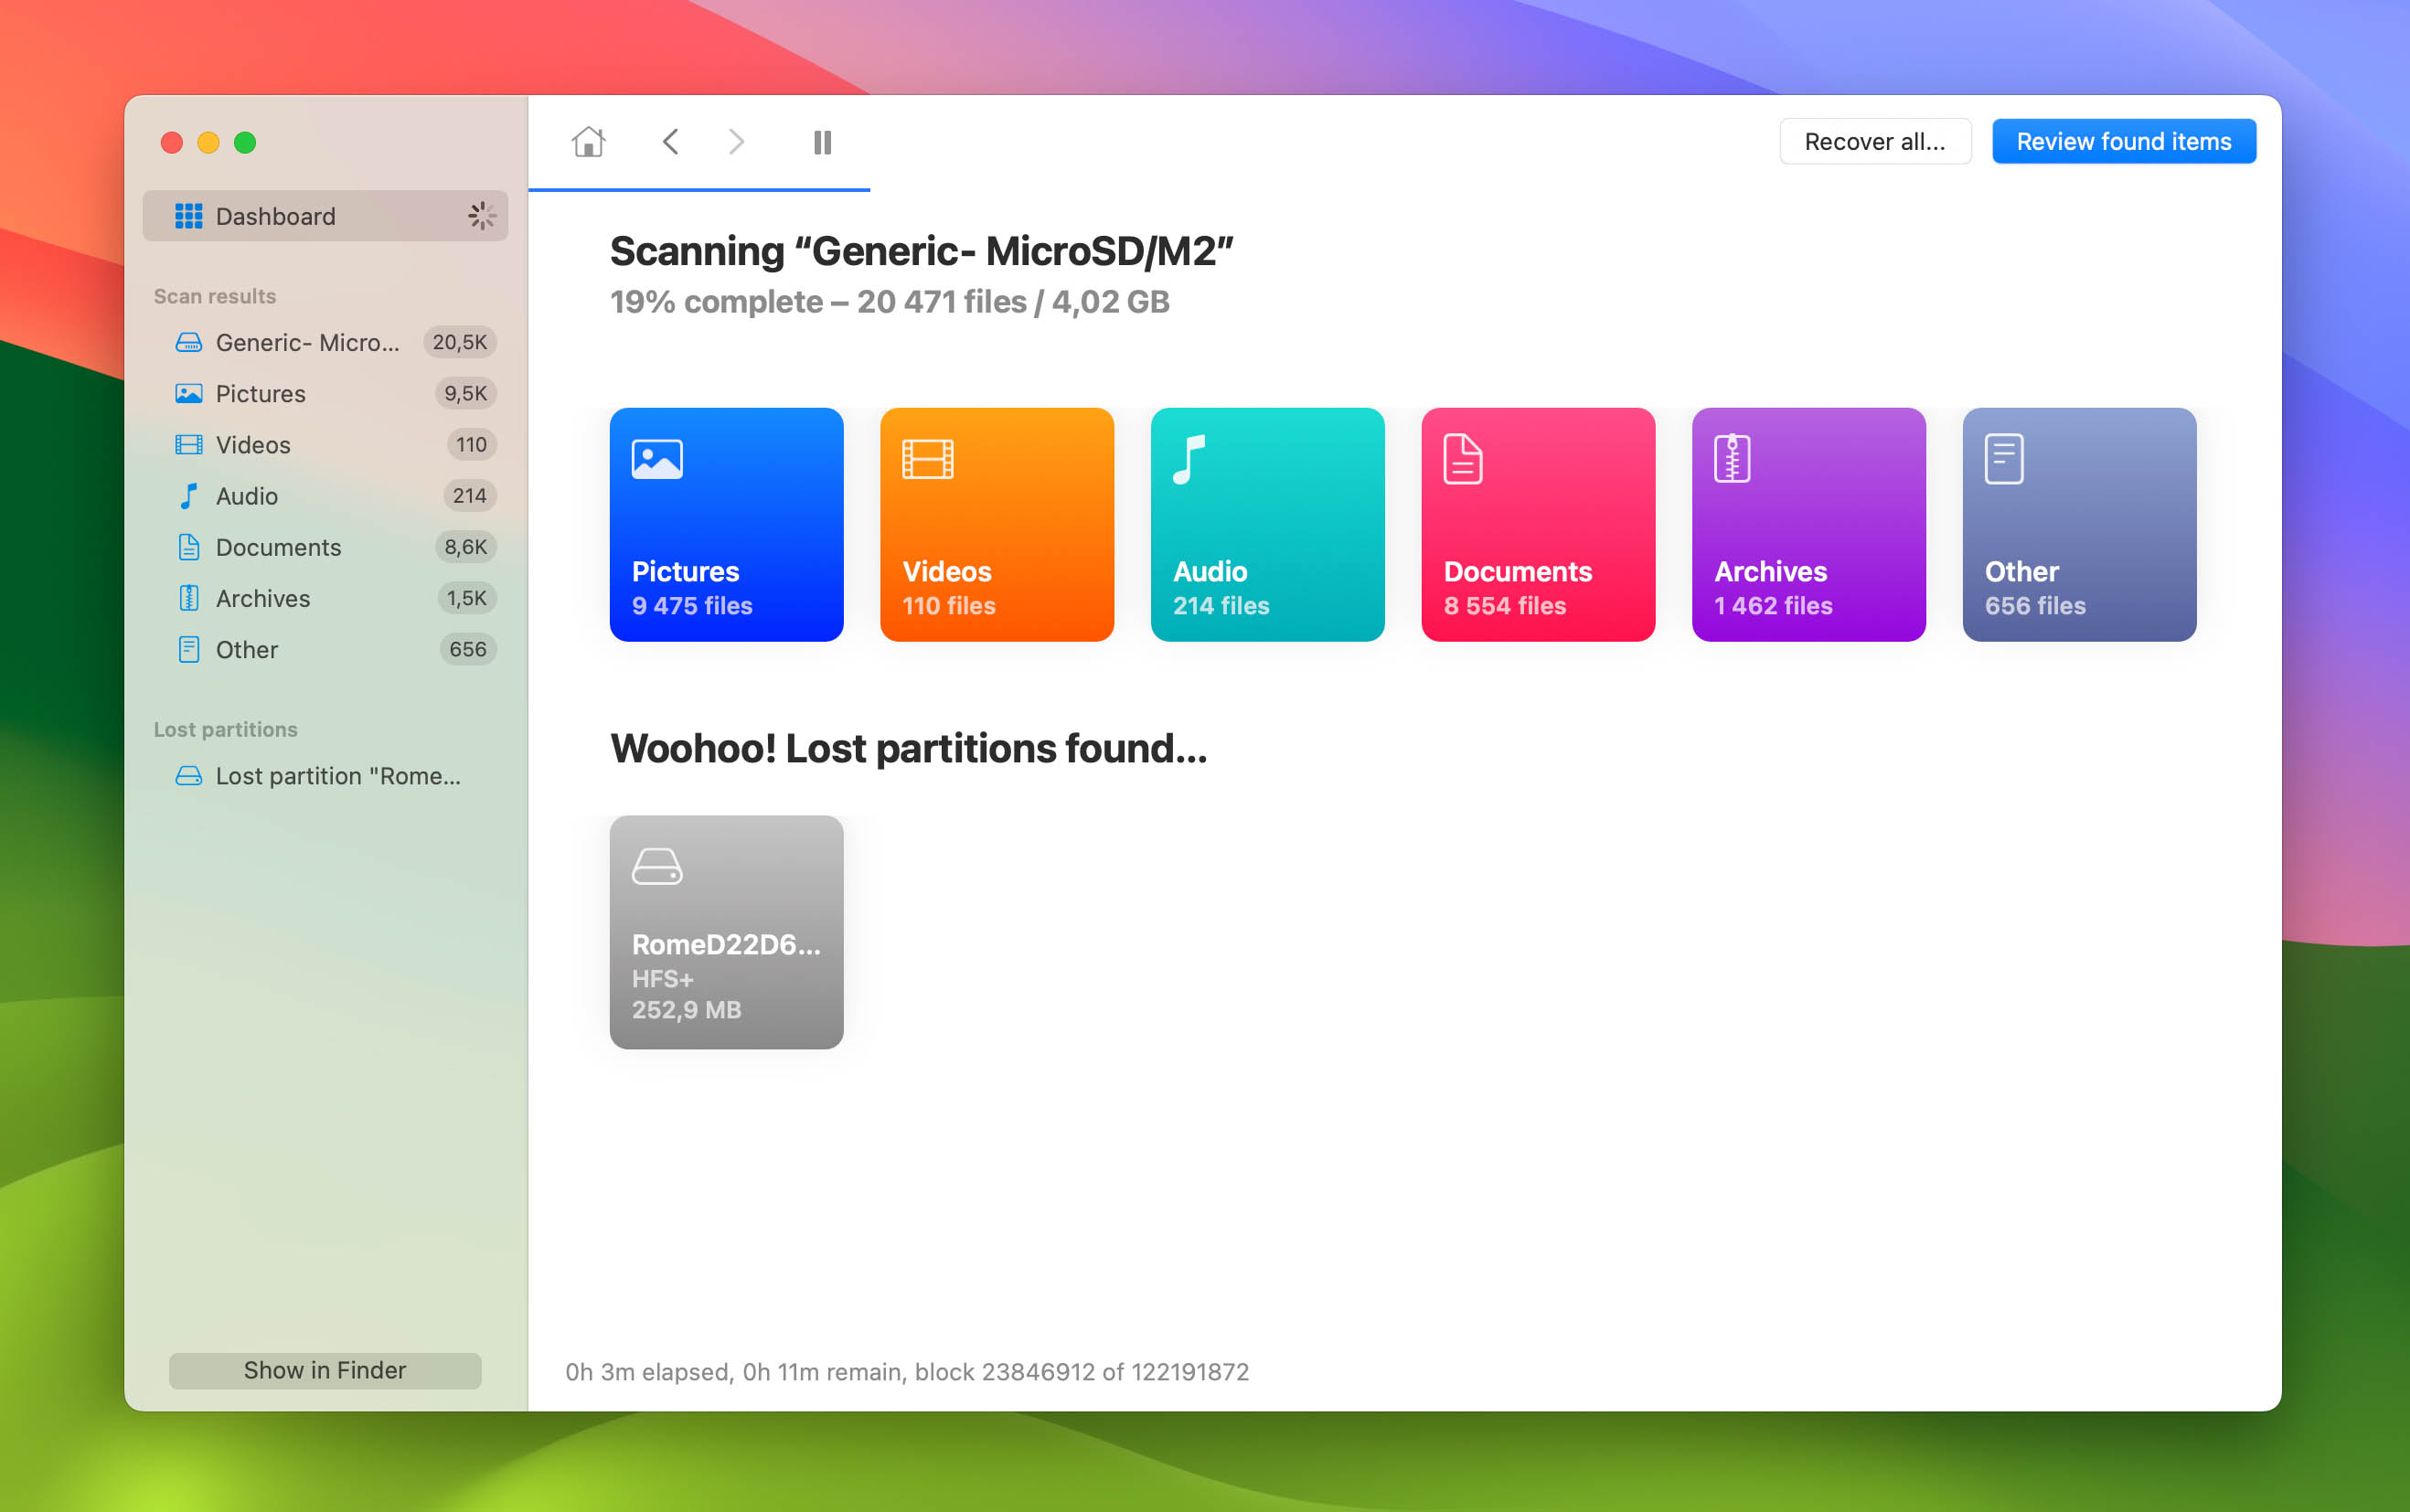
- Disk Drill can helpfully group found files by their type. By default, it will list All files, but you can narrow down the list from the group list on the left. You can click on any file to get more information about it. Disk Drill will also show a preview for popular file formats like text documents and images.
- When you locate the files you want to get back, place a checkmark on their left to mark them for recovery. Then, click on Recover in the bottom right of the Disk Drill window.
- Disk Drill will ask you to choose the destination for your soon-to-be-recovered files. Follow along, and soon you’ll find them there.


Method 2: Using Terminal to Recover Lost Files from a Formatted SD Card
If you’d prefer a more hands-on way to get back your files from your formatted SD card on a Mac, you can use PhotoRec in the Terminal. The easiest way to get it set up is through Homebrew, which lets you install and run PhotoRec from any Terminal window without worrying about folder paths.
Follow these steps to recover files using PhotoRec in Terminal:
- If you don’t already have Homebrew installed, open Terminal and paste the following command:
/bin/bash -c "$(curl -fsSL https://raw.githubusercontent.com/Homebrew/install/HEAD/install.sh)"
- Once Homebrew is ready, install TestDisk (which includes PhotoRec) by running:
brew install testdisk
- Now you can launch PhotoRec from any Terminal window by typing
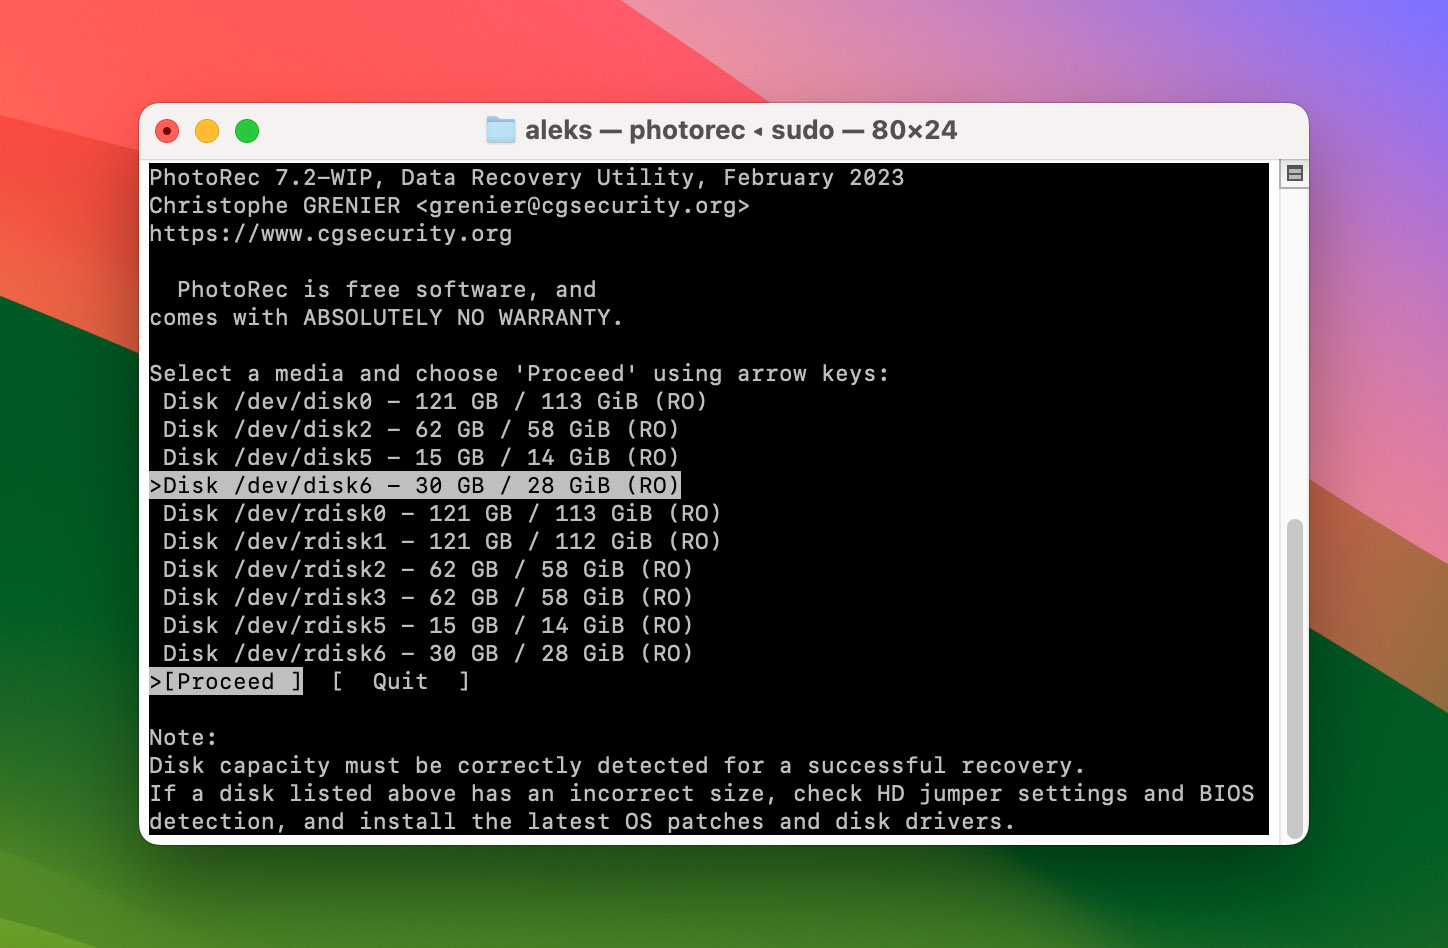
sudo photorecand pressing Enter. - Choose your SD card from PhotoRec’s list of media, using the cursor keys to highlight it. Then, with Proceed selected, press Enter on the keyboard.
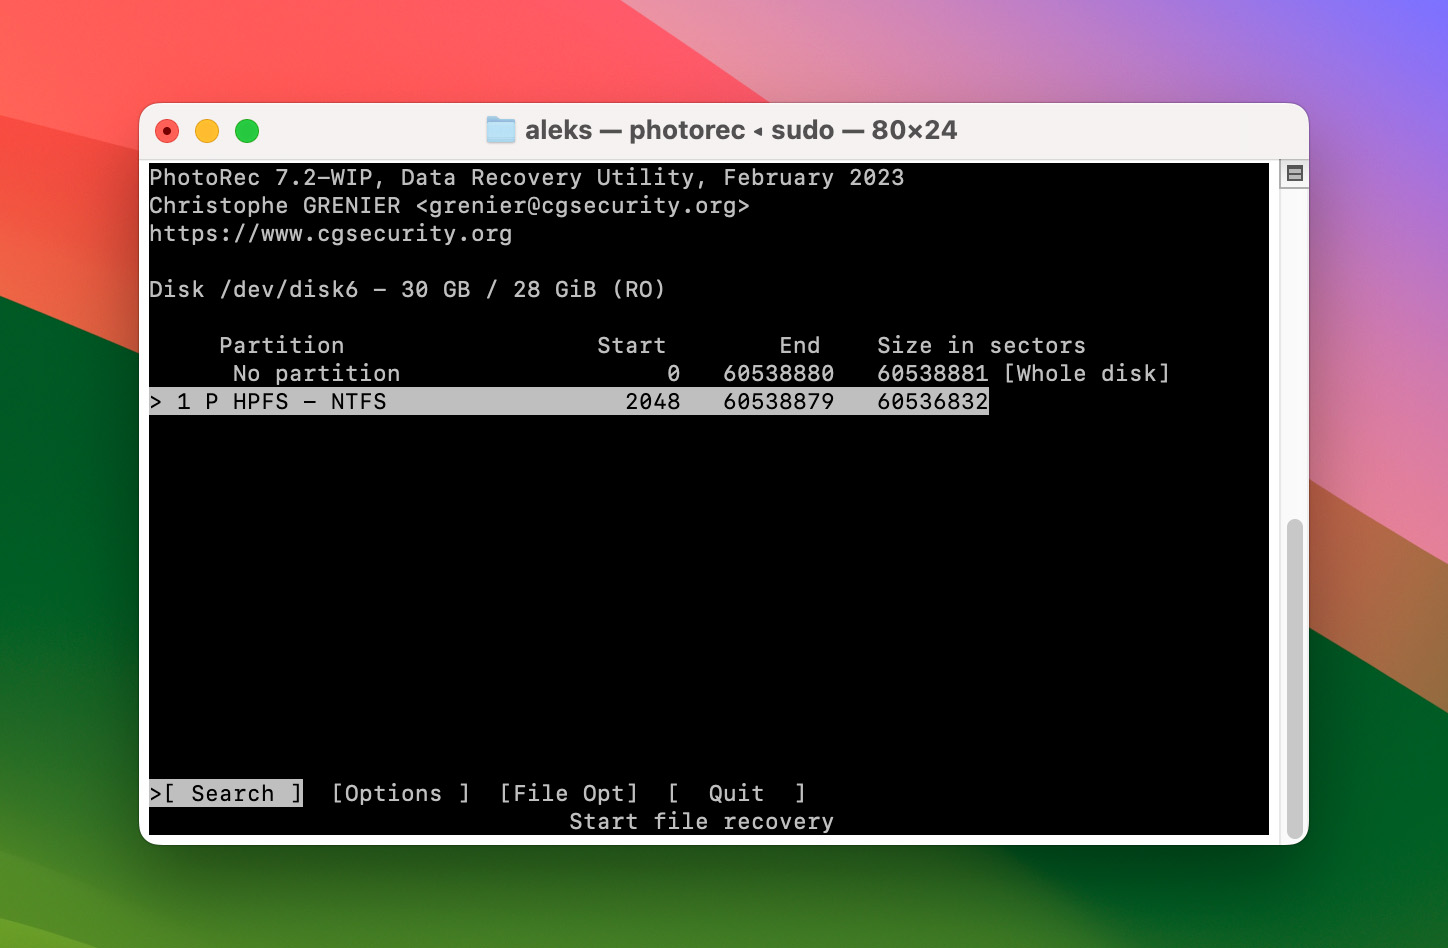
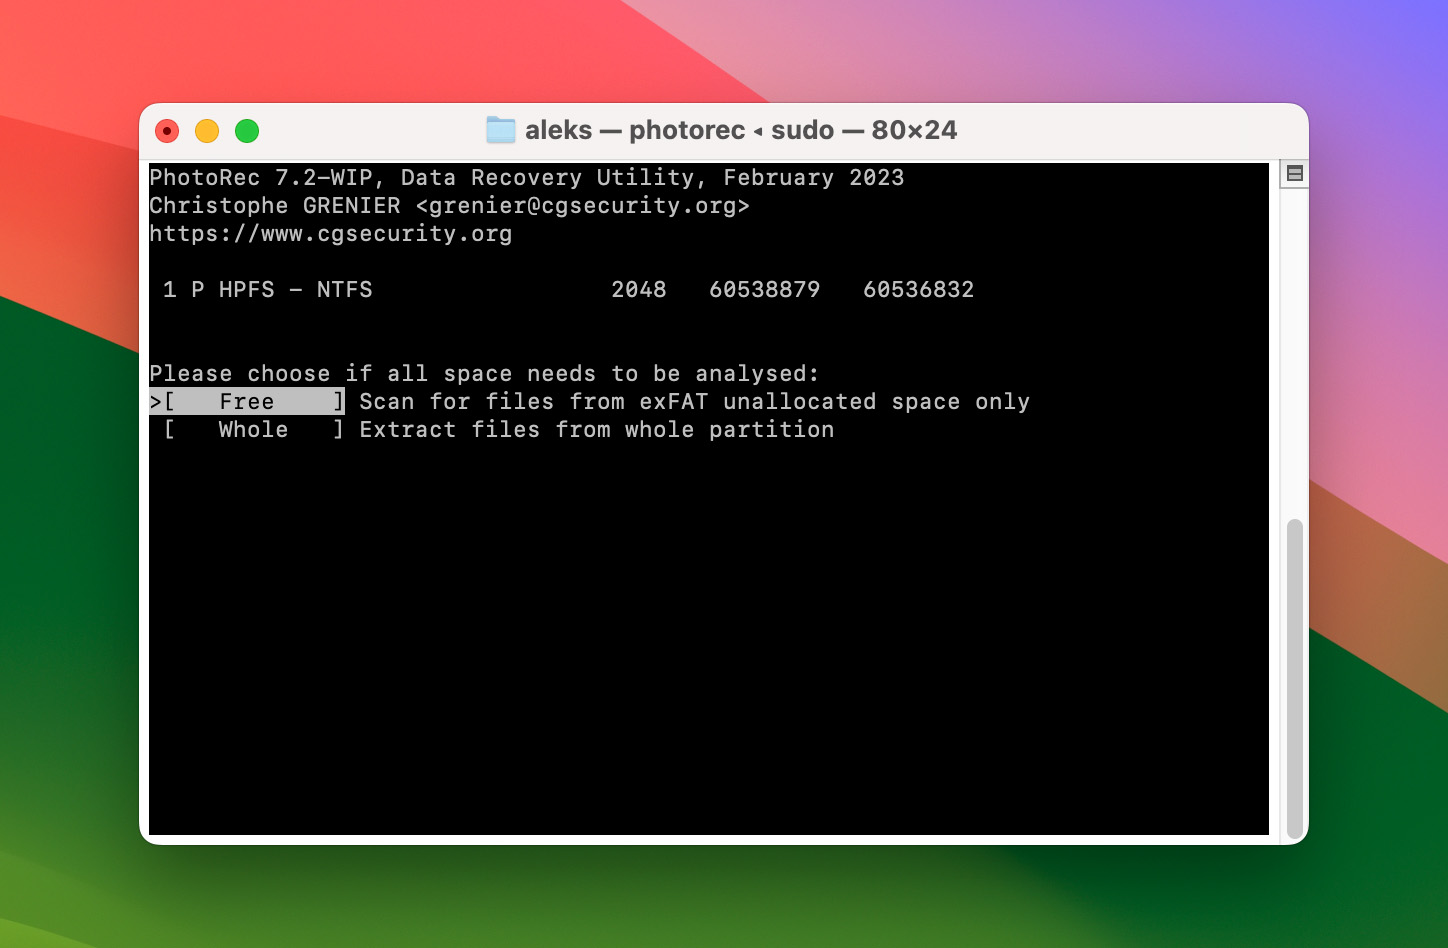
- If PhotoRec detected an existing partition, choose it and press Enter with Search highlighted to analyze it for lost data. Alternatively, you can select No partition to have PhotoRec scan the whole device.
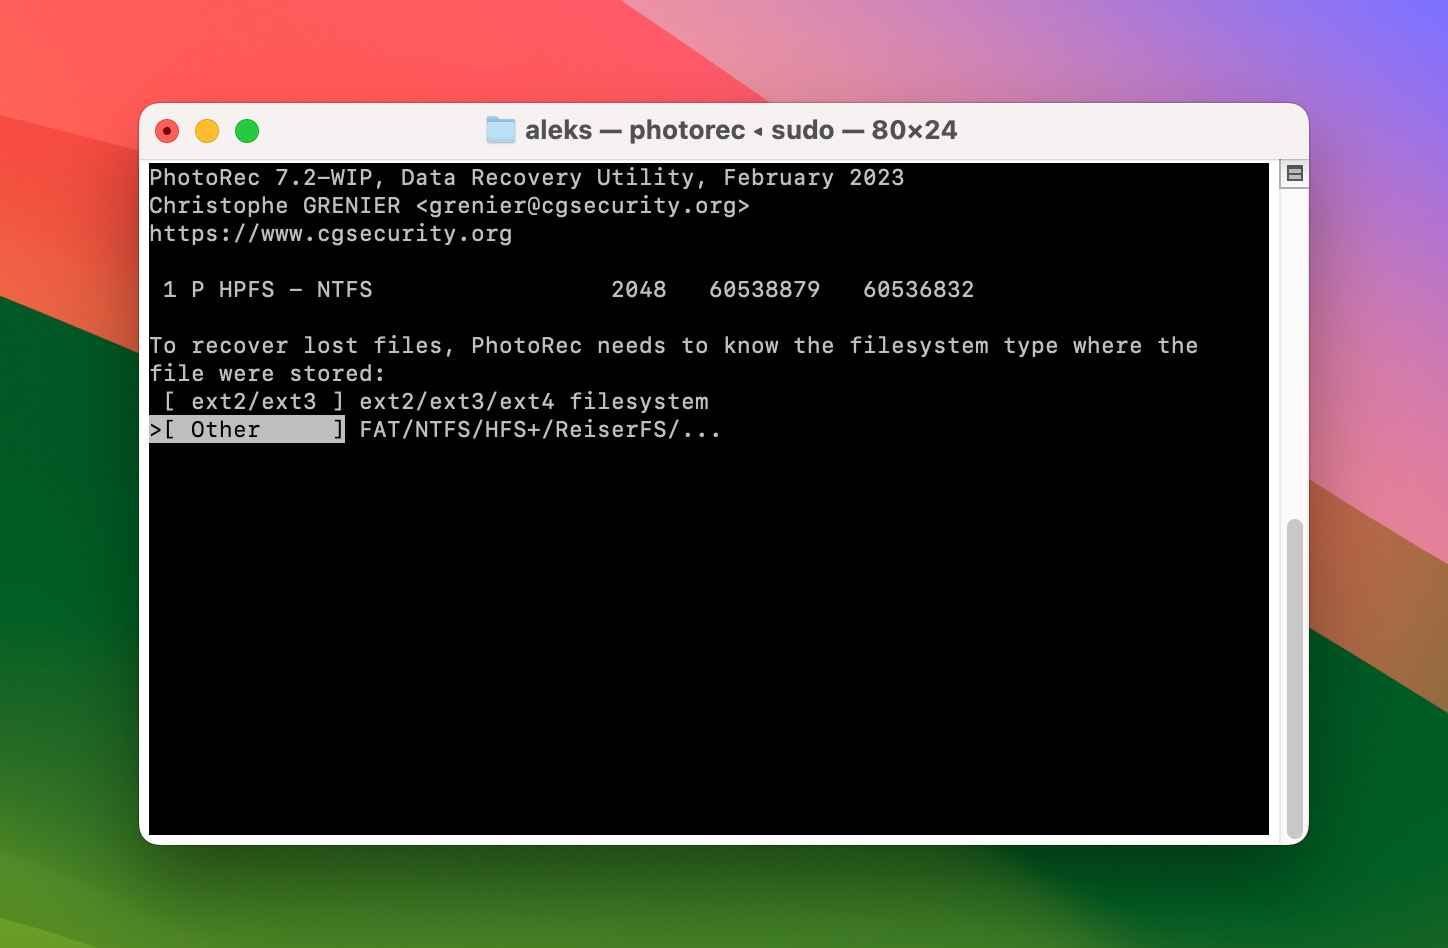
- PhotoRec will ask for the device’s file system. In most cases, you’ll probably want to choose Other.
- You can have PhotoRec perform a partial or complete partition scan. Free is quicker but only scans the unallocated space. Whole is much slower but (usually) leads to extended results.
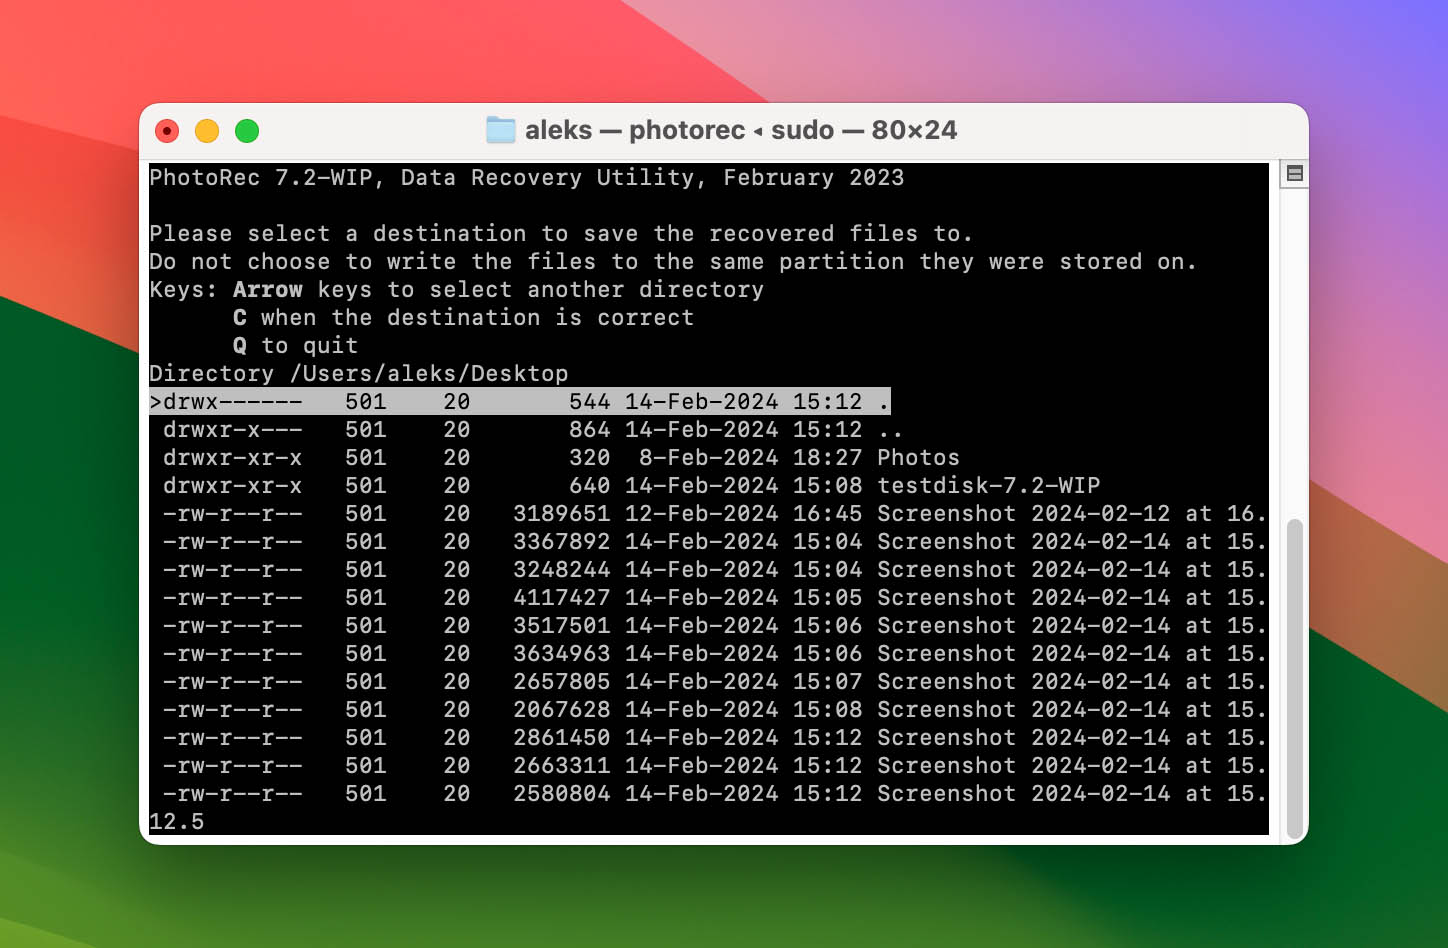
- You’ll also have to choose the destination where PhotoRec will save any salvaged files. Use the arrow keys and Enter to navigate the file and folder list. Press C on the keyboard when you’re inside the desired destination folder.
- Give PhotoRec some time to complete its scan. You can choose Stop to interrupt the scan, but the more time you allow it to run, the more files PhotoRec will find. Ideally, you should let it complete.
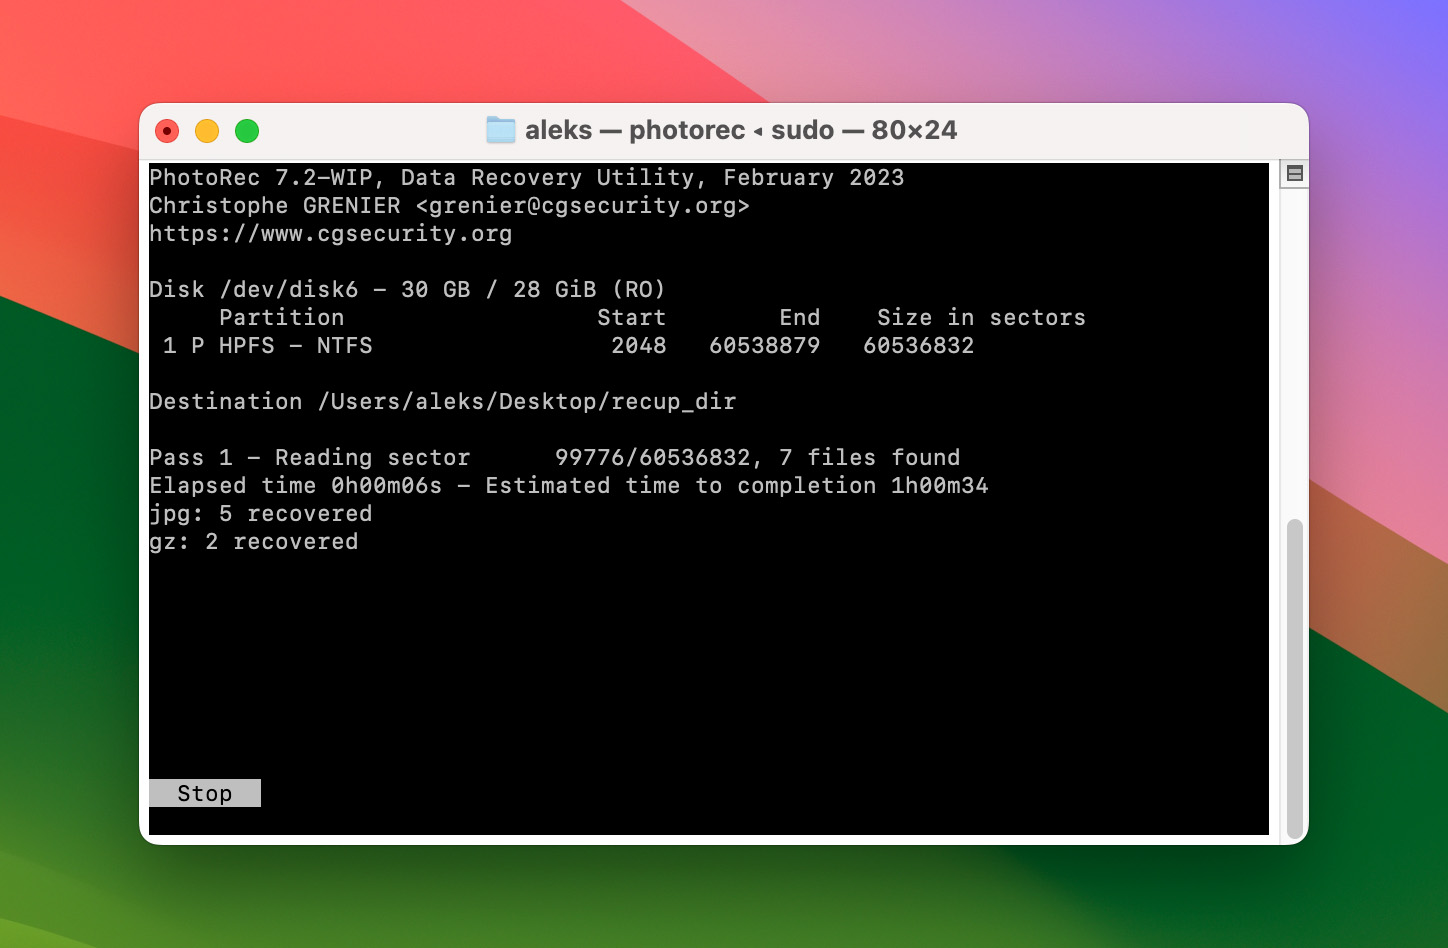
- When the process completes, PhotoRec will present a summary of the number of files and destination folder. Press Enter on the single preselected Quit option to exit the app. You’ll find all files PhotoRec recovered in the destination folder you selected.
How to Prevent an SD Card from Becoming Formatted
Having an SD card appear as formatted means you have to recover your lost files, then check it for errors, then format it again to keep using it. It’s time-consuming and annoying. Thus, it’s better to minimize the chances of the problem appearing in the first place.
- ❌ Never abruptly pull out your SD card from any device. Instead, select any available option to detach any removable media safely. Alternatively, you can turn the device off.
- 🔋 Make sure the device where you’re using your SD card, like your camera, is fully charged.
- ⚡ Don’t keep using it until its battery’s power depletes.
- 💾 Don’t agree to format your SD card when a device prompts you to do so. Especially if your SD card works fine on another device, like your PC. If you choose to format your SD card, first check that you’ve backed up all its contents elsewhere.
- 👨⚕️ When on your PC, use antivirus and firewall apps to keep malicious software and users at bay. Never run untrusted apps from unknown sources, which could end up corrupting your storage devices.
- 🔥 Except for the occasional breeze, the elements aren’t friendly to your SD card. Avoid exposing it to heat, dust, or water.
- 📦 Use carrying cases and never throw your SD card in your pocket among keys, coins, and other “stuff” that could get it scratched, chipped, or bent.
- 🗑️ If there’s visible wear, your SD card’s many years old, or it has appeared as formatted or RAW again in the past, it’s time to replace it.
Conclusion
As we saw, even if your SD card appears as formatted, there’s hope you can save your files from it. Even better, you might be able to “fix it” and keep using your SD card like before.
Still, you should be vigilant, especially if the same SD card has failed again in the past. Don’t gamble with your precious files. At the slightest hint of imminent failure, back them up and order a new SD card as soon as possible.
Thanks to nifty tools like Disk Drill, recovery might always be an option and feel like a piece of cake. However, avoiding it altogether is always the wiser course of action.
FAQ
If you’re dealing with a micro SD card that refuses to format, here are some solutions that might help:
- Use a different computer to format the micro SD card.
- Assign a different drive letter to the micro SD card.
- Format the micro SD card using a third-party partition manager.
Still no luck? Then the micro SD card might be damaged or severely corrupted.
Is your operating system telling you that your SD card needs to be formatted? In that case, it’s very likely that the SD card has become corrupted. If you have important data on it, DON’T format it. Instead, use data recovery software to retrieve your data and then fix the formatting issue.
Yes, when you format an SD card, you delete all files stored on it, including your photos. That said, the deleted photos will physically remain on the SD card until they are overwritten by new data, giving you a chance to recover them using special SD card recovery software.
Yes, there are data recovery apps for Android that allow you to recover files from a formatted SD card without a computer. One such app is called DiskDigger, and you can find it on Google Play Store.
It depends. If the card was only quick-formatted, there’s still a chance of recovery even after shooting new footage. The most important factor is how much new data landed on the card and whether it overwrote the space where your old files were stored. Anything that gets overwritten is typically gone for good. That’s why you should stop using the card immediately and scan it as soon as you can. You may not get everything back, but files that weren’t overwritten often come through just fine.