


If you deleted (or otherwise lost) videos on your SD card, don’t do anything with the card until you read this text. Pull it out of the camera/phone/drone and set it aside. In our walkthrough, you’ll find everything you need for DIY SD card video recovery. We tested multiple methods that cover most setups and scenarios, so you can choose the path that fits your case and start recovering your footage ASAP.
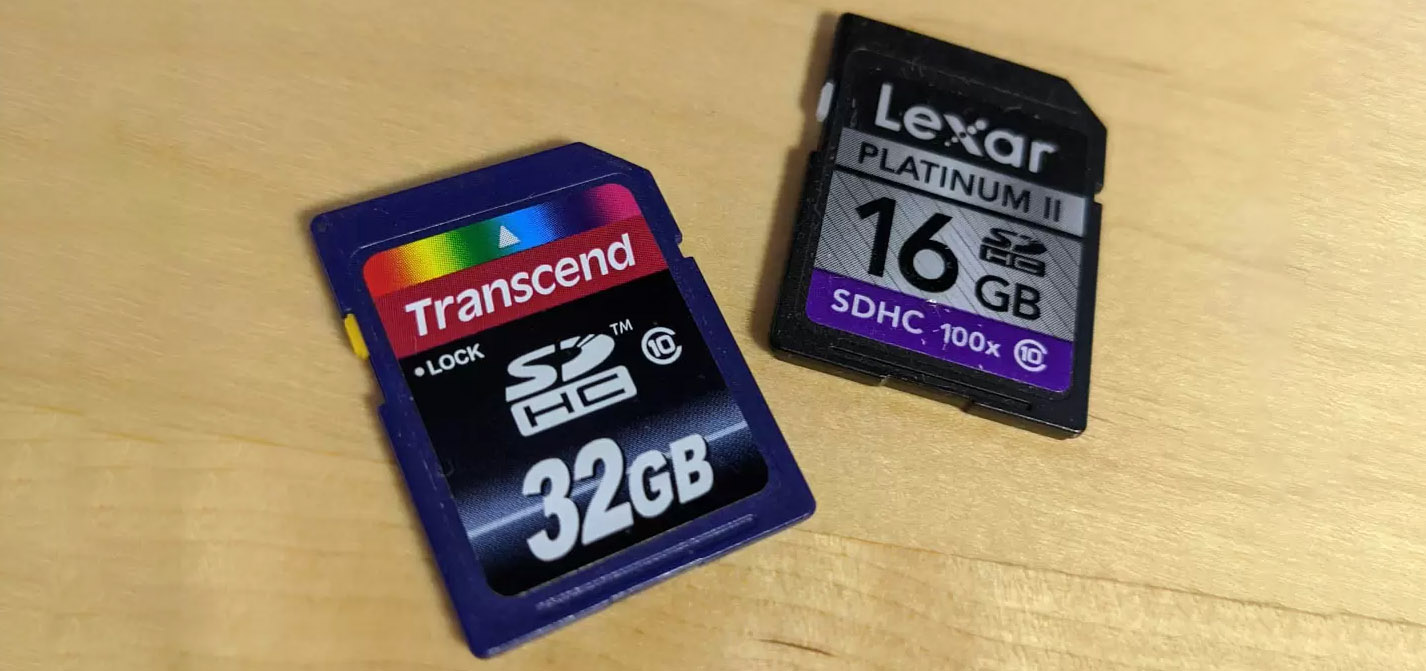
Can I Recover Deleted Videos on an SD card?
Yes, you can recover deleted videos from an SD card in many cases. When you delete a video file from an SD card, its entry in the file system is marked as deleted, but the actual video content remains physically present on the card until it’s overwritten by new data.
If you act quickly after accidental deletion and stop using the card immediately, your chances of successful SD card video recovery are very high. Even if you’ve used the card since deletion, attempting SD video recovery is still worthwhile as not all marked-as-deleted space may have been overwritten.
The same logic applies after a quick format: the file system records may be reset, but the video data can still physically remain on the card. However, there is one important exception – some cameras (especially certain Sony models) may send an SD_ERASE command during formatting. If the SD card controller supports the related erase commands (CMD32, CMD33, CMD38), the card may clear the data in a way that behaves more like TRIM on an SSD. In that case, videos may be impossible to recover because the actual data is no longer there.
| Method | When this method makes sense | Our take |
| Method 1: Recover Deleted Videos from an SD Card with Data Recovery Software | Use this first. It’s the most practical way to recover videos from SD card storage because a good recovery tool can scan the card directly, find deleted video files, and in some cases rebuild fragmented footage. | This is the best all-around method. |
| Method 2: Recover Deleted Videos from SD Card on Android | This can help if the deleted videos were on a microSD card inside an Android device and you want to try recovery without a computer. It’s convenient, but phone apps usually have more limits than desktop software. | May be useful in a pinch, but not our first choice. If the videos matter, use a computer-based method instead. |
| Method 3: Check the Recently Deleted Folder on the Original Device | This makes sense if the videos were deleted from the Photos app, Gallery app, Files app, or a computer folder after you copied them from the SD card. Some devices keep deleted media in a temporary trash folder for a limited time. | Fast and harmless. Check it, but don’t expect it to help if the deletion happened directly inside a camera. |
| Method 4: Recover Deleted Videos from Cloud Backups | Try this if you use Google Photos, iCloud Photos, OneDrive, Dropbox, Samsung Cloud, GoPro cloud, or another sync service. Even if the video is gone from the SD card, a cloud copy may still exist. Also check the cloud trash folder. | Great when it works. The catch is that many cloud services sync deletions, so the backup copy may also be gone unless it’s still in Trash. |
| Method 5: Recover Videos from Local Backups on a Computer | This method fits users who copied the footage before deletion (even once). Check Windows File History, Time Machine, old import folders, video editing project folders, external backup drives, and folders named after the camera or shoot date. | Often overlooked, but worth checking. Sometimes the “lost” video is sitting in an old import folder with a boring name like DCIM_0426. |
| Method 6: Check Camera, Drone, or Action Camera Apps | Use this one if you want to know how to recover deleted footage from SD card media after you transferred, previewed, edited, or shared the videos through a companion app. The app may still have full copies, lower-resolution previews, exports, cached clips, cloud-synced versions. | Not always full-quality, but still useful. A recovered 1080p export beats having no footage at all. |
| Method 7: Contact a Professional Data Recovery Service | Choose this if the card doesn’t show up anywhere, reports the wrong capacity, gets hot, has bent contacts, or contains footage you can’t afford to lose. DIY software can’t fix physical NAND or controller problems. | Last resort, but the right call for serious failures. |
Method 1: Recover Deleted Videos from an SD Card with Data Recovery Software
We’ll start with the method that makes the most sense in almost every situation: data recovery software. If you want to recover deleted files from your SD card, this is usually the best place to begin.
For this walkthrough, we’ll use Disk Drill, available for both Windows and Mac users. This tool has an incredibly high success rate with SD card video recovery.
Another plus is its Advanced Camera Recovery module. It is one of the few apps in this category with a dedicated recovery mode for camera, drone, and action camera footage. That matters because videos on SD cards are often fragmented. Simpler recovery tools may find pieces of those clips but fail to rebuild them into playable files.
To get started with Disk Drill, you need to download it. You will be automatically redirected to the correct version of the program whether you are using Windows or macOS. Once downloaded, launch the installer and install the software on your computer. Then follow the guide below. The recovery steps are identical on Windows and macOS, even though our screenshots were taken on Windows 11.
How to recover videos from SD card using Disk Drill:
- Launch Disk Drill and give it the permissions it asks for.
- Open Advanced Camera Recovery from the left menu, it sits under the main Storage Devices section. This mode is built specifically for camera-style video recovery, which is exactly what we want when we need to recover footage from an SD card.
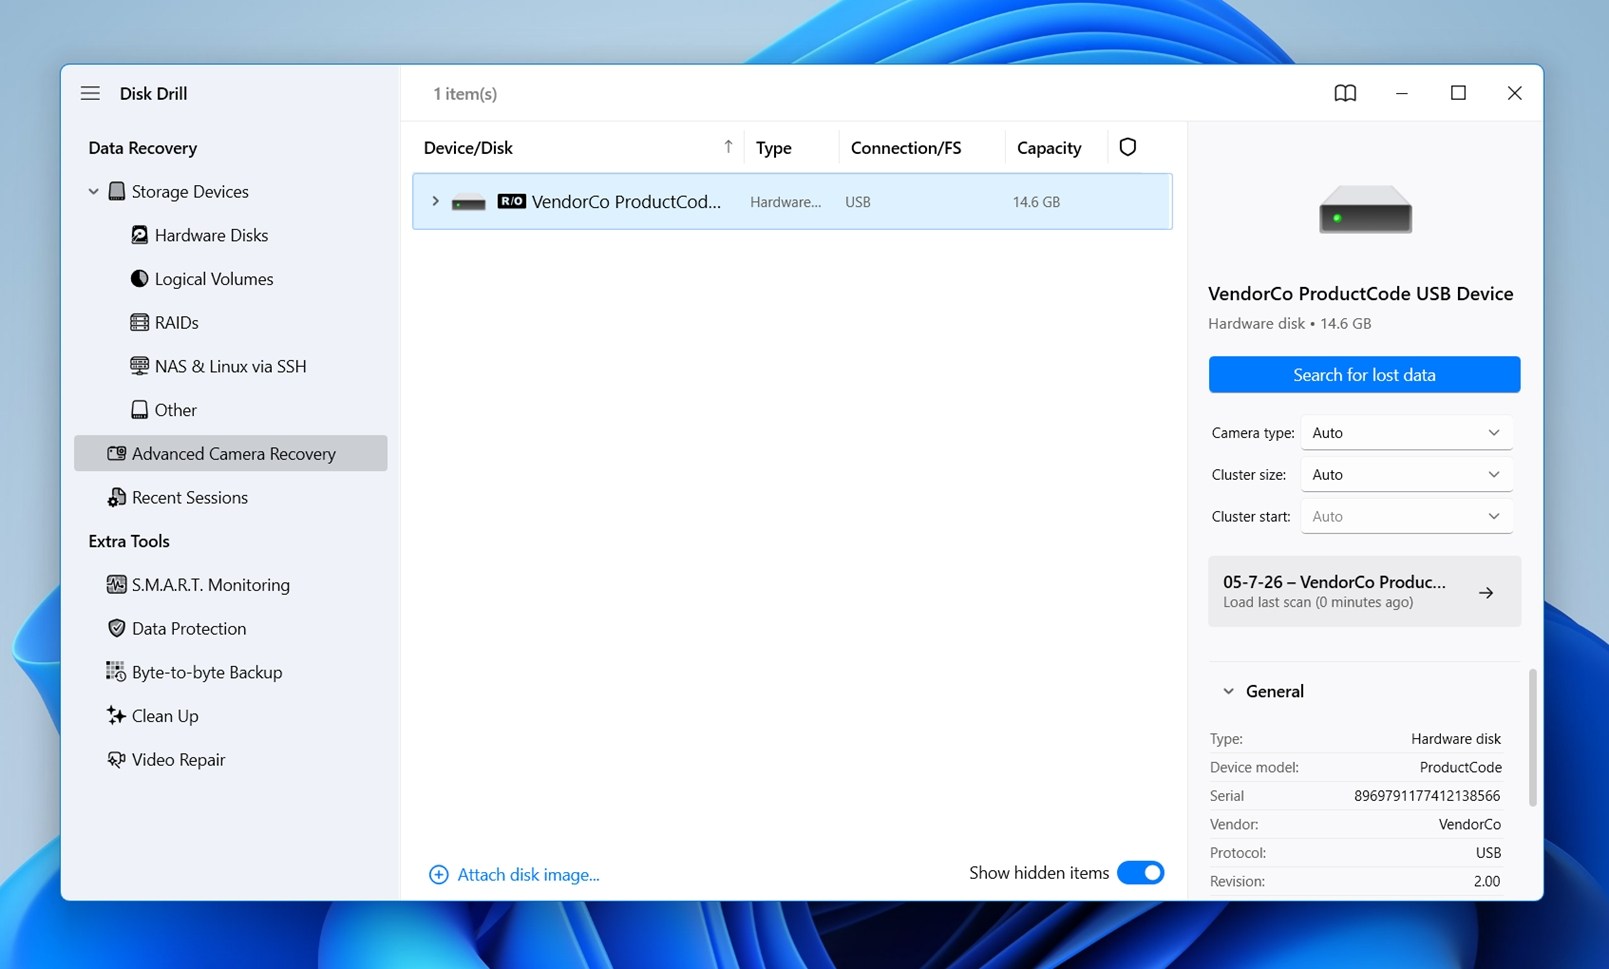
- Pick your SD card from the list. Your card may show a brand name, card reader name, or something generic like “USB Device.” The easiest way to avoid mistakes is to check the card’s capacity.
On the right side, Disk Drill gives you options like Camera type, Cluster size, Cluster start. You can adjust these if you know the exact camera model or technical details, but most don’t need to touch them. In most cases, Auto is the right choice. - Click Search for lost data. Disk Drill will start scanning the card for recoverable video files. This can take a few minutes or much longer, depending on the card size, speed, and condition.
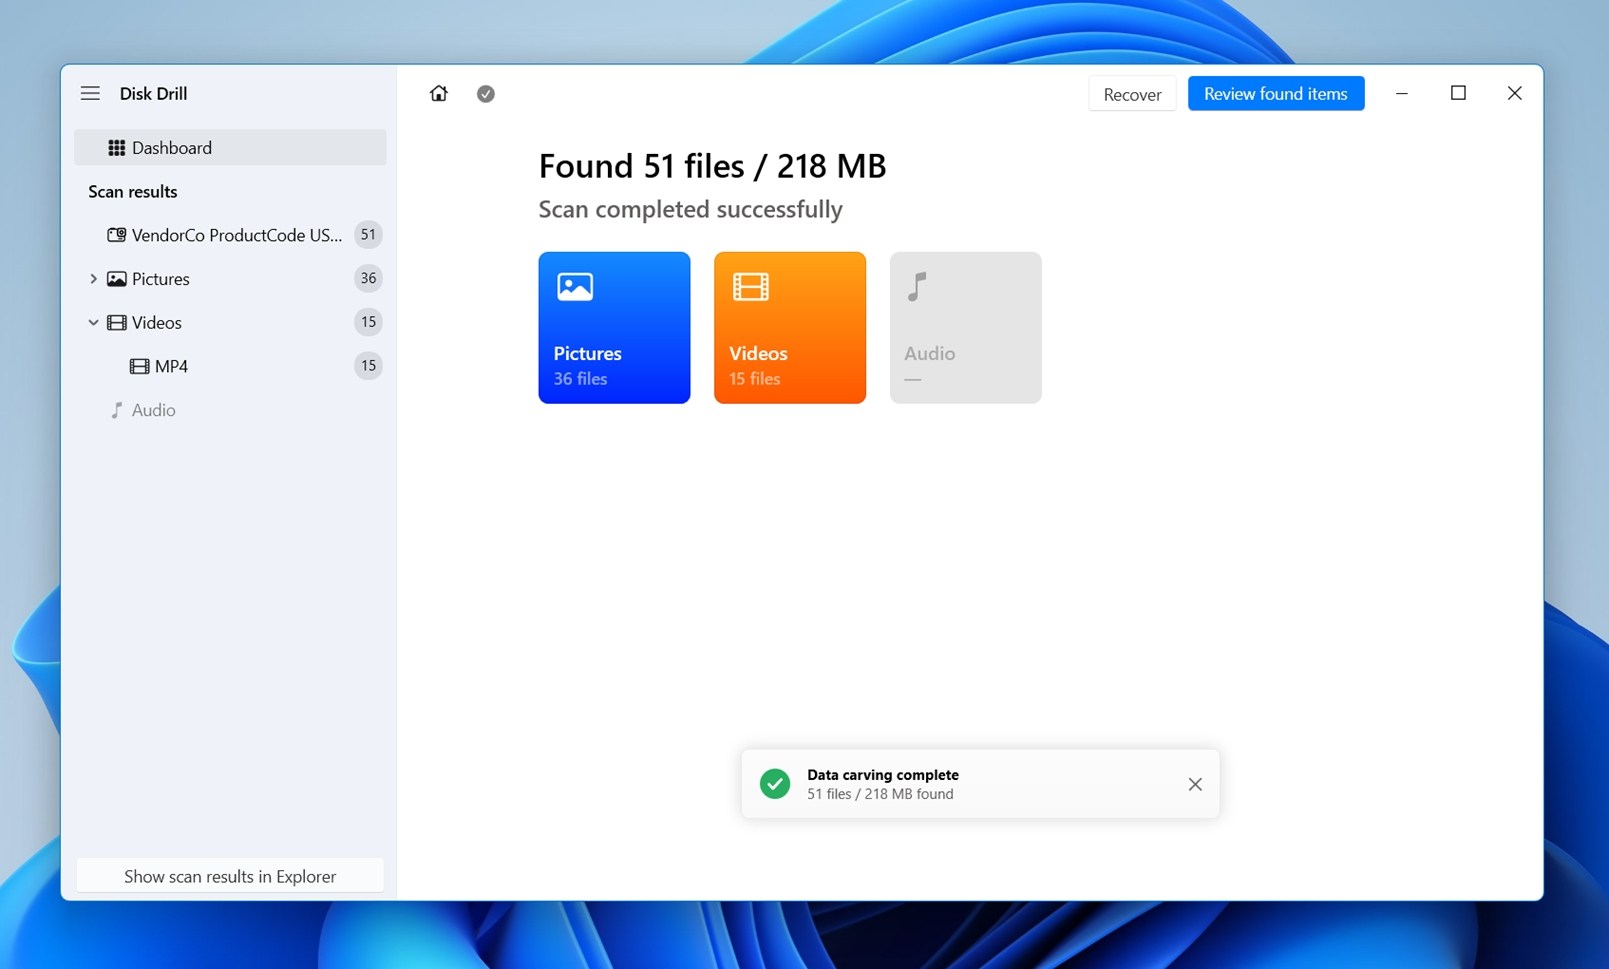
- Click Videos to filter the results down to video files only. On the left, Disk Drill also groups scan results by category. You can expand Videos and click a specific format, like MP4, if that’s what your camera used. This is helpful when the scan finds a mix of media files and you don’t want to scroll through everything.
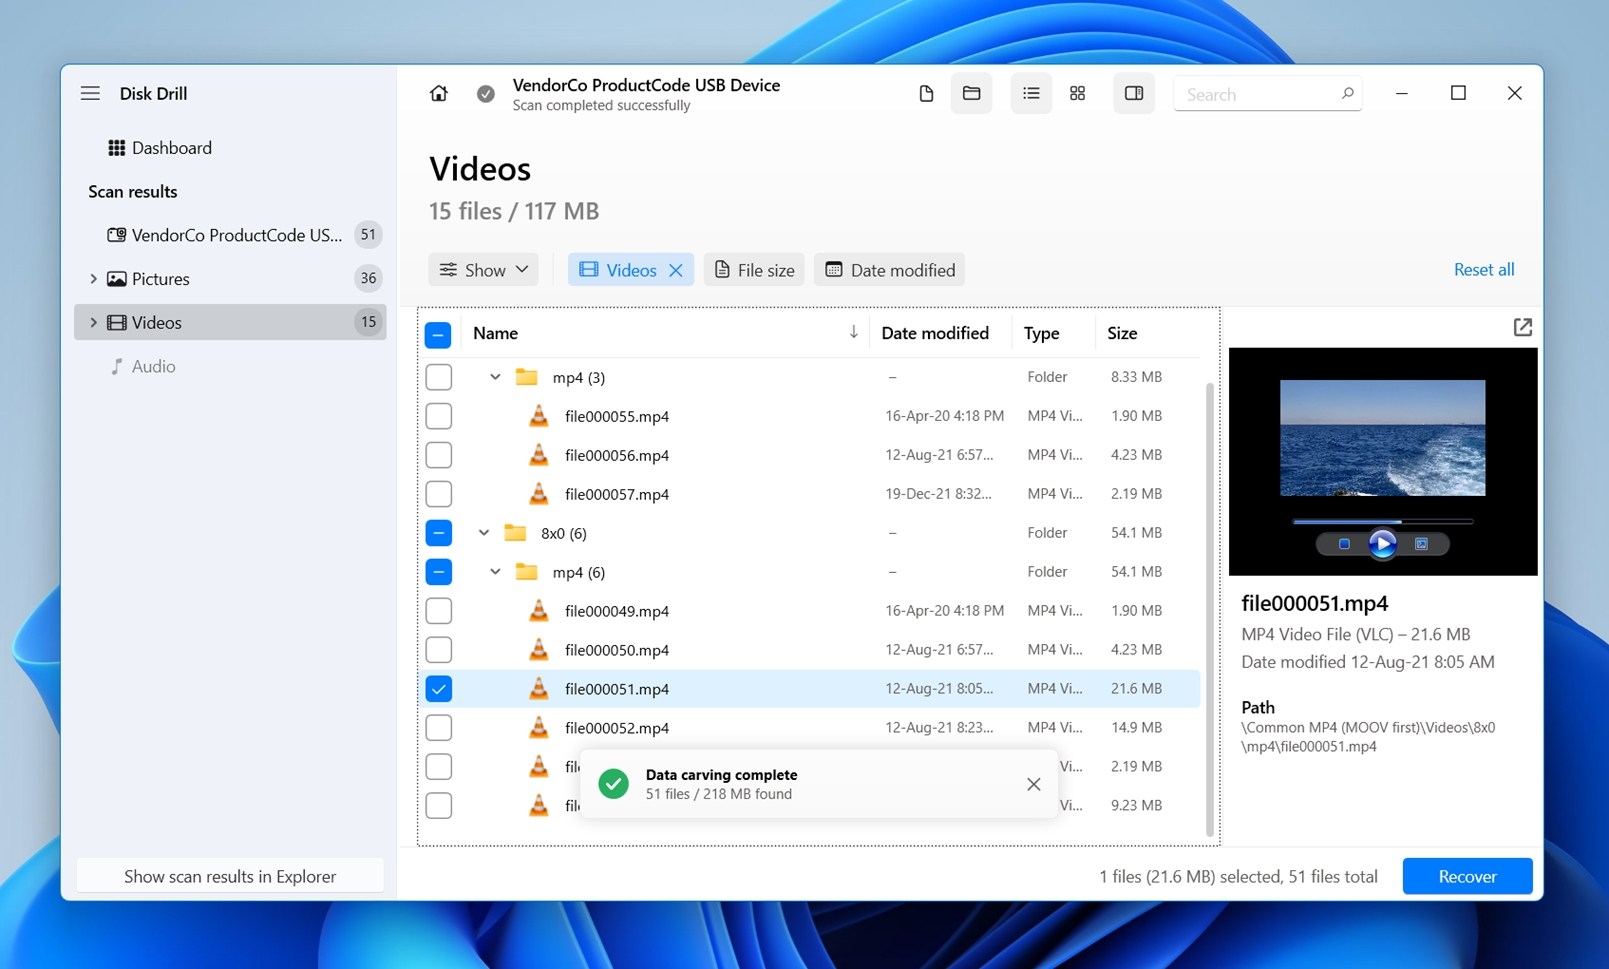
- Check the recovered video list and use filters if needed – you’ll see filenames, folders, file sizes, dates, and formats. If the list is long, use the filters at the top. In our screenshot, the Date modified filter is open, with quick options like Today, Yesterday, This week, and so on. You can also use the File size filter if you’re looking for longer clips, since real camera videos are often much larger than thumbnails or tiny preview files.
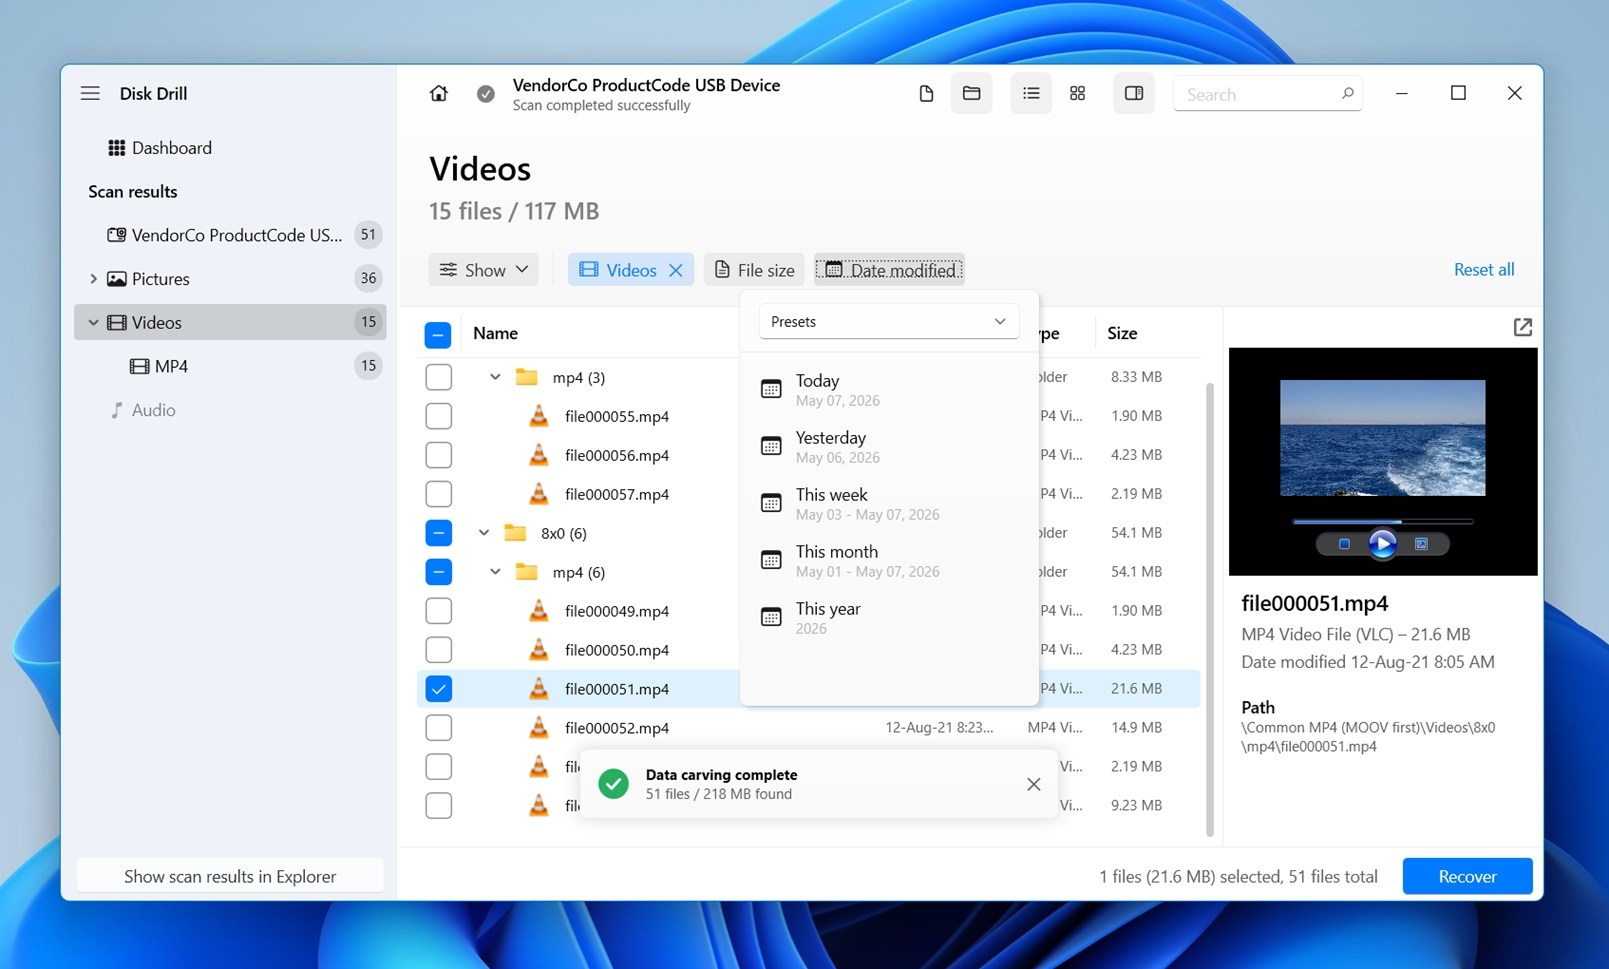
- Click a video file and look at the preview panel on the right. If the clip opens and plays there, it’s a 100% sign the recovered file will be usable after you save it. That said, don’t treat a missing preview as a failed recovery. Some video files can be fully recoverable but still not play here. Disk Drill relies on the video formats/codecs your OS can preview natively, so a file like HEVC/H.265 may show only a still frame, even if the recovered video itself is fine.
- Check the box next to each video you want back, then click the blue Recover button in the bottom-right corner.
- Choose a folder on your computer’s internal drive (or another external drive) and click Next.
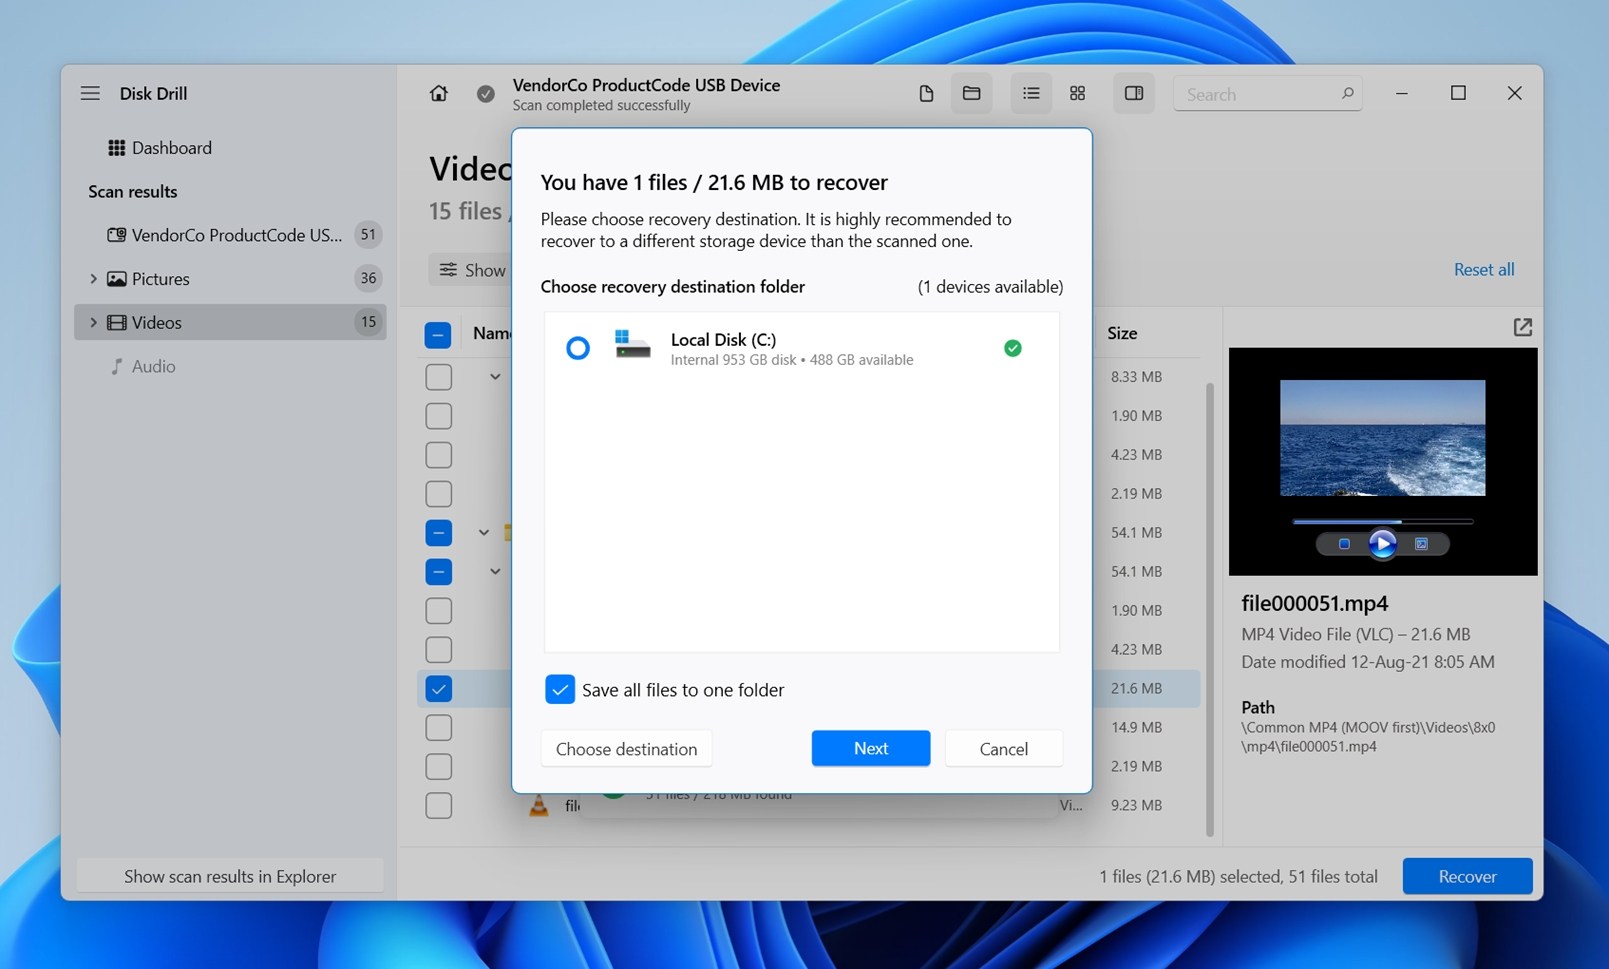
(Do not save the files back to the same SD card. That card still contains the deleted data you’re trying to protect, and writing new files to it can overwrite other recoverable videos.)
There are two versions of Disk Drill:
- Free – which can find & preview deleted files on an SD card. The Windows version of Disk Drill can additionally recover up to 100 MB of data for free. This may solve a small or medium-sized data loss end-to-end.
- Pro – which can recover deleted files from an SD card without limits.
Method 2: Recover Deleted Videos from SD Card on Android
If you’ve mistakenly deleted a video from your Android phone or from the microSD card on your phone, you also have the option to run a scan right on the device with a specialized app such as DiskDigger.
DiskDigger is a data recovery app created for recovering lost videos from Android phones. It is capable of finding and recovering deleted photos and videos on either your phone’s built-in storage or microSD card.
Without root, DiskDigger can run only a limited scan. As the app itself warns, it may show videos that still exist on the device rather than truly deleted ones.
Here’s how to restore deleted videos from the SD card on your Android phone:
- Use Google Play Store to install the DiskDigger app.
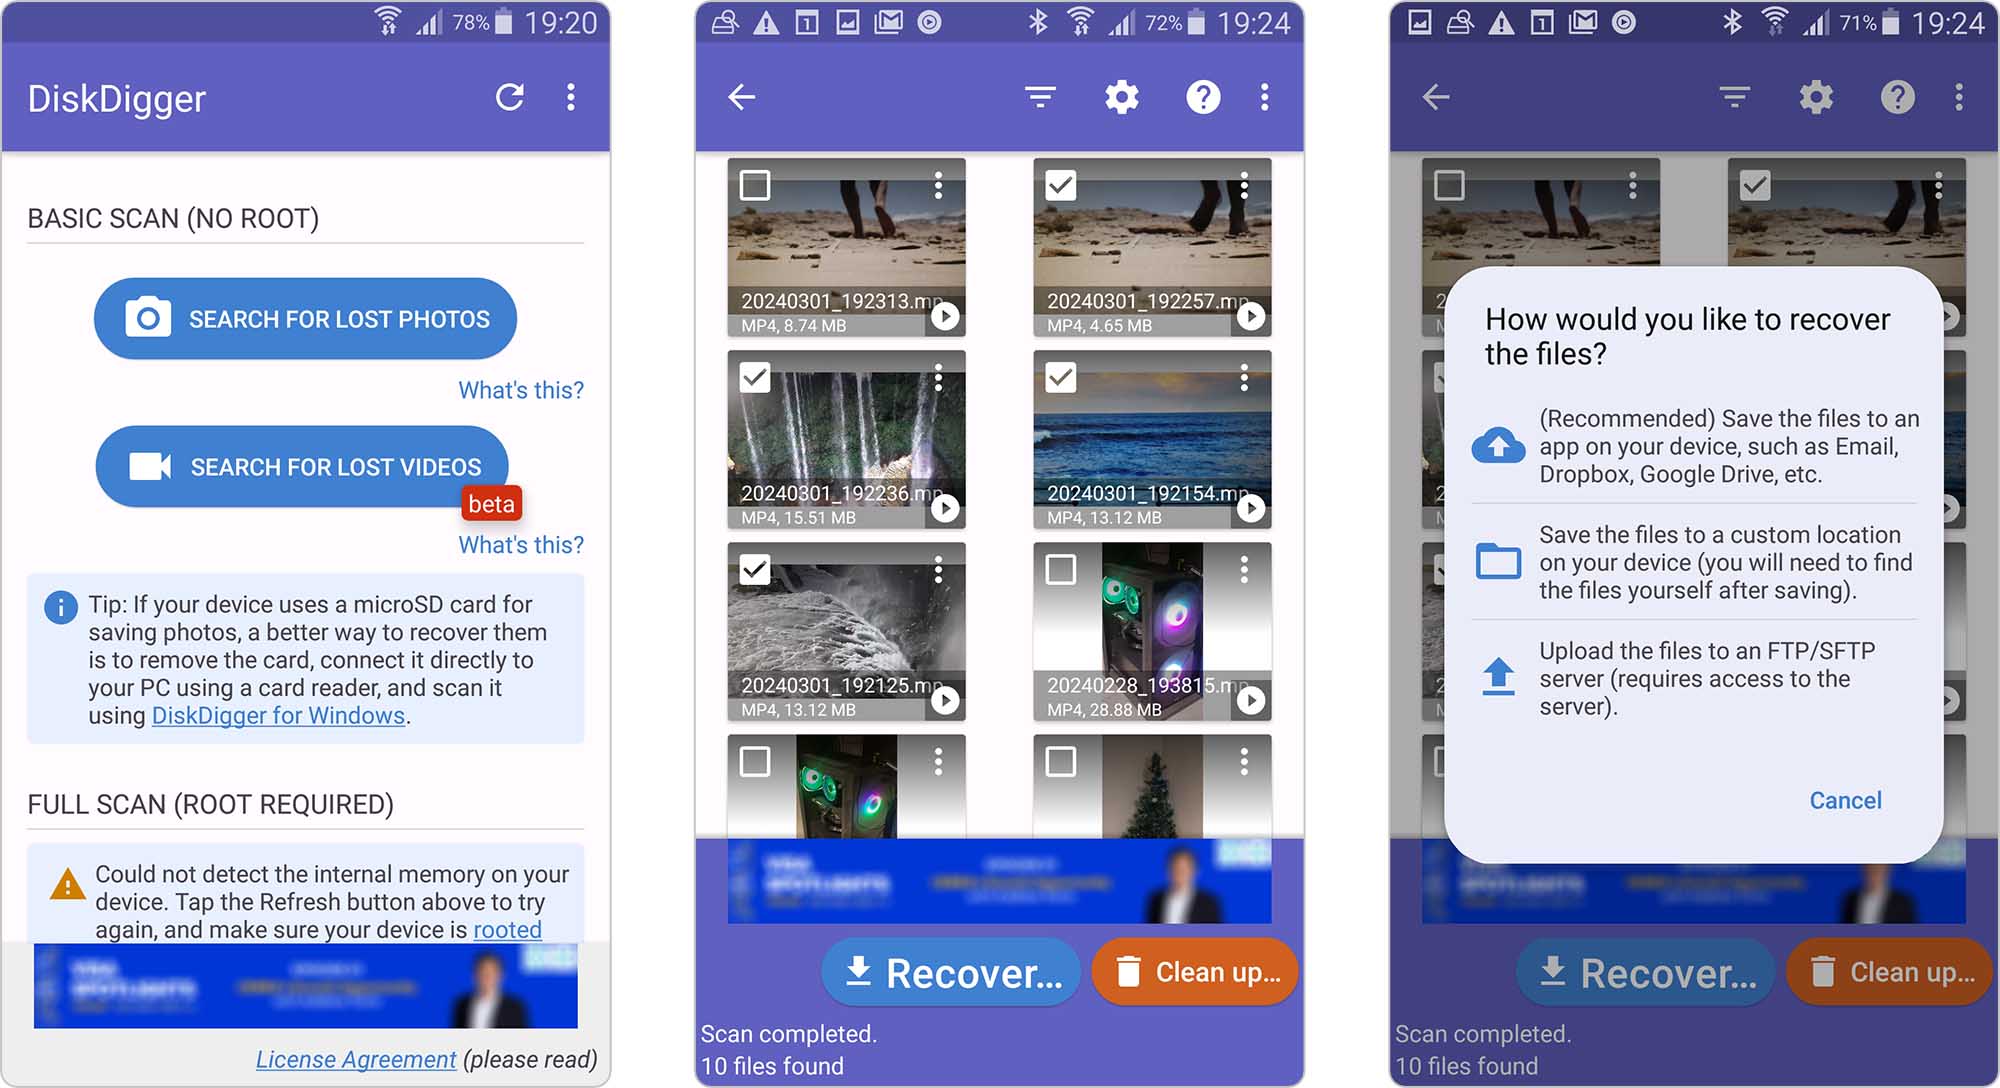
- Launch the app and tap Search for lost videos to search for the lost videos. (If your Android device is rooted, go to the Full Scan section instead.)
- When prompted, allow the app to access your device’s storage.
- Look through the found photos and videos and select the ones that you wish to recover.
- Tap the Recover button.
- Choose how you want to restore the files (it’s recommended to use an online storage service for the recovered data).
While Disk Digger can sometimes deliver on its promise of microSD card recovery without a computer, a more effective solution is to remove the micro SD card from your phone and recover the videos using computer-based recovery software like Disk Drill. Just know that Disk Drill will be able to help only if your SD card is configured as removable storage rather than adopted storage (where it’s encrypted as an extension of internal memory).
Method 3: Check the Recently Deleted Folder on the Device
This one might sound obvious, but we want to include it to be thorough. Sometimes the deleted SD card video was not deleted from the card directly. It was imported to a phone or tablet, or computer first, then removed from the gallery or file manager. In that case, your best recovery method might be the simplest one: check the trash folder.
- On Android, open your Gallery, Google Photos, or Files app and look for folders named Trash, Bin, or Recently Deleted.
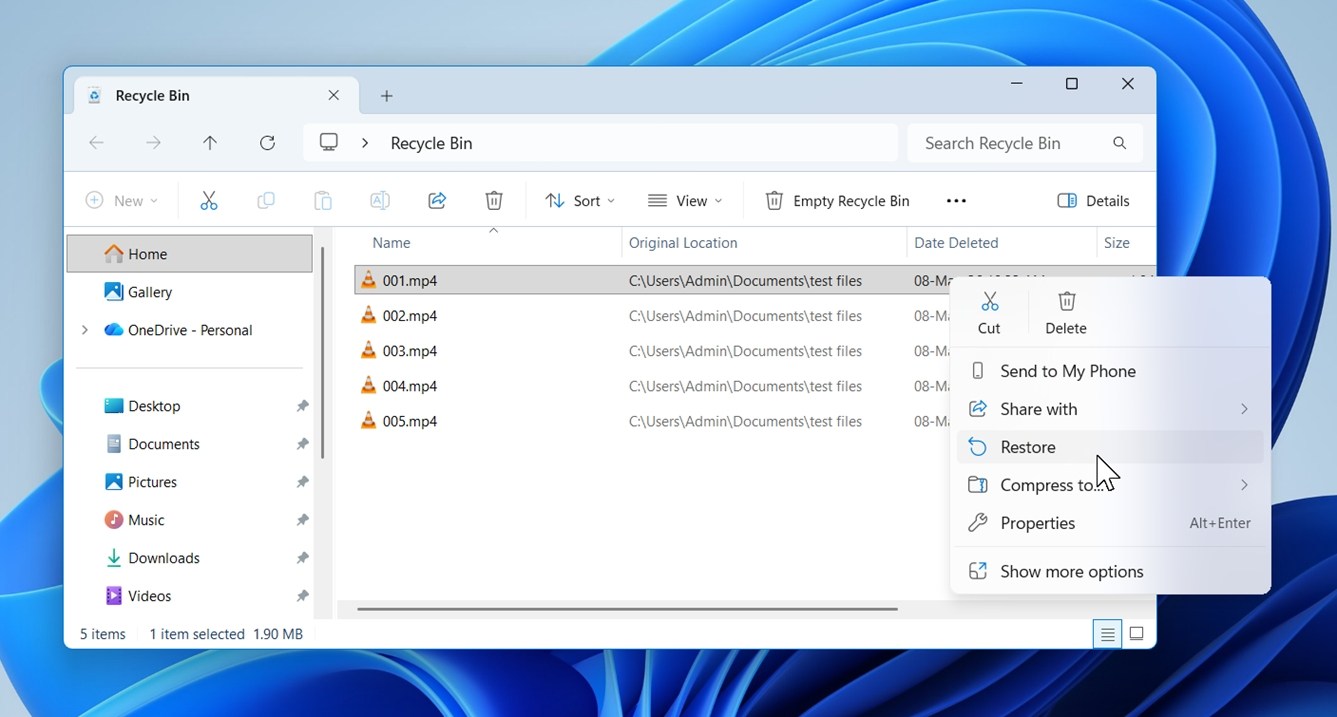
- On Windows, check the Recycle Bin.
- On Mac, check Trash, or Recently Deleted inside the Photos app if the video was imported there.
This method makes the most sense when the video was deleted after you transferred it from the SD card to another device. For example, maybe you copied drone footage to your phone, cleaned up the gallery later, and assumed the original SD card was the only place it existed.
There’s one important limit, though. Most cameras, drones, dash cams, and action cameras don’t have a real recycle bin. If you deleted the video directly inside the camera menu, this method won’t help. In that case, go back to Method 1 and scan the SD card with recovery software.
Also, think about every place where that video may have been copied. If you remember transferring it to a PC, Mac, external drive, another storage device and then deleting it there too, scan that device as well.
Method 4: Recover Deleted Videos from Cloud Backups
This method is also relevant when the video from your SD card touched another device at some point. Maybe you imported the clips to your phone. Or copied the SD card to your laptop, and OneDrive, Dropbox, Google Drive, or iCloud picked them up in the background.
There’s one catch, though: most cloud backups sync deletions. If you deleted a video from your phone or computer while sync was active, the cloud copy may have been deleted too. But cloud services don’t all handle deleted files the same way. Google Drive, for example, will often remove the file from the synced folder but keep it in its Trash, where you can still restore it (for a limited time).
You can check Google Drive from any browser:
- Go to drive.google.com and sign in to your Google account.
- Use the search bar at the top to look for the video name, file type, or camera extension, like MP4, MOV, or MTS.
- If you don’t see it, open Trash from the left sidebar.
- Look for the missing video there.
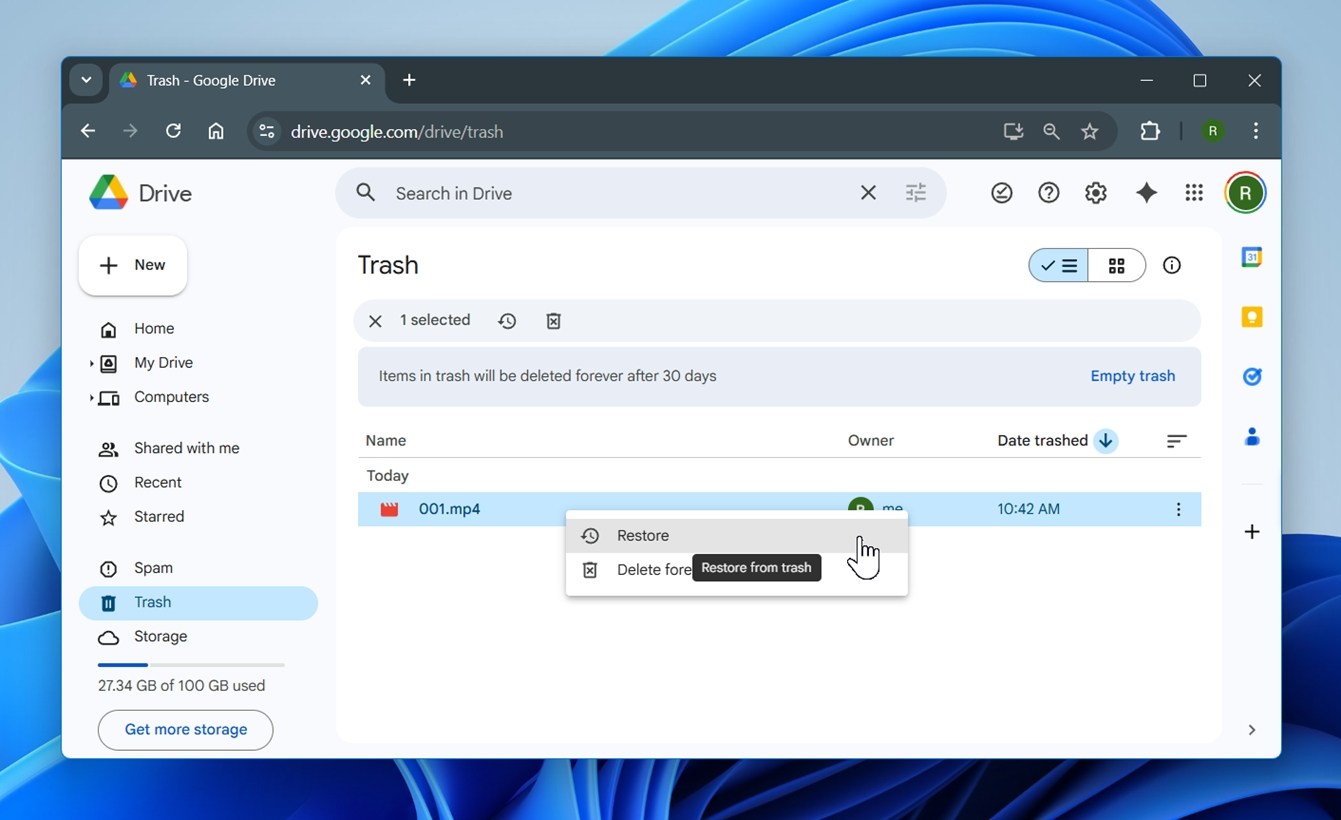
- Right-click the file and choose Restore.
- After that, check its original Google Drive folder again.
It doesn’t hurt to check this even if you’re sure the video is gone. This is useful if you need to recover deleted footage from an SD card after you had already imported it somewhere else.
Method 5: Recover Videos from Local Backups on a Computer
Another type of backup that might help here is a local one. The same logic applies: if you copied the videos from your SD card to a Windows PC or Mac at some point (and the built-in backup feature was running), you may be able to restore those files without touching the SD card at all.
This method won’t help if the videos never left the SD card. But if you ever copied them to your computer, even briefly, it’s worth checking.
On Windows, that feature is usually File History. On Mac, it’s Time Machine. Both can keep older versions of folders, which is exactly what you want if the SD card footage was imported, moved, or deleted later.
Here’s how to check File History on Windows:
- Connect your backup drive if you use one. Give Windows a few seconds to recognize it.
- Open the folder where the videos used to be. This might be Videos, Pictures, Downloads, or Desktop.
- Right-click inside the folder and choose “Properties.”
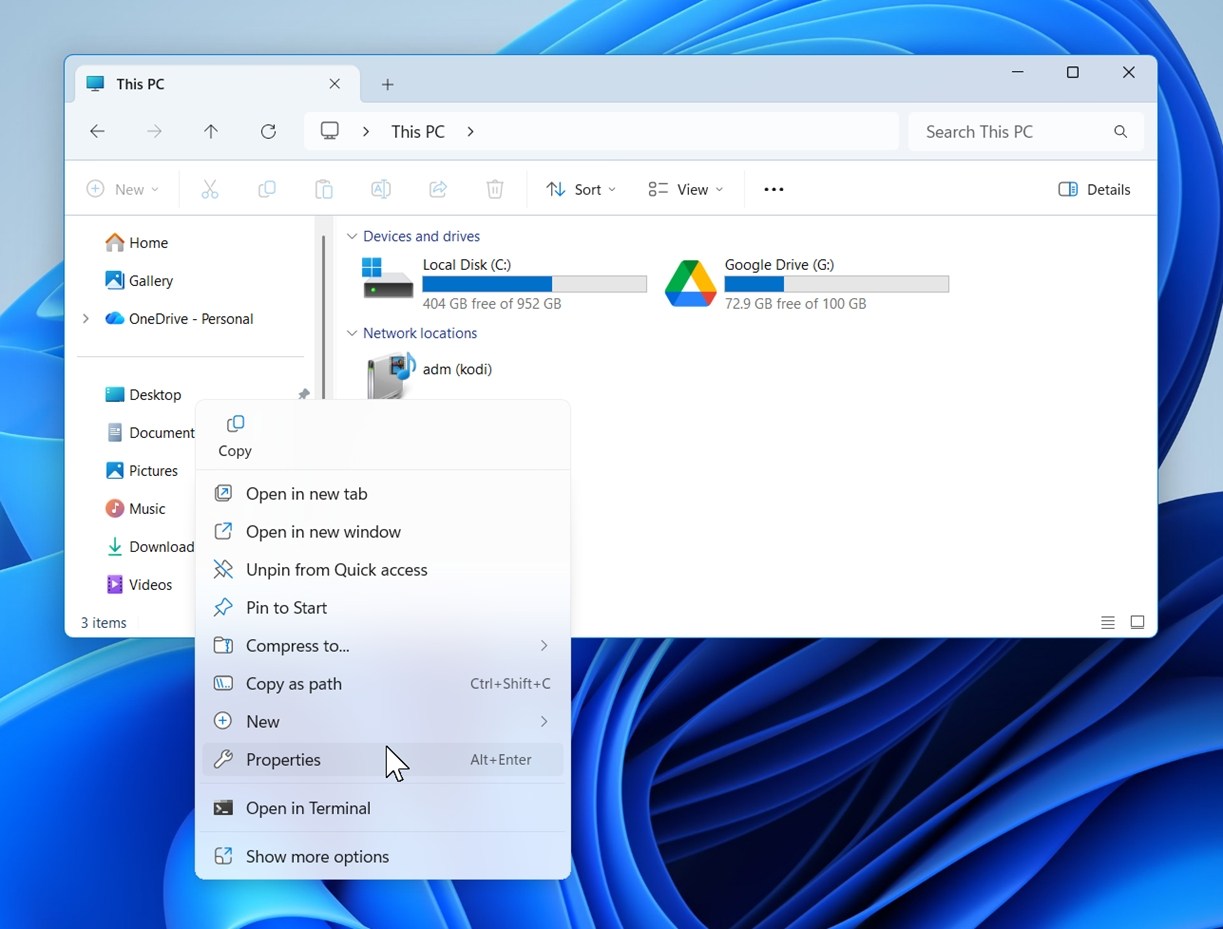
- In the folder properties window, open the Previous Versions tab.
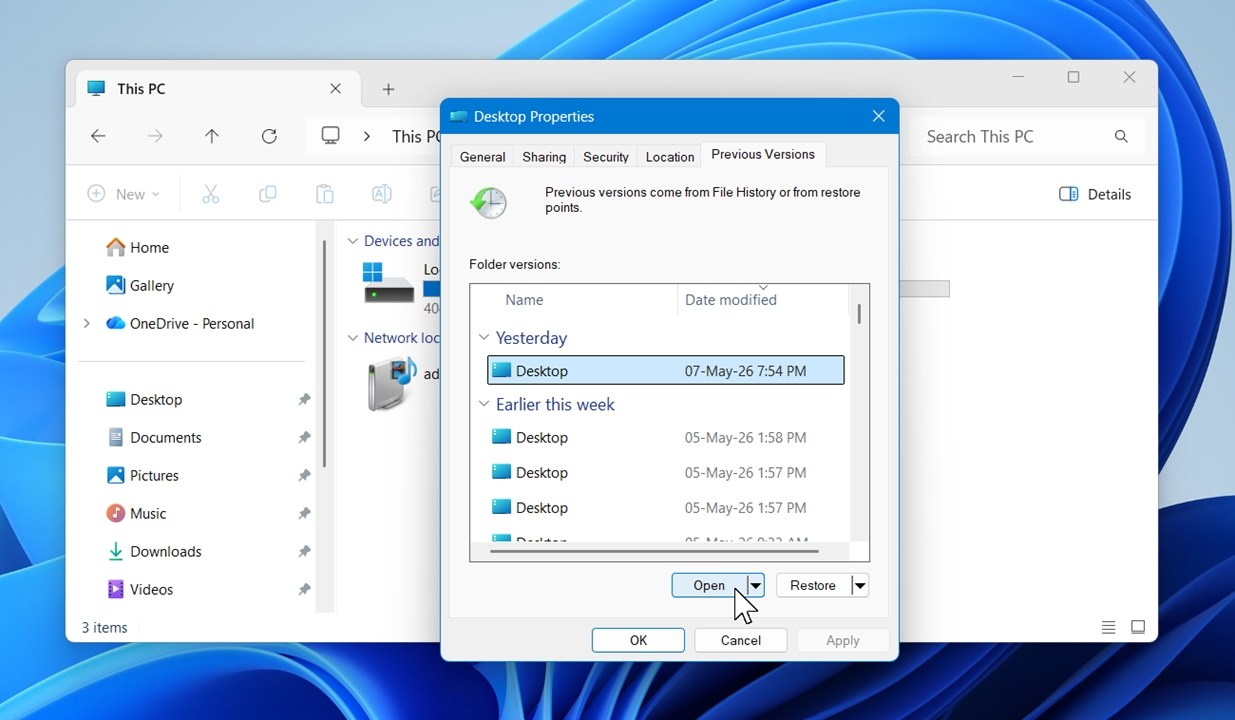
- Choose a version from a day when you know the videos were still there.
- Use Open first if Windows gives you the option. This lets you browse the old folder and check whether the missing video files are inside.
- If you find them, copy them to another location on your computer or an external drive. We prefer copying first instead of using Restore right away, because Restore can overwrite the current version of the folder.
On Mac, the idea is similar. If you had Time Machine running when the videos were on your Mac, here’s how to check it:
- Connect your Time Machine backup drive.
- Open the folder where the SD card videos were copied.
- Click the Time Machine icon in the menu bar and choose Browse Time Machine Backups.
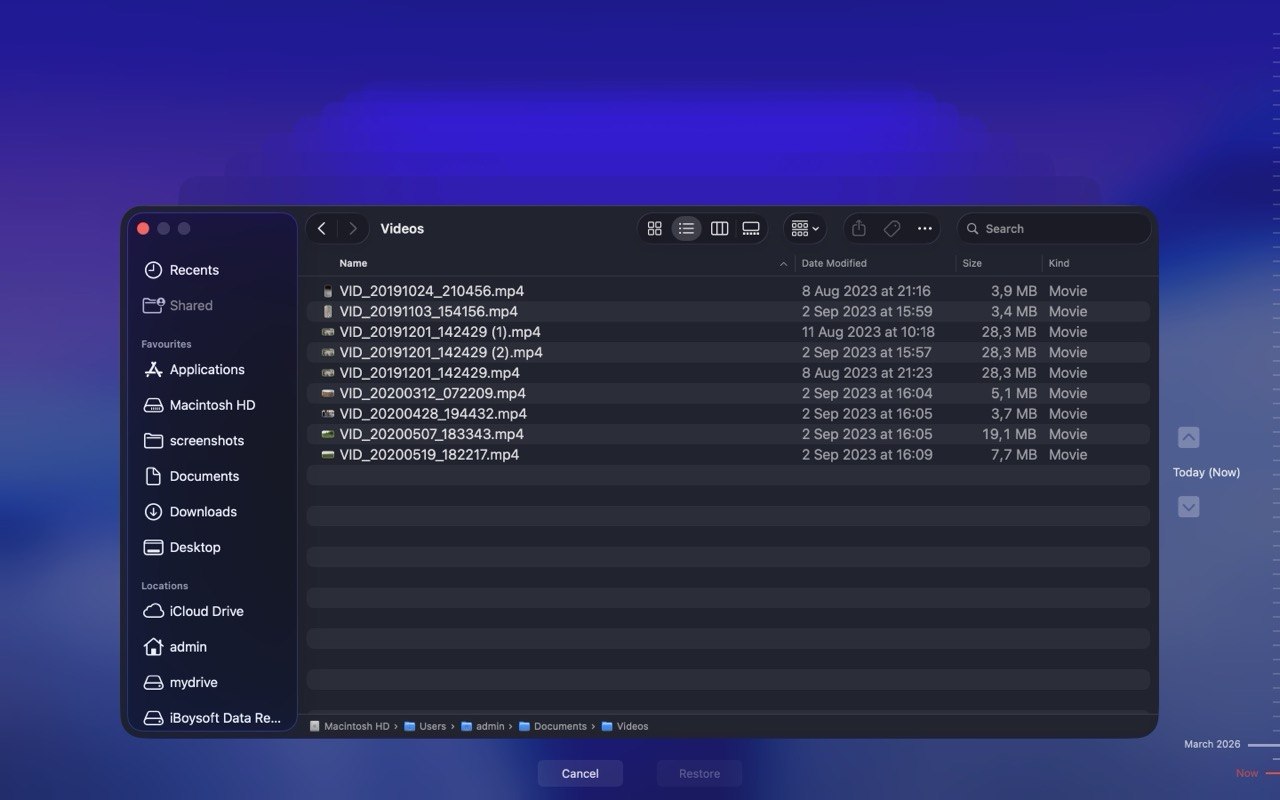
- Use the timeline on the right side of the screen to move through older folder versions.
- Select the missing videos and click Restore.
Method 6: Check Camera, Drone, or Action Camera Apps
Many modern devices that use SD cards for video storage can also create device-specific backup copies.
For example, GoPro action cameras can automatically upload your videos to cloud storage when your camera connects to your phone via the GoPro Quik app. Security cameras and dash cams frequently use rolling backup systems that store footage both on the SD card and in cloud storage.
So even if you can’t recover footage from the SD card directly, the app may still have something useful.
One small warning: app copies are not always the original files. You may find a compressed version, a short preview, or an edited export instead of the full-quality clip from the SD card.
Method 7: Contact a Professional Data Recovery Service
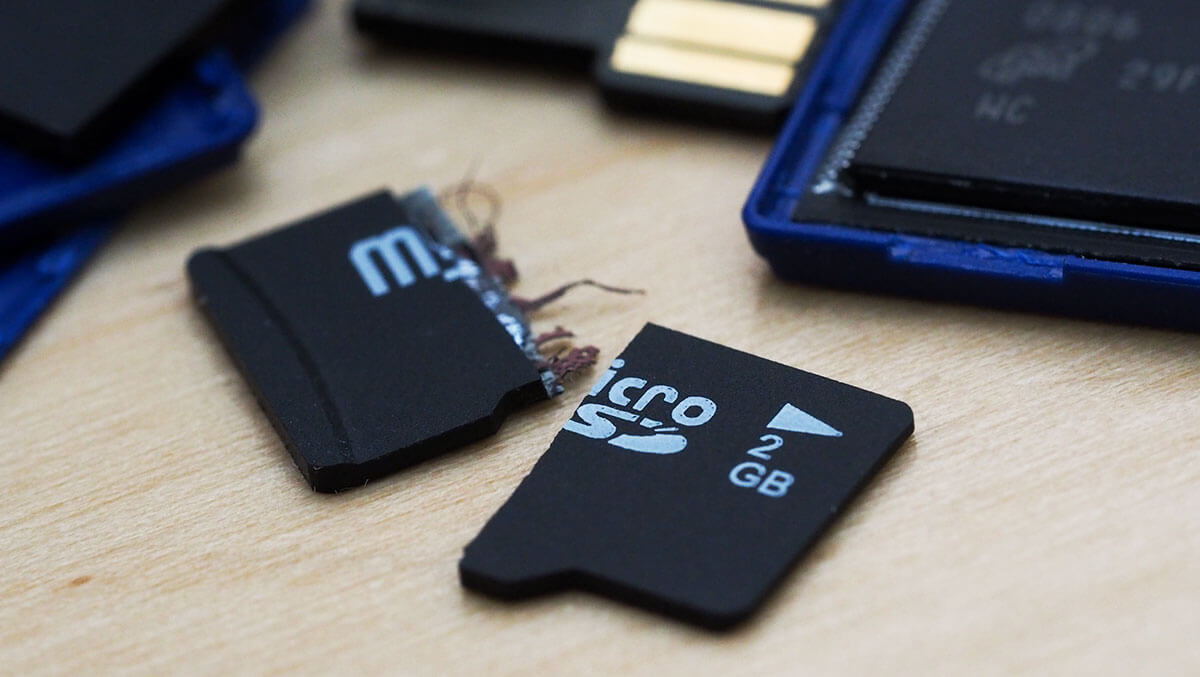
The last method is to contact a professional data recovery service. We’d recommend this mainly in cases of physical damage, because if the SD card is healthy and your computer can still read it, DIY recovery at home with software is usually enough. In many logical data loss cases, labs do the same basic thing you can do: they scan the card with professional recovery software and recover whatever can still be read.
But physical failure is different.
If your SD card has become physically damaged (perhaps you accidentally pulled it out of an adapter too quickly, or if it has been exposed to water or other physical stresses) you should consider using a professional recovery service.
One reputable service is offered by CleverFiles, which operates on a “No data, no charge” policy. To initiate a recovery, visit their order page, where you can select the urgency of your SD card video recovery request. You’ll then need to ship your SD card to them and await a recovery estimate that you can either approve to proceed with the recovery or decline.
How to Protect Your SD Card Videos Against Deletion
While you can often recover lost SD card videos, prevention is always better than cure. The following tips should help you greatly reduce the risk of data loss caused by the deletion of a video from an SD card:
- ⚙️ Enable device-specific auto-backup features: Many current-generation cameras support automatic backup features that can save your videos as you shoot. For example, it’s possible to automatically upload footage to the cloud through the Quik app from your GoPro SD card.
- 🛜 Wirelessly download videos from your SD card: Canon’s Camera Connect app provides wireless transfer capabilities, while Nikon and Sony offer similar functionality through their respective apps. Take advantage of these and other similar apps and always download all important videos from your SD card to a backup location as soon as you can.
- 💾 Use two SD cards: Professional photographers and videographers should consider cameras with dual memory card slots for instant backup. Many high-end cameras support simultaneous recording to both cards, effectively creating an immediate backup of your footage. For example, Canon’s 5D Mark IV and EOS R5 feature dual card slots, as do Nikon’s D850 and Z-series cameras, Sony’s Alpha series, and Panasonic’s professional Lumix models.
- ☁️ Take advantage of cloud backups: Most smartphones can automatically sync videos to services like Google Photos or iCloud, while many security cameras include cloud storage in their service plans. Such automatic backups provide an extra layer of protection against accidental deletion and make it easier to recover videos accidentally deleted from an SD card.
Final Thoughts
Now you know how to recover deleted video from SD card storage without overcomplicating the process. In most cases, Method 1 is the way to go: connect the SD card to your computer, run Disk Drill, scan the card, preview the found videos, select what you need, and recover the files to a safe location.
If the deleted video data still physically exists on the card and hasn’t been overwritten, that gives you the best shot. The other methods are still worth checking, but they depend on specific situations: cloud sync, local backups, or camera companion apps. In our experience, most people never get around to setting all that up, so direct SD card recovery is usually the most practical place to start.


FAQ
Yes, this can happen. A recovery tool may find a deleted video file and recover it, but that doesn’t always mean the file is fully intact. Video files are large, and after deletion, parts of them can get overwritten if the SD card was used again. Even one new recording session can damage an old clip enough to make it unplayable. Your next step is to try a video repair tool. For example, Clever Online Video Repair can help. It supports the most popular video file formats (MP4, MOV, 3GP), requires no technical expertise, is completely free, and respects the privacy of its users.
Here’s a step-by-step guide to help you repair your corrupted videos using Clever Online Video Repair:
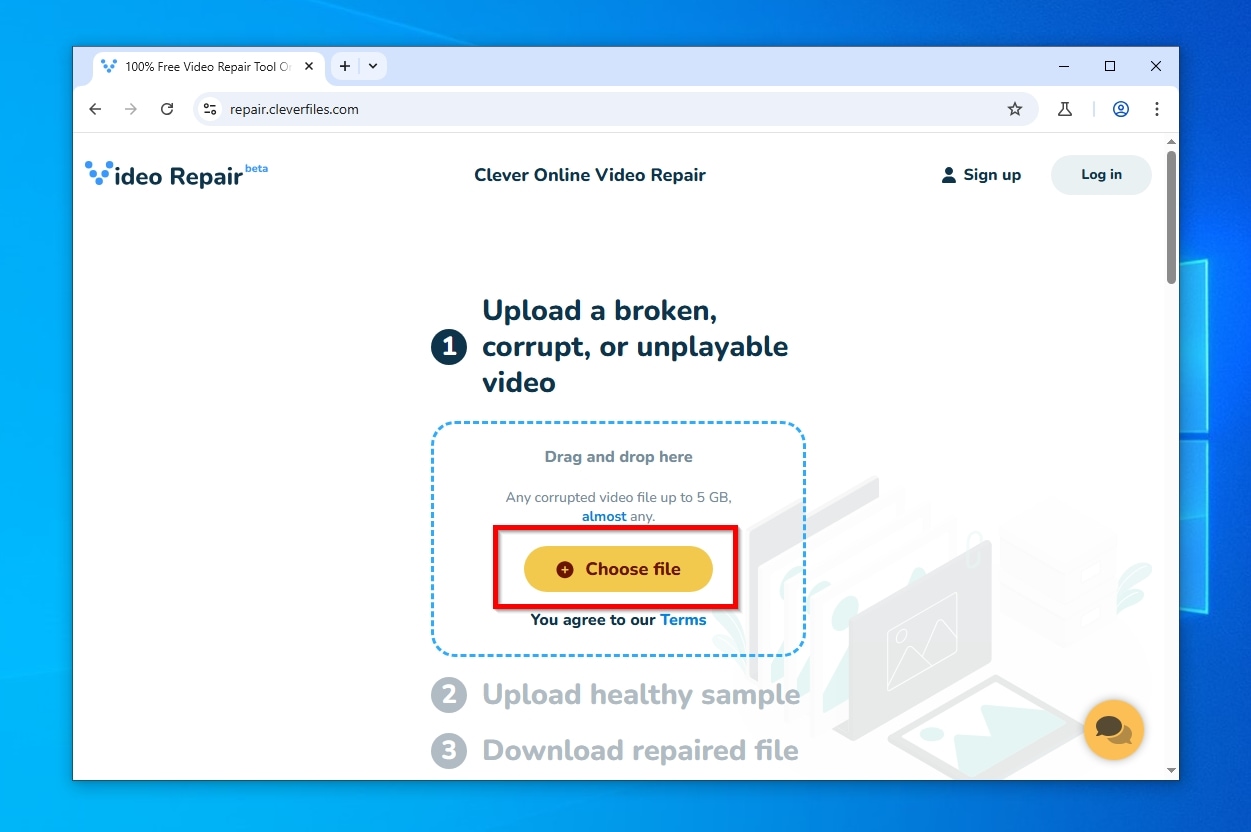
- Open your web browser and visit the repair.cleverfiles.com page.
- Click the Choose file button to select the corrupted video file from your computer or device or drag and drop the video file directly into the designated area on the webpage.
- Upload a healthy sample video if you have one. This step is optional, but it can improve the repair result. Ideally, use a working video recorded on the same camera, phone, drone, or dash cam with the same settings.
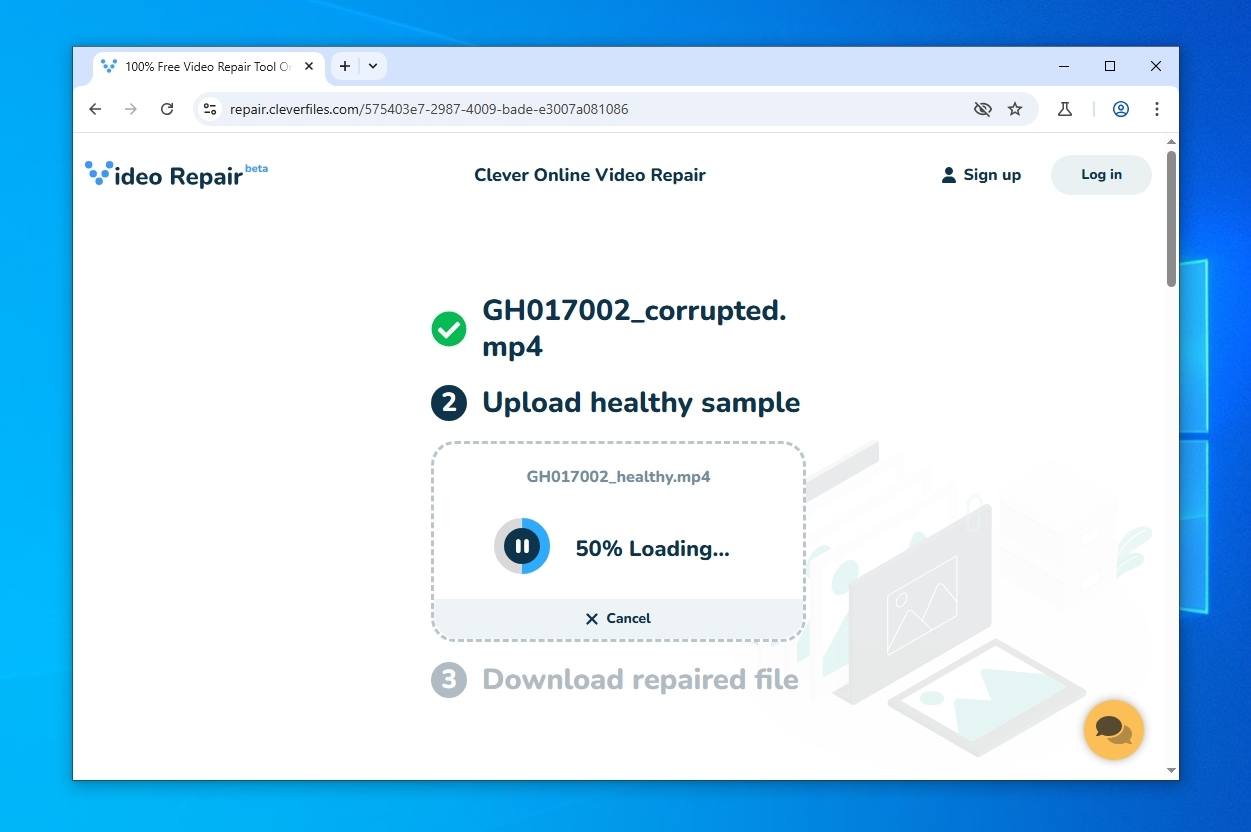
- The tool will begin analyzing the files and repairing the corrupted video, and you just need to wait for a short while.
- Click the download link to retrieve the fixed video.
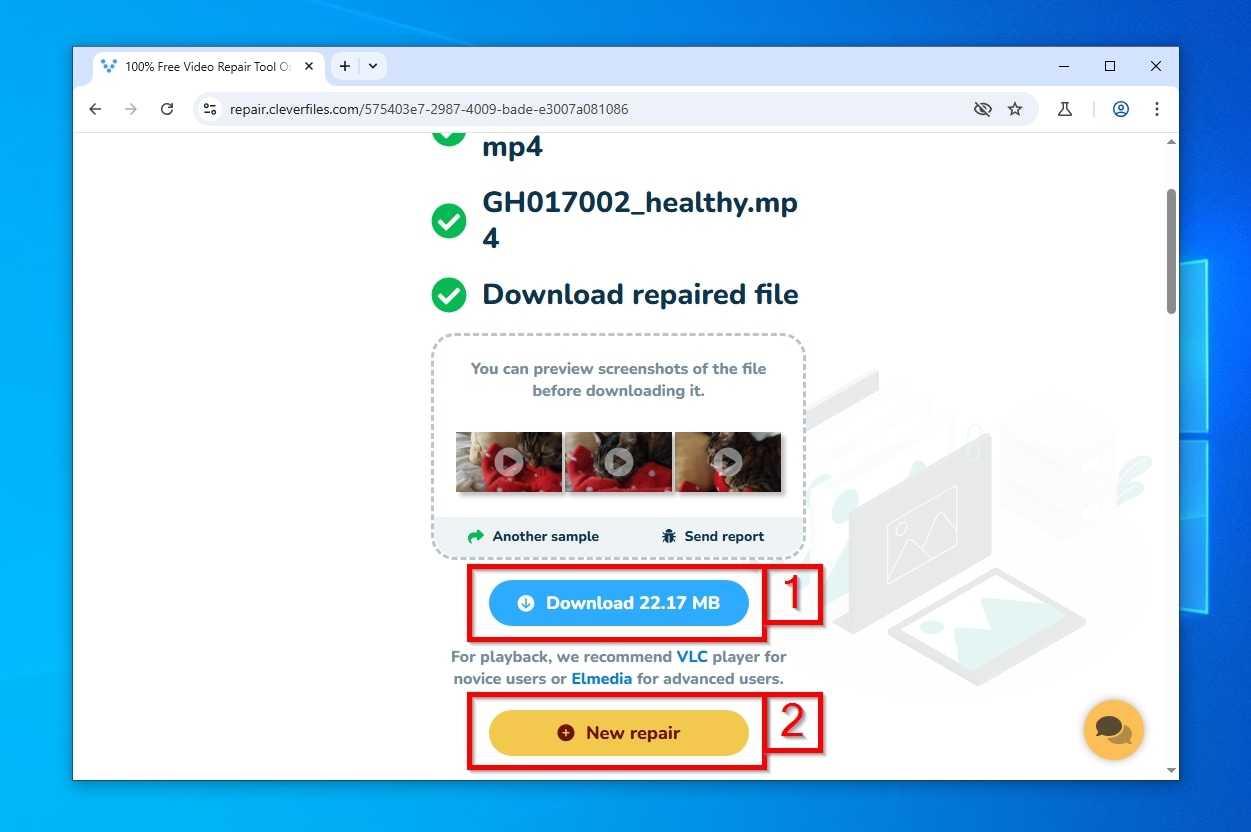
Using Clever Online Video Repair, you can fix corrupted SD card videos that are up to 5 GB large, and you can do so from any device, including your smartphone.
When it comes to Android SD card recovery, you have two basic options:
- Native Android recovery apps: Apps like DiskDigger can recover deleted videos right on your Android device, but they rarely deliver the same great results as their desktop counterparts.
- Windows/macOS recovery software: To recover as many lost videos as possible, it’s best to remove the SD card from your Android device and scan it with Windows or macOS recovery software like Disk Drill.
You recover videos from a SanDisk SD card basically the same way you would from any other SD card. Stop using the card right away, connect it to a Windows or Mac computer with a card reader, and scan it with data recovery software like Disk Drill.
If the deleted video data still exists on the card and hasn’t been overwritten, recovery software should be able to find it. If the card is physically damaged, not detected anywhere, or shows the wrong capacity, consider a professional recovery service.
If you’ve noticed videos or other files disappearing from your SD card, it’s possible that the card is corrupted or damaged. In such a case, stop using the SD card immediately and perform data recovery to get back those videos.
If you want to recover deleted videos from an SD card without software, your best option is to check places where copies of those videos may still exist.
- Start with Recently Deleted, Trash, or Recycle Bin on the device where you viewed, imported, or edited the footage.
- If you copied the videos to a computer at any point, check local backups too: File History on Windows or Time Machine on Mac.
- Cloud services are also worth checking. Open Google Photos, Google Drive, iCloud, OneDrive, Dropbox, GoPro Quik, DJI, Insta360, or whatever app your device uses, then check both the main library and the trash folder.
Without recovery software, you’re not scanning the SD card itself, so you need to find an existing copy somewhere else. If no backup or synced copy exists, software-based recovery is the next step.
