Accidentally deleted photos from your SD card? Good news: recovery is usually easier than you’d expect, and in most cases, you can do it yourself – it is actually not that hard to do. The same applies to most memory card photo loss scenarios.
All the methods for recovering deleted photos from an SD card you’ll see below were tested by our team, and we’ll walk you through each one step by step, with screenshots and practical tips along the way.
ℹ️ Quick note before you do anything: the less you use the SD card, the better your chances of recovery. When photos are deleted, the data usually stays on the card until something new overwrites it. If you keep using the card (taking photos, copying files, and so on), you risk losing those files. That doesn’t mean one new photo will instantly wipe out every deleted file, but you can’t control where new data gets written. (We’ll explain this in more detail in the FAQ section.)
So pause, remove the card, and don’t use it until you get to the recovery steps below.
Why Would I Need to Recover Deleted Photos from an SD Card?
There are numerous reasons why you would need to recover photos from an SD card. All of those reasons are bad, but in this case, there are varying levels of bad. Here are a few reasons why data loss can occur on a digital camera, phone, or other camera-equipped device:
- You might need to perform SD card photo recovery due to the accidental deletion of photos. If you delete photos on your phone directly, you may be able to recover photos from the SD card for free, as most phones have a ‘Recently deleted’ folder. Otherwise, if the photos were deleted on a PC or camera, the files will need to be recovered with data recovery software if a backup is not available.
- Photo loss due to formatting results in the photos becoming deleted and, therefore, inaccessible. In most instances, this is because you’ve mistakenly chosen the wrong card to format. Or, your phone displayed a message requesting you to format due to damage on the card. Either way, the files are recoverable with software so long as (a) they haven’t been overwritten, and (b) it was a quick format (formatted in a camera without the SD_ERASE function; a full format or SD_ERASE-style operation is a much tougher case because it can actually wipe the data).
- Corruption is a major culprit for data loss. When your SD card becomes corrupted, the file system it uses becomes unusable, and your data can no longer be found through traditional means. Sometimes the SD card doesn’t show up at all. In this case, data recovery software is the best option, as attempting to fix an SD card that’s not showing up (or showing other signs of corruption) could cause further damage.
If you need to recover permanently deleted photos from your memory card, follow these methods based on your OS:
6 Ways to Recover Deleted Photos From an SD Card
Depending on the operating system and device you’re using, there are various ways to recover deleted photos from an SD card. We’ve included a few methods below to give you some options that will work on all types of cards, including PNY, Lexar, Kingston, and SanDisk SD cards.
Way 1: Recover Photos Using Data Recovery Software
To recover deleted photos from your SD card, using a data recovery tool is one of the best options. More specifically, we recommend using Disk Drill SD Card Recovery tool, as it uses several scanning methods to pull up as many photos as it can find. You also have the chance to preview your deleted photos and make sure they’re still intact – a very valuable feature when it comes to recovering photos in bulk.
Let’s take a look at how easy it is to use this data recovery tool to recover deleted photos from an SD card.
Steps to Recover Deleted Pictures from an SD Card on Windows
- Download and install the Disk Drill onto your Windows computer. The free version allows you to preview recoverable files and actually recover up to 100 MB of data for free, without upgrading to the Pro version. This is usually enough to test the app and restore personal files.
- Connect the SD Card to your Windows PC using an SD card adapter, or the built-in SD card slot if your computer has one.
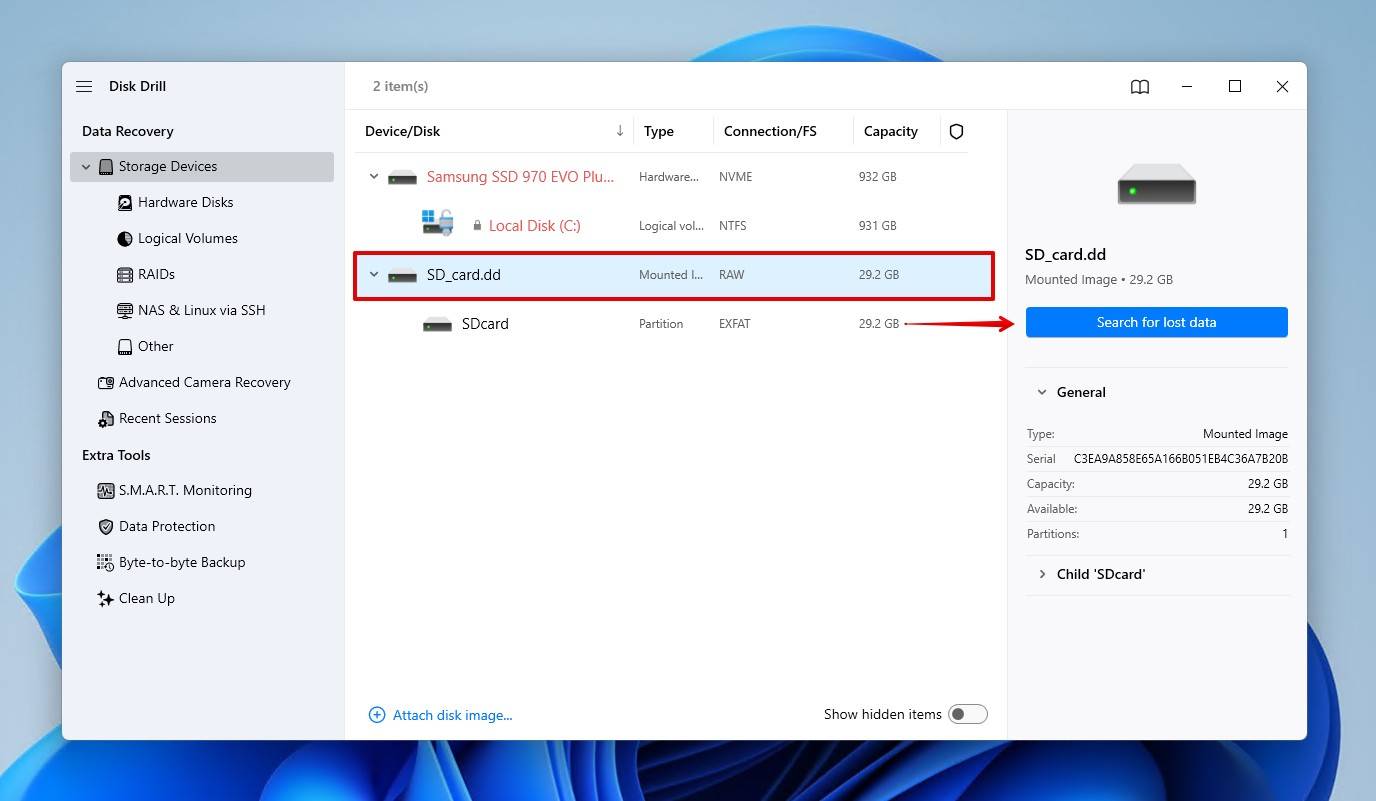
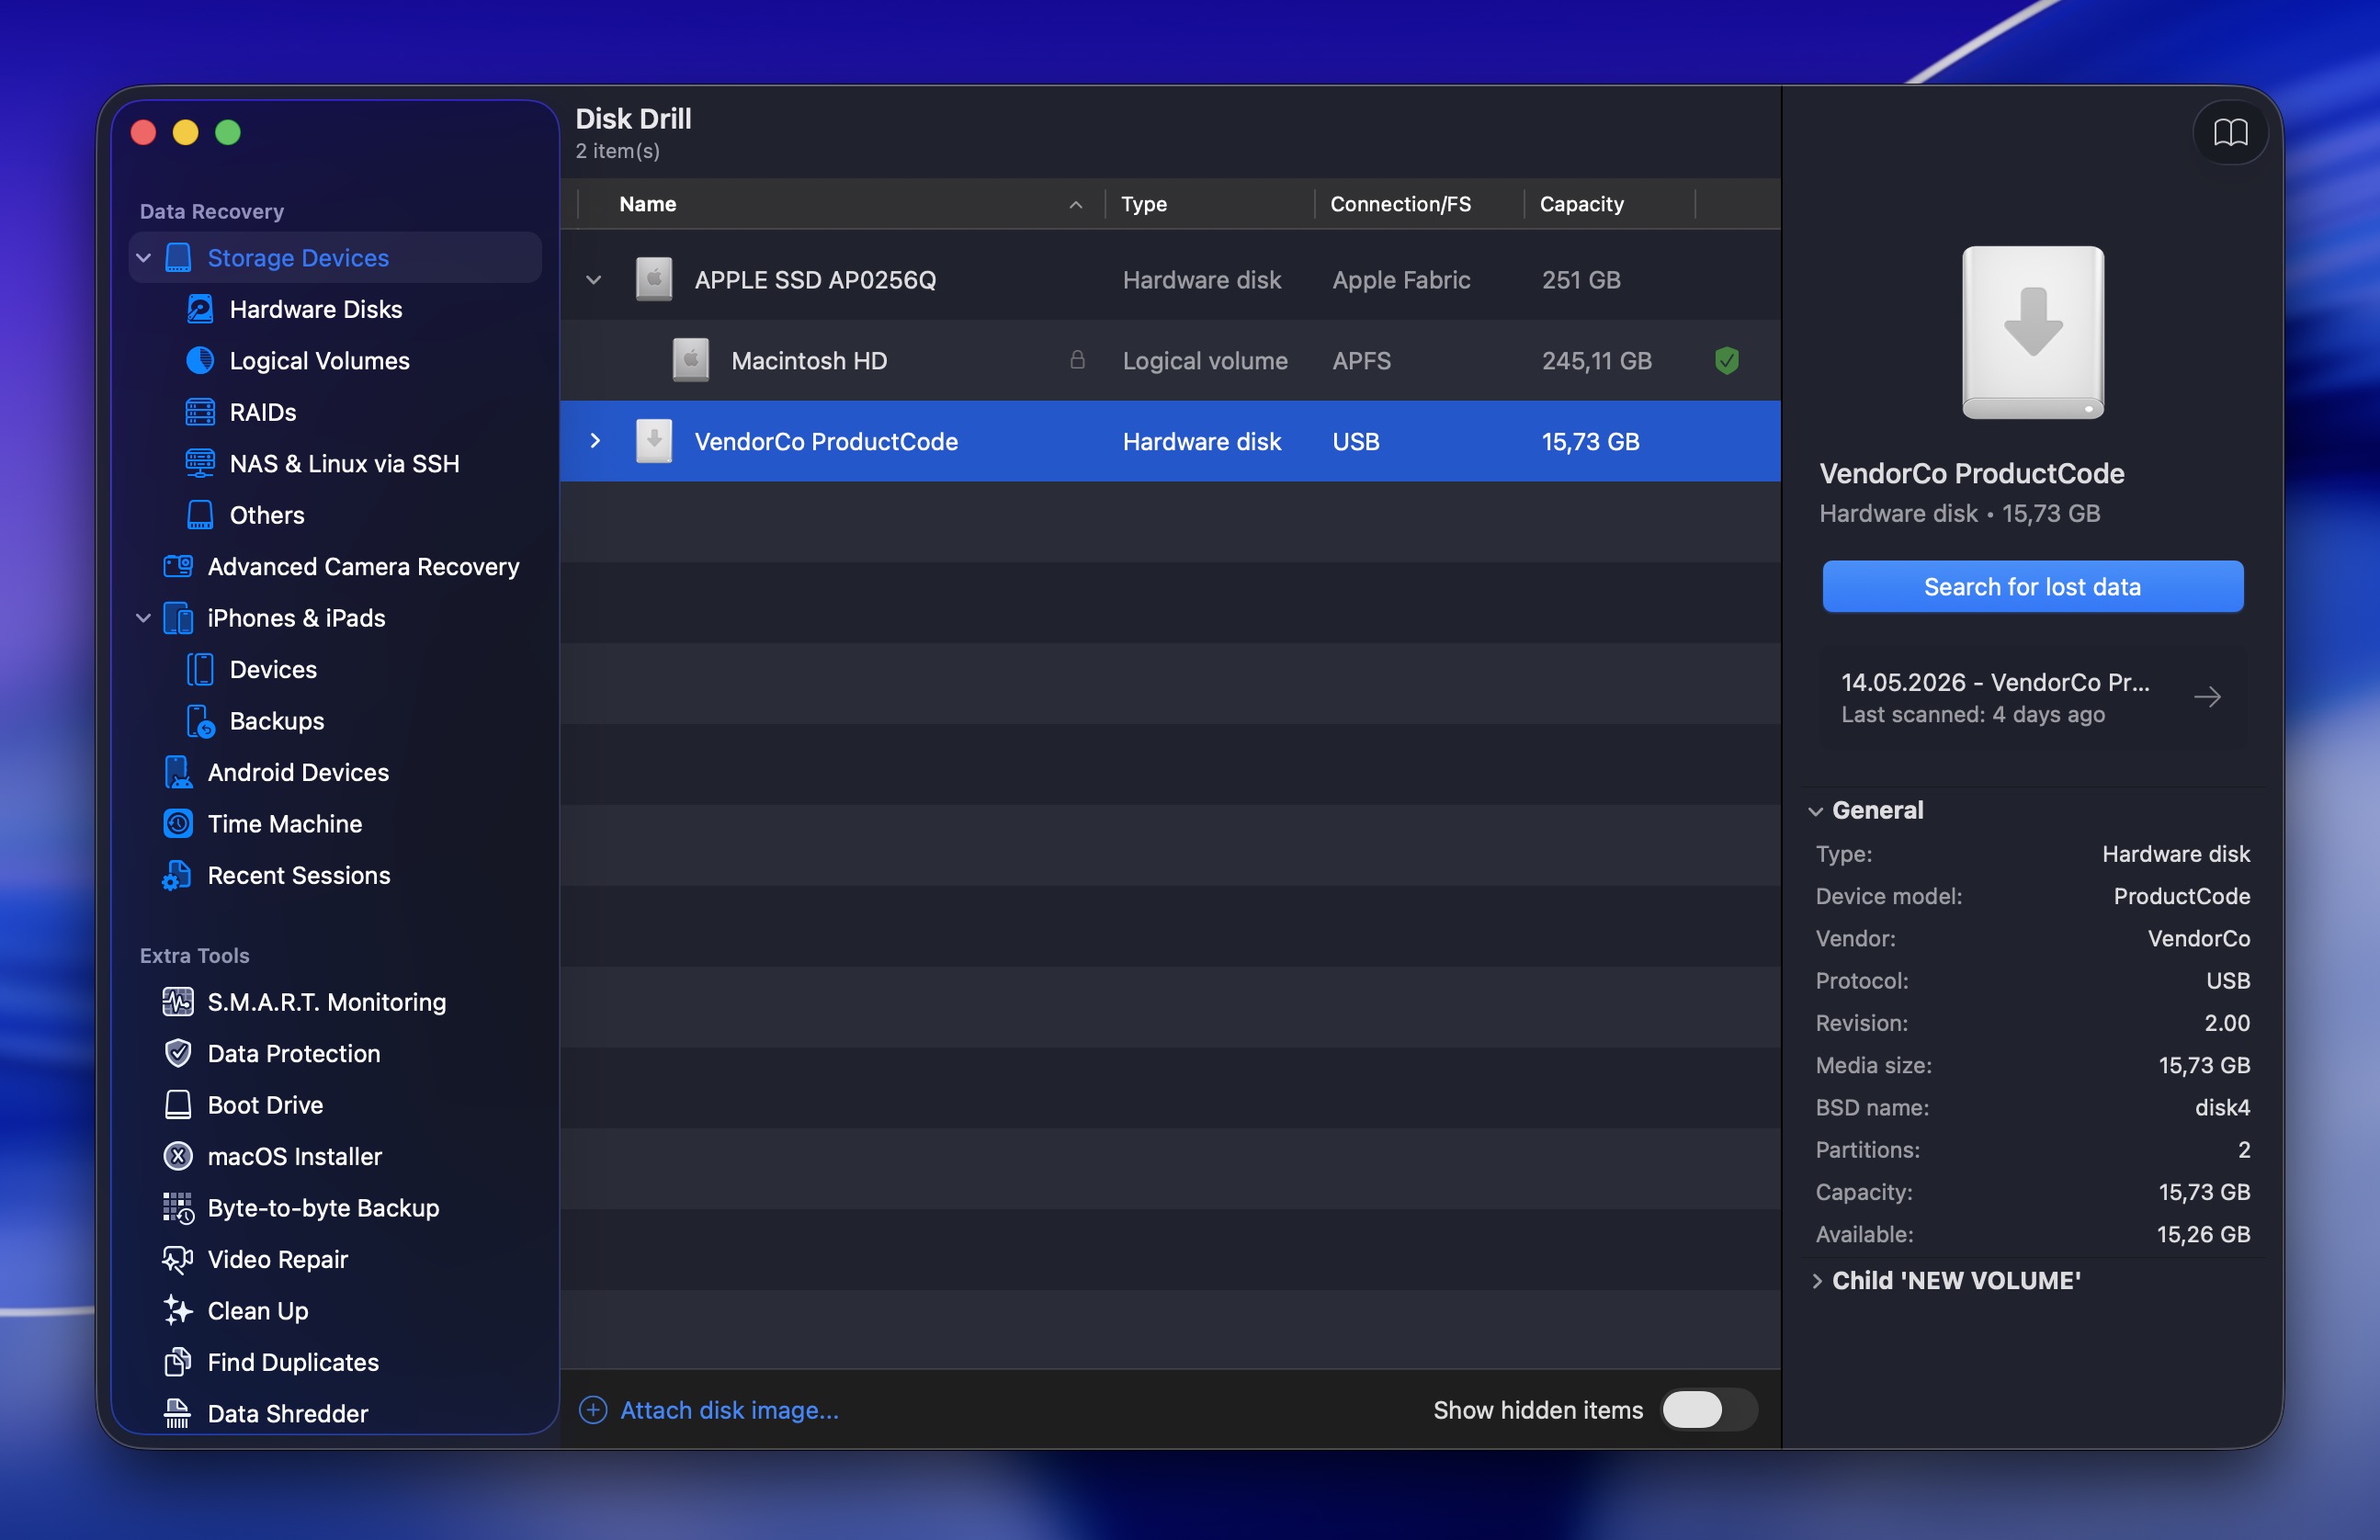
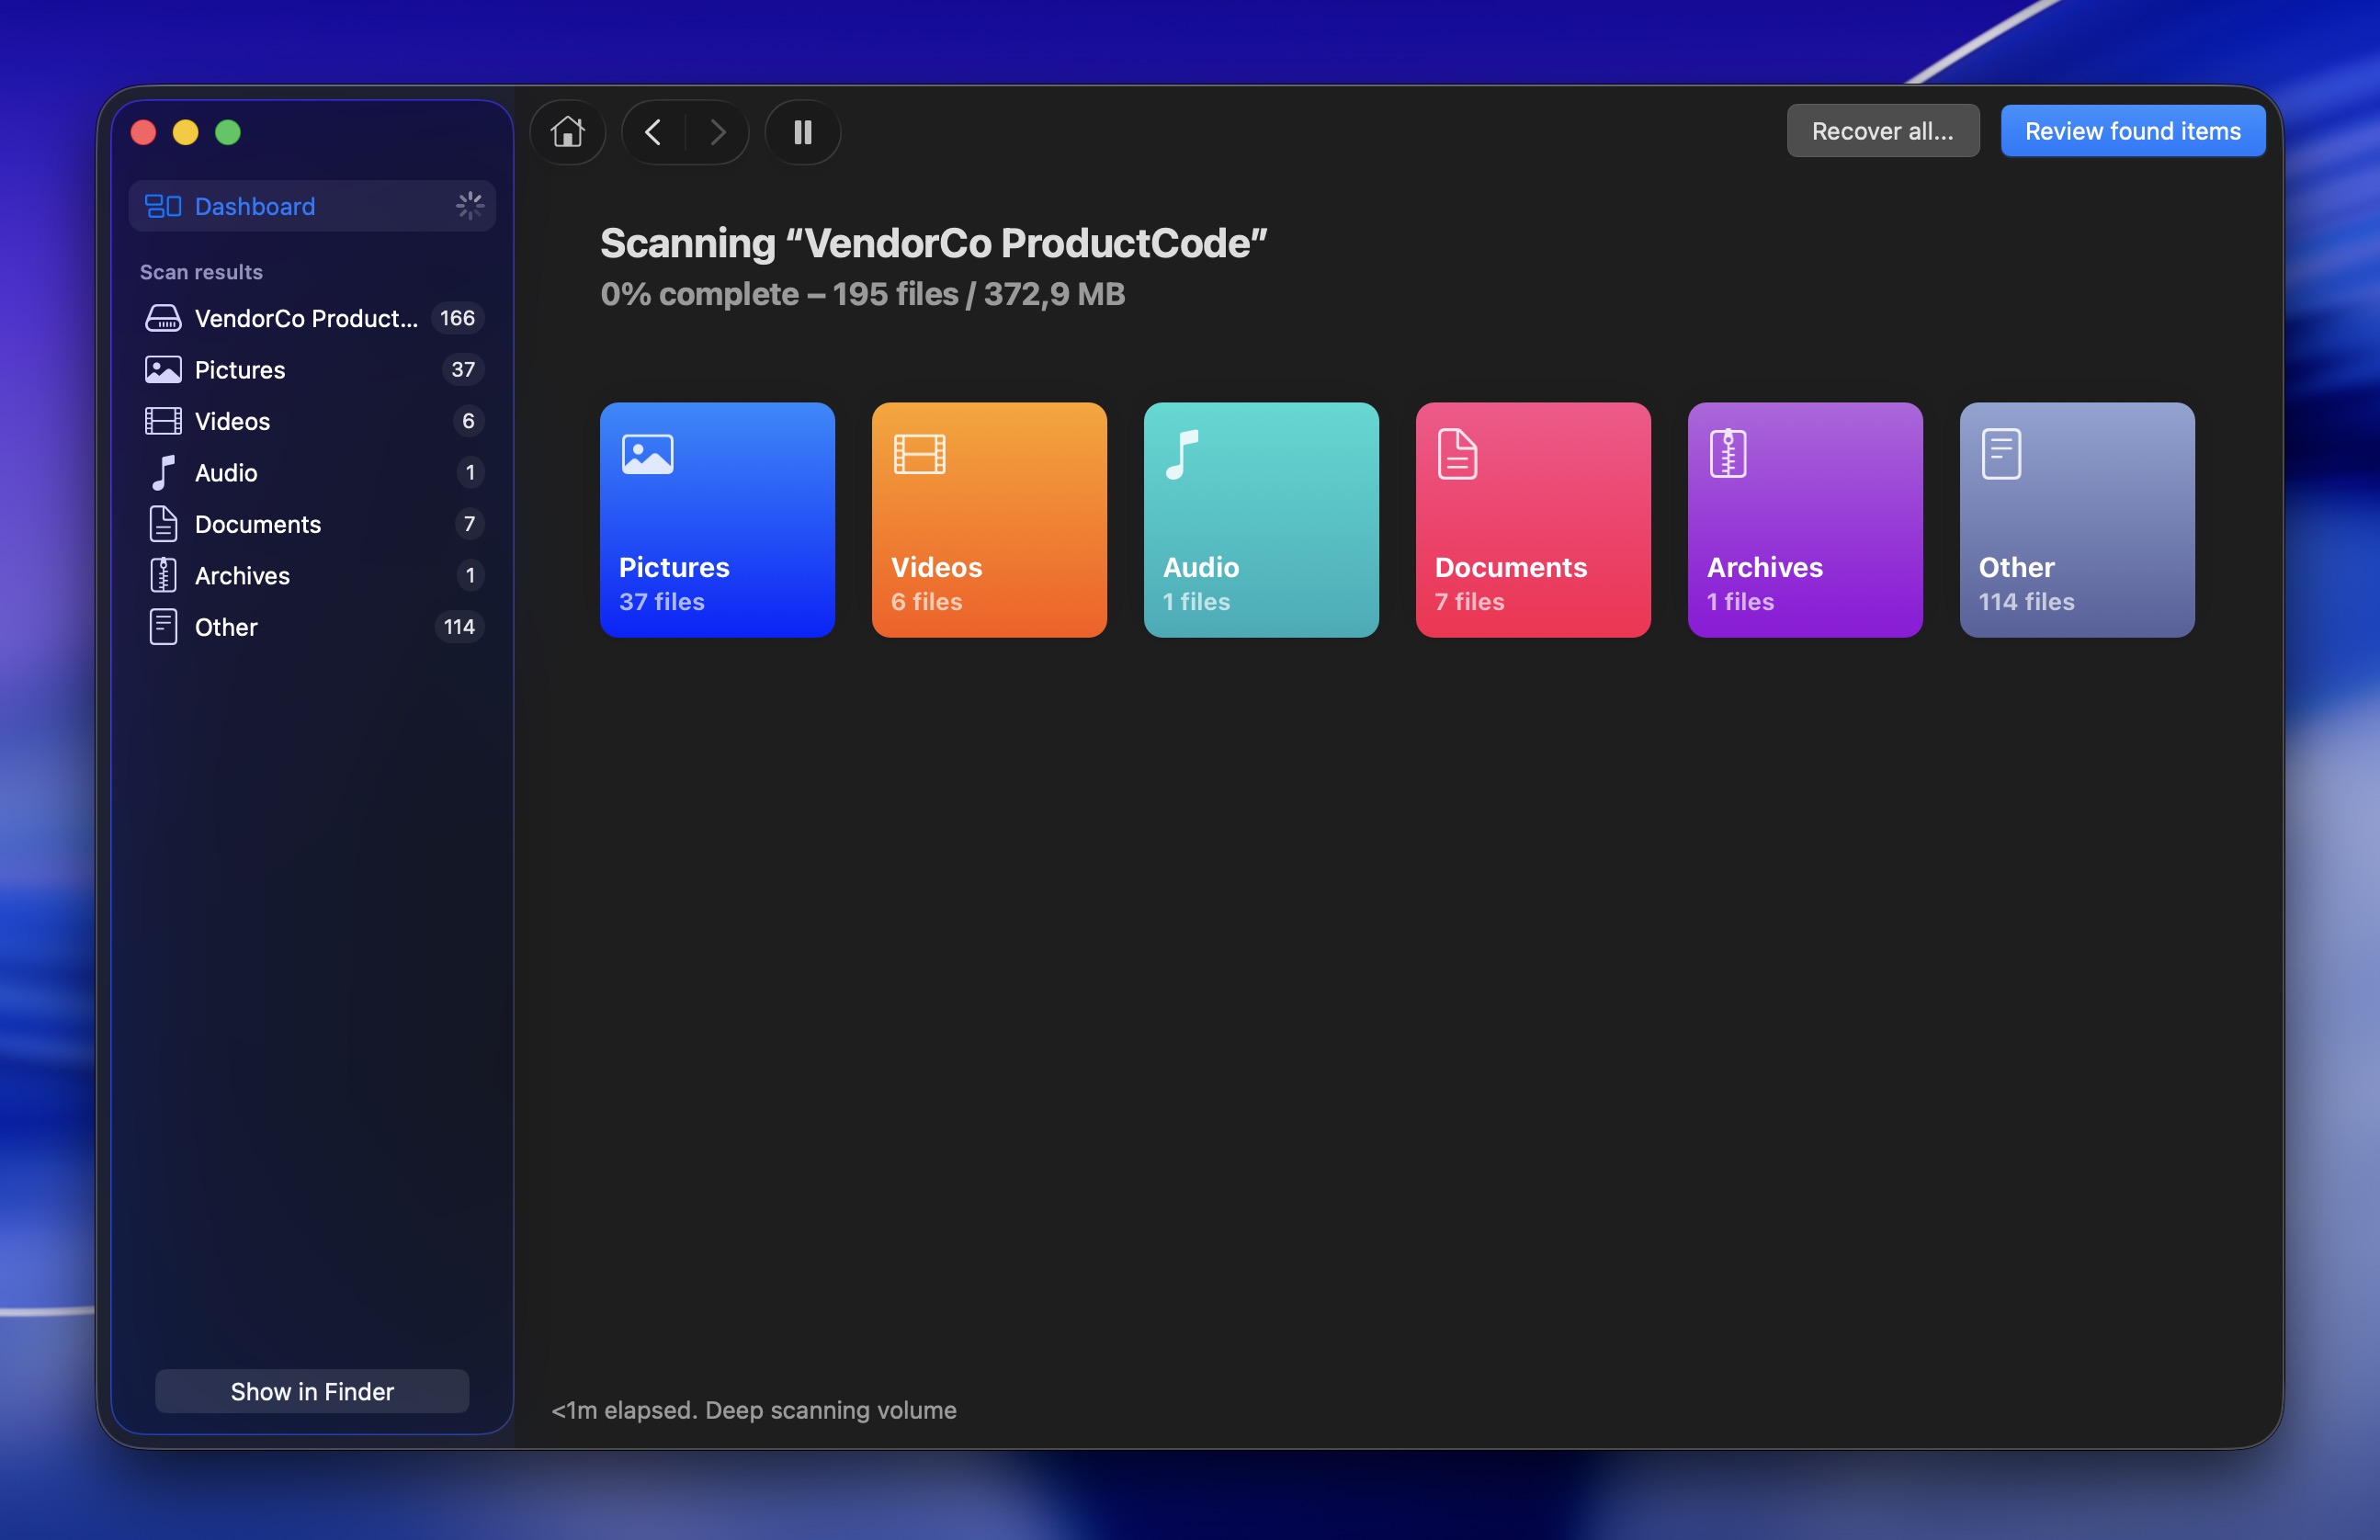
- Launch Disk Drill and select your memory card from the list of available disks. Once you’ve selected the card, click on Search for lost data.
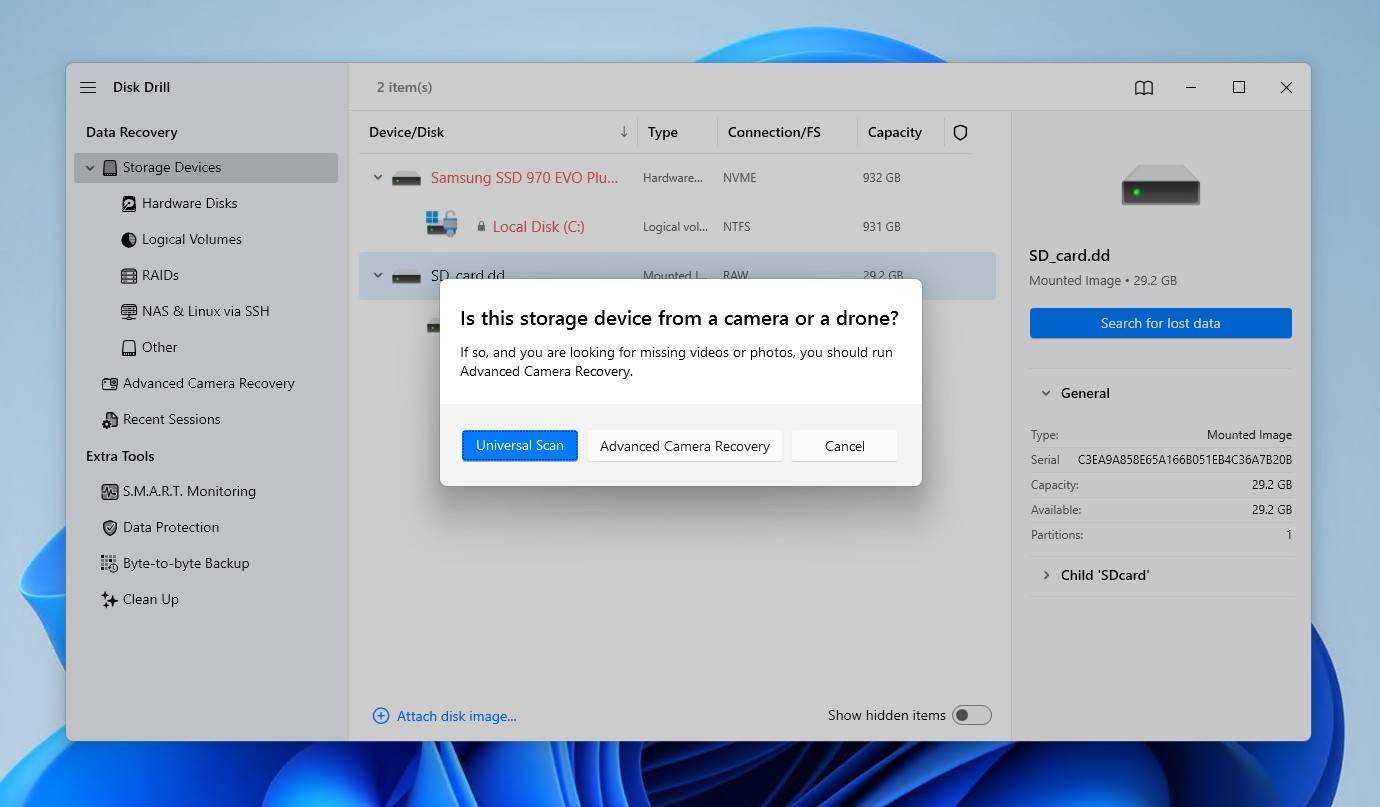
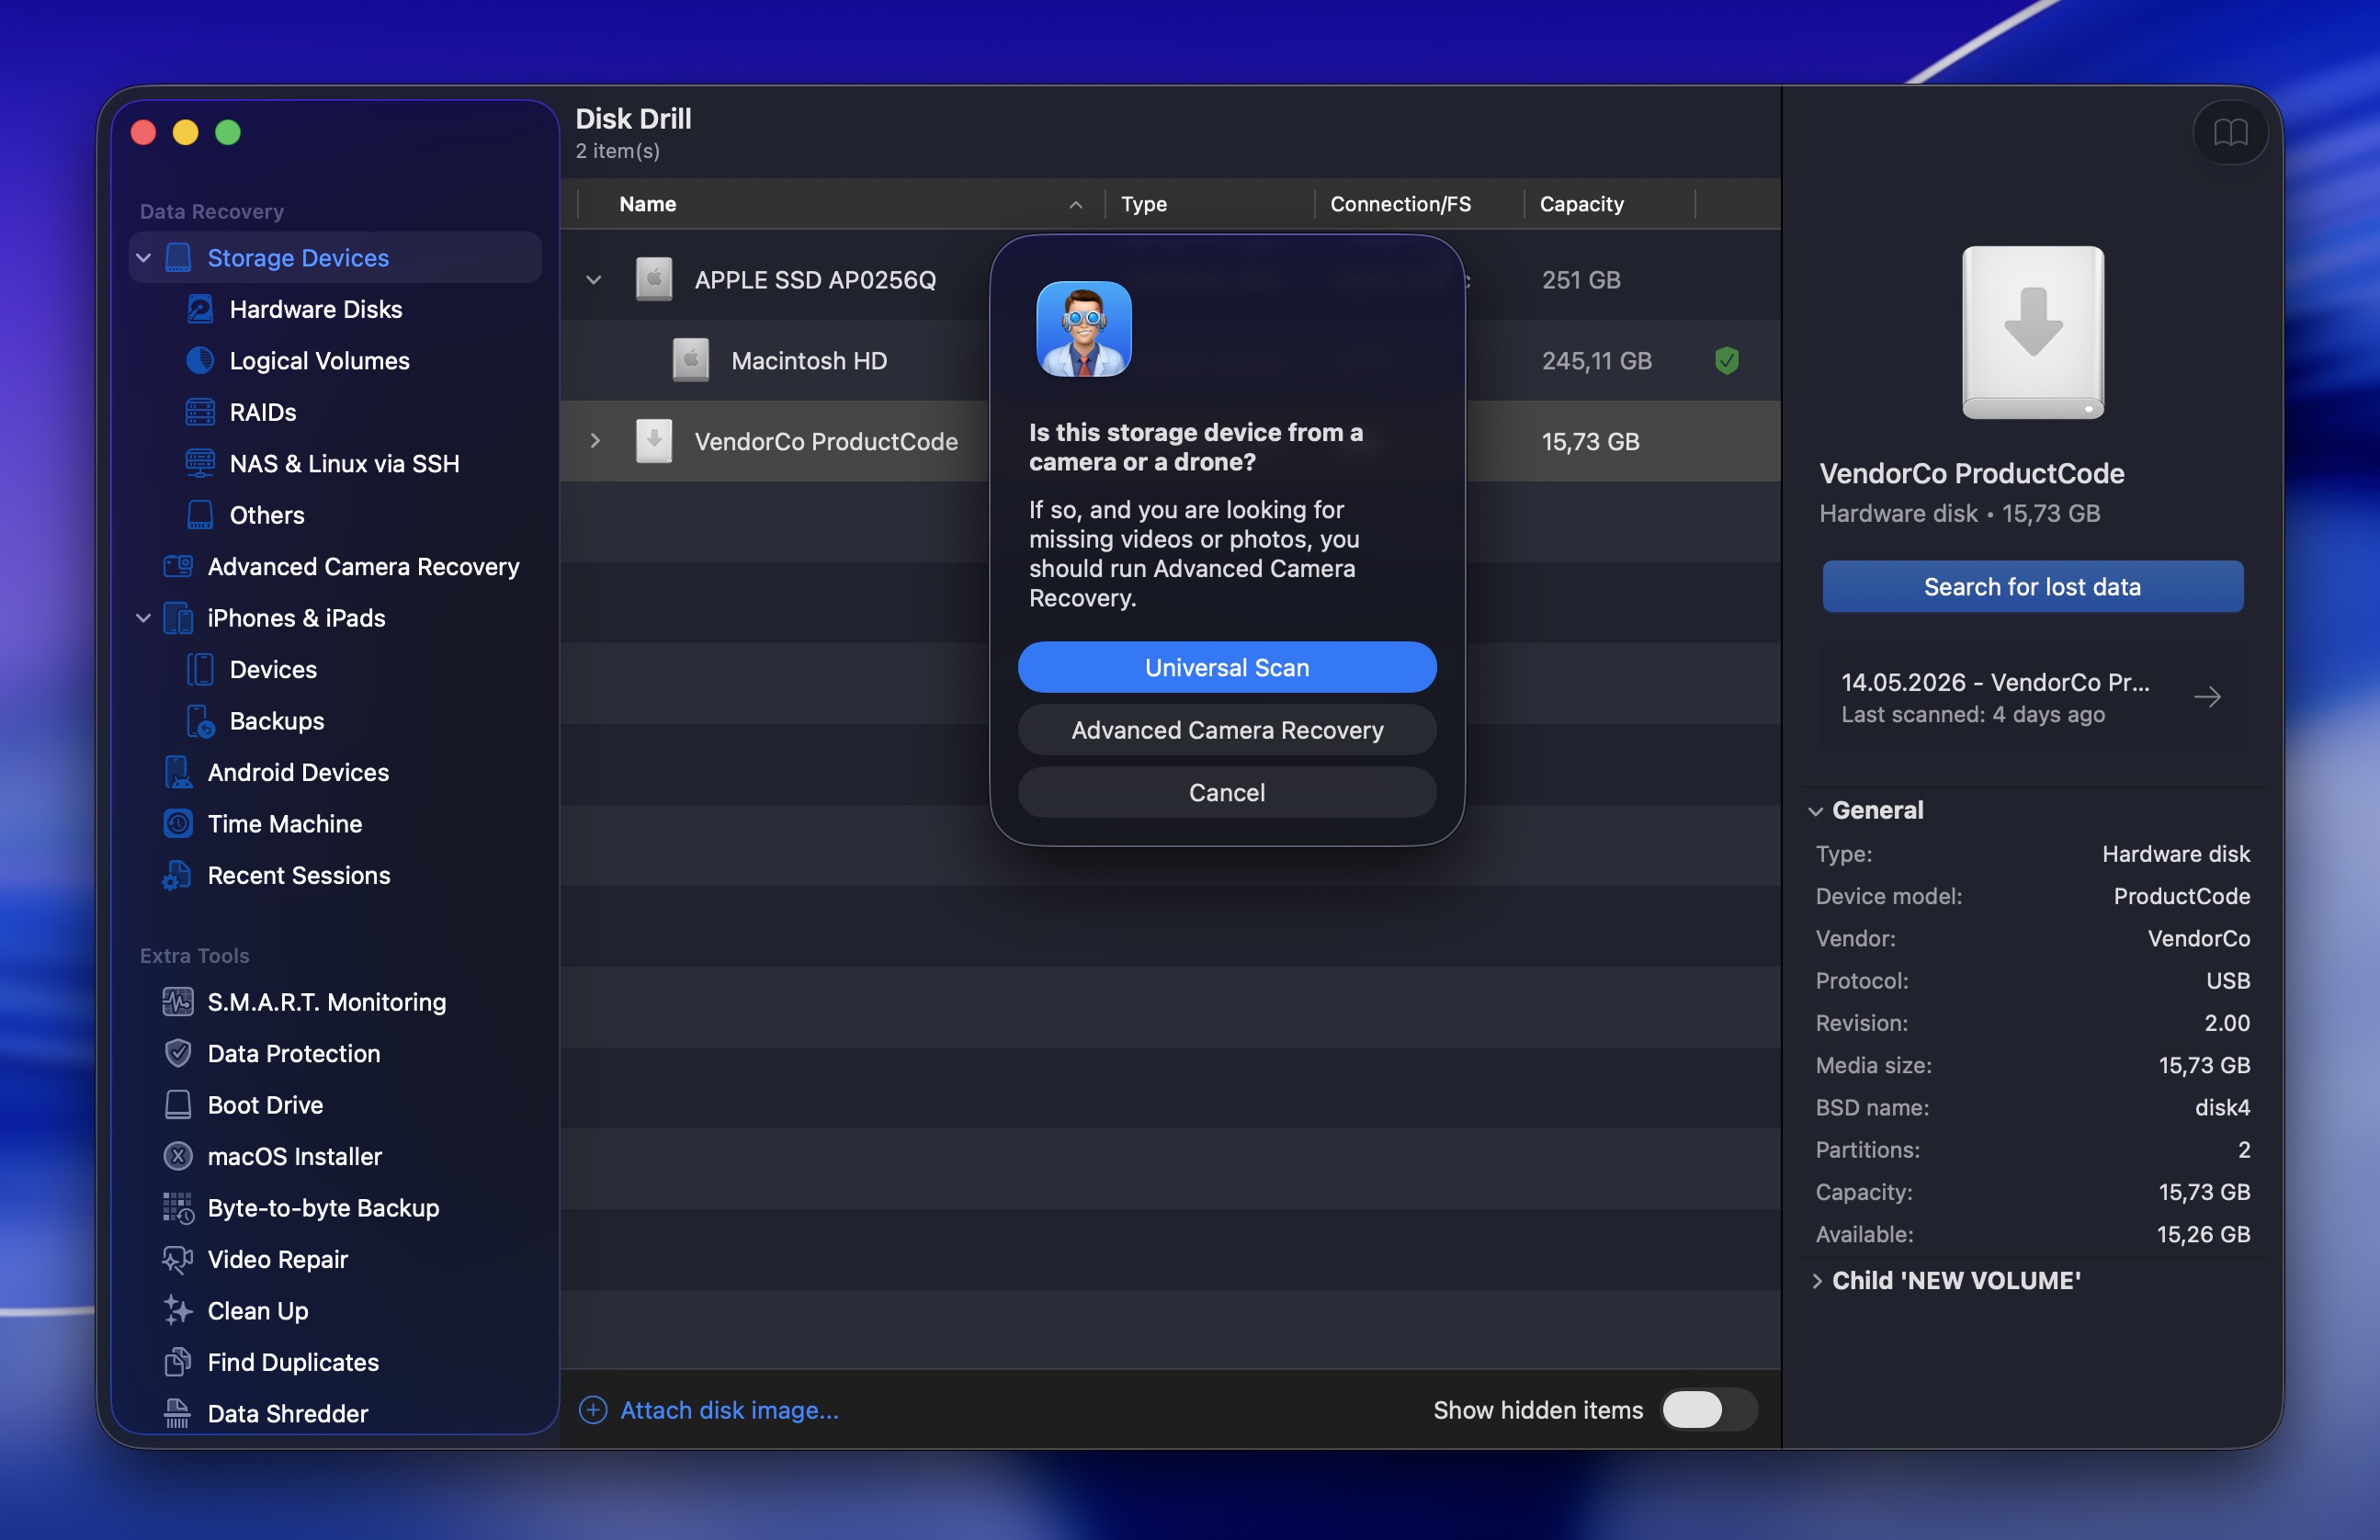
- Use Universal Scan first for photos. If you’re recovering videos recorded on a camera, then try Advanced Camera Recovery. You can always rescan with a different mode later if needed.
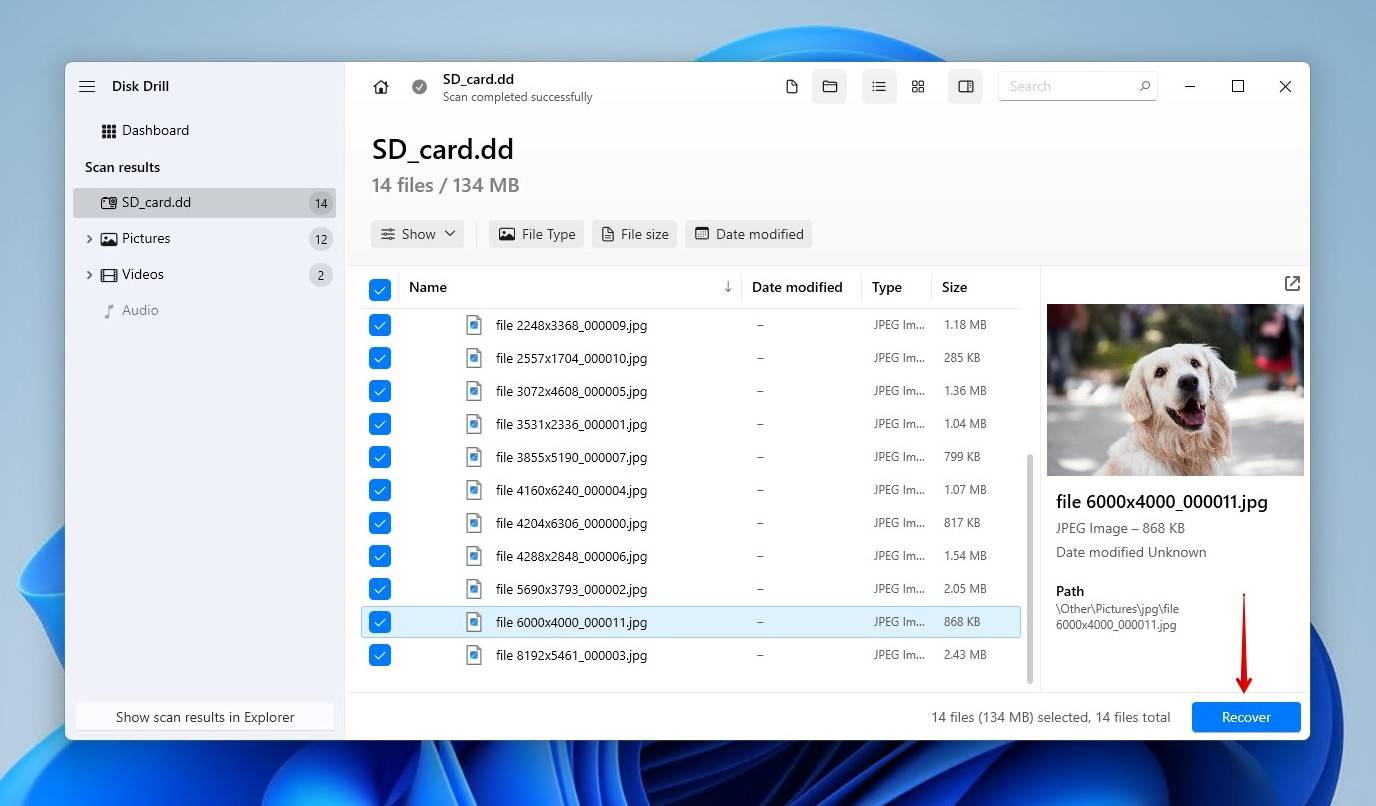
- Wait for the scan process to complete, and then click Review found items.
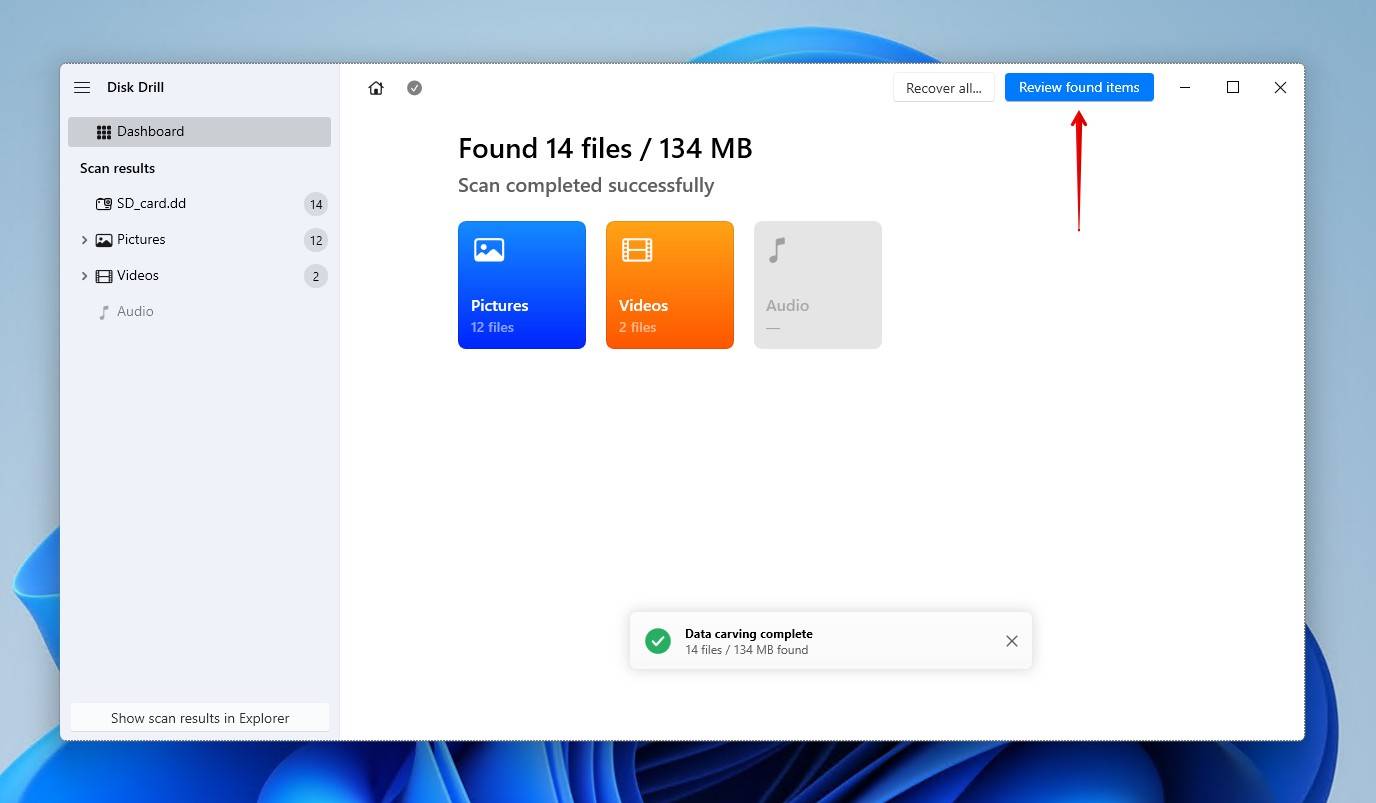
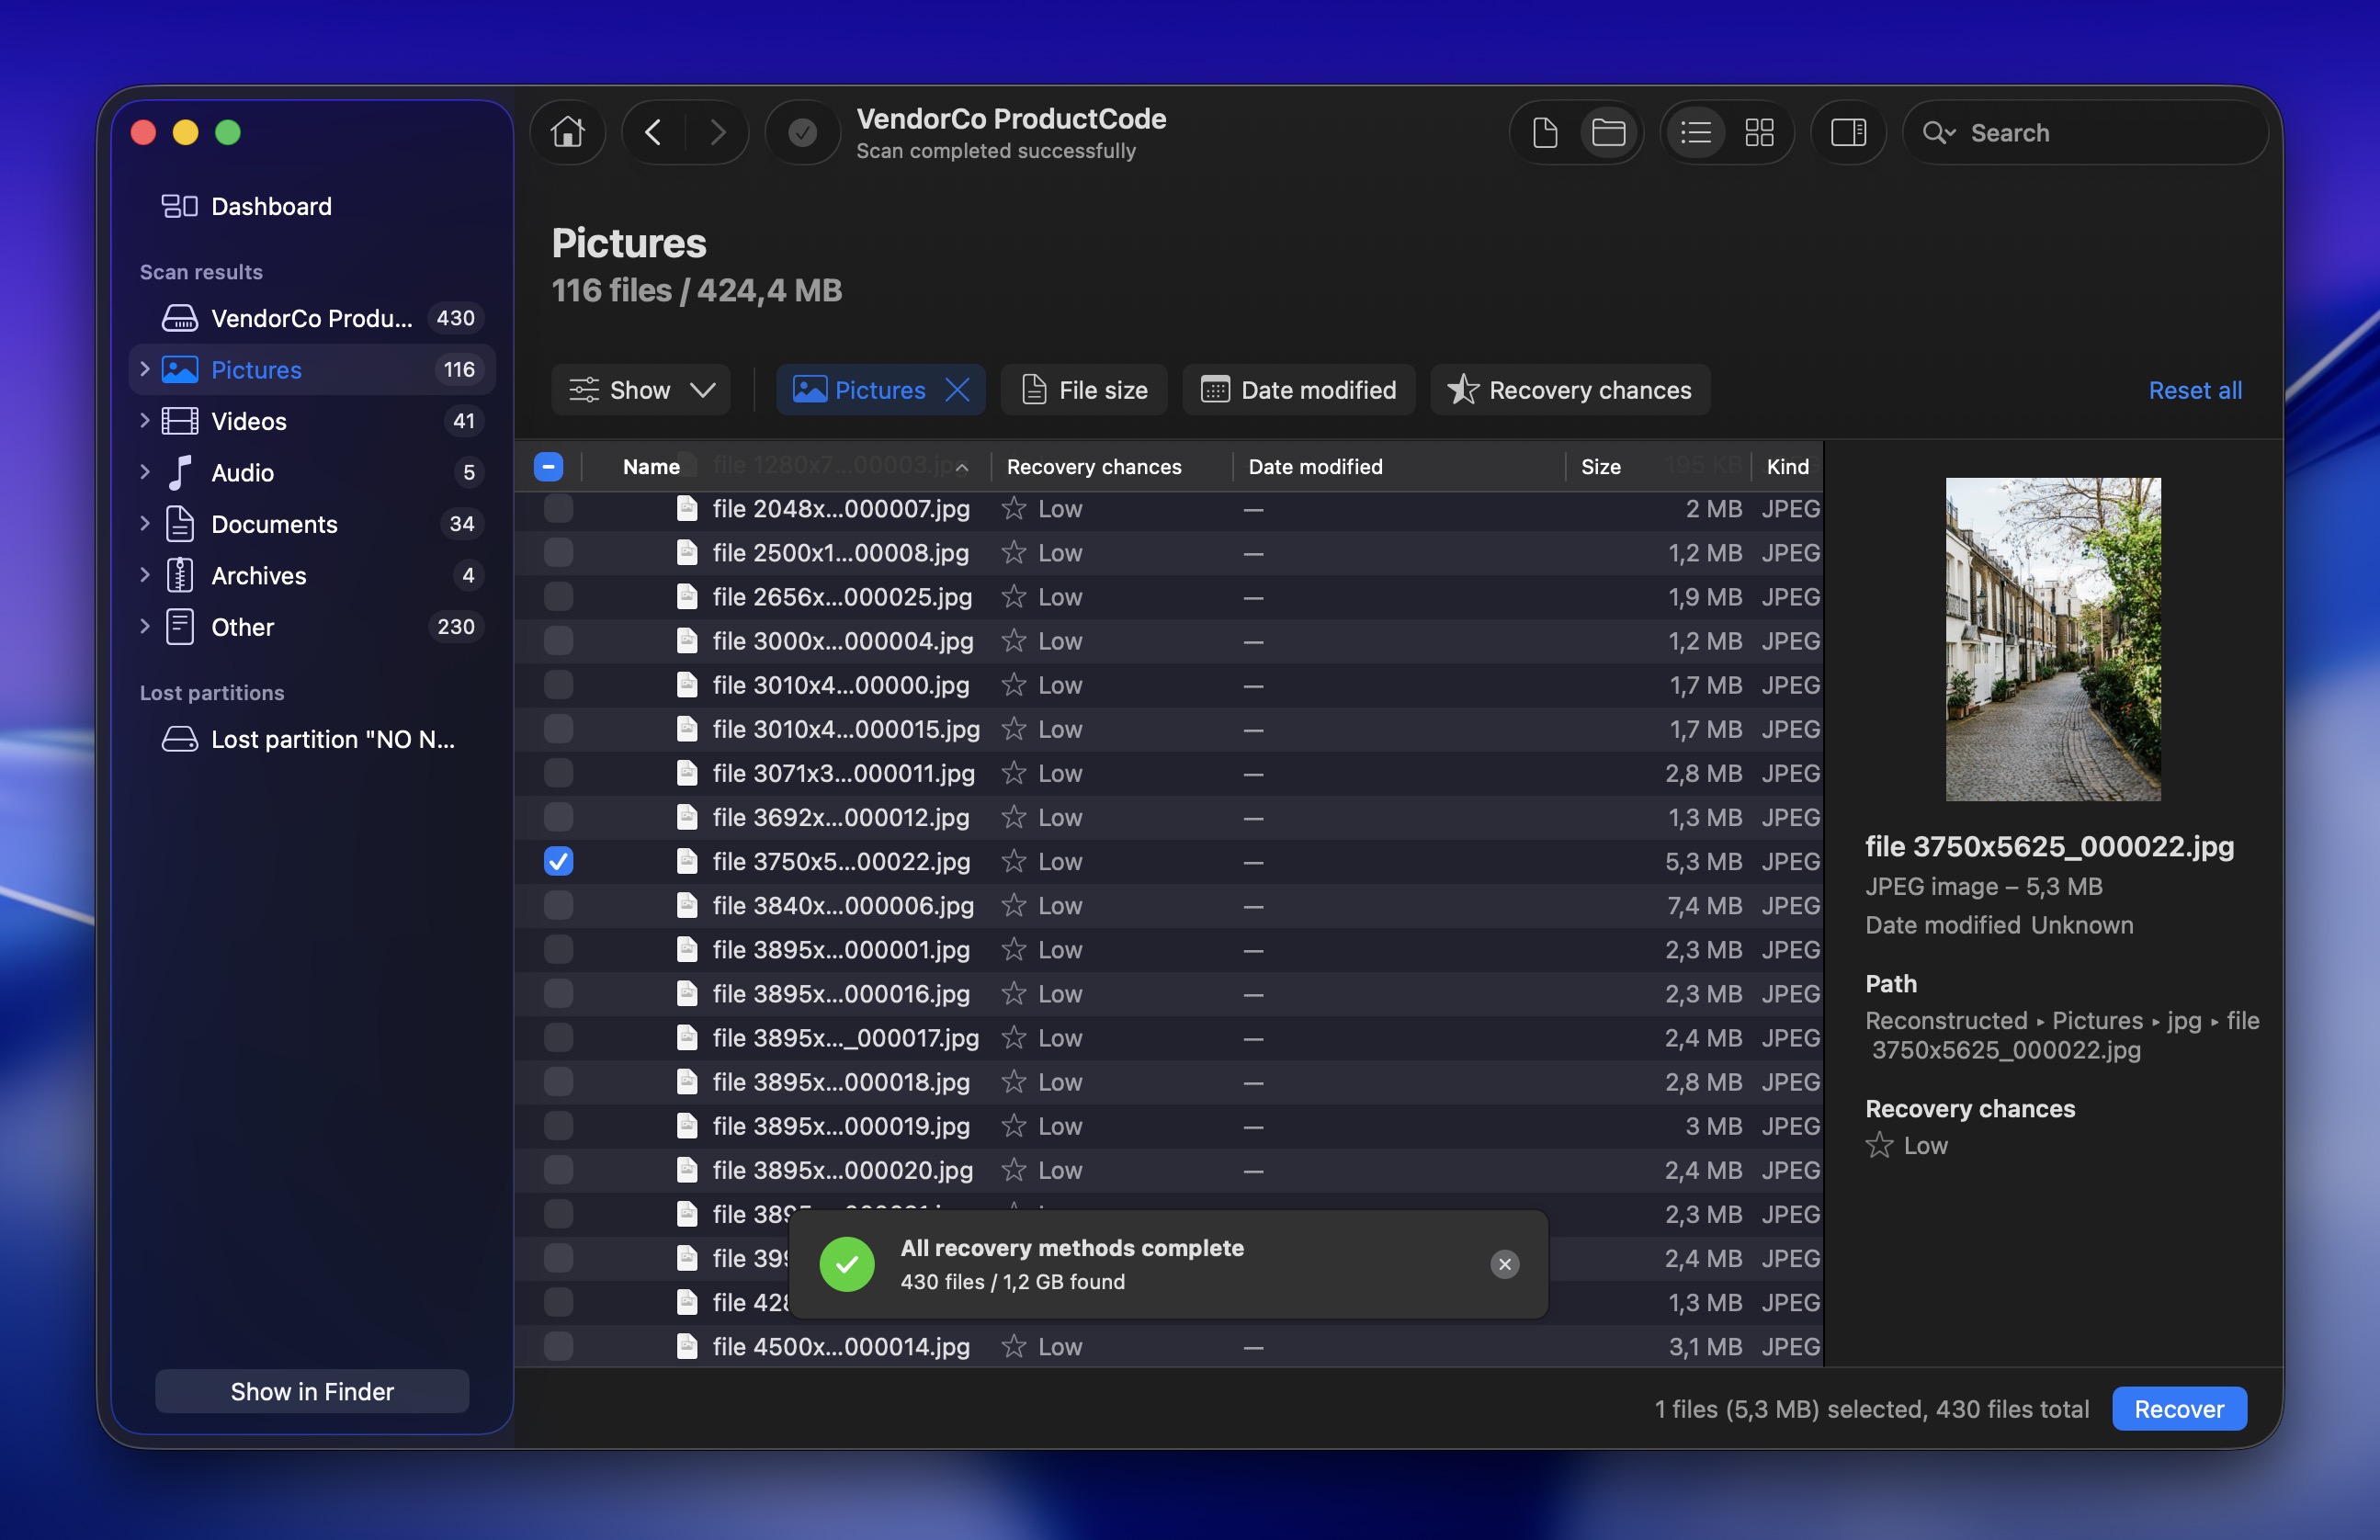
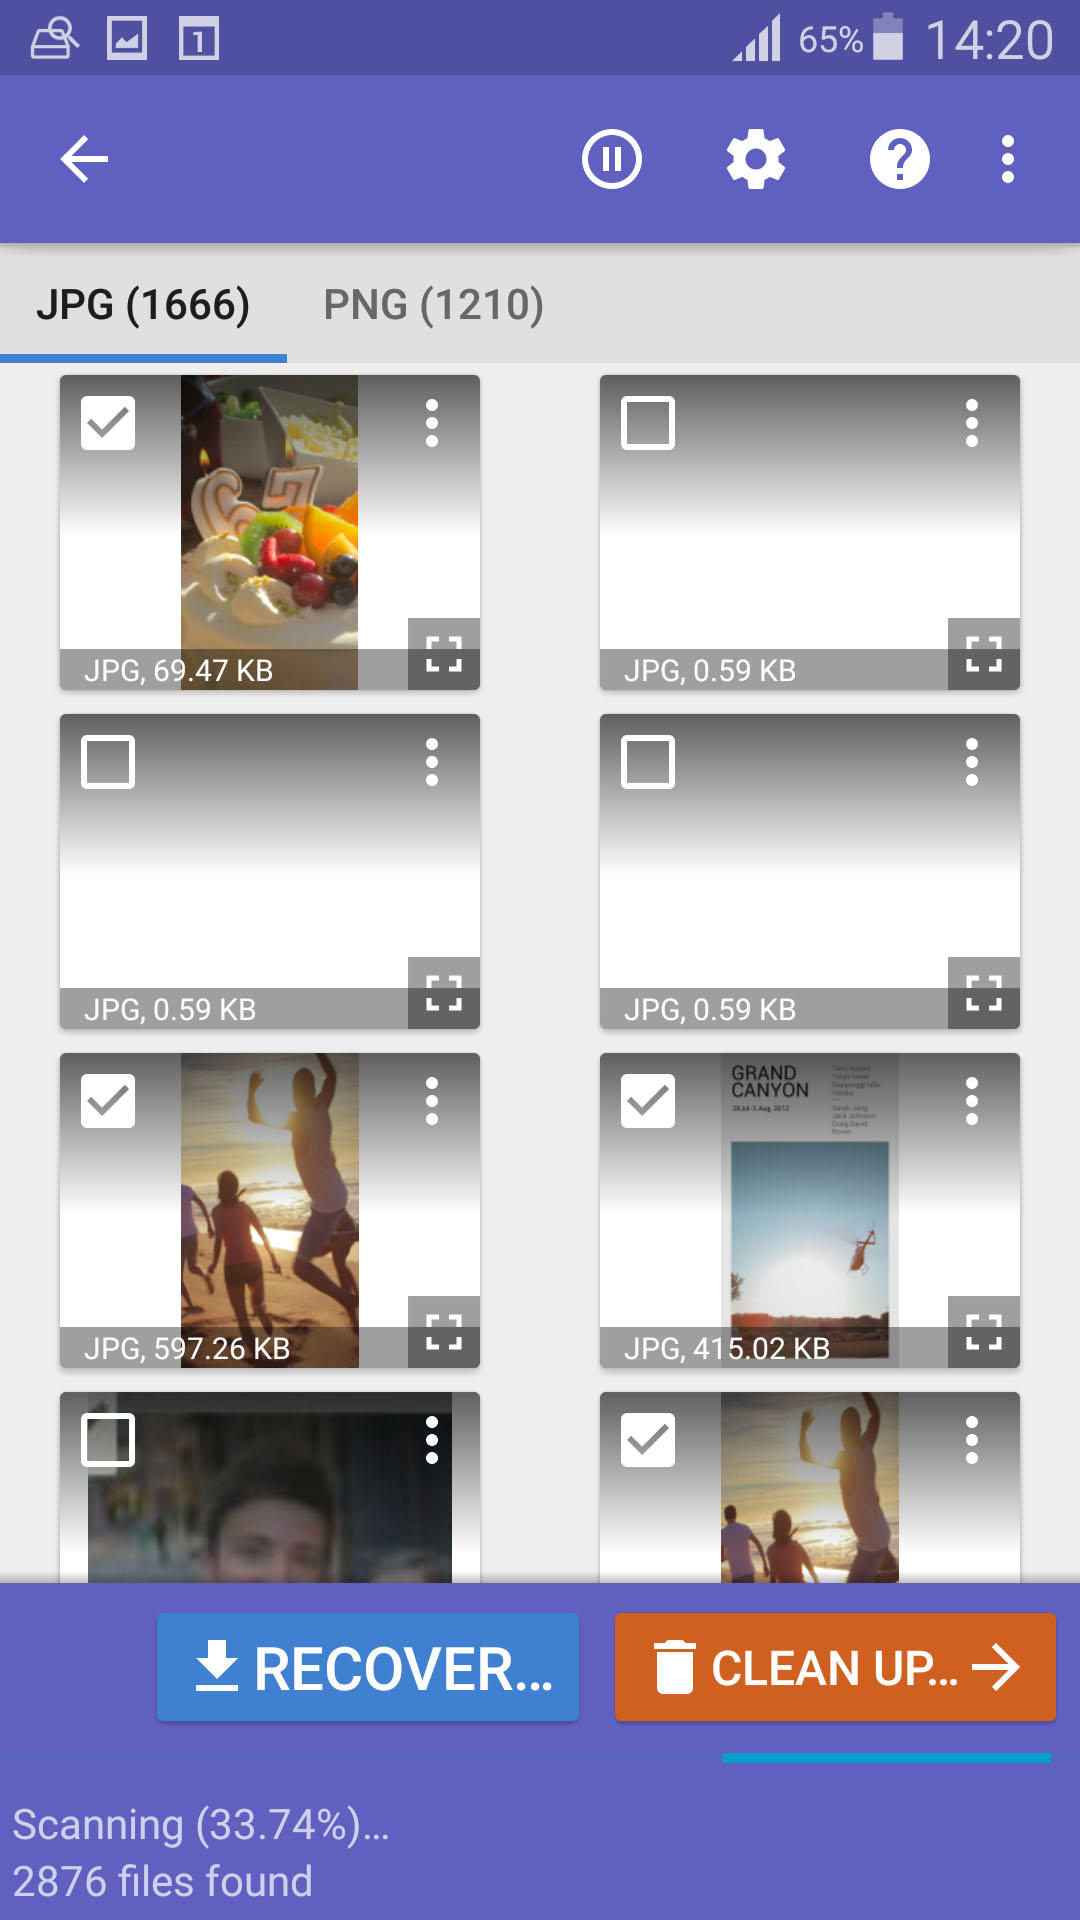
- Browse the photos that Disk Drill found on the SD card once the scan has finished. Click on the Preview icon to look at the pictures before you choose to recover them. If a file opens in preview, it’s a sure sign it will recover intact. (But don’t treat a missing preview as a failure. Some file types, especially certain RAW formats like RAF, may not show a preview because your system doesn’t have the right viewer installed to open them. So if the file looks relevant, it still makes sense to recover it and then check it in a compatible photo viewer or editor.)
- Check the files that you would like to recover. Make use of the filters to organize the data, either using the Pictures category on the left, or searching the file type (you can try “cr2” or “jpg” in the search box). You can also expand the Pictures section to see subcategories; it’s easier to find what you need that way.
- When ready, click the Recover button.
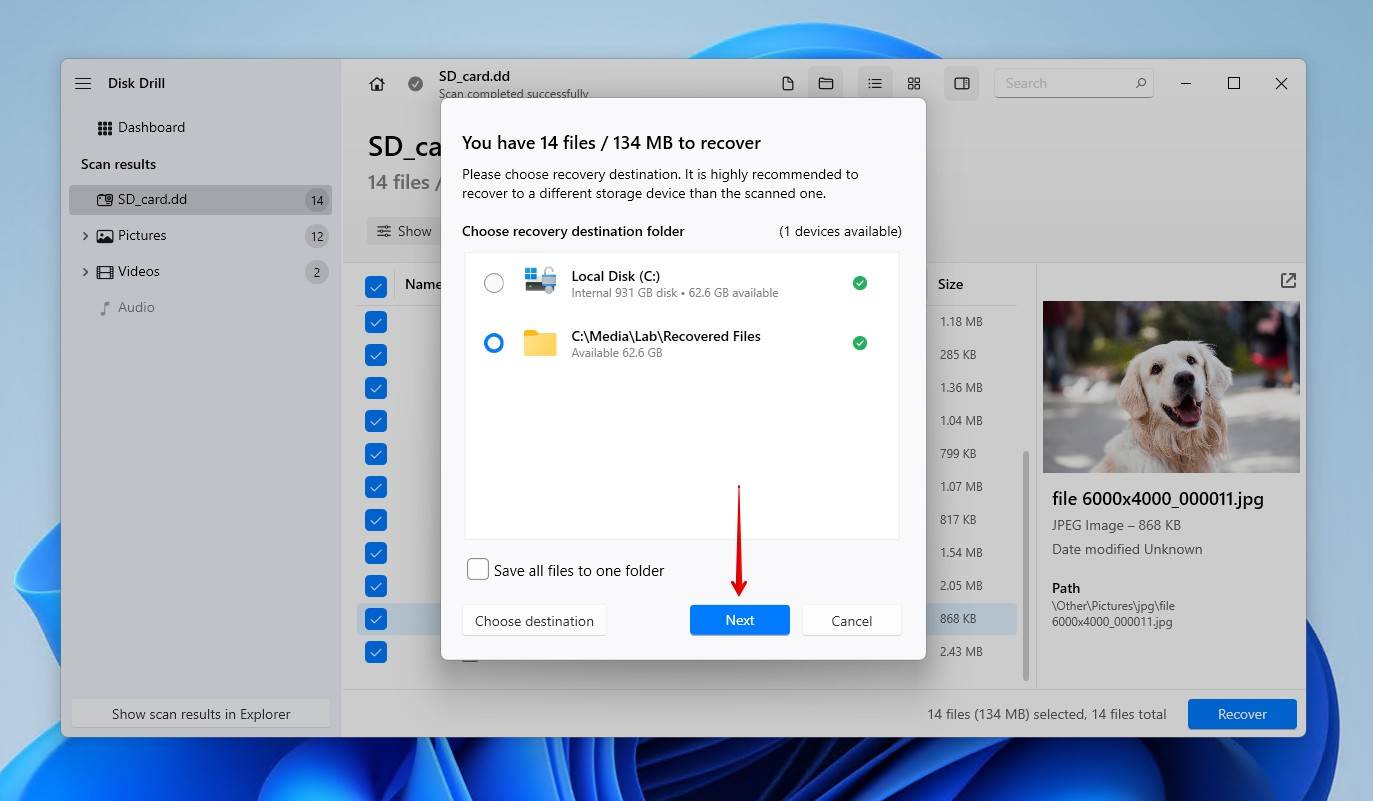
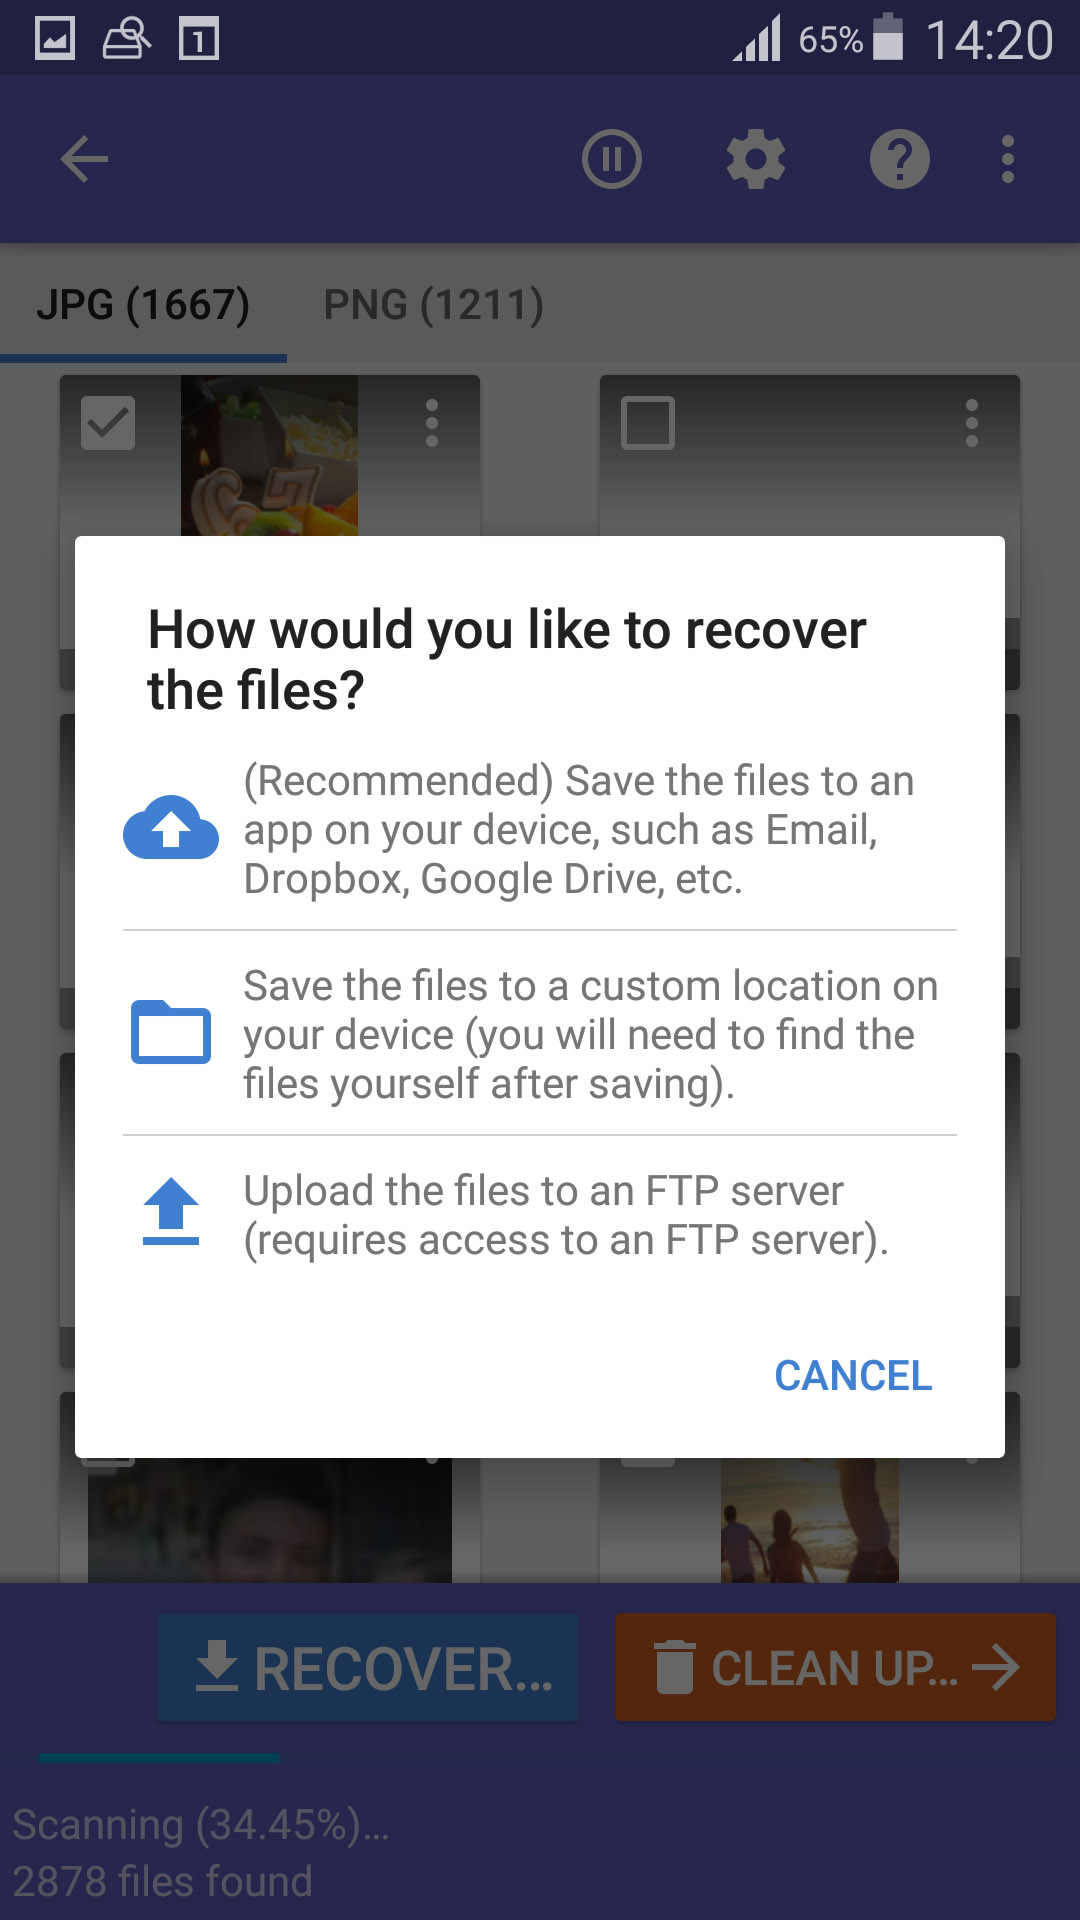
- Choose a suitable recovery destination for the files on a separate storage device. You’ll notice your SD card isn’t listed here – that’s intentional to prevent overwriting the data you’re trying to recover. You can always copy the files back to the card later if you want.

Steps to Recover Deleted Photos from an SD card on Mac
For Mac users, the recovery process is almost the same. You can download a free version of Disk Drill that allows you to preview the files that it can recover before any financial investment is required. If the files you need are recoverable, you can opt to purchase the Pro version of Disk Drill and perform the actual data recovery.
This is how to recover photos from an SD card on Mac:
- Download and install Disk Drill onto your Mac.
- Connect the SD card that held the deleted photos to your Mac using an SD card reader or the built-in SD card slot, if your Mac has one.
- Select the SD card from the list of disks presented by Disk Drill. In this case, we’re going to select our SD card but it could be any storage device.
- Choose a scan type. Universal Scan is usually the best place to start – it covers the widest range. But if you’re trying to recover video files from a camera, Advanced Camera Recovery can be a better option for those.
- Wait for the scan process to complete. This can take some time depending on the size of the SD card and the type of connection.
- Now that the scan is done, review the items that Disk Drill was able to recover from your SD card. You can browse your files, use the search box to find something, and also use the Preview function to check files before recovering them. As Disk Drill will point out, it’s the most reliable way to confirm your files are intact. There’s also a “Recovery chances” column with indicators, but previewing the file gives you a much clearer answer. (Just keep in mind that some formats may not preview on your system even if they’re still recoverable, so don’t automatically skip a file only because preview isn’t available.)
- Look through the files that you want to recover from your SD card and then checkmark the box to select them for recovery. Now, click on the blue Recover button to recover the files and put them back onto your Mac.
- Choose an appropriate location for recovery. You can select your Mac’s internal drive or any other connected storage (recovering to the same SD card is a bad idea – it can overwrite the data). After the recovery is complete, you can copy the photos back to the SD card if needed.
Way 2: Recover Pictures Using an Android Data Recovery App
If you need to recover deleted photos from an SD card that was used to expand the storage space of your Android smartphone or tablet, then you can use an Android data recovery app like DiskDigger photo recovery. It’s free software, but a Pro version is also available.
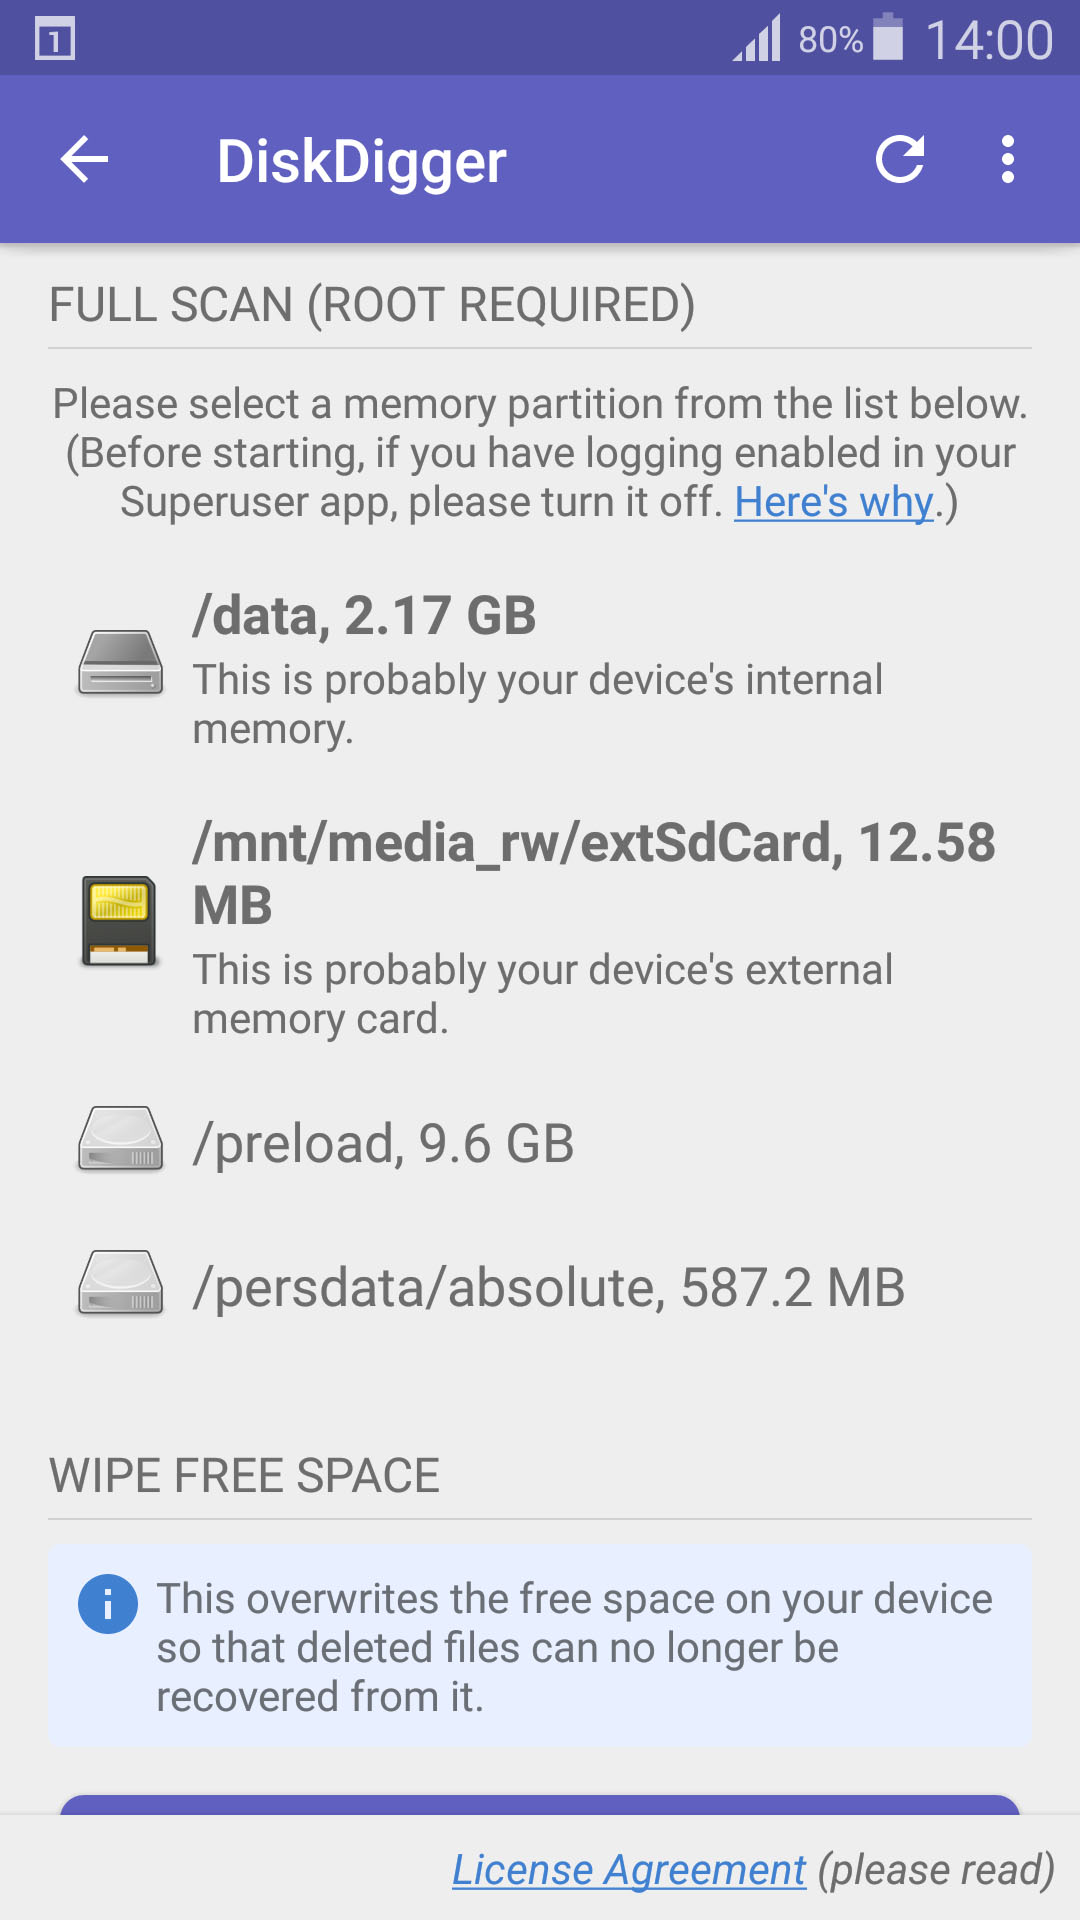
As DiskDigger allows you to recover photos from an SD card on Android and save it to internal memory, this is a very useful method for those who don’t have access to a computer. However, In order to scan your SD card, DiskDigger will require root access. If your device is not rooted, it will only be able to recover files from caches and thumbnails. We’ll explain why that happens and, in more detail, whether you should root your phone if it wasn’t already rooted in the FAQ section.
Here’s how to recover photos from an SD card with DiskDigger:
- Download the app from the Play Store.
- Launch it and scan your SD card. If your Android device isn’t rooted, use Basic Photo Scan first. If the device is rooted, you can choose the SD card path instead, which usually appears as something like /mnt/sdcard or similar.
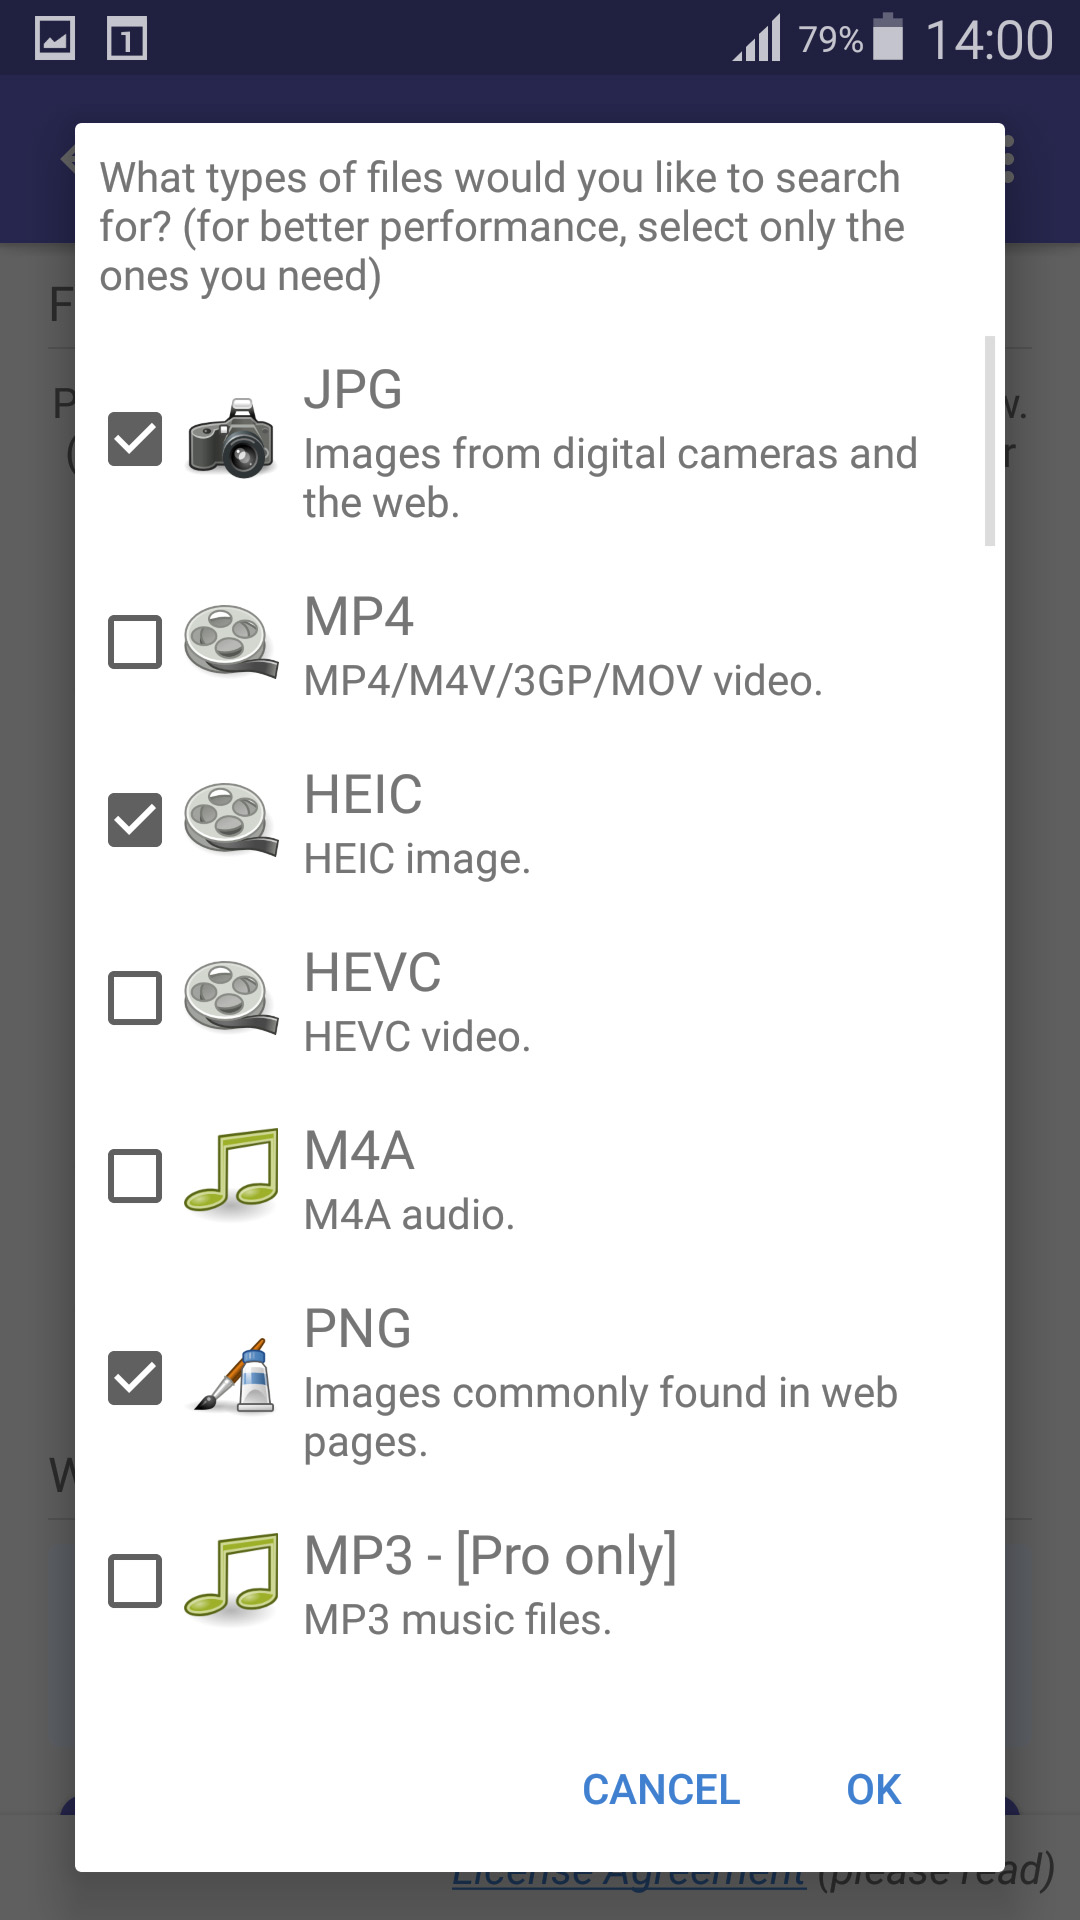
- Specify the file types you would like to search for and tap OK.
- Choose the files you want to recover.
- Tap the Recover button to save them to your device.
For the best results, your device should be rooted, and you should use DiskDigger Pro instead of the free version. Still, don’t expect to find as many deleted photos as with desktop data recovery software like Disk Drill.
Way 3: Restore Photos from a Backup
Backups can help if the photos from your SD card passed through your computer at some point. For example, if you copied photos from the card to a Windows PC or Mac, your backup tool may have saved them automatically, even if you never backed up the SD card itself.
So, check whether your backup tool already has a copy of the folder where those photos were stored. This won’t help if the photos only ever existed on the SD card, but it can save a lot of time if you imported or transferred them before they disappeared.
Retrieve from a Backup on Windows
On Windows 10 and 11, you can use the native backup utility File History to back up your personal files. We’re going to rely on the hope that you copied photos from the SD card to your computer at least once. If you did, and the folder which you stored the photos was included in the File History backup, you can then restore the deleted photos.
This is how to recover deleted photos from an SD card:
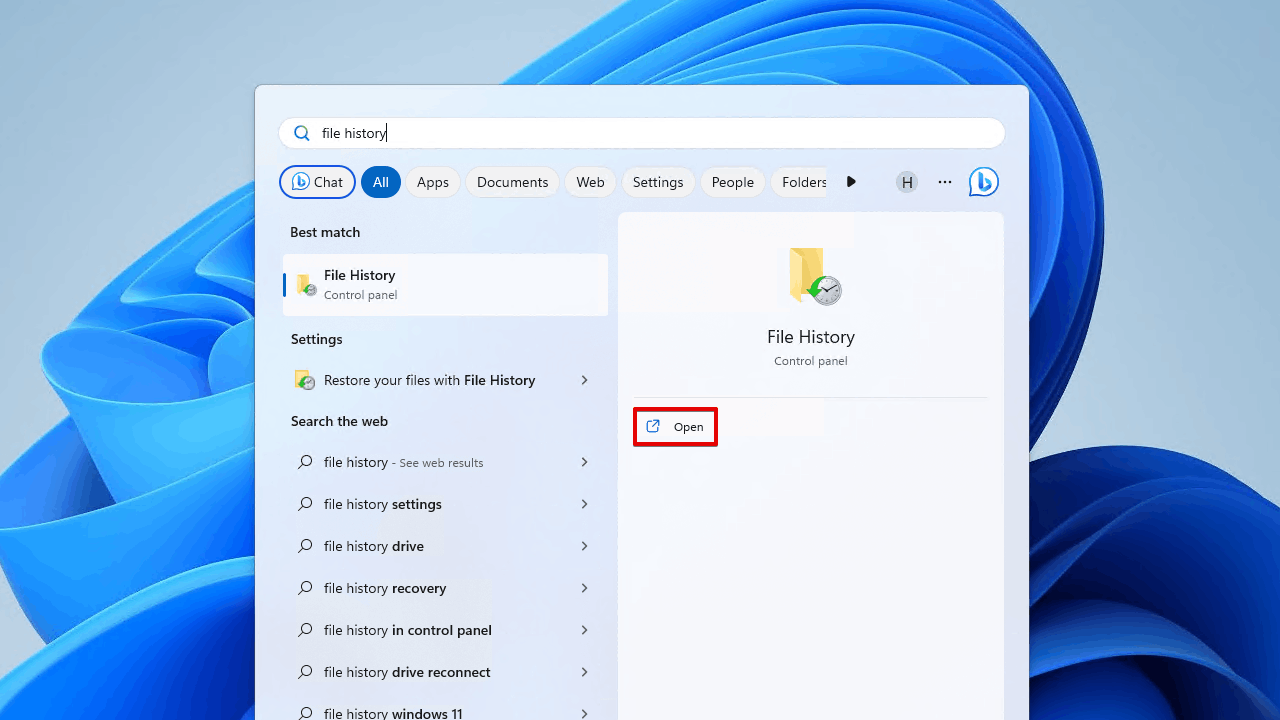
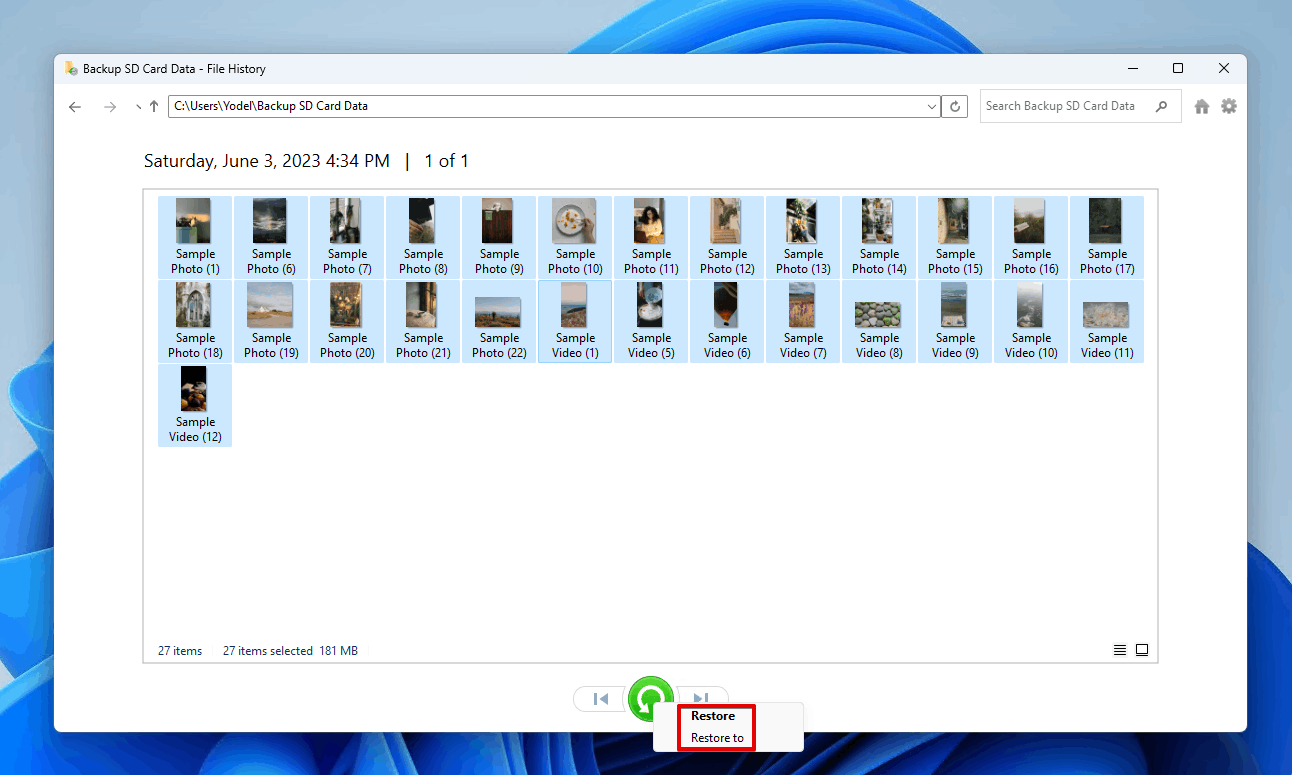
- Open Start and search File History. Open it.
- Click Restore personal file.

- Navigate to the backed-up photos and select the ones you want to restore.
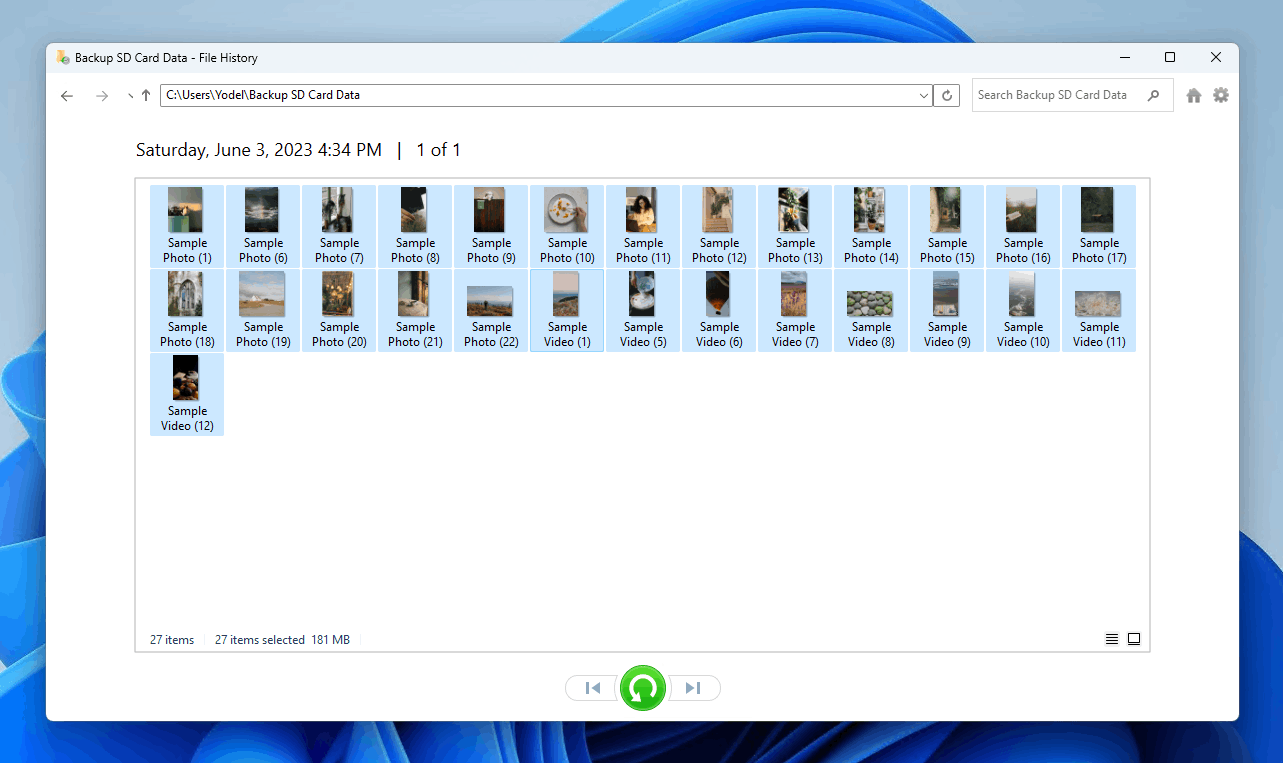
- Right-click the green Restore button and either click Restore to restore them to the original location, or Restore to in order to choose a custom destination.
Alternatively, if you previously copied or moved the files from your SD card to your computer, try searching for the photos instead, as they may reside in a subfolder somewhere. Using File Explorer, you can enter the name of the photo or folder you’re looking for into the search box. Or, you can pull all files by a specific type if you cannot remember the name.
Restore from a Backup on Mac
Time Machine is the primary backup feature for macOS. It can be used to automatically back up your personal data, allowing you to easily restore files that have become deleted, damaged, or otherwise inaccessible.
You can recover photos that were deleted from your SD card using Time Machine. Like with File History, we’re assuming you copied/imported those photos to your Mac earlier, and Time Machine had a chance to save that folder in one of its backups.
Here’s how to use Time Machine to restore SD photos:
- Connect the drive that contains your Time Machine backup.
- Open the folder where the photos used to be stored on your Mac.
- Click the Time Machine icon in the menu bar and choose Browse Time Machine Backups.
- Use the timeline on the right to go back to a date when the photos were still there.
- Select the photos or the whole folder you want to restore.
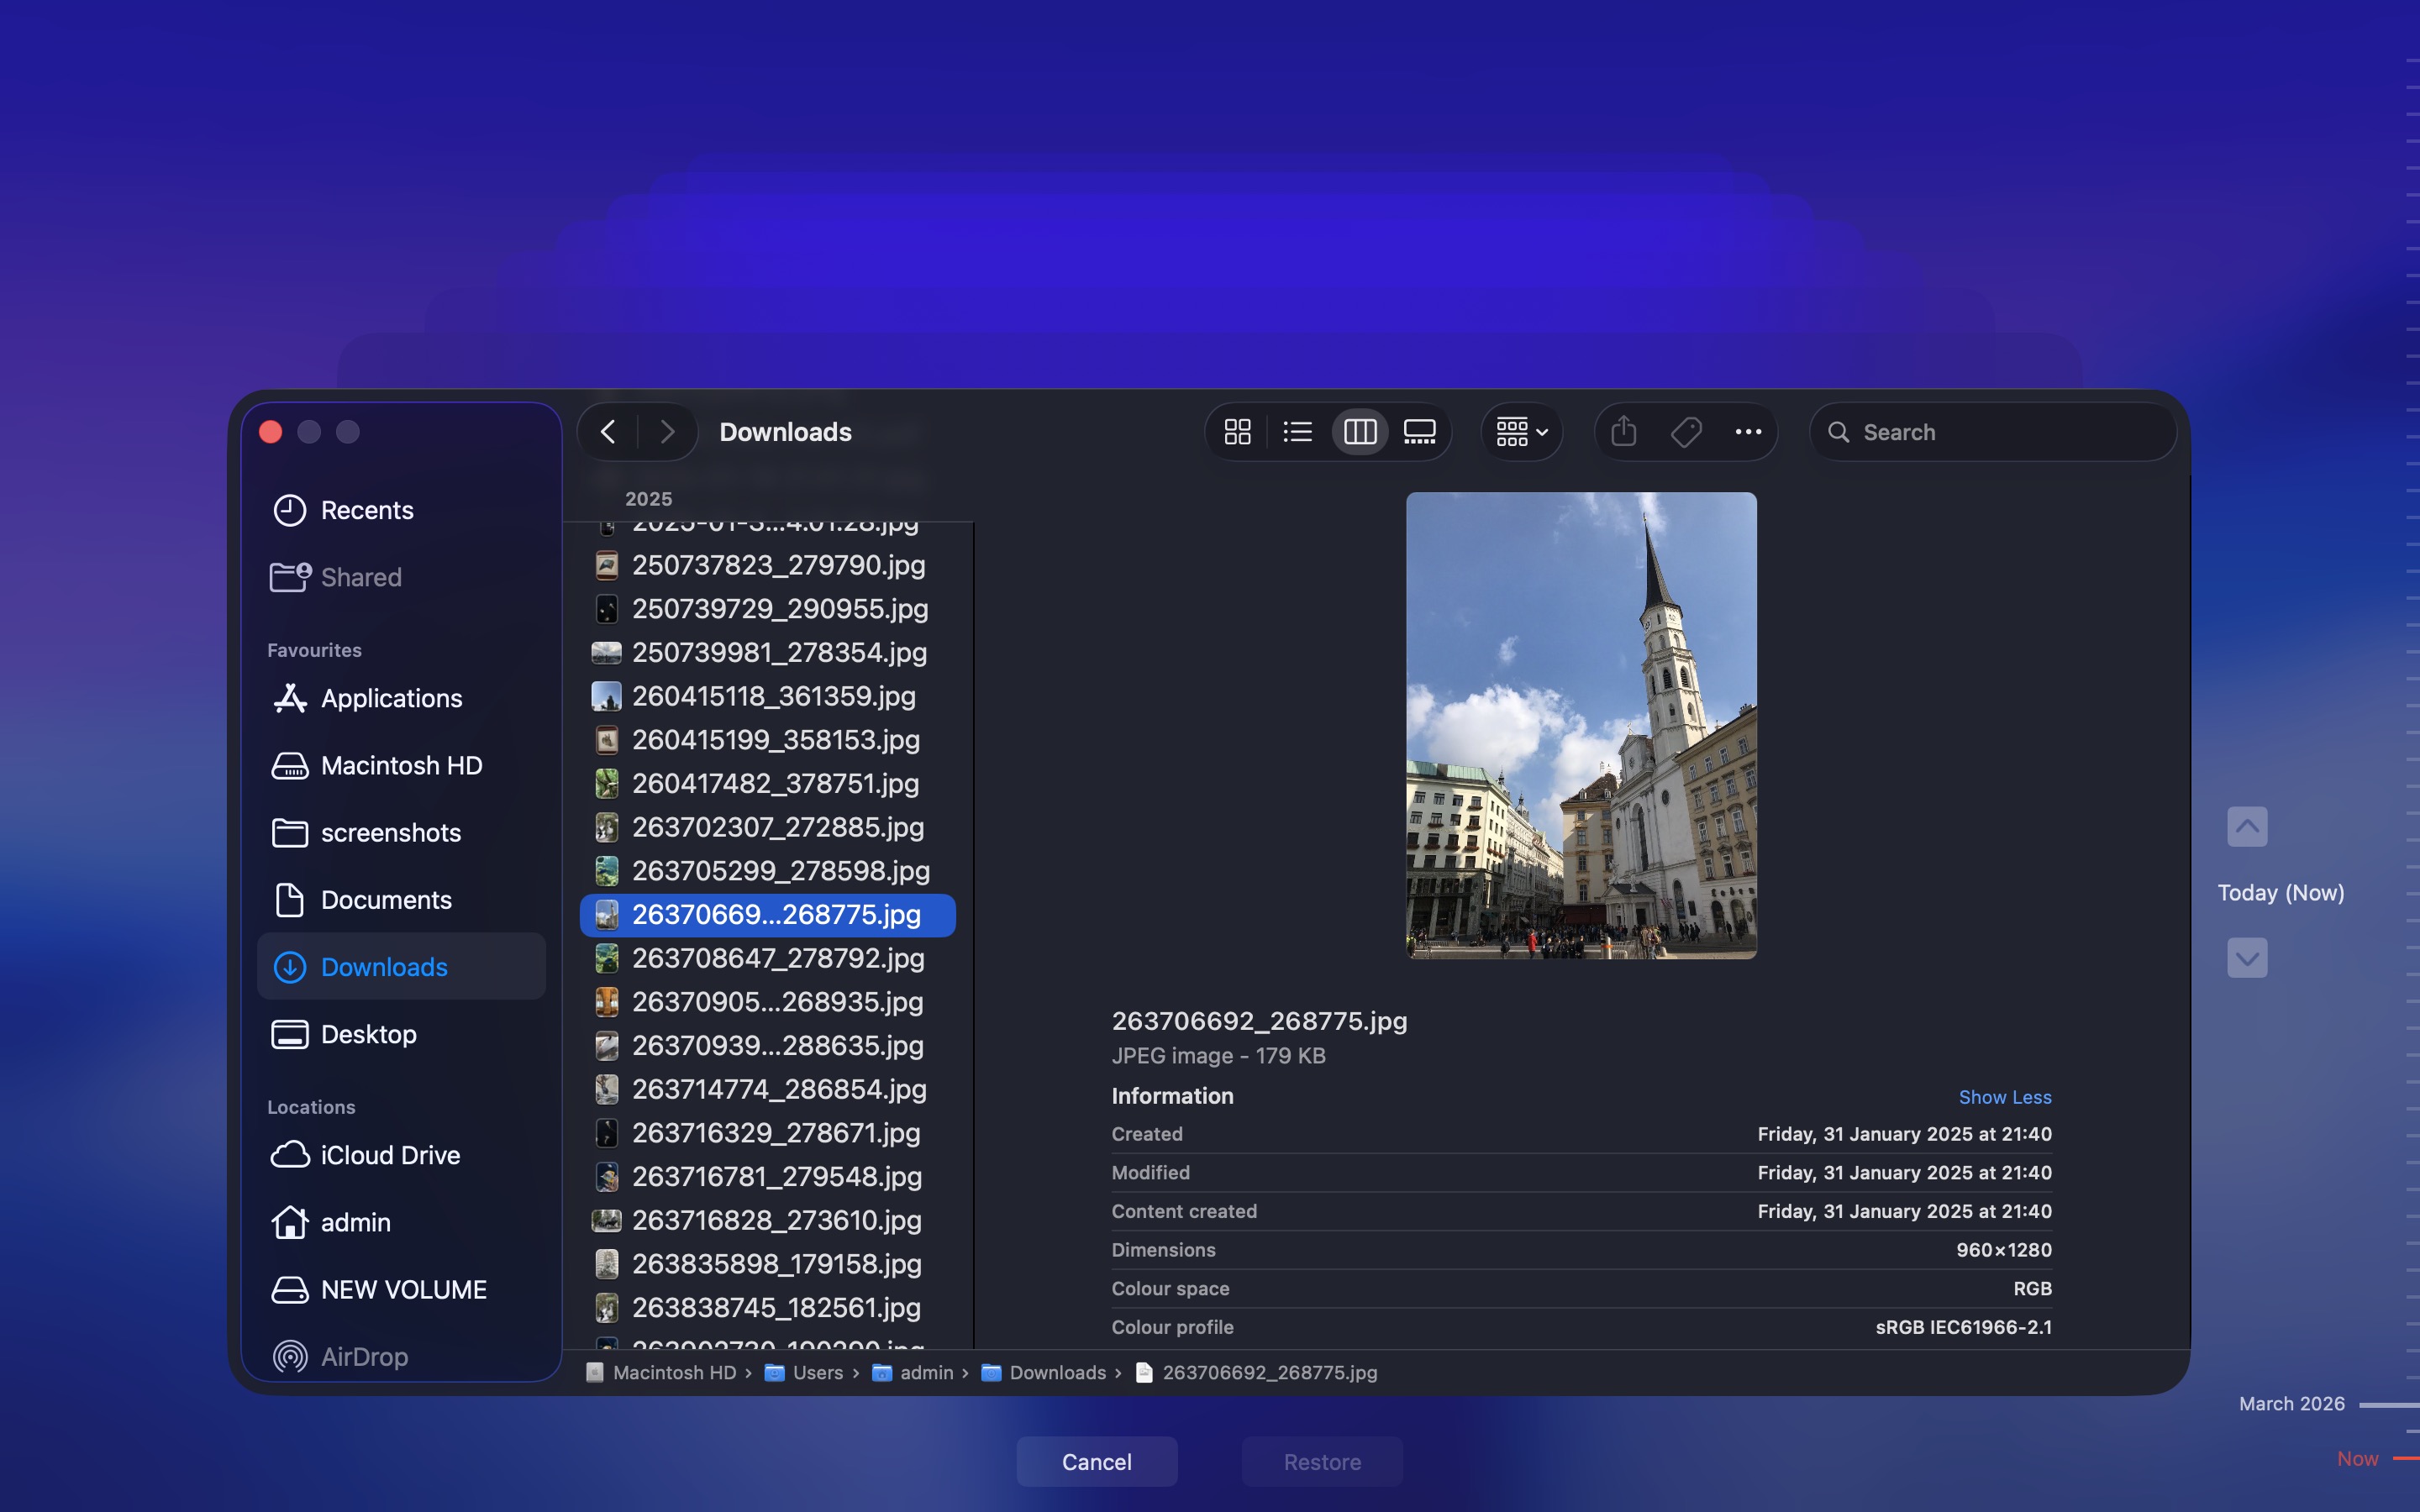
- Click Restore.
Again, your exact procedure will vary based on the type of backups that you perform. Whether you have backed up to the cloud or an external storage device, there is a secure feeling that comes with knowing that you can recover all of your precious memories at any time.
Way 4: Get Back Photos from a Cloud Backup
Android users have it great because they can not only tell their smartphones to store photos on a removable SD card, but they can also take advantage of apps like Dropbox or Google Photos to back up everything to the cloud. So if you had backup active and are now trying to figure out how to recover deleted SD card photos, check your cloud before you assume the files are gone for good. This method can also help outside Android. Maybe you copied photos from the SD card to your computer, and that folder later synced to the cloud. Or uploaded the photos to it manually.
Keep in mind, though, these services usually sync deletions. If you removed a photo while everything was connected and syncing, it’s likely gone there too. But if the SD card deletion happened while it was outside the device, or sync didn’t happen for some reason, the cloud copy might still be there.
If that’s your case, then you should be able to recover each and every deleted photo just by downloading it from your cloud storage service of choice. Best of all, you can do so from anywhere and on any device, so this method can save you even if your original device has become stolen or lost.
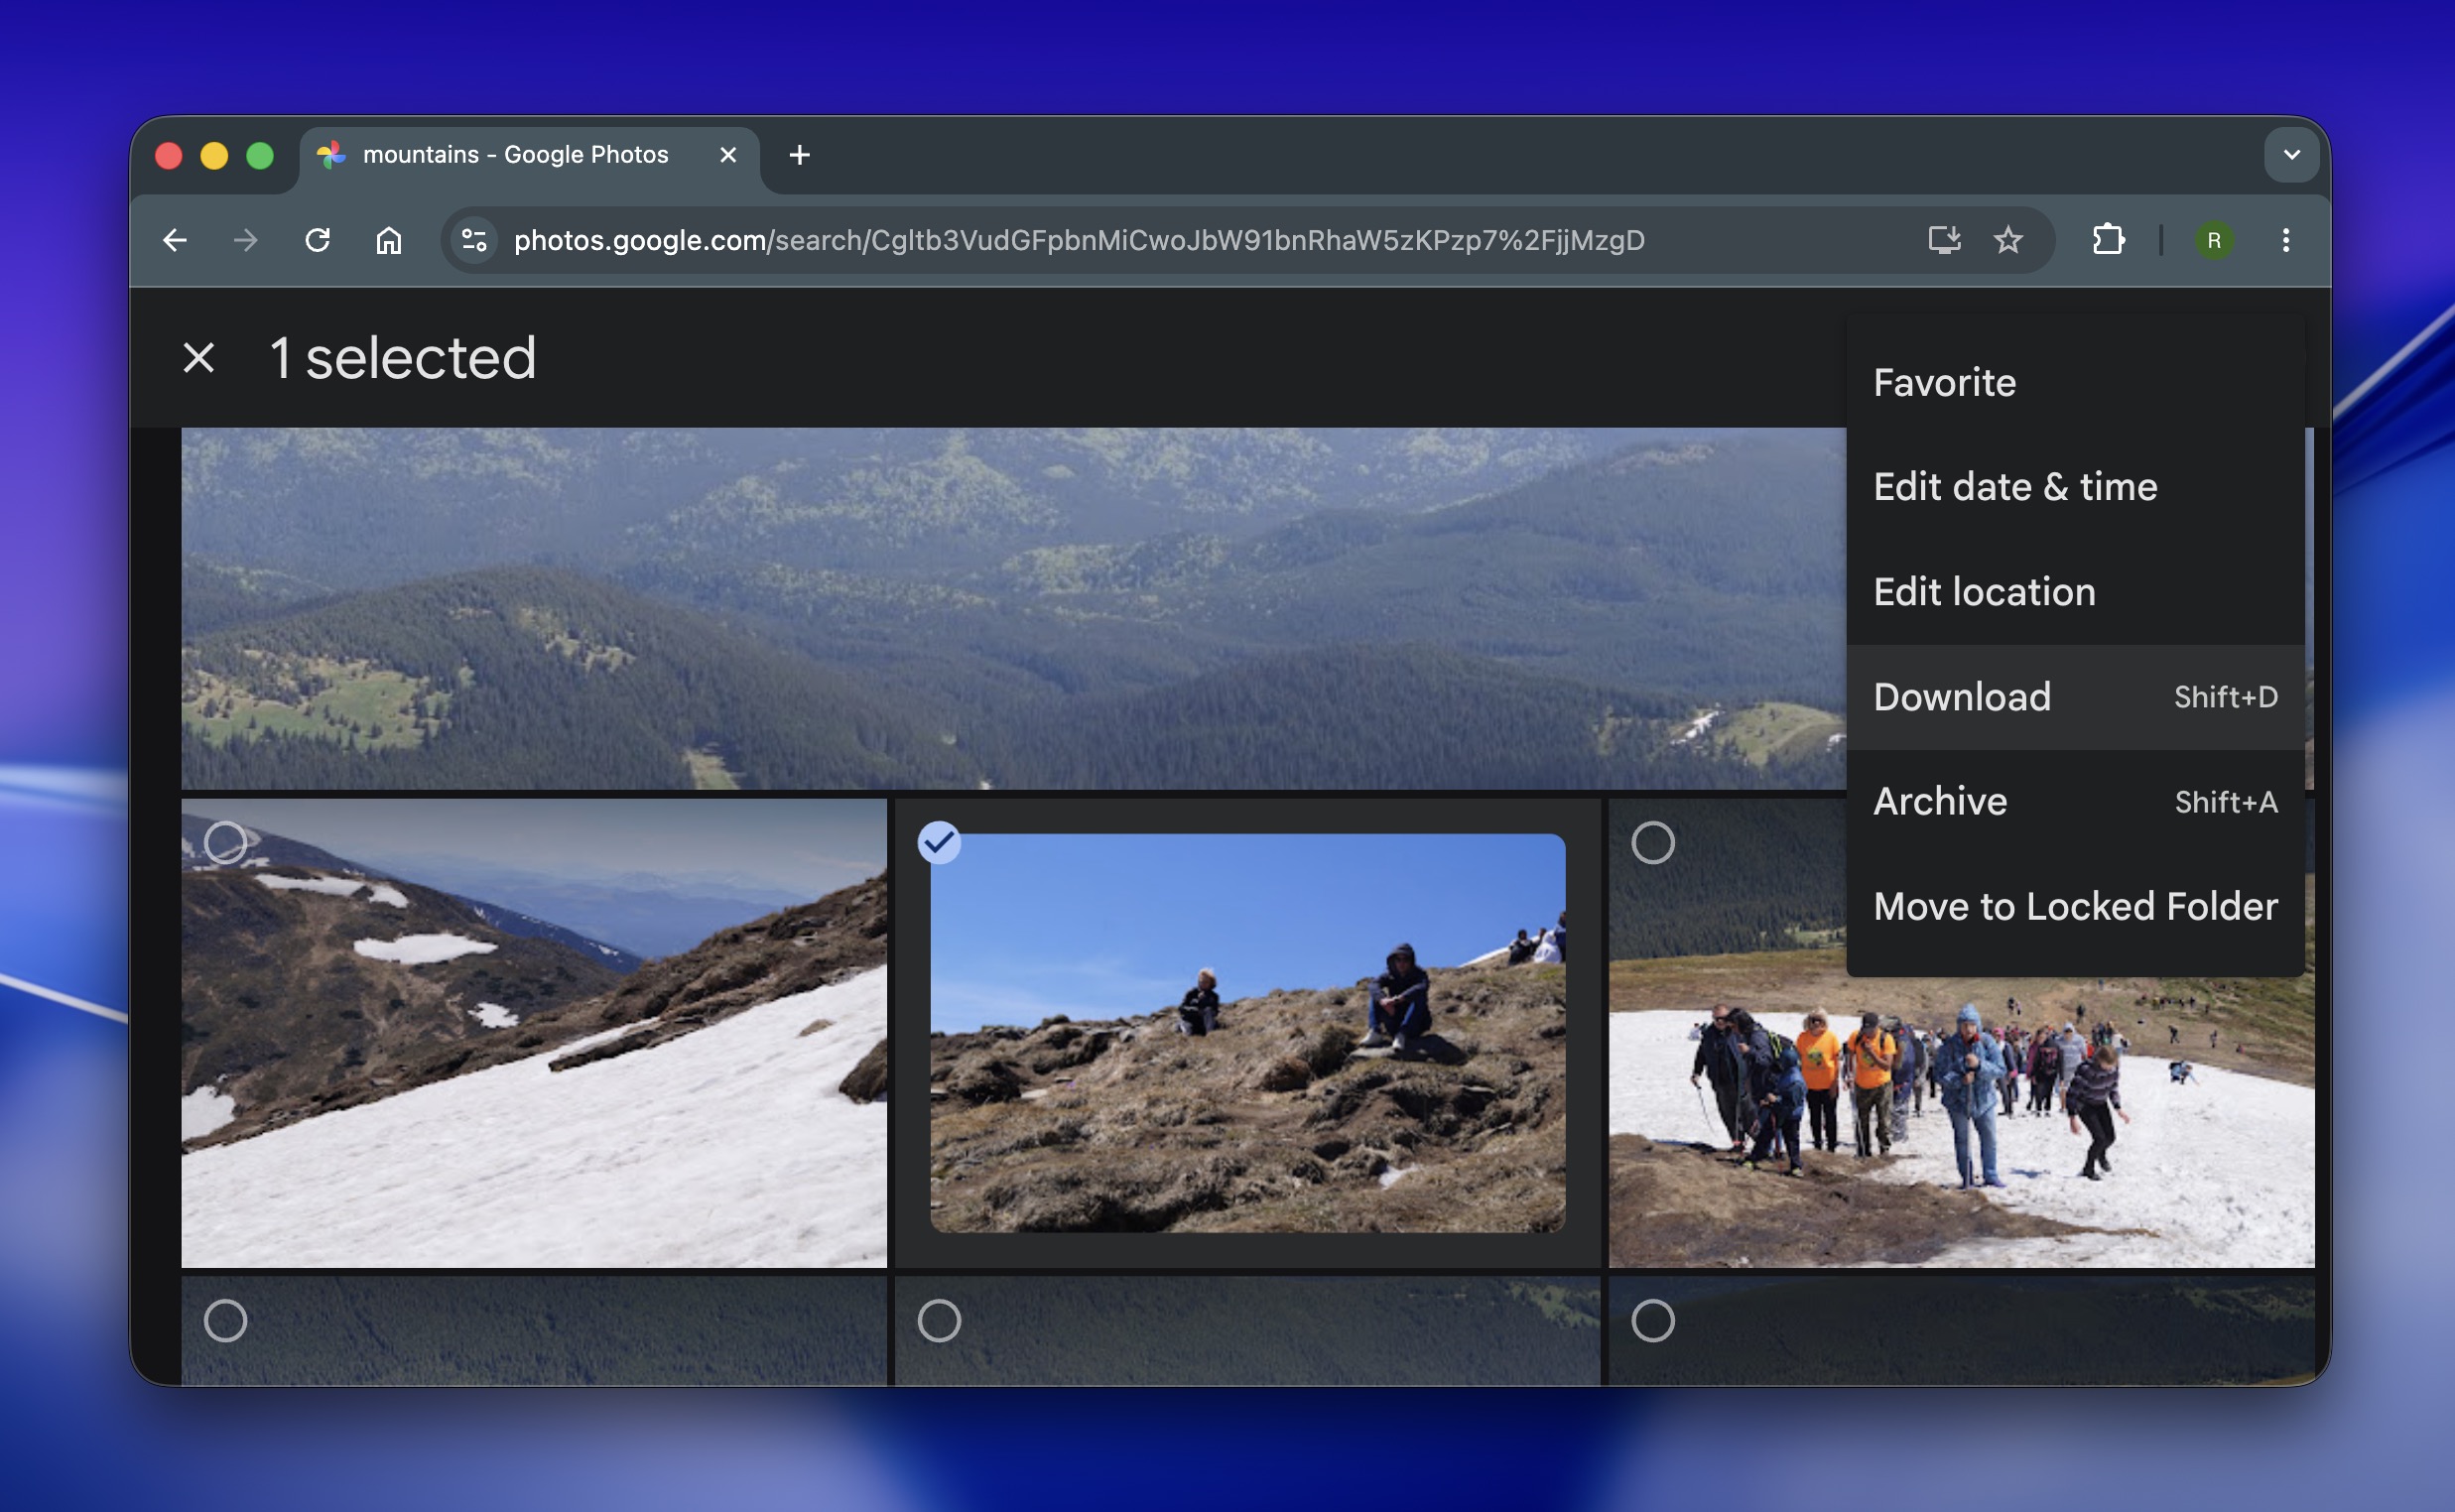
Use the following links to see official guides on how to download files from popular cloud storage services:
Do you use a different cloud backup app and are not sure how to download your deleted photos from it? Then we recommend you consult Google and look for a suitable guide.
Way 5: Retrieve Photos from Your Device’s Internal Memory or Storage
Be sure to check your device’s internal memory or temporary storage on Mac or Windows PC. When you delete a photo on your device, it is logically deleted and its storage space is marked as available, allowing new data to overwrite it at the same location. It is not immediately physically removed from your SD card.
Of course, you can also restore the deleted photos from apps that retained copies of them, such as Photos on macOS. The Photos app allows you to import photos from your SD card. In doing so, a copy of the photos will be moved to your Mac’s storage disk. If they’re deleted from within the app, you can then go to the Recently Deleted folder and quickly restore them.
A similar procedure can be performed using the various photo gallery apps found on Android devices.
Way 6: Recovering Photos From the Recycle Bin
In case you weren’t aware, there is a place where files go before they’re permanently deleted on Windows and macOS. On Windows, this is Recycle Bin. On Mac, it’s Trash. The two work very similar to each other, with only slight differences.
⚠️ This method isn’t always viable for those who need to know how to recover SD card photos. Cameras do not have a Recycle Bin equivalent of their own. Therefore, your only recovery option (short of restoring from a backup) is to recover the photos with data recovery software.
We’re including this mostly as a quick reminder – just in case the photos were copied to your computer first and deleted there. It takes just a few seconds to check.
On Windows
Windows will send any file you delete to the Recycle Bin unless it’s either permanently deleted or too large to be stored in the Recycle Bin.
Here’s how you can restore files from the Recycle Bin on Windows 10 and 11:
- Open Recycle Bin on your Desktop.
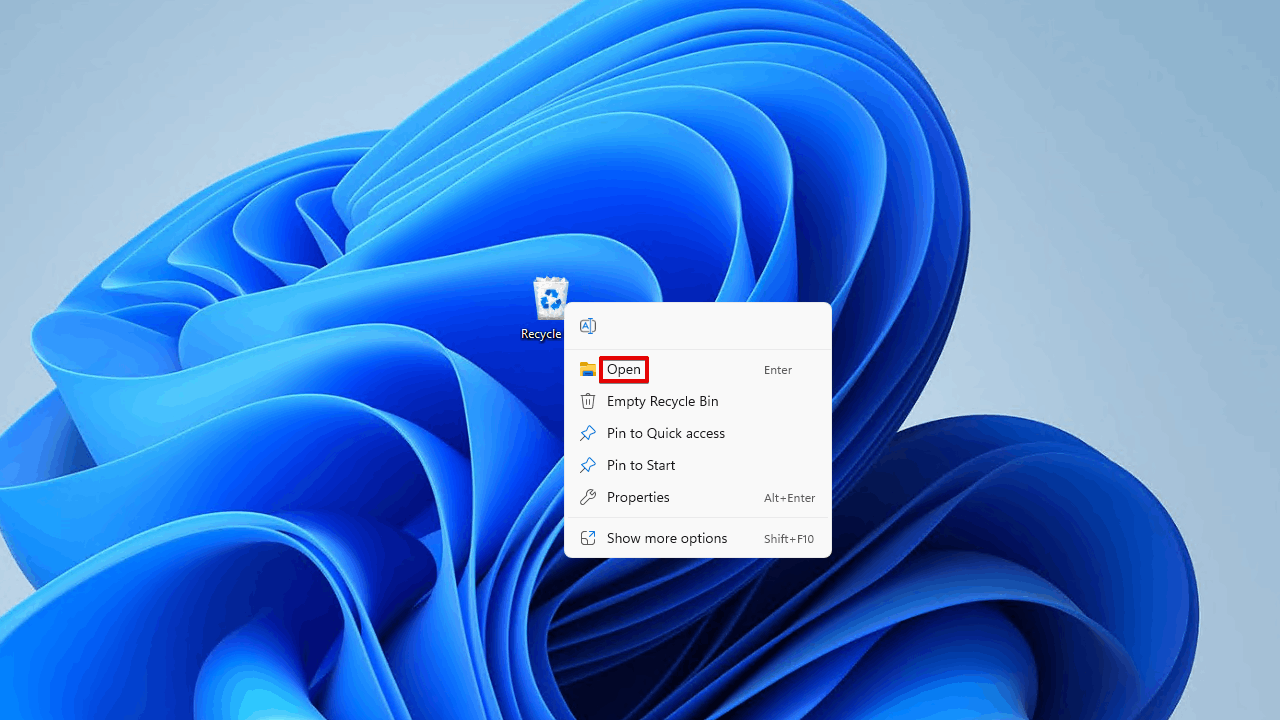
- Select the data you want to restore, then click Restore the selected items.
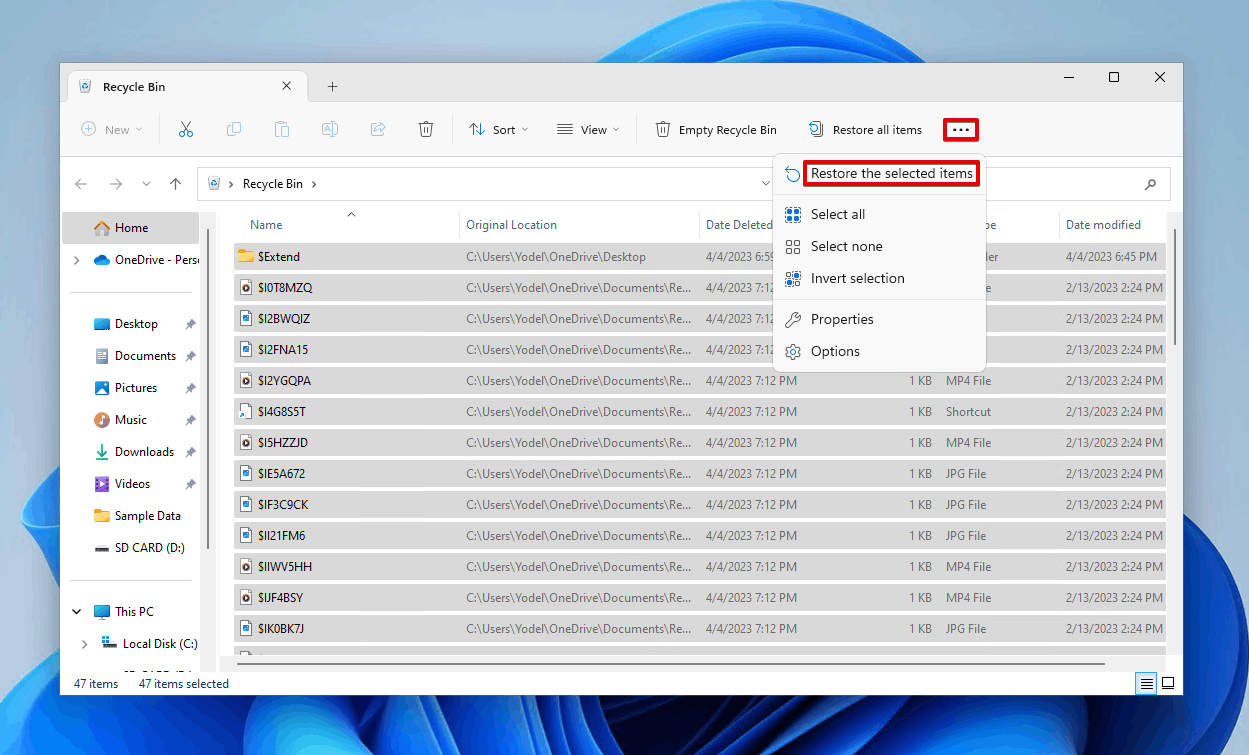
This will restore the items back to their original location. If you want to restore them elsewhere, simply drag and drop them out of Recycle Bin and into another folder.
On Mac
The process of restoring data is similar on macOS.
You need to simply:
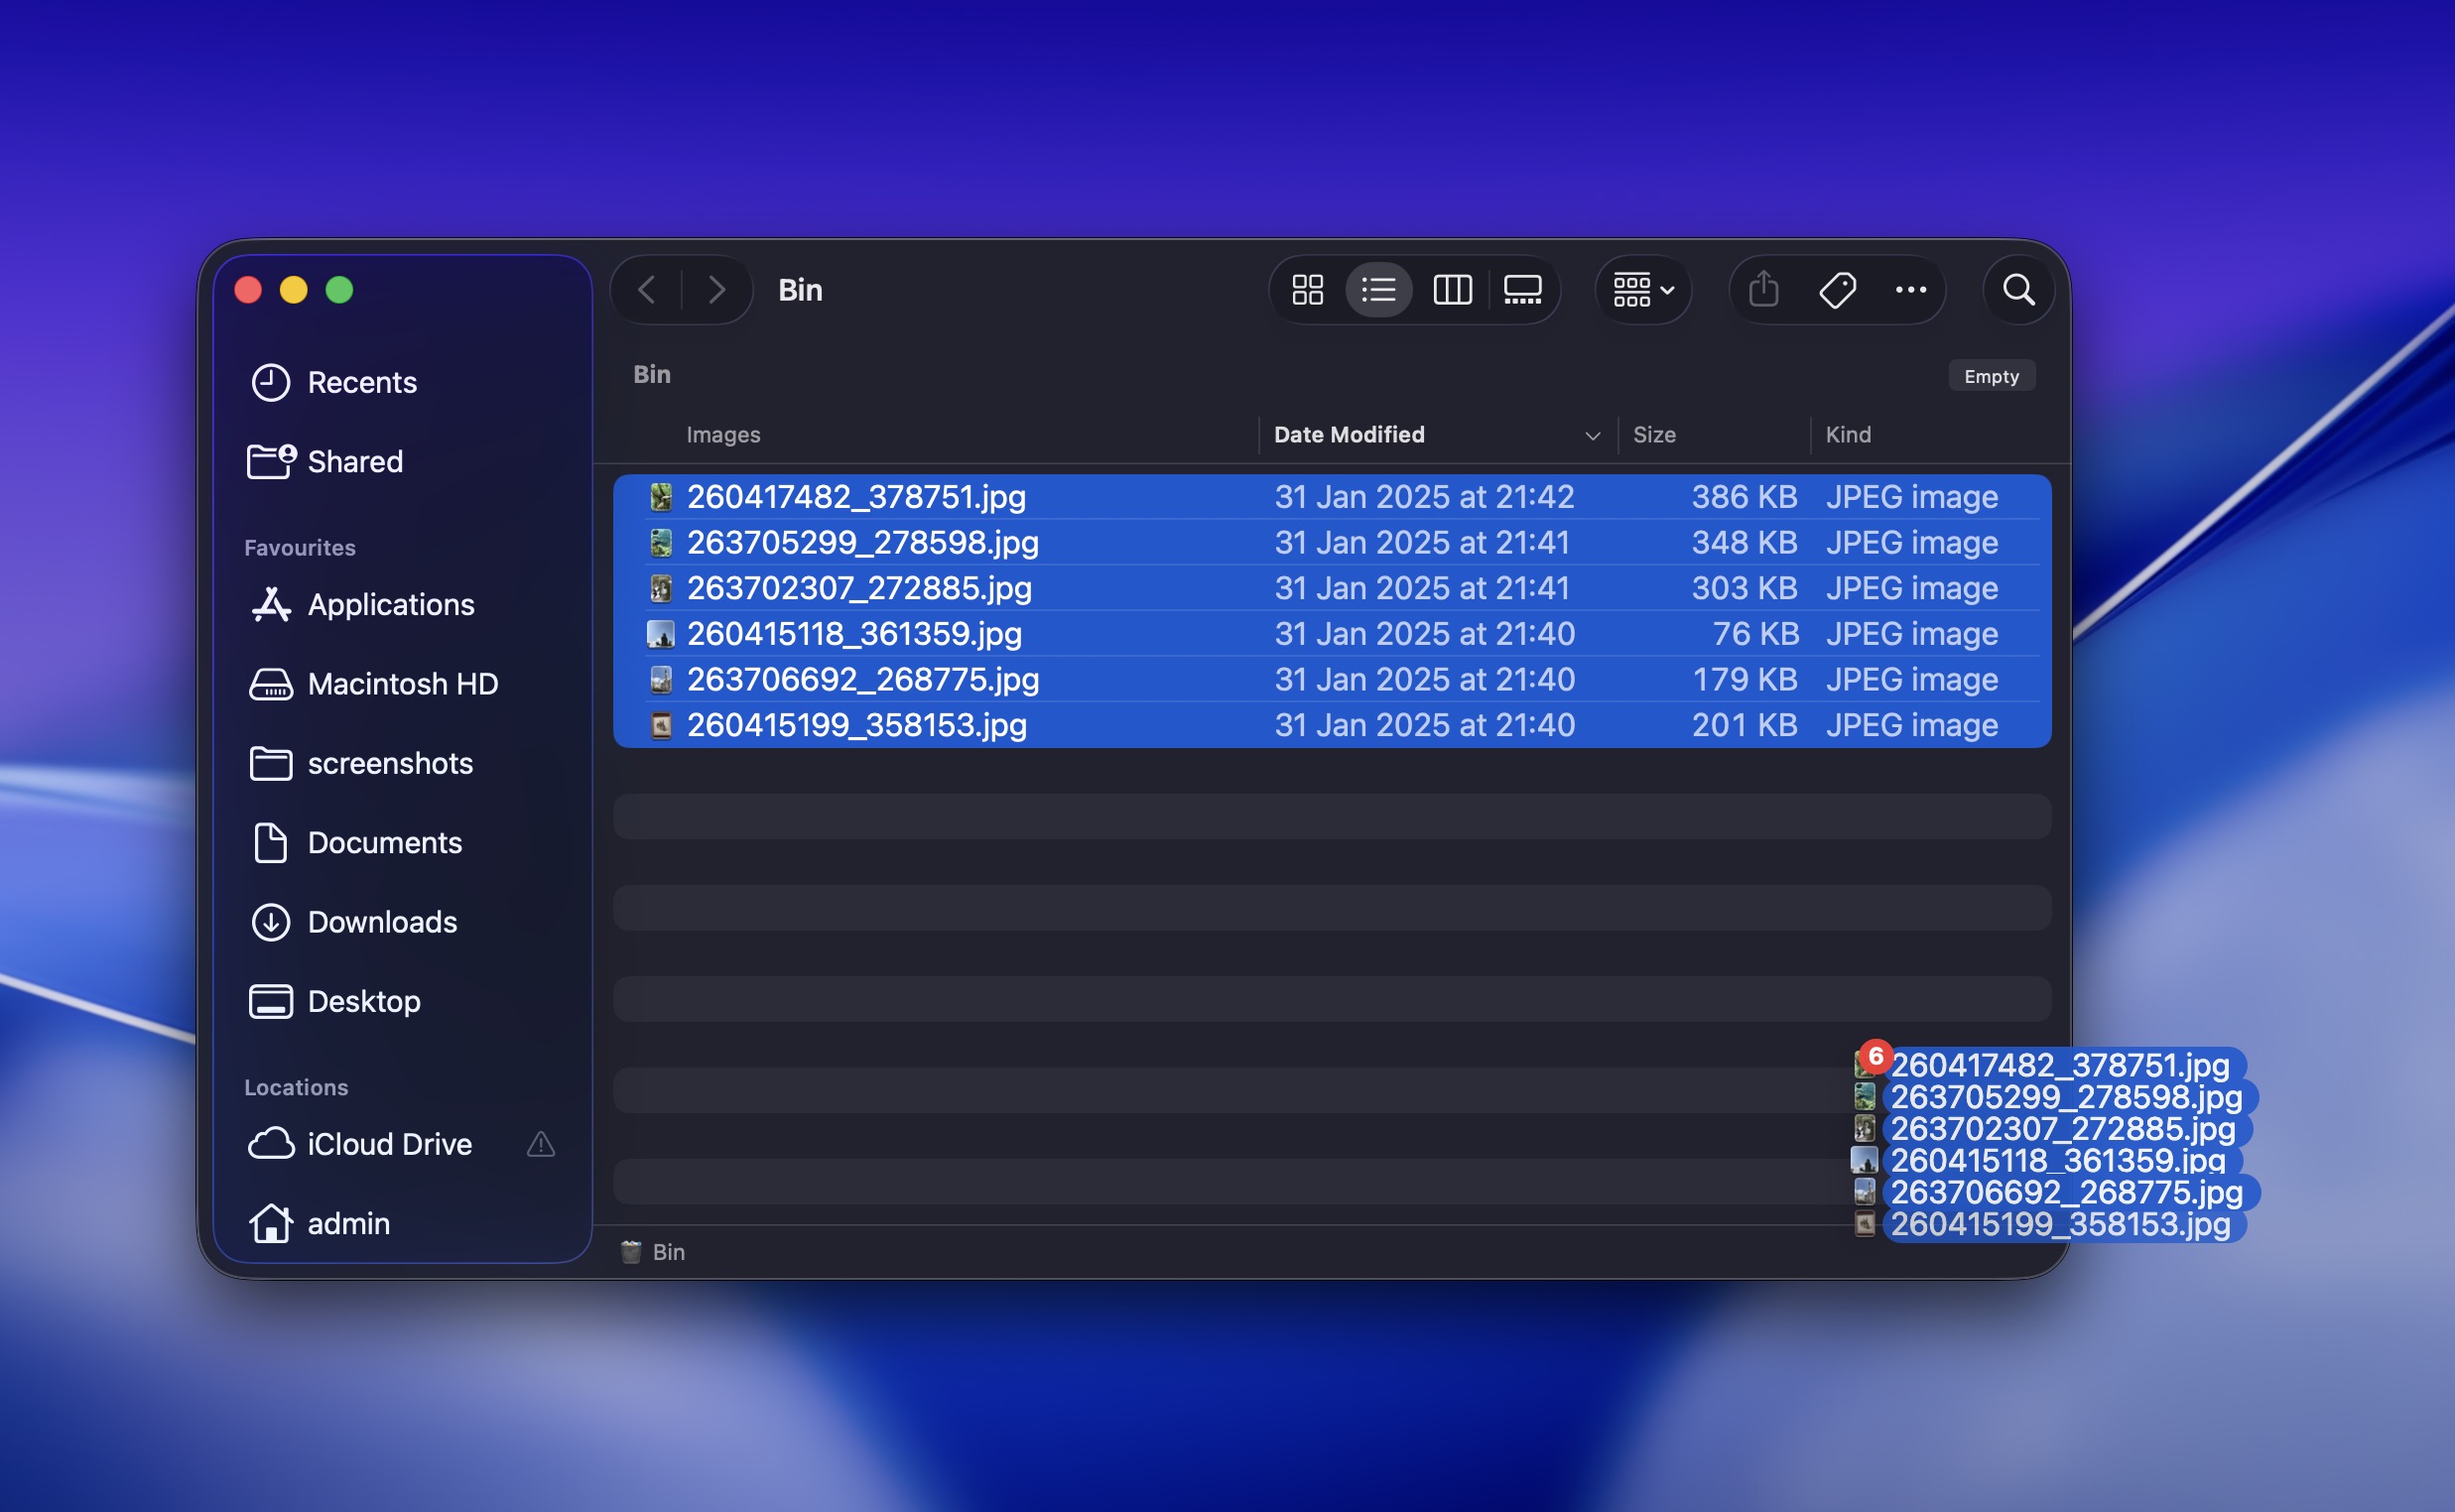
- Open Trash using Finder.
- Drag and drop the files to a safe location.
One more thing: files in Recycle Bin or Trash aren’t always stored on your computer’s main drive. For external devices, the deleted files sit in a hidden system folder on that same device. So if you deleted photos from an external storage, connect that device first, then check Recycle Bin or Trash. Otherwise, those deleted files may not appear there at all.
Wrapping Up SD Card Photo Recovery
What’s important when you’re trying to recover SD card photos from an SD card on Mac, Windows, or even Android, is that you act quickly. Photos that have been deleted can still be recovered, whether they were deleted by accident or became missing due to some form of SD card corruption.
Much of the time, you can recover the data yourself using data recovery software like Disk Drill. It’s pretty straightforward: connect the SD card to your computer, open the app, run a scan, review what it finds, and recover the files to a safe location. In many cases, that’s all it takes.
However, in cases where the SD card is no longer detected at all or shows signs of physical damage, you should consult a data recovery service instead. But thankfully, most situations aren’t that severe, so a DIY approach is usually enough.


FAQ
You can use a free SD card recovery application. Here are three popular options:
- Disk Drill (100 MB for free with Windows version)
- PhotoRec (Windows, Mac, and Linux)
- Windows File Recovery (Windows)
Disk Drill has an easy-to-use graphical user interface, while PhotoRec and Windows File Recovery are command-line utilities with some notable limitations. Even though they can recover photos from an SD card for free, Windows File Recovery’s recovery engine is very limited, and PhotoRec relies on signature-based scanning only, which means it doesn’t preserve original file names, folder structure, or metadata.
Unfortunately, it’s not possible to recover deleted photos from a memory card without software. You can, however, go through your backups and look for them there. Some digital cameras automatically create backup copies and store them in the internal memory, so make sure to look there as well.
You can, but your chances drop the more you use it. When you delete photos, the data stays on the card until something new writes over it. If you kept taking photos, some of that space may be replaced.
You might recover everything, only part of it, or nothing at all; it depends on how much new data was written. The only way to know for sure is to scan the card with recovery software and see what’s still there.
Android users can download an SD card recovery app called DiskDigger directly from the Google Play Store and use it to recover deleted photos with a few simple taps. But there’s a catch – without root access, results are usually limited (often just thumbnails or cached versions).
That doesn’t mean you should rush to root your phone. Yes, rooting won’t affect the SD card itself (unless the card was used as internal/system storage), but the process will wipe the phone’s internal memory and may also cause problems with certain apps afterward. For most, it’s simply not worth the risk just for photo recovery.
For better results, it’s smarter to remove the SD card, connect it to a computer with a card reader, and scan it using desktop recovery software. That gives you a much deeper scan and a higher chance of getting full-quality photos back.
If your SD card has been formatted, then we will want to use a third-party recovery software to recover the files from the storage device. Keep in mind a formatted SD card doesn’t have the highest chance for data recovery, especially after a full format, but it’s worth trying. The good news is that if the card was formatted in a camera, it was most likely a quick format, which doesn’t immediately erase the actual data. (Although some cameras can send an SD_ERASE command during formatting. Think of it as a TRIM-like operation for SD cards – it can permanently clear deleted data and make recovery impossible.)
Use data recovery software of your choice and scan the SD card before you do anything else with it. We recommend starting with Disk Drill.