


Is your SD card not showing up or not being recognized properly? A problem like this can happen to anyone for a number of different reasons, but the good news is that there are just as many solutions that you can try to fix it. Our goal with this page was simple: to gather the methods that actually helped in real SD card detection cases, test them on real equipment, and organize them in a way that makes sense.
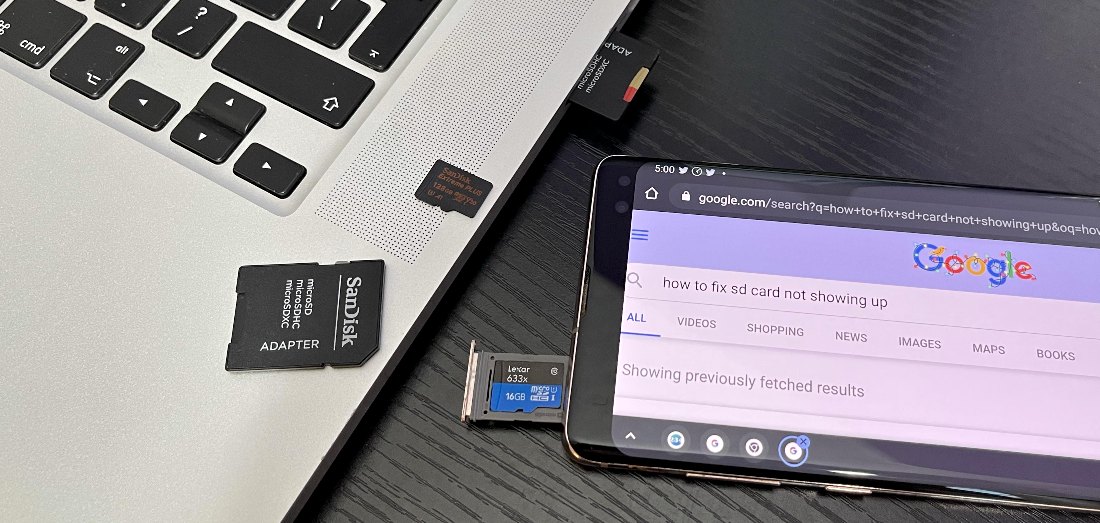
Quick Roadmap to Fixing an SD Card That Won’t Show Up
To make our guide practical, we looked through around 60 real-world cases where an SD card was not showing up, not reading, or not recognized by a phone, camera, computer, or card reader. These came from tech forums, data recovery communities, Reddit threads, and photo enthusiast discussions, including cases like a DPReview user whose SD card worked in some devices but caused connection errors on a PC. After reviewing those cases, we grouped the most common problems by what people actually saw on their devices. Instead of throwing every possible fix at you in random order, we’ll help you match your symptom to the method that makes the most sense.
The table below is your roadmap – find the scenario that matches your case, then jump to the method that fits it best. In some situations, there may be two or three possible fixes, so we will list them in order, starting with the simplest one.
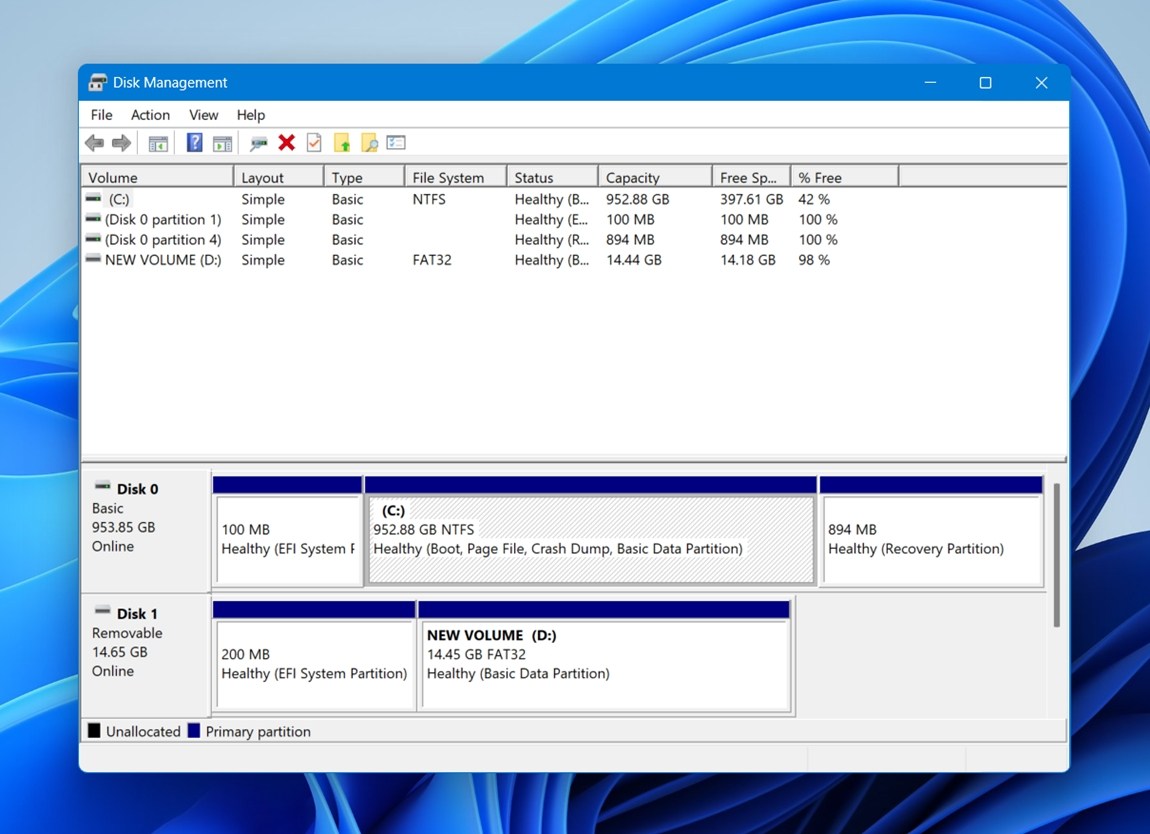 If the card shows up there, even as RAW, Unallocated, or without a drive letter, that is a good sign. Windows can still detect the card at some level, which means you have a clearer path forward. If the SD card does not appear in Disk Management at all, start with the basic hardware checks first: another reader, another adapter, another USB port, another device.
|
What you see |
Start with these methods |
|
The SD card does not show up on your Android phone |
Method 1: Remount and reinsert the card. Then try Method 2: Clean the SD card contacts or slot. If the phone supports the card but still cannot use it, go to Method 10: Format the SD card. |
|
The SD card works in one device but not another |
Method 3: Test another reader, adapter, USB port, or device. Then try Method 4: Check compatibility and capacity limits. |
|
The SD card does not show up in Windows File Explorer |
Method 3: Test another reader, adapter, USB port, or device. If Windows detects the card but does not show it in File Explorer, go to Method 6: Assign a new drive letter to the SD card. If the partition was deleted and the card appears as Unallocated, go to Method 9: Create a partition on the SD card. |
|
The SD card appears in Disk Management but has no drive letter |
|
|
The SD card appears as RAW, unallocated, or corrupted |
If the files matter, recover them first. Then try Method 8: Recover file system on SD card. If that does not help, go to Method 9: Create a partition on the SD card or Method 10: Format the SD card. |
|
Windows asks you to format the SD card before you can use it |
If the files matter, do not format it yet. Recover the data first. Then try Method 7: Use CHKDSK to repair SD card corruption or Method 8: Recover file system on SD card. |
|
Your camera does not recognize the SD card |
Method 4: Check compatibility and capacity limits. Then try Method 5: Check if the SD card is inserted correctly and Method 2: Clean the SD card contacts or slot. |
|
Your camera says the card needs to be formatted |
If the card contains photos or videos you need, recover them first. Then go to Method 10: Format the SD card, preferably in the camera that will use it. |
|
The SD card is brand-new but does not show up correctly |
Method 4: Check compatibility and capacity limits. Then try Method 9: Create a partition on the SD card or Method 10: Format the SD card. |
|
The card reader stopped working after a Windows update |
Try Method 3: Test another reader, adapter, USB port, or device. |
Before You Try to Fix the SD Card, Recover Your Data First
As we warned at the beginning, if the files on this SD card are important, it is better to recover them before you start fixing. Not every method here is destructive, of course – cleaning the contacts or assigning a drive letter should not erase anything.
But some fixes can change the file system. CHKDSK, formatting, creating a new partition – those steps can help make the SD card usable again, but they can also (or will also) erase data.
So here is the safe rule: if the card shows up in Disk Management with the correct or close-to-correct capacity, data recovery software may still be able to scan it even when the OS refuses to open it.
Here’s how to recover your data using Disk Drill:
- Download and install Disk Drill for Windows or Mac (we’re using the Windows version for the purposes of this demonstration).
- Connect the SD card to your computer and launch Disk Drill.
- Select your SD card from the device list. If you’re not sure which device is your SD card, look for the correct storage capacity to identify it.
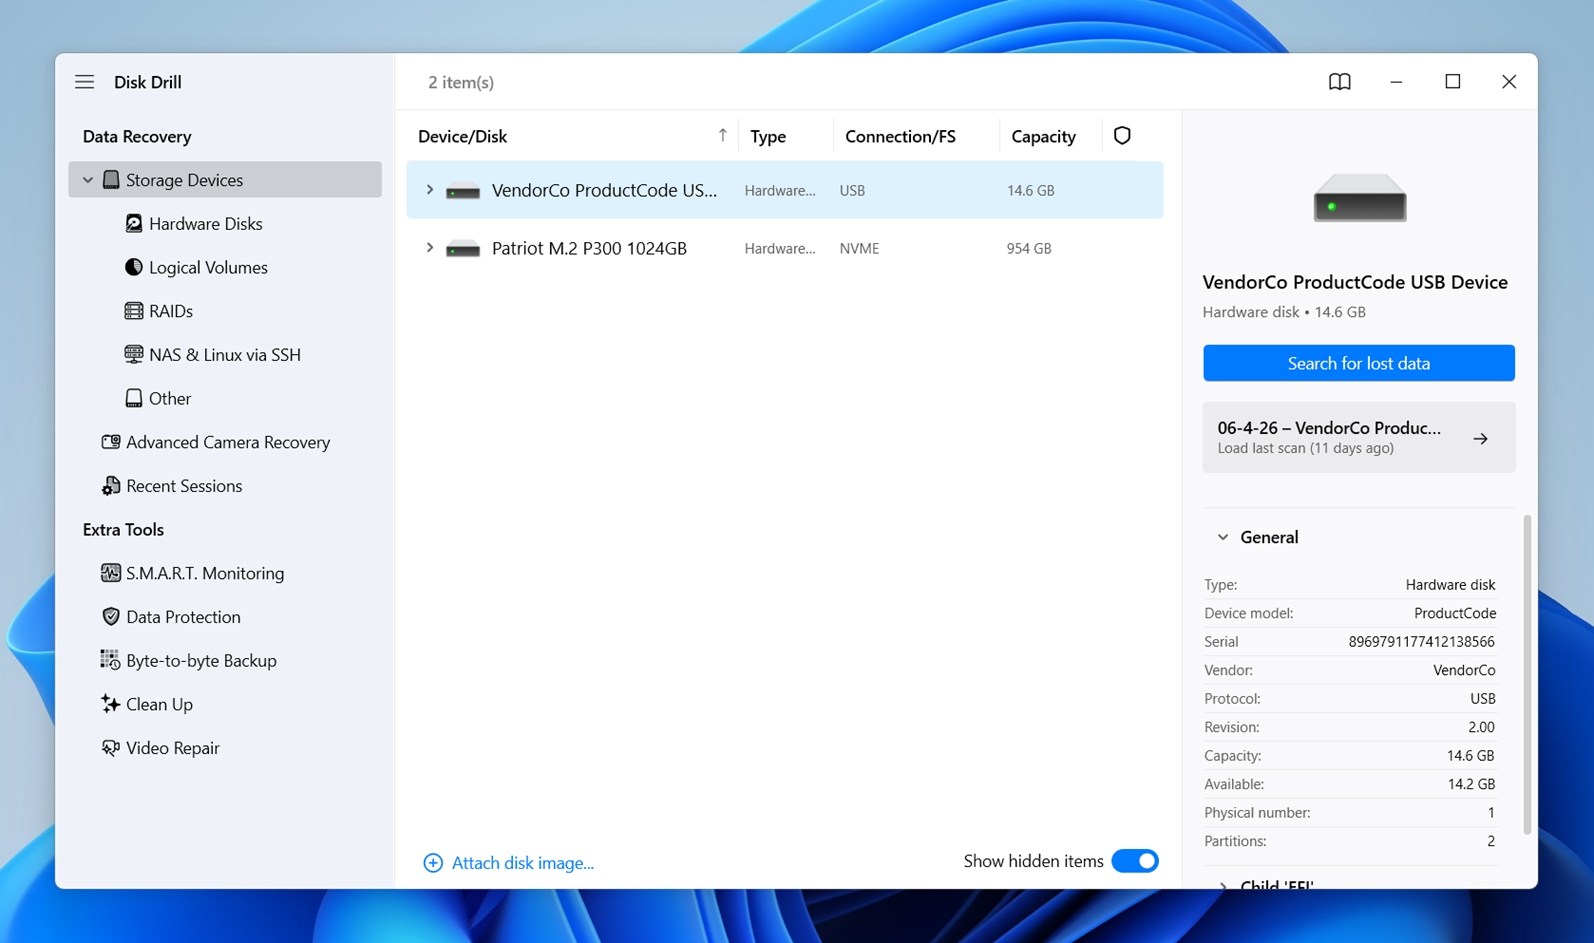
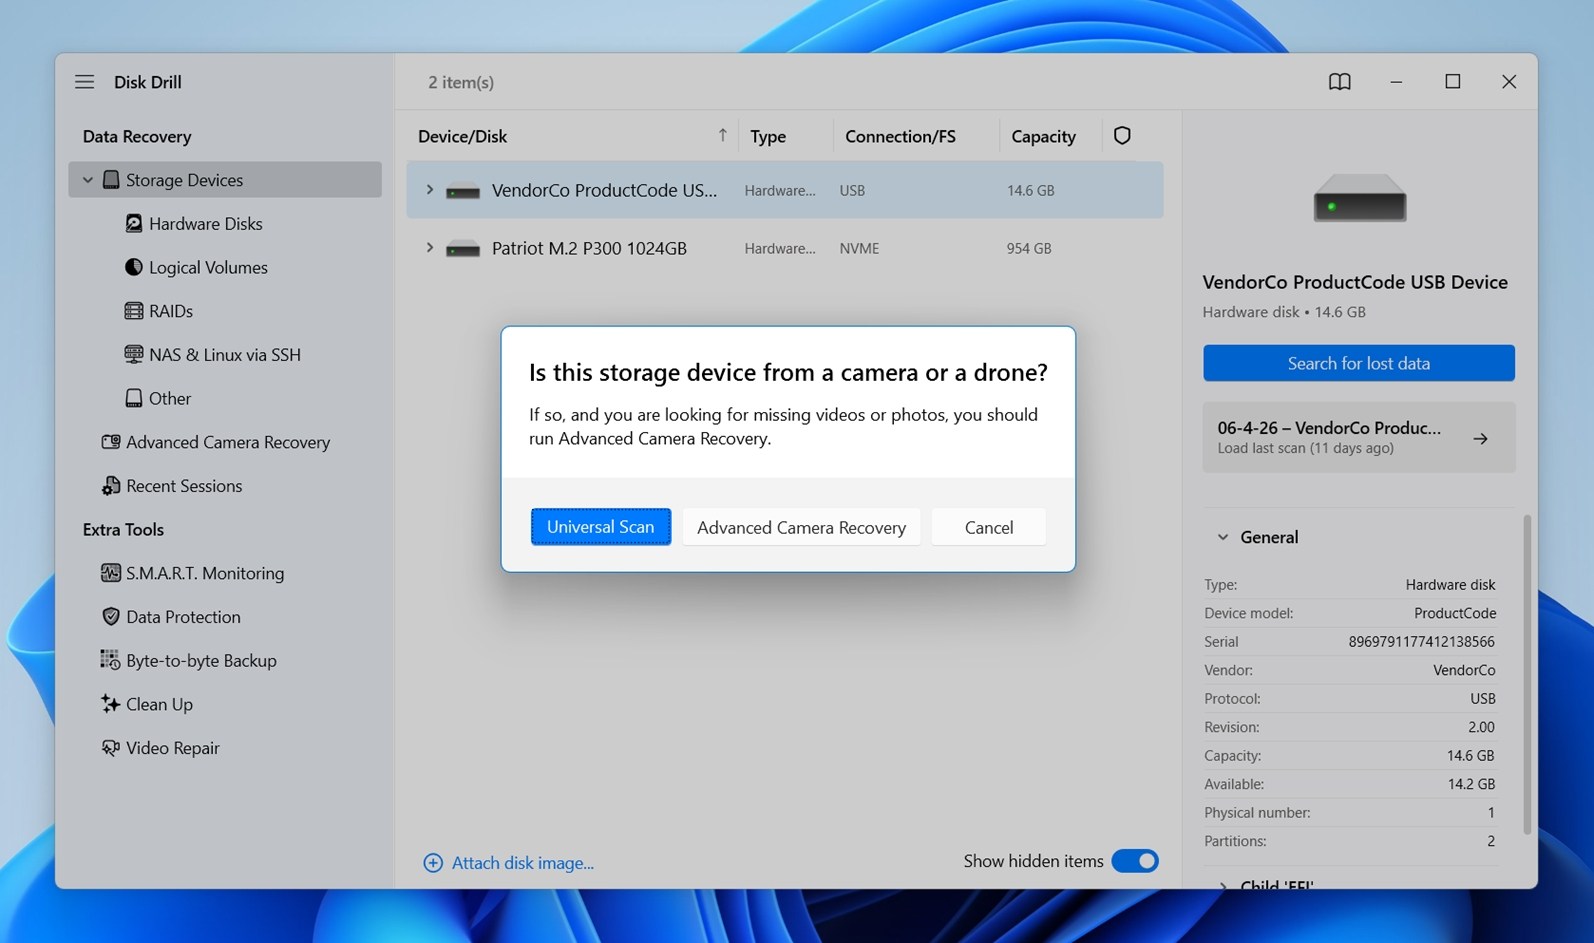
- Click Search for lost data. When Disk Drill asks which scan type to use, choose Universal Scan. This is the best first option for most cases.
- You can click the Review found items button to see scan results immediately (with scanning continuing in the background).
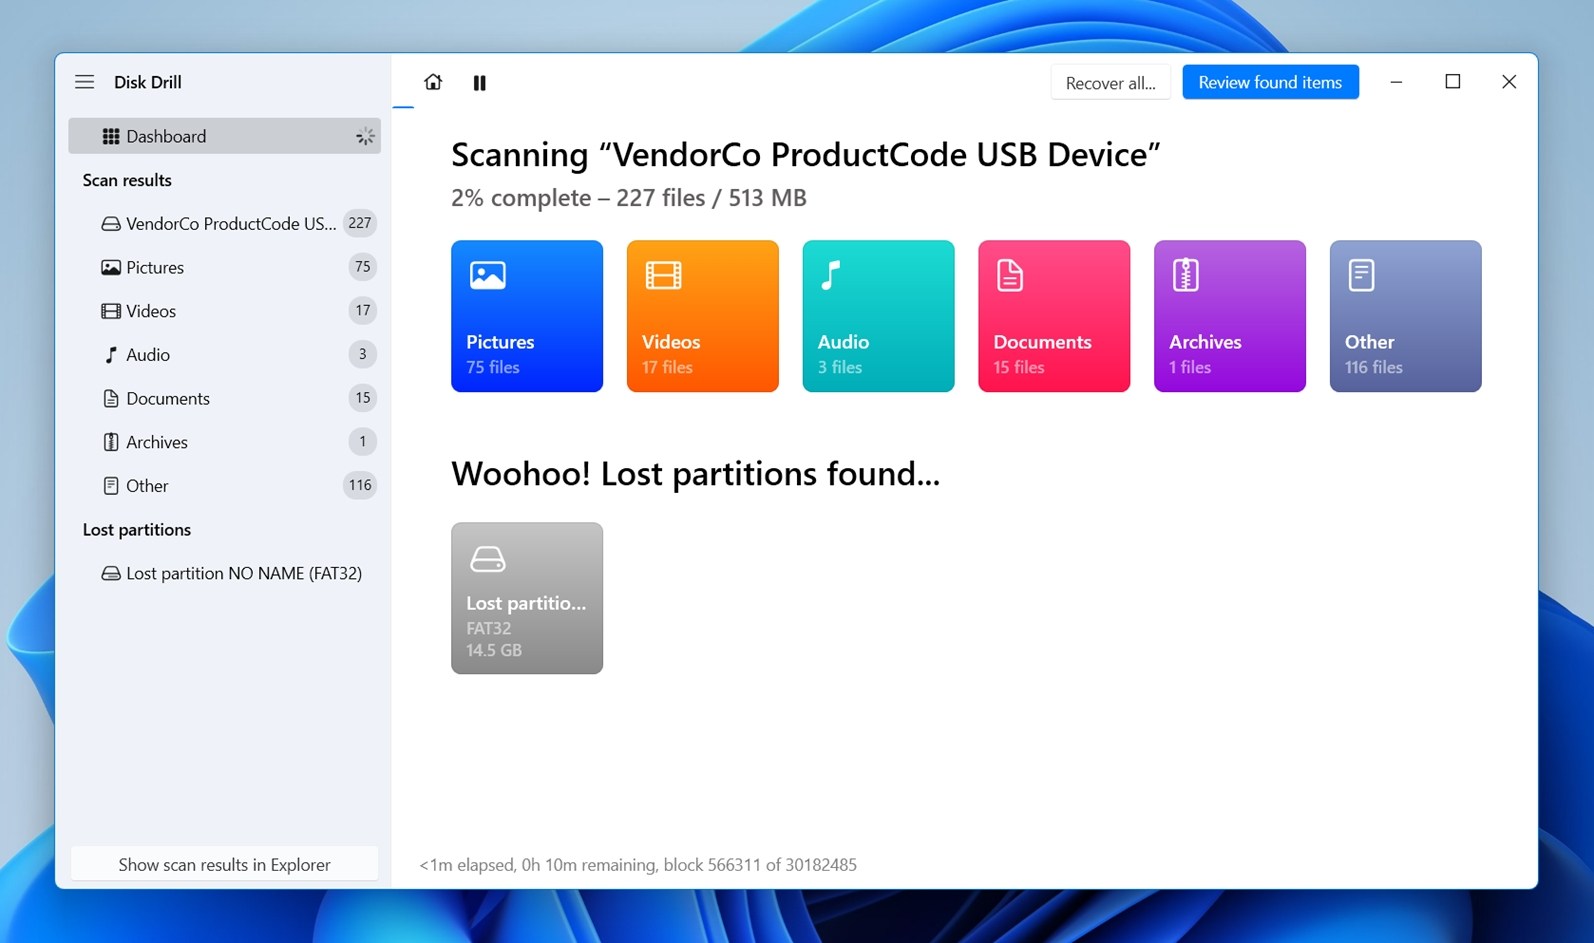
Expand the scan result categories to see what Disk Drill found. Click the small arrow next to a category to open it. (Files under Existing are still readable through the current file system. Files under Deleted or lost were found outside the “normal” structure, often after deletion, corruption, or a damaged file system.)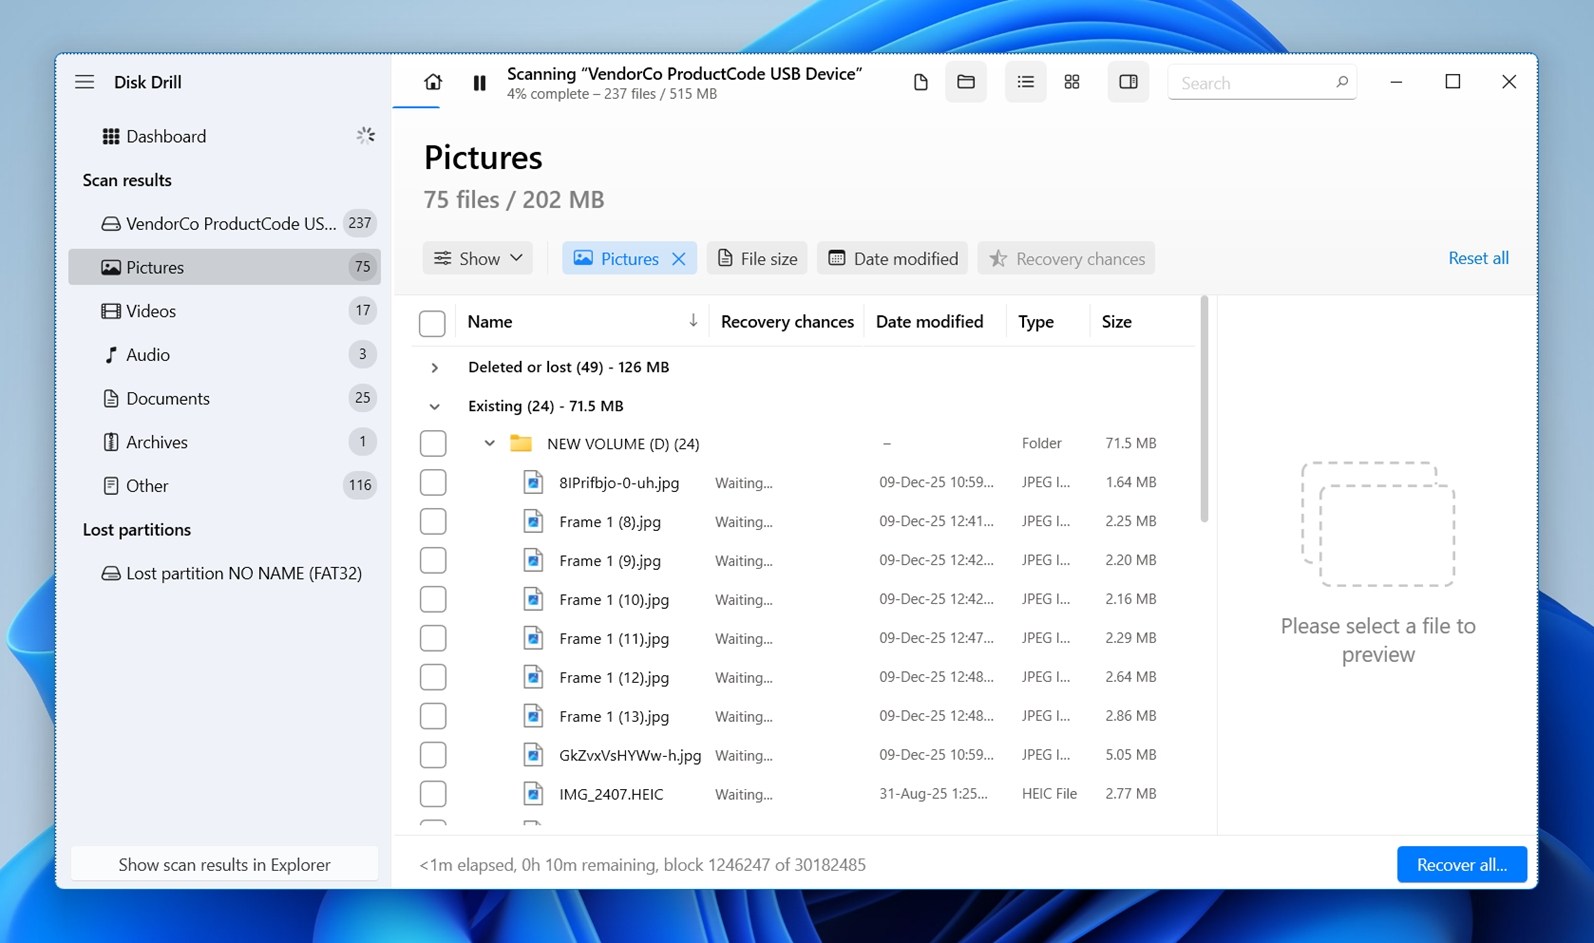
- Select the files you want to recover. You can preview recoverable files before restoration (formats like JPG, PNG, PDF, Office documents, and other files your operating system can open natively or through an installed viewer).
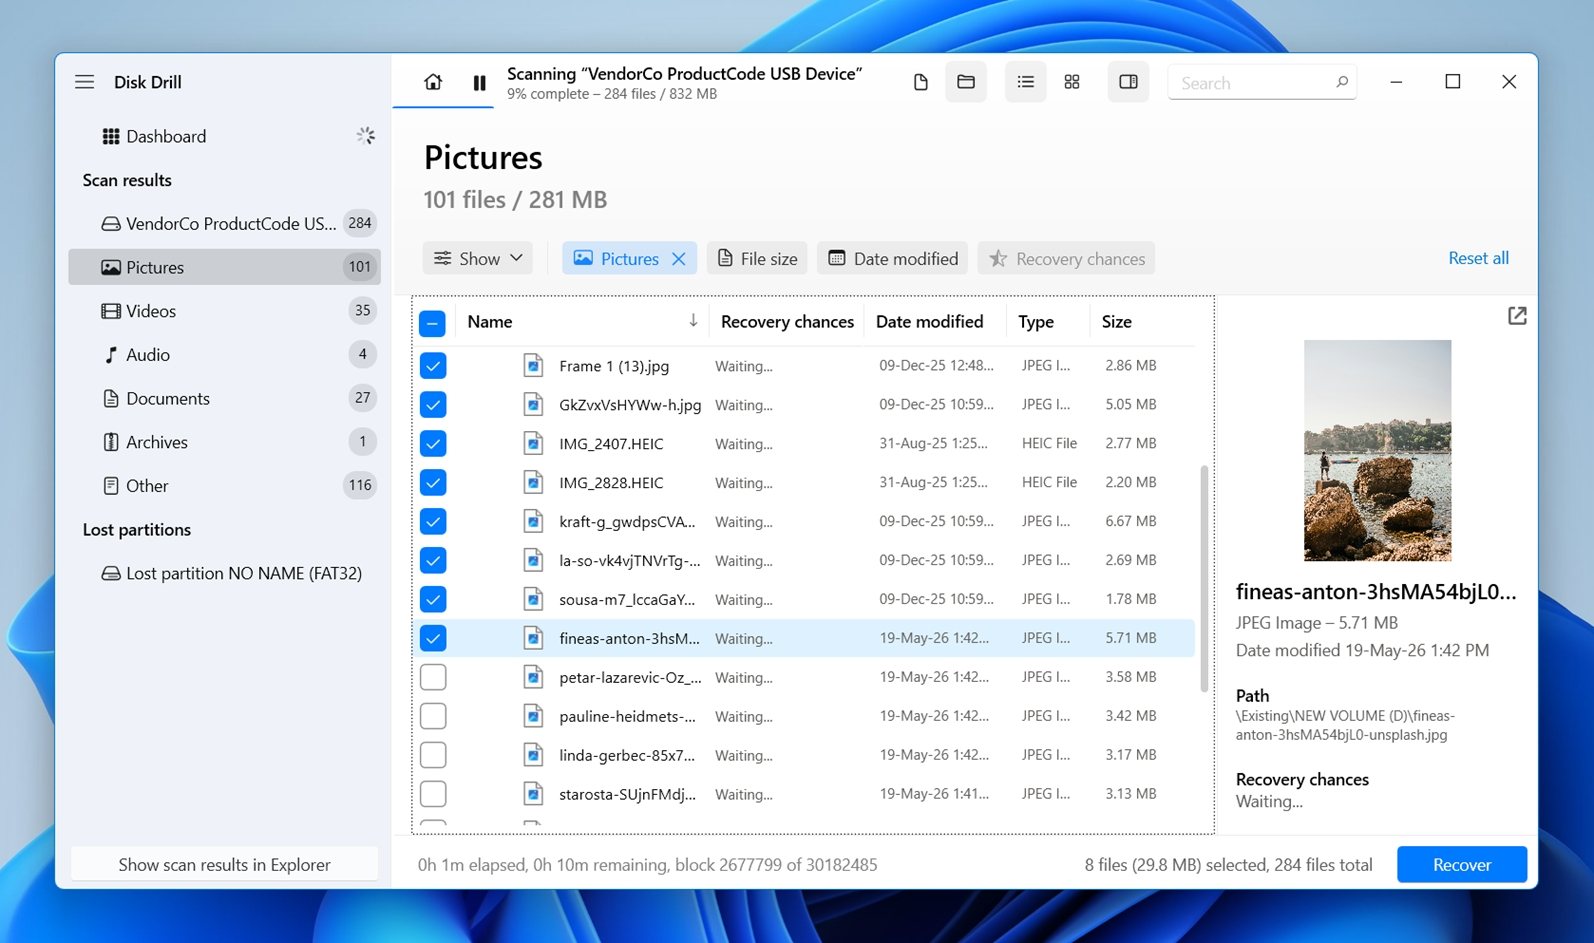
- Click the Recover button and specify the recovery destination and click Next to begin the recovery of your files.

After recovering your important files from the SD card, you can safely move on to the repair methods below without worrying that something will wipe out the only copy of your data.
How to Fix SD Card Not Detected, Not Showing, or Not Reading Error
There is a pretty wide range of fixes for this problem here. Some take 10 seconds. Others might require some comfort with Windows tools or recovery software, but we will walk through each step and include screenshots where they help, so you are not left guessing what to click next.
Method 1: Remount and Reinsert the Card
Start with the simplest fix: remove the SD card and insert it again. Sounds too basic, but it often helps when an SD card is not showing up or not reading by a phone, camera, console, or computer. A tiny misalignment or a temporary mounting glitch can be enough to make the device act like the card is missing.
Here is what to do depending on where you use the card:
- Computer. Safely eject the SD card if it appears anywhere, unplug the card reader, wait a few seconds, then plug it back in. If you use a microSD card with an adapter, remove the microSD card from the adapter and insert it again.
- Android phone. Power the phone off completely, remove the microSD card, check that it sits cleanly in the tray or slot, then insert it again and turn the phone back on. If your micro SD card is not detected after that, check Storage settings to see whether Android sees the card but failed to mount it.
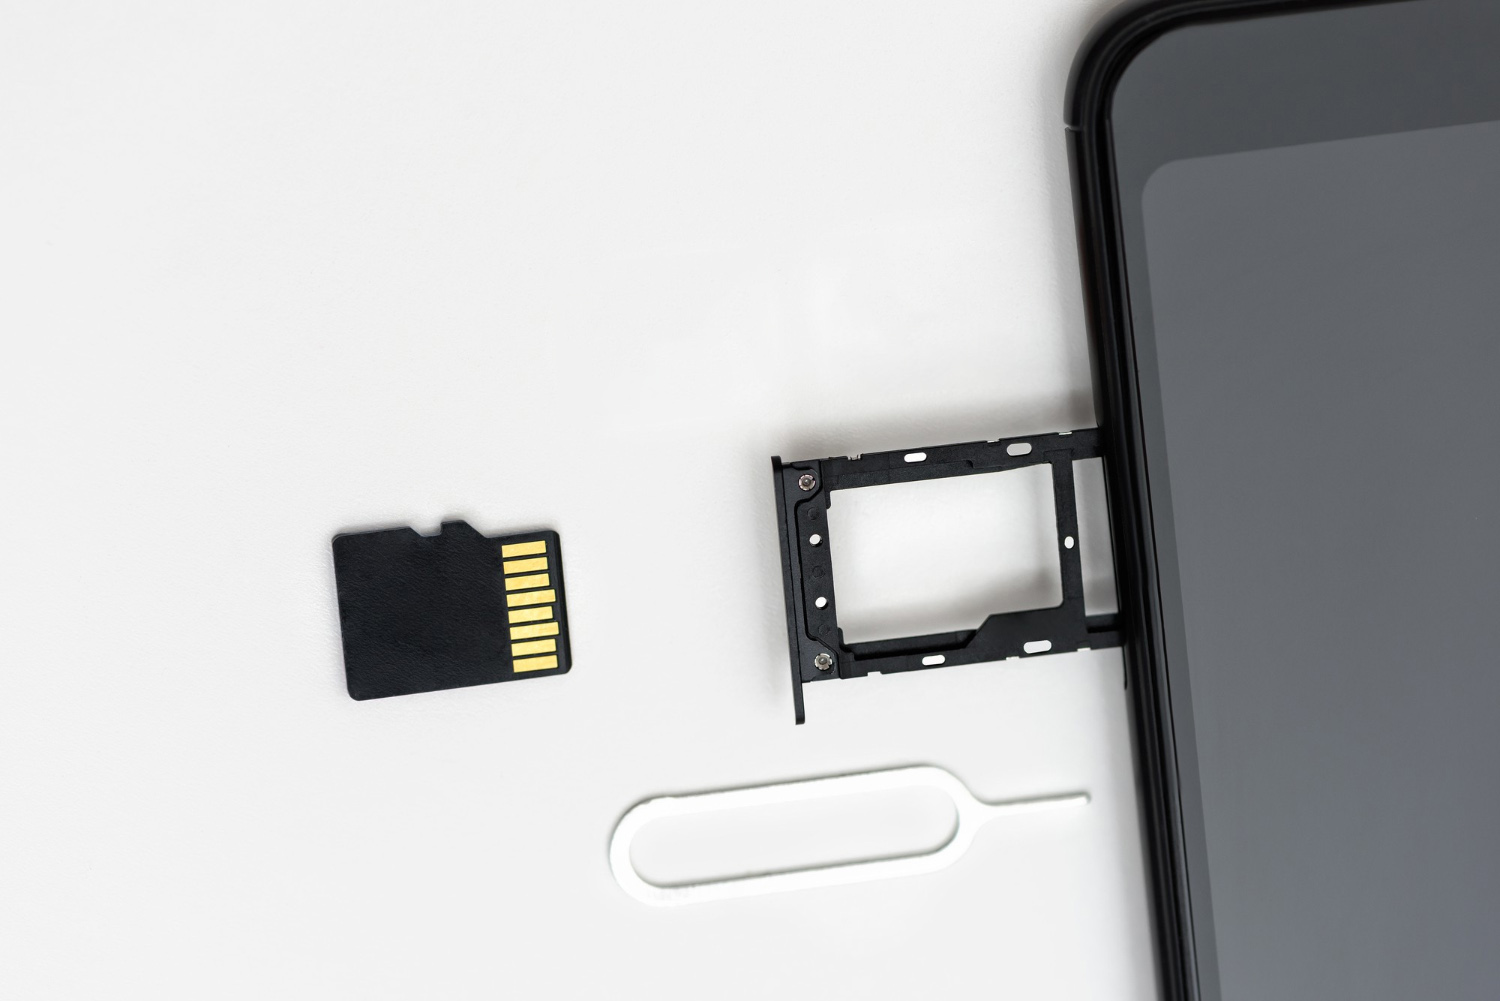
- Camera, drone, or action cam. Turn the device off first, open the card door, remove the card, then insert it again until it clicks or sits firmly in place. Do not pull the card out while the camera is saving photos or video, because that can corrupt the card.
- Console or handheld device. Fully power the device off, not sleep mode, then remove and reinsert the card. This matters for devices like the Nintendo Switch, Steam Deck, and older handheld consoles that may keep the card active while asleep.
If everything goes well, then your microSD card will be automatically mounted and should appear in your device’s storage settings. If the card still isn’t being detected, continue to the next fix.
Method 2: Clean the SD Card Contacts or Slot
SD cards depend on those small gold contacts to communicate with your device. A bit of dust or grime from a camera bag can be enough to make an SD card not reading issue look much worse than it is. The same applies when an SD card is not detected in a laptop: the contacts inside the laptop slot or card reader may not be getting a clean connection.
Remove the card and look closely at the contacts. They should be clean, flat, and free from obvious scratches, corrosion, bent areas. If they look dirty, wipe them gently with a soft microfiber cloth. For stubborn dirt, use a small amount of isopropyl alcohol on the cloth or a cotton swab, then let the card dry completely before inserting it again.
Avoid scraping the contacts with a knife, screwdriver, or anything abrasive. If the contacts are bent, missing, burned, or the card casing is cracked, stop here. Cleaning will not fix physical damage, and forcing the card into more devices can make recovery harder.
Method 3: Test Another Reader, Adapter, USB Port, or Device
As explained earlier in this article, an issue with an SD card not showing up doesn’t always mean the card itself is faulty. The problem could lie anywhere in the chain of components that connect your SD card to your computer. Here’s how you can diagnose the exact source of the problem:
- Start by testing your SD card in different devices. If you have a camera, phone, or another computer available, try the card in those devices. If it works in other devices but not your computer, this suggests the issue is with your computer’s hardware or software. If it doesn’t work, then the SD card is definitely to blame.
- Insert the SD card into a different SD card reader. Still nothing? Then make sure to insert the SD card reader into a different USB port. Many users have found that their cards work perfectly in one reader but fail to show up in another, which means the reader might be faulty or incompatible with the specific card.
- A card that works in different devices but not in different SD card readers on the same computer might be perfectly fine—the operating system could be the problem. You can easily test this by booting into a live Linux environment using a distribution like Ubuntu and accessing the SD card from there.
Method 4: Check Compatibility and Capacity Limits
Sometimes an SD card is not detected because the device simply cannot work with that card. This is common with older cameras, handheld consoles, car stereos, drones, some Android devices. The card may be perfectly healthy, but the device does not support its capacity, card type, or file system.
Capacity is the first thing to check.
- Standard SD cards go up to 2 GB,
- SDHC cards range from 4 GB to 32 GB,
- and SDXC cards start at 64 GB and go much higher.
An older camera that supports only SDHC cards, for example, may never recognize a 128 GB SDXC card. In that case, there is no fix. You need to use a smaller compatible card.
File system support is a little different because it can often be fixed with formatting. A card formatted as NTFS may work fine on a Windows PC but fail in an Android phone, or camera. Some older devices also require FAT32, while newer devices usually handle exFAT. If the card is detected on your computer but not in the target device, check the device manual and reformat the card to the file system it supports.
Method 5: Check if the SD Card Is Inserted Correctly
This one sounds almost too obvious. A card can feel like it went in properly while sitting slightly crooked, not fully clicked in, or shifted inside a loose adapter. While it shouldn’t be possible to insert SD cards incorrectly, even a mountain can be moved with enough determination and force.
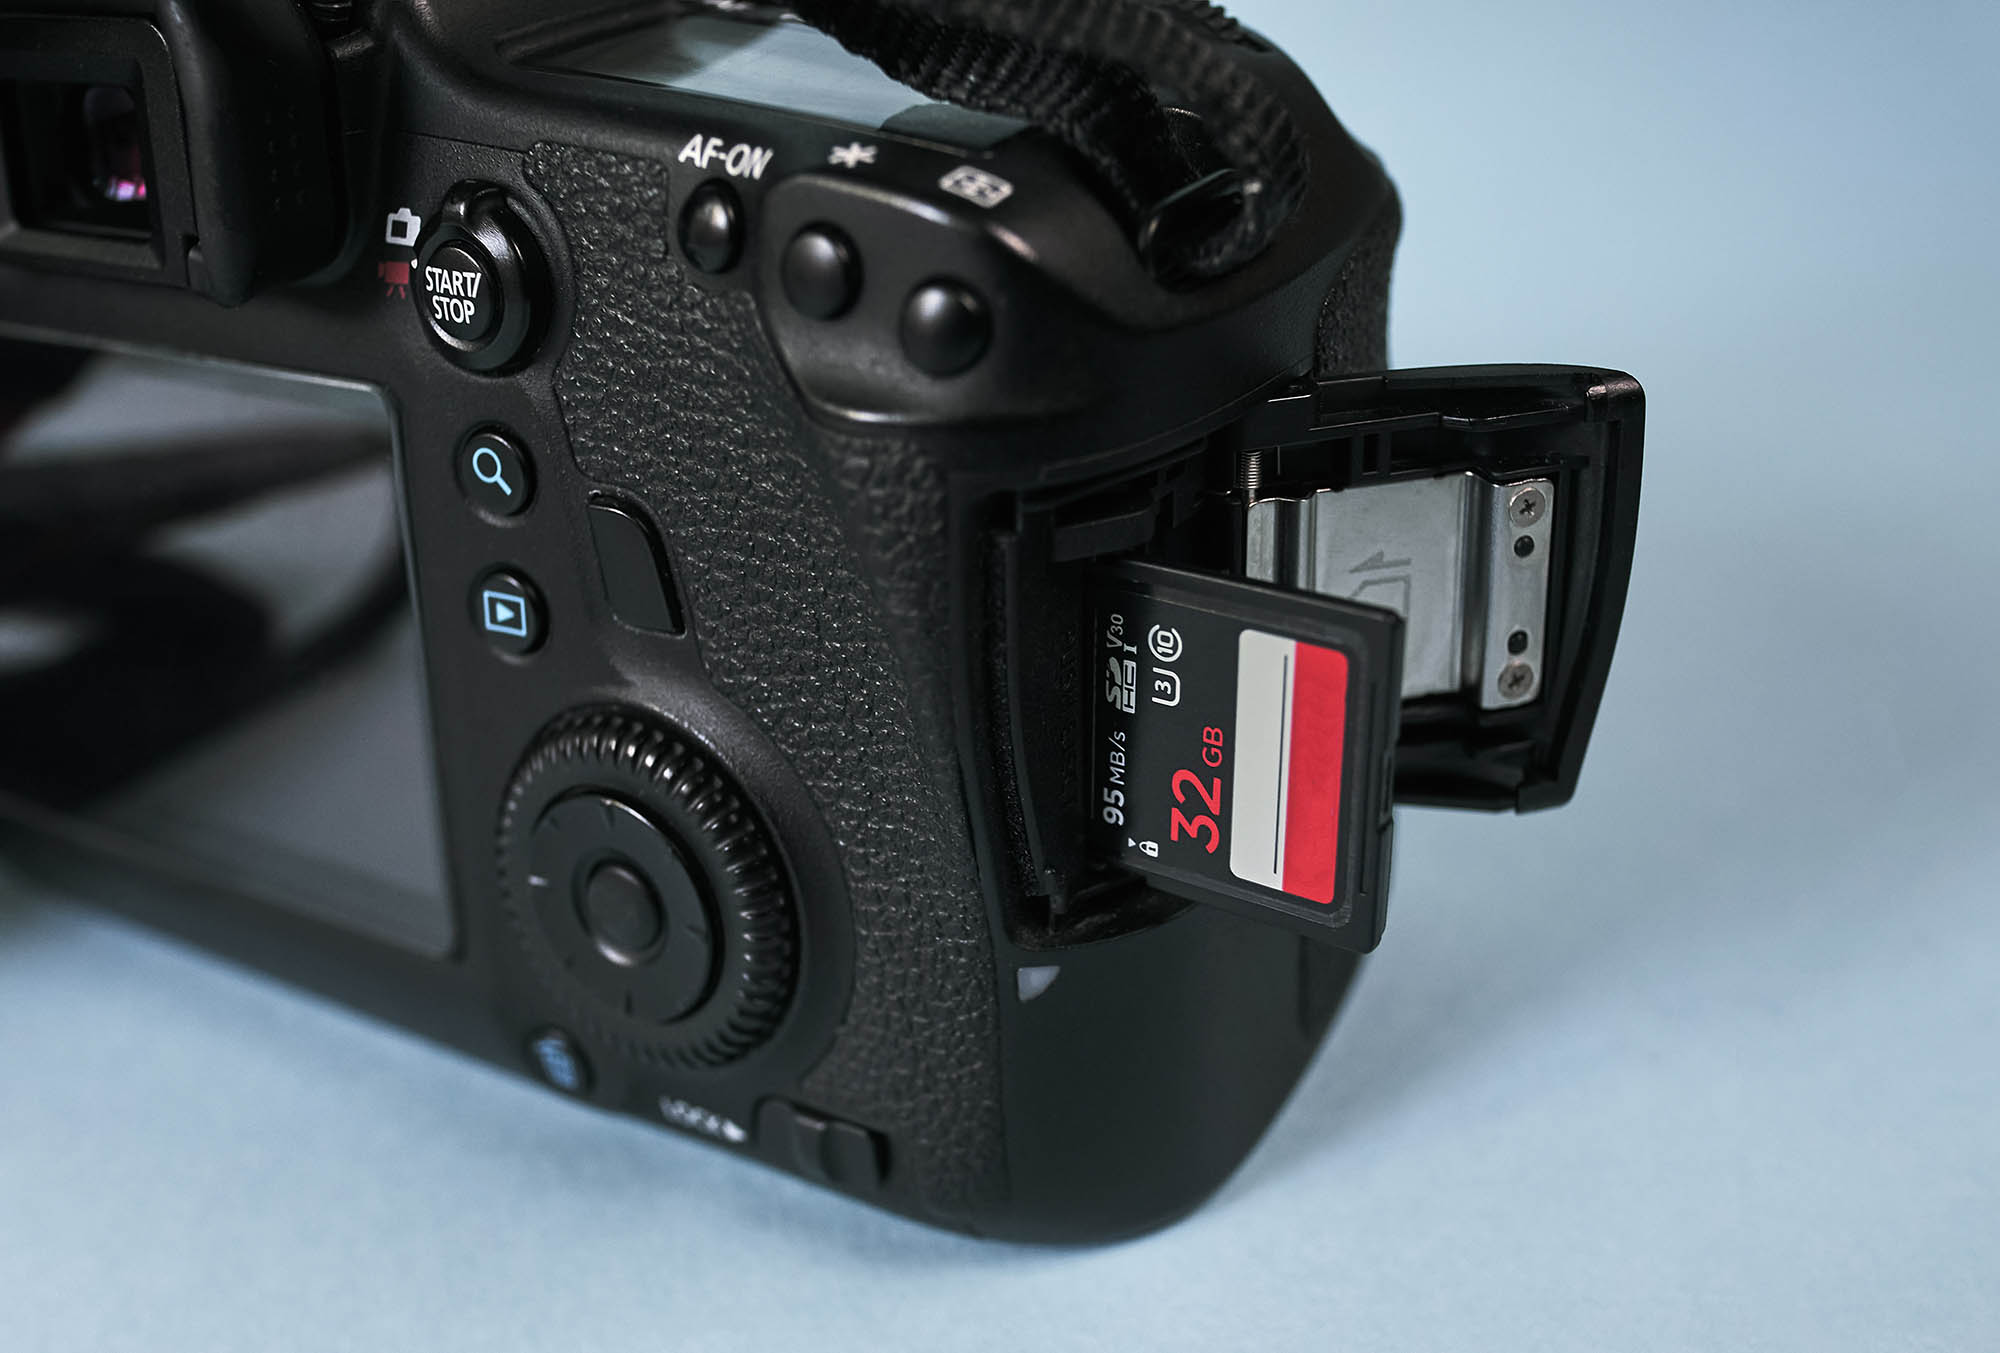
To correctly insert the SD card, open the memory card cover (if present) and slide the card in by pushing the center portion of the bottom edge until it clicks into place at the back of the slot.
Method 6: Assign a New Drive Letter to the SD Card
You can’t access an SD card on a Windows PC unless the SD card has been assigned a unique drive letter. Although Windows is supposed to assign drive letters to storage devices automatically, things don’t always go according to plan. Even when they do, simply changing the drive letter to a different one is sometimes enough for Windows to recognize an SD card. To manually assign a new drive letter to your SD card:
- Press Windows + X.
- Select Disk Management.
- Right-click your SD card reader and select the Change Drive Letter and Paths option.
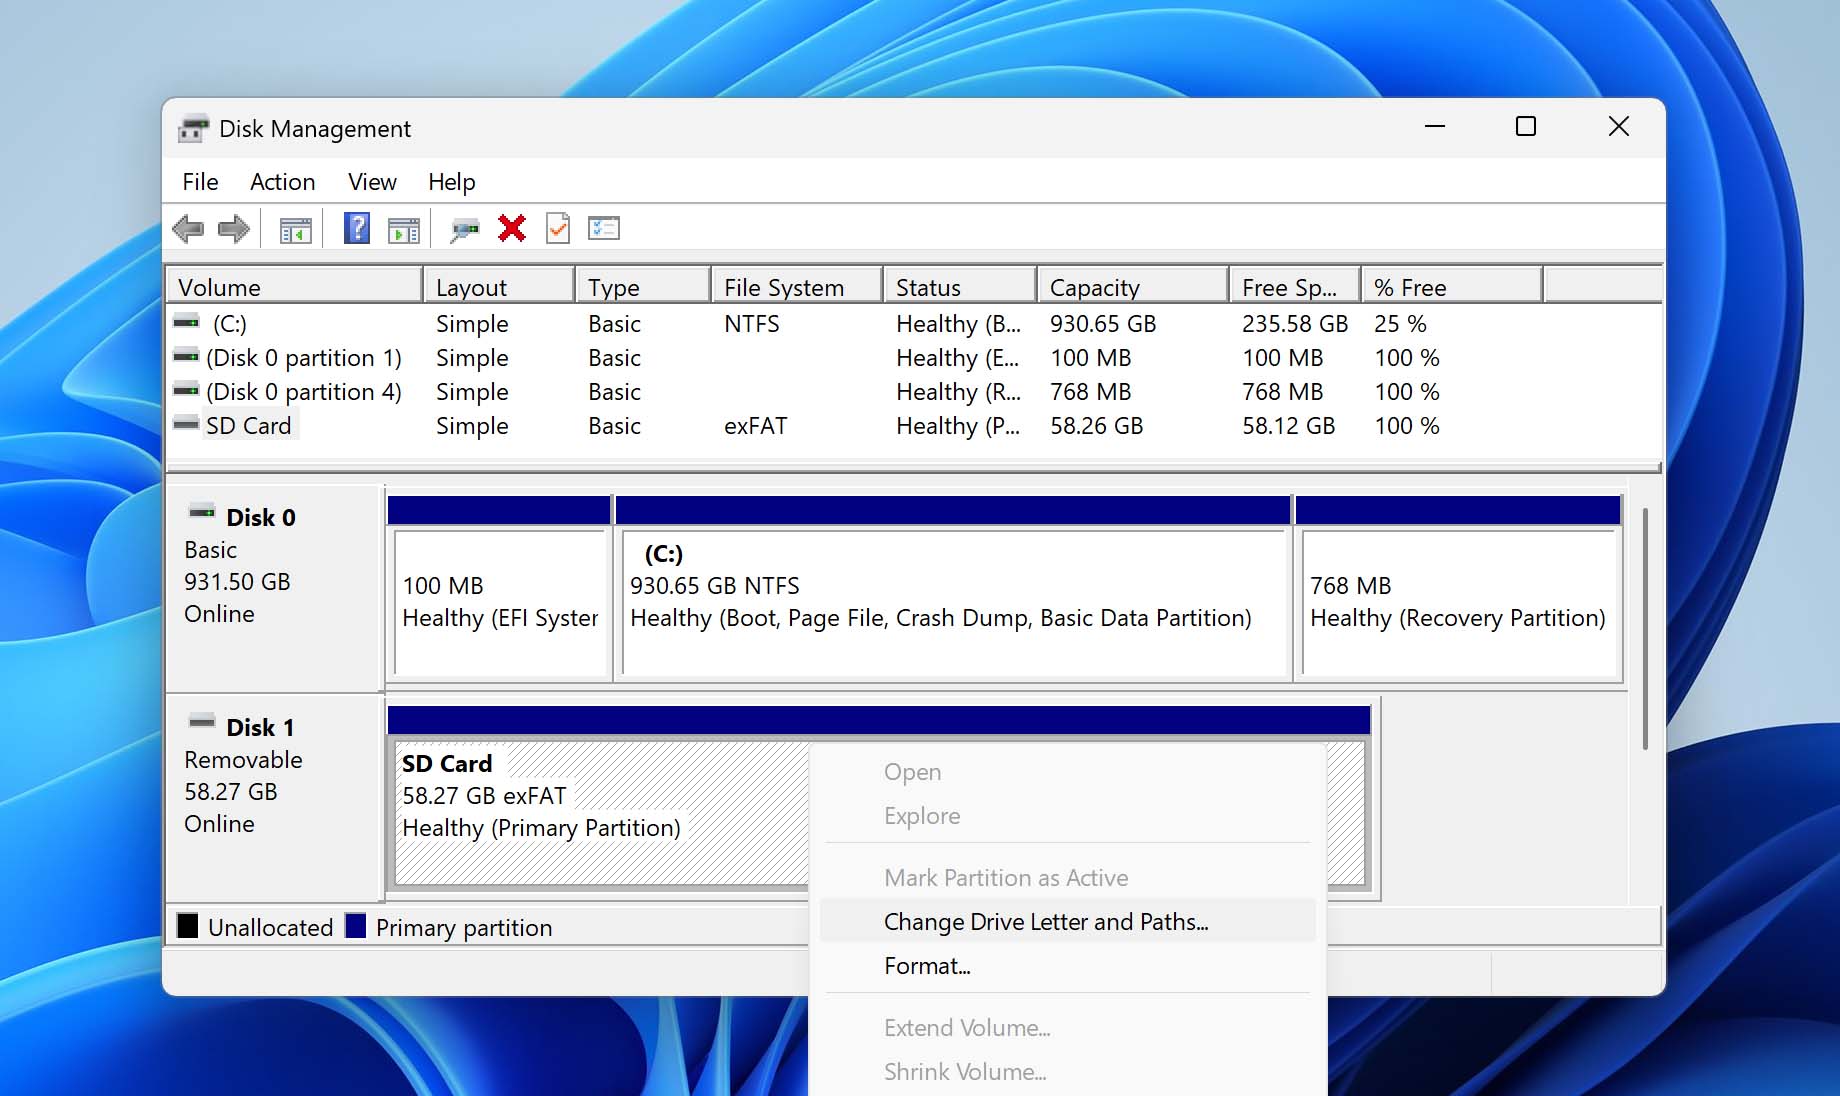
- Pick a new drive letter and confirm.
Method 7: Use CHKDSK to Repair SD Card Corruption
CHKDSK is a useful command-line tool that can automatically repair many file system errors to make a corrupted SD card usable again. The tool may seem somewhat intimidating, but it actually takes just one simple command to repair an SD card with it:
- Press Windows + X.
- Select Windows PowerShell (Admin).
- Enter the following command (make sure to replace X with the letter assigned to your SD card) and press Enter: chkdsk X: /R
- Wait for CHKDSK to finish. The process may take several hours, depending on the size and speed of your SD card.
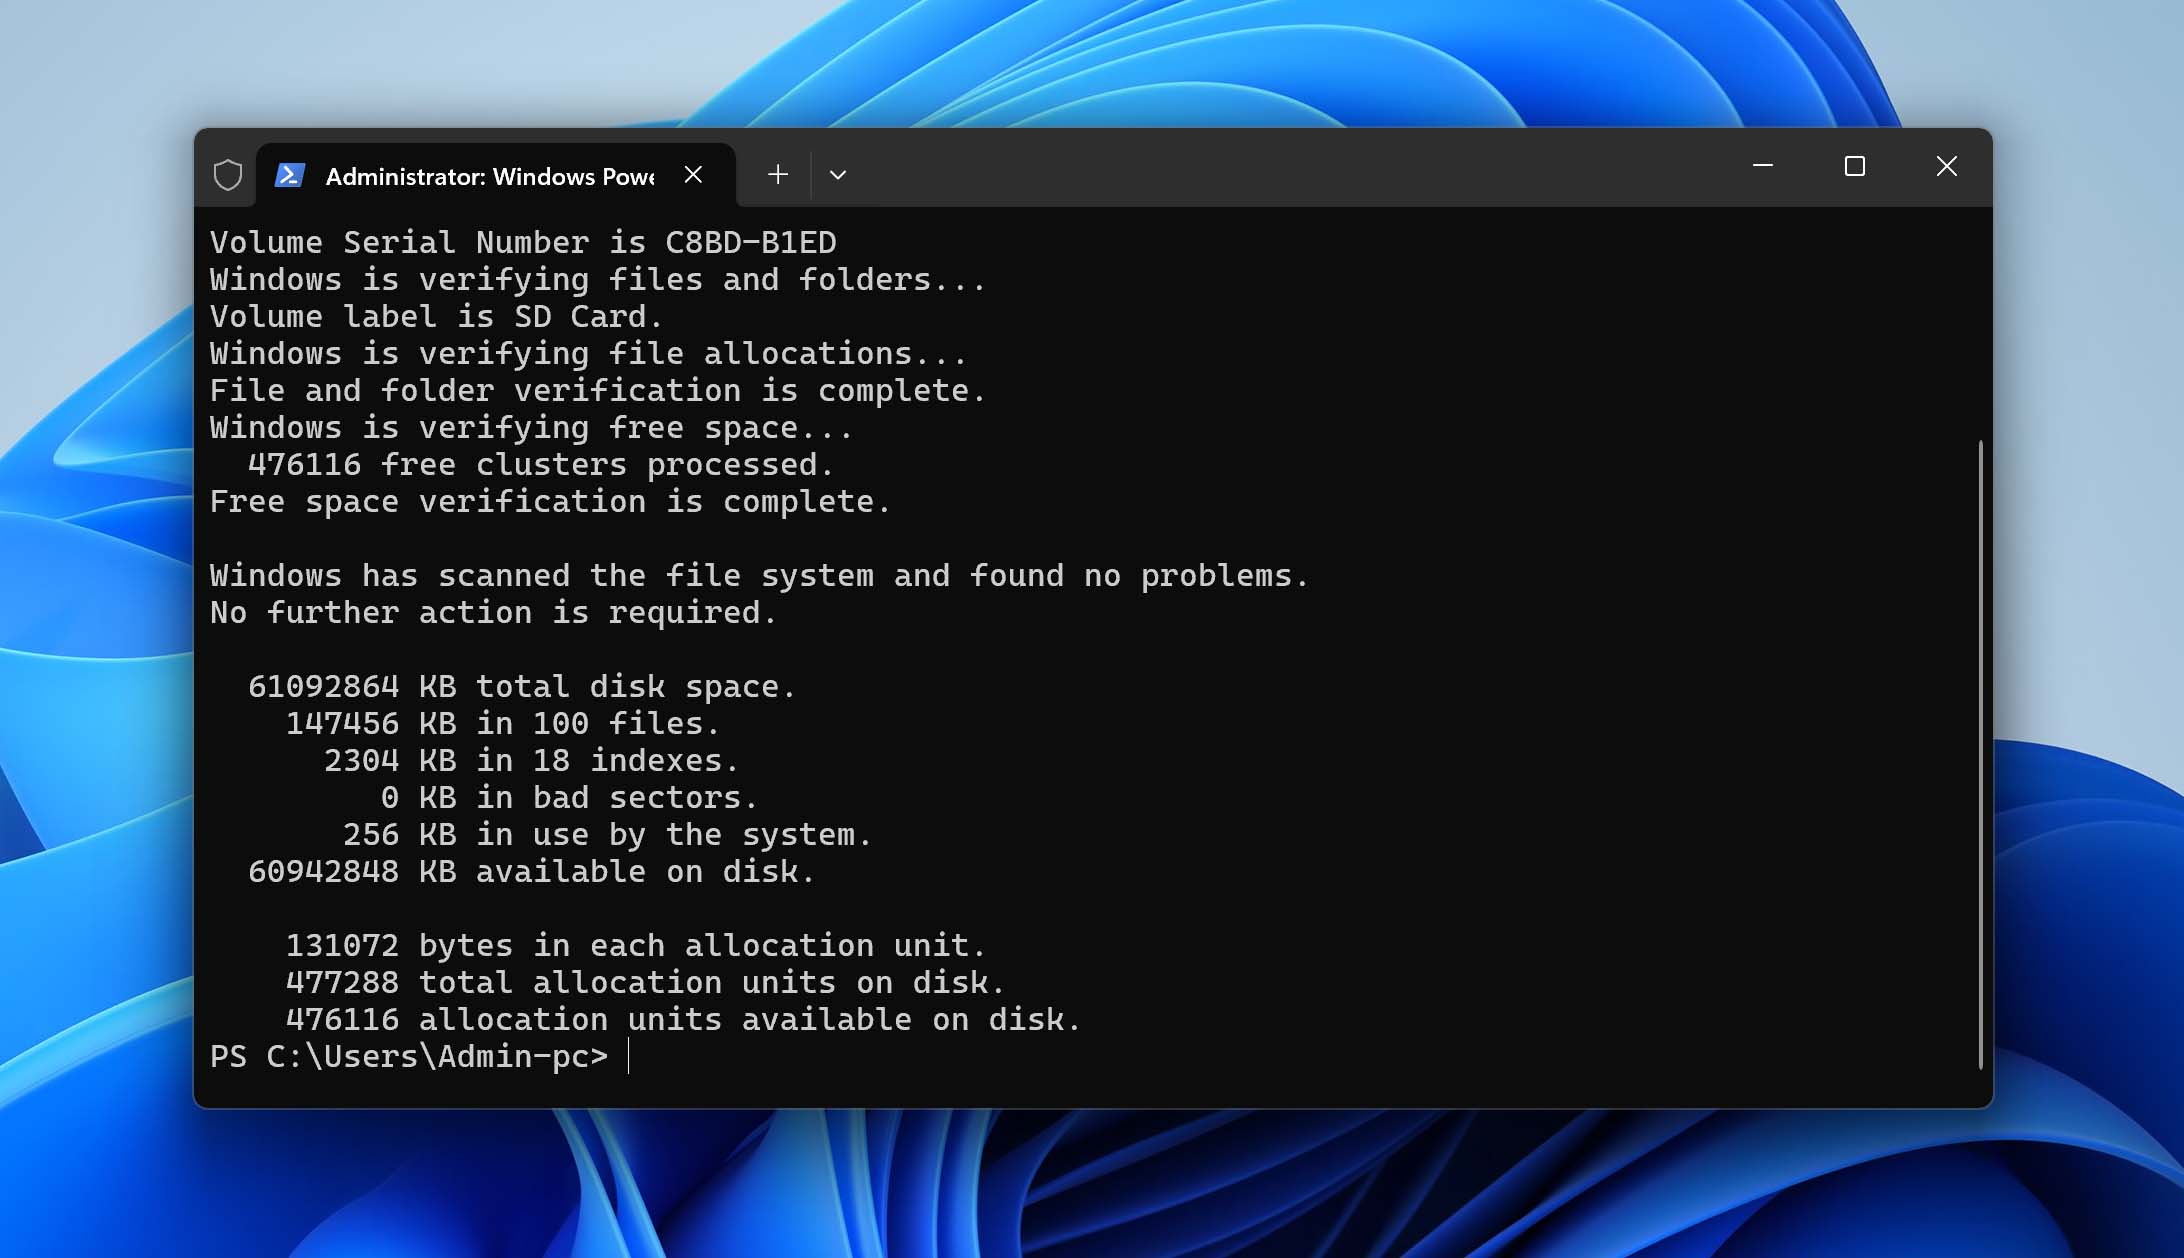
The /R parameter tells CHKDSK to checks the entire SD card for bad sectors and repair them if possible.
One important note: CHKDSK does not work with RAW drives. If Windows shows a message like “The type of the file system is RAW. CHKDSK is not available for RAW drives,” move to the next method.
Method 8: Recover File System on SD Card
If you checked Disk Management earlier and saw the SD card listed as RAW, Unallocated, or shown with a missing/damaged partition, the file system may be the problem. In some cases, the card itself is still detected correctly, but Windows no longer understands how the data on it is organized.
This is where TestDisk can (sometimes) help. It is a free, open-source tool that can search the SD card for lost partitions and damaged file system structures. If it finds the old partition, it may be able to write that structure back and make the card readable again.
While TestDisk is not the prettiest tool, it is manageable if you follow the steps carefully:
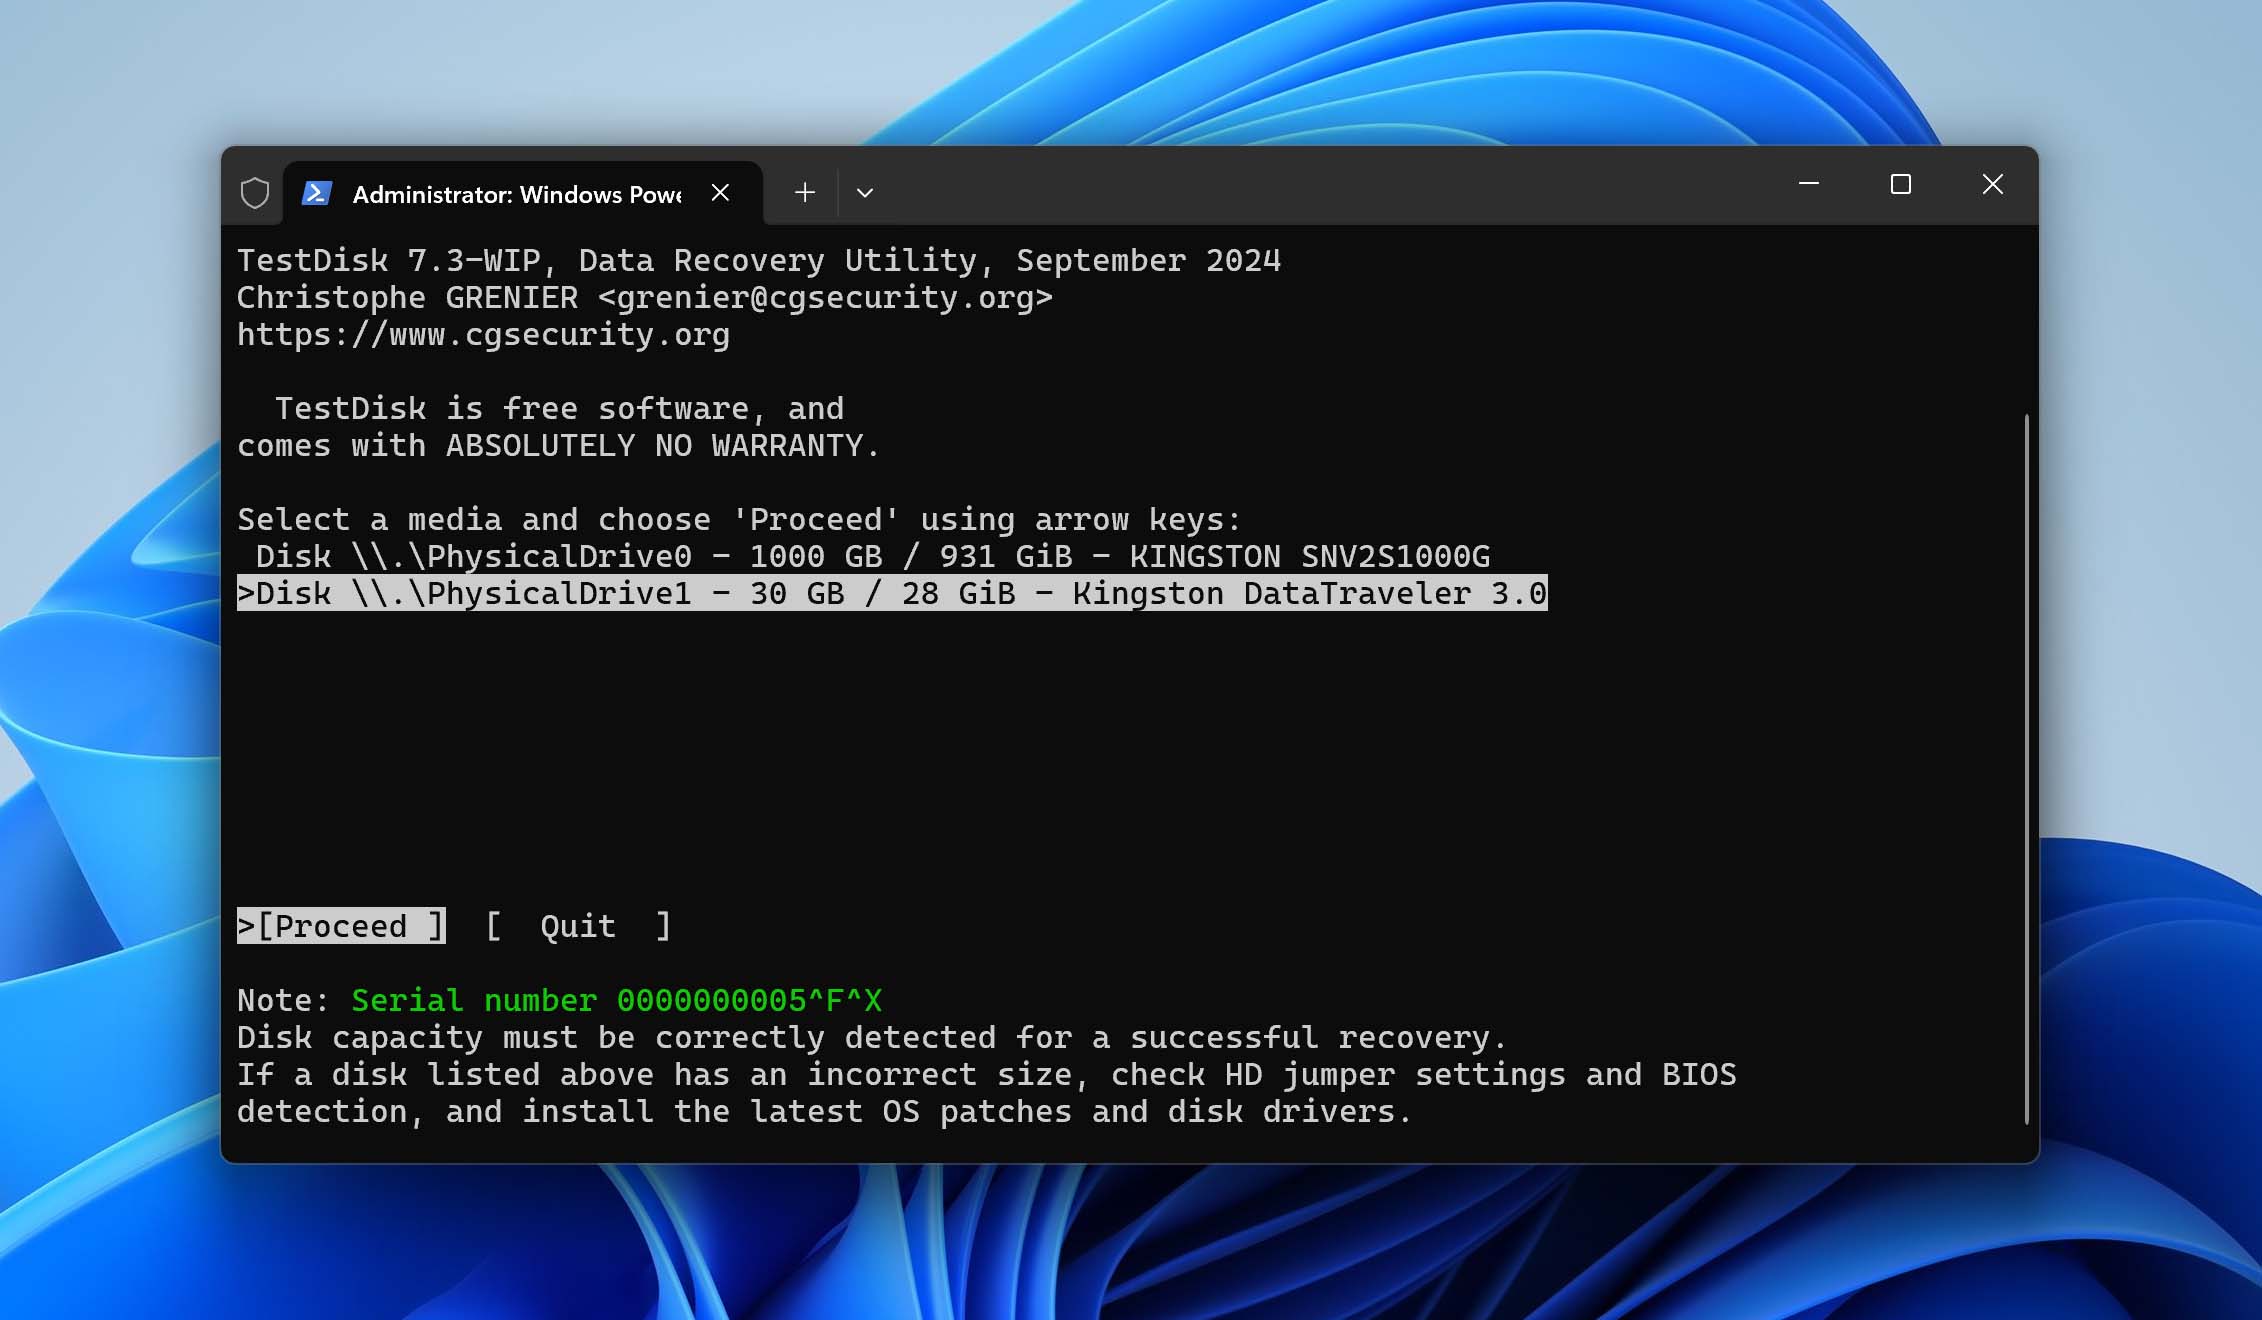
- Download and run TestDisk (run as administrator on Windows). You’ll be asked if you want to create a log file. You can create one if you want to, but it doesn’t really matter.
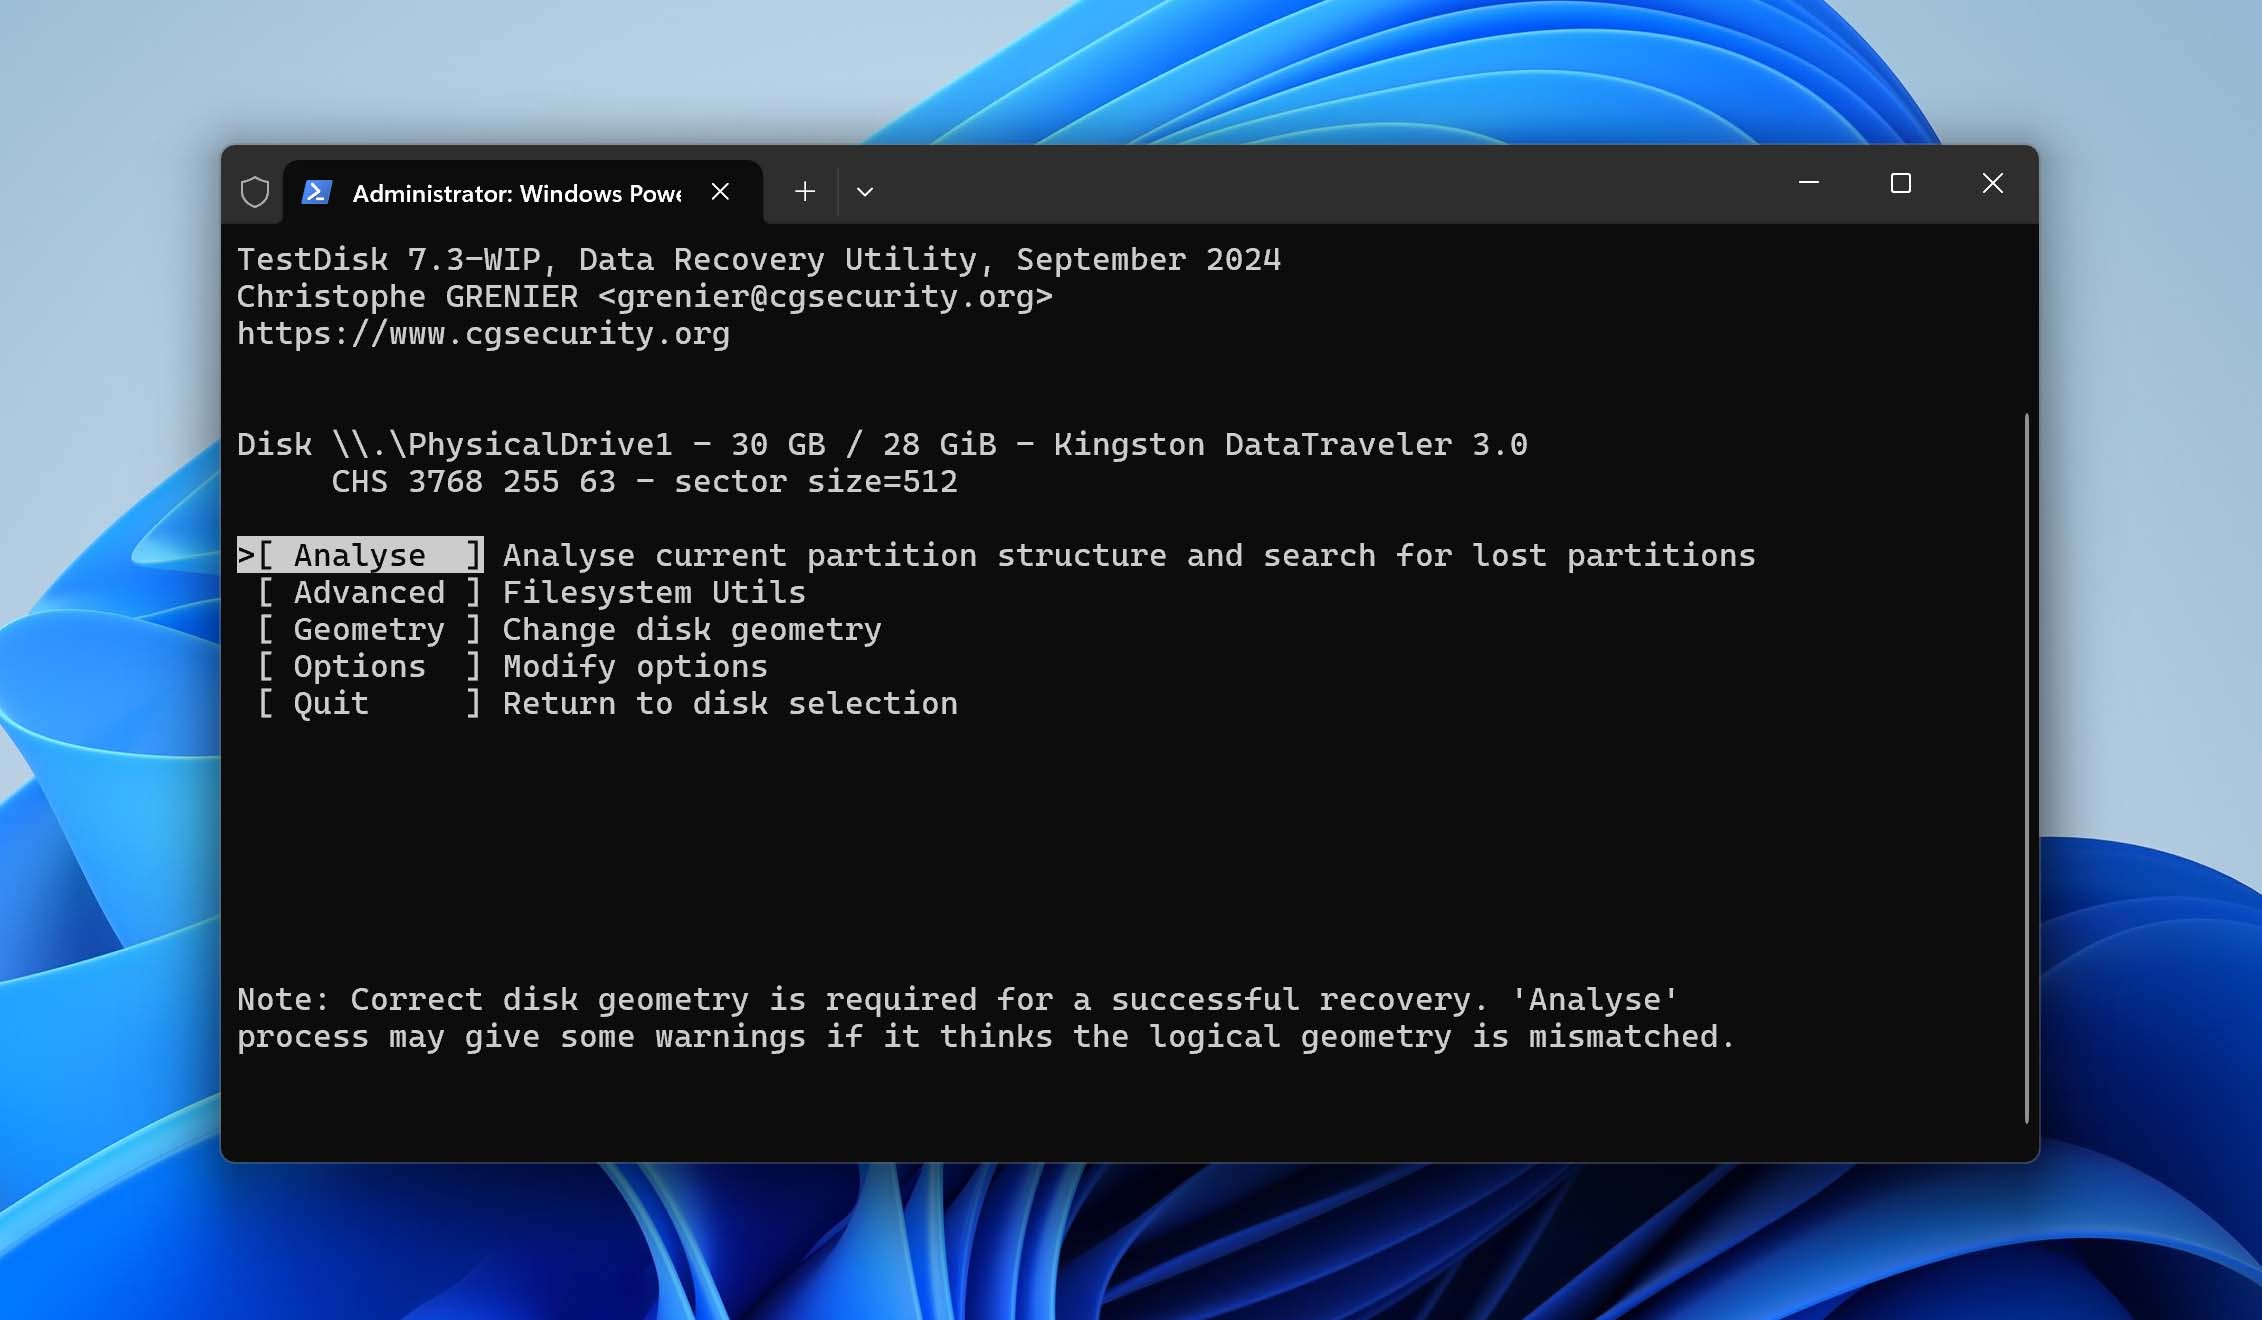
- Select your SD card from the device list and choose the correct partition table type (TestDisk will usually detect the right one automatically). Press Enter to proceed to the analysis menu.
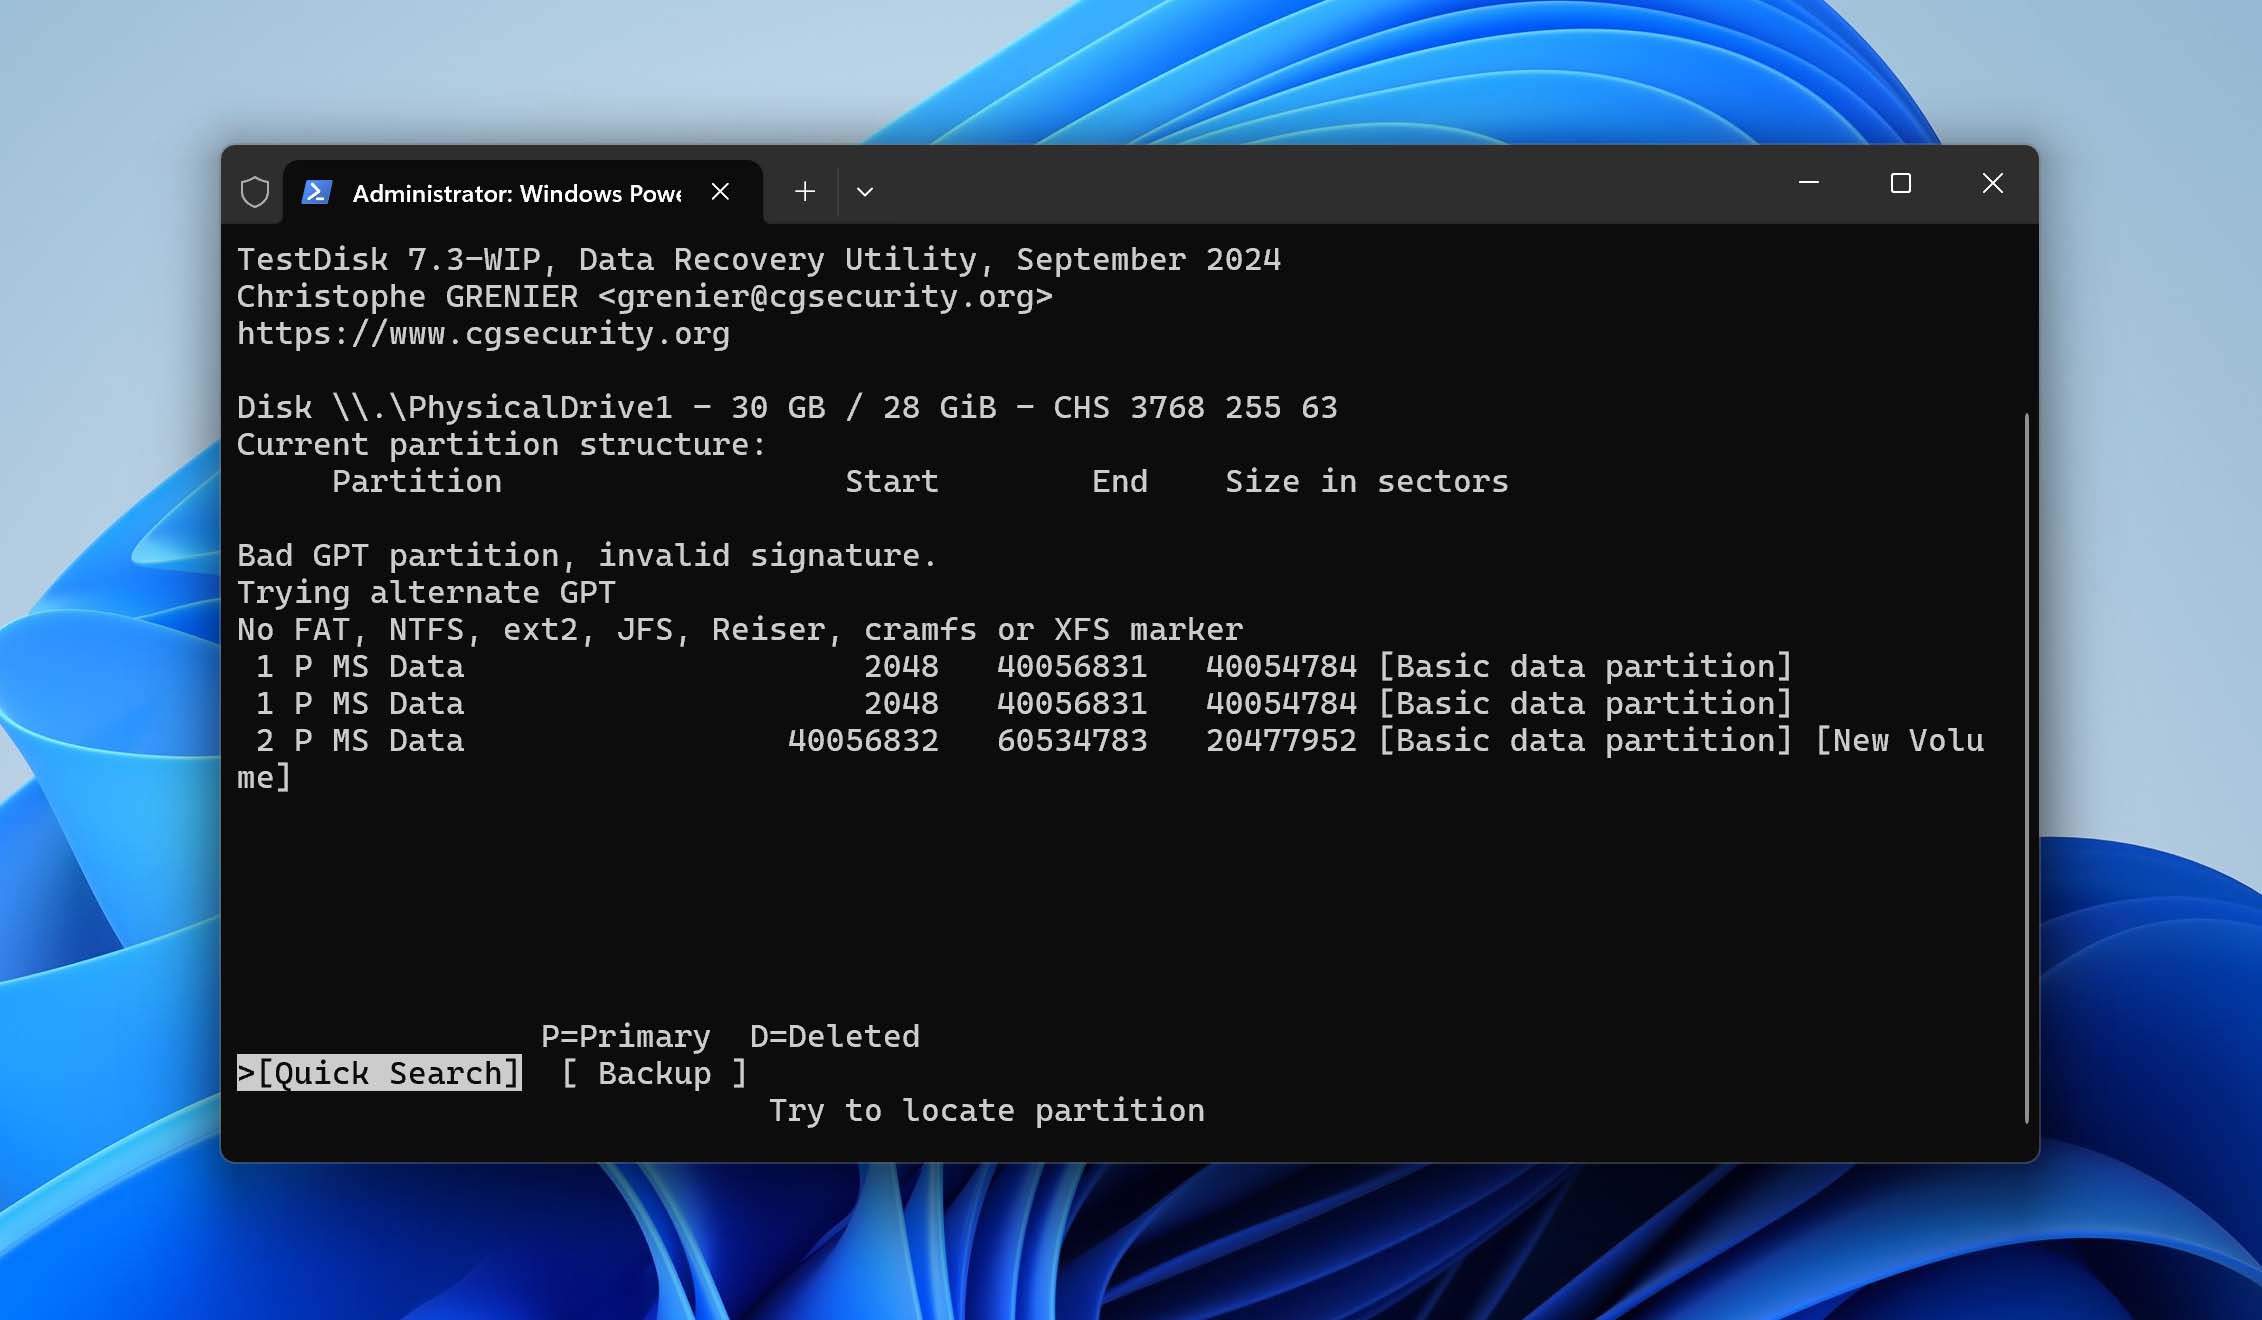
- Choose Analyse to examine the current partition structure and then perform a Quick Search. If your partition isn’t found, use Deeper Search which involves a more thorough scan using backup boot sectors and partition signatures.
- Review the results of Quick or Deeper Search. If TestDisk found your partition, then you need to select the Write option to save the recovered partition table.
If there’s no partition to recover (perhaps it’s been damaged beyond recovery after a virus infection), then you can move on to formatting the card.
Method 9: Create a Partition on the SD Card
If your SD card’s space appears as Unallocated (or there is no usable volume with a drive letter) in Disk Management this is the method to use. It means Windows can detect the SD card as a physical device, but it does not see a working partition on it. You need to create a new one.
To create a new SD card partition manually, follow these steps:
- Press Windows + X.
- Select Disk Management.
- If the SD card shows as RAW or has an existing damaged partition, then you need to right-click the partition and select Delete Volume.
- Right-click the unallocated SD card space and select the New Simple Volume option.
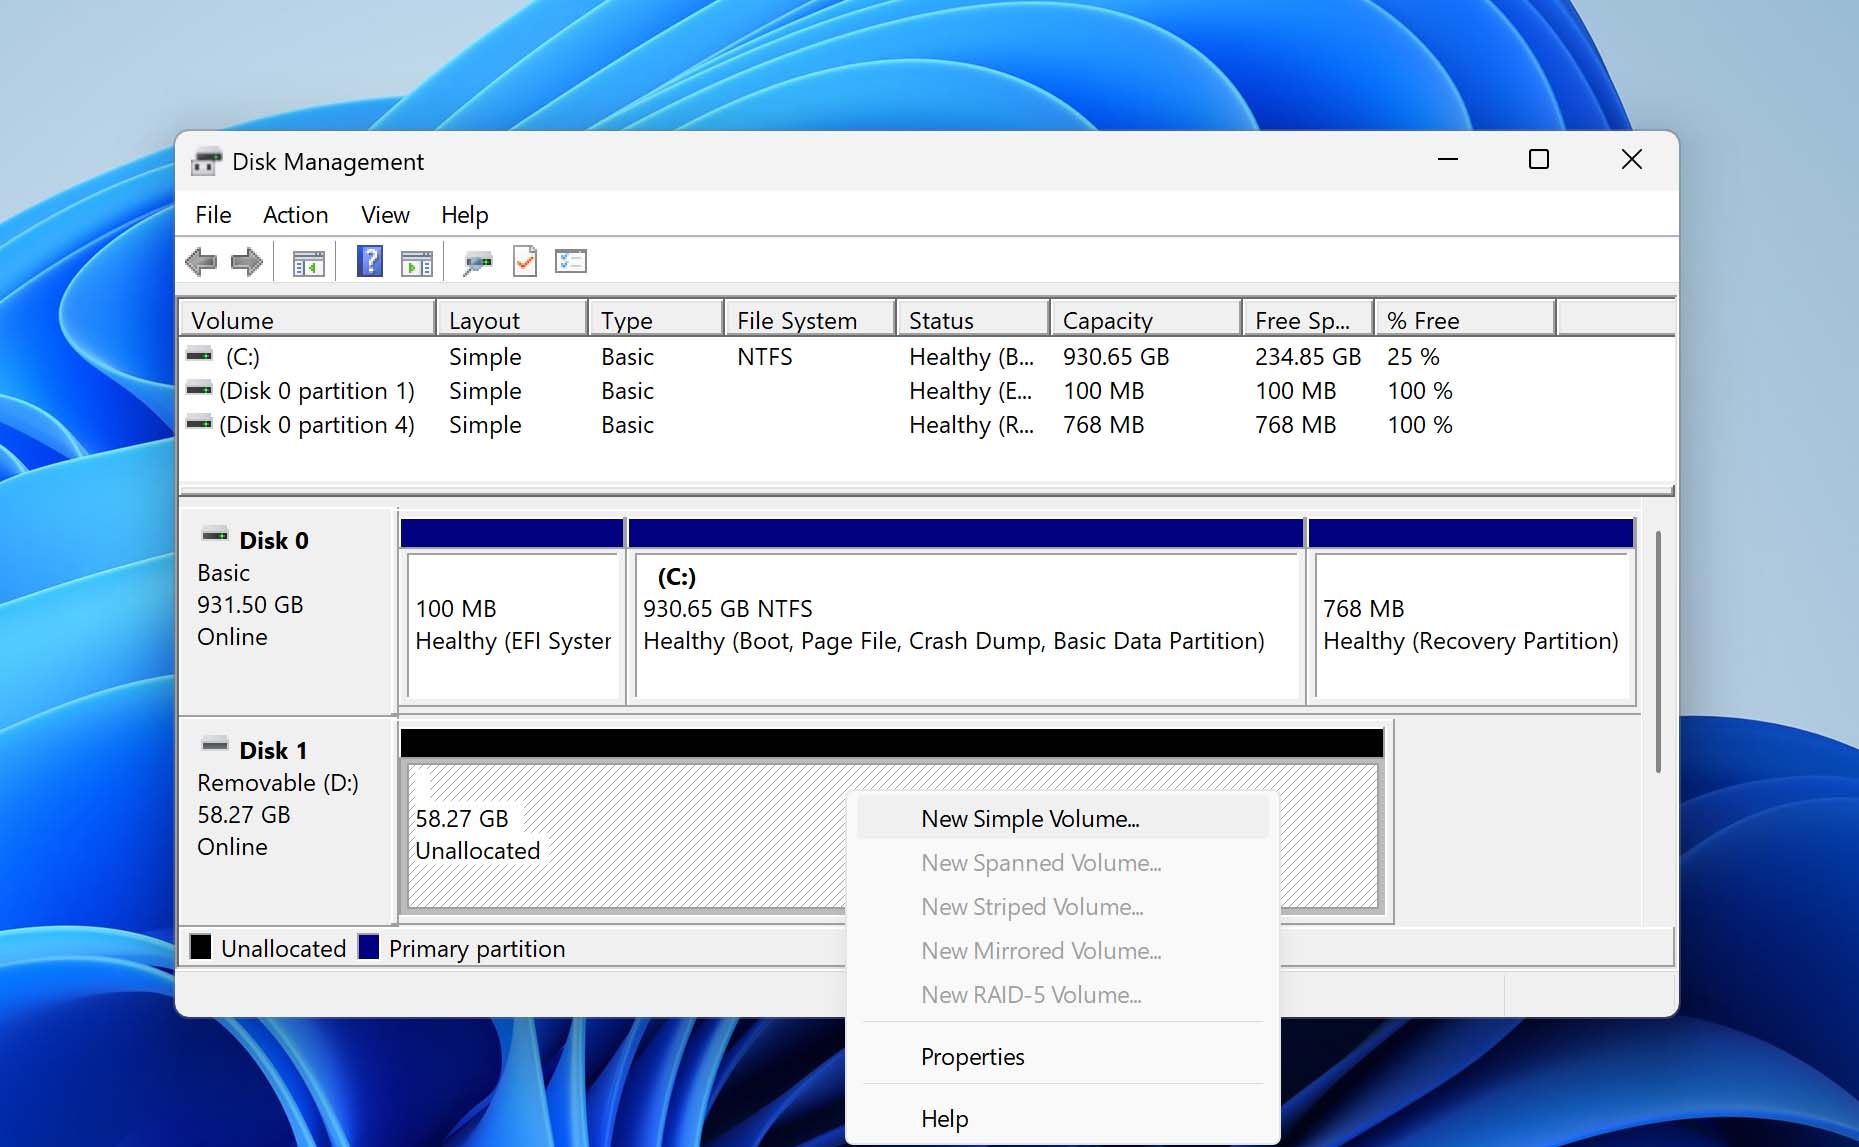
- Go through the partition creation wizard. When asked to choose a file system, select FAT32 for best compatibility or exFAT for larger files. You can keep the “Perform a quick format” option checked.
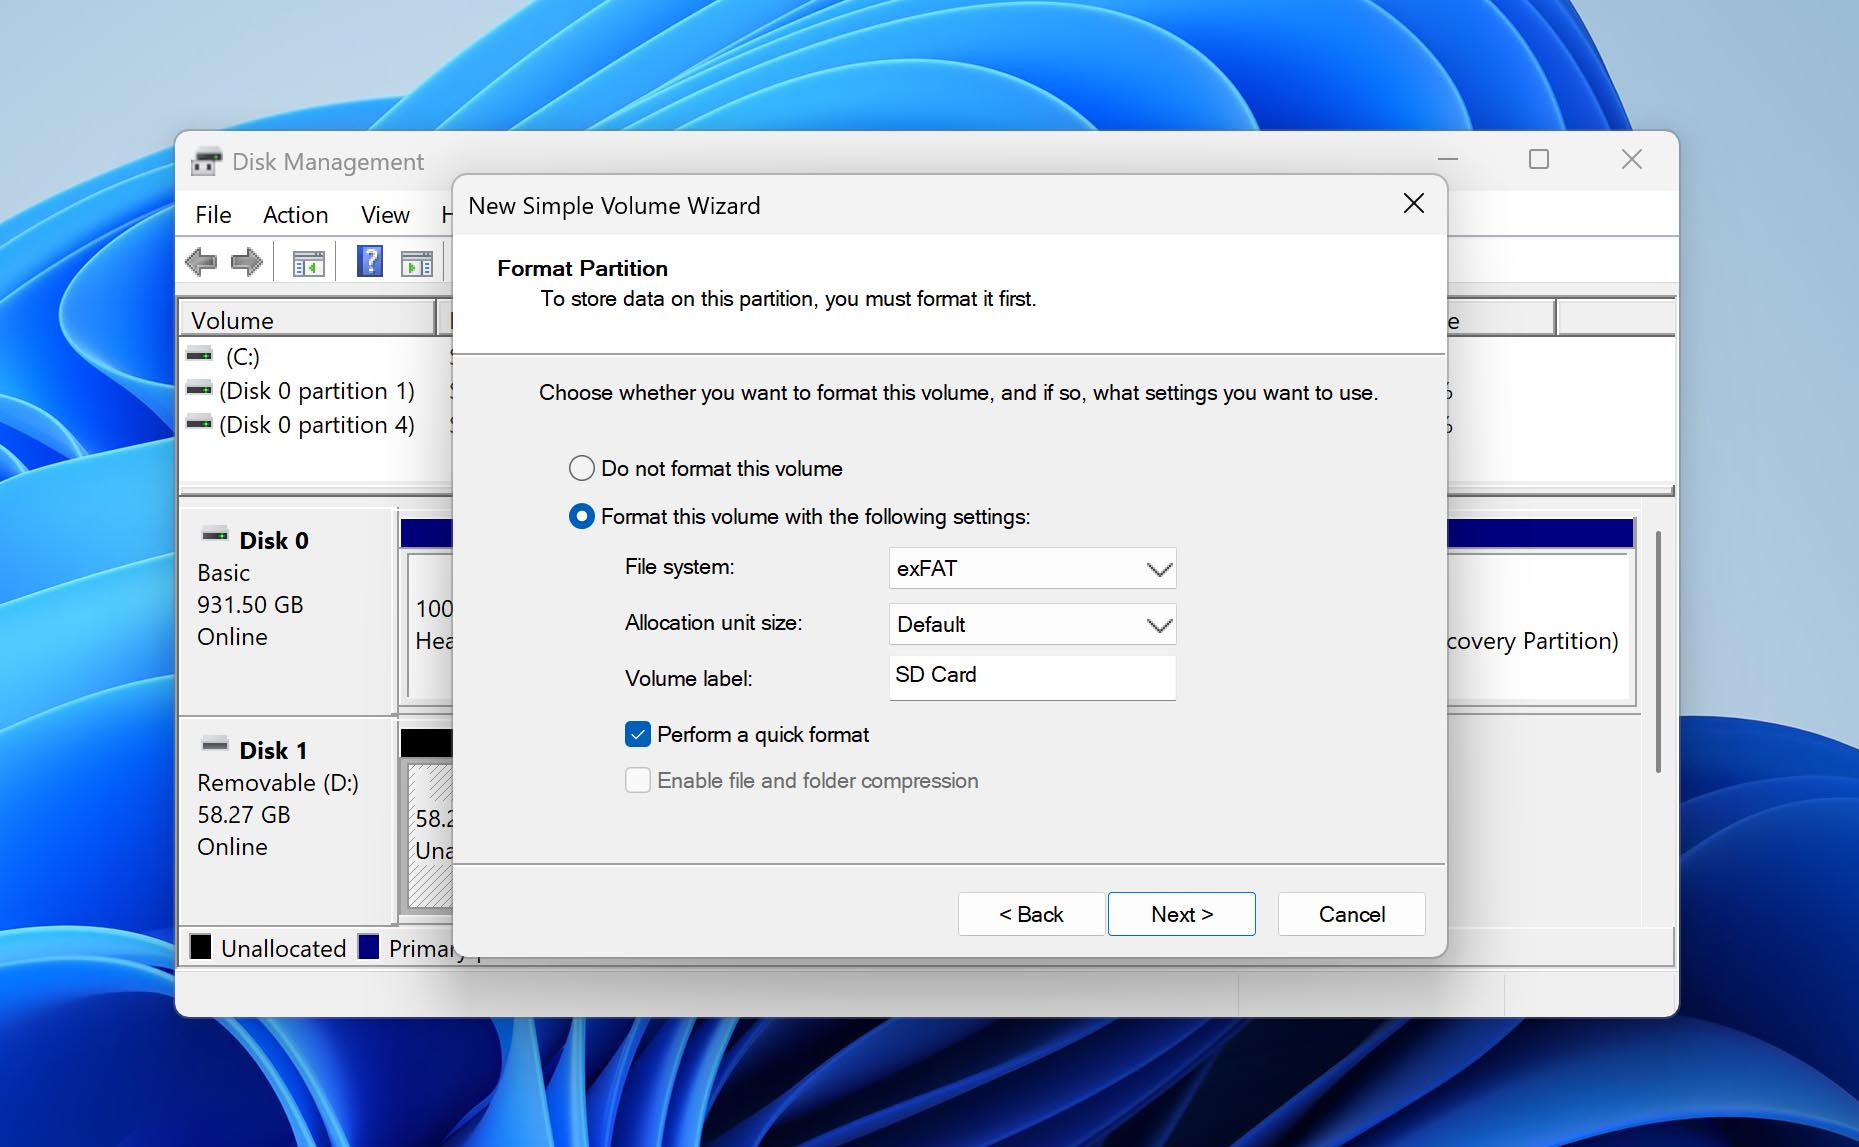
- Click Next and then Finish.
Method 10: Format the SD Card
Formatting is the last practical DIY fix to try when the SD card is detected, but still refuses to work properly. Use this method if the card shows up on your computer or device, but appears as RAW, asks to be formatted, uses an unsupported file system, or still won’t read after all the previous attempts.
This is a destructive fix. Formatting will erase the current file system and remove access to the files stored on the card. If you skipped the data recovery section and still need anything from the SD card, go back and recover your files first.
If you plan to use the SD card in a camera, Android phone, drone, dashcam, console, the best option is usually to format it in that same device. That way, the device creates the file system and folder structure it expects. If the device cannot format the card, you can format it on a Windows instead.
To format an SD card on Windows:
- Open Disk Management.
- Find your SD card in the disk list.
- Right-click the SD card volume and select Format.
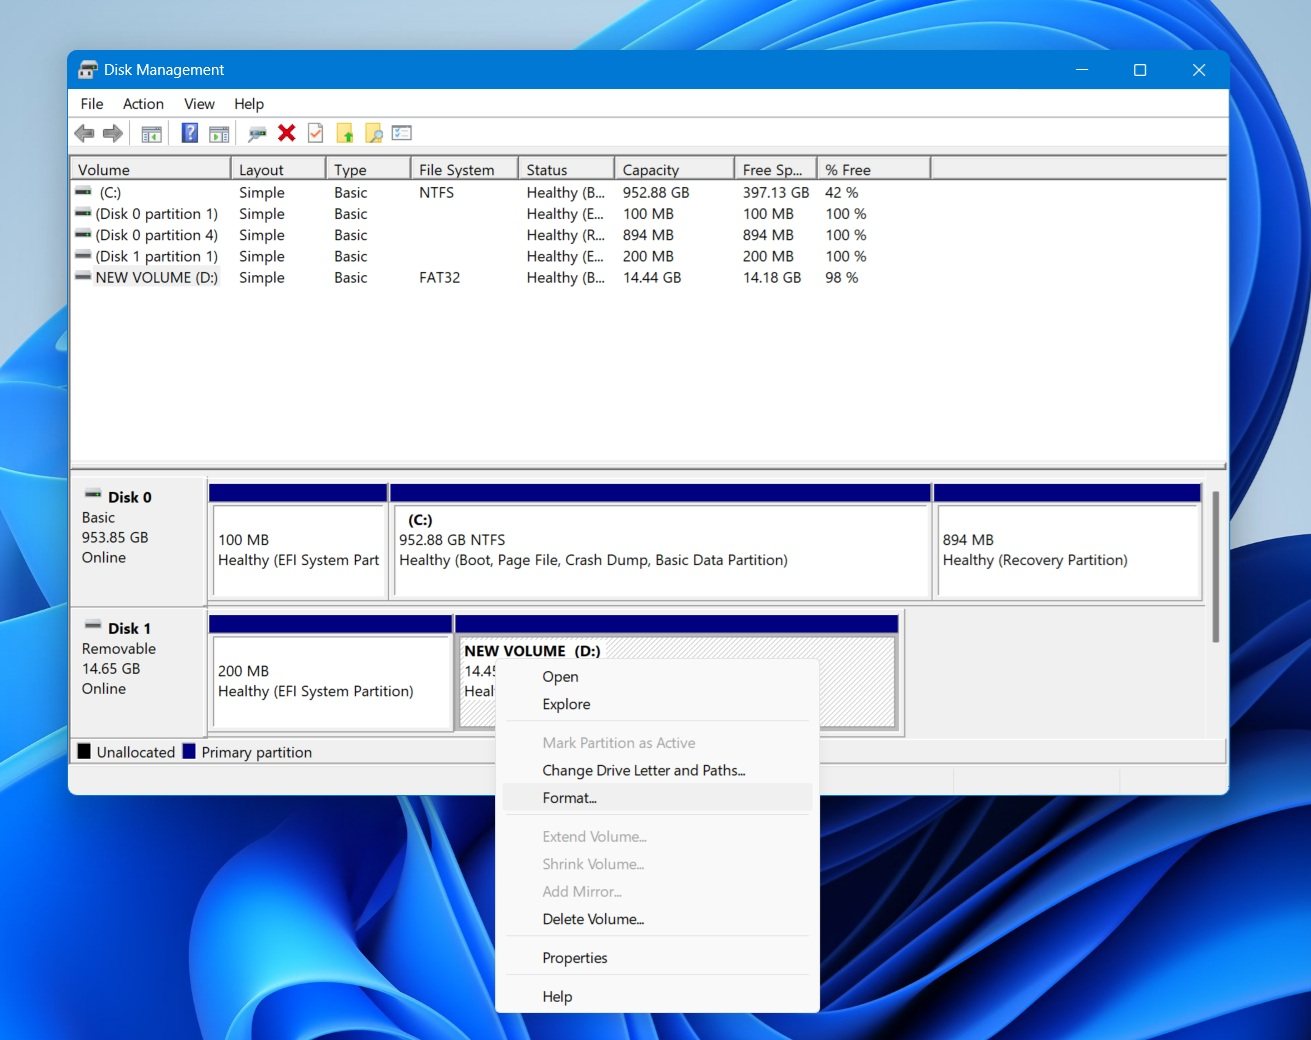
- Enter a volume label if you want to name the card.
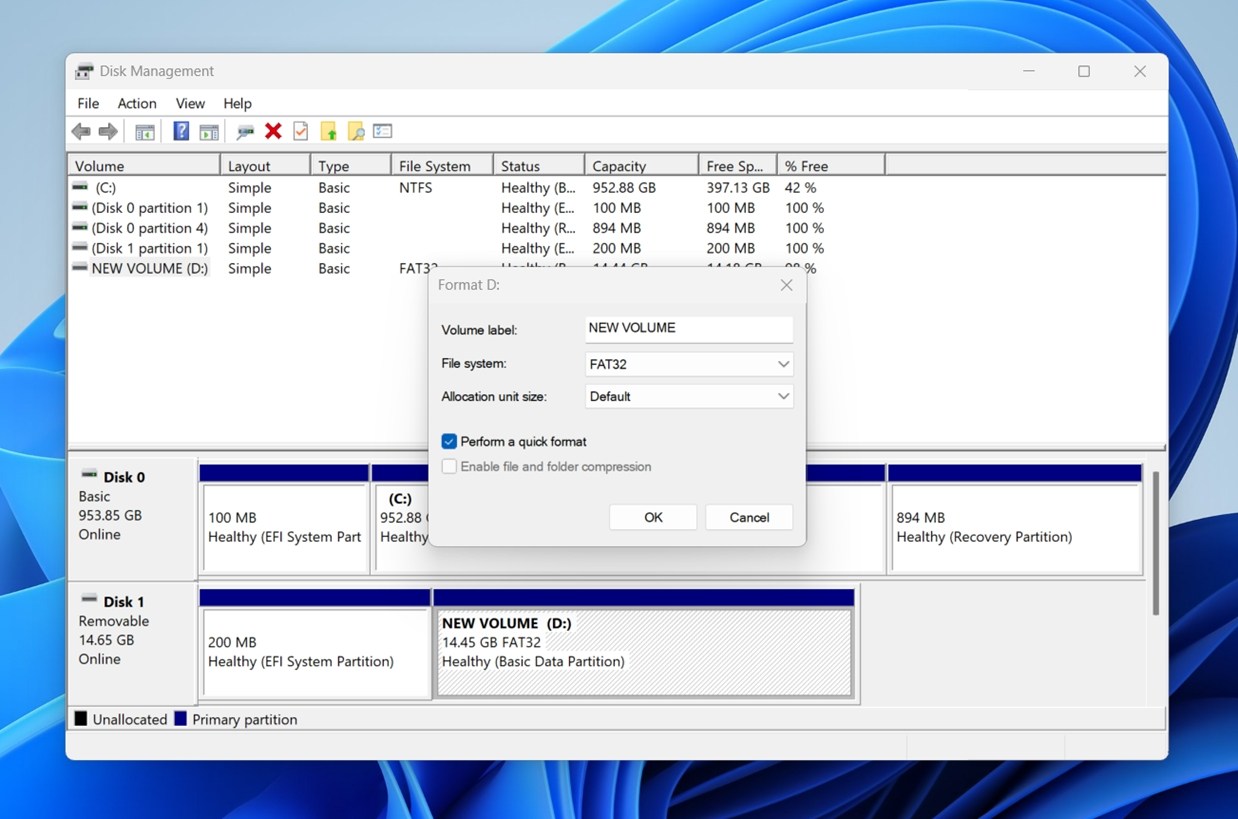
- Choose a file system. Use FAT32 for older devices that require it, or exFAT for larger SD cards and modern devices. (Keep Perform a quick format selected unless you have a specific reason to run a full format.)
- Click OK, then confirm.
After formatting, remove and reconnect the SD card, then check whether it appears normally.
Final Recap
If your SD card shows up in Disk Management with the correct (or close-to-correct capacity, you still have a good chance to DIY fix the problem. The safest short path is to recover your files first with a tool like Disk Drill, then format the card once the data is safe. If you plan to keep using the card in a camera, Android phone, drone, dashcam, or console, format it in that same device whenever possible. (That way, the device can create the file system and folder structure it expects.)
If the SD card does not show up in Disk Management at all, even after you cleaned the contacts, tried another reader, checked another USB port, and tested it on another device, the problem may be physical. The card could have a failed controller or internal memory damage. If the data on it matters, stop trying random fixes and consider a professional recovery lab. If the files are not important, replacing the SD card is usually the smarter move.

FAQ
Physical damage is usually visible. Look for bent or broken contacts, cracks in the casing, or signs of water damage. Logical corruption, on the other hand, typically shows up as formatting errors, missing files, or the card appearing as RAW in Windows while looking perfectly normal on the outside.
Yes, the SD card slot could be the problem. The easiest way to check is to test your SD card in another device and also test a different SD card in your device’s slot. If your card works in other devices but other cards don’t work in your slot, the problem is likely with the slot.
First, try connecting the SD card using a different memory card reader. If it doesn’t appear, try accessing the card on another computer to determine if the problem is with the card or your system.
Make sure the Switch is completely powered off (not just sleep mode) before inserting the card. Check that you’re using a compatible card (the Switch supports microSD, microSDHC, and microSDXC cards up to 2TB) and that it’s properly formatted to FAT32 (for cards 32GB or smaller) or exFAT (for larger cards). If the card still isn’t recognized, try formatting it using a computer, then reinsert it into the Switch.
It’s possible that your phone is not reading your SD card because the card has been formatted on a computer to an incompatible file system. Format it again to FAT32 and try again.
You should insert it into at least two different memory card readers to verify that the issue is actually caused by the card itself. If it is, then we recommend you try the solutions described in this article.
DIY camera repairs are usually a bad idea because modern cameras are delicate inside. If your camera SD card is not showing up on a computer, but the card still works in the camera, start with the safer checks first: try another card reader, another USB port, inspect the SD card contacts. For the camera slot itself, the best you can do at home is use short bursts of compressed air to blow out dust or small debris.
There are countless different Android smartphones and tablets (LG G3, Samsung Galaxy S20, OnePlus 8 Pro, Motorola Edge Plus, Xiaomi Mi Note 10), so there are many possible reasons why your SD card is not showing up, including logical corruption, file system or storage size incompatibility, mechanical damage.
First, try using a different SD card reader or at least connecting the same reader to a different USB port. If that doesn’t work, open Device Manager, find your card reader under Disk drives or USB controllers, right-click it, and select the Uninstall device option. Then restart your computer, and Windows will automatically reinstall the device with fresh drivers.
Follow those methods if your laptop or computer doesn’t recognize the SD card:
- Reinstall the SD card reader driver
- Assign a new drive letter to the SD card
- Use CHKDSK to repair SD card corruption
- Create a partition on the SD card
- Recover data from the SD card
- Show SD card files hidden by a virus
