


“iPhone Storage Full.” These three words can instantly ruin your day, especially when they appear when you need to save new data the most and you don’t know how to get more storage on your iPhone for free. Unfortunately, many users keep encountering this exact warning message on a regular basis despite repeated attempts to do something about it:
“I have an iPhone 12 with 64 GB storage. I am basically at capacity now and my memory is full. I have deleted as many photos and apps as I can,” complained one person on Reddit.
While Apple offers solutions like paid iCloud storage or buying a model with more space, you don’t always need to spend money to solve your storage problems. In this article, I describe multiple methods, such as clearing hidden caches and managing your photos more efficiently, to help you get more storage on iPhone without paying.
Can You Get More Storage on iPhone Without Buying It?
Unlike many Android smartphones and other devices like digital cameras or portable gaming consoles, you cannot expand the storage space on your iPhone using a memory card.
The good news is that the absence of a memory card slot doesn’t make it impossible to increase the amount of data that can be stored on your iPhone – you just need to think outside the box.
The most straightforward solution is cloud storage. With it, you can store your photos, videos, documents, and other files on remote servers instead of your device, accessing them whenever you need via the internet. This approach effectively gives you extra storage space while keeping your iPhone’s internal storage free for apps and system files.
Apple’s iCloud offers the most seamless integration with your iPhone, as it’s built directly into iOS. While the free 5 GB tier fills up quickly for most users, the paid plans are reasonably priced. For those who need more free storage or have specific requirements, third-party options like Google Drive, OneDrive, or Dropbox can be excellent alternatives.
If you prefer a solution that doesn’t rely on internet connectivity, then you can also use an external storage device. Modern iPhones with Lightning ports can connect to MFi-certified flash drives, while newer models with USB-C ports support standard USB drives directly. External storage options are perfect for offloading photos, videos, and documents you don’t access frequently but want to keep. Of course, this solution is free only if you already have an iPhone-compatible external storage device.
Another good option on how to get more iPhone storage space is to delete unnecessary files that are taking up valuable space. This approach is completely free and often surprisingly effective. Most users are shocked to discover just how much space they can reclaim by removing caches, unnecessary media files, infrequently used apps, and more.
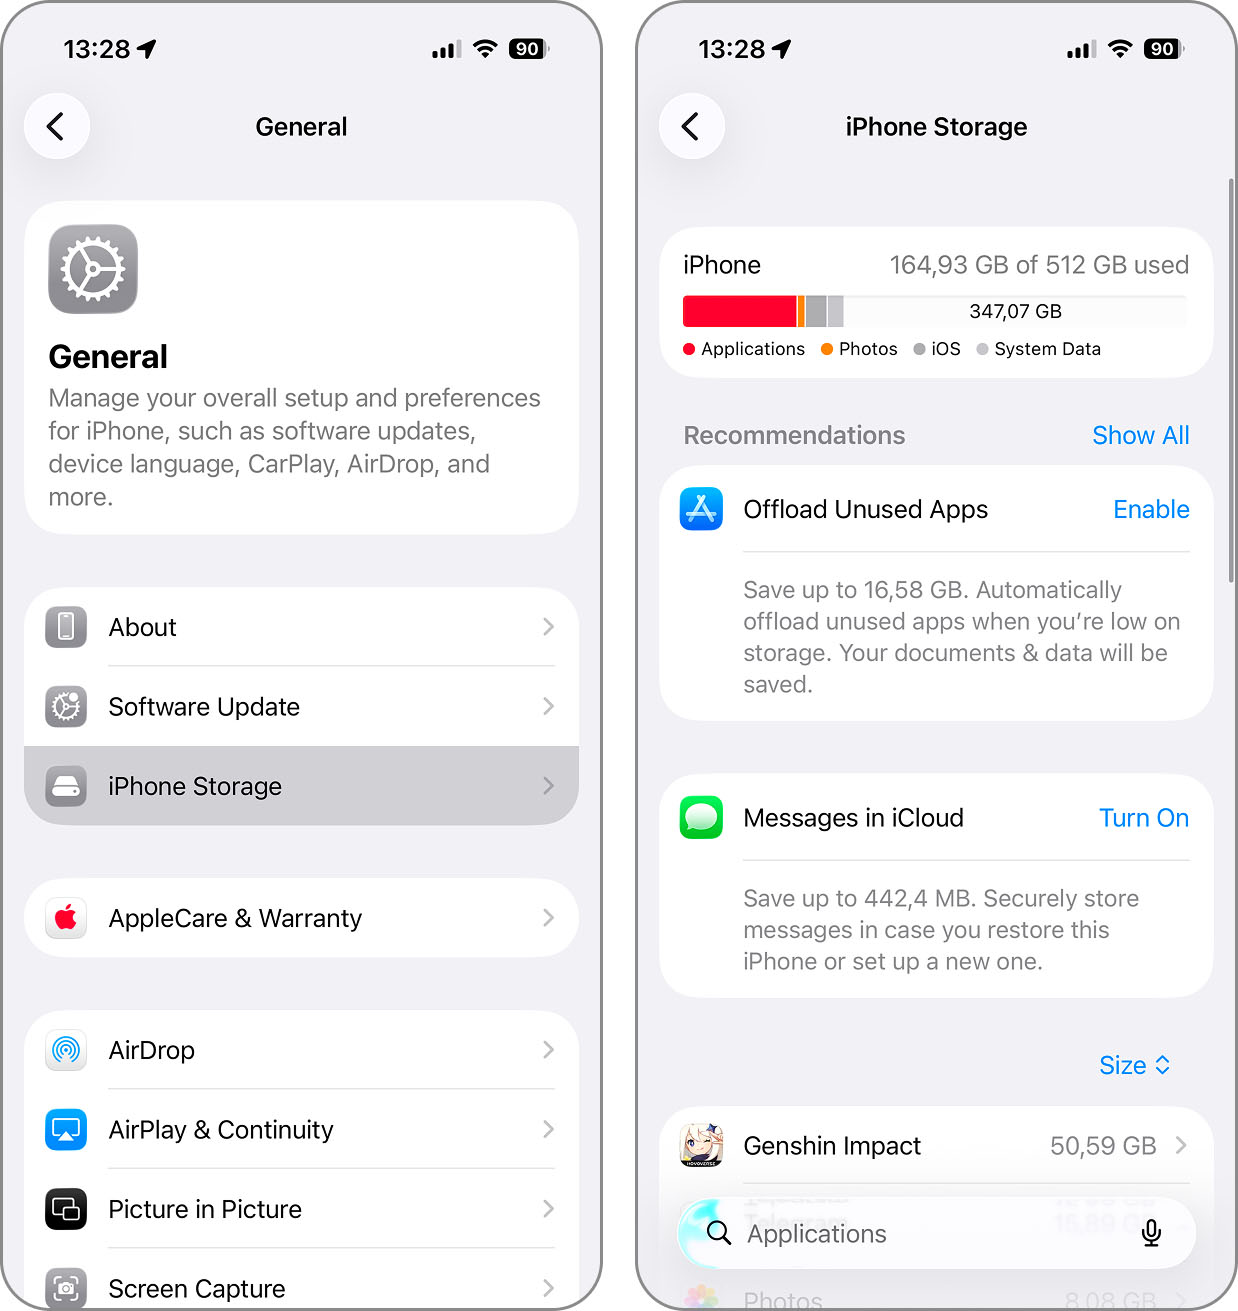
How to Increase Storage on iPhone for Free
Very few things are free nowadays. But when it comes to getting extra storage on your iPhone by making more of what you already have available for use, there are things you can do that don’t cost anything except a little of your time.
Method 1: Clear Your Browser’s Cache
A great place to start when you need to get more storage space on iPhone is to clear your Safari browser cache. The cache holds onto items like images, fonts, and style sheets from sites you visit. As you can imagine, these items build up over time and take up space.
- To clear your Safari cache, open the Settings app, navigate to the Apps section, and select Safari.
- Choose Clear History and Website Data.
- Select All history as the Clear timeframe and confirm by tapping Clear History and Data.
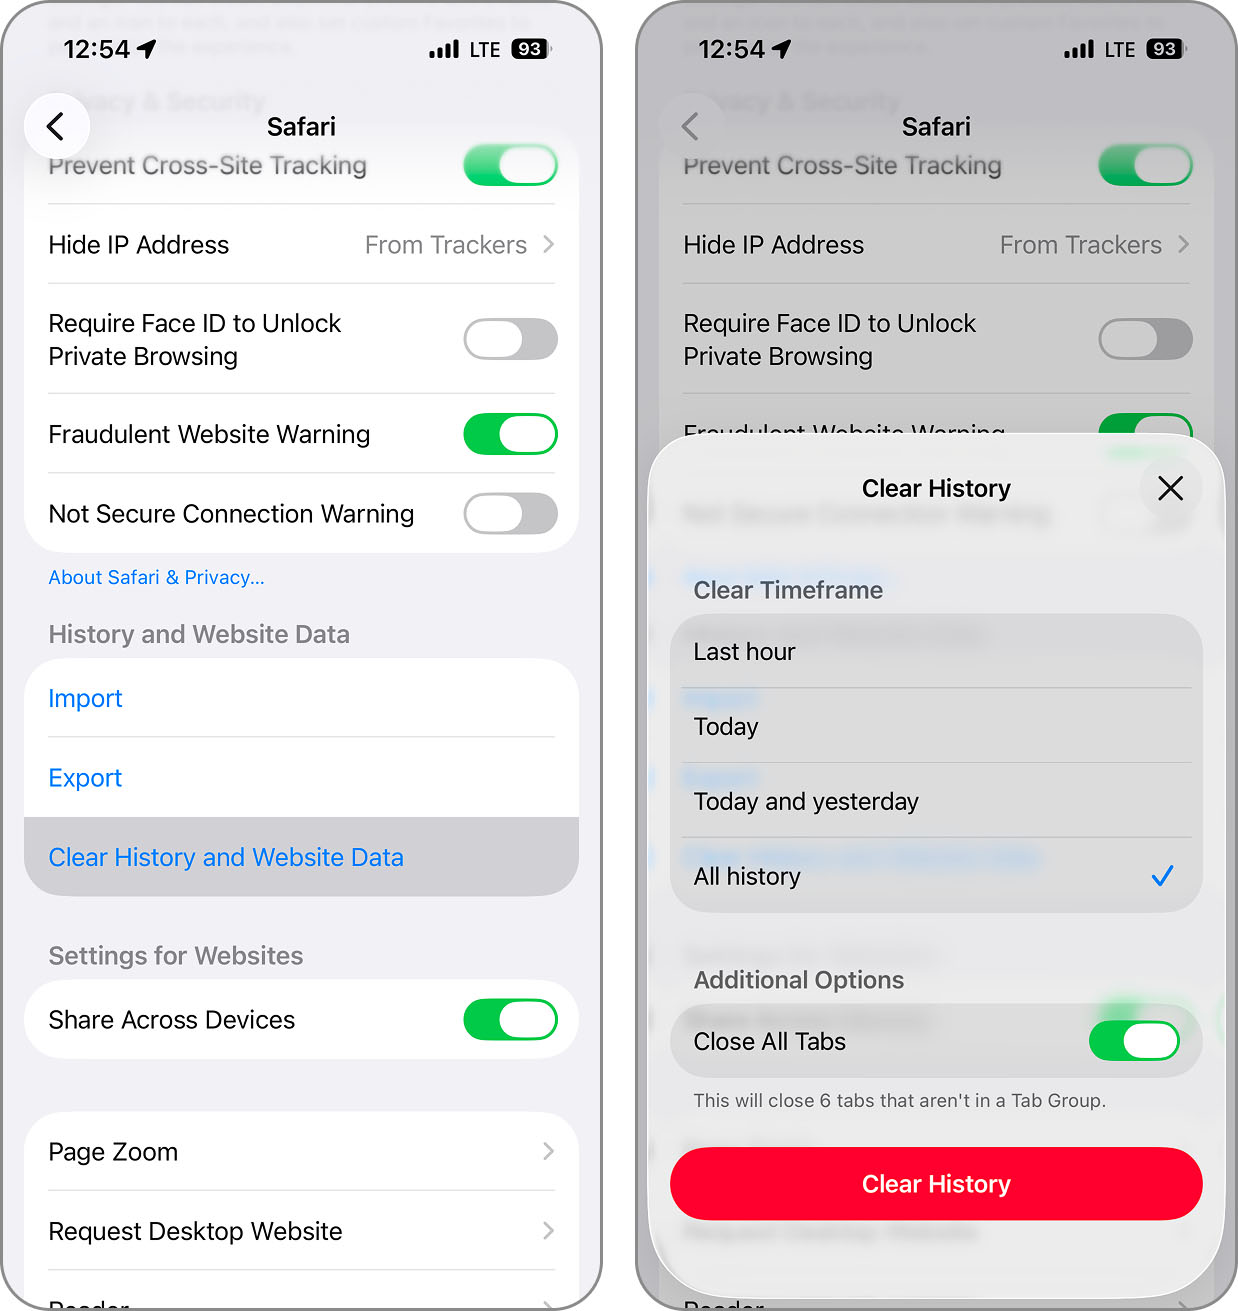
You’ll then see that the Clear History and Website Data option is grayed out. It’ll remain this way until you begin browsing in Safari again.
👨💻 My personal experience: I use my Safari web browser all the time and was able to free up around 700 MB of storage after clearing my history and website data. I did notice that many websites took significantly longer to load for the first time after the clean-up, and a good chunk (around 200 MB) of the freed-up storage space was gone again after just an hour of browsing. Still, it’s useful to be aware of this solution because you might find yourself in a situation where a few hundred extra free MB is all you need to install an app or take a few pictures.
Method 2: Delete Your Apps Cache
Similar to your web browser, apps that you install contain a cache. Some culprits are social media apps like TikTok, Facebook, Snapchat, and Instagram where you see many photos and videos. Clearing these caches is one of the most effective ways to increase iPhone storage capacity for free, as these apps can secretly hoard gigabytes of temporary data without you realizing it.
The process for clearing an app’s cache depends on the app itself. Here, we’ll use TikTok as an example.
- Open TikTok and tap Profile in the bottom-right corner.
- Tap the Menu icon in the top-right corner and select Settings and privacy.
- Scroll down to Cache & Cellular and tap Free up space.
- Next to Cache, tap Clear, then confirm by tapping Clear again.
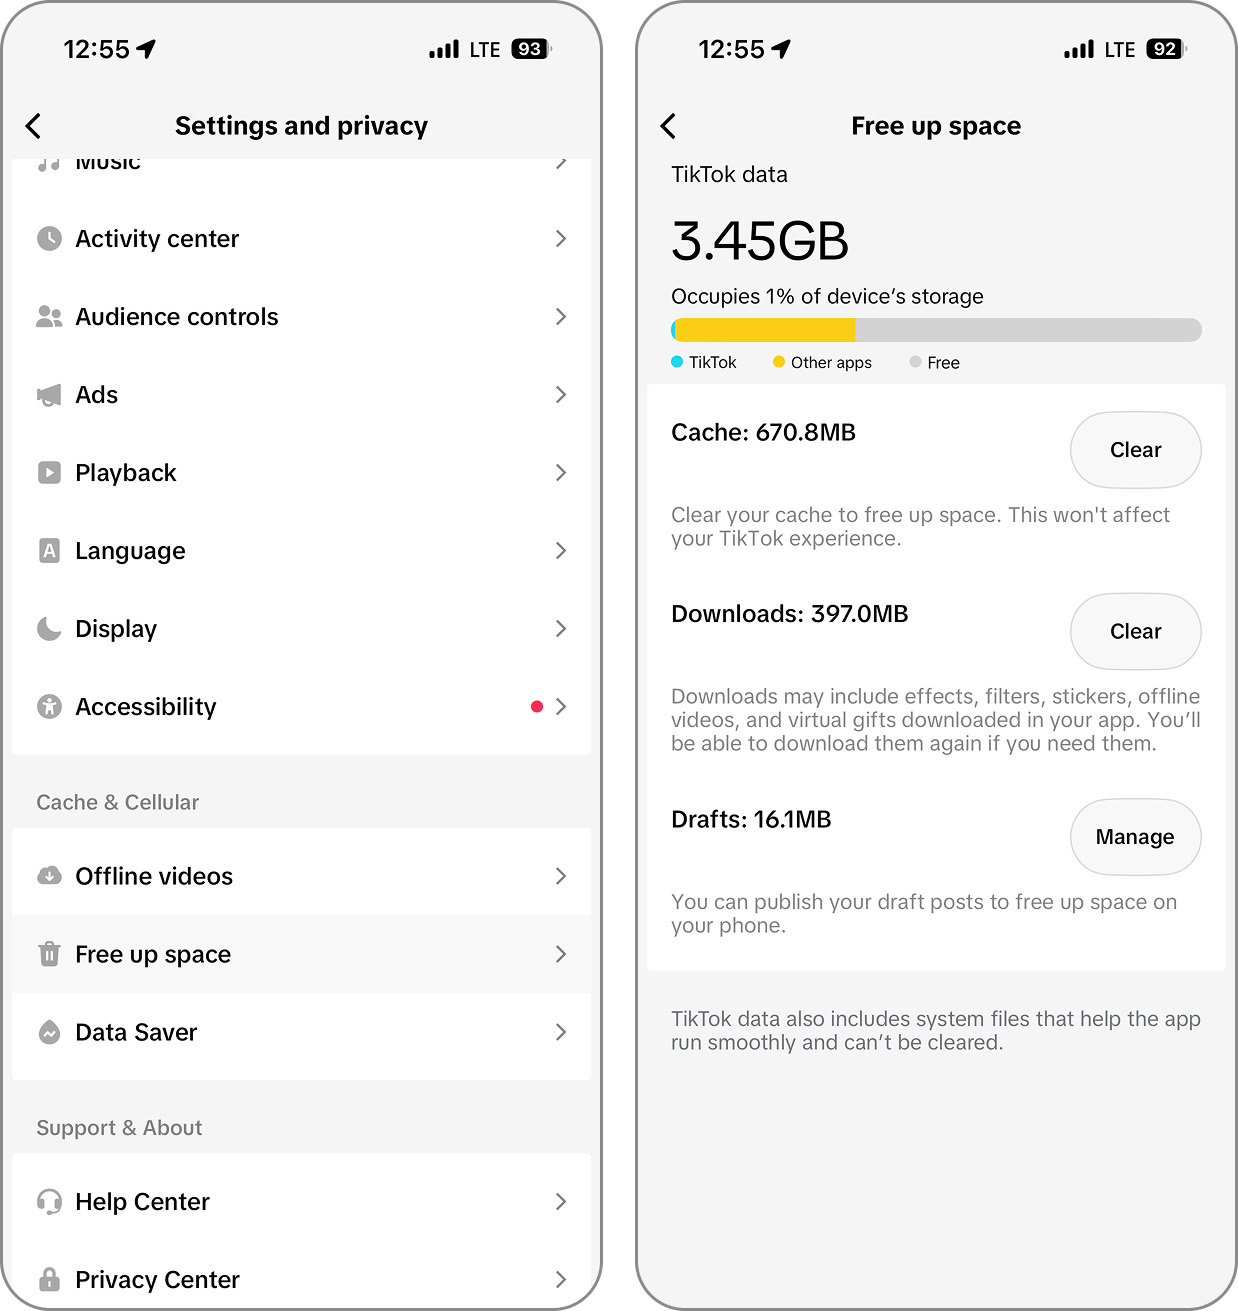
👨💻 My personal experience: While my cache cleaning effort started with the TikTok app (I was able to free up around 800 MB of storage space), it certainly didn’t end there. I methodically continued with other frequently used apps one by one. After a few cache cleanings, I struck gold. My Spotify cache was almost 10 GB large! Best of all, I noticed very little difference in streaming performance. Maybe a few songs took a little longer to start playing, but that was it. The cache was probably full of old music that I no longer listen to.
Method 3: Organize Your Photos & Videos
Photos and videos are often the biggest storage consumers on your iPhone, sometimes taking up 60-70% of your device’s capacity. Let’s look at a few approaches to how you can get more storage space on iPhone by effectively managing your gallery using native features and third-party cleaning apps.
Merge Duplicates
With iOS 16, Apple introduced the Merge Duplicates feature. This allows you to combine copies of photos or videos that are exactly or close to the same. For instance, instead of five photos of the same subject, you’ll have just one.
- Open the Photos app and select Collections.
- Scroll down below Utilities and tap Duplicates. You’ll see all duplicates next to each other along with their sizes and dates.
- To merge one set of duplicates, tap Merge on the right.
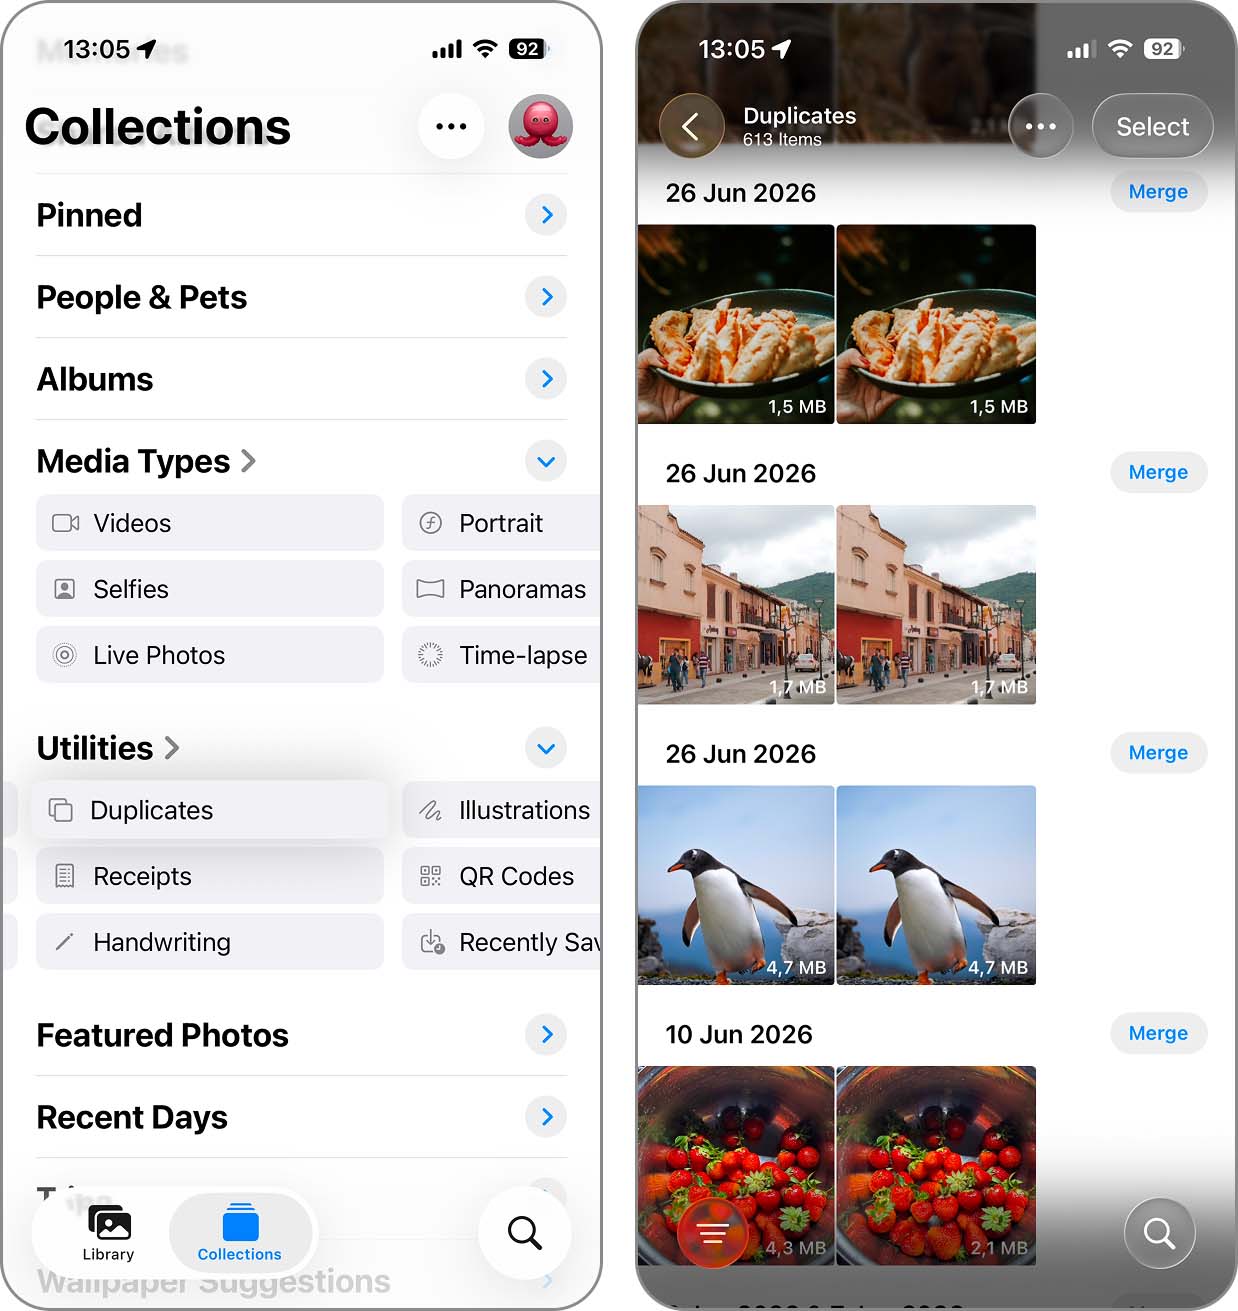
- For all duplicates, tap Select on the top right, Select All on the top left, and then Merge (X) at the bottom.
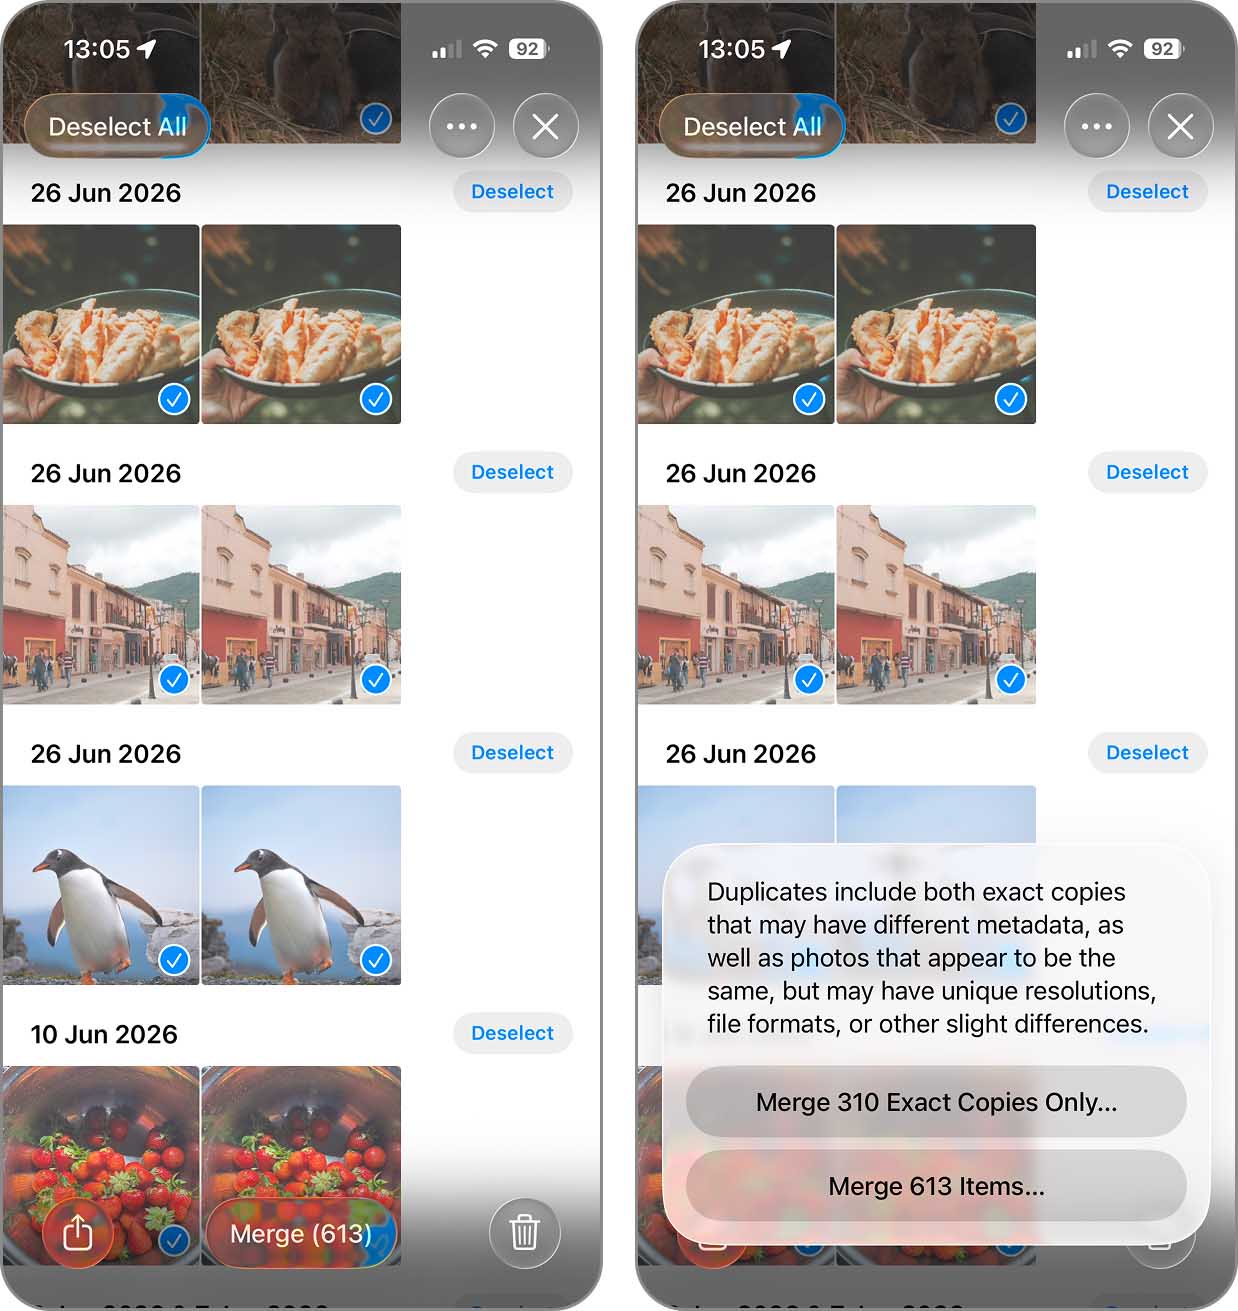
- When the prompt appears, choose Merge X Copies or Merge X Exact Copies to confirm.
Use Third-party Free Cleaner App
While Apple’s duplicate-merging tool is a decent start, it’s not always enough if you’re serious about how to get more storage on your iPhone without buying it. Fortunately, there’s Clever Cleaner, a cleaner app that you can use for free thanks to its generous daily limits.
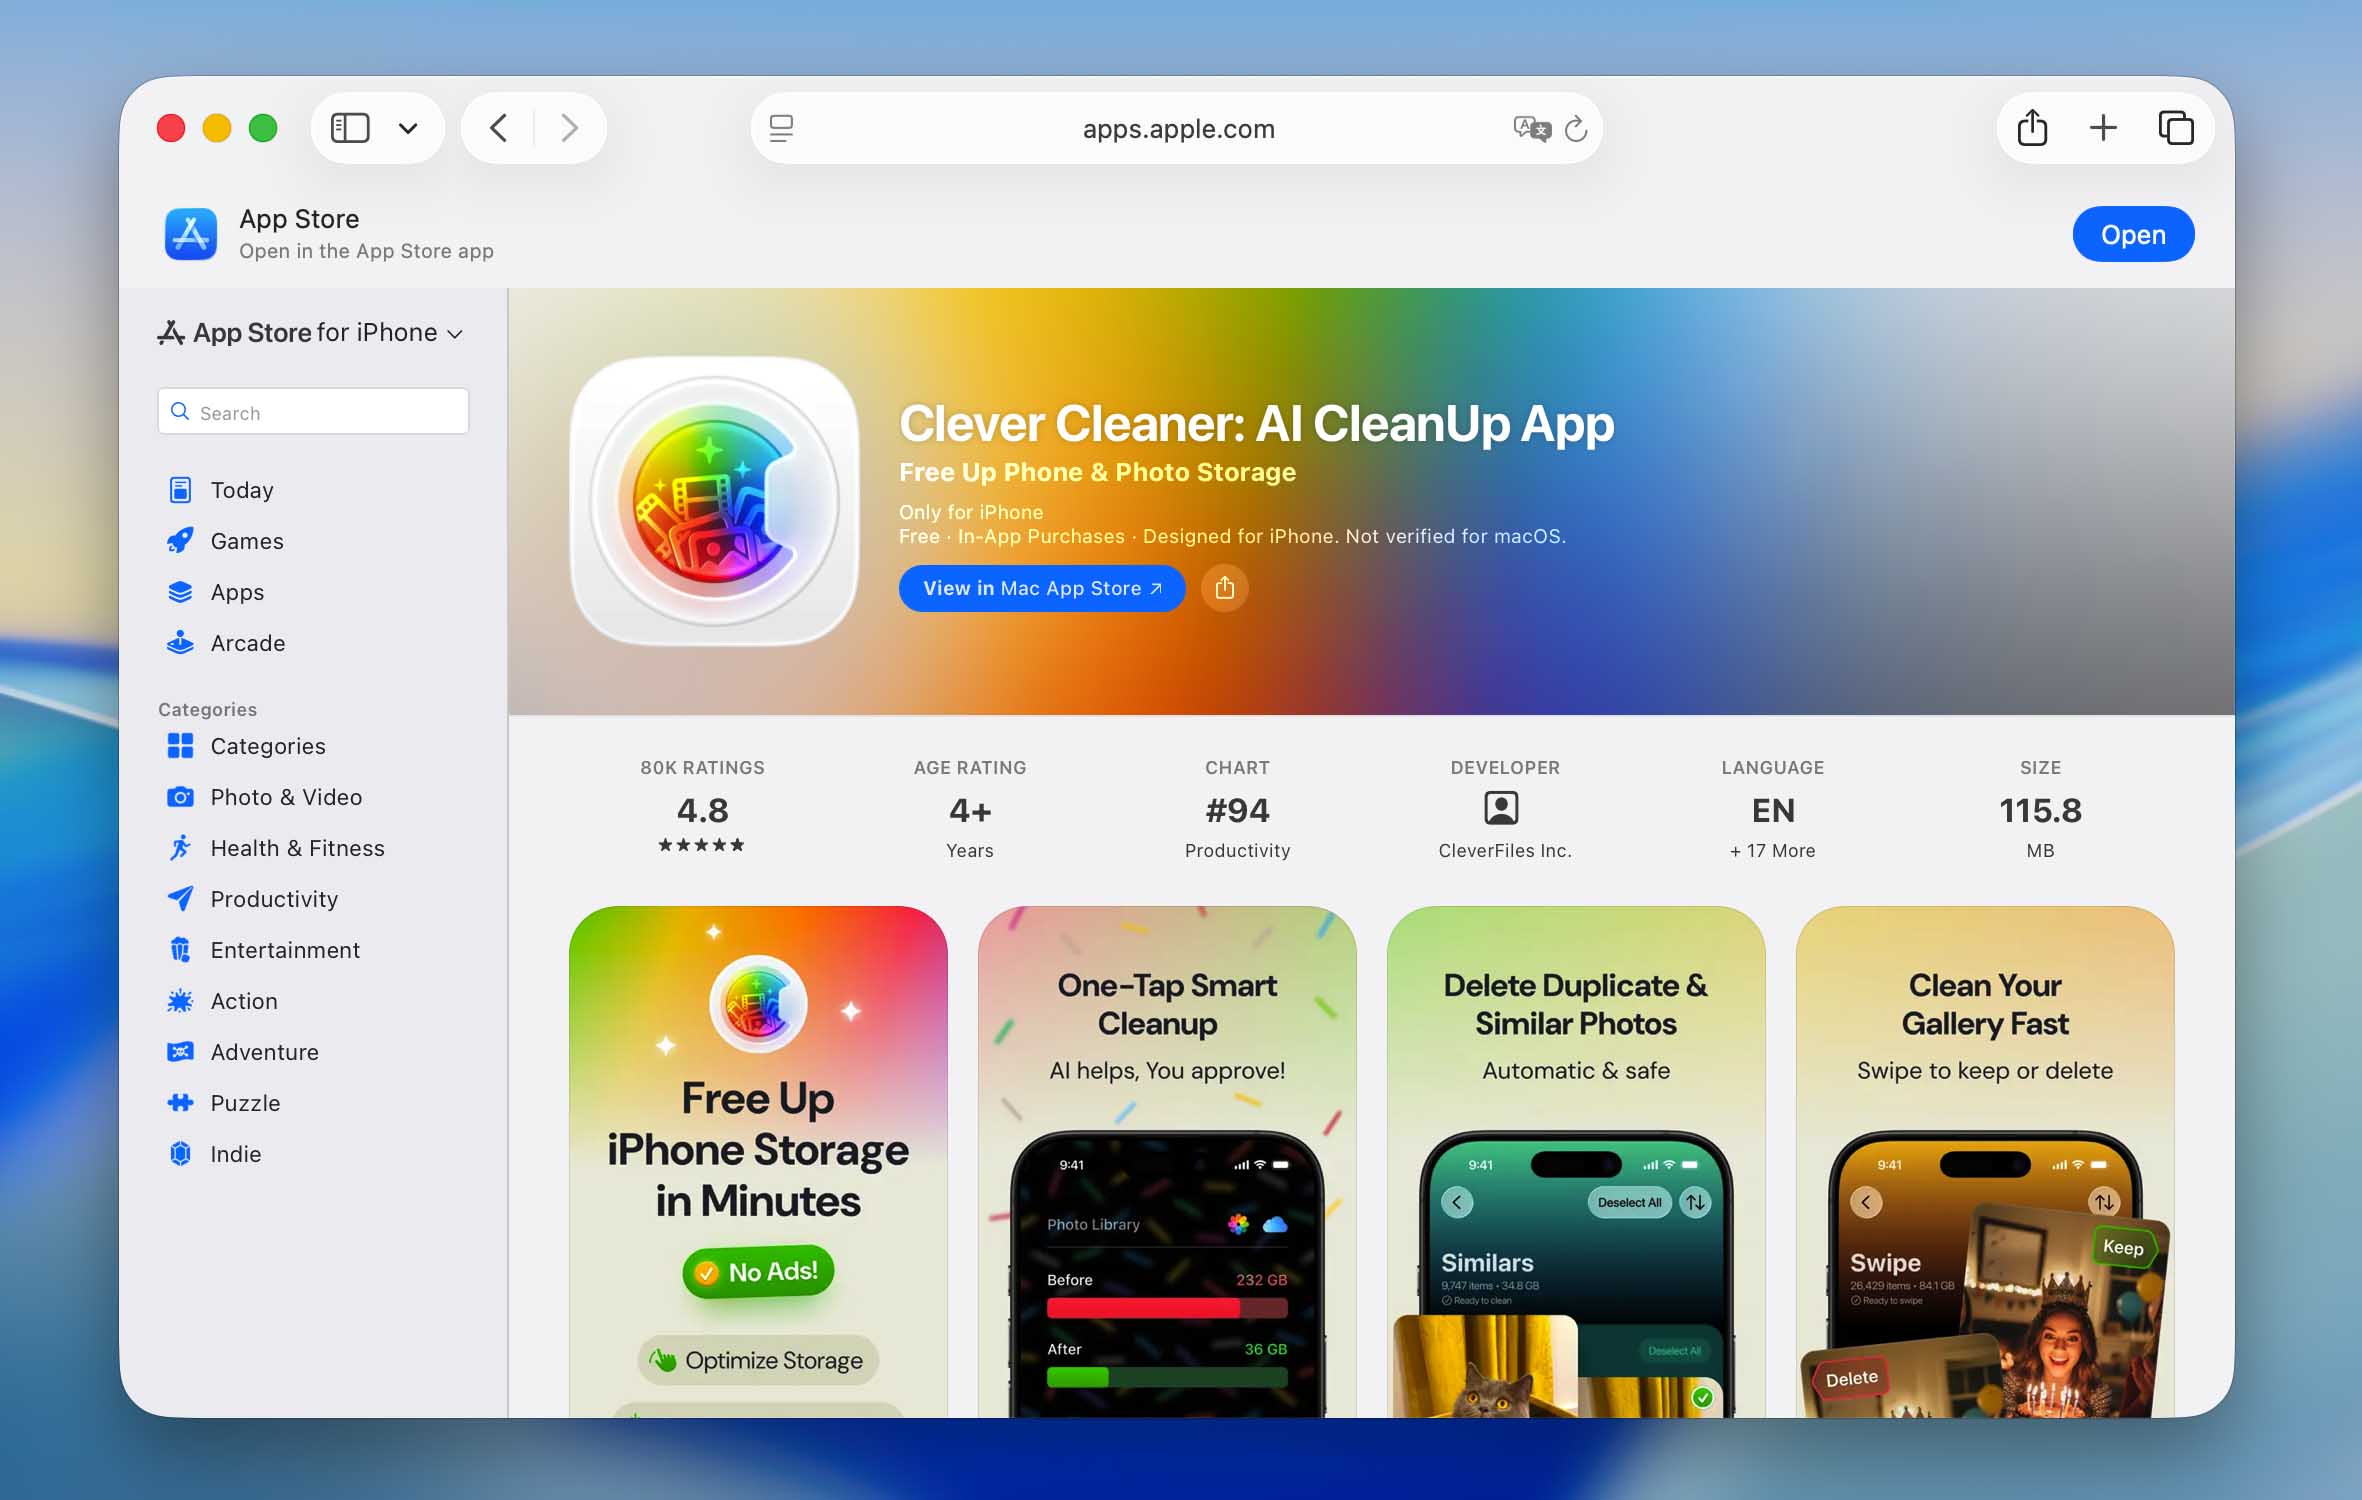
Getting started with Clever Cleaner is straightforward, but the results can be impressive when it comes to freeing up iPhone storage space:
- Visit the App Store and download Clever Cleaner app. The app can be used for free and doesn’t even contain any ads.
- Launch Clever Cleaner. You’ll need to grant it permission to access your photo library. After permissions are granted, let the initial scan run its course.
- Once the scan is complete, tap Similars to open the feature. Tap Select All at the top, and then tap Delete at the bottom. The AI-powered cleaning process will intelligently identify and remove duplicate and similar photos. All removed photos will be moved to your Recently Deleted album. This gives you a 30-day safety net in case you want to recover anything.
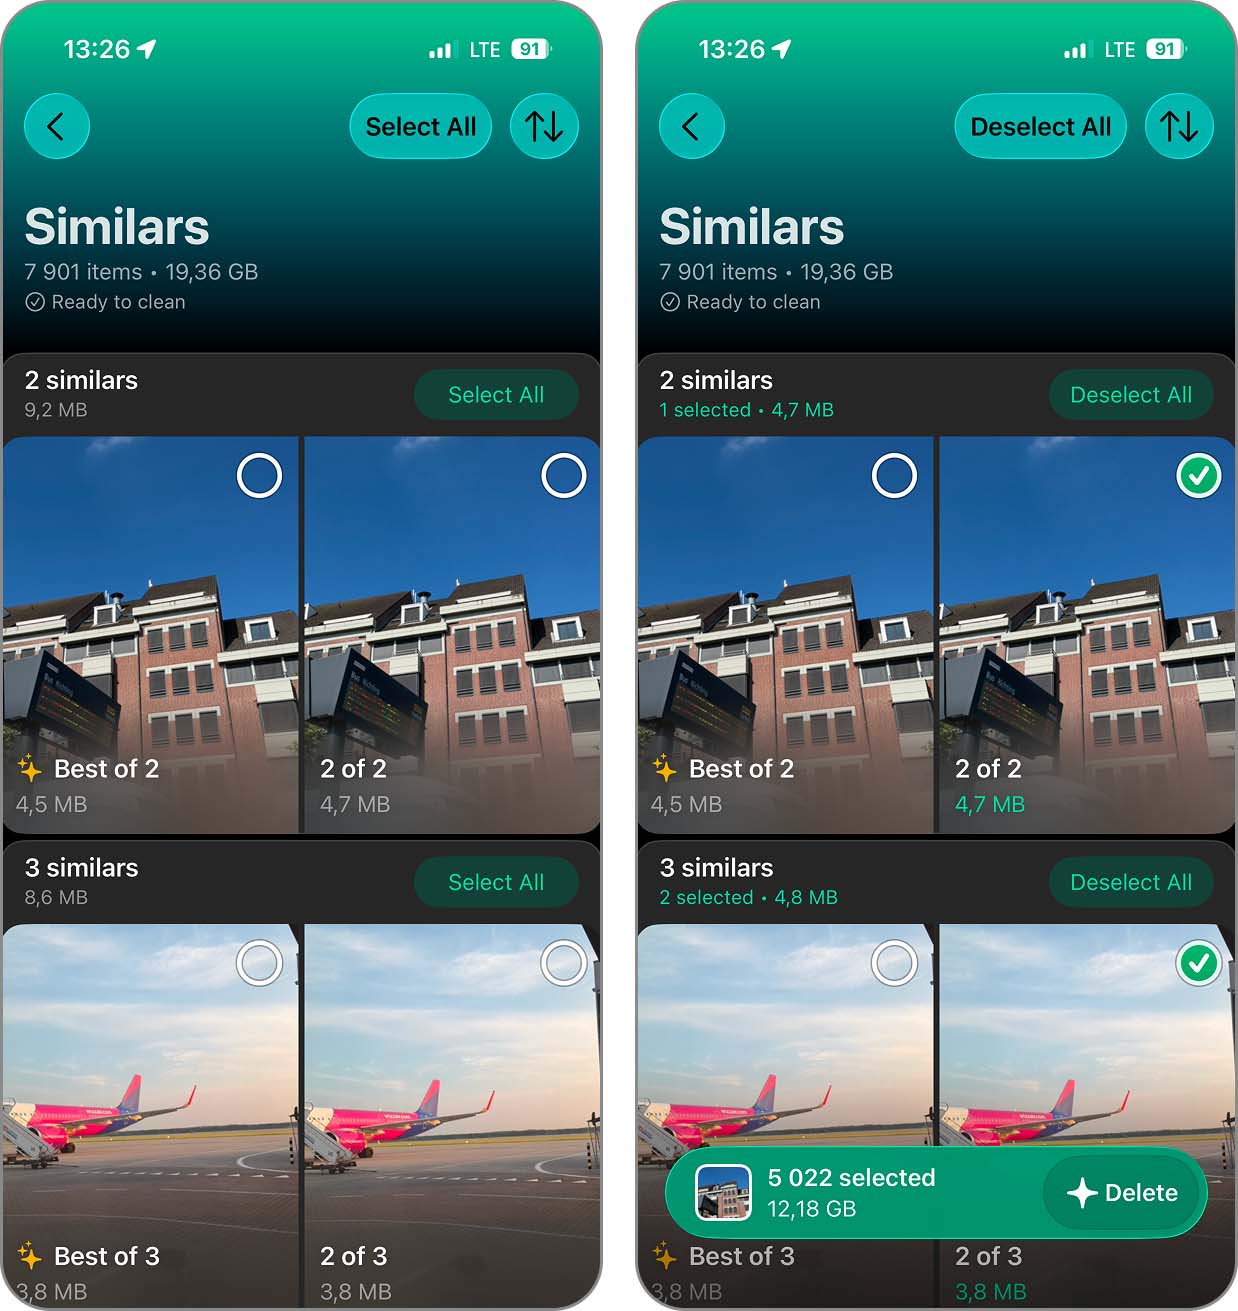
Clever Cleaner goes well beyond the identification of exact and partial duplicates (but it does excel at it too) by providing the following storage space-maximizing features:
- 🤖 AI-powered best photo selection: Clever Cleaner employs highly sophisticated algorithms that can identify similar-looking photos with excellent accuracy and automatically select the best picture for keeping. You can then process thousands and thousands of pictures with a single tap.
- 🏞️ Repeated shot management: When capturing action or trying to get the perfect moment, many users intentionally or accidentally take multiple photos in quick succession. These series of similar shots can rapidly consume storage space. Clever Cleaner can identify these sequences of manually taken similar photos and help you keep only the sharpest, most well-composed shots while removing the rest.
- 🧹 Smart cleanup: Dealing with several thousand unnecessary photos one by one can take forever. Clever Cleaner can automatically remove duplicate and similar photos, convert Live Photos into still images, and compress screenshots. You can choose which of these actions you want it to perform or use all three at once.
- 🎥 Large video identification: Videos can easily be among the biggest storage consumers on your iPhone, yet the Photos app doesn’t let you sort them by size. Clever Cleaner does, so you can quickly identify and remove the largest ones. If there’s a large video you don’t want to delete, you can compress it instead.
- 👆 Photo library management: Even when your photo library isn’t full of duplicates, there are probably plenty of pictures you simply don’t need anymore. Clever Cleaner groups photos by the month they were added and lets you go through them using simple swipe gestures (and there’s no daily limit on this feature). You can also review Recent photos, Videos, Screenshots, Live Photos, or Favorites separately.
- 📸 Screenshot management: Screenshots are easy to forget about after they’ve served their purpose, and hundreds or thousands of them can take up a surprising amount of storage space. Clever Cleaner lets you sort them by newest, oldest, or largest to make the biggest space-wasters easy to find. You can then delete them or compress the screenshots you want to keep.
- 🔍 Live Photo compression: Live Photos are wonderful for capturing special moments, but they can take much more storage space than regular photos. Clever Cleaner can convert them into regular images by removing the short video clip while preserving the main photo. You can also simply delete the Live Photos you no longer need.
- 🗜️ Photo and video compression: Sometimes you need to free up storage space but don’t actually want to part with your photos or videos. Clever Cleaner can make them smaller instead, with three compression levels available for photos, screenshots, and videos. This way, you can decide how much space you want to save without removing the files themselves.
Optimize Photos
Another way to add more storage to iPhone by manipulating photos is to store them in iCloud and then optimize them. By saving and optimizing your images in iCloud Photos, you can still access your media, but the high-resolution images and videos are stored in iCloud instead of on your device.
To enable the Optimize iPhone Storage feature:
- To use iCloud Photos, open the Settings app and select your username.
- Tap iCloud and pick Photos.
- Turn on the toggle for Sync this iPhone.
- Further below, select Optimize iPhone Storage to place a checkmark next to it.
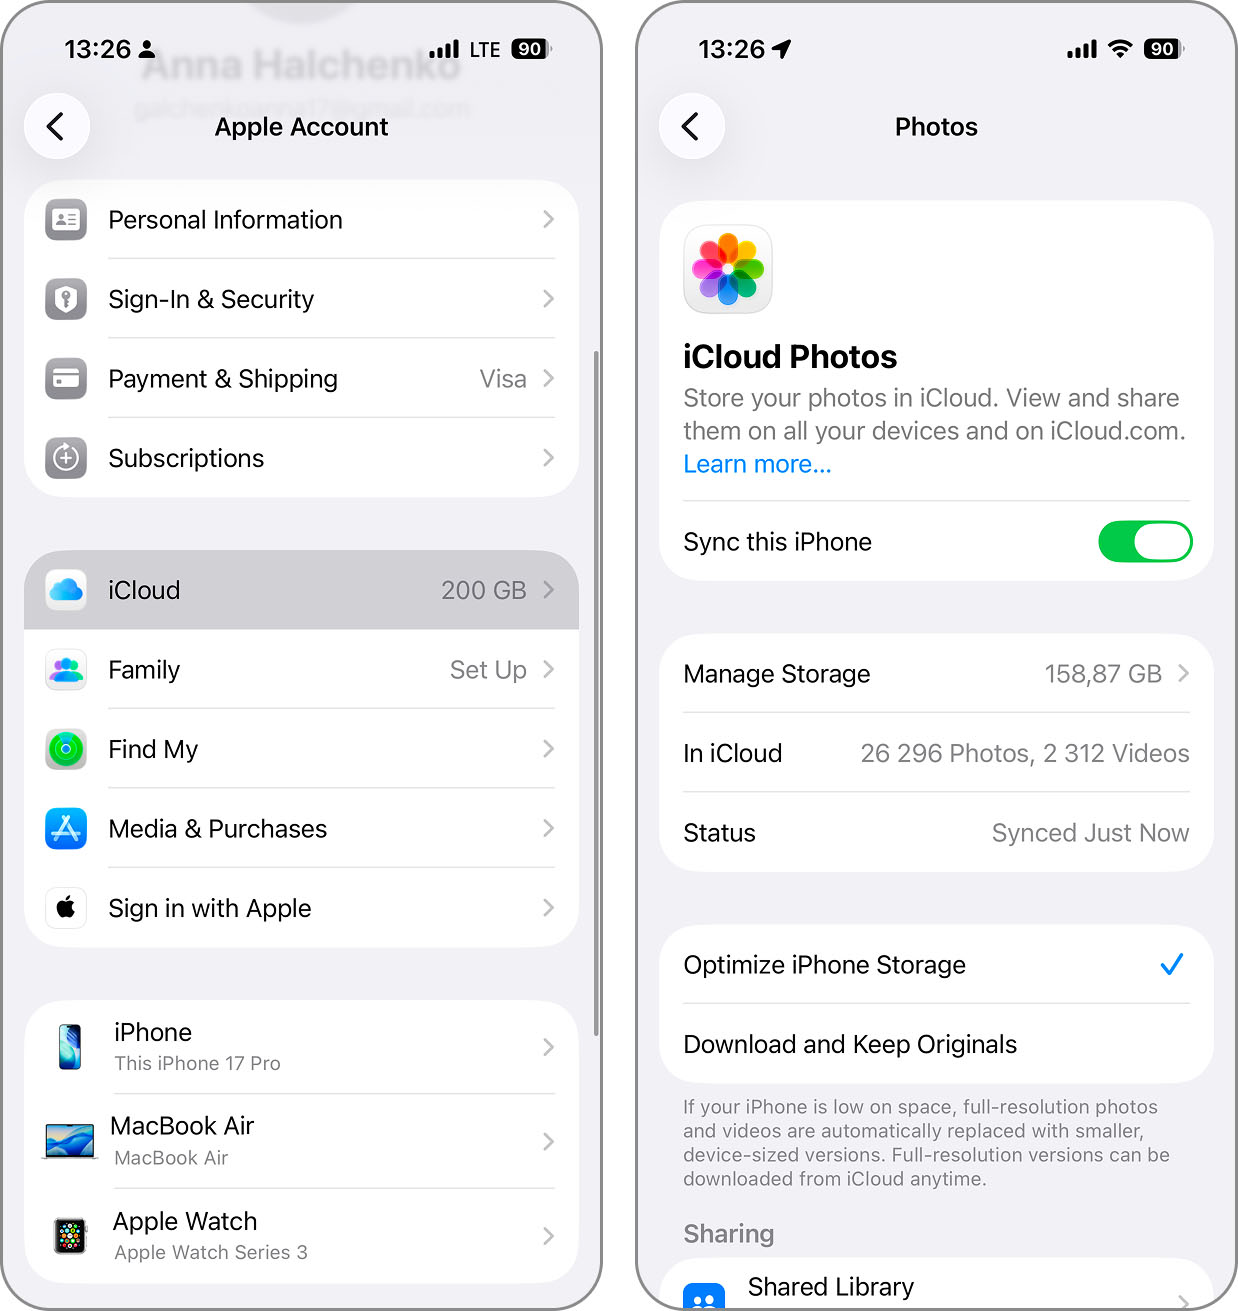
Using iCloud and the optimization feature, you’ll regain some of that much-needed space on your iPhone.
👨💻 My personal experience: I started with the two native storage cleaning features to free up space on my iPhone. As an iCloud subscriber, I wasn’t limited to just 5 GB of cloud storage space, so the potential of the feature to get more space on iPhone was much greater than it would be for regular users. The Duplicates feature managed to identify many duplicates, but a more in-depth review of my gallery revealed that there still was more duplicate cleaning to be done. That’s when I downloaded Clever Cleaner and was amazed at its ability to find and reliably handle virtually all leftover duplicates. What’s more, it also optimized my Live Photos (which I take a lot) and identified several 1 GB+ videos that I could safely delete.
Method 4: Offload Infrequently Used Apps
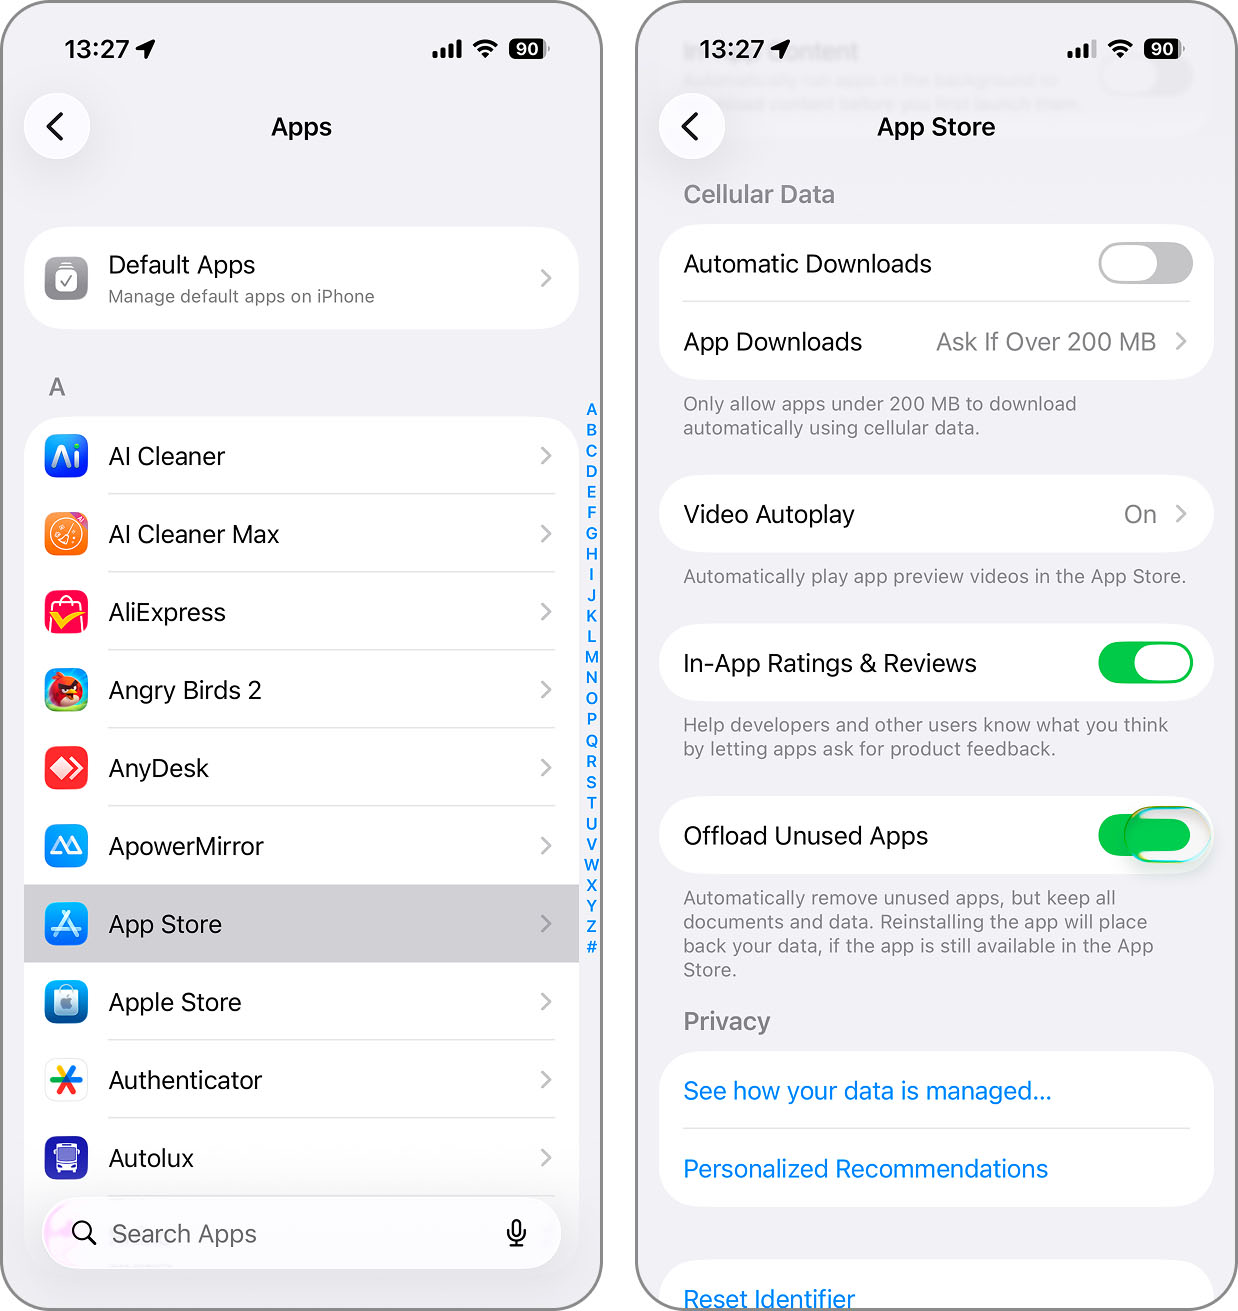
Many times, we download apps, give them a try, and then never open them again. They get forgotten but continue to take up storage space. Using the Offload Unused Apps feature, you can regain some space on your iPhone.
When you enable this feature, apps you rarely use are automatically removed, but their documents and data remain on your device. This allows you to easily reinstall the app with a tap.
- Open the Settings app and navigate to Apps and then App Store.
- Scroll all the way down.
- Enable the Offload Unused Apps option.
If you prefer to offload specific apps instead, this is another option.
- In Settings > General > iPhone Storage, select the app from the list.
- Tap Offload App and then confirm by tapping Offload App once more.
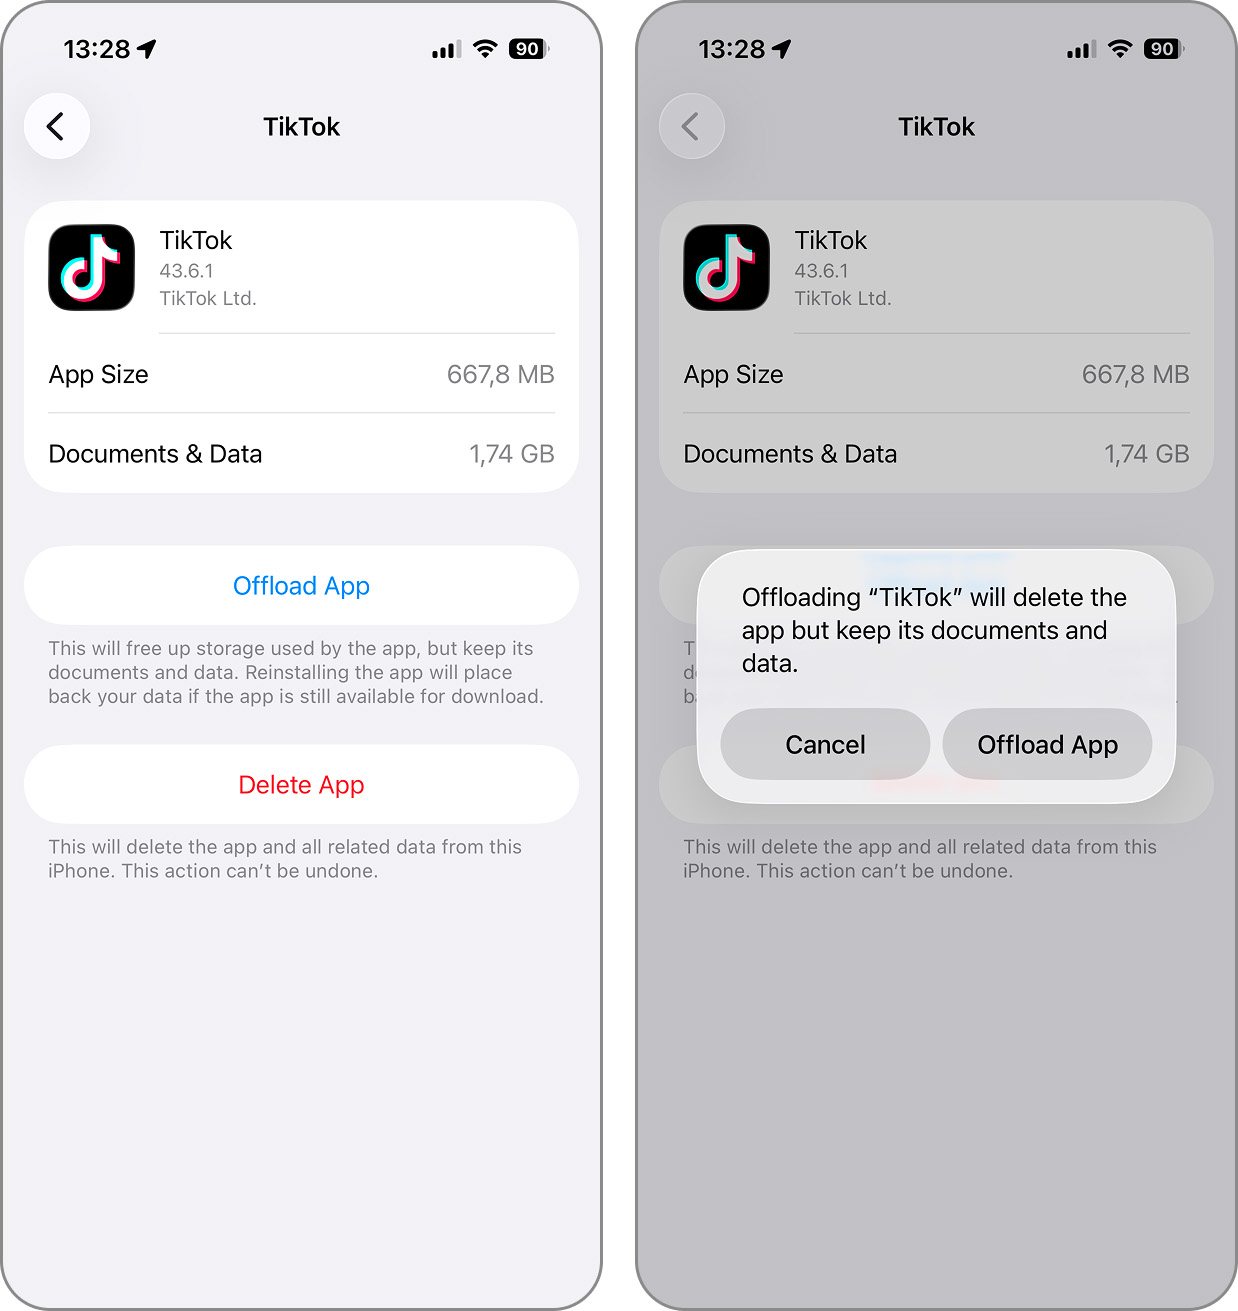
Continue this process for any additional apps you want to offload.
👨💻 My personal experience: When I first considered offloading apps as a way to free up some space, I’ll admit I was unsure about how it might affect performance – would the trade-off even be worth it? I imagined laggy app launches or constant waiting for downloads, especially since I rely on a bunch of apps daily. To my surprise, the impact has been almost nonexistent so far. I believe that’s because I’m nearly always connected to Wi-Fi or 5G. Whenever an offloaded app needs to reinstall before launching, it’s back in action in just a few seconds. As for how much space I’ve freed up, it’s tricky to pin down an exact number because it shifts with my app habits, but I’d estimate several gigabytes at any given time.
Method 5: Delete Unnecessary Apps
The Offload Unused Apps feature is handy if you think you may want to reinstall an app later. But, if you have apps that you never use nor do you plan to, why not get rid of them altogether? This is one of the best ways to increase storage space on iPhone.
- To delete an app, long-press its icon on your Home screen or in a folder and choose Remove App from the pop-up menu.
- Confirm by tapping Delete App.
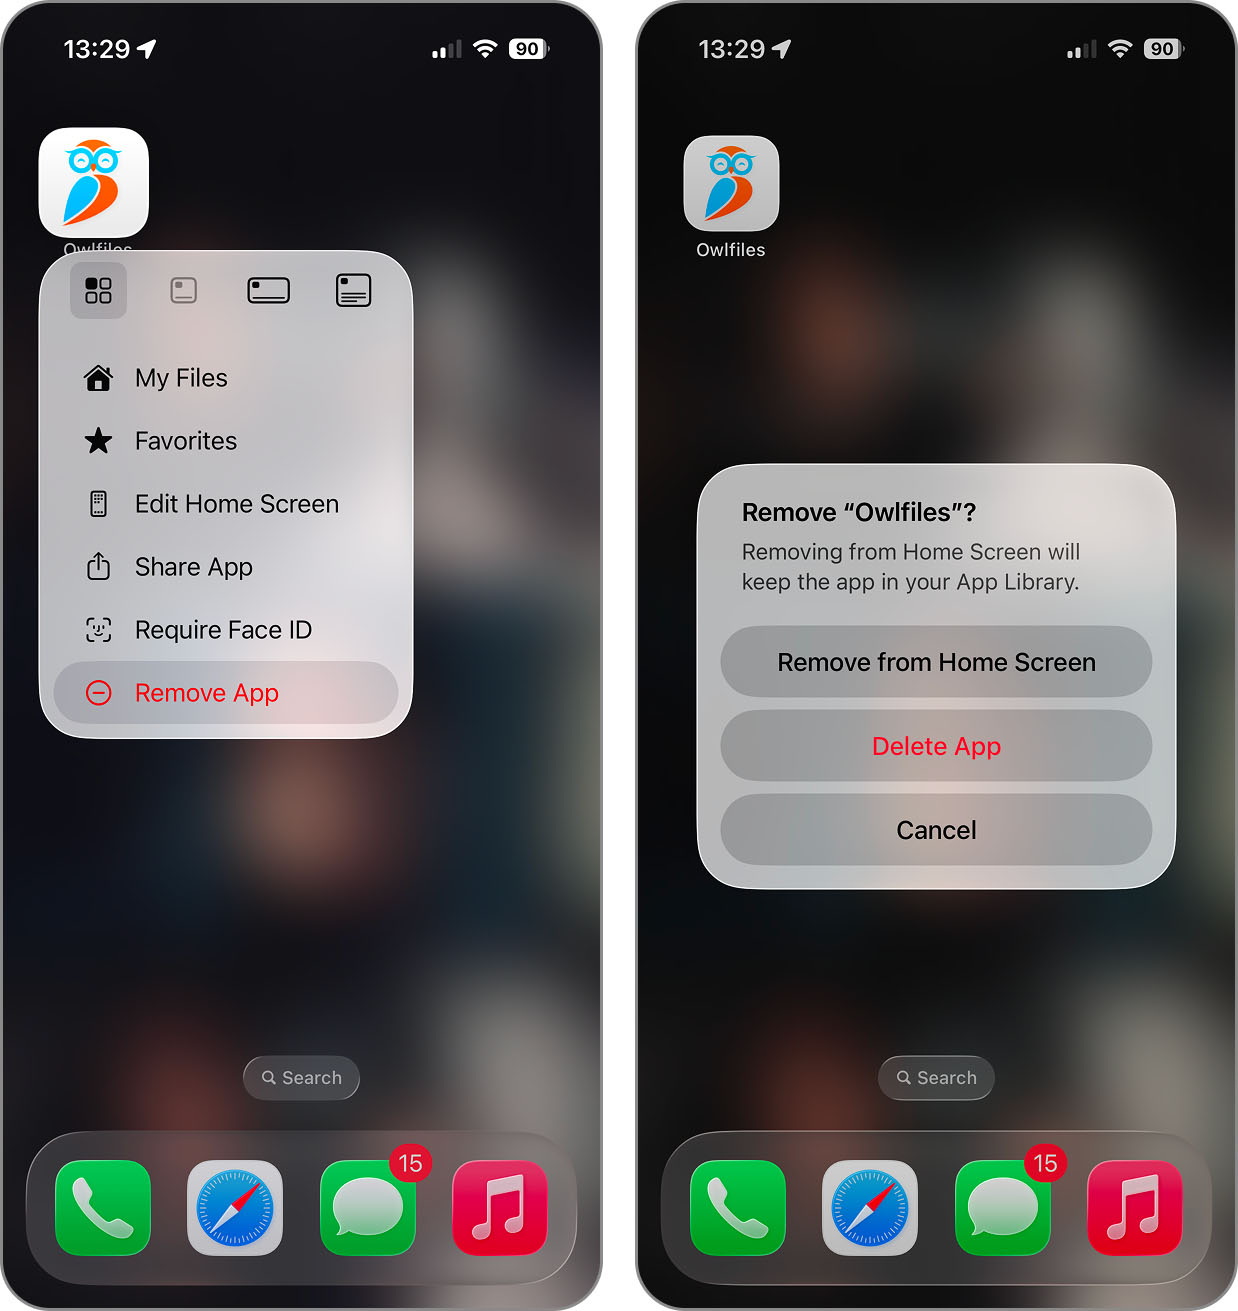
If you want to remove several apps, you can also put the icons into edit (jiggle) mode to delete them.
- Long-press an app you want to remove and continue to hold until you see all of your icons jiggle.
- Tap the minus sign in the top left corner of the app icon and then choose Delete App.
- Confirm by tapping Delete once more.
- Continue to use the minus sign for each app you want to remove. When you finish, select Done on the top right to exit edit mode.
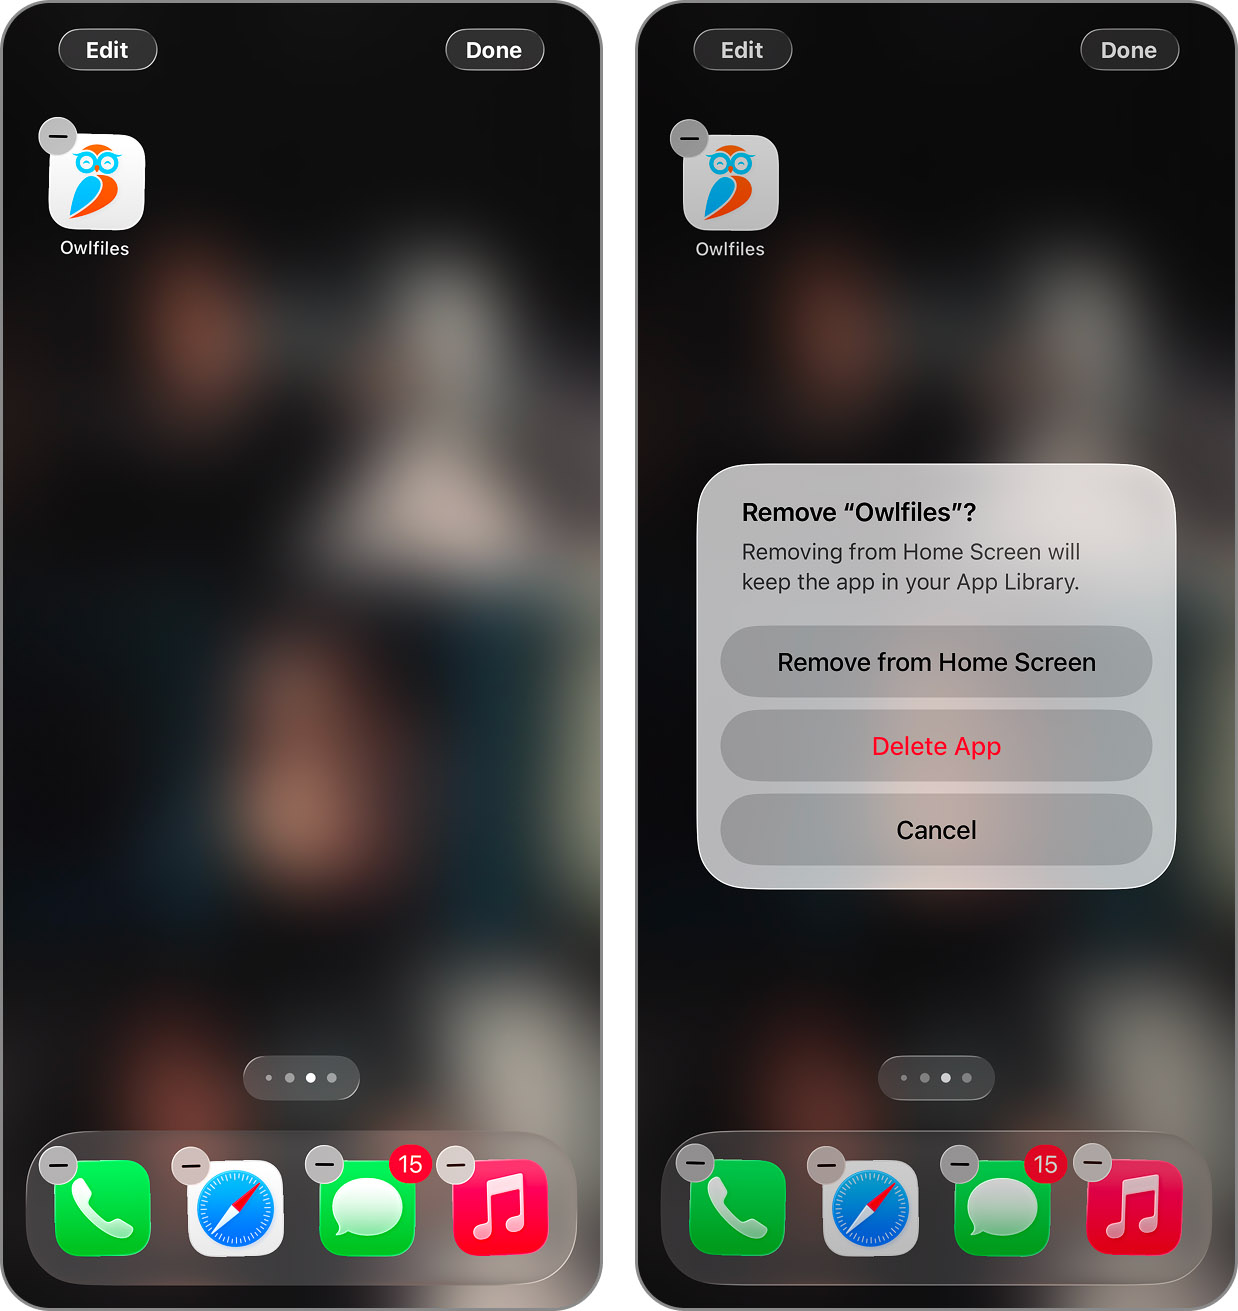
Keep in mind that you can always redownload or restore the app should you decide to use it again.
👨💻 My personal experience: I discovered I had accumulated over a dozen casual games and entertainment apps I’d downloaded when I was sick the last time and had to mostly stay in bed for three days. Upon checking their combined size, I was shocked to find they were consuming nearly 4 GB of storage space! It’s crazy how large even simple games can be these days.
Method 6: Clean Out Your Downloads Folder
Another spot on your iPhone that tends to fill up with unnecessary items is the Downloads folder. You might download a file or image, use it for what you need, but never remove it from that folder. Or, you may have temporary files that accompany other downloaded items.
- To review and clear your Downloads folder(s), open the Files app.
- For downloads in iCloud Drive, tap iCloud Drive and for downloads on your device, tap On My iPhone.
- Open the Downloads folder to review the files.
- Select an item you want to remove or for all items in the folder, tap the three dots on the top right, pick Select, and then choose Select All.
- Tap the Delete icon (trash can).
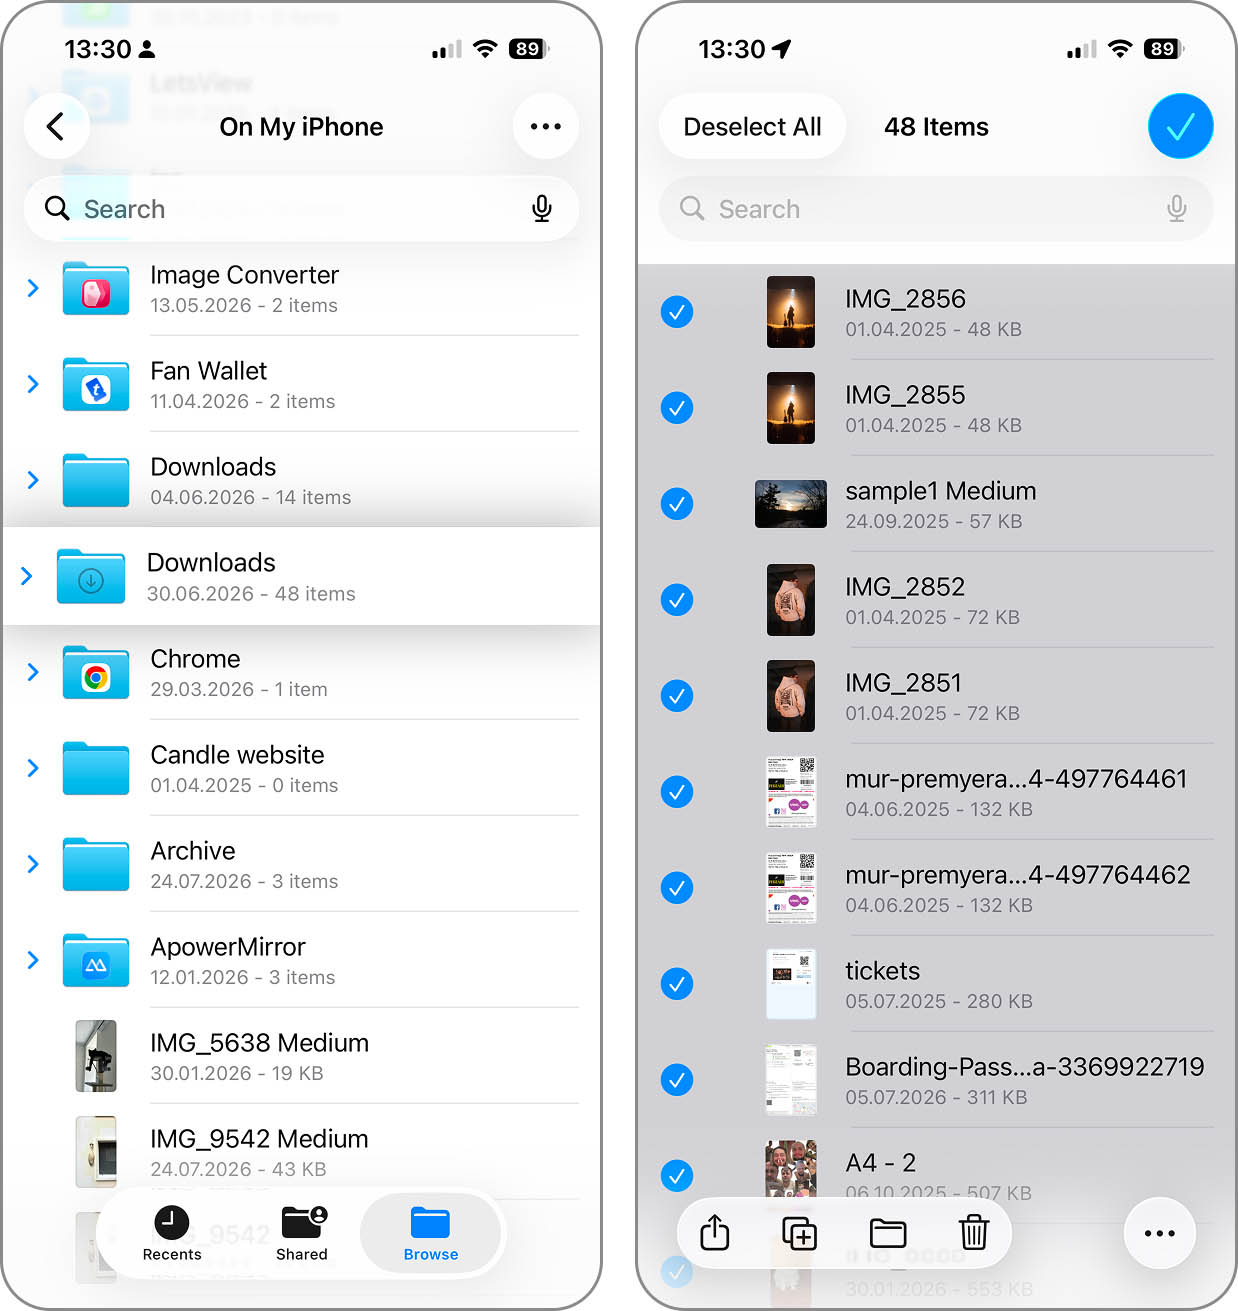
👨💻 My personal experience: After not cleaning it for two years (that’s how long I have had my current iPhone), my Downloads folder was a digital junkyard of forgotten files, such as downloaded PDF reports, installation files for Windows software I planned to transfer to my PC but completely forgot about, and ever a few podcasts I downloaded directly from the web for a long train ride. All these downloads together amounted to about 3 GB of storage space.
Method 7: Remove Large Message Attachments
One of the coolest things about the Messages app is that you can quickly and easily share photos, videos, and files with your friends and family. But here again is another item that takes up space on your iPhone. By removing large attachments from Messages, you can regain some storage.
- Open the Settings app and select General.
- Tap iPhone Storage and you’ll see Review Large Attachments below Recommendations. You can see the size of these attachments and how much space you’ll reclaim.
- Tap Review Large Attachments to see the items which display with their individual sizes along with the dates.
- To remove the attachments, select Edit at the top and then mark the circle to the left of each one.
- Tap the Delete icon on the top right.
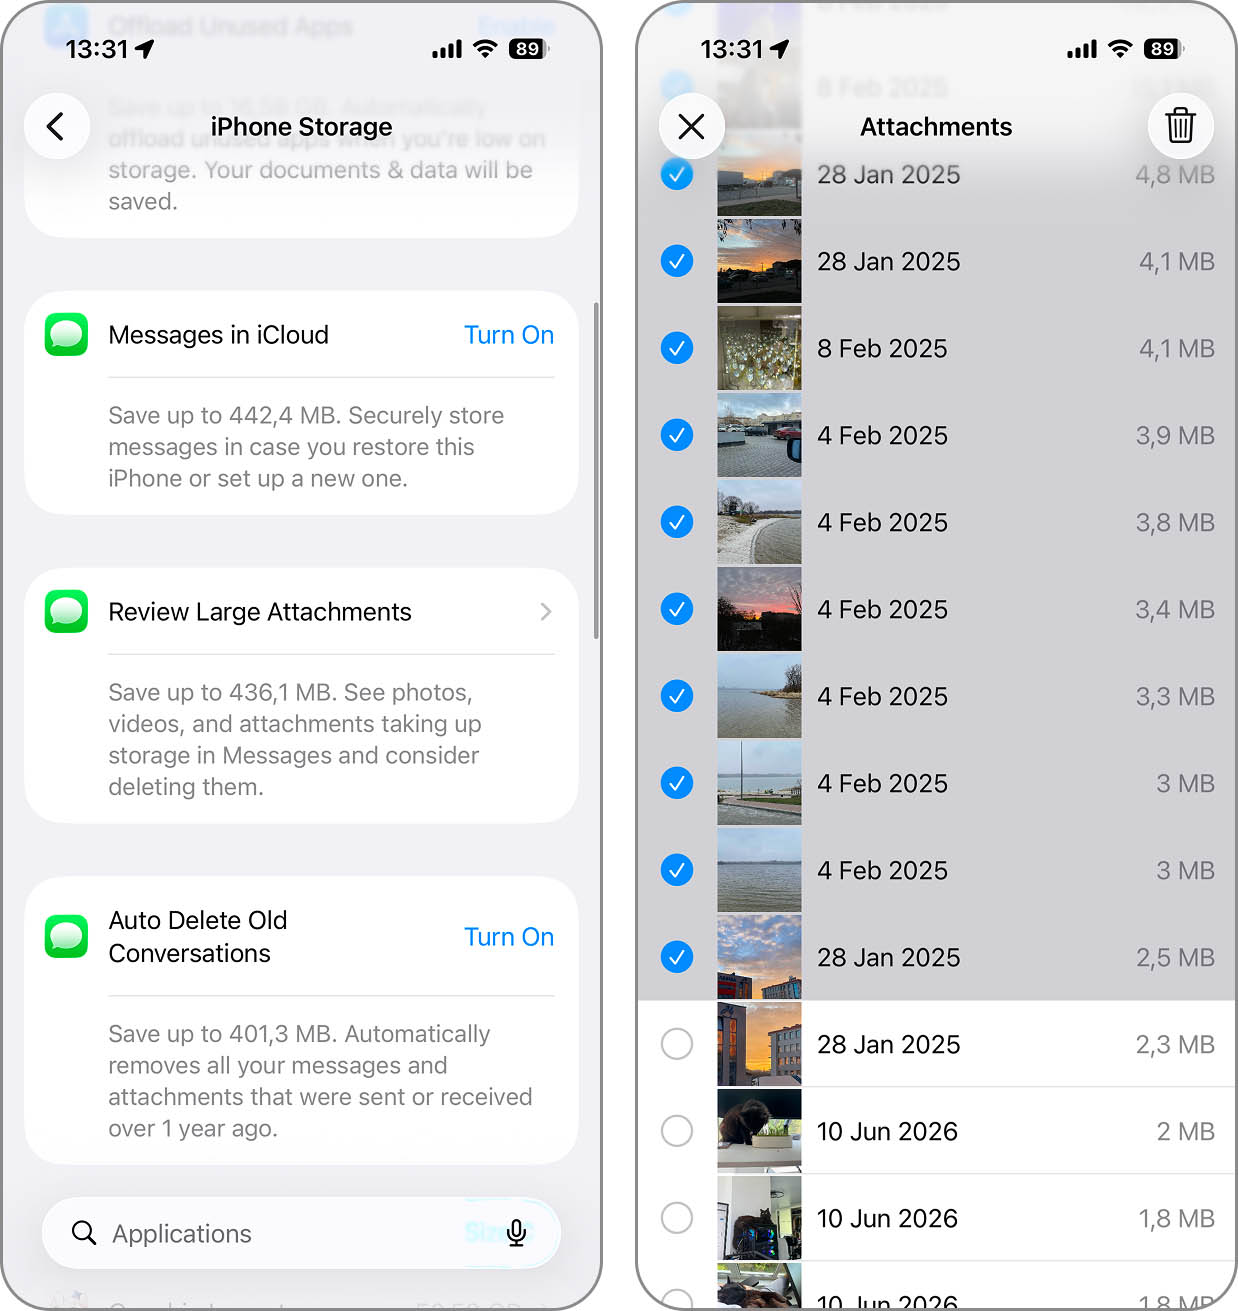
👨💻 My personal experience: Most large attachments aren’t actually all that large—typically between 10 MB and 50 MB. That said, they certainly do add up. Just videos from my friend’s birthday party that three people shared with me were taking up around 1 GB of storage. Together, all large attachments on my device were taking up whopping 3.8 GB, and I found it easy to delete all of them because I had already saved the important photos and videos to my Photos app.
Method 8: Delete All Unimportant Data in One Go
When you’re desperate to get more storage space on your iPhone, you can take an extreme action. This includes backing up all important items on your device to iCloud and resetting your iPhone.
If you are willing to go this route, you must be extremely careful so that you don’t miss anything important You must also keep in mind that the items you do back up will be restored to their current state, so you’ll still need to, for example, handle duplicate photos using a different method.
- To create the backup:
- Open the Settings app and select your username.
- Tap iCloud and use See All in the Apps Using iCloud section to choose the items you want to back up. You can select and turn on things like iCloud Mail, Health, and Passwords and Keychain and use the toggles for items like apps, Game Center, and Siri.
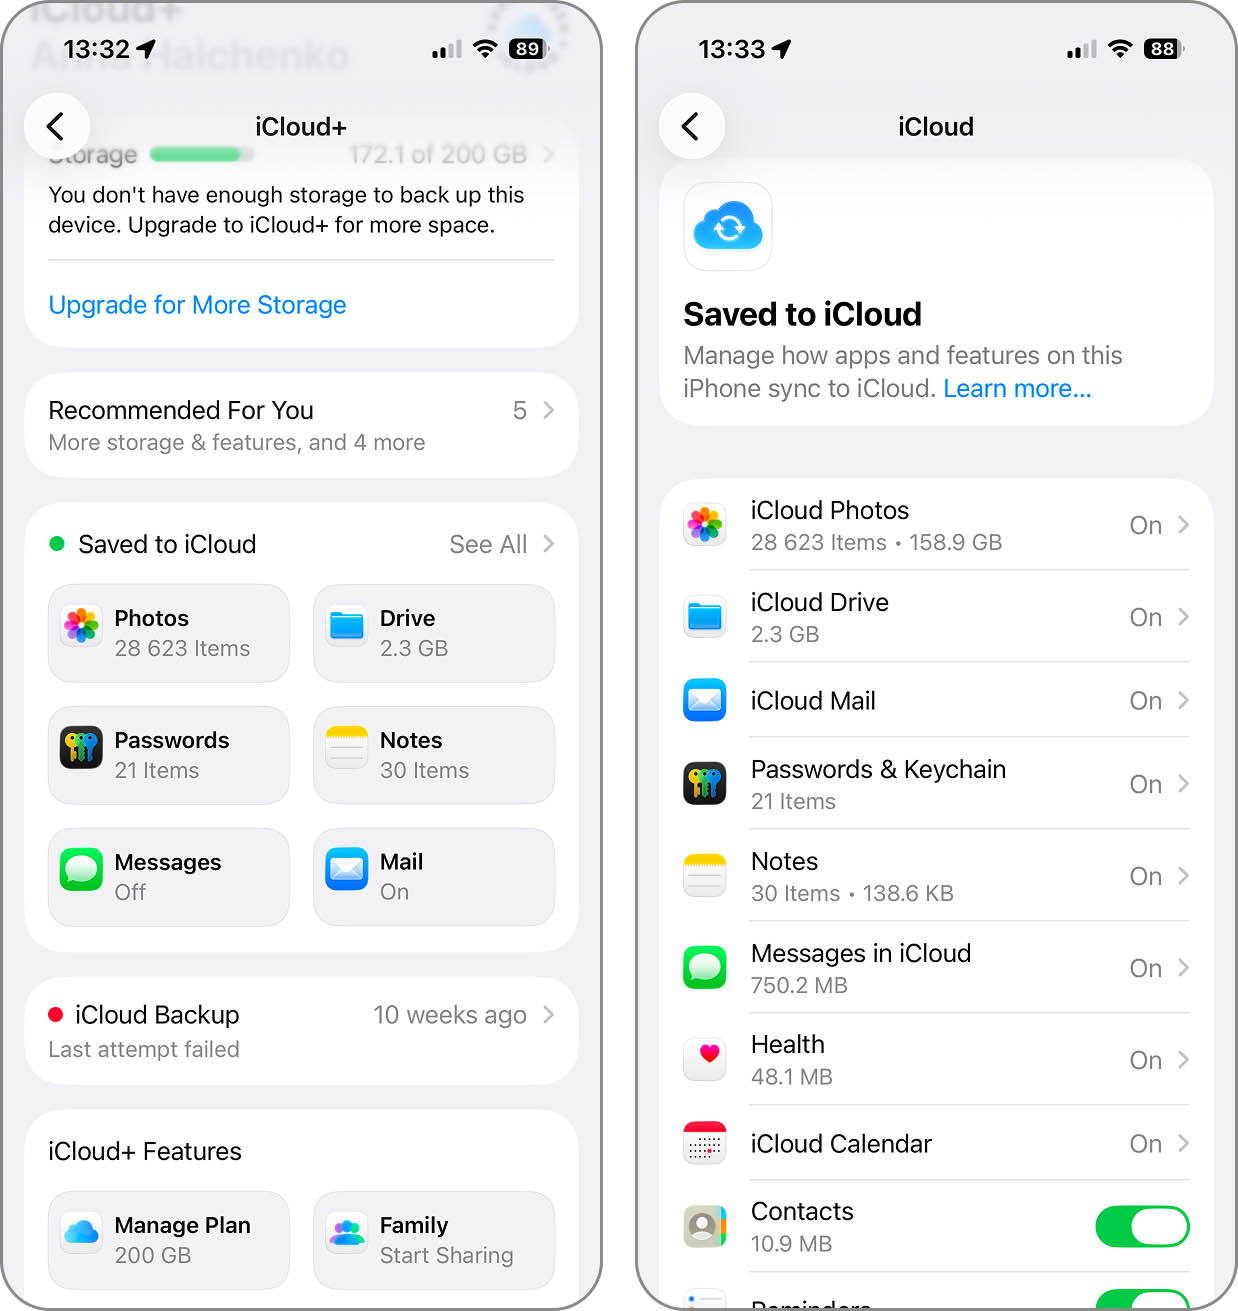
- When you finish selecting the items you want to back up, tap the iCloud arrow on the top left.
- Back on the iCloud screen, select iCloud Backup.
- Then, choose Back Up Now.
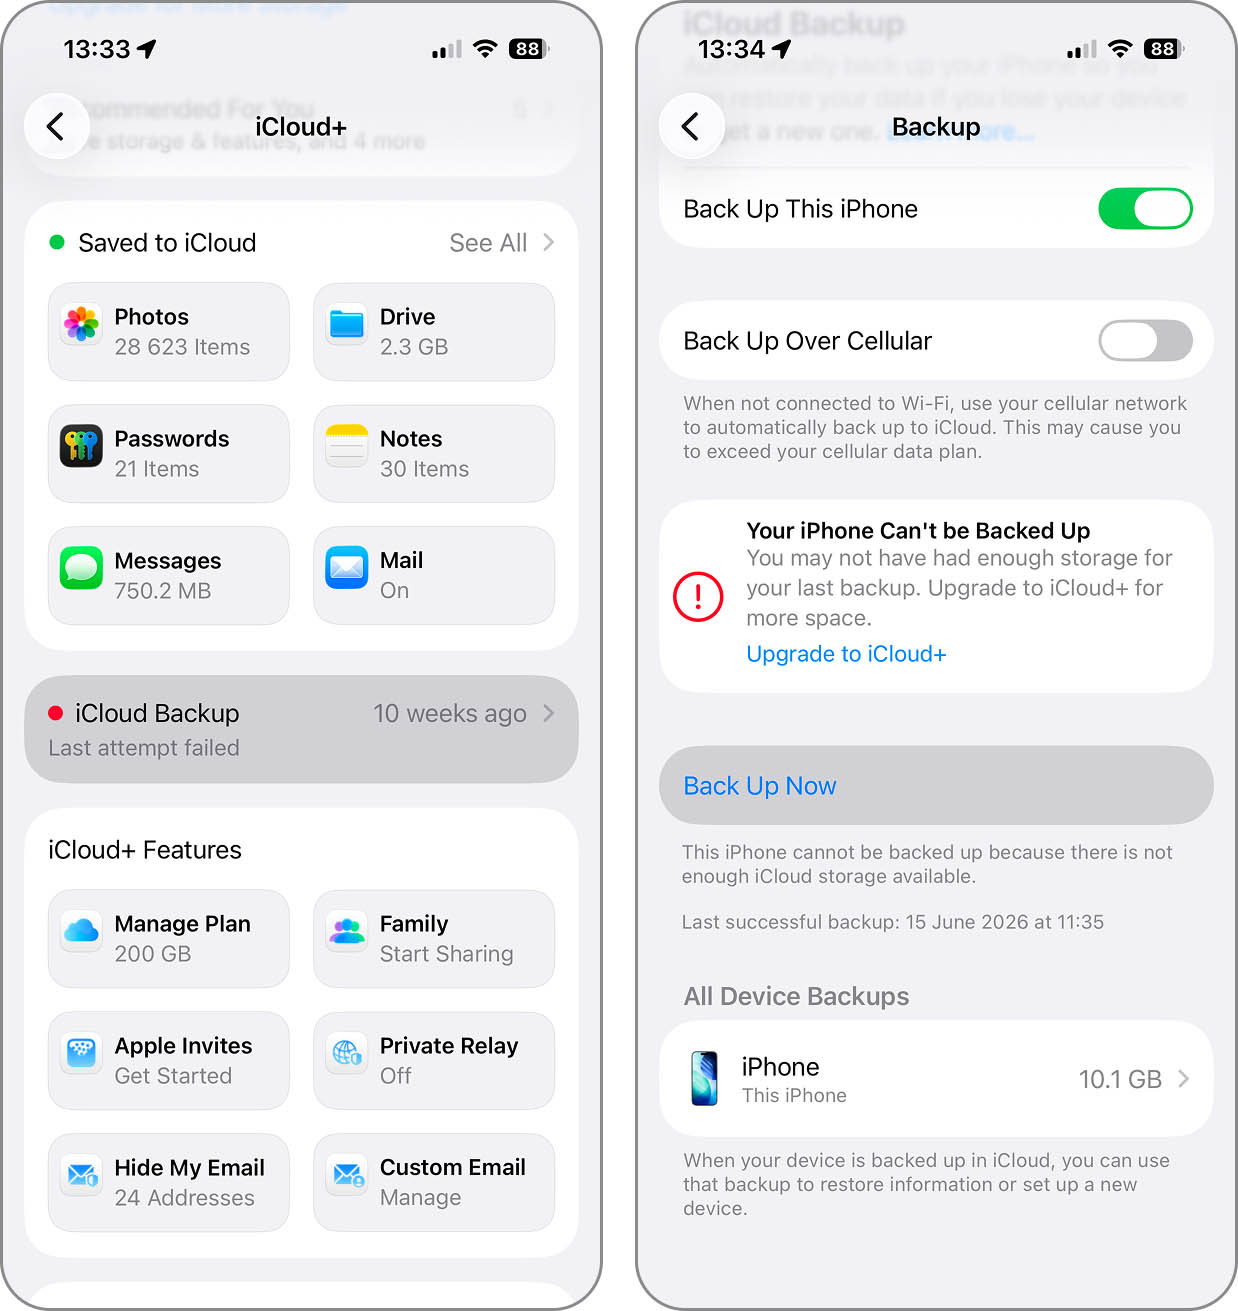
Once you see that your backup is complete, you can reset your iPhone and restore it from that iCloud backup.
- Tap the arrow on the top left until you arrive at your main Settings screen and select General.
- Scroll down and pick Transfer or Reset iPhone and then tap Erase All Content and Settings.
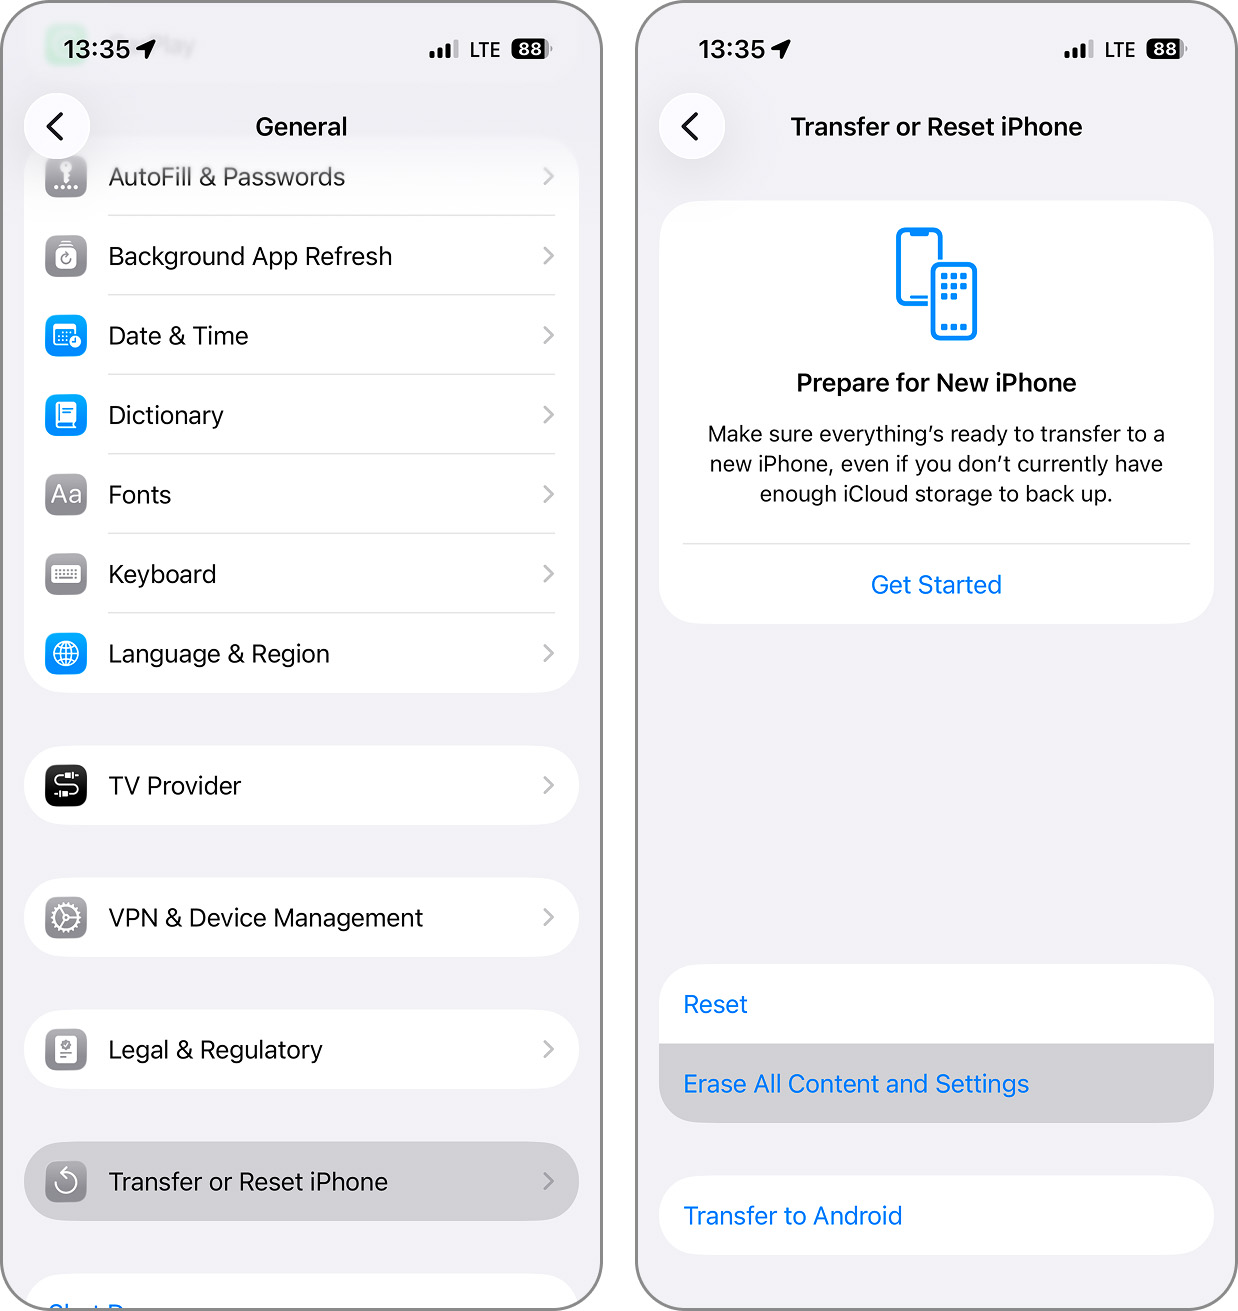
- Review the statement and items on the Erase This Phone screen, tap Continue, and follow the subsequent prompts to complete the process.
When your device restarts, you can then restore your iPhone using the iCloud backup you performed which installs only your chosen items.
👨💻 My personal experience: I perform a complete iPhone reset whenever I get a new model. It’s always interesting to see the total storage space usage be much lower after I restore my data on the new device despite transferring all my essential apps and data. On my most recent upgrade, I restored all my important content but found I was using nearly 12 GB less storage than on my old phone. This really shows how much hidden cache, temporary files, and system clutter can accumulate over time, even when you’re careful about storage management.
Method 9: Utilize Third-Party Tools
Several free apps can help you get extra storage on the iPhone without spending a penny. The apps below offer features designed specifically for finding and removing storage-consuming files that iOS’s built-in options might miss or not delete efficiently enough to be useful in practice.
1. Clever Cleaner
📲 Download on App Store: https://apps.apple.com/us/app/clever-cleaner-ai-cleanup-app/id1666645584
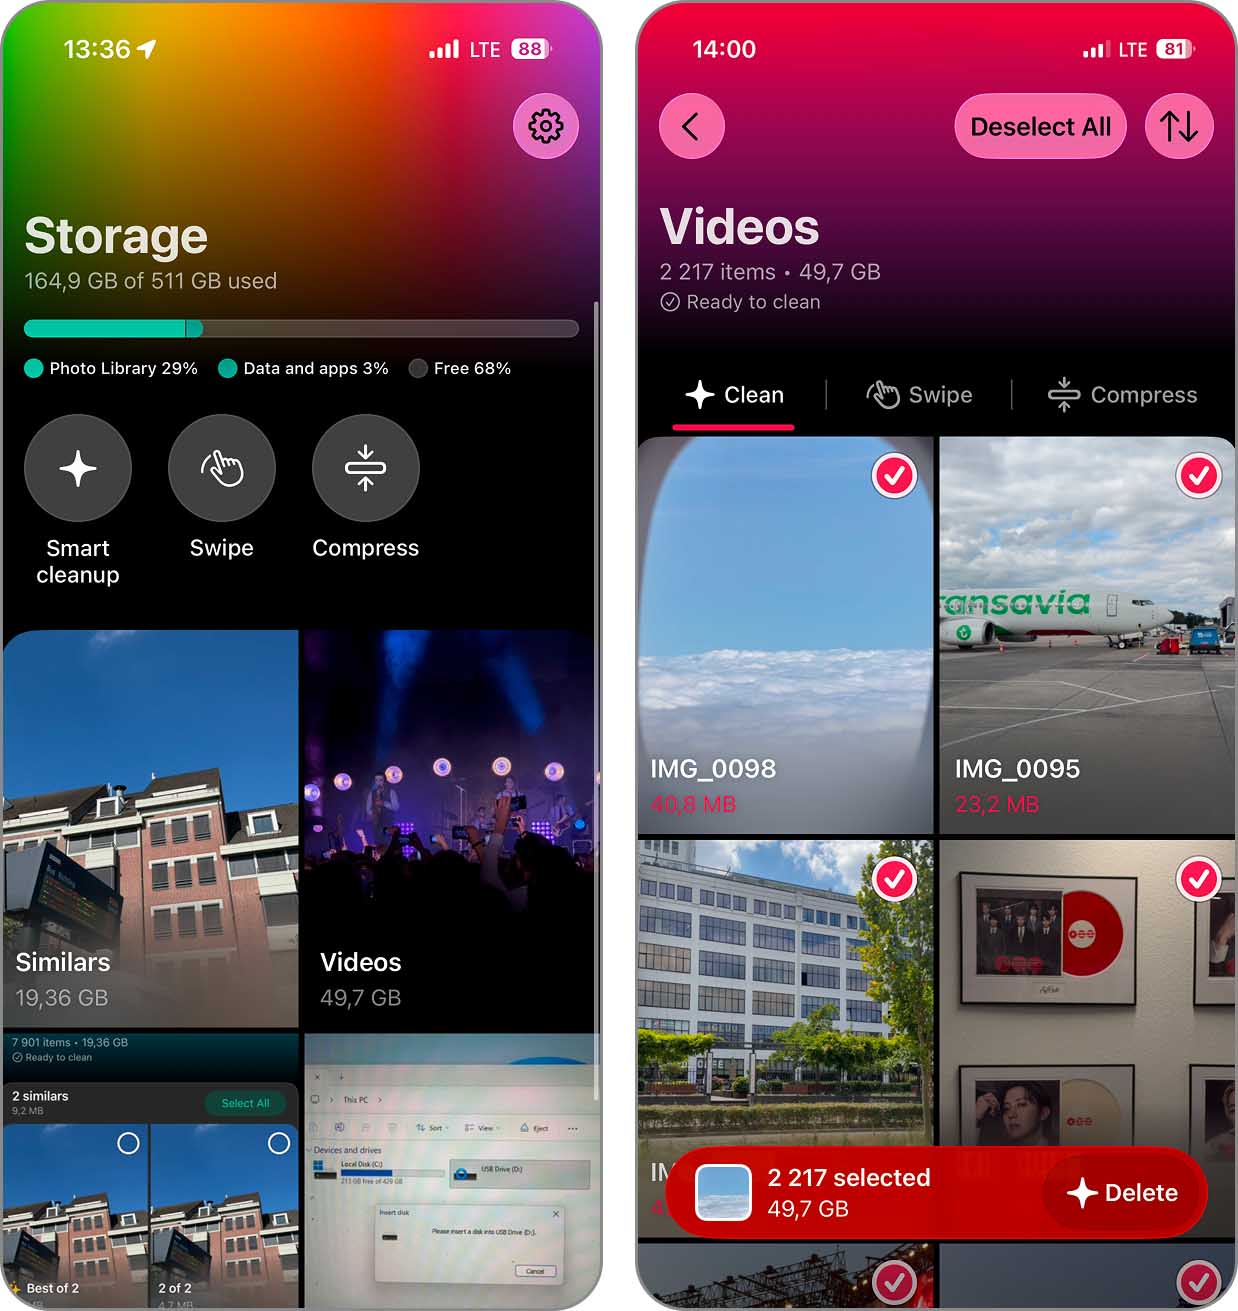
Our top pick when it comes to getting more storage space on iPhone is Clever Cleaner – the rare app that offers all its features for free without making a premium subscription mandatory.
With Clever Cleaner, you can identify and remove duplicate photos, optimize Live Photos, remove large media files, compress photos and videos, and more. The app’s AI algorithms excel at finding similar photos and automatically selecting the best versions to keep, so even a gigantic photo collection full of duplicates can be organized quickly and efficiently.
All Clever Cleaner’s features are enjoyable to use thanks to the app’s clean, ad-free interface (it’s developed by the same team behind the renowned Mac and Windows data recovery app Disk Drill). Unlike many competitors that bombard you with upgrade prompts or limit functionality until you subscribe, Clever Cleaner lets you focus entirely on freeing up space on your iPhone. If you need more than what’s available for free, you can also choose one of the premium subscription options.
2. Boost Cleaner
📲 Download on App Store: https://apps.apple.com/us/app/boost-cleaner-clean-up-smart/id1475887456
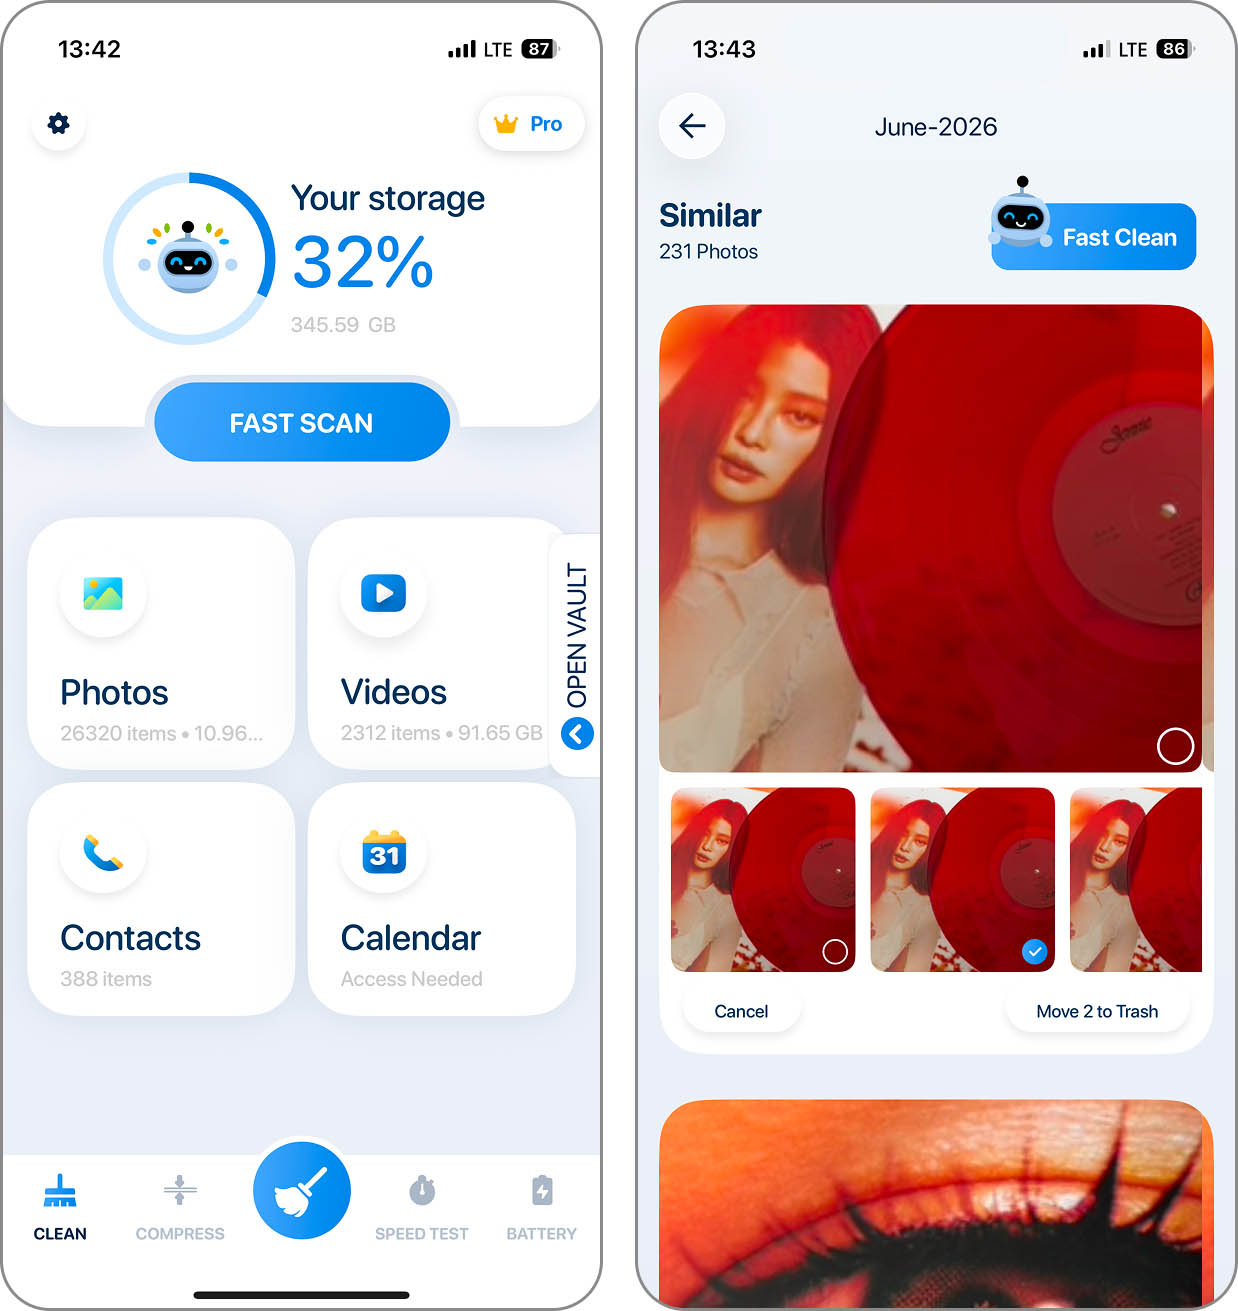
Unlike Clever Cleaner, Boost Cleaner is less generous when it comes to free use, but it still offers enough useful features without requiring payment to make it a good option for getting more storage on iPhone.
Without a subscription, you can clean up to five files per day for free, which allows you to test its photo organization tools and contact management features on a limited basis. The app offers photo organization by date and location, duplicate photo detection, and contact cleanup capabilities, but with the daily restriction.
If you’re okay with firing up the app every day to take advantage of the daily limit, then you can actually accomplish quite a lot over the course of a year. Specifically, you can clean up almost 2,000 images – not bad in my opinion.
3. Phone Cleaner
📲 Download on App Store: https://apps.apple.com/us/app/phone-cleaner-phone-clean/id1465702183
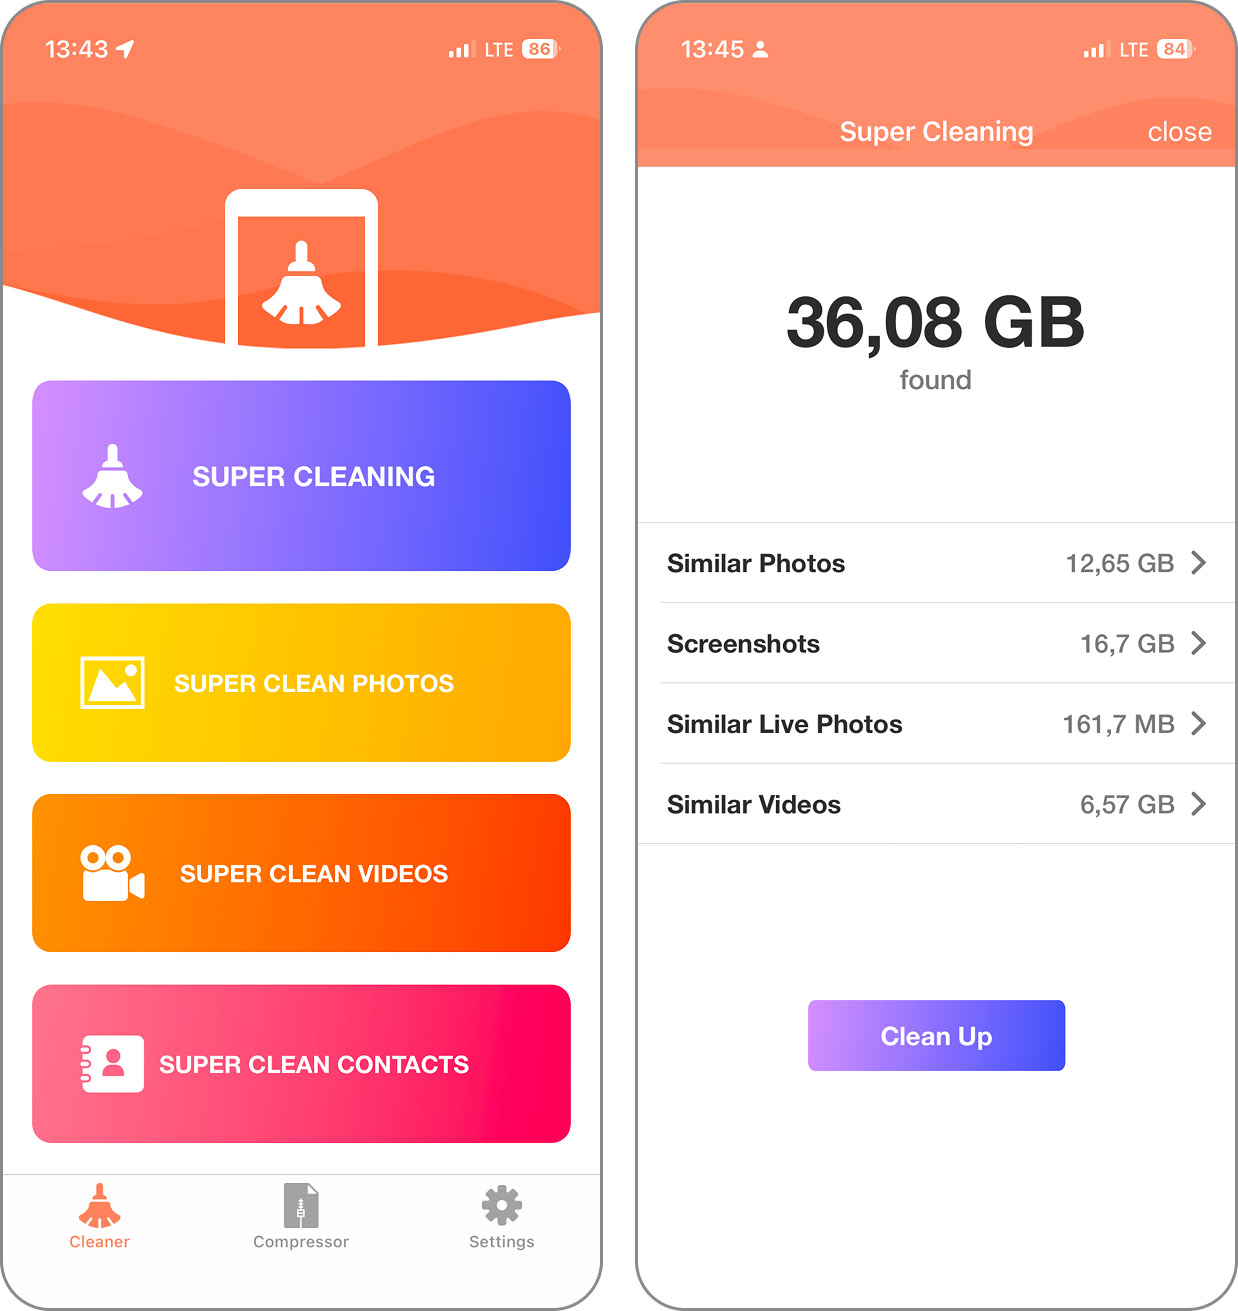
Similar to Boost Cleaner, Phone Cleaner offers limited but useful free functionality for those patient enough to work within its constraints. The free version allows you to process 5 items per day across different categories — you can delete 5 similar photos, remove 5 duplicate contacts, clean up 5 videos, or compress 5 photos every 24 hours without subscribing.
4. Smart Cleaner
📲 Download on App Store: https://apps.apple.com/us/app/smart-cleaner-storage-clean-up/id1472524442
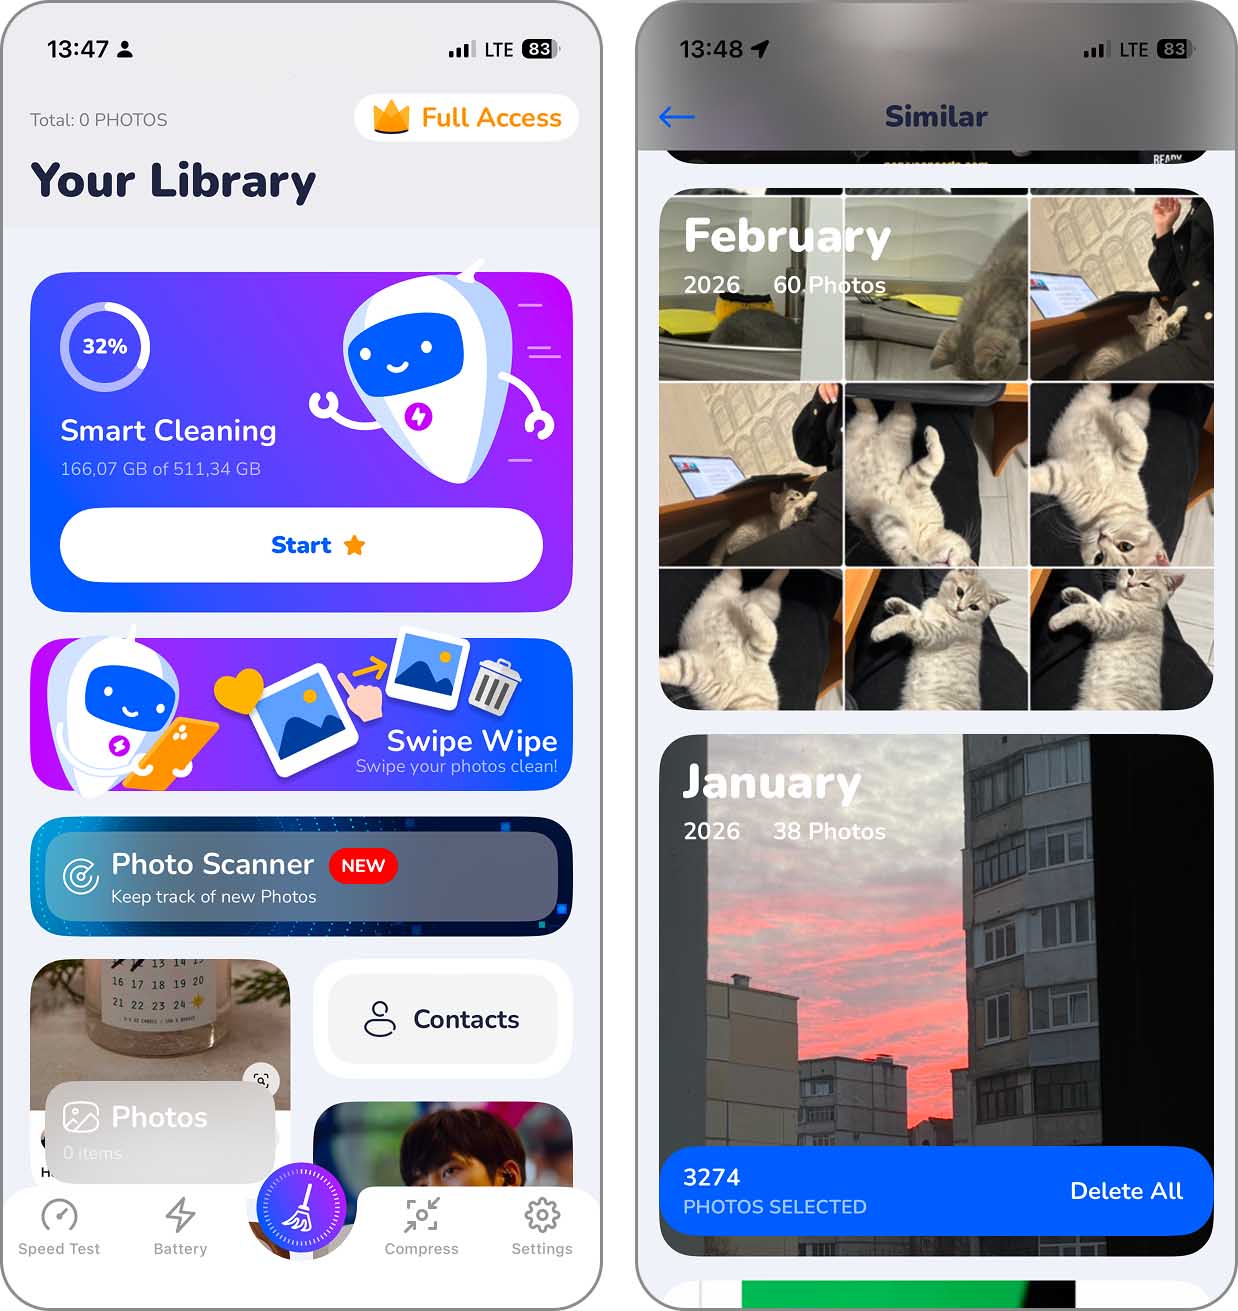
Last on our list is Smart Cleaner, which, like the previous two apps, limits free users to deleting only 5 photos per day. What puts this app at the bottom of our ranking is that it also displays ads while you use it. That said, Smart Cleaner does offer some unique features that you should pay attention to, including AI-powered photo analysis that identifies and suggests which photos to keep based on quality factors like focus, smiles, and open eyes.
👨💻 My personal experience: After putting these apps through their paces, I’ve got a clear favorite: Clever Cleaner. I reclaimed a whopping 18 GB in one go – duplicates, similar looking photos, heavy videos, and a compressed Live Photo stash – thanks to its AI smarts and generous free tier. It’s fast, thorough, and doesn’t push you toward a subscription, making it my go-to for getting more space on iPhone without paying.
How to Add More Storage to iPhone
If you find that the methods suggested earlier aren’t helping you free up enough storage space on your iPhone, you might consider other options to expand your available storage.
iCloud Storage
First, you should consider getting more storage through iCloud. With it, you can store photos and videos, back up your device, save your passwords and keychain, hold onto Messages, and much more. For this reason, Apple offers iCloud+ paid plans for additional storage so that you can keep your most important items.
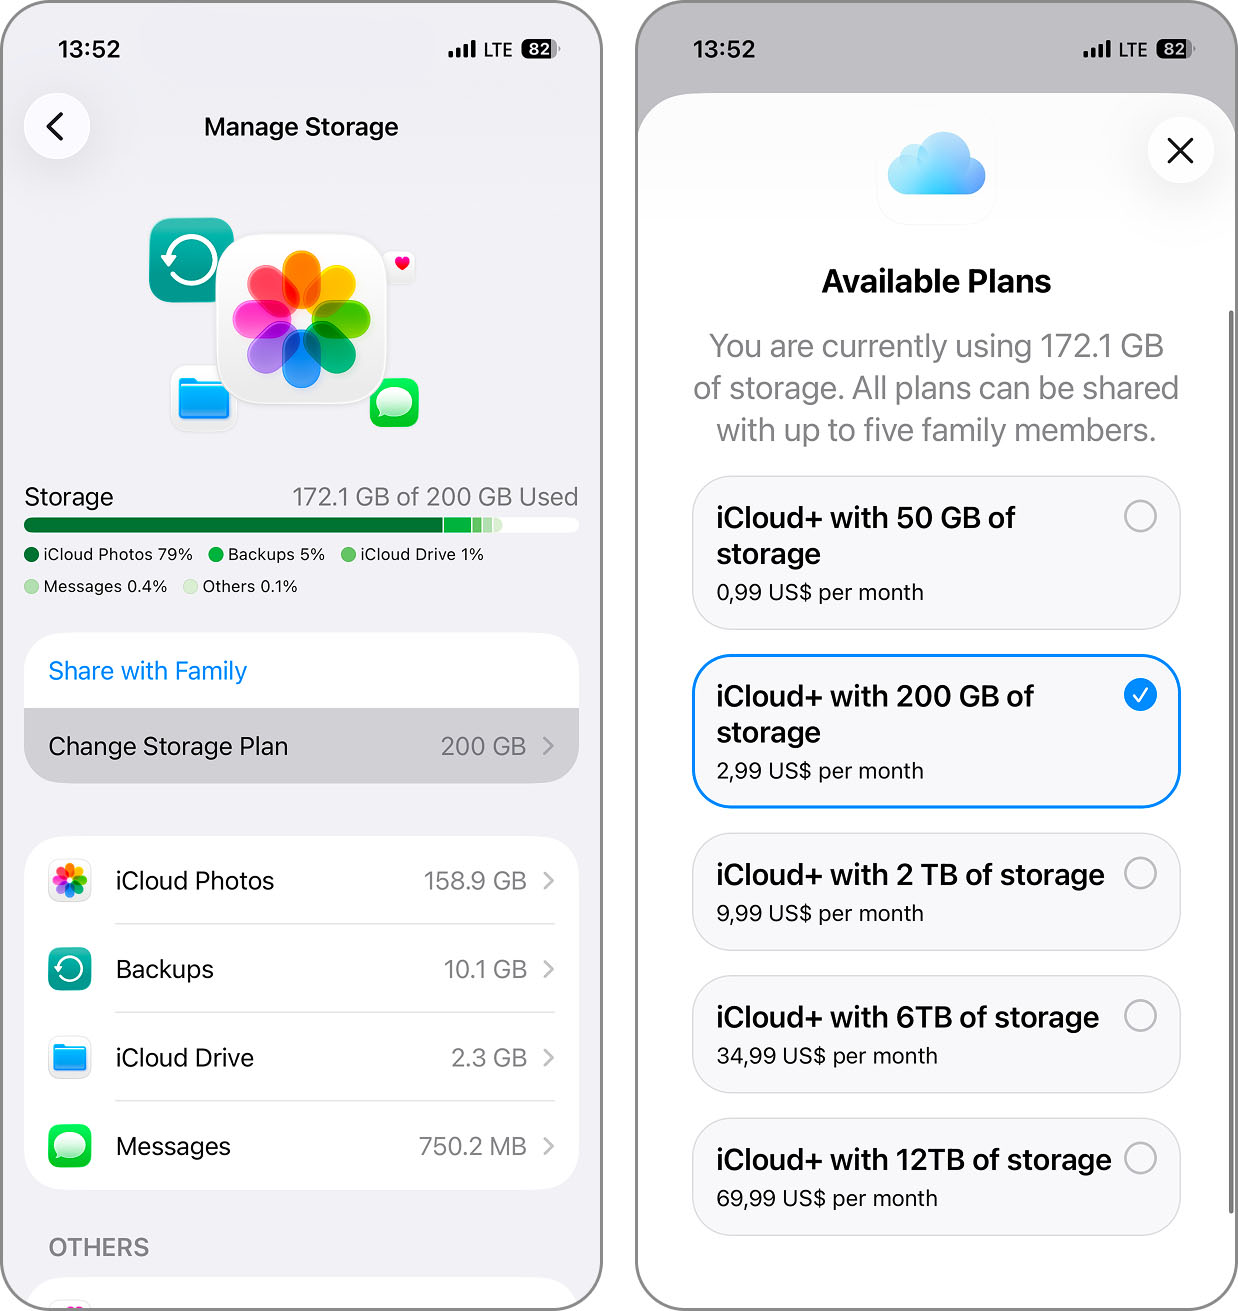
When you first sign up for iCloud, you receive 5 GB of storage space. But, you can opt for plans with storage capacities ranging from 50 GB to 12 TB.
- To upgrade your current plan, open Settings, select your username, and tap iCloud. You’ll see the amount of storage you’re using in the graph at the top.
- Tap Upgrade for More Storage beneath the graph.
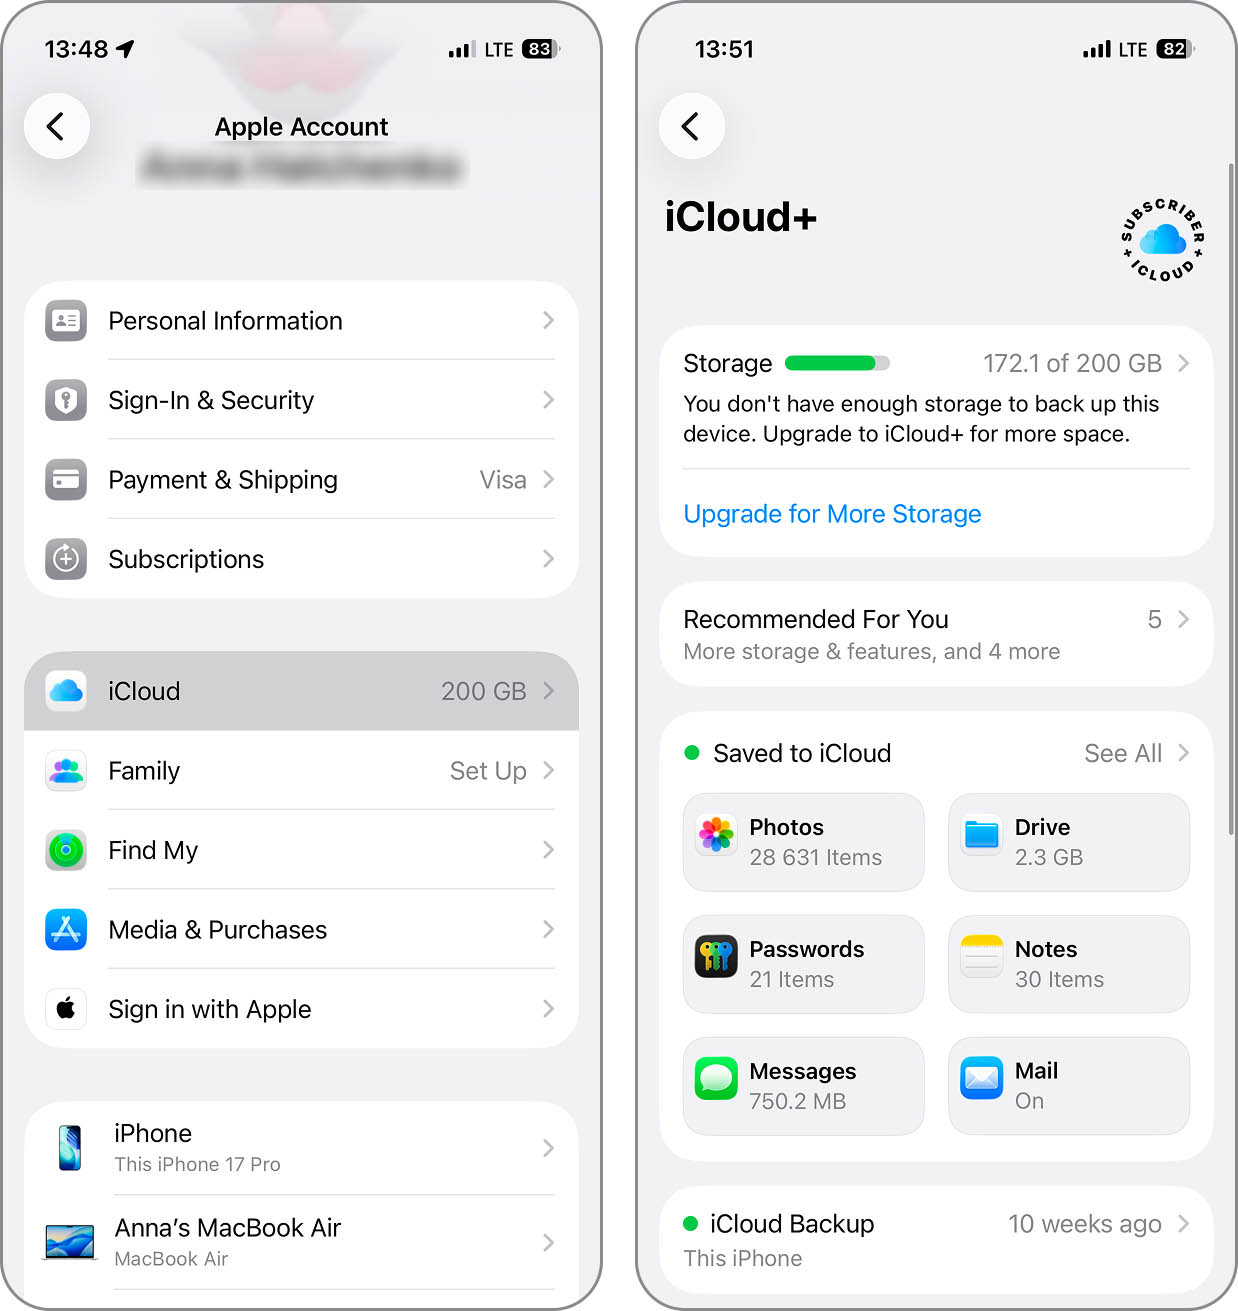
- You’ll then see the amount of space for your current plan next to Change Storage Plan. Tap this option to review available upgrades.
- Select the plan you want to purchase, tap Buy, and follow the subsequent prompts. Alternatively, if you have an Apple One plan, you can tap Change Apple One Plan at the bottom.
Other Cloud Services
While iCloud offers seamless integration with iOS, third-party cloud storage services can provide more generous free storage tiers and different feature sets that might better suit your needs. These alternatives can be used either alongside iCloud or as a complete replacement, depending on your preferences and budget.
Here are the top third-party cloud storage options for iPhone users:
| Service | Free Storage | Key Advantage | Paid Plan |
|---|---|---|---|
| Google Drive | 15 GB | Best for Google users, excellent document collaboration | $1.99/month for 100 GB |
| Microsoft OneDrive | 5 GB | Seamless Office integration, excellent interface | $1.99/month for 100 GB |
| MEGA | 20 GB | Highest free storage, strong encryption | €9.99/month for 2 TB |
| Dropbox | 2 GB | Simple interface, reliable syncing | $11.99/month for 2 TB |
Google Drive is my top recommendation for iPhone users looking beyond iCloud. With a generous 15GB of free storage and excellent integration with Google’s productivity suite, it’s particularly convenient since most iPhone users already have a Gmail account, which is all you need to get started. The Google Drive iOS app automatically backs up your photos and provides easy access to your documents.
External Storage Devices
Now, if the idea of monthly fees makes you wince, you should also consider if iPhone-compatible external USB flash drives can’t meet your needs.
Modern iPhones (iPhone 15 series and newer) with USB-C ports can connect directly to USB-C flash drives, while older models with Lightning ports can use MFi-certified Lightning flash drives that can offer anywhere from 32 GB to 512 GB and even more of additional storage space.
External USB flash drives are particularly useful for:
- Storing large video files and photo libraries
- Backing up important documents
- Transferring data between devices
- Watching movies without taking up iPhone storage
Of course, you can always combine cloud storage with external storage to expand your iPhone’s storage capacity beyond its built-in limits as much as possible.
FAQ
If you can’t afford a larger iCloud storage plan, the free ways to get more storage on iPhone you see here are the best methods.
Clear your caches, offload or remove apps, clean out your Downloads folder, optimize your photos and videos, delete message attachments, remove unimportant data, or use a third-party cleaner.
Not all items on this list require you to delete something. You can still take advantage of optimizing photos and videos, clearing your caches, and offloading unused apps. Additionally, you can convert images and videos to smaller file sizes and limit downloads of things like podcasts and music.
When your iPhone reaches its storage capacity, you’ll no longer be able to install apps, save new photos, sync your media, or even update iOS to its latest version.
As mentioned, you cannot simply pop a memory card into your iPhone to add storage space. You can; however, free up the space you have by removing items, moving things, saving to iCloud, and optimizing the items you have.
You can upgrade your current iCloud plan to obtain more storage. In the U.S., Apple’s iCloud+ plans currently range from 50 GB for $0.99 per month to 12 TB of storage for $59.99 per month. Keep in mind that prices vary by region and Apple can change the storage amounts and costs at any time.
Conclusion
With these free ways to increase storage on iPhone, you can pick which one to use or try a combination of two or three. Then, see how much space you regain. Just remember to keep track of the storage space available on your iPhone before it fills up and you’re in a mad dash to get more.
