You double-checked your USB Flash Drive, and it should offer more storage space than what you’re seeing on your computer. How come?
Is Reduced Space on a USB Drive a Problem?
At the very least, a USB device showing less available space than what it should is restrictive in that you can’t store as much data on it as if it was performing as intended.
However, such problems may also signify a more significant issue that you should address as soon as possible.
How Can a USB Drive’s Storage Decrease?
There are many reasons a USB Flash Drive could appear as if it had (much) less available storage space than it should.
- 💾 A corrupted file system could mean that it’s not only the free space that doesn’t appear correctly, but your precious data could get “garbled” too.
- 🔨 A failing USB Flash Drive could outright stop working, “locking” your files within it forever.
- 💀 A virus could expand to other storage devices, affecting their contents.
- 📦 If your USB Flash Drive was mispartitioned or wrongly formatted, you won’t be fully taking advantage of its capacity.
How Can You Restore a USB Drive Back to Full Capacity?
Out of all possible issues you might face with a USB Flash Drive, only one should have you really worried: hardware failure.
If you have a rapidly deteriorating device in your hands, the first thing you should do is to take a complete backup of its contents. You can use a dedicated solution for the purpose. Still, it’s worth noting that Disk Drill, which we’ll see a bit below, also offers such functionality among its extra features.
Apart from hardware issues, almost all other problems that could make your USB Flash Drive show a smaller capacity can be dealt with one of the following solutions.
If You’re on Windows
No matter the version of Windows you’re on, you can deal with a USB Drive that shows a diminished capacity using the same methods.
Method 1 Manually Delete the USB Drive’s Contents
The simplest reason for a USB Drive not having as much free space as desired or advertised may be that you’re using it.
If your USB Flash Drive is filled with old files you aren’t using anymore, deleting them will free up space for other uses. That’s doable with any file manager, like the File Explorer that comes with Windows.
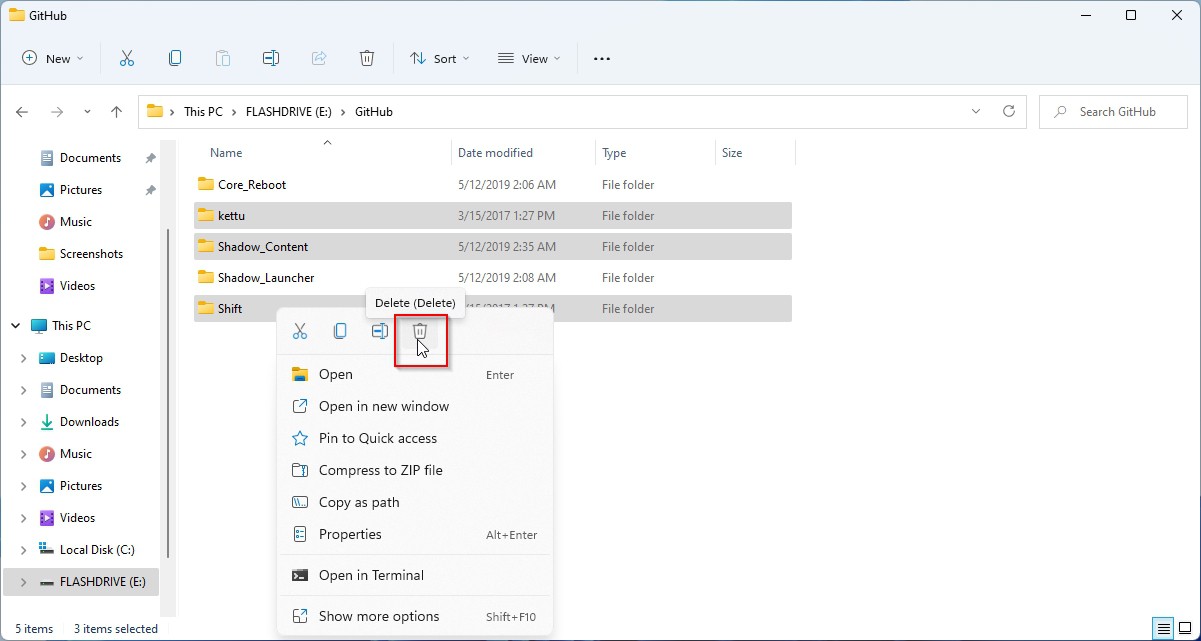
- You can seek File Explorer using Search or the Start Menu. However, it’s probably easier to just hit the Windows Key + E combination on your keyboard.
- Click on your Flash Drive on the list on the left of the window. The right side of File Explorer’s window will update to show its contents.
- Select the files and folders you want to remove from your USB Flash drive by left-clicking on it, or use CTRL or Shift while clicking to select multiple entries. Then, you can:
- Hit the Delete key on your keyboard to send them to the Recycle Bin.
- Use the Shift + Delete to fully remove the selected content skipping the Recycle Bin.
- Right-click on one of the selected entries and choose either the Trashcan icon if you’re on Windows 11 or the Delete action in older versions of Microsoft’s OS.
Method 2 Format the USB Drive
Formatting any storage device is an easy way to “reset it” and have once more access to all the free space it can offer.
The easiest way to do that on Windows is using an app like File Explorer.
- Right-click on your USB Flash Drive and, from the available actions, choose that you want to Format it.
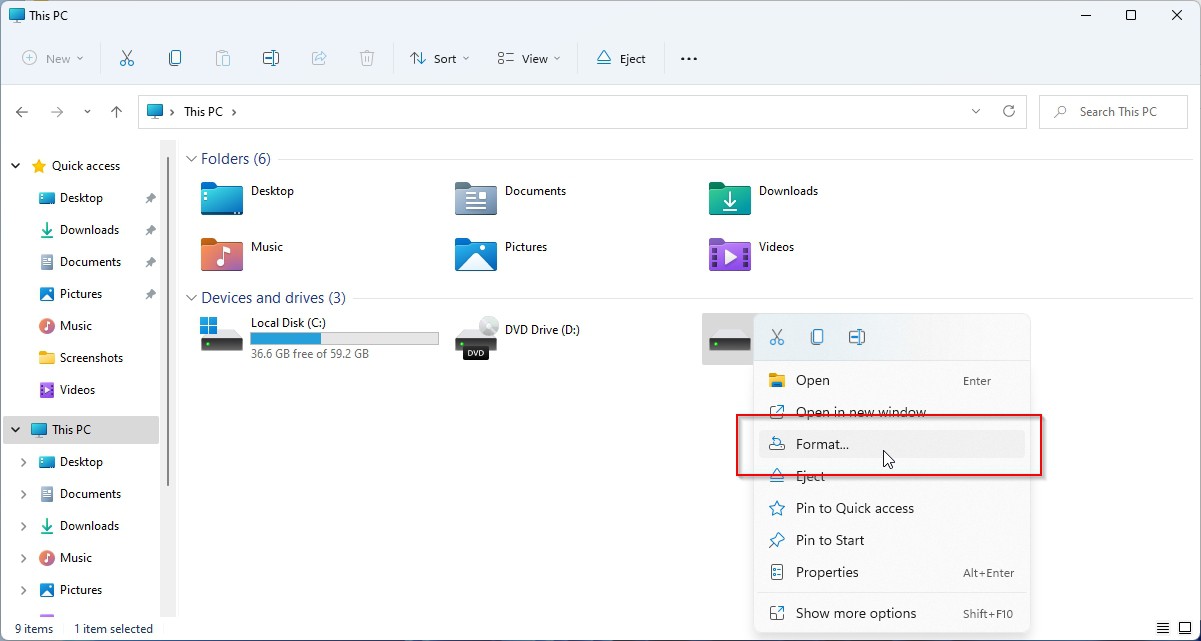
- A window will appear, allowing you to customize the format process. You can change the file system used or assign a new volume label. However, you can simply leave everything as it is, and with Quick Format enabled, click on Start.
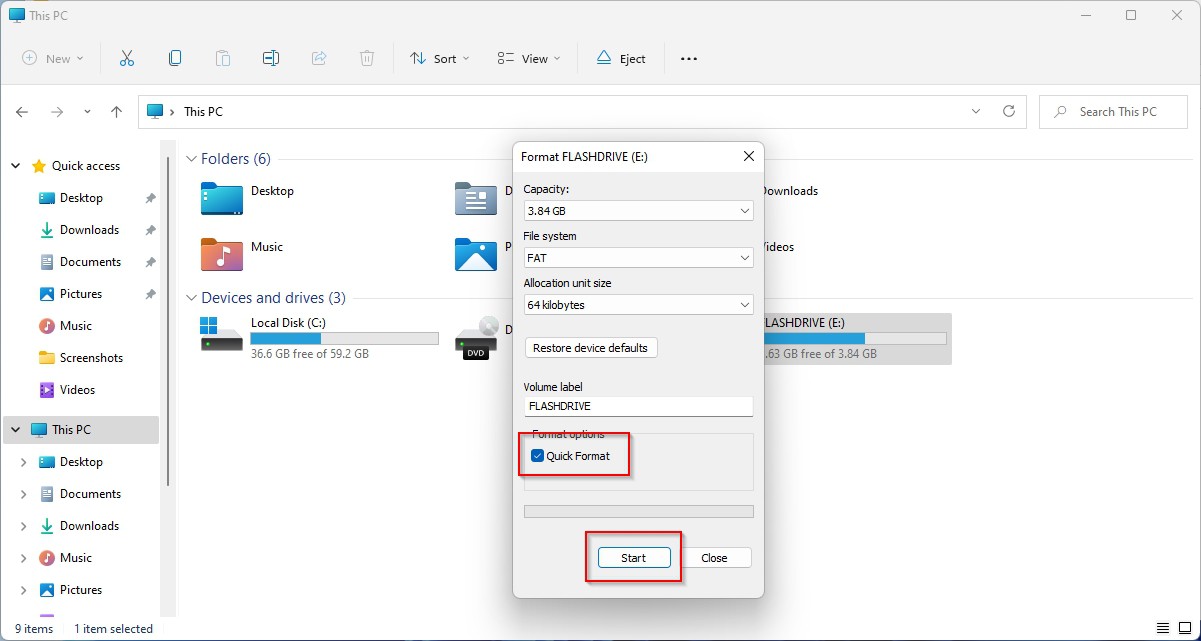
When the process completes, your USB Flash Drive should appear empty, with all its free space available.
Method 3 Delete Its Partitions
Like any other storage device, a USB Flash Drive can be “split” into partitions. “Partitions” which may also be hidden or not mounted, leaving their space useless.
A more practical problem with partitions is that, since they split the device’s space into many chunks, you can’t use it as a whole. So, a single 40GB backup file could fit on a 64GB Flash Drive but won’t if it’s split into two 32GB partitions.
To delete all partitions on your USB Flash Drive and re-use all its space as a single whole on Windows 11:
-
You can search for Disk Management using Search, the Start Menu, or type “diskmgmt.msc” in a Run dialog.
We believe it’s quicker pressing Windows Key + X to access the Power User tools menu, then choosing the Disk Management entry.

- Find your USB Flash Drive on the list on the left of Disk Management’s window. Then, right-click on each of the partitions on it, and choose Delete Volume.
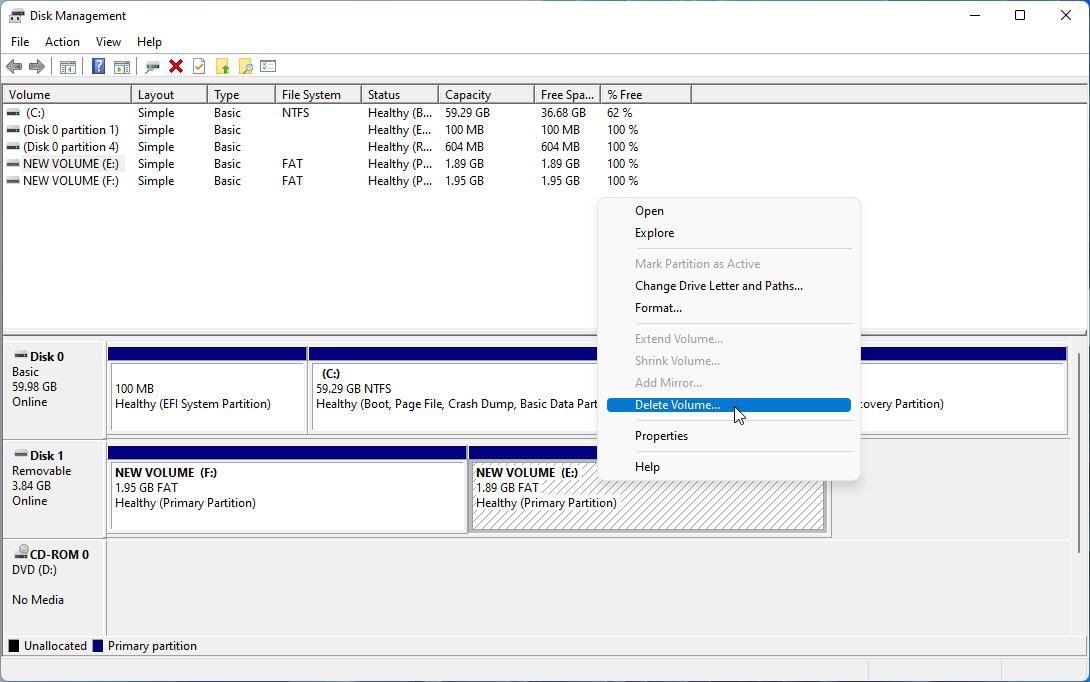
- Answer positively when warned that deleting the volume will erase all data on it. Then, repeat for the rest of the partitions until they’re all gone.

-
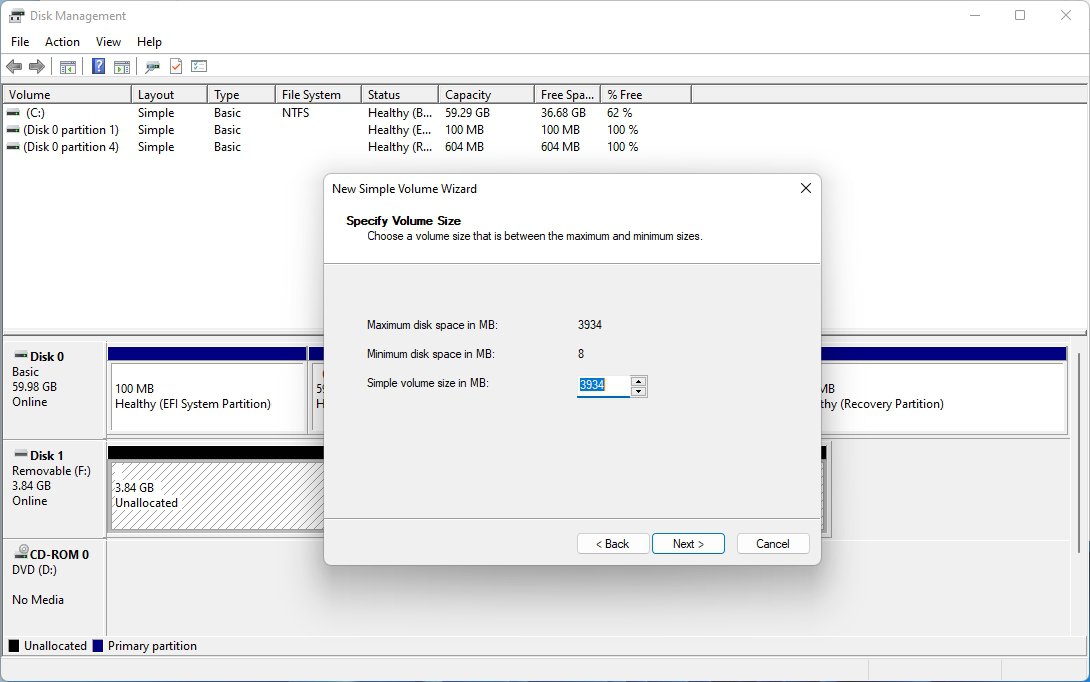
When no partitions are left, right-click on the “Unallocated” space, and choose New Simple Volume.
Go through the steps of the wizard that will show up to create a new partition on your USB Flash Drive and then format it.
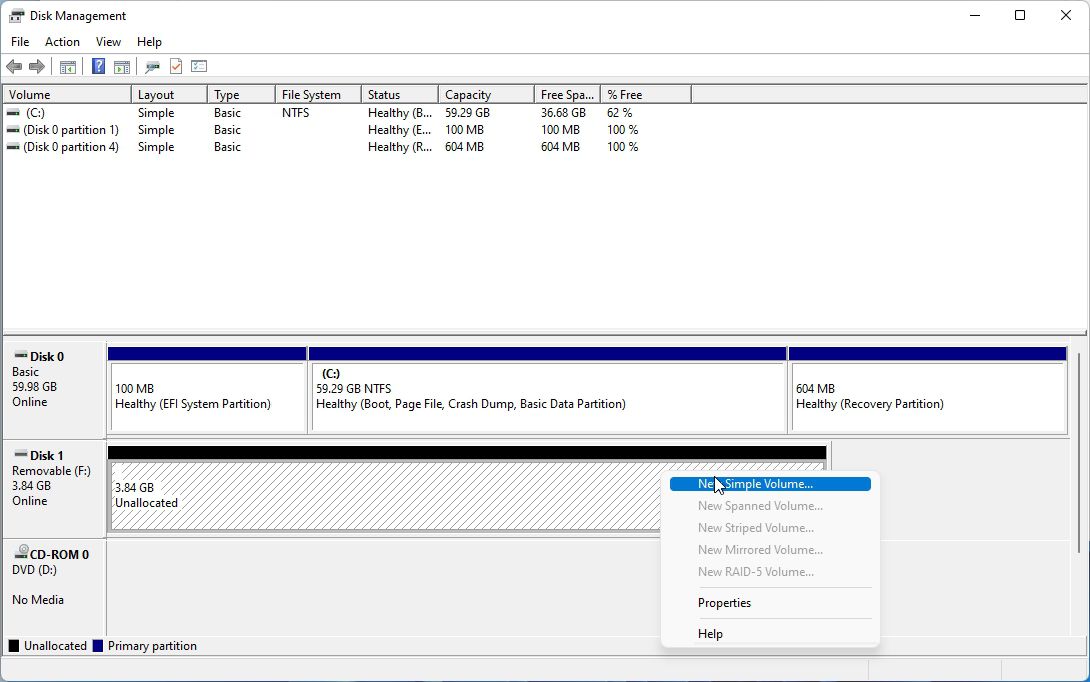
- Make sure to assign all of the device’s space to a single partition when at the Specify Volume Size step by having “Simple volume size in MB” show the same value as “Maximum disk space in MB”.
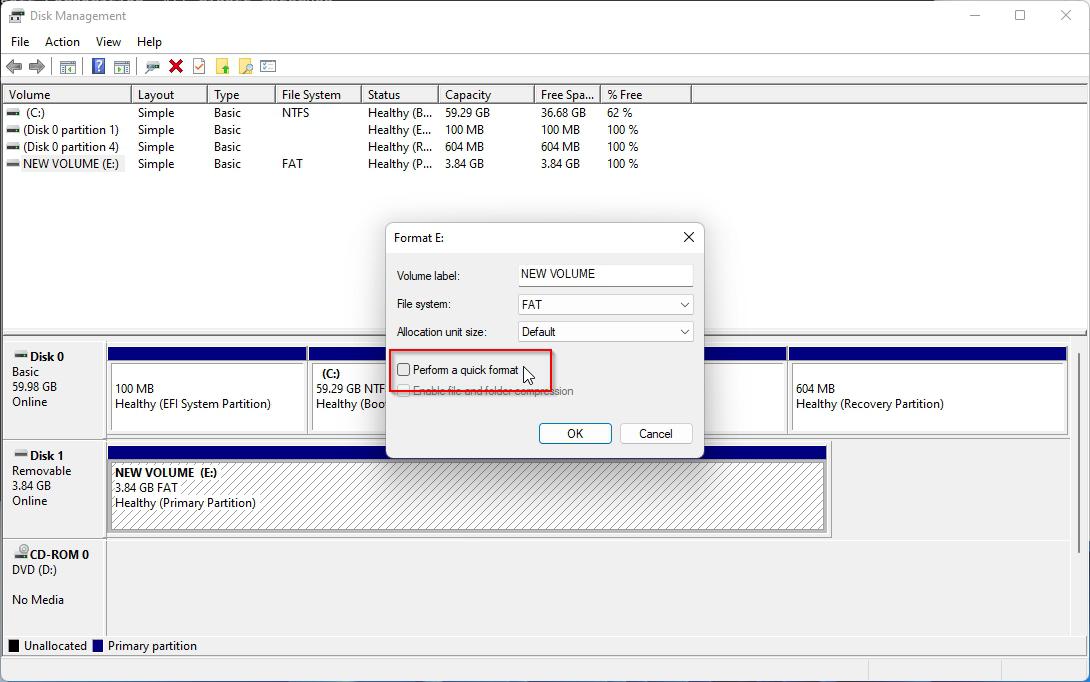
Method 4 Erase Everything Securely
Suppose you don’t only want to reclaim your storage device’s free space but also to ensure its current contents won’t be recoverable afterward. In that case, you have to “secure erase” your device.
There are many third-party tools you can turn to for securely erasing a storage device. For most people, though, the secure erase capabilities baked in Windows should be more than enough.
-
Right-click on your USB Flash Drive from Windows File Explorer, or after visiting Disk Management, and choose that you want to format it. However, make sure to disable the option to Perform a quick format.
This way, Windows will fill all your storage device’s space with zeroes while formatting it to ensure any data that already exists will be overwritten.
-
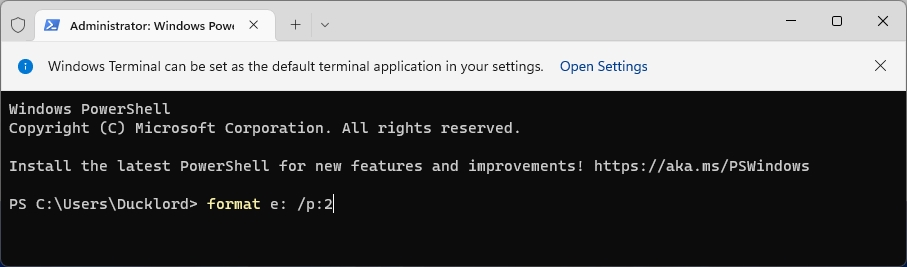
If you want an even more secure way of erasing your device’s contents, fire up either the “Command Prompt” Terminal or PowerShell.
You can find them on the Start Menu, use Search, or call the Run dialogue with Windows Key + R and then type “cmd” or “powershell”, respectively, and hit Enter.
However, it’s quicker to access the WinX menu using the Windows Key + X combination, and then selecting one from there.
-
Use the command format DRIVE_LETTER: /p:NUMBER to securely format your storage device.
Replace “DRIVE_LETTER” with the actual letter assigned to your storage device and “NUMBER” with the number of times you’d like your device to be re-re-overwritten with random numbers to eliminate any trace of its existing contents.
For example, to erase the drive that’s accessible through the letter “E” with two passes, the command would look like: format F: /p:2.
After your USB Flash Drive is successfully and securely formatted, you’ll have access to its entire storage space. And if your USB Flash Drive falls into the wrong hands, they won’t have a chance of accessing any trace of your old data.
If You’re on a Mac
Apple’s Macs are known for being largely trouble-free and effortless. So, even when a USB Drive shows reduced storage compared to its capacity, dealing with such issues proves relatively trivial.
Method 1 Manually Delete the USB Drive’s Contents
To remove all contents of your USB Flash Drive and free up its storage space for other uses, you can:
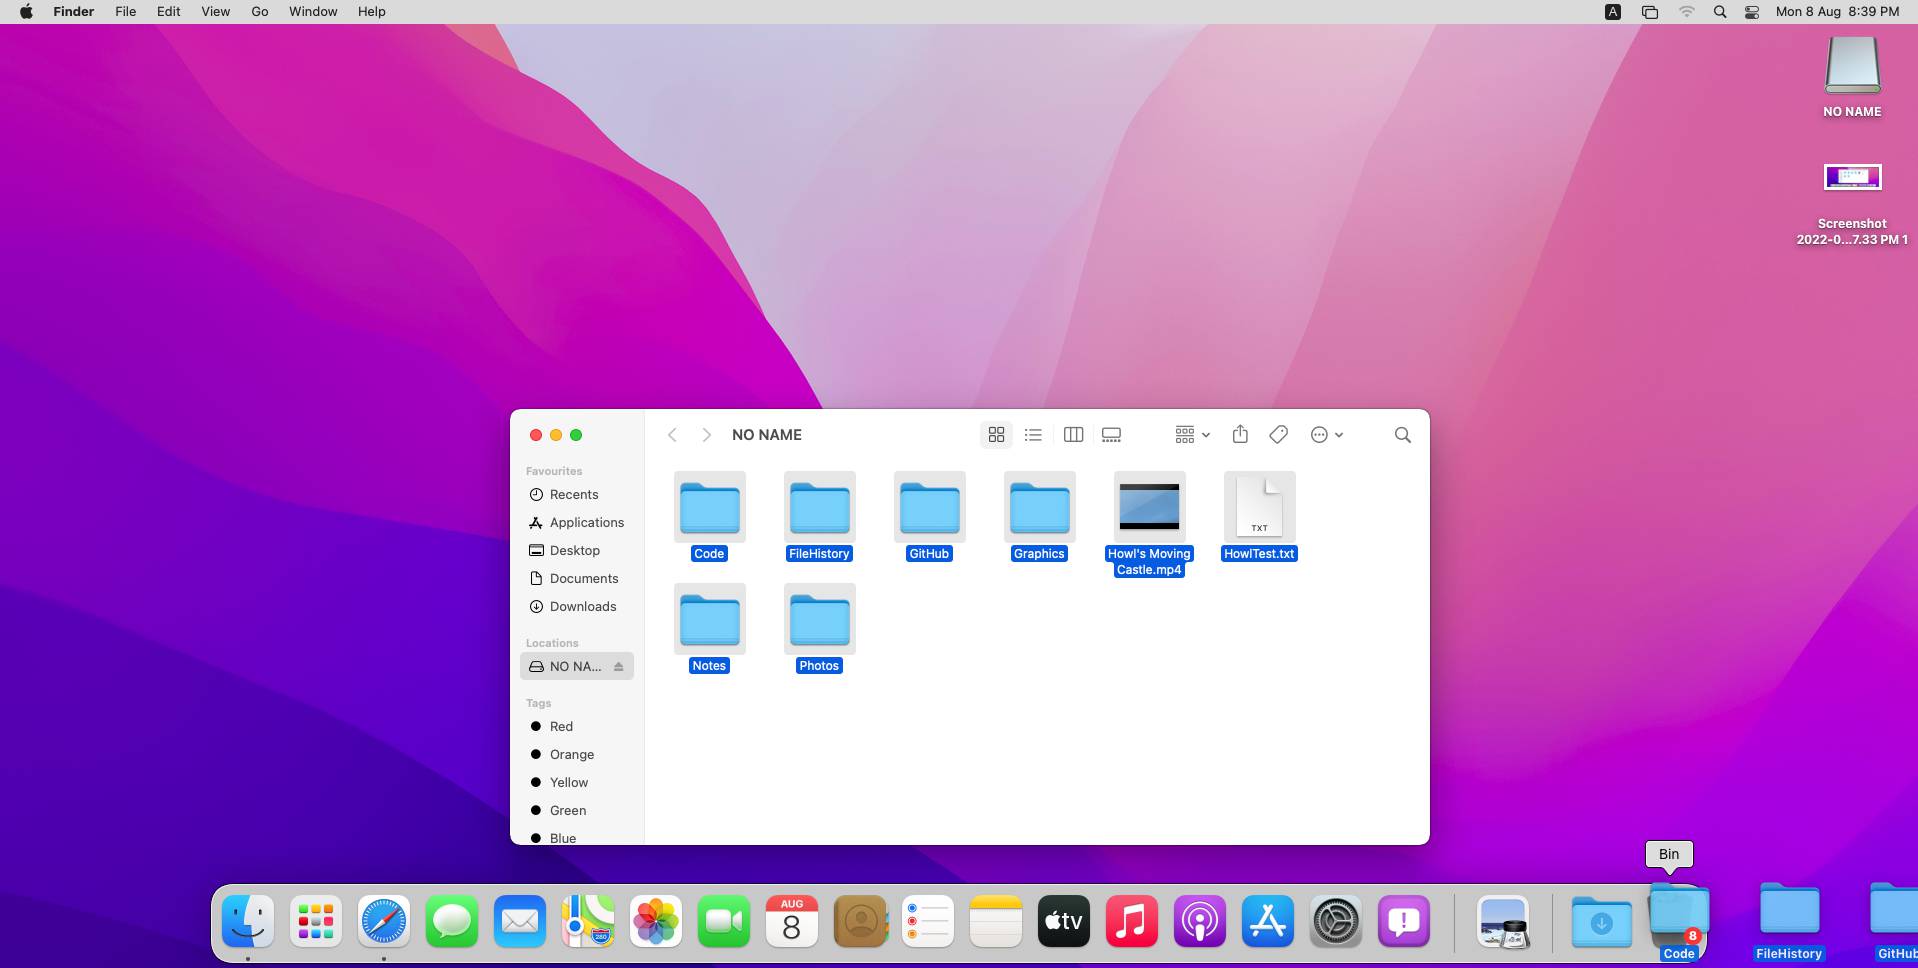
- Connect your USB Drive to your Mac, then “open it” or choose it from within Finder (macOS’s default file manager).
- Select all contents “inside” your USB Drive and drag them to the trash icon.
And with that, all data in your USB Flash Drive will be removed, allowing you to use all of its space however you wish.
Method 2 Format the USB Drive
Removing the files from your USB Flash Drive may not thoroughly “clean it”. Hidden files may remain behind, taking up precious space.
You can render them visible to remove those, too. And yet, formatting the drive would be a more effortless solution to reclaim all its space in one move.
To do that on a Mac:
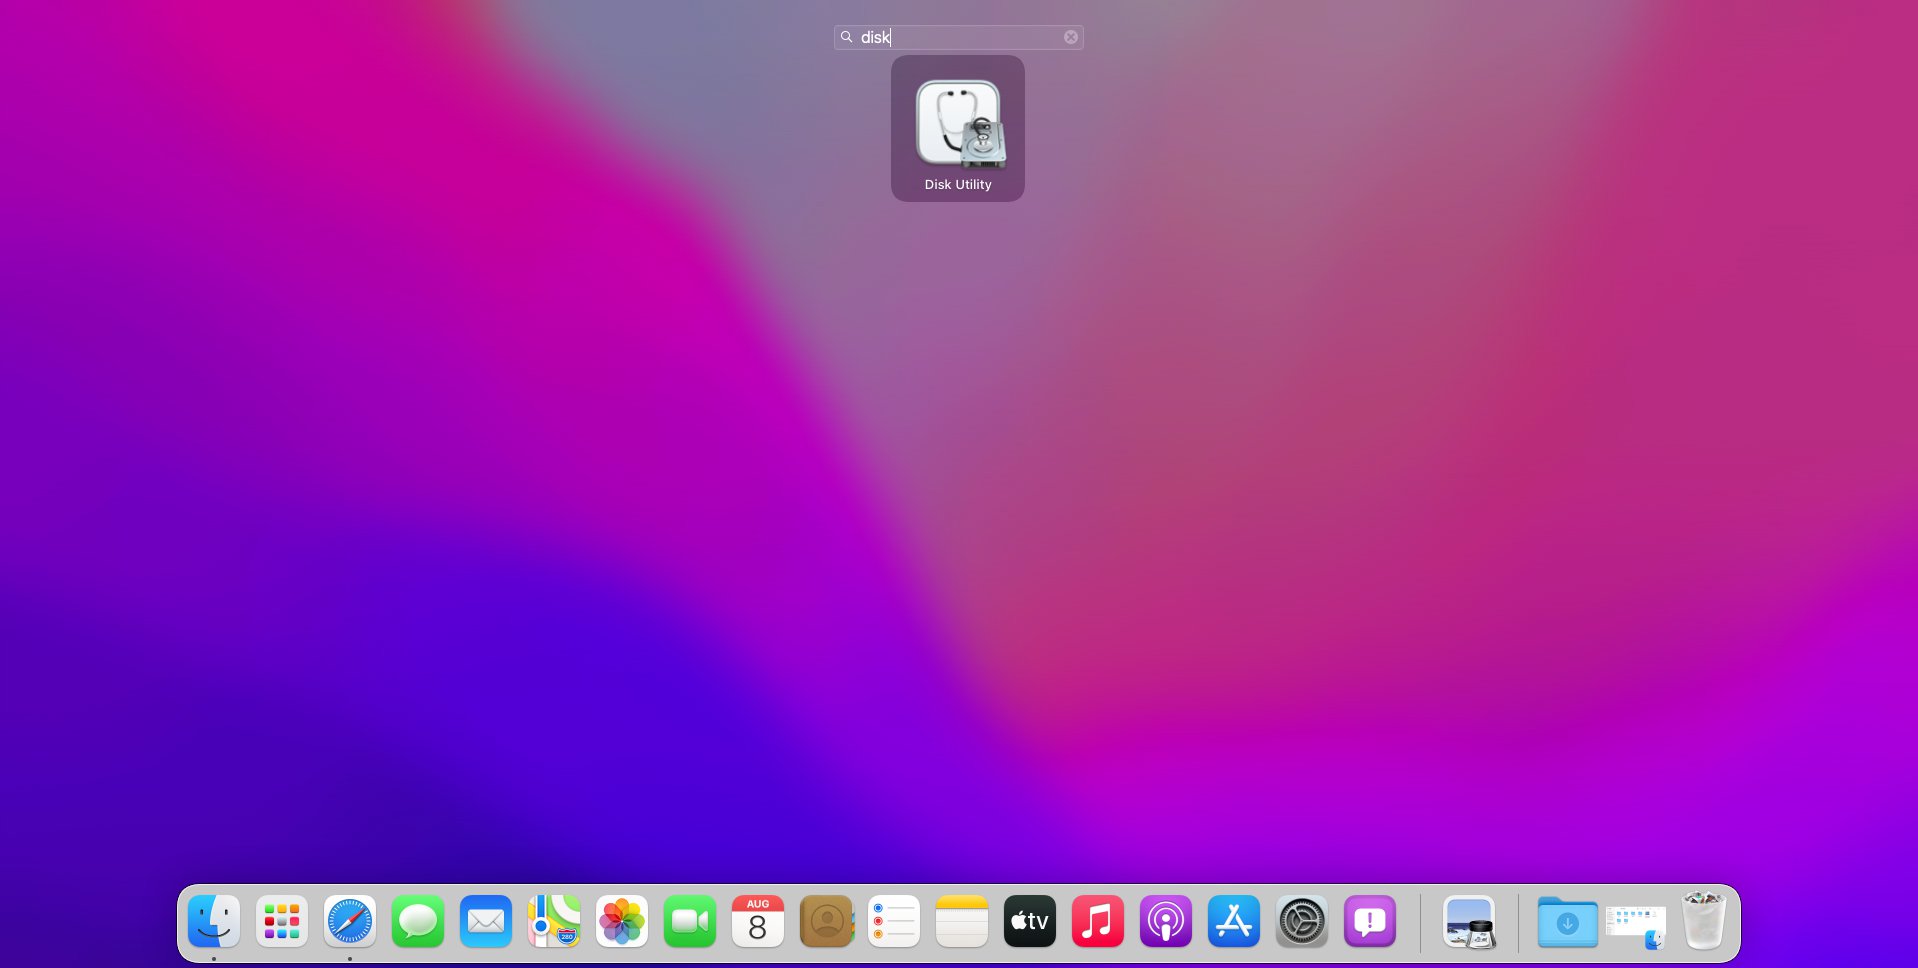
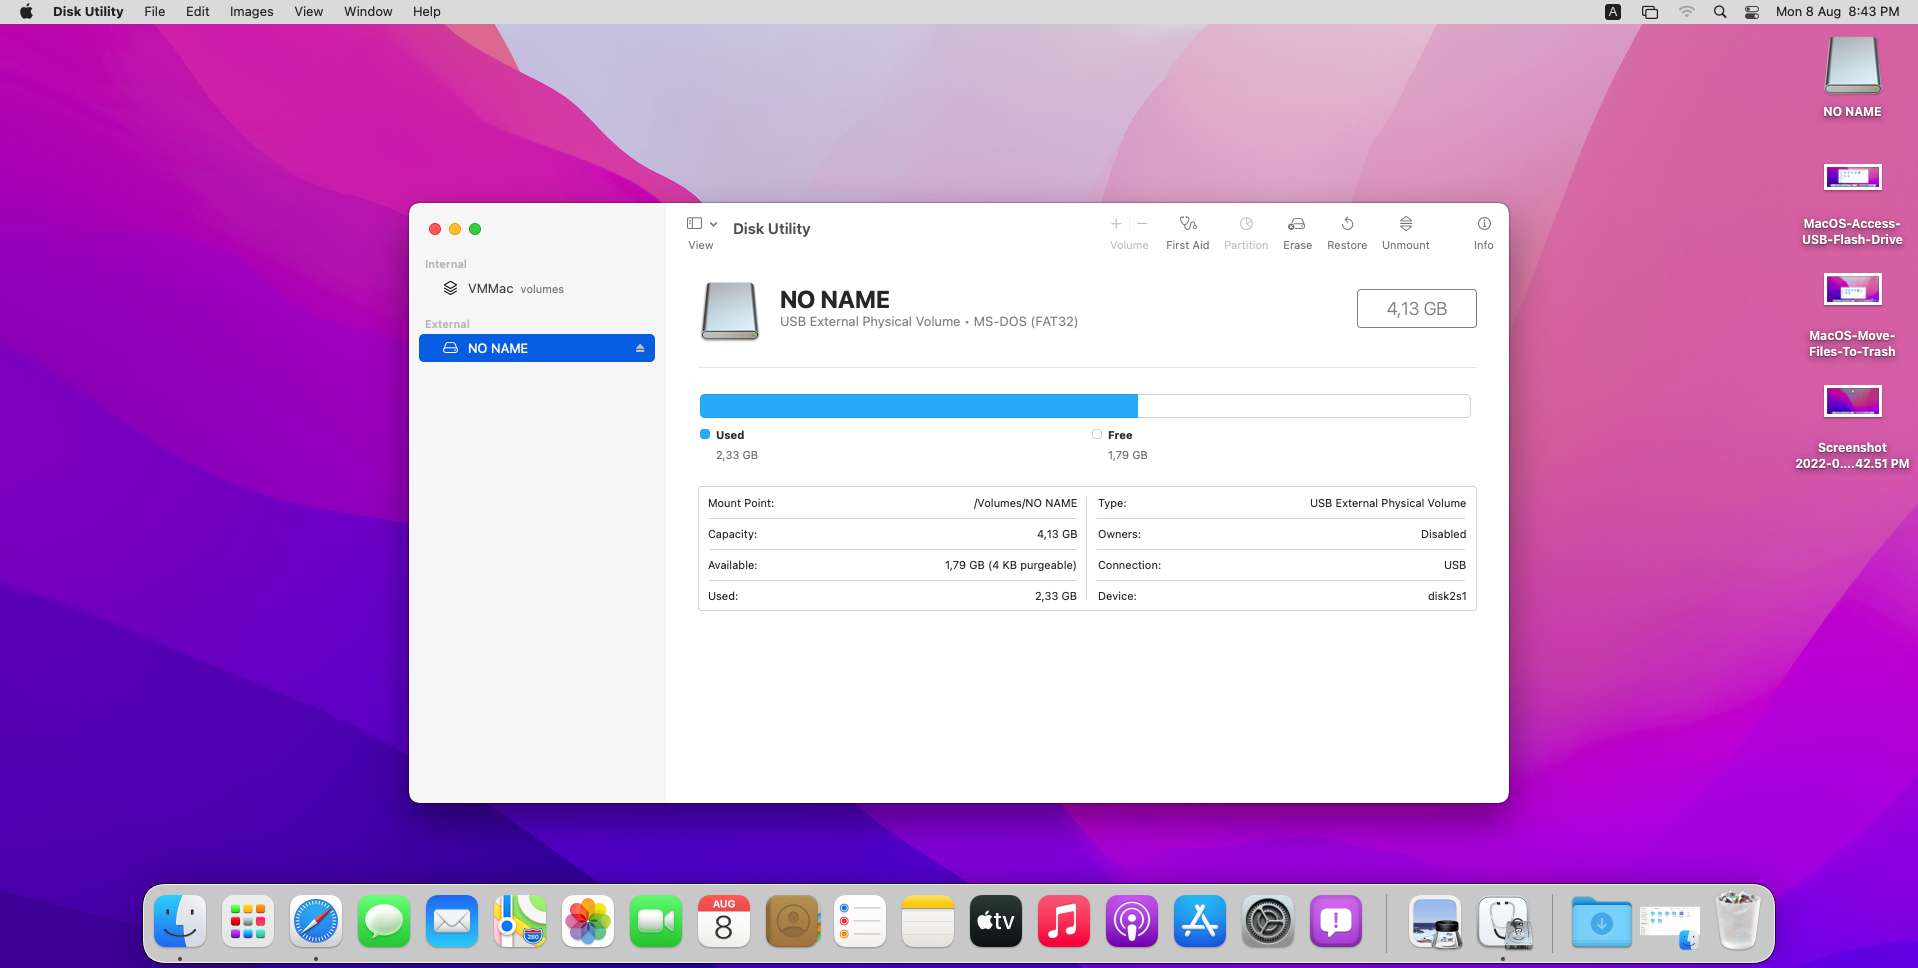
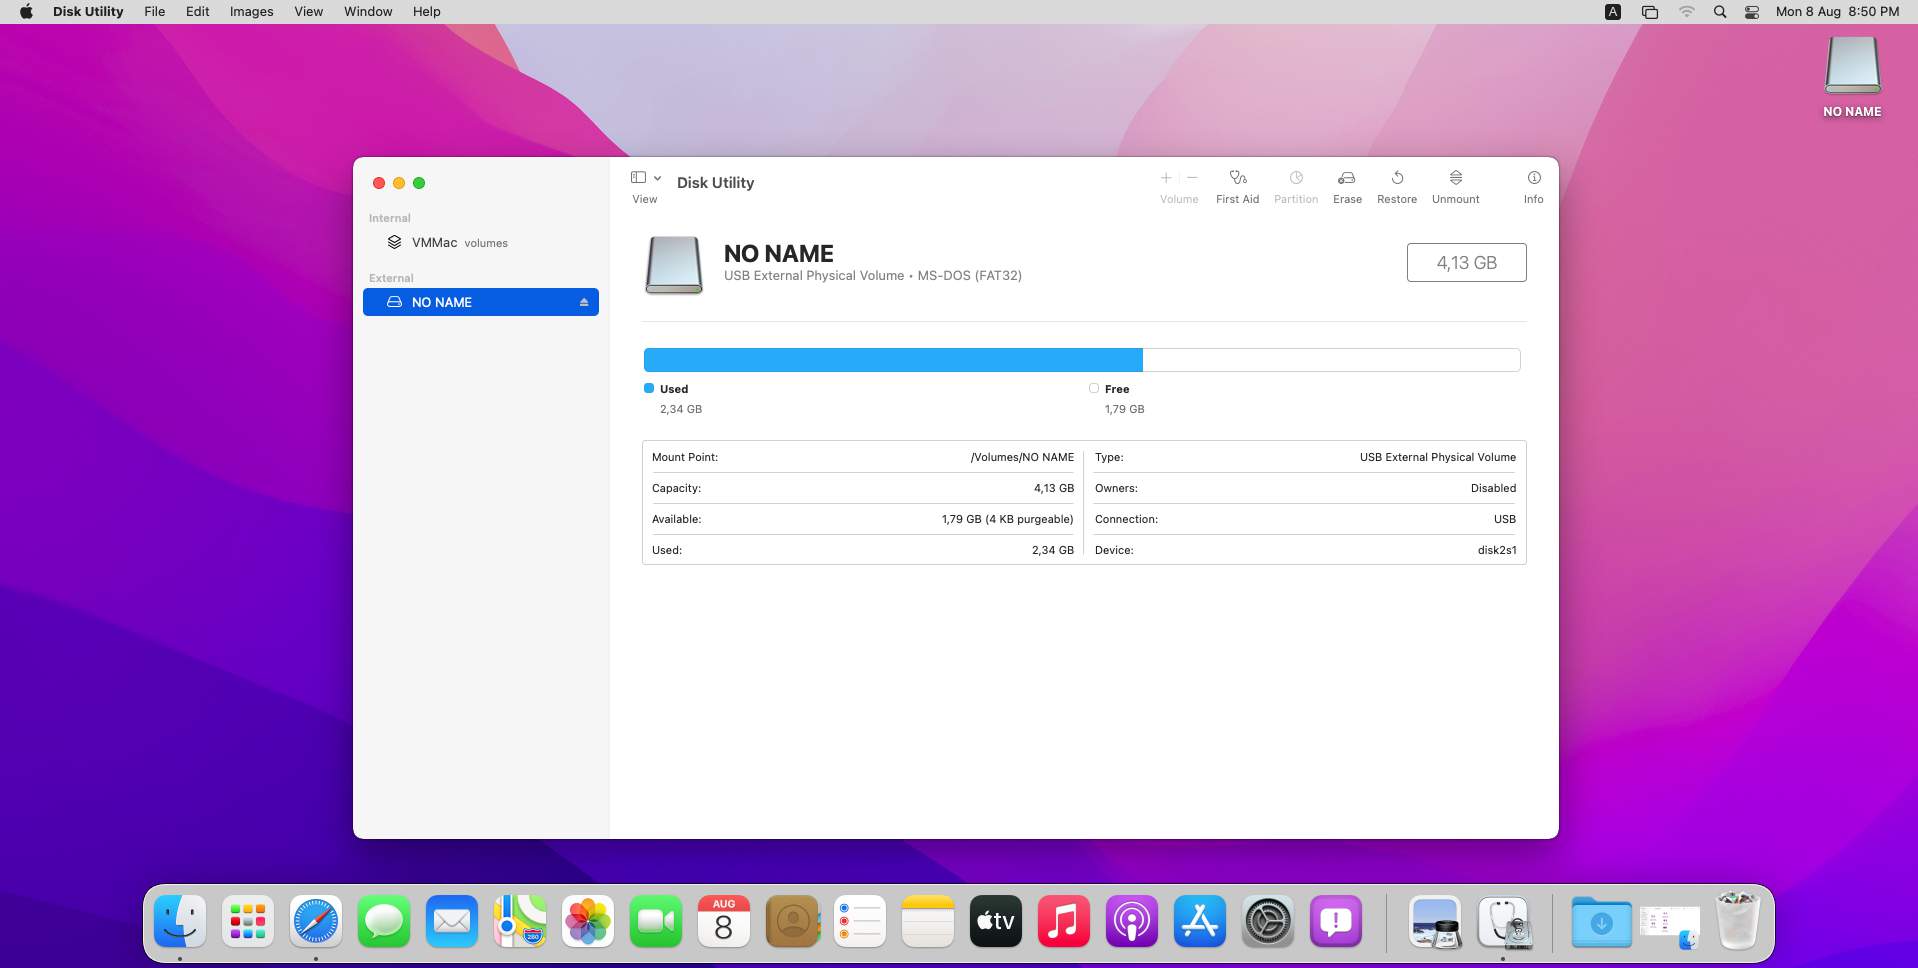
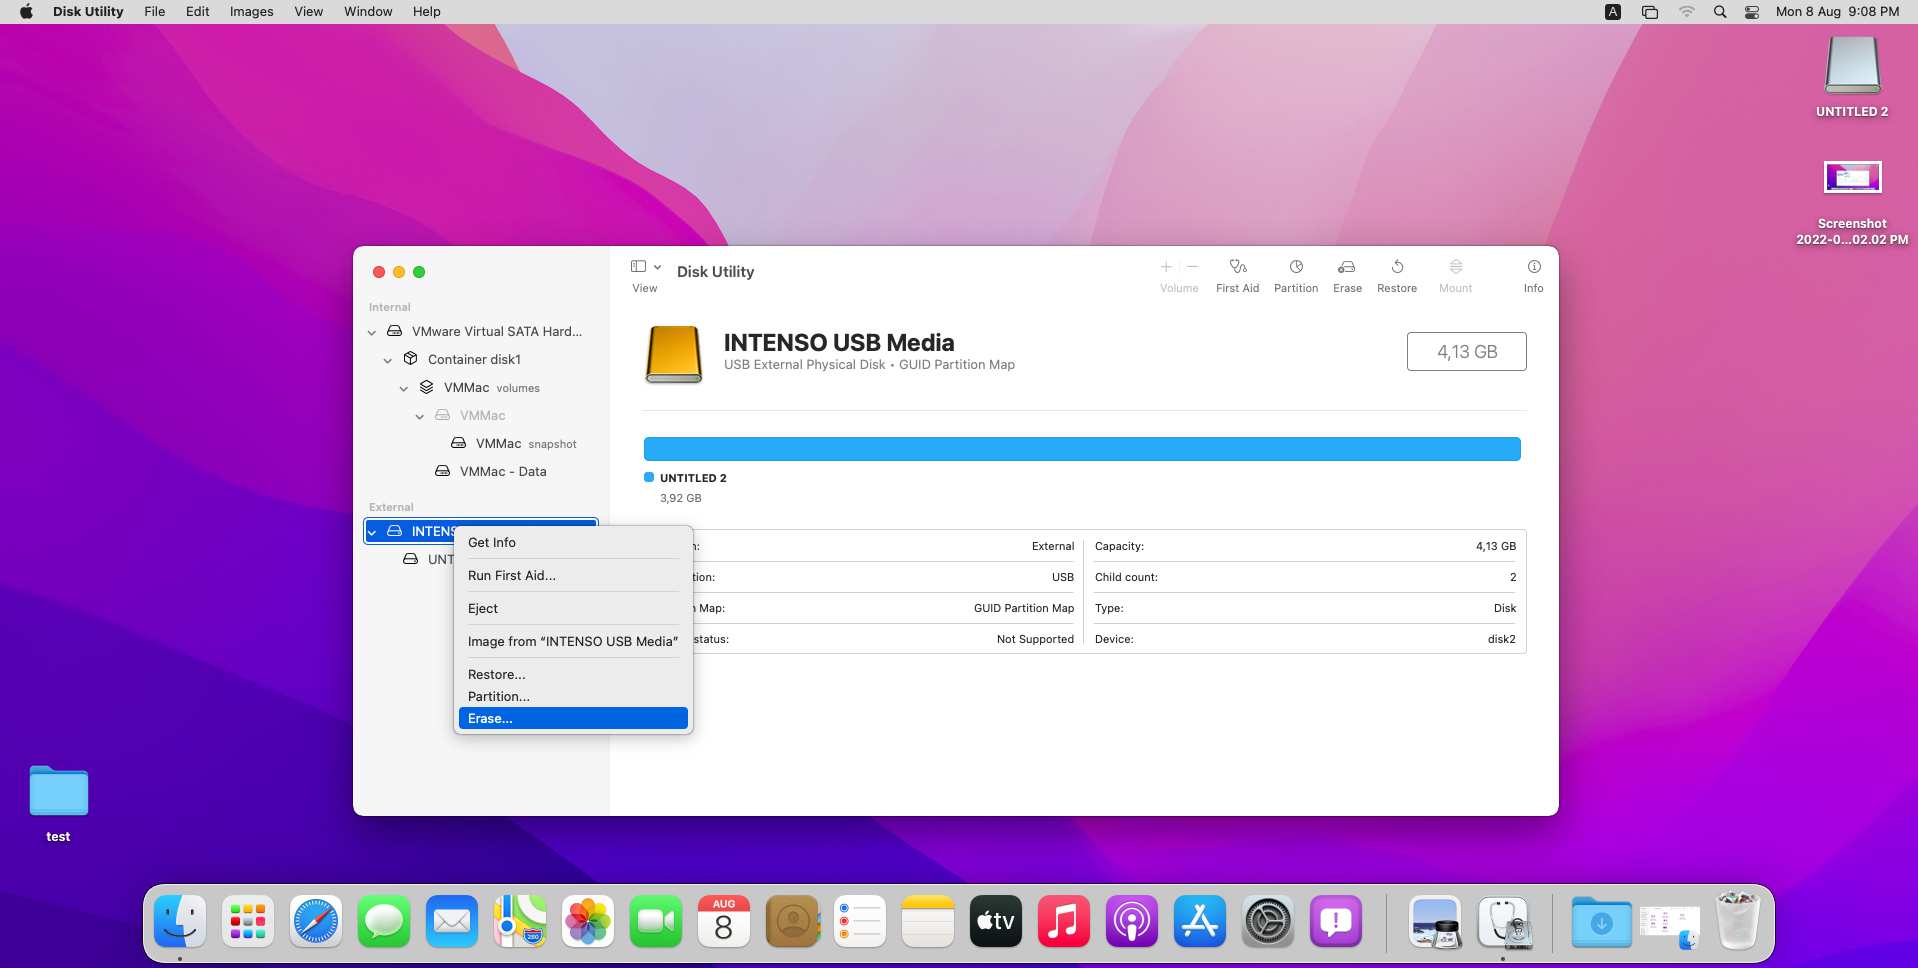
- With your USB Flash Drive connected, run Disk Utility. You can use Launchpad’s Search feature to quickly locate it (search for its name, “disk utility”).
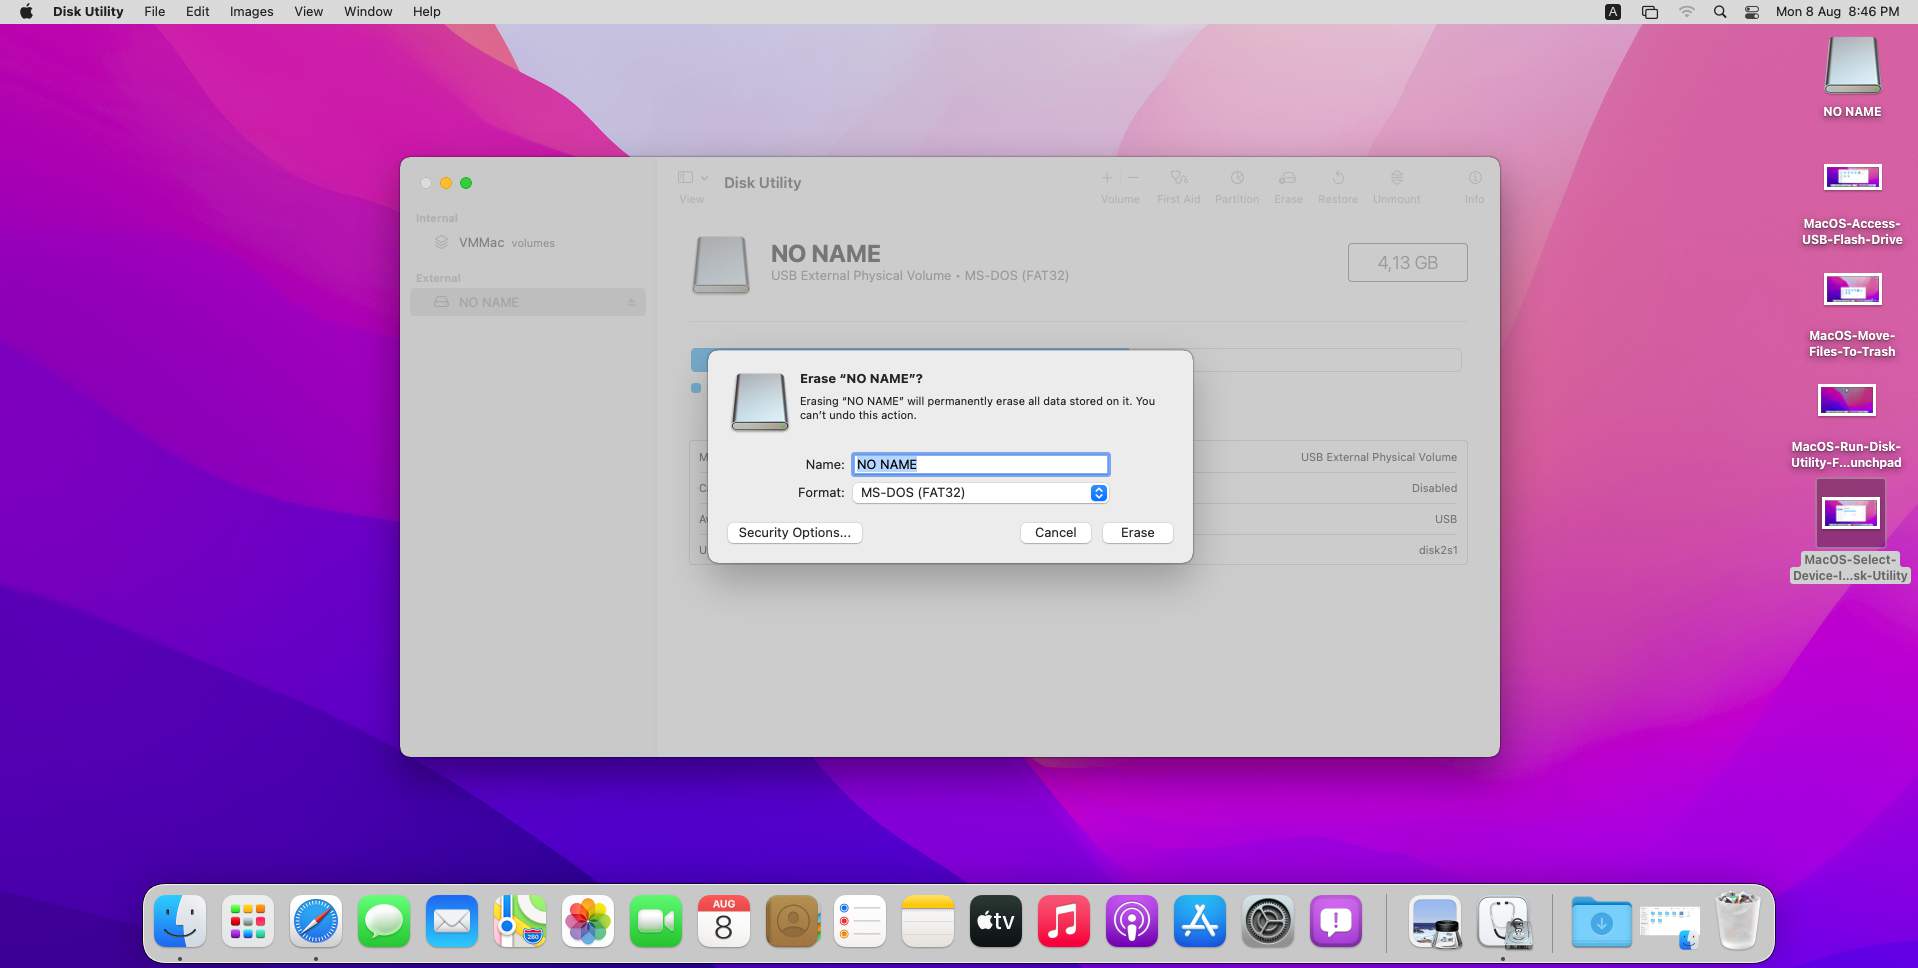
- Choose your device from the list on its left. Then, click on Erase.
-
Choose the file system you’d like to use on your USB Flash Drive.
Go for FAT32 for maximum compatibility with various devices, from computers with other OSes (Windows, Linux) to smartphones and tablets.
Finally, click on the Erase button to begin formatting your USB Flash Drive.
When the process completes, your USB Flash Drive should be “fresh” as new, with all its storage space available.
Method 3 Delete Its Partitions
Suppose you want to ensure that all your older data’s gone from your USB Flash Drive, and you’ll have all its storage capacity available.
In that case, it’s best to remove any existing partitions. By repartitioning a device, you can be confident you’ll have all of your USB Flash Drive’s space available.
On all relatively new versions of macOS, the easiest way to do this is:
- Connect your USB Flash Drive to your Mac. Then, run Disk Utility.
- Expand the View menu at the top left of the window, and change the setting to Show All Devices.
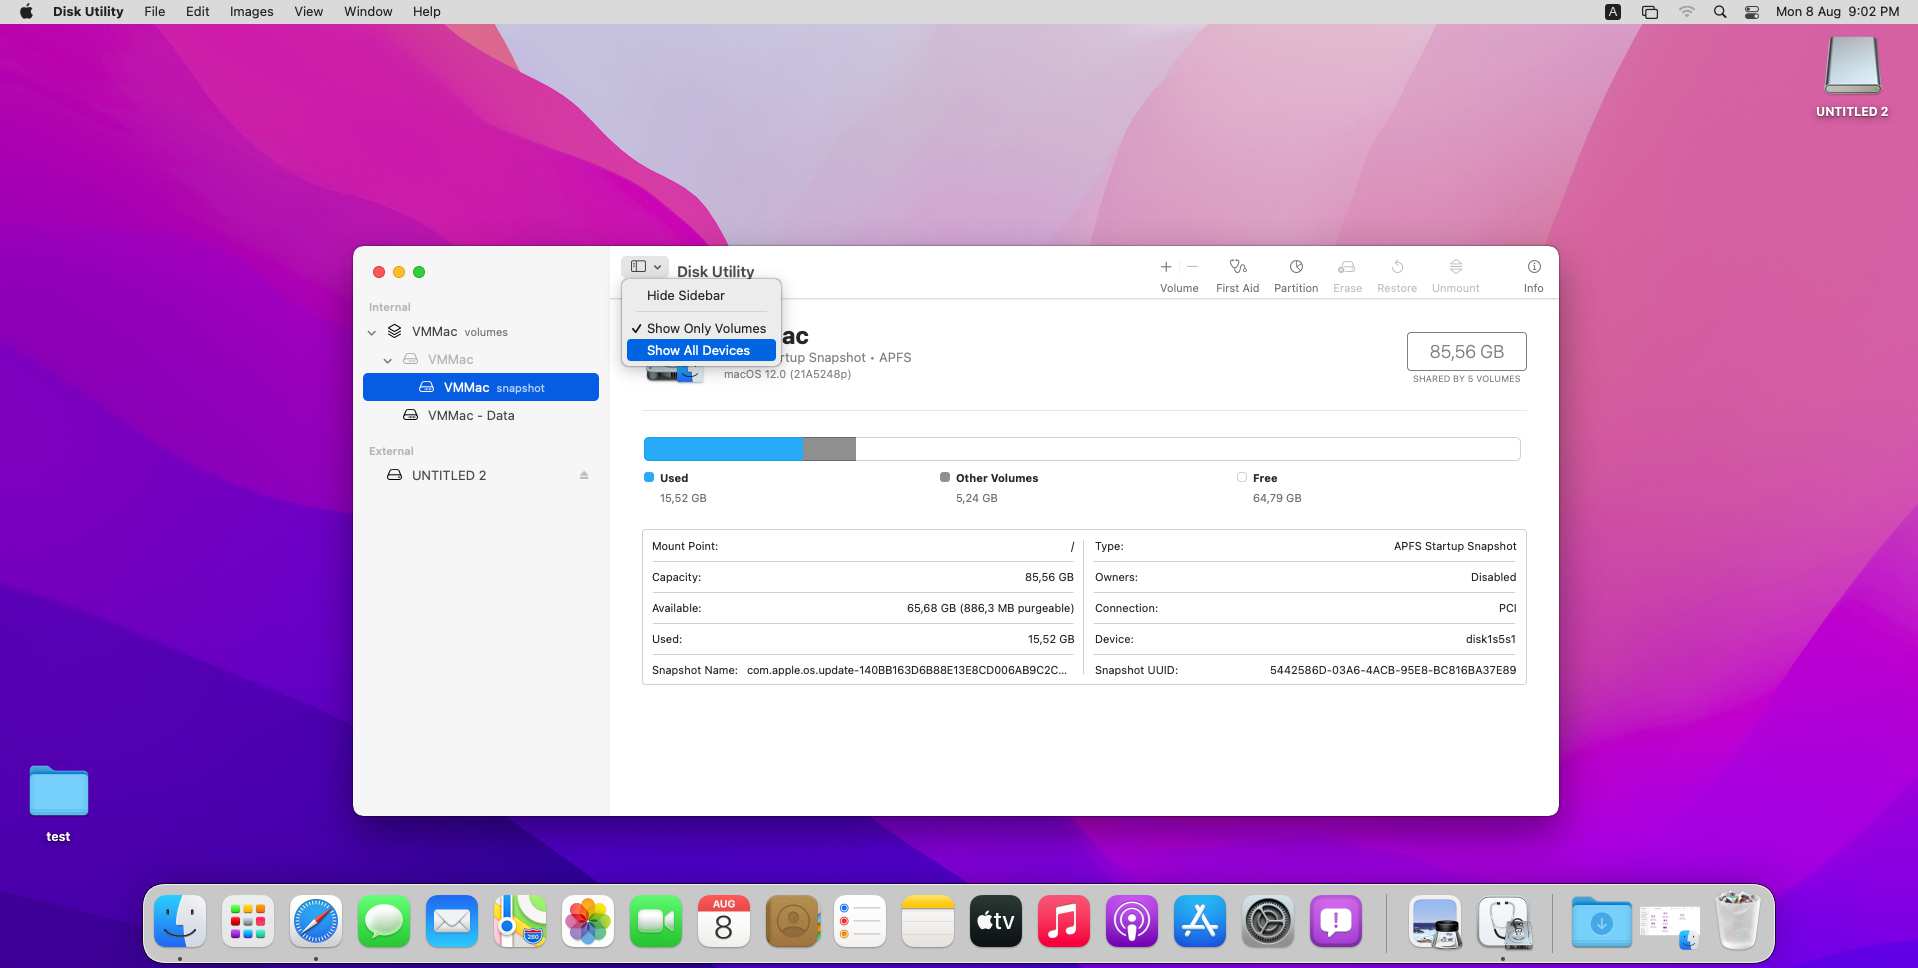
- Right-click on the device itself, not the volume(s) within it, and choose Erase from the menu that pops up.
-
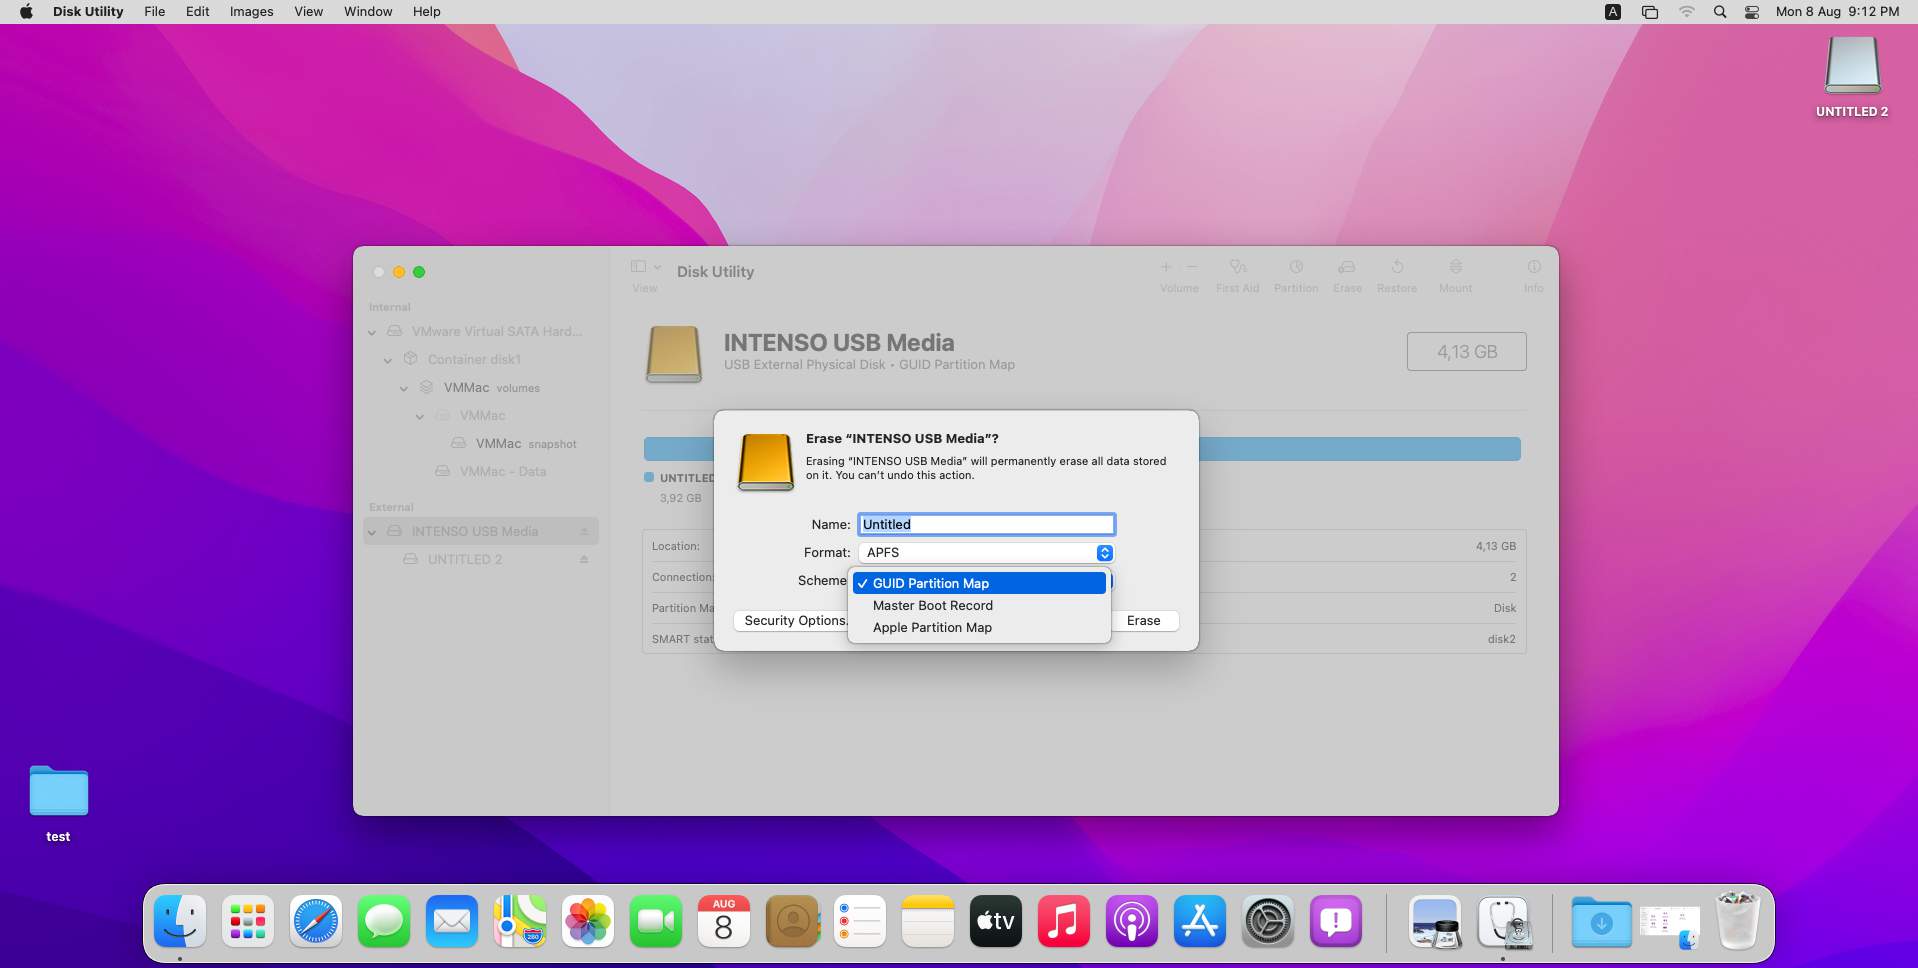
Note that if you want to re-segment your USB Flash Drive into partitions, you’ll have to choose a non-MBR partitioning scheme (like GUID).
Then, after it’s erased, right-click on it again and choose Partition to split it into smaller sections.
Method 4 Erase Everything Securely
Proving once again that using a Mac is an effortless affair, securely erasing a device is just as easy as a “plain” erase.
The only extra step needed is stating that you want to securely erase the device and dragging a slider to define the level of security.
-
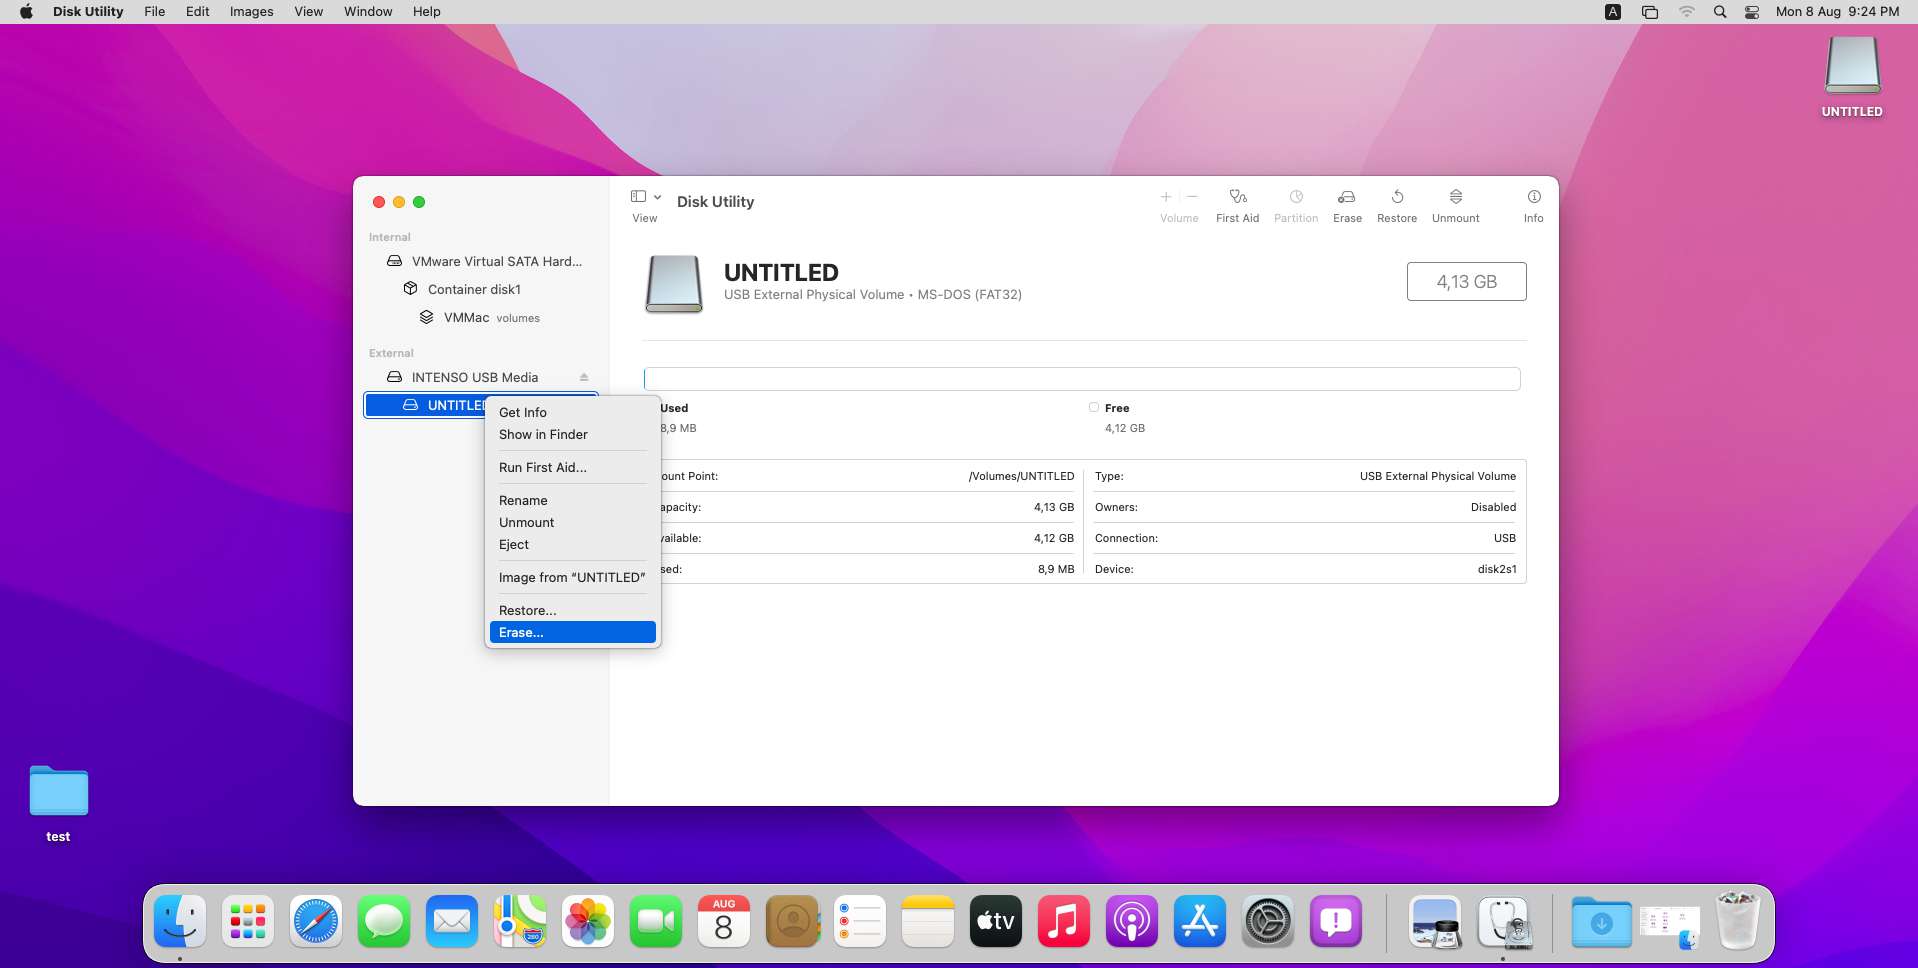
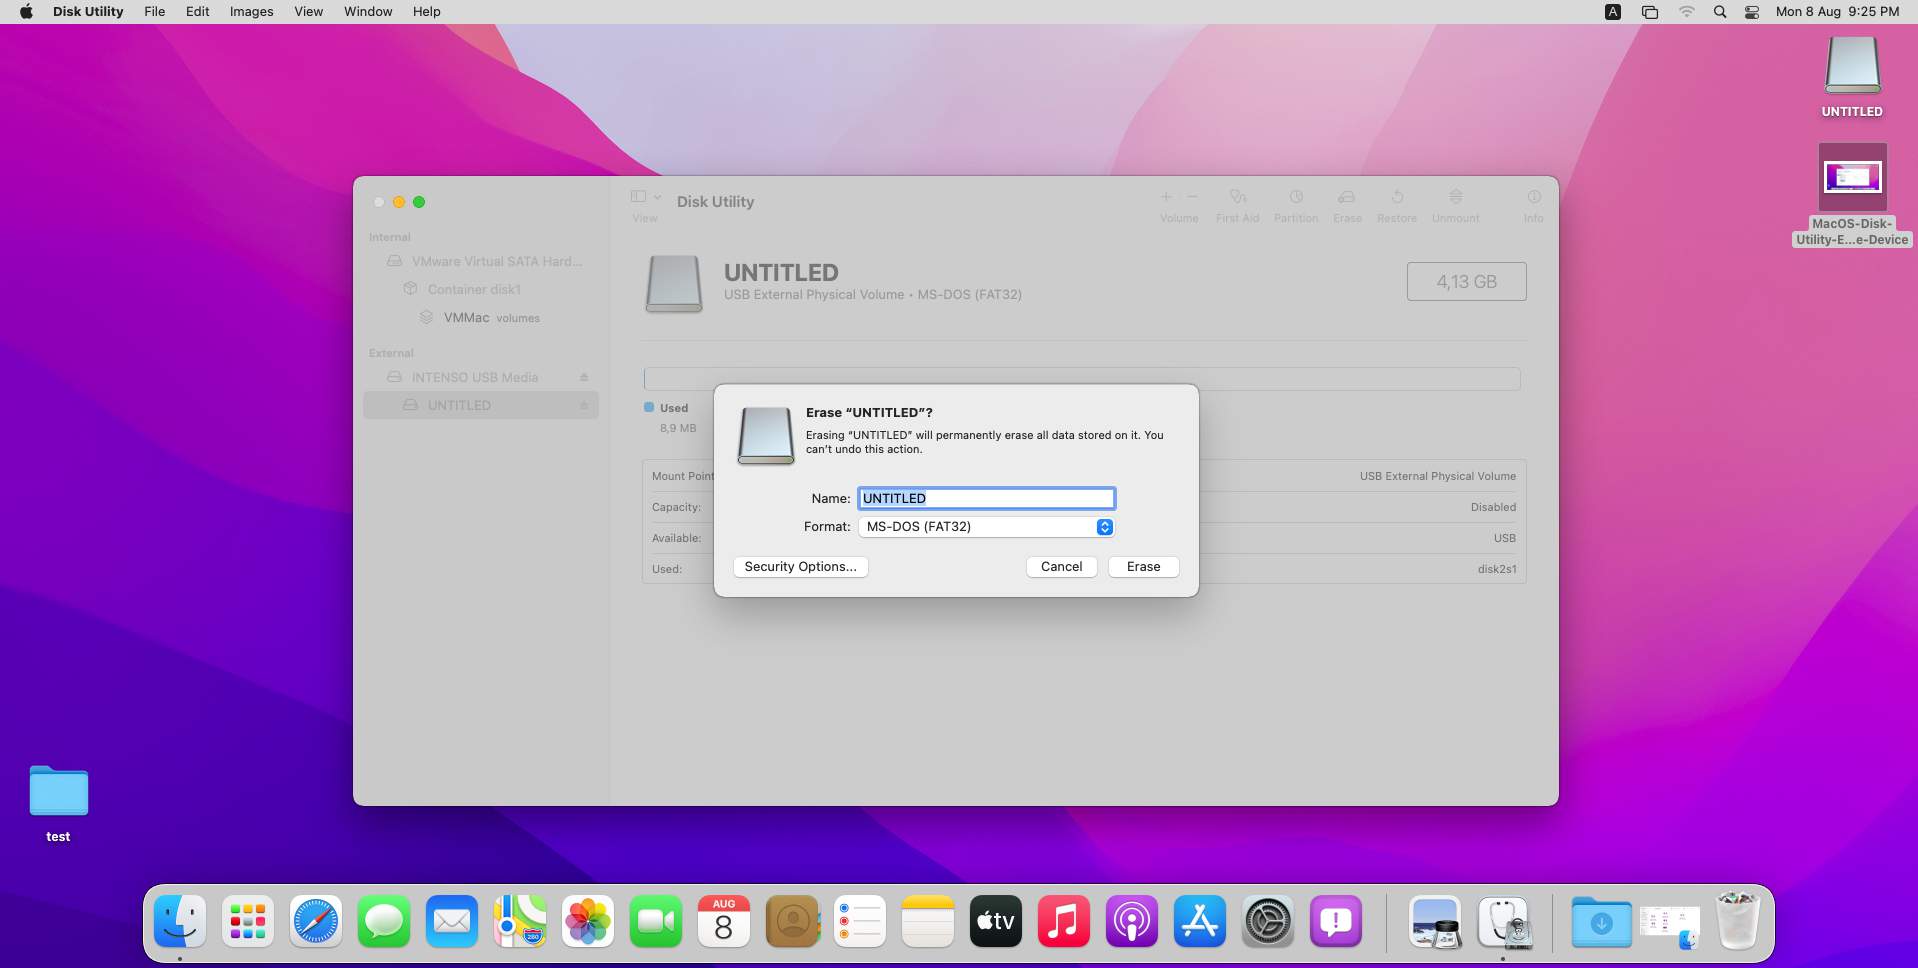
Run Disk Utility, and right-click on your USB Flash Drive from the list on the left.
Choose that you want to Erase it.
Alternatively, you can select your device and click on the Erase button on the top-right of the window.
- After entering a name and type of format for your soon-to-be-erased USB Flash Drive, click on Security Options on the bottom-left of the window.
-
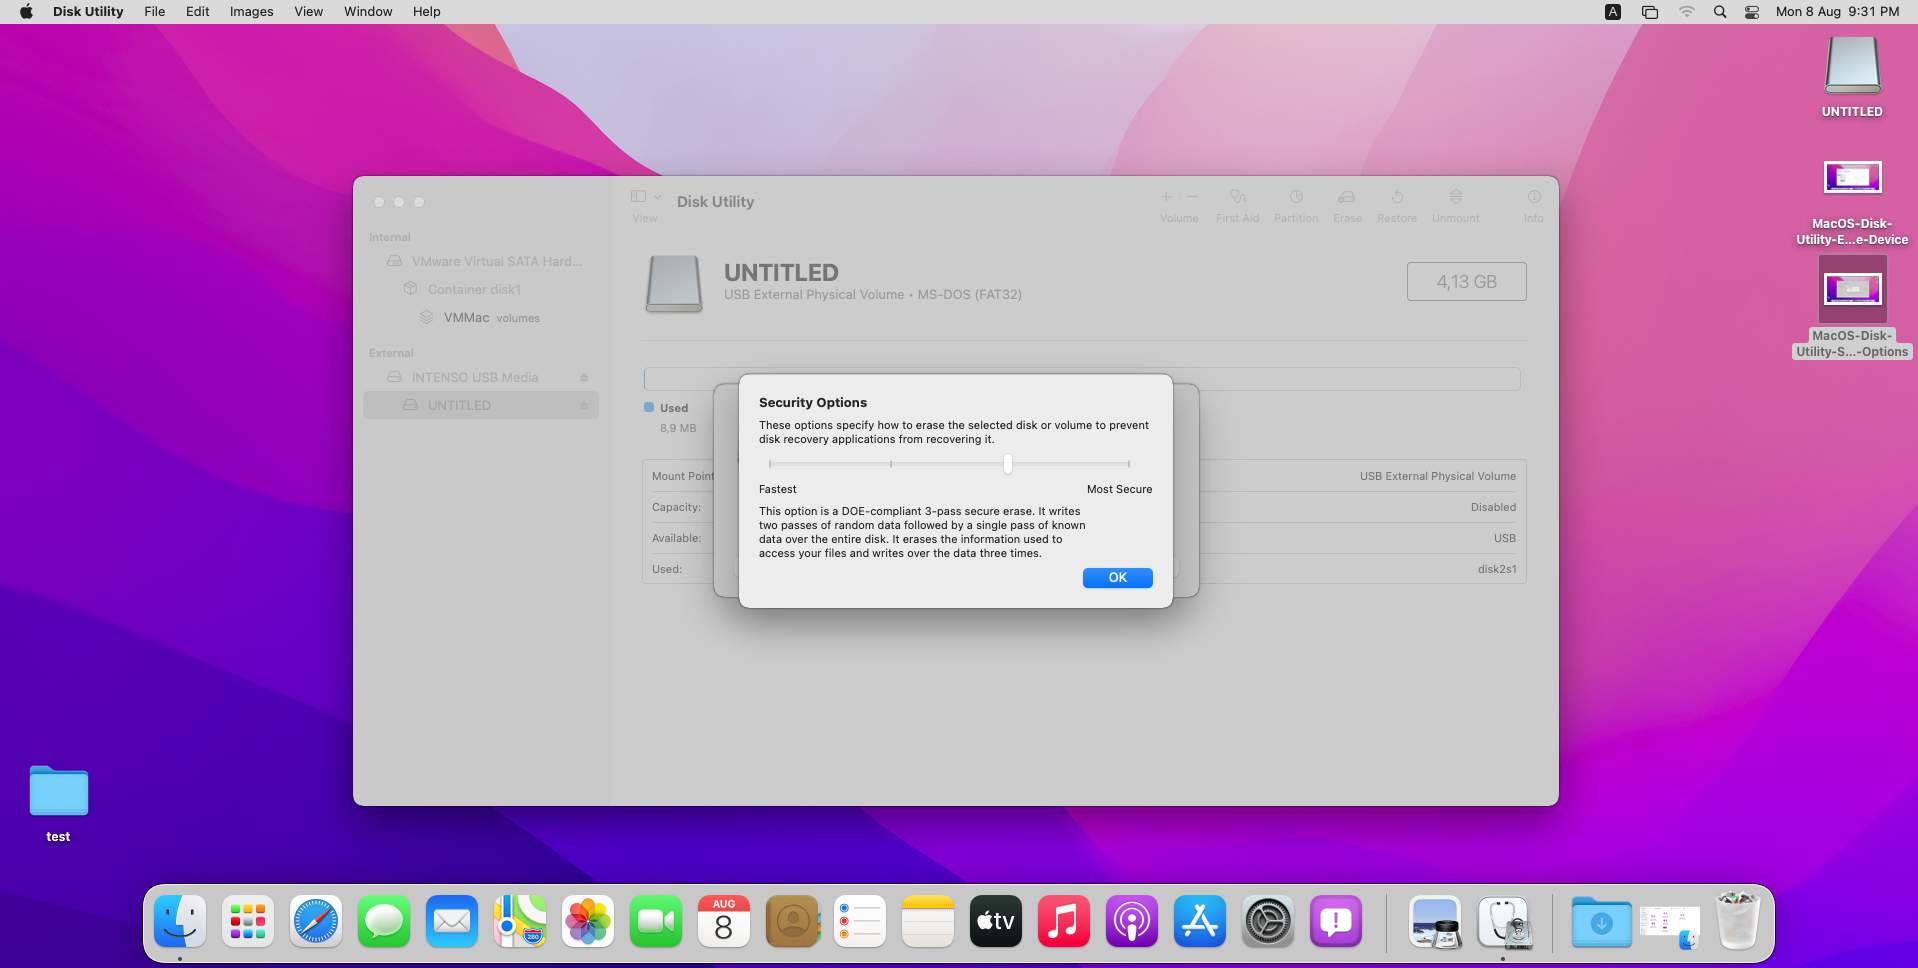
Drag the slider to the right to define the level of security you prefer.
The closer it is to the right, the higher the level of security, and the fewer the chances anyone could recover a single bit from the data that already exists on your storage device.
However, higher security also means a slower format process. If you can afford the time, though, and don’t mind your device being “locked” for minutes, feel free to move the slider all the way to the right.
When Using Linux
Linux is widely regarded as a complicated beast, where you must type commands in its terminal to perform even the most basic of tasks.
And yet, as we’ll see next, managing your USB Flash Drive’s storage only requires some clicking. You only have to type commands if you need more than the GUI-based tools offer.
For this guide, we’ll be using the popular Ubuntu 22.04 Linux distribution, which comes with the Gnome desktop environment. Thus, you can follow along on all Ubuntu-compatible distributions and perform the same steps if using the Gnome desktop (and the apps it comes with).
If you’re on a different setup, you’ll have to adjust the steps accordingly.
Method 1 Manually Delete the USB Drive’s Contents
We could go over one or more ways of deleting all of your USB Flash Drive’s contents through the terminal. However, most people today prefer interacting with their OS using a desktop environment, and most popular distributions come with one.
Selecting a bunch of files and folders with a mouse swipe and hitting Delete is much quicker and effortless. On Ubuntu 22.04 with Gnome, it goes like this:
- After connecting your USB Flash Drive, you’ll see an icon for it pop on Ubuntu’s dock. Clicking on it will open it with the default file manager (Files).
-
Alternatively, you can launch the file manager yourself.
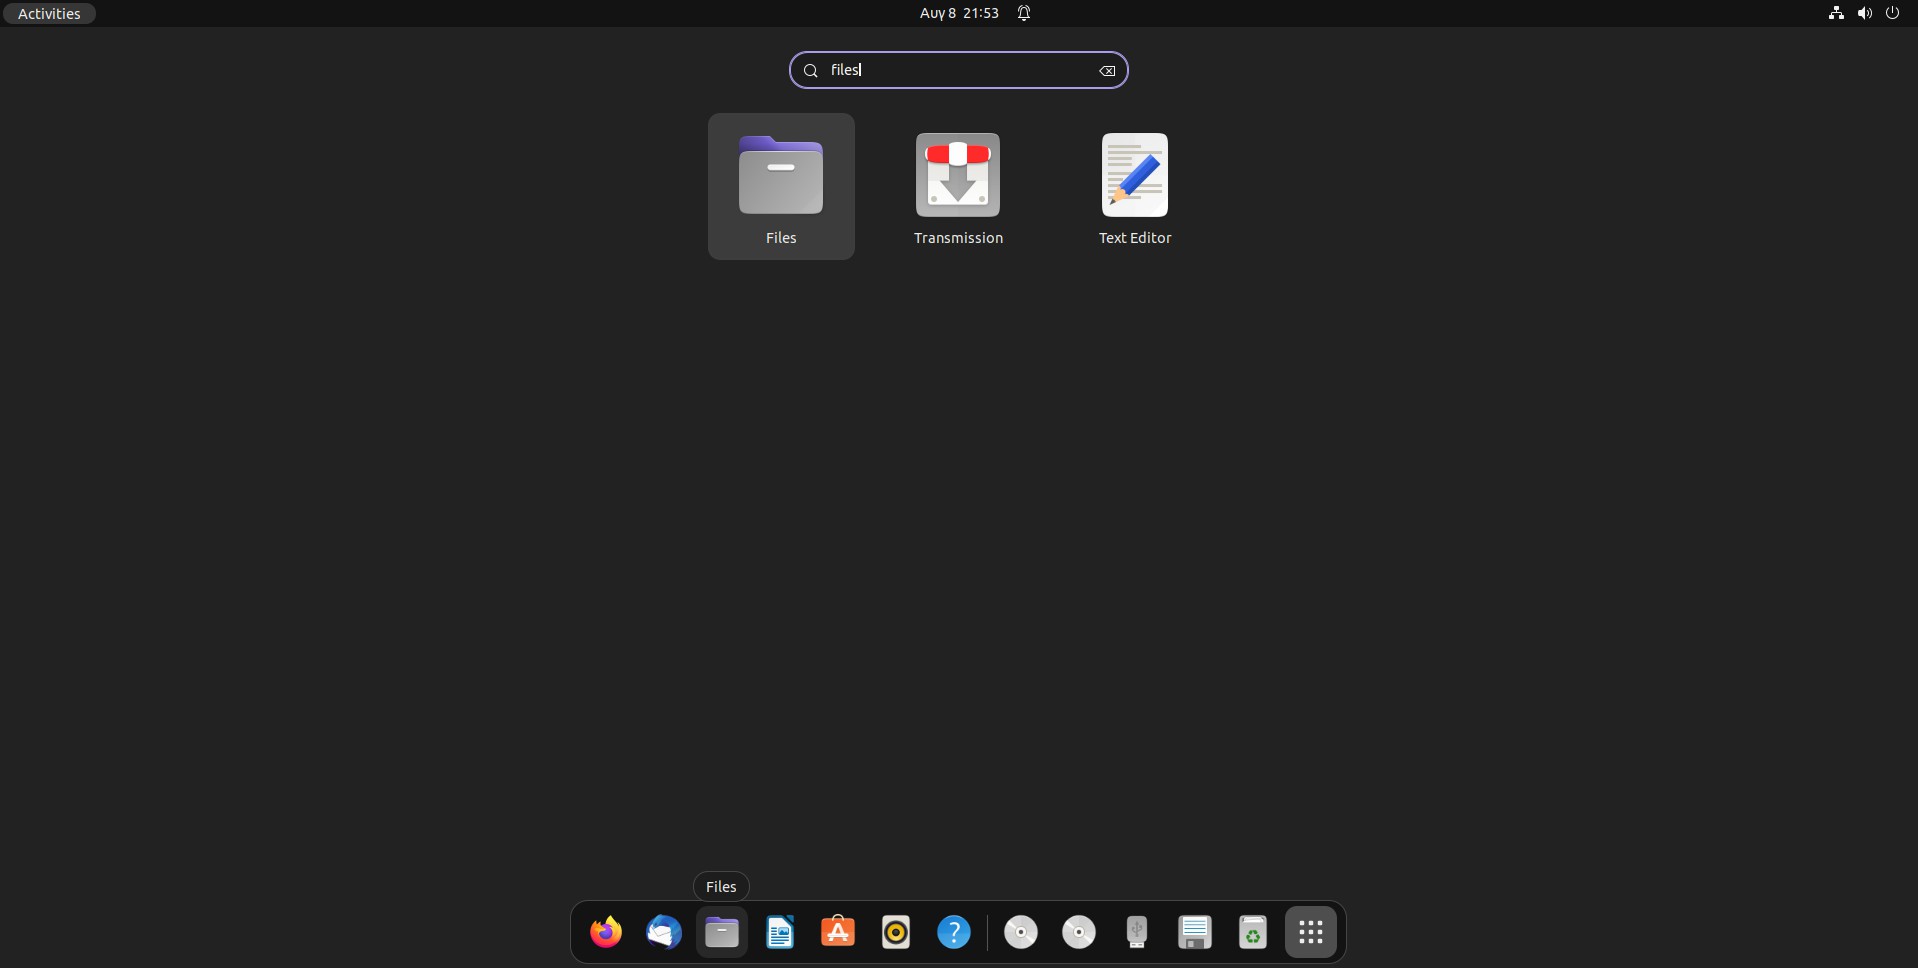
On Ubuntu 22.04, visit its applications menu, and use the search on the top to seek “files” (that’s the name of Gnome’s default file manager, which was previously known as “Nautilus”).
Or you could launch any other file manager you prefer – like Dolphin, Konqueror, etc.
-
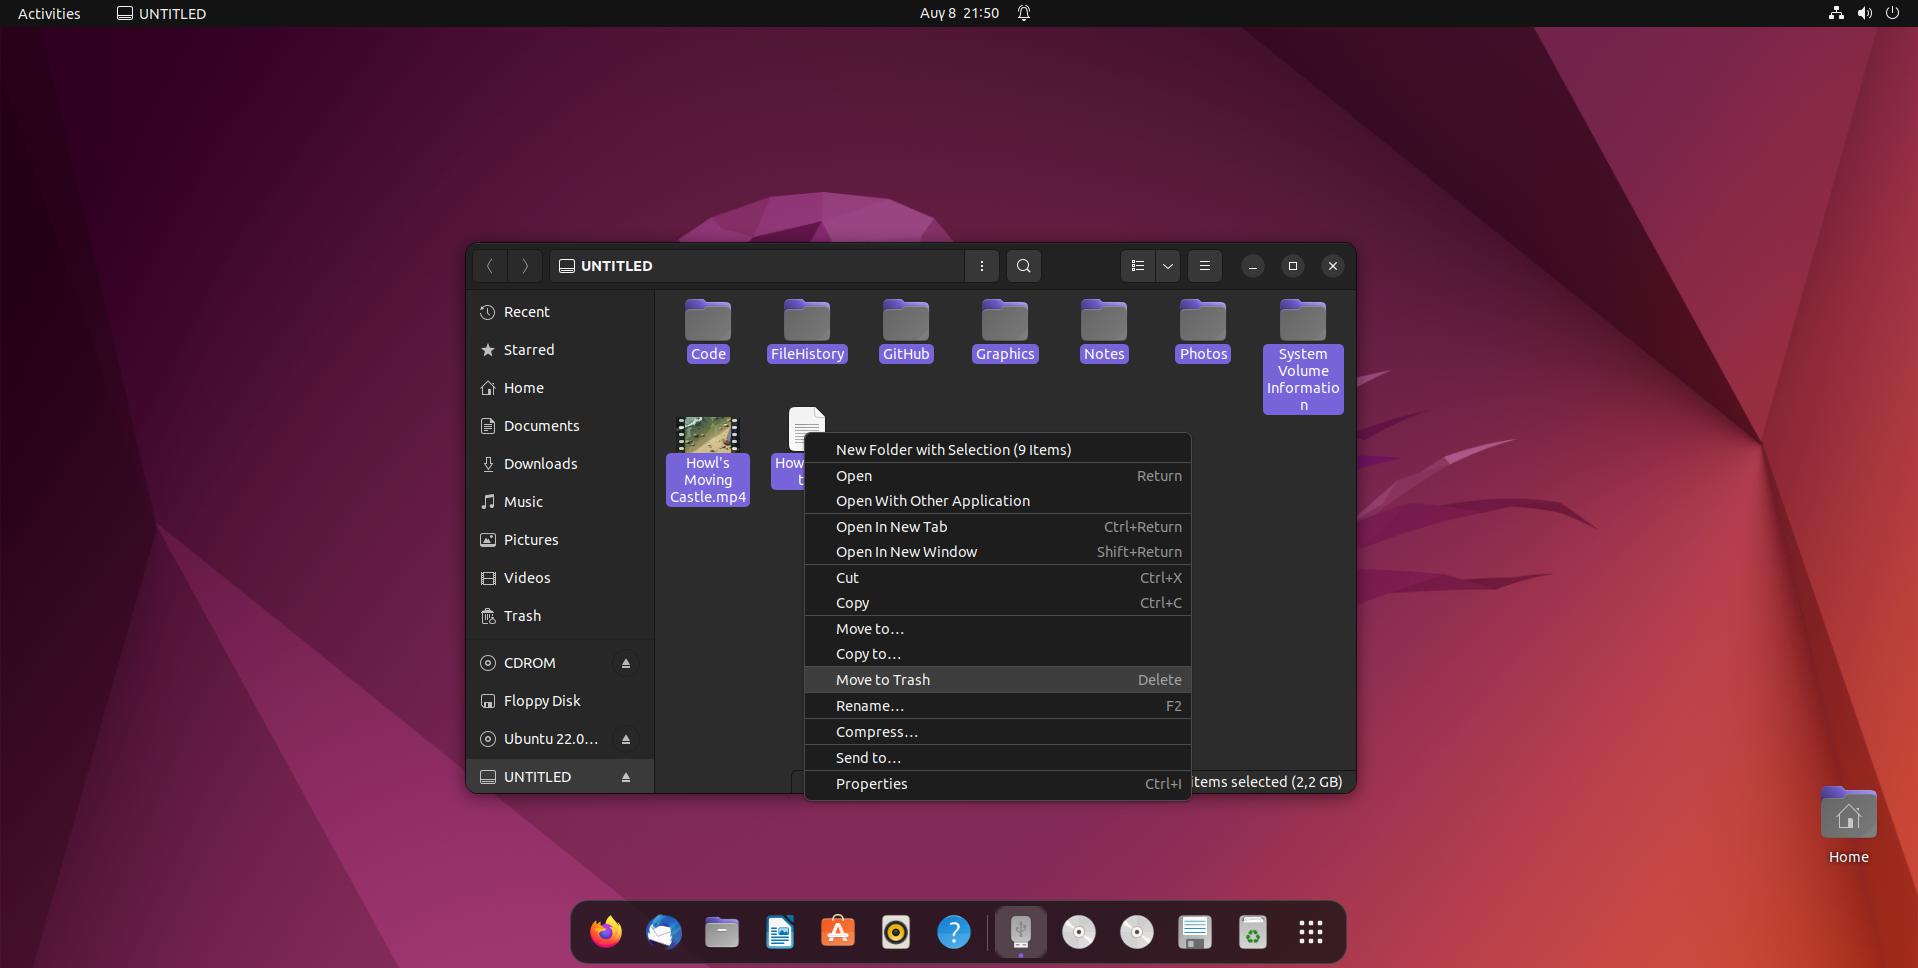
Locate your USB Flash Drive on your file manager’s devices/places list.
On Gnome’s Files, it’s on the left of its window. You might have to scroll down to find your USB Flash Drive if you have many storage devices on your PC.
Click on it, and when its contents appear on the file manager’s window, drag a box around them or click inside the window and hit CTRL + A to select all files and folders.
Then, either right-click on them and choose Move to Trash (or Delete, the option can change between file managers) or hit Delete on your keyboard.
Method 2 Format the USB Drive
Formatting your USB Flash Drive to free all its available space might seem like a “brute force” solution since it recreates its file system and indexes from scratch.
However, it also ensures there won’t be any data leftovers in the volume. As a bonus, you don’t have to deal with individual files and folders.
It feels more like “clicking a single button to solve a problem” – although, admittedly, it involves more than a single click. To do that, on Ubuntu 22.04 with Gnome:
- Run the Disks application. You can find it by searching for its name in the activities menu (yes, its name is a plain “disks”).
-
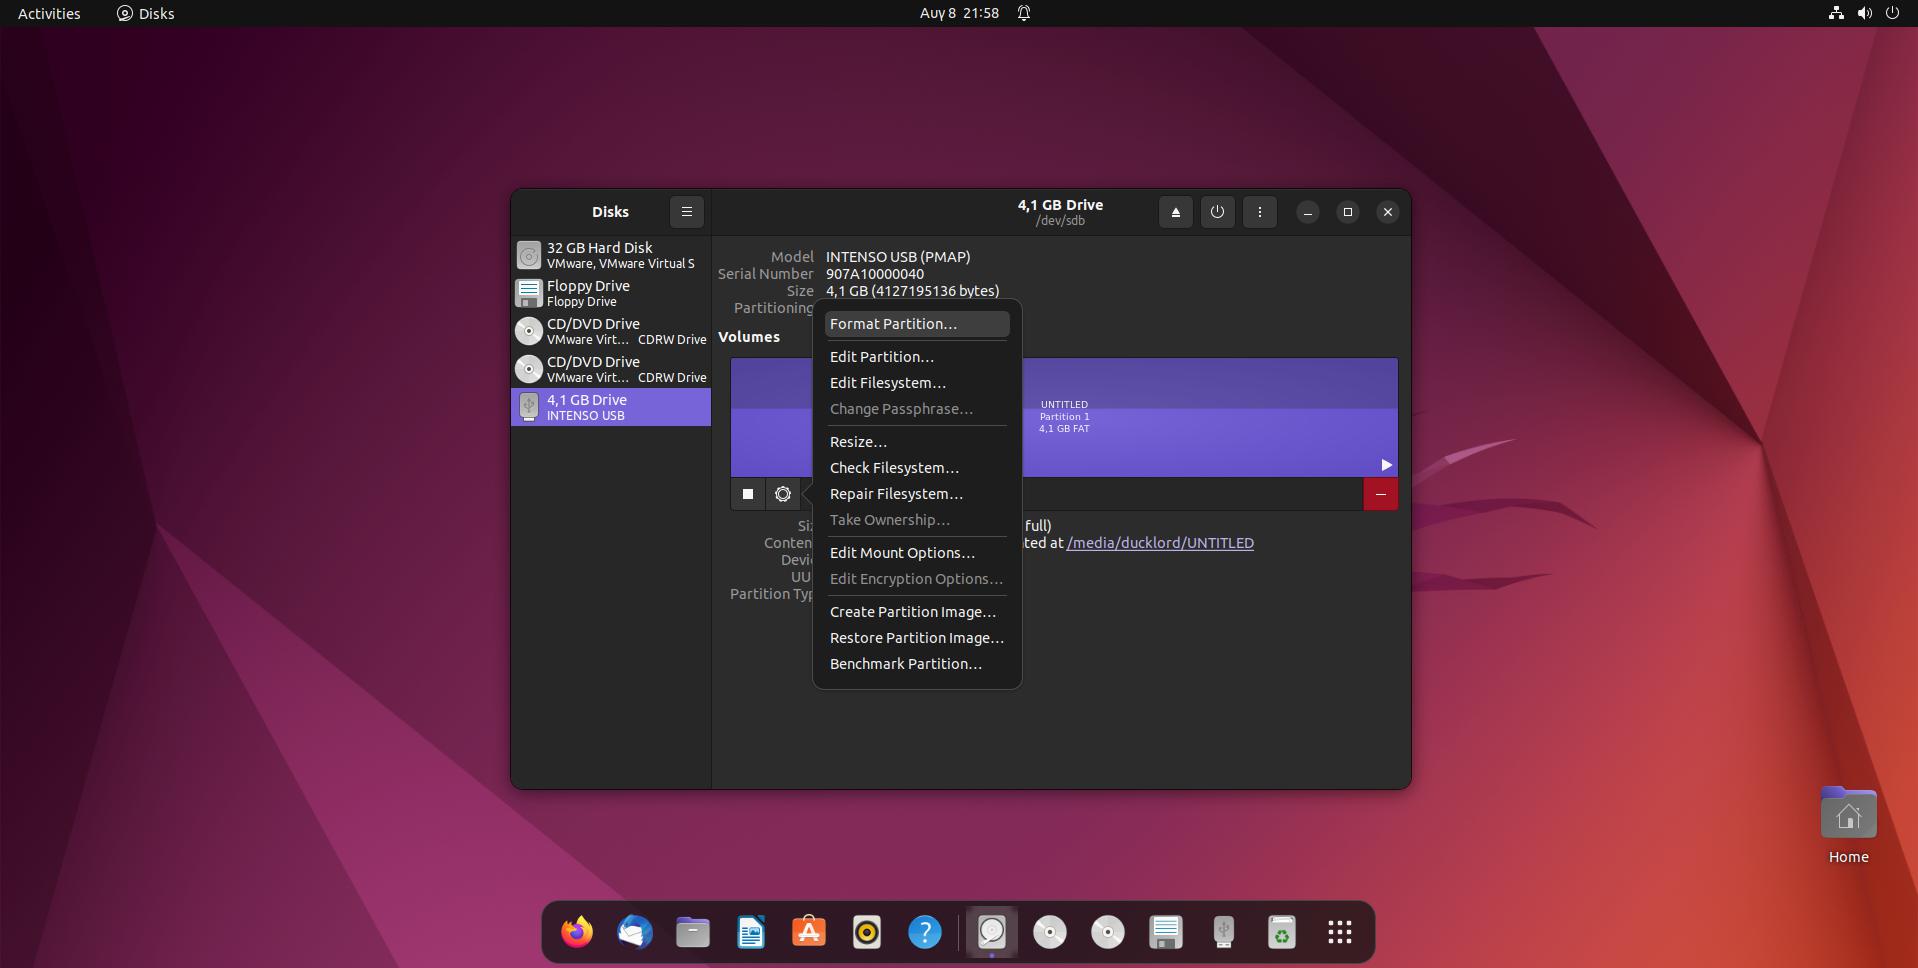
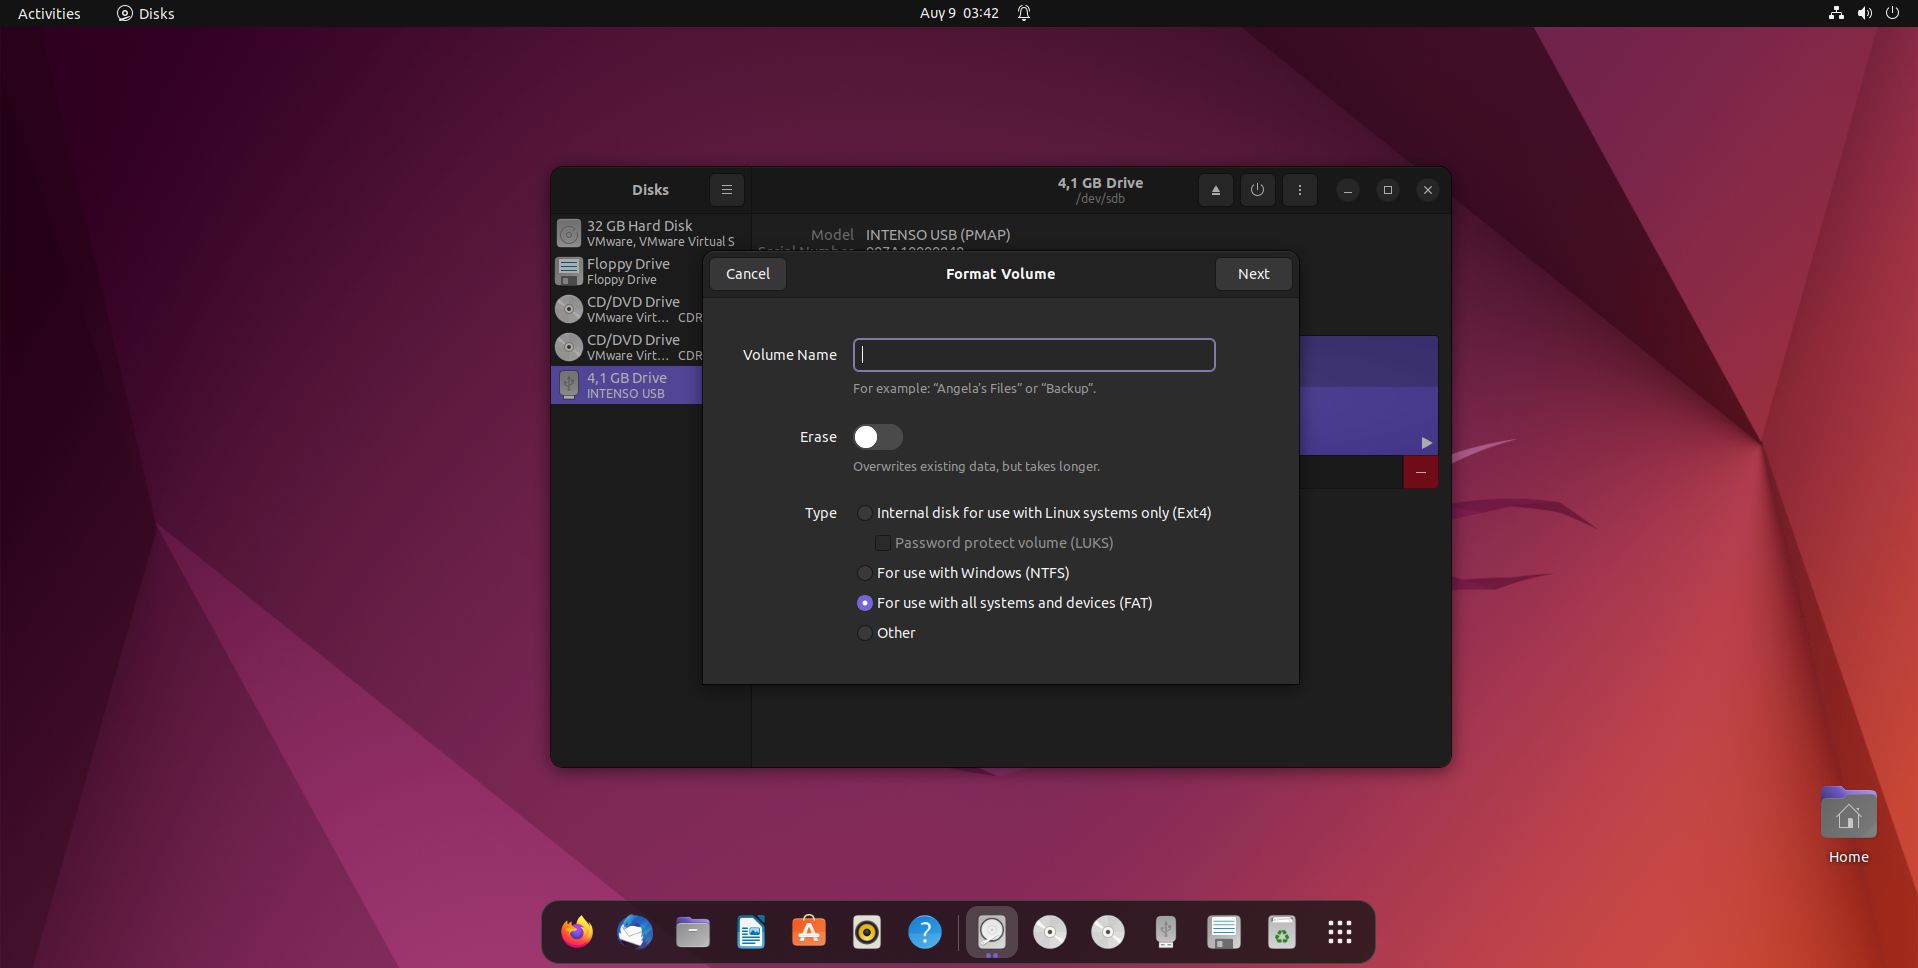
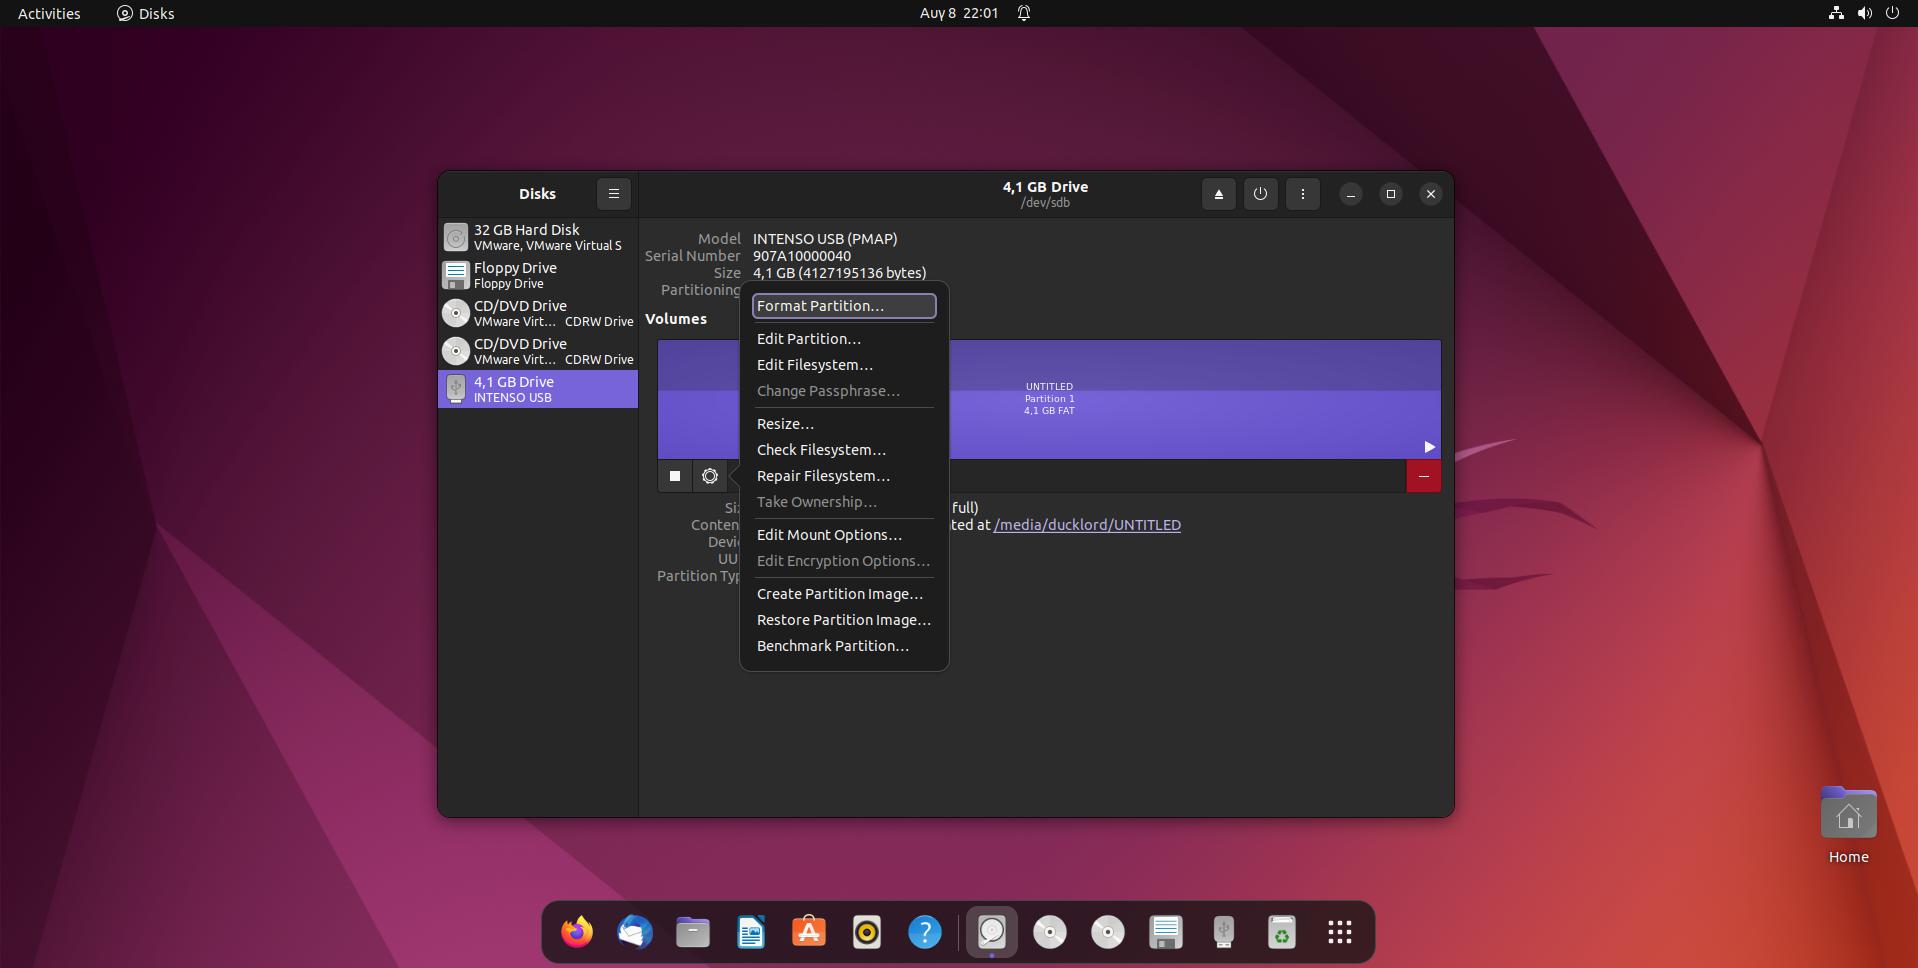
Select your USB Flash Drive from the list on the left of the Disks’ window.
Then, click the button with the cog icon under its volume, and choose Format Partition.
-
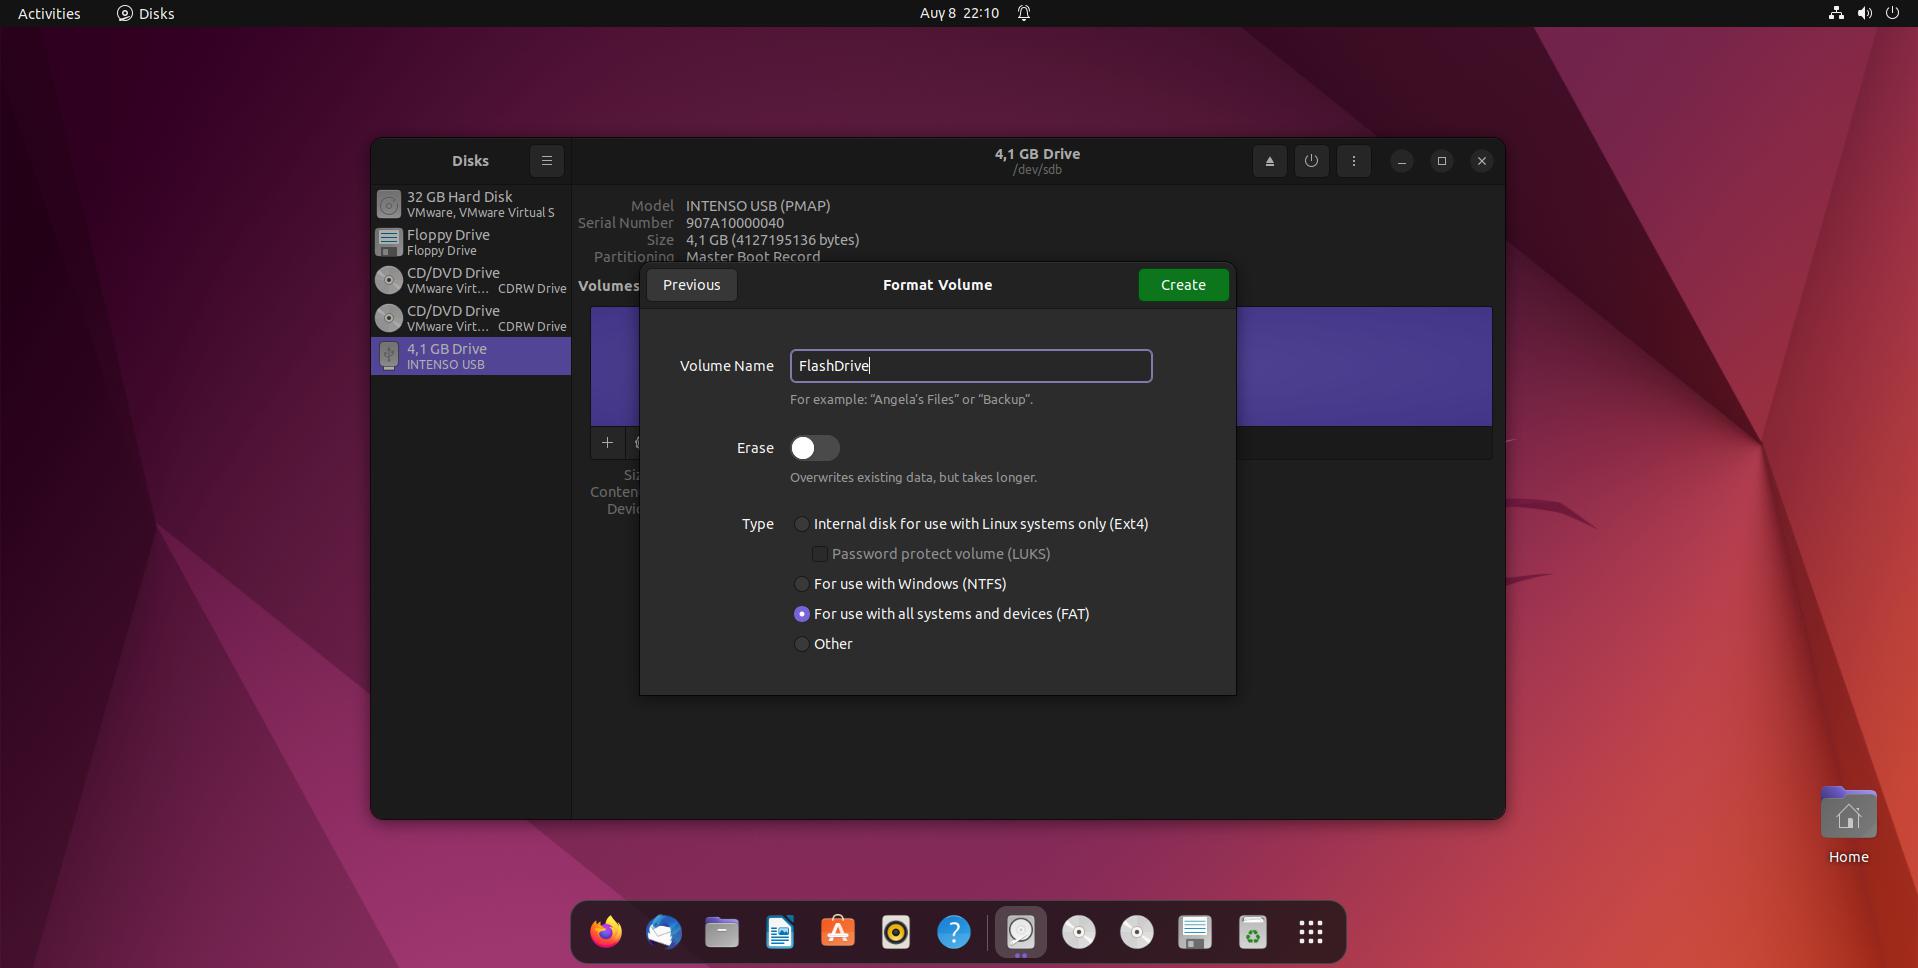
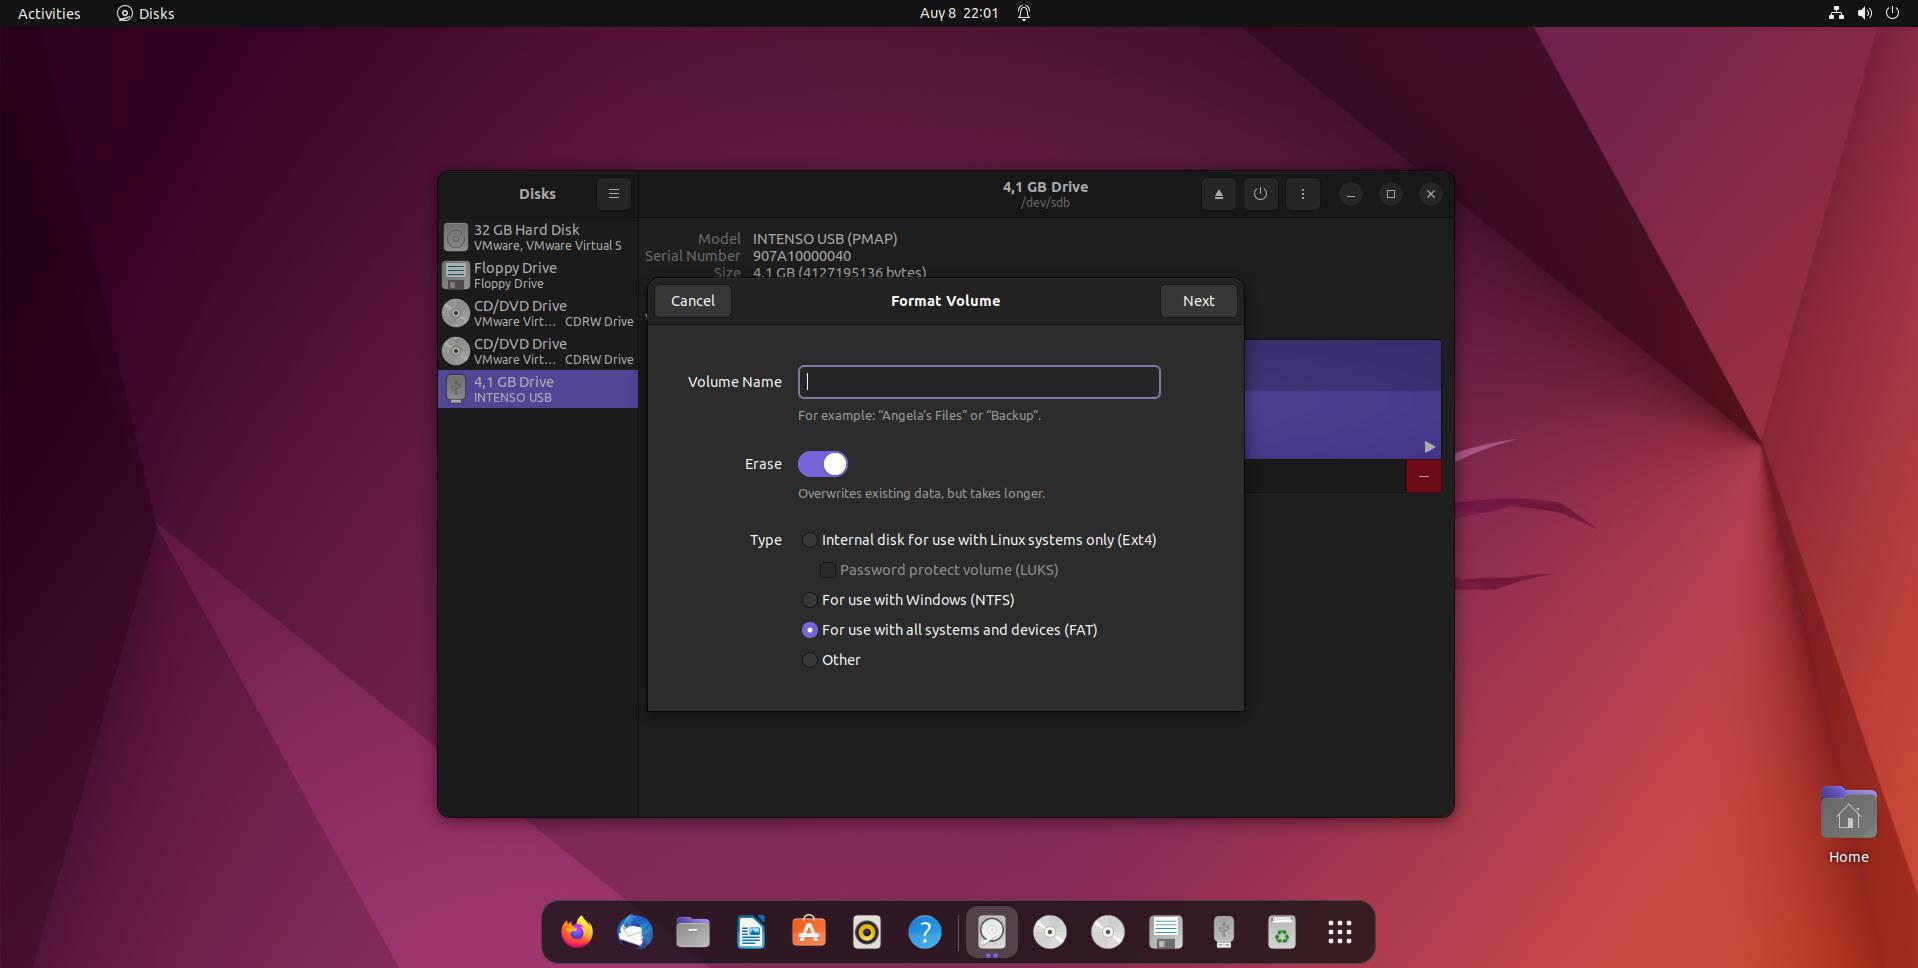
Enter a name for the newly formatted volume, and choose its type – or leave it at FAT for broader compatibility.
Then, click on Next on the top right.
-
You’ll be given a final chance to cancel the process and reminded it will lead to the removal of all data on your USB Flash Drive.
If sure, click on Format on the top right corner of the window.

Method 3 Delete Its Partitions
Are you tired of juggling files between your USB Flash Drive’s partitions, trying to make them fit? Would you prefer to use it as a single, larger storage space, where you can “dump” files without overthinking it?
Or, maybe, the opposite, to create multiple partitions, each with a different file system, to take advantage of the best both Linux and Windows can offer?
You can do it like this:
-
Fire up the Disks application – you’ll find it by searching for it using its name in the apps/activities menu.
Locate your USB Flash Drive on the list on the left of its window, and click on it to select it.
Then, click the button with the minus symbol on the right and under the chosen volumes’ graphical representation.
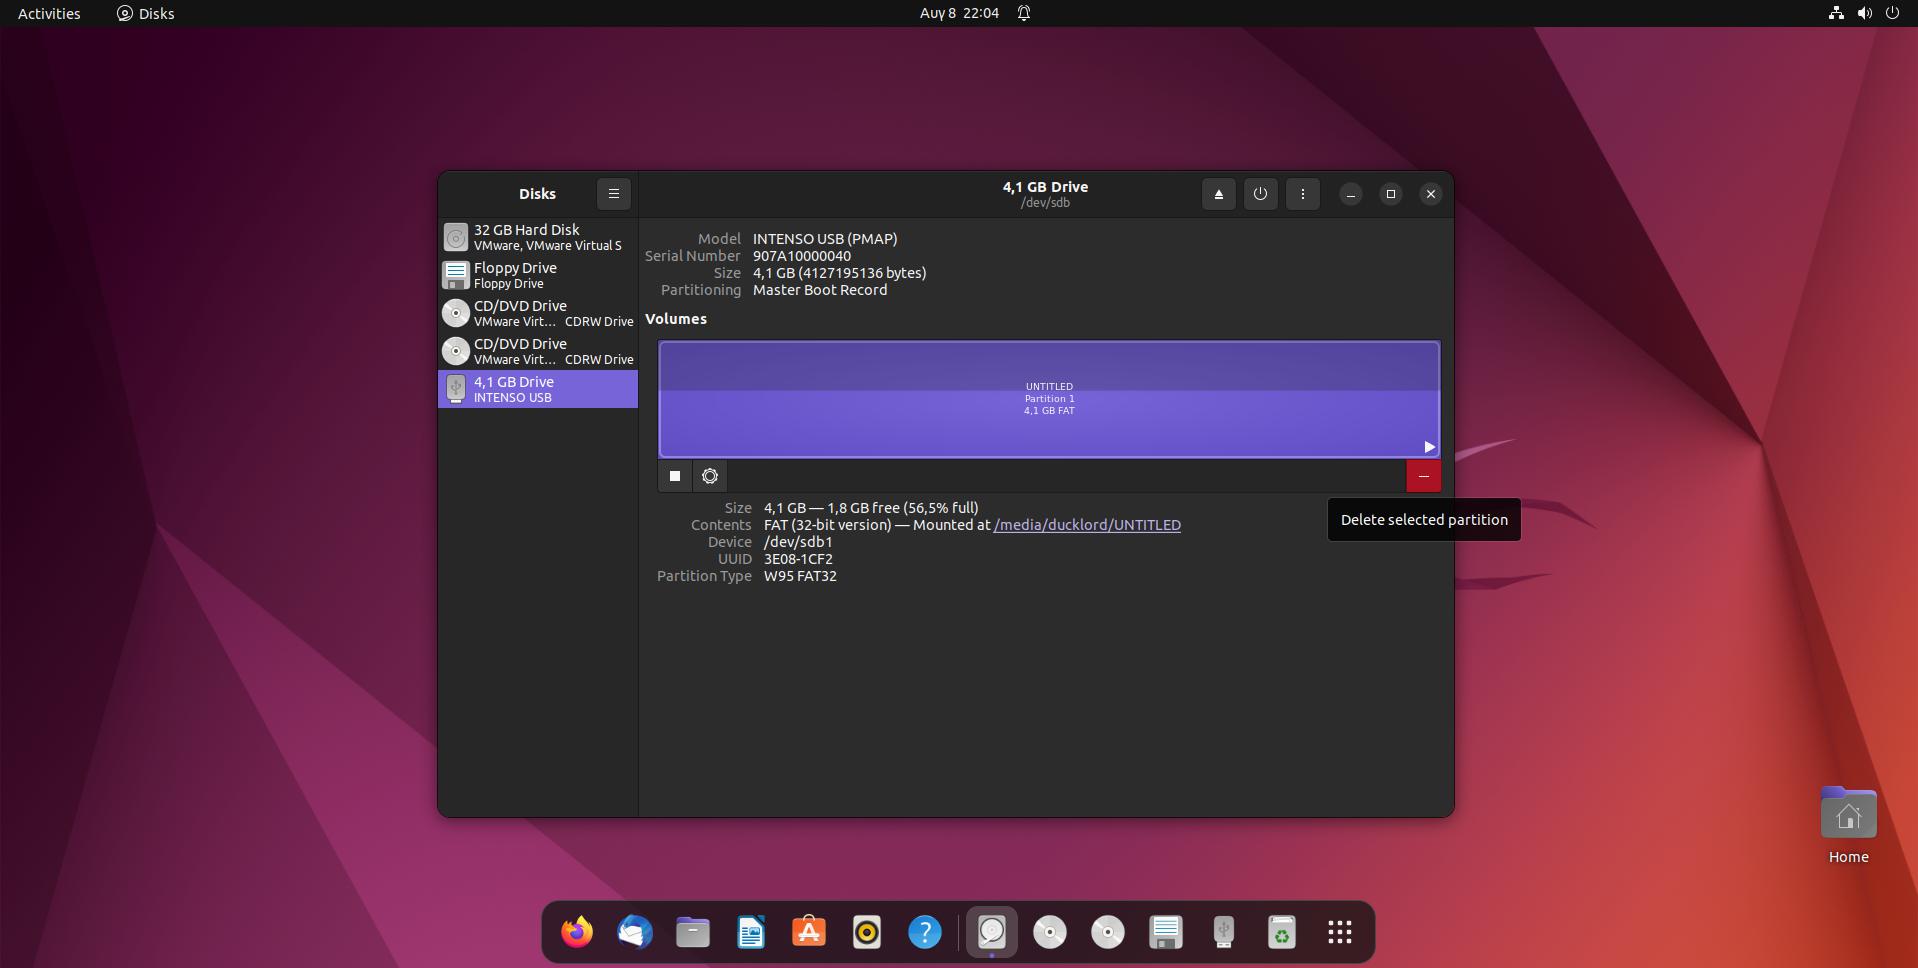
- Answer positively when asked if you’re sure you want to delete the selected partition. That is, if you are sure, of course, that it doesn’t contain any data you need.

-
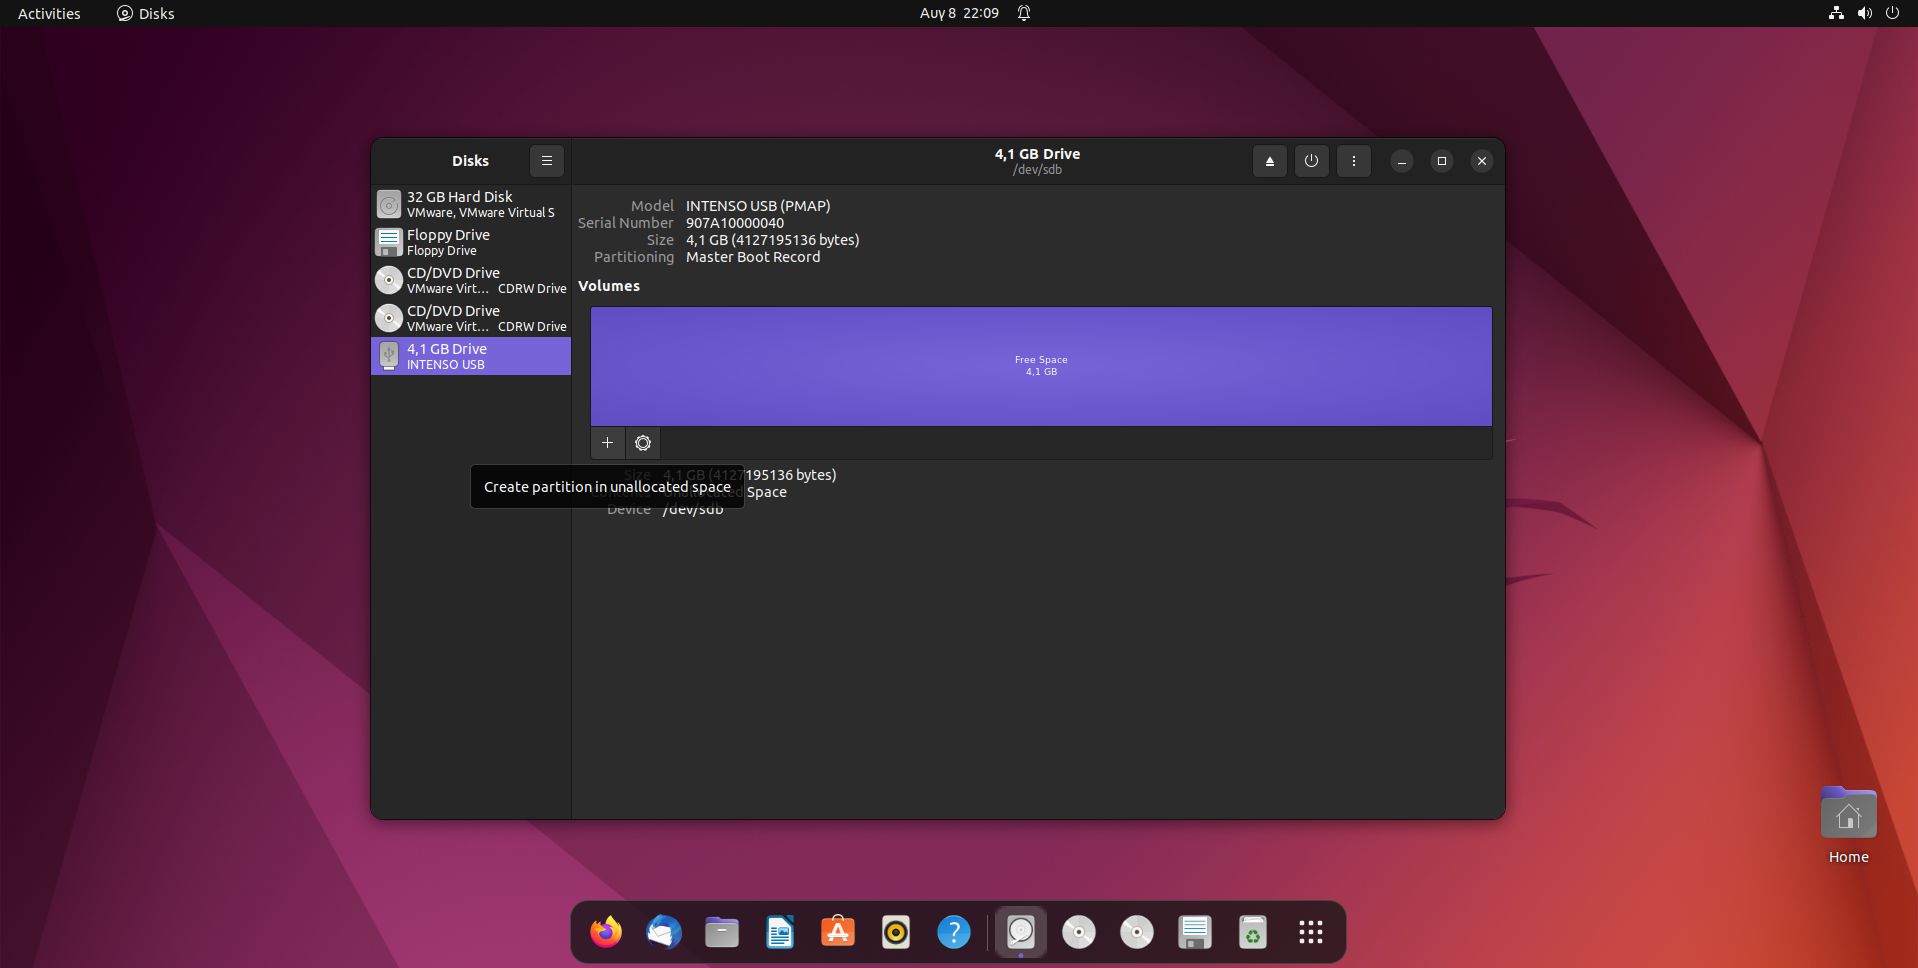
After removing all partitions, your USB Flash Drive will be unusable “as it is”, appearing as a “RAW” device.
To turn it usable again, you’ll have to add at least one partition to it by clicking on the button with the plus symbol, on the left under the volumes’ “bar”.
-
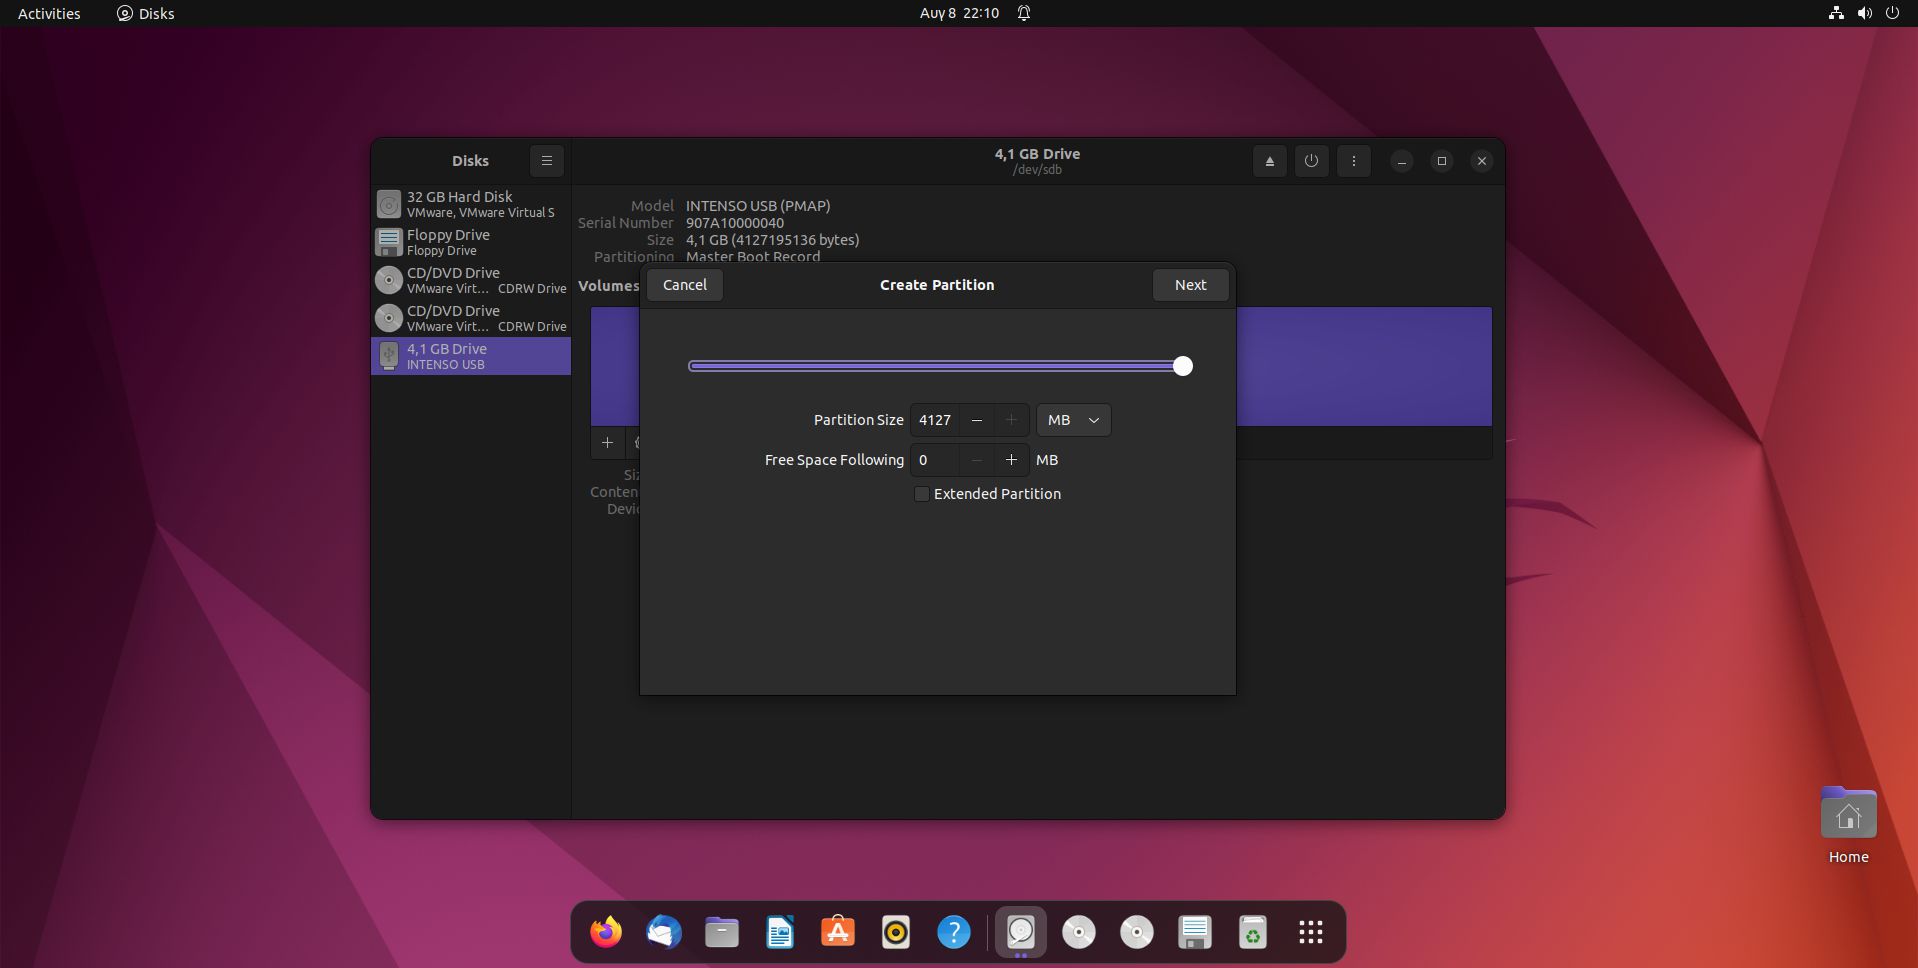
In the following dialog, you can use the slider or manually type a number to define the size and position of the partition you’re creating.
Leave both untouched to assign all of the available space to a single partition.
-
The next dialog you’ll meet is identical to the one you see when directly formatting a device.
You can enter a Volume Name and choose its file system.
When ready, click on Create on the top right corner of the window to turn those settings into a partition and render your USB Flash Drive usable again.
Method 4 Erase Everything Securely
As evidence that Linux is all about freedom of choice, securely erasing your USB Flash Drive can be as simple or complex as you wish.
For the easy way out, we won’t go over all steps since they’re a variation of the typical format process that we’ve already covered above.
-
To securely erase your USB Flash Drive, go through the steps for formatting it using the Disks app.
Locate Disks, run it, and select your USB Flash Drive from the list on its left.
Then, click on the button with the cog symbol, and choose that you want to format the partition.
-
The difference between a typical and a “secure” format is the single little switch next to Erase when setting up how you want your device formatted.
By flicking this to On, instead of a quick format, Disks will go over the whole storage area of your device, filling it with zeroes.
Finish the process by clicking Next on the top right corner and then acknowledging you’re OK with the removal of any data on the device.
For an even more secure erasure of your USB Flash Drive’s contents, you’ll have to type a little something on the terminal. Don’t worry; it’s a single command. However, you have to ensure you’ll use the correct device ID if you don’t want to erase any of your other storage devices.
-
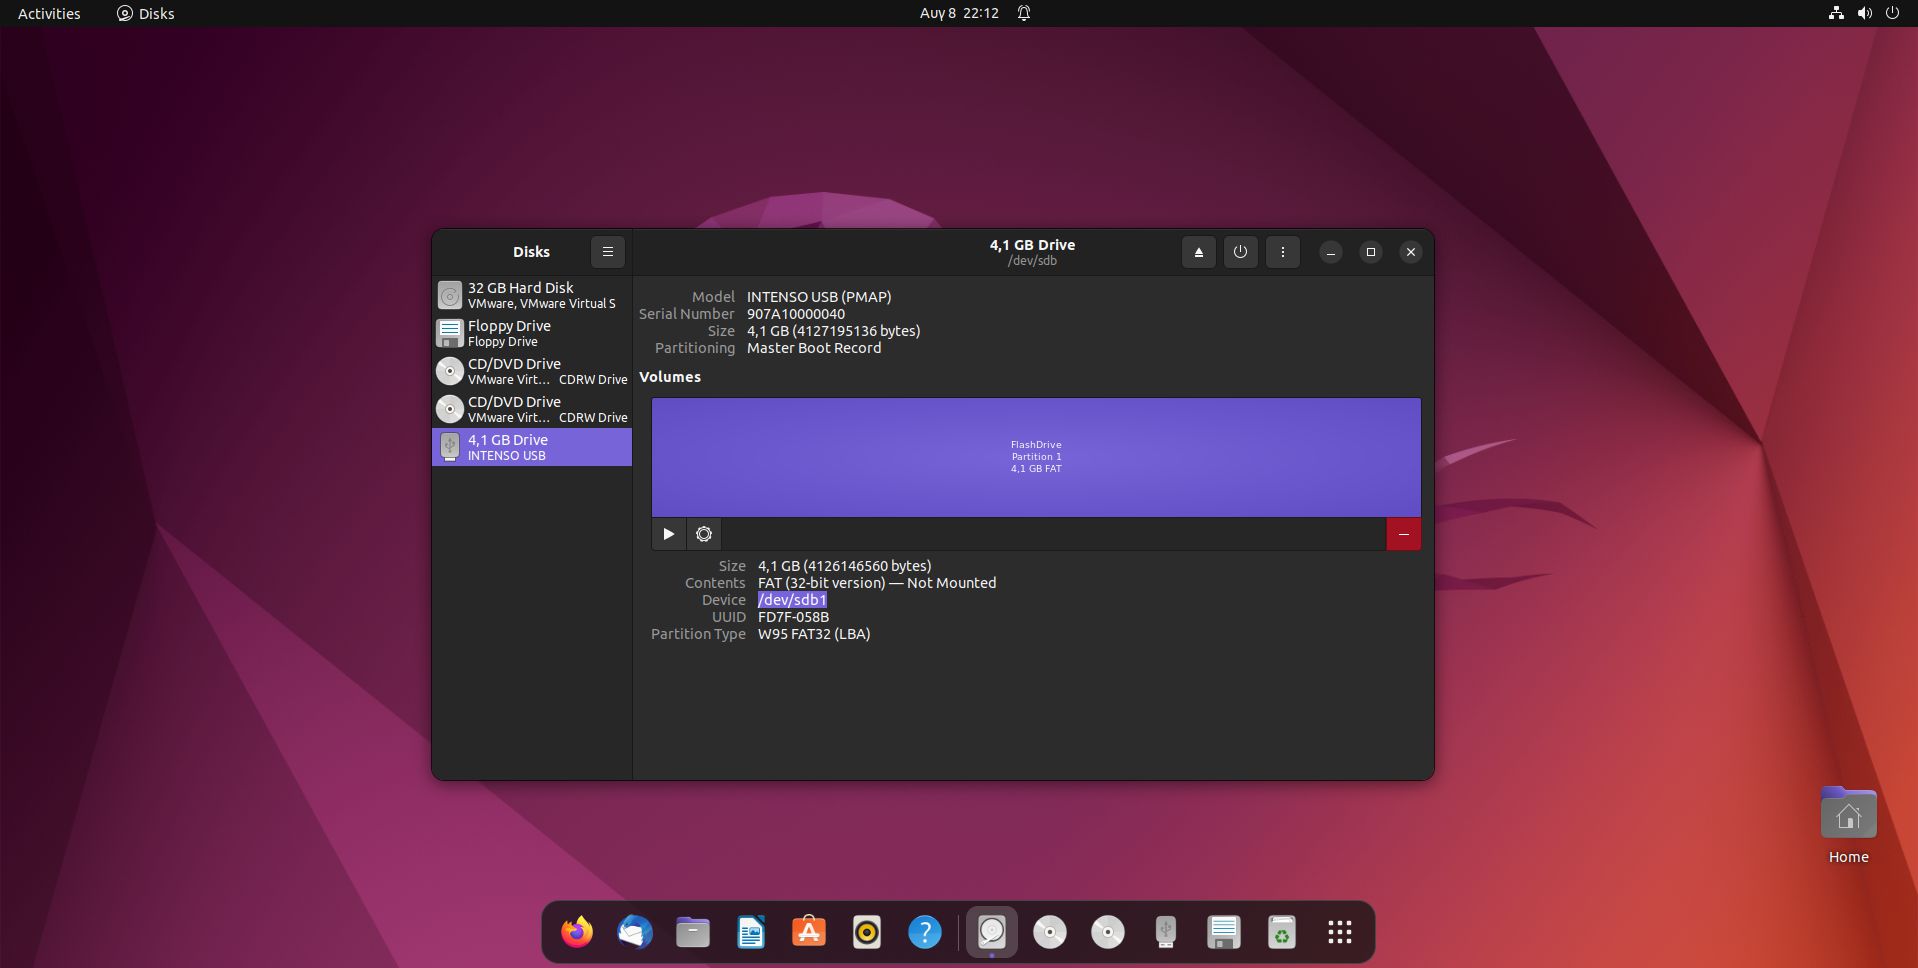
Disks can help in that, too, for apart from a graphical bar for the volumes on a device, it also shows some helpful information underneath.
Notice the “dev/sdXY” bit.
“Dev” is short for “device”.
“sd” comes from “SATA Drive” (it’s used for storage devices even if they aren’t connected through SATA).
That’s followed by a letter for the particular drive and a number for the partition.
Since a single drive can have many partitions, if, for example, you see three volumes with IDs sdb1, sdb2, and sdb3, that means they’re three partitions on the SATA Drive “B”.
That part is what you need – the “sda”, “sdb”, “sdw”, etc., for the drive itself, not including the number for the partition.
Note that down, for you’ll need it in the next step.
-
Launch the terminal (you can use the CTRL + Alt + T shortcut), and use the following command to securely erase everything on your USB Flash Drive.
sudo dd if=/dev/urandom of=/dev/DEVICE_ID bs=4096 status=progress
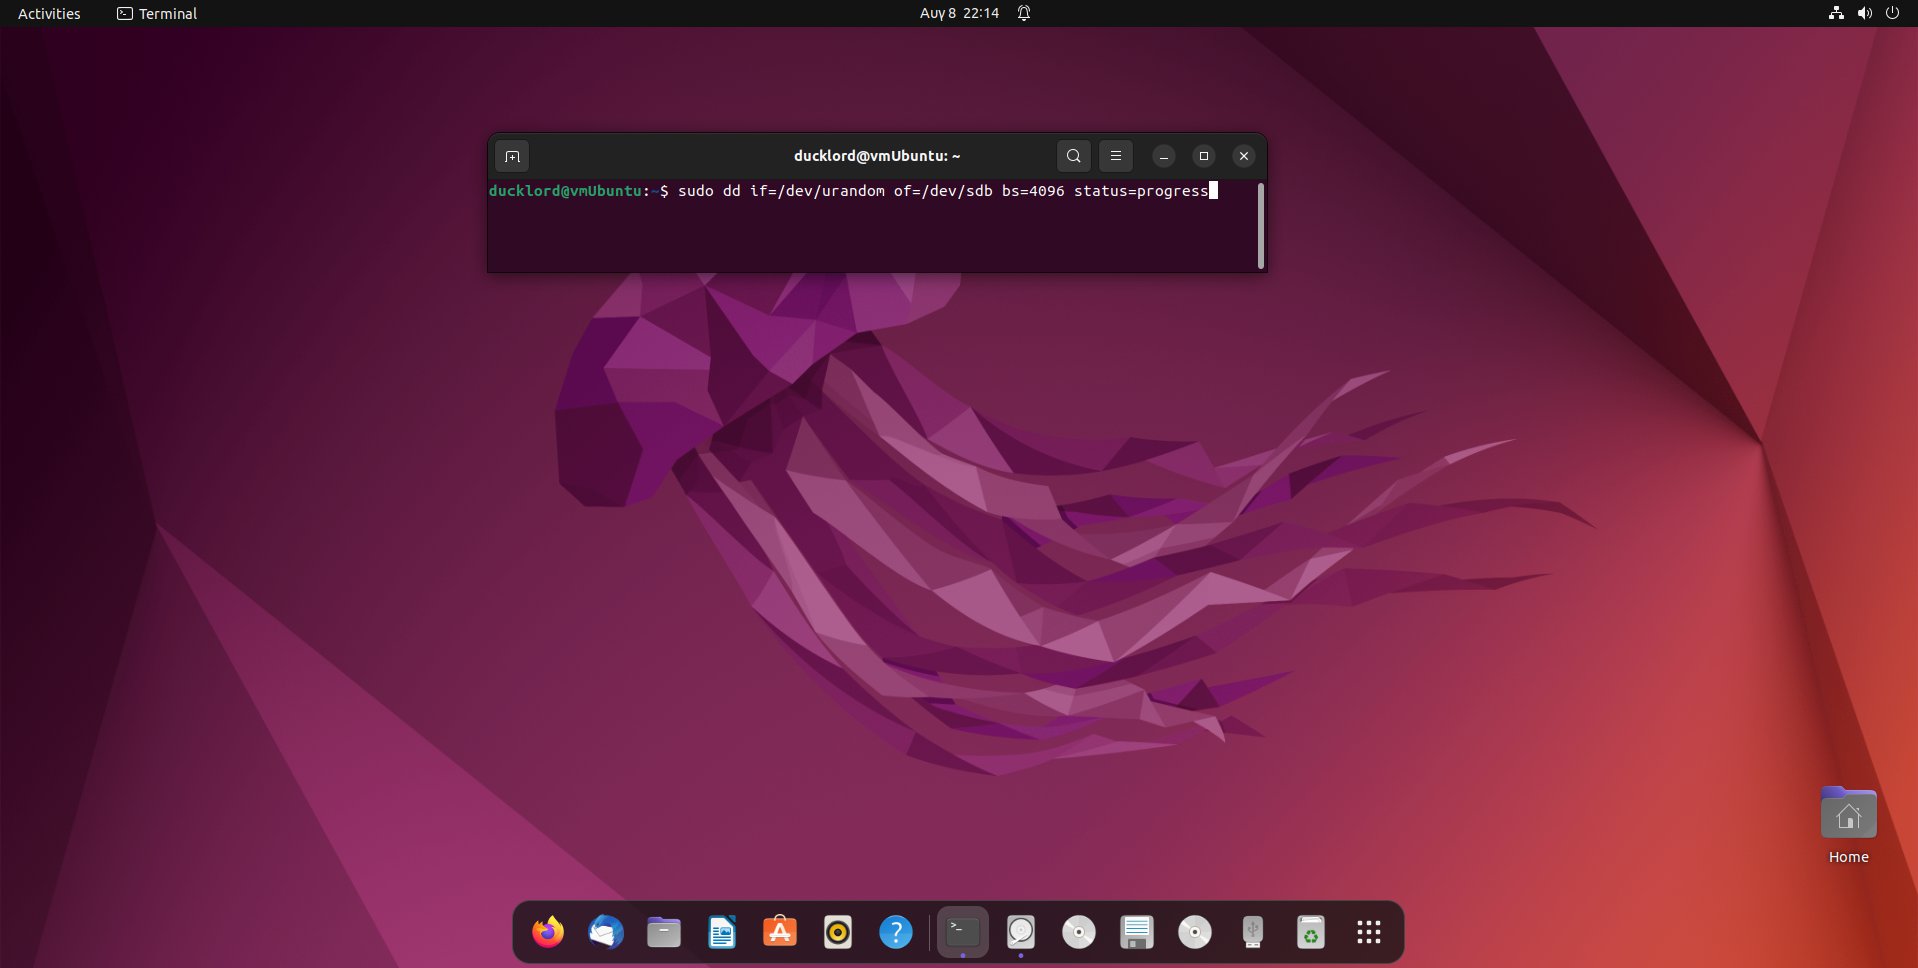
Remember to replace DEVICE_ID with the “sda”, “sdb”, or similar, that Disks “told you” is the ID of your USB Flash Drive. So, if your device ID was “sdb”, the command would look like:
sudo dd if=/dev/urandom of=/dev/sdb bs=4096 status=progress
Hit Enter, and soon after, the contents of your USB Flash Drive will have gone extinct beyond recovery.
Can You Recover Lost Files After Restoring Your USB Drive to Its Full Capacity?
Did you follow one of the solutions we saw to free up all of your USB Flash Drive’s storage space but remembered afterward you did have some data you needed on it?
The bad news is that if you went for a secure erase, it’s not possible to bring any data back. Unfortunately, that’s what a secure erase is all about – eliminating any chances of recovery. Still, even in such cases, maybe recovery professionals, like CleverFiles’ Data Recovery Center, could help.
But there is also good news. Data recovery apps may be able to bring your data back after anything but a secure erase, and if you also kept backups, your files are a backup restore away.
Using Disk Drill
Did you remove the files from your USB Flash Drive, performed a quick (or “simple”) format, or “merely” re-arranged some partitions? Then, advanced data recovery software like Disk Drill may be able to analyze your USB Flash Drive, locate your precious files, and bring them back from their current nothingness.
To recover your files from your erased USB Flash Drive with Disk Drill:
-
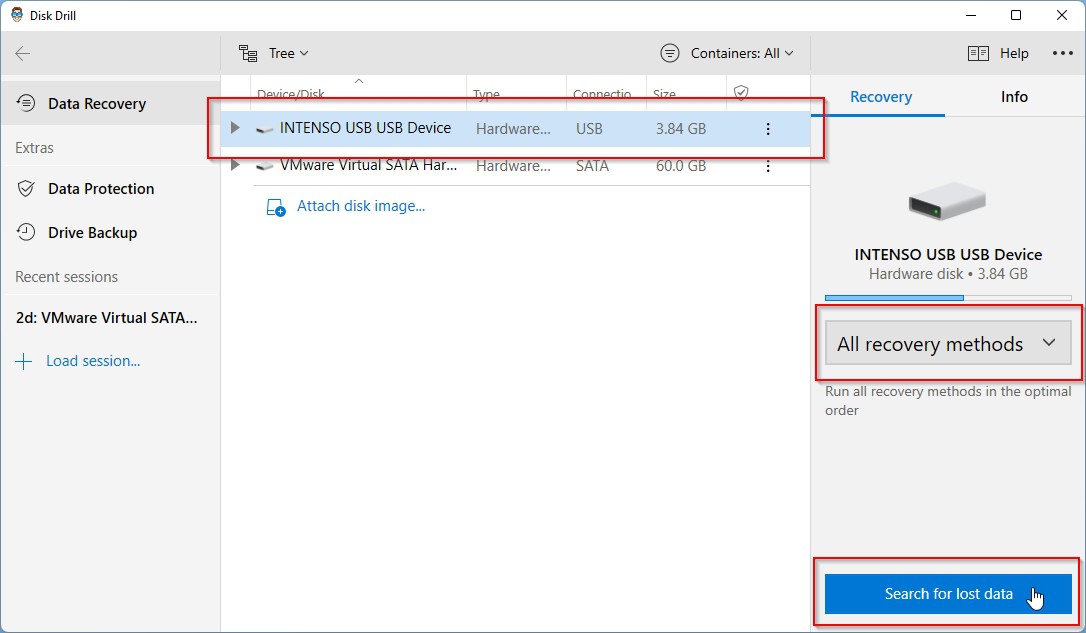
Download Disk Drill from its official site, and install it.
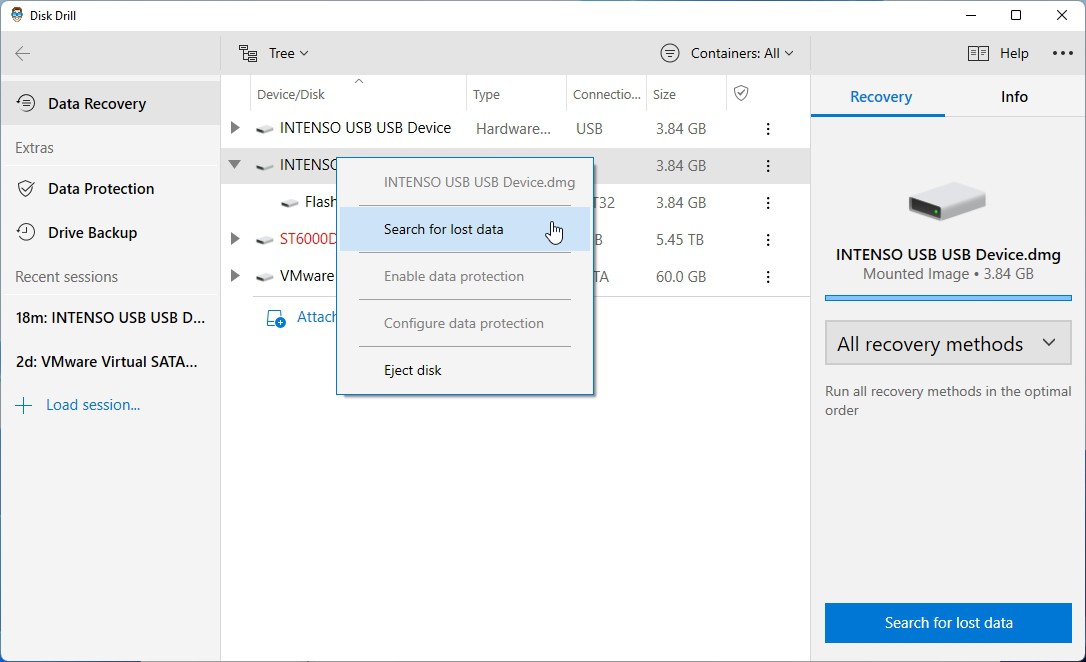
Then, run it, and select your USB Flash Drive from its Device/Disk list.
Ensure All recovery methods is selected from the menu on the right, and click on Search for lost data on the bottom right of Disk Drill’s window.
-
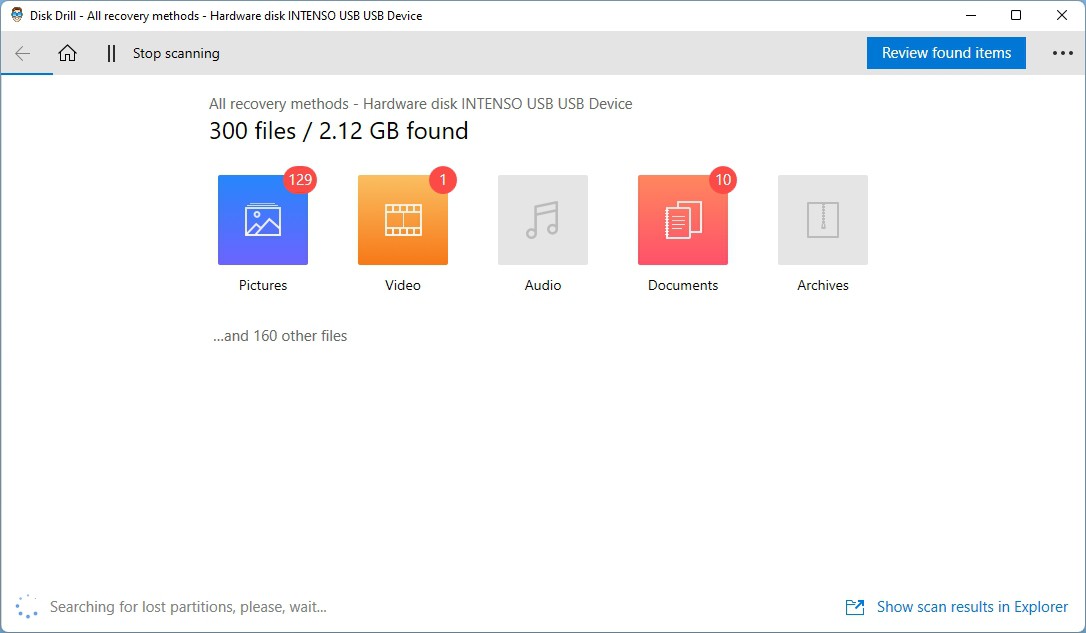
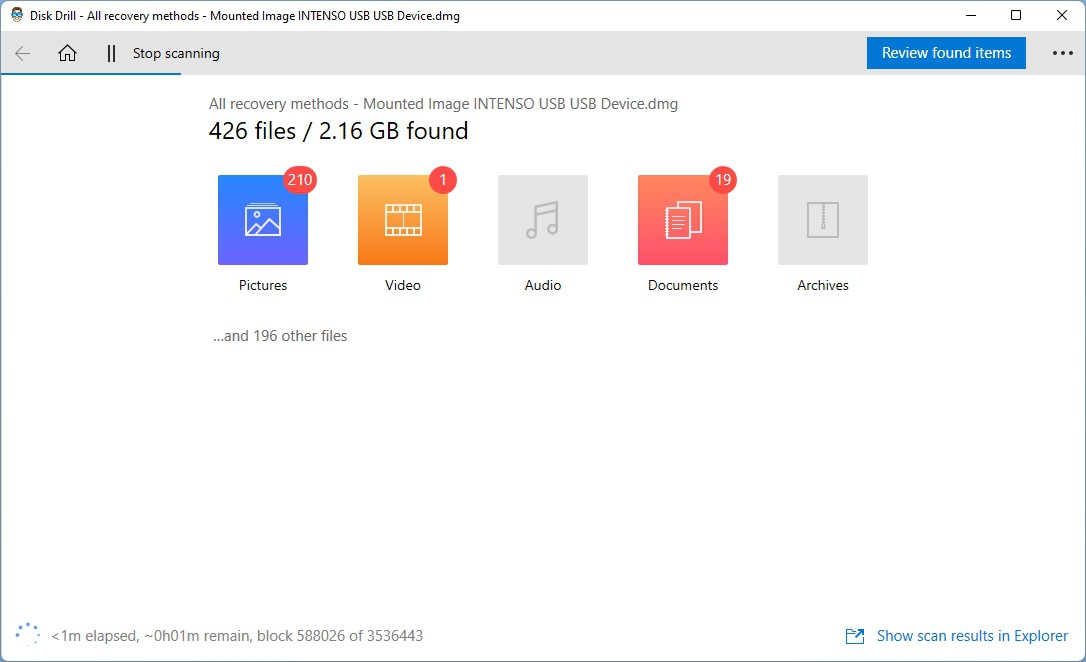
Disk Drill will begin scanning your USB Flash Drive for lost data.
It’s best to let the scan complete to maximize the chances Disk Drill locates as many lost files as possible. Still, you can break the process at any time with a click on Stop scanning, and check what Disk Drill has located up to that moment by clicking on Review found items.
Note that you can do the latter while the scan still runs in the background.
-
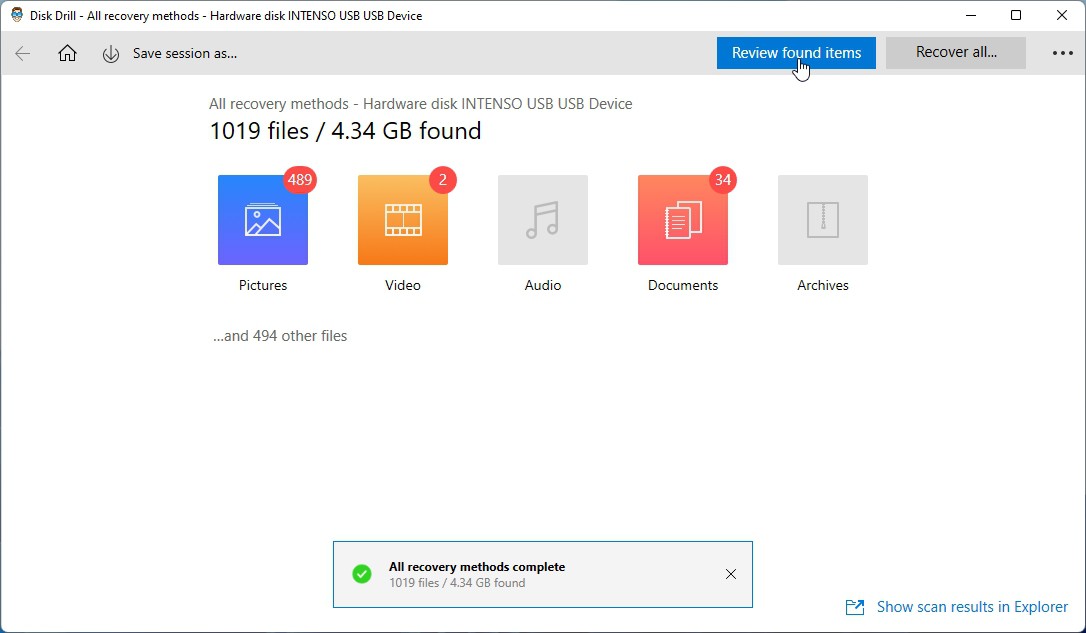
When Disk Drill shows an All recovery methods complete message, you can use the little “x” on its right to close it.
Then, click on Review found items to see what Disk Drill located on your USB Flash Drive.
-
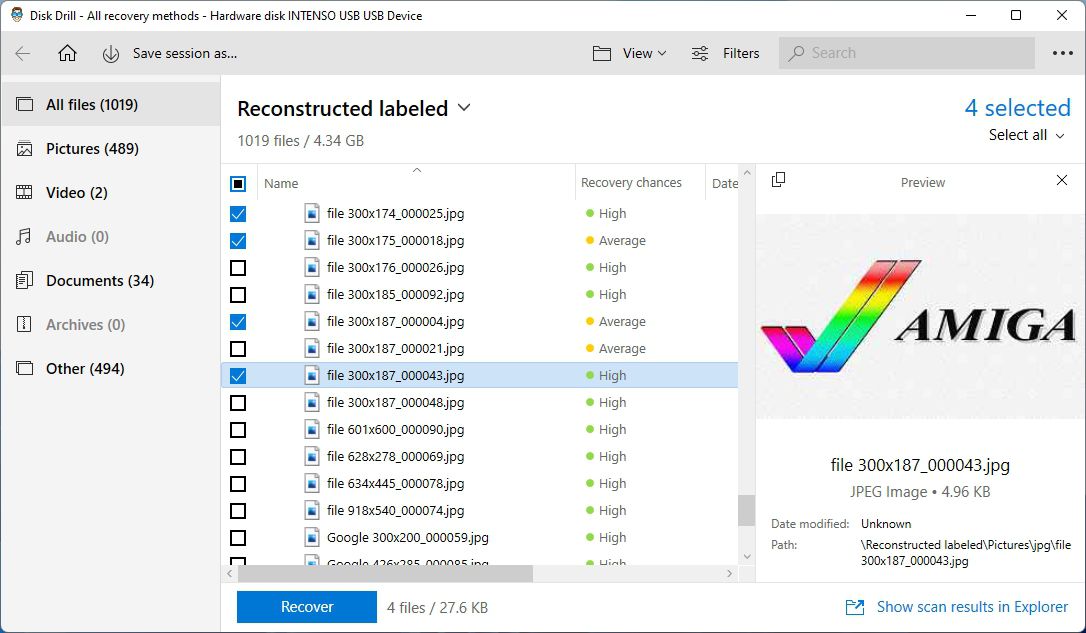
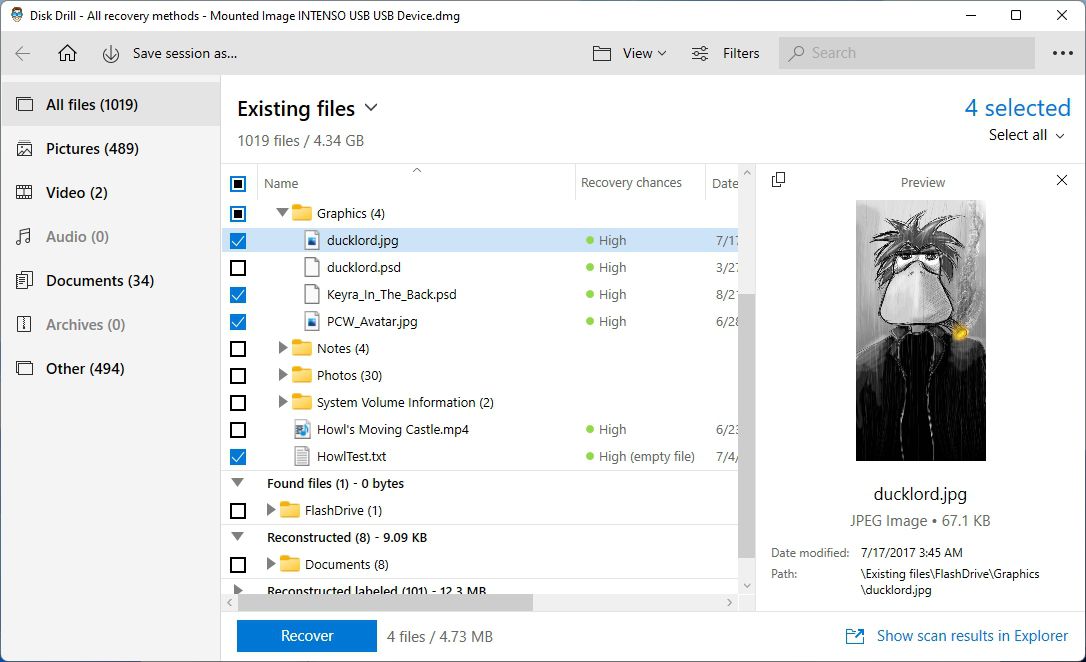
Go through Disk Drill’s results, not forgetting to also look inside folders.
If hunting down particular types of files, or specific ones for which you know the filename, you can use Disk Drill’s filters or Search, on the top right of its window, to locate them quickly.
Place a checkmark on the left of every file you wish to bring back, and finally, click on the Recover button under the results list.
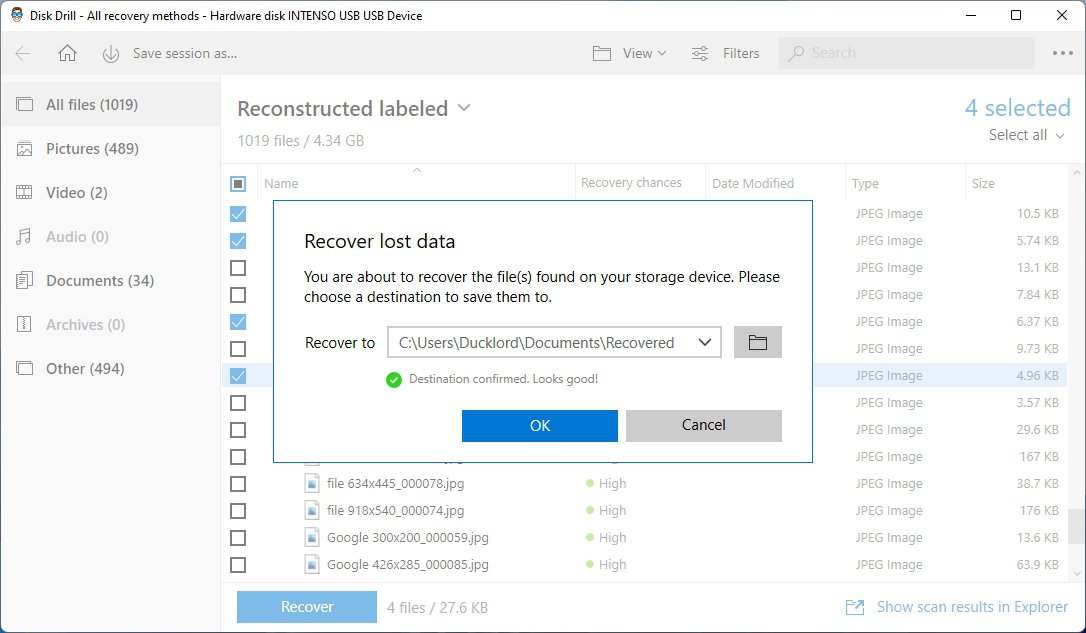
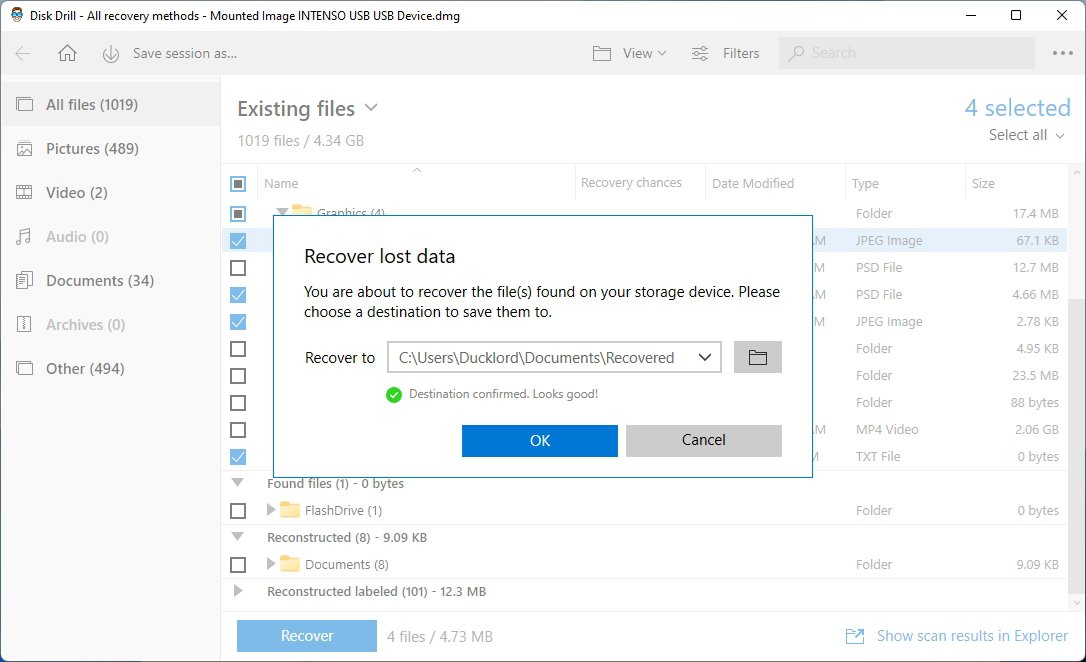
- On the window that appears next, click the button with the folder icon on the right to choose the path where you want Disk Drill to store all the files it recovers.
-
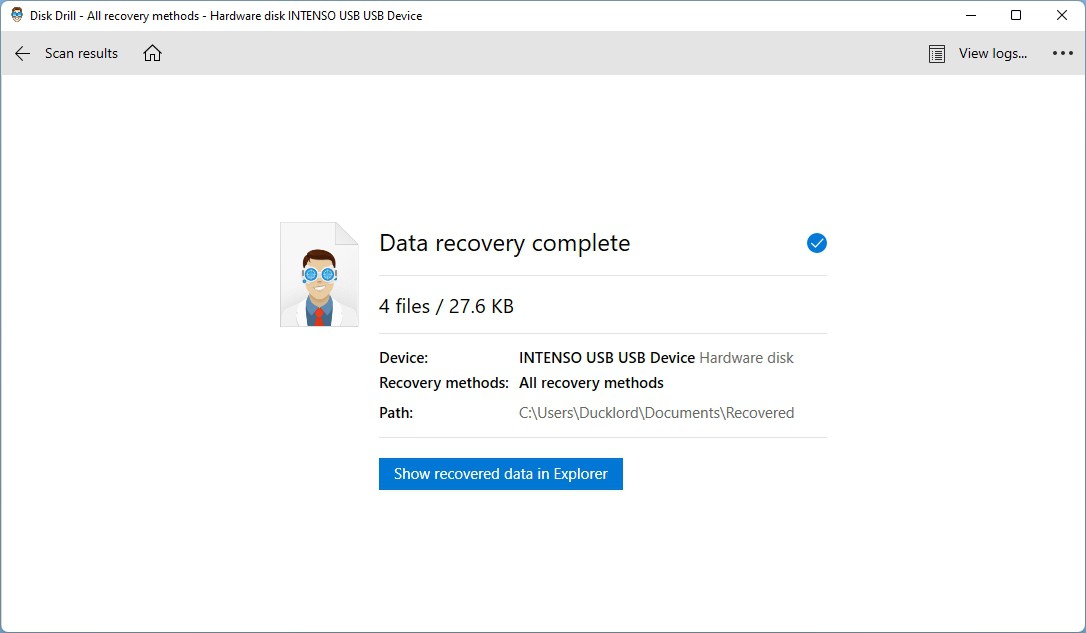
When the process completes, Disk Drill will show you a summary of the results.
Click on Show recovered data in Explorer to open the chosen “target path” in the default file manager and access all data Disk Drill recovered there.

Restoring From a Backup
If you’re used to keeping backups of your most important files, and you’ve included the contents of your USB Flash Drive in them, you don’t have to try recovering lost data from it. You can “fish it out” of your backups.
Windows comes with some backup solutions, but they’re primarily designed to store data on external drives, not from them. So, they’re not optimal when you need to bring back data you kept on a USB Flash Drive. For such scenarios, third-party backup solutions are much better options.
Since there are countless such solutions available, for this guide, we decided to stick with a piece of software we’ve already included for another purpose: Disk Drill. Its primary goal might be recovering data, but since it can also take byte-to-byte perfect image backups of any storage device, you can use it for securing their contents.
If you already have such a backup available, bringing your files back from it is a breeze.
- Run Windows File Explorer and point it to the folder where you keep your backups. Double-click on the latest backup to have it open in Disk Drill.
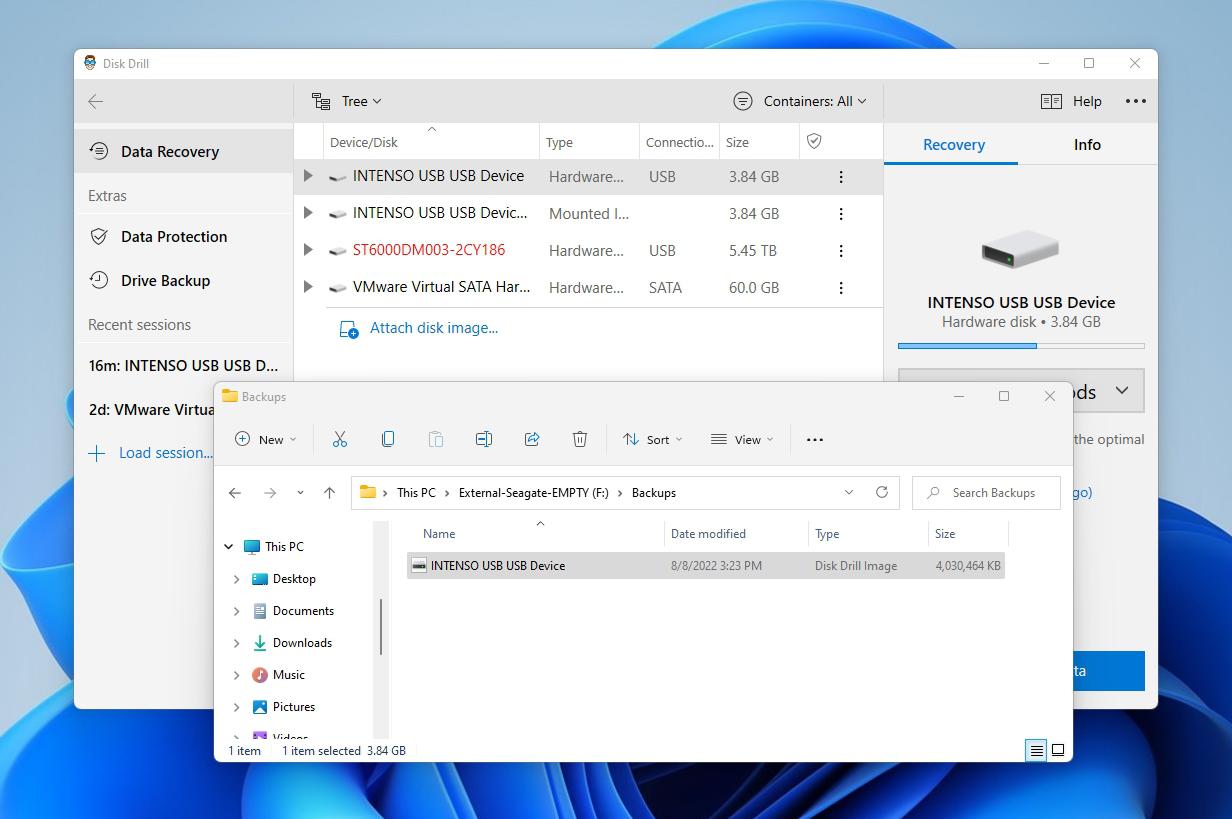
-
Disk Drill will load, having the backup you selected “attached” as a virtual device listed among the real ones in its Device/Disk list.
You can right-click on this virtual device and select Search for lost data, or left-click on it to select it and then click on the button with the same name on the bottom right of Disk Drill’s window.
-
Disk Drill will start scanning the image for lost files since that’s its primary purpose. However, the process will be much quicker than if you were trying to recover files from a problematic storage device.
When the scan completes, click on Review found items to see your files.
- Check Disk Drill’s results, locate among them the files you want to bring back, and place a checkmark on their left to select them. Then, click on the Recover button under the file list.
- Choose a destination folder where you want to save the files Disk Drill will “extract” from your backup image.
- When the “recovery” process completes, you’ll find your restored files in the destination path you selected in the previous step.
Of course, the above implies you’d already taken a backup of your USB Flash Drive using Disk Drill. If you haven’t, the process is as easy as the following steps:
- Launch Disk Drill and click on Drive Backup from the Extras list on its left.
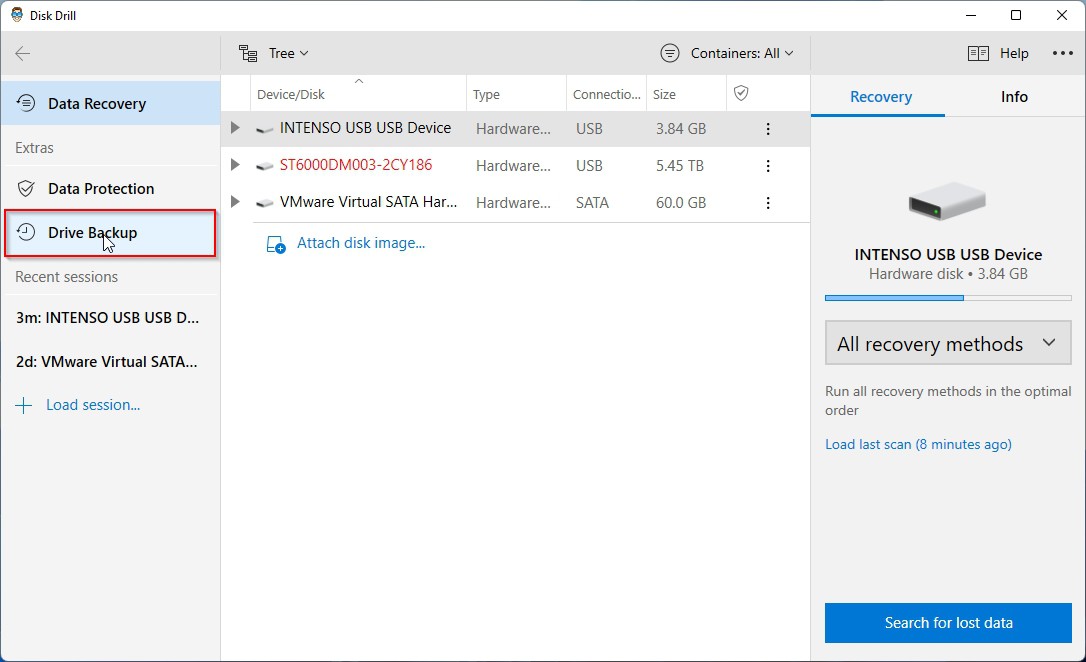
- Proceed by selecting the device or partition you want to backup.
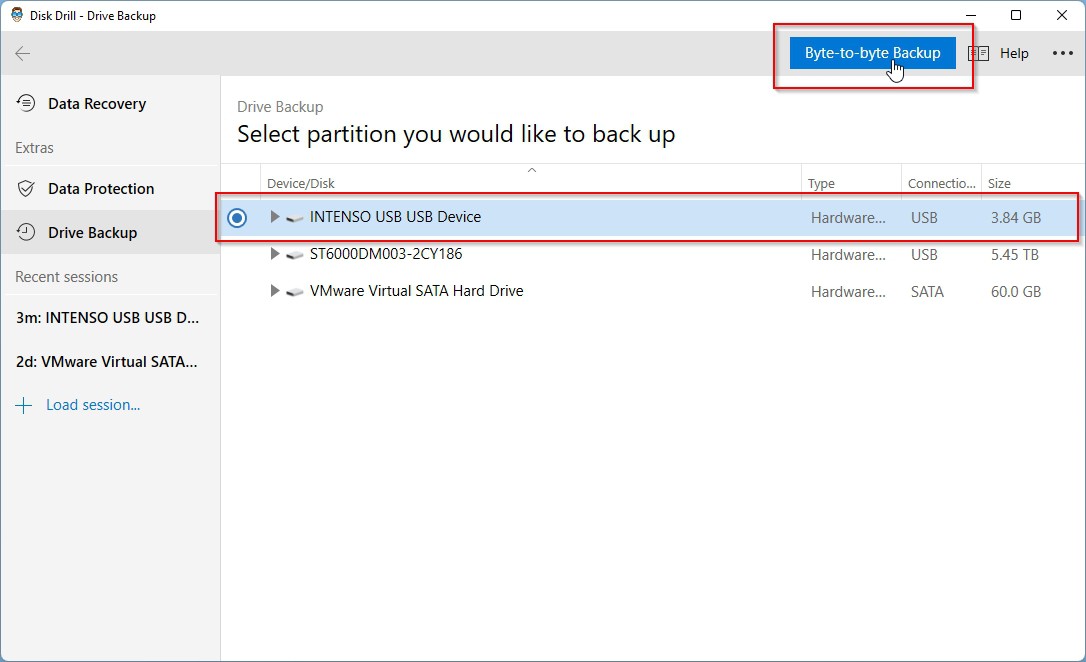
- You can leave all backup-related settings as they are, but make sure to click on the button with the folder icon to select the Path where you want to store your backup.

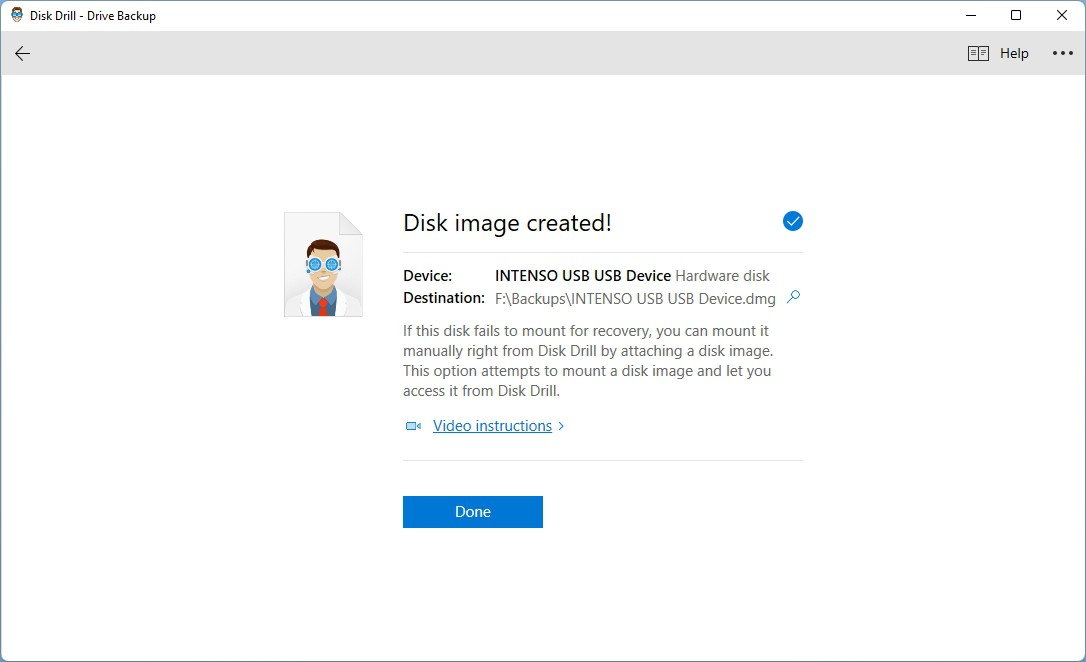
- The backup process can take a while, depending on the size of your USB Flash Drive and the speed of its connection to your PC.

- When the backup process completes, you’ll have a pristine byte-to-byte perfect copy of the contents of your USB Flash Drive in the path you chose earlier. Whenever – and if – catastrophe strikes, you’ll be able to recover any or all of its contents from that backup.
How Can You Protect Your USB From Capacity Loss?
There are many reasons a USB Flash Drive’s storage capacity may drop, and you can take steps to avoid most of them.
- 🥃 Don’t fill up your USB Flash Drive with random files you don’t need on it.
- 📦 If in need to transfer apps or games, prefer copying their installers on your USB Flash Drive instead of their already installed folders. Installers are usually compressed and bundle all needed files in a few packages, demanding less storage space.
- 🗜 Bundling multiple files in compressed archives can be both quicker and less space-consuming than dumping all of them individually on a USB Flash Drive.
- 🍕 Multiple partitions on a USB Flash Drive segment its available storage into smaller parts. For most users and uses, it’s better to use a single partition to present all of a USB Flash Drive’s storage space as a unified whole.
- 🐛 File system corruption may lead to misreported free space.
- 👴 Everything eventually wears out, including the memory chips in USB Flash Drives, where data is stored. As they start failing, your computer will begin marking some of their storage as problematic, unusable, “bad blocks”. The result is less available storage space.
Conclusion
Even if your USB Flash Drive shows diminished storage capacity, as we saw, you can deal with such issues in many ways. Most rely on either tools built right into the operating system you’re already using or readily available user-friendly third-party software.
The worst possible scenario is having to replace a device that’s deteriorated because of age or overuse. Still, even that can be good news: with USB Flash Drive prices continuously falling, your new one will offer much more storage space than you could ever “recover” on your tired old thumb drive.


FAQ
You can recover both lost space and lost files from your USB storage. The first can be as easy as fully formatting it, but the second will expect you to use data recovery software.
If a USB storage device appears unreadable on your computer, you can try fixing it using various methods. However, it’s usually quicker to just format it and then unleash a data recovery app on it to bring back the files you want to keep.
The best way to have a USB Flash Drive act like the first day you bought it is by formatting it. This will erase everything on it and free up all its storage space.
The process is the same as on previous versions of Windows. You can manually erase its contents, format it, or repartition it. It’s worth noting that we, too, used Windows 11 for all Windows-related methods we covered in the main part of this guide.