Every iPhone user who likes taking a few extra shots or relies on the Photos app for management has likely noticed similar or identical pictures building up over time. If you have five pictures of Fluffy eating ice cream or seven photos of your bestie giving a thumbs-up, you probably don’t need to keep them all. With a couple of super simple methods, we’ll help you delete duplicate photos on your iPhone and even get rid of near duplicates.
How to Delete Duplicate Photos on iPhone
There are several ways to remove duplicate photos on your iPhone, as well as get rid of similar photos. The method best suited for your use case depends on whether you need to clean up duplicates or similars (or both), and if you prefer using third-party or native applications. Don’t worry—all methods are completely free!
Method 1: Use an App to Delete Duplicate and Near-Duplicate iPhone Photos
You may be familiar with the Duplicates utility provided in the native Photos app. It’s powerful, but it has a major weakness that we’ll talk more about later. The truly most efficient method to get rid of duplicate photos on your iPhone, as well as similar images, is to use third-party applications that are specially designed to find them.
There are several in the App Store that you can choose from, but we’ll be using an app called Clever Cleaner: AI Cleanup App for this guide. It’s completely free, so you can follow along, and its detection tool is specifically programmed to find both similar photos and exact duplicates.
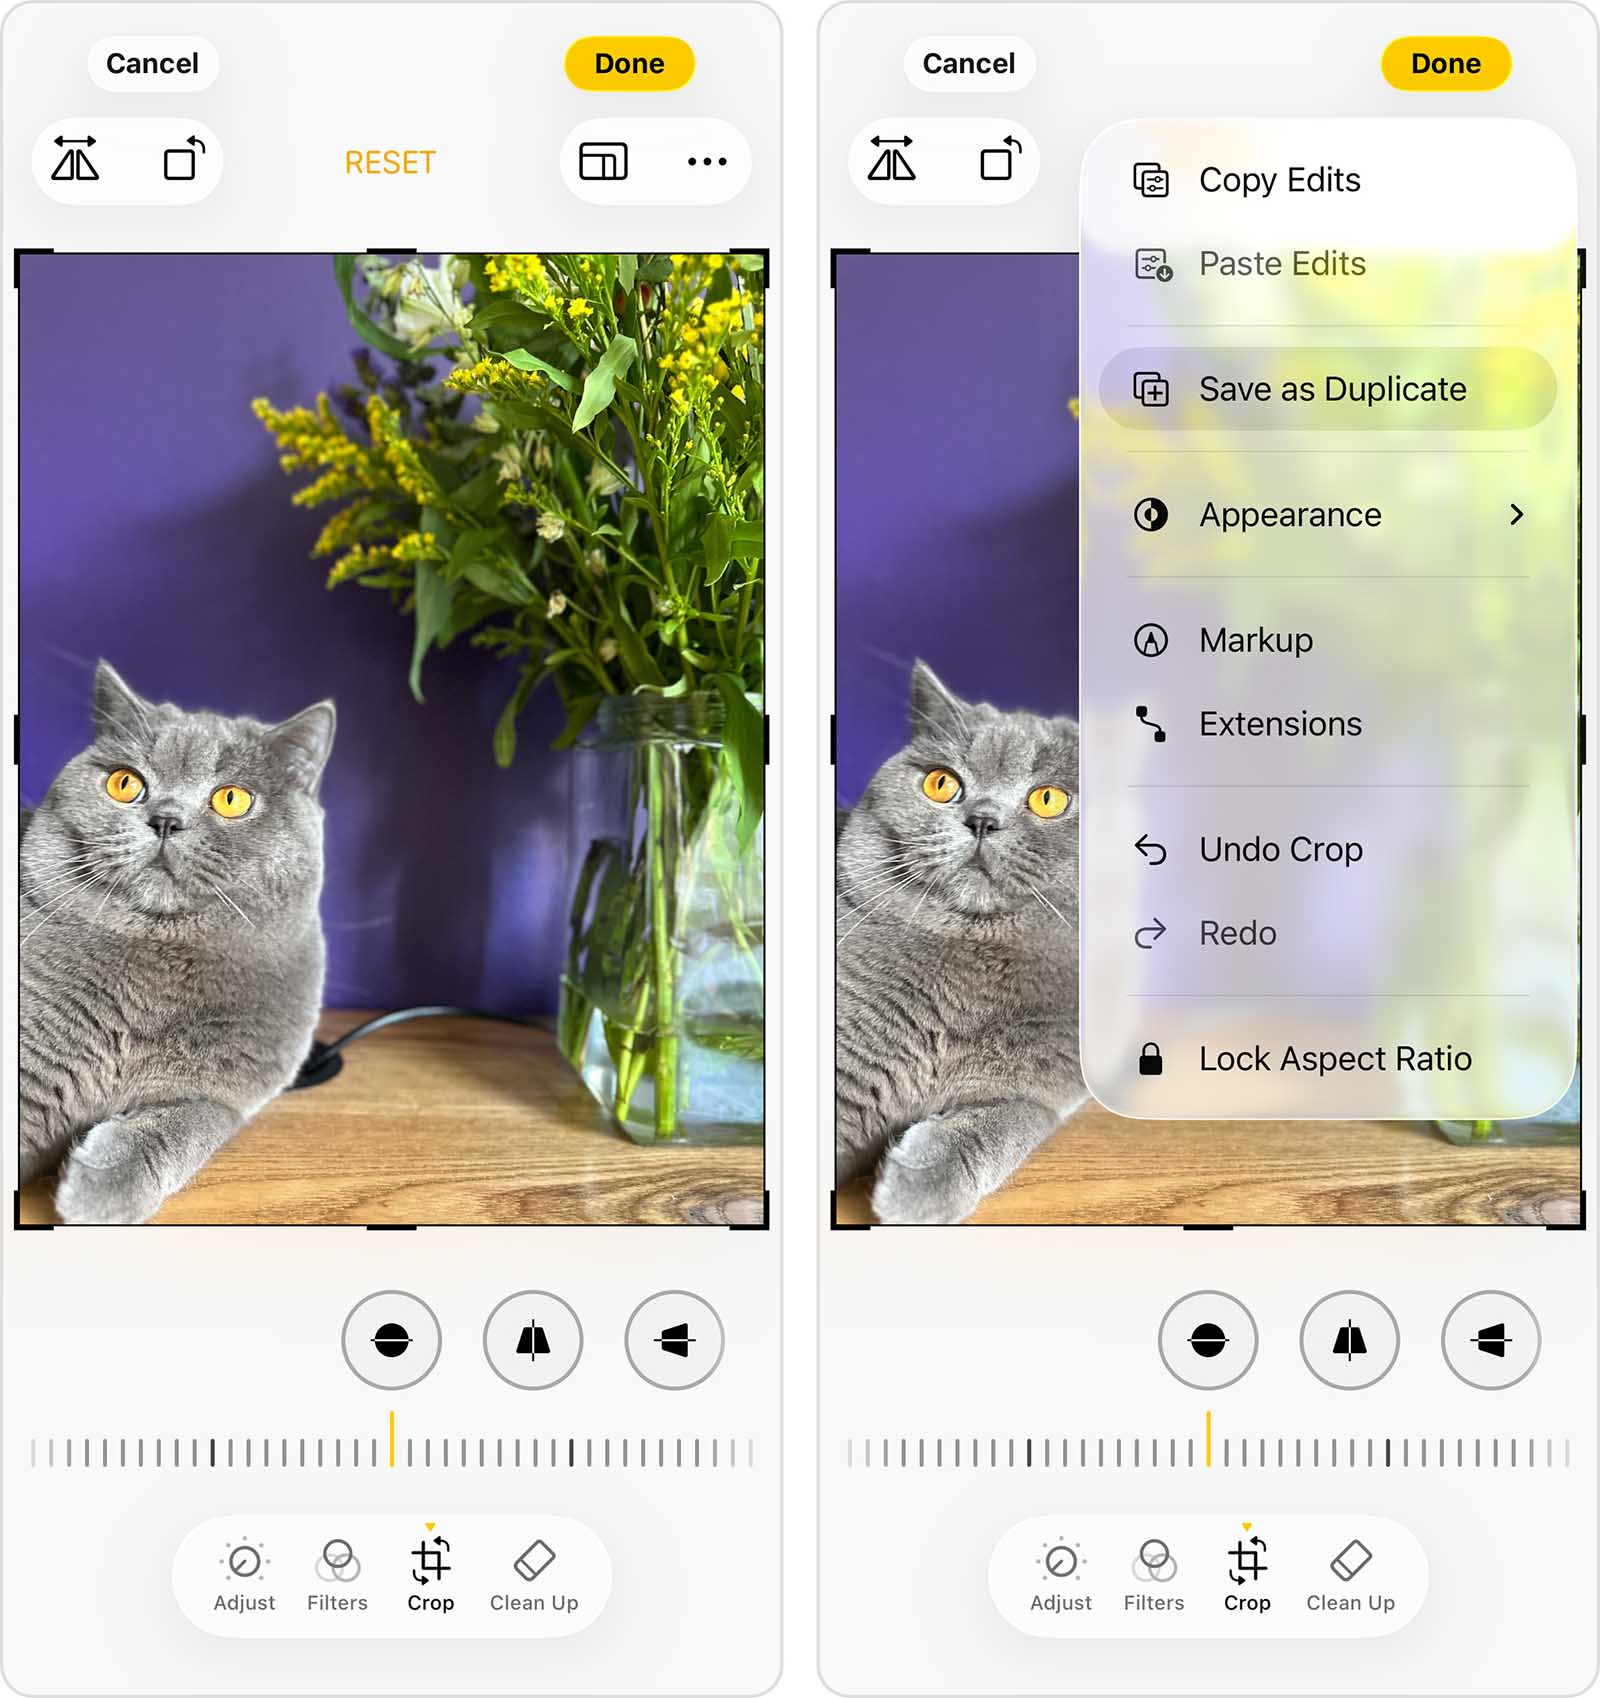
To delete duplicate photos on iPhone using Clever Cleaner:
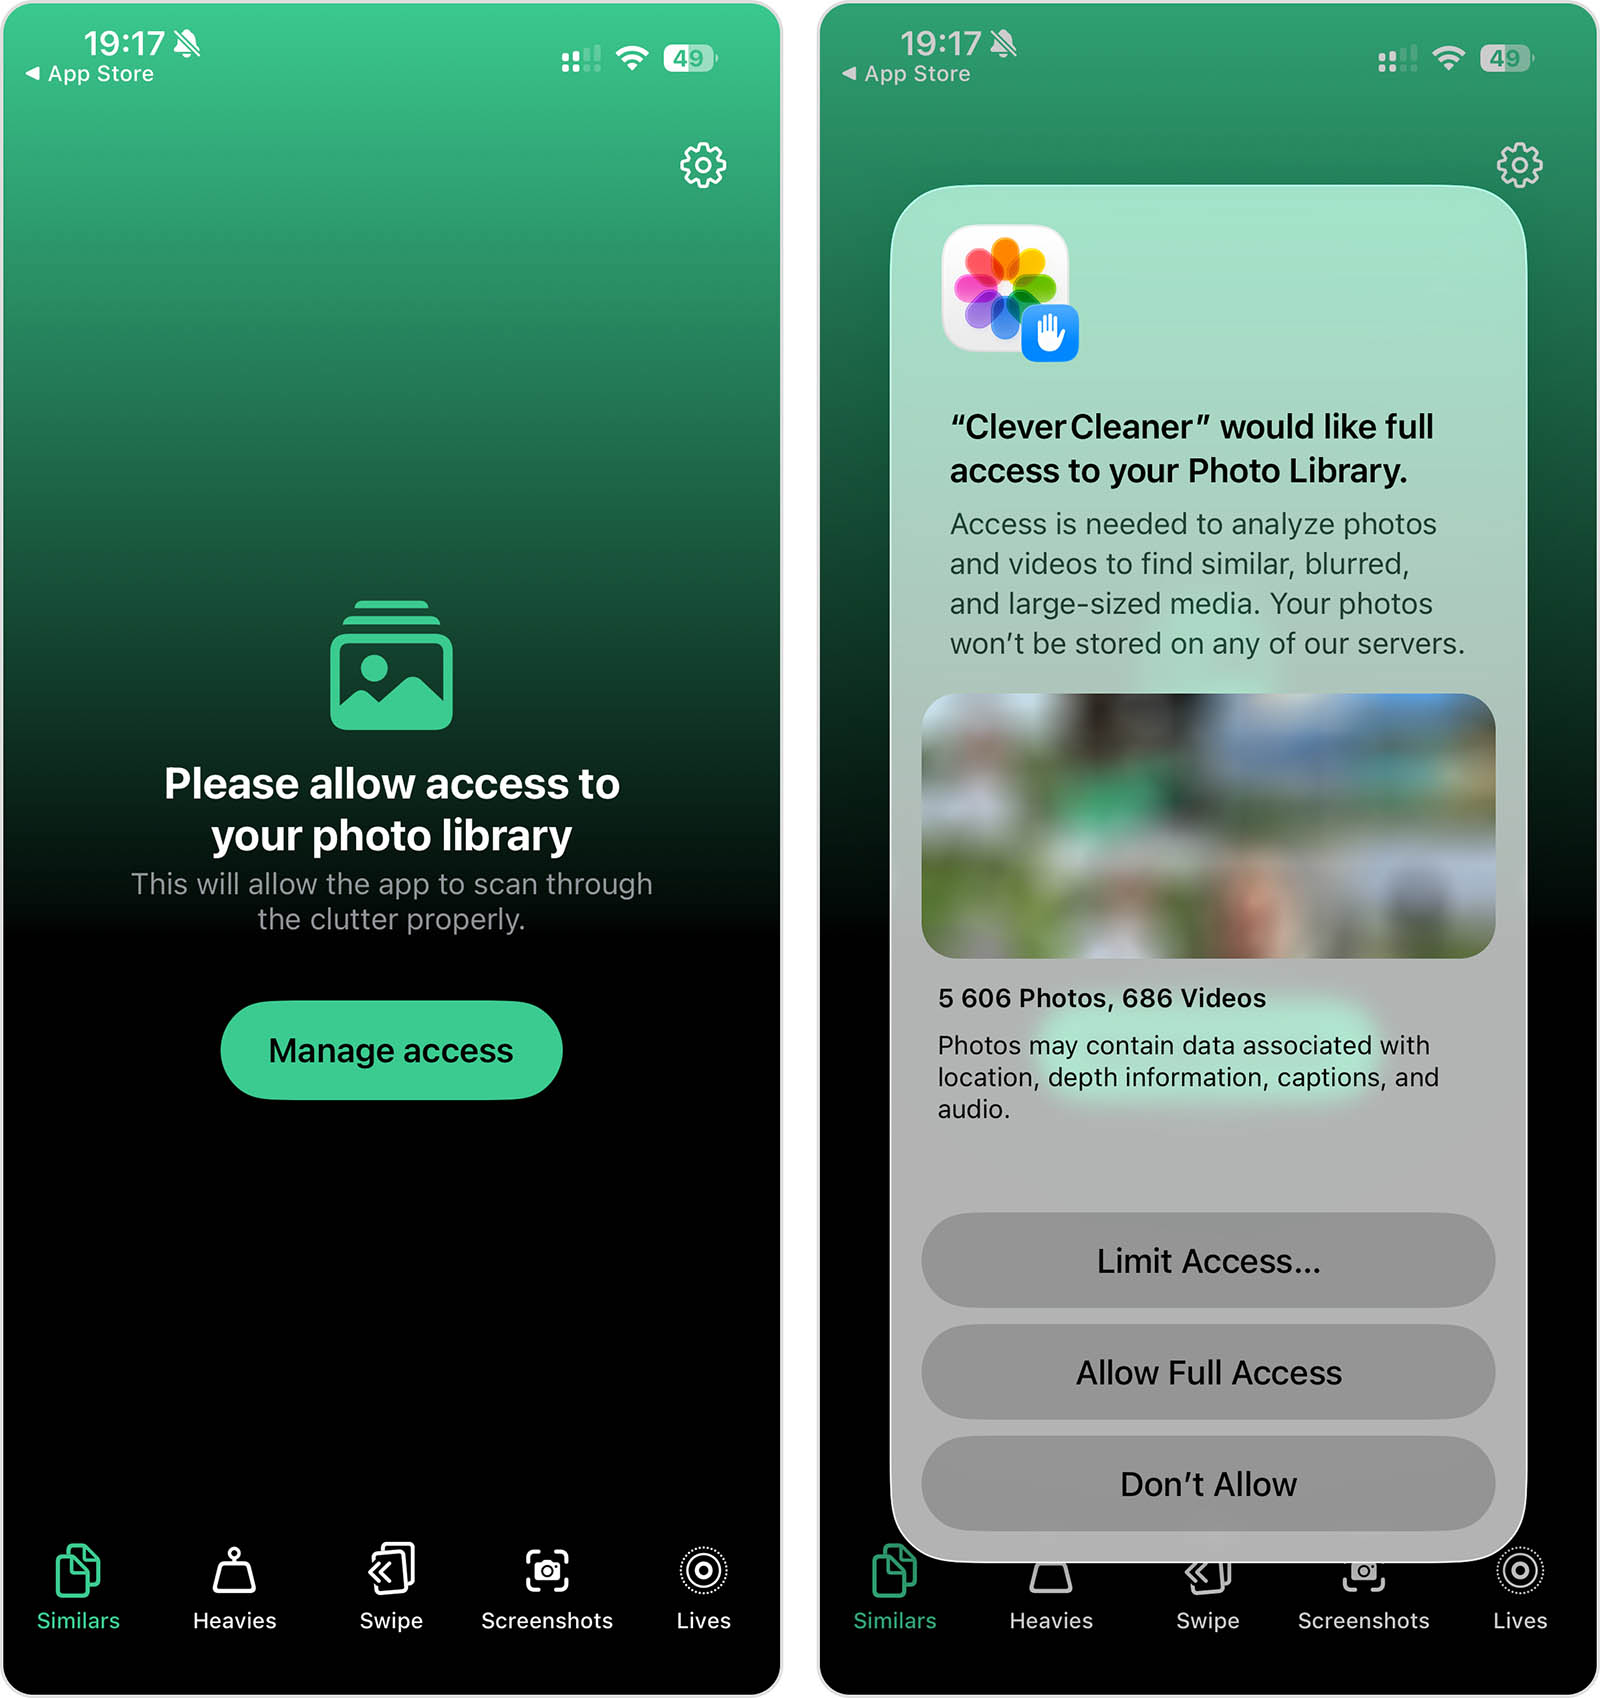
- Download Clever Cleaner: AI Cleanup Appfrom the App Store. When you first open the app, you’ll have to grant Full Access to your photo library. Don’t worry—we verify that it’s completely safe!
- On the bottom menu, tap Similars. You can tap the Smart Cleanup button to clear all duplicate and similar photos from your library at once. Alternatively, you can tap a group of photos that you want to review in detail.

- For each group of similar or duplicate photos, Clever Cleaner automatically chooses the “Best Shot”. The “less good” shots are selected as candidates for deletion. After verifying the selection, tap the Move to Trash button.
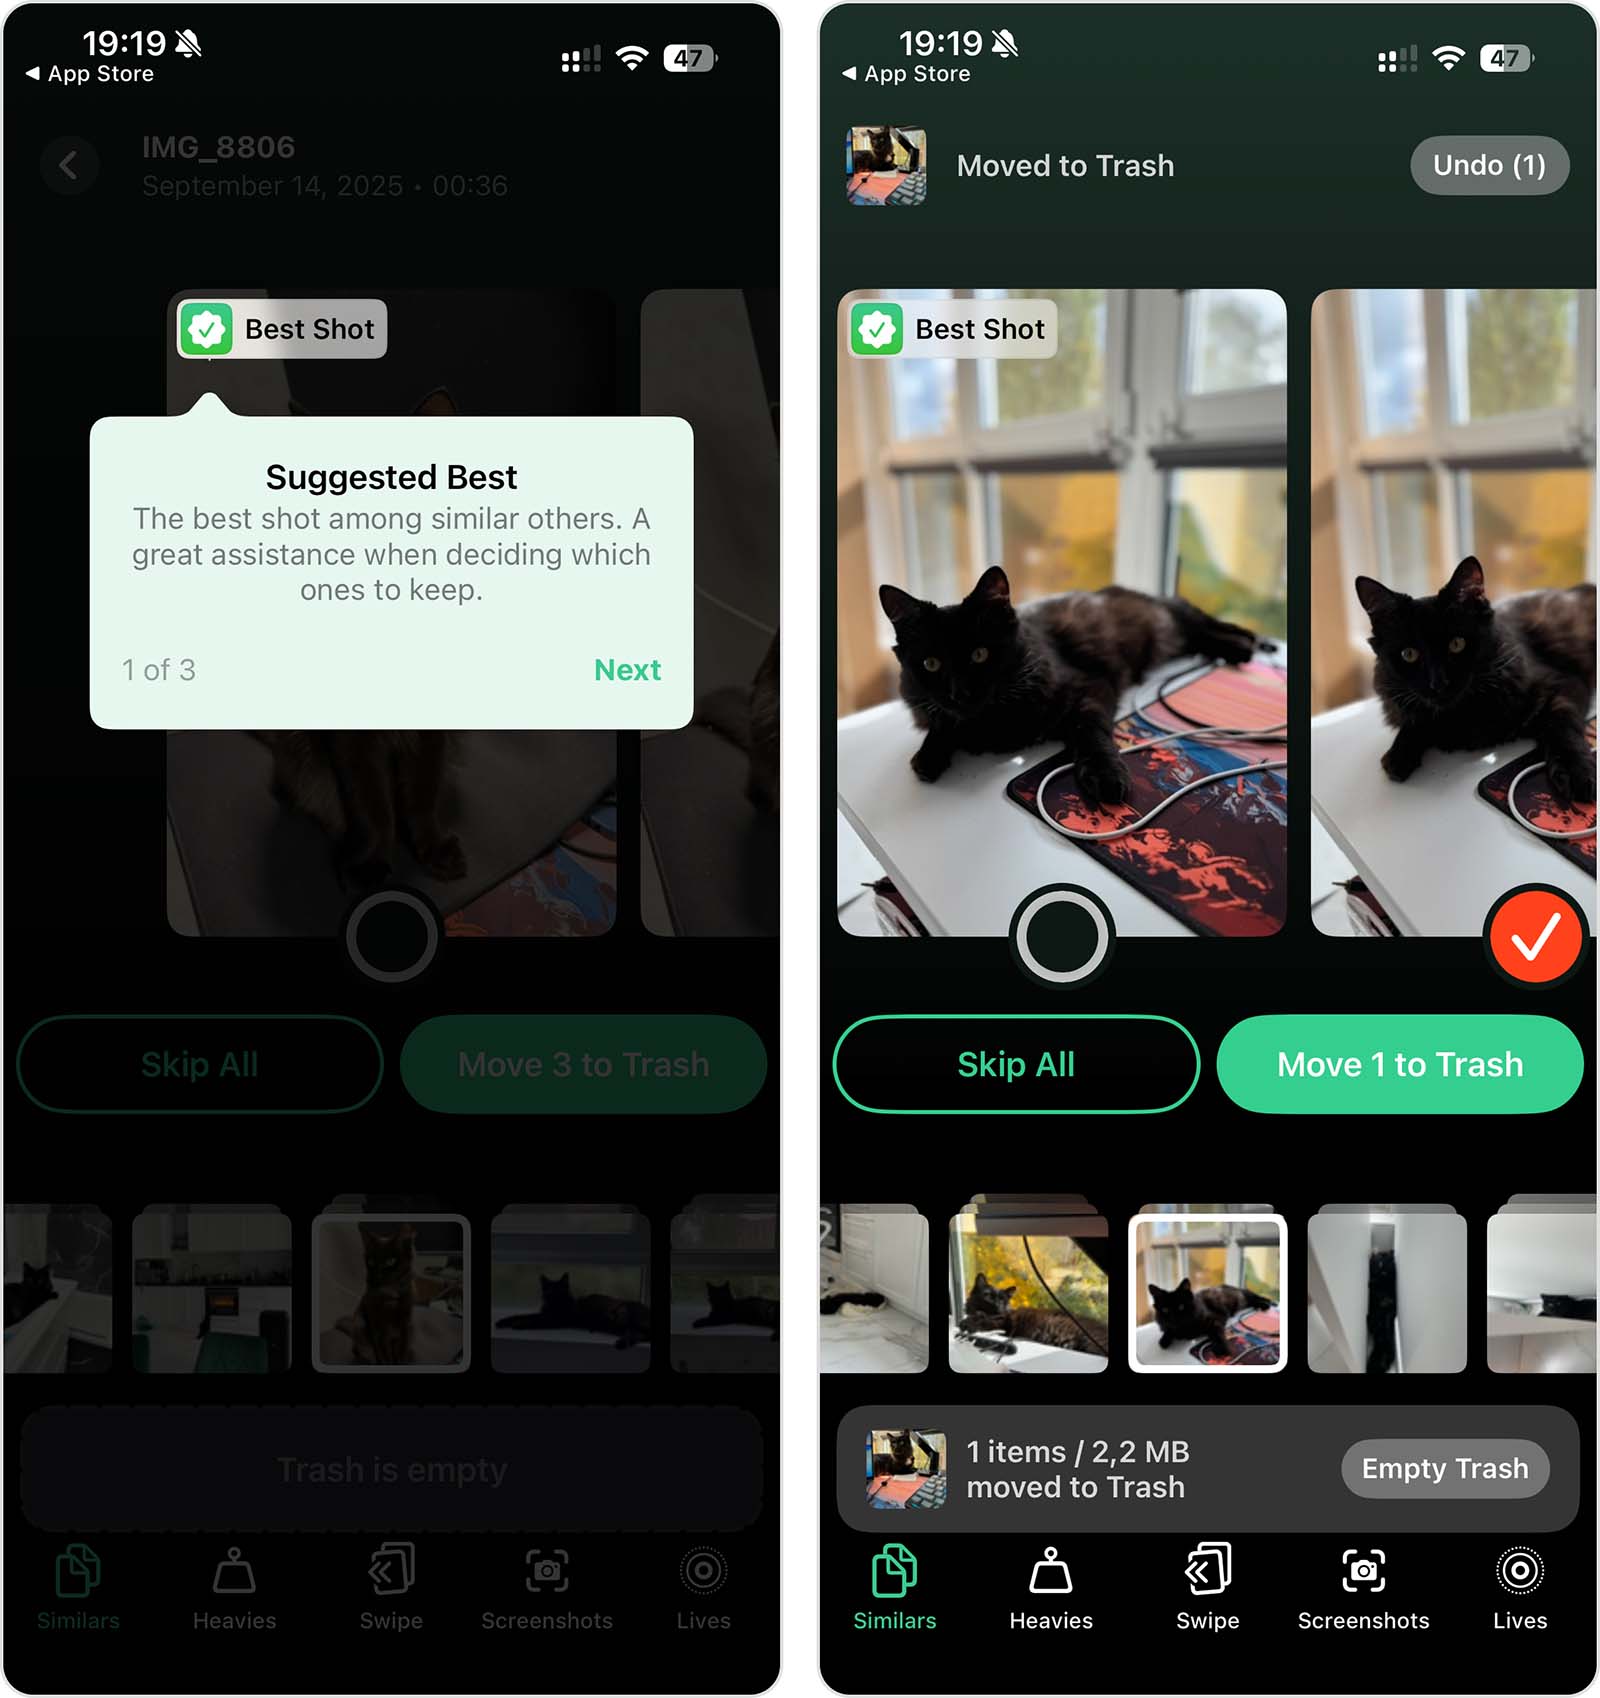
- Right after moving your rejected photos to the Trash, a pop-up will appear at the bottom of your screen. Tap the Empty Trash button inside the pop-up to confirm the deletion of your photos.

And if you want to clean up your iPhone storage even more, Clever Cleaner has other features that can help:
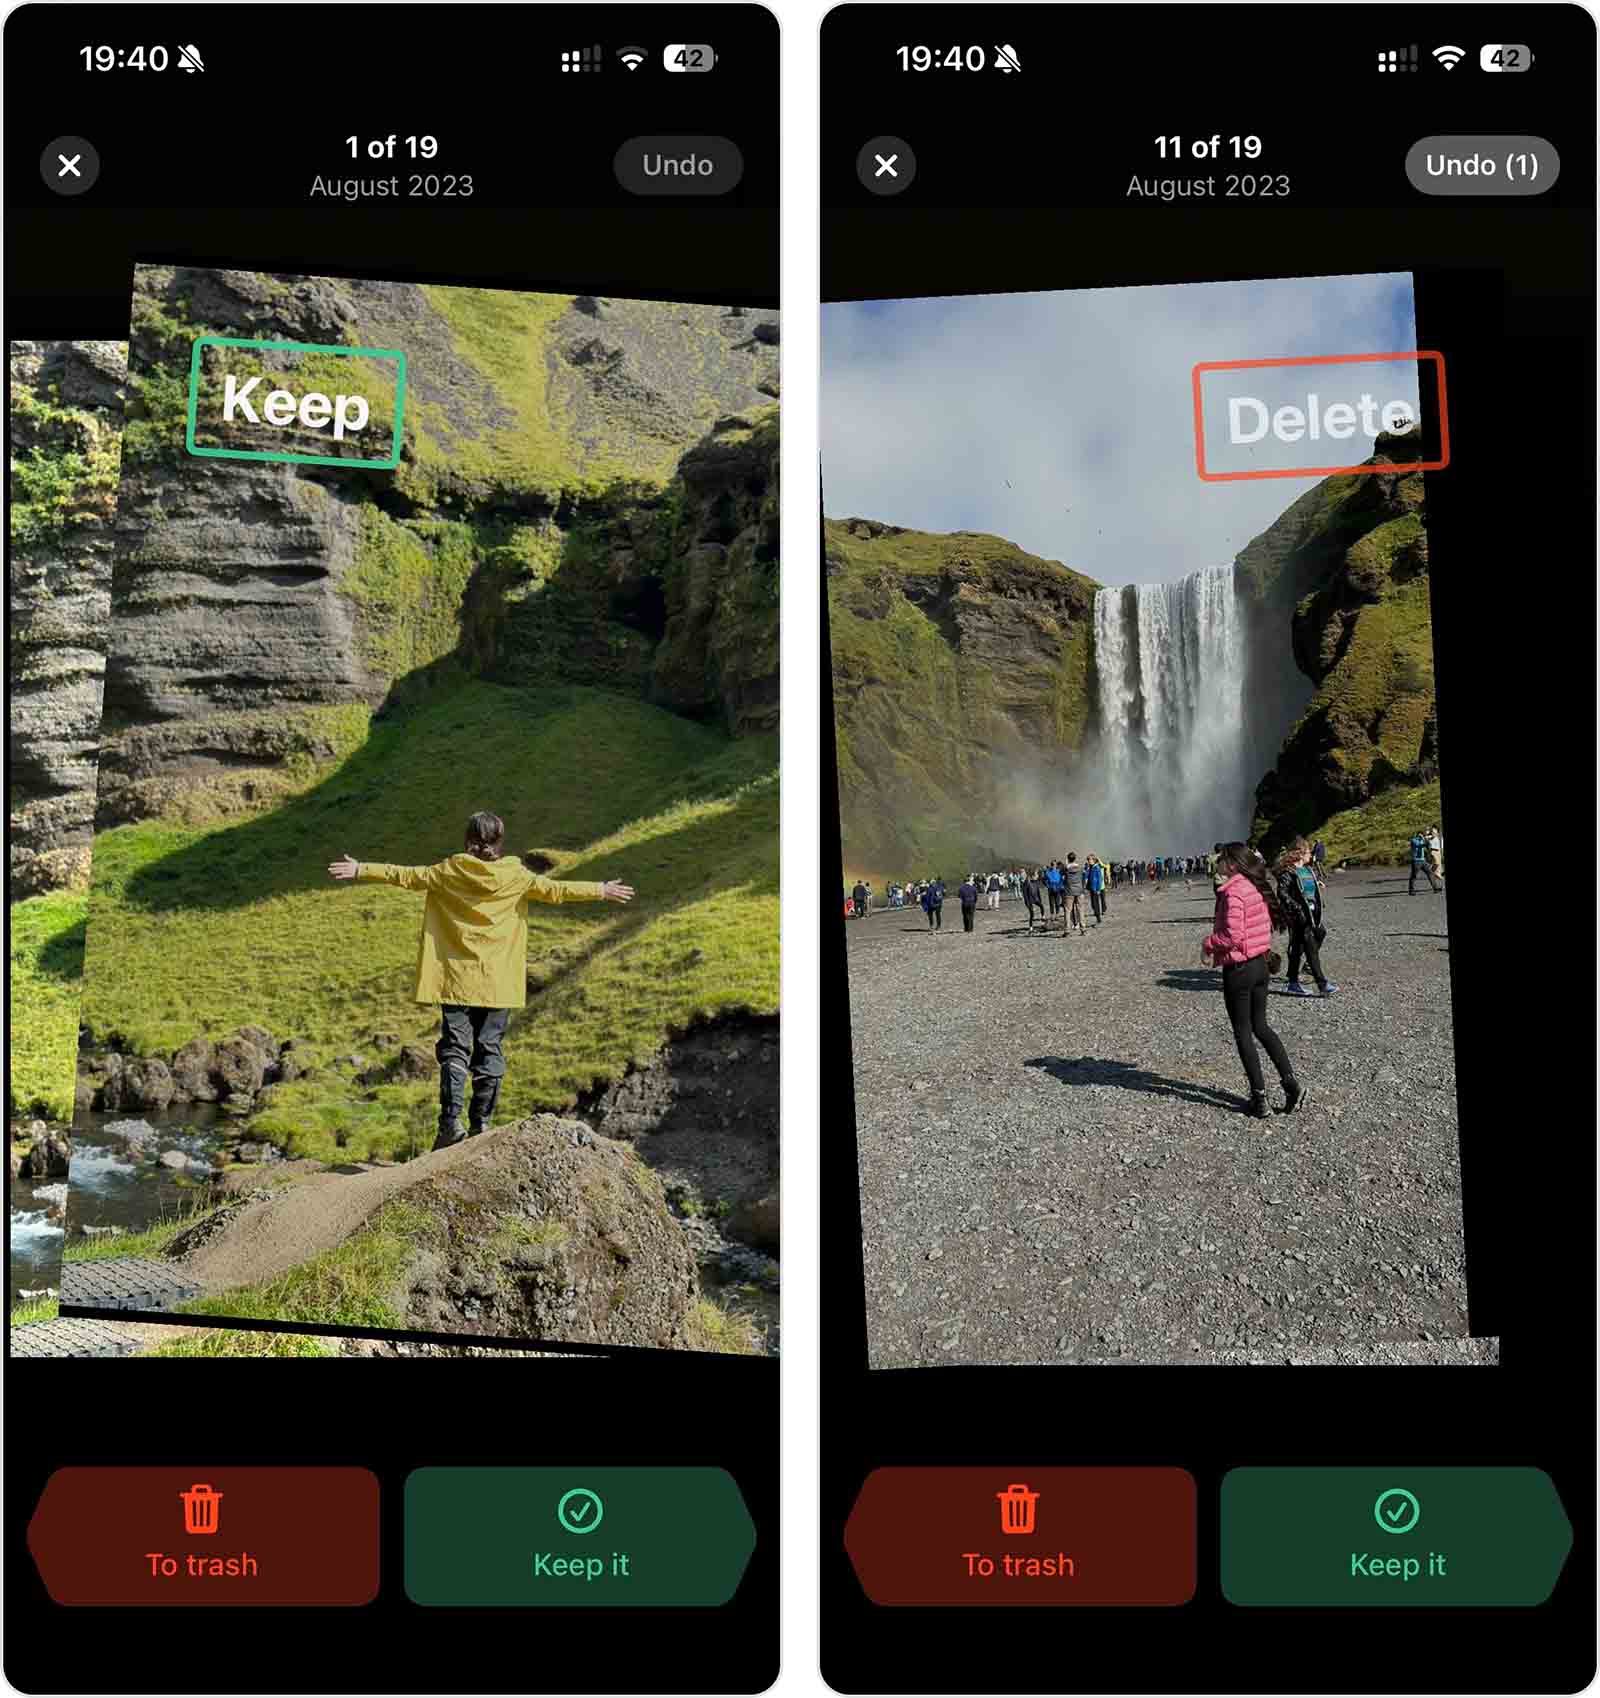
- Swipe: Use swipe gestures to review individual photos and move them to the keep or delete pile. Think Tinder, but for cleaning up your photos.
- Screenshots: Review all of your screenshots in one place and see how much space they’re taking up. You can also nuke them all with one button.
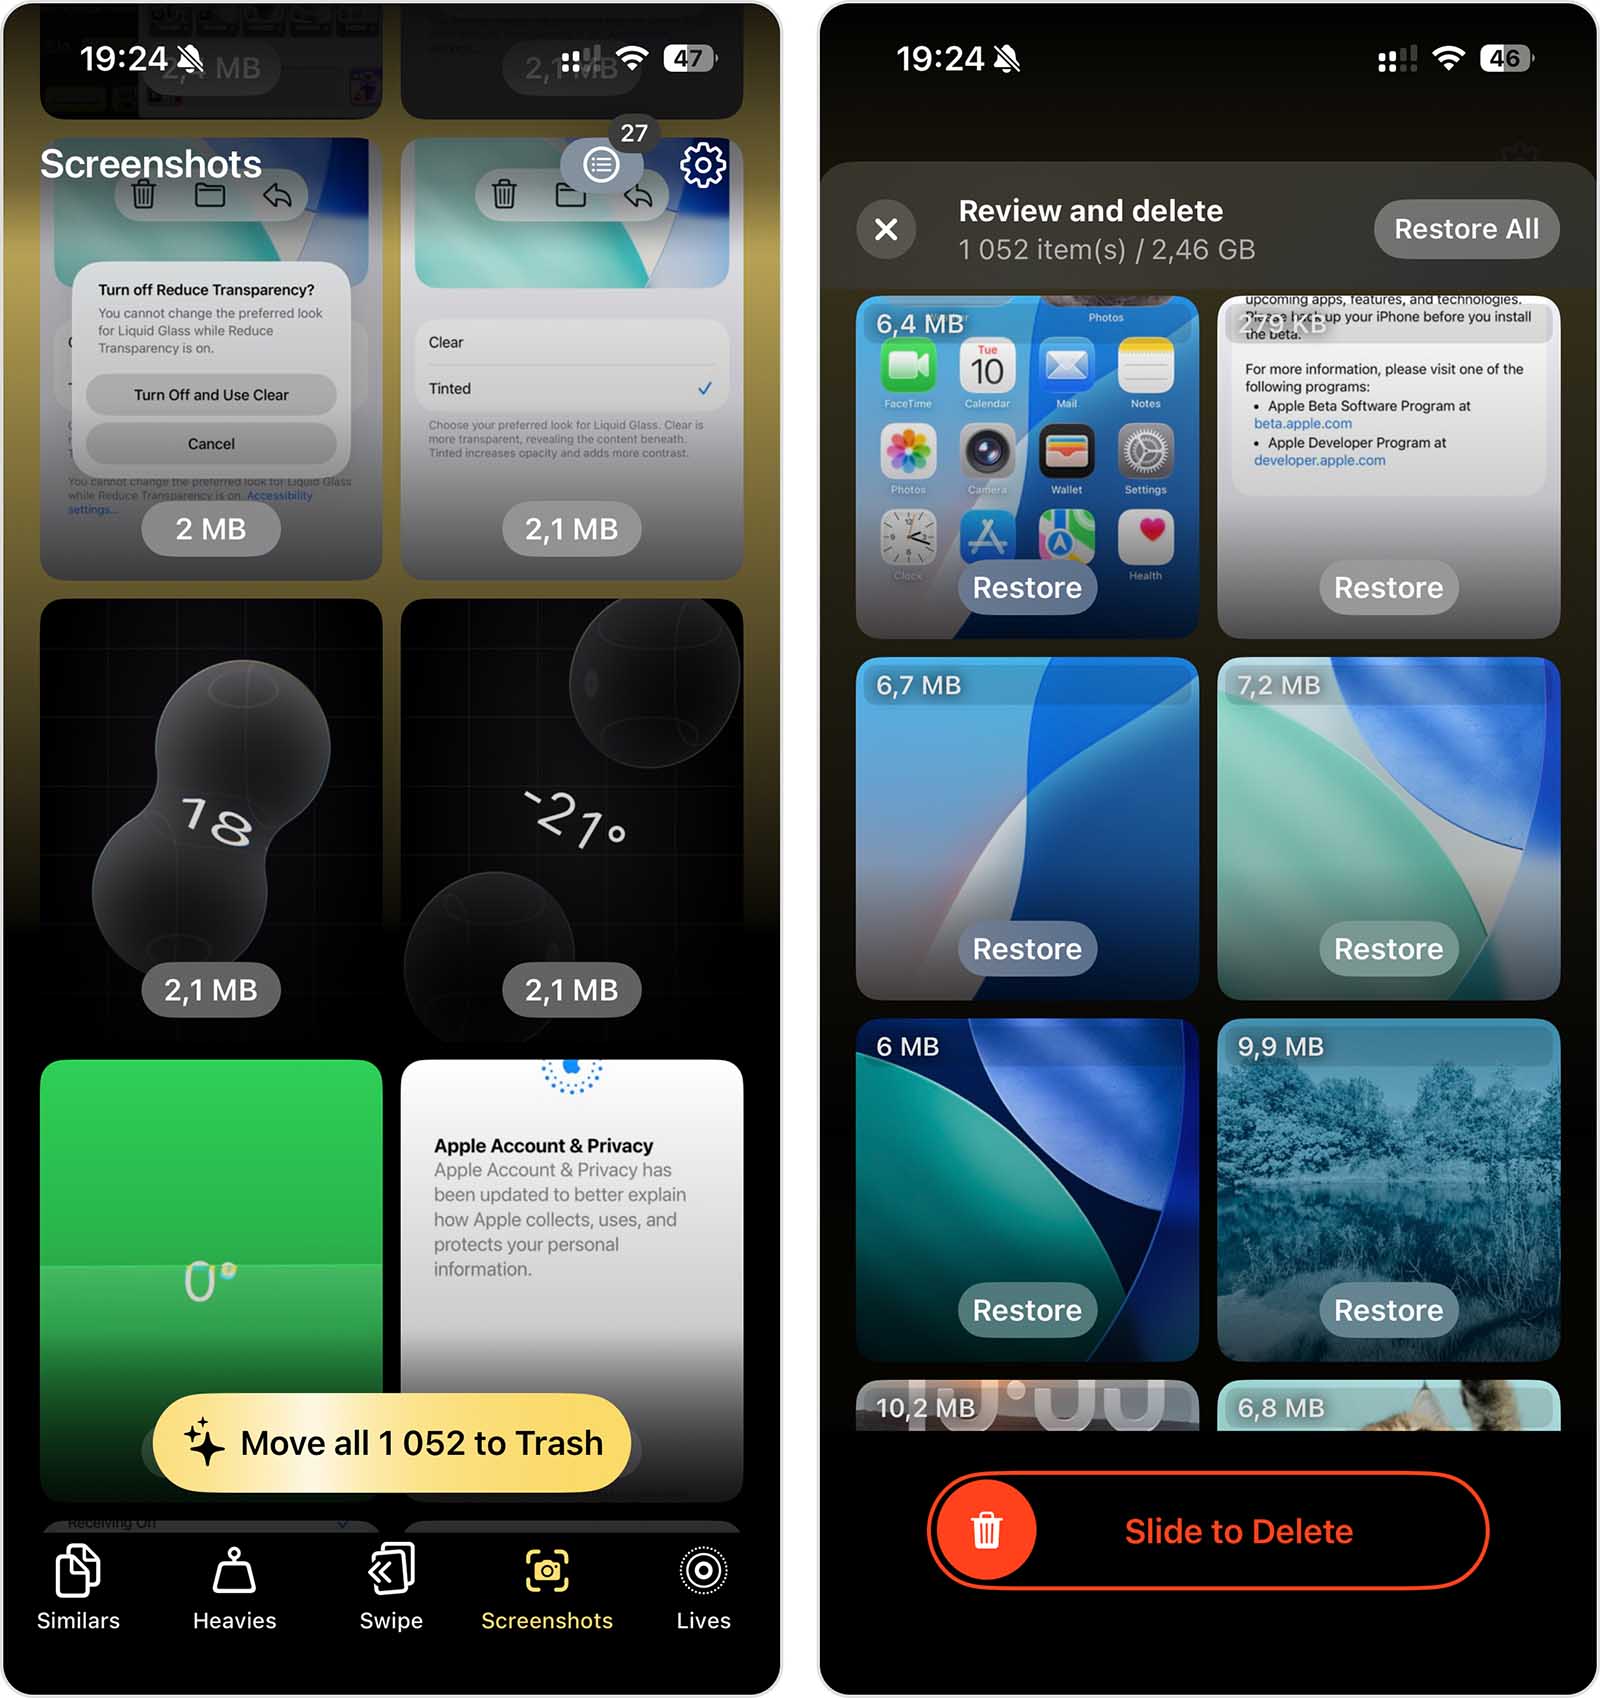
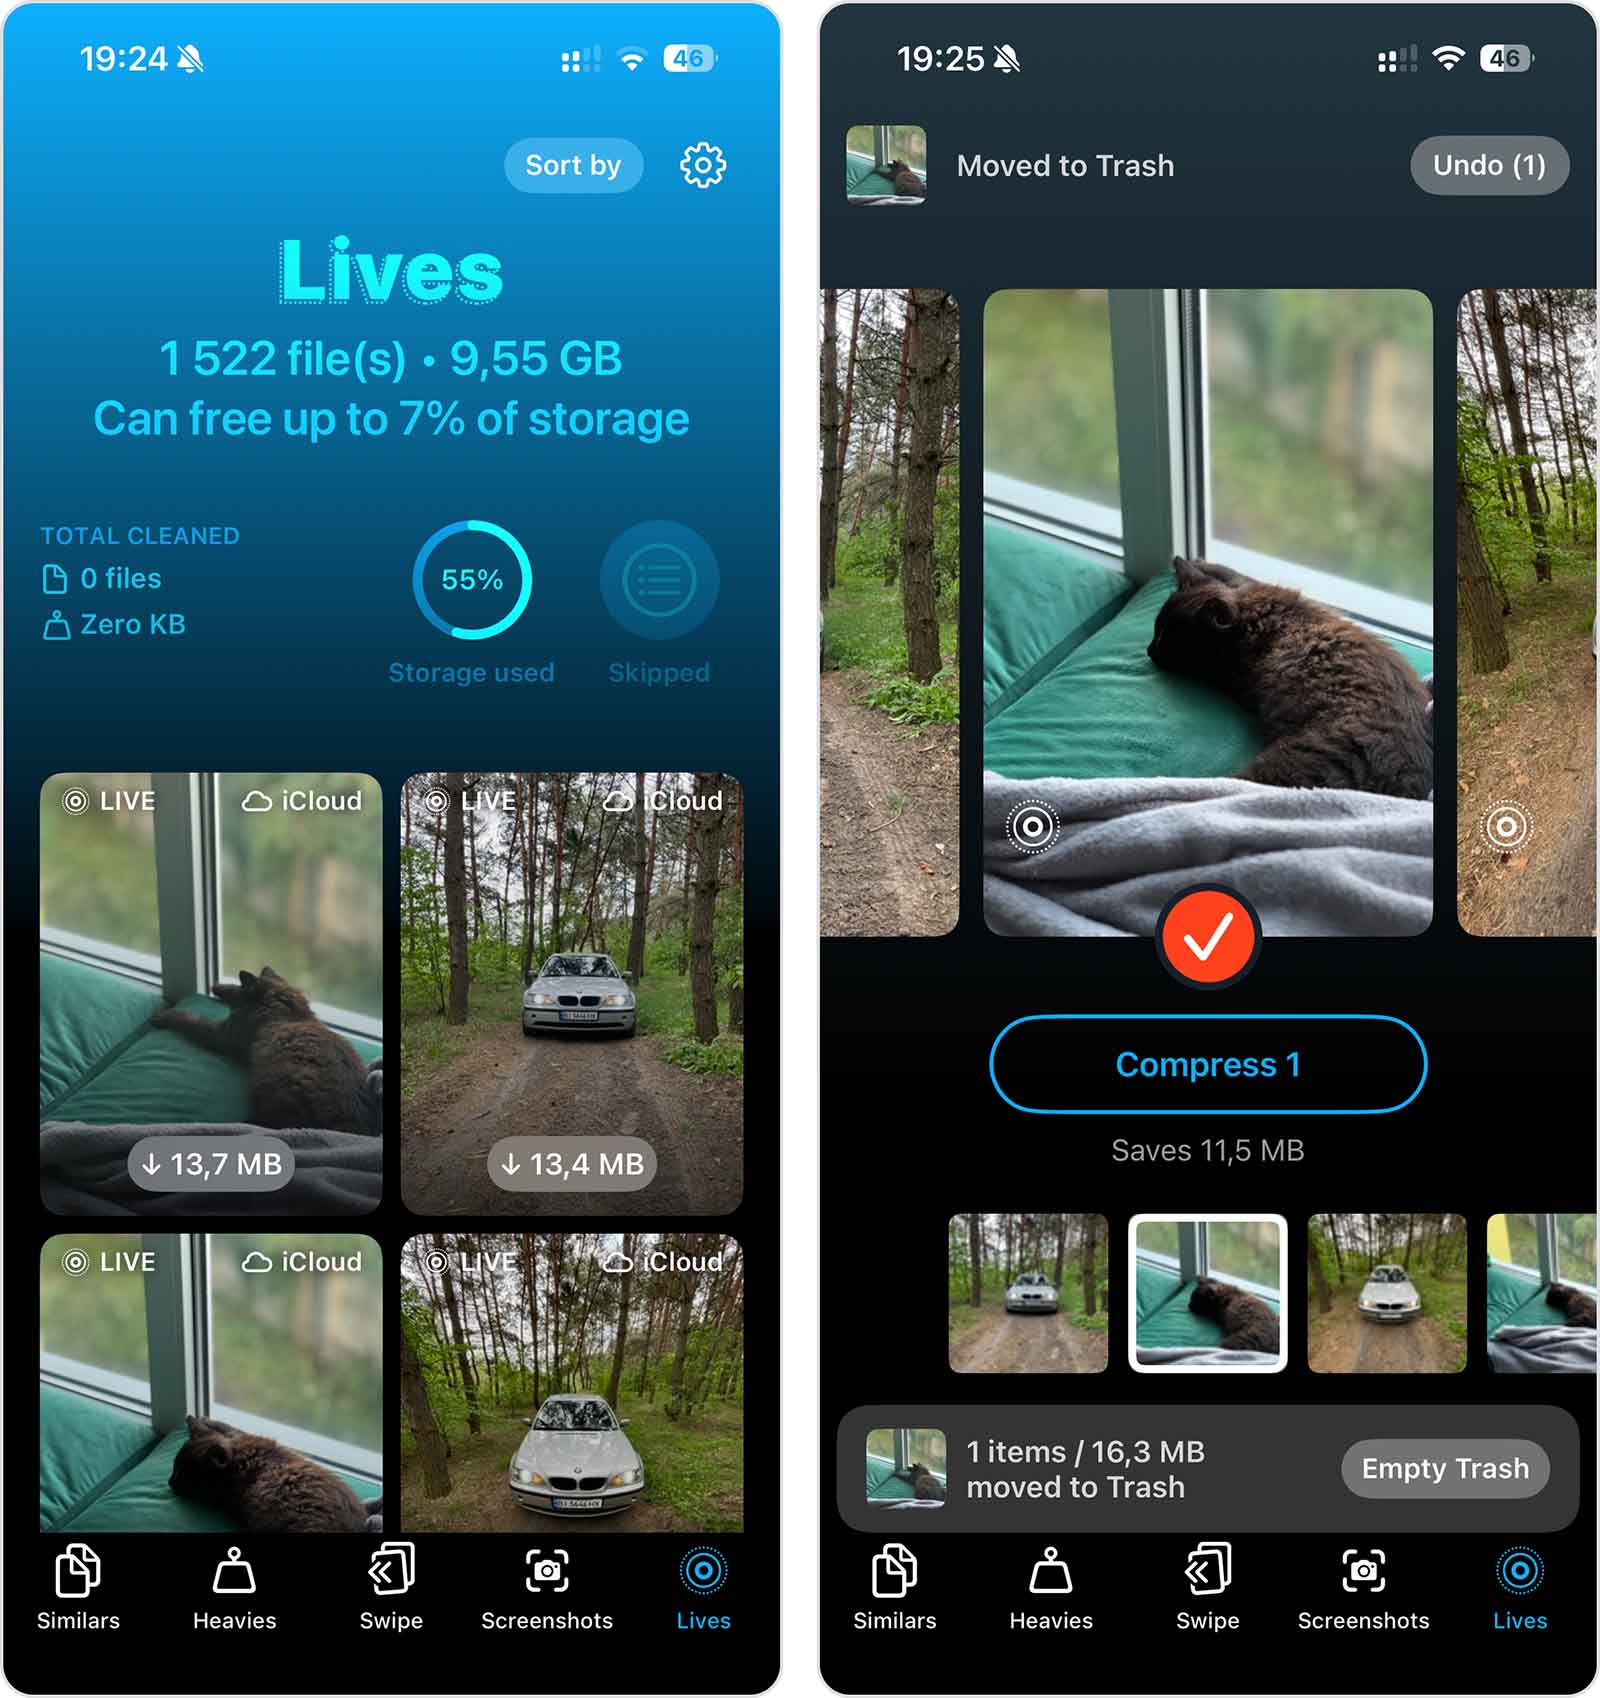
- Lives: Convert Live photos to high-quality still images without editing it yourself. This is a great way to free up space without deleting important photos or videos.
- Heavies: Easily cull your old and unwanted videos or compress them to shrink their file size without affecting quality. Unlike the Photos app, you can sort your videos and photos by size and date.

Clever Cleaner will remain free for all early adopters forever, even if additional features are introduced in the future. For more details, visit the official page of the app. For a more complete picture, we also recommend checking out our ranking of the best apps for cleaning iPhone storage (spoiler alert: Clever Cleaner made the list). You can also read independent reviews of Clever Cleaner, like this one.
Method 2: Use Built-in Features of the Photos App
If you prefer to avoid using third-party applications to clean up your duplicate and similar photos, you can also rely on iOS’ native features to get the job done. While this section covers methods for cleaning up both duplicate and similar photos, only exact duplicates are able to utilize iOS’ auto-detection (and only after they’ve had enough time to be indexed).
Similar photos are identical images that iOS does not consider exact duplicates. While they may visually look the same, even minor differences disqualify them from iOS’ auto-detection. So, unlike using an app like Clever Cleaner, you’d have to find similar photos manually. We’ll show you how to do this using a convenient feature in the Photos app.
Option A: Manage Duplicate Photos with the “Duplicates” Utility on iOS 16 and Later
Duplicates is a Photos app utility that automatically compiles all the duplicate photos it can find in your library. In this utility, duplicates are grouped together so you can easily review them and—most importantly—Merge them.
Merge is an action that combines multiple photos into one image, using the highest possible quality. Their metadata (e.g., dates, tags, etc.) is also consolidated into one complete entry. This feature was first released in iOS 16, but it has been on every device released since–including early models like the iPhone X series, as well as the latest models like the iPhone 15, iPhone 16, and iPhone 17 series running iOS 26.
Here’s how to use this feature:
- Open the Photos app.
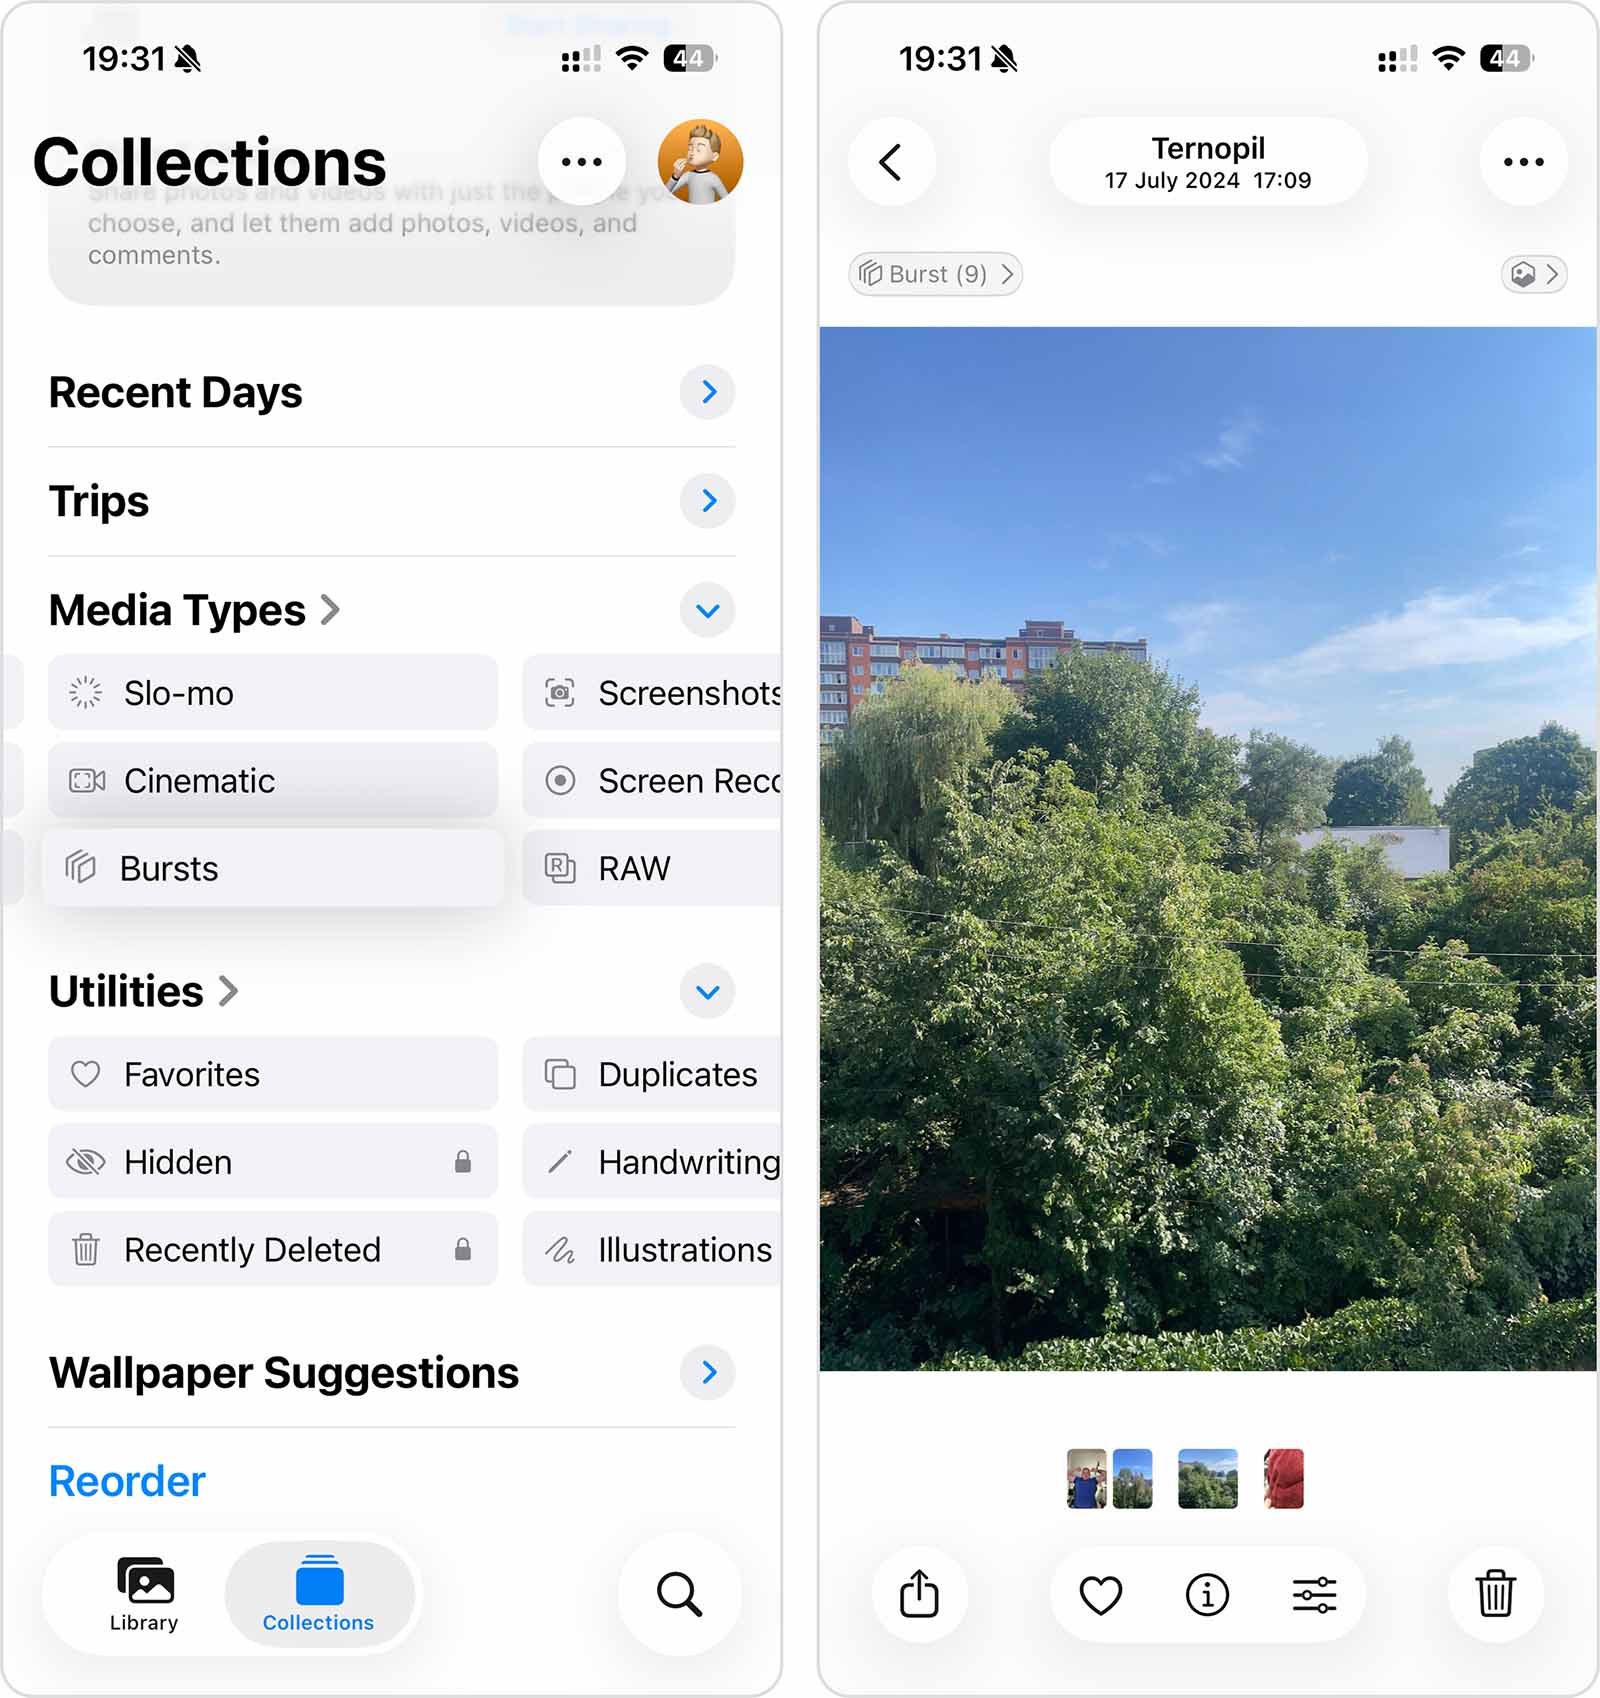
- On the bottom menu, tap Collections. Then, scroll all the way down to the Utilities section and swipe left on it once. Tap Duplicates.
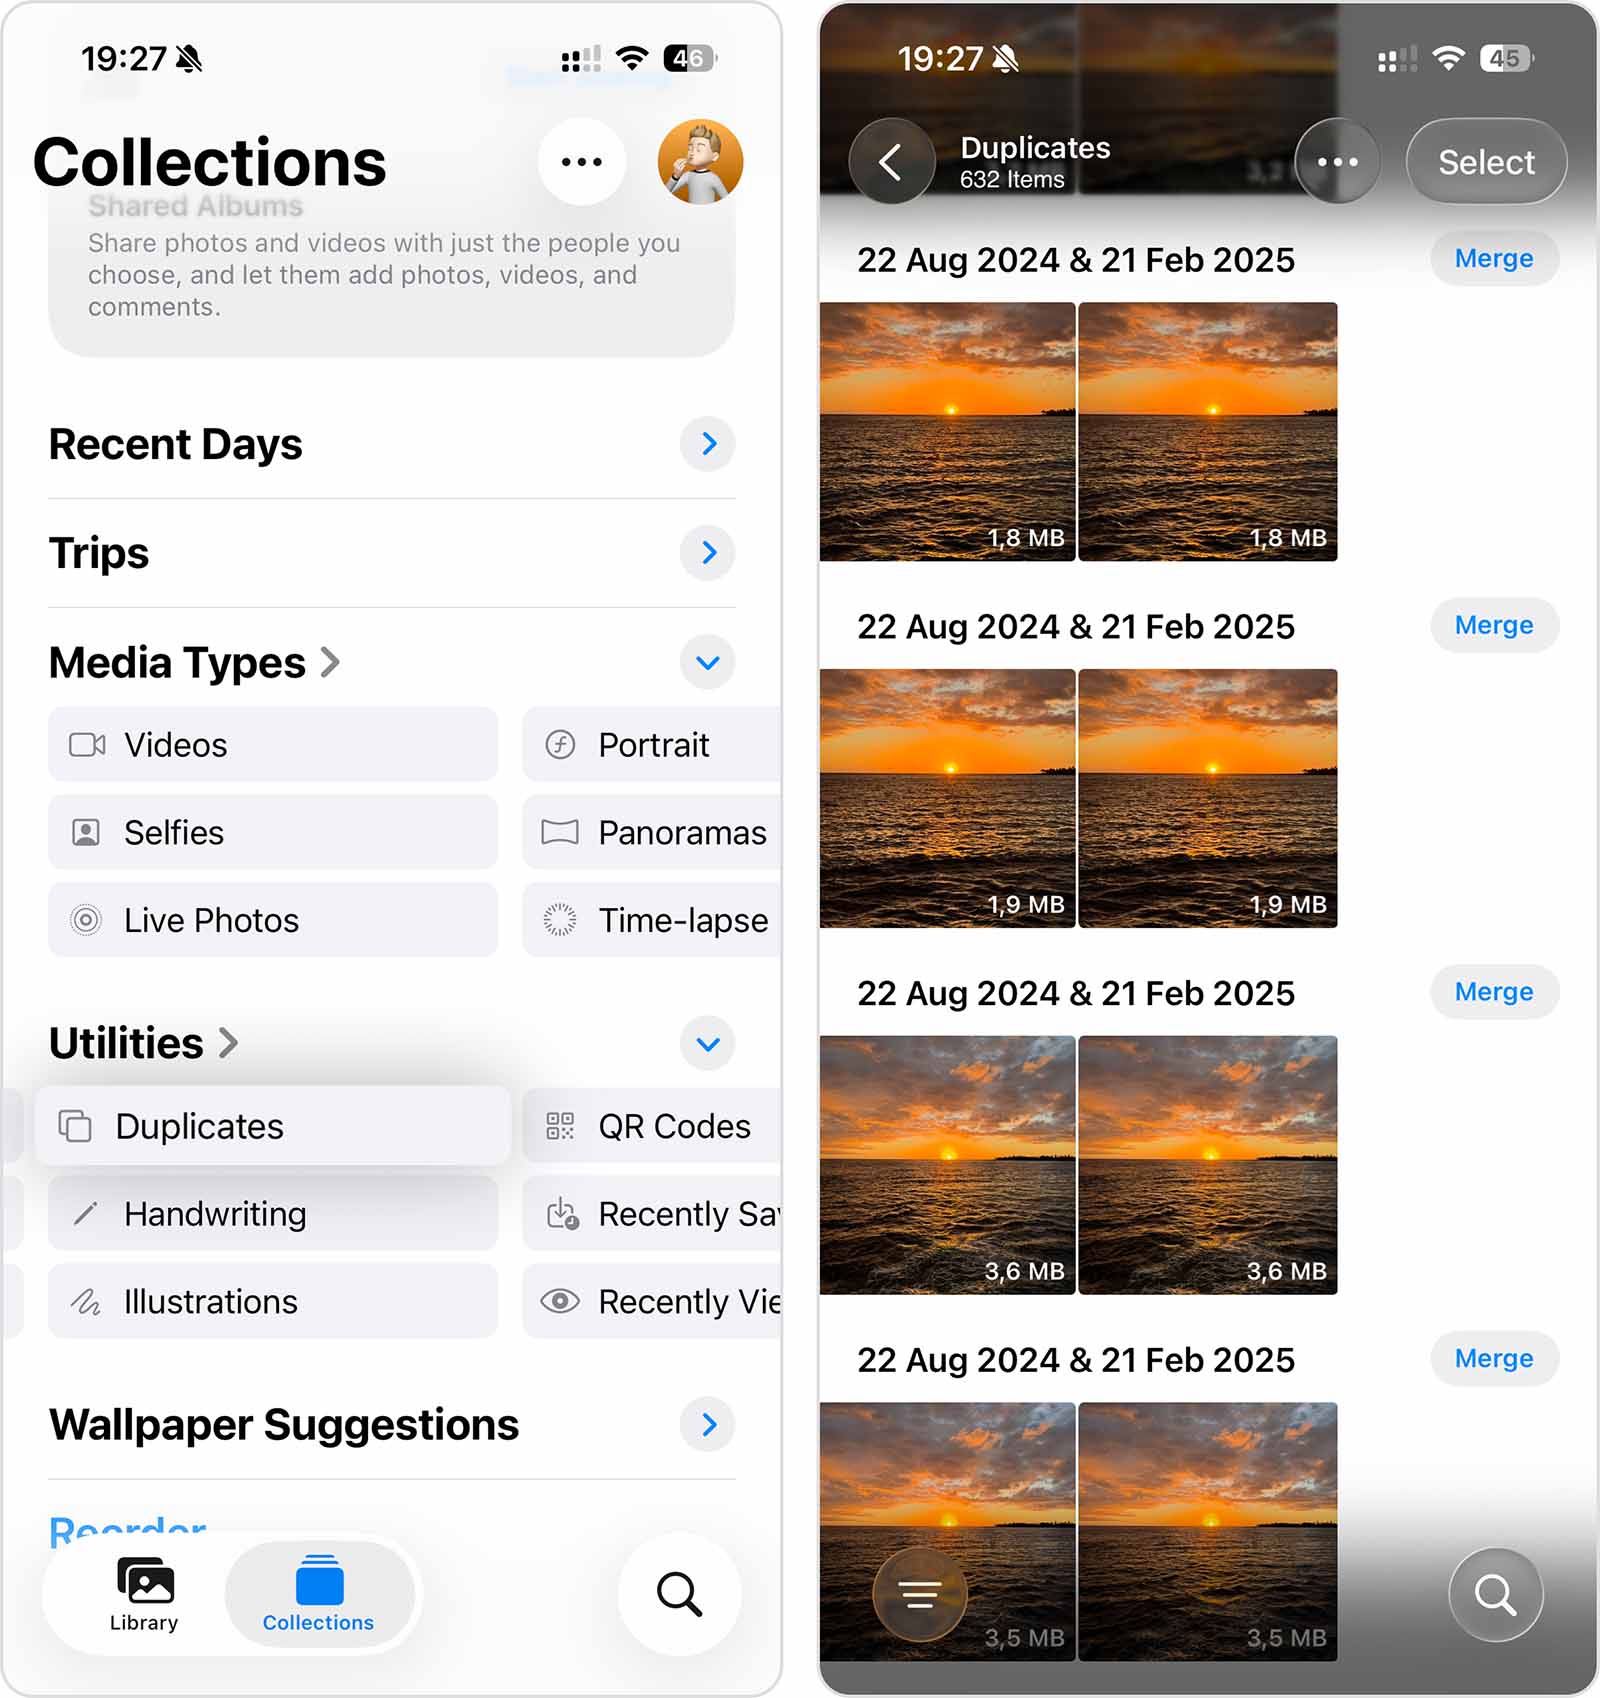
- Beside each group of photos, you’ll see a Merge button. Tap it to merge all the photos in that group into a single image.
- Finally, tap Merge Photos again in the pop-up to confirm that you want to merge the images.
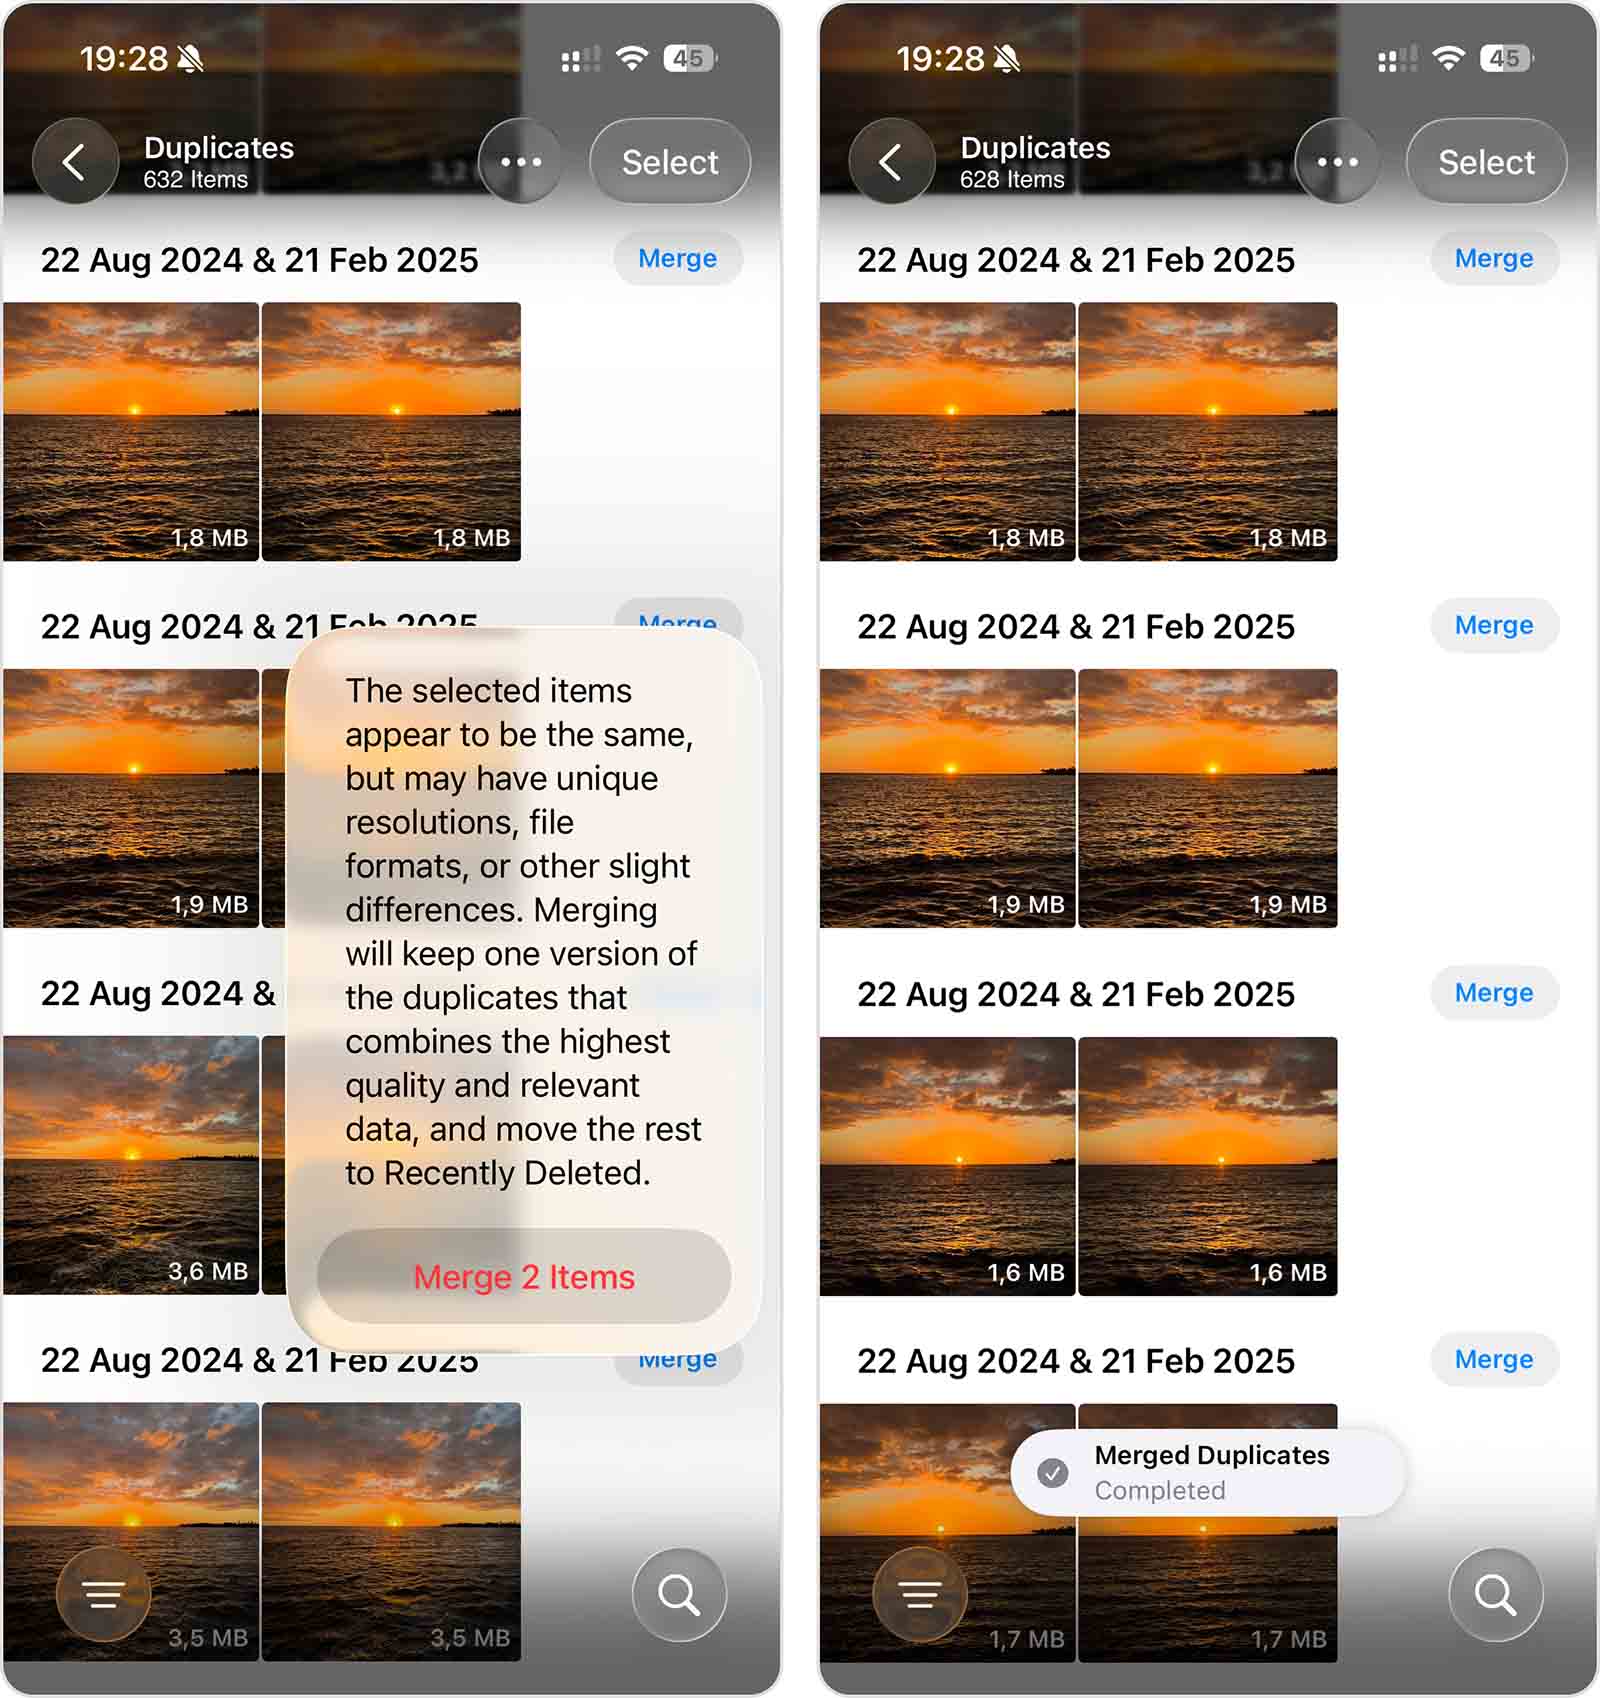
Unlike recently deleted photos, the only way to “reverse” merged photos is to duplicate the resulting image. This will only be an issue if you want to restore the original metadata.
Option B: Search for Duplicate Photos on iPhone
For similar photos, the next best native solution is to manually search for them in your library—which is made easier with Photos’s intuitive Collections feature.
Collections are iOS-generated categories that group your photos together, and there are several that are useful for this task (e.g., People & Pets). For our guide, we’ll show you how to find duplicate photos on your iPhone using the Maps collection—it’s reasonable to assume that similar photos would have the same location stamp.
Here’s how you can use Collections to identify similar photos on your iPhone:
- Open the Photos app.
- Tap Collections at the bottom of your screen. Then, under the Pinned section, tap Map.

- At each location you visited, a photo you took during the trip will be displayed. Tap a photo to open that location and see all the photos you took.
- Once you’ve found your similar photos, tap and hold an image and select Delete from the context menu. Alternatively, tap Select in the top right corner of the screen to choose and delete multiple photos. Make sure to tap Delete Photos again in the confirmation pop-up.

After you find and delete duplicate photos on your iPhone, don’t forget to clear the Recently Deleted folder in the Photos app to free up storage space.
Why Do Photos Keep Duplicating on iPhone?
There are several reasons why you find duplicate photos on your iPhone. Aside from knowing how to delete duplicates on your iPhone, you should also know why they appear in the first place, so you can minimize their occurrence in your library (and there are probably more reasons than you expect or know about).
Reason 1: Accidental Manual Duplication
We all make mistakes, and some of our mistakes result in the creation of duplicate photos on iPhone (could be worse, right?). For example, one Reddit user confessed to accidentally duplicating their favorite photos multiple times. Their mistake turned 1,300 photos into around 5,000, so you can imagine how much storage space was instantly wasted.
I accidentally duplicated the 1300 favourited photos I had a few times and now I’m sitting at 5k favs I want to delete the duplicates but they don’t show up in the duplicates tab what do I do (I keep these photos hidden since they are nsfw) I use an IphoneX btw 256 gigs.
Accidental manual duplication can happen when you’re organizing your photos or when you’re trying to save or share images through various apps. It’s a simple human error, but one that can significantly bloat your photo collection, necessitating a cleanup to reclaim storage space and organize your gallery.
Reason 2: Editing Photos Without Deleting the Original Shots
Whenever you edit a photo using a photo editing application, you often have the option to save it as a “separate image.” This creates a copy of the original image with your new edits applied. And due to the edits, iOS will not recognize the new edited photo as a duplicate of the original.
Reason 3: Tapping the Shutter Button Multiple Times
Many iPhone users instinctively tap the shutter button multiple times to capture the perfect moment—and why not? It’s not like digital photos cost money to take. However, they do cost storage space, and that’s definitely something iPhone users have to pay premium prices for.
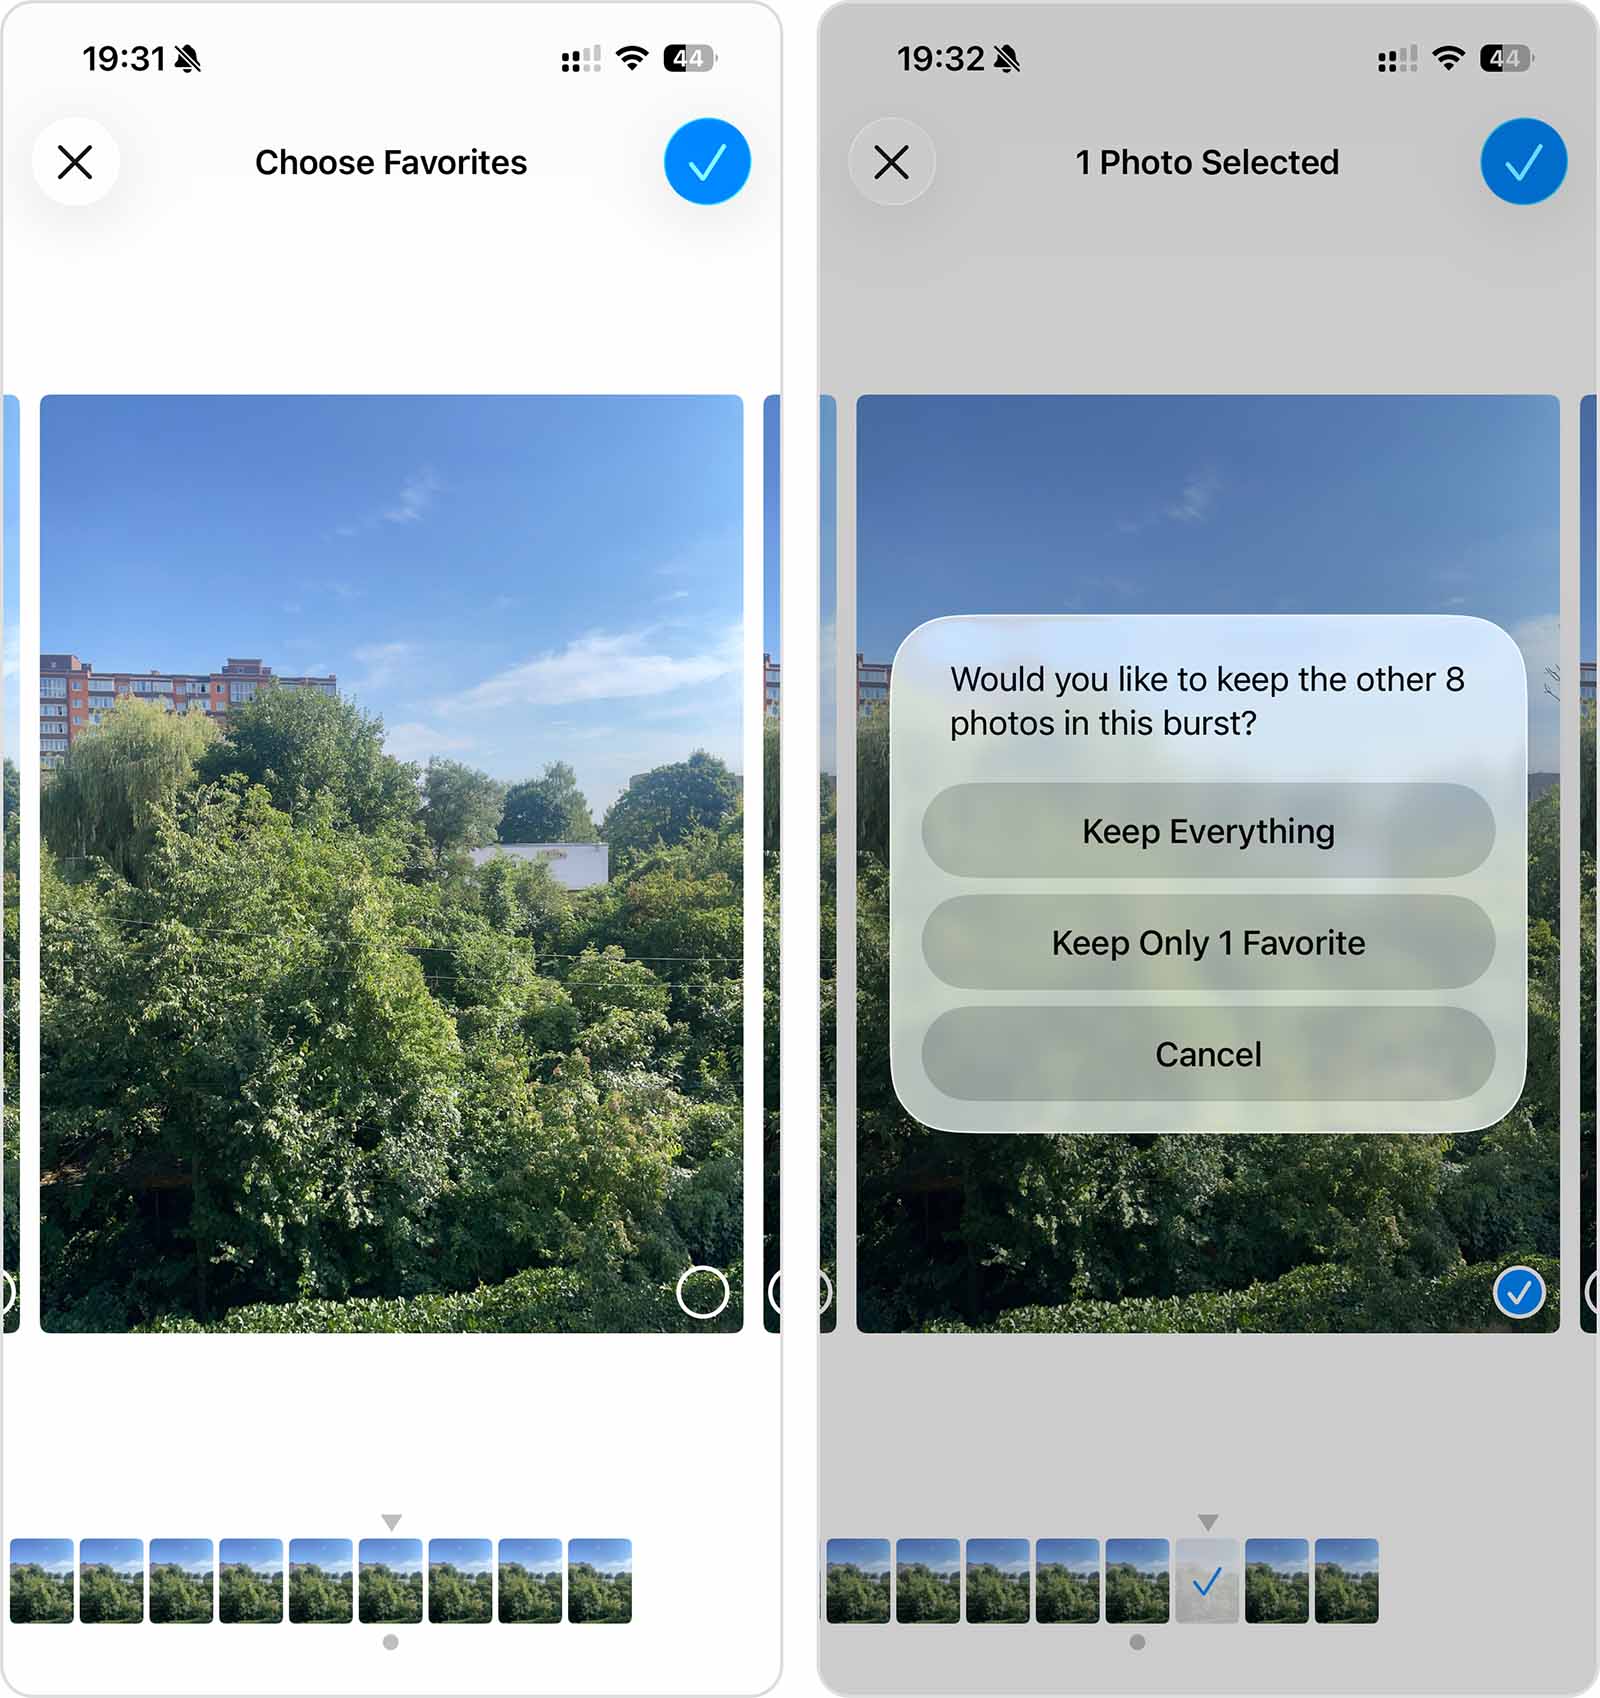
As if tapping the shutter button like it’s a winning slot machine wasn’t enough to fill up your storage, there’s also Burst Mode. When you capture a burst of photos, the Camera app automatically snaps a sequence of pictures within seconds. While these photos are actually stored as a single item in your Gallery, they can take up a significant amount of space.
- Launch the Photos app and navigate to the Collections menu. Then, scroll down to the Media Types section and select Bursts.
- Choose a Burst you want to review.
- In the top left corner of the screen, tap Burst.
- Mark the images you want to keep.
- Finally, tap the check mark in the top right corner of the screen. Then, tap the Keep Only X Favorite option in the dialog menu that appears.
Reason 4: Repeated Photo Downloads
If you download a photo once (as an attachment), then download it a second time, you’ll end up with duplicates. And since you don’t usually get the option to overwrite the old photo, you could download the same photo multiple times without even noticing.

Reason 5: Using the HDR Feature on Older Devices
iPhone X and earlier models offered a controllable HDR (High Dynamic Range) setting in the Camera app. When the “Keep Normal Photo” option was enabled, the camera would save two versions of each photo – one with HDR and one without, effectively creating duplicates of every shot. If you’re still using an older device, then this could be another source of duplicate photos on your iPhone.
The good news is that modern iPhones (starting with iOS 17) save only the HDR-enhanced version of your photos. For more detailed information about HDR settings on your specific iPhone model, you can check out Apple’s comprehensive HDR camera settings guide.
- Open the Settings app.
- Navigate to the Camera section.
- Find the Keep Normal Photo option and turn off the toggle switch next to it.
Is Interest in Deleting iPhone Photo Duplicates Growing?
According to our data, interest in cleaning up duplicate photos on iPhone keeps climbing. We started from a simple question: do users actually search for help with this problem more often, or does it only feel that way. To answer it, we took the most common search query, “delete duplicate photos on iPhone”, and tracked its behavior in Google Trends for the last five years in worldwide web search. The screenshot shows an interest-over-time chart with a normalized popularity index for this query, updated week by week, so every spike or dip reflects real search behavior.
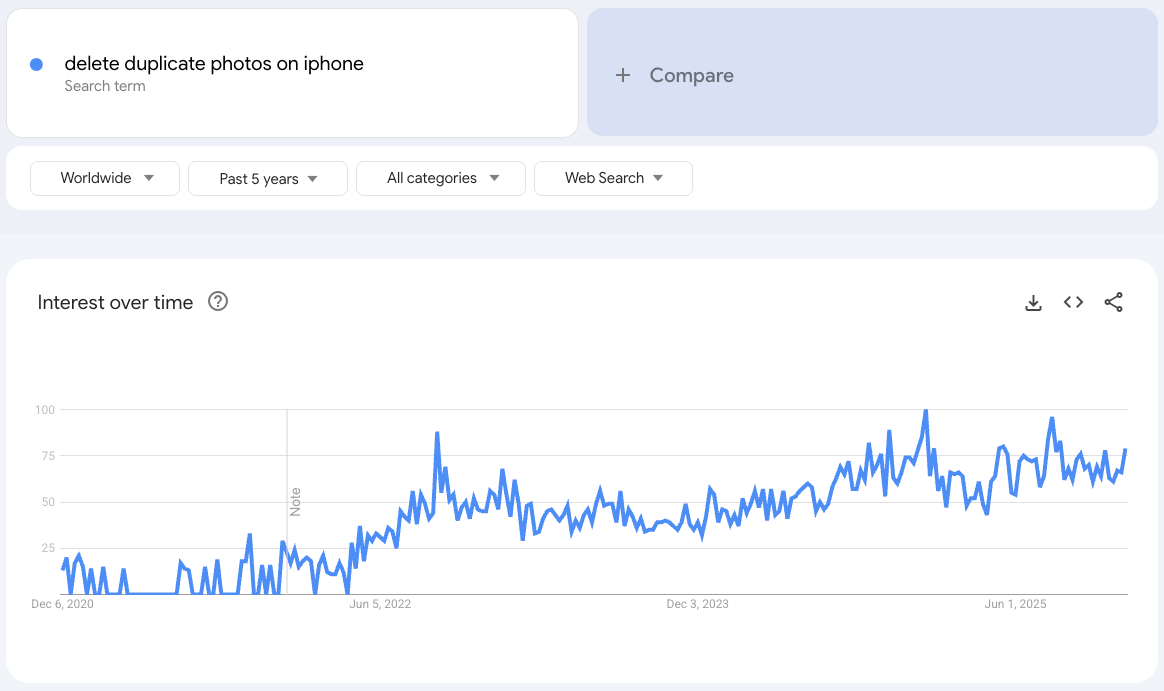
The shape of the curve looks pretty clear. In 2020 and 2021, users entered this query far less often, and the line sits closer to the bottom of the scale. Starting in 2022, the baseline level steps up, then keeps edging higher while sharper seasonal peaks appear around the same parts of the year. By 2024 and 2025, the chart stays at a higher tier than at the start of the period, which matches growing photo libraries, tight iPhone storage, and the routine habit of cleaning out junk shots.
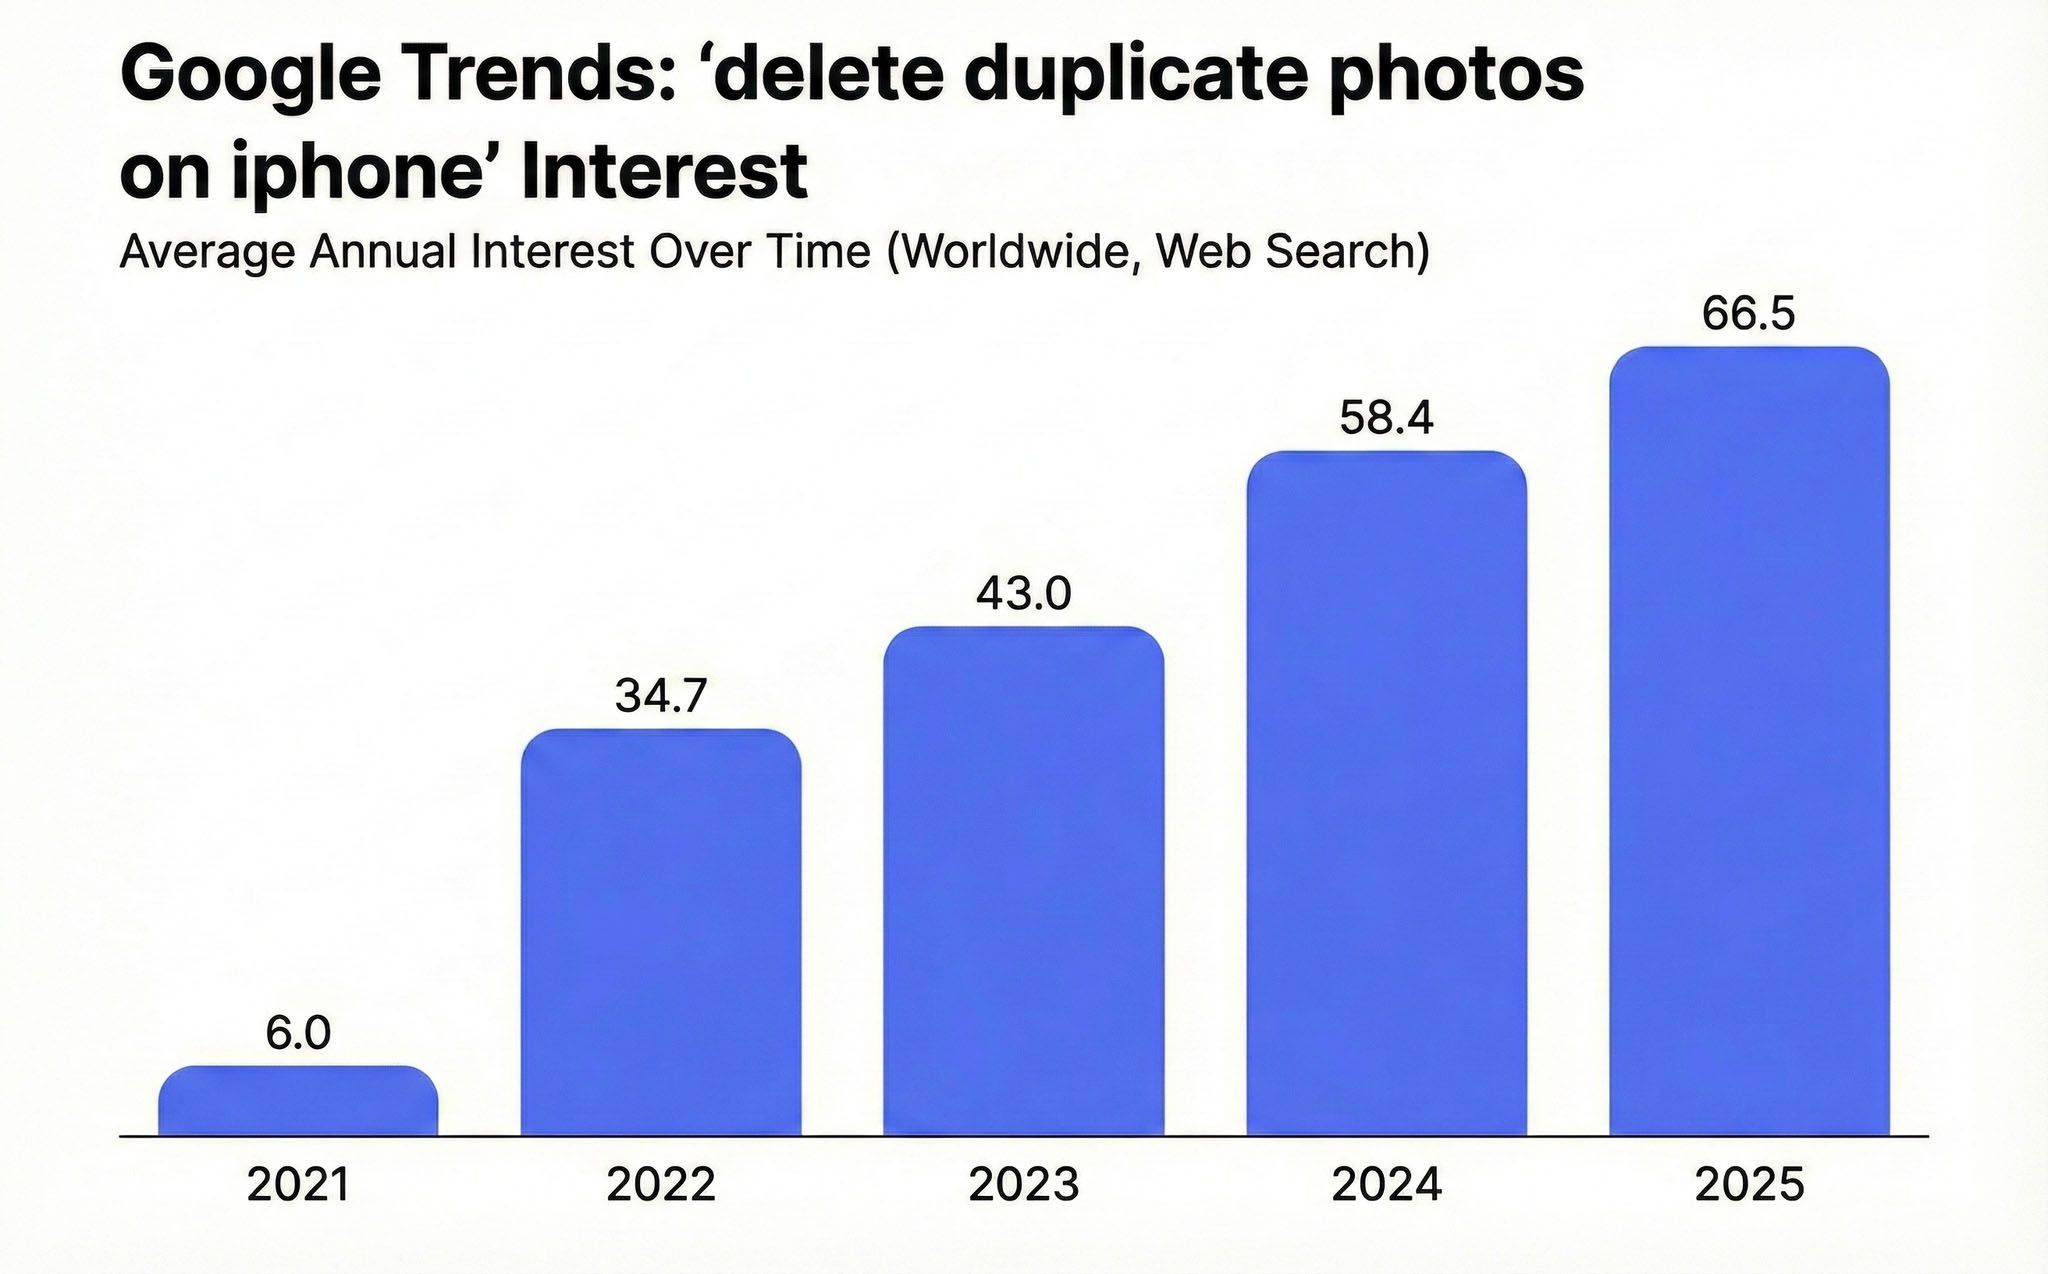
When we look at the year-over-year averages in Google Trends, 2025 shows roughly 14% higher interest compared with 2024. Right after the release of iOS 26 on 15 September 2025, the graph jumps for a short stretch, and the index in the following weeks climbs above early-September levels. After the earlier iOS release in September 2024, the change came out even stronger, with search interest rising by about one third compared with the week of that launch. From a practical risk and technology angle, we think this pattern signals steady, routine growth rather than a one-off spike, so in 2026 interest in deleting duplicate photos on iPhone will likely keep rising at a measured pace, with local highs near new iOS versions and any new Photos app features that promise even a small boost in storage comfort.
Conclusion
Duplicate (and similar) photos are an inevitable part of your iPhone library. If you really want to keep it tidy and clutter-free, the long-term solution is to develop good storage hygiene habits. Make it a point to review your photos after each shoot or download, or check your library on a regular schedule (e.g., every Saturday).
If you struggle to maintain these habits, then you can at least rely on the methods in this article to make the cleanup process more convenient. That said, try to avoid hitting the limits of your device storage—iOS tends to operate less efficiently when it doesn’t have enough elbow room (even the indexing process may suffer, and you’ll be unable to download applications like Clever Cleaner).