You’ve connected your external hard drive to the computer countless times in the past. Except, this time, it hasn’t shown up. While it’s obvious that something has gone wrong, the situation isn’t always as bad as you’d think. Before using one of the several solutions we’ve included to fix your undetected external hard drive, data recovery is your first priority.
How to Recover Data from an HDD Which Is Not Detected
Recovering the data before attempting to fix the drive is critical, as the repairs may end up causing the data to become unrecoverable. Furthermore, you’ll need to be selective in which data recovery solution you choose. Each data recovery tool has its own strengths and weaknesses in certain situations. For recovering data from an external hard drive that’s undetected by Windows, we recommend Disk Drill.
We prefer to use Disk Drill here because, as long as the drive is visible in Disk Management and reading the correct size, there’s a good chance that it can scan and recover some data. It works with NTFS, exFAT, ReFS, BTRFS, and ext2/3/4 file systems, as well as disks that are uninitialized, showing as RAW, or displaying unallocated space.
Follow these steps to recover data from an external hard drive that is not recognized:
Step 1. Download and Install Disk Drill.

Step 2. Connect your external hard drive to the PC. Now, launch Disk Drill.
Step 3. Select the external hard drive from the list of drives, then click Search for lost data. Disk Drill will automatically utilize every scanning algorithm it has.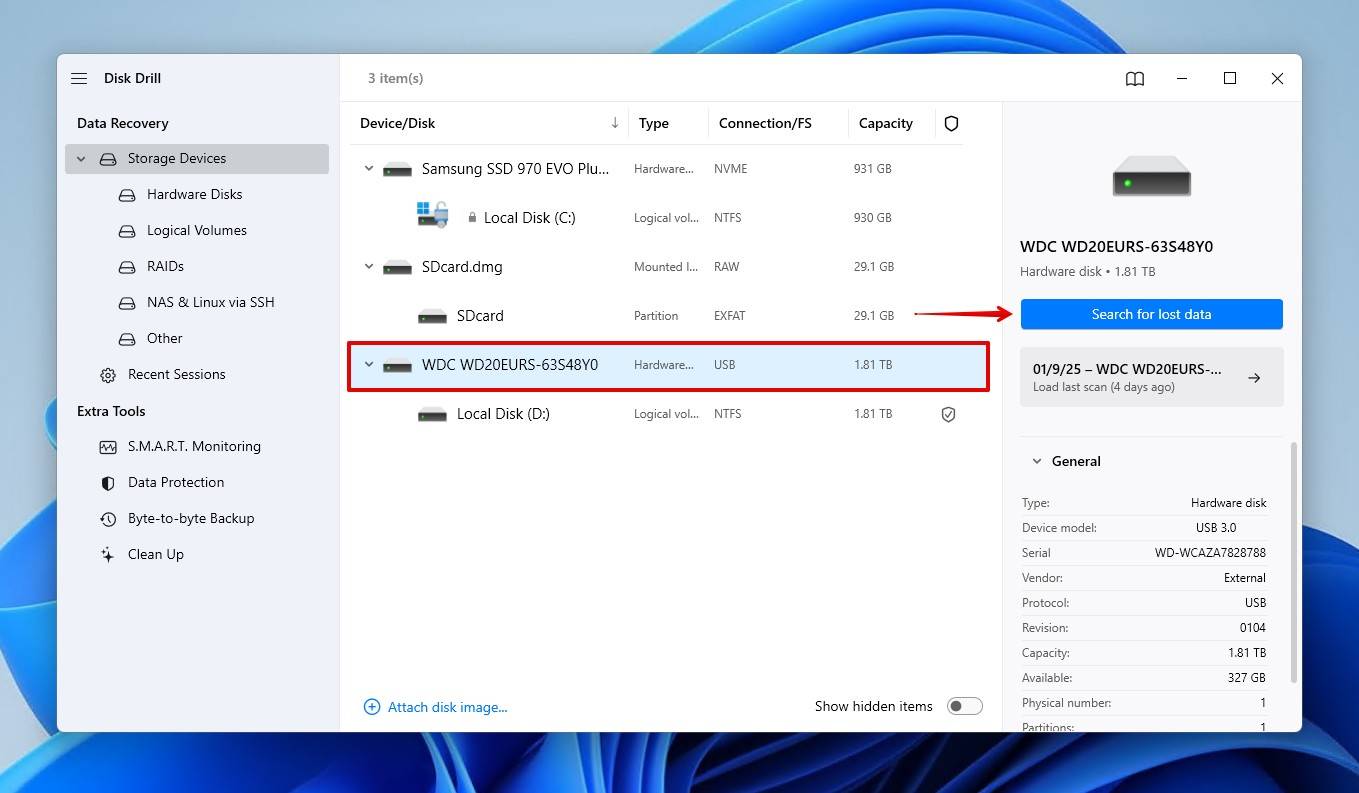
Step 4. View what Disk Drill has found at any time by clicking Review found items. Alternatively, when the scan is finished, you can click Recover all to recover everything at once.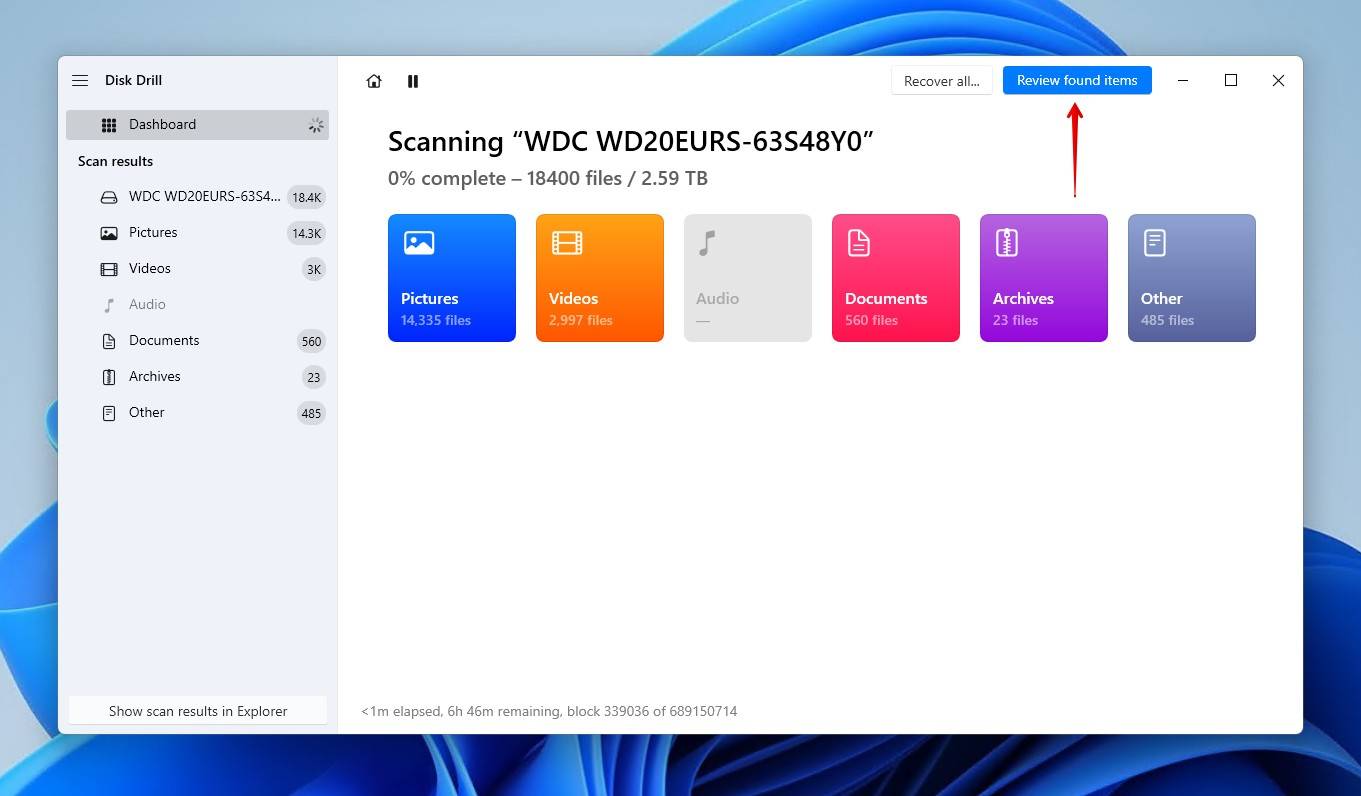
Step 5. Preview and select the files you want to recover. You can preview any files that Windows can open natively or with any file reader that’s installed by default. When you’re ready, click Recover.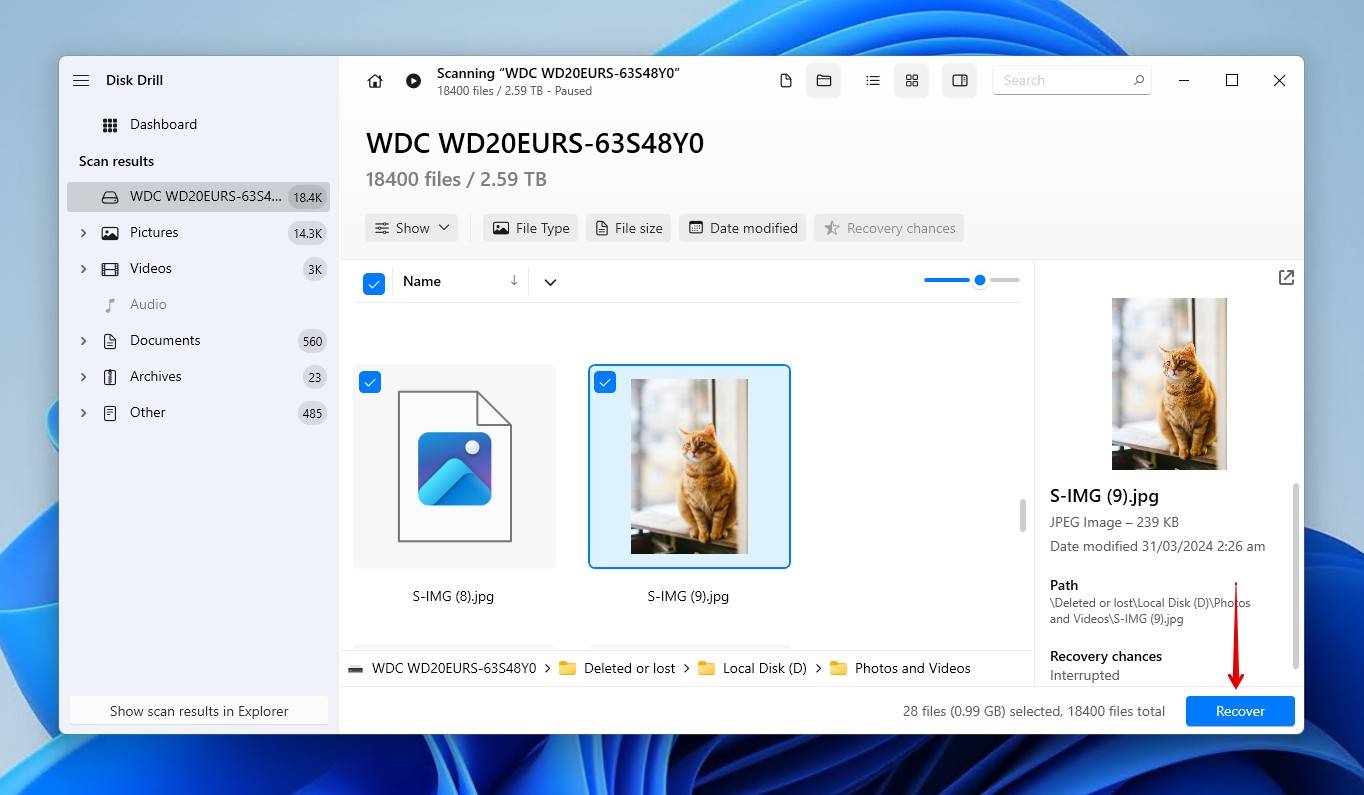
Step 6. Disk Drill will ask you to choose the recovery location. Once it is selected, click Next to finish recovering the data.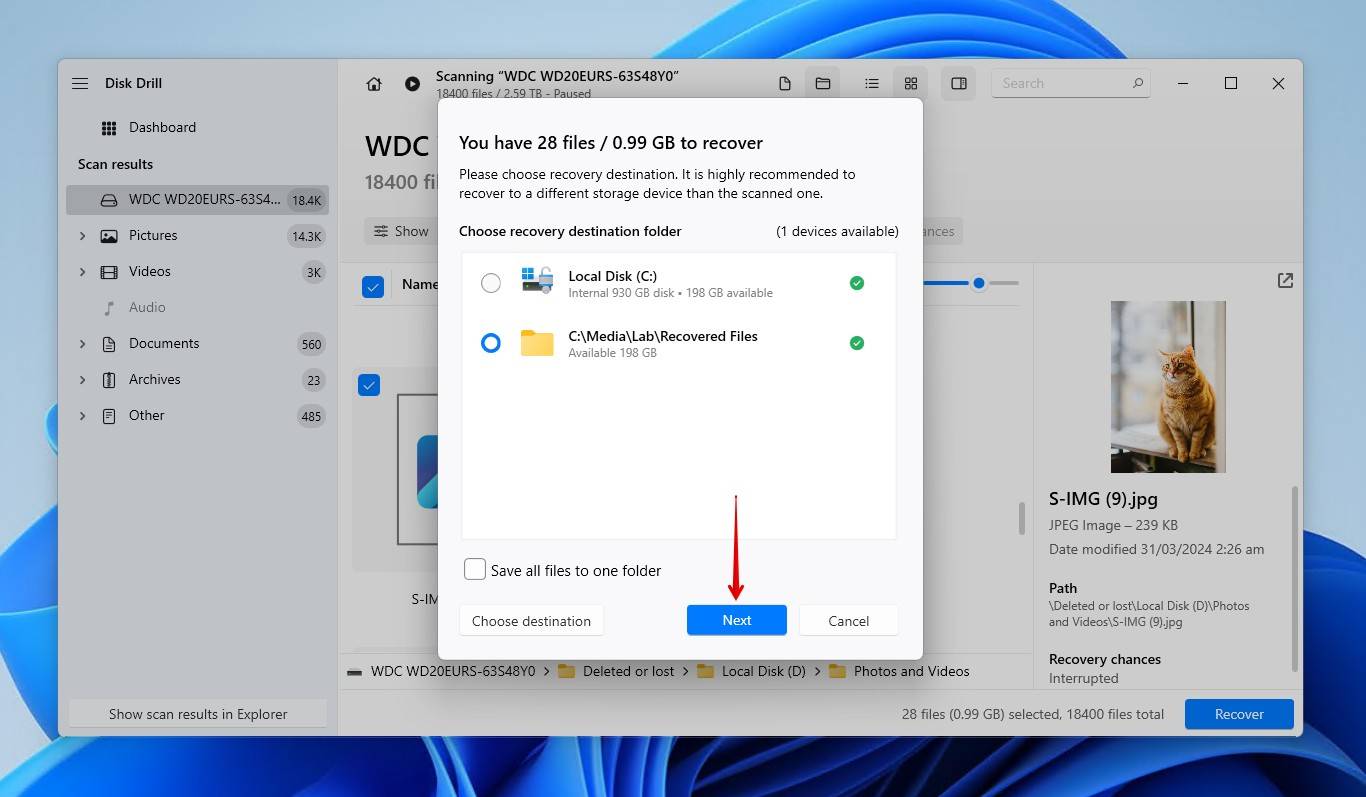
Why is My External Hard Drive Not Detected by Windows?
There are so many problems that could be the reason for your external hard drive not showing up. The exact reason why it’s not showing up will also impact the recoverability of your data. Seeing as external hard drives are mechanical, their moving parts can be a big liability if the drive sustains significant damage. In addition to visible issues, there may be underlying logical problems affecting the drive’s recognition. Missing drive letters, partition table corruption, and damage to the file system are all issues that may not be as obvious as physical damage.
We’ve included some problem scenarios below, along with some links so you can jump to our recommended solutions based on each problem.
| Problem | Description | Solution |
| Faulty hardware, i.e., USB port or cable | Faulty cables are a very common issue with portable storage devices, given how much they’re handled. It could also be a faulty USB port or even a faulty USB header on your motherboard in extreme cases. | |
| Partition identification problems | An issue is preventing the partitions on your drive from being read by Windows. It could be that the disk has been wiped or the partition has vanished as a result of some form of damage. | |
| Unsupported file systems | Operating systems only work with some file systems. For instance, if you try to read an APFS-formatted drive on a system running Windows, you won’t be able to access the data. Worse yet, Windows will even suggest formatting it to fix it. | |
| Insufficient power | If you have too many devices connected to your laptop, it may not be outputting enough power to keep up. Be sure to check the power demands of your external hard drive, as it may need to be connected to a USB 3.0 port. | |
| Drive letter issues | A logical issue, and a minor one at that. Windows requires connected storage devices to have a drive letter. If your drive hasn’t been assigned one, or it was lost somehow, it will not be accessible. | |
| Corrupted file system or partition table | A corrupted file system will result in Windows being unable to read the drive. The same is true for a corrupted partition table. Windows doesn’t know how to read the drive and find the data. | |
| Mechanical or internal damage | Mechanical or internal damage is more severe. It could be that you experienced a head crash, or the motor of the hard drive has sustained damage making your hard drive completely dead. | |
| Faulty enclosure | An external hard drive is just an internal hard drive in an enclosure. If the enclosure becomes damaged, whether internally or externally, it could disrupt communication with the disk. |
If the drive is connected to a PC and showing in Disk Management (with the correct capacity), recovering the data first and then fixing the drive is the best course of action, as there’s no telling when the state of the drive will worsen.
How to Fix a Hard Drive Not Being Detected by Windows
Once your data is safe and sound after recovery, you can attempt to bring the drive back to working condition. There are a few ways to do this, but we encourage you to start with the first method and work your way down to ensure you cover all your bases.
Method 1: Try Another USB Port and PC
Determining if the issue lies with the external hard drive, USB port, or computer is a very simple matter. Start by trying a different USB cable, or plug the drive into a different port. If you’re still not having any luck, try connecting the drive to a different computer entirely.
If you are connecting your external drive to your computer using a USB hub, it is possible that it is not getting enough power. Over time, your hard drive will draw more power as worn components are affected by mechanical resistance. Try connecting the drive directly to your computer, preferably a USB 3.0 port or higher as they can output more power than USB 2.0.
Method 2: Troubleshoot on Windows
If Windows doesn’t detect your hard drive, you can use the default Troubleshooter to scan and resolve some hardware issues without software. Before going to other methods that can become slightly complicated, run the troubleshooter to try and fix the problem automatically.
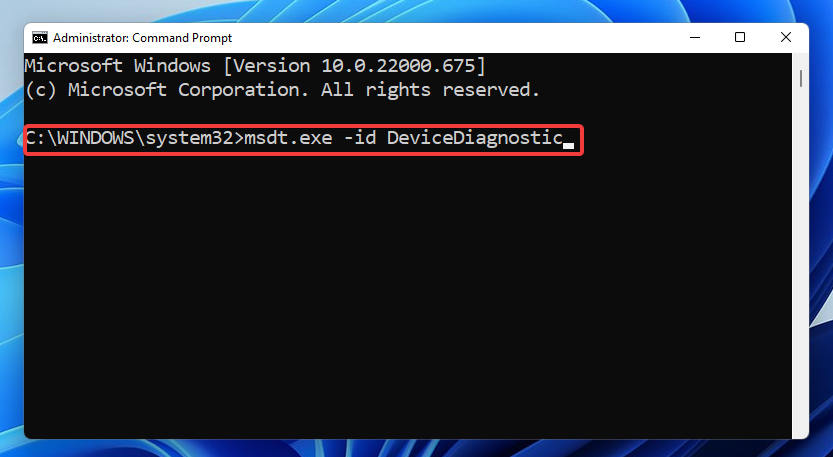
Here’s how you can run the Hardware and Devices troubleshooter in Windows:
- Right-click Start and click Terminal (Admin).
- Run the command
msdt.exe -id DeviceDiagnosticfor the troubleshooter to appear.
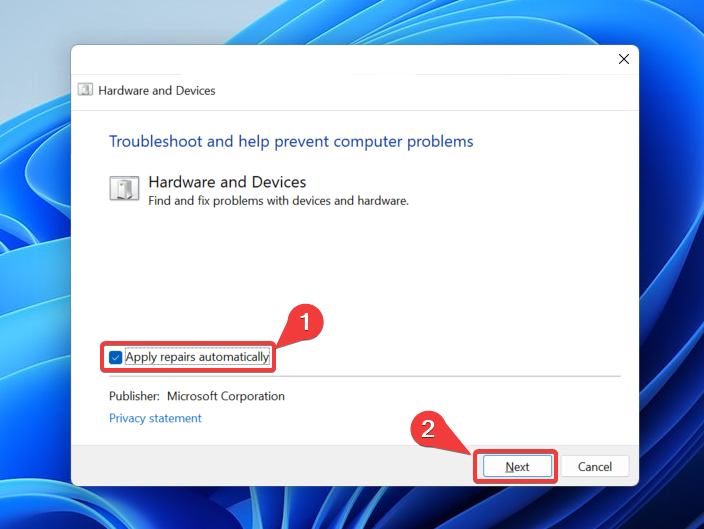
- Click Advanced and ensure that you’ve selected the Apply repairs automatically option. The troubleshooter will now start scanning your system for potential issues.
- After the scan is complete, you shall receive a ‘Troubleshooting Report’ that’ll list any detected problems and whether they were resolved.
Method 3: Initialize the Hard Drive
Initializing the hard drive gives it a partitioning scheme. If the disk was previously working fine but has since become uninitialized, it’s likely due to your Master Boot Record (MBR) or GUID Partition Table (GPT) partition table becoming corrupted, resulting in Windows being unable to detect the partitions.
This is easily fixed by reinitializing the disk and setting up new partitions. Bear in mind that this should be done after data recovery to reduce the risk of data loss. Even though reinitializing the disk is unlikely to affect the data on the disk (given the physical space it occupies on the drive), it’s ill-advised because any actions could hinder your chances of getting the data back.
This is how you initialize an external hard drive with Disk Management:
- Right-click Start and click Disk Management.
- Right-click the external drive that says “Not Initialized” and click Initialize Disk.
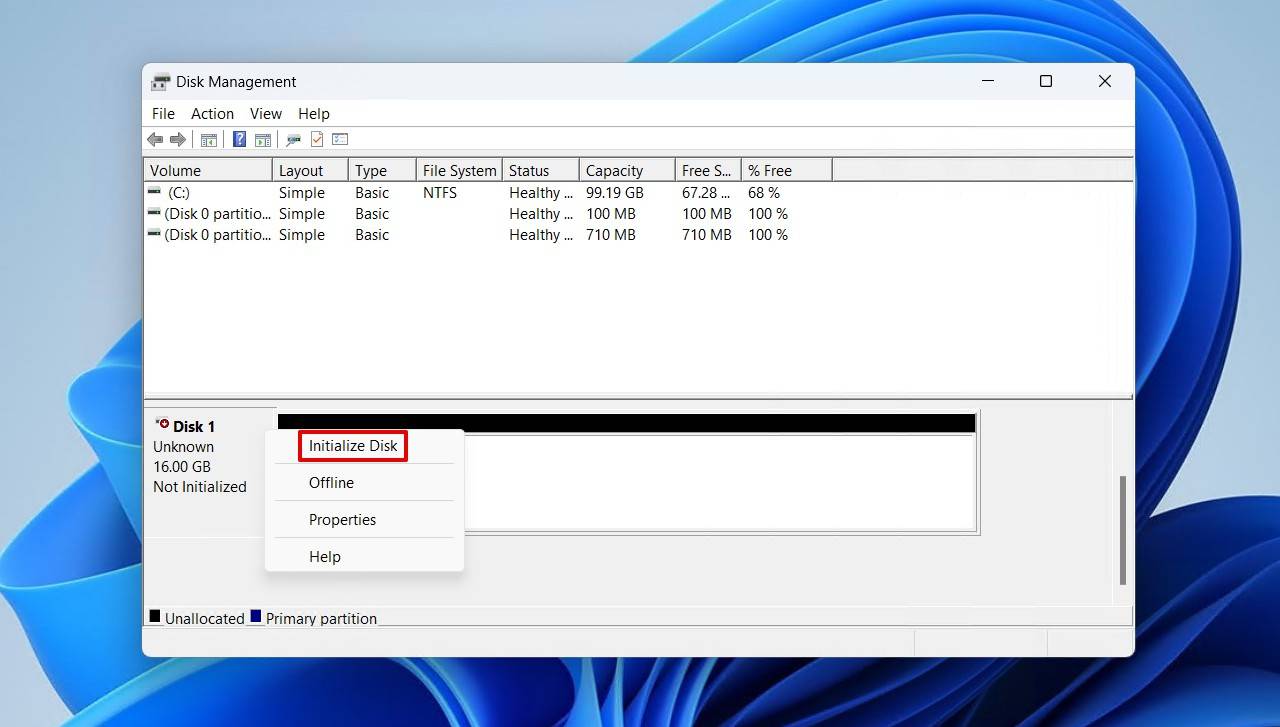
- Now, press OK.
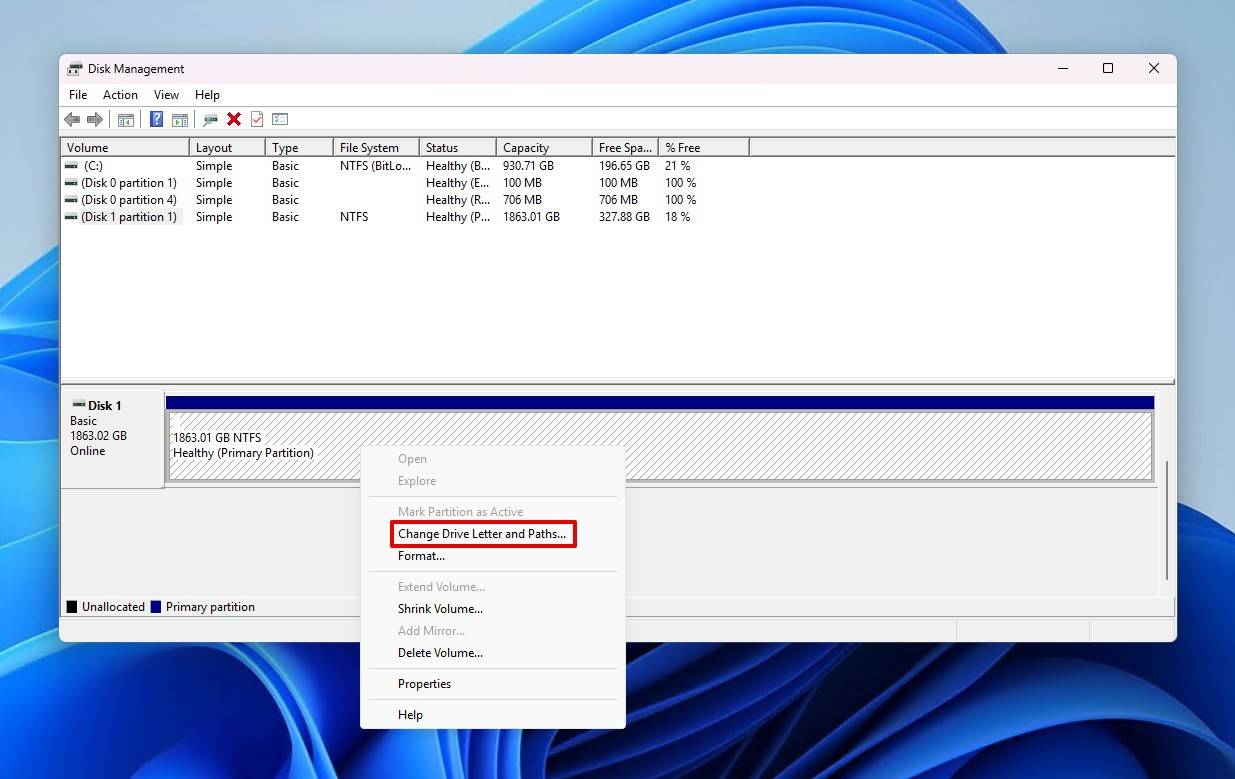
Method 4: Add or Change the Drive Letter
Windows relies on drive letters to know what storage devices are connected to the computer. Without a drive letter, the data isn’t visible through traditional means like File Explorer. Likewise, if you’ve somehow ended up with a drive letter that’s already in use, the drive won’t be accessible.
This is quite an easy fix. All you need to do is add a drive letter or change your existing one. Here’s how you can update the drive letter with Disk Management:
- Right-click Start and click Disk Management.
- Right-click the volume and click Change Drive Letter and Paths.
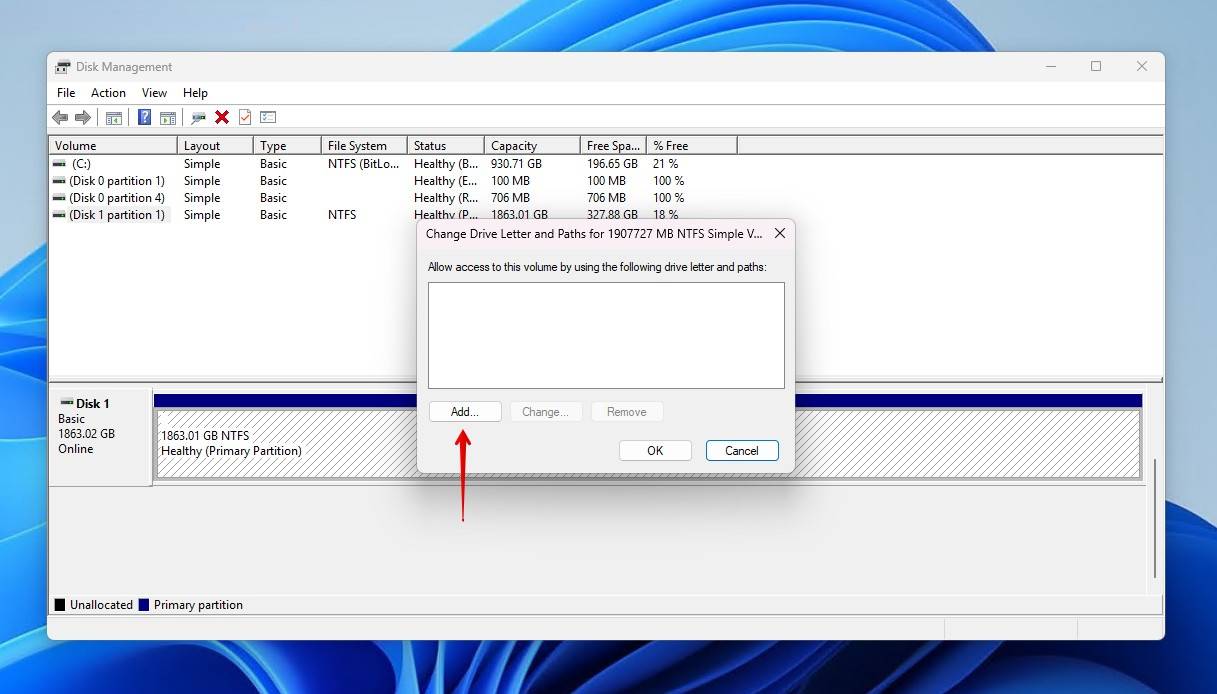
- Click Add to assign a drive letter. If you already have one, click Change instead.
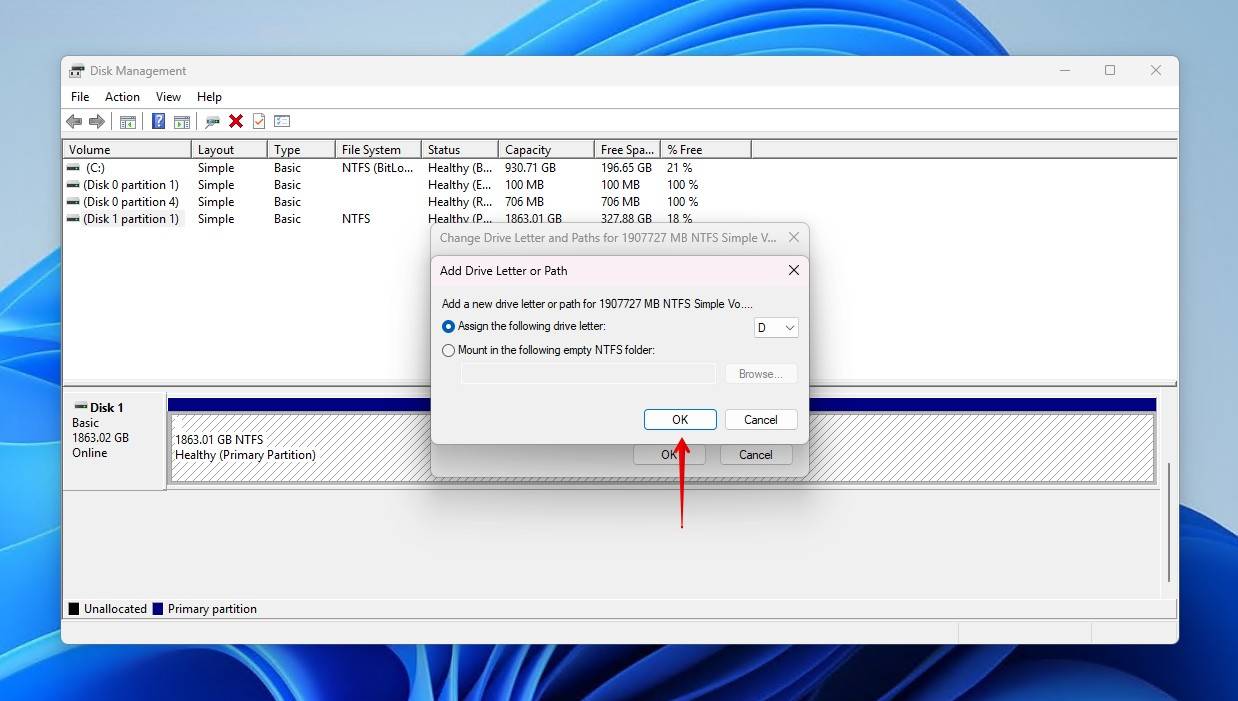
- Select a drive letter and click OK. Click OK again to confirm.
Method 5: Use Hard Drive Management Software
Do you typically use your external hard drive on a Mac? If so, it’s likely unreadable because it’s formatted with HFS+ or APFS. These file systems are Apple-specific and won’t natively work with Windows, so it doesn’t mean you need to recover data from external hard disk which is not detecting. Instead, you’ll need to download a hard drive management tool that can read and interact with the data on the drive.
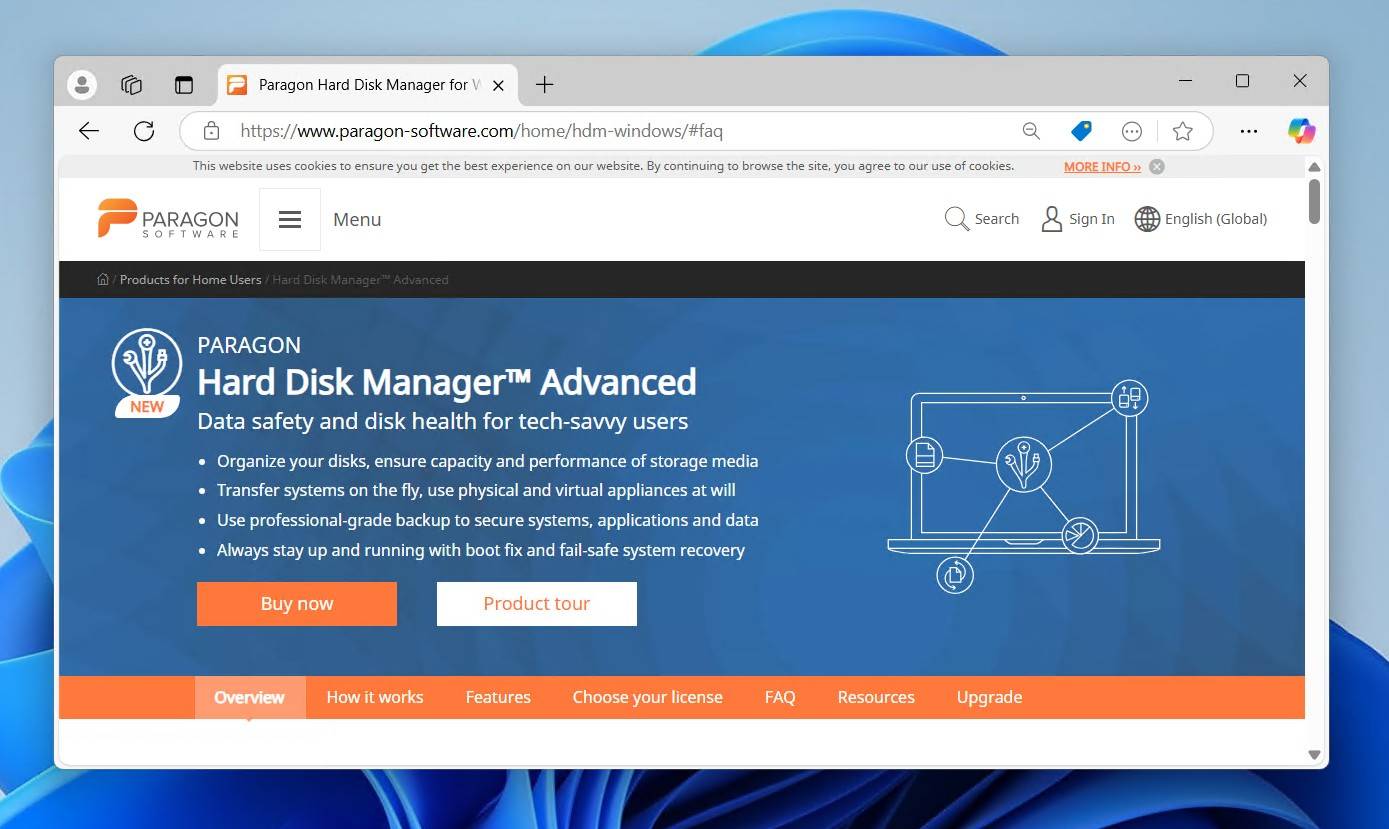
We’d recommend checking out Paragon Hard Disk Manager if you want to convert the file system from HFS to NTFS. HFS+ for Windows and APFS for Windows are also options if you want to keep the same file system but still use the drive on Windows. Otherwise, if the drive is using HFS, HFS+, or HFSX, you can get away with using the free tool HFSExplorer. Just bear in mind that HFSExplorer cannot recognize APFS drives.
Method 6: Disable the USB Selective Suspend Setting
Windows’ USB Selective Suspend setting allows it to power down individual USB ports. It is primarily used to save power when the ports are not in use.
However, sometimes the port remains powered down even when we need to use it. This could be why your hard drive isn’t showing up on the PC. You can disable this setting entirely to eliminate this problem.
- Click Start. Search “Control Panel” and open it.
- Click Hardware and Sound, then go to the Power Options.
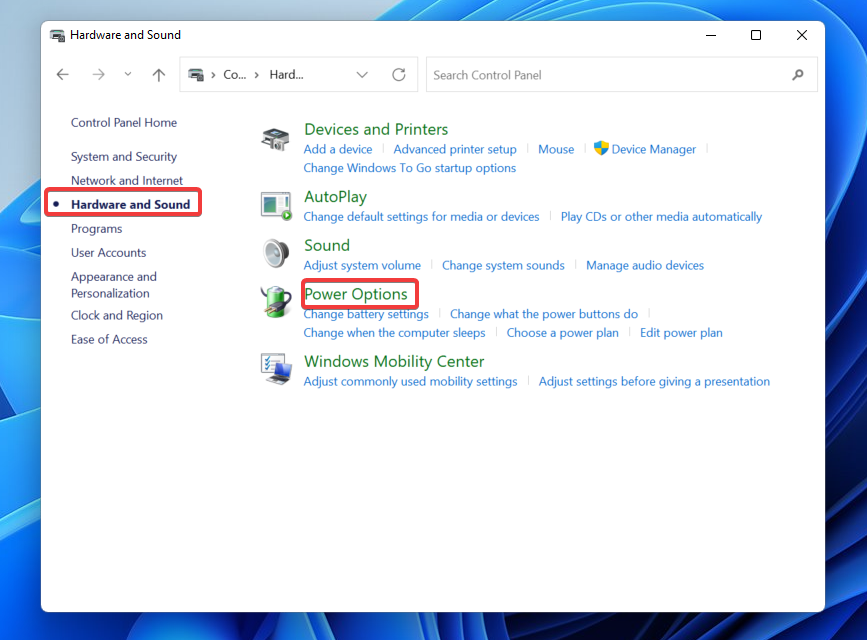
- Next, go to the Change plan settings option, then click Change advanced power settings.
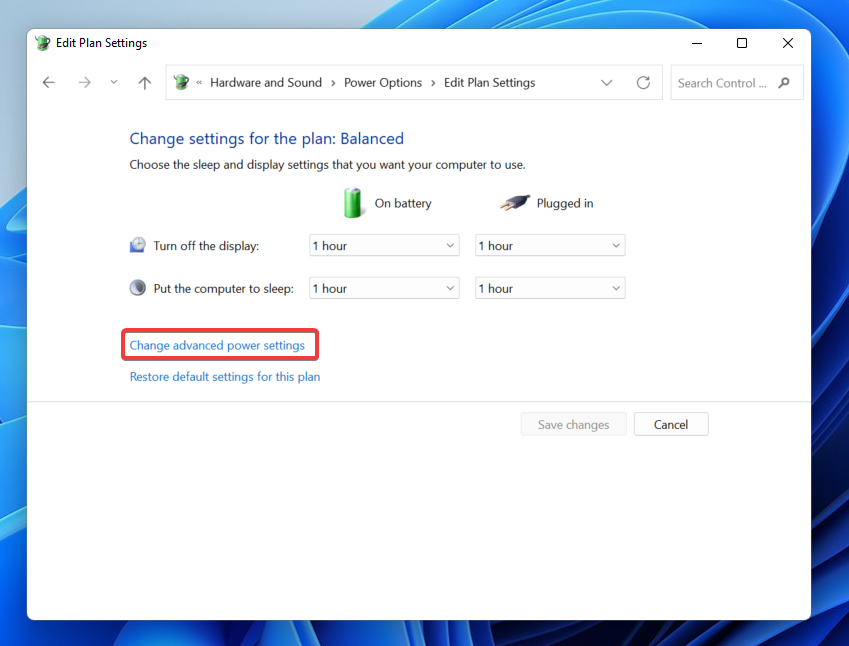
- Find the USB settings dropdown, and change the USB selective suspend setting to Disabled.
- Now, click Apply.
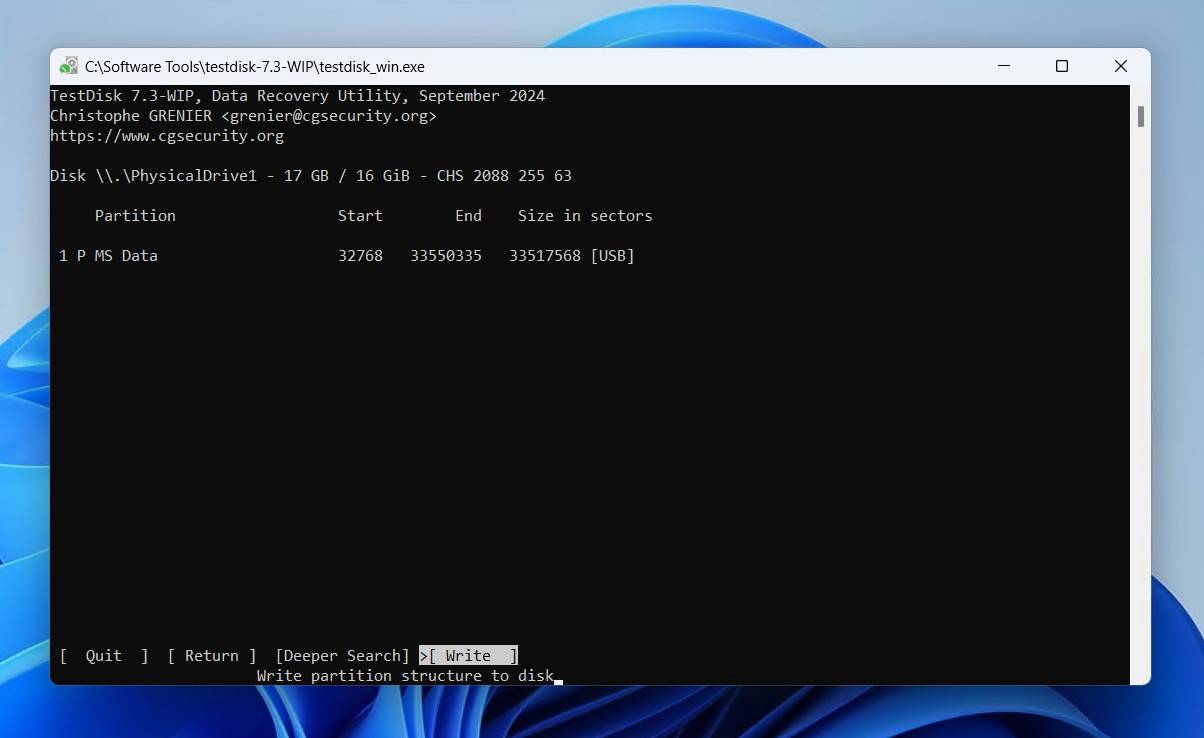
Method 7: Fix Corrupted Partition Using TestDisk
TestDisk is a well-known open-source tool that specializes in recovering partitions (along with the data they contain) from undetected external hard disks without formatting by fixing the underlying damage that caused the partition to disappear. While its free companion app PhotoRec is good for recovering individual files, TestDisk gives you the opportunity to restore the corrupted file system to its original state, bringing back the partition. It remains a popular go-to solution for RAW drive recovery.
It’s a terminal-based application, so you may experience some difficulty if you haven’t used a command-line interface (CLI) before. Don’t worry too much though, as our instructions will help guide you through fixing the corrupted partition with TestDisk:
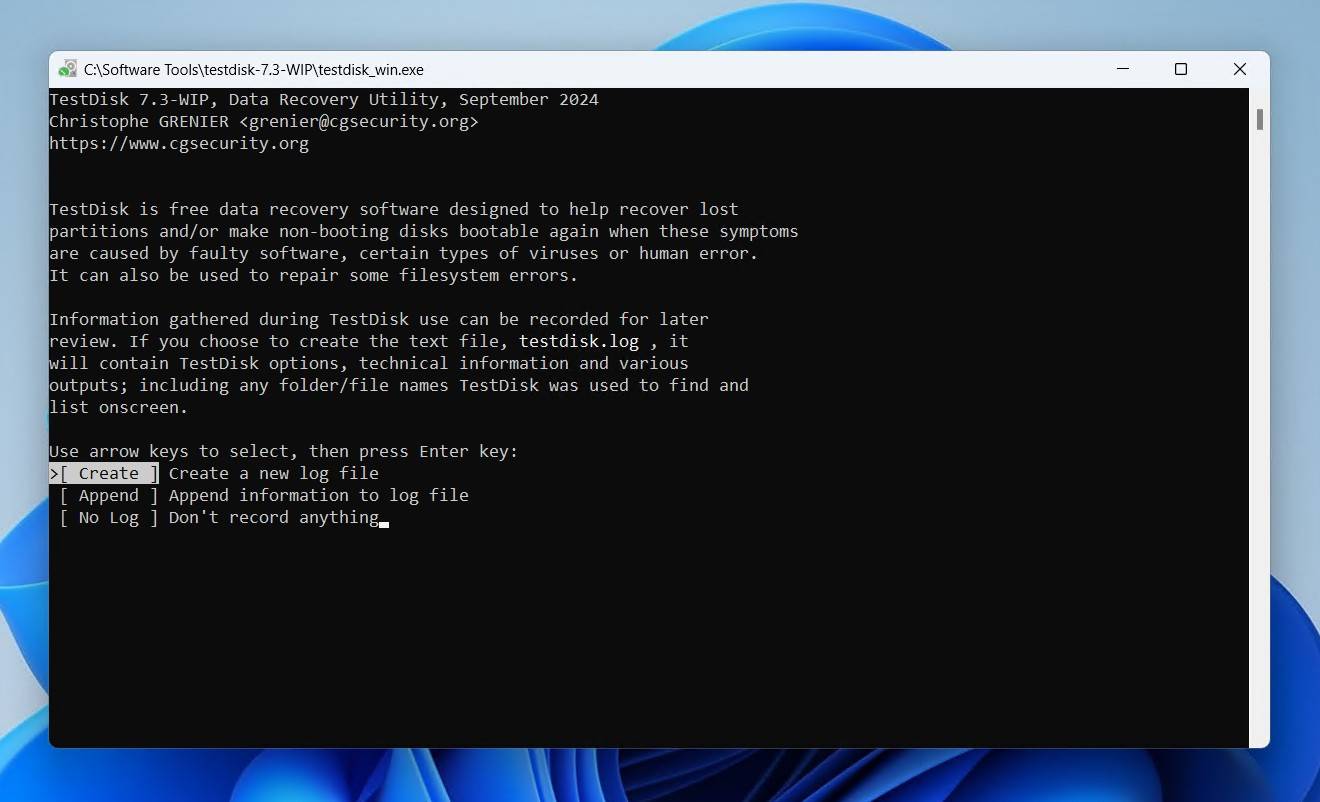
- Download and extract TestDisk. Open testdisk_win.
- Press Enter to create a new log file.
- Select the external hard drive and press Enter.
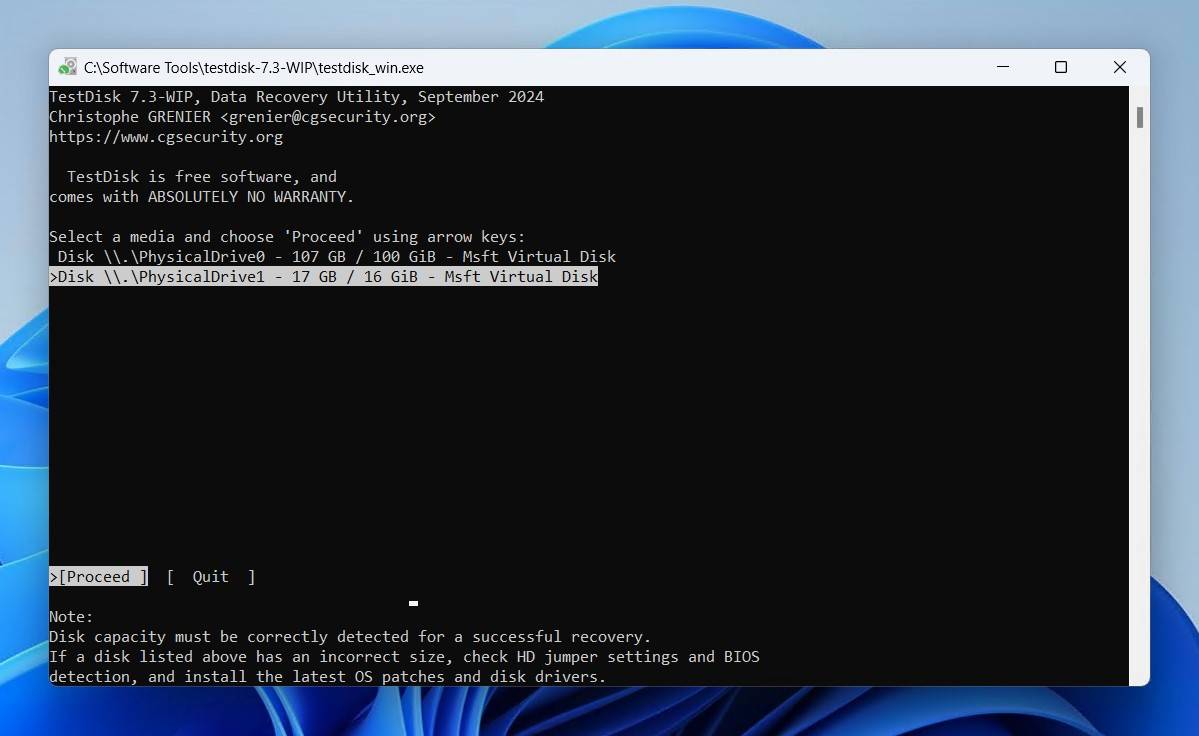
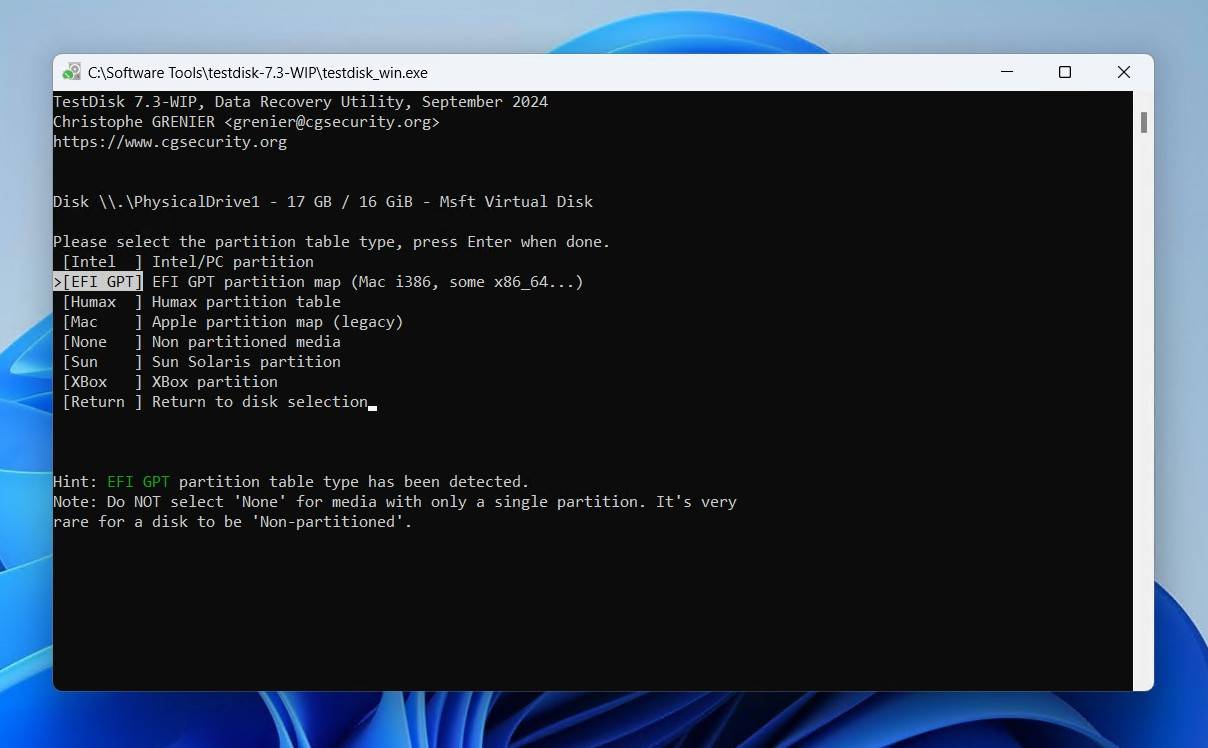
- Choose a partition scheme and press Enter.
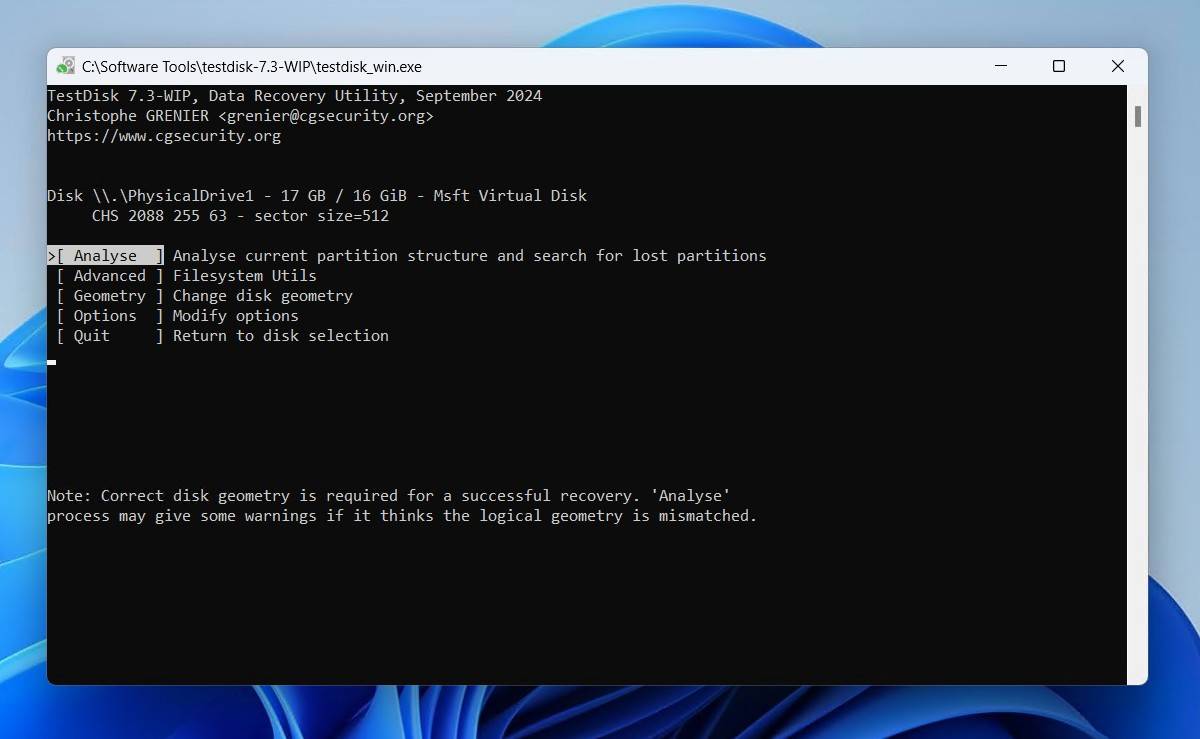
- Press Enter on the Analyse option.
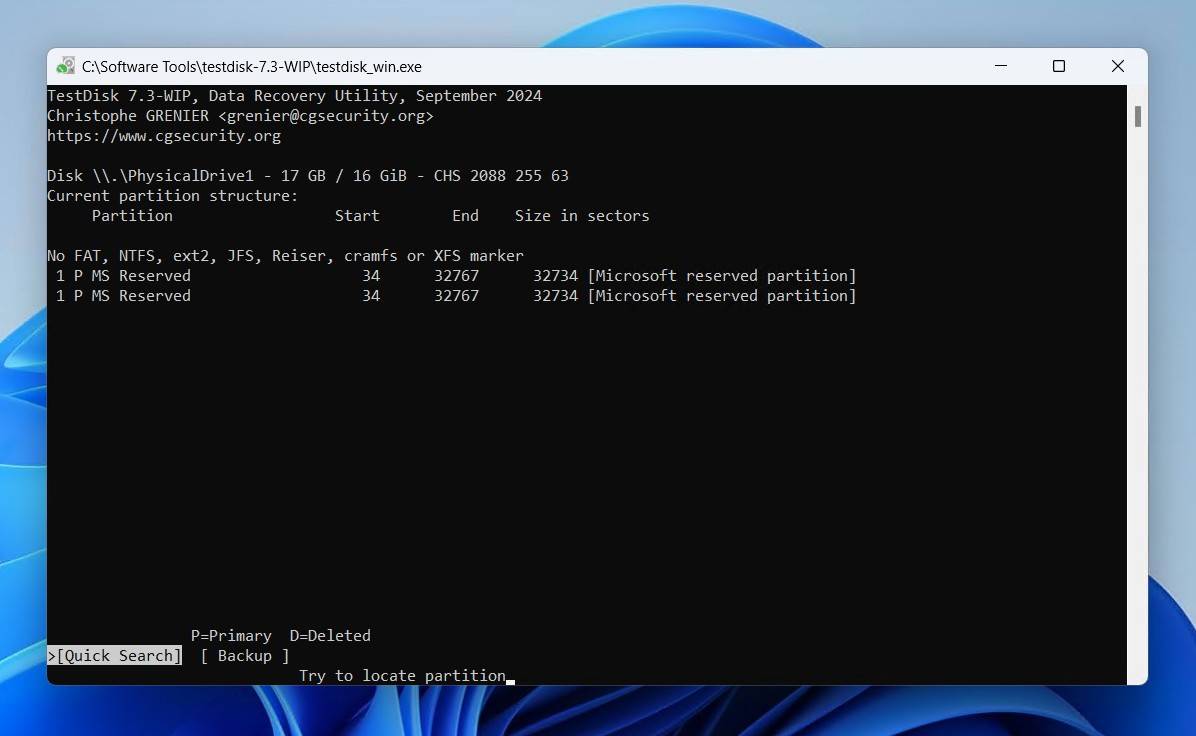
- Press Enter to begin the quick search.
- Press Enter.
- Select your partition, then press Enter.
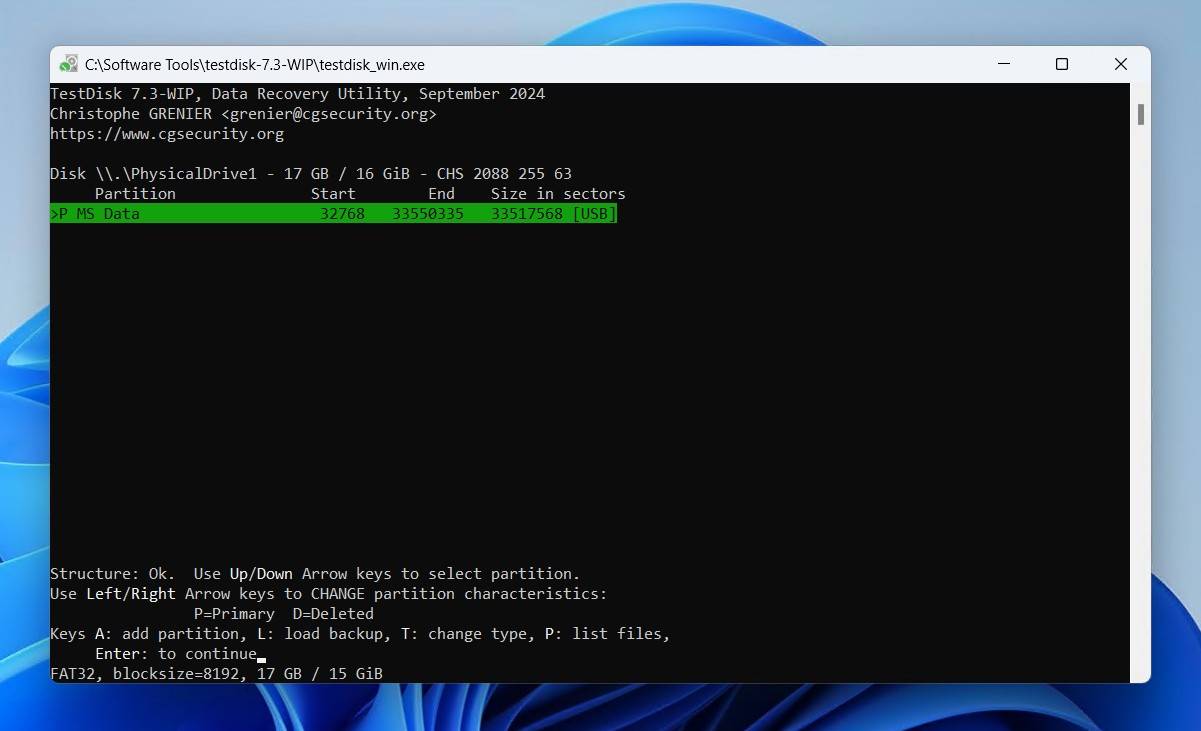
- Go to the Write option and press Enter.
Method 8: Format the External Hard Drive
If none of these methods work, you can try formatting your hard drive to a file system compatible with your system (say, NTFS). However, performing a format means all your existing data will be lost, and the hard drive will be restored to factory settings. So, before you format your drive, make sure to recover your data with reliable data recovery software.
These steps will guide you through how to format an external hard drive:
- Right-click Start and click Disk Management.
- Right-click the volume of your drive and select Format.
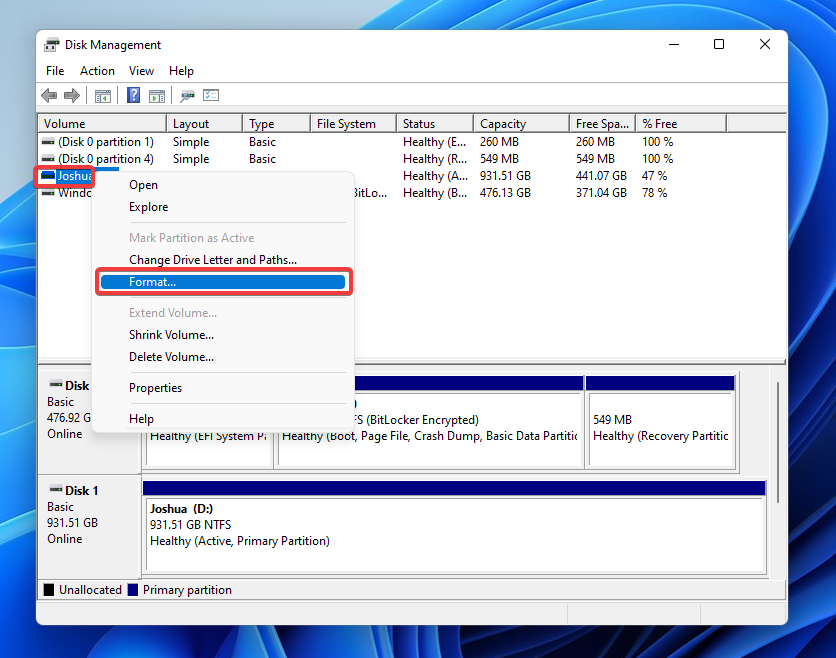
- Specify a name for the drive and the file system. Make sure Perform a quick format is ticked, then click Format.
- Finally, click OK.
What to Do If the External Hard Drive Is Still Not Detected
There’s only so much you can personally do to fix an external hard drive that’s not being recognized. If a format doesn’t fix it, or you find that the drive is physically damaged, then there’s likely no logical solution that can help. At this point, it’s time to call in the big guns: data recovery experts.
While using a data recovery service might prove to be a little expensive, the value you place on the data you are trying to retrieve will determine whether you are willing to part with the money.
We have collected together a list of the five best recovery services for you to consider, with all of them offering free assessments of drives so you know the chances of successful recovery before you have to pay anything.

Conclusion
If Windows doesn’t detect your external hard drive, one of these solutions is sure to be helpful. These methods can resolve most problems you’ll face with drive recognition. However, if you’ve tried all these solutions and the drive still doesn’t respond, it’s probably time to invest in a new hard drive.
FAQs
The data recovery process is almost exactly the same for both internal and external hard drives. If the drive you want to recover data from is a corrupted system drive, you will need to remove the hard drive and connect it to another computer as an external device before you can recover data from it.
A hard drive that’s not recognized as a disk drive in File Explorer, Disk Management, or BIOS is considered severely corrupted. DIY data recovery software isn’t capable of working with such drives. Instead, you should see our guide on crashed hard drive recovery to explore your options.
Using professional data recovery software like Disk Drill, you can recover files from an external hard drive that won’t read as long as the drive is (a) visible in Disk Management, and (b) displaying the correct size. Here’s how you can retrieve an external drive in just a few steps:
- Download and Install Disk Drill on your PC.
- Ensure that your external hard drive is plugged into your computer. Select the drive from the list of devices and click Search for Lost Data.
- Once the scan is complete, filter through the search results. You can select the entire drive to recovery or choose files from a specific partition.
- Now, select the recovery location and click Recover.
You can format an external hard drive that isn’t detected in File Explorer by doing it through Disk Management instead. Right-click Start and click Disk Management. From there, you can right-click the existing volume or unallocated space and format the external hard drive. Alternatively, you can use the format command.
If your PC isn’t recognizing your Seagate external hard drive, some possible reasons for this are:
- The USB drive or port is faulty and unusable
- File system corruption prevents Windows from finding the data
- There isn’t enough power to turn the external hard drive on and keep it running
- The Seagate hard drive’s file system is incompatible with your operating system
In most cases, you can still recover files from a Seagate external hard drive that’s not detectedusing data recovery software.