Old hard drives often store piles of personal and professional data that hold significant value and sentiment, such as family photos and videos or critical business documents.
That’s why this article will walk you through what you need to know in order to get your data back. We’ll cover everything from identifying your drive type to fixing detection errors, and explain exactly how to access files on old hard drive systems step by step.
How to Properly Identify an Old Hard Disk Drive Problem
Owners of old hard drives sometimes face problems that prevent them from retrieving their data. In most cases, the problems stem from incompatible connection interfaces, mechanical wear from years of inactivity, or corrupted file systems. The good news is that they can usually be solved at home and with relative ease.
Connection Interface Issues
Older drives use IDE (PATA) interfaces with wide ribbon cables and 40-pin connectors, while newer systems only have SATA ports. To complicate things further, old laptop hard drive models often use smaller 2.5″ IDE connectors that are even harder to find adapters for. If your drive has the wrong interface for your computer, you’ll need an adapter before you can even begin recovery.
Drive Hasn’t Been Used in Years
When a drive has been sitting unused for years, its read/write head can be literally stuck to the platters (this is often referred to as “stiction”). When this happens, the drive won’t spin up at all. You’ll power it on, but nothing happens.
If you do hear clicking or grinding noises when the drive powers on, stop immediately because these sounds are caused by the head trying to move in vain, which can result in the platters being scratched. The only solution to this problem is to remove the hard drive cover and repair the stuck head. Unfortunately, that’s something you should never attempt to do at home. Only professional data recovery and repair centers have the clean environments necessary to get it done safely.
Drive Mounts But Data Is Inaccessible
Sometimes the drive spins up fine and even shows up in your computer, but that’s where the good news ends. You might see:
- The drive appearing as RAW format instead of NTFS or FAT32, for example.
- “Drive needs to be formatted” error messages.
- Files and folders that were there before now missing.
- The drive showing as unallocated space.
These symptoms point to file system corruption, which means that the logical structure that organizes your files is damaged even though the physical drive might be working without any issues. In these cases, if the drive successfully mounts, you can take these steps to recover data from the drive.
How to Tell If Your Old Hard Drive Uses IDE or SATA
Before you can get files off your old hard drive, you need to determine the type of interface the drive uses. The interface type will dictate the kind of port, adapter, dock station, or hard drive enclosure you’ll need to connect the storage device to your computer.
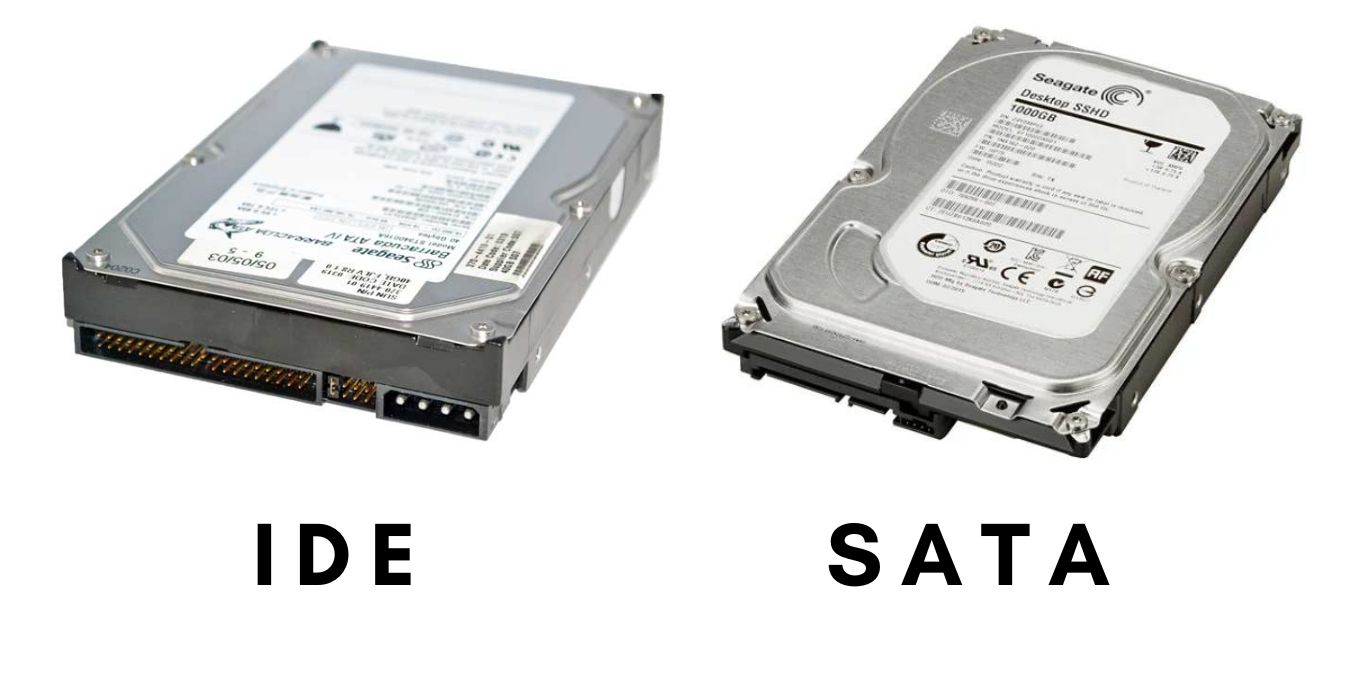
Hard drives commonly use either the IDE (Integrated Drive Electronics) or the SATA (Serial ATA) interface:
- IDE interface: IDE, also known as PATA (Parallel ATA), was widely used in computers manufactured before 2007. An IDE connector is larger and consists of two rows of pins with 20 pins in each row, making it 40 pins in total. These pins plug into a ribbon-like, wide, and flat cable. If your hard drive has a large, two-row pin connector, it uses an IDE interface. Laptop IDE drives use the same pin configuration but in a smaller 2.5″ form factor with a 44-pin connector that combines data and power.
- SATA interface: This interface came into mainstream use after IDE, offering faster data transfer speeds. A SATA connector is much smaller than an IDE connector and consists of two separate connectors: a larger one with 15 pins for power and a smaller one with 7 pins for data. The cables are thin and flat but not nearly as wide as IDE cables. If your hard drive has two small, separate connectors, it uses a SATA interface. Both desktop (3.5″) and laptop (2.5″) SATA drives use identical connectors, making it easier to get files off old laptop hard drive systems.
Hopefully, you now know whether your old hard drive uses an IDE or SATA connection. The next step is to connect the drive to your computer using an appropriate method, and that’s what the next section is all about.
How to Get Data from an Old Hard Drive
Let’s walk through the complete process of recovering your files. We’ll start with connecting your old drive to a modern computer, then move on to accessing and copying your data, and finally cover what to do if things don’t go as planned.
Step 1: Connect an Old Hard Drive to Your Computer
There are various ways to connect an old hard drive to a computer. We’ll cover three methods that should help you achieve the goal regardless of your technical skill level and circumstances.
Use an IDE/SATA to USB Adapter
Many newer computers don’t come with IDE ports anymore. Fortunately, you can still connect an old IDE hard drive to a SATA-only motherboard using a suitable IDE to SATA adapter.
IDE to SATA adapters come in two types: internal adapters that connect inside your computer case, and external USB adapters that let you connect the drive like an external hard drive.
Here’s how to use an external USB adapter (the easiest method):
- Remove the old hard drive from the computer it’s currently installed in.
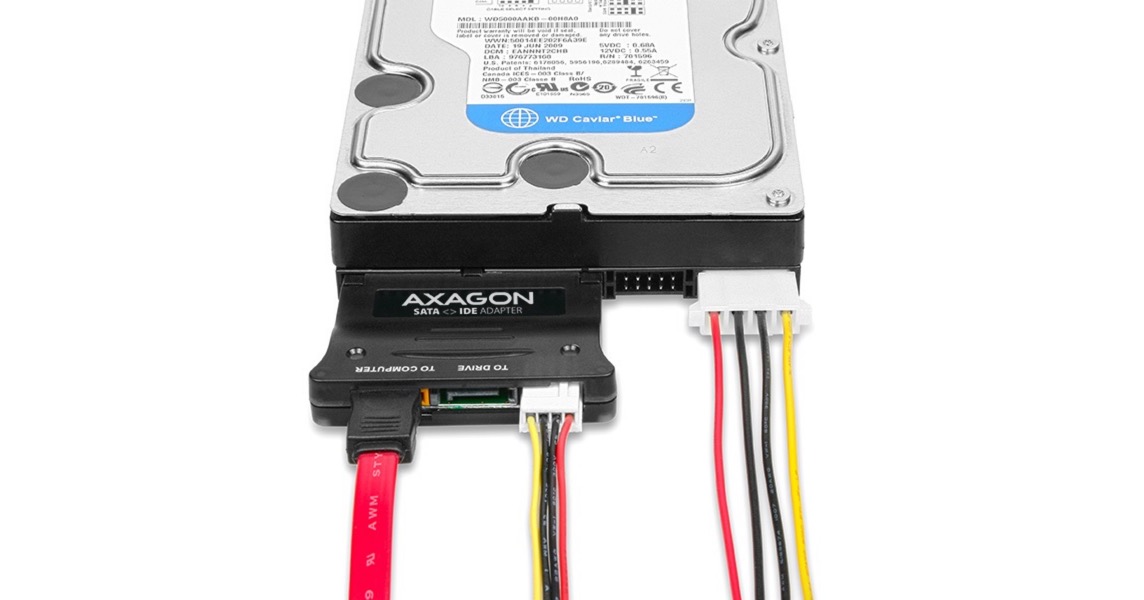
- Plug the IDE connector on your old hard drive into the IDE end of the adapter.
 The image shows an MT5100 SATA/IDE to USB adapter.
 - Connect the USB cable from the adapter to your computer.
- Power on the adapter if it has a separate power switch.
- Verify if your old hard drive has been successfully recognized.
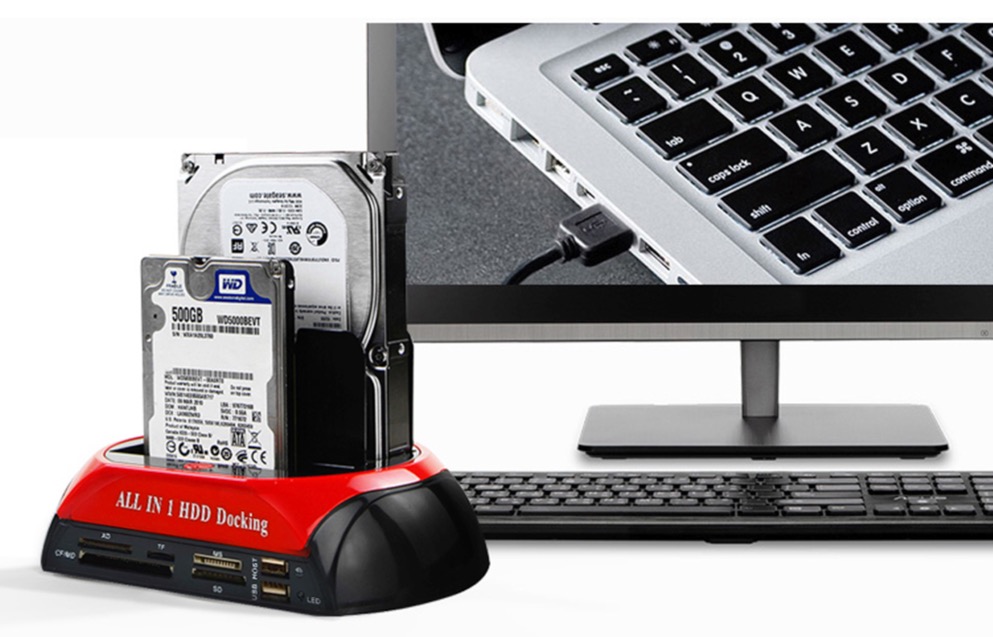
Get a Hard Drive Docking Station or Enclosure
A hard drive docking station or enclosure can turn any old internal hard drive into an external hard drive that you can effortlessly connect to your computer using a USB port. This method is great if you don’t have access to any desktop computer but do own a laptop.
- Choose a docking station or enclosure compatible with your old hard drive’s IDE or SATA interface.
- Remove the old hard drive from the computer it’s currently installed in.
- Insert the drive into the docking station or enclosure.
- Connect the docking station or enclosure to your new computer using a USB cable.
- Verify that you can access files on the old hard drive.
Note: Hard drive docking stations and enclosures intended for regular 3.5″ internal hard drives typically require an additional supply of power because the USB interface is limited to 5 V of electricity with a maximum current of 0.5 A.
Connect the Old Hard Drive Directly to the Motherboard
If you want to connect your old hard drive to a desktop computer, then you can do so directly as long as you’re fine with some tinkering and have an available IDE or SATA port on your motherboard. Here’s what you need to do:
- Remove the old hard drive from the computer it’s currently installed in. Make sure to shut down the computer beforehand to avoid logical corruption. It’s also good practice to disconnect the computer from the power supply network for additional safety.

- Open the case of the new computer. Again, make sure the computer isn’t running.
- Find an available IDE or SATA port and connect the old hard drive to the available port using a compatible IDE or SATA data cable. Don’t forget to also connect the power cable from your power supply to the old hard drive.
- Close the case and turn the computer on.
- Verify if your old hard drive has been successfully recognized.
If you don’t have the right port available on your motherboard (for example, your old drive uses IDE but your motherboard only has SATA ports), you can use an internal IDE to SATA adapter:
- Remove the old hard drive from the computer it’s currently installed in.
- Plug the IDE connector on your old hard drive into the IDE end of the adapter.
- Open the case of the new computer.
- Connect the SATA end of the adapter to a free SATA port on your computer’s motherboard.
- Close the case and turn the computer on to verify if your old hard drive has been successfully recognized.
Step 2: Get Files Off Old Hard Drive
If your old hard drive connected successfully and shows up in your computer, you might be able to simply copy your files over. But here’s the reality: old hard drives degrade over time. You might see corrupted file systems, error messages, or find that your data is simply inaccessible.
That’s where hard drive data recovery software becomes essential. Disk Drill can access both your existing files and recover data that seems lost due to file system corruption or accidental deletion. Plus, it includes a byte-to-byte backup feature that lets you create a safe copy of your failing drive before it deteriorates further.
Method 1: Use Data Recovery Software
Follow these steps to get data off your old hard drive using Disk Drill:
- Download Disk Drill from its website and install it on the computer to which you’ve connected your old hard drive.

- Launch Disk Drill and locate your old hard drive in the list of available drives. Before scanning, we strongly recommend creating a byte-to-byte backup first. To do that, select the Byte-to-byte Backup tool in the left pane, choose your old drive, and click Create backup.

- If you’ve created a backup image of your old hard drive in the previous step, you need to mount it first by clicking the Attach disk image link at the bottom of the Storage Devices section. You can then select the image (or your old hard drive if you haven’t backed it up) and click the Search for lost data button. The data recovery software supports an array of file systems, including FAT16/FAT32/exFAT, NTFS, NTFS5, HFS, HFS+, APFS, EXT2/EXT3/EXT4, and even RAW disks.

- Give Disk Drill all the time it needs to recover data from the old hard drive. Keep in mind that old hard drives are often slow, so don’t be surprised if Disk Drill takes a while to finish. You can preview scan results in real time if you want to by clicking the Review found items button during scanning.

- Review the found files and select the ones you want to recover. You can choose to see only existing (files that are currently present on the old hard drive) or only deleted (files that have been deleted from the old hard drive but can still be recovered) if you want to. Disk Drill’s file format filters and search feature make it easy to locate specific files. To quickly find photos, videos, or documents, use the file type filters on the left side of the screen.

- Click the Recover button and choose a location on your new computer to save the recovered files. Never save recovered files back to the same old hard drive as this could overwrite data you’re still trying to recover.

Step 3: Contact a Professional Data Recovery Service

While Disk Drill can handle most data recovery situations, including corrupted file systems, deleted files, and drives showing as RAW, some problems require professional intervention. If you notice any of these warning signs, stop using the drive immediately and contact a data recovery service:
- Clicking, grinding, or beeping sounds coming from the drive.
- Drive doesn’t spin up at all (no vibration or sound when powered on).
- Burning smell or visible damage to the drive’s circuit board.
- Drive was physically damaged (dropped, exposed to water, fire damage).
- BIOS/system doesn’t detect the drive at all, even after trying different cables and computers.
These symptoms indicate physical damage that software alone cannot fix. Continued attempts to run a physically damaged drive risks destroying your data permanently. Professional services have clean rooms and specialized equipment to safely disassemble drives and recover data from damaged components.
FAQ
To access old hard drive on new computer, first identify whether your drive uses IDE (wide 40-pin connector) or SATA (small L-shaped connectors). Most drives from 2007 onwards use SATA. For SATA drives, the easiest method is using a USB-to-SATA adapter or docking station to copy data from old hard drive to new computer. IDE drives require a USB-to-IDE or IDE-to-SATA adapter. The drive should appear in Windows 10 or Windows 11 as a new drive letter. If it doesn’t show up, check Disk Management to see if it’s detected. If it is, then you can recover data from it using data recovery software like Disk Drill.
If your old hard drive won’t turn on, it’s best to ship it to a professional data recovery service center capable of diagnosing and repairing the issue. DIY attempts to access its contents could result in permanent data loss.
To read a SATA hard drive using a USB port, you’ll need a hard drive docking station or enclosure. Simply insert the SATA hard drive into the docking station or enclosure and then connect it to your computer using a USB cable.
To retrieve data from an old external hard drive, you should be able to just connect it using a USB or, in some cases, FireWire cable and then access the files directly. If the files are not accessible or the drive is experiencing issues, consider using data recovery software like Disk Drill to create a byte-to-byte backup of the drive. You can then scan the backup image to recover all existing, corrupted, and missing data.
To get pictures off an old computer hard drive, first connect it to your computer using a USB adapter, docking station, or direct motherboard connection. If you can see the drive in Windows Explorer, you can simply browse to your pictures and copy them to your new computer. However, if you can’t access the files directly due to corruption, permission issues, or deleted data, you’ll need data recovery software. Disk Drill is a great choice for photo recovery because it lets you filter results by file type by activating the Pictures file type filter (or even narrowing the scan results down to a specific image file format like JPG or PNG). What’s more, Disk Drill supports many RAW image file formats that professional and amateur photographers alike rely on.
If you’re having issues accessing your old hard drive on a Windows PC due to insufficient permissions, you can fix this through File Explorer. Navigate to This PC, right-click your old hard drive, and choose Properties. Go to the Security tab and click Advanced. Select the current user and click Change permissions, then select the user again and click Edit. Give the selected user Read access and confirm your changes. This process grants your Windows user account the necessary permissions to access files on the old hard drive that may have been protected under a different user account or Windows installation.
Disk Drill offers a free backup feature that creates an exact copy of your drive without any size limitations. Simply launch Disk Drill, select the Byte-to-byte Backup feature in the Extra Tools section of the left panel, choose your drive, and click the Create backup button. This process reads every sector of your drive, including damaged areas and deleted files that are still physically present on your drive, to create a safe image you can work with multiple times without risking further damage to the original drive.
If your drive spins up but Windows doesn’t recognize it, check Disk Management first (right-click Start button > Disk Management). The drive might be there but without a drive letter, marked as “unallocated,” or showing as “not initialized.” Try assigning a drive letter or initializing the disk if prompted. If the drive doesn’t appear at all, test different USB ports (preferably USB 2.0 for better compatibility), cables, and adapters. You can also check Device Manager for any driver issues. If these steps fail, the drive might have logical damage that requires data recovery software like Disk Drill to access files on the old hard drive, or physical issues needing professional recovery.
Yes, drives showing as RAW typically have corrupted file systems, but the data often remains intact. Disk Drill is a great example of data recovery software that excels at RAW drive recovery with its ability to recover lost data from RAW partitions that were previously formatted as NTFS, FAT32, exFAT, HFS+, APFS, and other file systems. It does this by first attempting to reconstruct the damaged file system using any remaining structural information, then falling back on deep scan technology that searches for file signatures, which are unique patterns that identify specific file types like JPEG images, Word documents, or video files.
Conclusion
The task of recovering data from an old hard drive is complicated by the fact that the computer interfaces that these drives use may not be compatible with modern systems. But with a bit of patience, the right tools, and the instructions provided in this article, you should be able to get data off any old hard drive that still works in no time.