In this UFS Explorer review, we’ll break things down into clear, separate categories: features, recovery performance, user feedback, and pricing compared to competitors. Each section gets its own score from 1 to 5. Then at the very end, we’ll average it all out to give you our final verdict.
📌 Here’s our brief summary:
If you’re serious about data recovery, UFS Explorer might be exactly what you’re looking for. It’s not flashy. It’s not built for beginners. But under the hood? It’s one of the most capable recovery tools available for professionals and power users alike.
In our tests, UFS Explorer showed great results in recovering data from formatted and corrupted drives. It’s fast, highly configurable, and supports an impressive range of file systems. But all that power comes with a learning curve – and a price tag. Home users might find better options when it comes to the balance between ease of use, features, and licensing.
| 👍 Strengths | 👎 Weaknesses |
|---|---|
|
|
🔎 Why You Can Trust Us:
Every app review is the result of a hands-on, multi-step process run by team experts. Our QA specialists run recovery tests on real drives. Then, lab engineers verify the results to make sure every text is accurate. Experienced technical editors present the results in a clear, reader‑friendly format.
Main Recovery Features in UFS Explorer
UFS Explorer is a multi-platform data recovery tool developed by SysDev Laboratories, a Ukrainian company founded back in 2008 by a team of software engineers, mathematicians, and analysts. They’ve clearly built this tool with professionals in mind – it’s packed with low-level options, deep file system support, and advanced recovery modes that aren’t common in most consumer-grade tools.
| Category | Details |
| 💻 Platform | Windows, macOS, Linux |
| 🆓 Free Version | Trial limited to files <768 KB (Professional), <256 KB (Standard) |
| 📁 File Type Support | Thousands of formats supported, including custom and uncommon ones |
| 📂 File System Support | NTFS, FAT12/16/32, exFAT, ReFS, HFS+, APFS, ext2/3/4, Btrfs, XFS, and more |
| 🔍 Scan Modes | Quick & Deep scan, customizable scanning, IntelliRAW rules |
| 🧠 RAID/NAS Support | Yes – advanced RAID 0/1/5/6/10, custom RAID layouts, NAS systems |
| 🖥️ Virtual Disk Support | VMware, VirtualBox, Hyper-V, Parallels, DMG, AFF4, E01, etc. |
| 💿 Disk Imaging | Yes – multi-pass disk imager with advanced settings |
| 🔐 Encrypted Volumes | BitLocker, FileVault2, LUKS, VeraCrypt, TrueCrypt, and more |
| 📊 SMART Monitoring | No live SMART monitoring |
OS Support
UFS Explorer covers all three major OSs: Windows, macOS, and Linux. While the core features – like partition recovery, file restoration, and disk imaging – are the same across the board, there are a few key differences.
- UFS Explorer for Windows offers the most seamless experience, with full access to system and external drives, no extra configuration needed.
- UFS Explorer for Linux is the most flexible, especially in Live USB setups – perfect for rescuing dead systems, though it does assume some tech know-how.
- UFS Explorer for Mac, however, runs into some limitations. On newer Macs with T2 or Apple silicon chips (M1–M4), it can’t access internal system drives due to macOS security restrictions. So while you’ll still get all recovery features, you won’t be able to scan your Mac’s main drive.
File Format & File System Support
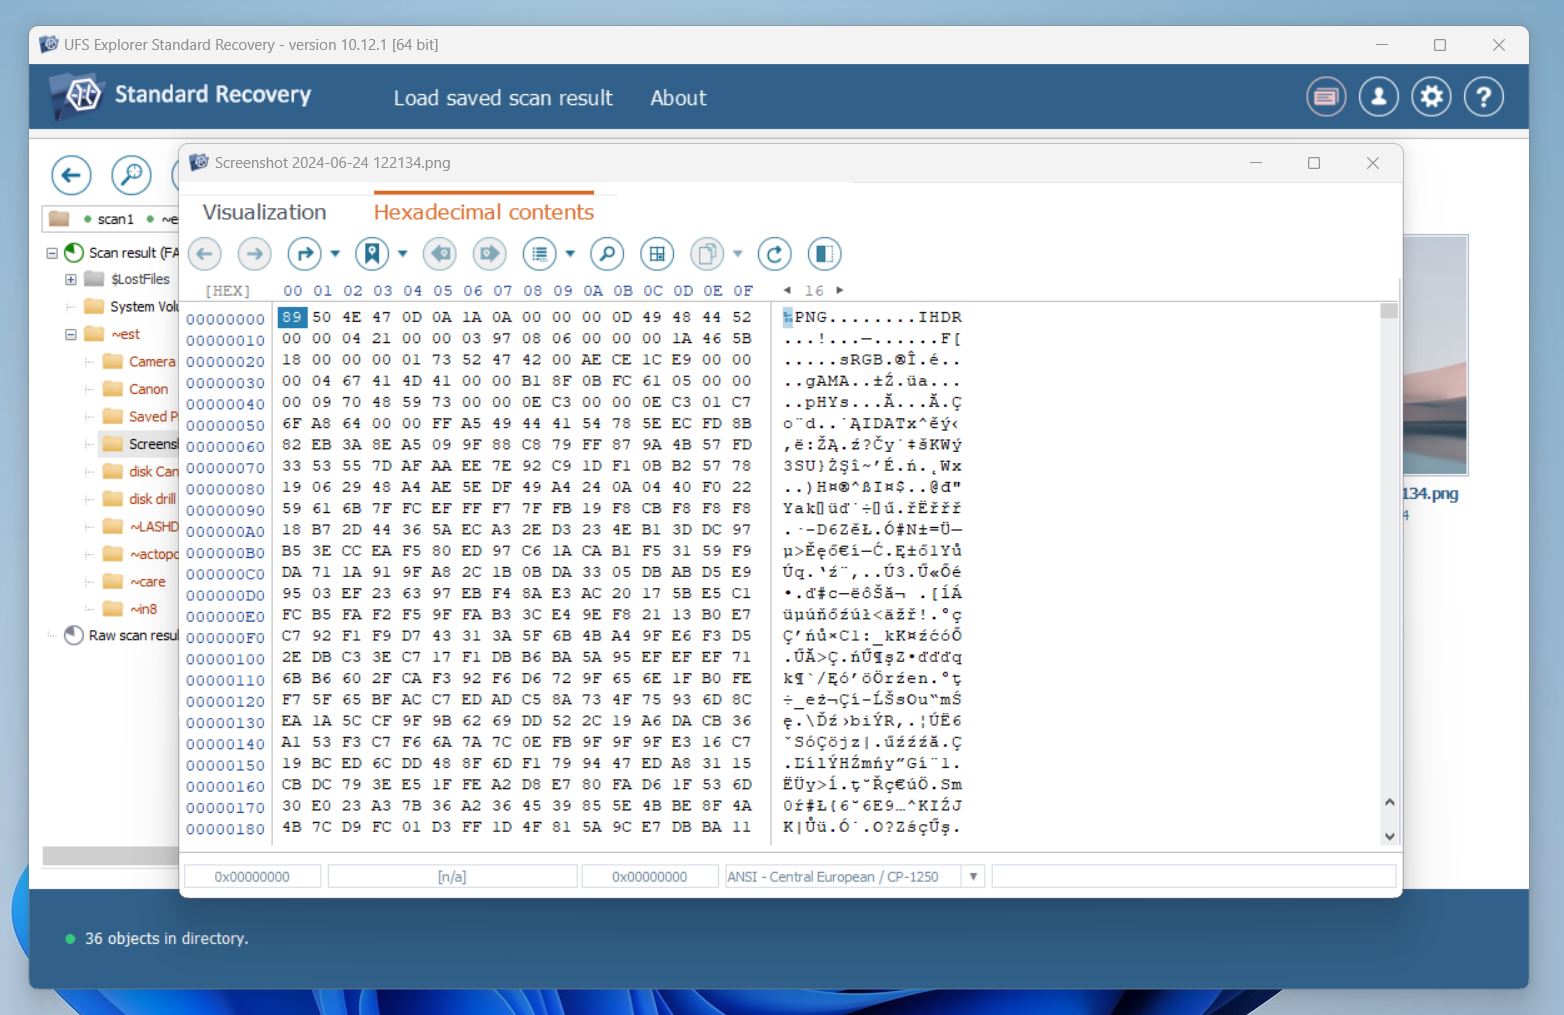
When it comes to file types, UFS Explorer doesn’t advertise an exact number (like “1,000+ formats supported”), and frankly, it doesn’t need to. It uses deep file system parsing combined with content-based (signature) recovery when needed, which means it can recover all the typical file types you’d expect – and a whole lot more. If you need to find a file signature that’s not recognized out of the box you can add it yourself using the built-in file signature editor and hex viewer.
Also, when it comes to file system compatibility UFS Explorer is one of the most versatile tools we’ve reviewed. Here’s what you get:
- Windows: FAT12/16/32, exFAT, NTFS, ReFS/ReFS3
- macOS: HFS, HFS+, APFS (including encrypted)
- Linux: Ext2/3/4, XFS, JFS, ReiserFS, Btrfs, F2FS
- BSD/Solaris: UFS, ZFS
- VMware: VMFS, VMFS6
- Legacy/Other: HPFS, NWFS, NSS, ISO9660/UDF (read-only)
UFS Explorer can access, analyze, and recover from almost any major OS file system – and many niche or outdated ones too. Compared to most tools on the market, this is one of the most complete sets of file system support available – especially if you’re dealing with multi-platform environments.
Storage Devices & Data Loss Scenarios
UFS Explorer supports a wide range of storage devices – from basic USB sticks and memory cards to more advanced setups like encrypted disks, LVM volumes, and virtual machines (VMware, Hyper-V, VirtualBox, etc.).
It handles the usual data loss scenarios: accidental deletion, formatting, file system damage, and partition issues.
The software also works with encrypted volumes (BitLocker, FileVault, LUKS, and more), as long as you have the right credentials.
One of the areas where UFS Explorer truly shines is how it handles RAID and complex multi-disk volumes. But that deserves a closer look – let’s talk about it next.
RAID & Complex Volume Support
If there’s one area where UFS Explorer pulls ahead of most of the competition, it’s RAID and complex volume support. It can deal with:
- Standard RAID levels – RAID 0, 1, 3, 5, 6, 10, 50, 60, and more.
- Nested and custom RAID setups – Including reverse and hybrid configurations.
- Drobo BeyondRAID – With automatic detection and dedicated recovery assistant.
- Synology Hybrid RAID.
- Microsoft Storage Spaces.
- Linux LVM, LVM Thin – With thin provisioning support.
- Apple Fusion Drive and Core Storage.
- ZFS with RAID-Z, Z2, Z3.
- Degraded, partially failed, or manually rebuilt arrays.
- Disk images and virtual RAID setups – Combine physical and image-based components seamlessly
It also includes a RAID builder tool and can even reconstruct volumes from virtual machines or forensic images. If RAID recovery is on your to-do list, this is one of the most capable tools you’ll find.
Ease of Use & Extra Features
Let’s be honest – UFS Explorer isn’t built for beginners. The interface leans more toward raw functionality than sleek visuals, and the terminology can feel overwhelming if you’re not already familiar with data recovery work. There’s no friendly wizard like you get in Recuva, and no “click here to get started” tips like EaseUS throws at you. There’s 0 hand-holding.
But to be fair – every feature is just one click away. Once you figure out where things are, the layout actually makes sense.
As for extras, beyond what we’ve already covered, you do get tools like a hex editor, advanced scan options, and support for bad block maps. But surprisingly – for such a powerful tool, it can’t read S.M.A.R.T. data from external devices. Also, there’s no session manager to resume previous scans – something we’d absolutely expect in software of this caliber.
OK, that’s about it – we think it’s time to give UFS Explorer Data Recovery its first score.
It gets a solid 4 out of 5 from us.
It’s one of the most capable tools out there, packed with features pros actually need – especially when it comes to RAID, encryption, and complex storage setups. But a couple of things held it back from getting a perfect score.
First, the learning curve is steep, and there’s little guidance for less experienced users. Second, missing basics like S.M.A.R.T. monitoring and no session manager are real drawbacks in a tool of this caliber.
Still, for anyone who knows what they’re doing (or is willing to learn), this is serious software. Solid 4.
How to Recover Data Using UFS Explorer
Now that we’ve wrapped up the overview, let’s get into something more hands-on. If you’ve never used UFS Explorer before, you’re probably wondering: what does the actual recovery process look like? Or better yet – how useful is it in real-world data loss situations, if you’re just a regular home user and not sitting in a data recovery lab?
That’s exactly what this section is about. We’ll explain how we tested the tool, what we found, and how to use it without needing a PhD in digital forensics. But if you’re in a hurry, here’s a quick teaser of what UFS Explorer was able to recover during our test scenarios:
| Test Scenario | Scanning Speed | Data Recovered (Approx.) | Documents | Photos | Videos |
| Deleted Files | ~10 min | ~1.4 MB out of 1.5 GB | ✅ 100% | ✅ ~90% | ✅ ~90% |
| Quick Formatted Drive | ~10 min | ~1.4 MB out of 1.5 GB | ✅ 100% | ✅ ~85% | ✅ ~85% |
| Corrupted File System | ~13 min | ~1.1 MB out of 1.5 GB | ✅ 100% | ⚠️ ~85% | ⚠️ ~80% |
As you can see – it’s no slouch. Let’s break down exactly how we ran these tests.
Testing Process
First thing first – here’s the setup we used in our UFS Explorer data recovery review:
- OS: Windows 11 Pro (23H2)
- CPU: Intel Core i7-12700F
RAM: 32 GB DDR4 - Storage: 1TB NVMe SSD (host system)
- Test Device: 16GB USB 3.0 flash drive (FAT32)
- File Set: ~1.5 GB of real-world data (a mix of DOC/DOCX, XLSX, PDF, JPG, PNG, CR2, MRW, ORF, TIFF, MP4, MOV, MXF)
We designed our tests to simulate what the average user might face. The scenarios:
- Deleted Files – Classic. Just delete everything and empty the Recycle Bin.
- Quick Format – Reformat the USB using Windows default quick format.
- Corrupted Drive – We intentionally damaged the file system headers so that Windows couldn’t recognize the device anymore. It appeared as RAW/unallocated in Disk Management.
We loaded our test flash drive with a mix of just under 800 files – most of them typical formats you’d expect to see in day-to-day use. DOC, DOCX, PDF, JPEG, PNG… the usual suspects. But we also added a few trickier formats. Things like MXF (video), ORF (Olympus RAW photos), and TIFF (which can trip up less advanced tools). We didn’t want to make it too easy.
Installation & Scanning
Before we go into the results, let’s walk through how the recovery process actually works with UFS Explorer. Because if you decide to give it a shot yourself, the last thing you want is to trip over something the developer assumed you already knew. So let’s break it down step by step.
- First up, installation. We downloaded the Standard version of UFS Explorer from the official site. Out of all available editions, Standard seemed the most relevant for regular users – it’s not as expensive as the Pro version and still gives you full access to recovery features 99% of people would ever need.
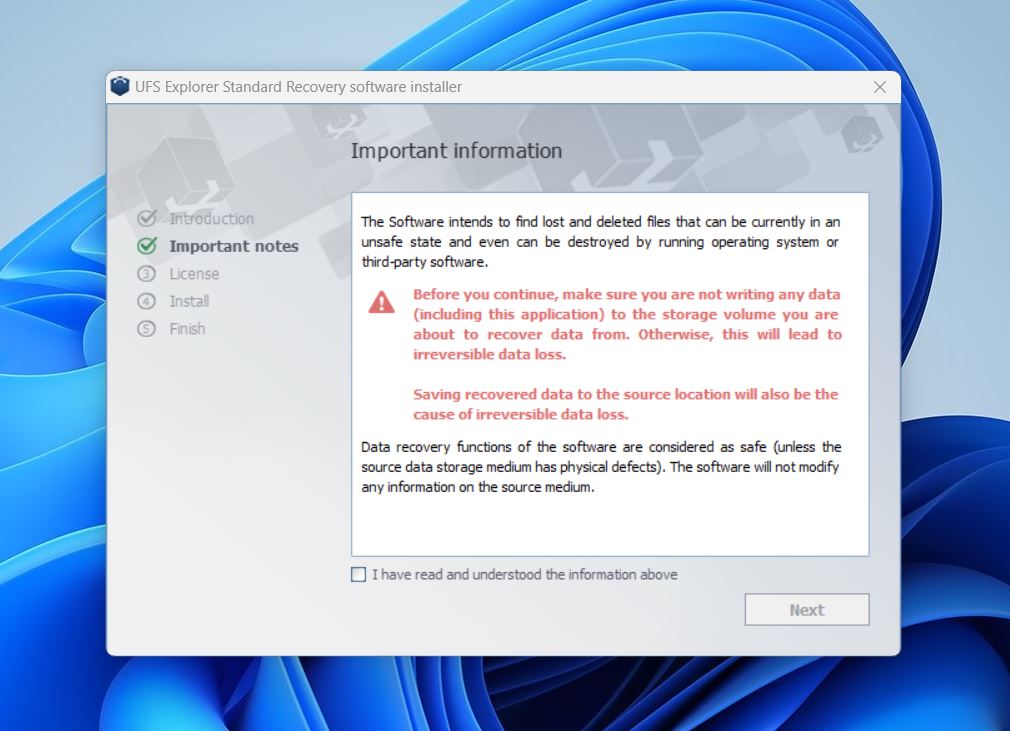
- Installation was smooth and to the point. The installer lets you change the default install path – useful if you’re trying to recover data from your system drive. It even warns you not to install the software on the same drive you’re recovering from. Standard but important advice (overwriting lost data is one of the fastest ways to make it unrecoverable.)
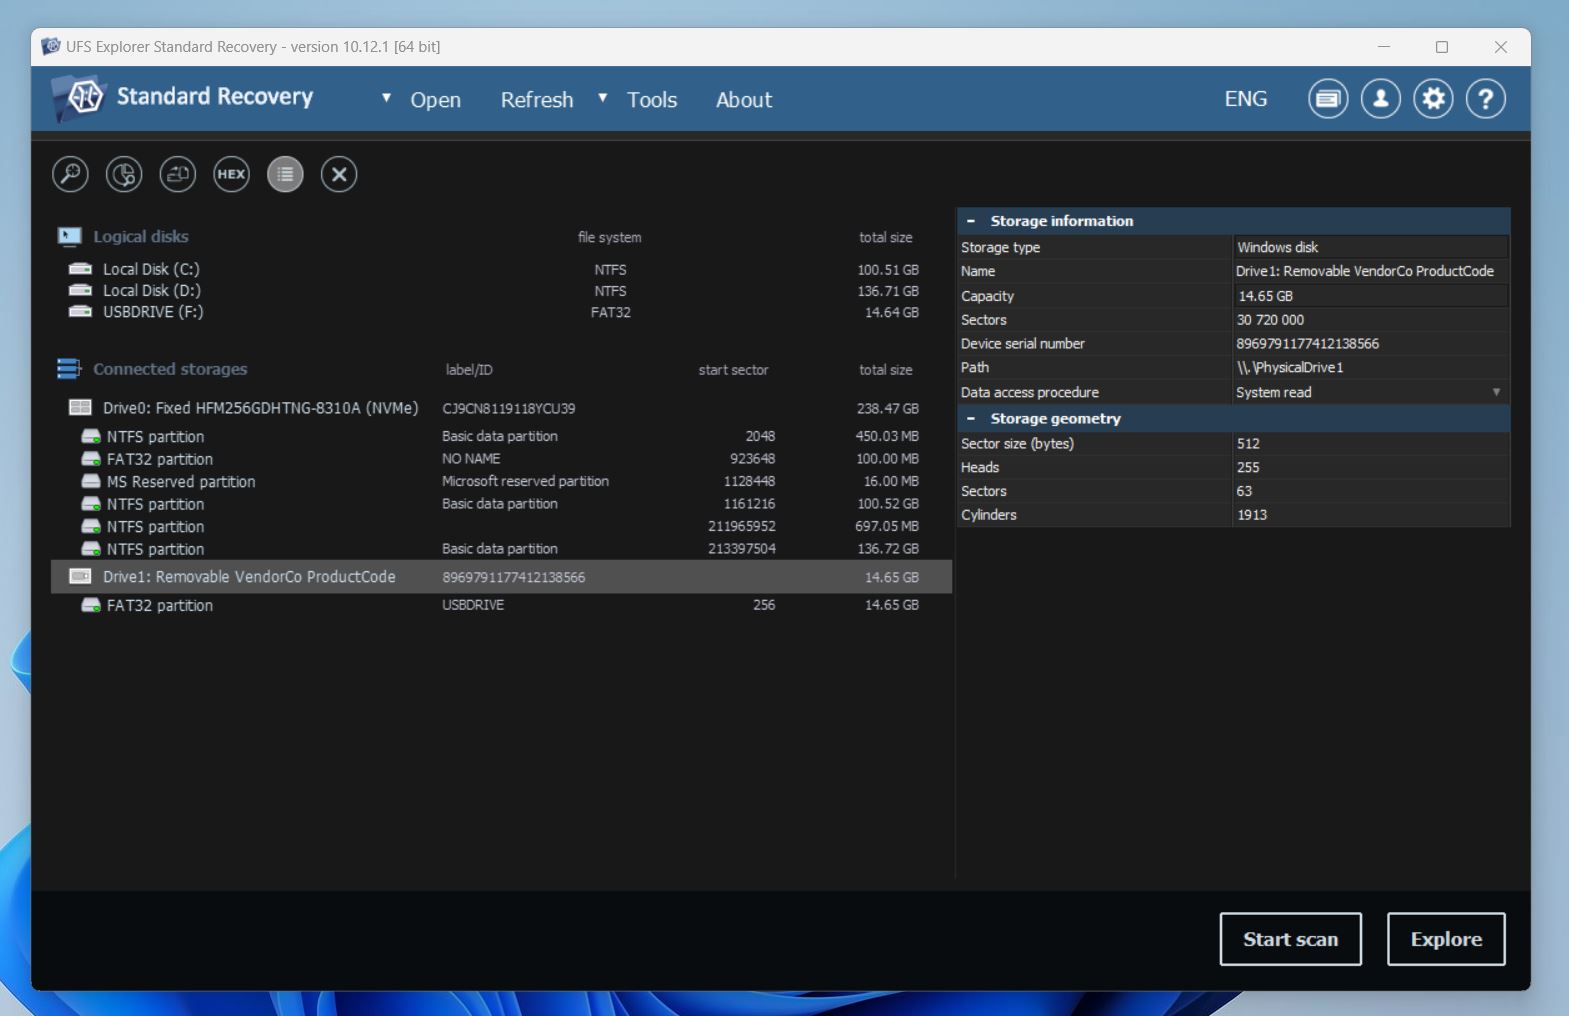
- With the software up and running, we plugged in our 16GB USB flash drive and were greeted by UFS Explorer’s very… engineer-friendly layout. Drives are listed on the left; technical details pop up on the right. A bit dense, sure – but logical. Scaling on high-res displays could use some love (text was a little fuzzy on our 4K), but it’s readable enough to work with.
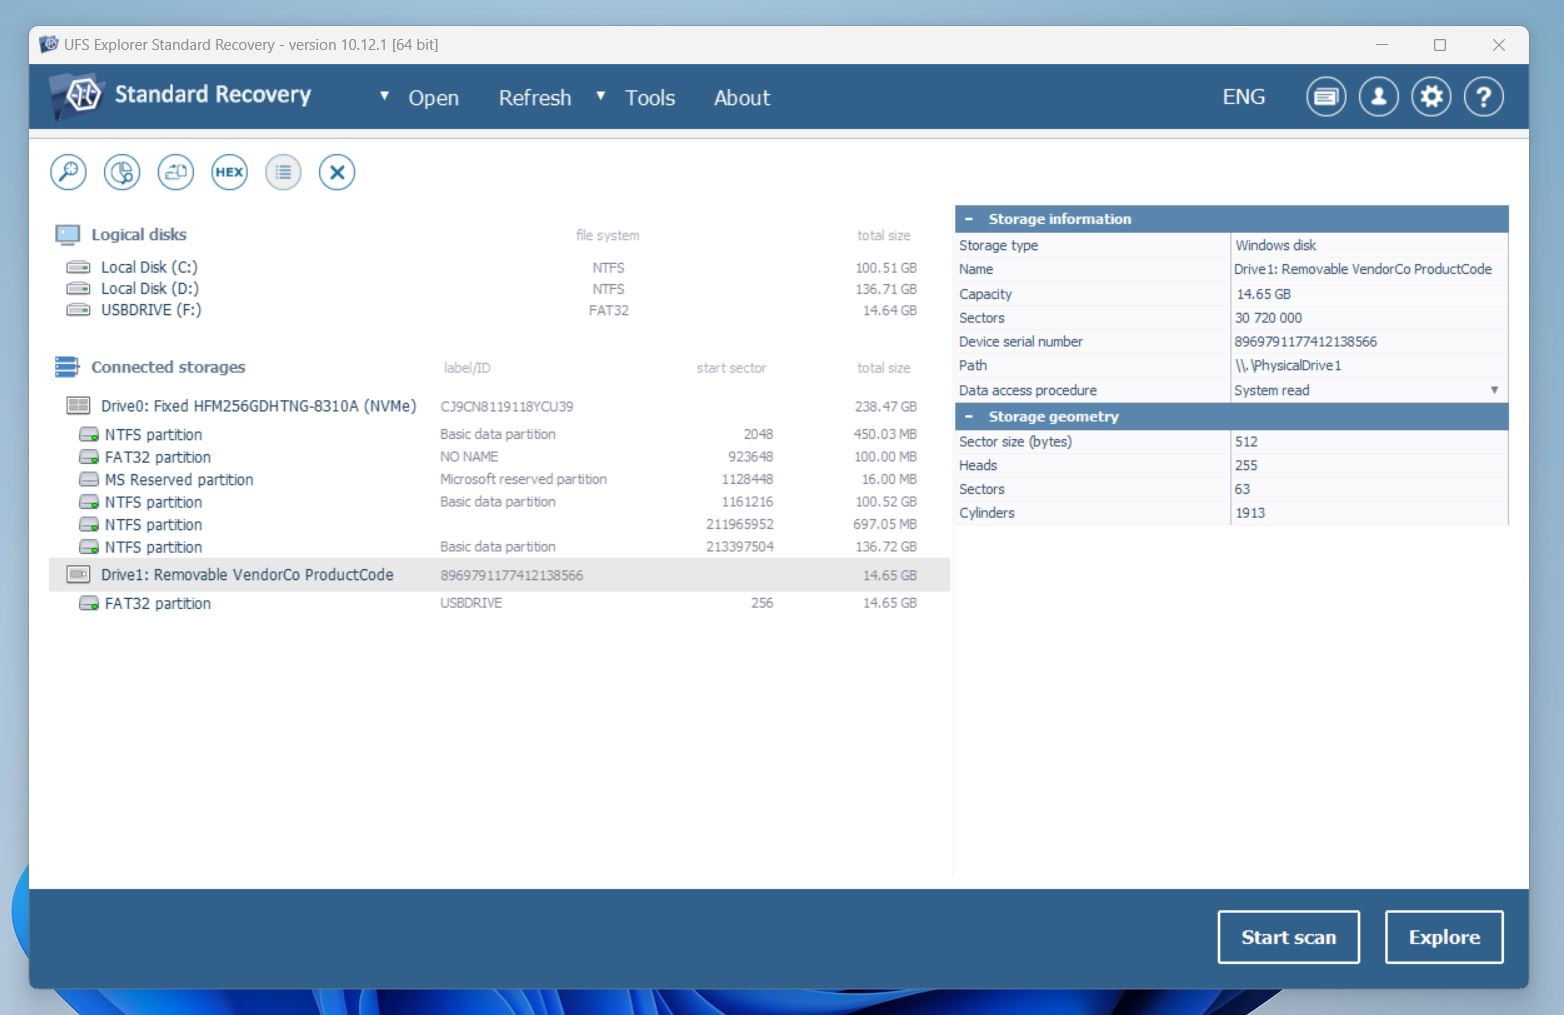
- We selected our test USB, hit Start scan, and were prompted to choose a region to scan. We left everything at default – entire drive, index file system, and scan unused space only.
- Next step: file system selection. Our drive was FAT32, but again, we left all file systems selected, just to be thorough.
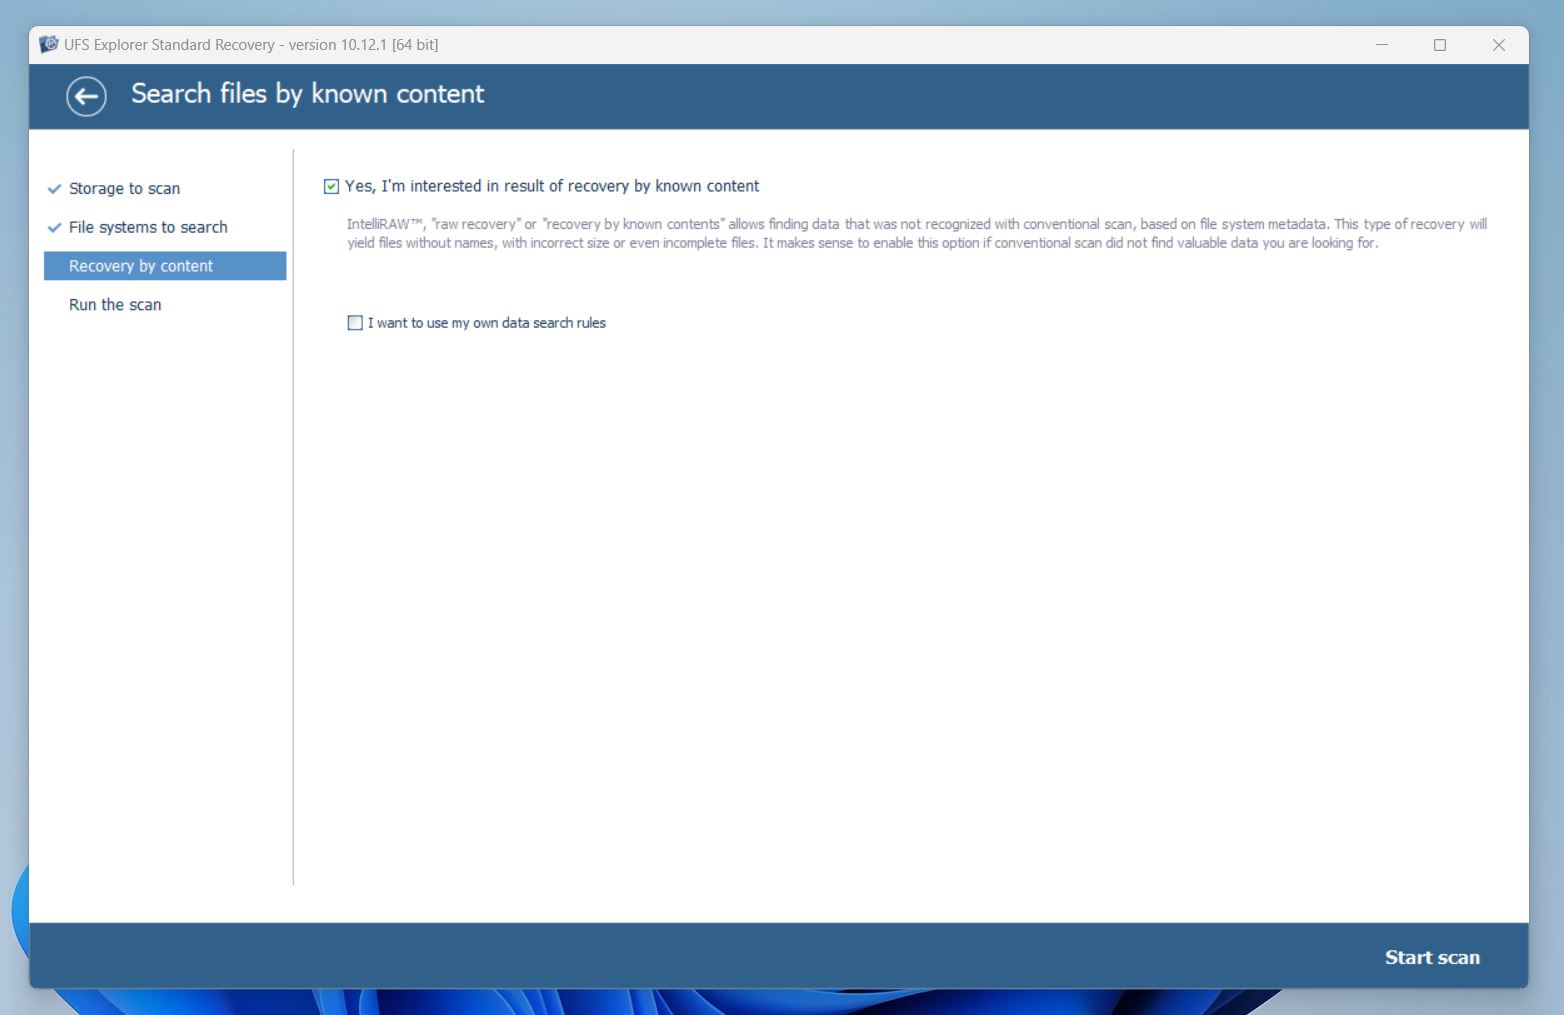
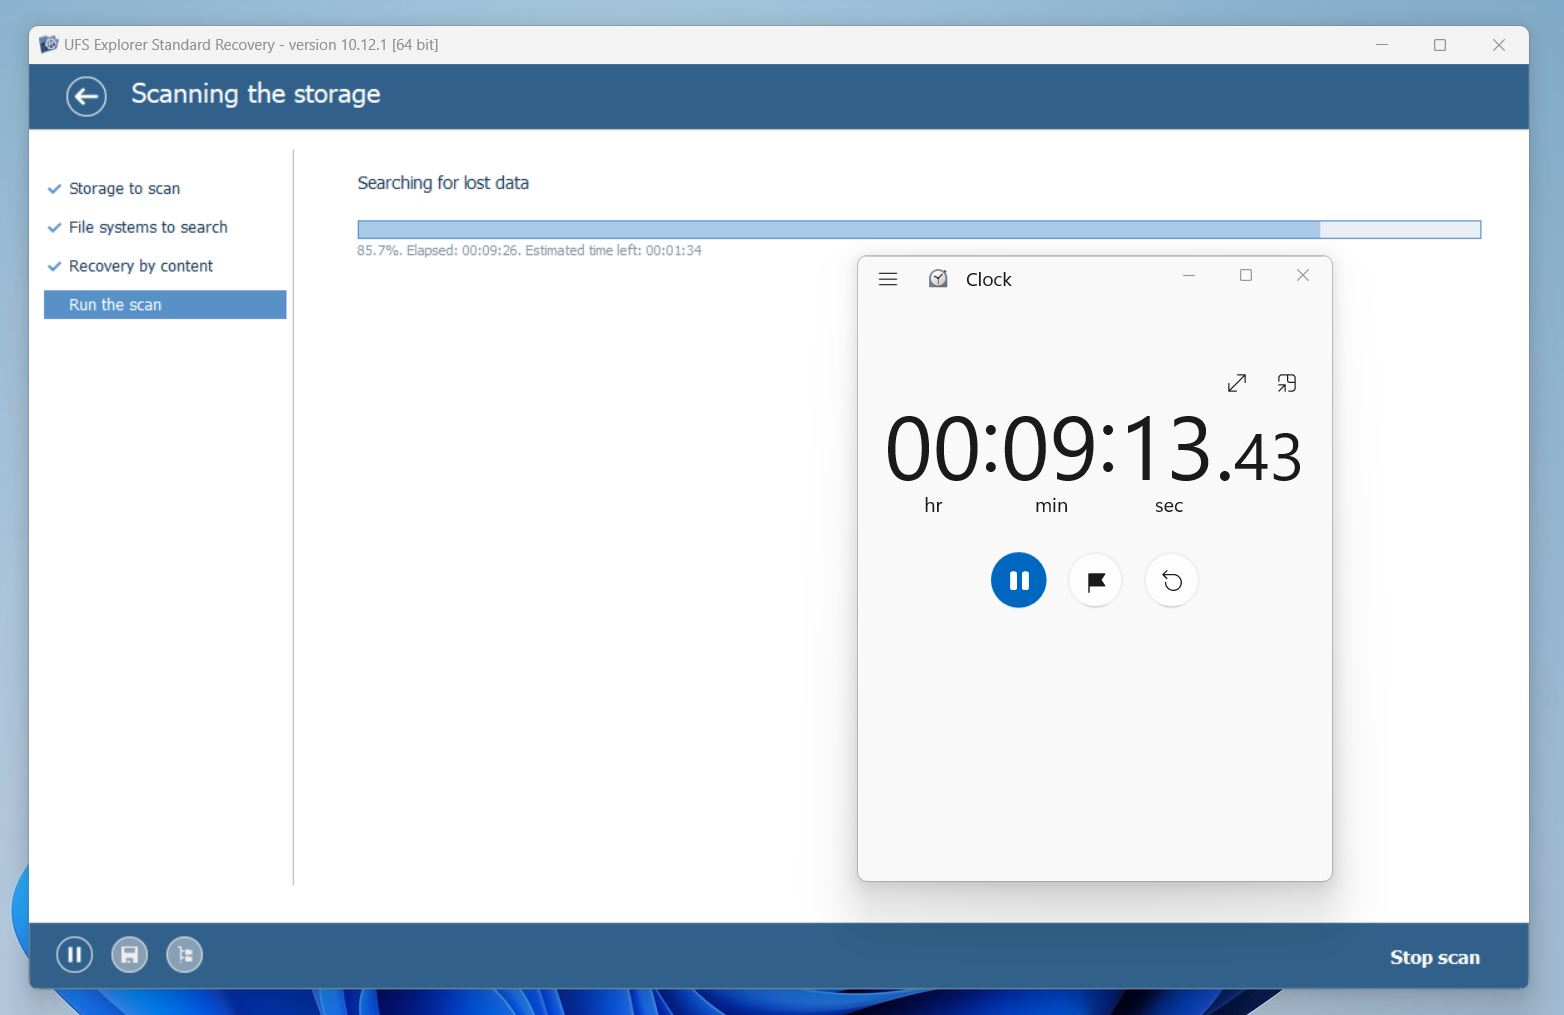
- Then came the prompt for IntelliRAW – UFS Explorer’s deep, sector-level scan engine. We decided to do so, and the scan kicked off.
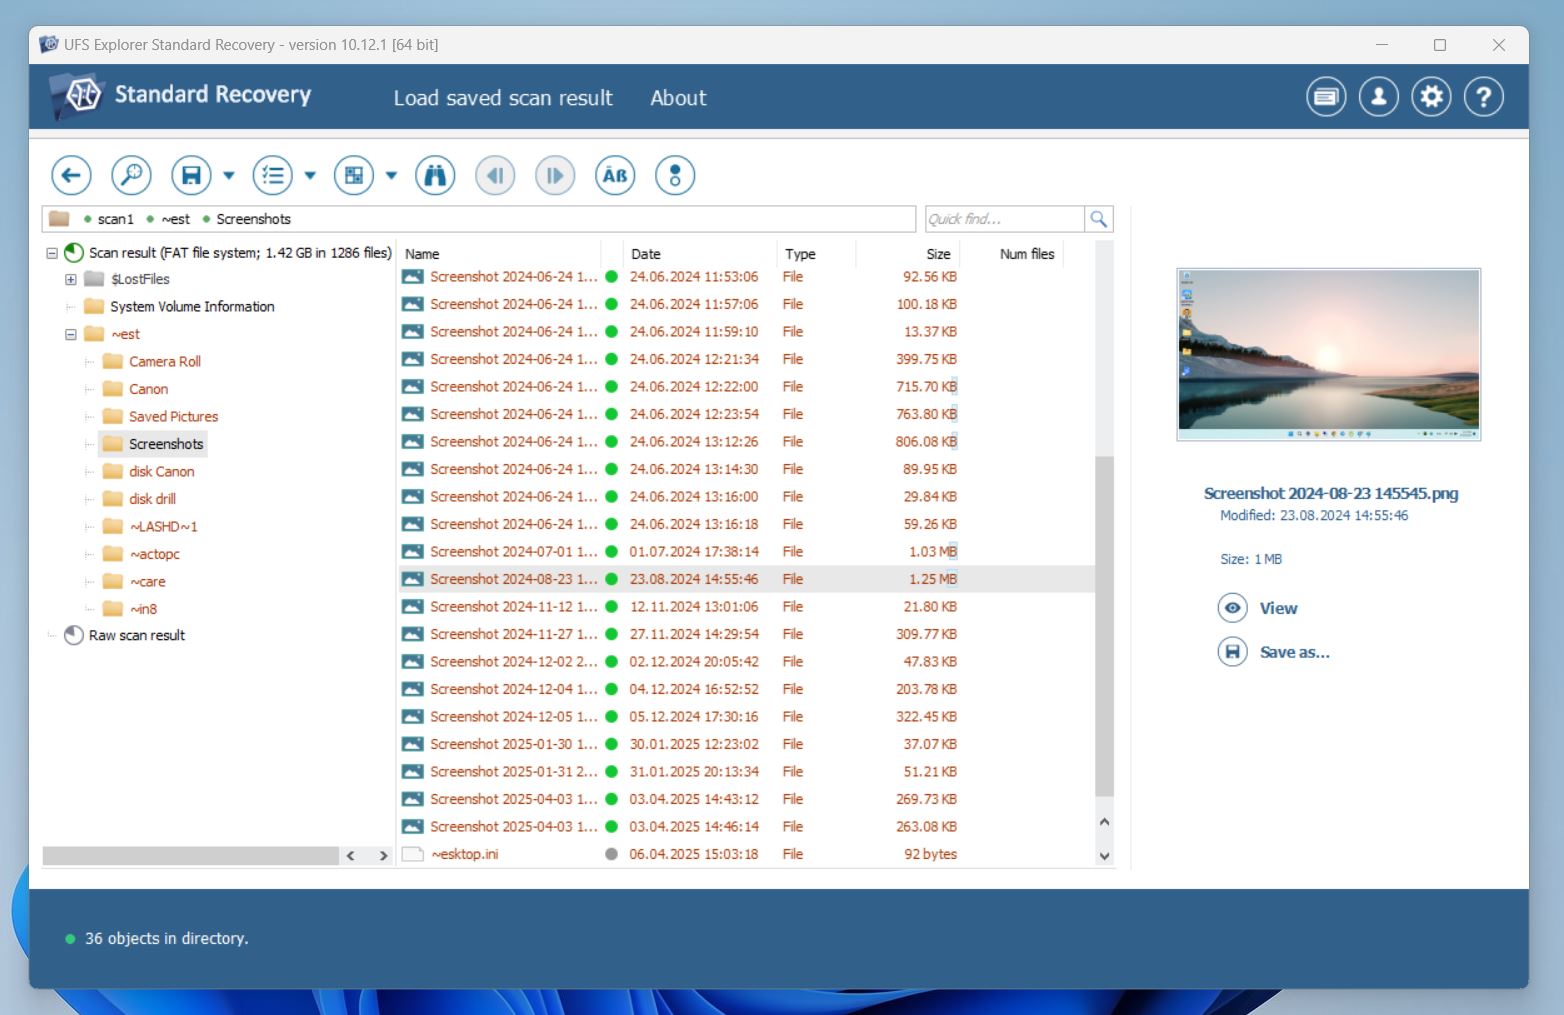
- The whole scan took just around 10 minutes, which is a solid result for this kind of deep analysis. Once done, the recovered data showed up neatly categorized: normal file structure here, IntelliRAW findings there. Deleted files were clearly marked, and we were able to preview a good chunk of our JPGs and PDFs with 0 issues.
- One gripe: there are no checkboxes to select files. You have to Ctrl+Click or Shift+Click – which is fine if you know that, but it’s not obvious. And no, there’s no little popup telling you either.
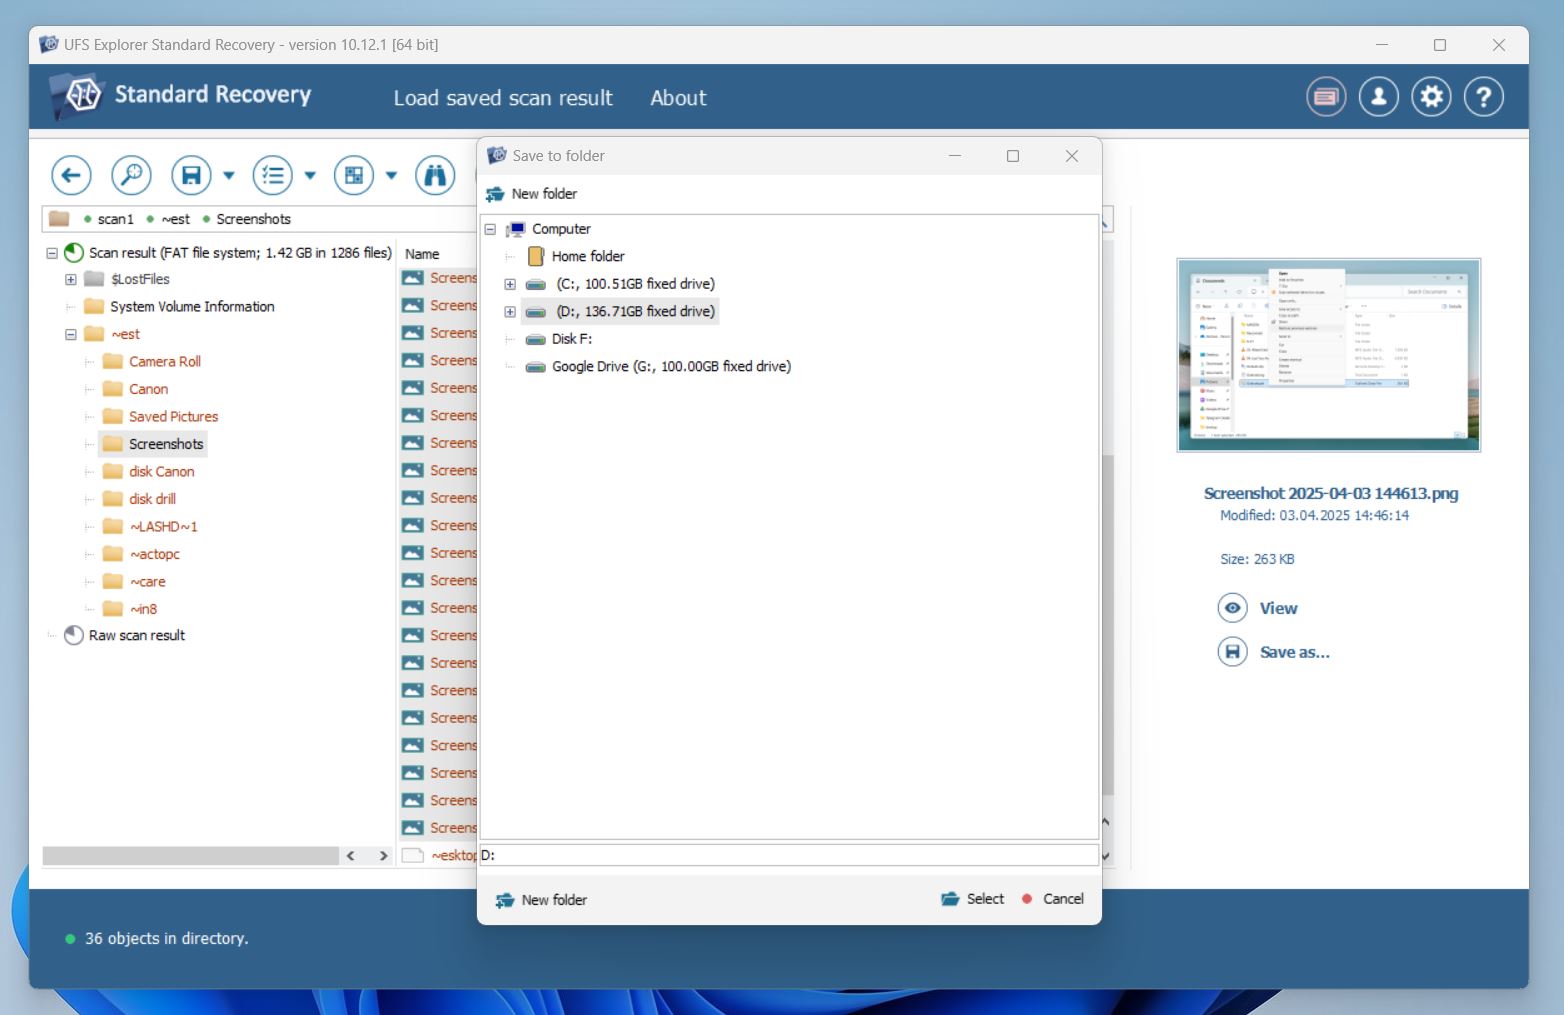
- Once everything was selected, we clicked the “Save” icon and chose where to put the recovered files.
Bottom line: The recovery workflow is powerful – but it clearly assumes you know what you’re doing. There’s zero handholding, no hints, no beginner-friendly mode.
The UI? Functional, yes. Polished? Not quite. Font scaling can be rough on high-res screens, and the interface isn’t exactly modern-looking. The developers seem aware of this, though – recent versions added Dark Mode, which is a small step forward.
Still, we can’t help but feel the software would win a lot more fans if it introduced a Basic Mode – something with just the essentials, clean layout, and big buttons. Because let’s be honest: most people don’t want to sit down with a manual before getting started. A simplified UI as an option would go a long way.
Recovery Results
Now, as to the recovery results. In one word: Good. In two: Very good.
First off, we’ve gotta give credit where it’s due: scan time estimation was spot on. We timed it with the Windows stopwatch, and the prediction from UFS Explorer was dead accurate. That might seem like a small thing, but compared to tools like Recuva that toss out random time guesses – it’s super accurate. Props to the devs.
Now to the actual recovered data.
Across all test cases – simple deletion, quick format, and a corrupted drive – we recovered a total of 1,286 files adding up to 1.42 GB.
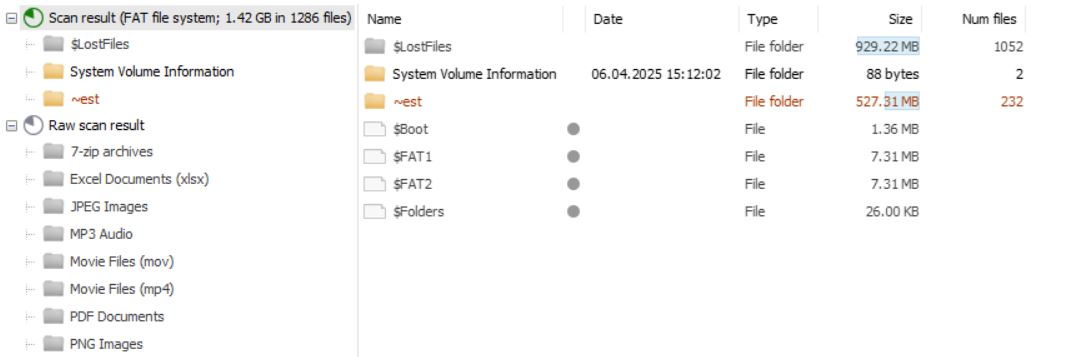
With Documents it was flawless. In every scenario, from deleted to corrupted, all document files were recovered and fully readable. That’s a 100% precision success rate. We’re talking DOCX, PDF, XLS.
Images and videos? For deleted and formatted tests, we got nearly everything back – including some heavier formats. Even more complex types like ORF and BMP made it.
With the corrupted file system test, recovery dropped slightly. Around 1,200 files total were recovered. Some TIFFs and MXF files didn’t make it, so clearly UFS Explorer still has limits (like any tool). But overall: Solid performance.
So yeah – with document files it was a total win. But even in more difficult cases, this tool held its ground better than most.
We’re giving UFS Explorer a very solid 4 out of 5 here. Honestly, we considered 4.5 – but we don’t do half-stars, so let’s call it what it is: accurate, reliable, and pretty fast. It’s not the fastest scanner out there, but the consistency makes up for that. The scan estimates are precise, the recovery engine is strong, and it nailed all our document recovery tests.
That said, it’s not perfect. For home users without much experience, the scan results aren’t always easy to interpret. You’ll need to know what you’re looking at. And the fact that you can’t see recovered files until the scan is fully complete is a letdown – especially when even much simpler tools let you browse results in real-time.
So yeah, the overall impression is definitely positive, but a few obvious gaps keep it from hitting full marks.
UFS Explorer Pricing and Plans
Now let’s talk about UFS Explorer price.
UFS Explorer isn’t exactly a budget pick. This is professional-grade recovery software, and the pricing reflects that. What’s nice though is that SysDev (the developer) breaks it down into several editions, so you’re not forced to overpay for features you’ll never use.
Here’s what’s available at the time of writing:
| Edition | License Type | Users | Computers | Price (USD) |
| Standard Recovery | Personal | 1 | 1 | 64.95 |
| Professional Recovery | 1 seat | any | 1 | 629.95 |
| Network RAID | Personal | 1 | 1 | 209.95 |
| RAID Recovery | Personal | 1 | 1 | 139.95 |
| Technician | 3 months | any | 1 | 399.95 |
What’s disappointing is that while there is a free trial version, it’s very limited. In the Standard Recovery edition, you can only recover files smaller than 256 KB, and in Professional Recovery, that limit goes up to 768 KB.
So what does that mean in real terms? It means you won’t be able to recover pretty much anything beyond text files. You can scan, preview, and explore what’s there – but you can’t actually save most of it unless you pay.
But let’s see how it stacks up against its closest competitors – Disk Drill and R-Studio. All three are aimed at users who want more than just a basic undelete tool. We’ll take the Standard edition for this comparison, since they’re most relevant to individual users. Here’s a quick side-by-side look:
| Feature | UFS Explorer (Standard) | Disk Drill PRO | R-Studio (Standard) |
| Price (one-time) | $64.95 | $89 | $79.99 |
| Trial Limitations | 256 KB per file | 100 MB total recovery (Windows) | Recovers files <256 KB |
| OS Support | Windows, macOS, Linux | Windows + macOS | Windows, macOS, Linux |
| File System Support | NTFS, FAT, exFAT, HFS+, Ext2/Ext3/Ext4, Btrfs, XFS | FAT32, exFAT, NTFS, APFS/HFS+, ReFS and EXT4 | NTFS, NTFS5, ReFS, FAT12/16/32, exFAT, HFS/HFS+ and APFS |
| Disk Imaging | ✅ Yes | ✅ Yes | ✅ Yes |
| RAID Support | RAID 0/1/5/6/10, custom RAID layouts | RAID 0, 1, 5, 10, 50, 60 | RAID 0, 1, 4, 5, 6, 1+0, 1E, 5E, 5EE, 6E |
| Preview Support | ✅ Most file types | ✅ Yes (media-rich) | ✅ Yes |
| Ease of Use | ❌ Technical UI | ✅ Beginner-friendly | ❌ Complex interface |
In a direct comparison – UFS Explorer vs R-Studio – UFS Explorer is slightly cheaper, but both share similar drawbacks: limited free versions, dated interfaces, and a steep learning curve. These tools are clearly built for users with strong technical backgrounds, not casual recovery jobs. If you’re after a UFS Explorer alternative, R-Studio is the closest match in features and complexity. It’s just as powerful, though not much easier to use.
Compared to UFS Explorer, Disk Drill feels more modern and accessible. Both support imaging and RAID, but Disk Drill adds a cleaner UI, unlimited preview, a usable free tier with 100 MB of recovery on Windows, and a single license that works on both Windows and Mac.
Now, RAID support deserves a quick footnote. Disk Drill can recover data from RAID setups – but it does this by scanning individual drives, not reconstructing complex arrays. Tools like R-Studio or UFS Explorer are more capable if you need full rebuild functionality. But for most everyday users, Disk Drill’s approach is probably enough. And if it gets the job done, why pay more?
So if you’re not a forensic analyst or data recovery pro and just need a powerful, user-friendly recovery tool with fair licensing and a proper free trial, Disk Drill is likely the better UFS Explorer alternative.
We think 4 is more than fair here. While the Professional Recovery edition comes with a hefty $629.95 price tag, it’s clearly aimed at labs and technicians. The Standard edition, on the other hand, is much more competitive for individual users at around $65.
Still, when you factor in the limited free trial, the dated UI, and the learning curve, it’s fair to say there are better-rounded alternatives in the same price range. Some tools offer similar recovery success rates with a more intuitive experience. So even though UFS Explorer brings serious technical power, that alone doesn’t carry it to a perfect score.
UFS Explorer Customer Reviews
And to provide a better and fair score, we didn’t just rely on expert opinions – we also looked at what real users are saying. We browsed testimonials on the official UFS Explorer site, feedback platforms like G2 and Trustpilot, and scattered social media posts.
Here are a couple of examples:
💬 Gregory Gibbons from UFS Explorer’s review section says:
“Unbelievable – the Standard Edition of your software is working, I am recovering my data – you guys are the absolute best. Buffalo would have me spending $2000+ on data recovery, that’s their only advice.“
💬 harry77 from HDDGuru Forums says:
“Just played around the first time with UFS-Explorer. What I really like is the possibility to define the encryption key of encrypted filesystems (e.g. APFS, LUKS) and that this recovery tool can be used without permanent internet connection (compared to ReclaimePro).“
💬 Dimitar V. from G2 says:
“Interface has own logic , but when you used to work with it is OK.“
💬 seven-000-seven from Reddit says:
“One thing I do not like about Sysdev is their confusing product setup / line. It used to be even worse with RAISE and all kinds of separate add-ons. And then there’s also tools like photo recovery, DVD, and whatnot, and the free tools in Russian language only. It seems UFS and Recovery line are not updates in same pace. I could be wrong about that though.“
So once again, we give it a 4 out of 5 for user feedback.
People who know what they’re doing generally have good things to say – especially about the software’s capability with encrypted volumes and complex setups. But there’s no shortage of mentions about the learning curve, outdated UI, and the confusing product lineup. It’s clearly not for everyone, but for those who get it, it delivers.
Final Verdict
This UFS Explorer review was surprisingly easy to score. We gave it:
- ⭐ 4 for Features
- ⭐ 4 for Recovery Performance
- ⭐ 4 for Pricing & Value
- ⭐ 4 for User Feedback
We think it accurately reflects what UFS Explorer brings to the table.
It’s consistent, powerful, and built for serious recovery work – but it’s not designed for casual users. If you’re a technician, advanced user, or someone recovering data from RAID or encrypted volumes, UFS Explorer is absolutely worth a look.
That said, if you’re after a more user-friendly interface, better free trial experience, or just want something you can launch without reading a manual, there are some alternatives that might make your life easier.
If the developer invested a bit into the UI – maybe added an optional simplified view, larger fonts, and a more modern design – it could go a long way. UFS Explorer already has the brains – it just needs a bit more charm.