Do you need to format an external hard drive without losing data? Maybe your hard drive is a disorganized mess, and you want to start from scratch, or perhaps it doesn’t work well with your computer due to file system corruption.
Why You Might Be Required to Format Your External Hard Drive
Formatting is a quick & easy solution to many hard drive-related issues. Here are some of the most commonly encountered situations where formatting is required:
- ⚠️ External hard drive errors: You know those annoying pop-ups that keep telling you there’s an error with your external HDD, such as the “You need to format the disk in drive X: before you can use it” message? These are your HDD’s way of saying it’s time to take action. And often, a proper reformat is the best way to get rid of error messages.
- 🥩 Lack of a file system (raw external hard drive): When your computer says your hard drive is “raw,” it means it can’t recognize its file system (because the file system is unsupported or because there’s no file system to begin with). A fresh format will create a file system that your operating system can recognize to make the drive usable.
- 🍎 Incompatible file system: Operating systems, such as Windows 10, Windows 11, macOS, and various flavors of Linux speak different languages when communicating with storage devices. For example, Windows is fluent in NTFS, while macOS is a pro at APFS and HFS. If you’re a Windows user and won’t use your external hard drive with any other computer, then the NTFS file system is a good choice. But if you plan to use it with many different computers, then a universally understood file system like FAT32 or exFAT is a better choice. Formatting using the method described in this article lets you change the external hard drive format without losing data.
- 🦠 Viruses or malware infection: Viruses or malware can make your files inaccessible or even harm your computer. If your external hard drive’s caught a nasty digital bug, sometimes the only cure is a clean sweep. With proper data backup precautions, you can give it a clean start and eliminate all viruses and other kinds of malware in the process.
- 💻 Reusing an old hard drive for a different purpose: Your old hard drive can be reused for a different purpose in no time, and you don’t even need to manually go through its contents to check if there’s anything you might still need. By following the instructions provided in the next section of this article, you can create a complete backup of your old hard drive, ensuring every precious file is saved. Then, you’re free to format the hard drive without losing data and repurpose it for whatever you decide.
Can I Reformat an External Hard Drive Without Losing Data?
Yes, you can reformat an external hard drive while keeping your data intact, but only if you take the right approach to the formatting process.
❌ If you haven’t formatted your drive yet, then you need to start by creating a complete backup of all important data. Then, you can format your drive with your desired settings and copy your files back from the backup.
🧹 If you’ve already formatted your drive and now want to reverse the data loss caused by it, then you need to consider the type of formatting that was performed:
- Quick Format: If you have performed a quick format, there’s still a chance to recover your files using data recovery software. However, successful recovery depends on several factors, such as whether you’ve written new data to the drive after formatting. Please refer to our guide on how to recover a formatted drive for more information.
- Full Format: During a full format, your drive undergoes a complete overwrite of all sectors. Unfortunately, this means your data is permanently erased and cannot be recovered, even by professional data recovery services.
🔄 If you want to change the file system but keep all files exactly where they are right now (like switching from FAT32 to NTFS in Windows), then this can be done without data loss using a special built-in file system convert command.
Here’s a table that provides a quick overview of the available options:
| Available Options | Pros and Cons | Solutions |
| I want to back up data first, then format the hard drive without losing data. | ➕ Safe ➖ Takes time |
Back up your files before formatting and then format your external hard drive using File Explorer or Disk Management. Finally, recover files from your backup. |
| I want to format the hard drive and then recover the data. | ➕ Quick ➖ Not safe |
Format your external hard drive using File Explorer or Disk Management and then use data recovery software to recover important files. |
| I need to format an external hard drive from FAT32 to NTFS without losing data. | ➕ Quick ➖ Not always available |
Use the convert command to change the external hard drive format without losing data. |
How to Format an External Hard Drive Without Losing Data
Now that you understand your options, we can finally dive into the meat of the matter: how to format a hard drive without losing data. Let’s get to it!
Step 1. Back Up Your Files Before Formatting
If you want to format a drive without losing data, the first step is to create a complete backup of all your important files.
While you could simply copy selected files to another location, experience has taught us that whenever possible, it’s best to create a complete byte-to-byte backup of your drive.
A byte-to-byte backup creates a perfect mirror image of your entire drive, capturing every single file—including hidden files and even those that might be inaccessible due to corruption. It also works even with unsupported file systems (like an APFS drive on a Windows PC) or when your drive shows signs of corruption (formatting can repair corrupted drives) or isn’t detected properly by your OS.
There are many different tools that can help you create a byte-to-byte backup of your external hard drive. We recommend Disk Drill because it runs on both Windows and macOS, is highly intuitive to use, and creates reliable and comprehensive backups that you can recover using the same straightforward method Disk Drill employs for external hard drive data recovery in general.
To back up your files before formatting using Disk Drill:
- Download Disk Drill from its official website and install it on your Windows PC. You can download Disk Drill for free and use its byte-to-byte backup feature without any limitations.
- Launch Disk Drill and select the Drive Backup feature from the left pane.
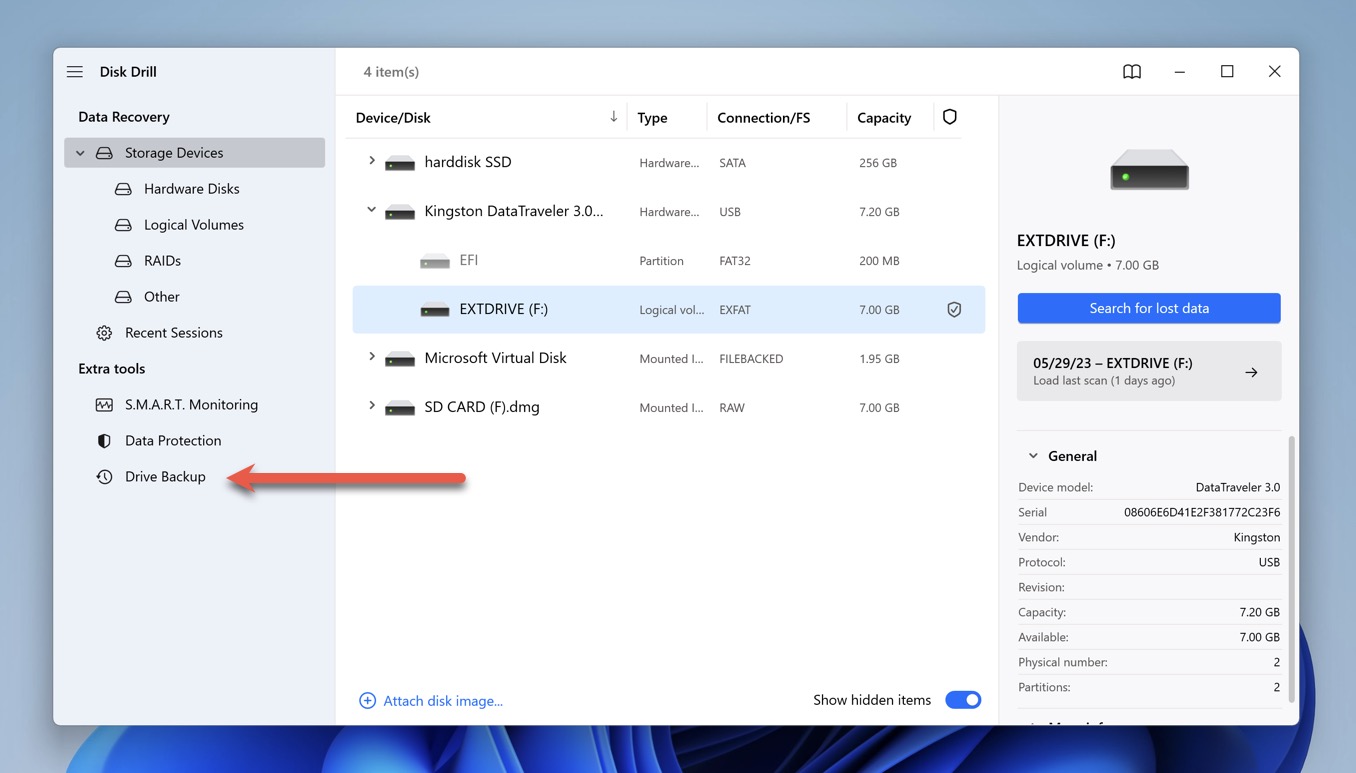
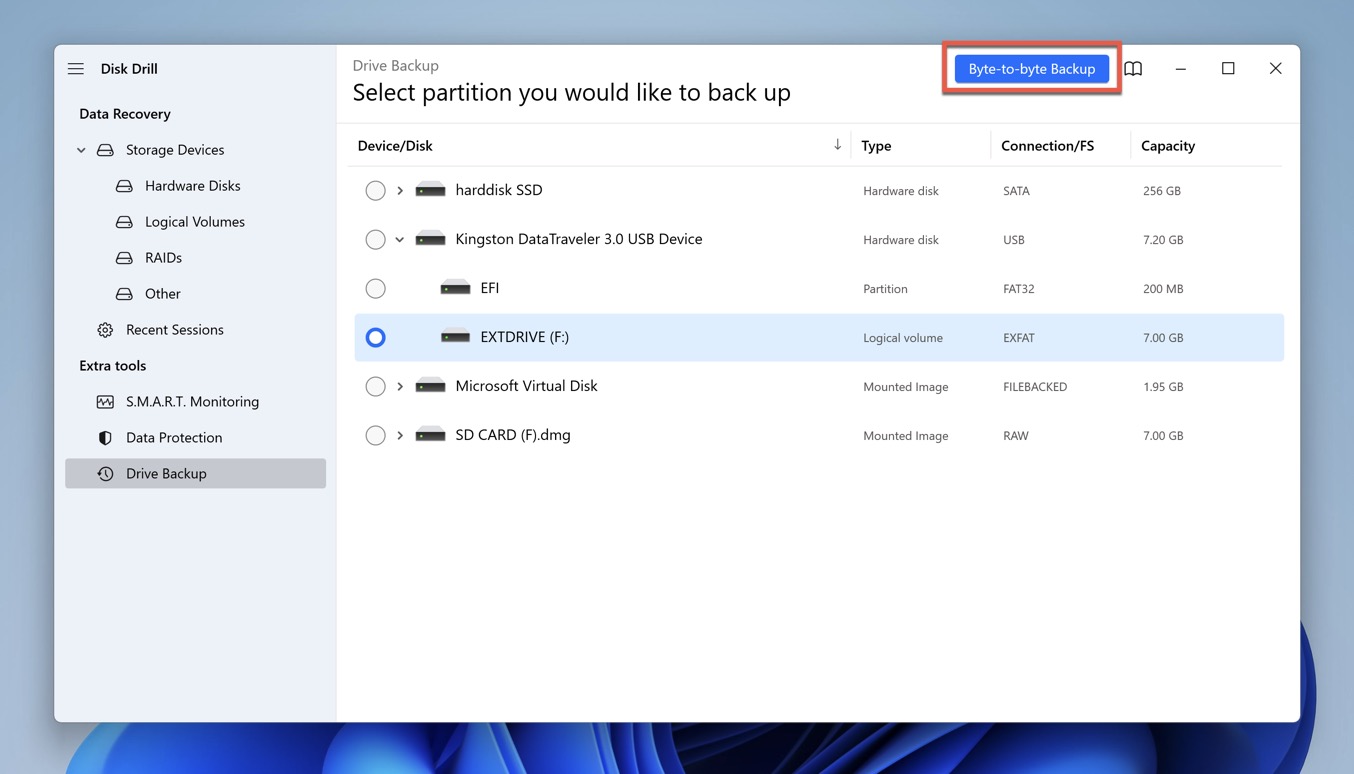
- Choose the external hard drive you want to backup and click the “Byte-to-byte Backup” button. Disk Drill supports a wide range of file systems, including FAT16, FAT32, exFAT, NTFS, NTFS5, HFS, HFS+, APFS, EXT2/EXT3/EXT4, ReFS, BTRFS, and even RAW disks.
- Select a location for the backup image and confirm. Keep in mind that the backup image will be as large as your external hard drive.
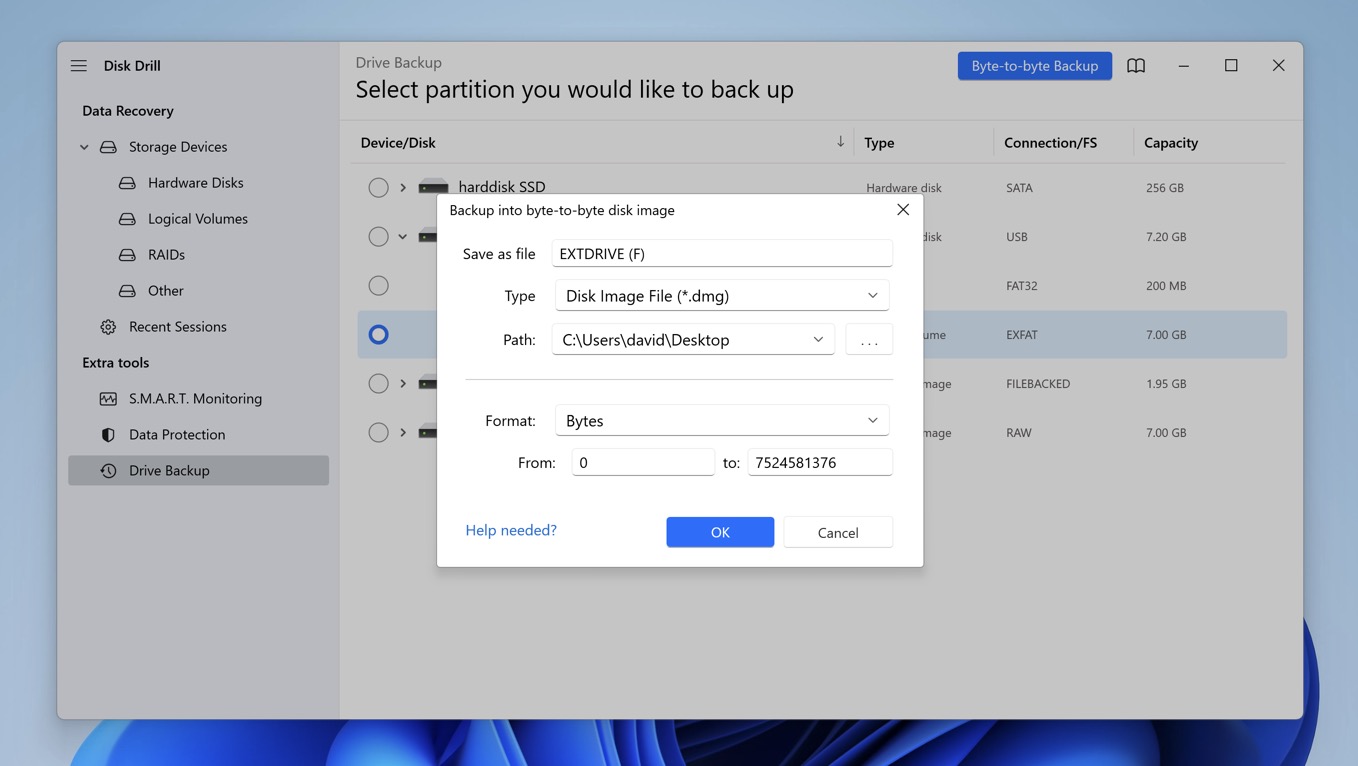
- Give Disk Drill all the time it needs to create the backup image.
Step 2. Format an External Hard Drive Using Suitable Method
Once you’ve backed up your external hard drive, it’s time to reformat the drive without losing data using one of the methods below.
Using File Explorer
File Explorer is the default file manager in Windows 10 and Windows 11, and it makes it possible to format any external hard drive that has a drive letter assigned to it in a few simple steps:
- Launch File Explorer and select “This PC” from the left pane.
- Right-click your external hard drive.
- Choose the “Format” option.
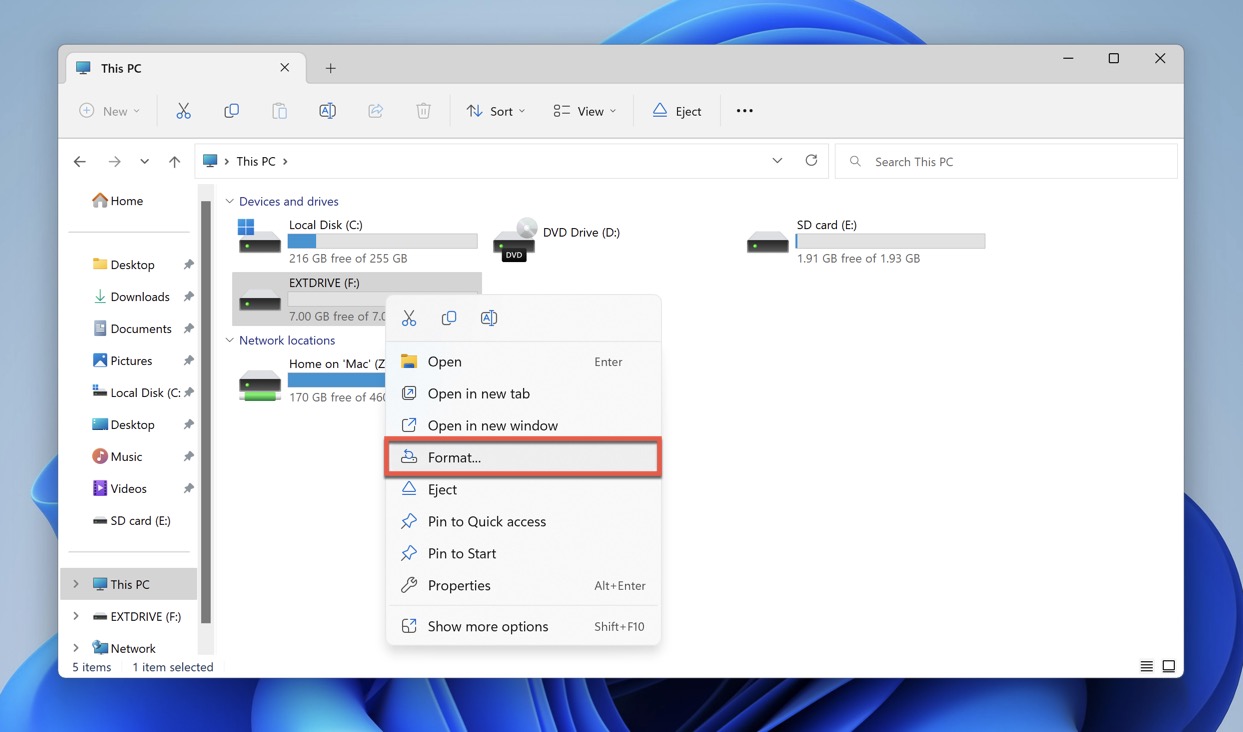
- Remember to check the “Quick Format” box.
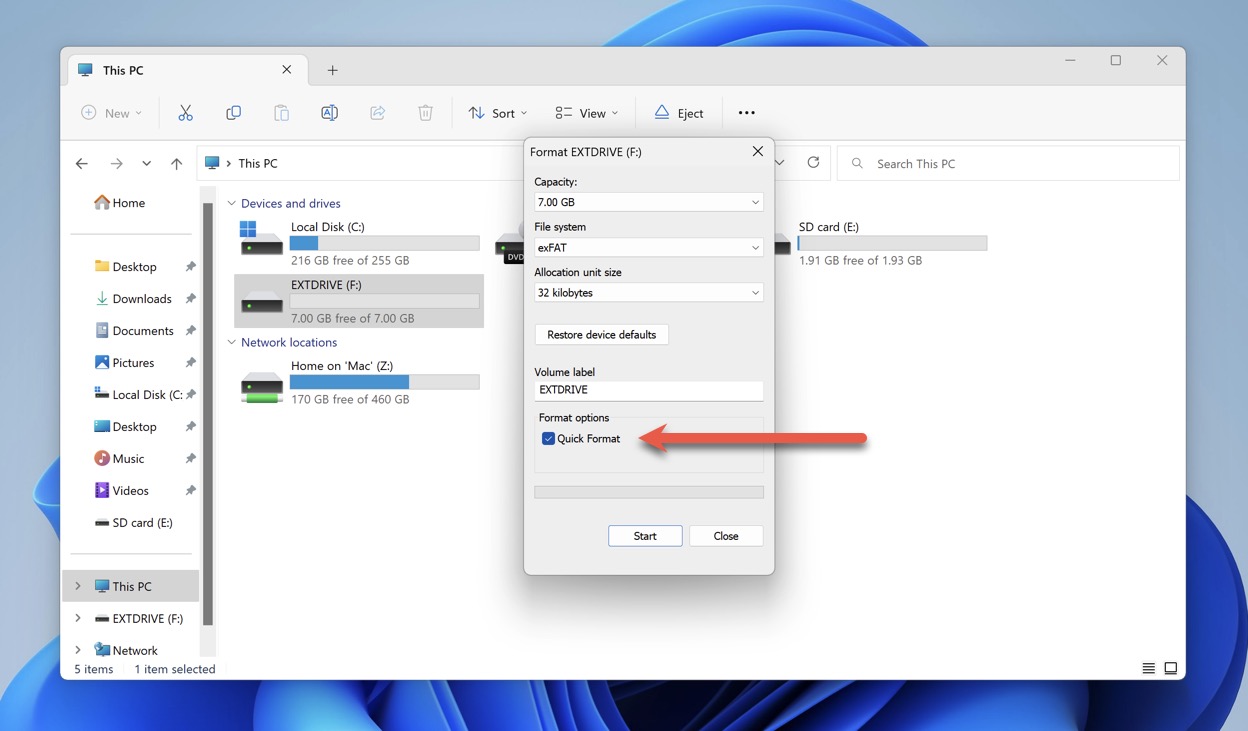
- Select the desired file system and click “Start” to begin.
Using Disk Management
Raw external hard drives and those that for some reason don’t have a drive letter assigned to them are not displayed in File Explorer. Such drives need to be formatted using the Disk Management tool. Like this:
- Press the Win + X keys and select “Disk Management” from the menu.
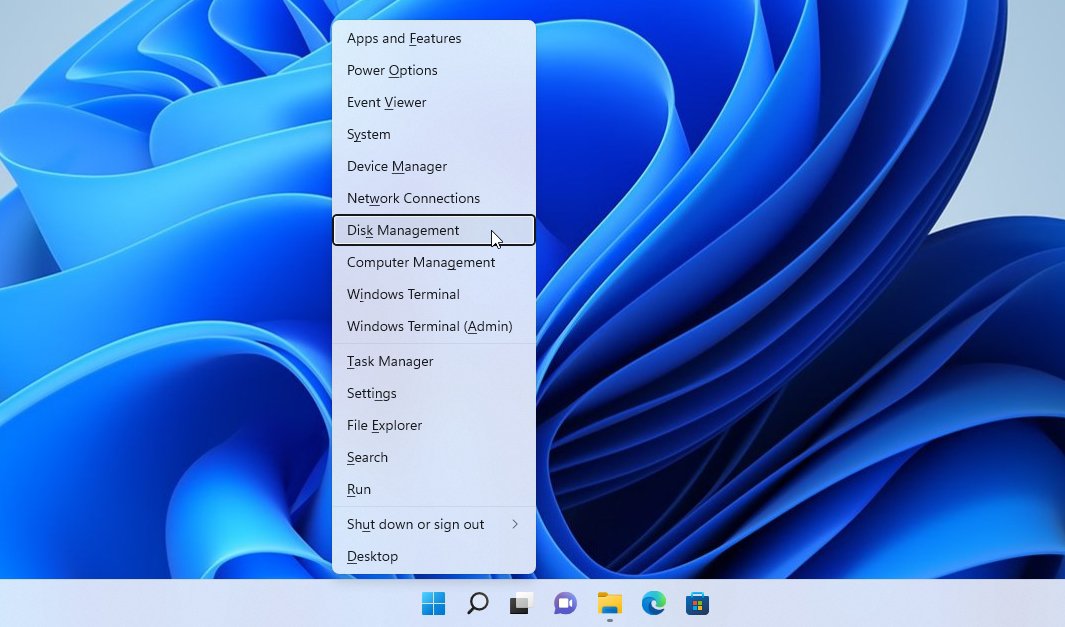
- Right-click your external hard drive and choose the “Format” option.
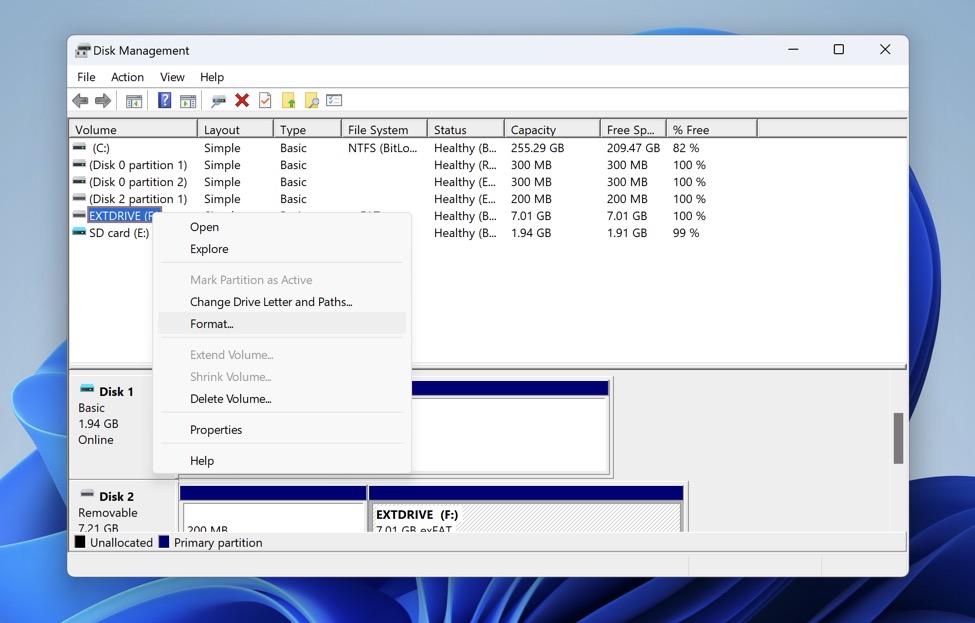
- Make sure the “Perform a quick format” option is checked.
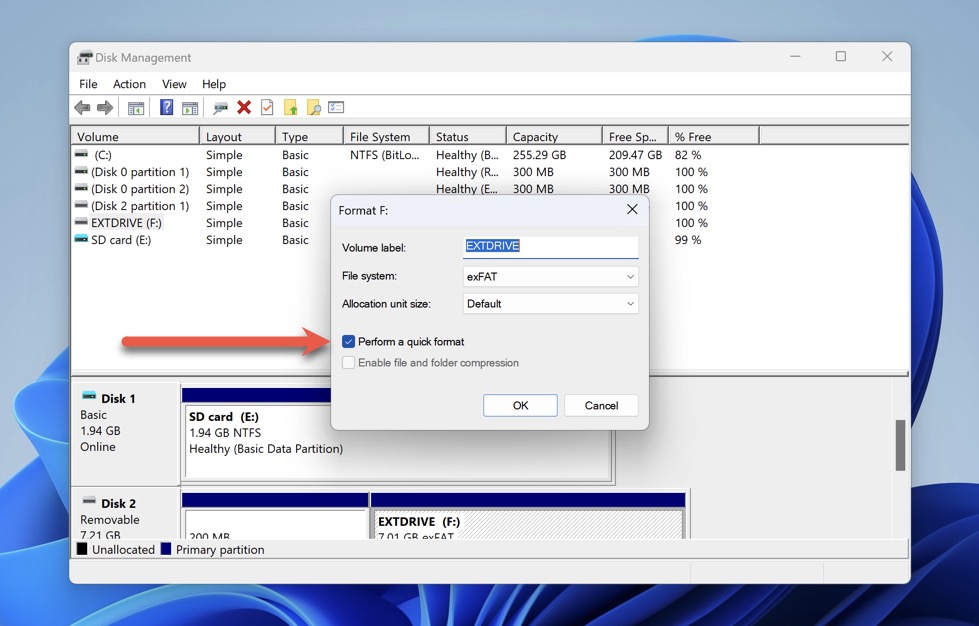
- Choose your desired file system and click “OK.”
- Wait for the formatting process to finish.
Using CMD Convert Command
The Convert command in Windows can change the file system of a volume from FAT or FAT32 to NTFS without formatting the volume or losing data. Here’s how to use it:
- Press the Windows + X keys and select “Terminal (Admin)” from the menu.
- Type the following command to convert a FAT or FAT32 drive to NTFS: convert x: /fs:ntfs (replace ‘x:’ with the letter of your external hard drive)
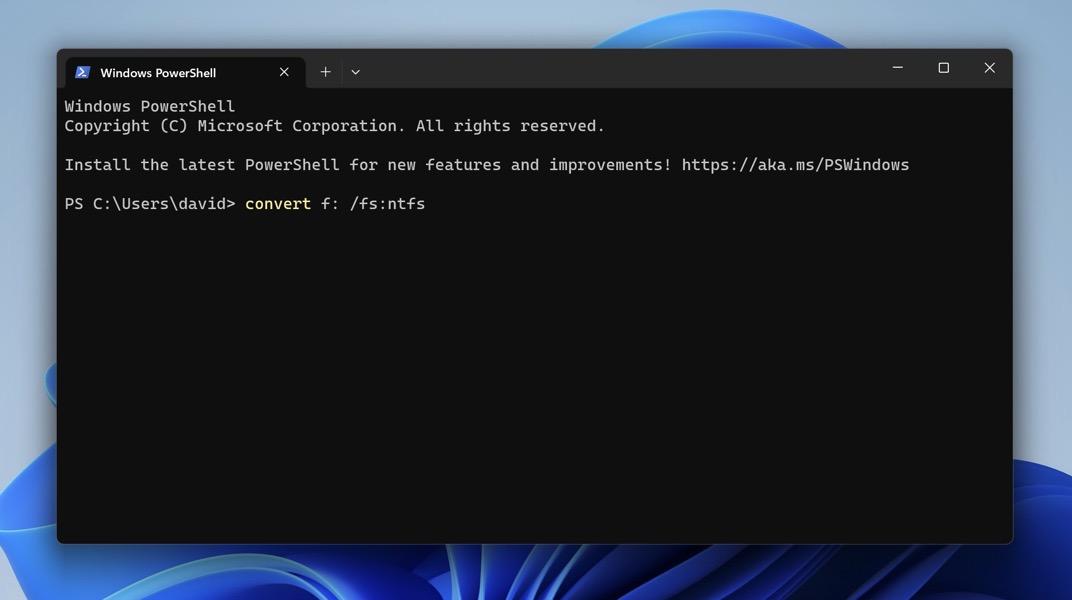
- Press Enter to start the conversion process.
Step 3. Recover Files from Your Backup
Now that your external hard drive is formatted, it’s time to put the byte-to-byte backup we created earlier to good use. We’ll be using Disk Drill, the same tool that has helped us back up our external hard drive into an image.
With Disk Drill, it’s possible to easily mount the image as a virtual drive and then scan it for all existing, hidden and deleted files using a combination of the tool’s file system and file signature (around 400 signatures are supported) recovery algorithms.
You can then filter out the scan results (or search for specific files using the search bar) and preview individual files to quickly find exactly what you’re looking for and recover it to the formatted external hard drive. Here’s how it works:
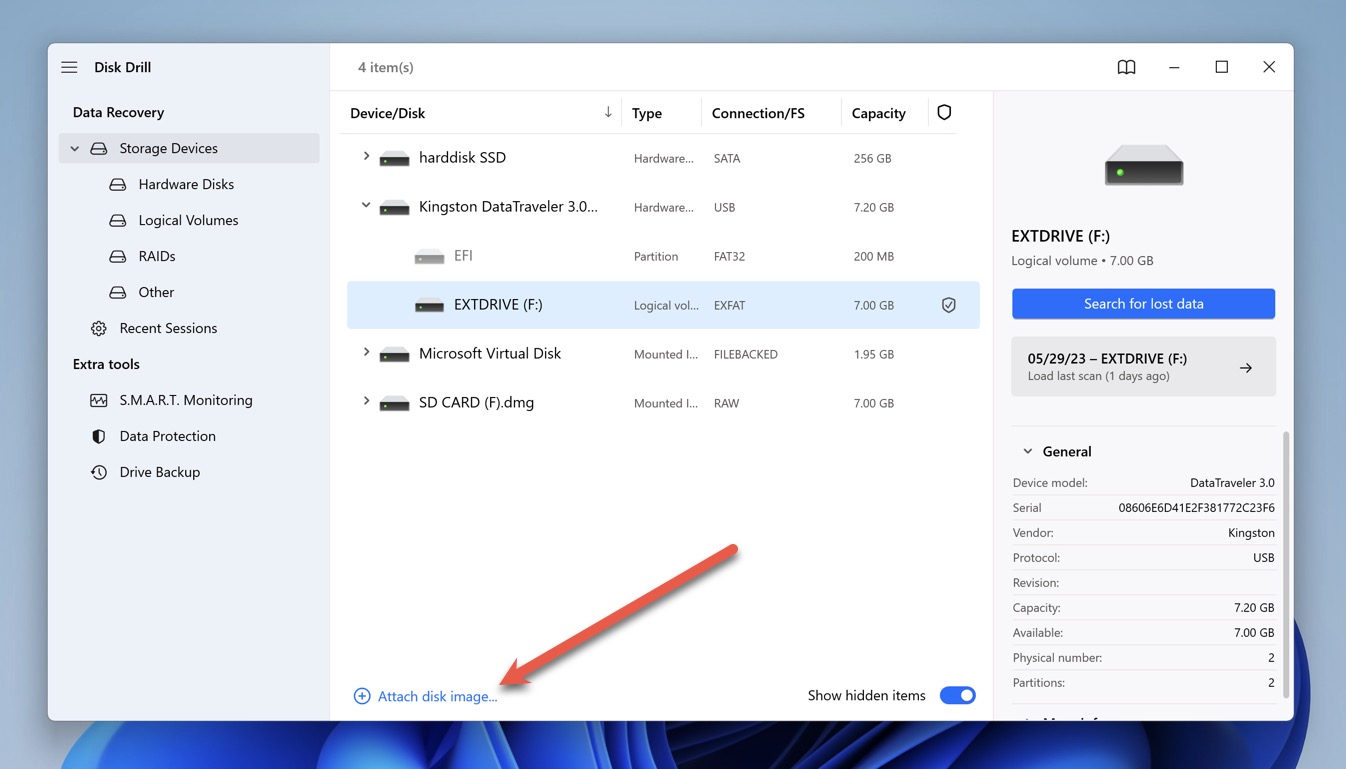
- Start Disk Drill on your Windows PC. If you haven’t installed it yet, you can download it from its official website.
- Click on the “Attach disk image” button and locate the backup image you’ve created to reformat an external hard drive without losing data.
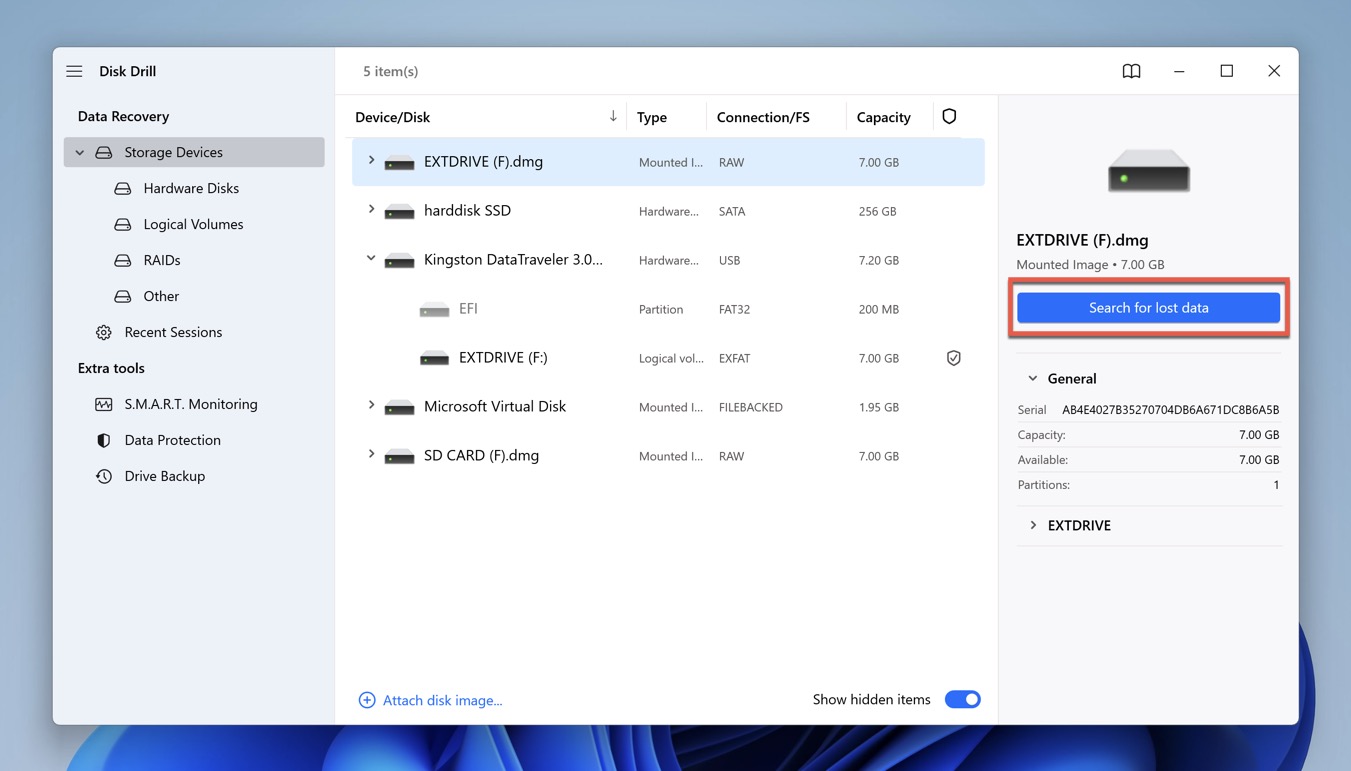
- Select the newly mounted virtual drive and click the “Search for lost data” button to scan it. Disk Drill will start scanning your backup image for both deleted and existing files.
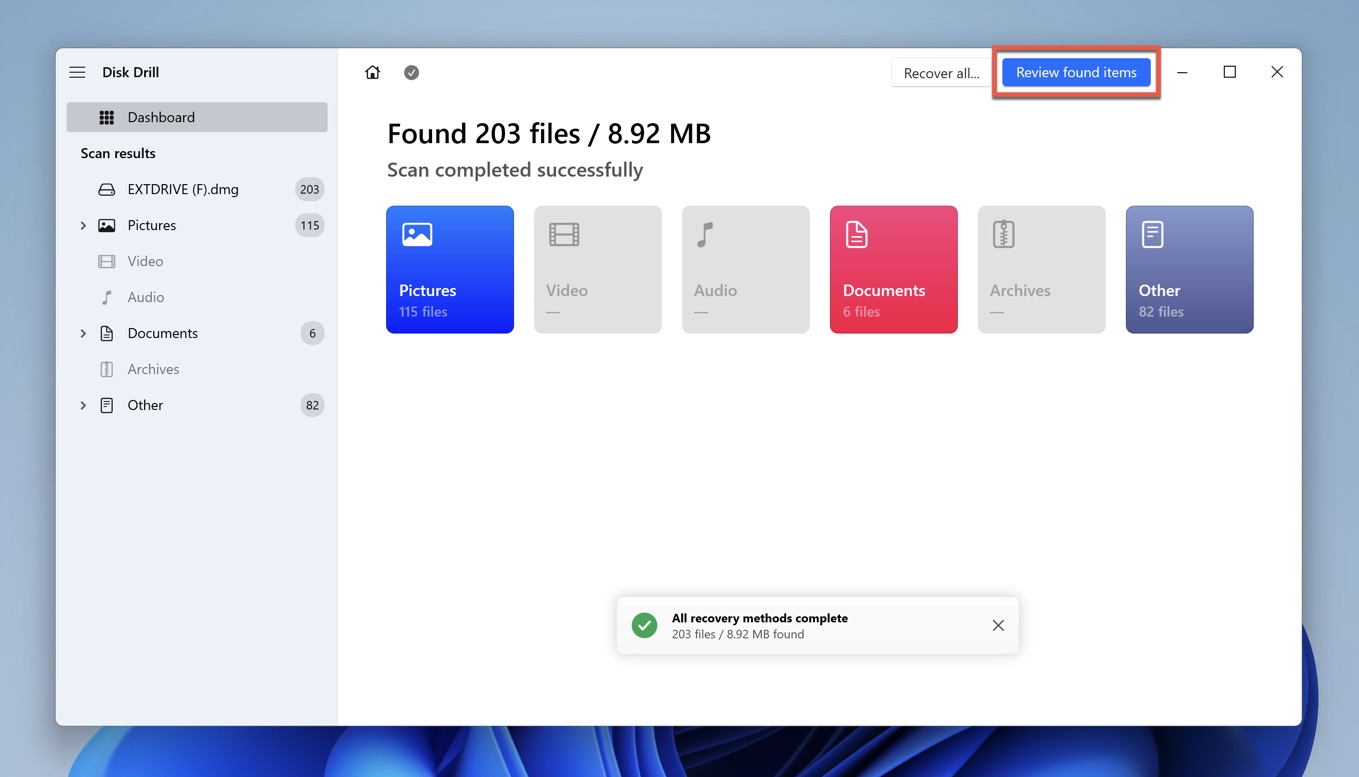
- Click the “Review found items” button to see a list of found files. You can preview these files before recovery, filter them by type, or use the search bar to locate something specific. Since we’re interested only in the files we’ve backed up, our focus is the Existing folder..
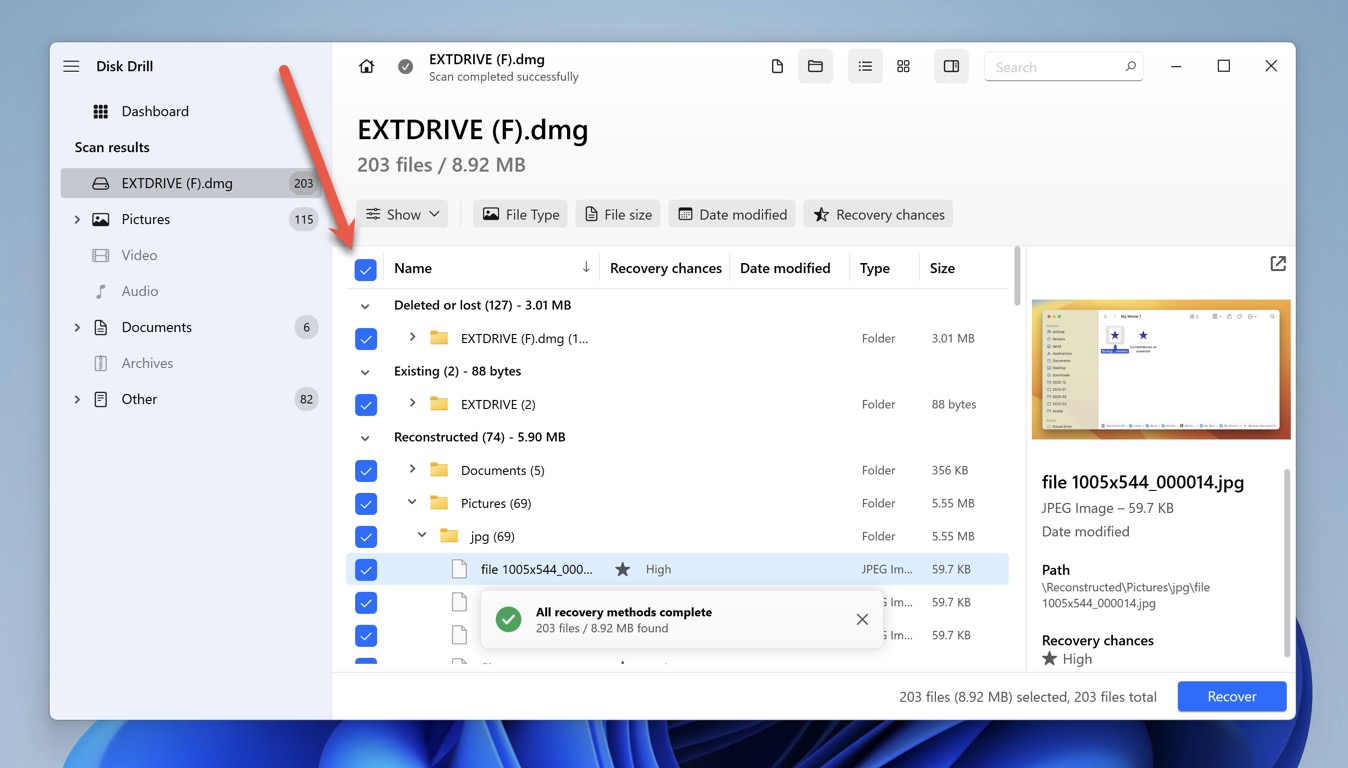
- Click the checkbox next to each file you want to recover to your freshly formatted external hard drive. Better yet, click the top checkbox to select all files at once.
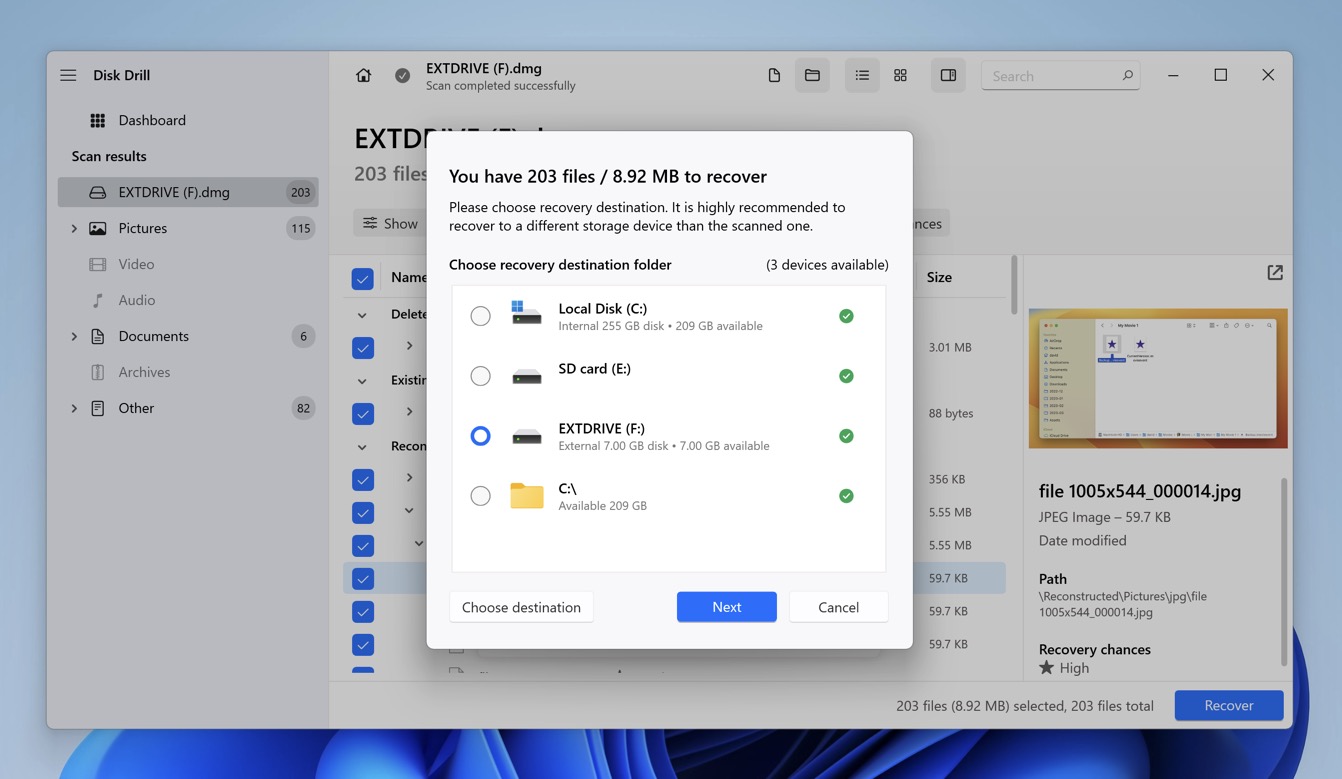
- Click the “Recover” button and select a destination for the recovered files. Make sure to select your external hard drive.
- Open File Explorer and check if the selected files have been successfully recovered.
Congratulations! You’ve successfully managed to recover data from your external hard drive backup, thus completing the formatting process without losing a single important file.
FAQ
Yes, but only if you performed a quick format and haven’t written new data to the drive. For the best chances of recovery, stop using the drive immediately and use data recovery software like Disk Drill as soon as you can.
Windows provides a built-in tool to convert FAT/FAT32 to NTFS without data loss. To use it, open Command Prompt as administrator, enter “convert x: /fs:ntfs” (replace ‘x:’ with the letter of your external hard drive), and press Enter.
If your C drive is your system drive (it is by default), then you need to backup your files, applications, and settings before you can format it without data loss. The formatting itself must be done from your Windows installation media and be followed up by the reinstallation of the operating system (or the installation of a different OS).
To format an external drive for PS4/PS5 without losing data, first copy your files to another drive. Then, you can connect the drive you want to format to your PS4/PS5, navigate to the USB Storage Device (PS4) or Storage (PS5) section in Settings, and choose the Format as USB Extended Storage option.
The process for formatting an SSD without losing data is essentially the same as for a regular HDD:
- The safest method is to back up your data before formatting.
- Alternatively, you can do a quick format and then use data recovery software to retrieve your files (TRIM must be disabled beforehand).
- Lastly, you may be able to convert the SSD without formatting, depending on the current and target file systems.
To format an external hard drive without losing data on a Mac, do the following:
- Create a byte-to-byte backup using a tool like Disk Drill.
- Format the external hard drive using Disk Utility.
- Recover important files from the byte-to-byte backup.
Formatting an external hard drive can potentially delete everything on the drive, depending on the formatting method you choose. Quick formatting hides the files without actually deleting them, making it possible to recover the files using data recovery software. Full formatting, on the other hand, overwrites the data and makes it impossible to recover.
To format an external hard drive without losing data on Windows 10, first create a backup of your files using Disk Drill. Next, format the external hard drive using File Explorer or Disk Management with the desired file system (e.g., NTFS, FAT32, exFAT). Once the formatting is complete, restore your files from the backup.
Conclusion
The takeaway is that you don’t have to lose your precious data when reformatting your external hard drive. As long as you choose the right approach based on your specific needs and follow our step-by-step instructions, you should be able to navigate your next reformatting journey with confidence.