Losing your notes can be a significant setback. When that happens, you might start wondering if it was a bright idea in the first place to swap pen and paper for digital convenience.
Thankfully, as you’ll see, it’s possible to get those notes back.
The Major Pro of Sticky Notes
You can find many note-taking solutions, but one of the best is built into Windows. We’re referring to Sticky Notes, which, apart from their usefulness, also share a problem with their physical counterparts: you can lose them too.
Still, all note-taking solutions, including Sticky Notes, have to store their data somewhere. And data can be recoverable.
And that’s a major pro with digital notes, including Sticky Notes. Whereas you can’t un-scorch a burnt paper note, you probably can bring back your Sticky Notes.
What are Sticky Notes?
There are enough note-taking apps available nowadays that you can split them into sub-genres. One of those groups includes dozens of apps for multiple platforms, that mimic 3M’s Post-It (TM) notes in their looks and their approach. And one of the best is Sticky Notes, built right into Windows.
The Sticky Notes app stores its content locally in an SQL database file but also syncs with remote servers and mobile devices.
Those characteristics can and, as we’ll see, do affect how you can recover those notes if you lose them.
How Can Sticky Notes Disappear?
There are many ways you can lose one or more of the snippets (or whole ebooks) you’ve stored in Sticky Notes.
- 🚮 Some or all of your notes could have been deleted by mistake.
- ⚡ A power disruption might have corrupted their files.
- 🦟 A virus or similarly malicious software might have affected their files or contents.
- 💾 A software update/upgrade might have affected Sticky Notes as an app or everything stored in it.
- 💀 The storage device where Sticky Notes are stored could have malfunctioned or be close to its End Of Life point.
No matter the cause, you can try any of the following solutions to bring your Sticky Notes back.
Where Are Sticky Notes Stored on Windows 10
Many note-taking apps store their content locally. Some work more like web services, syncing everything to remote servers. Sticky Notes does both, so by using it with your Microsoft account, you can both have your notes stored locally for quick access and find them online using Microsoft’s services.
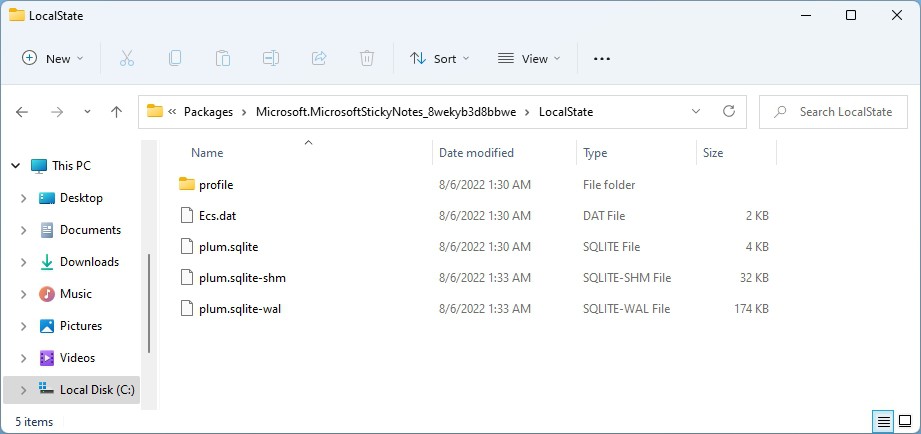
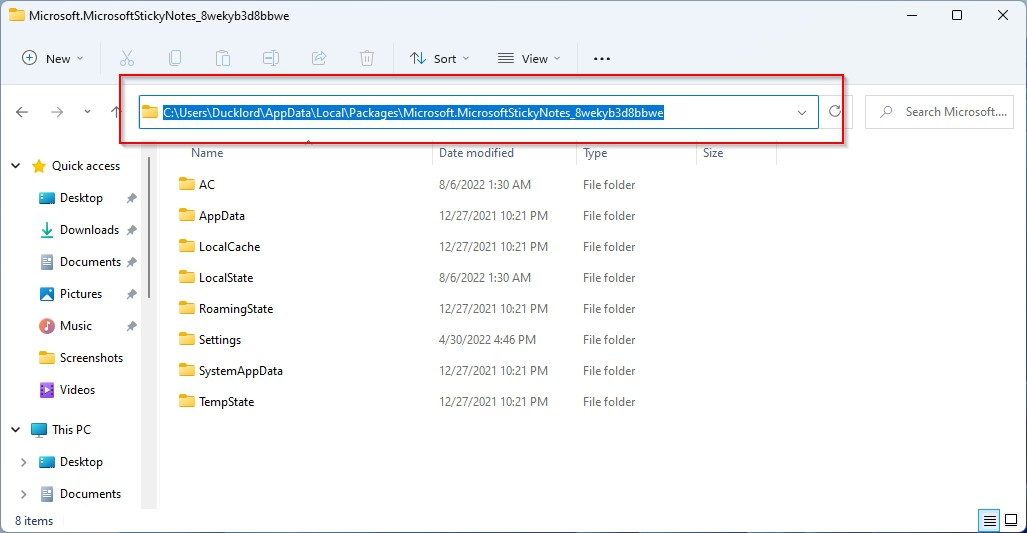
Sticky Notes saves locally its notes’ content in a single SQLite database file, “plum.sqlite“. You may usually find that file in
%UserProfile%\AppData\Local\Packages\Microsoft.MicrosoftStickyNotes_8wekyb3d8bbwe\LocalState
If you can’t see any files and are using Windows’ built-in File Explorer, that could be because they’re marked as hidden. To uncover them, visit View and place a checkmark on Hidden items in the Show/hide section.
How to Recover Deleted Sticky Notes
When losing your notes, you can try to solve the problem in many possible ways. Some of your options could be:
- 💿 Use a data recovery application specializing in locating lost data.
- 📁 Manually locate the files where your notes are stored and “extract” their data.
- ☁ Re-Download your lost notes from remote servers/cloud services.
- 📆 Restore your files from older backups.
However, data loss involves many variables, so what worked for others might not for you. If one of the methods we’ll see doesn’t bring the desired results, don’t skip the rest.
Method 1 Restore Sticky Notes on Windows 10 With Disk Drill
One of the best methods to bring your lost Sticky Notes back is by using specialized data recovery software.
For this article, we’ll be using Disk Drill, that’s widely regarded as one of the most versatile and feature-rich data recovery solutions. Disk Drill is compatible with many devices and can recognize hundreds of filetypes. Thus, it’s an optimal option for the task at hand.
To recover your Sticky Notes with Disk Drill:
- Download Disk Drill from its official site. Install the application, and run it. Note that the Sticky Notes files are (usually and by default) stored on the same disk/partition as Windows. To maximize the chances of their successful recovery, it’s best to install the app to a secondary storage device. It doesn’t matter if it’s an older external HDD you use for storing backups or a USB flash drive.
- Choose the device where your Sticky Notes were stored from Disk Drill’s main list. Usually, this should be the same drive where Windows is stored.
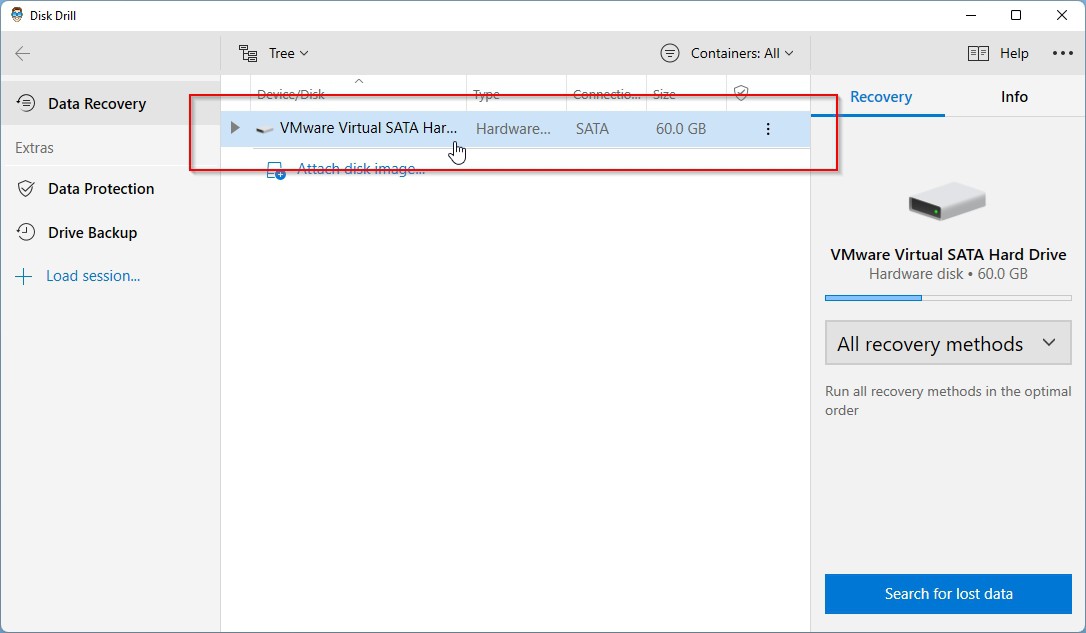
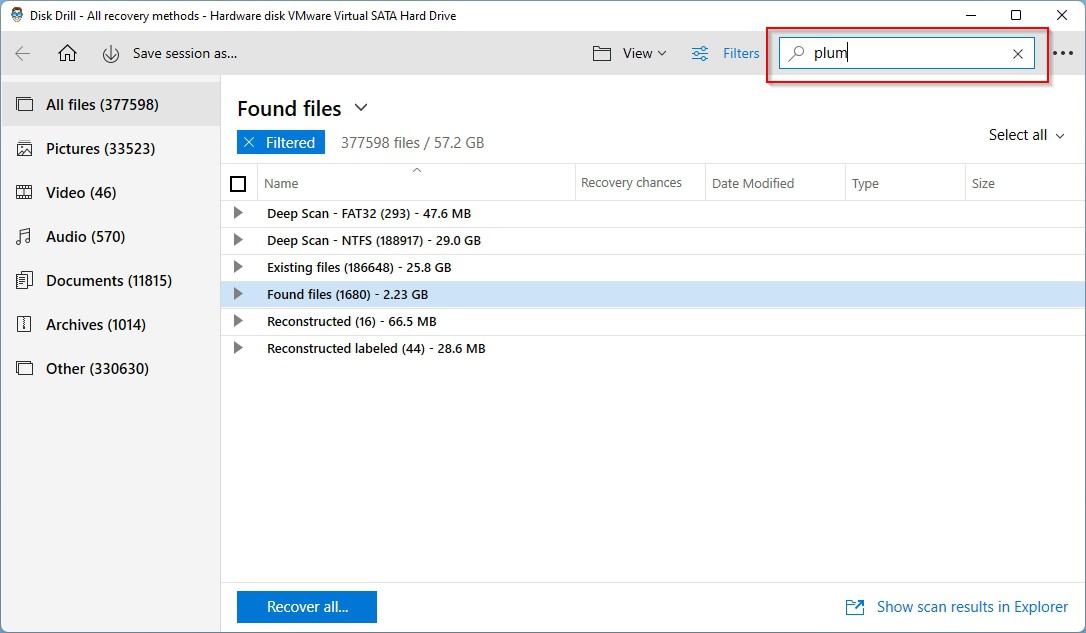
- Ensure All Recovery Methods is enabled, on the right, to get the most thorough scan results and increase the chances Disk Drill successfully locates your Sticky Notes files. Then, click on Search for lost data on the bottom right of its window.
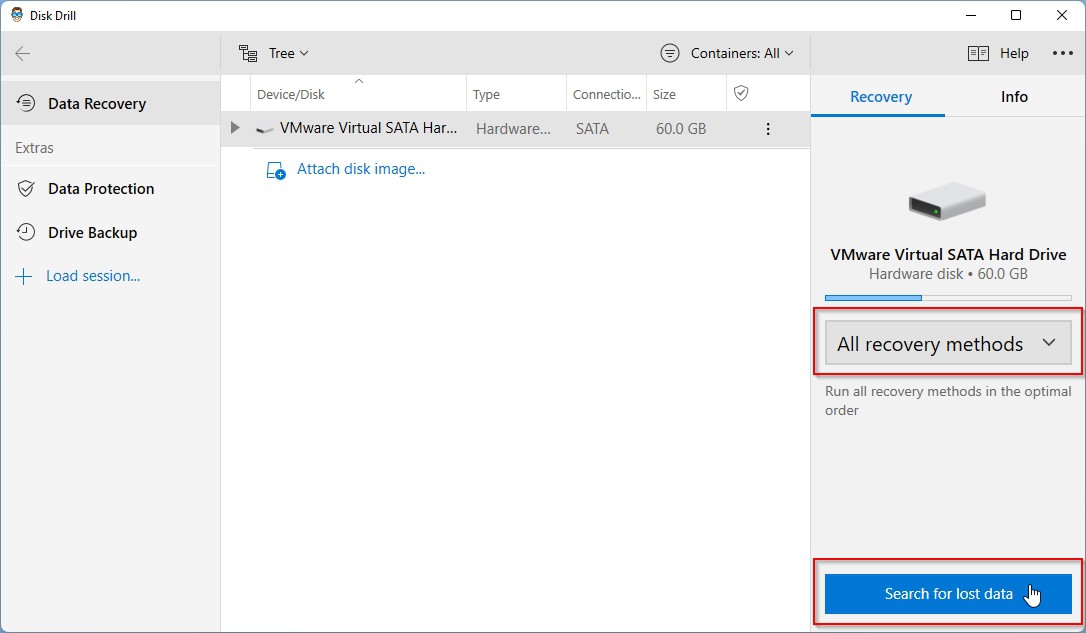
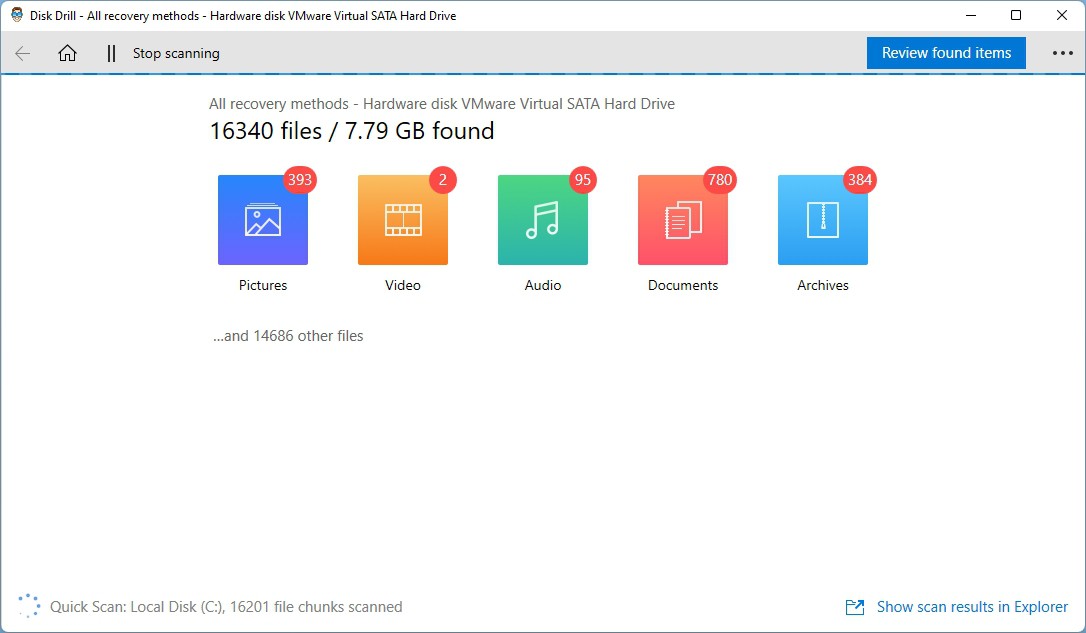
- Disk Drill will begin scanning the storage device you selected. You can pause or stop the process and browse what it’s already located at any time. However, it’s best to let Disk Drill complete its scan to maximize the chances it will uncover more data.
- When Disk Drill’s scan finishes, click on Review found items on the top right of its window to check out the files it found.
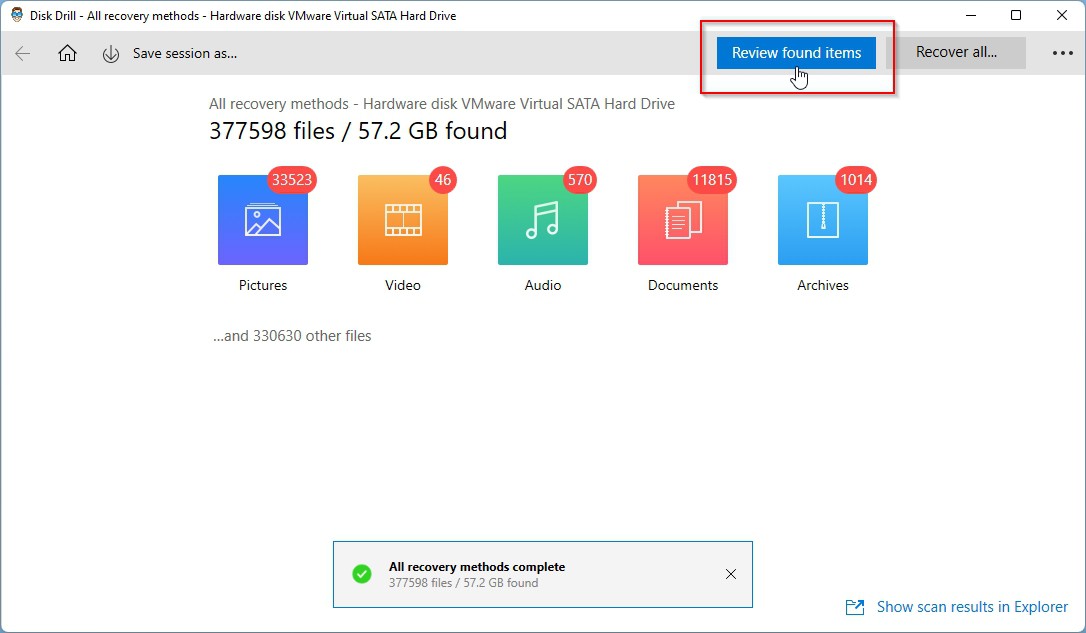
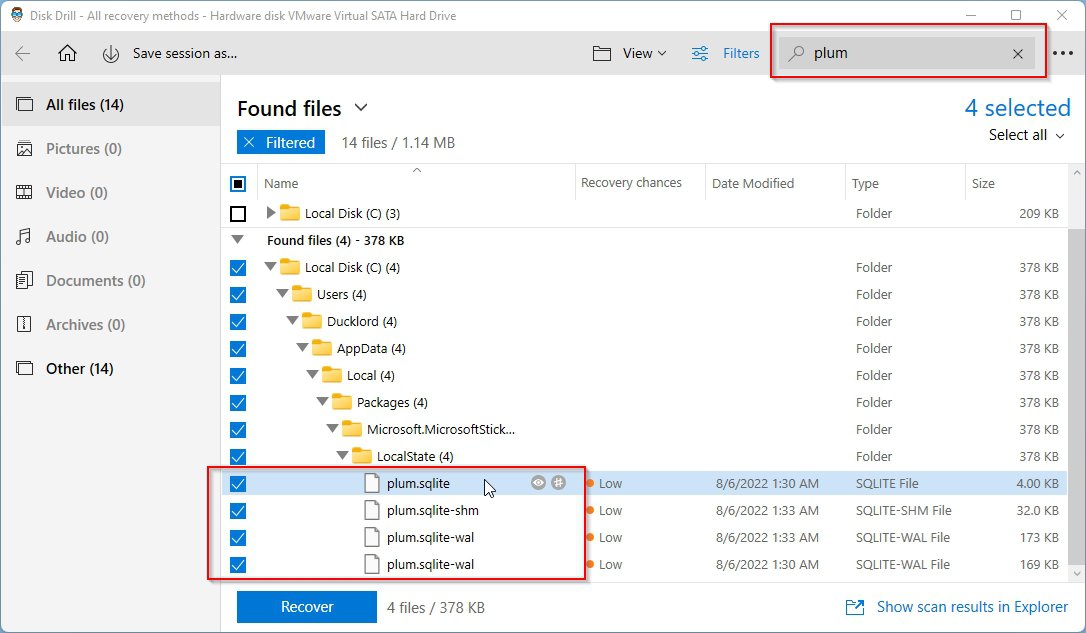
- You can go manually through Disk Drill’s results, seeking any files related to Sticky Notes to mark them for recovery. However, the most important ones usually have “plum” in their filename. Thus, you can take a shortcut and use Disk Drill’s filtering capabilities to hunt them down. Type “plum” in the Search field on the top right of its window.
- Disk Drill will build a list of all the files it located. If any have “plum” in their name, you’ll see them, or the folders where they’re stored, show up on its window. Place a checkmark on their left to mark them for recovery. Then, click on the blue Recover button at the bottom left of its window.
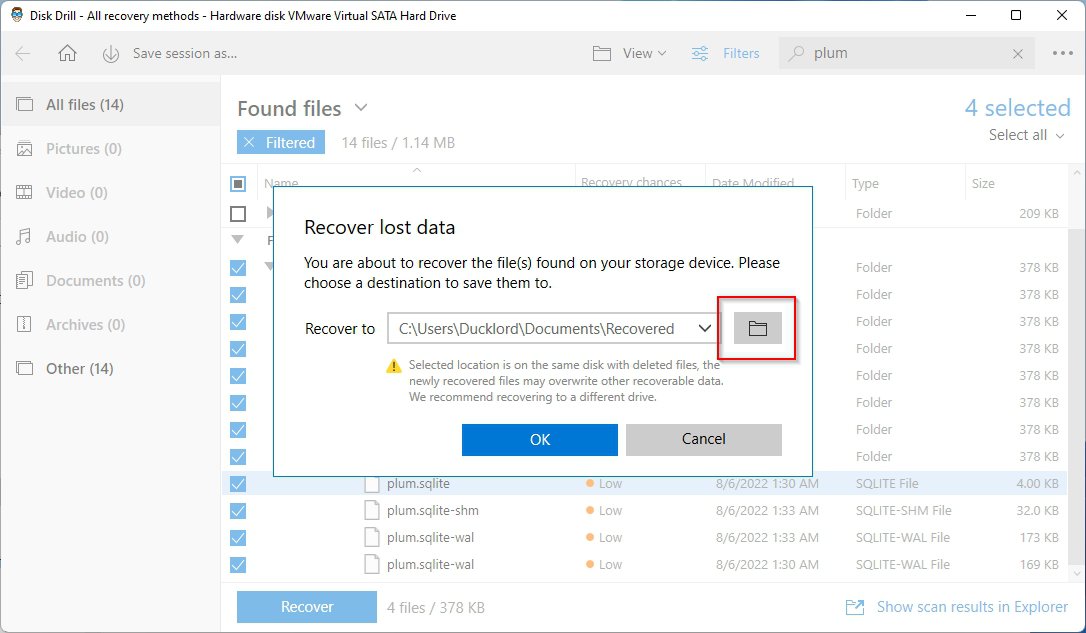
- Disk Drill will ask you where you want to store the recovered files. Click on the little button with a folder icon on the right of this requester, and choose the path you prefer. Ideally, select a different storage device than the one you’re recovering from. By not using the same storage device as your recovery source and destination, you ensure what you’re recovering won’t be overwriting itself.
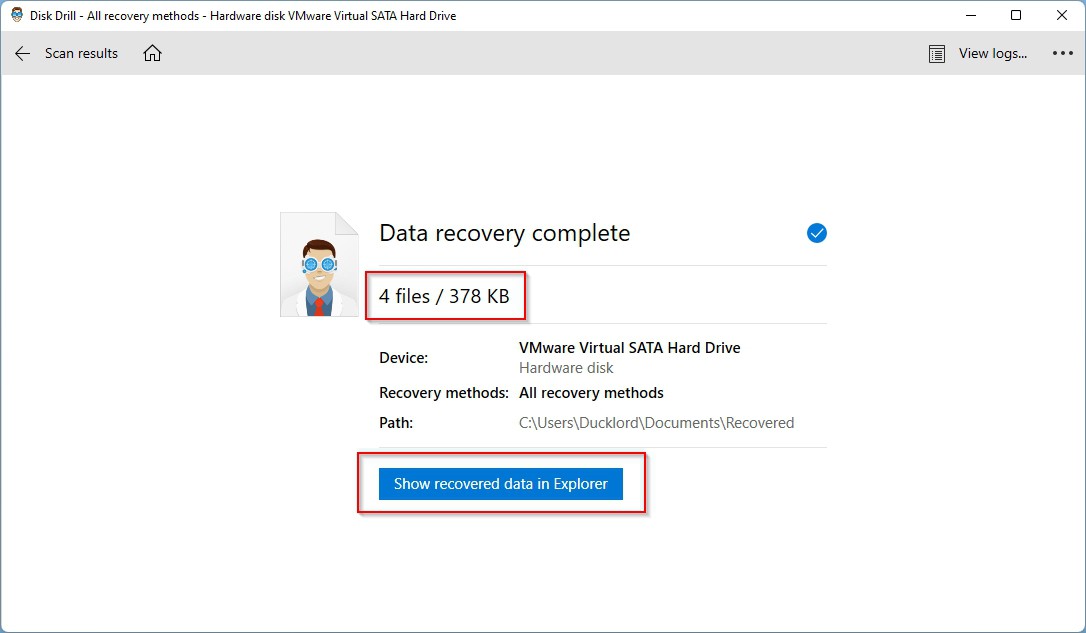
- Soon after, Disk Drill will show you a summary of the results of the recovery process. You can click on Show recovered data in Explorer on this window to open the default file manager “on the path” where Disk Drill stored the file(s) it recovered.
- To restore your notes, copy the files you recovered back to their original folders. Since we’re talking about Sticky Notes, this should be
%UserProfile%\AppData\Local\Packages\Microsoft.MicrosoftStickyNotes_8wekyb3d8bbwe\LocalState
At least, if Microsoft hasn’t updated that path since the time we wrote this article.


Method 2 Deciphering Sticky Notes With DB Browser For SQLite
Are your Sticky Notes files available, and you can see them with a file manager like Windows File Explorer, but for some reason, not through their actual application?
If your note-related files are currently available, it would be better to fish out their contents before you attempt anything that could jeopardize them.
Even if you can’t see your notes in the Sticky Notes app, the fact it uses a generic SQLite storage format means you can access them with an app designed for the purpose. “An app” like the open-source and free for personal use DB Browser For SQLite.
- Start by visiting DB Browser For SQLite’s official site and downloading the app. You’ll find it after clicking the Download link at the top. Make sure to pick the correct version for your OS (32-bit/64-bit). We suggest you go for the more straightforward installer version instead of the archives marked with “(no installer)” or the PortableApp one.
- Choose from DB Browser For SQLite’s main action bar, at the top of its window, that you want to Open Database.
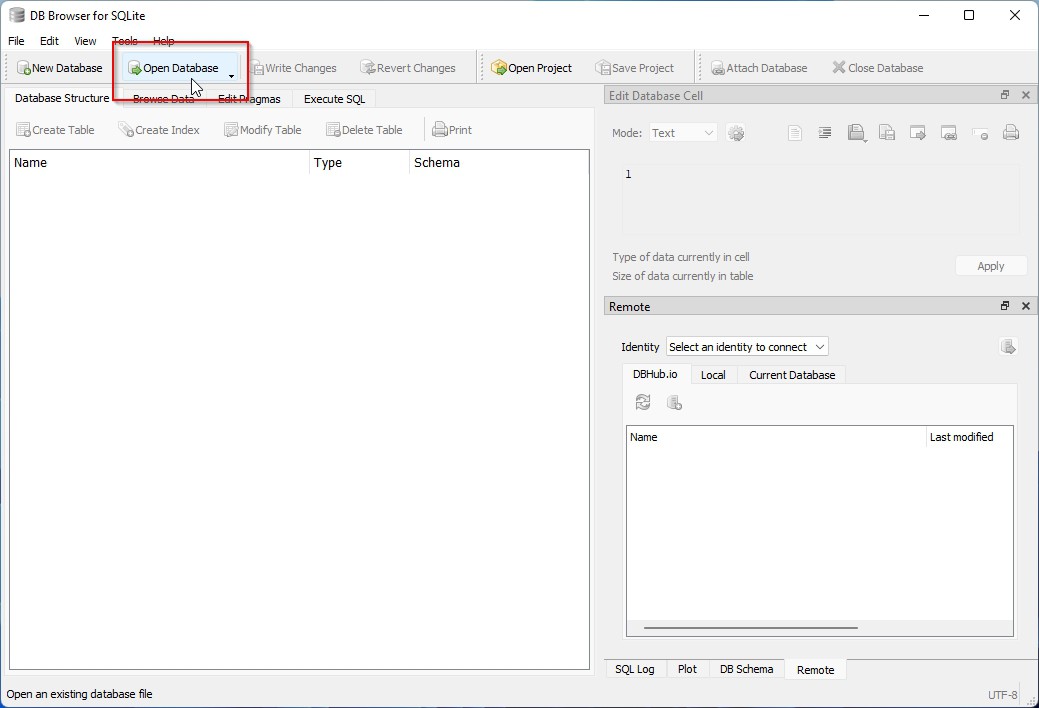
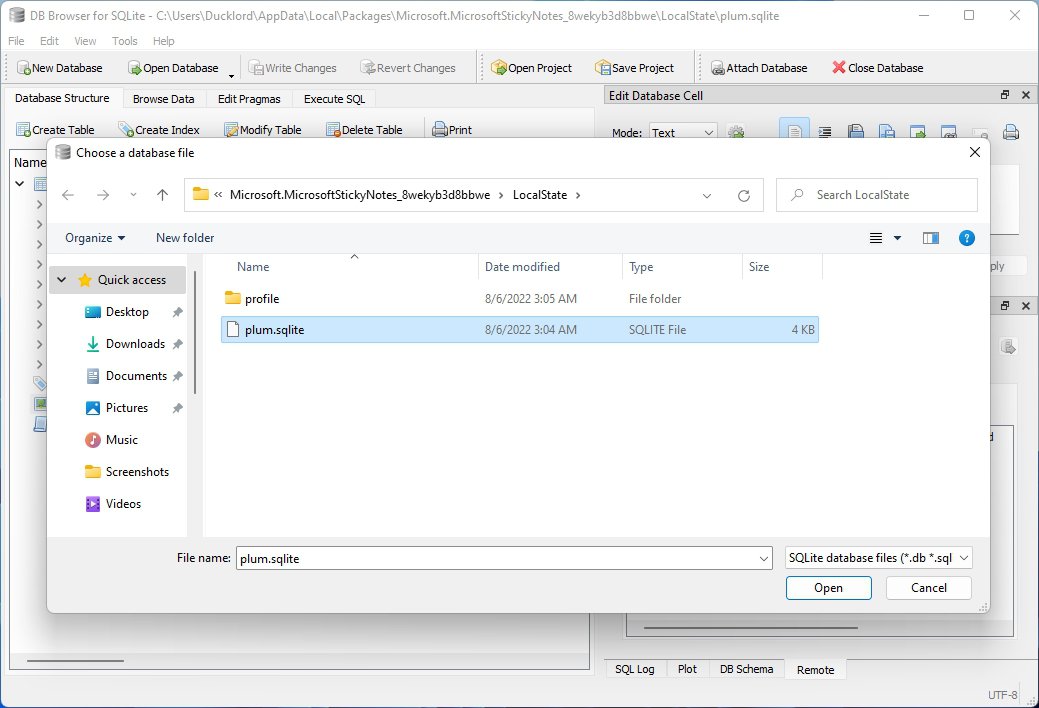
- Point the requester to the path where your Sticky Notes are saved. By default, this should be
%UserProfile%\AppData\Local\Packages\Microsoft.MicrosoftStickyNotes_8wekyb3d8bbwe\LocalState
- Move to the Browse Data tab (it’s right under the Open Database option that you clicked before).
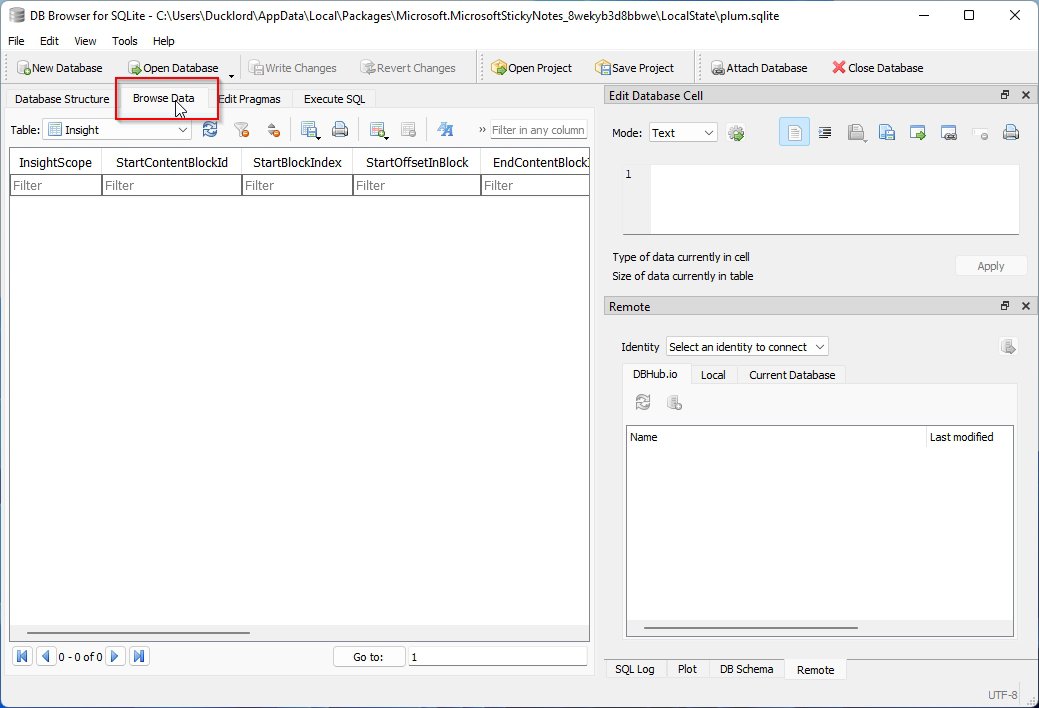
- Point your gaze some more pixels downwards, and expand the Table drop-down menu (on the left of the window). Choose the Note table.
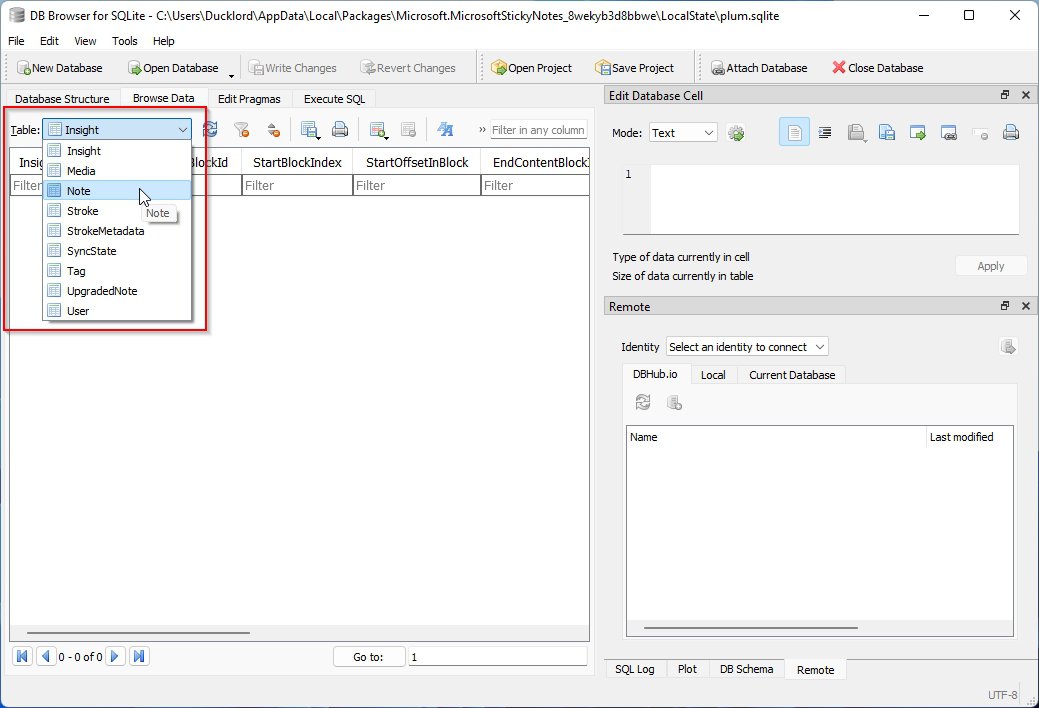
- You will see a list of all your notes, but unfortunately, it’s not possible to casually browse their contents from DB Browser For SQLite. You’ll have to select them one by one and then check the content of each entry on the secondary preview on the right of DB Browser For SQLite’s window. You’ll see IDs for the notes’ content, followed by the actual content.

Method 3 Check the Notes Folder in Outlook
Thanks to the magic of syncing, your Sticky Notes may be available on the online version of Outlook, known as Outlook Live. However, they’re not front and center, so you’ll have to scroll a bit to find them.
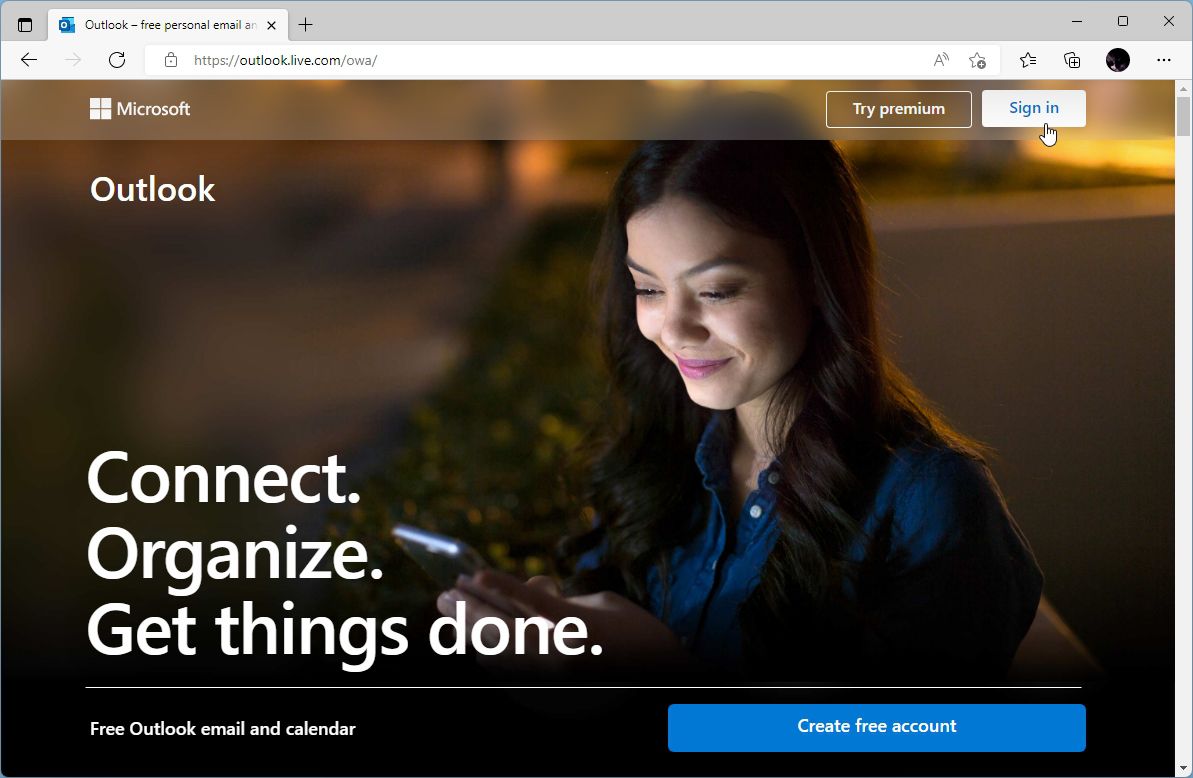
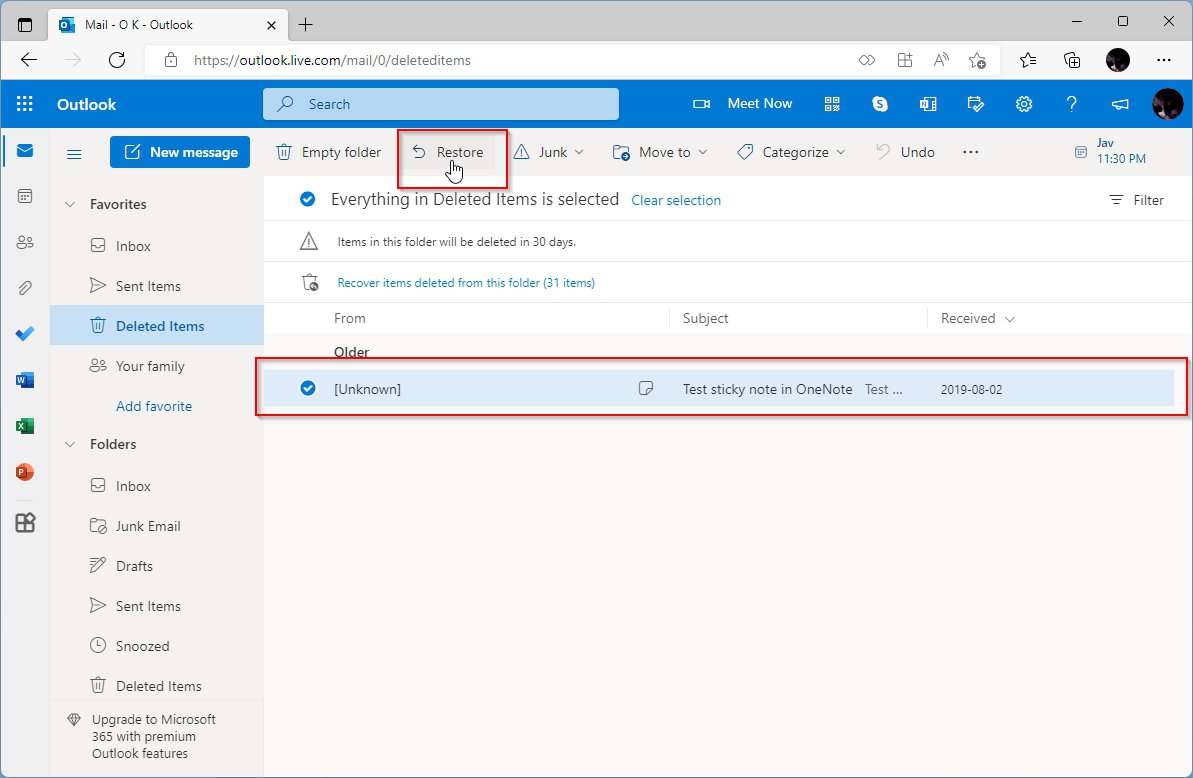
- Pay a visit to Outlook Live’s official site, and sign in with the same account you were using with the desktop Sticky Notes up.
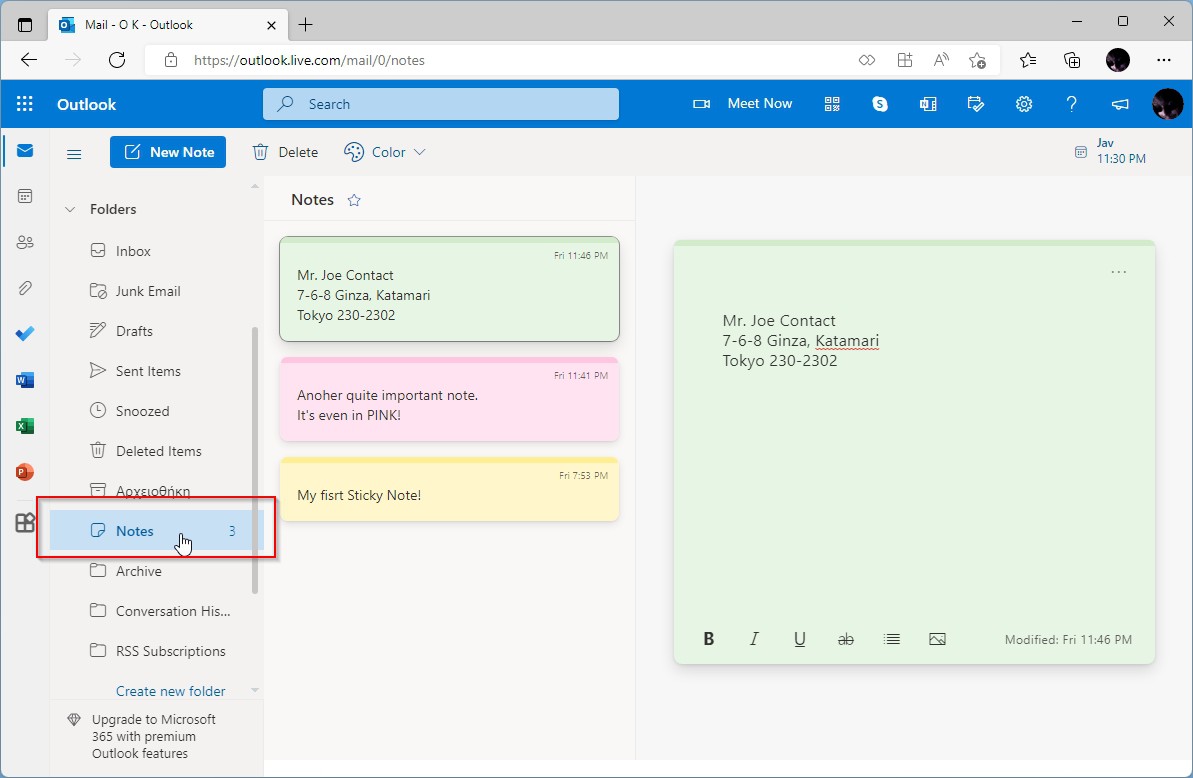
- Outlook Live’s left list begins with the most popular mail-related folders. Ignore them and scroll downwards until you find Notes. Then, select it to see the web-enabled version of your Sticky Notes.
- If they aren’t there, and their disappearance is relatively recent, Outlook Live will probably have kept them in its Deleted Items folder. Select it from the same list to see all of Outlook’s deleted items. If your notes are among Outlook Live’s deleted items, place a checkmark on their left to select them.
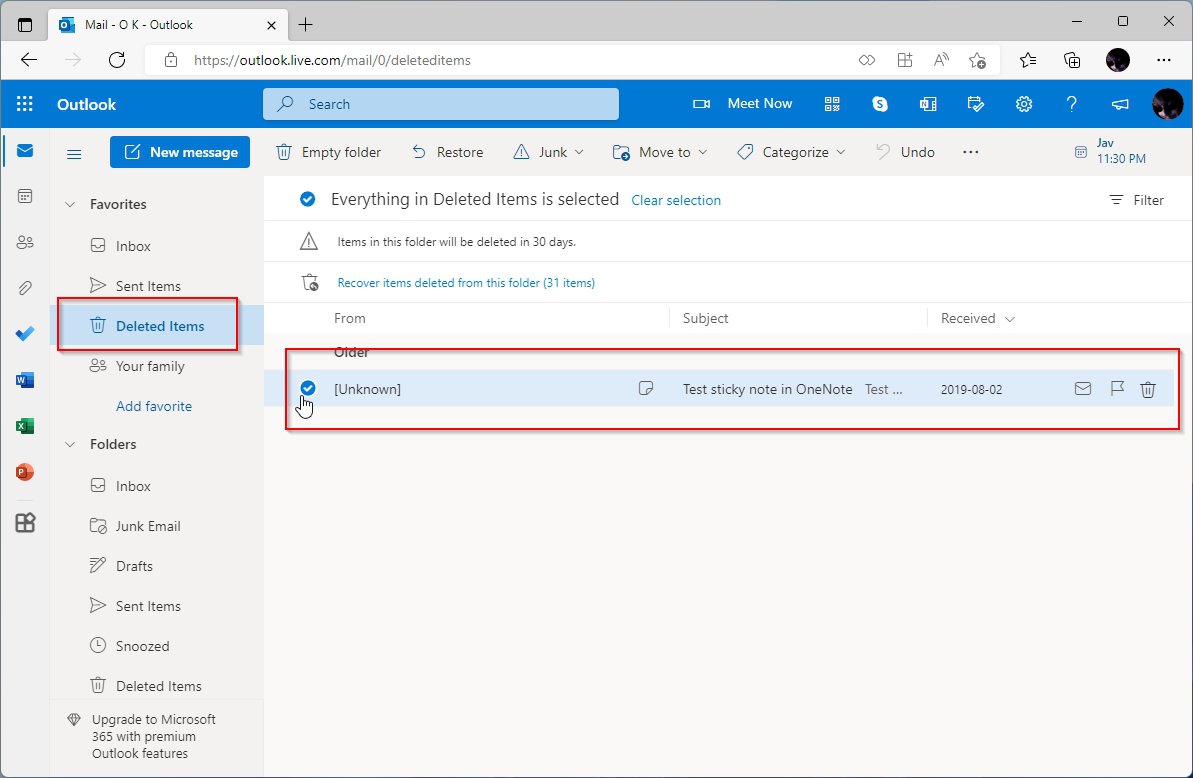
- Finally, click on Restore from the action bar at the top of Outlook Live’s interface to undelete the selected files.
Method 4 Bring Back Your Sticky Notes From File History
If you’ve been using a backup solution, and your Sticky Notes were included in those backups, you can recover them from there.
Strangely, Windows comes with more than one backup solution baked-in. Among them, File History is probably the most user-friendly. To recover your Sticky Notes from it, try the following:
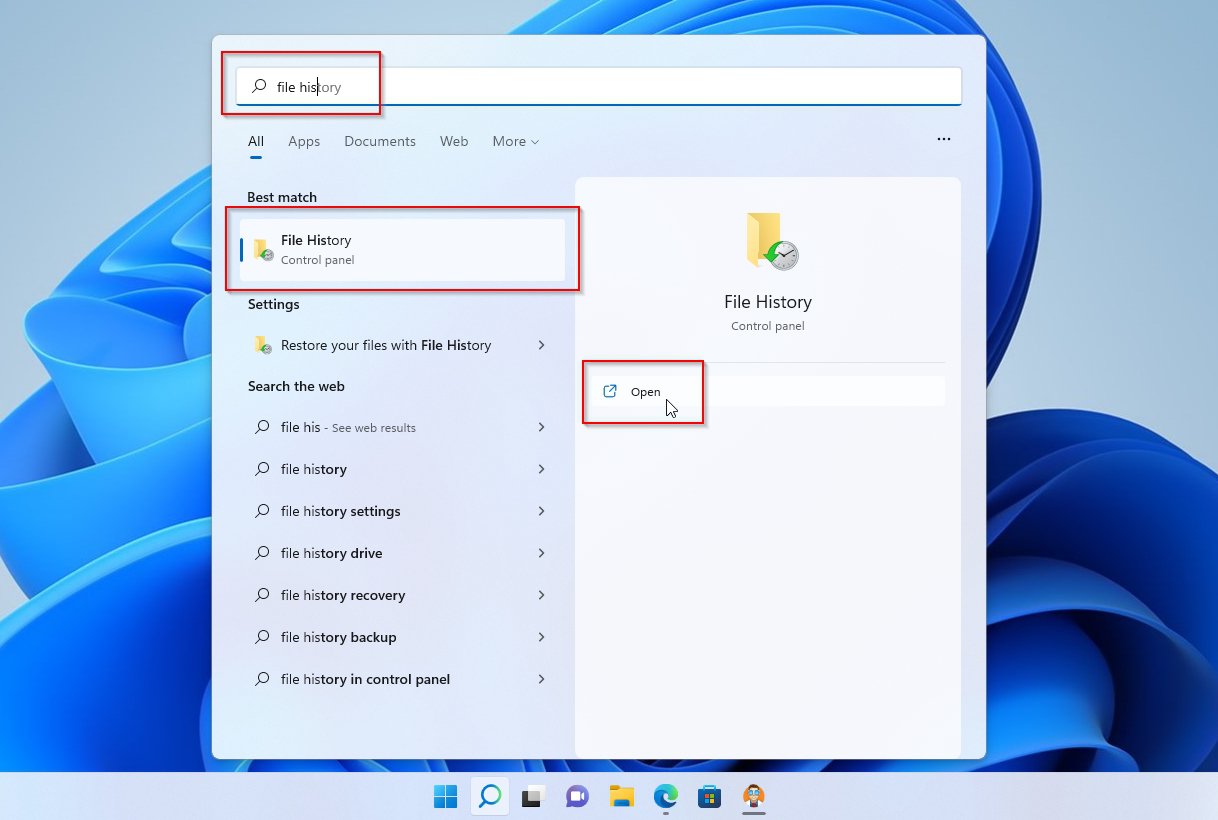
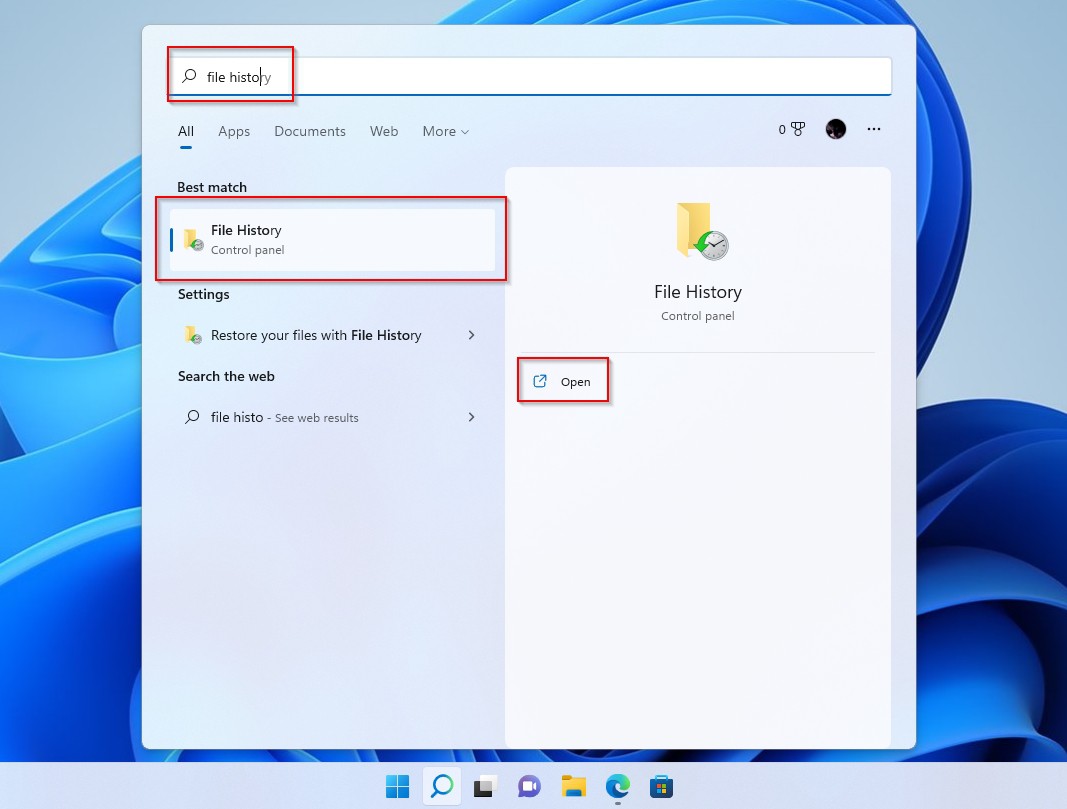
- Seek File History in the Windows Start Menu, and when you find it, launch it.
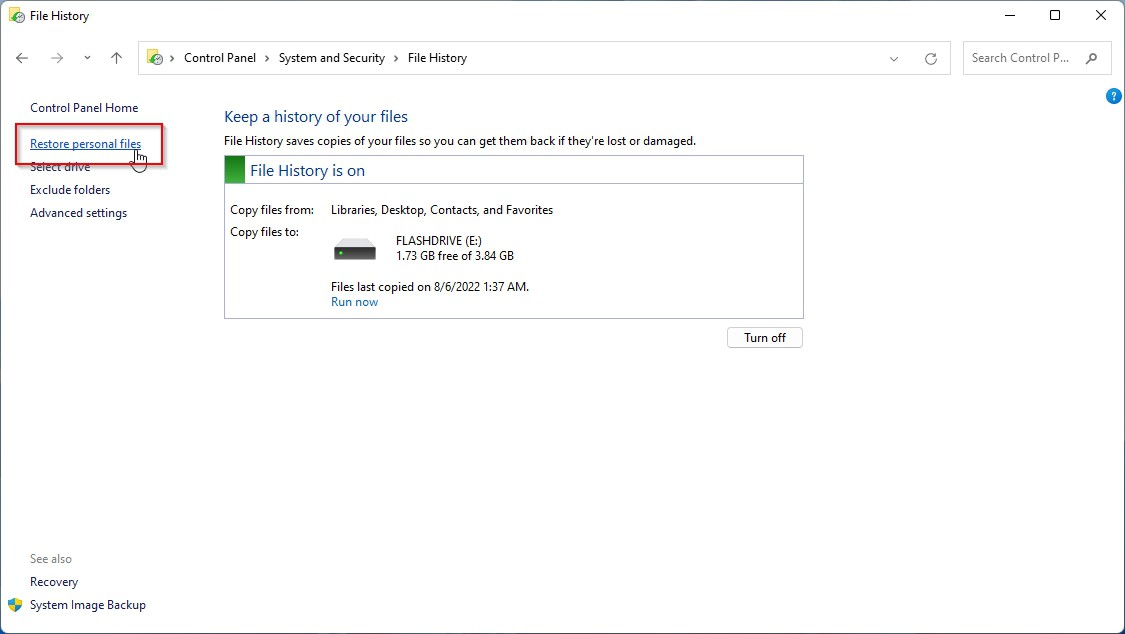
- Notice the entries on the left of the File History’s window. From there, click on Restore personal files.
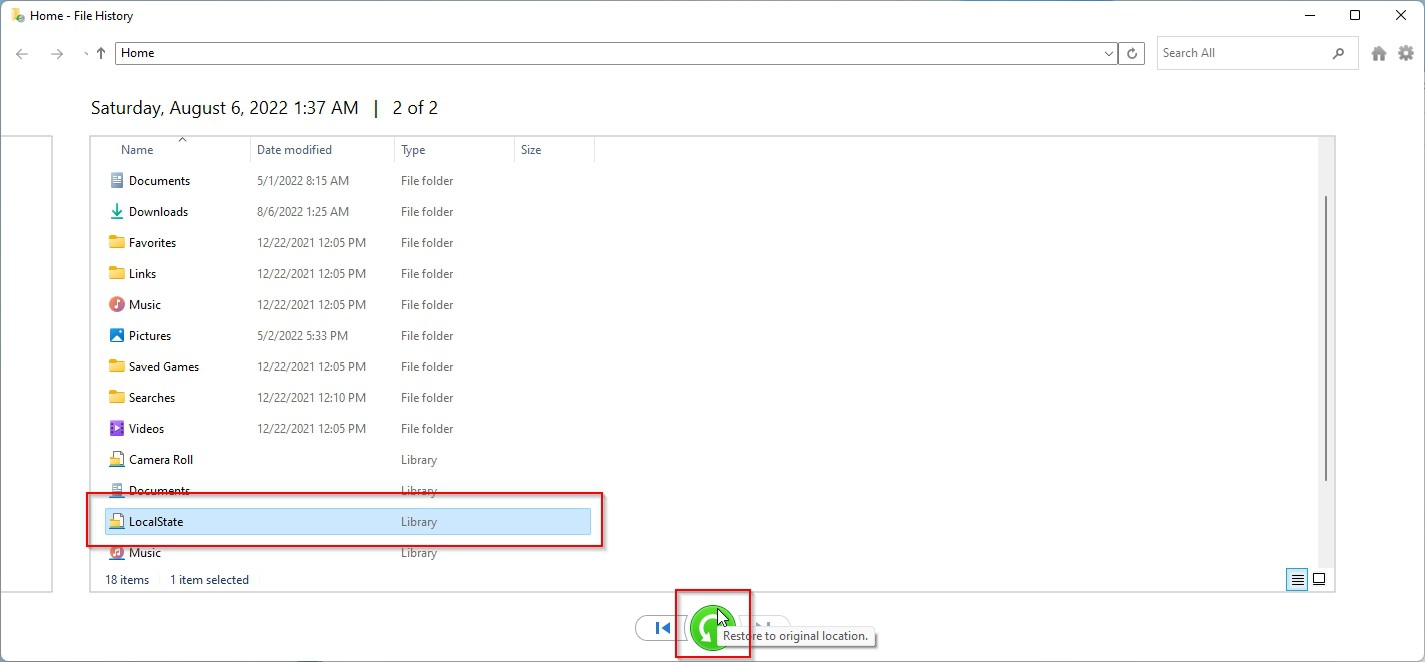
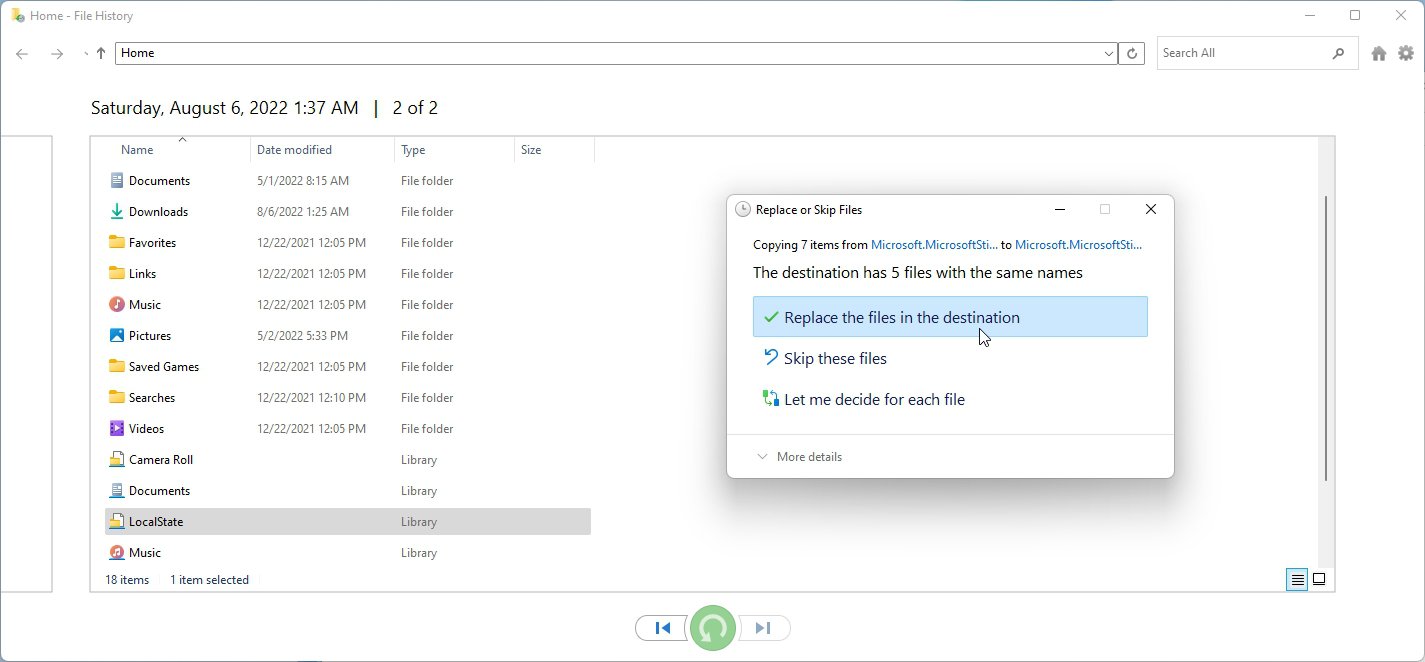
- File History will show you a list of your files in its backups. Locate your Sticky Notes-related entry and select it. To restore it, click the circular button at the bottom center of the window.
- If restoring to the files’ original folder, and there’s already a corrupted version of them there, File History will inform you about the file conflict. It will allow you to choose if you want to replace all files that share the same name, skip all of them, or decide for each file separately.
When the process completes, you’ll have your Sticky Notes back.
Method 5 Restore to a Previous Version
Having File History enabled also enables another one of Windows’ built-in safety features: Previous Versions. As its name states, Previous Versions allows you to revert some files or folders to an earlier state selectively. At least, as long as this “earlier state” was included in one of File History’s backups.
So, to revert your Sticky Notes files or folder to an earlier condition, back when they were still accessible, or before you’ve absent-mindedly overwrote some of their contents, fire up Windows File Explorer. Then, follow those steps:
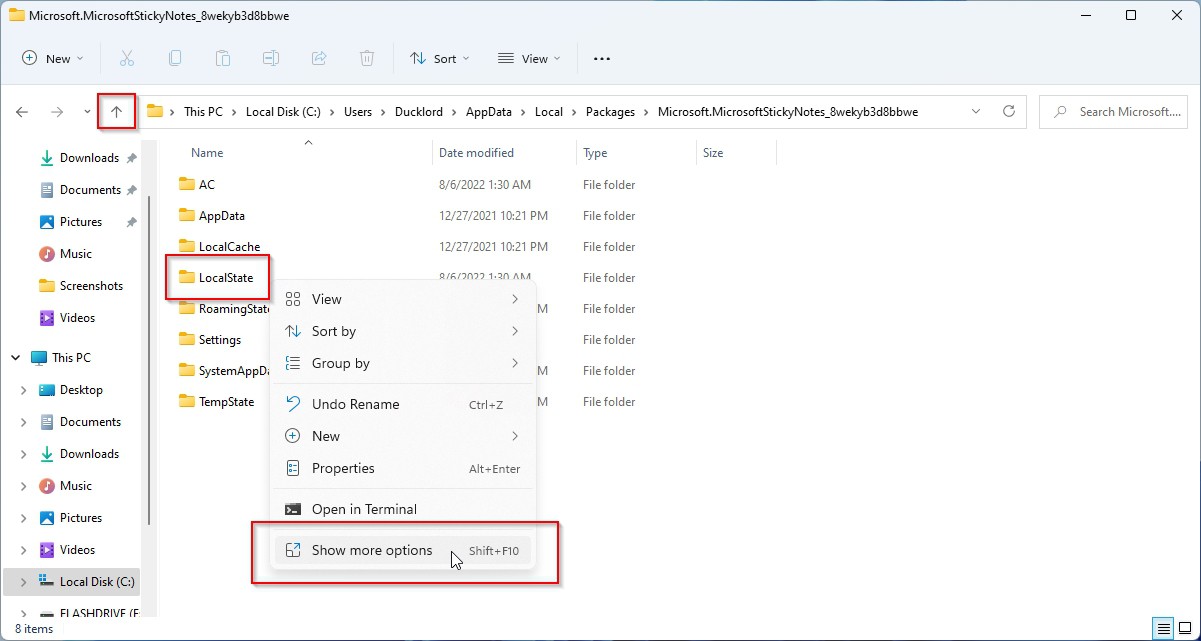
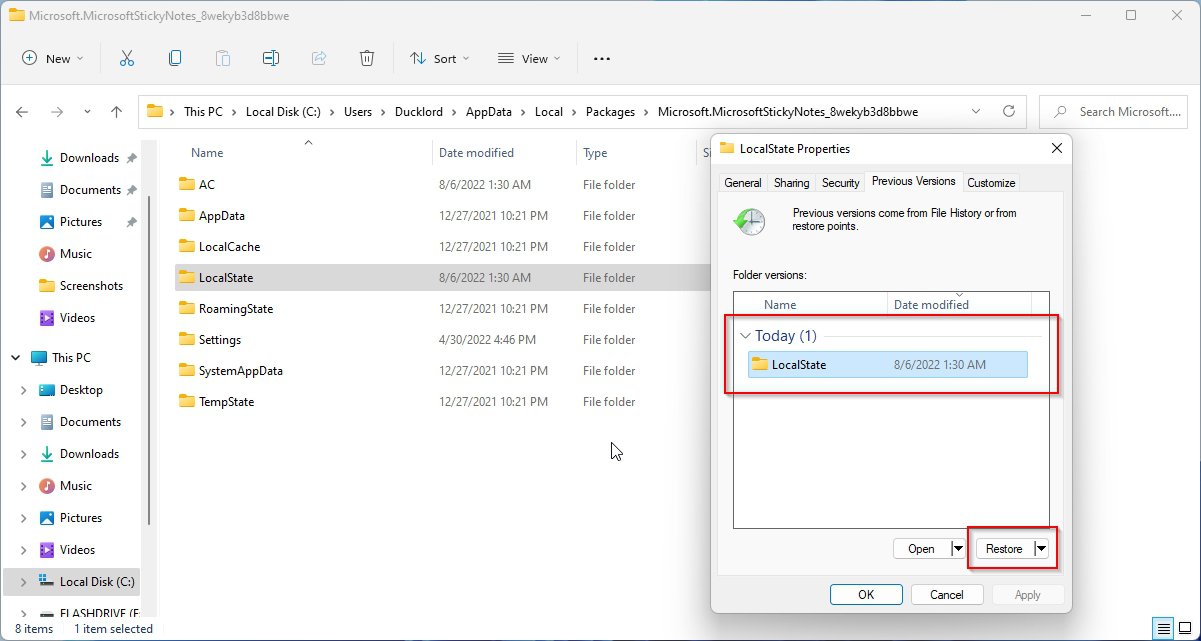
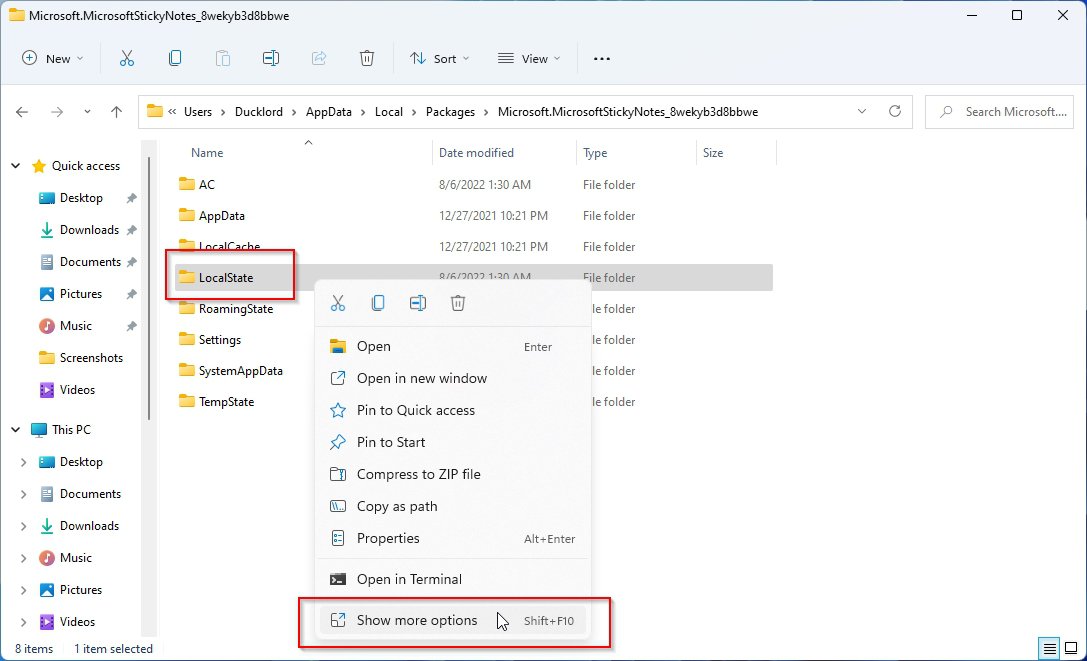
- Point File Explorer to the Sticky Notes folder. By default, you’ll find it at
%UserProfile%\AppData\Local\Packages\Microsoft.MicrosoftStickyNotes_8wekyb3d8bbwe\LocalState
- You’ll be inside the LocalState folder, seeing your Sticky Notes files. Move one level up, using the arrow pointing upwards, above the list on the left side of File Explorer’s window, or press Backspace on the keyboard. Right-click on the LocalState folder, and if you’re on Windows 11, select Show more options to access the classic right-click menu. If you’re on Windows 10 (or older), you’ll already be looking at the classic menu.
- From the (classic) right-click menu, choose the Restore previous versions entry.
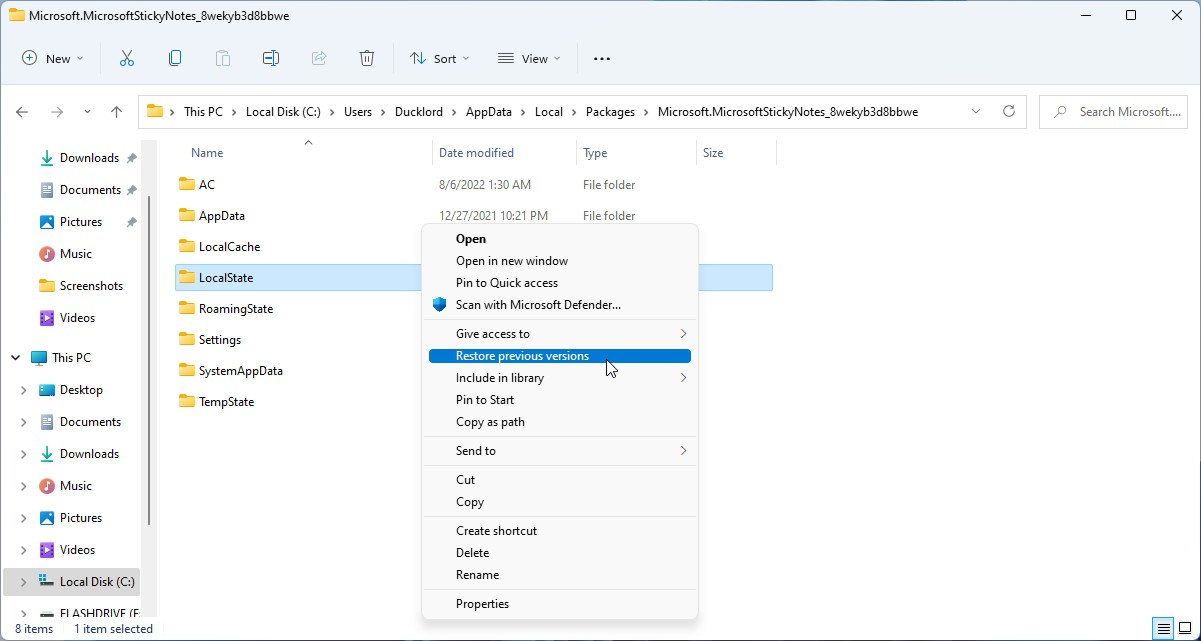
- At this point, you’ll be looking at what can be described as your sticky notes history. Choose the entry you want to restore from the list under Folder versions. Note that in our screenshot, you’re only seeing a single entry, but in your case, if using File History long enough, your list may contain more entries. With the desired entry selected, click on Restore on the bottom right of the window.
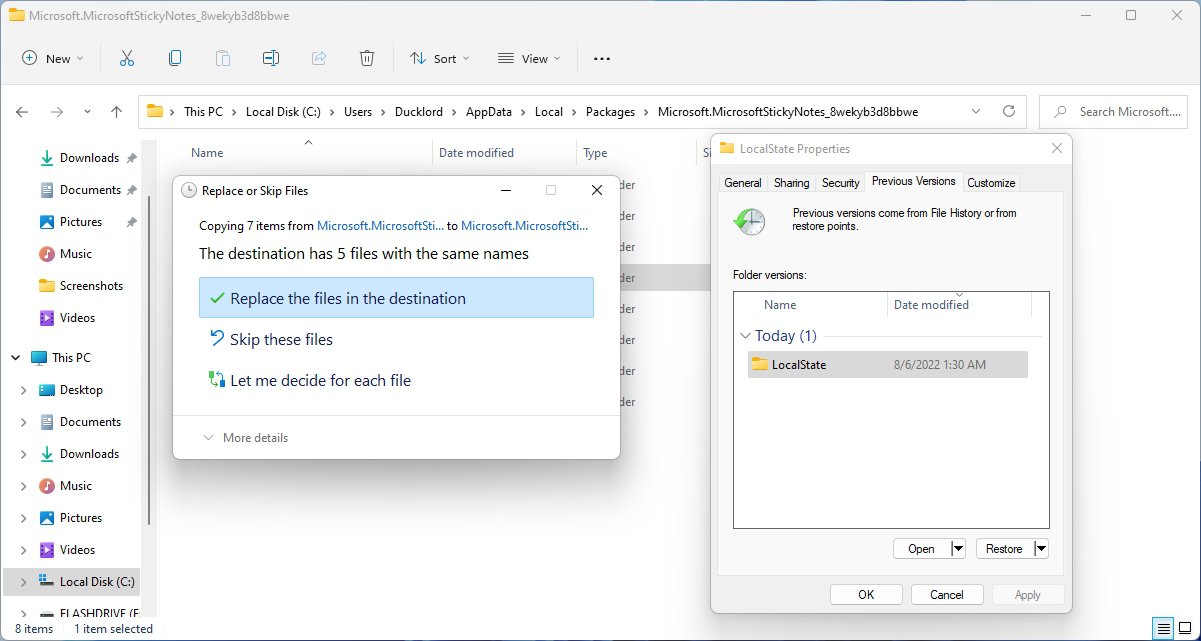
- If you’re recovering files and folders to the same spot from where they were backed up, versions of them still exist there and have the same name as the recovered ones, you’ll be informed about their conflict. You can choose to replace or skip all files in one move or decide for each separately.
The process should complete in seconds or, at worst, a few minutes. Its speed depends on the amount of data recovered and the performance of your storage devices (and PC in general).
Method 6 Backup Sticky Notes
Setting up a backup plan after losing your Sticky Notes won’t bring them back, but it will ensure you won’t ever lose them again.
To do that with the free, robust, and “transparent” File History:
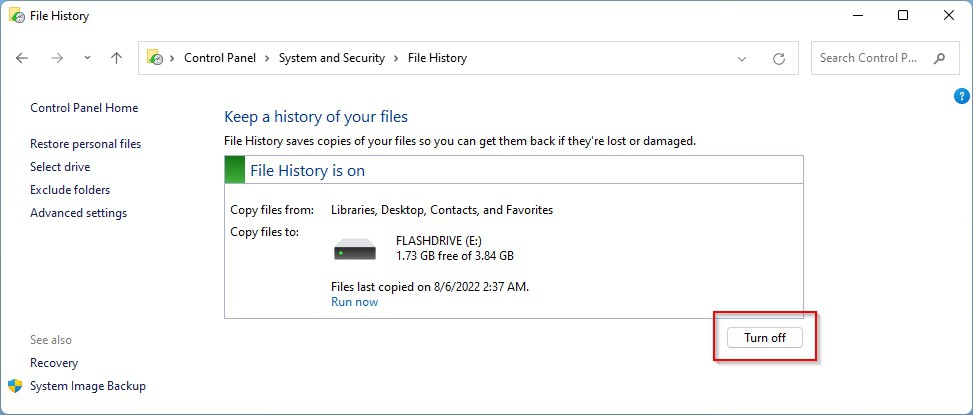
- Ensure you have an external storage device, like a USB Flash Drive, connected, where File History will store backups. Use Search or the Start Menu to find and open File History.
- File History will show you your external storage device but won’t be using it by default. To activate File History and use this storage device for storing backups, click on the Turn on button.
- With File History active, your personal files will be backed up and secure. Unfortunately, your Sticky Notes won’t be among them by default. To add them to File History’s backups, fire up Windows File Manager and visit their path. It should be
%UserProfile%\AppData\Local\Packages\Microsoft.MicrosoftStickyNotes_8wekyb3d8bbwe\LocalState
.
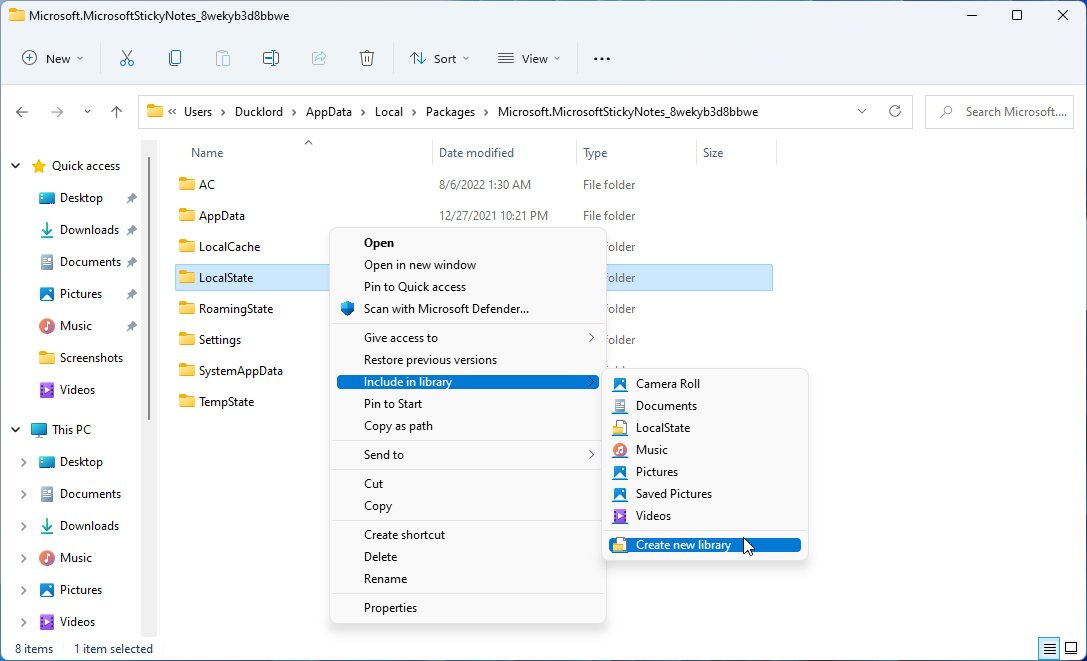
- Move one level up using either the top-pointing arrow on the top of the places list on the left or by pressing Backspace on the keyboard. Right-click on the local Sticky Notes folder, named “LocalState“. On Windows 11, select Show more options. On older versions of Windows, you can skip that.
- Highlight the Include in Library entry. Then, either choose one of the existing libraries where you’d like to include your Sticky Notes or Create new library specifically for them.
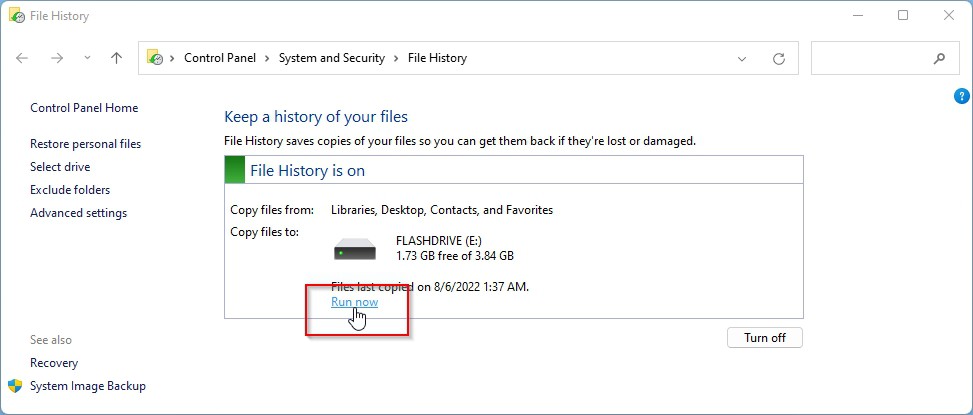
- File History works automatically. To ensure your Sticky Notes will be backed up when you want, return to File History’s page. There, click Run now, which will show up directly underneath your storage device.
Method 7 Did Sticky Notes Completely Disappear?
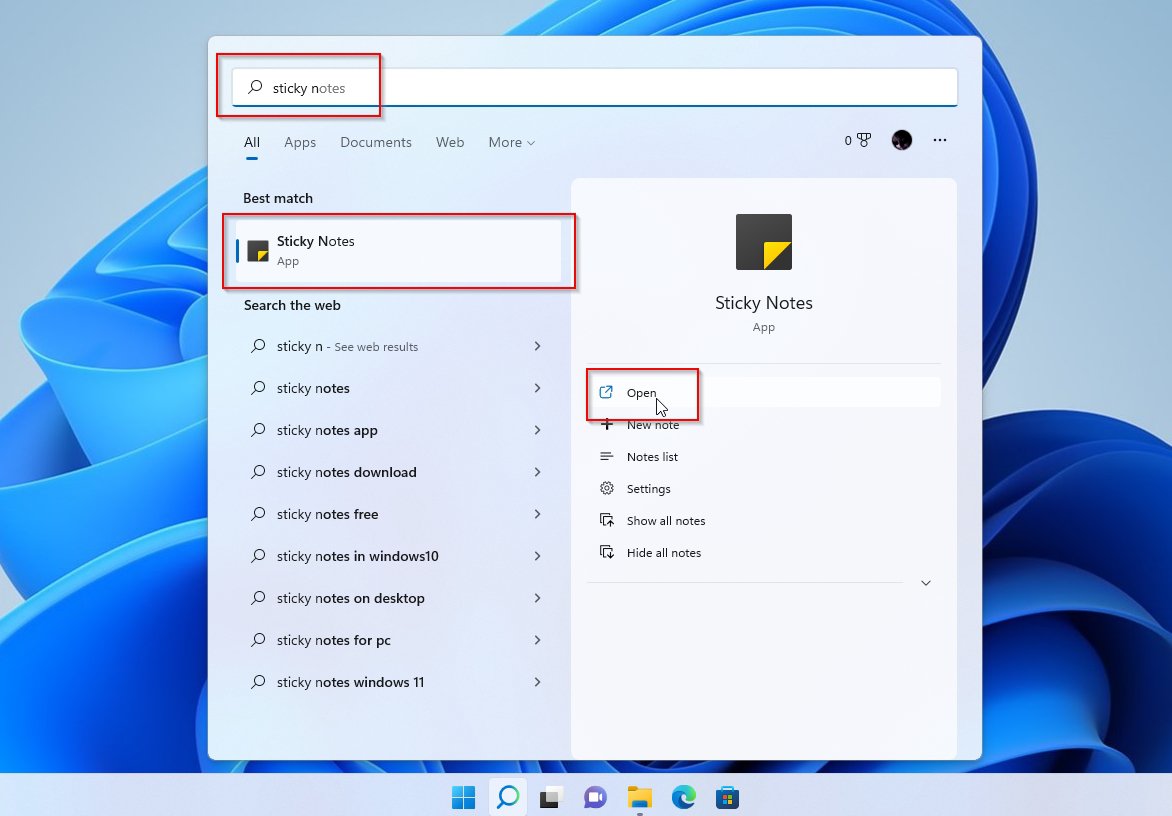
When most people say that “their Sticky Notes disappeared”, they refer to the contents of the app. For some, though, it’s the app itself that seemingly went invisible. Even Microsoft acknowledges that this can happen and suggests you try re-installing Sticky Notes.
To do that:
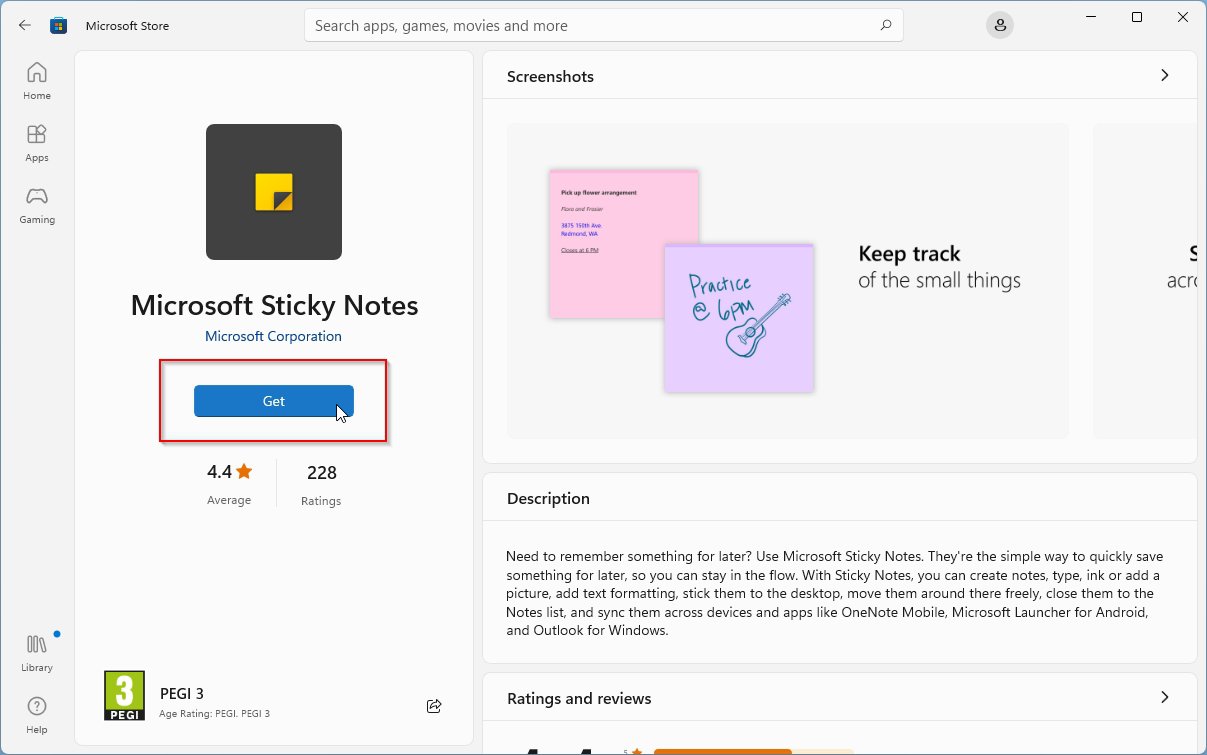
- Open the Microsoft Store app. Use its search field to search for Sticky Notes. Pay attention that “Sticky Notes” is also the term for many other similar note-taking solutions. Ensure the one you select is by Microsoft.
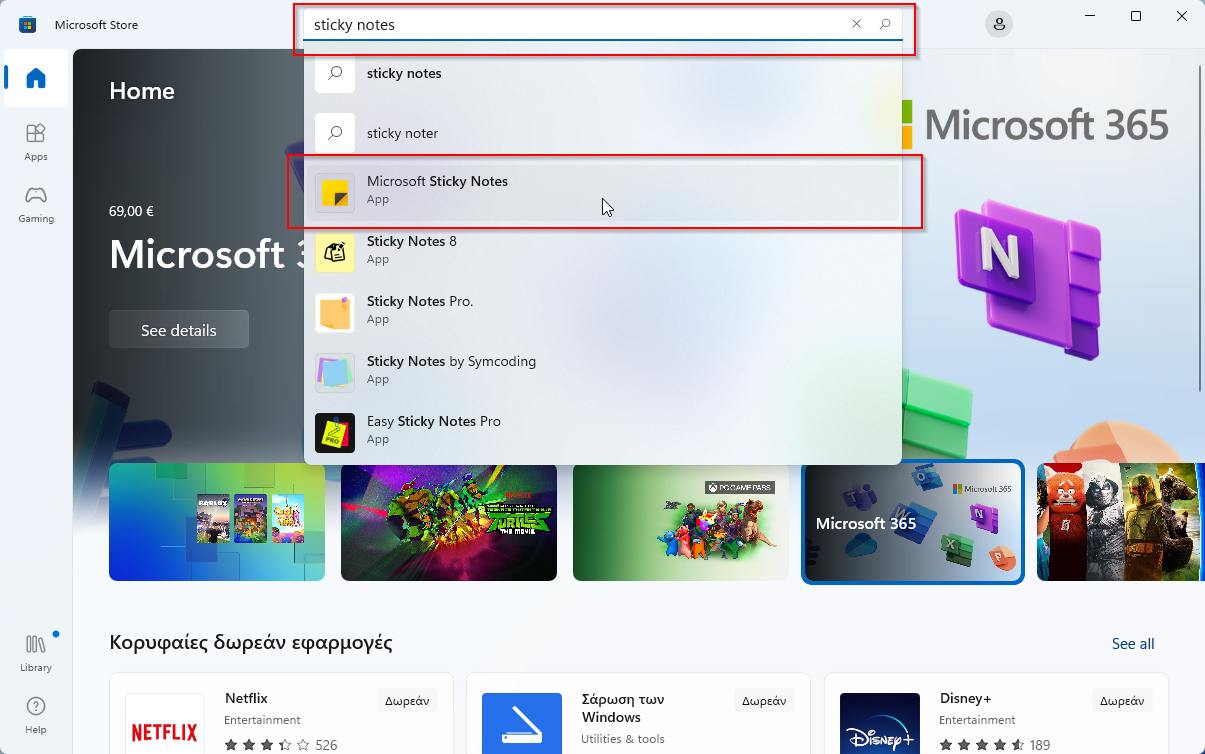
- Click the Get button on the left of the window to install Sticky Notes. If it’s greyed out, maybe the app is still installed but corrupted. Use the Search or Start Menu and type “add remove” to find the Add or remove programs panel. Search for Sticky Notes, click on the three-dot button on its right, and choose Uninstall to remove it. You’ll have to close and re-open Microsoft Store for it to recognize the change, and then return to Microsoft’s Sticky Notes page and click on Get to install it.
- After re-installing it, Sticky Notes should be available and fully working again. You might have to re-enter your account details when you run it.
Method 8 Can’t Access Your Sticky Notes Online?
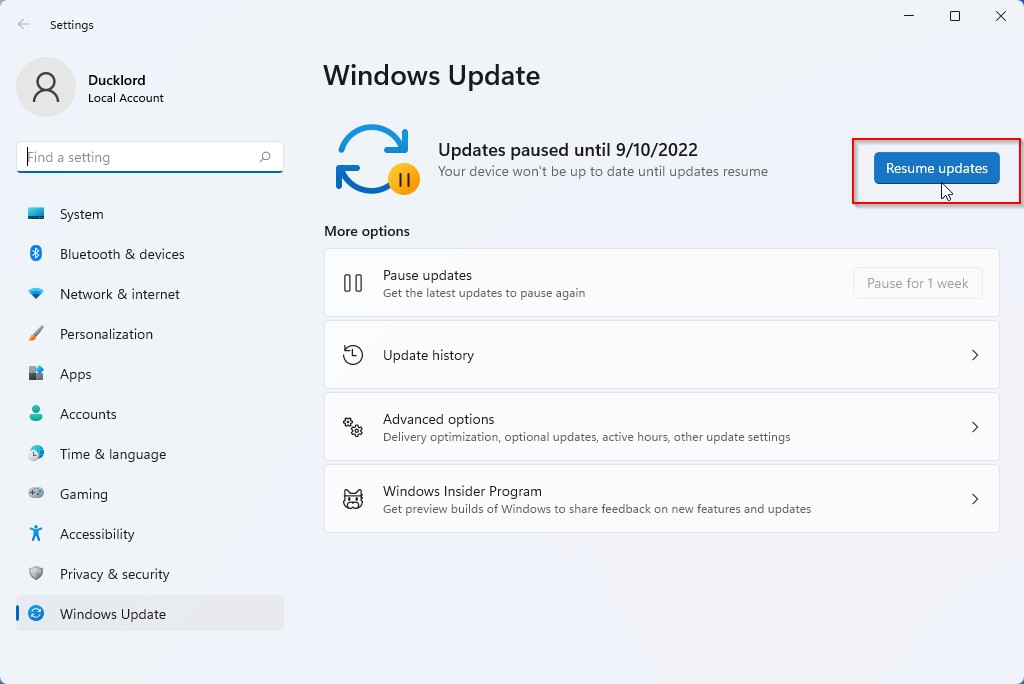
One wouldn’t expect Windows Updates to affect if and how Sticky Notes work. And yet, it seems that can happen, too, rendering your Sticky Notes inaccessible. At least if you’re using a work account.
So, make sure Windows Update is enabled and your operating system is up to date.
- Use Search or the Start Menu to find and open the Windows Update settings page.
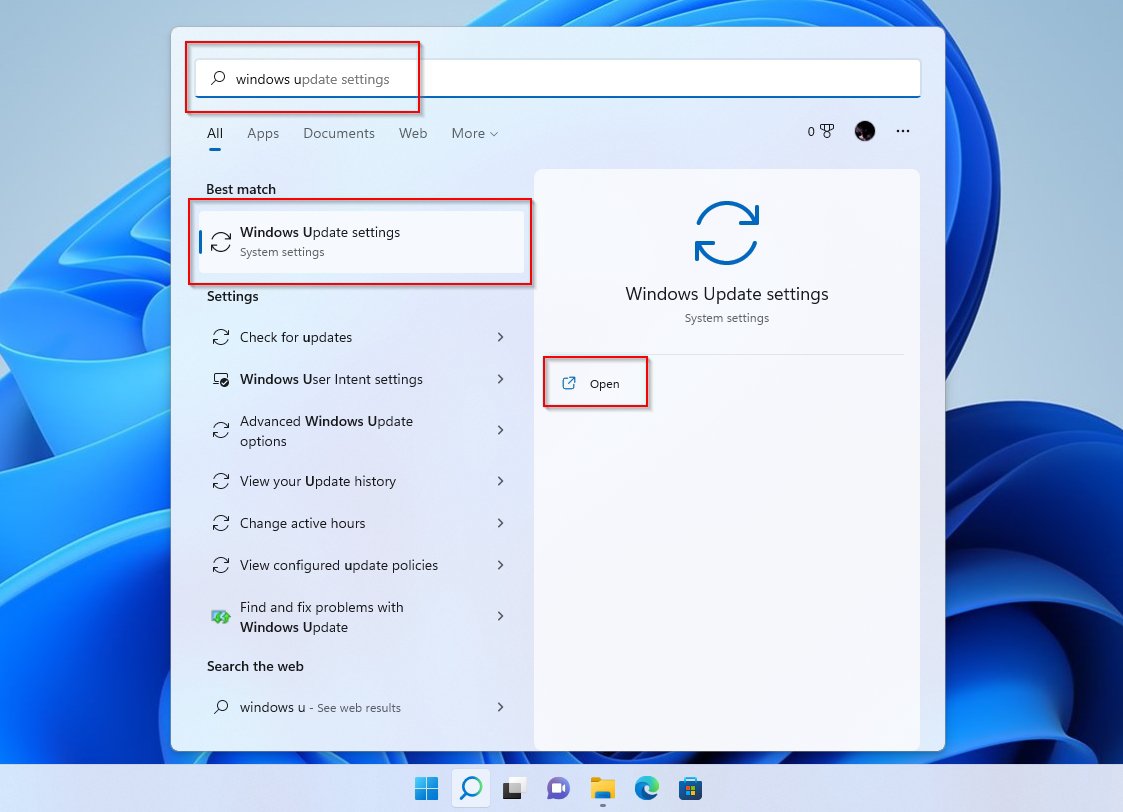
- If Windows Update is disabled or paused, you’ll see an option to enable it or resume updating. Click on that and allow Windows Update enough time to catch up with the latest update offerings. When it does, and maybe after a restart and signing in again, your Sticky Notes should be back to normal.
Method 9 Where Are Your Sticky Notes On Your Other Devices?
Microsoft’s Sticky Notes can also be accessed from other devices, like smartphones and tablets. To do that, you need another piece of software to complete the equation: OneNote.
Despite being a note-taking solution of its own, Microsoft’s OneNote for iOS and Android devices also includes Sticky Notes. So, to access them, find and install OneNote from your device’s official store. Then, run OneNote and log in with your Microsoft Account. Give it some time to sync.
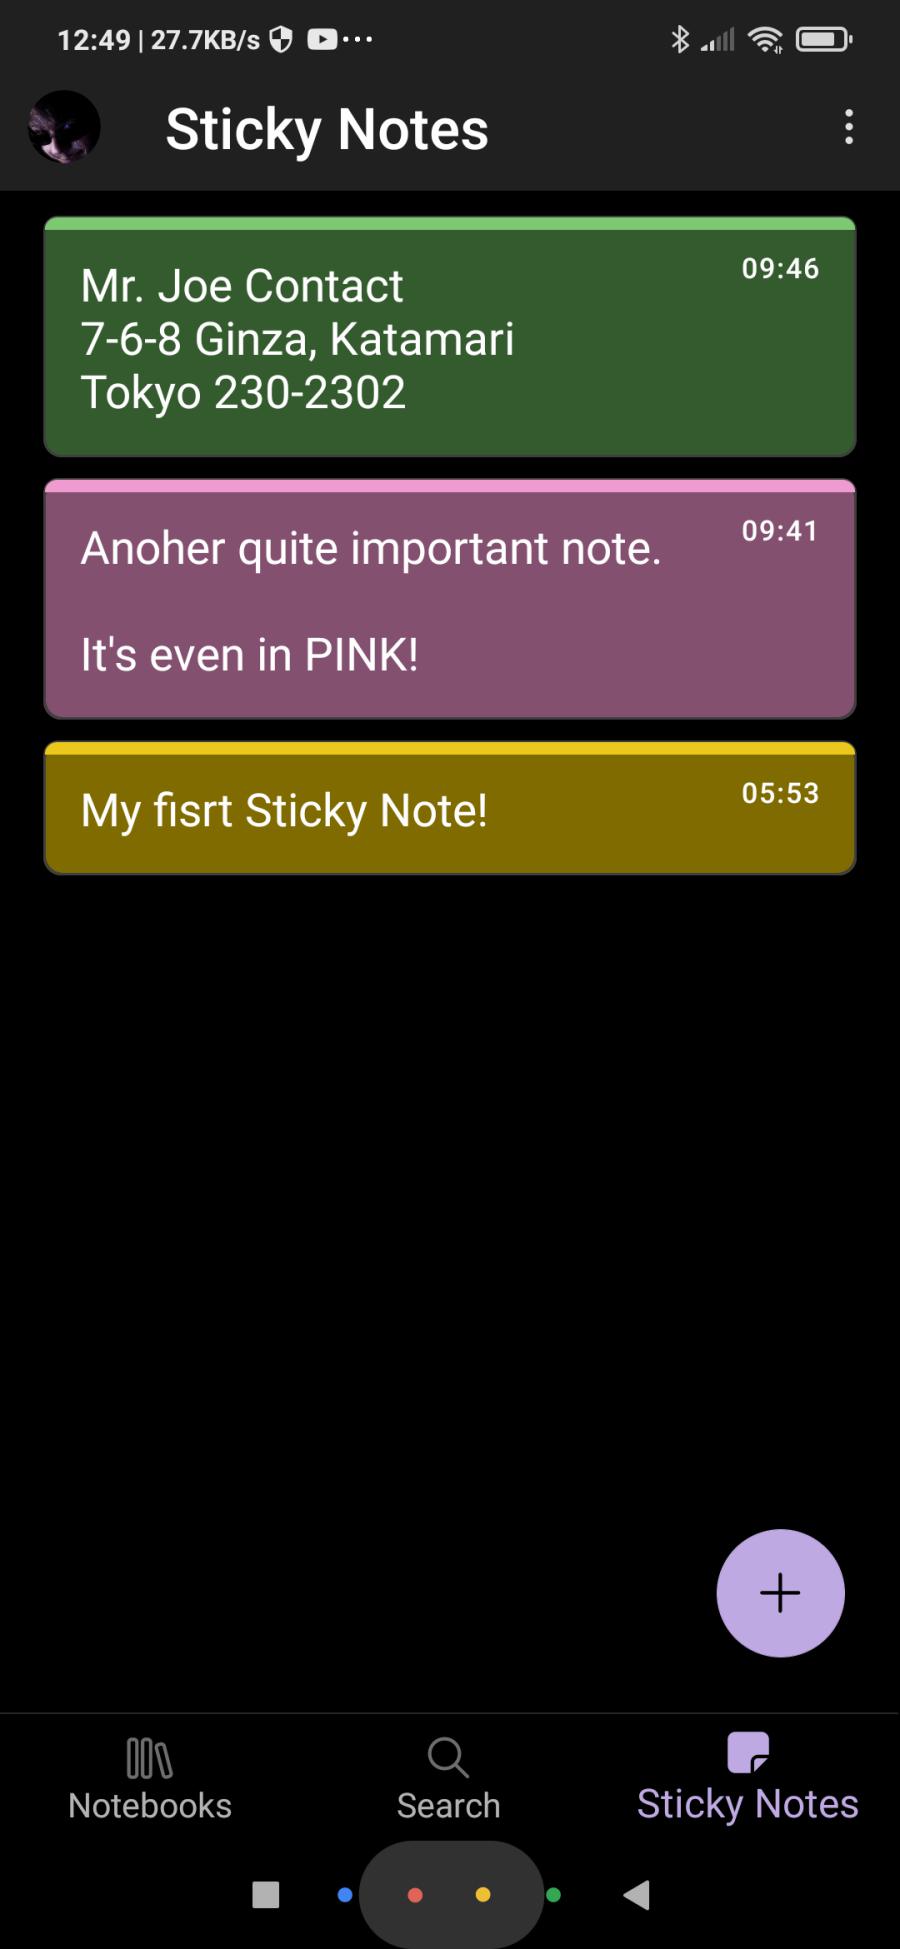
- When OneNote finishes syncing your Notes, tap on the third icon on its bottom bar, “Sticky Notes“.
- You’ll see there all the notes you took with the standalone desktop version of Sticky Notes or through Outlook Live’s Notes page.
How to Protect Sticky Notes on Windows 10
It’s easy to send one of your notes to oblivion. That’s why Microsoft has equipped Sticky Notes with an extra layer of security against absent-mindedness.
To enable it:
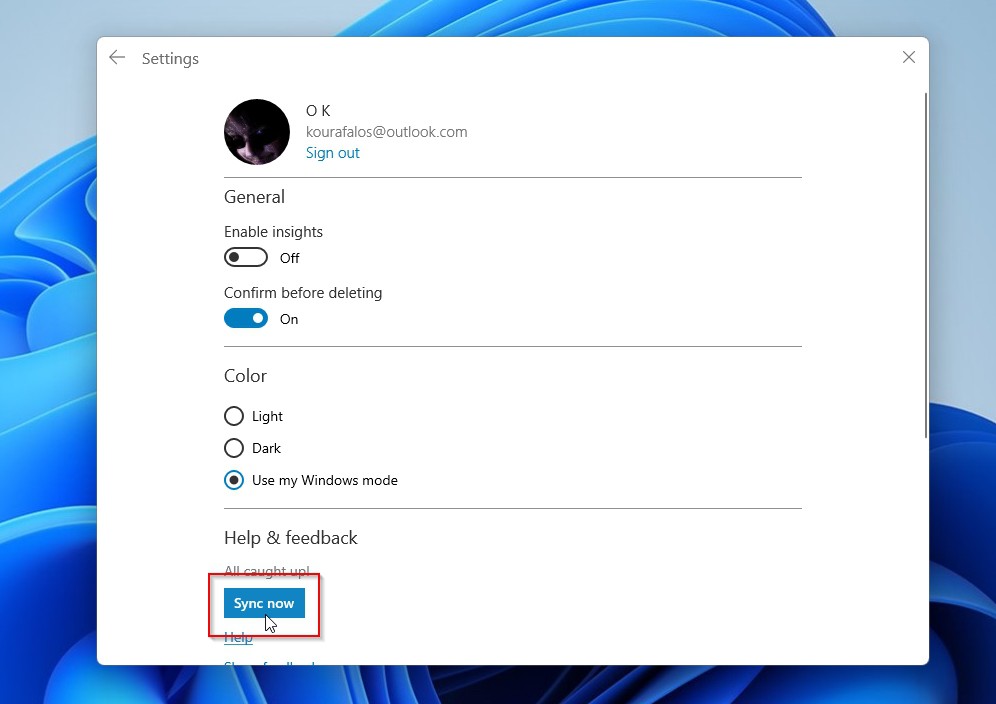
- Click the button with the cog icon on the top right of the Sticky Notes window to access the app’s settings.
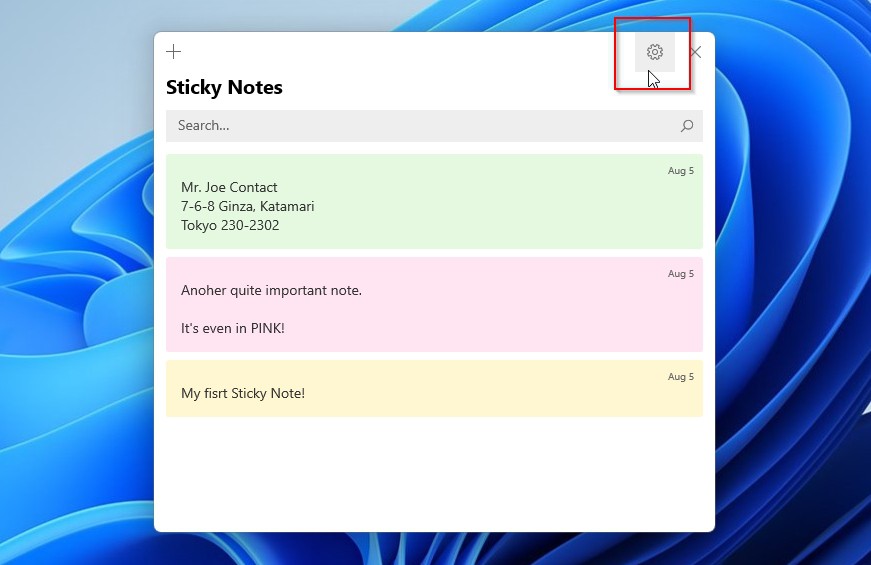
- Flick the switch under Confirm before deleting to On to have Sticky Notes ask you to double-check whenever you try to delete a note.
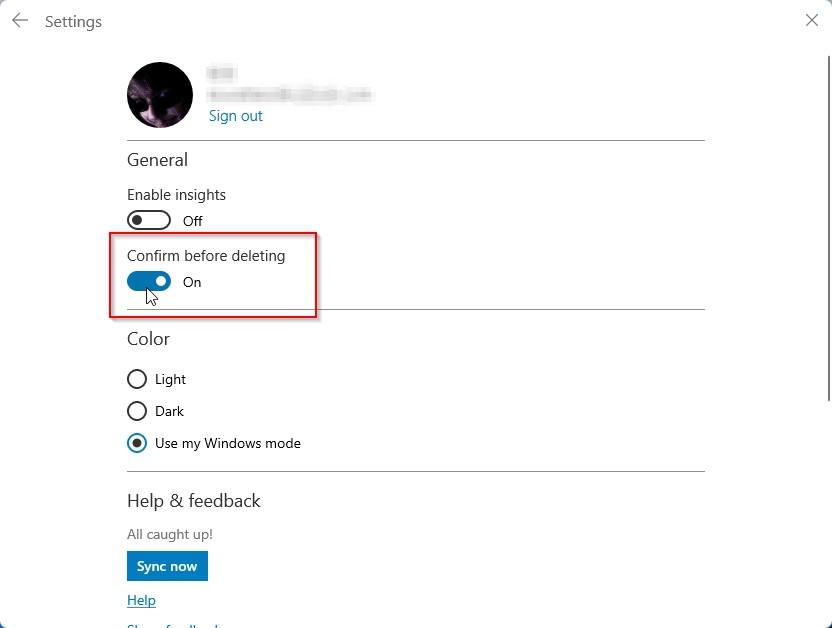
- While being here, it wouldn’t hurt to also click on the Sync now button that you’ll find under Help & feedback. This will have your notes synced with Microsoft’s servers, ensuring that if something happens to one version of your notes, you’ll still have access to the other.
Conclusion
As we saw, “losing your Sticky Notes” can mean many things. A corrupted file system could render the notes themselves inaccessible. An absent-minded move could have sent some of them to the Trashcan Of Doom. Or the Sticky Notes app itself could have stopped responding.
Thankfully, all those problems, and more, have solutions. Even when your notes have disappeared, an advanced tool like Disk Drill can return them from the void.
Thus, instead of worrying you’ve lost them forever, just go through the solutions we listed. It’s almost a given at least one will work for you.


FAQ
According to Microsoft, they’re gone forever. Microsoft’s official suggestion is to turn on the need for confirmation before deletion to ensure you don’t accidentally delete your notes. For if you do, it’s permanent.
As we saw, although you can’t “un-delete” your notes, there are many alternative ways to get them back.
It could be one out of many possible reasons.
- Could a recent power loss have corrupted your PC’s file system?
- Is it possible that your cat, who likes sleeping on your PC’s comfy keyboard, also moved the mouse and chose the option to Delete some of your notes?
- Is there any chance some recently downloaded software, or maybe an operating system update, could also have affected other apps?
Each of the solutions we saw in this article can work best with particular causes. If you don’t know what made your sticky notes disappear, it won’t hurt to try all solutions one by one.
Thankfully, despite Microsoft presenting Sticky Notes deletion as permanent, there are many ways you can undo it. However, there’s no single answer on how that can be done, precisely because there are many ways to do it, and they also depend on how your sticky notes “got deleted”.
In the main part of this article, we go through some of the most prevalent reasons sticky notes can disappear and the best solutions for bringing them back. One or more of those solutions will probably work for you.
There are many ways you can recover deleted sticky notes. You can:
- Use a data recovery solution, like Disk Drill.
- If you’ve synced them, you may find them on the Notes subsection of Outlook Live.
- Find them by running OneNote on your smartphone or tablet since Microsoft has “bundled” Sticky Notes with its mobile versions.
- If your notes database file is still available, or you recovered it, you can use a tool like DB Browser For SQLite to “decipher” their content.
The ways of recovering Sticky Notes when using Windows 11 are identical to Windows 10. Especially since the best ones rely on third-party tools, like DB Browser For SQLite or Disk Drill, or online services, like Outlook Live, which are all identical no matter your version of Windows.
Thus, all the solutions you see on our list above should work on both Windows 10 and Windows 11. In fact, for this article, we used Windows 11 for everything.