Having issues with a drive that’s constantly asking you to format? This is a sign that the file system on your drive has become corrupted. In this state, your data still physically remains on the drive, but it’s in a vulnerable, inaccessible state.
What Are the Most Common Causes of Hard Drive Corruption?
Why does Windows ask you to format? Because it is unable to detect a working file system. Formatting fixes this issue by writing a new, working file system to the drive (or rather, partition).
Broadly speaking, the issue you’re facing can fit into one of two categories: logical (software-related) or physical (hardware-related), both of which can result in file system corruption, or worse.
🔧 Issues that are often fixable without formatting:
- 💾 Interrupted disk operations that result in corruption of the entire file system.
- ⏏️ Improper removal of the device leads to an unusable file system.
- 🔌 A sudden power loss event interrupted important operations that led to file system corruption.
- 🪟 OS-level bugs introduced with bad updates.
- 🦠 Virus-infected drives.
💥 Issues where professional help is considered essential:
- 🟥 Physical damage to the platters, like a head crash, can lead to bad sectors or blocks where your file system is located.
- 👎 Incorrect capacity value being shown in File Explorer.
- 🐌 Slow disk operations caused by failing or severely outdated hardware.
- 🔥 Overheating due to a faulty hardware component rather than restricted airflow.
- 🎲 Data is randomly and sporadically becoming corrupted.
How to Recover Files From an External Hard Disk Drive Without Formatting
It’s possible to recover files from an external hard drive and render it usable again without having to turn to formatting. That’s where data recovery solutions can help.
Disk Drill is one of our favorite hard drive data recovery apps. It’s easy to use, affordable, and well-suited for recovering data from corrupted disks with a file system that’s either not identified or appears as RAW. By interfacing with the drive directly, it bypasses any error messages that stop traditional apps. And, because it can recover using file system pointers (from file systems like FAT, exFAT, NTFS, ReFS, EXT, and BTFS) and file signatures, it gives you even better odds of recovering more.
To recover your files from your external hard disk drive with Disk Drill:
- Download Disk Drill on your Windows or Mac.
- Install it, and then launch the app once it’s installed.
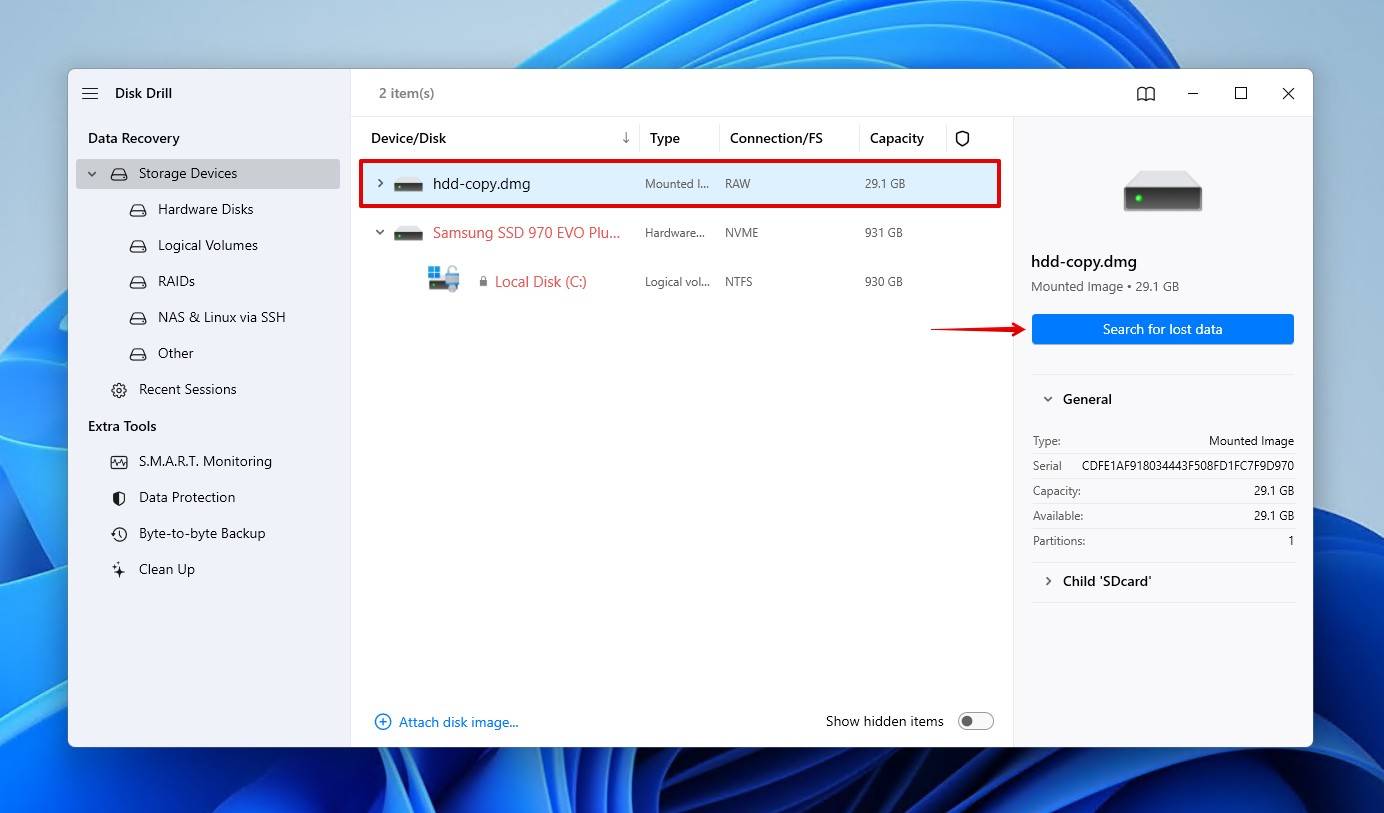
- Choose the external hard disk drive to scan from Disk Drill’s Device/Disk list at the center of its window. Then click on Search for lost data.
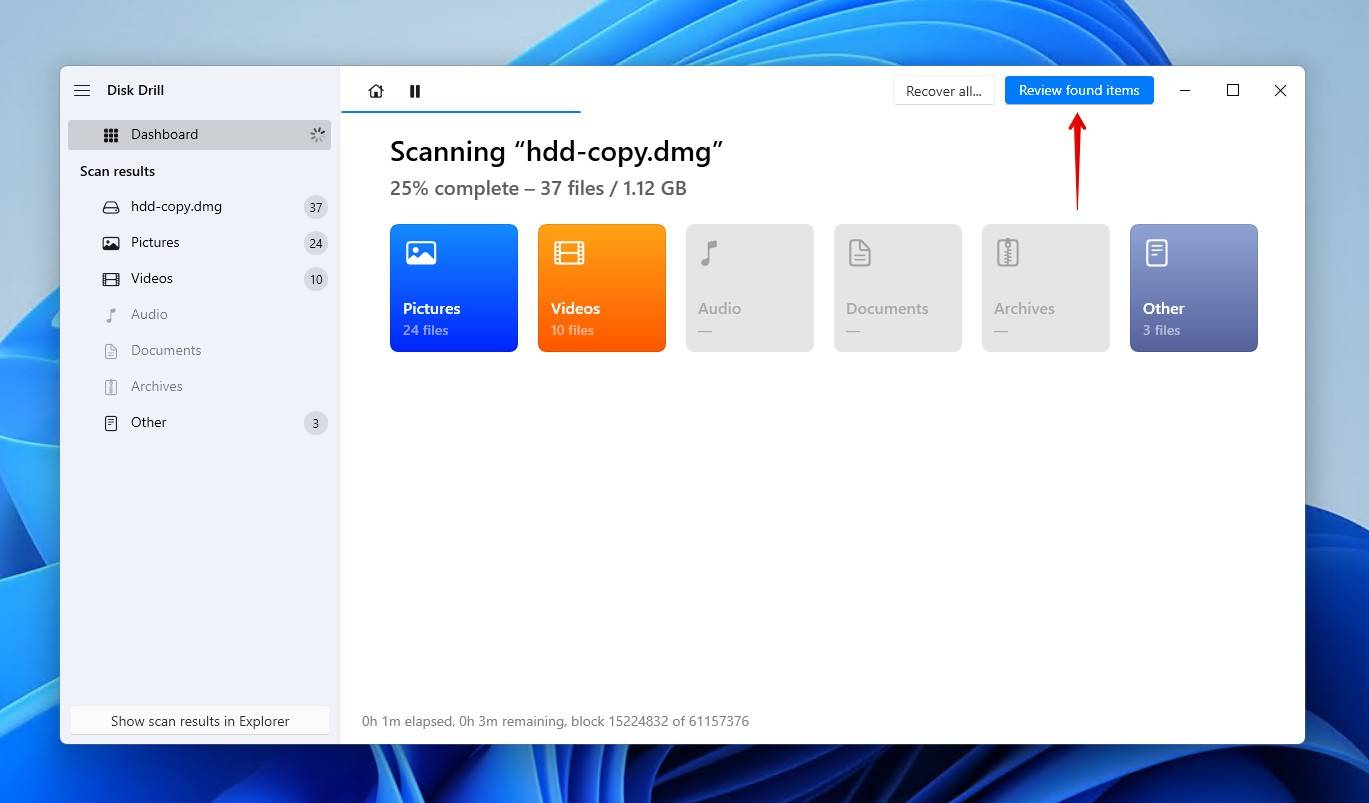
- Disk Drill will begin scanning your external hard disk drive. You can use the button adjacent to the home icon on the top left to pause and resume the process at any time. You can also click on Review found items to see the files Disk Drill has located and choose the ones to recover. However, it’s best to let the scanning process finish to find as many files as possible.
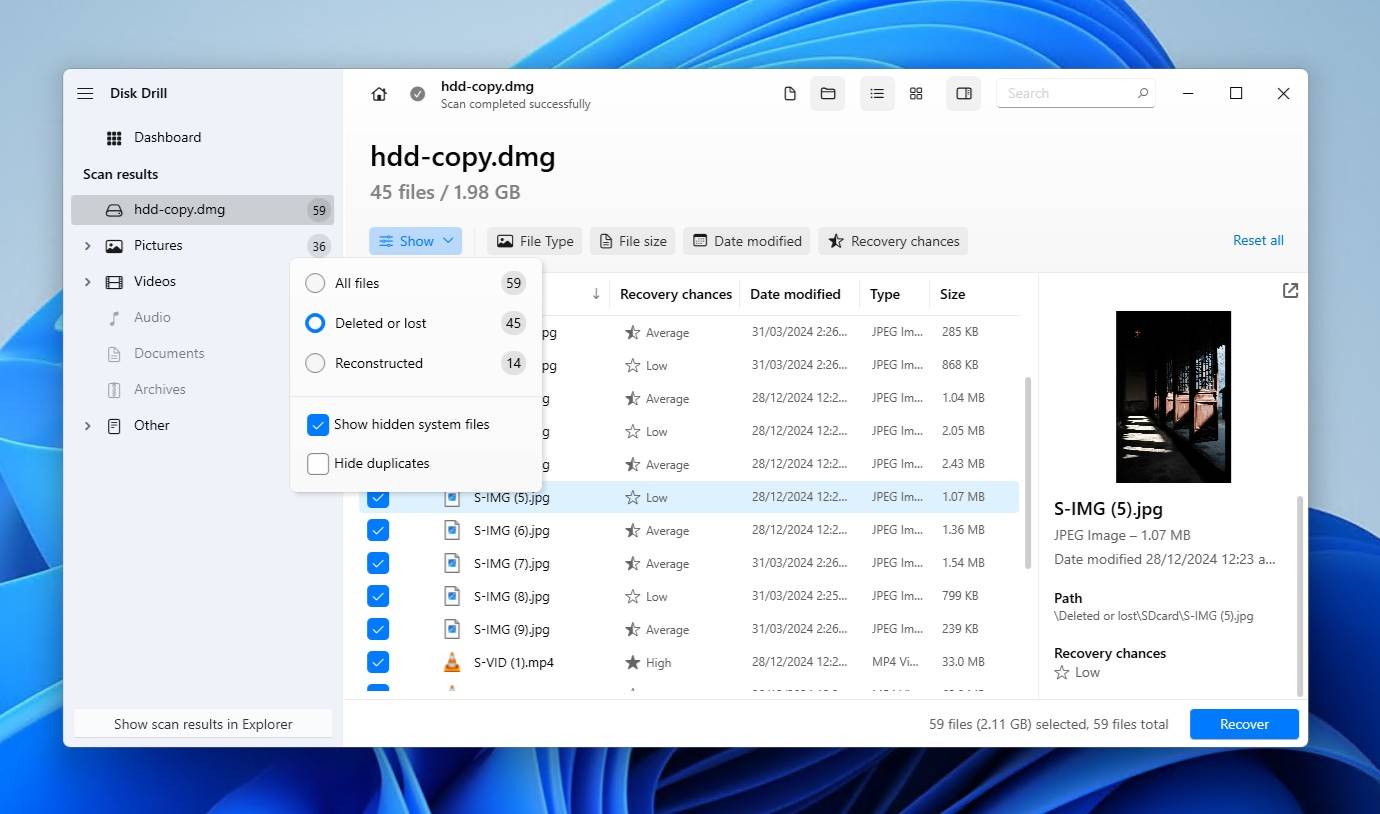
- Go through Disk Drill’s results and place a checkmark on the left of the files you want to recover. Disk Drill lets you preview any file types that Windows can open natively, like JPEG and MP4, as well as files you have the default application for.
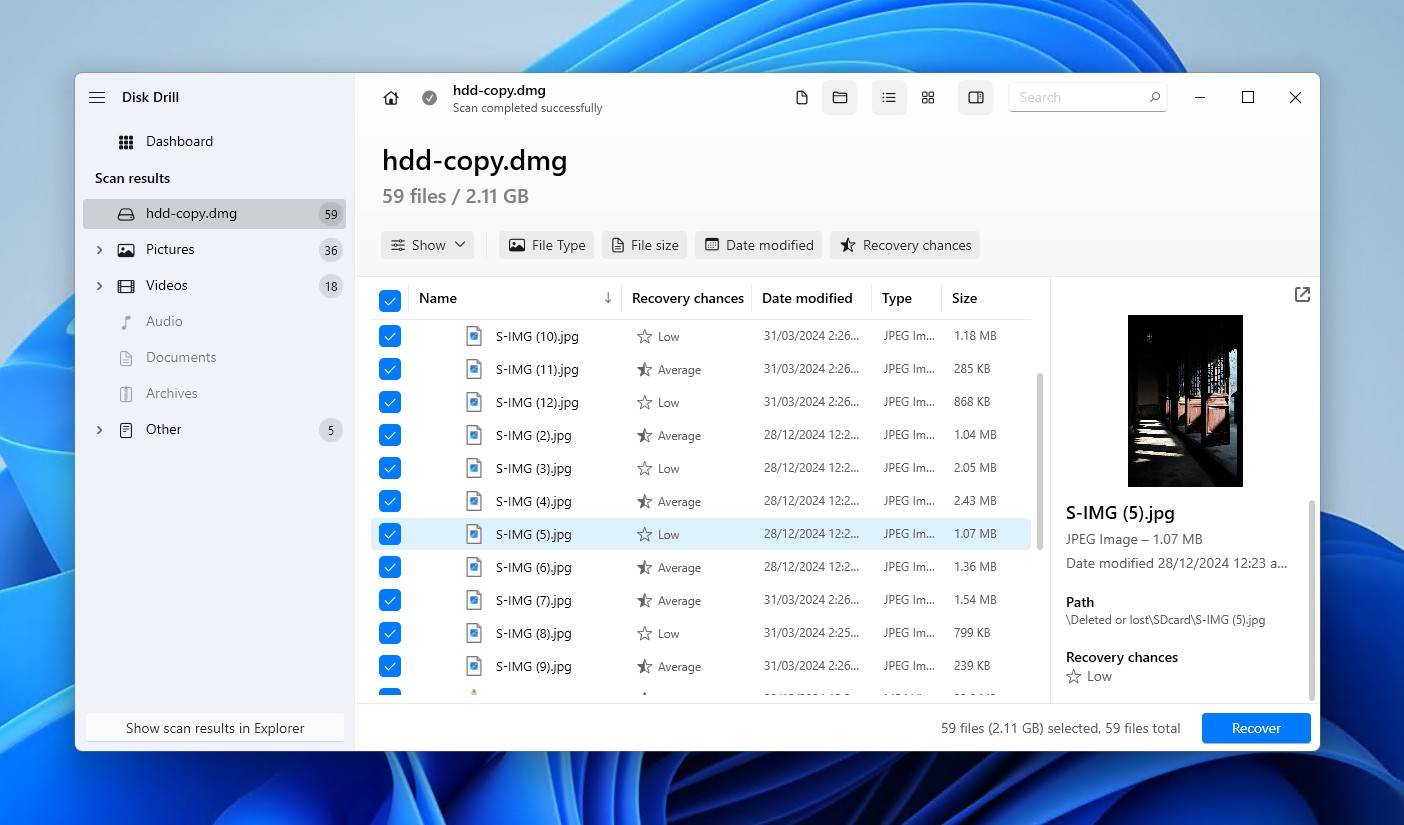
- If Disk Drill found thousands of files, use filters to find the files you want. Options include filtering results by status (existing, deleted, etc.) and file size. Once you’ve marked all the files you want to restore, click the Recover button. If you’re only interested in recovering everything, use the Recover all option instead.
- Choose where you want to store all recovered files. Then, click on Next to start the actual recovery process.
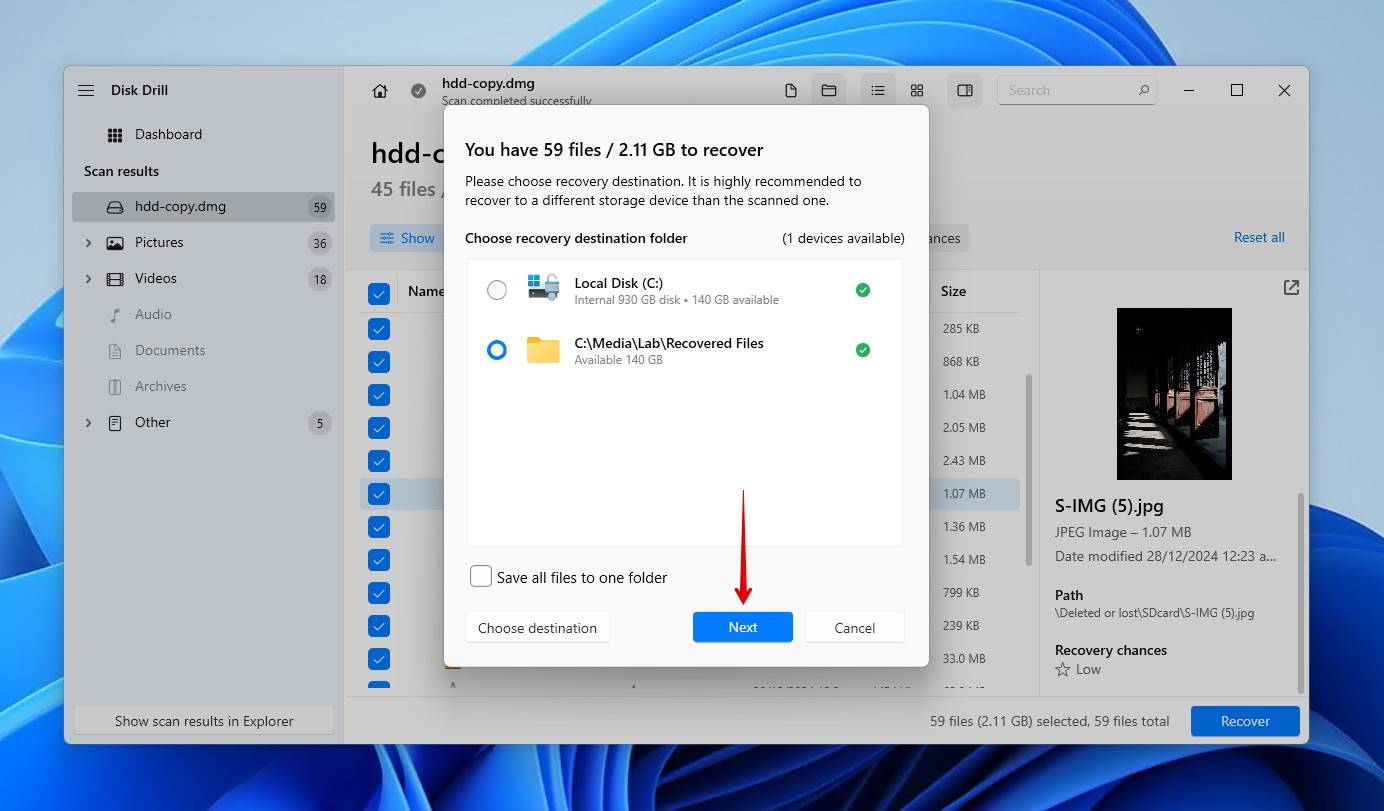
- When done, Disk Drill will present a summary of the data recovery. Click on Show recovered data in Explorer to open with Windows’ default file manager the folder where Disk Drill stored all recovered files.

How to Repair or Fix an External Hard Disk Drive Without Formatting
You can take many paths to fix an external hard disk drive without formatting it. If you’re an experienced user looking for more advanced solutions, check out our full guide on how to repair a corrupted external hard drive.
Method 1: Use CHKDSK
CHKDSK was created for fixing hard disk drive errors back in the DOS era. Despite being a command-line application, it’s still relevant and helpful in dealing with drive problems, more specifically, those relating to your file system.
Typically, CHKDSK requires that your file system be at least identifiable. However, there is a unique case where a NTFS-formatted partition turns RAW due to a damaged boot sector. In this case, CHKDSK can use the information from the backup boot sector to restore functionality.
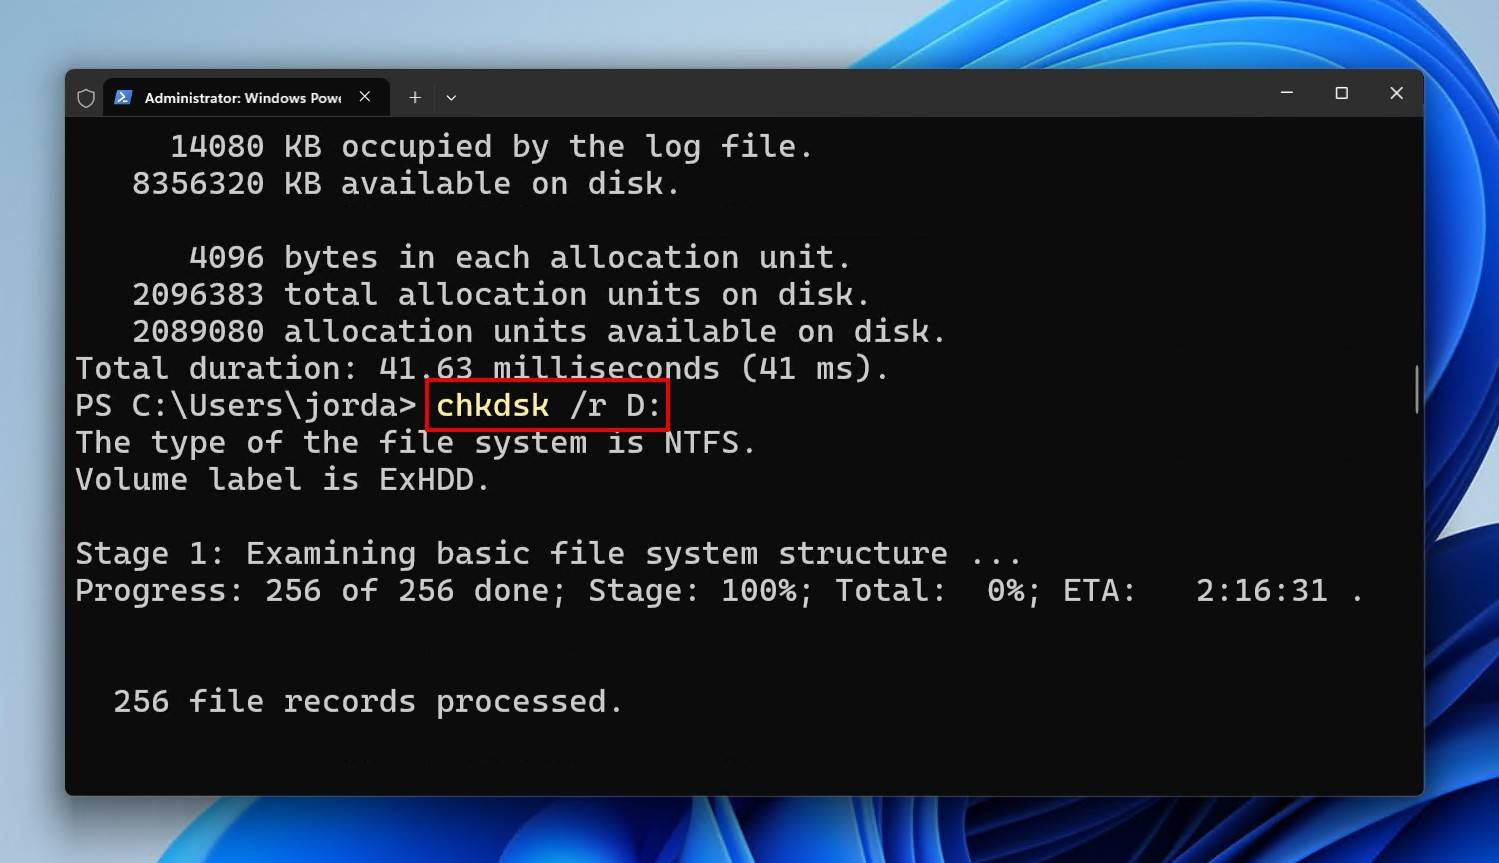
This is how you run CHKDSK using CMD:
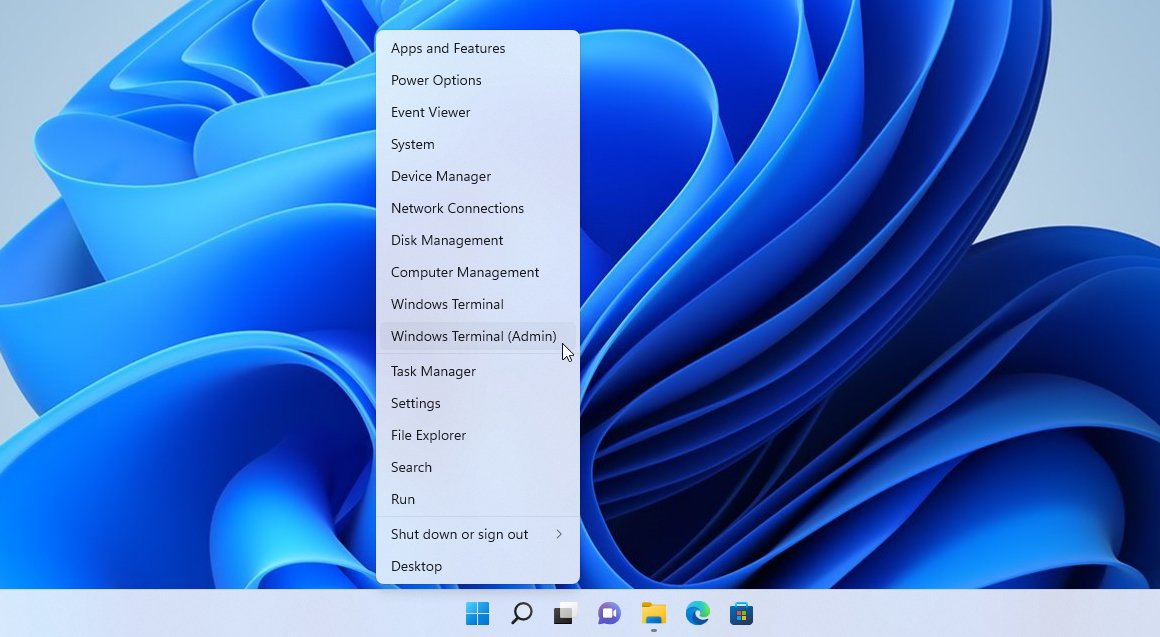
- Open a console window by hitting Windows key + X and selecting Windows Terminal or PowerShell. Go for the version with elevated privileges (marked “admin”).
- Type CHKDSK /f E: (where “E” is the letter of your drive) to scan its file system for errors.
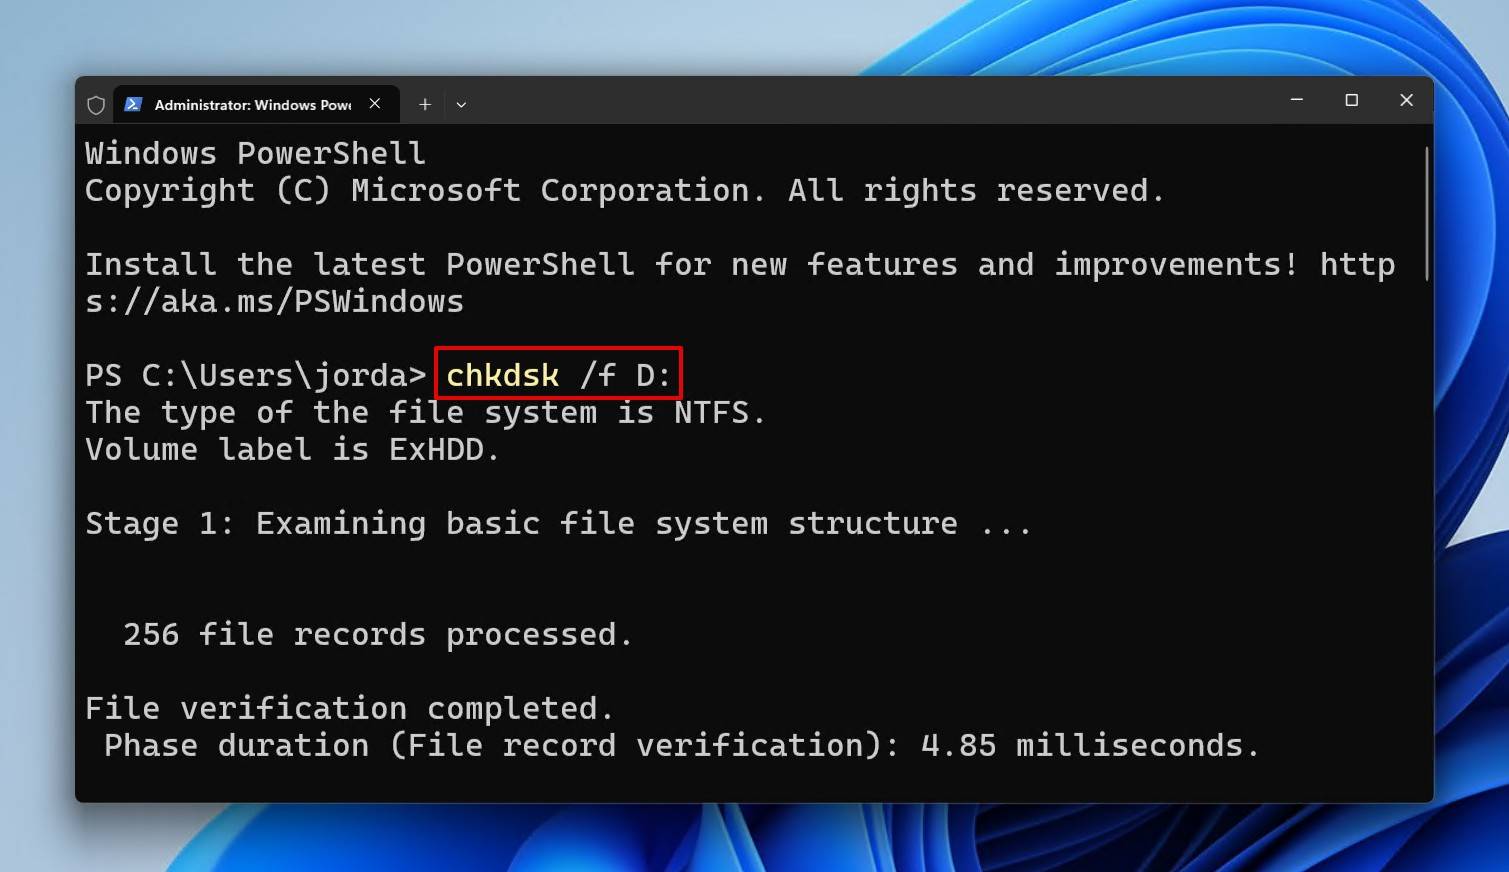
- If that doesn’t “fix” your drive, have CHKDSK scan the entire storage area for bad sectors, mark them as unusable, and then “correct” the file system, with CHKDSK /r E:.
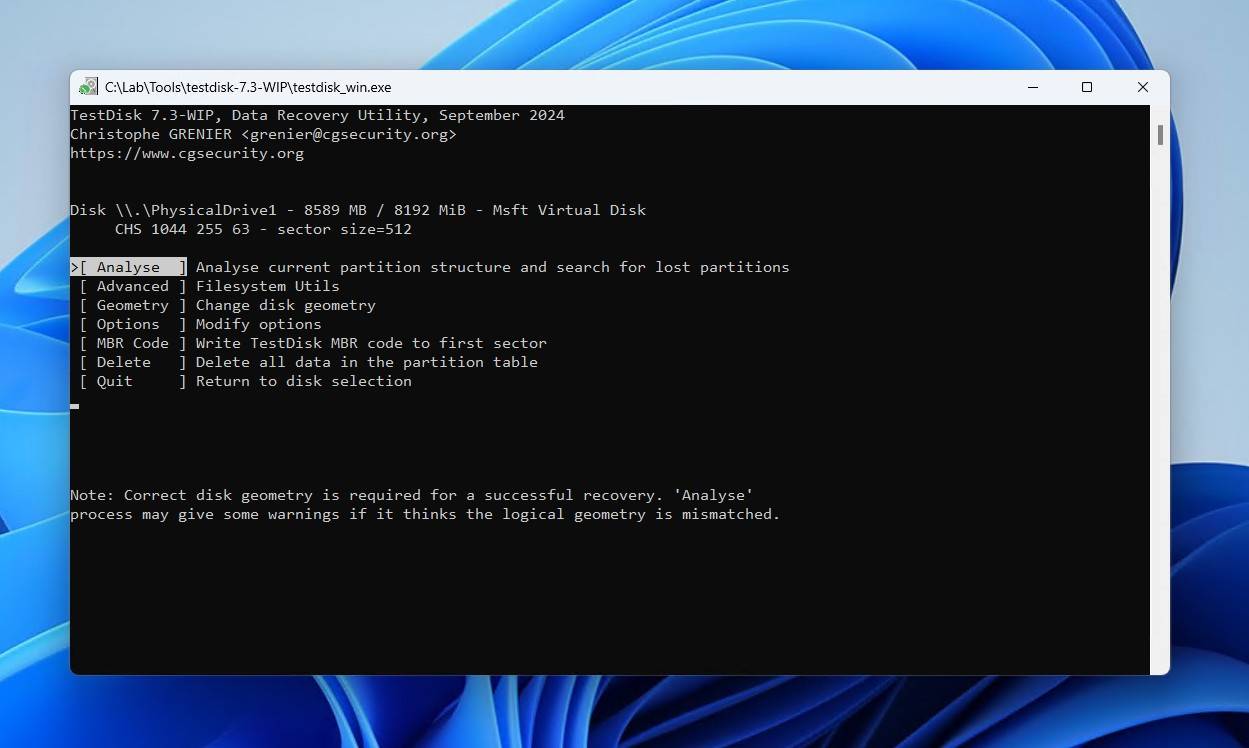
Method 2: Recover Partition Using TestDisk
An excellent tool to recover an external hard drive without formatting is TestDisk, a free and open-source partition recovery tool. Rather than recover select files, TestDisk works by fixing the corruption itself, thereby restoring access to the partition and its data.
Here’s how you can recover a partition using TestDisk:
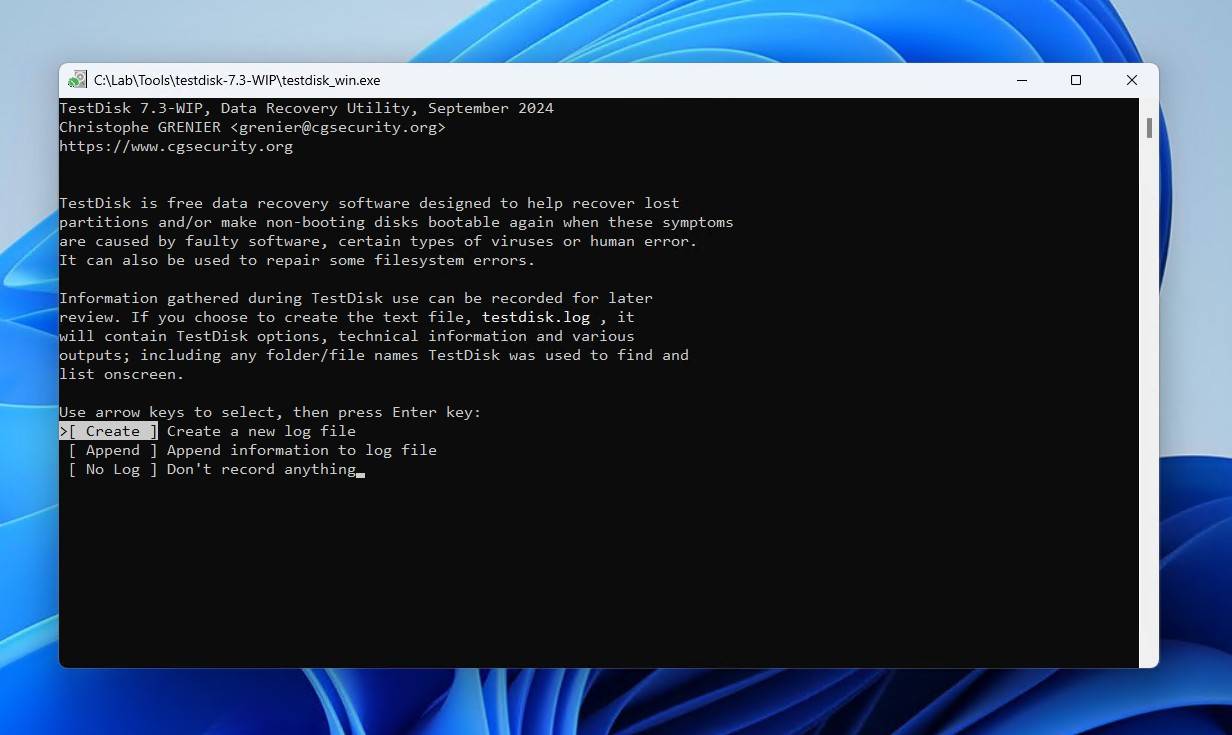
- Download and extract TestDisk. Open testdisk_win.exe.
- Press Enter to create a new log file.
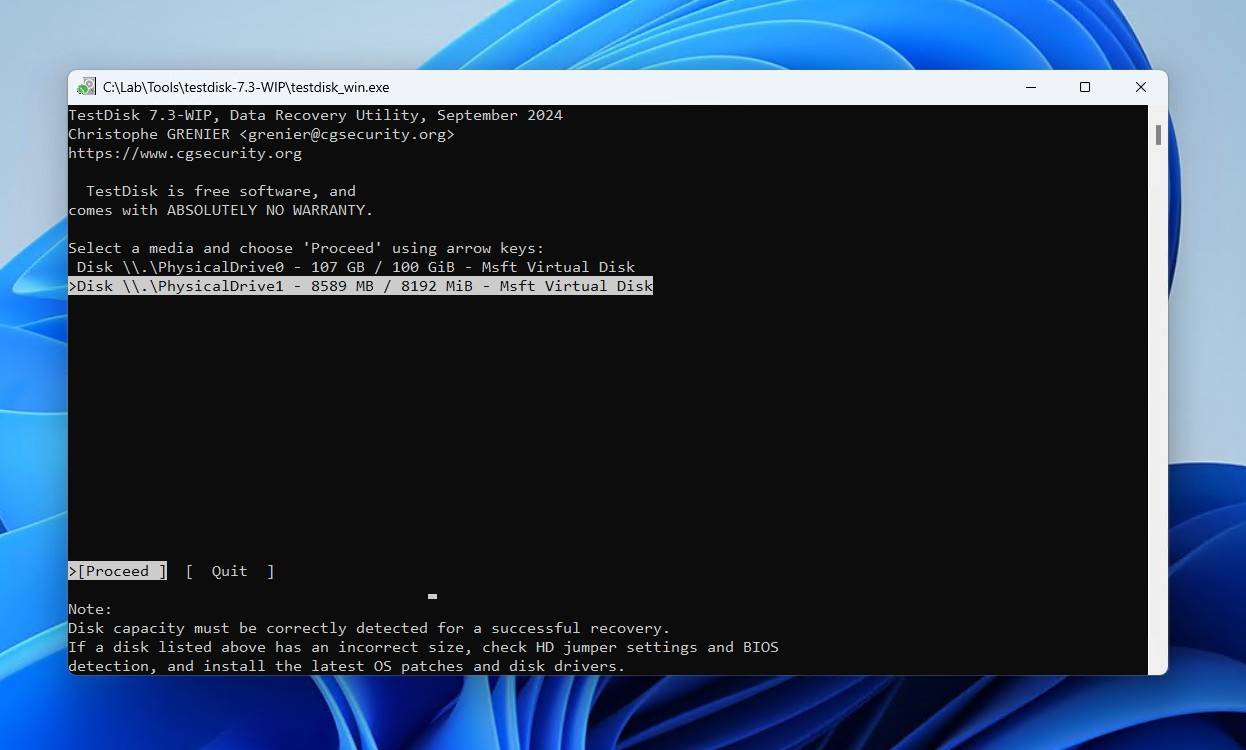
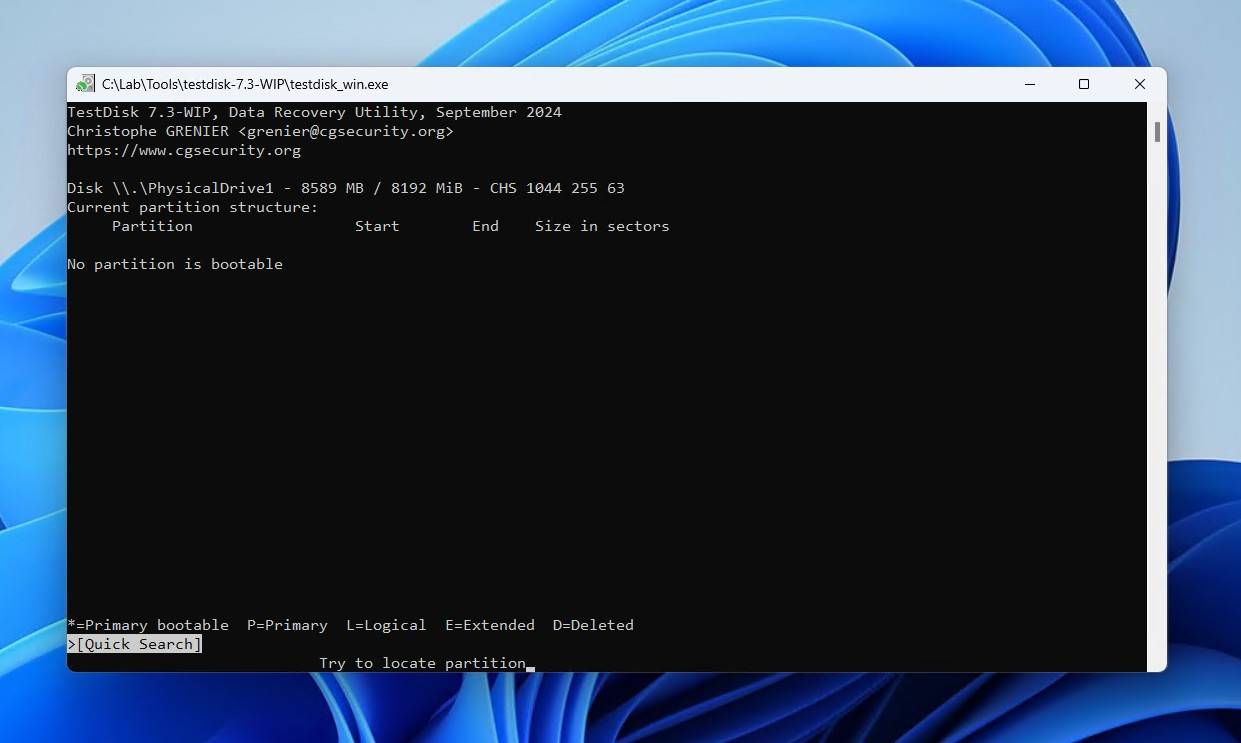
- Select your drive, then press Enter.
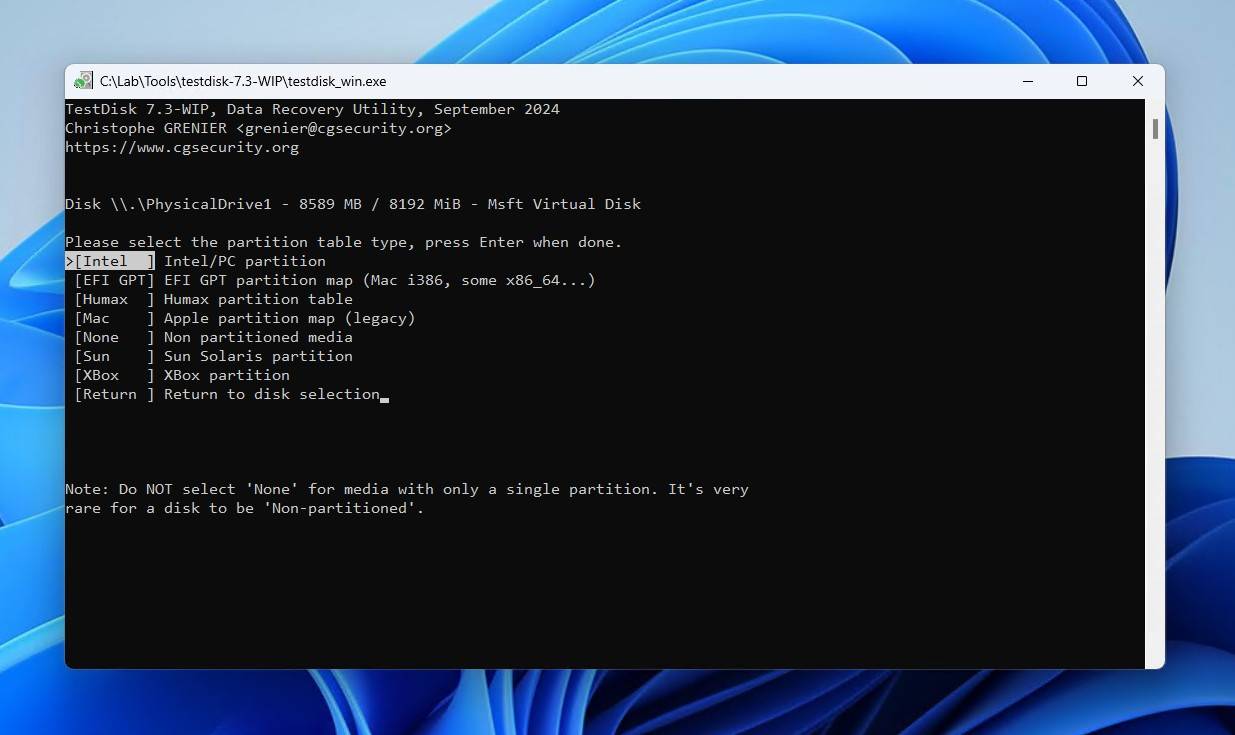
- Choose your partition table type, then press Enter.
- Press Enter.
- Press Enter to perform a quick search.
- Press Enter.
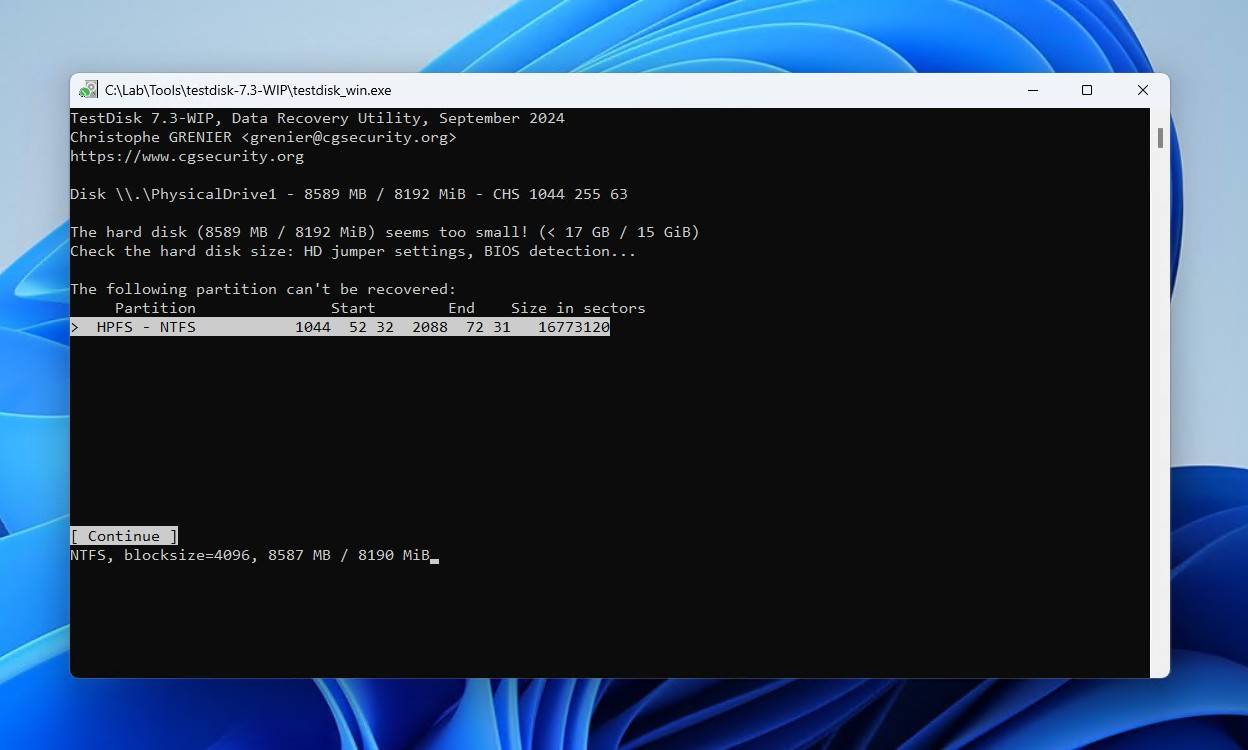
- Open the lost partition by selecting it and pressing Enter.
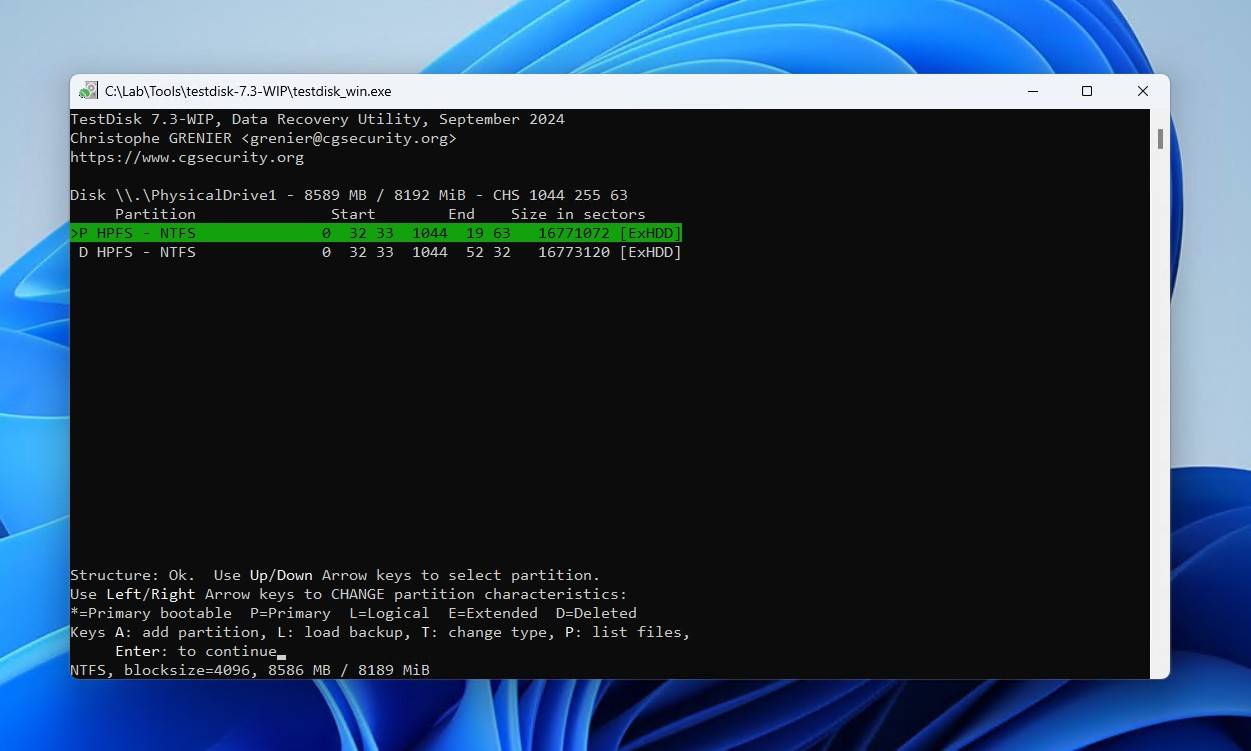
- Go to the Write option and press Enter.
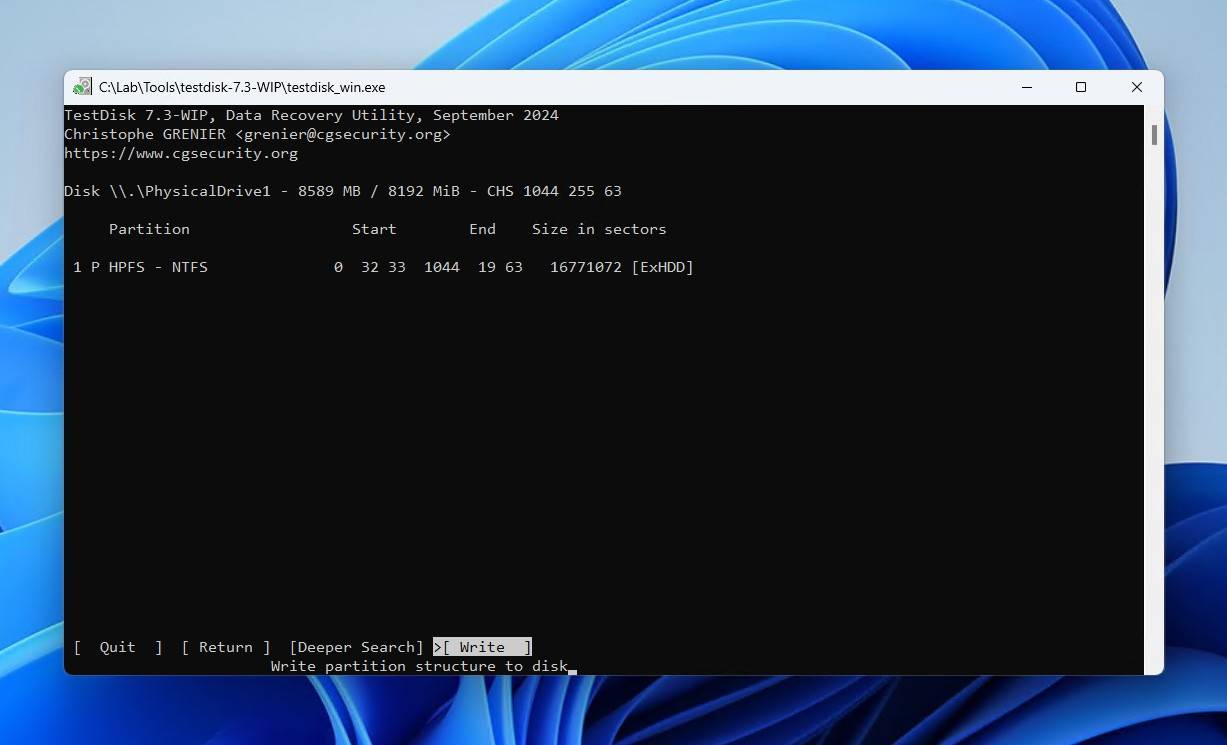
- Press Y to confirm.
Method 3: Assign a Drive Letter
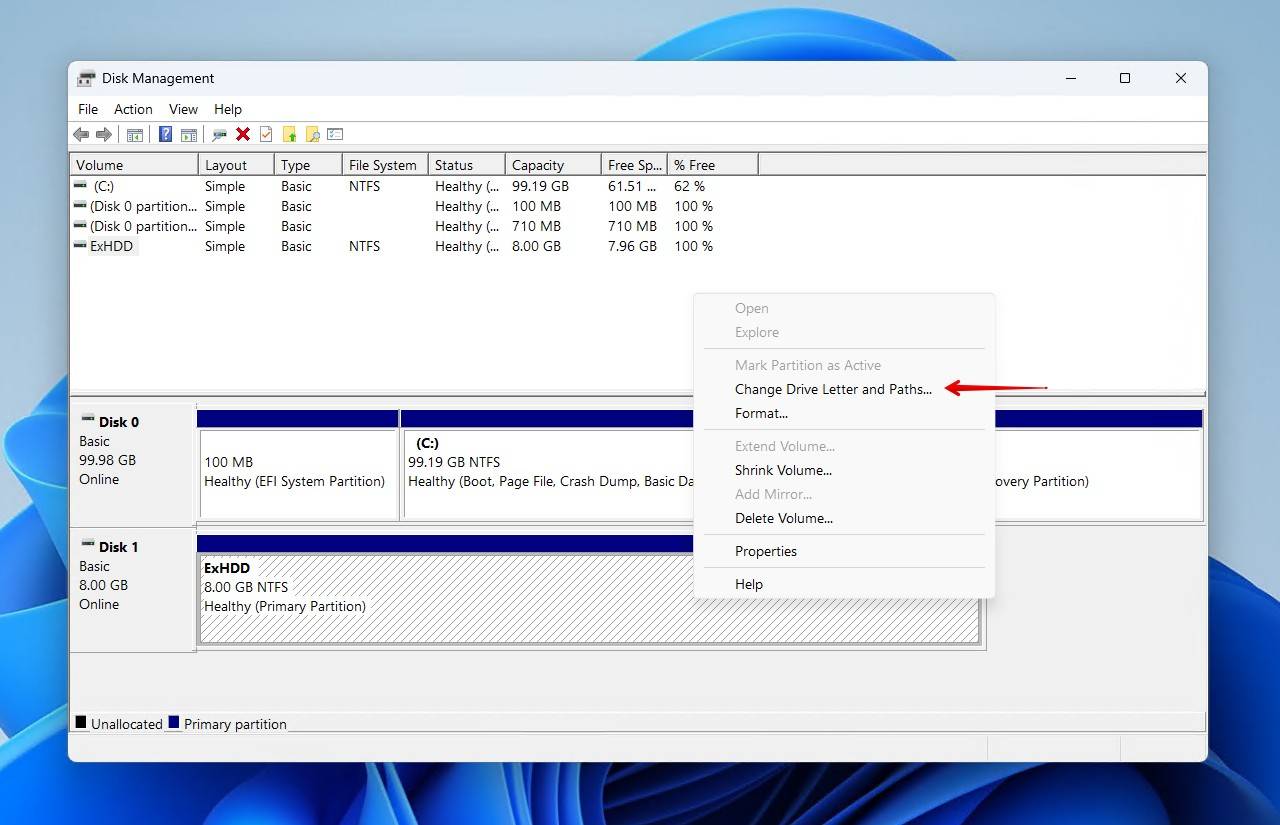
If your drive isn’t appearing in File Explorer, that doesn’t mean it’s not recognized at all. If you check Disk Management and find that the drive is both visible and reading the correct capacity, formatting is not necessary, as you likely only need to assign a drive letter.
Windows may “forget” to assign a letter to one of your storage devices if you have many and often connect and disconnect them.
Thankfully, fixing that is easy. This is how to read a HDD without formatting by assigning a valid drive letter:
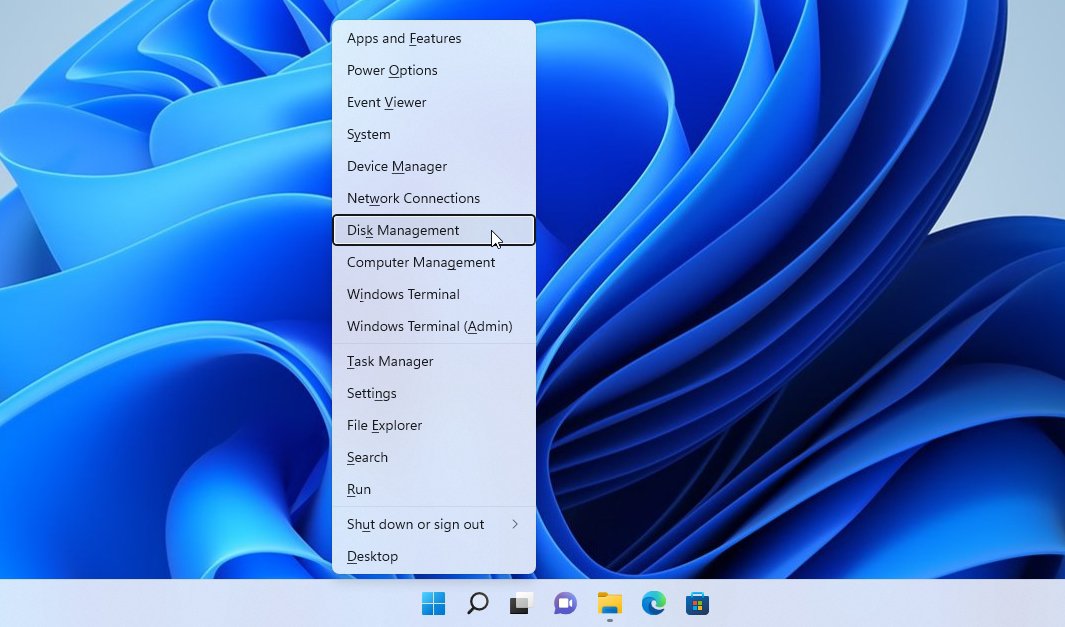
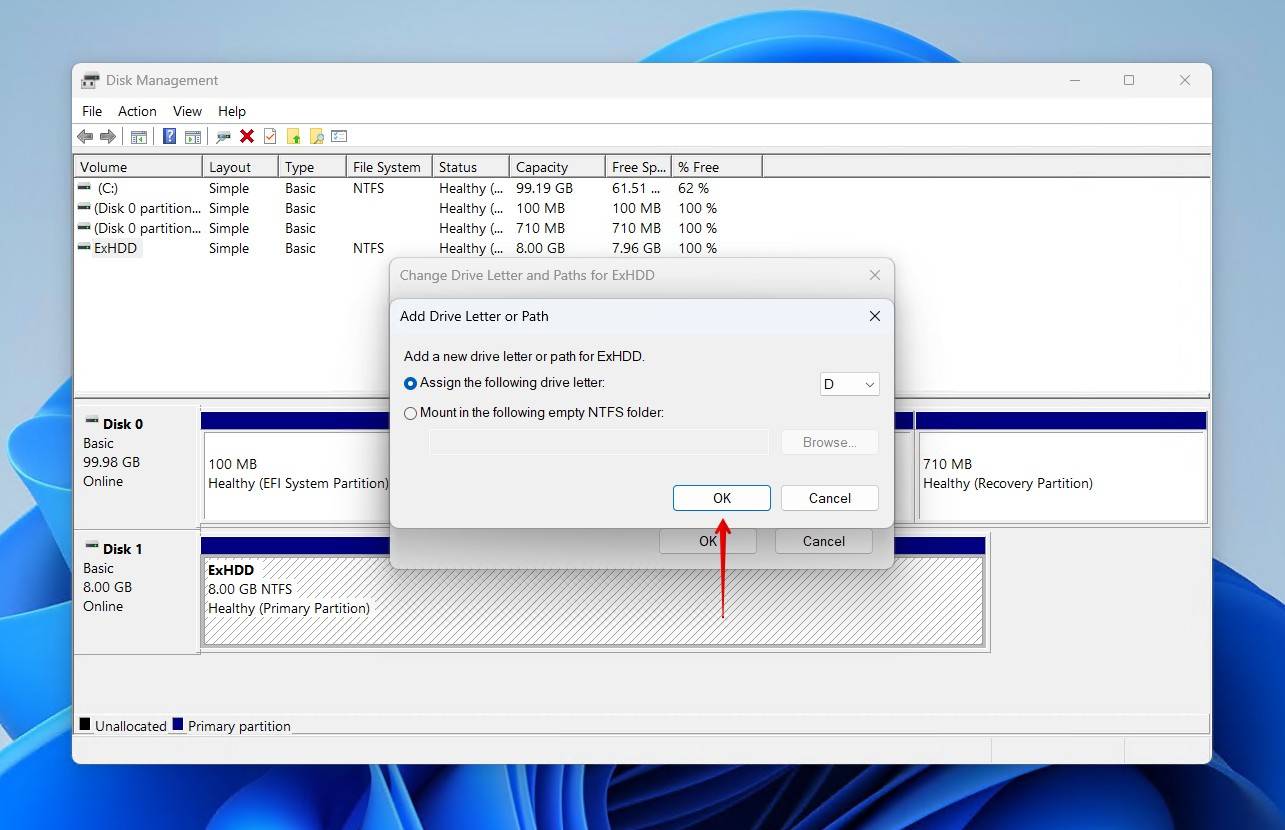
- Press Windows Key + X and select Disk Management. Alternatively, you can seek Disk Management by its name in the Windows Start menu and launch it from there.
- Locate your inaccessible external hard disk drive among the rest of the listed devices. Right-click on it, and choose Change Drive Letter and Paths from the menu that shows up.
- Click on Add in the window that will show up to assign a letter to your drive.
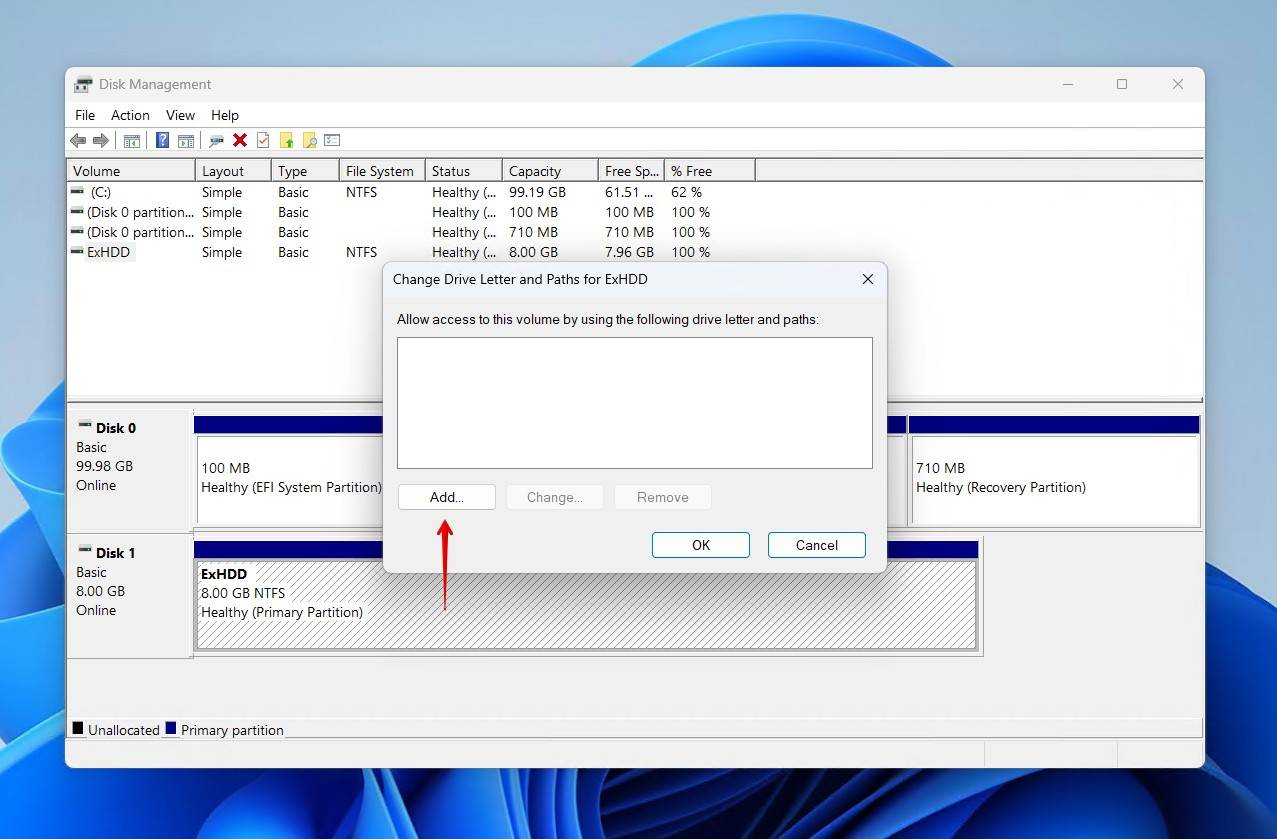
- On the next window, go for Assign the following drive letter. Then, choose a letter for your external hard disk drive from the pull-down menu on the right. Finally, click on OK on both windows and close the Disk Management window. Your external hard drive should now be accessible.
Method 4: Run an SFC/DISM Scan
The following steps don’t affect or “fix” a problematic external hard disk drive. That’s because SFC and DISM are actually tools for fixing Windows OS files, not storage devices.
Still, OS corruption can cause various problems, like a computer’s inability to “recognize” or use external hard disk drives.
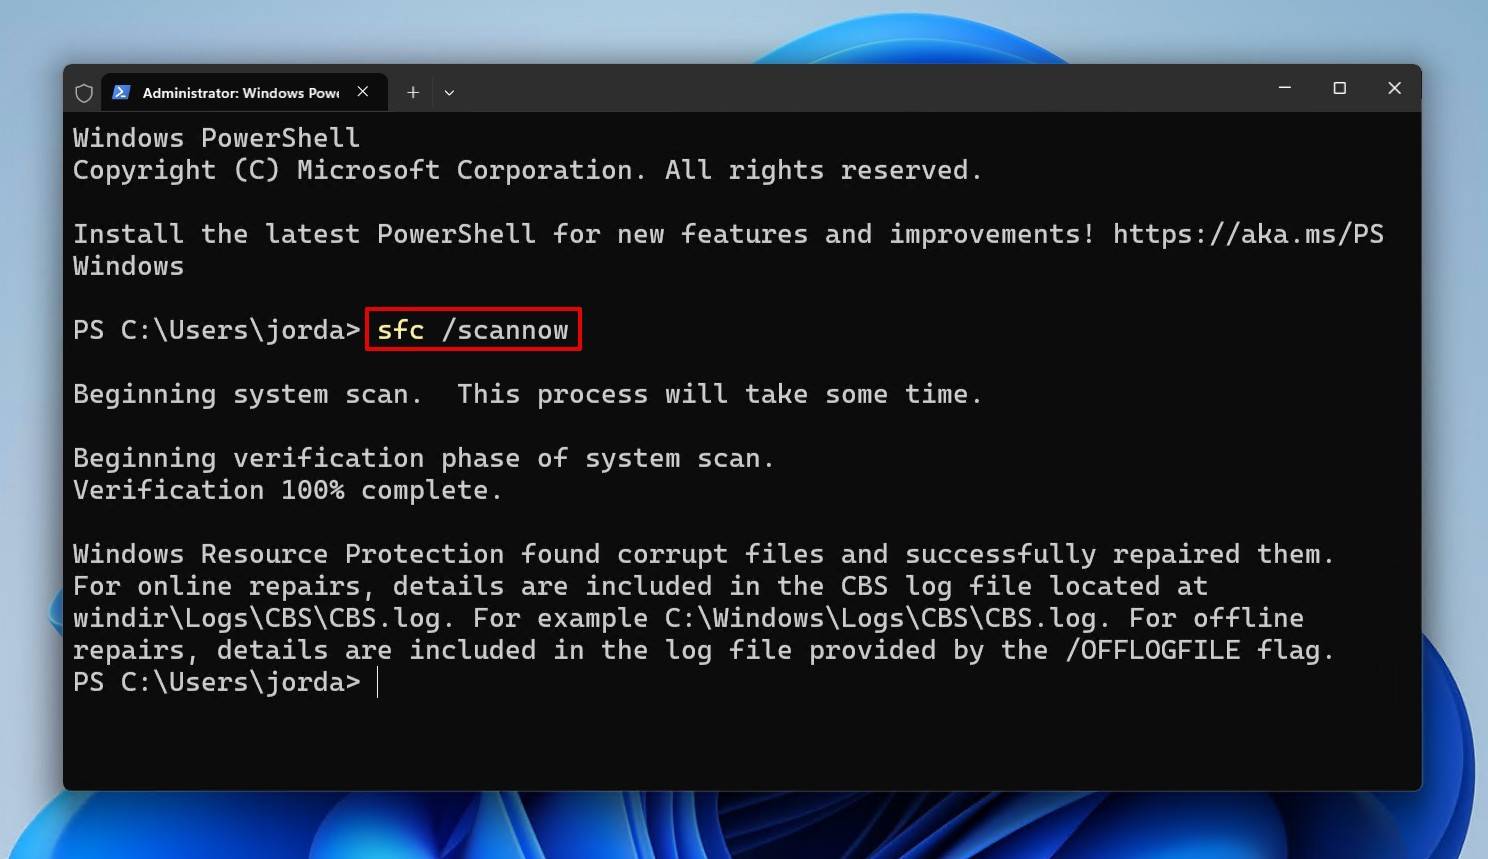
So, to scan Windows for problems and “renew” its files with SFC and DISM:
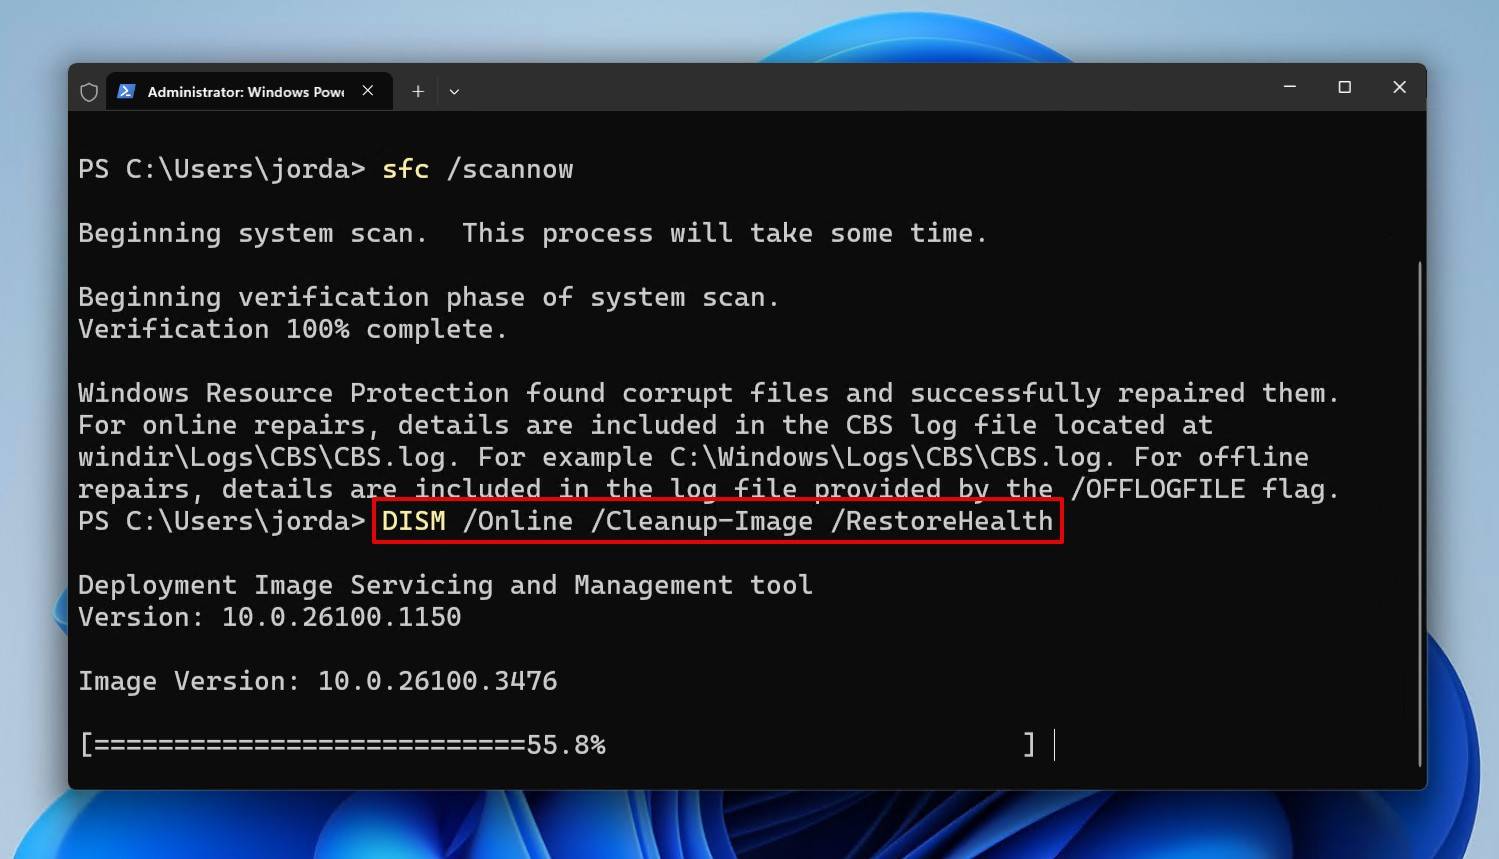
- Press Windows Key + X and launch an “elevated” Windows Terminal or PowerShell instance (marked as “Admin”). Then, to scan your Windows installation for problems, type sfc /scannow.
- After the SFC scan, use the command DISM /Online /Cleanup-Image /RestoreHealth. This will replace any corrupted files in your Windows installation with new, “pristine” versions from Microsoft’s servers. You can also swap “/RestoreHealth” for “/CheckHealth” or “/ScanHealth” to only check for corruption without actually fixing it. However, it’s suggested you move directly to RestoreHealth to avoid over-stressing a potentially failing OS drive.
Method 5: Update Related Drivers
Sometimes Windows Update might not install the correct driver. Even if it looks as if everything’s in order, many things can go wrong.
- 🌟 Newer drivers might not support your older hardware.
- 🕸 Older drivers don’t take full advantage of your hardware’s capabilities.
- ☠ Drivers for hardware from different vendors might lead to substandard performance of your hardware, and sometimes complete failure.
Thankfully, it’s easy to update or swap drivers in Windows without losing data.
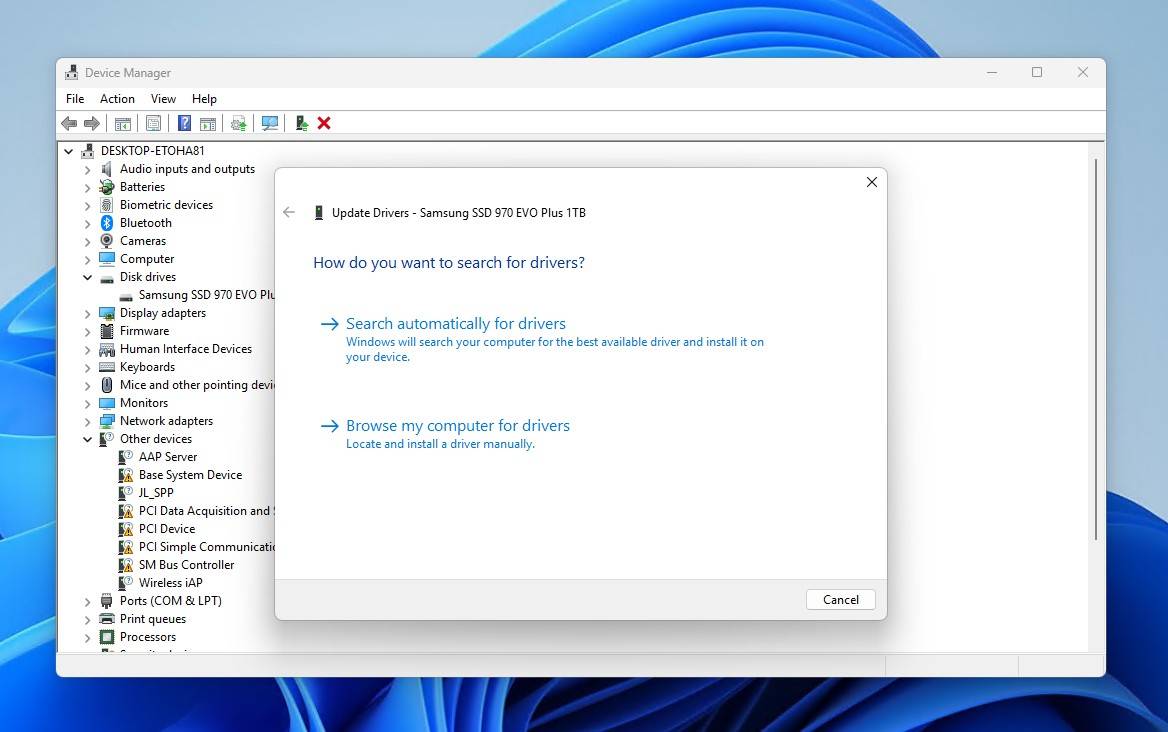
- Press Windows Key + X and select the Device Manager (or search for it in Start and launch it from there). Locate your seemingly corrupted external hard disk drive under Drives, right-click on it, and choose Update driver.

- Choose Search automatically for drivers from the next window to seek new/alternative drivers for the selected hardware. Then, follow along to update them.
Method 6: Run an Antivirus Scan
Unfortunately, an antivirus scan can’t fix a corrupted external hard drive after a virus attack. Even if an antivirus scan detects and quarantines malicious files or processes, the damage will already have been done.
However, you should still do it to ensure no further damage occurs. Windows’ built-in Defender antivirus solution is usually up to the task.
This is how to open external hard disk without formatting by performing virus removal:
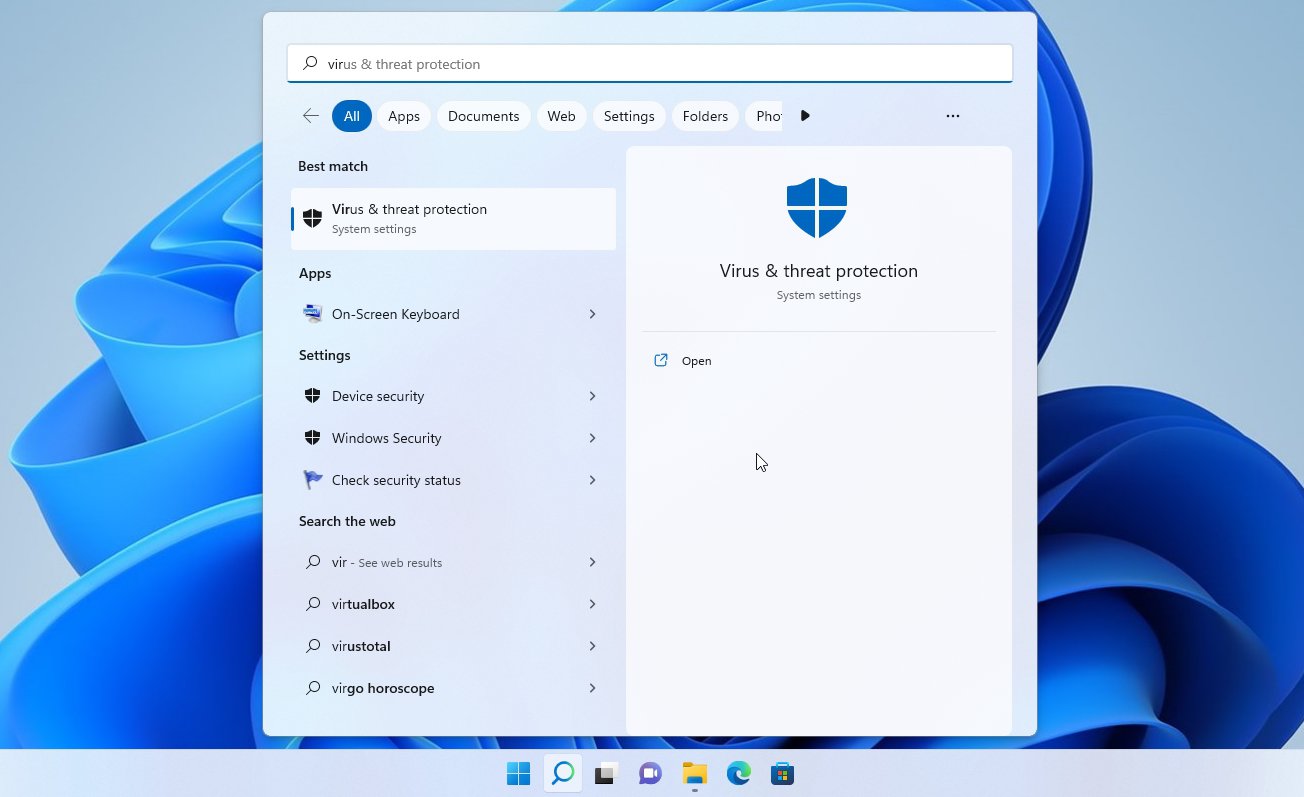
- Open the Start menu and type “virus” to locate the Virus and Threat Protection entry. Then, launch it.
- Windows Defender (and most other built-in Windows security solutions) should already be active. If not, you’ll be given the option to enable them. To scan your PC for threats, click on the Quick scan button under Current threats.
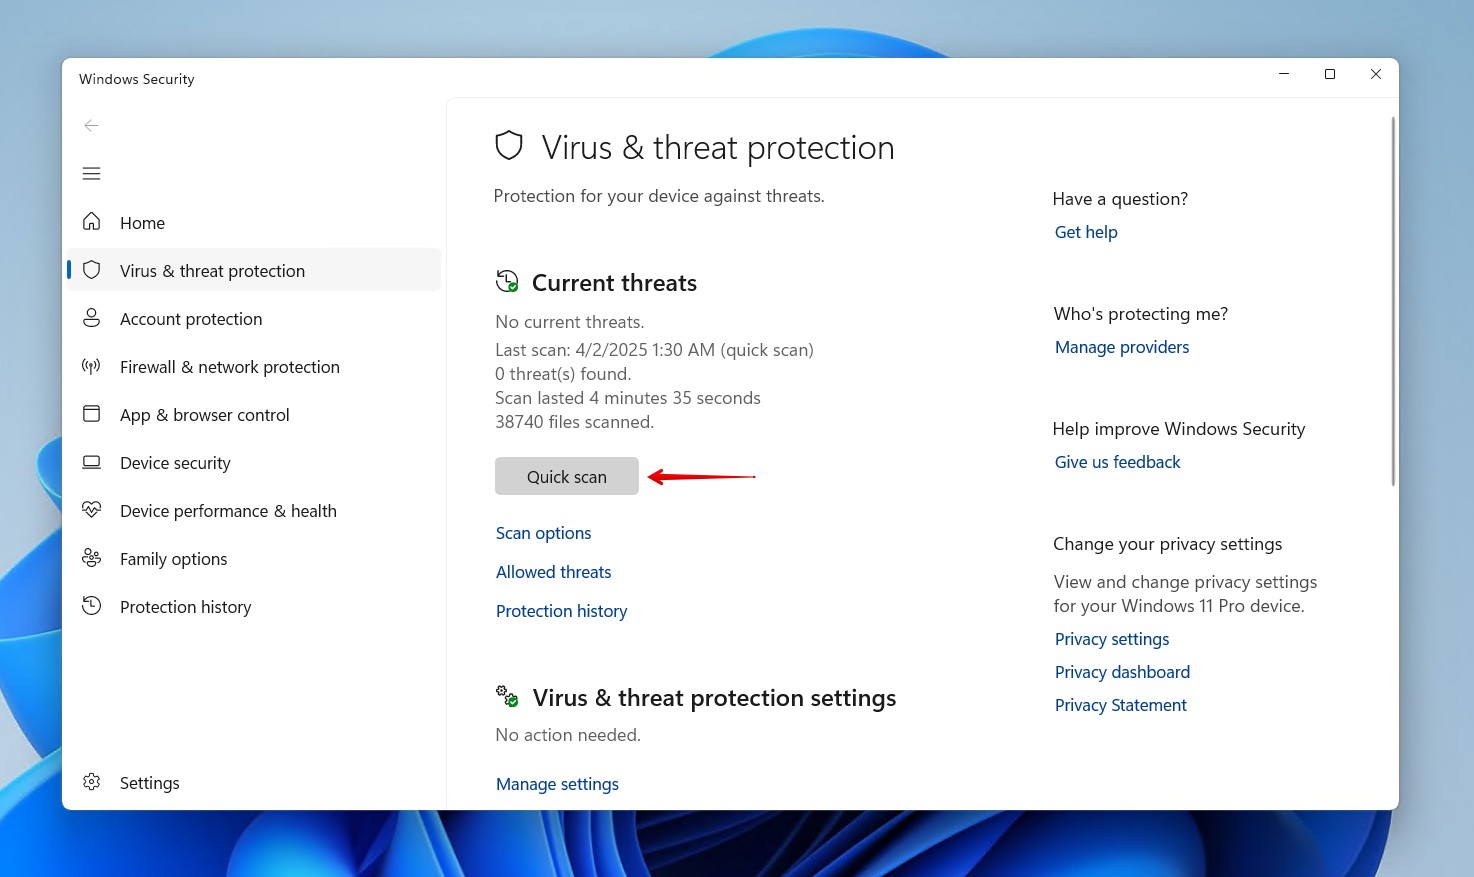
That’s it. Depending on your Windows and Windows Defender settings, any threats found will be quarantined automatically, or you’ll be asked to choose how to deal with them.
How Can I Protect an External Hard Disk Drive from Corruption?
Instead of seeking ways to fix an external hard drive that has become corrupted, it’s best to avoid such problems altogether. Of course, this isn’t always possible. But, there are some actionable steps you can take to at least ensure you’re covering all your bases.
1. Eliminate External Factors
One of the most avoidable causes of corruption is ejecting the drive safely each time you’re disconnecting it from a computer. Ejecting safely ensures all operations in progress on the drive are stopped. Simply pulling the external HDD out can cause corruption and prevent it from appearing, as seen in this Reddit thread.
How the drive is physically handled is just as important. As hard drives consist of mechanical parts, they can stop working at the smallest misalignment. In some cases, a single drop is all it takes, as this user experienced. Protect your drive against physical damage by storing it in a protective case when taking it with you. And, be sure to use high quality cables to prevent disconnections or bottlenecked transfer speeds.
2. Perform Regular Diagnostics
Keeping an eye on your drive’s health is an excellent way to get a headstart on any potential issues. Here are some common symptoms that point towards a failing hard drive:
- Consistently slow performance
- Error messages when opening files
- Constant reconnections
- Disappearing data
- Beeping from the hard drive
S.M.A.R.T. data is a useful way to get the status of your drive. Manually checking this S.M.A.R.T. data all of the time is impractical. Instead, you can use a S.M.A.R.T. monitoring tool that runs in the background and alerts you to any concerning values. Disk Drill includes this feature for free, or you can use a tool with similar functionality.
3. Keep Backups
It’s easy to overlook the importance of backups until you’re faced with an issue that would benefit from one. Seeing as external hard drives are usually just a means of transporting data, many don’t consider keeping backups of them. However, this can cost dearly if you move data to it, forget to take it off, and then lose it to due a data loss issue.
The 3-2-1 backup rule is a well-known backup strategy. It involves keeping 3 copies of your data across 2 different storage mediums, with 1 residing offsite. However, automatic backups can be troublesome with external devices, considering they’re always being moved. So, your best option is to regularly move data across from your external hard drive to one that’s being backed up, or at least acts as a backup.
Conclusion
In this article, we learned how to recover files from an external hard disk without formatting it (even from drives that are unreadable in some aspects) and how to “fix” it to continue using it. However, we’ll have to close with a reminder.
Wasn’t this the first time something like this happened? Was it really your external hard disk drive that “misbehaved” and not user error? Then, you shouldn’t trust this storage device anymore with your precious data.
Even if you managed to save most of your files from it and render it usable with one of the above solutions, make sure to at least double-check a S.M.A.R.T. analysis of its condition. You never know when it might fail again, and it’s better to replace it instead of betting your data on a faulty storage device. And, in challenging data loss cases, don’t forget that you can lean on a data recovery expert for help.


FAQ
You can recover files from a corrupted external hard disk drive or any other storage device using an app like Disk Drill. There’s no need for formatting.
- Download the app from its official site. Install it on a different device than the one from which you want to recover data, and run it.
- Choose your external hard disk drive from Disk Drill’s list, and initiate a scan on it.
- When the scan completes, click on Review found data and select the files you want to get back. Use Disk Drill’s filters to make it easier to locate the ones you seek. When done, click on Recover.
- Choose where you want to store the recovered files, and soon you’ll find them there.
Depending on the scenario you’re facing, it’s probably possible to recover most files from an external hard drive after formatting it, but only if the format process was a quick one and not a full one. To get your files back, you can:
- Download an app like Disk Drill.
- Have it scan your external hard disk drive.
- Choose the files you want to recover.
- Save them on another device.
However, data recovery is unfortunately impossible after a full format.
Many methods exist to “fix” a corrupted external hard drive without formatting it. Formatting should be used only as a last resort if you no longer care about the data on the device and want a “quick fix” to continue using it.
Some methods for fixing storage devices without having to format them are:
- In a Windows Terminal or PowerShell window, type “CHKDSK /r DRIVE_LETTER” (replace “DRIVE_LETTER” with the letter of the drive you want to scan).
- If you can’t get to your drive because its letter is missing, press Windows Key + X to open Disk Management. Then, right-click on your drive, select Change Drive Letter and Paths, and choose the letter you want to assign to it.
- In a Windows Terminal or PowerShell window, type “sfc /scannow”, then “DISM /Online /Cleanup-Image /RestoreHealth”.
- Press Windows Key + X, launch the Device Manager, and locate your drive and any related IDE ATA/ATAPI and Storage controllers. Right-click on each, choose Update driver, and go through the steps on your screen to have Windows seek better drivers for those devices.