Have you ever inserted a memory card into your computer to copy or view a file, only to find that card inaccessible? This unfortunate situation can happen with any type of file system on memory cards, USB drives, external HDD drives, storage devices, and even internal drives. Depending on your situation, this inability to access that data can be devastating.
No matter the reason, when a partition becomes RAW, you will not able to access data on your drive and it won’t be usable until you format it. So, you have to take action to gain access to that data. One such route to success is using a data recovery tool on either macOS or Windows.
What is a RAW Partition?
Before we get into how to recover lost data, it’s important to understand what a RAW partition is. Simply stated, a RAW partition is a partition which has not been formatted with the file system recognized by the computer being used.
For example, most Windows machines use either FAT12, FAT16, FAT32, NTFS, or NTFS5 file systems. On the other hand, macOS uses APFS, HFS+, FAT32, and exFAT (with read-only support for NTFS). Linux machines use ext3, ext4, BTRFS, reiser, XFS, and more.
In some cases, it’s possible to have one system read a device formatted in another platform’s file system type. Unfortunately, this isn’t a guarantee. So when you go to read, say, an SD card formatted with the ext4 file system on a MacBook Pro, chances are good you’ll be informed the disk was not readable by the computer.
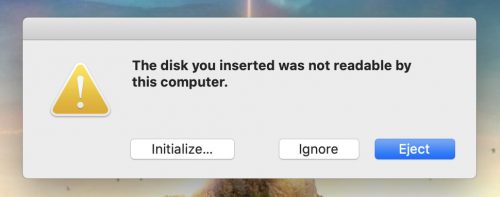
That Initialize option is the key. What it is informing us is that the card has not been formatted in such a way that the computer is able to read the card. You could click Initialize, however that would definitely erase all the data housed on the drive.
Is It Possible to Recover Data from a RAW Partition?
The good news is that, yes, it is possible to recover lost or inaccessible data from a RAW partition. Sometimes it’s just a matter of inserting the disk (or SD card) in question into the computer that was used to originally create the files and folders on the device. Once you’ve done that, you can copy the data to local storage, format the card to a file system the target computer understands, copy the data back, and insert the card into the target system.
If you no longer have access to the original machine (or a machine with a similar file system), or the cause is not due to incompatibility between your operating system and the present file system, then you will need to repair the damage and recover the data on the drive.
Why Do You Need to Convert RAW to NTFS?
Put simply, you won’t be able to access your data if it’s stored on a RAW partition. The function of a file system (like NTFS) is to logically store your data so it’s easy to retrieve when needed. Without a file system, your data is nothing but an unorganized mess, making it nearly impossible to find anything.
Since computers rely on file systems to locate and access your data, a RAW drive will not be accessible. The data on it may still be intact, but without a working file system, it will remain inaccessible.
How to Convert RAW to NTFS Without Losing Data
There is only one way to convert a RAW partition to NTFS without losing the data stored on it. To do so, you must use CheckDisk.
CheckDisk is a Windows command that scans the volumes of your drive for logical and physical errors. With additional parameters, it can even repair any problems it finds, making it useful when you need to convert RAW to NTFS without losing data. We’re using CheckDisk because it may be able to find and repair the damage that’s preventing the volume from being read correctly.
Here’s how to convert a RAW drive to NTFS using Command Prompt (CheckDisk):
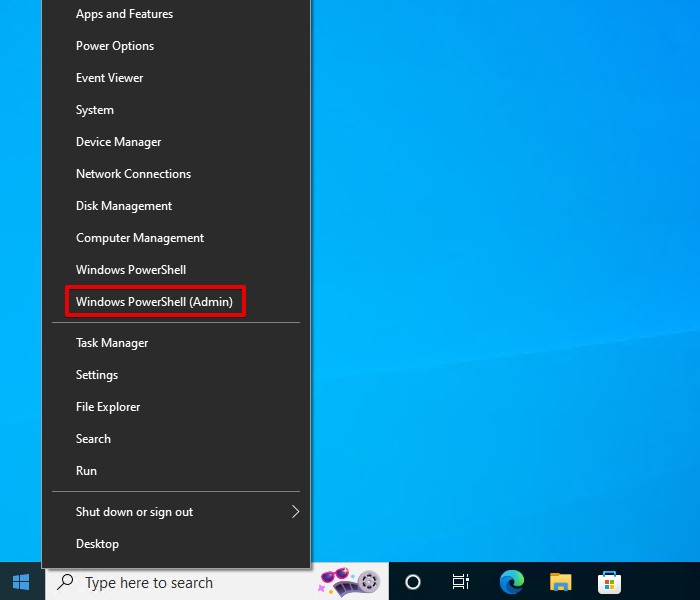
- Right-click Start and click Windows PowerShell (Admin). If prompted by UAC to allow, click Yes.
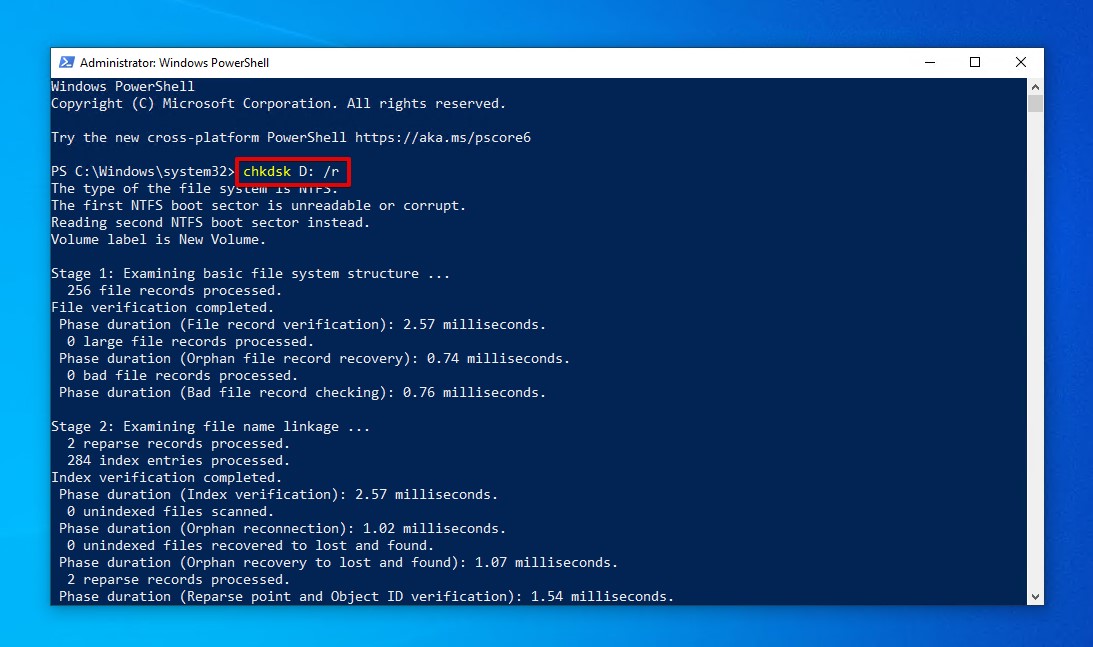
- Type chkdsk D: /r. Replace D: with the drive letter of the RAW partition. Press Enter.
After running the command, check Disk Management to see if the volume is now accessible again and shows the correct file system.
How to Recover Data from a RAW Partition
Sometimes CheckDisk and Disk Utility are unable to fix the RAW partition without losing data. If that’s the case, you should recover your data instead before converting the RAW partition back to NTFS manually.
Here are some methods you can use for recovering your data before repairing the troubled drive.
Solution #1 Recover Using Disk Drill
By employing Disk Drill Partition Recovery Tool, recovering data from a RAW partition is just a few quick clicks away. And because Disk Drill includes handy features like file filters, you can quickly find the files you’re looking for. And Disk Drill adds Recovery Vault and Guaranteed Recovery data protection algorithms to the mix, something the command line cannot do for you.
Disk Drill is also capable of making a byte-to-byte backup of a failing disk, which means you can possibly salvage data from a disk that’s about to die.
To restore files from a RAW partition follow these steps:
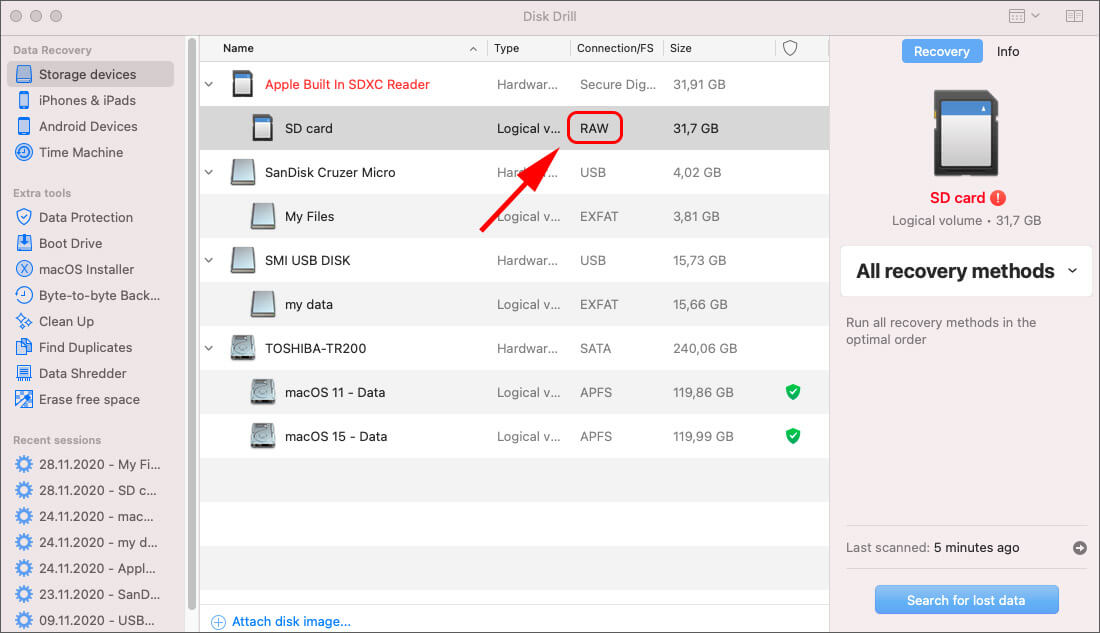
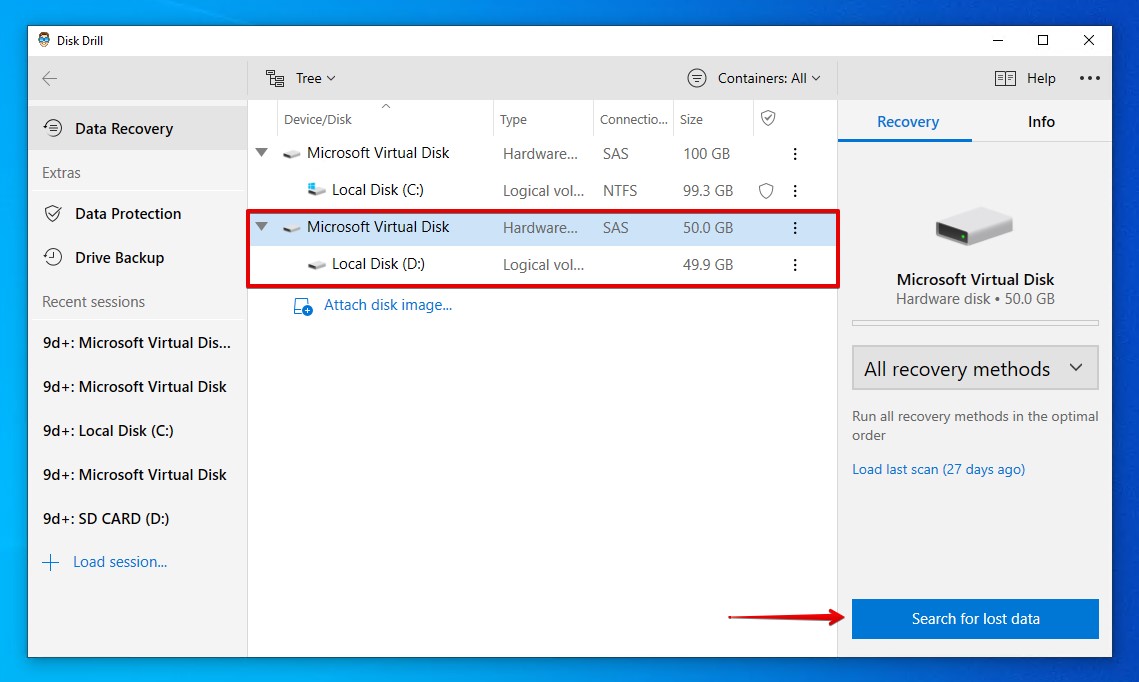
- Download and Install Disk Drill for Windows or Mac.Once you’ve downloaded and installed Disk Drill, open it. Even though the drive isn’t readable by the operating system, Disk Drill will see it.
- Select the RAW drive in question and click Search for lost data. At this point, Disk Drill will start scanning the hard drive to see if it can find any files.
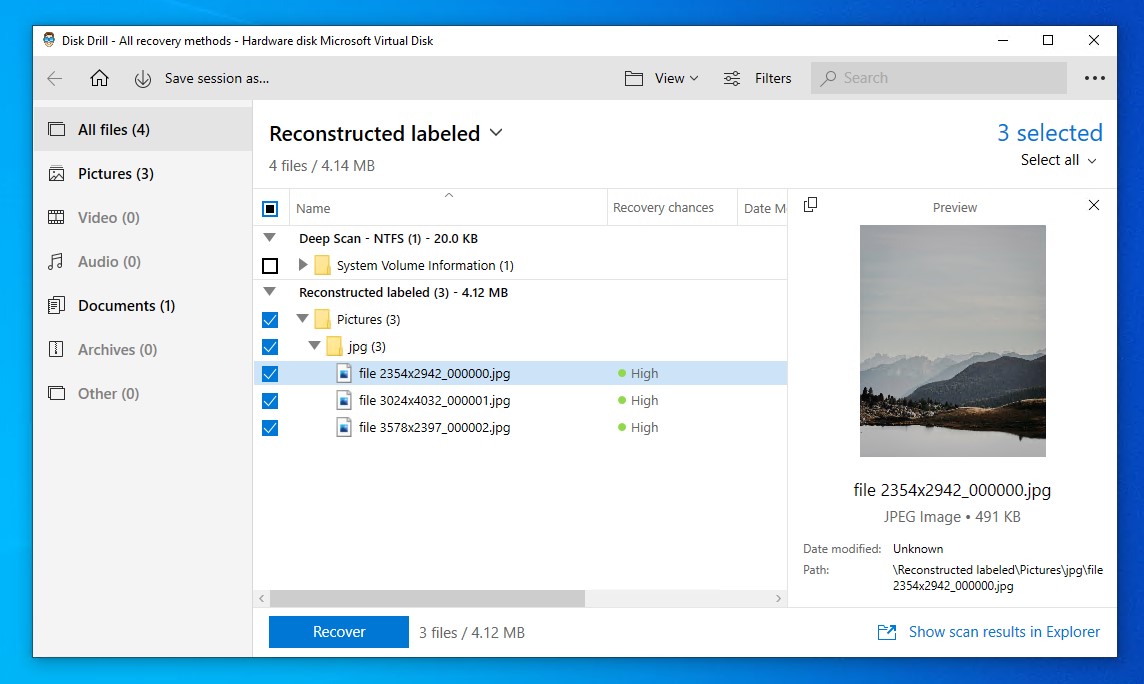
- Once the scan completes (depending on the size of the drive, this process can take some time), click Review found items then you can begin navigating through the discovered file structure.
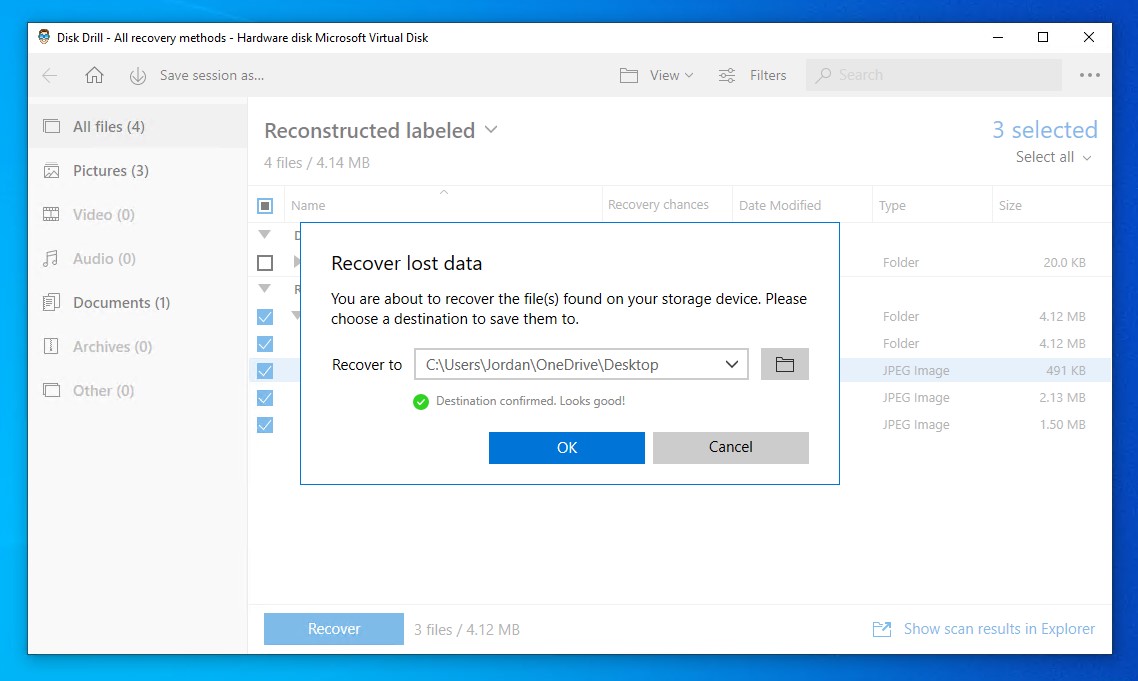
- After selecting the files to recover, click Recover. Select where you want to store the recovered files. Make sure you’re choosing an output location on another separate physical partition.
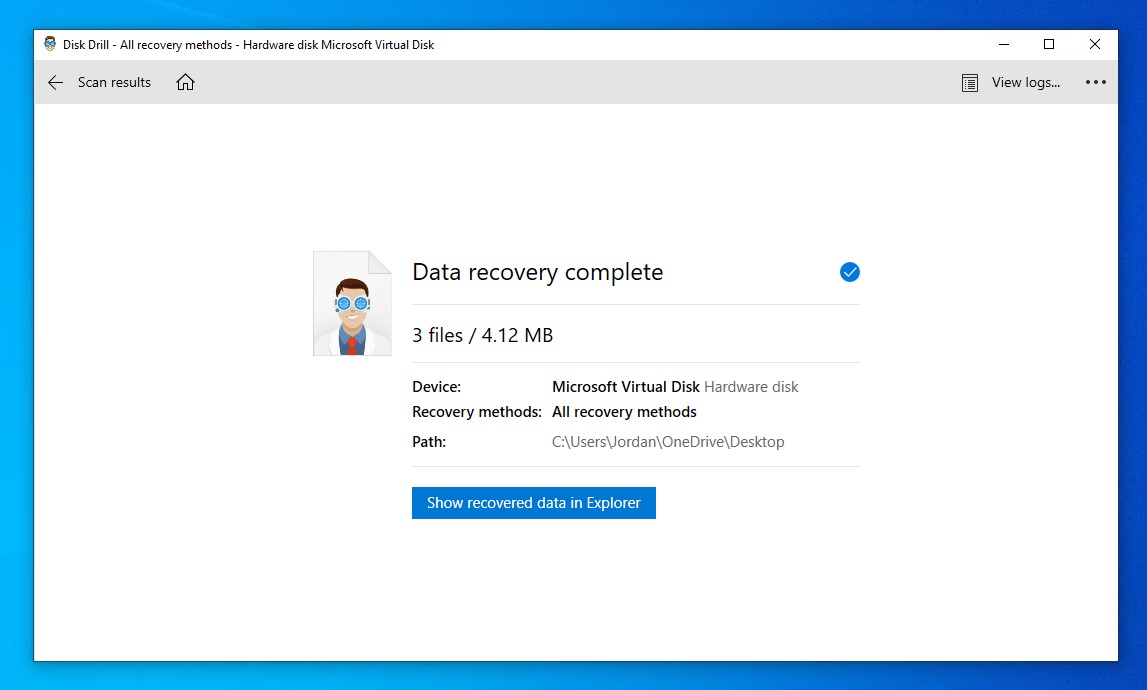
- Click OK and the recovery process will begin. Depending on how many files you’ve selected to recover, how large those files are, and the condition of the scanned device, this can take some time. When the process completes, Disk Drill will present you with an overview screen that includes an option to jump straight to your data.

Solution #2 Recover Using TestDisk
You can recover the entire partition using TestDisk. TestDisk is an open-source recovery tool designed to restore lost or missing partitions. It’s also completely free. It doesn’t use a graphical user interface, so it can be challenging for new users. However, by following the step-by-step instructions, you can restore your missing partition in no time.
Here is a quick demonstration showing the recovery of a lost partition using TestDisk:
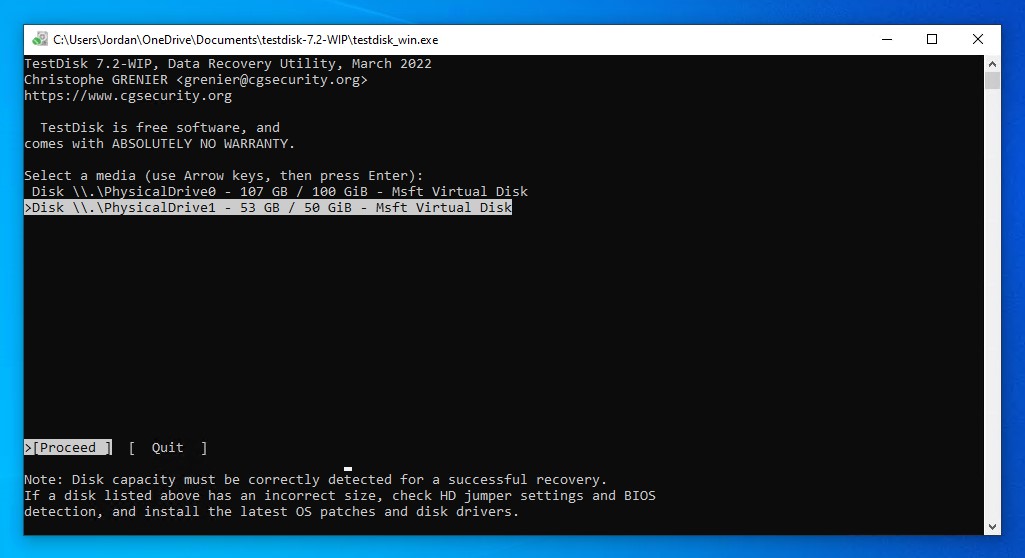
- Download and unzip TestDisk. Open testdisk_win.exe.
- Press Enter to create a new log file.

- Select the drive containing the RAW partition, then press Enter to proceed.
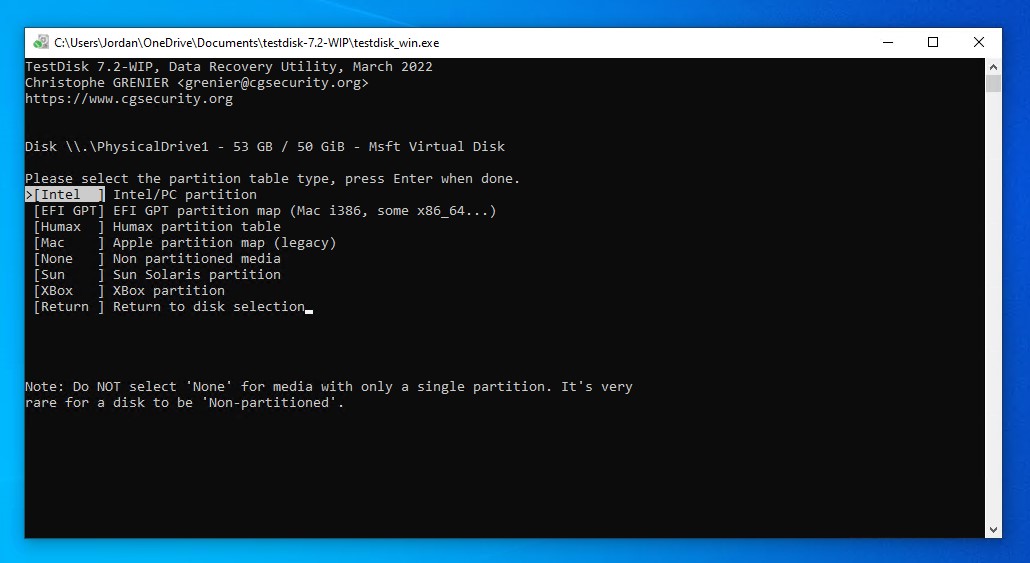
- Select the partition table type. TestDisk automatically selects the one it believes it used. Press Enter.
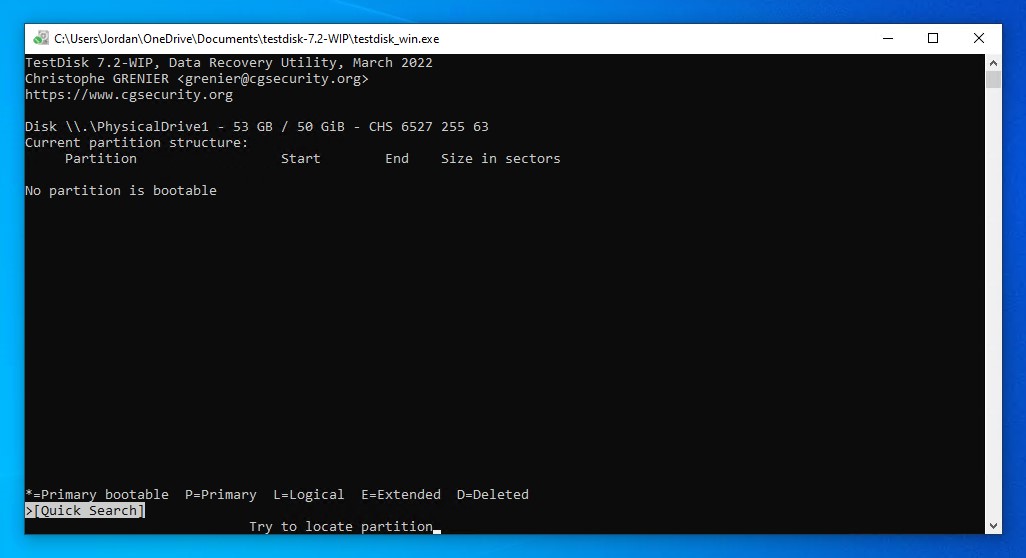
- Press Enter to analyze the partition structure and look for lost partitions.

- Press Enter again to begin the Quick Search.
- When it’s done, press Enter.
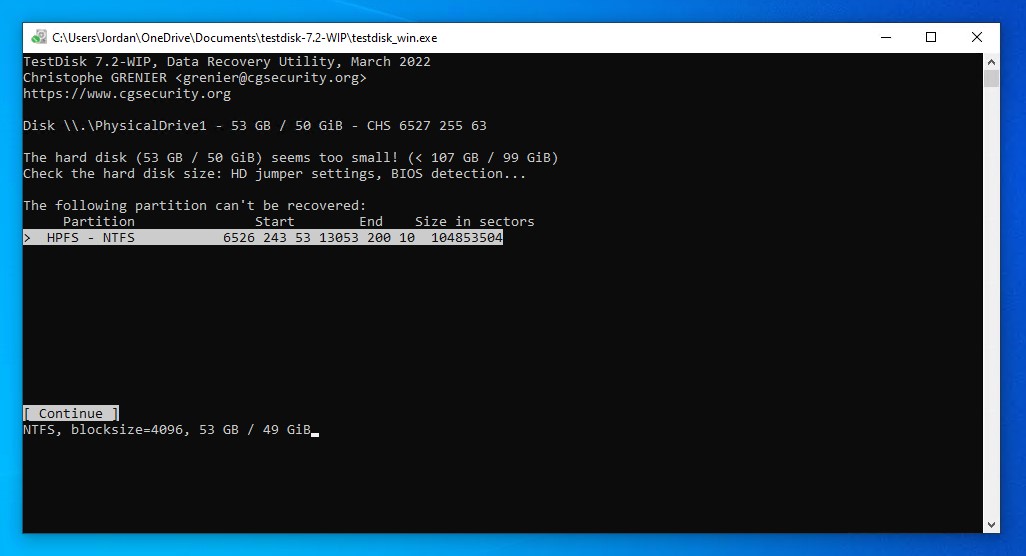
- Select the partition, then press Enter.
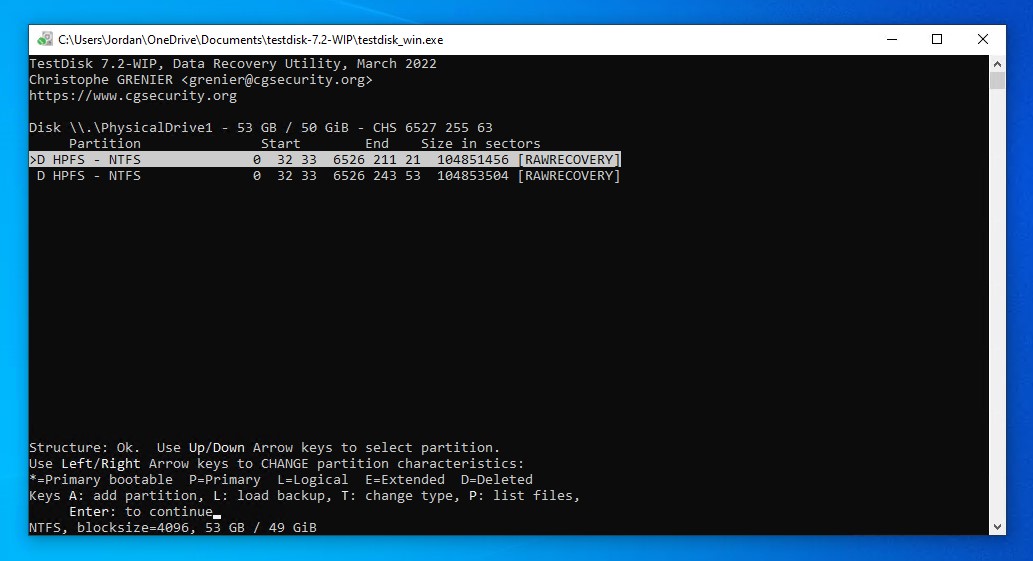
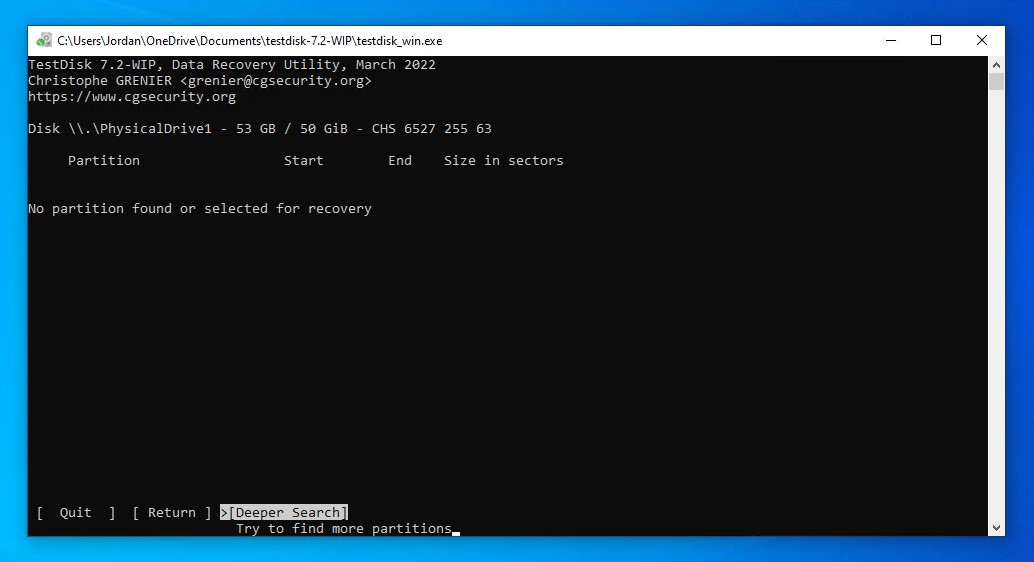
- If nothing appears, select Deeper Search for an in-depth search.
- Select Write when the partition is found.
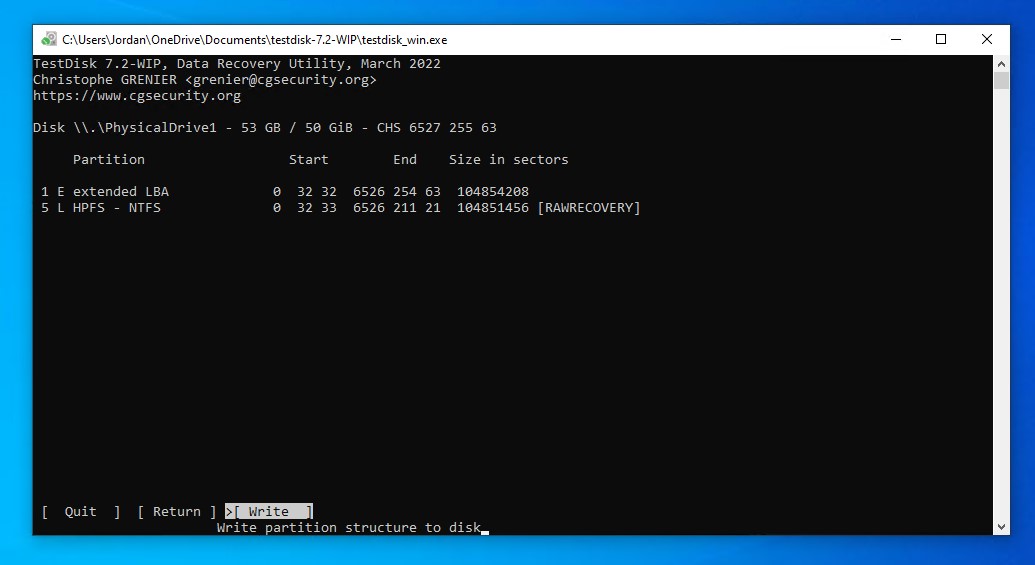
- Press Y to confirm, then restart your computer once it’s finished.
Solution #3 Recover Using a Data Recovery Center
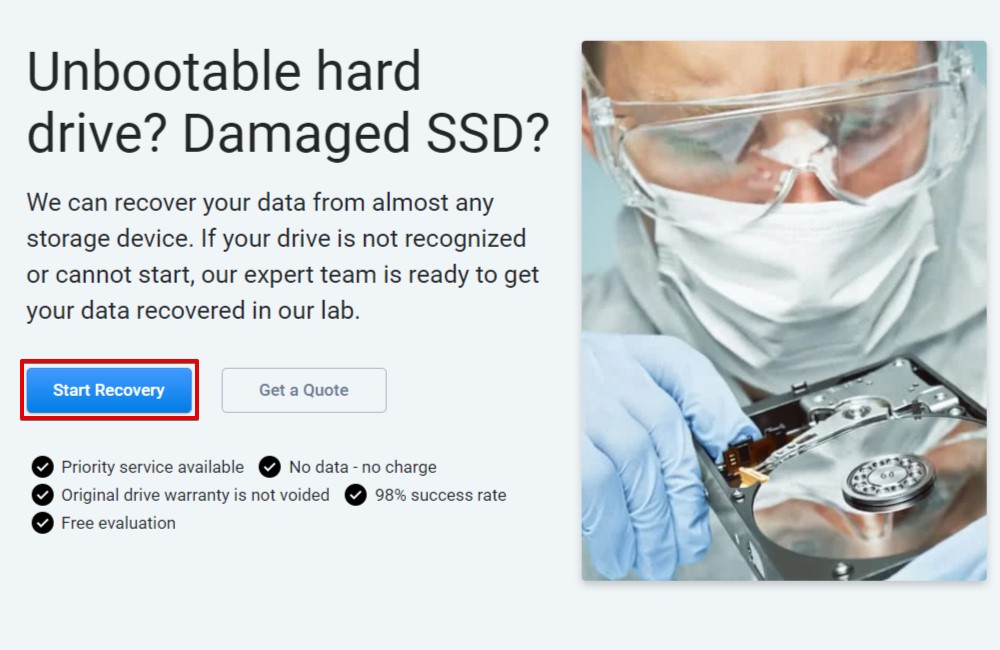
Sometimes even advanced recovery tools still aren’t enough to recover your data. Or, perhaps you’re just not comfortable with attempting to recover the data yourself. No matter, as the option of using a data recovery center is still available.
A data recovery center employs data recovery specialists who are equipped with an advanced understanding of file recovery and industry-grade equipment to get the job done. Using a data recovery center for recovery is often the most expensive option, but it’s also the option with the highest rate of success.
Here’s a general look at what you can expect if you choose to recover your data using a data recovery service:
- Click Start Recovery.
- Fill in all of the necessary information. This includes the type of service you want, your contact information, and any information pertaining to the drive.
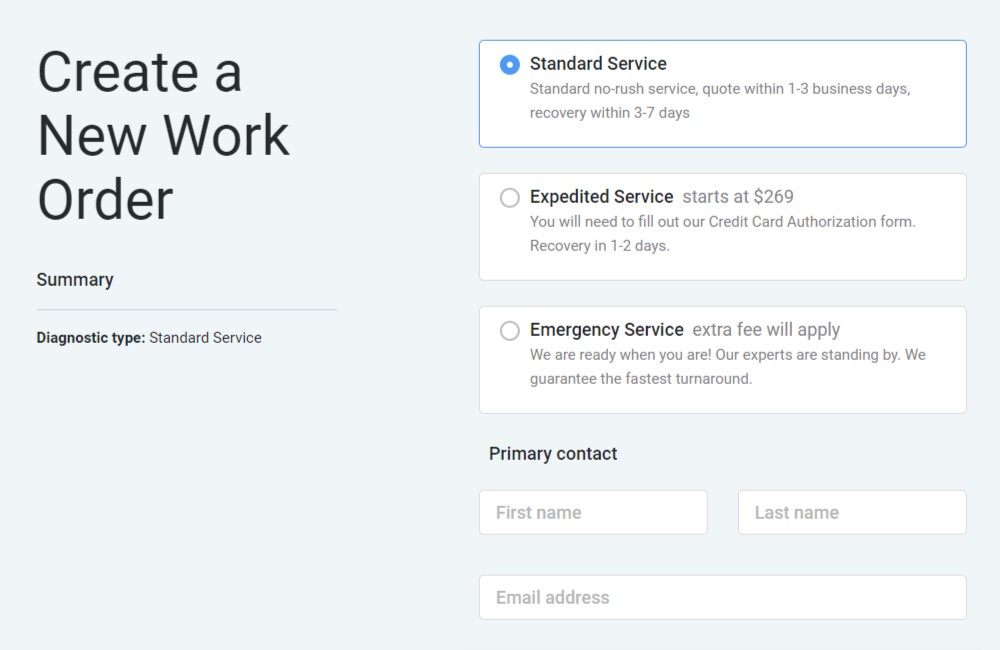
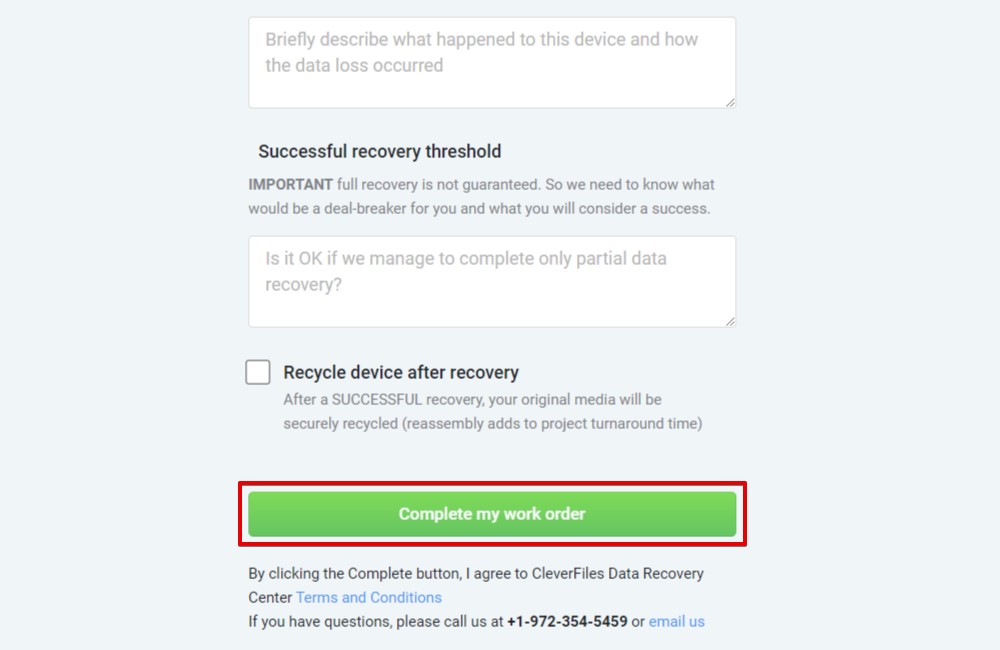
- Click Complete my work order when you’re ready to submit. From here, you will be advised to send your drive away for recovery.
Methods to Convert RAW to NTFS
After recovering your data, it’s time to look at fixing the drive. Generally speaking, fixing a RAW partition is fairly easy once you don’t have to worry about the loss of your data. All it involves is formatting the drive with a new file system to replace the damaged or incompatible one.
The below solutions will show you how to fix a RAW hard drive to NTFS and how to configure a drive.
Method #1 Format with File Explorer
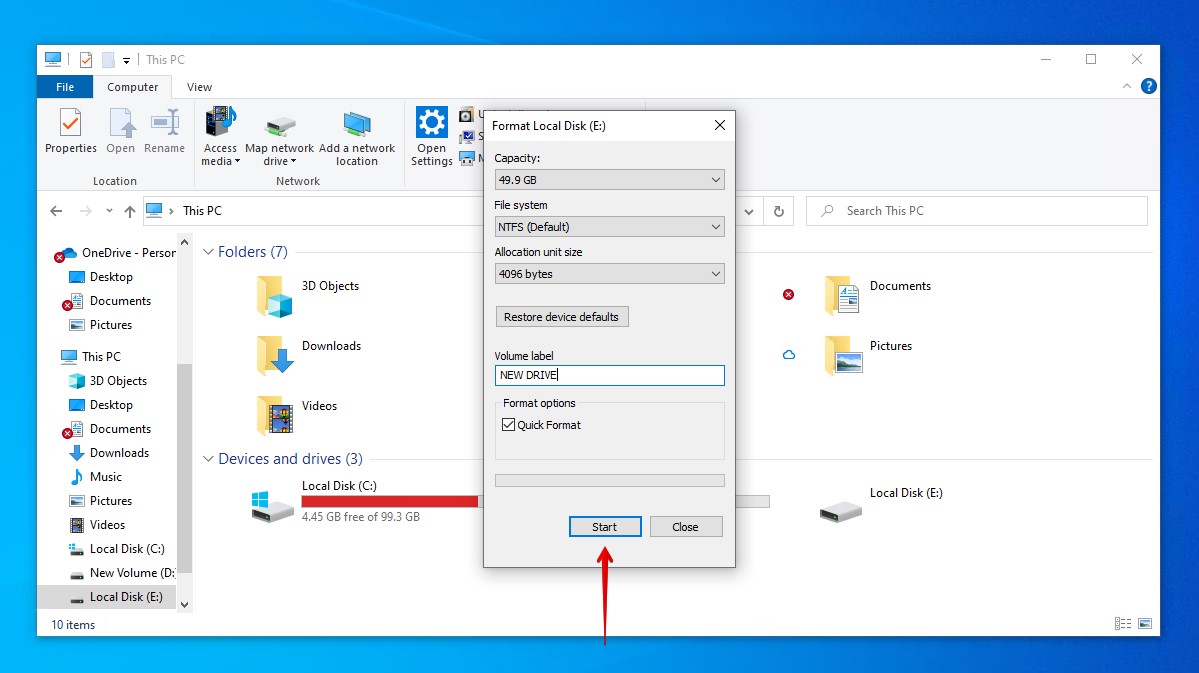
Formatting a drive through File Explorer is one of the easiest ways because it only takes a few clicks. If you’re unsure what values to use when formatting, simply click Restore device defaults when you’re about to finalize the format.
- Open File Explorer.
- In the left navigation pane, right-click the partition you want to format and click Format.
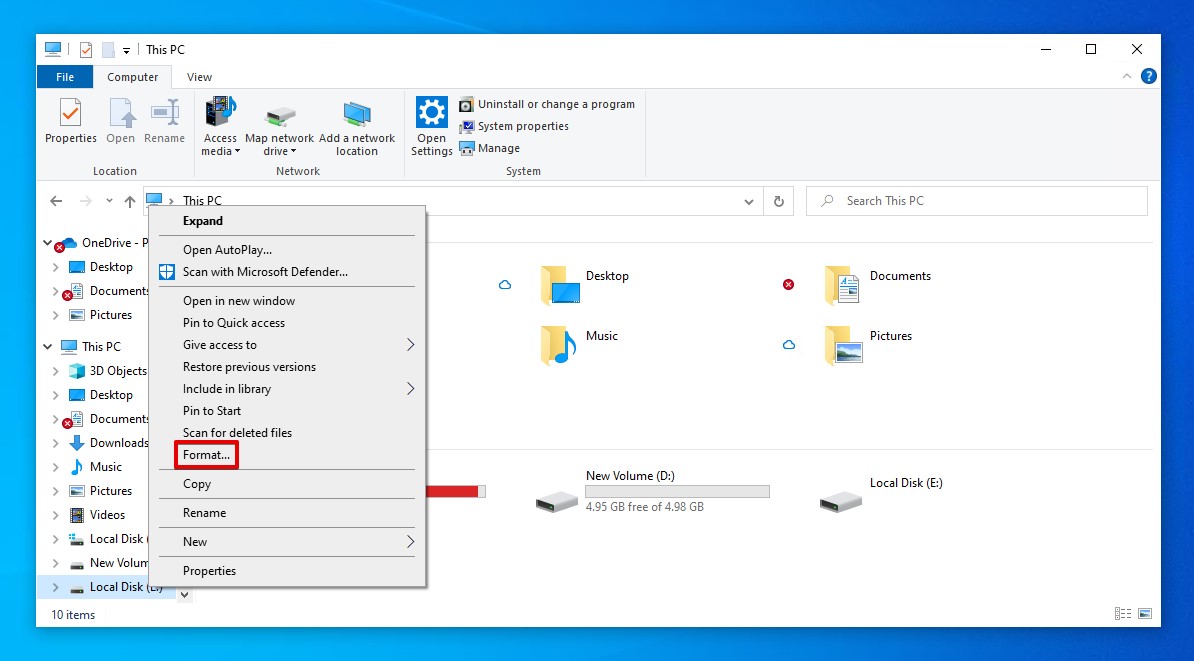
- Define the values for the format and click Start when ready.
Method #2 Format with Disk Management
Disk Management is a Windows utility that allows you to review and make changes to your computer’s storage disks. It gives you a breakdown of the health of your drives and the data allocations of each. It can also be used for format your drives.
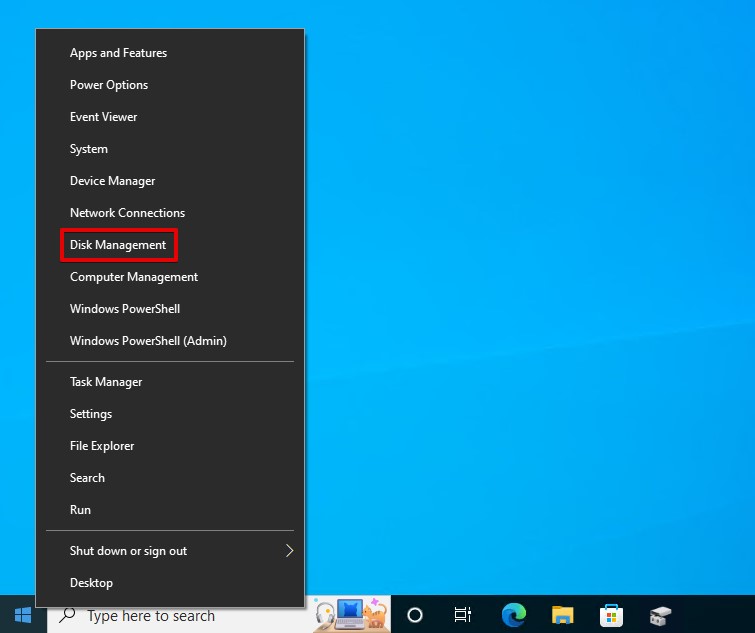
- Right-click Start and select Disk Management.
 Right-click the volume and select Format.
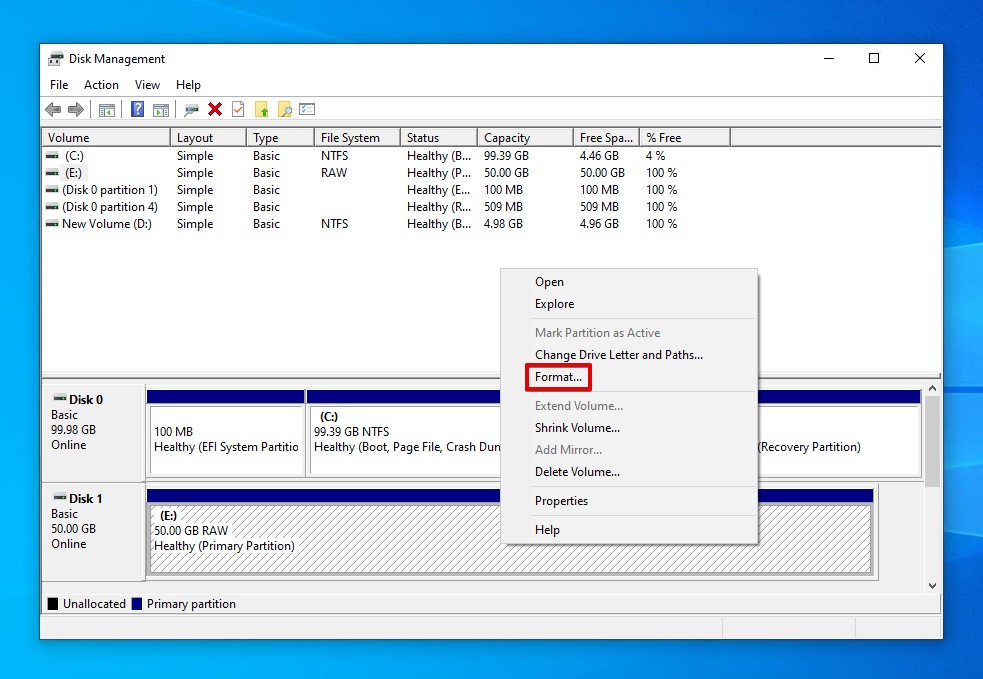
- Define the values for the format, then click OK when ready.
- Click OK to confirm the format.
Method #3 Format with DiskPart
DiskPart is a powerful command interpreter that is similar to Disk Management in that it’s used to manage your computer’s storage disks, but it uses a command-line interface instead. This is a useful option if File Explorer and Disk Management haven’t worked for you.
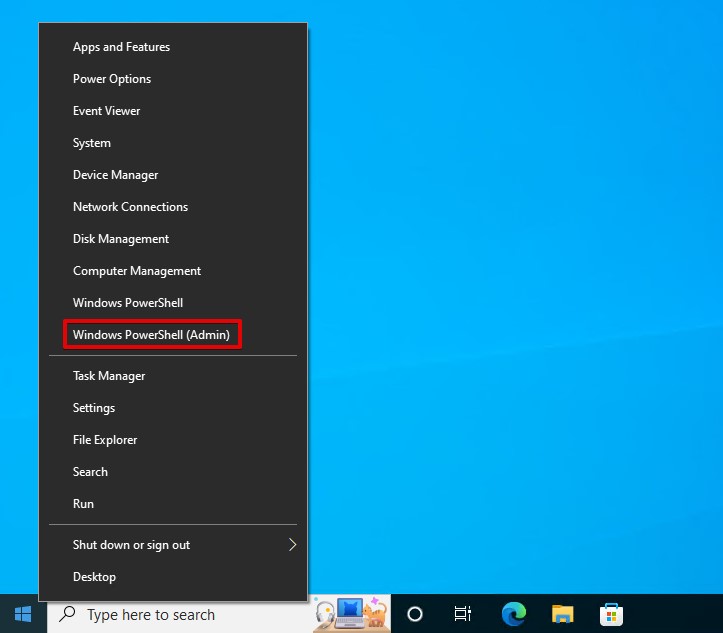
- Right-click Start and select Windows PowerShell (Admin).
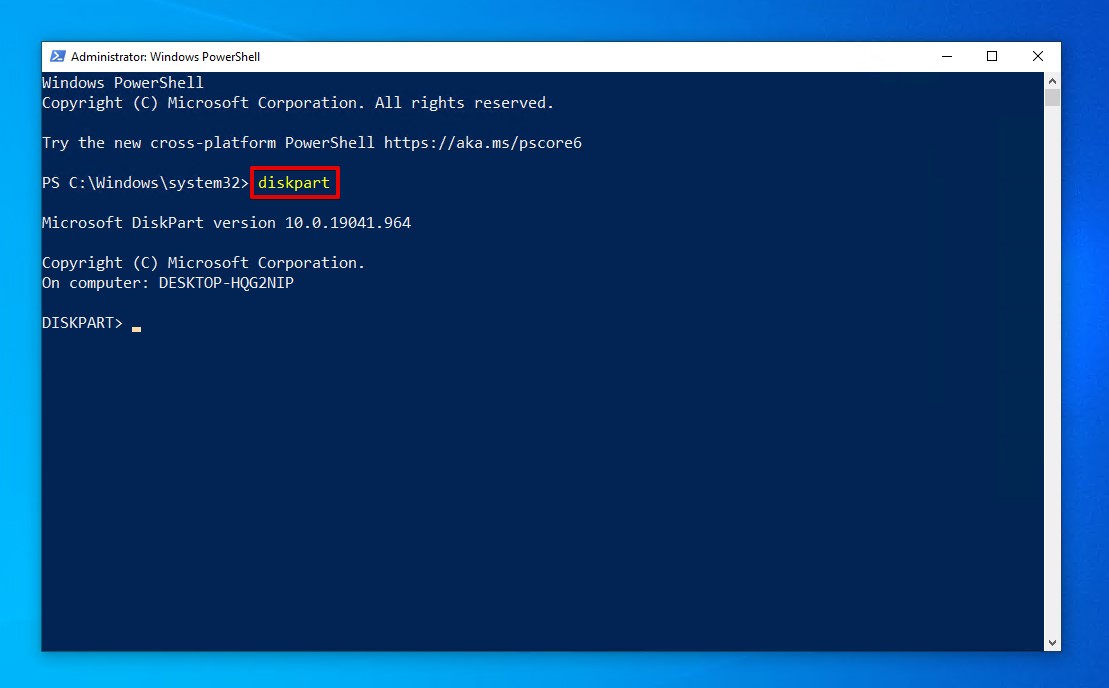
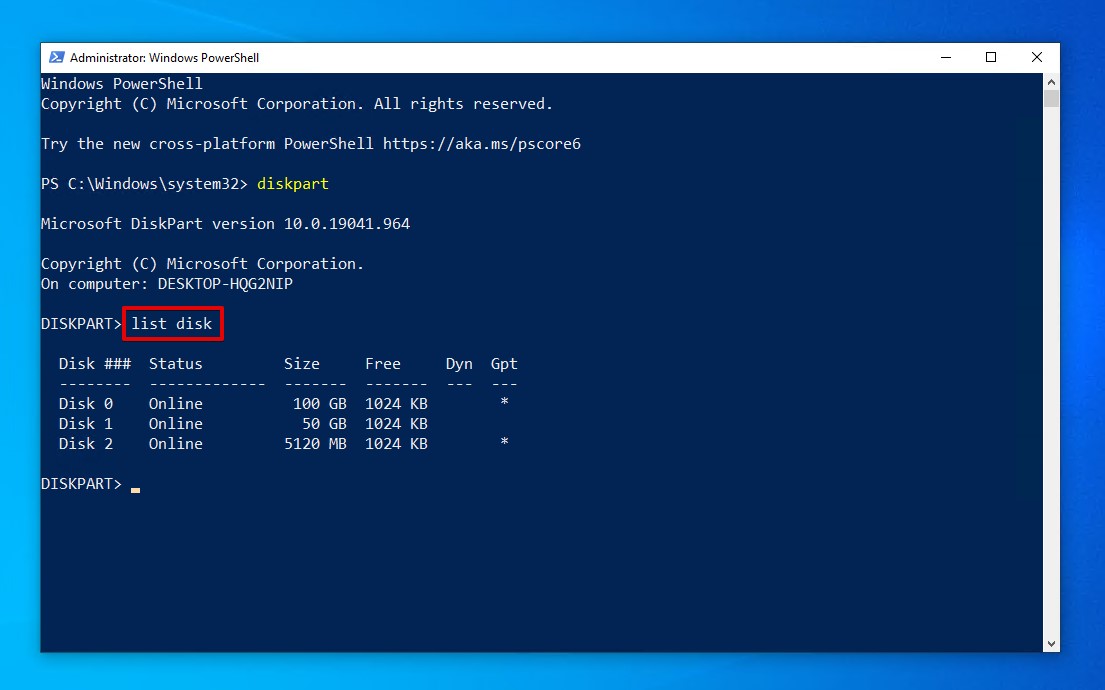
- Type diskpart and press Enter.
- Type list disk and press Enter. Make note of the disk number that has the RAW partition.
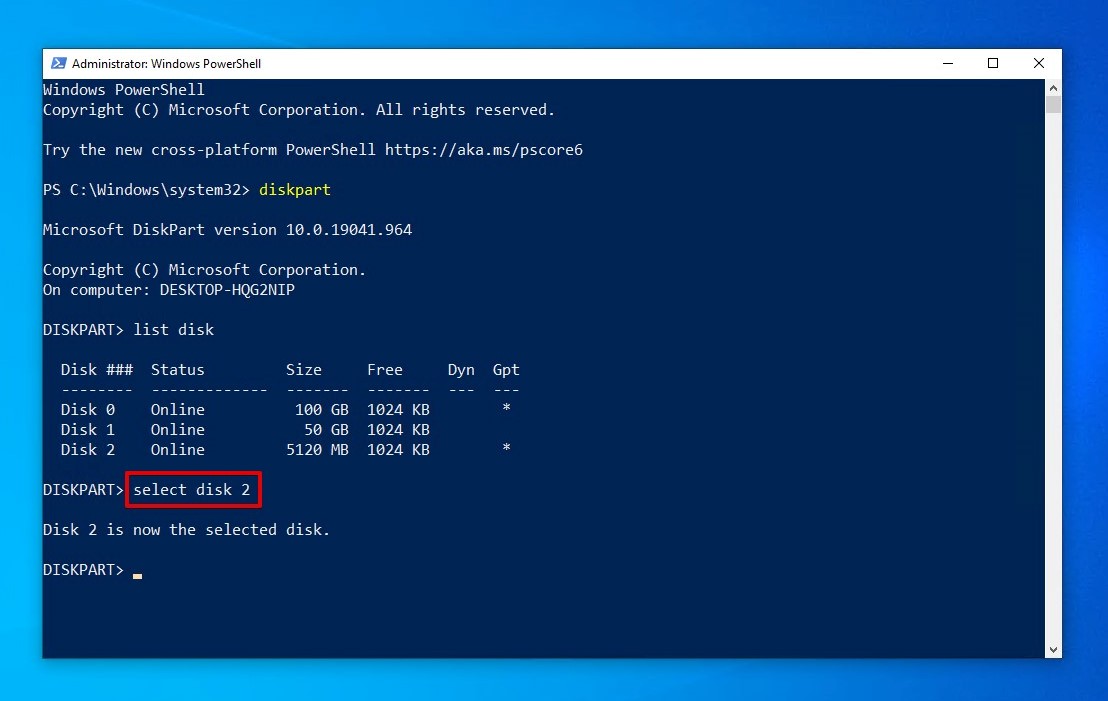
- Type select disk 2. Replace 2 with your own disk number.
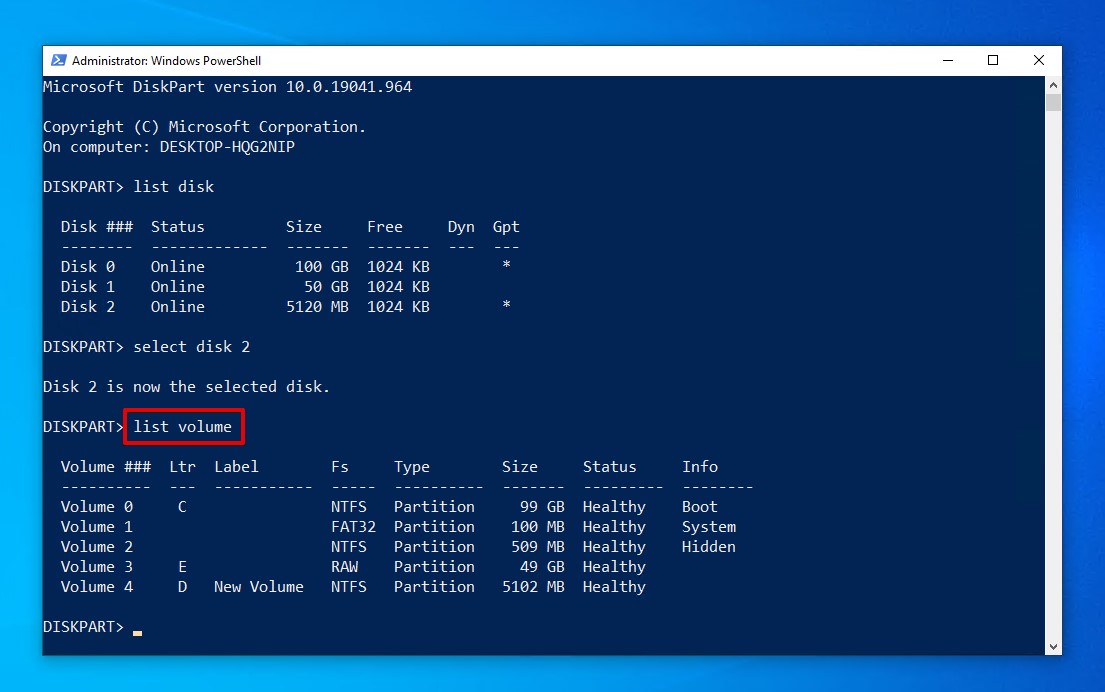
- Type list volume and press Enter. Make note of the RAW volume number.
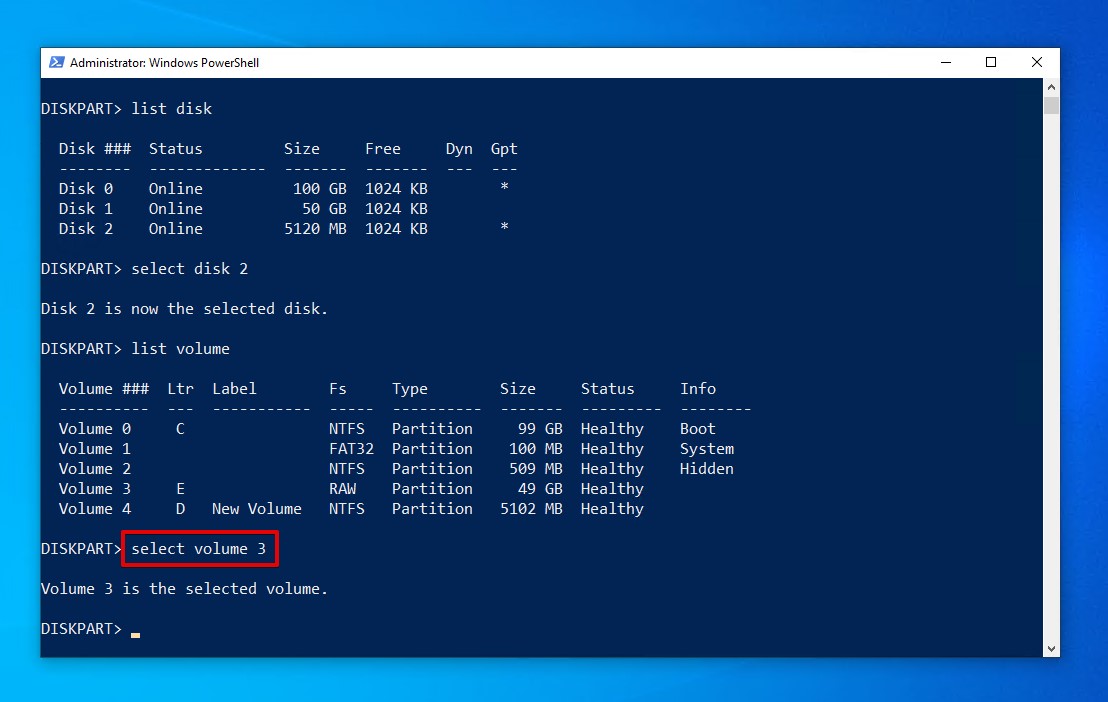
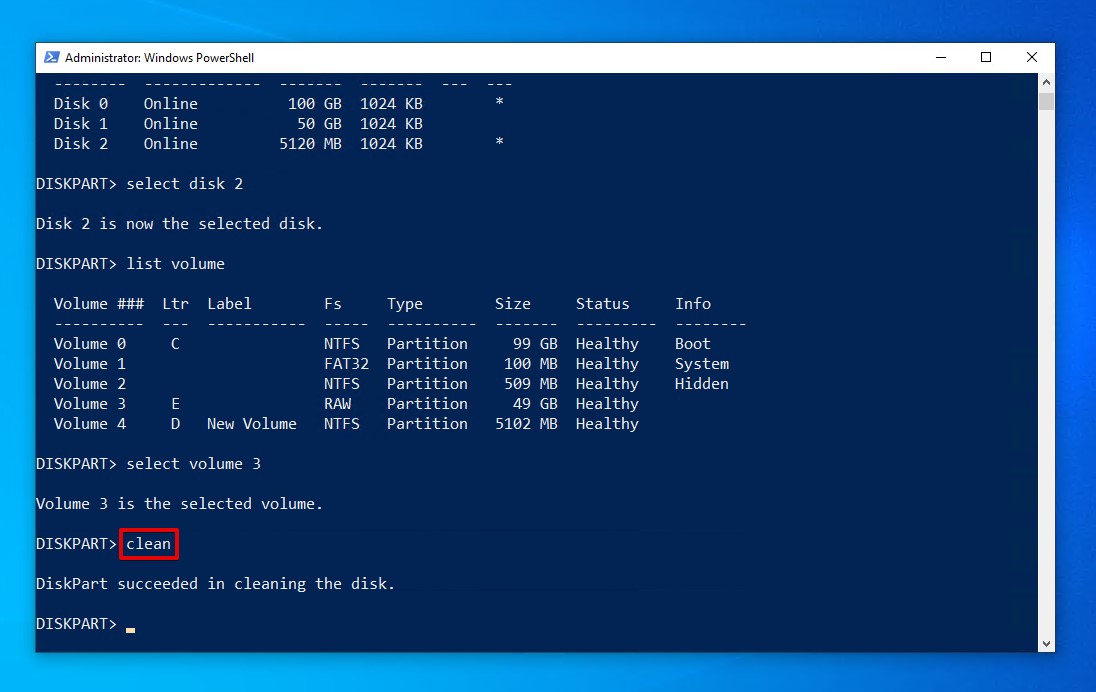
- Type select volume 3 and press Enter.
- Type clean and press Enter.
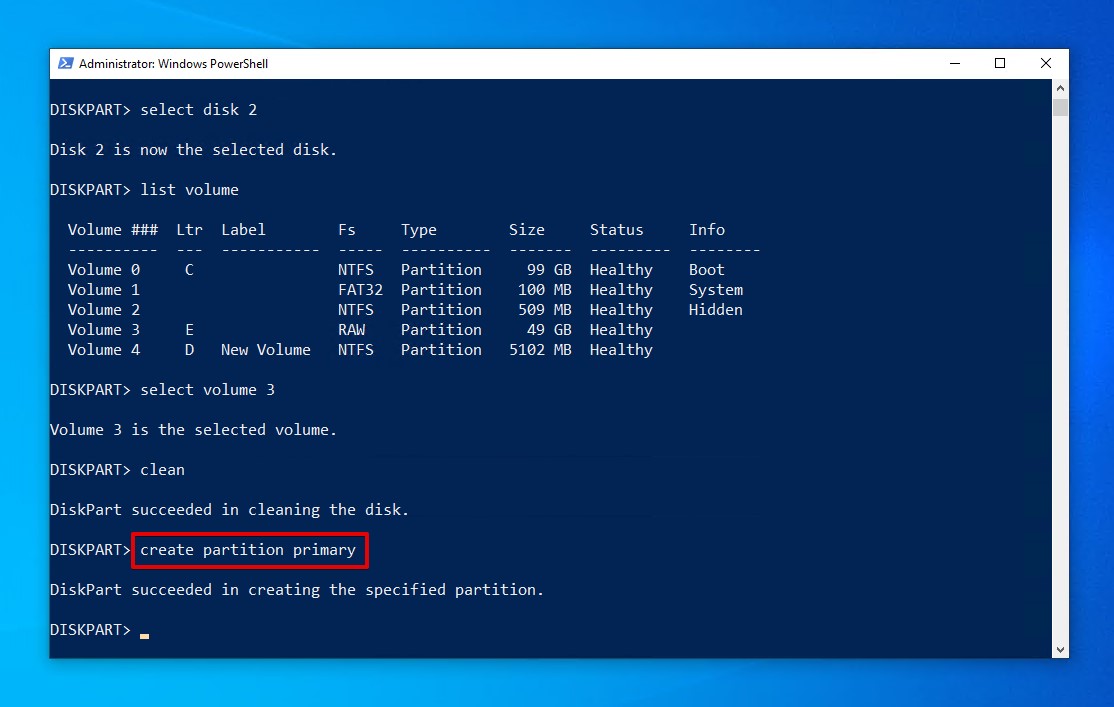
- Type create partition primary and press Enter. This creates a new blank primary partition.
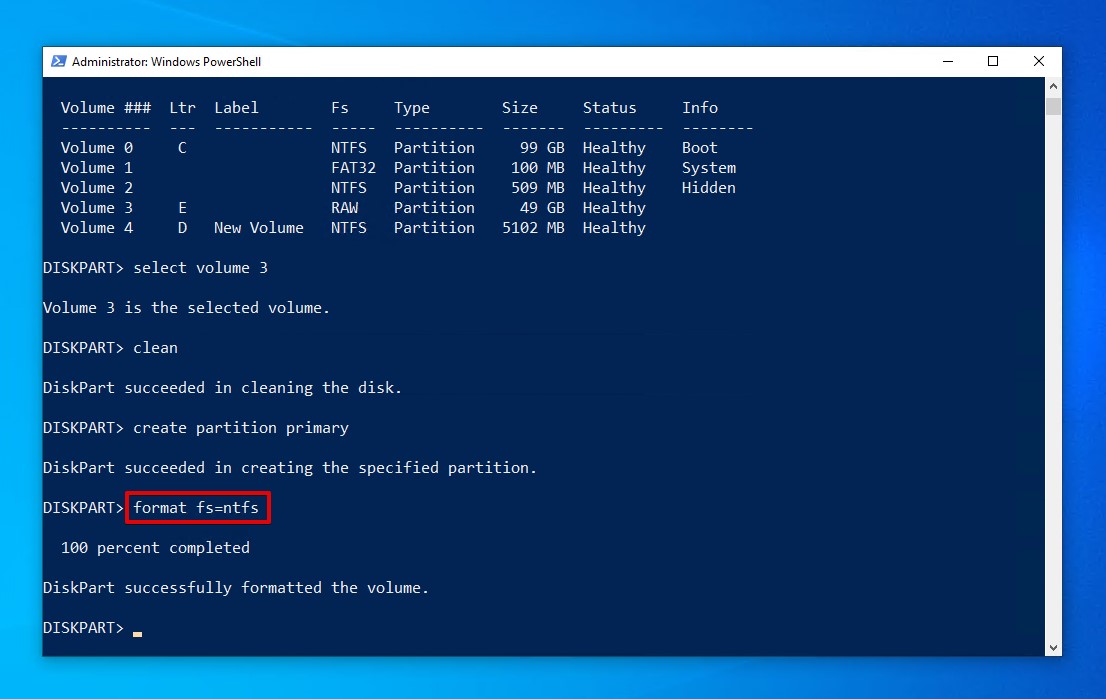
- Type format fs=ntfs and press Enter. This formats the volume with NTFS.
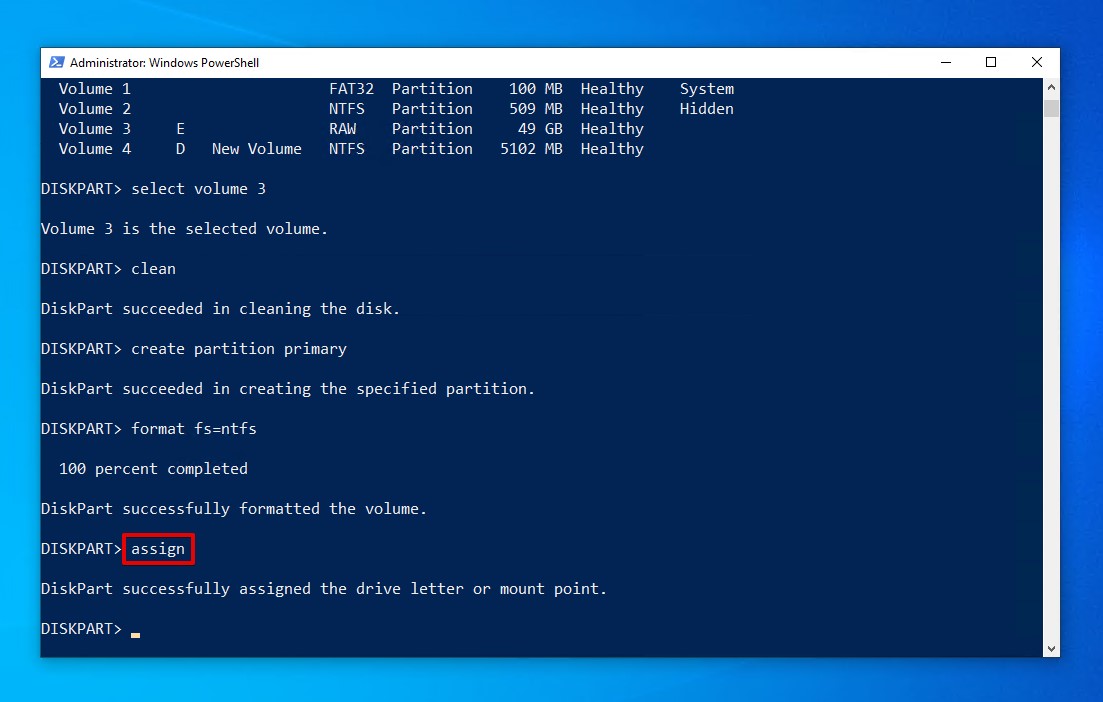
- Type assign and press Enter. This assigns a drive letter.
Tips to Prevent a Partition from Converting to RAW from NTFS
At this point, you’re probably wondering, “How can I prevent a partition from becoming RAW?” That’s a great question. After all, you don’t want to have to go through the process of RAW partition recovery every time you insert an SD card, a USB flash drive, or an external HDD into your computer. Fortunately, there are a couple of things you can do to help prevent this from happening.
- ❌ Never remove a USB drive or SD card without first ejecting or “Safely removing” it using your computer’s built-in function. If you simply remove the drive, without having your operating system safely unmount or eject the device, chances are good it will lead to a RAW partition.
- 💻 Format your drives with as universal a file system as you can. Both FAT32 and NTFS file systems can be read by nearly every operating system, so those are good choices. The one problem with NTFS is that with macOS it is read-only, so your best option is always FAT32. When you opt for one of these file systems, you shouldn’t have any problem with your platform of choice needing to initialize a disk or simply not being able to read it.
- 🔌 Shut your computer down properly. Immediate power loss can interrupt processes running on your computer. This can result in the corruption of your file system. When shutting down your computer, always do so safely instead of performing a force shutdown.
- 💾 Monitor your disk health. Using a disk monitoring tool that can read your drive’s SMART data can give you a heads-up to any potential issues your drive encounters as they happen. As issues appear, you can take immediate action to prevent further damage.
Of course, even if you do all of this, a drive can still become RAW at any moment. Therefore, in order to truly protect your data from such an event, you should create regular backups so a safe copy of your data is always available. Built-in Windows backup solutions like File History are a great choice because they’re easy to set up and keep snapshot records of your data so you can even restore to a previous version if needed.
Conclusion
It’s pretty easy to avoid having to deal with a RAW partition or drive. However, when this occasion does arise, know that you have the tools available to solve the problem. With Disk Drill your chances of recovering data from a RAW drive or partition are quite good. If you’re unsure, download the free Basic version of Disk Drill and have it scan your RAW drive or partition. If Disk Drill is able to find your inaccessible data, purchase the Pro license, and recover that data safely.

FAQ
You can restore a RAW partition by formatting it with NTFS. Bear in mind that formatting the RAW partition with NTFS will delete any data currently stored on it, so be sure to recover what data you can before proceeding:
- Right-click Start and open Disk Management.
- Right-click the RAW partition, then click Format.
- Name the volume and make sure NTFS is the selected file system. Ensure Perform a quick format, then click OK.
- Click OK again to confirm.
You can recover your RAW partition using TestDisk, a free open-source recovery tool that can recover lost or missing partitions. Since it uses a command-line interface, it
- Download and unzip TestDisk. Open testdisk_win.exe.
- Press Enter to create a new log file.
- Select the drive containing the RAW partition, then press Enter to proceed.
- Select the partition table type. Press Enter.
- Press Enter to look for lost partitions.
- Press Enter again to begin the Quick Search. When it’s done, press Enter.
- Select the partition, then press Enter.
- Select Write when the partition is found.
- Press Y to confirm, then restart your computer.
When a partition appears as RAW, it means the file system used by the partition is either:
- Corrupted, therefore unreadable
- Incompatible with the operating system
- Non-existent (there is no file system)
In order to access the files stored on the partition, you will need to repair the file system or connect it to an operating system that can read it. Or, alternatively, you can recover the data from the RAW partition using a data recovery tool like Disk Drill. Here is a quick example of what recovering data from a RAW partition looks like with Disk Drill:
- Download and install Disk Drill.
- Select the RAW partition and click Search for lost data.
- Click Review found items and begin marking the files you want to recover.
- Click Recover, then select a recovery location. Click OK to finalize recovery.
Yes, it is possible to convert RAW to NTFS without losing data, but it can only be accomplished using CheckDisk on Windows. CheckDisk is a hard drive repair tool that can scan for and repair any issues it finds, including those that are causing the drive to be read as RAW.
- Right-click Start and click Windows PowerShell (Admin).
- Type chkdsk D: /r. Replace D: with the drive letter of the RAW partition. Press Enter.
If CheckDisk fails to fix your RAW partition by restoring a working version of NTFS, there is no other way to convert a RAW partition to NTFS without formatting.
You must either repair it using CheckDisk or format the partition with a compatible and working file system. Bear in mind that formatting the partition or drive will delete any data on it.
These steps will show you how to format a RAW partition with the NTFS file system:
- Right-click Start and select Disk Management.
- Right-click the RAW partition and select Format.
- Fill in the desired format values and click OK.
- Click OK to confirm.
If an external hard drive is appearing as RAW, you should find out what file system it’s using. More often than not, drives appear as RAW because they’re using a file system that’s incompatible with your operating system. If this is the case, simply connect the external drive to a computer using a compatible operating system and remove the data.
If the partition is RAW due to damage, try repairing it using CheckDisk.