Your data is super important – it’s always painful to lose, regardless of the reasons. We are here to ensure its recoverability and provide help and advice. Unfortunately, recovering lost data is not an exact science, and as we usually say, [almost] every recovery case is unique, that’s why we’ve compiled a great list of simple hints that may increase your chances of getting your data back successfully.
In this article we’ll concentrate on data recovery from HDD, hard disk drives. However, most of our recommendations can be universally applied to memory cards, SSD, RAID arrays, etc.Data recovery centers and solo specialists are known to discourage users from attempting do-it-yourself data recovery with the help of software, like Disk Drill. Clearly, their motivation is largely fueled by their own price tags (a professional data recovery may easily cost you US$500-$5000 per case or more), while Disk Drill is available for US$89/year or a one-time US$149, and depending on your circumstances, is perfectly safe to download and run yourself.
Obviously, there are situations when you want an expert to be involved. However, being in this business for 12+ years, seeing hundreds of thousands of real-life data loss cases, speaking to tens of thousands of users every month, we are more than confident that ~80% of accidental file loss can be treated with the right software tools without any external help.
It’s also true, there are pretty common data loss situations when data, unfortunately, is really gone for good, and even a pricey white-glove data recovery lab won’t be able to restore it, not mentioning numerous scams on the internet from impostors. However, if you are following basic data recovery rules, there’s hardly any possibility that data recovery software can cause additional damage.
Moreover, Disk Drill won’t cost you anything to verify your data recoverability, it lets you preview and even recover up to 100 MB of your data for free before you consider whether you are interested in upgrading to its premium version for unlimited recovery, or seeking someone else’s advice.
The decision-making point
Whichever the cause of your data loss, your specific recovery scenario will most probably fall into one of these categories.
Quick Guide: Creating a Disk Backup (Disk Image) with Disk Drill
- Launch Disk Drill. Open Disk Drill and select “Byte-to-byte Backup” from the sidebar.
- Choose Your Disk. Select the disk or storage device you want to back up from the list provided.
- Start the Backup. Click “Create backup” to begin creating your disk image.
- Set the Destination. Choose destination by selecting the folder where you’d like to save the backup file. Then click “Save” button and wait until the process completes—this might take some time depending on the size and condition of your disk.
- Backup Complete! Once the backup is finished, you’ll find the newly created disk image (usually
.dmgon macOS or.ddon Windows) in your selected destination folder.
This, in short, is how backups are created. These simple steps are exactly the same for both Windows and macOS users. For more advanced instructions, follow the relevant section of this article.
Why Is Backup Important in Disk Drill?
Creating a byte-to-byte backup (often simply called a “disk image”) is an essential step before performing any data recovery operations. Attempting recovery without a backup can cause irreversible changes or additional damage to the storage device. Рrofessional data recovery specialists almost never work directly with the original drive—they rely exclusively on byte-to-byte backup copies for maximum safety and effectiveness.
What is a Byte-to-Byte Backup, and How Does it Differ from Other Backups?
A byte-to-byte backup, also known as a disk image or clone, is an exact digital replica of a storage drive. It includes every sector of the disk—from the very first byte to the last—even those sectors that might appear empty or unused. Unlike traditional file backups, which typically copy only selected files or folders, a byte-to-byte backup preserves the full disk structure and its complete data content.
Users often misunderstand this concept and attempt to directly mount Disk Drill’s plain byte-to-byte backups as regular storage drives in their operating systems, intending to copy data as if it were a simple file-based backup. While mounting such backups can sometimes succeed—particularly when the original drive was structurally intact and free of bad sectors—it’s important to understand this difference clearly:
- Traditional File Backup: Copies individual files and folders, suitable for everyday file recovery and easy to browse directly.
- Byte-to-Byte Backup (Disk Image): A complete sector-by-sector clone of the entire disk. Primarily intended for data recovery, forensic analysis, or disk diagnostics rather than direct use as a regular mounted drive.
In macOS, a healthy byte-to-byte backup can often be mounted using built-in system utilities. On Windows, specialized software such as 7-Zip or VMware may achieve similar results.
A universal data recovery 101
In ANY case, it’s always recommended to immediately stop using the device where the lost data was stored!
In addition to that, here’s a great 101 on what to do once you discover that your data was lost which is relevant in any situation:
- As we mentioned before, stop using the storage device your data was on. If you don’t act immediately, new data may overwrite recoverable files.
- Eject an external disk.
- Detach a memory card.
- Shut down your computer right away.
- Do not install Disk Drill or any additional software on the drive where the lost data was stored.
- Data recovery should be initiated on a separate computer.
- The drive with deleted data should be connected as an additional external media, you should not boot from it.
- When possible, Disk Drill will automatically switch the scanned drive into read-only mode to prevent potential data overwrite.
- When possible, create a byte-to-byte disk backup to an additional healthy storage device and conduct your recovery using the newly created backup, rather than directly recovering from the original media.
- This is especially important when the original media containing the recoverable data is physically damaged.
- Always preview the recoverable files. Full intact preview is the only guarantee that your data is fully recoverable. Do not rely solely on the lists of files or recovery chances from initial scans.
- Even on healthy drives, it’s recommended to check S.M.A.R.T. before initiating direct recovery.
- If you scanned your storage device and were able to locate your deleted files, do not re-scan it again, try to recover everything as soon as you can within the same session. In case of data loss (and consequentially, recovery) time is your enemy.
Why Is Creating a Backup So Critical?
✍️ Risk of Data Overwrite or Modification
After accidental deletion or formatting, operating systems may continue writing data in the background, potentially overwriting data you still could have recovered. Users might also inadvertently write new data onto the drive, reducing the chances of successful data recovery.
🔨 Physical Deterioration of the Storage Device
If your storage device is physically damaged (e.g., bad sectors or mechanical failure), attempting to read from it could worsen its condition, even leading to complete data loss.
⛔ Unsuccessful Data Recovery Attempts
Incorrect actions—such as repairing the file system without a backup—can inadvertently delete or overwrite recoverable data.
🛡️ Protection Against Software Errors
Recovery software can occasionally malfunction or contain bugs, potentially corrupting your data. A backup provides a safety net in such scenarios.
♻️ Multiple Recovery Attempts
If the initial recovery attempt is unsuccessful, having an untouched backup allows you to safely experiment with alternative recovery methods without risking your original data.
✂️ The TRIM Command and SSDs
If files were deleted from an SSD or SMR (Shingled Magnetic Recording) HDD, the operating system might issue the TRIM command, instructing the drive to mark deleted blocks as empty. Once this happens, DIY recovery becomes impossible, and professional recovery significantly more difficult and costly.
Creating a backup quickly after data loss can preserve some recoverable data. Although the TRIM command typically doesn’t execute immediately (except on high-performance NVMe SSDs), it usually activates during periods of disk inactivity (from minutes to hours after deletion). By actively creating a disk image, you increase the chances of capturing a usable copy before TRIM erases the data.
Introducing the Improved Byte-to-Byte Backup Module in Disk Drill 6
What’s New?
- 🤓 Smart Multi-Pass Backup. Disk Drill 6 intelligently handles damaged sectors by initially skipping over problematic blocks to rapidly create a complete backup. After this initial pass, Disk Drill performs additional read attempts on previously skipped damaged blocks without causing further disk degradation.
- ↕ Optimized Data I/O Operations, Multithreaded Read and Write Processes. Disk Drill 6 features improved data input/output (I/O) optimization by performing reading and writing operations simultaneously in separate threads. This multithreaded approach significantly boosts the speed and efficiency of backup creation, reduces disk wear, and enhances overall reliability when working with damaged drives.
- 🚧 Automatic Block Size Adjustment. Disk Drill dynamically selects the optimal reading block size (ranging from 64 KB down to 512 bytes) to ensure reliable data extraction, which is especially crucial when encountering bad sectors or unexpected drive disconnects. When damaged zones are detected, Disk Drill automatically initiates between 5 to 8 additional read attempts, progressively decreasing the block size.
💡 Note: Backup time estimates provided are approximate. Actual backup speed depends on the drive’s condition and the number of bad sectors, and can fluctuate—either improving or worsening—during the backup process.
- ⏩ Skip Slow Zones. No need to wait for days when the files you need have already been backed up. Disk Drill provides an intuitive visual disk map showing the exact locations and sizes of bad sectors. You can evaluate this information and decide to finalize the disk image creation at any time, bypassing reading of problematic areas.
💡 Note: If you disable Disk Drill’s retry mechanism for reading bad sectors, the backup will be finalized without any potentially recoverable data from those skipped problematic areas.
- ✍ Automatic Backup Range Correction. If incorrect values are entered for a partial backup range, Disk Drill automatically corrects them to align with the disk’s sector size, ensuring accuracy and reliability throughout the backup process.
- 💾 Standard Backup File Formats and Types in Disk Drill. Disk Drill creates a universal, plain byte-to-byte backup without compression or encryption. This backup type is an industry-standard format widely recognized by professional data recovery labs and fully compatible with all forensic and data recovery software.
Default and Optional File Extensions:
— Windows: default.dd; optional.iso,.dmg;
— macOS: default:.dmg.
Recover Lost Data from Byte-to-Byte Backups Using Disk Drill: Advanced Disk Image Creation Explained
As previously mentioned, if your disk has not failed completely, there’s still a chance to salvage your data. Depending on its condition, which we’ve already discussed in this article, if your assessment is light mechanical damage, we don’t recommend direct scan and recovery of such a storage device. Instead, to minimize potential impact, after following our basic recommendations, you should create a byte-to-byte backup of the entire drive to a healthy storage device. Once completed, such a backup will contain all the sectors from the original media, even the ones that are marked as empty but may still contain valuable data to be recovered. As a result, data recovery software will be scanning and analyzing a physically healthy device that contains the same set of potentially recoverable data.
Here we go.
- If you haven’t already done so, download and install Disk Drill on your computer.
💡 PRO-Tip: If you’re an IT professional specializing in data recovery and want to fine-tune your backup settings, check out the advanced settings section of this article for detailed guidance and best practices.
- Start the program and you should see a screen like this:
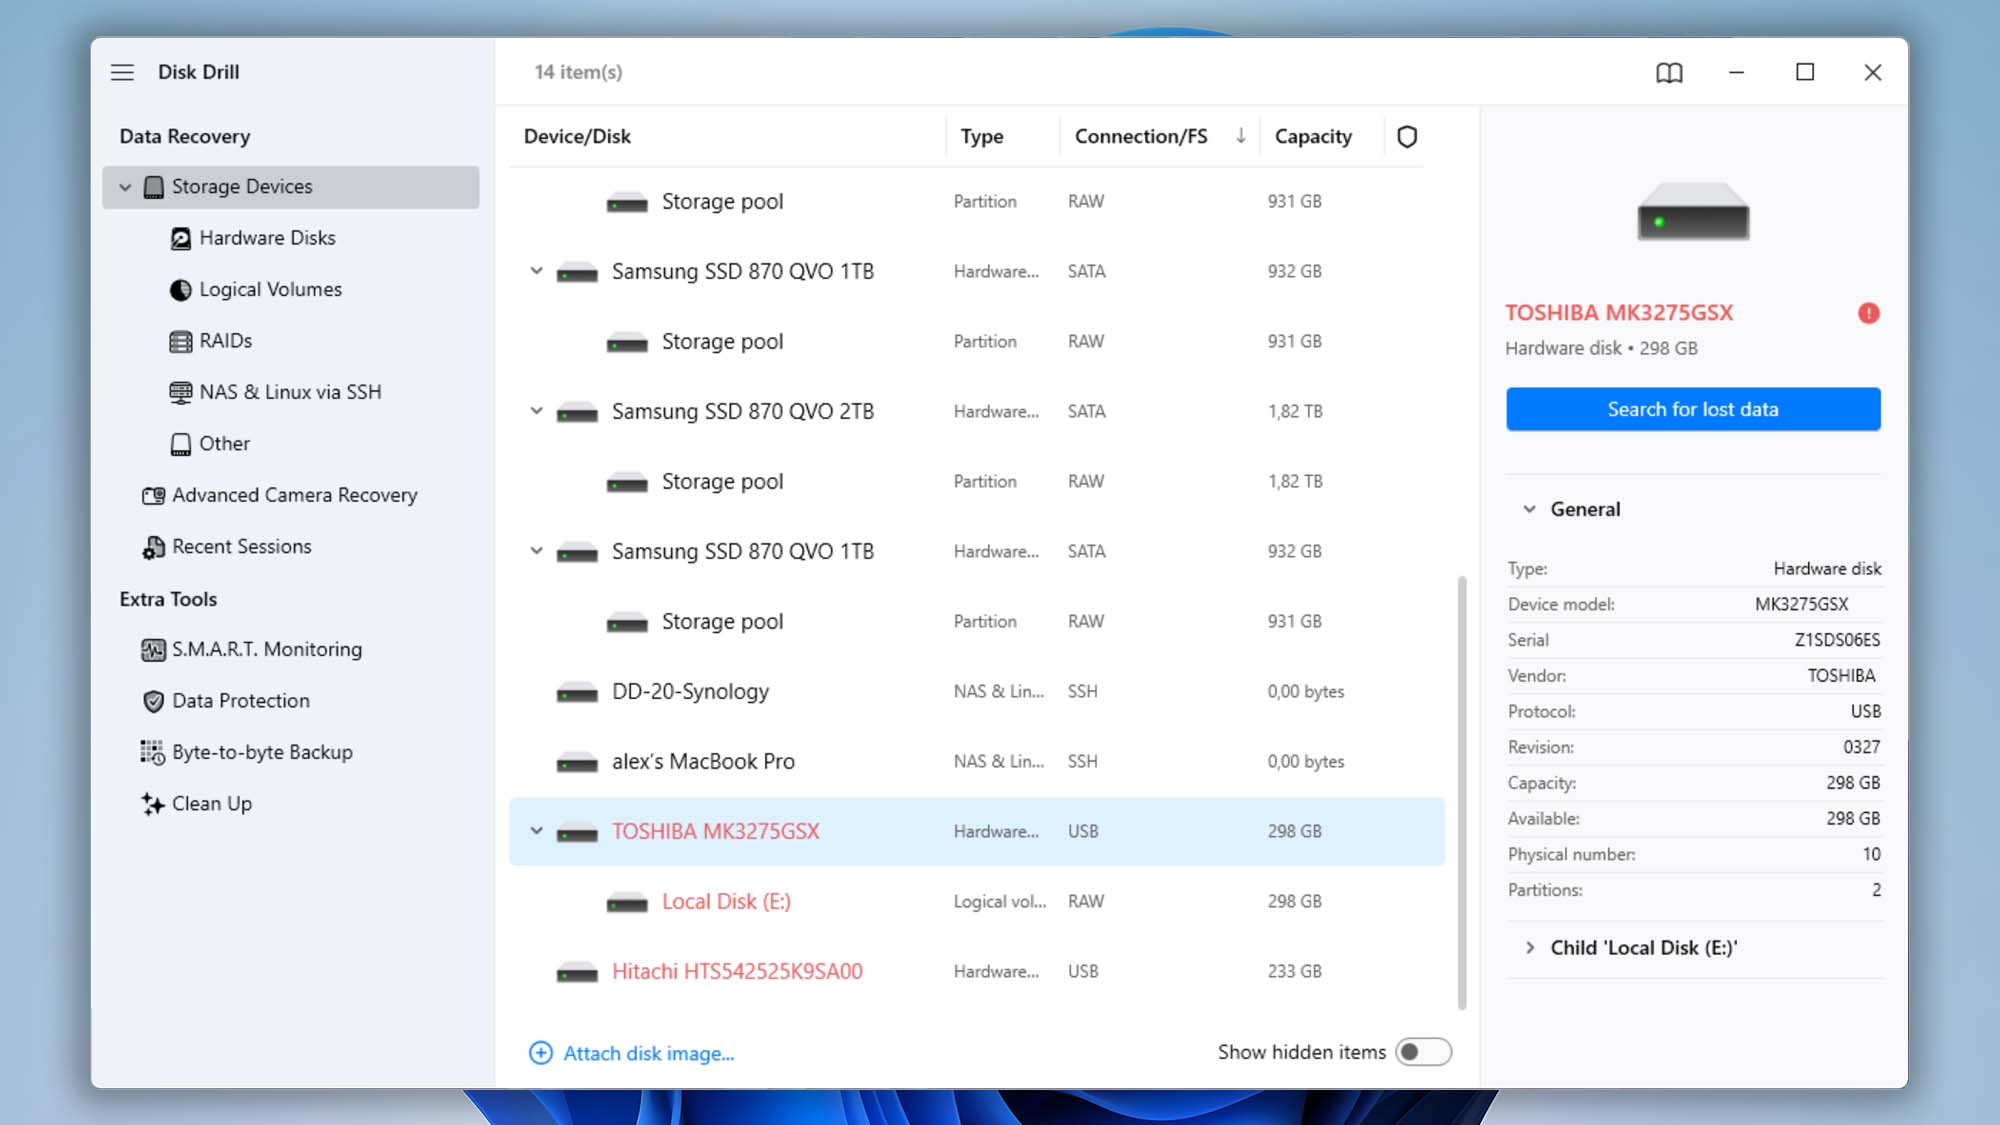


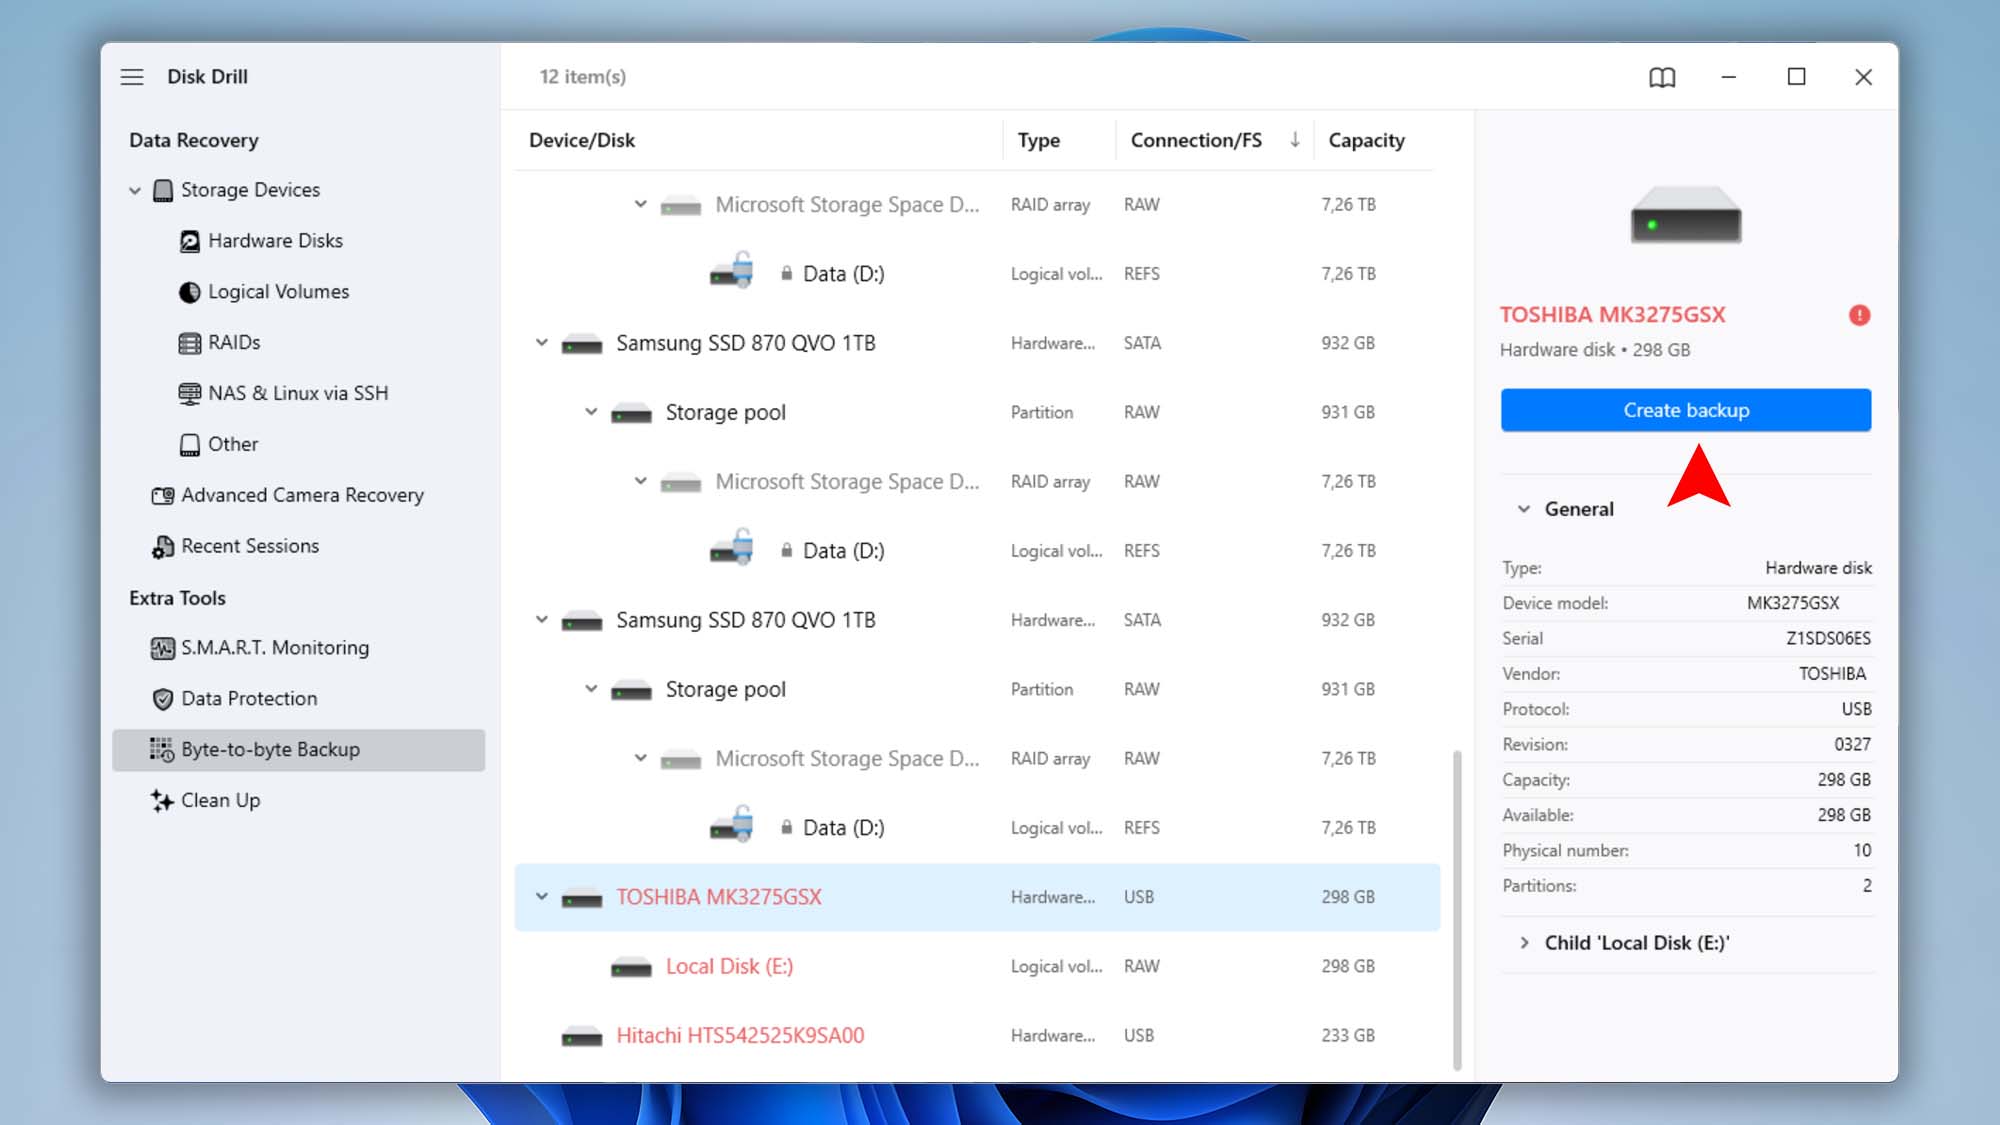
- Select “Byte-to-byte Backup” from the “Extra Tools” menu in the left panel.
- You will now be presented with the disks that are available to be backed up into a disk image. Select the disk you need to back up and click the “Create backup” button. We recommend backing up the whole drive.
- Choose a name and location for the DMG file to be saved at. There is also an advanced option that lets you choose the start and end positions for the backup image. You can configure this setting either in sectors or bytes, which is especially helpful if you’re an IT professional and already know the specific area of the drive containing the data you need.
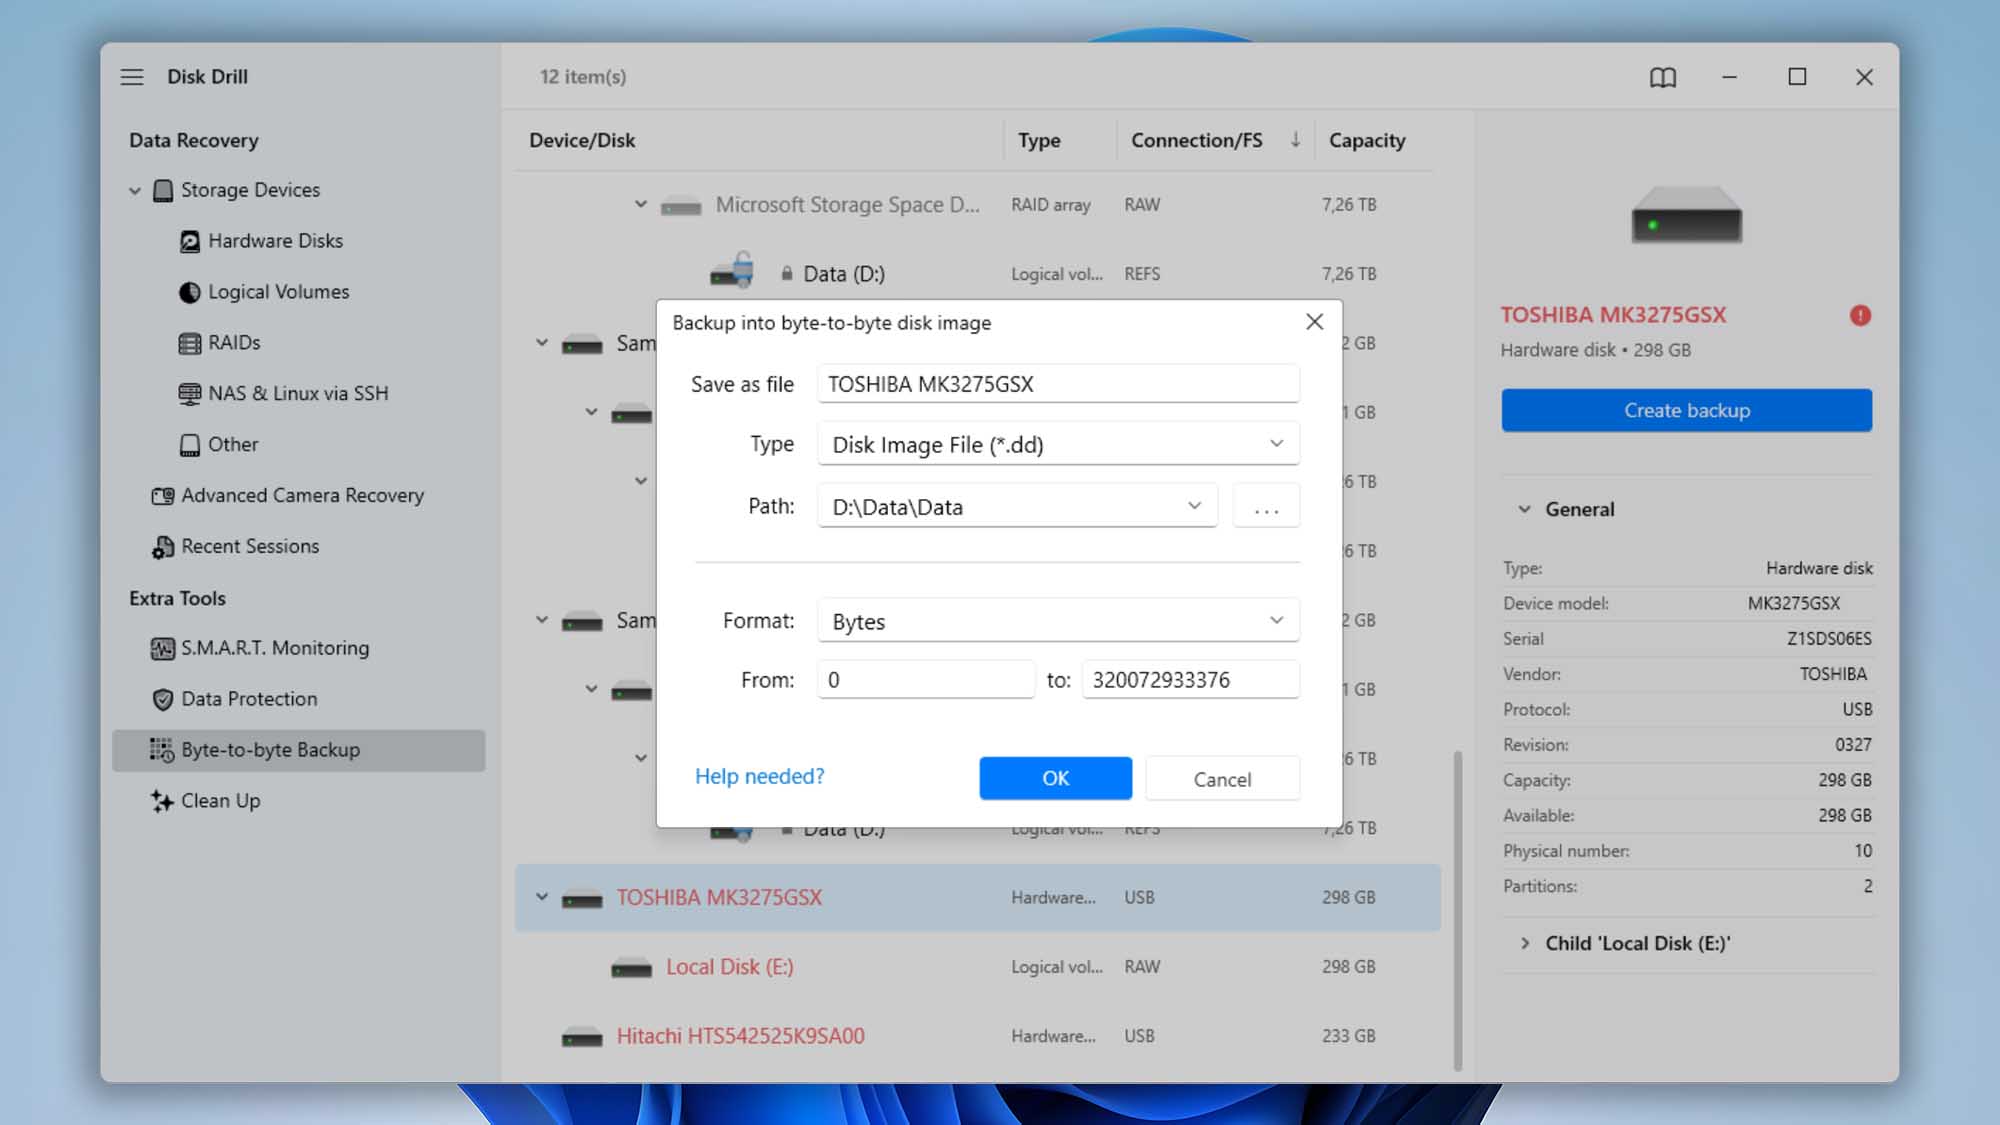 💡 Note: Make sure to choose a destination disk that has more space than the disk you are backing up. Having a destination disk of the same size as the source one isn’t enough, because the file system stores internal metadata on the disk—even if you can’t see it—which requires some additional space. For example, if you’re backing up a 3 TB disk, we recommend at least 3.1 TB of available space on the destination device. A good rule of thumb is to have around 5–10% extra disk space beyond the original disk size. Additionally, we recommend formatting the destination disk using a file system native to your operating system, such as APFS or HFS+ for macOS and NTFS or ReFS for Windows, to ensure optimal performance and reliability during backup and recovery processes.
 - Click the “Save” button in the macOS version of Disk Drill or “OK” in the Windows version to start your backup. Once initiated, Step 1 will begin, during which Disk Drill will read all accessible data and mark any damaged or bad sectors on the disk. You’ll then see a status screen similar to this:
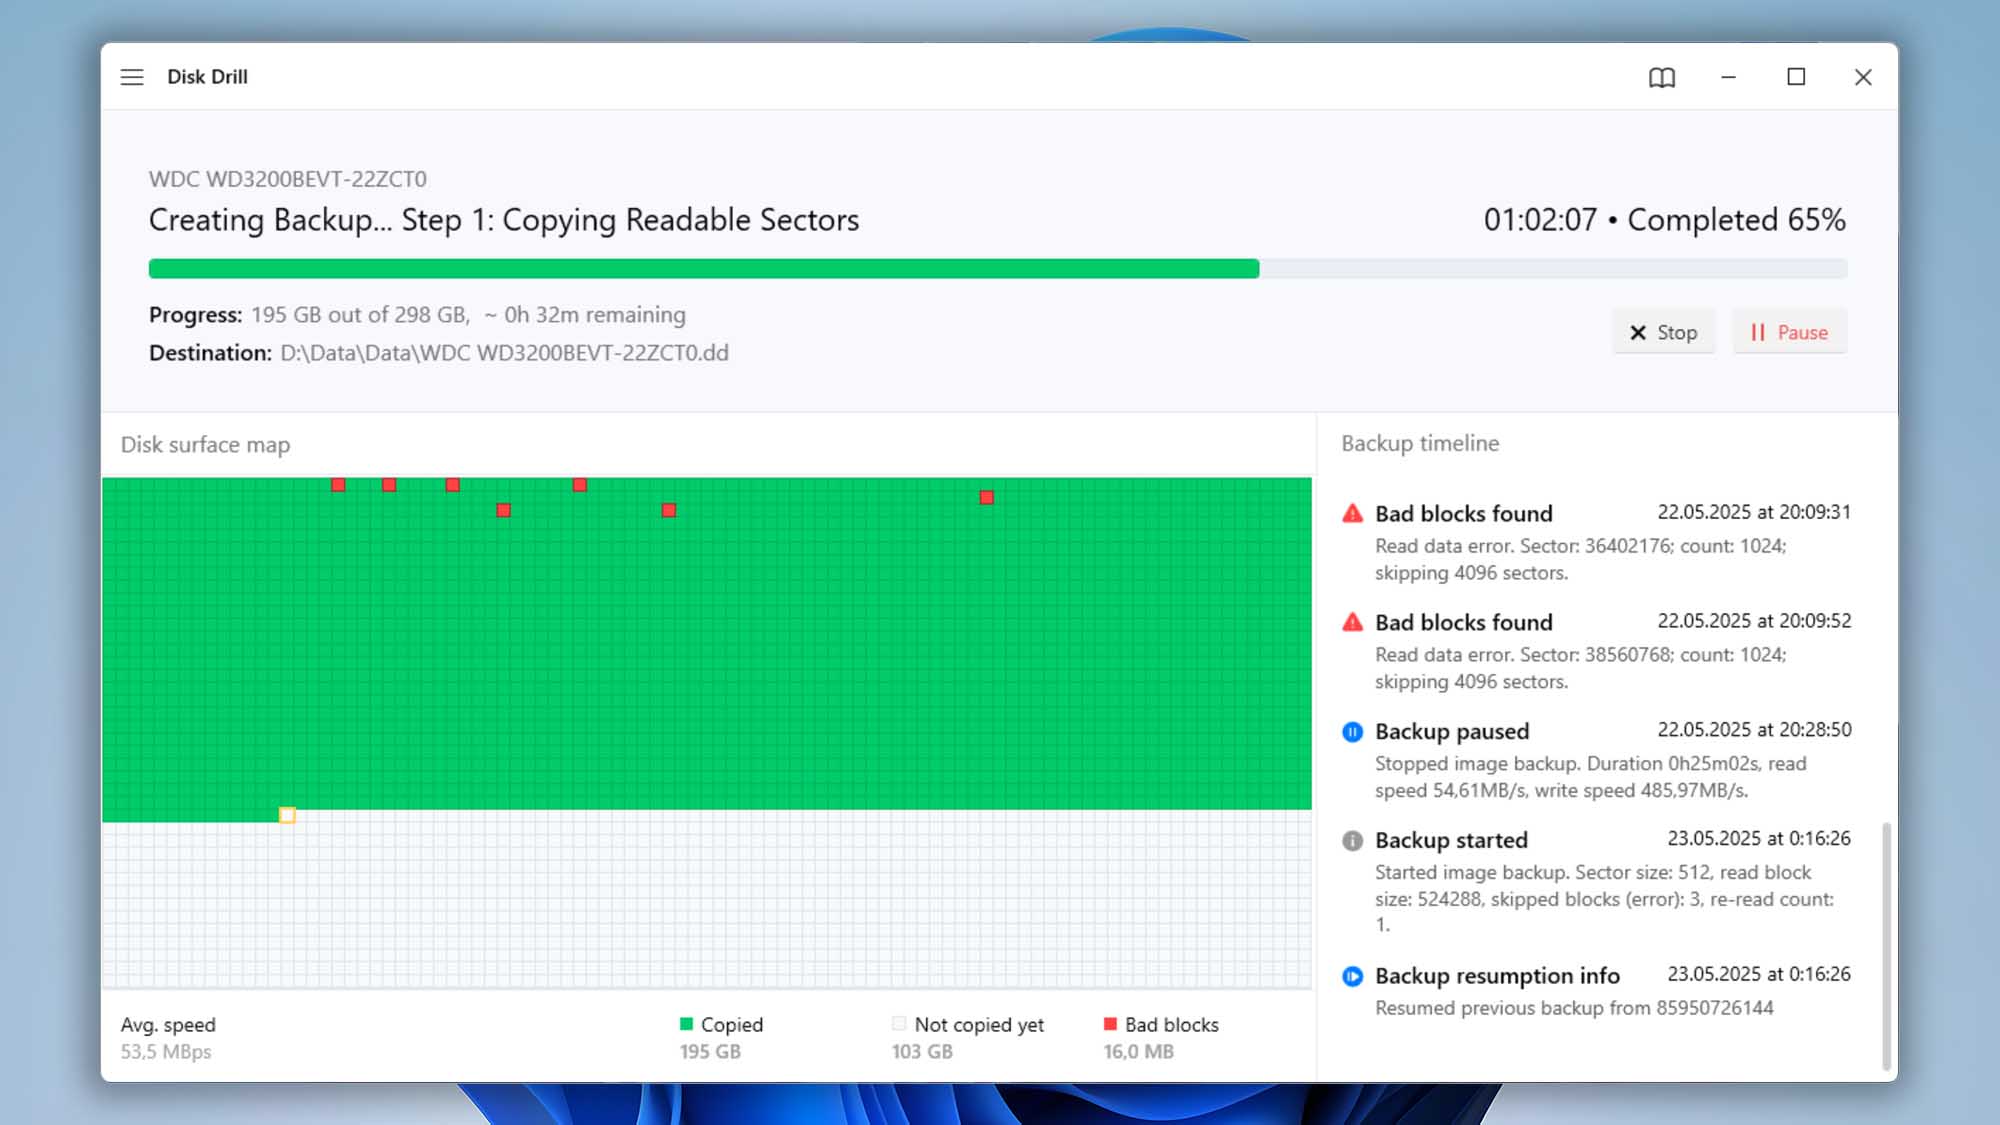 Disk surface map legend:
– 🟩 Green blocks indicate data that was successfully copied;
– 🟥 Red blocks represent sectors with read errors, commonly known as bad blocks;
– ⬜ Gray blocks indicate areas of the disk that haven’t been copied yet. - If the drive being copied accidentally disconnects on its own during the backup process, Disk Drill will automatically resume the backup every time the drive comes back online. If the process is too slow, or the disconnects are too frequent, the drive is probably in a worse condition than assessed before. As mentioned before, you should consider reaching out to a data recovery center.
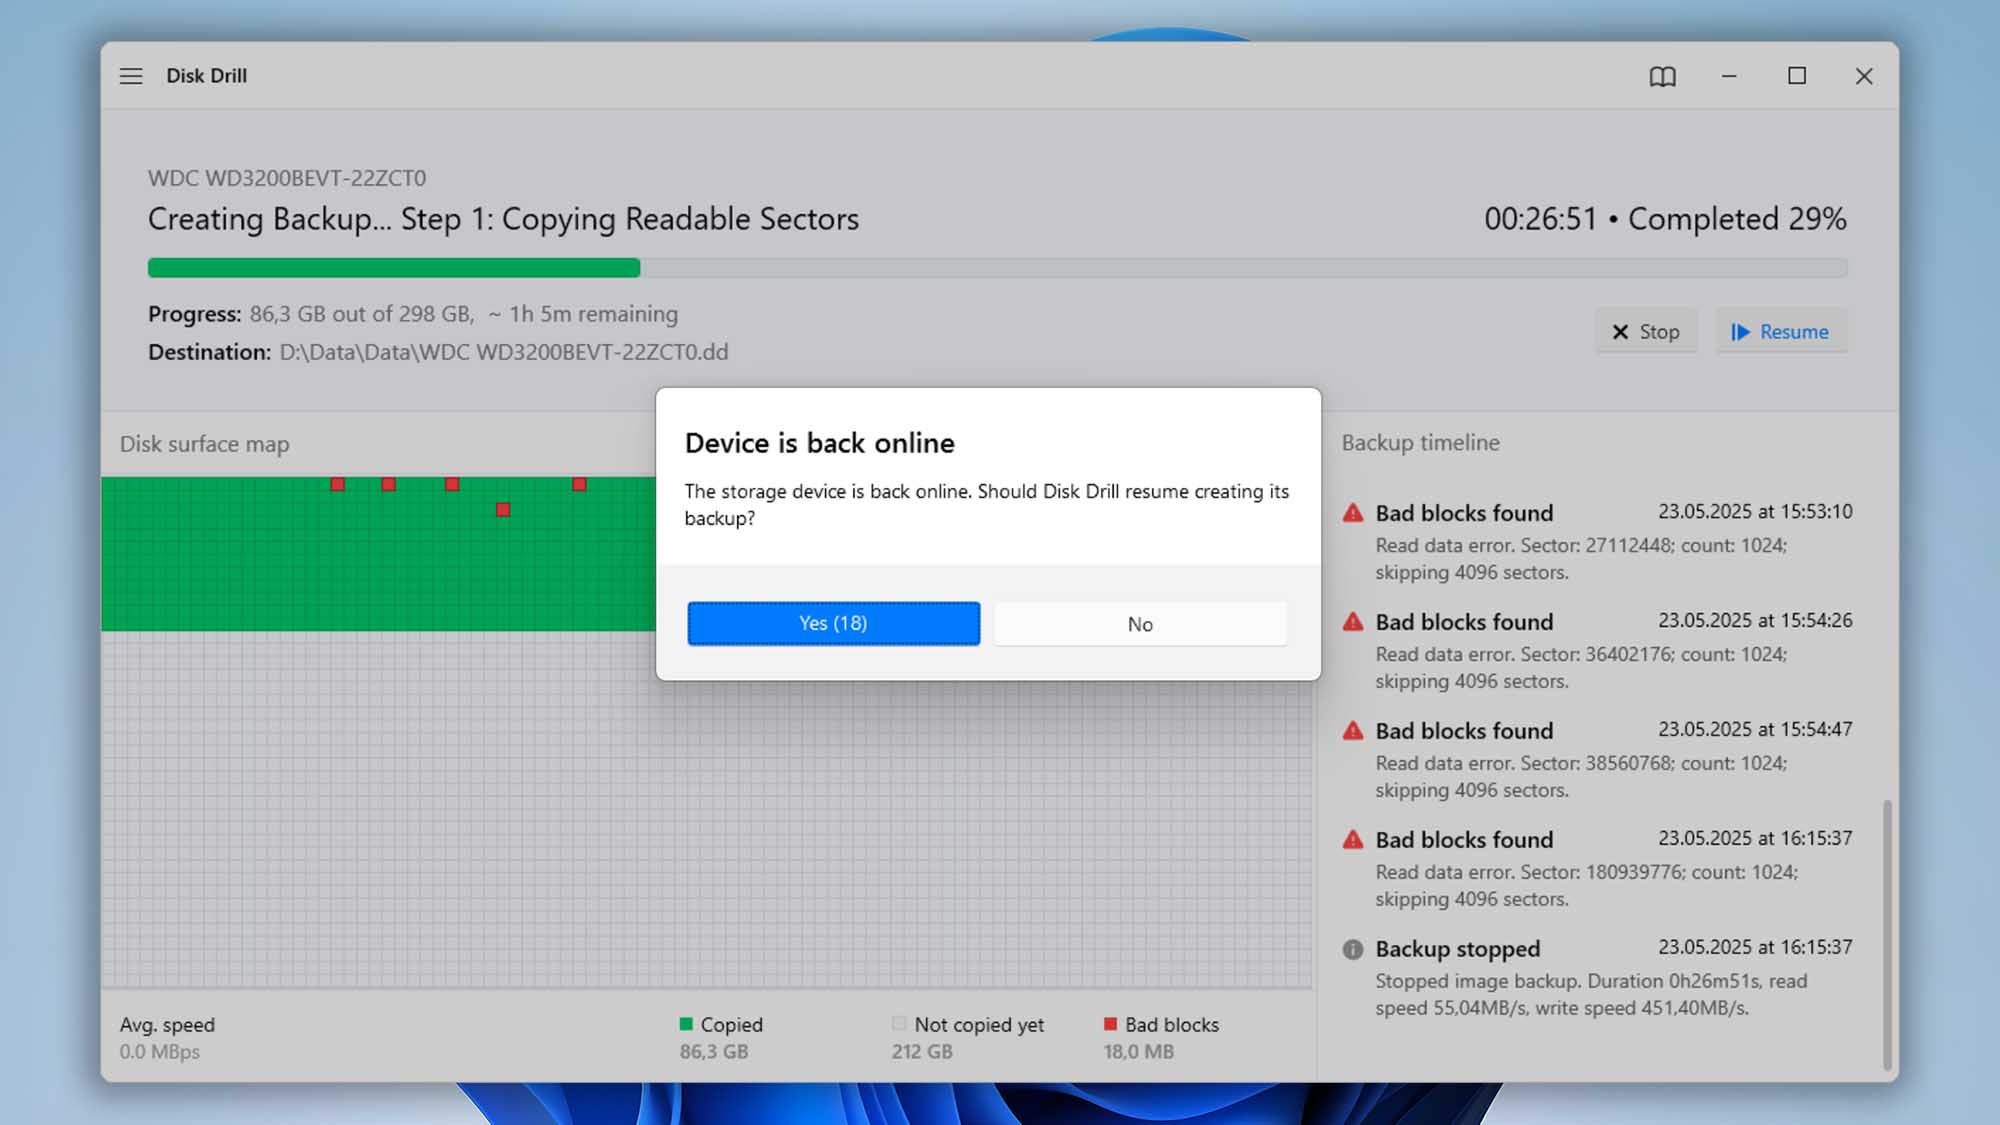 💡 Note: If you’re using specialized hardware tools like a USB Stabilizer, which manage the power supply to the drive and attempt to reboot it in case of a freeze, you’ll need to monitor the drive status manually. Disk Drill will notify you if the drive disconnects from the system. If it doesn’t reconnect automatically within about 5 minutes, you’ll need to manually cycle the power or unplug and replug the drive into the computer’s USB port.
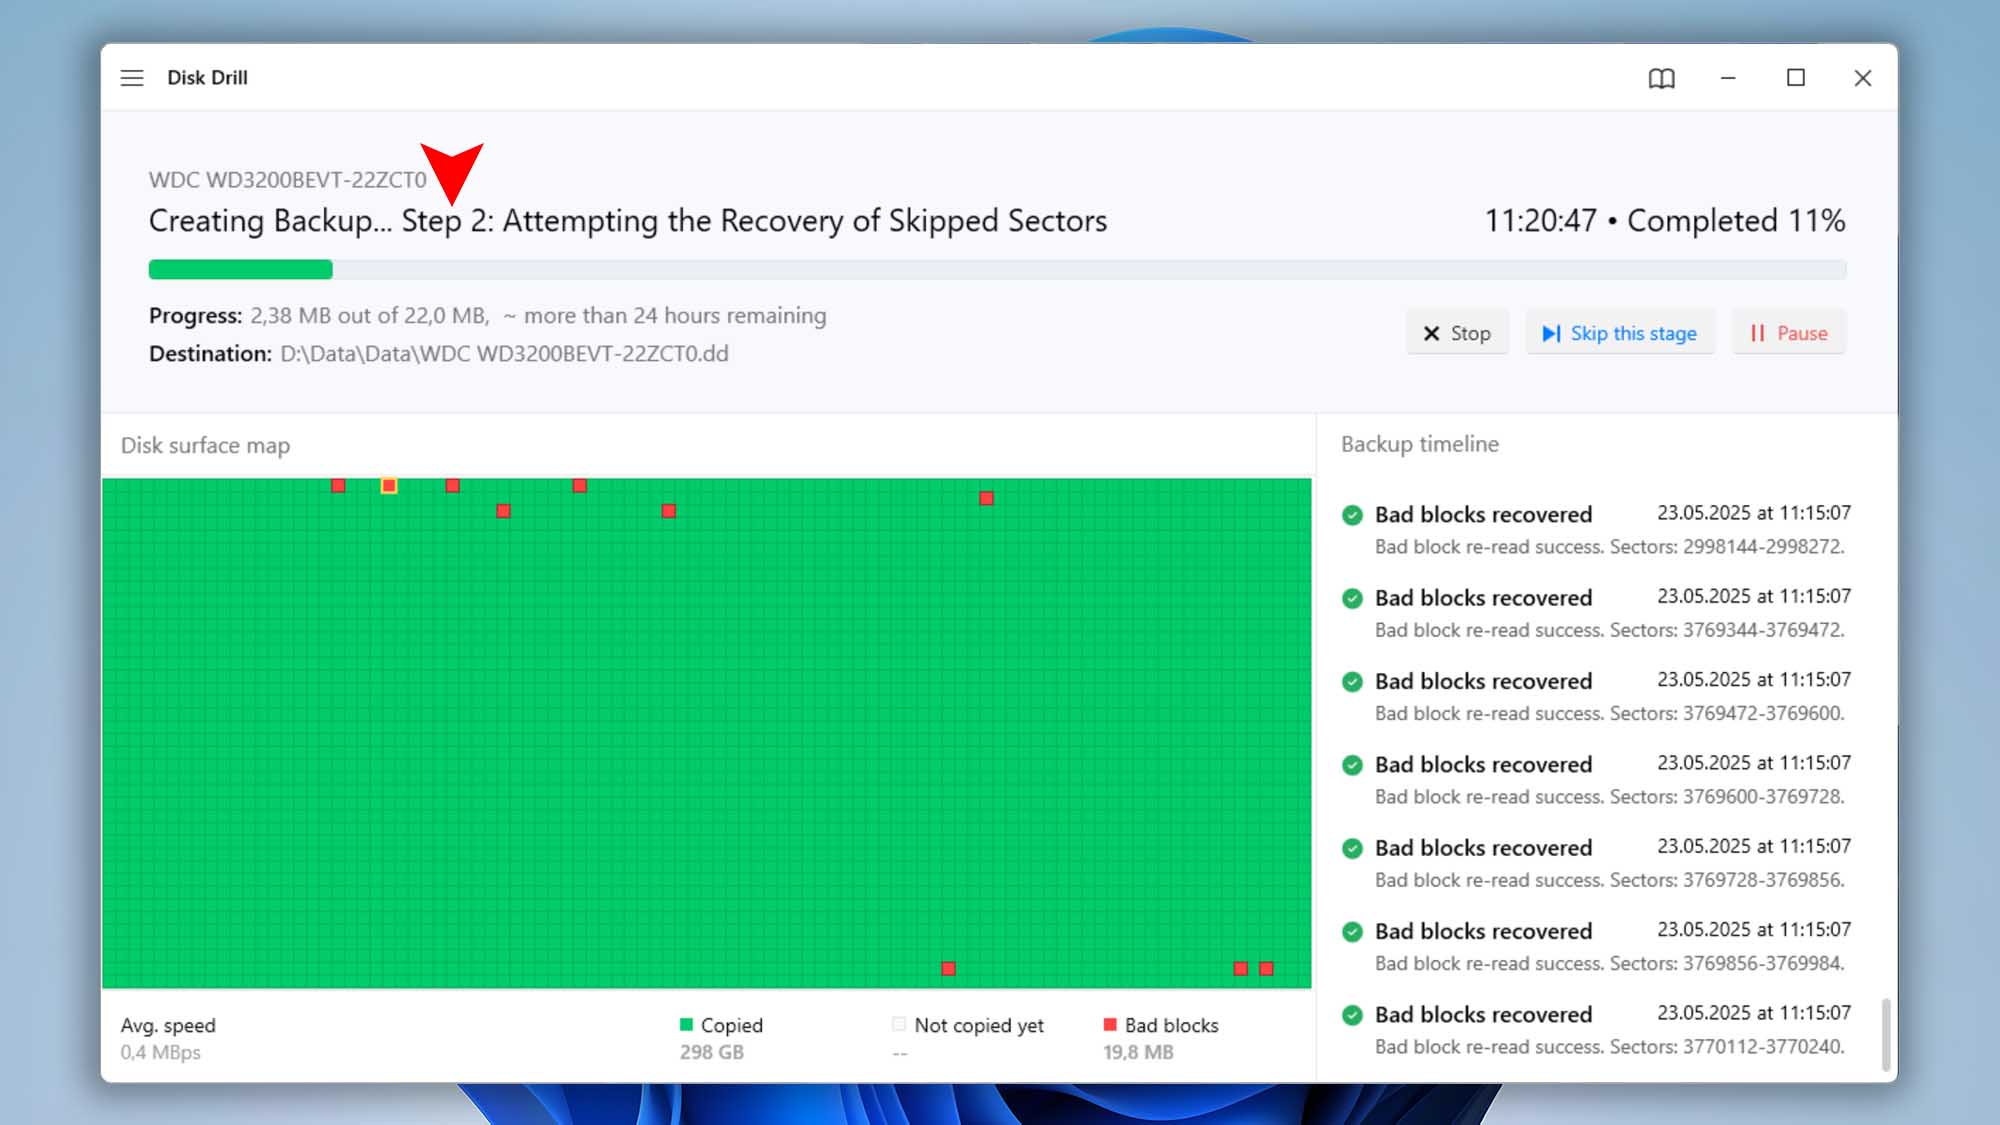
 - From Step 2 through Step 9, Disk Drill will attempt to re-read data from damaged areas or skip over them if recovery isn’t possible. This stage can be time-consuming, but it’s crucial for recovering files from bad sectors. If you prefer to move forward without this process, simply click the “Skip this stage” button.
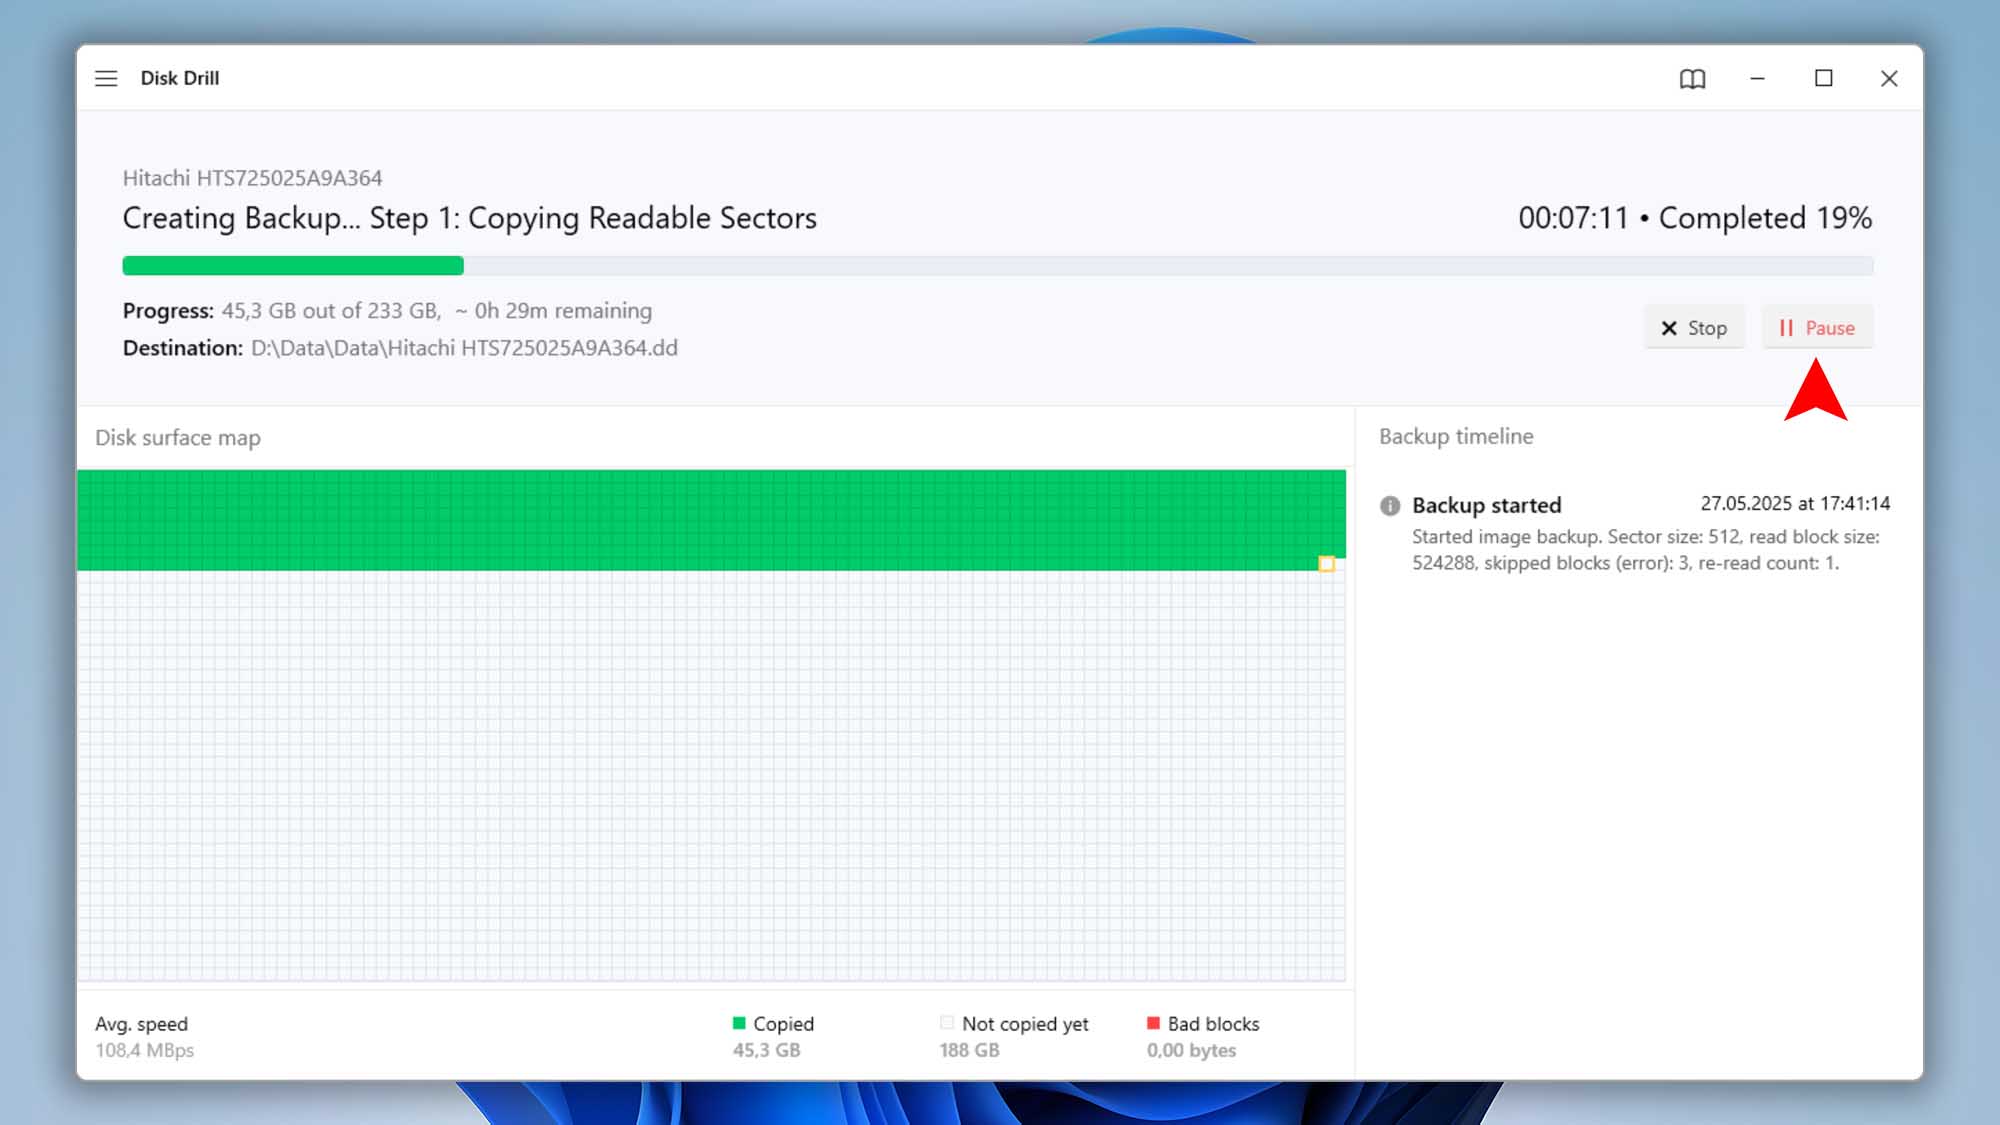
- The backup process can be paused and resumed at any time by clicking the appropriate button. This feature is especially helpful if you need to prevent your drive from overheating or if you want to continue the backup at a later time without starting over.
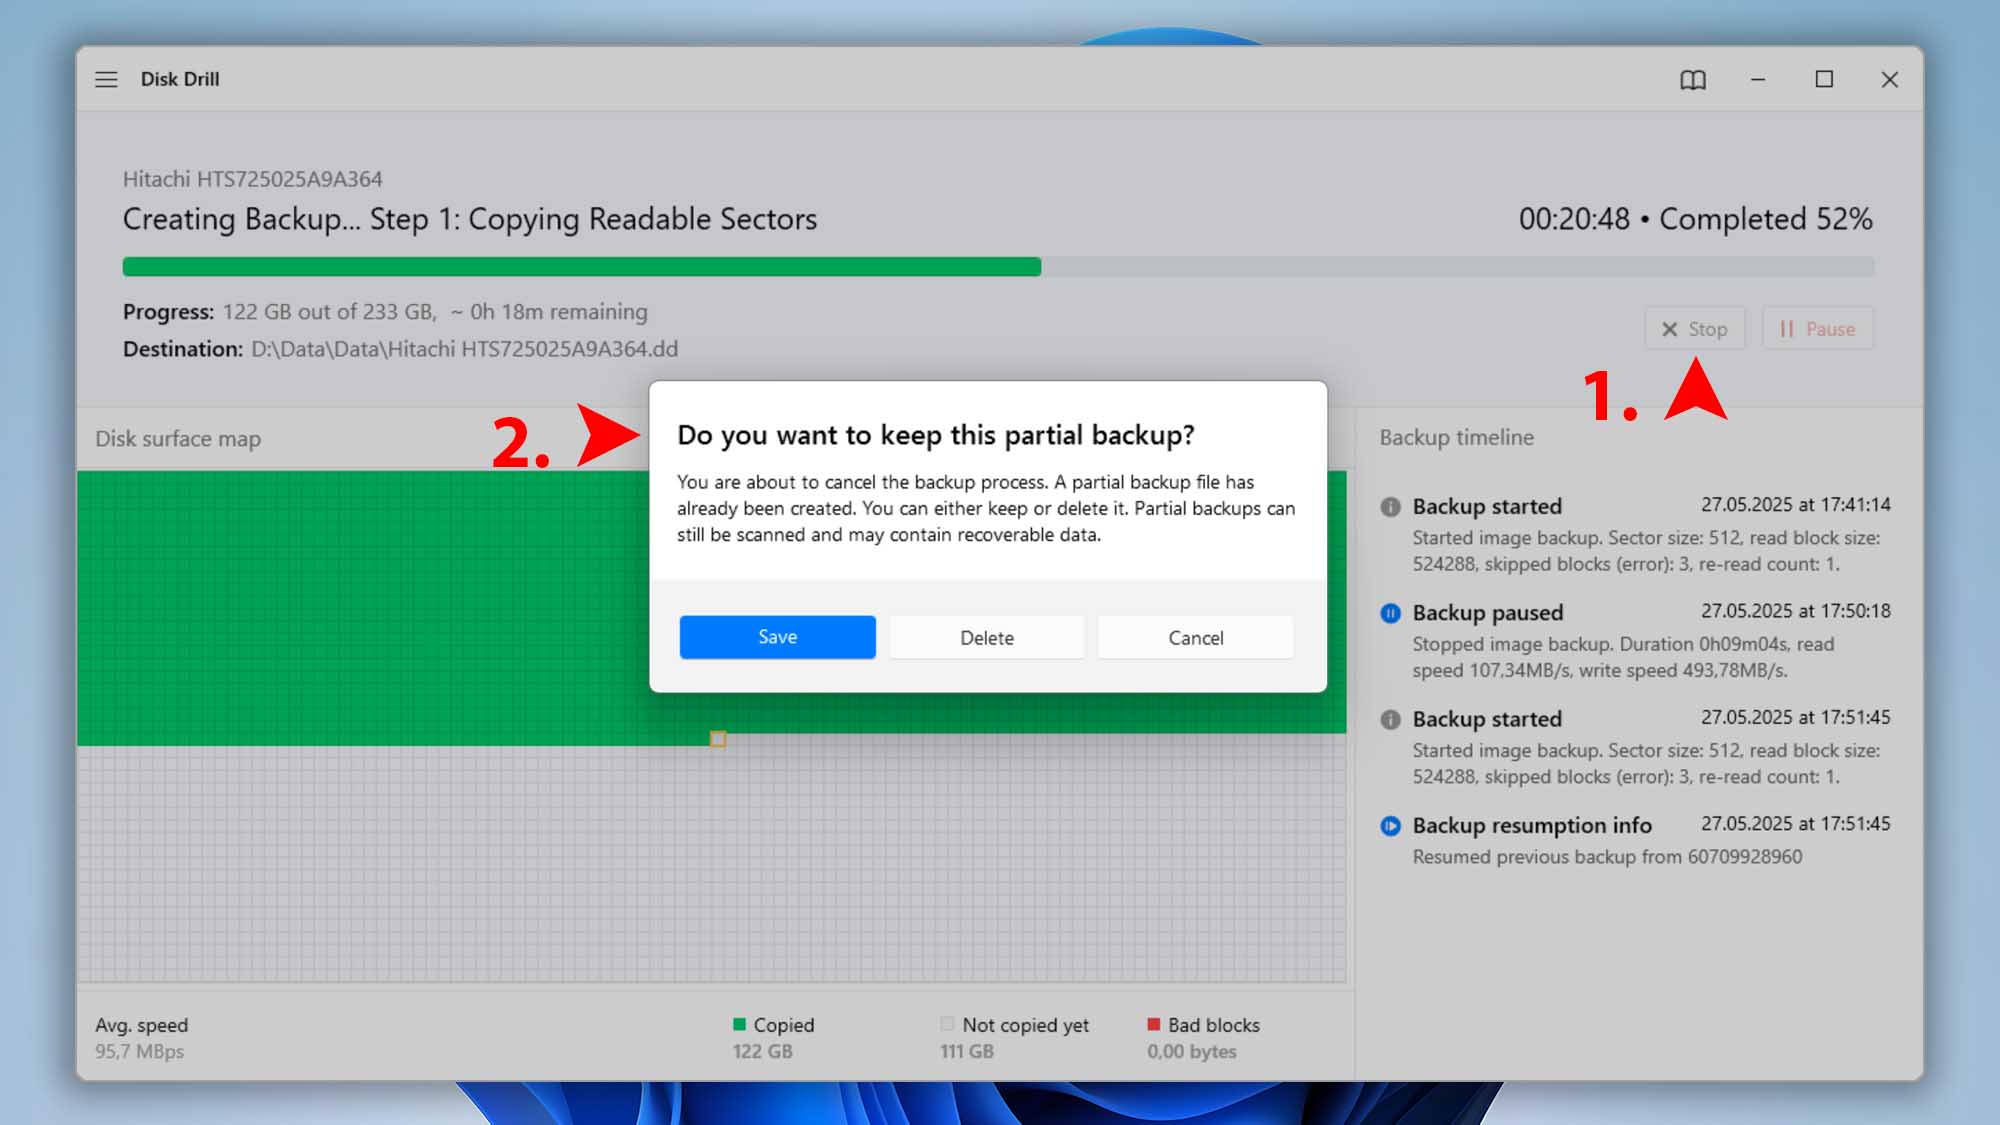
- If you want to save a partial backup and resume the process later, follow these steps:
- First, stop the backup process by clicking the “Stop” button. Then, click the “Save” button to store your partial backup file, so you can safely resume the process later without losing any progress.
- To resume the backup later, select the same disk you were backing up from the list, click “Create backup” again, and make sure to use the same settings as before (Steps 4 and 5).
- When prompted, choose the “Append” option to continue the backup from where it left off last time—without duplicating any previously saved data.
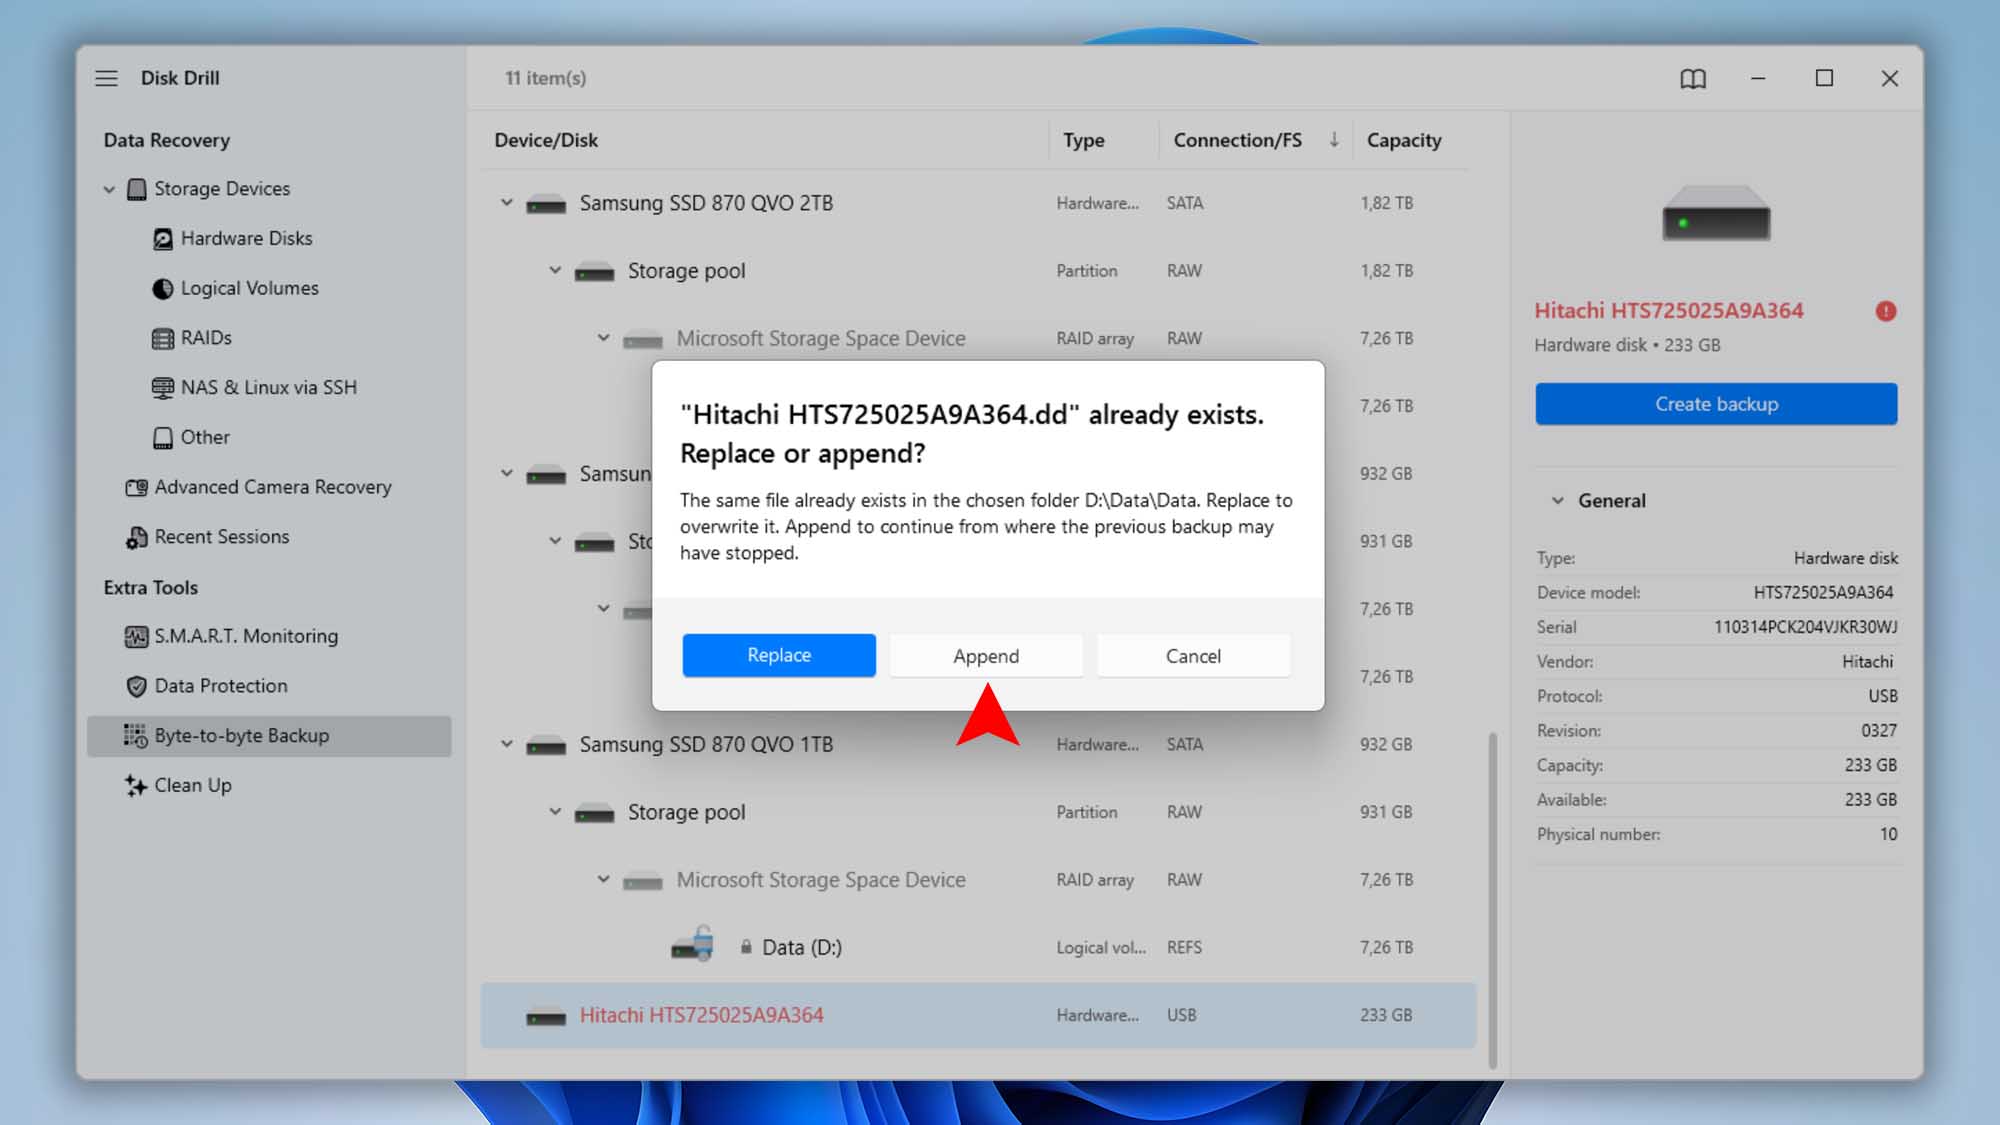 The Append feature only works with full‑drive (entire‑drive) backups. If you’re creating a partial backup, Append isn’t supported.
- First, stop the backup process by clicking the “Stop” button. Then, click the “Save” button to store your partial backup file, so you can safely resume the process later without losing any progress.
- Once the backup is complete, you’ll see a detailed summary screen with the following information:
- The amount of data successfully copied, not copied, and affected by bad blocks.
- The number of bad blocks that were successfully recovered.
- Total duration and average speed of the backup process.
- A scrollable timeline of the backup, showing progress and disk activity over time.
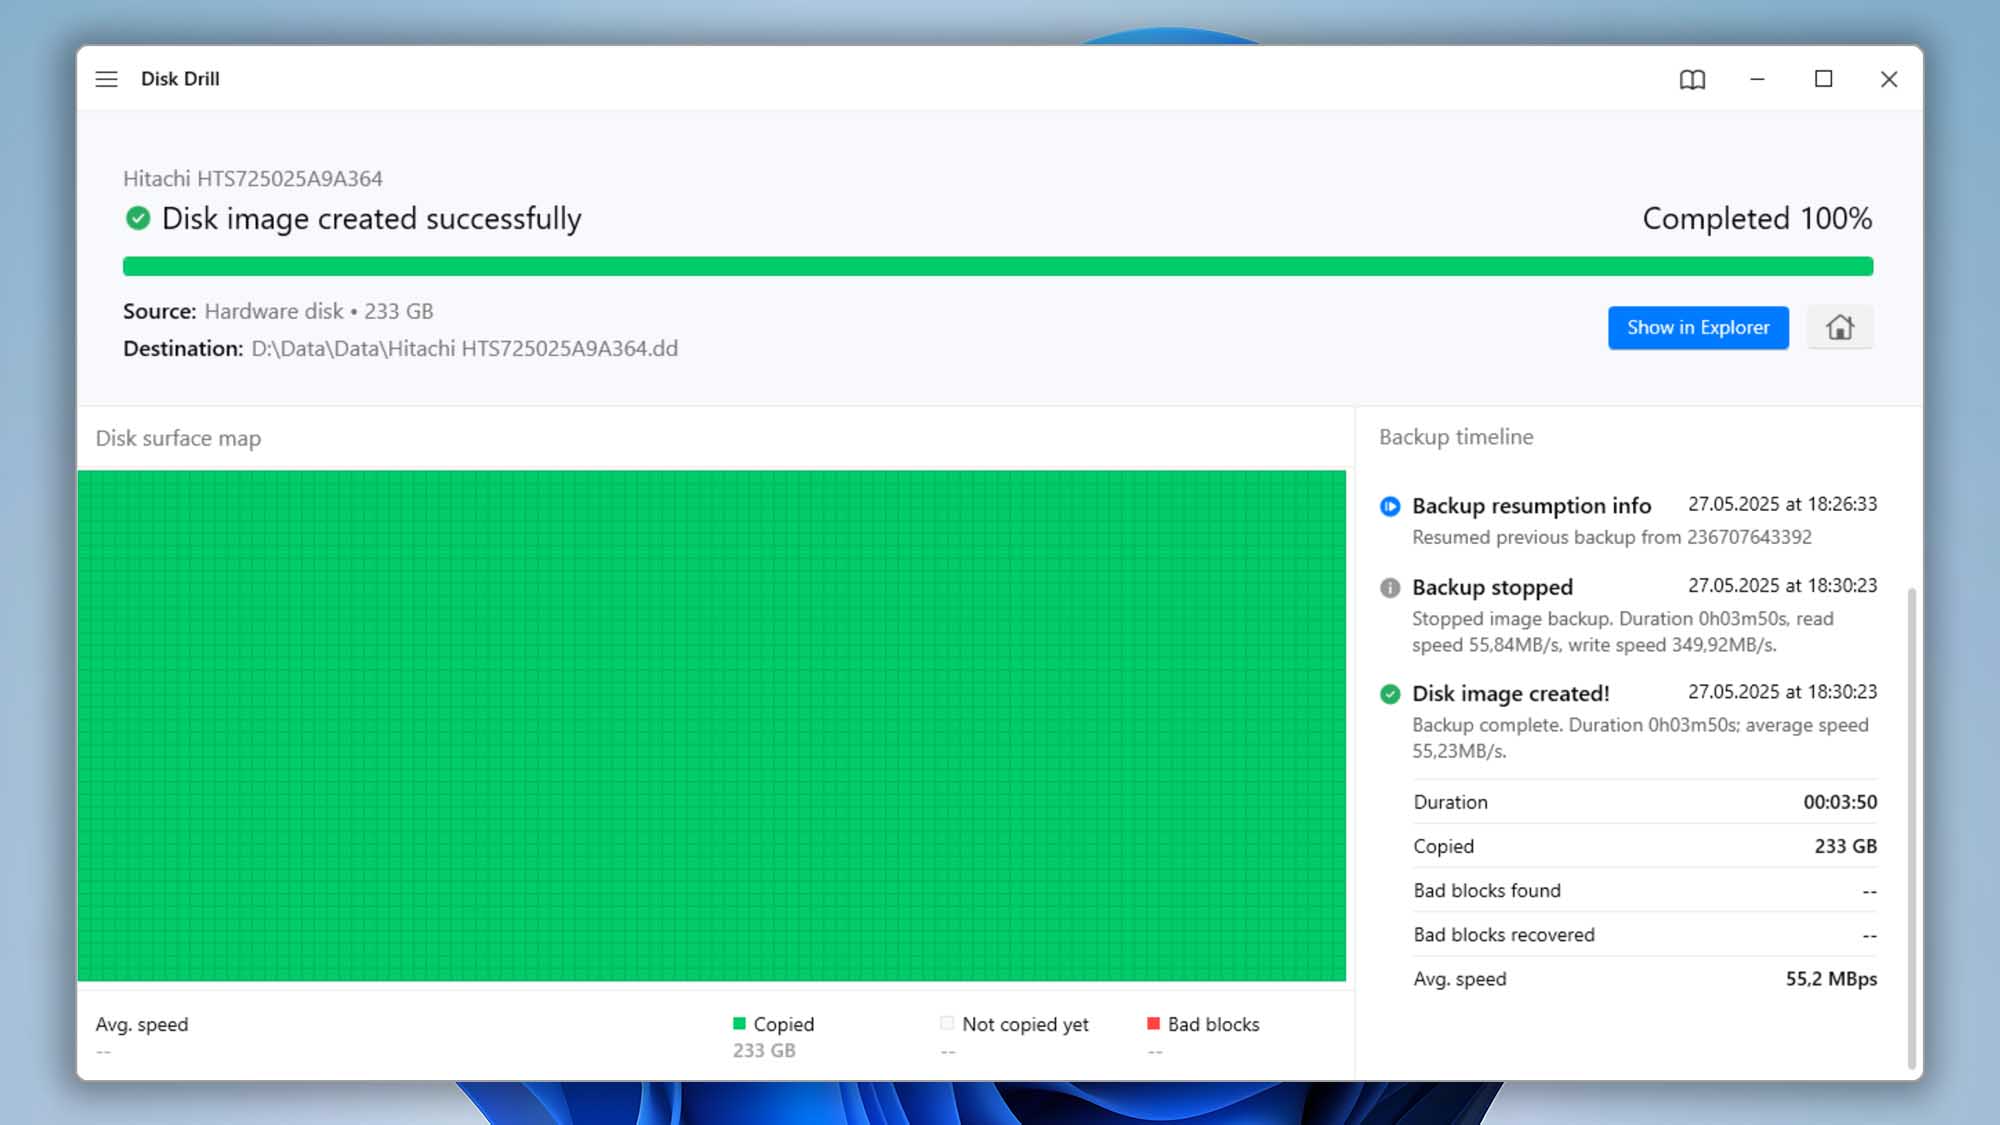 This overview helps you evaluate the reliability of your backup and identify any issues with your drive’s health.
 - At this point you want to eject the original damaged disk that we just copied. Once it’s ejected, go back into Disk Drill and attach the recently created disk image as a source for data recovery. Choose “Storage devices” from the left panel in the “Data Recovery” menu and then select “Attach disk image…” at the very bottom of the app window. Alternatively, you can drag and drop the created DMG file to the Disk Drill window.
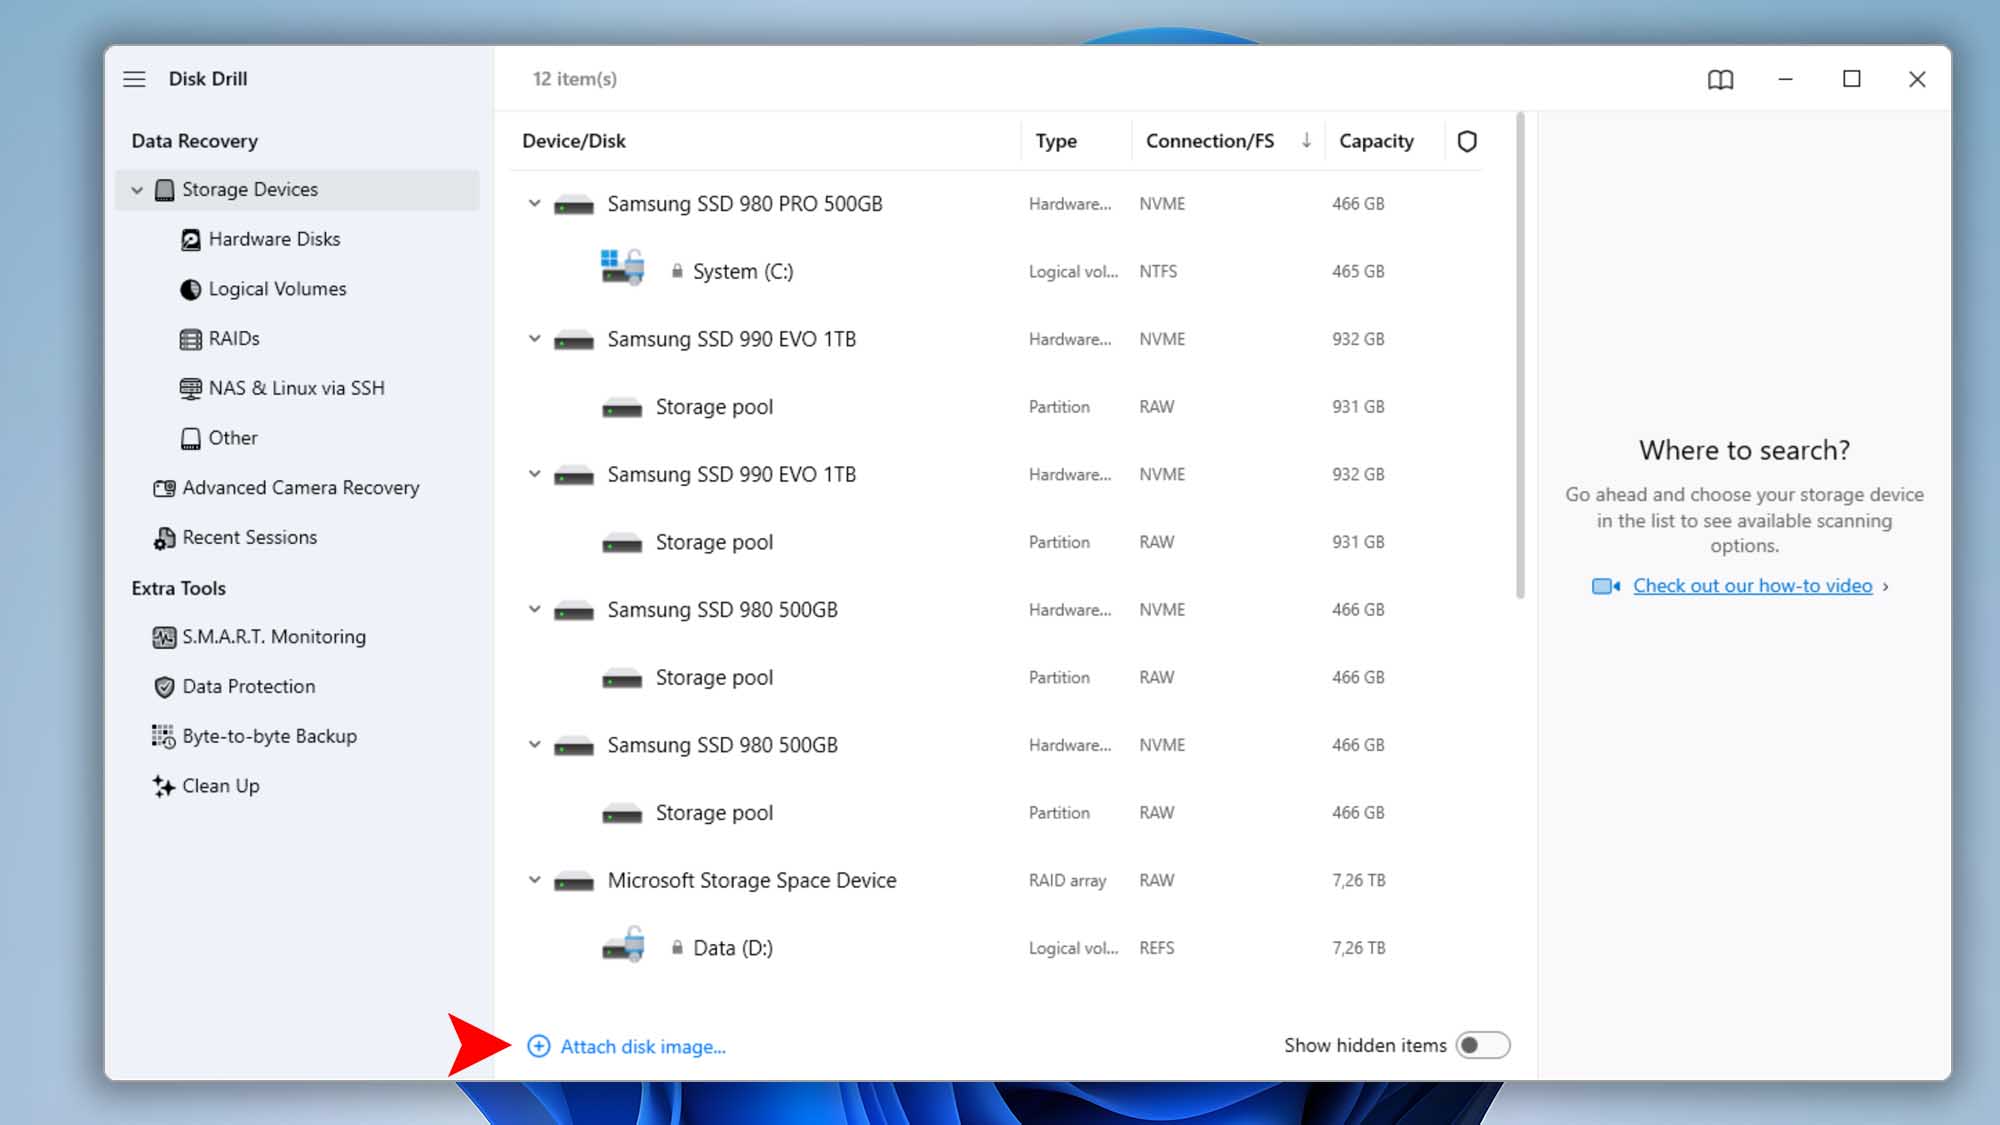
- Select your DMG backup file, then click “Search for lost data” on the right panel to start the recovery process by scanning the disk image. If you’d like to dive deeper into how the scanning process works, click here to learn more.


Using Disk Drill and following this step-by-step tutorial to recover lost files from a binary backup of a damaged or healthy hard drive greatly increases your chances of a successful recovery. By creating a disk image first, you only read the drive once—minimizing wear and tear. All subsequent recovery actions are performed on the image, not the physical drive, reducing the risk of further hardware failure or accidental data overwrites. Disk Drill offers all the tools you need to complete this safe and effective data recovery process in one convenient package.
Advanced Hidden Backup Settings for Power Users
If you’re an advanced user or data recovery professional, Disk Drill offers hidden settings you can fine-tune for even better backup performance. All changes made using these advanced settings are performed at your own risk. Only proceed if you fully understand what you’re doing and the potential implications of these adjustments.
- backupSkipBlocks: 0–128 (Number of blocks to automatically skip after encountering a bad block)
- backupBlockSize: 131072–2097152 (Value in bytes; must align with your drive’s sector size)
- backupRetryCount: 0–10 (Number of additional attempts to read bad blocks. Setting to 0 means Disk Drill will perform only one read attempt.)
How to Adjust Hidden Backup Settings on Windows
Before making these adjustments, ensure Disk Drill is completely closed and not running in the background. Settings must only be changed when the program is not running.
- Press Win + R, type regedit.exe, and press Enter.
- In Registry Editor, navigate to:
HKEY_CURRENT_USER\Software\CleverFiles\Disk Drill\Settings - Right-click in the right pane, select New → DWORD (32-bit) Value, and name it
backupSkipBlocks,backupBlockSize, orbackupRetryCountaccordingly. - Double-click the newly created value and enter your desired setting (within the specified range).
- To undo any changes, right-click the value and select Delete.
How to Adjust Hidden Backup Settings on Mac
Before adjusting these settings, make sure Disk Drill is completely closed and not running in the background. Changes must be done while the program is fully exited.
- Open Terminal.app.
- Enter the following command and press Enter:
defaults write com.cleverfiles.DiskDrill VALUE1 -int VALUE2
Replace VALUE1 withbackupSkipBlocks,backupBlockSize, orbackupRetryCountand VALUE2 with your desired value. - To remove a setting, enter:
defaults delete com.cleverfiles.DiskDrill VALUE1
Replace VALUE1 with the specific setting you wish to delete.
Does Disk Drill for macOS Remember the Bad Blocks Map for a Disk, and How Can This Help?
Yes, Disk Drill automatically saves a comprehensive map of bad blocks after completing a full backup of a problematic disk. This map precisely marks all identified bad sectors.
If you subsequently scan the same original disk, you’ll benefit from the following advantages:
- Skipping Known Bad Sectors: During subsequent scans, Disk Drill automatically bypasses previously identified bad blocks, utilizing the saved map to avoid redundant operations.
- Faster and More Reliable Scans: The disk scan process becomes quicker and more stable, significantly reducing potential issues caused by repeatedly encountering the same damaged sectors.
Disk Drill’s Intelligent Automated Rules for Backing Up Damaged Drives
Disk Drill 6 introduces automated rules specifically designed for reliable backups of drives with bad sectors:
- Automatic Adjustment When Drives Disconnect During Reading:The data block size (the amount of data read at once) is automatically reduced to 64 KB.This adjustment ensures more reliable data retrieval, even if a user previously set a different block size.
- Automatic Block Size for SSH-connected Drives:Disk Drill automatically sets the data block size to 2 MB for drives connected via SSH.
- Handling Bad Sectors Without Manual Registry Changes:If Disk Drill detects bad sectors and the user hasn’t manually adjusted settings via the registry (Windows) or terminal (macOS):
- Disk Drill automatically determines how many retries (5–8 attempts) are required to read problematic sectors.
- Each retry pass reduces the problematic block size by half.
The goal is to gradually decrease the initial block size of 64 KB to match the drive’s smallest sector size (4096 or 512 bytes), maximizing data recovery from surrounding areas.
- Practical Examples:For drives with a sector size of 4096 bytes:
- It takes 5 passes: 64 KB → 32 KB → 16 KB → 8 KB → 4 KB (sector size).
For drives with a sector size of 512 bytes:
- It takes 8 passes: 64 KB → 32 KB → 16 KB → 8 KB → 4 KB → 2 KB → 1 KB → 512 bytes (sector size).
Why Is Backing Up a Bad Disk on macOS Sometimes Slow, and How to Fix It?
Backing up problematic drives on macOS can be notably slow due to the operating system’s instability when handling unreliable storage media—especially on Macs with ARM processors.
Fortunately, there is an effective solution for macOS users: booting into Recovery Mode.
Use the following command in Recovery Mode to load a minimal macOS environment optimized for stable and glitch-free backups with Disk Drill 6:
sh <(curl http://www.cleverfiles.com/bootmode/boot.xml)
This approach ensures a smooth and stable backup process by minimizing the performance issues typical to regular macOS environments.
💡 Important Note for macOS Users! When performing backups in Recovery Mode, Mac computers may enter sleep mode during extended backup processes. To prevent interruptions, periodically check your Mac to ensure it remains awake throughout the backup.