During a scan, Disk Drill’s data‑recovery power engine may temporarily flag certain sectors as bad (also called bad blocks) when repeated read attempts fail. This helps keep the scan fast by skipping unstable areas that would otherwise stall progress. These flags exist only inside Disk Drill—they don’t modify your drive—and you can clear them at any time to rescan those sectors for additional data. This approach is especially useful when you’re trying to recover sensitive files from lightly damaged regions of a hard drive or SSD. For details and step‑by‑step instructions, see our guide to managing bad sectors in Disk Drill.
What Are “Bad Blocks” (Bad Sectors)?
At the media level, a bad sector is a logical block address (LBA) the drive can’t read reliably anymore. Bad sectors are often categorized as:
- Hard/physical: irreversible media damage (platter defects, NAND cell wear).
- Soft/logical: data in the sector exceeds ECC correction limits or metadata is inconsistent; a later rewrite may succeed or trigger hardware remap.
Modern disks keep spares and remap failing sectors on write, tracking health through S.M.A.R.T. attributes such as Reallocated Sectors (ID 5), Current Pending (ID 197), and Uncorrectable (ID 198)—rising values tend to increase failure probability and warrant immediate backup.
Why they happen
- Media wear or head/media contact (HDD)
- Program/erase wear and weak cells (SSD)
- Power loss during writes
- Cable/port issues causing persistent CRC errors
- Latent defects that the drive’s firmware can’t remap automatically
What Are “Slow Read Blocks”?
A slow read block is an area that technically returns data but only after multiple ECC corrections and internal retries, which looks like multi‑second stalls during scans or imaging. These regions frequently precede fully unreadable sectors and can grind recovery to a halt. Disk Drill’s Byte‑to‑Byte Backup can skip slow zones so you can finalize an image without waiting days for marginal areas; you can revisit those zones later if needed.
Why slow blocks matter
- They drag scans to a crawl, because the scanner waits through retry cycles.
- They increase thermal and mechanical stress on a marginal device.
- They waste recovery time that could be used to extract still-healthy data first.
How Disk Drill (macOS) Manages Bad Blocks Under the Hood
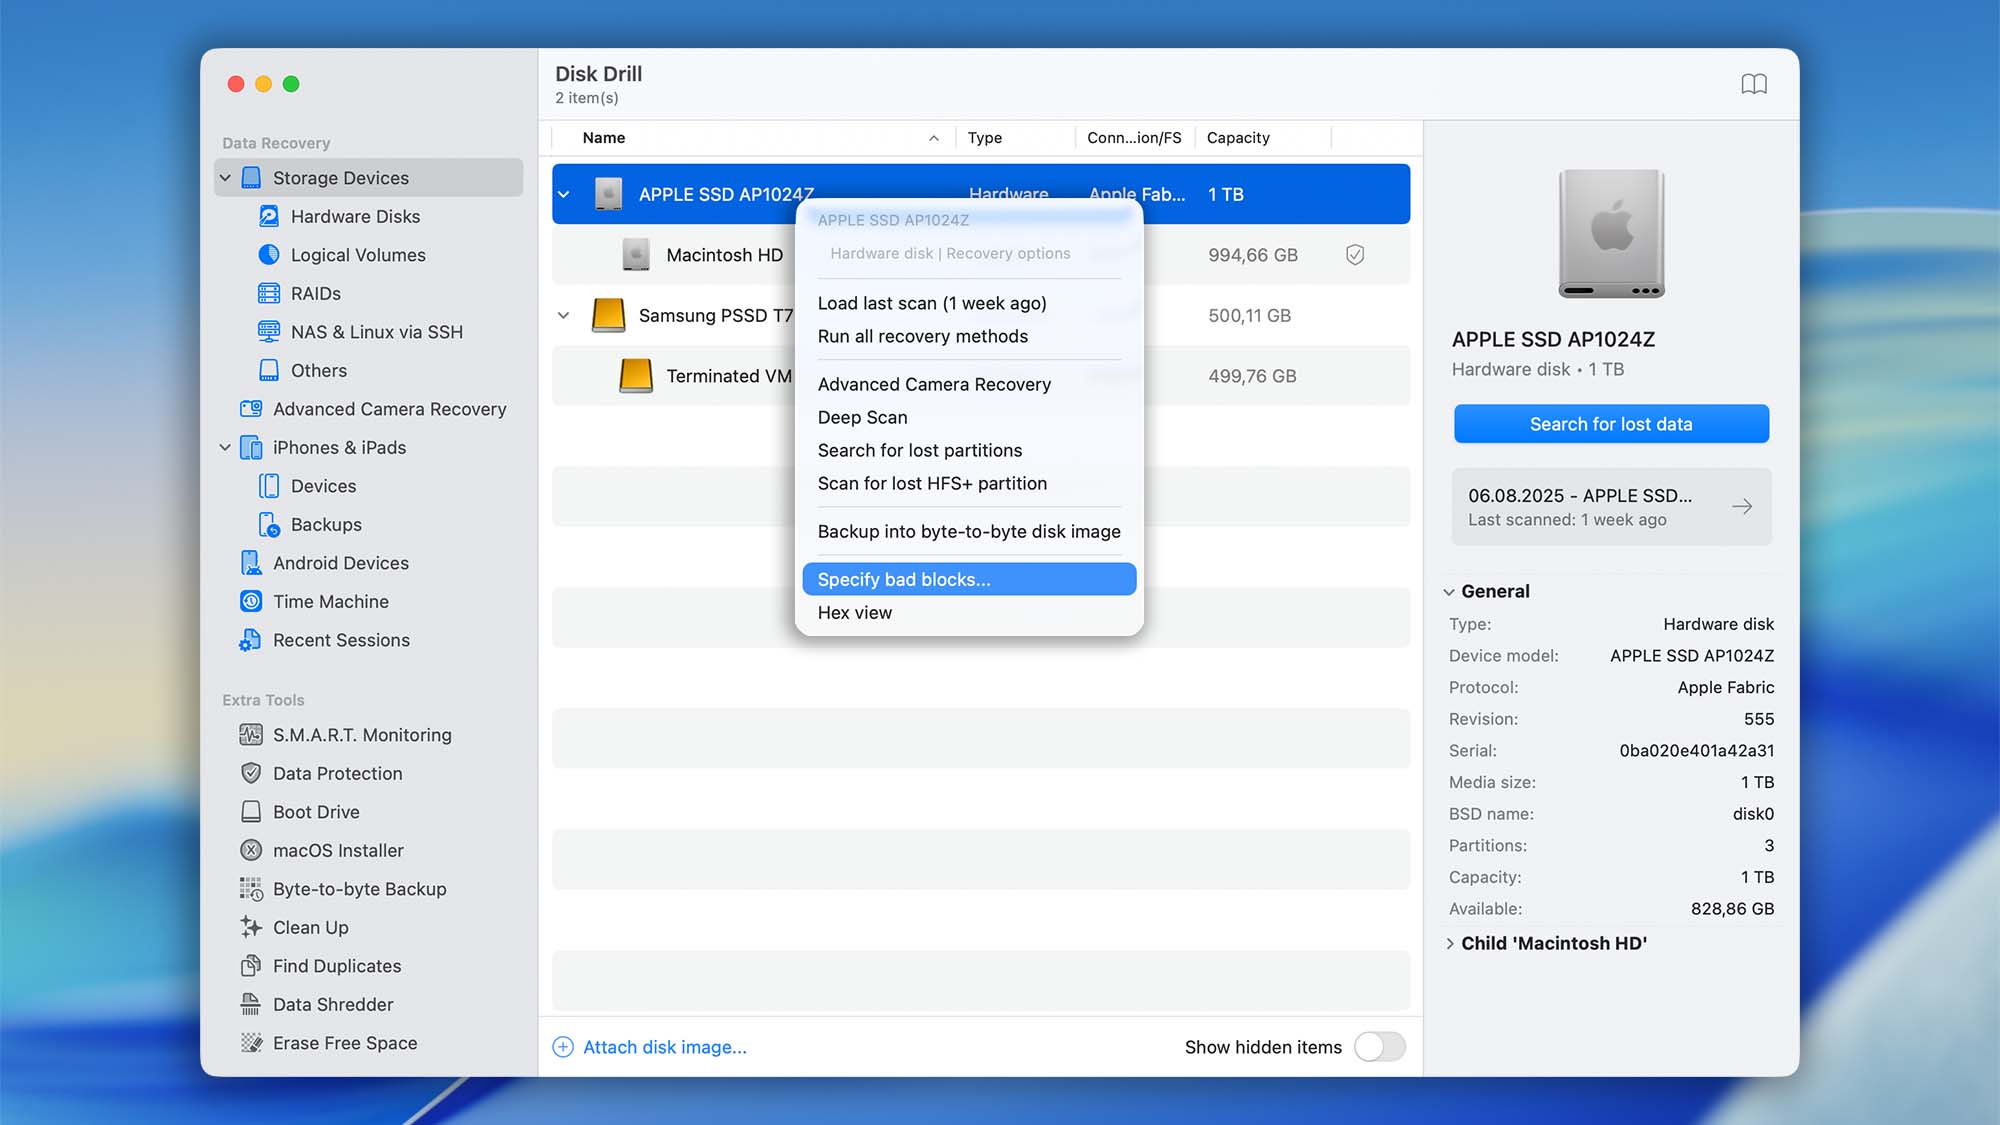
Уou can always manually set memory sectors (or blocks) on your storage device as “bad” in Disk Drill following to “Сontext menu” -> “Specify bad blocks” on your device. Or vice versa, you can always manually remove the previous marks set by you or by Disk Drill automatically.
Disk Drill’s scanning engine uses a non‑destructive, software‑only bad‑block map to keep recovery efficient:
- On the first failed read, the sector is marked as a candidate;
- If a second attempt also fails, it’s recorded as bad inside Disk Drill; subsequent scans skip these addresses to avoid thrashing;
- When Disk Drill hits consecutive problematic sectors, it may mark ahead (a larger range) to regain scanning speed.
💡 Tip: These marks live inside Disk Drill only (not on the disk) and are fully reversible.
How the Bad Blocks Editor Works
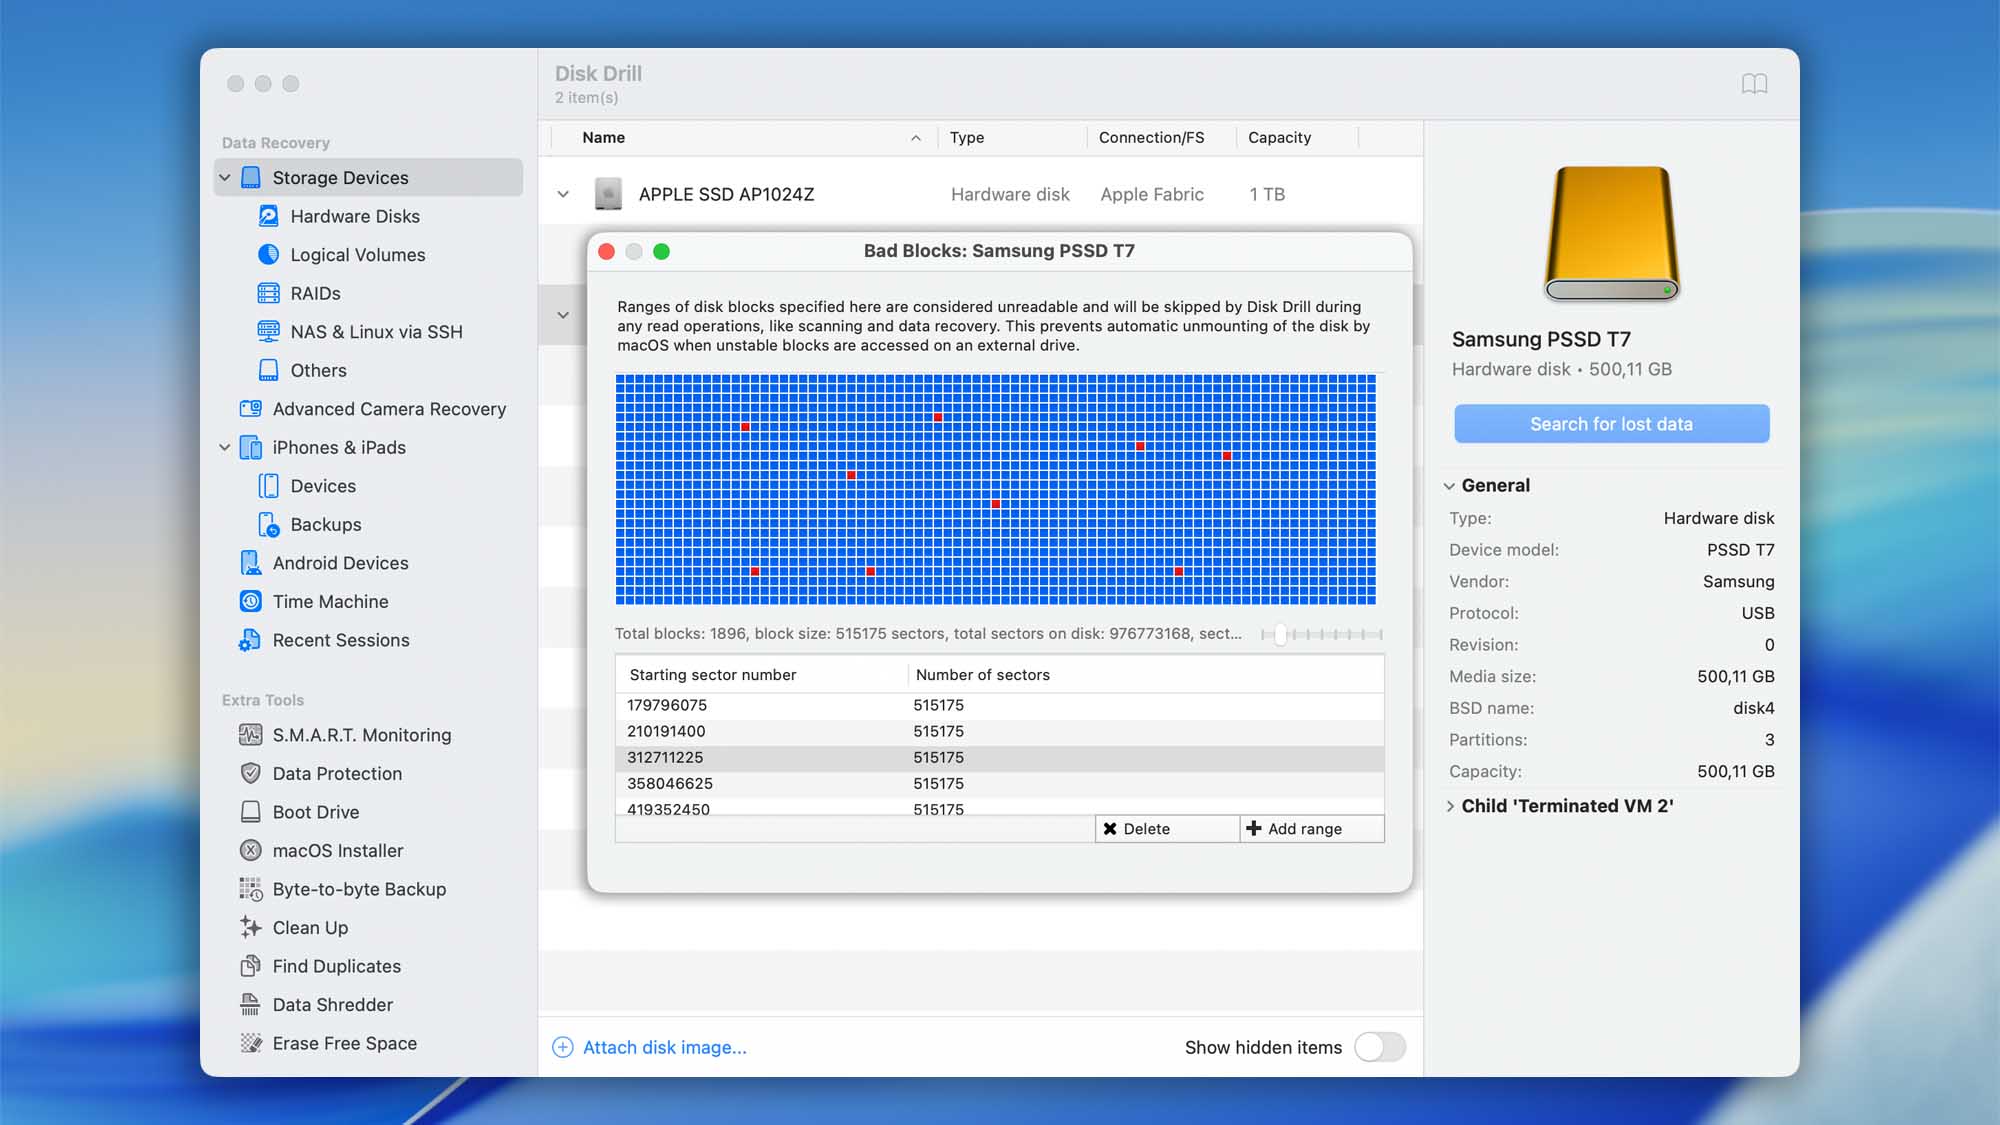
The Bad Blocks editor lets you tell Disk Drill which parts of a drive to skip during scans, imaging, and recovery. The blue grid represents the whole disk; red squares are ranges you’ve flagged as unreadable. These flags are non‑destructive—they live only inside Disk Drill—so you can remove them anytime and try those sectors again. This manual control is available in Disk Drill for macOS.
Key controls at a glance
- Click on the grid – Instantly adds a bad block at the clicked location. Use this for quick, surgical marks when you notice problem spots.
- Add range – Opens a dialog where you enter a Starting sector number and Number of sectors to mark a wide span (great for slow‑read regions or large unstable areas).
- Delete – Select a row in the table and click Delete to remove that range from the skip list. This does not erase data; it simply allows Disk Drill to read those sectors again on the next pass.
- Scale slider – Adjusts the zoom/scale of the disk map so you can inspect fine details or get a big‑picture view of bad sectors across the drive.
Once ranges are marked, Disk Drill skips them during read operations (scan, Byte‑to‑Byte backup, and recovery). This speeds things up and helps prevent macOS from unmounting unstable external drives. You can refine the map at any time and rerun the scan for additional data.
Managing Marks: Reset and Rescan Strategy
Disk Drill stores its internal map of bad/slow ranges per device/scan context. You can:
- Keep the map to accelerate future passes and avoid stalls.
- Clear the map before another run to force Disk Drill to try those sectors again. This is useful if the drive has cooled down, if you changed cables/ports, or after a successful disk image that reduced read stress.
The sole purpose of this technique is to prevent endlessly long scans when the storage is lightly damaged or just doesn’t operate properly, which might be a temporary issue. For example: you are scanning your external hard drive, Disk Drill locates bad sectors that don’t read well, and the response from the hardware is so slow it may take days to scan even one megabyte of disk area. Disk Drill, in this case, will mark a few megabytes ahead of the last failed sectors and will proceed with scanning from there. A few sectors are skipped this way, but the chances to gain scanning speed are much higher. If the sectors at the advanced location are still “bad”, Disk Drill will do the same until it reaches the end of the storage area, or the healthy set of sectors.
You may reset Disk Drill’s stored data about bad sectors for a specific hard drive manually at any time by going to its “Specify bad blocks” menu option. This may reset Disk Drill’s alerts for that drive that may be popping out with a red “issues” label. If these alerts return when scanning this drive again, chances are, your drive has real physical issues.
Also, in case you can’t finish your scan due to the scanned drive or storage device (like a memory card) being unexpectedly disconnected (unmounted) when scanning is active, and if it happens at a relatively the same scanning progress (always at 1-2 or 5%, for instance) over and over again, you could try to note the sector number from the last moment when the scan was active. For that, see Disk Drill’s status messages when the scan is running in the following screenshot:

Import/Export Bad Sectors in Disk Drill
Disk Drill for macOS stores your bad‑sectors (bad blocks) maps as hidden files in your user Library. Backing them up lets you preserve skip lists for every drive you’ve worked with; restoring them puts those maps back so scans, imaging, and recovery can use the same exclusions.
Where Disk Drill Stores Bad‑sectors Data
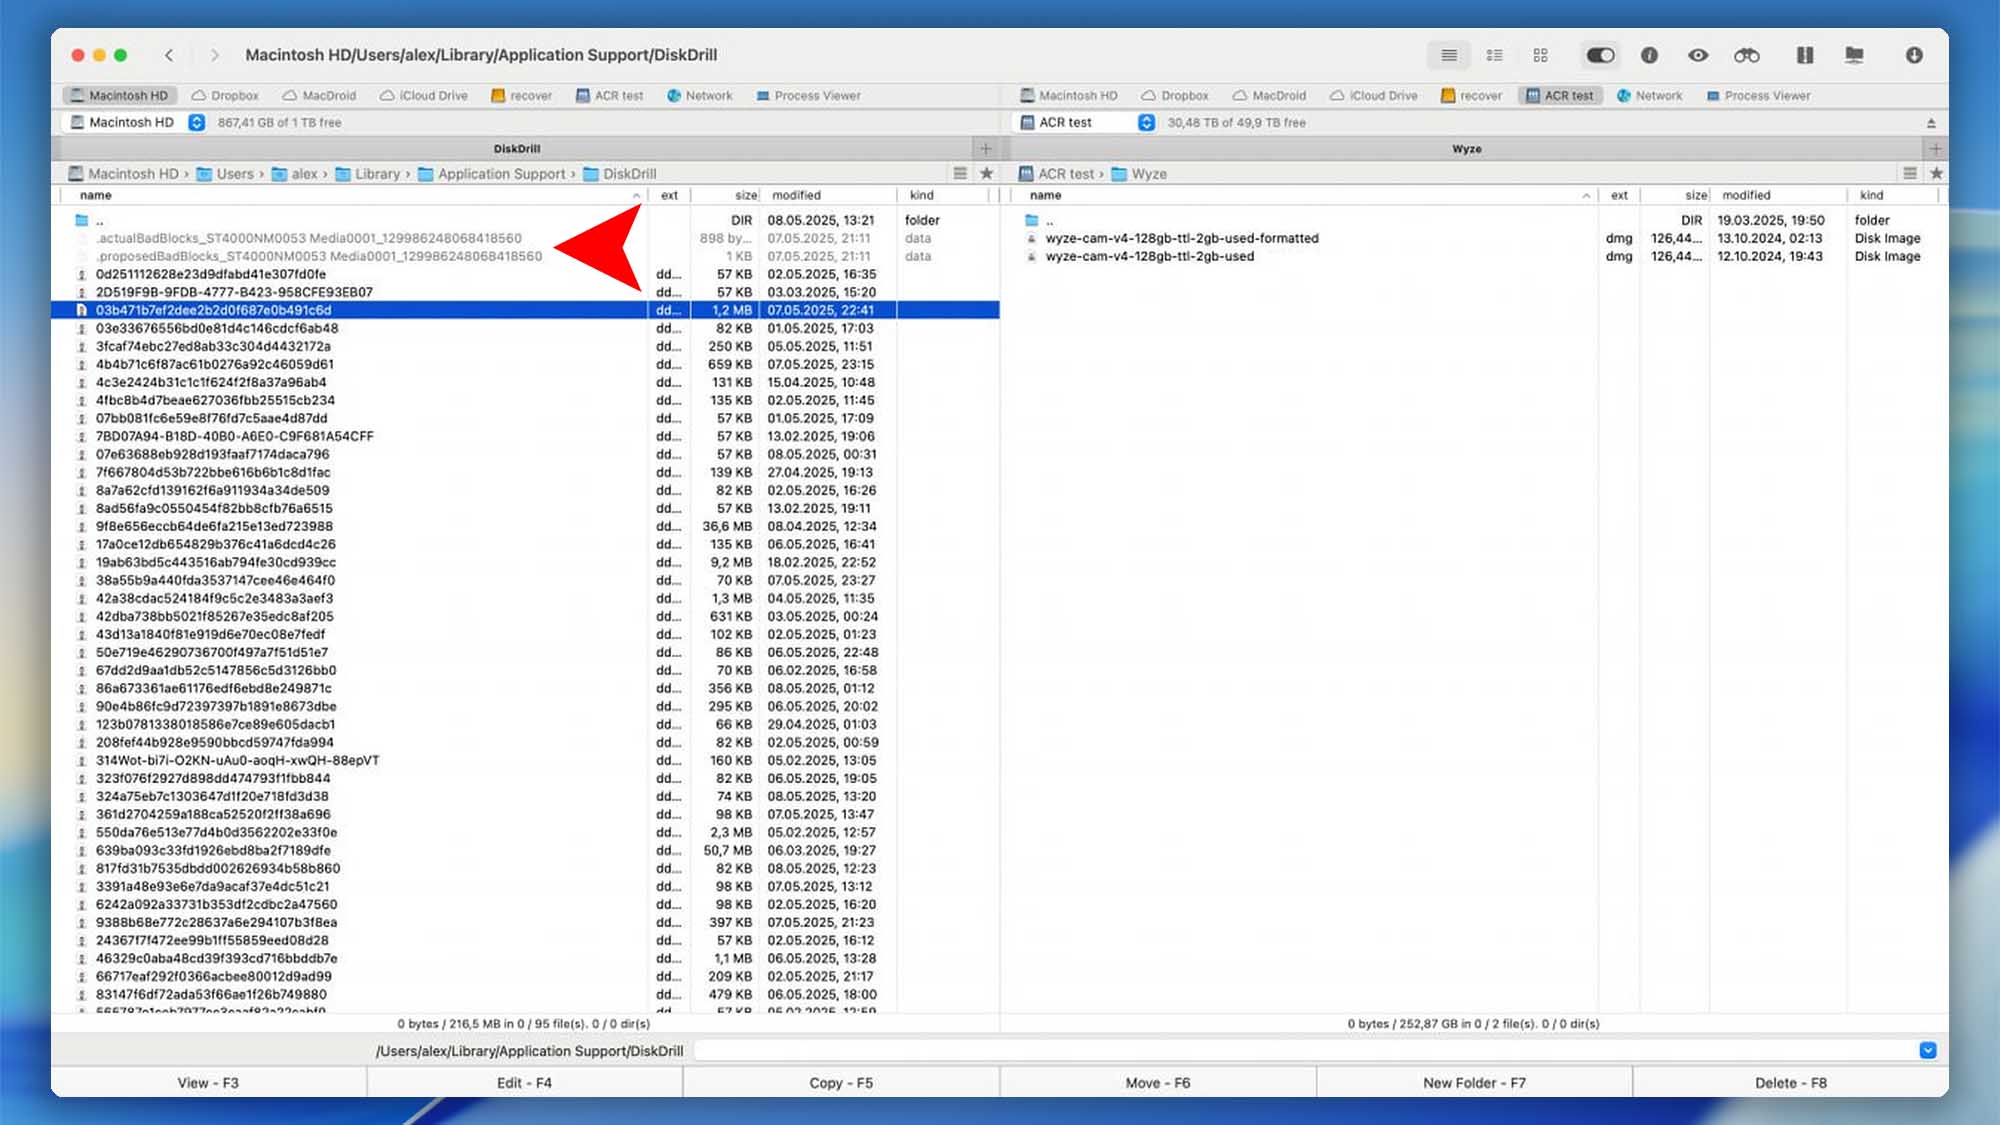
Inside that folder you’ll see hidden files named like:
.actualBadBlocks_[DiskName]_[DiskUID].proposedBadBlocks_[DiskName]_[DiskUID]
You’ll typically have one pair per device. The filename includes the drive name and a unique identifier.
How to Export (Back Up) the Bad‑sectors Database
- Quit Disk Drill. This prevents the app from rewriting files while you copy them.
- Open Finder → Go → Go to Folder… Paste this path and press Go:
~/Library/Application Support/DiskDrill/💡 Tip: Can’t see anything? Press Command + Shift + . to toggle hidden files. - Copy the files that start with
.actualBadBlocks_*and.proposedBadBlocks_*to a safe location (external drive, cloud folder, etc.).
How to Import (Restore) the Bad‑sectors Database
- Quit Disk Drill if it’s running.
- In Finder, open:
~/Library/Application Support/DiskDrill/ - Copy your backup files (
.actualBadBlocks_*and.proposedBadBlocks_*) back into that folder. - Relaunch Disk Drill.
Why the “Specify Bad Blocks” Option Isn’t Available
The Specify Bad Blocks editor appears only when you select a device type that Disk Drill can map directly to physical sector addresses. That means:
It does appear for
- Physical disks (the top‑level device, e.g., “Samsung PSSD T7 Media”).
It doesn’t appear for
- Logical items such as APFS containers/volumes, partitions, or mounted disk images (.dmg, .img, .dd).
- CoreStorage / Fusion Drive virtual disks (the top entry inside the CoreStorage/Fusion group).
- Other virtual layers that don’t have a 1:1 link to the underlying physical sectors.
Why: Logical/virtual volumes typically aren’t directly tied to the physical LBAs. Marking a sector range on the physical disk won’t automatically propagate to those virtual layers.
Limitations & Truths (No Marketing Fluff)
- This does not fix media. Marking sectors in Disk Drill is advisory for scanning logic, not a repair.
- Reallocation is firmware-controlled. You can’t force a healthy remap from user space.
- SSDs behave differently. After TRIM and garbage collection, wiped pages are truly gone; rescanning won’t bring them back. The slow-block workflow mainly helps before purge or on HDDs.
FAQ
No. It optimizes how scans proceed around defective areas and lets you decide when to re-try them.
No. The marks exist inside Disk Drill only. They don’t modify the disk or file system.
This bad/slow block management workflow is available only in Disk Drill for macOS.
Because slow read blocks can be just as time‑consuming as unreadable ones. Use Disk Drill’s Byte‑to‑Byte Backup to skip slow zones and complete an image sooner, then target problematic ranges later.