Disk Drill is not your regular app. It belongs to system utilities and requires elevated permissions to run properly and access your data, unlike some of the apps that you might be used to downloading from the App Store. It’s “slightly” more powerful, and thus needs some of your admin approvals to get started.
This is especially true if you are planning to attempt data recovery on your system drive and other storage devices or locations protected by Apple’s SIP (System Integrity Protection) layer. Granting Disk Drill access to the system and its disks is crucial to accomplish the data recovery process. The steps you will need to take to give Disk Drill the necessary permissions may differ depending on the macOS version you are running.
This article describes these steps, and guides you through the process of granting required disk permissions. Once the necessary steps are completed, you will be able to scan and start the actual recovery. Don’t worry, Disk Drill itself will guide you through with helpful hints and step-by-step instructions within the app. It takes just a couple of clicks and a few minutes of your time, maybe less.
How to Enable Disk Drill's System Extension (Video Guide)
To ensure proper scanning and data recovery on macOS Catalina (10.15) and newer, Disk Drill requires the following permissions:
- Administrator password: Your user account must have administrative privileges.
- Full Disk Access: Necessary to scan external drives effectively.
- Direct Device Access (Kernel Extension – KEXT): Required for scanning your system drive.
Watch our official video tutorial below to guide you through this process:
If you follow the instructions in the video, you can skip the remainder of this article. If you prefer step-by-step written instructions for running Disk Drill on macOS, continue reading—they’re provided right below.
Enabling Disk Drill's System Extension (Kernel Extension or KEXT)
To simplify data recovery from macOS-protected areas of your system drive—and to avoid previously complicated permission setups—we created Disk Drill’s System Extension (KEXT). Enabling it is safe, straightforward, and takes only about five clicks.
System Extensions are specialized pieces of software that enhance your Mac’s built-in capabilities by enabling new features or functionality. They’re commonly found in antivirus software, hardware drivers, and advanced system utilities.
For macOS Catalina (10.15) and newer, you’ll need to enable this system extension specifically to recover deleted files from your main system drive (the disk running macOS). However, if you’re recovering data from external storage devices like USB drives, memory cards, or external hard drives, enabling Disk Drill’s system extension isn’t necessary.
Once enabled, your Mac remembers the setting, so you won’t need to do it again.
How to Enable Disk Drill's System Extension: Step-by-Step Guide
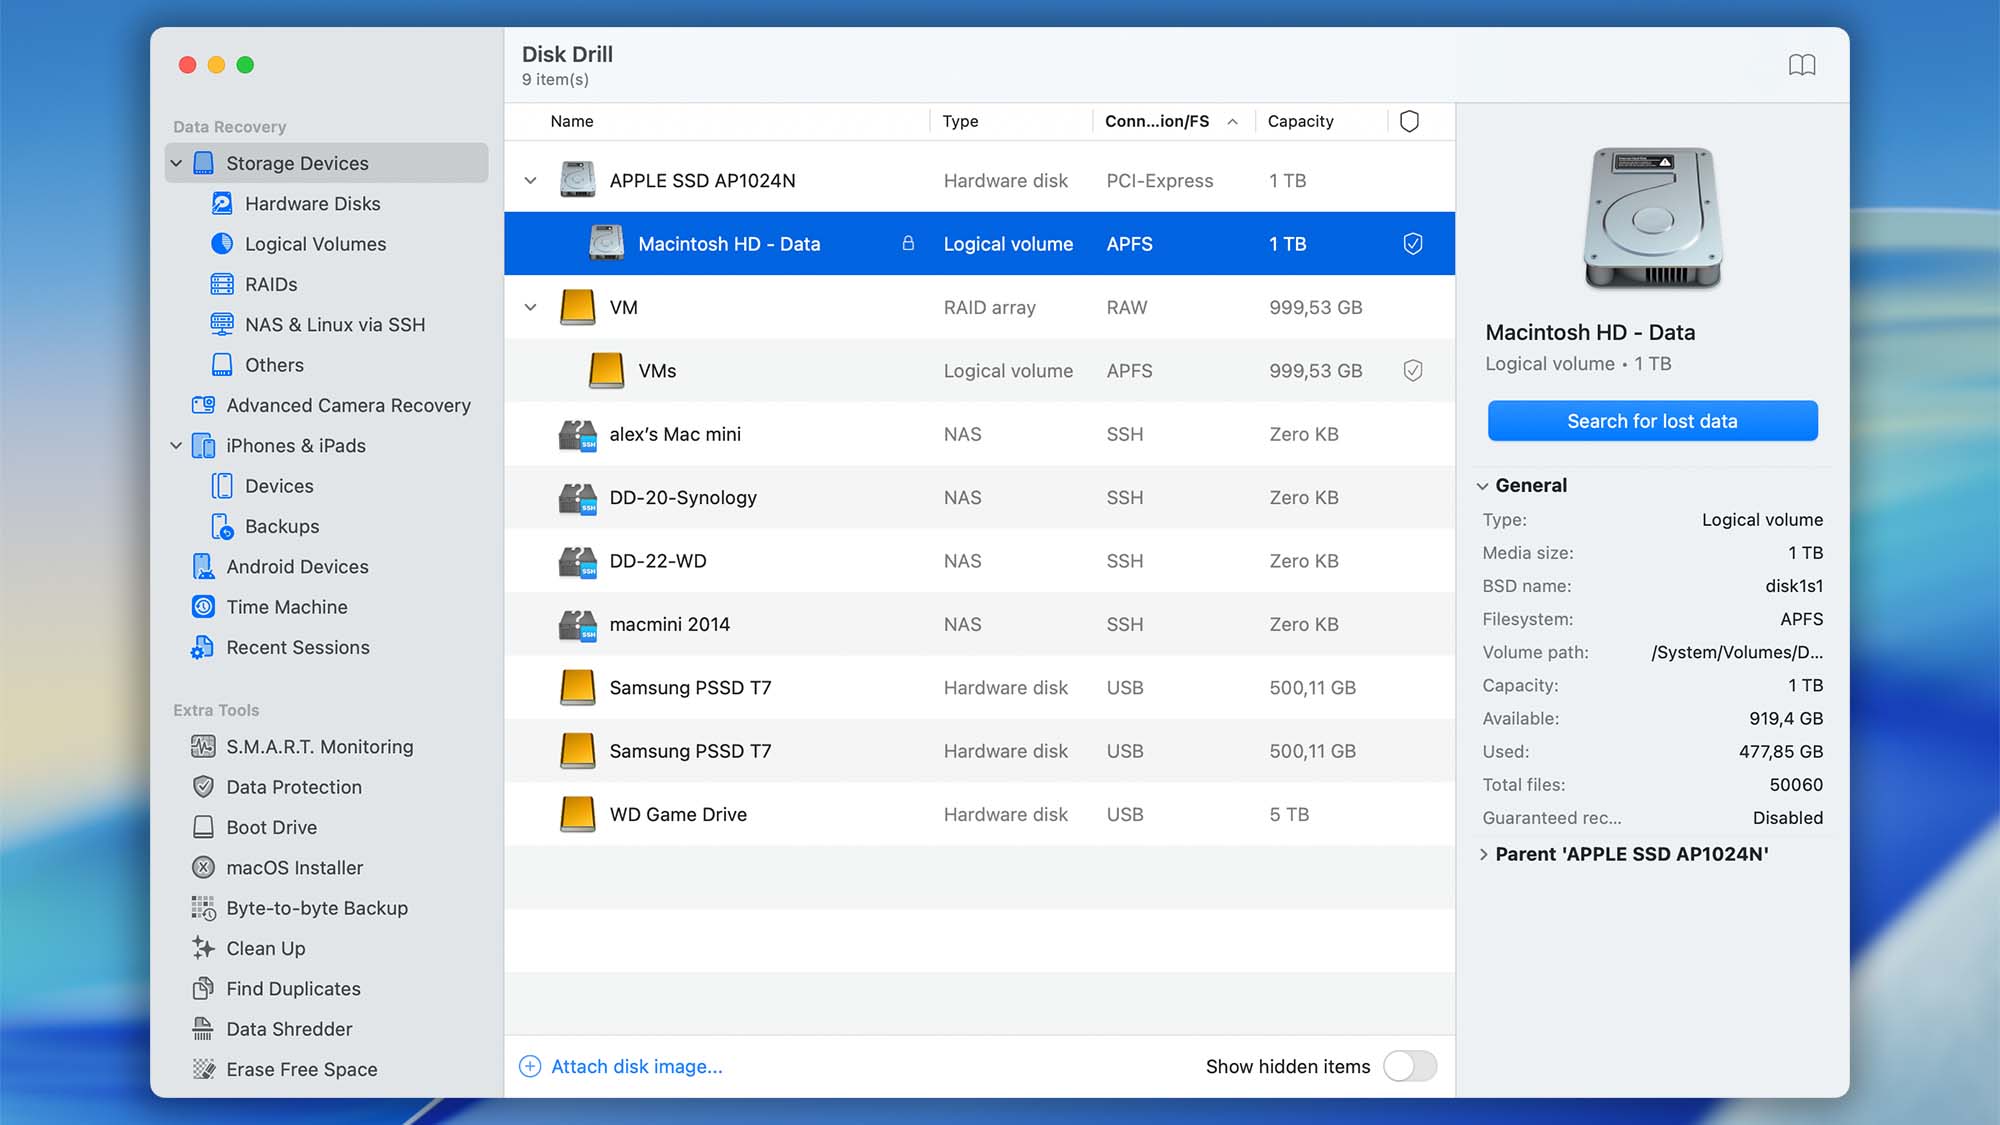
Once you’ve granted Full Disk Access, Disk Drill will launch and display a list of your connected storage devices. By default, Disk Drill doesn’t prompt you to install its Kernel Extension (KEXT)—the installation is triggered in two specific scenarios:
- Selecting Disk Drill → Enable Recovery from System Drives from the top menu bar.
- Starting a scan of your main system drive.
Let’s explore each method in detail:
Method 1: Enable Recovery from System Drives (Top Menu Bar)
This is the quickest way to give Disk Drill the necessary permissions to scan your Mac’s internal (system) drive or other SIP-protected storage devices. With these permissions, Disk Drill can leverage its powerful data recovery methods to thoroughly analyze every sector of your drive.
To initiate this:
- Click Disk Drill in the top menu bar.
- Choose Enable Recovery from System Drives from the dropdown menu.
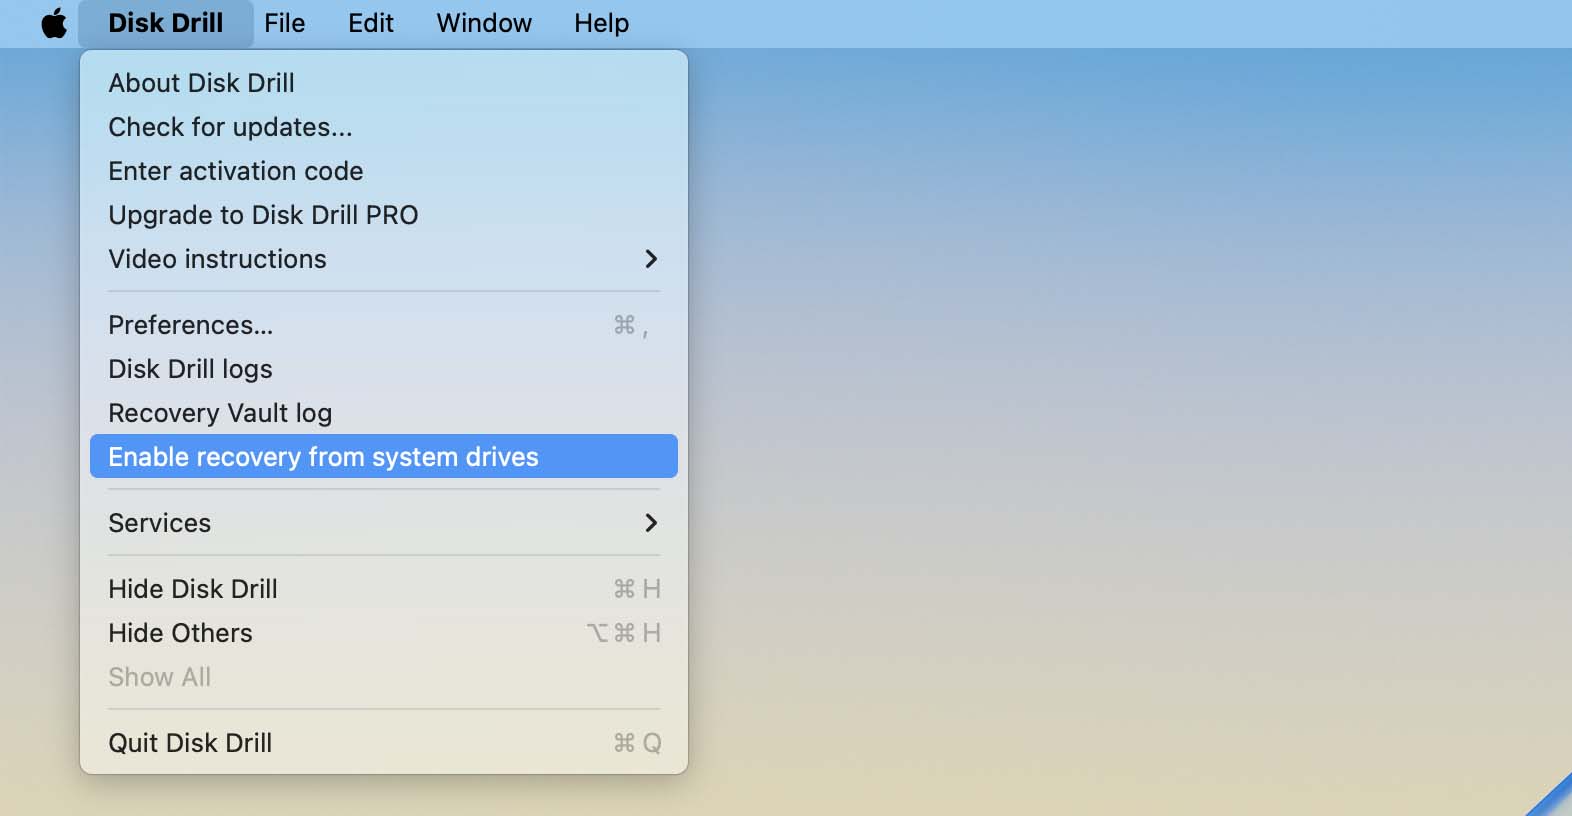
This action starts the process for enabling Direct Device Access. For next steps on completing this process, follow our dedicated guide here.
Method 2: Start Scanning Your Main System Drive Directly
Starting with macOS Big Sur (11.0), Disk Drill introduced a method to perform an initial scan of your main system drive without needing to install a Kernel Extension (KEXT). Without enabling the system extension, Disk Drill can:
- Identify existing allocated data.
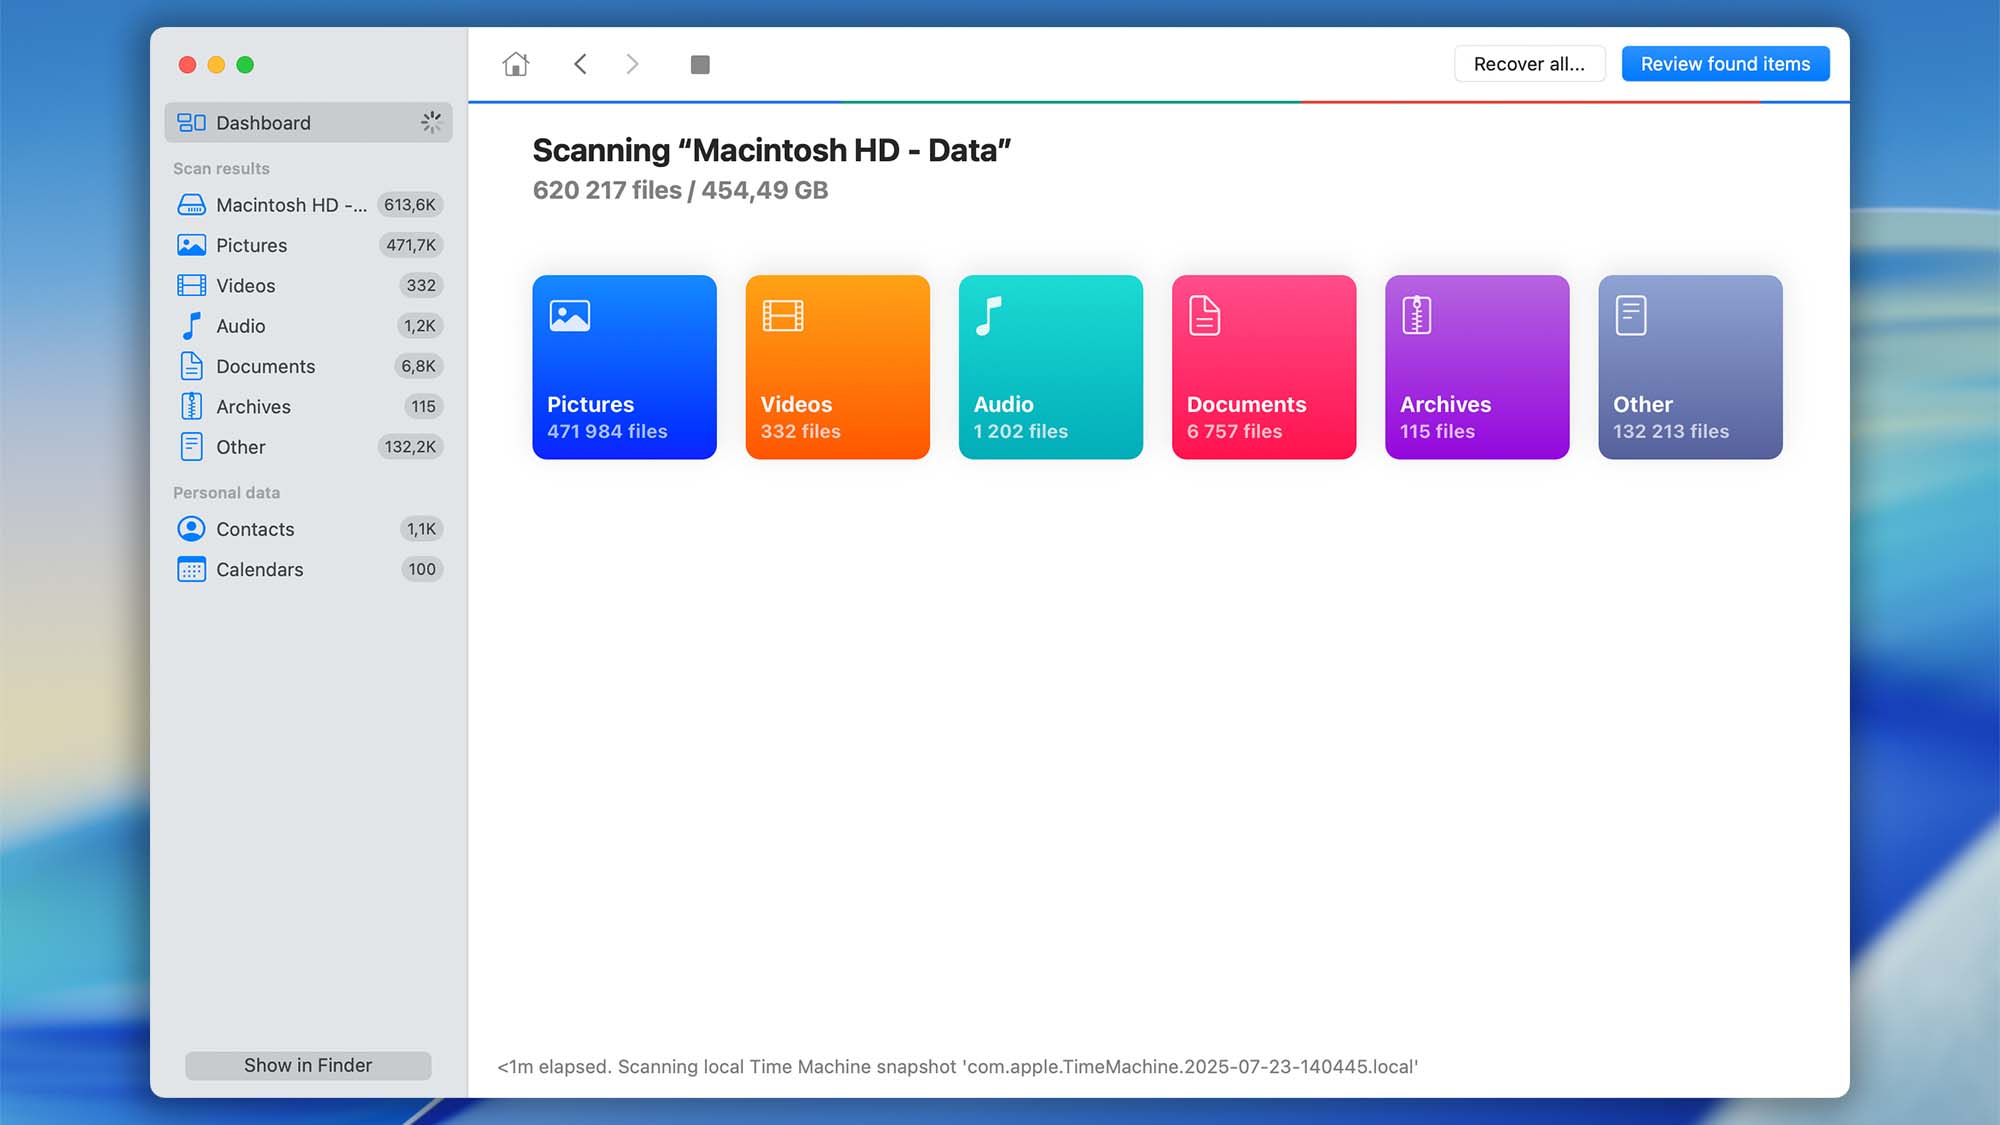
- Access local Time Machine snapshots.
- Recover files previously protected by Disk Drill’s Guaranteed Recovery feature.
- View your personal data from Contacts and Calendars applications.
- Deep Scan unprotected areas of system disk.
1. Allow Kernel Extensions on Apple Silicon Macs
Let’s get started. If you’re using an Apple Silicon-based Mac (such as M1, M2, etc.), you’ll first need to allow kernel extensions (KEXTs) to be installed (users with Intel-based Macs can skip to next step). Follow these steps:
- Restart your Mac in Recovery Mode:
➡️ Turn off your Mac
➡️ Turn it back on and don’t let go of the power button. Keep holding it until you see the startup options window. Click the gear “Options” icon and then click Continue.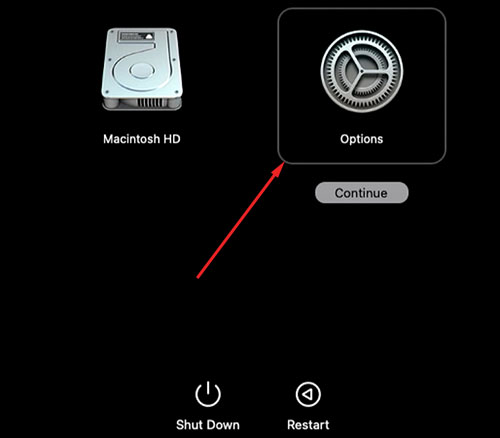
- You may be prompted for your administrator password during this or a later step. Enter your password to proceed.
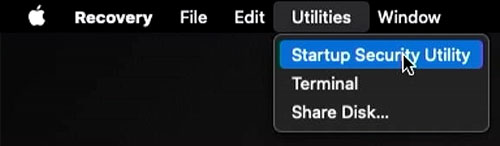
- When the Recovery Mode window opens, ignore the utilities shown. Instead, go to the top menu bar and select Utilities –> Startup Security Utility.
- Select your primary drive (usually “Macintosh HD” or the drive where macOS is installed).
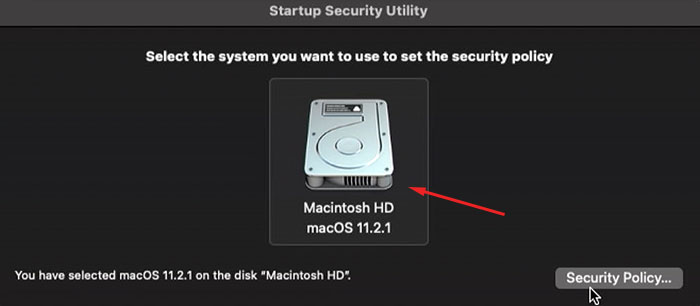
- In the Startup Security Utility window, choose “Reduced Security” option and tick the first “Allow user management of kernel extensions from identified developers” option.
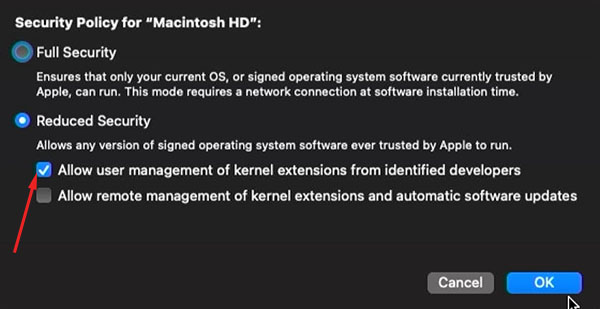
- Click “OK“, then restart your Mac normally to apply these settings.
2. Deploy Disk Drill’s Kernel Extension (KEXT)
As mentioned earlier, if you start your first system drive scan without installing the Kernel Extension (KEXT), Disk Drill will provide as many results as it can. After the initial scan completes, you’ll see a message indicating: “There’s a chance to find more data“.
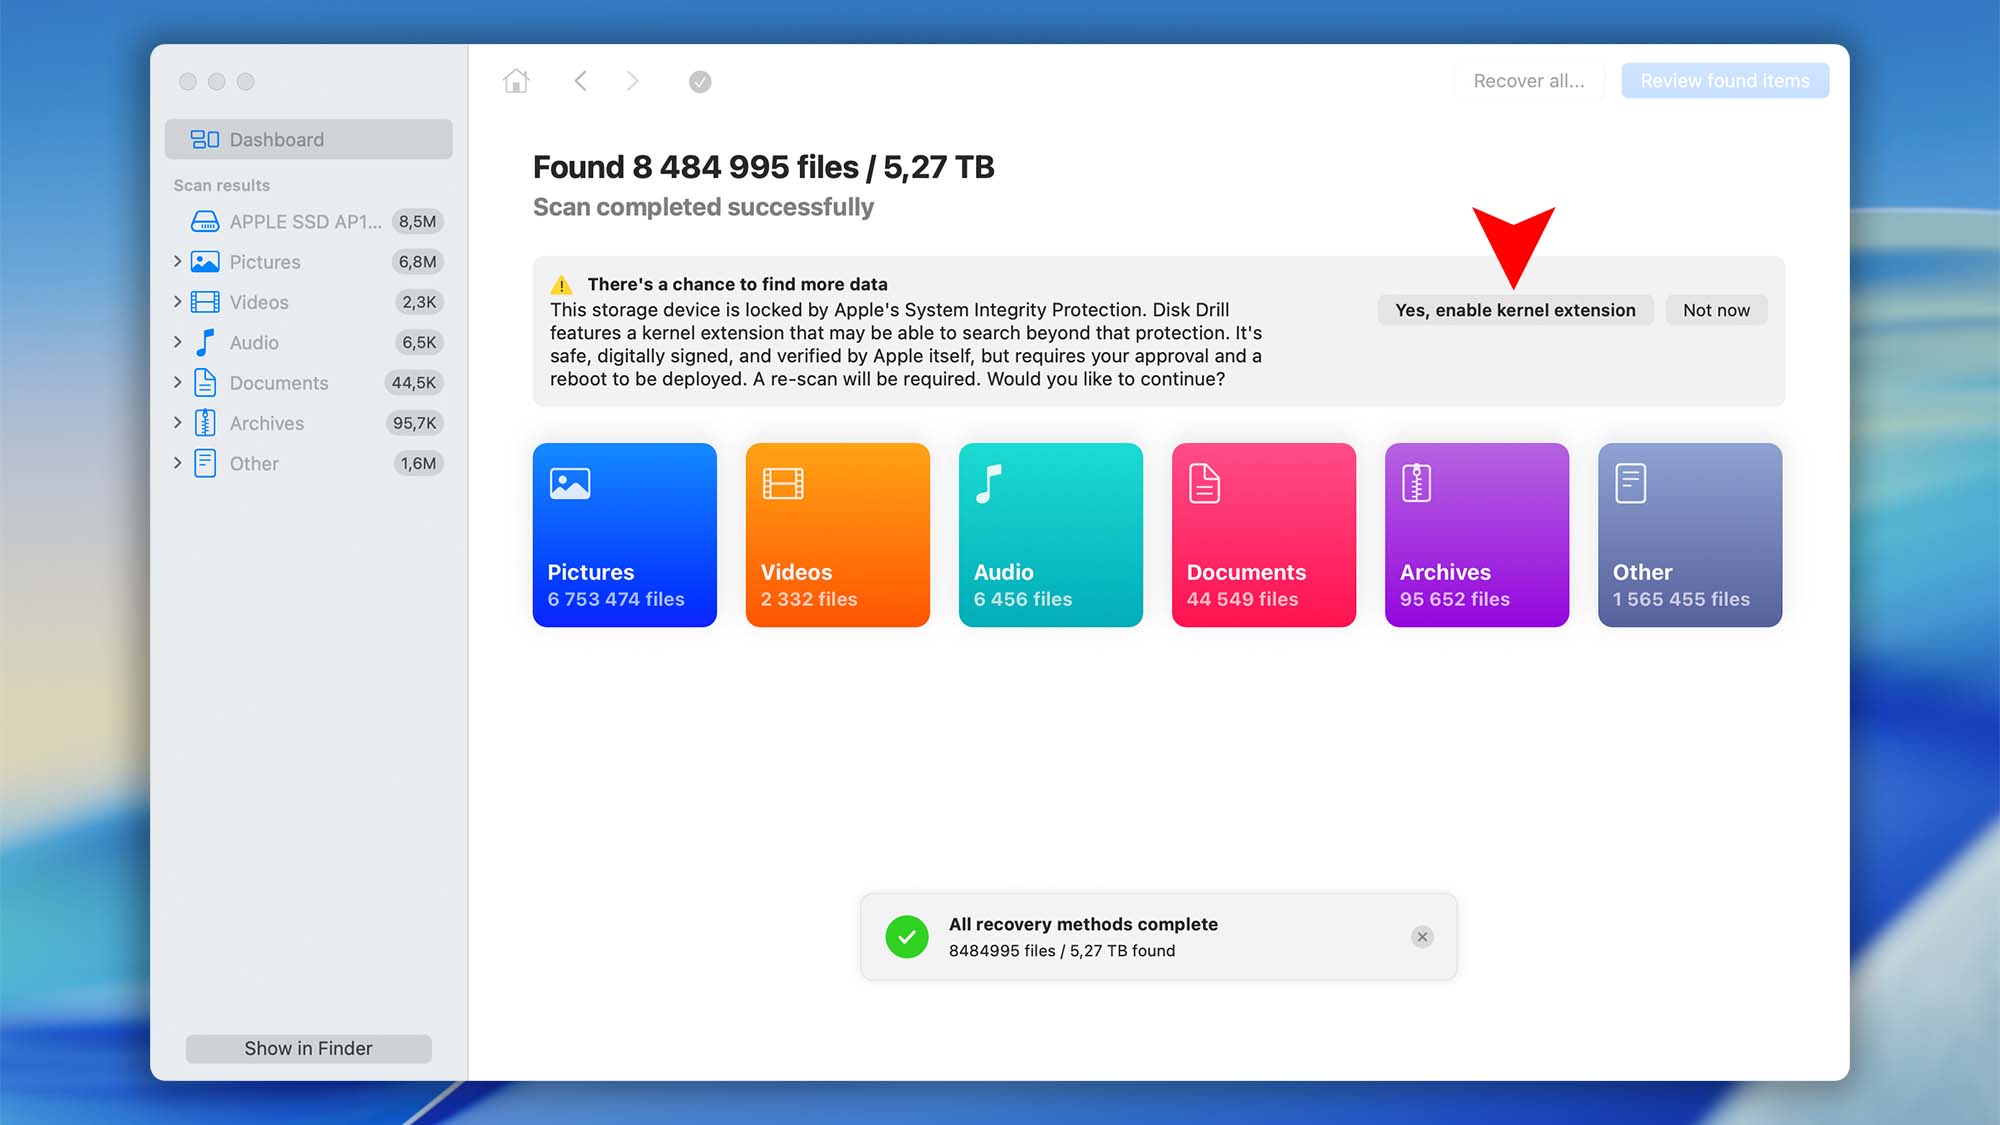
First, review the recovered data carefully to check if your missing files are already there. If not, proceed with installing the kernel extension by clicking: “Yes, enable kernel extension“. This action initiates the installation process of Disk Drill’s KEXT in macOS.
Follow these detailed steps:
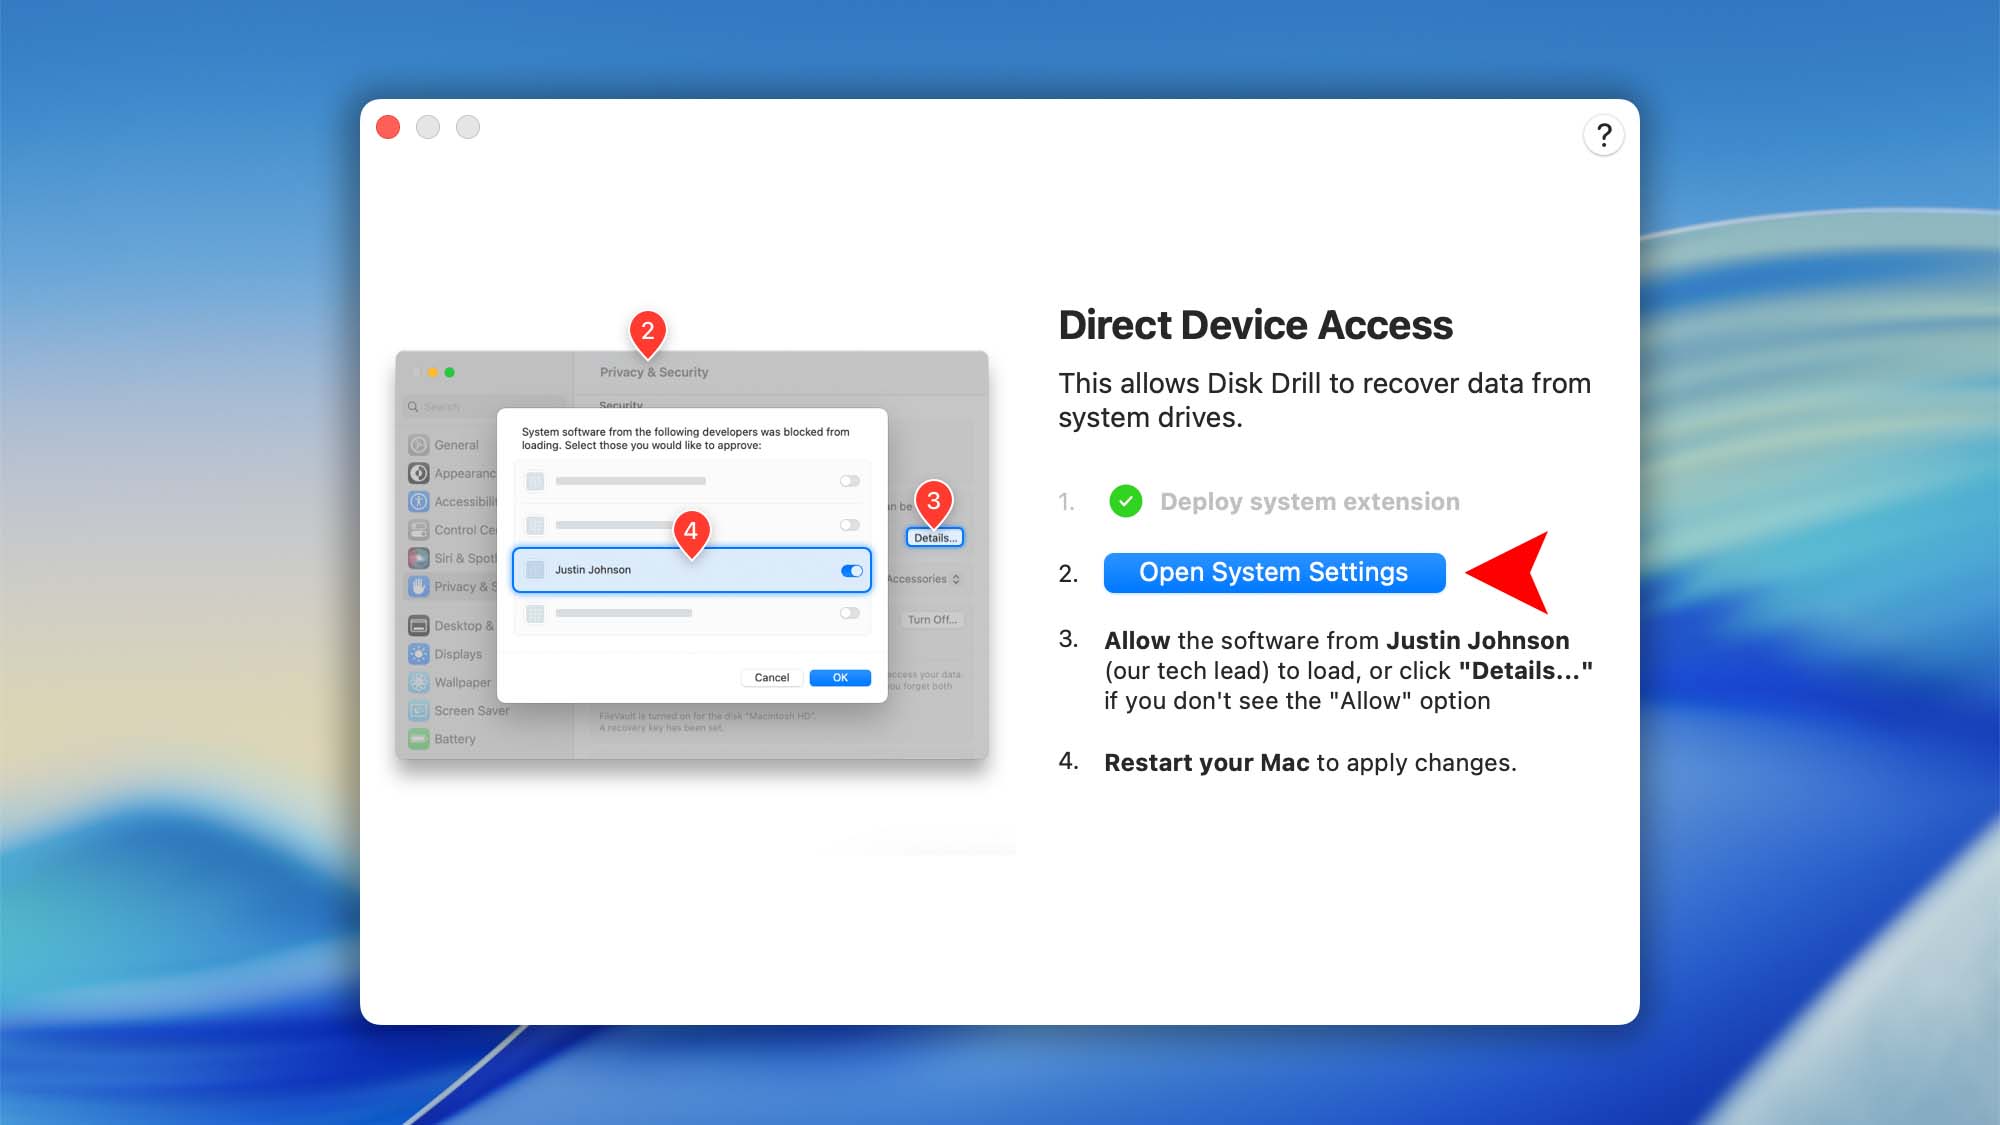
- In the Direct Device Access window, click the “Deploy system extension” button.
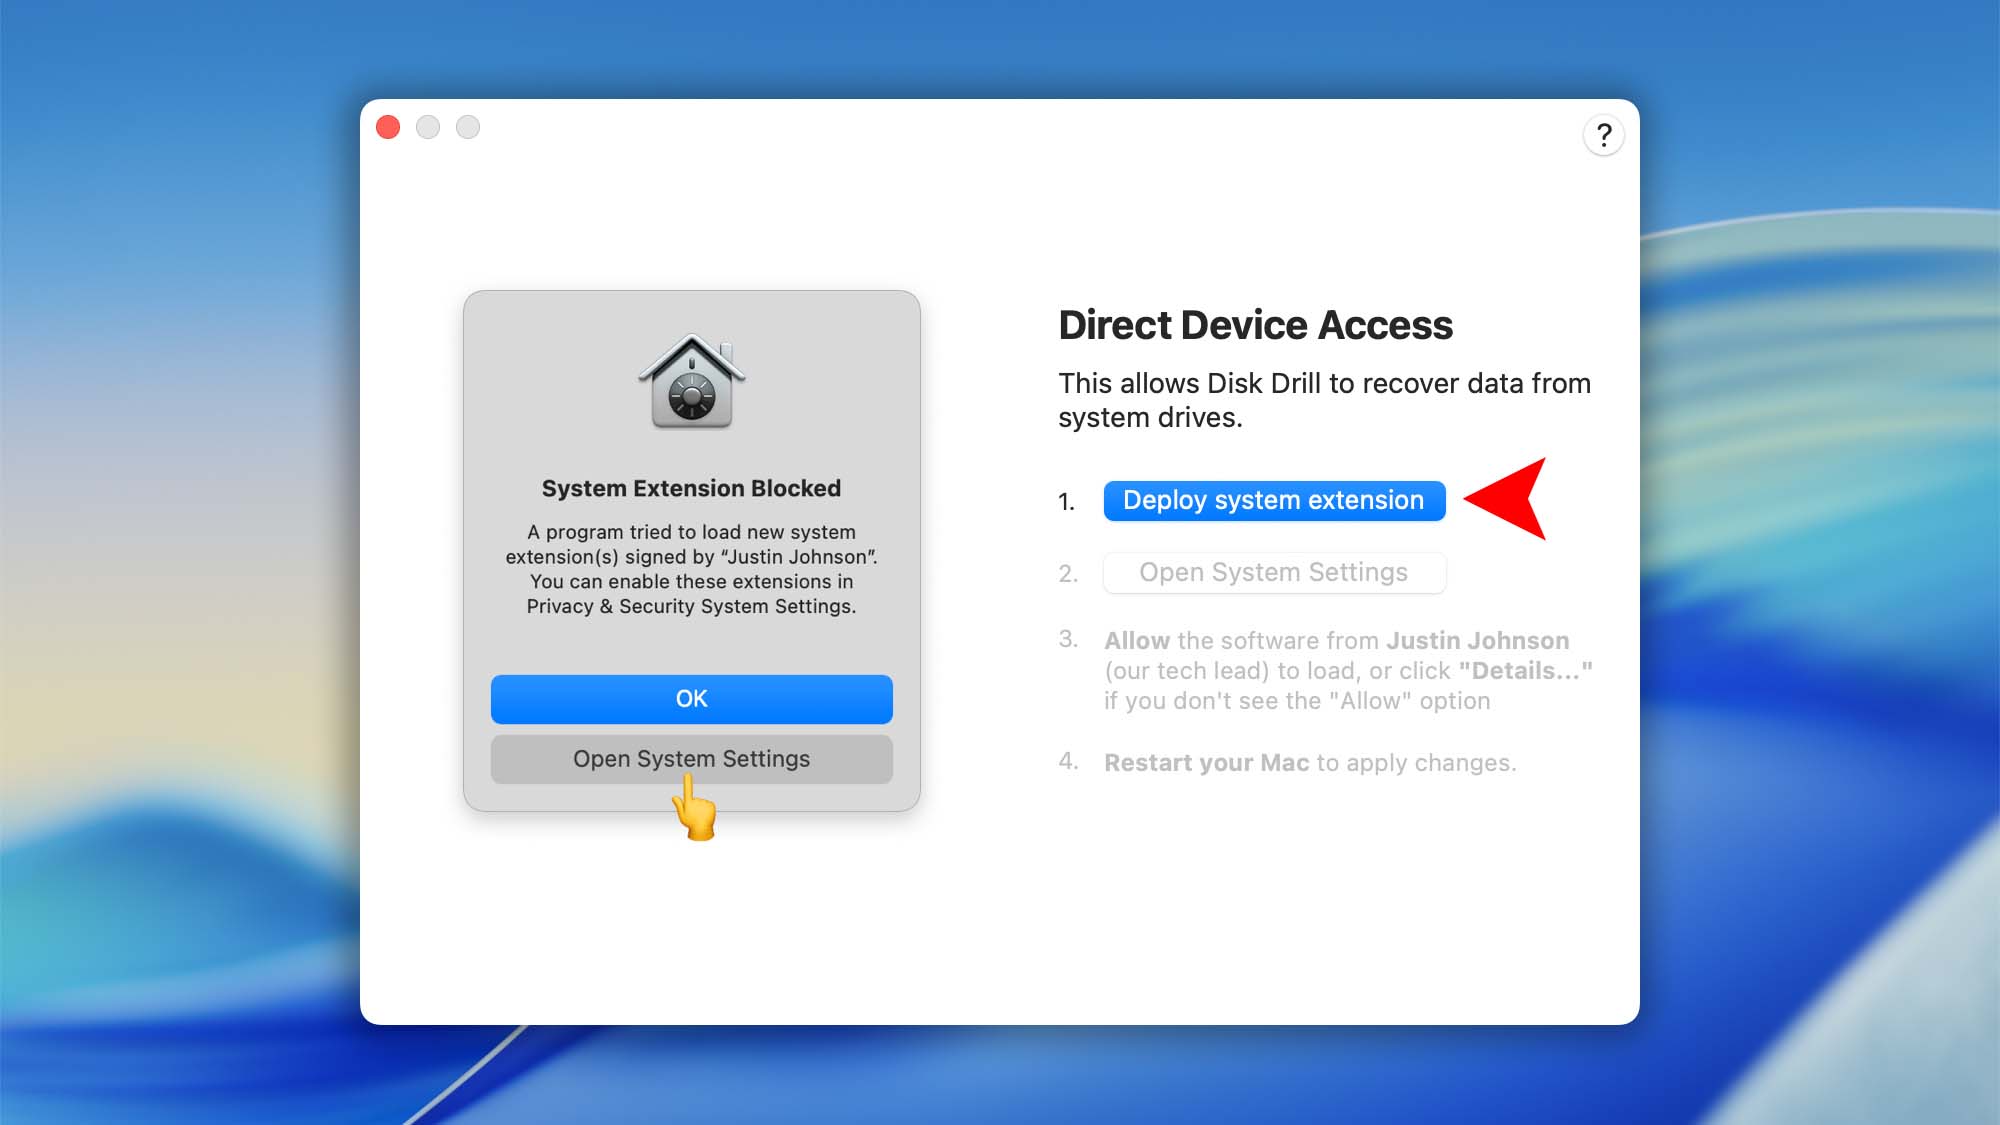
- When the system displays a pop-up message (“System Extension Blocked”), click “Open System Settings“.
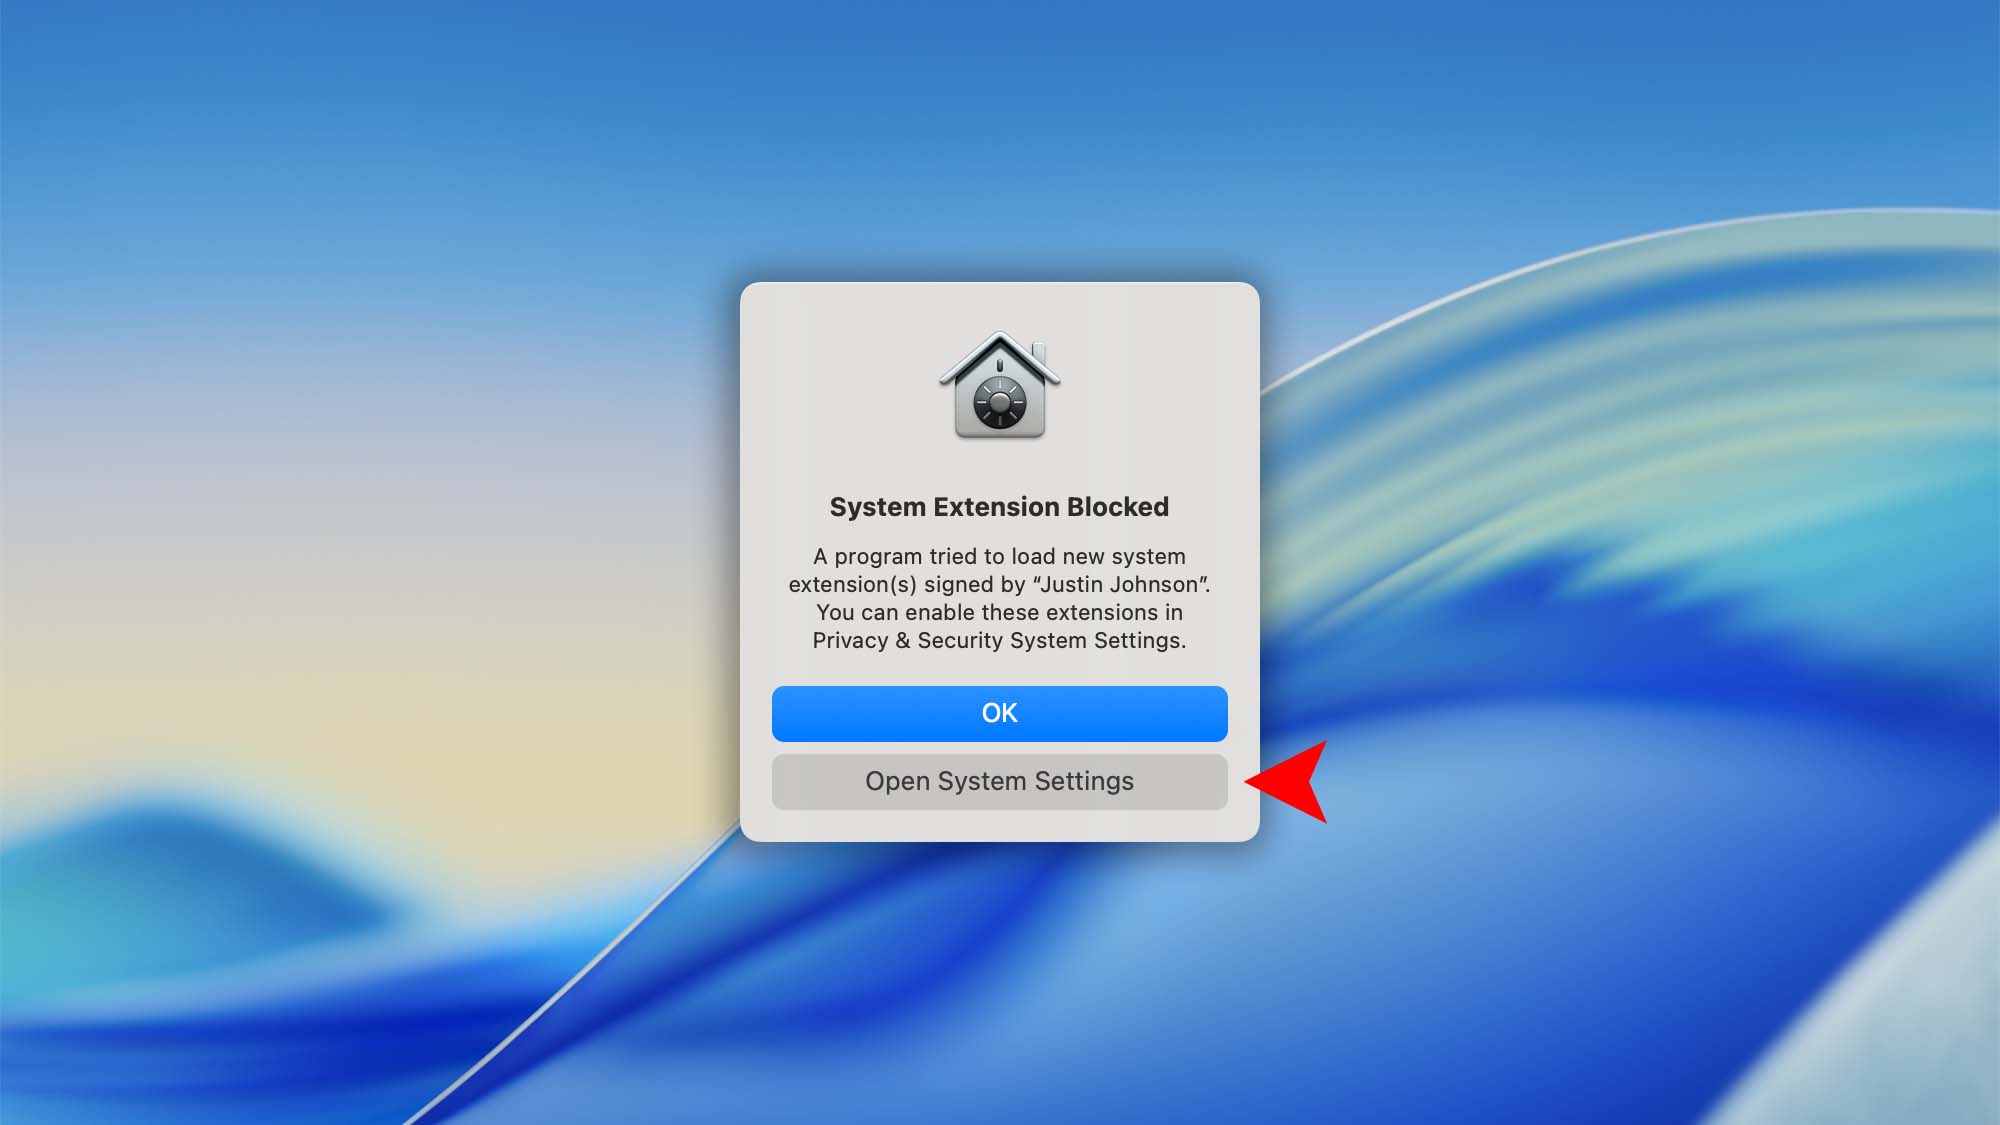
- 🔔 If you accidentally clicked OK, you can easily return to the Direct Device Access window and click “Open System Settings” again.
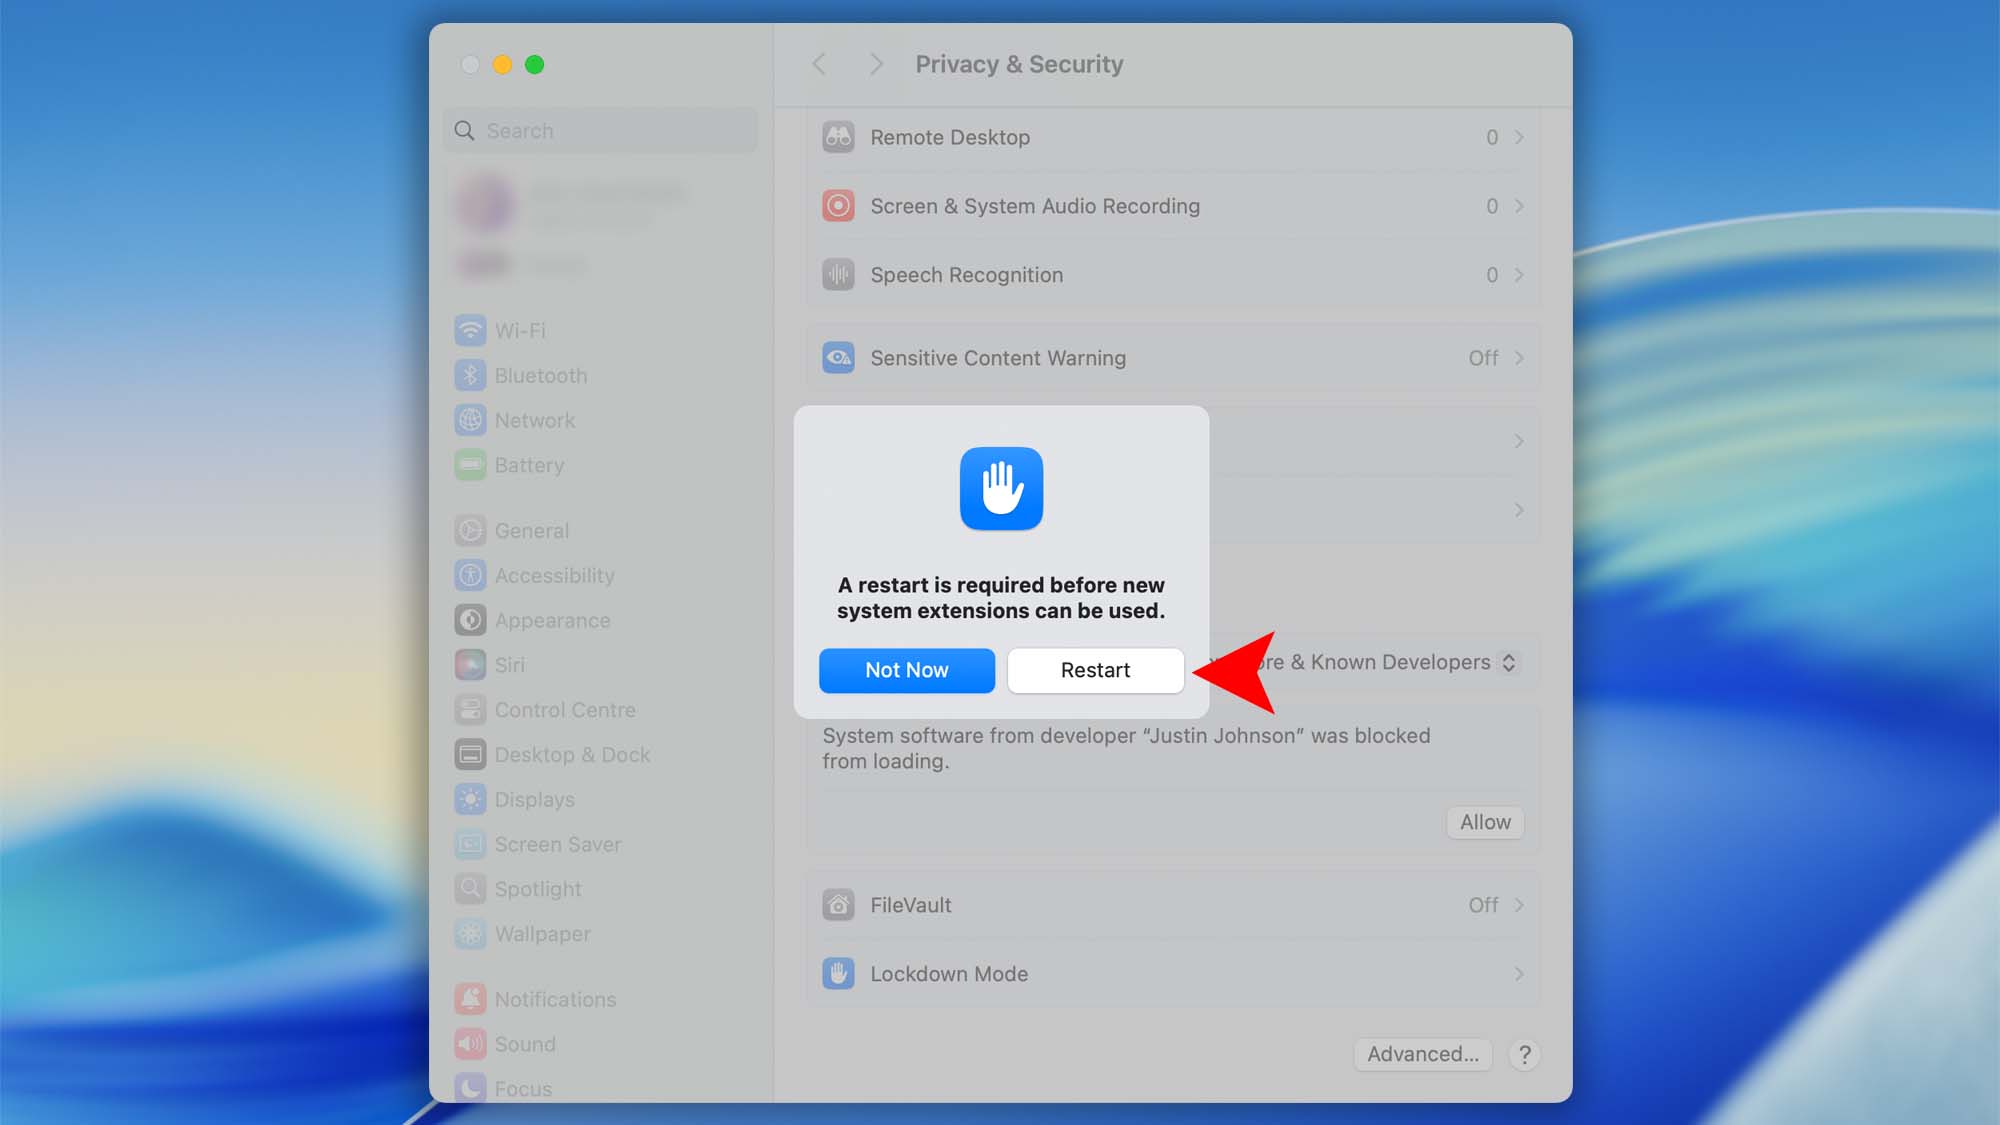
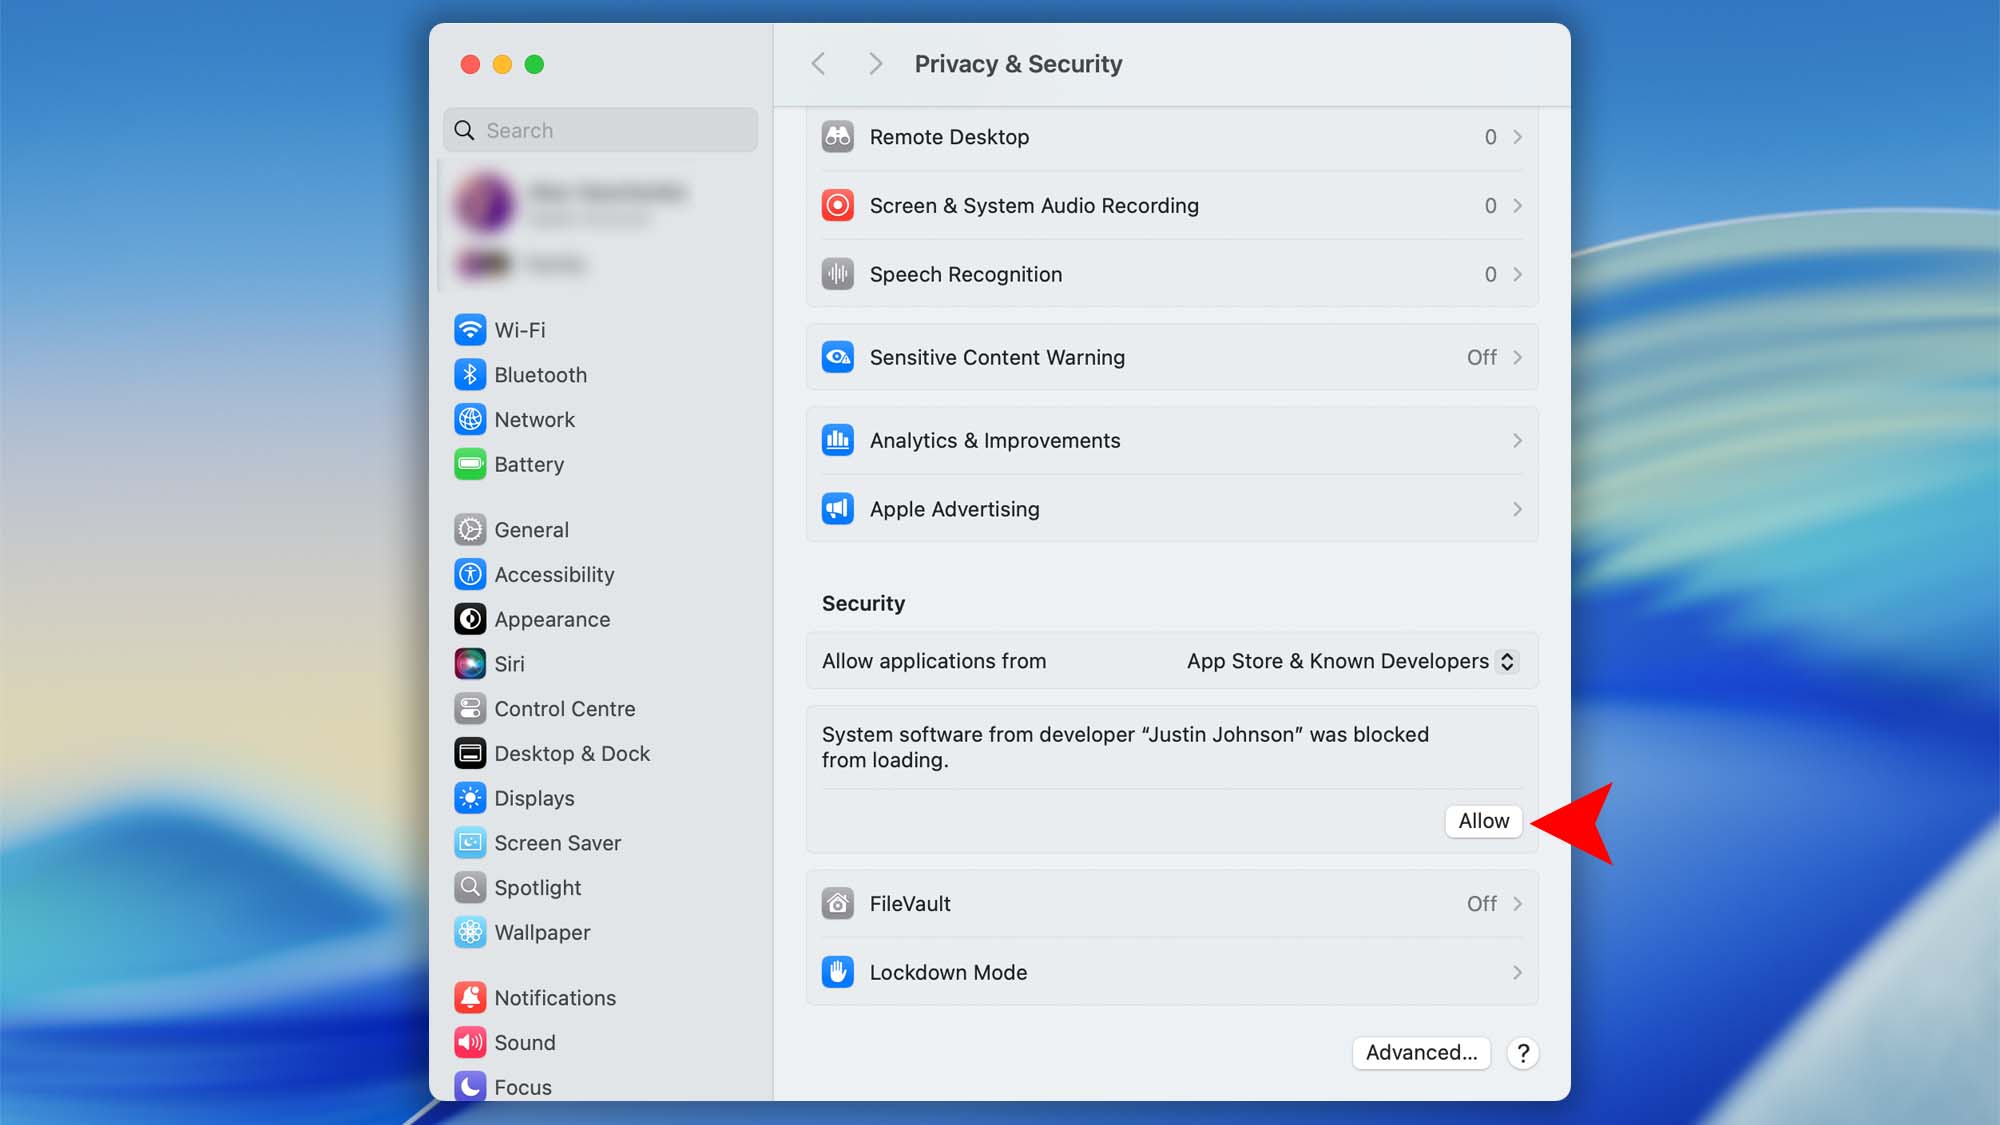
- In the System Settings window, locate the message: “System software from developer ‘Justin Johnson’ was blocked from loading.” Click “Allow“.
- When prompted, enter your administrator password.
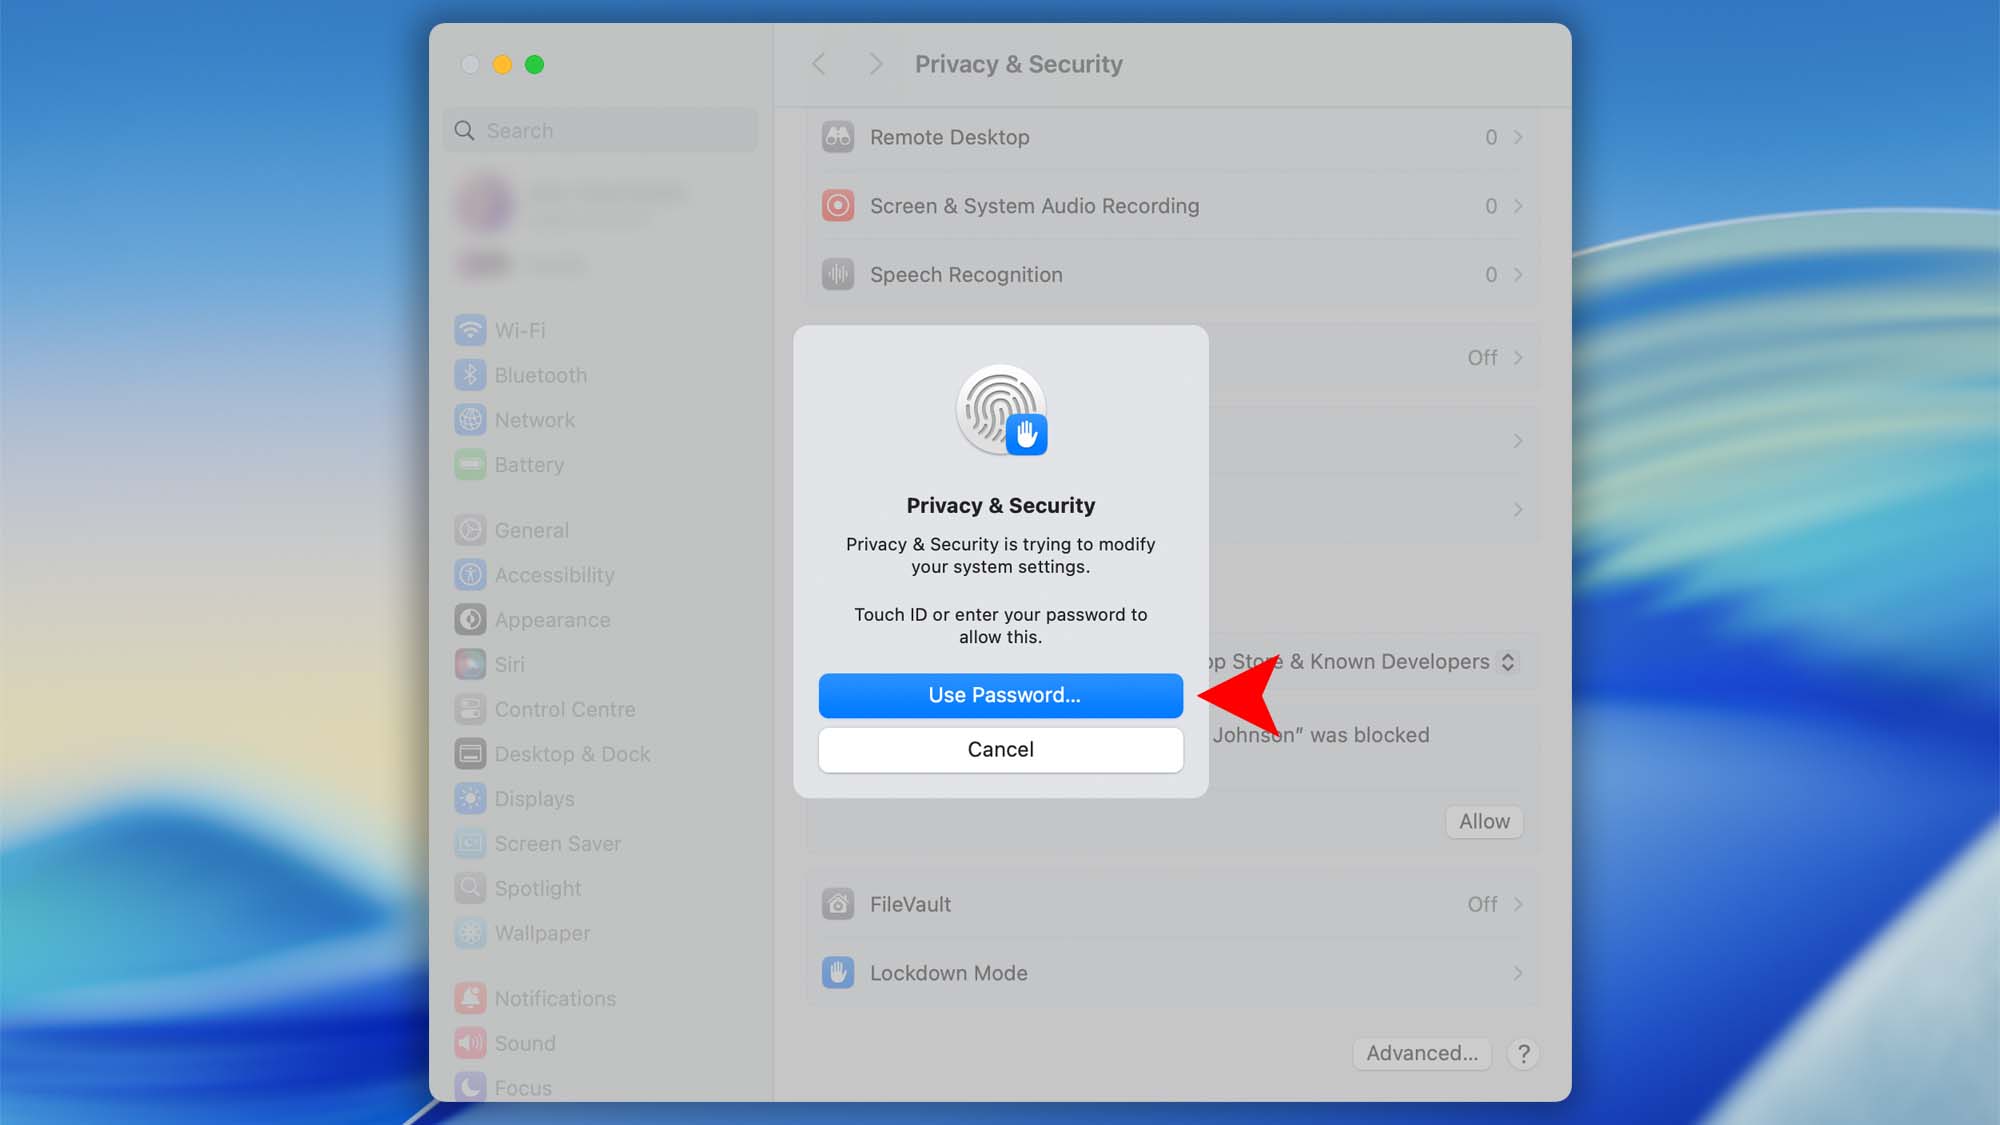
- Click “Restart” to apply these changes.
Disk Drill’s system extension is not running in the background all the time, it’s only enabled when Disk Drill actually scans your SIP/T2/M1-M4 protected devices for lost data. Once the scan and recovery are over, the extension is automatically unloaded.
3. Start Scanning Your System Drive Again with the Kernel Extension (KEXT) Enabled
Once you’ve successfully installed Disk Drill’s system extension, you can perform a deep scan of your system drive to recover the maximum amount of data. To do this, you’ll need to start a new scan on your system drive. Keep in mind that any results from your previous scan session will be lost when you start a new scan.
- Select your system drive and click the Search for Lost Data button.
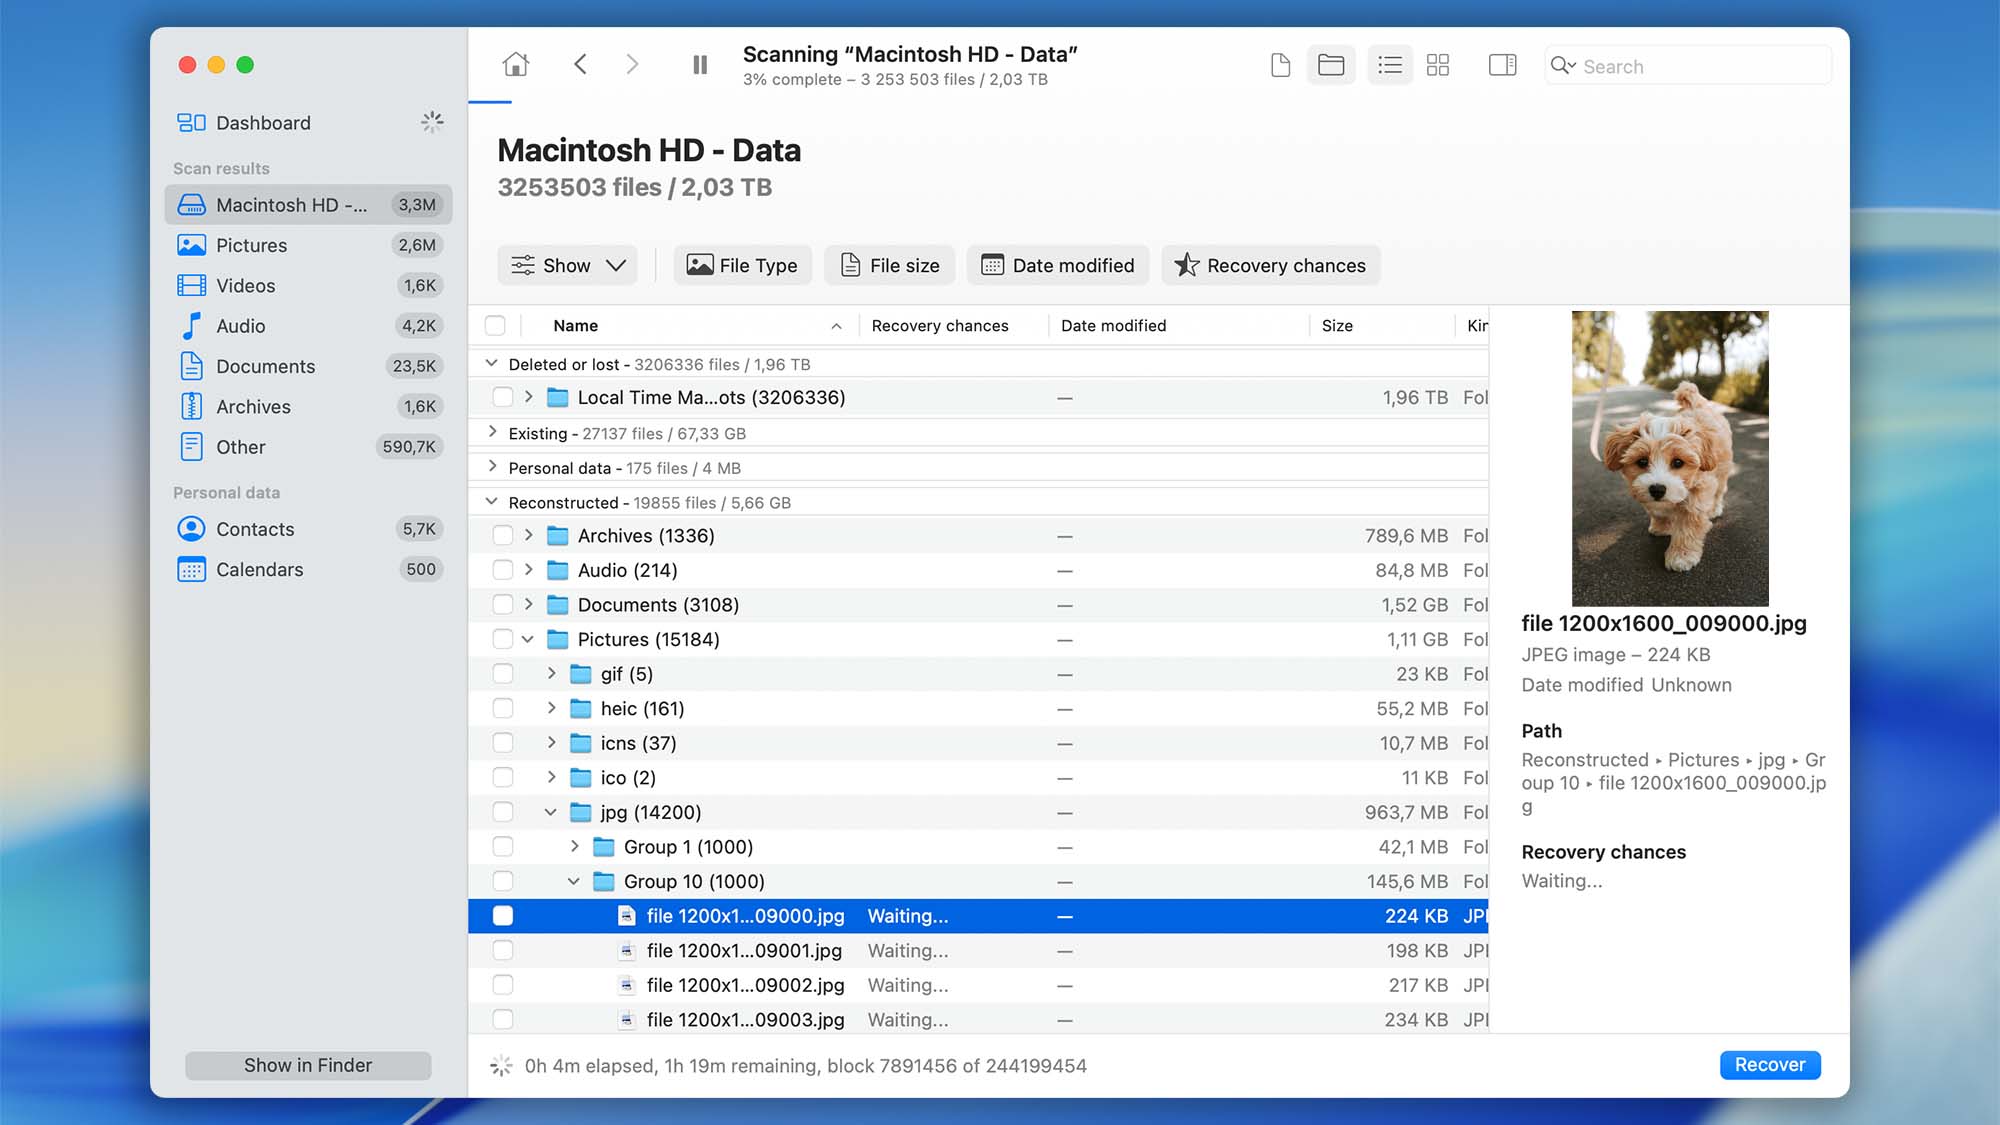
- Wait patiently while Disk Drill scans every byte of your drive.
- Review the recovered files and restore the ones you need.
Now, you are all set to begin your first scan and retrieve lost data with Disk Drill even from your system drives!
Alternatives to installing a kext
If you still want to try alternative routes, you may lower your System Integrity Protection for the time of your data recovery operation, or use Target Disk Mode, create a bootable drive with Disk Drill, or simply run Disk Drill in your Mac’s Recovery Mode.
FAQ

This issue occurs on Macs with Apple Silicon (M1, M2, etc.).
If you see a “Yes, show me how” button (which opens a YouTube tutorial) instead of the “Yes, enable kernel extension” button, it means that your Mac hasn’t been configured to allow third-party kernel extensions.
To fix this, you need to enable the option “Allow user management of kernel extensions from identified developers” in macOS Recovery Mode. Follow this guide to update your security settings and enable the necessary permission.
If you’re encountering an error while trying to load Disk Drill’s kernel extension (KEXT), follow the steps below to troubleshoot and resolve the issue:
- Open Terminal. You’ll need to enter your administrator password to run the following commands
- Clear the StagedExtensions folder by running:
sudo kextcache -v --clear-staging - Re-register Disk Drill’s system extension by typing:
sudo kextutil -v '/Applications/Disk Drill.app/Contents/Resources/BackService_11.app/Contents/Resources/SecureDisk_11.kext'
If Disk Drill’s kernel extension (KEXT) stops working after a macOS update, it’s likely due to broken system permissions on the KEXT folder. This can happen occasionally during macOS upgrades.
To fix the issue, follow these steps:
- Reboot into macOS Recovery Mode.
- Open Terminal. Run the following commands in Terminal to reset permissions:
- chflags restricted "/Volumes/Macintosh HD/private/var/db/KernelExtensionManagement"
- chflags restricted "/Volumes/Macintosh HD/private/var/db/KernelExtensionManagement/Staging"