If you’ve lost a file and need to recover it, don’t worry—Disk Drill’s installation process is quick and easy for both Windows and macOS. Best of all, in Disk Drill it’s absolutely free to scan your drive and see which files are recoverable.
Installing Disk Drill for macOS
Installing Disk Drill is straightforward—just drag and drop the app into your Applications folder. That’s really all you need to do! However, let’s walk through each step so you can take full advantage of Disk Drill’s features:
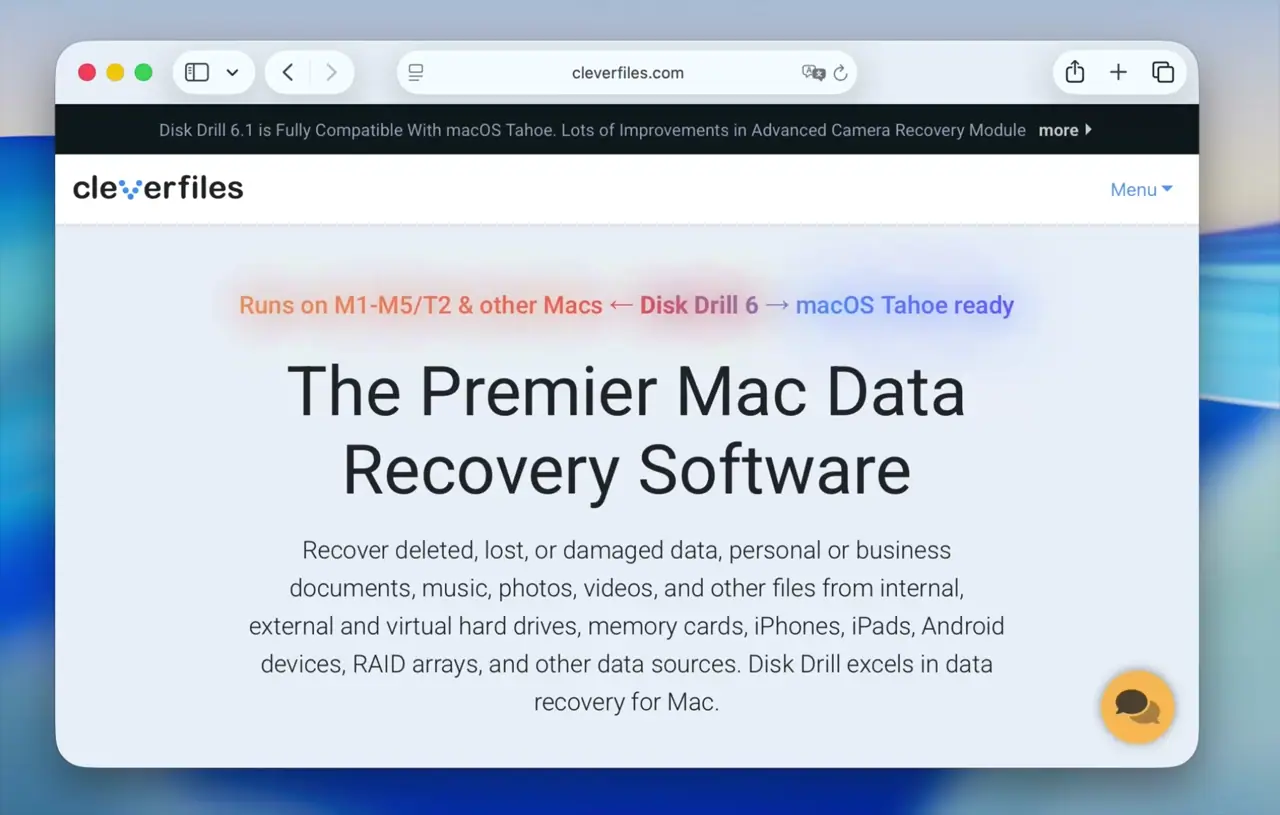
- Download Disk Drill. Visit https://www.cleverfiles.com/download.html to download Disk Drill. It supports macOS versions as early as 10.5. The download page usually detects the correct version for your system automatically, but you can also manually choose the version you need:
- macOS 10.15.7–26.x → Disk Drill 6.x
- macOS 10.15.7–15.6 → Disk Drill 5.7
- Mac OS X 10.11.6–macOS 12.6 → Disk Drill 4.7
- Mac OS X 10.9.5–macOS 10.15.6 → Disk Drill 3.8
- Mac OS X 10.8.5–10.9.4 → Disk Drill 3.7
- Mac OS X 10.6.8–10.8.4 → Disk Drill 2.4
- Mac OS X 10.5–10.6.7 → Disk Drill 1.8
Download Disk Drill data recovery app Download now - Save the Installation File. By default, the Disk Drill app will download to your Downloads folder. If your browser prompts you to choose a location, simply pick the folder you want and click Save. Depending on your internet speed, the download may take a few minutes.⚠️ Warning: Do not download the installation file to the same drive where your files were lost or deleted!
- Open the Disk Image. Go to your Downloads folder (or wherever you saved the file) and double-click the Disk Drill .dmg file.
- Drag to Applications. Drag the Disk Drill app icon into the Applications folder. That’s it—you’re done!💡 Note: If you want to run Disk Drill in portable mode, check out our separate step‑by‑step guide on how to use Disk Drill in Portable Mode.
Launching Disk Drill for macOS for the First Time and Enabling Additional Useful Options
Once you’ve installed Disk Drill, follow these steps to set it up for the first time and unlock extra functionality you might find useful:
- Open Disk Drill. Go to your Applications folder or Launchpad, then launch Disk Drill.
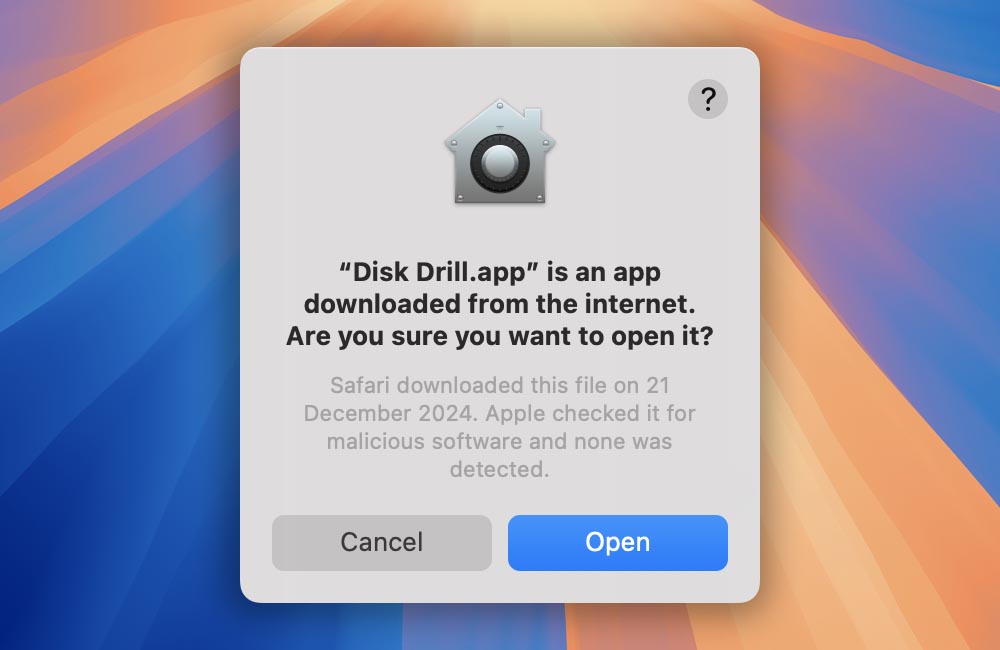
- Confirm App Launch. If macOS warns you that Disk Drill was downloaded from the internet, click Open to continue.
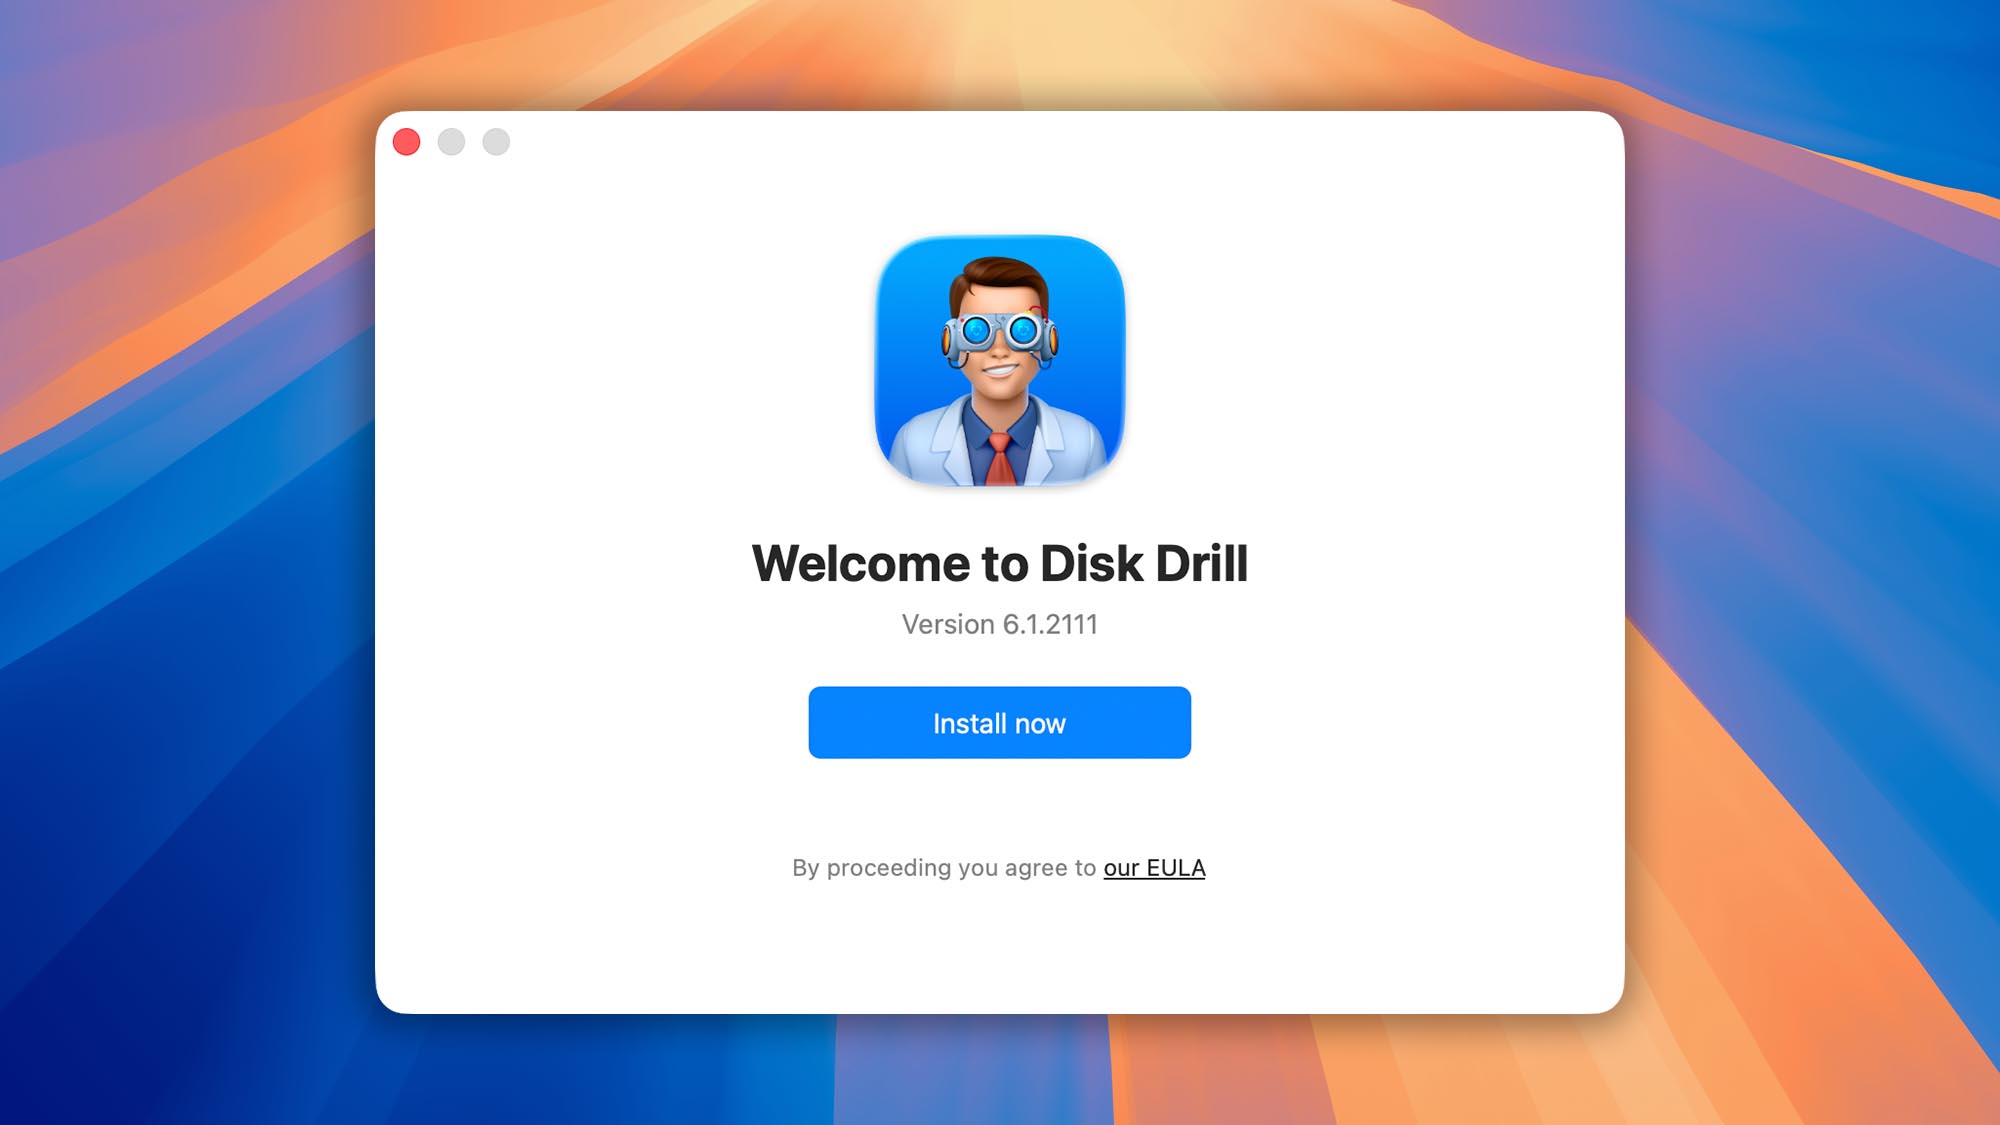
- Welcome Screen. On the first screen you see, click Install now. This will setup the cfbackd daemon, which handles tasks like constant disk communication and sending user notifications.
- ONLY FOR MACOS 13 AND EARLIER!
Enter Your Password. During this initial setup, you’ll be prompted once for your account password. Disk Drill requires administrative privileges so it can access your drives at a low level and thoroughly scan all of your lost data.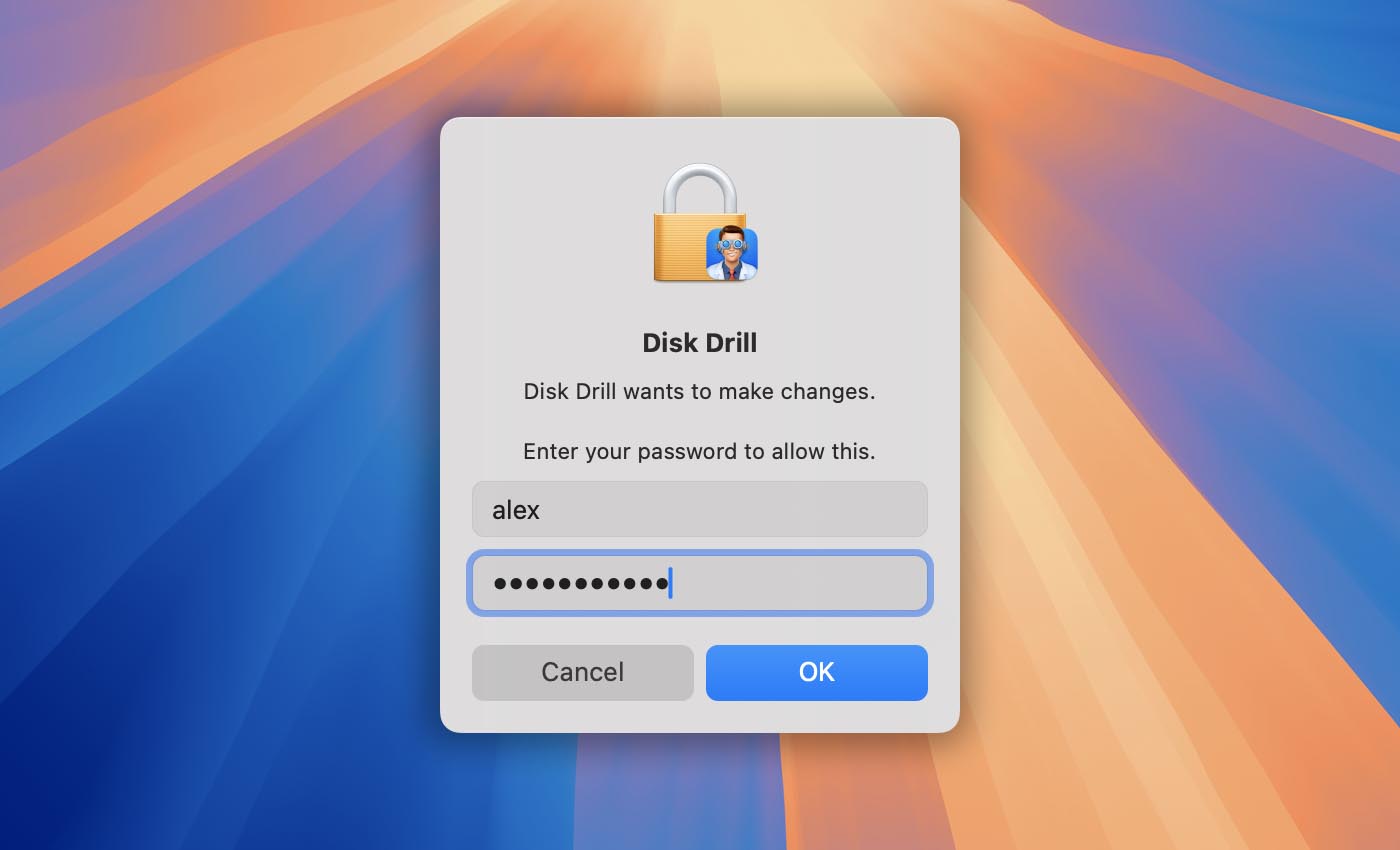
- Granting Disk Drill the necessary macOS permissions. Disk Drill needs specific system permissions to work correctly. The exact permissions depend on which version of macOS you’re using.➡️ For a more detailed explanation of why Disk Drill needs these permissions and how they are used, see our dedicated guides:
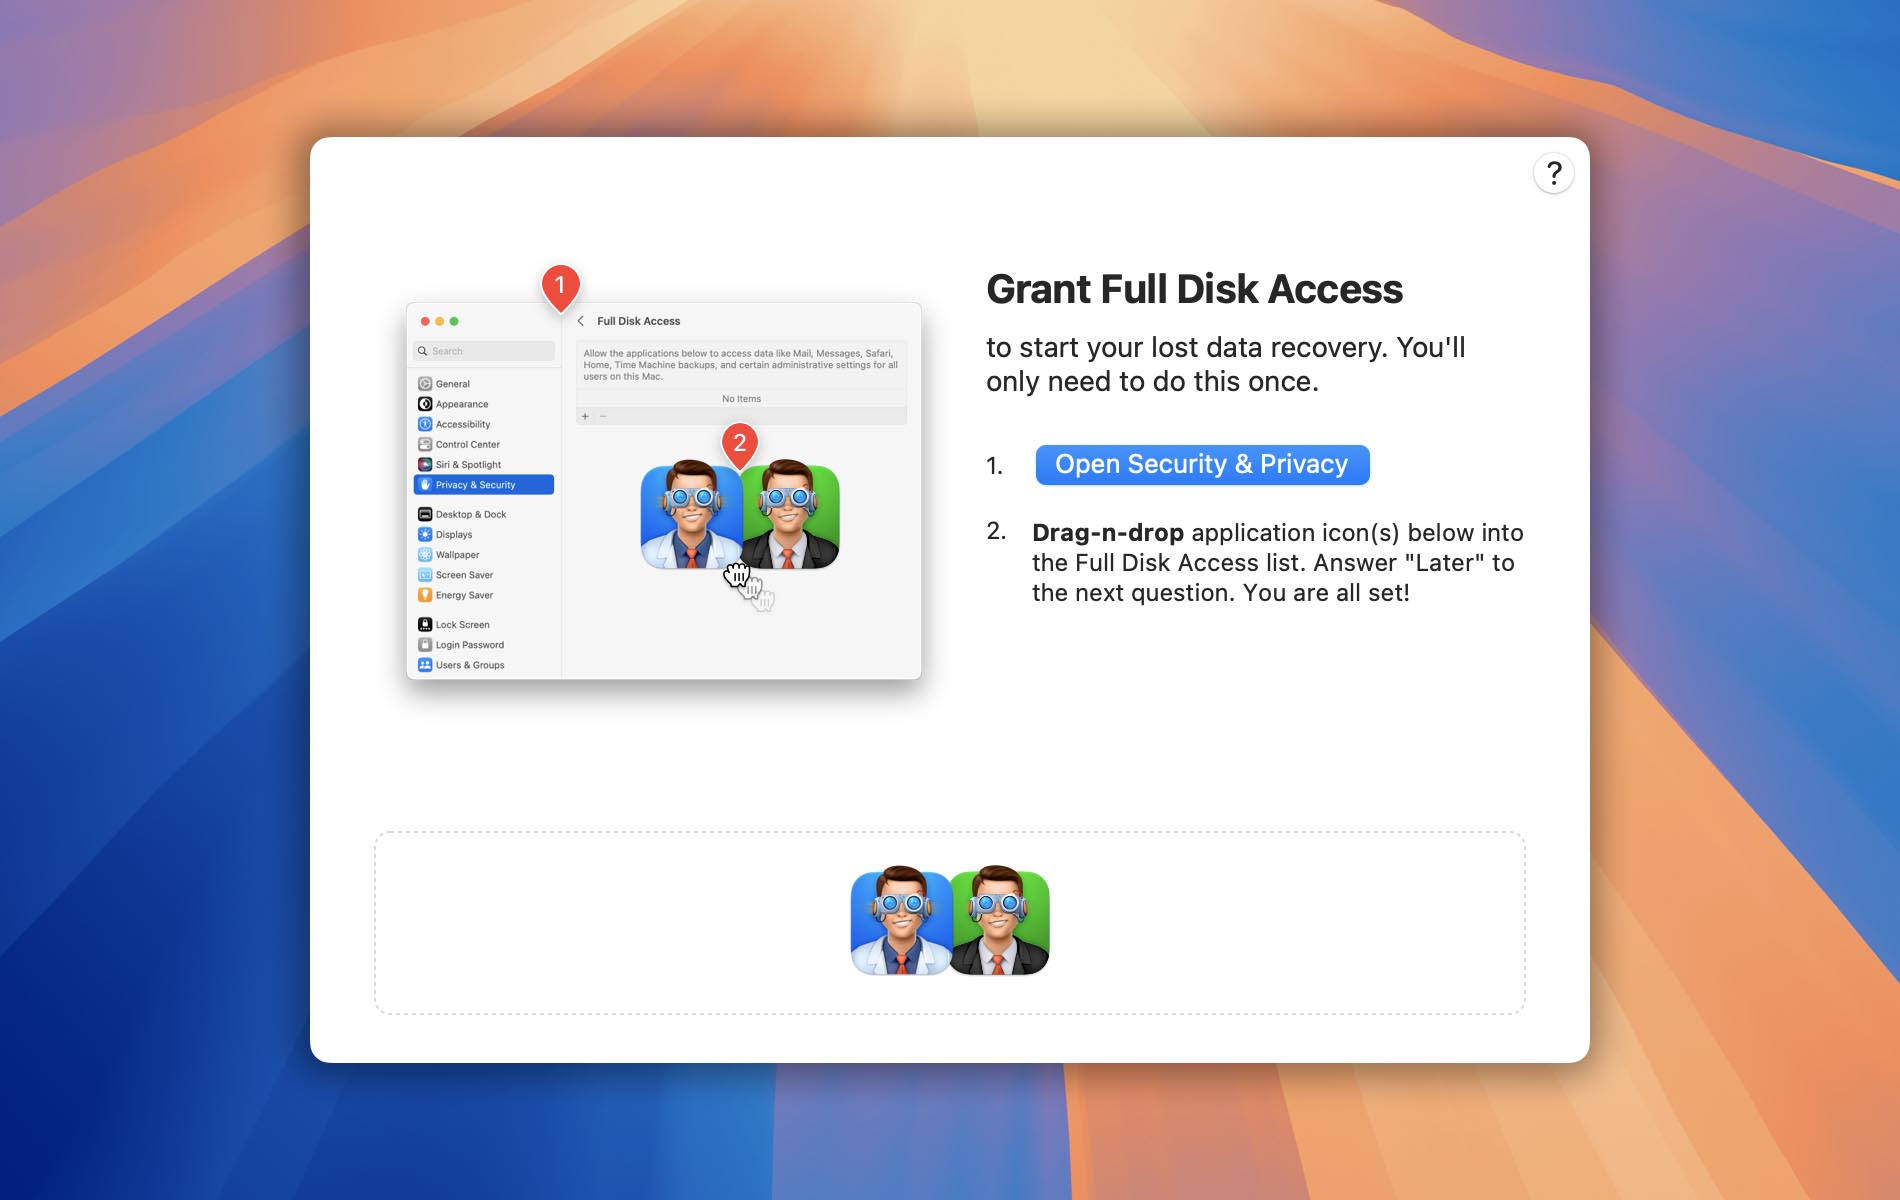
- macOS 13 and earlier. You’ll be asked to grant Full Disk Access to both Disk Drill and the cfbackd daemon. Full Disk Access is required so Disk Drill can read every byte of your drive and locate lost or deleted data.
- macOS 14 and later. With each new macOS release, Apple adds more security controls, so there are a few extra steps starting with macOS 14:
- Allow Background Activity. Allow Disk Drill to run in the background so it can, for example, monitor your disk’s health or protect your files using the Guaranteed Recovery module.
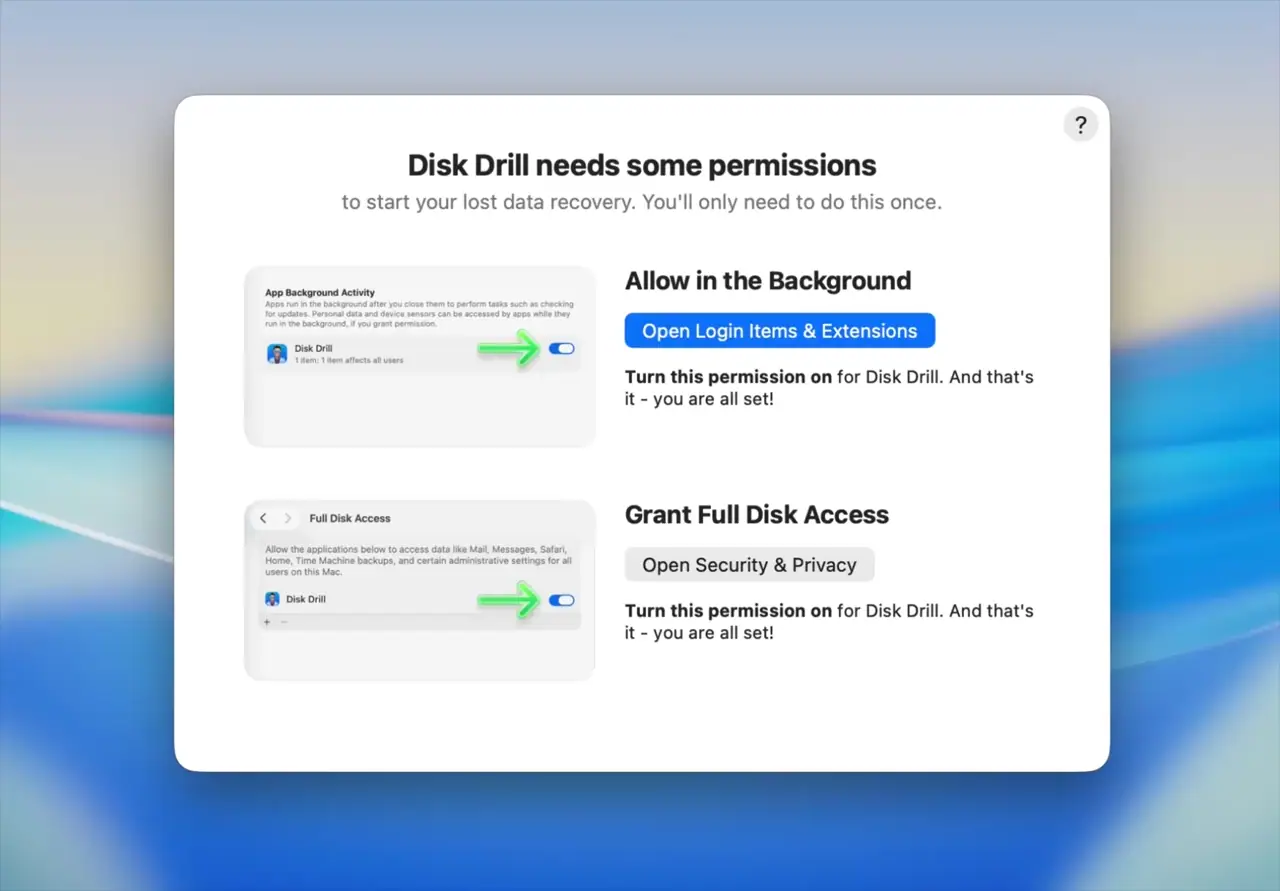
- Full Disk Access. Just like on earlier versions of macOS, Disk Drill needs Full Disk Access to scan your entire drive and find lost data.
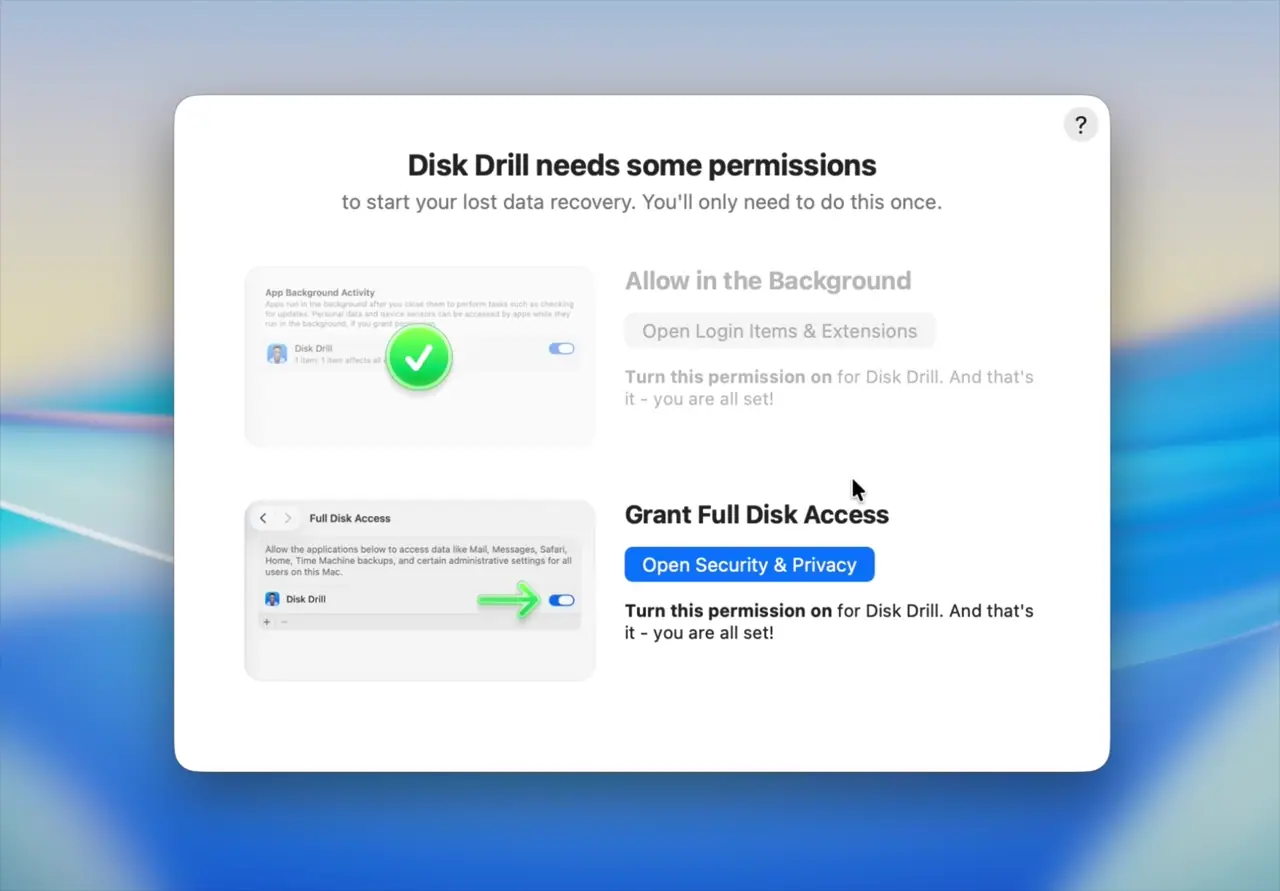
💡 Note: You may see a system notification about App Background Activity in the top‑right corner of your screen. You can simply close this notification – the permissions were already configured in the step above.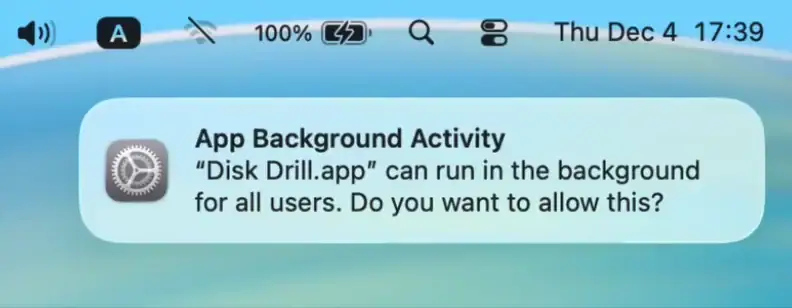
- Allow Background Activity. Allow Disk Drill to run in the background so it can, for example, monitor your disk’s health or protect your files using the Guaranteed Recovery module.
- macOS 13 and earlier. You’ll be asked to grant Full Disk Access to both Disk Drill and the cfbackd daemon. Full Disk Access is required so Disk Drill can read every byte of your drive and locate lost or deleted data.
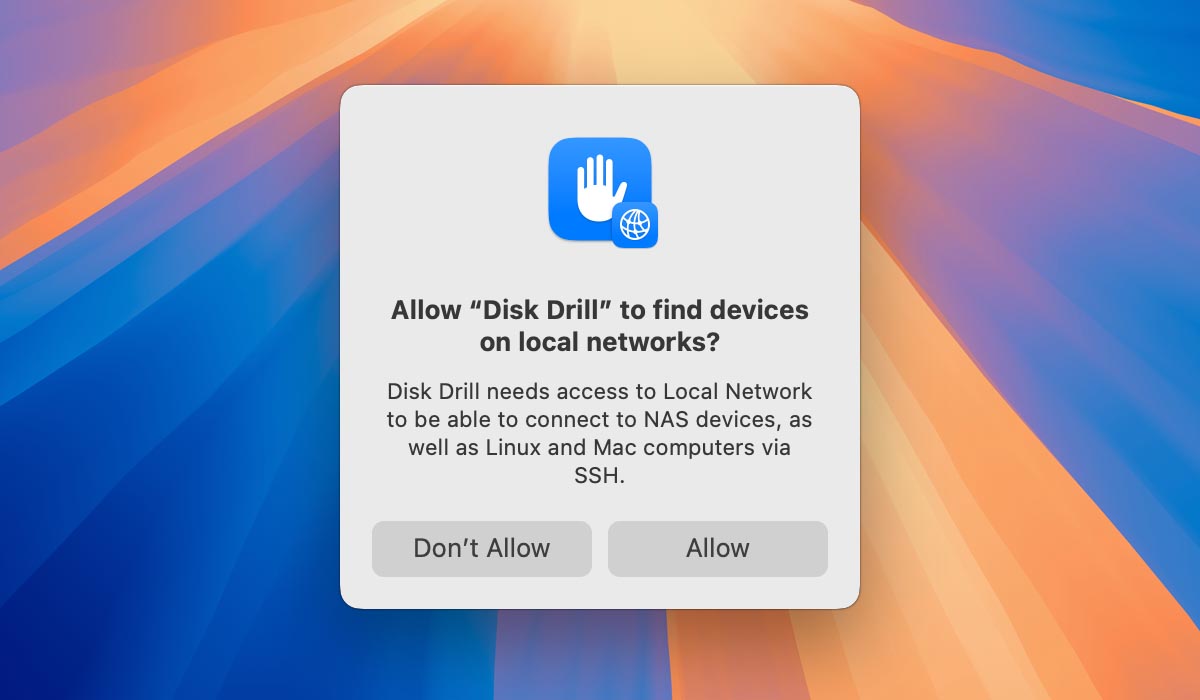
- Grant Local Network Access (macOS 15 Sequoia and Later). If you’re on macOS 15 Sequoia or newer, you’ll also need to allow access to your Local Network.➡️ See our article for more information about why this is required.
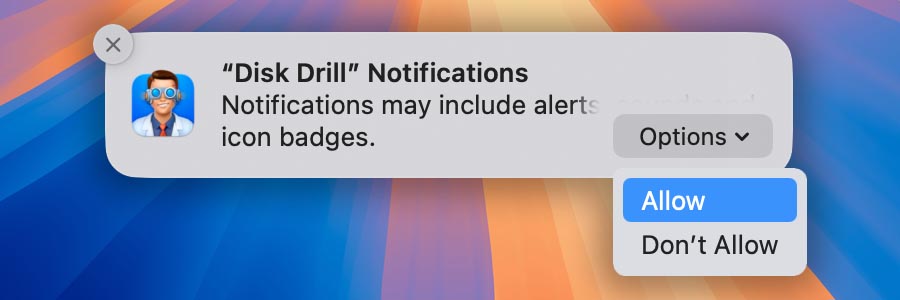
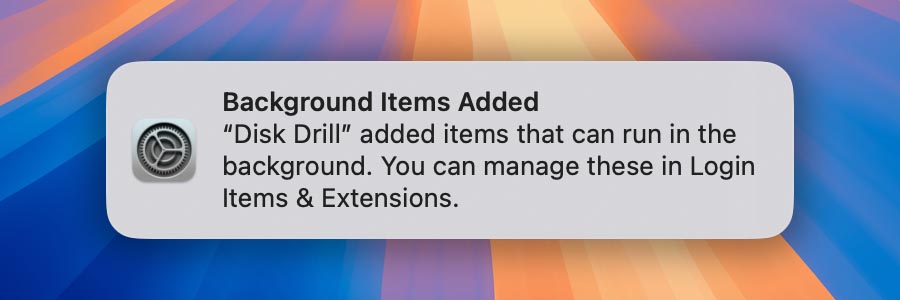
- Review System Notifications. After these steps, Disk Drill’s main interface will appear, and you’ll see two system notifications:
- Notification 1: Asks if you want to receive notifications from Disk Drill. Choose the option that best fits your preferences.
- Notification 2: Lets you know that cfbackd has been set to launch automatically each time your Mac boots. This is needed for Disk Drill to work properly and to monitor your drive’s S.M.A.R.T. status. You can simply close this notification.
- Notification 1: Asks if you want to receive notifications from Disk Drill. Choose the option that best fits your preferences.
- Explore Additional Built-In Modules. Disk Drill comes with several useful modules. Here’s a quick overview:
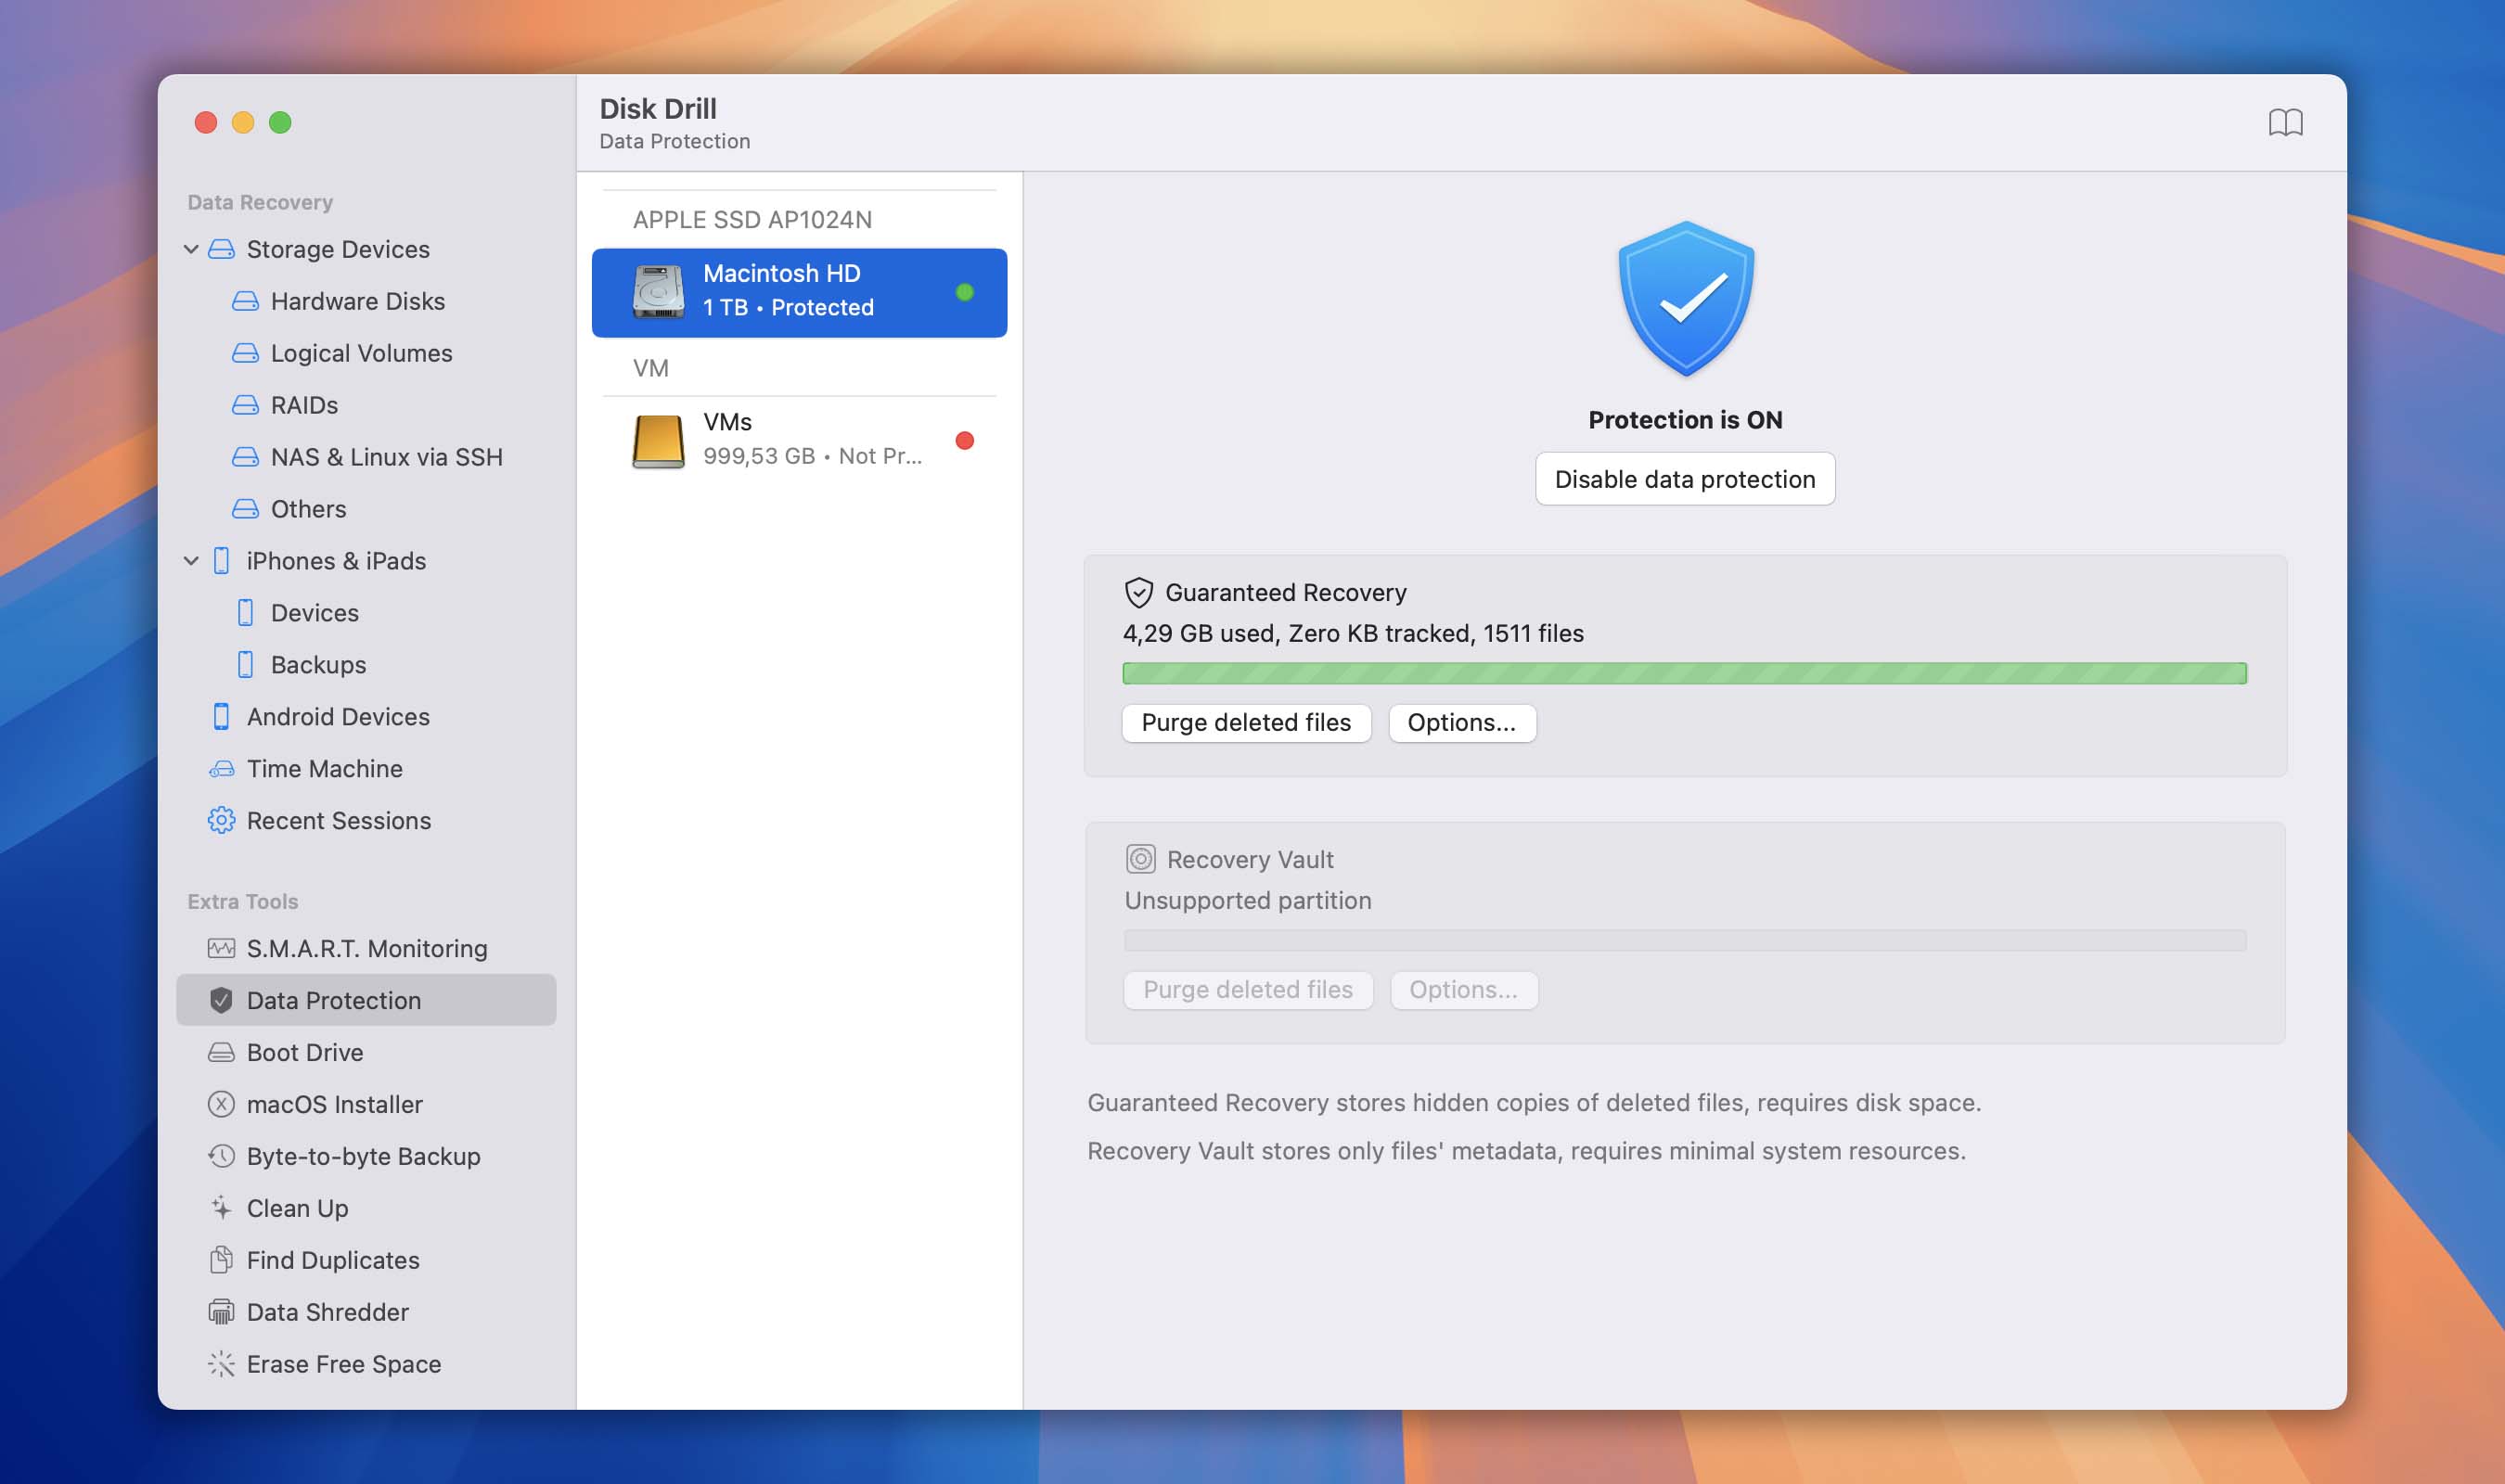
- Data Protection: Enabling this helps locate deleted files in the future. It logs file names and locations for all deleted files, which macOS file systems (HFS, HFS+, and APFS) otherwise wouldn’t save. Using Guaranteed Recovery makes it much easier to find and restore deleted files. ➡️ Learn more
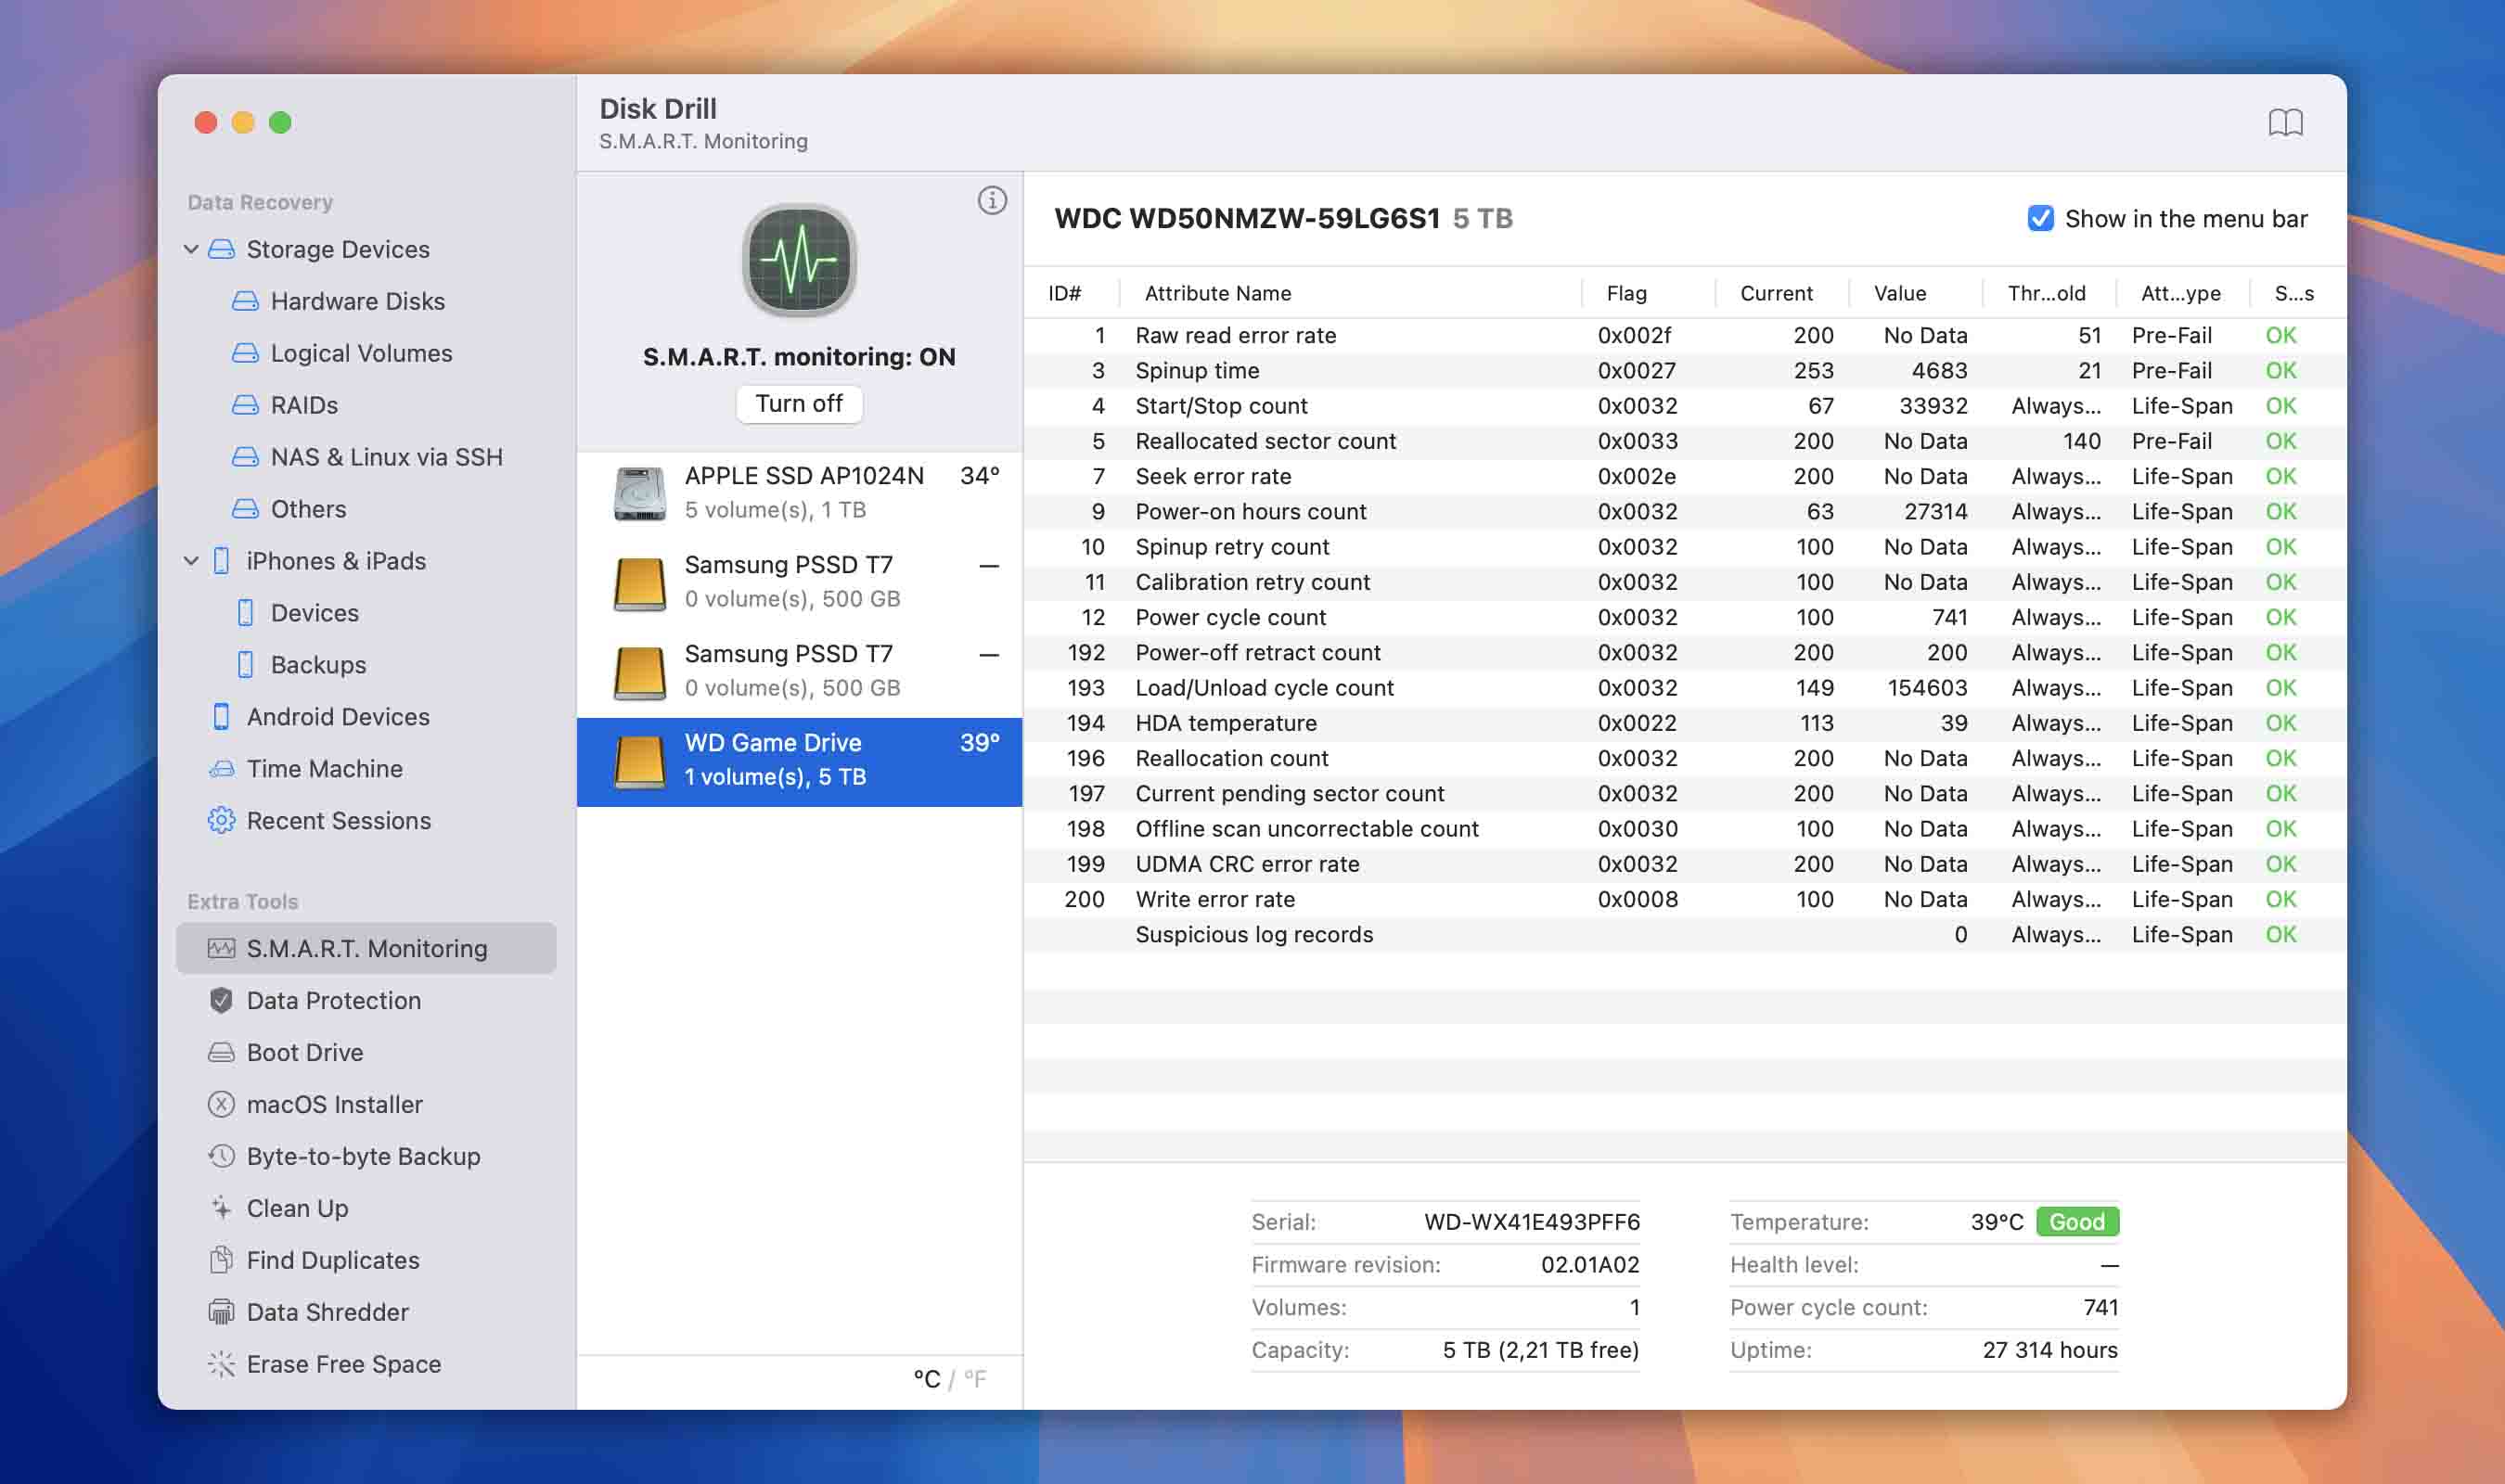
- S.M.A.R.T. Monitoring: S.M.A.R.T. (Self-Monitoring, Analysis and Reporting Technology) is built into your hard drive. Disk Drill can monitor this status and alert you if your drive shows signs of failure. ➡️ Learn more
- Mount Scanning Results as Disk: During the scan, this option lets licensed users view all the files Disk Drill finds as if they were on an external drive, making file recovery more straightforward. ➡️ Learn more

- Data Protection: Enabling this helps locate deleted files in the future. It logs file names and locations for all deleted files, which macOS file systems (HFS, HFS+, and APFS) otherwise wouldn’t save. Using Guaranteed Recovery makes it much easier to find and restore deleted files. ➡️ Learn more
- Install the System Extension (KEXT) if Needed. If you want to scan your system drive, you’ll need to install a system extension known as a KEXT.➡️ Our article explains what a KEXT is and how to install it.

- Continue to the Next Tutorial. You’re all set! Now head to our next guide: How to Recover Lost Files Using Disk Drill Basic.
Installing Disk Drill for Windows
Like most traditional Windows software, Disk Drill is installed through a dedicated setup file that’s only available from our official website. We also offer Disk Drill through the Microsoft Store. Any other source is not authorized or supported. Currently, we don’t provide a portable version of Disk Drill, but we plan to introduce one in a future major update. Let’s take a closer look at the initial setup process.
Installing Disk Drill Using the Official Installer
Follow these steps to install Disk Drill on your Windows computer using the installer downloaded from our official website:
- Download the Installer. Visit our download page to automatically get the correct version of Disk Drill for your system. Disk Drill supports Windows XP and later, including Windows Server 2003 and newer. If needed, you can also choose the specific version of Disk Drill from this list:
- Windows 10 (64 bit)/11 (64 bit, ARM) → Disk Drill 6.x
- Windows 10 (64 bit)/11 (64 bit) → Disk Drill 5.7
- Windows 7/8/8.1/10 (32 bit) → Disk Drill 4.5
- Windows XP & Vista → Disk Drill 2.0
- Save the Installer File. By default, the installer will be saved to your Downloads folder. If your browser prompts you to pick a location, simply choose your preferred folder and click Save.⚠️ Warning: Do not download the installer onto the same drive where your files were lost or deleted!
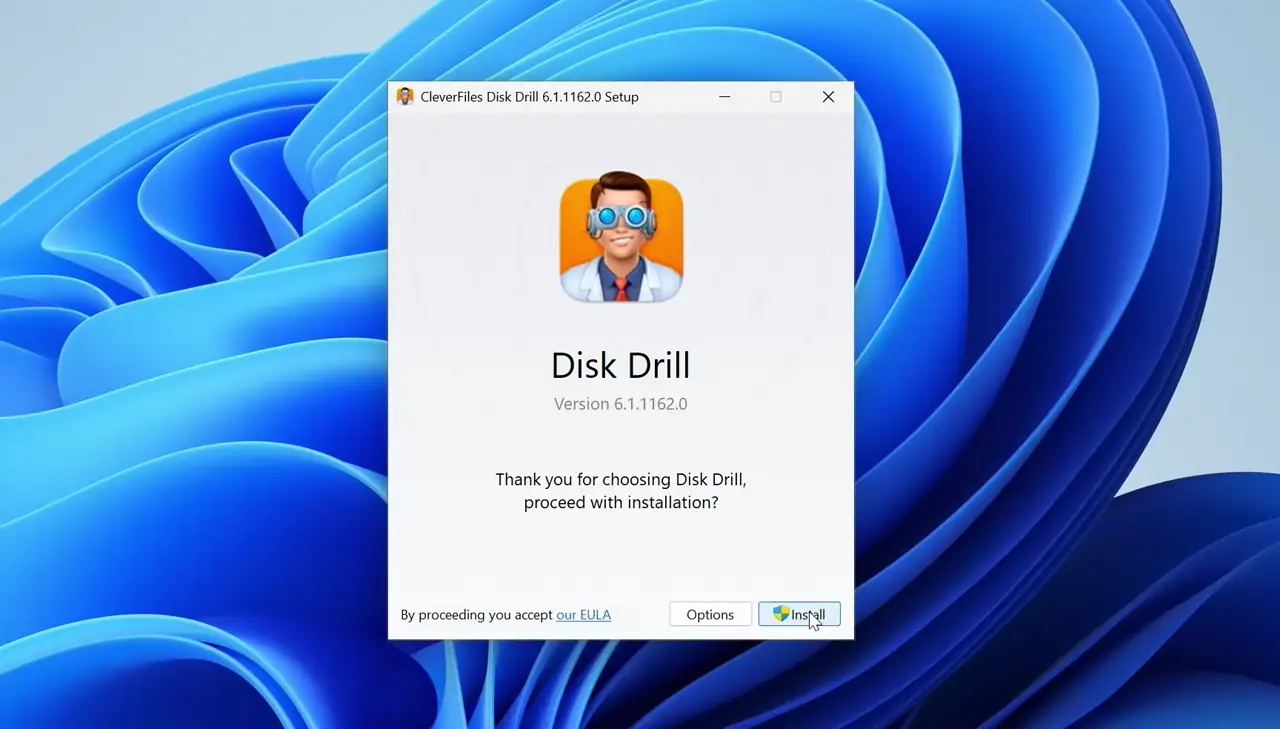
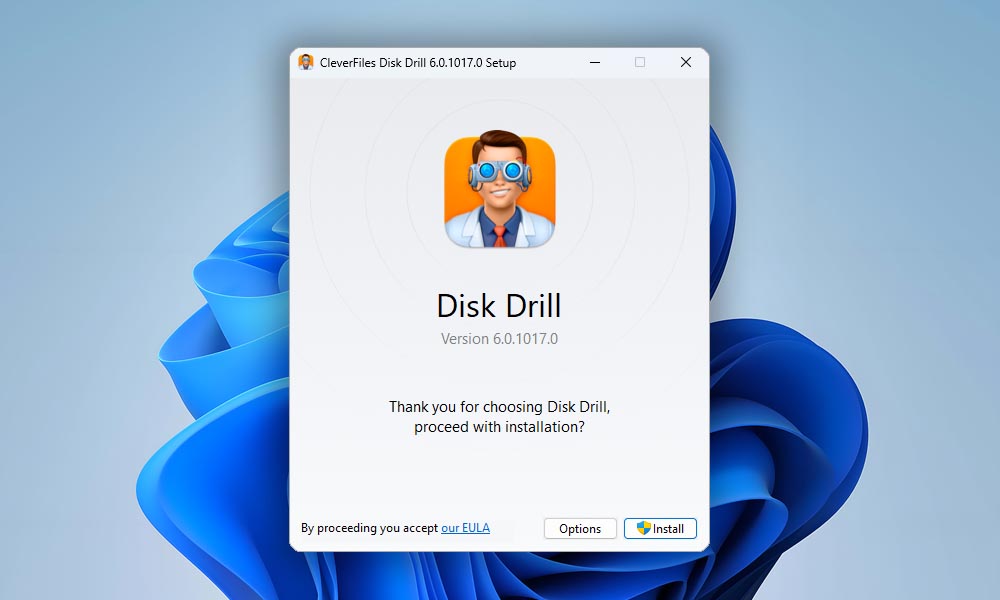
- Launch the Installer. Double-click the downloaded file to begin the setup process. If you want to change the default installation path, click the Options button before proceeding.⚠️ Warning: Never install Disk Drill on the same drive that contains the lost files you’re trying to recover.
- Complete the Installation. Click the Install button to finish setting up Disk Drill on your system. An active internet connection is required to complete the installation because the following components are downloaded during setup:
- .NET – a free, open-source framework for building apps;
- Microsoft Visual C++ Redistributable – runtime libraries for Microsoft C and C++ tools;
- Dokany – a user-mode file system for Windows.
Once the installation is complete, you can launch Disk Drill and begin recovering your lost data.
Installing Disk Drill from the Microsoft Store (Windows 10 & 11 x64 and ARM only)
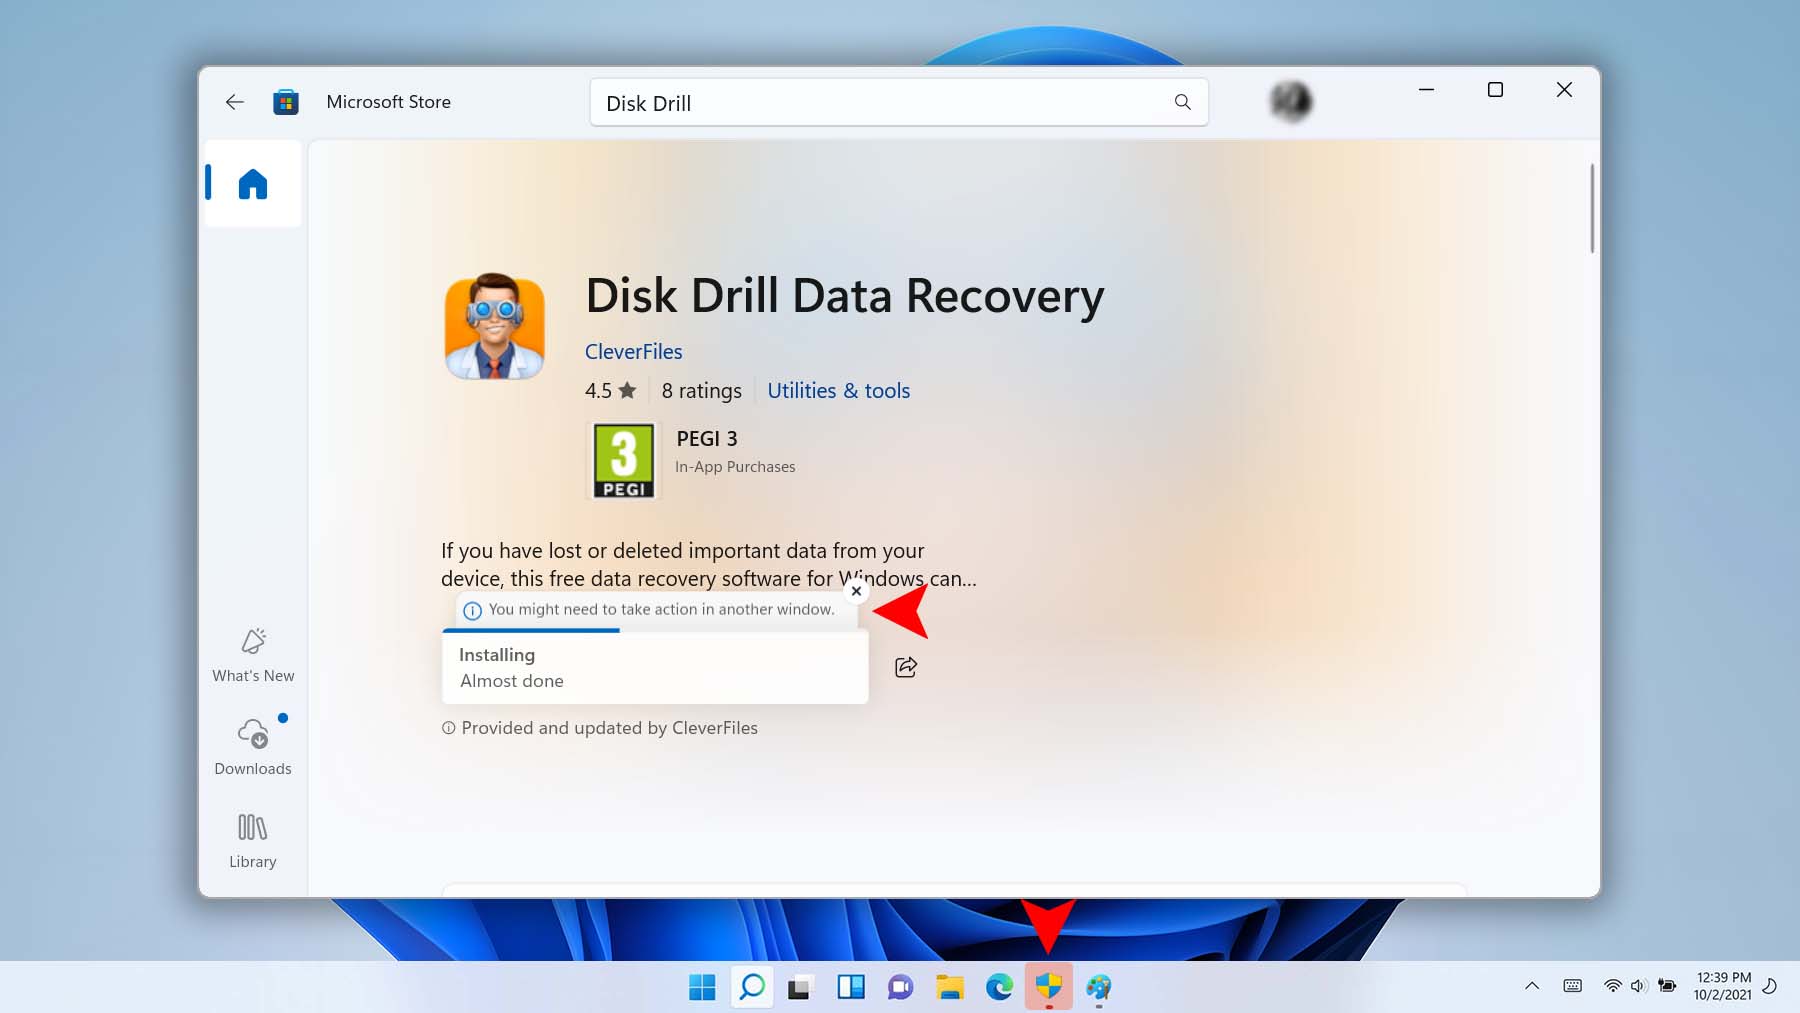
- Open the Disk Drill Page in the Microsoft Store. Visit the official CleverFiles page in the Microsoft Store, then click Install.
- Download the Setup File. Wait for the download to finish, which may take a few minutes depending on your internet speed. After the download, you’ll be prompted with a UAC (User Account Control) dialog that lets the Disk Drill installation begin.💡 Tip: Sometimes the UAC window doesn’t appear automatically. You may see a prompt on the taskbar saying, “You might need to take action in another window.” If so, locate the shield icon and click it to continue.
- Install Disk Drill. Click Install and wait for the installation process to complete.💡 Tip: If you encounter any issues installing Disk Drill, please contact our support team for assistance.
Extended Installer Version of Disk Drill
You may be wondering what exactly the “extended installer” of Disk Drill is. Simply put, it’s an offline version of our setup file that already contains all the necessary third-party libraries. This comes in handy if you need to install Disk Drill on a computer that doesn’t have an internet connection.
In a normal installation process (as described earlier), Disk Drill downloads these components—such as .NET, Microsoft Visual C++ Redistributable, and Dokany—from their respective official websites. This keeps the regular installer lightweight. However, if you don’t have internet access, you’ll need the extended installer, which includes all these libraries within the package. Because of that, the extended installer is significantly larger.
Below you’ll find direct links to download the extended installer version of Disk Drill:
- Windows 10 (64 bit)/11 (64 bit, ARM) → Disk Drill 6.x – Extended Installer
- Windows 10 (64 bit)/11 (64 bit) → Disk Drill 5.7 – Extended Installer
- Windows 7/8/8.1/10 (32 bit) → Disk Drill 4.5 – Extended Installer
First Launch of Disk Drill for Windows and Additional Useful Options
Let’s take a closer look at what happens the first time you start Disk Drill for Windows.
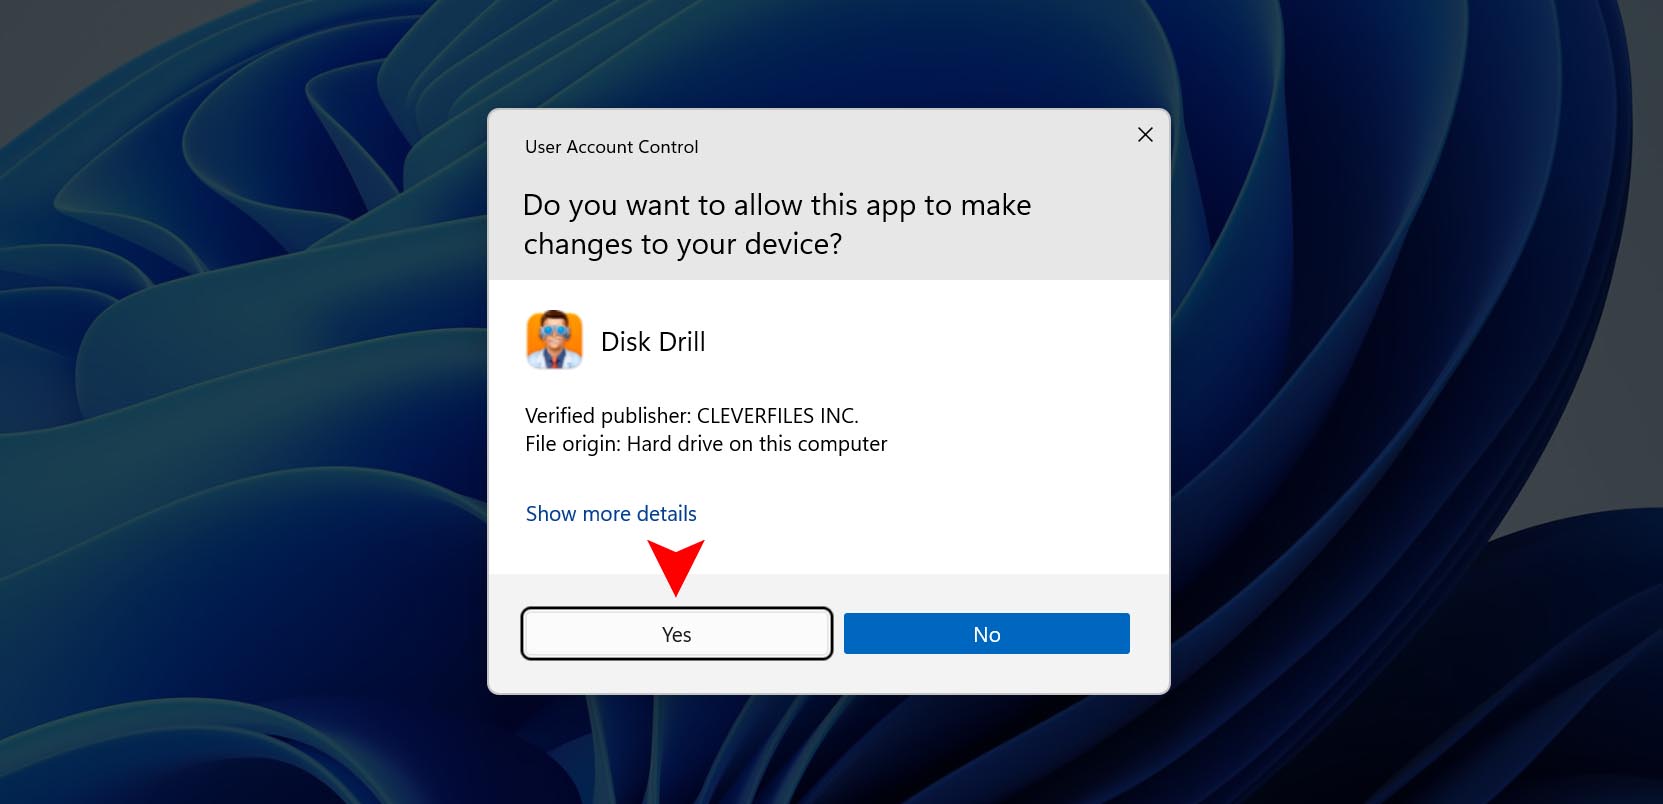
- Grant UAC Permissions. Disk Drill requires administrator privileges to access your drives at a low level. When the User Account Control (UAC) dialog appears, click Yes to proceed.
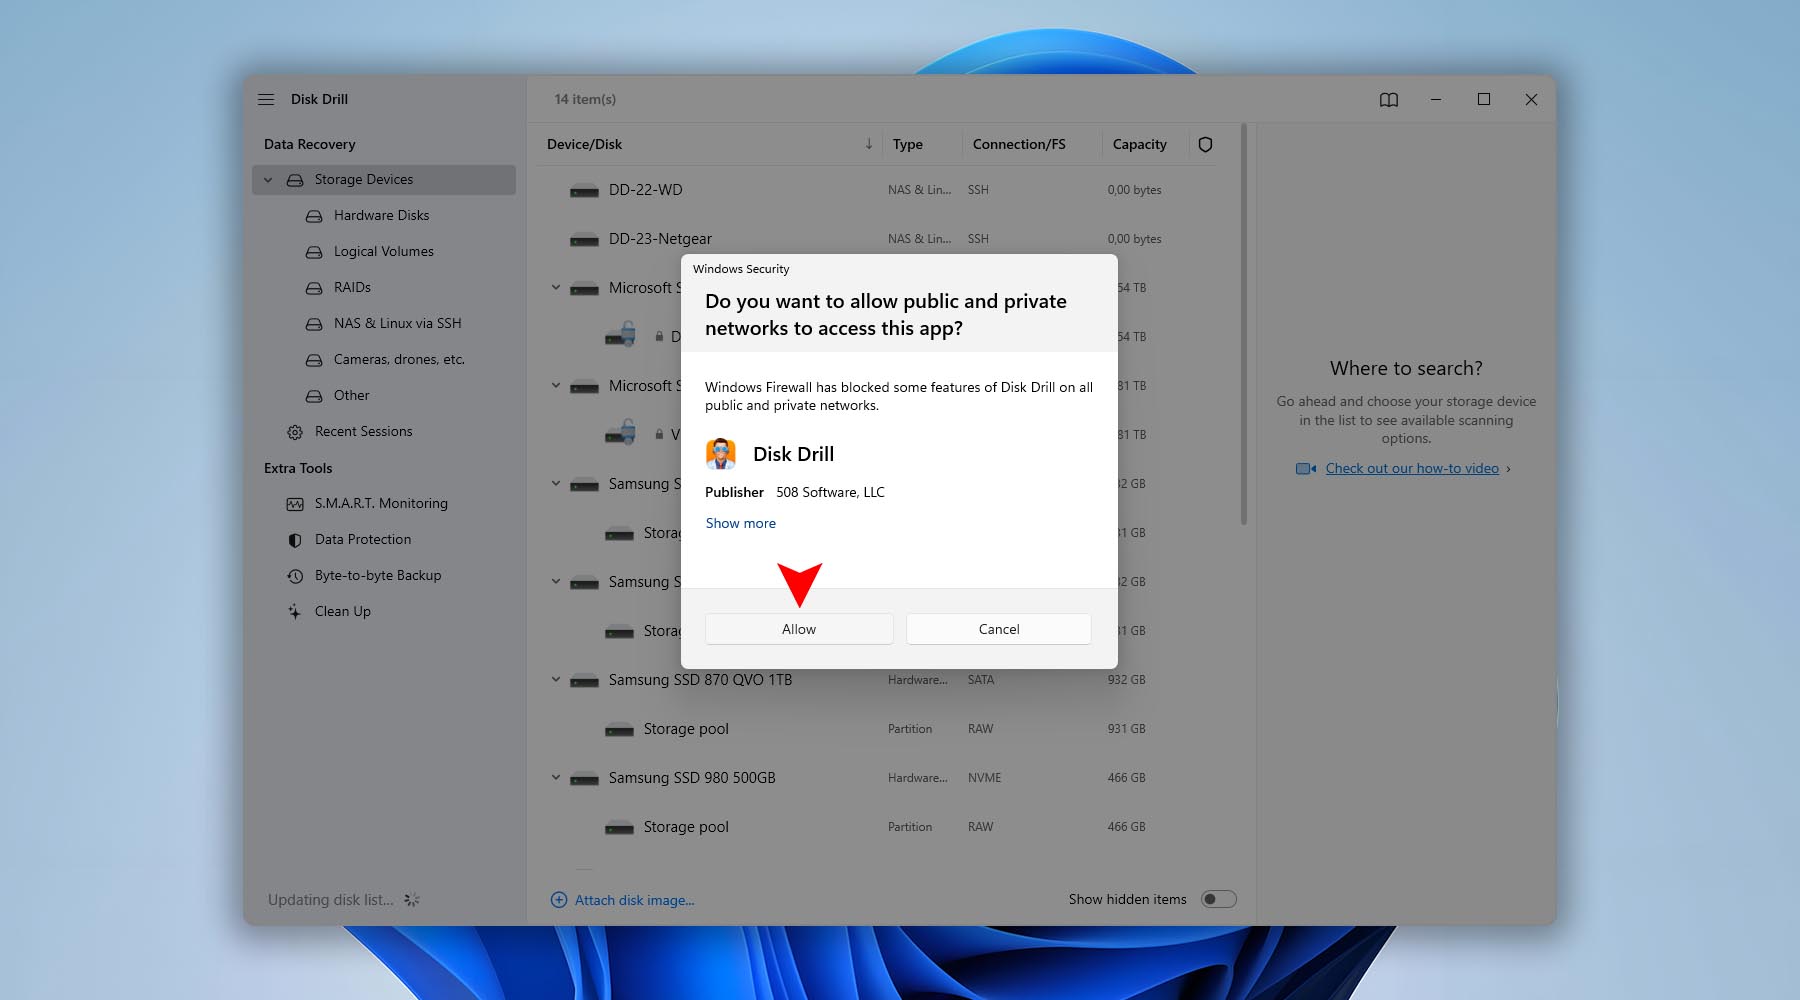
- Allow Network Access. If you want to recover files from a NAS or other network devices, be sure to allow Disk Drill to access your local network. ➡️ Learn more
- Explore Additional Useful Options. Disk Drill comes with several helpful features and modules. Here’s a quick overview:
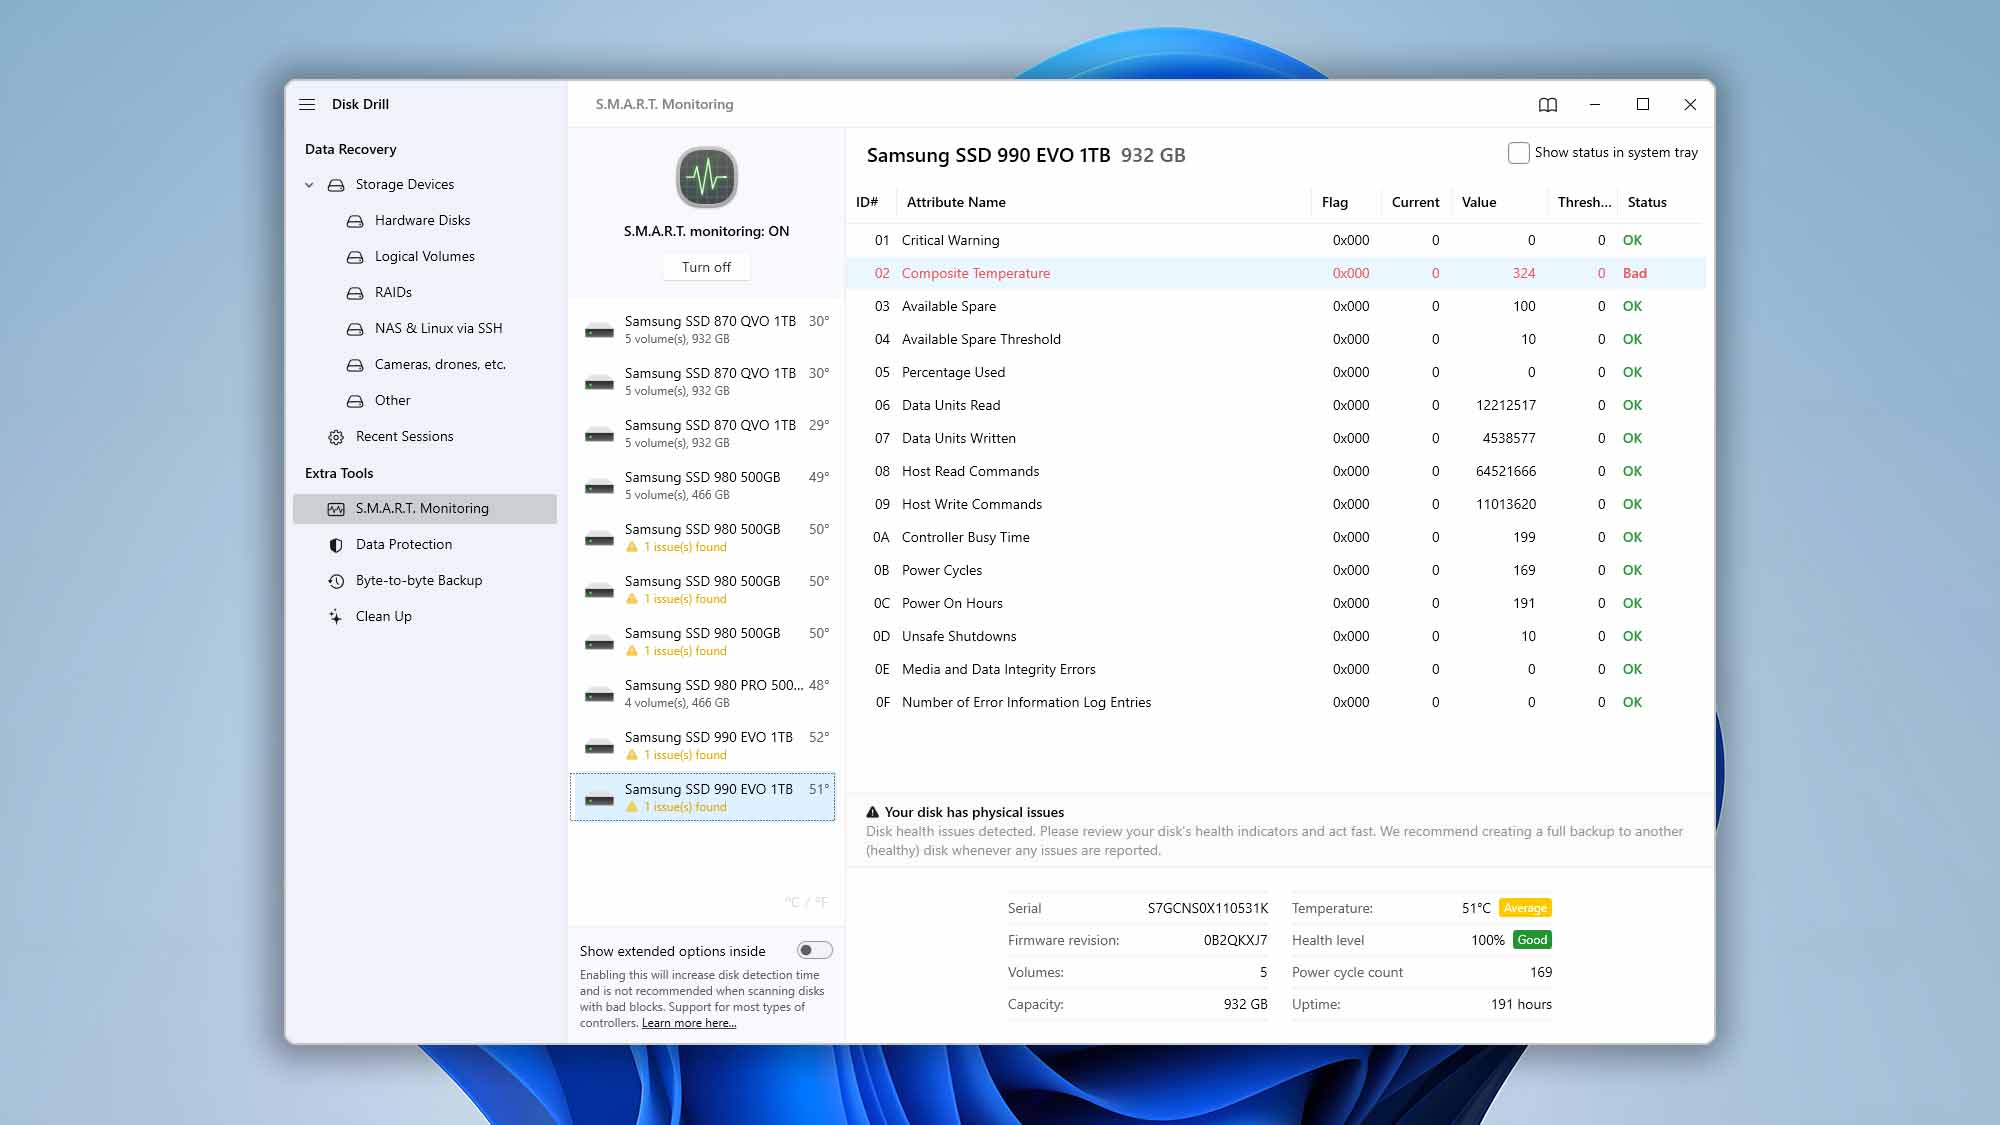
- S.M.A.R.T. Monitoring. Disk Drill can analyze your drive’s S.M.A.R.T. (Self-Monitoring, Analysis, and Reporting Technology) status and display detailed parameters in its interface. ➡️ Learn more
- Mount Scanning Results as a Virtual Disk. After scanning a supported device, the licensed version of Disk Drill can mount the scan results as a virtual drive. This lets you browse and access recoverable files as though they were on an external disk. ➡️ Learn more
- S.M.A.R.T. Monitoring. Disk Drill can analyze your drive’s S.M.A.R.T. (Self-Monitoring, Analysis, and Reporting Technology) status and display detailed parameters in its interface. ➡️ Learn more
Resolve Windows Installer Issues (When Disk Drill Won’t Install)
If you can’t install Disk Drill for Windows—or setup starts and then fails—Windows Installer may be blocked or corrupted. Use Microsoft’s official troubleshooter to automatically fix install/uninstall issues, then run the Disk Drill installer again:
➡️ Fix problems that block programs from being installed or removed.
After running the tool, restart Windows and launch the Disk Drill installer by right‑clicking it and choosing Run as administrator.
Fix “Could not load file or assembly …\DDCore.dll” in Disk Drill
If you see “Could not load file or assembly ‘C:\Program Files\CleverFiles\Disk Drill\DDCore.dll’” on Windows 11/10, Windows usually can’t load a required runtime or a system component is corrupted. Try the following, in order:
- Install the latest Microsoft Visual C++ Redistributable (2015–2022). Download the current packages from Microsoft and install both x64 and x86 on 64‑bit Windows: https://learn.microsoft.com/en-us/cpp/windows/latest-supported-vc-redist?view=msvc-170
- Install or repair the .NET Desktop Runtime (both .NET 9 and .NET 8). From Microsoft’s .NET downloads page, grab the Desktop Runtime (x64 or ARM) for .NET 9 and .NET 8. If they’re already installed, choose Repair: https://dotnet.microsoft.com/en-us/download
- Check system file integrity (SFC). Open Command Prompt (Admin) and run: sfc /scannow. Follow Microsoft’s guide if SFC finds issues: https://support.microsoft.com/en-us/topic/use-the-system-file-checker-tool-to-repair-missing-or-corrupted-system-files-79aa86cb-ca52-166a-92a3-966e85d4094e
- Repair the .NET Framework (if applicable). Use Microsoft’s official repair tool to fix older .NET Framework components that some apps still rely on: https://learn.microsoft.com/en-us/dotnet/framework/install/repair
After completing the steps: restart Windows, then right‑click the Disk Drill installer and choose Run as administrator. If the error persists, contact our support team.