Mac users can gain a wealth of information about their system with tools provided with their operating system. Clicking the Apple icon in the upper left corner and then choosing “About This Mac” allows you to investigate many details concerning the hardware and software components that comprise your system.
Utilities such as Activity Monitor, Terminal, and System Information also give you insight into the workings and performance of your machine. One of the most valuable and useful utilities is Disk Utility. Let’s take a look at what this application is and how you can use it on your Mac.
What is Disk Utility?
Disk Utility is a macOS and Mac OS X system utility that enables the user to perform tasks related to their hard disks and storage devices. Some of the things that you can do with Disk Utility are:
- Mounting, unmounting, and ejecting disks
- Partitioning of hard disks and storage devices
- Setting up and managing RAID disk sets
- Managing physicals disks and volumes
- Erasing and formatting disks
- Verifying the integrity of your storage devices
- Repairing damaged or corrupted storage device configurations
- Creation and conversion of disk images in various formats
In versions of the Mac operating system prior to El Capitan OS X 10.11, an option existed in Disk Utility that let you repair disk permissions. Starting with El Capitan, Apple instituted System Integrity Protection (SIP). This new security feature restricts the functionality of the root account on the operating system.
While protecting your system from inadvertent or malicious misuse of root access, certain functions, such as the repair disk permissions option in Disk Utility, are no longer available. It is a necessary trade-off between protecting your system and allowing the user to exercise more control over their environment.
Why You Need Disk Utility
Your system’s hard disks are a critical component in the performance and utility of your computer. They provide the secure location where all of the operating system code is stored, as well as the applications that make your computer useful to you. All of the digital photos, music files, videos, and documents that you create are stored on your hard drives.
Disk Utility can be beneficial in a number of ways. You might just be interested in gaining more insight into your hard disk or storage devices, and the tool will show you some statistics on how your drives are being used. Partitioning your drive is a good way to organize things and segregate certain files and applications, forcing them to use a different logical drive than the operating system.
Disk Utility is also a disk repair tool. Using the First Aid option, you can address problems with your hard drive and potentially repair a damaged or corrupted disk. Disk Utility can be used on your computer’s internal disks as well as peripheral storage devices that are attached to your machine.
How to Use Disk Utility
Let’s take a closer look at some of the more common ways you might need to use Disk Utility. First, you have to start the utility.
Starting Disk Utility on a Mac
Method 1
- Click on the Spotlight icon on the top right of the menu bar
- Type in “disk utility”
- Hit Enter to open Disk Utilities
Method 2
- Open a Finder window
- Click on Applications in the left window
- Scroll down and click on the Utilities folder
- Click on Disk Utility
Viewing Your Drives
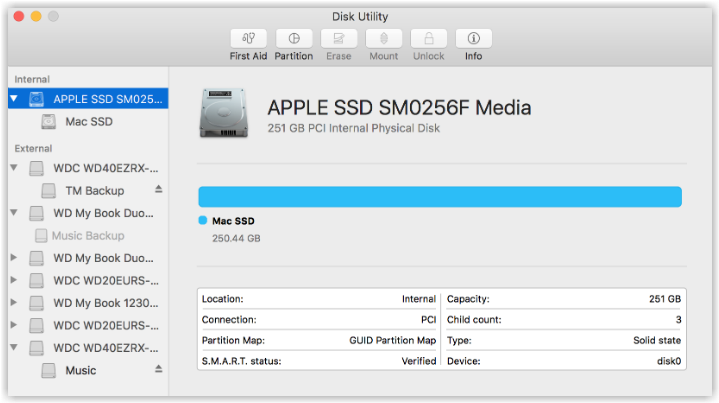
Upon opening Disk Utility you are presented with a view of the drives that are currently attached to your system. Internal and external drives are listed separately. The View drop-down in the top left corner lets you view all devices or just the logical volumes.
Select a volume or device by clicking on it to obtain information about your selection. You will see the currently used and free space on the disk as well as its capacity, mount point, type of drive, and the file system used on the disk. As you click on the drive, the procedures you can perform on the disk are highlighted on the top of Disk Utility’s menu. The options are:
- First Aid
- Partition
- Erase
- Restore
- Mount
A volume option is also on the top of the menu and allows you to add or delete volumes to a container if available for your selection.
Formatting a Disk
Here is the procedure to use when you want to format a disk.
- Click on the disk you intend to format.
- Select Erase from the top menu.
- Choose a name for your disk.
- Select the file system with which to format the drive.
- Select the partitioning scheme. Leave at GUID Partition Map unless you need something else.
- Click security options and choose how thoroughly to erase the data on the drive. A longer format will provide a more secure erasure of the data that was previously on the disk.
Care needs to be taken when formatting disks. An inadvertent format of the wrong disk can cause some serious problems and data loss, so proceed with caution.
Repairing a Disk
One of the main uses of Disk Utility is to repair a disk. You will want to perform this task if your hard drive is experiencing problems such as slow access time or missing and corrupted files. Follow this procedure to repair a disk.
- Click on the disk you need to repair.
- Select First Aid from the menu selections.
- Click the Run button to perform a disk check and then a repair if necessary.
- When complete, click on the Show Details option and you can see the state of your disk and if it did indeed need to be repaired.
Hopefully, after running First Aid, your disk problems will be resolved. If not, you may need to engage in further investigation. Make sure you have a good backup of the drive in case it’s on the way out.
Mounting and Ejecting Disks
Disks that appear in the listing of available devices are normally already mounted. You will be able to Mount or Unmount the disk based on its current state. These options are on the top menu and are only highlighted when the command can be used on your selected disk.
Restoring a Disk
Disk Utility can also be used to restore a disk from another connected disk. The restore function destroys all data on the destination disk so should be used with caution.
- Click on the drive to be restored.
- Select Restore from the top menu.
- Choose the disk that will be used to restore data to your target disk.
- Click Restore and let Disk Utility restore the disk.
Disk Utility and Disk Drill
While Disk Utility is a great tool that allows you to better understand your disks and perform many important tasks on them, it does have certain limitations. You may find that running First Aid is not enough to repair your disk and make it fully operational again. Perhaps you have to perform a data recovery and need to employ a specialized tool such as Disk Drill data recovery software.
Disk Drill can help you recover lost and deleted files from formatted drives. There is a known anomaly that can rear its ugly head when attempting to use Disk Drill to enact a data recovery. The issue is that a disk may appear in Disk Utility but is not visible to Disk Drill.
If confronted with this problem, your first action should be to make sure that the volume is mounted in Disk Utility. If it is mounted and still is not visible to Disk Drill, contact technical support at CleverFiles. They will work through the problem and troubleshoot the issue with you.
Disk Utility and Your Mac
We hope that this overview of Disk Utility illustrates the benefits that it can afford Mac users. It is an easy to use utility that you should become familiar with as a way to maintain the vital data stored on your hard disks.