⏳ Time required: 15 min or less
🕹️ Extra devices: any USB flash drive, 8GB+
Problem Overview
In order to recover data from your startup drive, Disk Drill requires read-only access to it. To bypass the built-in file system protections in macOS 10.11 (El Capitan), 10.12 (Sierra), 10.13 (High Sierra), 10.14 (Mojave) and 10.15 (Catalina), you can boot from another drive and run Disk Drill from it, accessing your original startup drive as if it’s a regular secondary disk. This is actually the recommended process of recovering data anyway, it lets you recover your data in the safest way possible; your system is idling and not actively overwriting your potentially recoverable files.
Step #1: Select the Source
The bootable drive we are creating here will NOT let you reinstall your macOS, instead, we are creating an emergency data recovery drive that will let you run Disk Drill on any compatible Mac. Begin by selecting your Recovery HD as a source of boot files. On the main screen of Disk Drill, choose “Create boot drive” and then “Boot drive for data recovery”. Disk Drill will list all available drives.
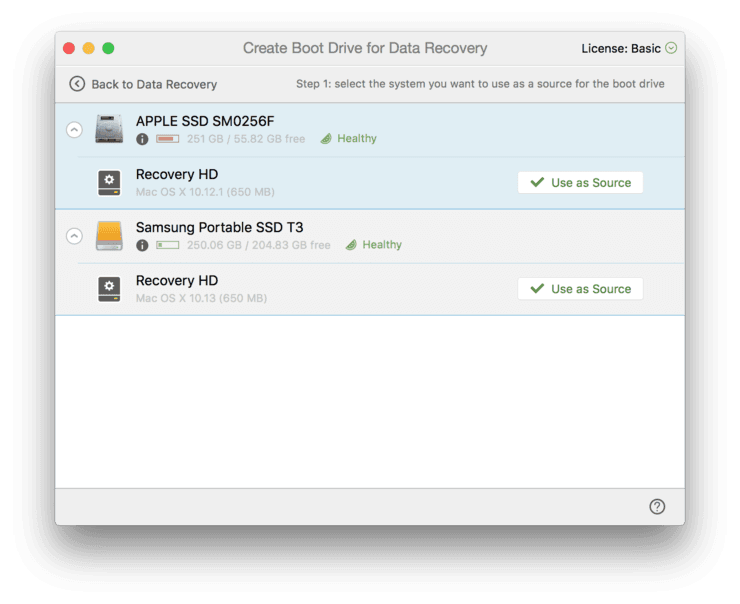
This will most likely be your primary hard drive.
Step #2: USB Drive
Insert your USB flash drive and select it in Disk Drill as the destination.
Step #3: Creating Boot Drive
Allow a few minutes to create the macOS bootable drive with Disk Drill.
![]()
🎉 Congratulations! You are almost done.
Final step: Reboot your Mac
Once done, reboot your Mac holding the Option key down (⌥). Choose “DiskDrill Boot” in the list of available boot partitions and run it.
![]()
You are now ready to safely recover your data from both internal and external drives attached to your Mac.
FAQ
Yes, in order to create a bootable USB drive, Disk Drill will format it erasing all the data. Make sure the thumb drive used does not contain anything valuable on it. Don’t worry, Disk Drill will warn you of all the actions it’s going to take.
Of course, you can create a bootable drive out of any USB storage device that can be attached to your Mac and is larger than 8GB.
To complete data recovery from the startup disk on 10.11 (El Capitan), 10.12 (Sierra), 10.13 (High Sierra), 10.14 (Mojave) and 10.15 (Catalina), we also recommend connecting your Mac in Target Disk Mode or temporarily lowering System Integrity Protection settings.
We are aware of similar cases when users can’t access their internal drives even though their computers boot from external storage devices. When this happens, most probably your internal drive still happens to be under active protection of SIP (System Integrity Protection). We recommend disabling it for the time when you need to recover data from your internal drives. It’s simple and totally safe, you can re-enable it back after your files are recovered.
If you are looking for the solution for macOS 11.0+, please check out this article. The post will guide you through the process for the macOS 11.0+ and will help you to recover your data safely and successfully. The installation process might be different but rest assured, it will yield excellent results, as it always does.