You’ve tried to access an SD card filled with irreplaceable photos and videos, but it appears as RAW for some reason. Have your files vanished? Is there any way to get them back?
In this article, we’ll go over the potential causes of such issues and the best methods you can use to recover data from a RAW SD card.
Is it Possible to Recover Data If Your SD Card Is RAW?
In most cases, it’s possible to get your files out of a RAW SD card and fix it to render it usable again.
Storage devices appear as RAW when the operating system doesn’t recognize their file system. This can happen when the file system is somehow damaged or corrupted, like after an interrupted format process or an abrupt removal of an SD card. The issue might often be a simple incompatibility, like formatting an SD card on Android using a Linux-friendly file system and then trying to access it on a Windows-based PC.
It’s important to note that even when an SD card is showing up as RAW, your files still exist on it but are inaccessible because, to put it simply, “the operating system doesn’t know how to find them”. That’s where data recovery apps can help since they specialize in recovering files from RAW SD cards by locating their fragments and reconstructing them into usable files.
Recover Your Files From A RAW SD Card With Recovery Software
Recovering your files can be relatively effortless if you use specialized RAW SD card recovery software that’s user-friendly and can produce usable results. However, there are some caveats to consider.
Out of dozens of data recovery solutions, we consider Disk Drill one of the best RAW SD card recovery apps. Even if an SD card’s file system is RAW or entirely absent, Disk Drill can directly analyze it, locating remnants of a file system, identifying folder structures, and reconstructing fragmented files while preserving their original names.
There are many reasons an SD card may “turn RAW”, but the worst scenario is that the card’s hardware, its memory chips or controller, might be on the brink of failure. In such a scenario, the more you use an SD card, the closer it gets to the point of no return.
Finally, when you’ve checked that all your files are safe and intact, you can try to fix and keep using your RAW SD card. However, note that for simplicity’s sake, we’ll work directly with an SD card instead of backup images in this article.
To recover data from a RAW SD card follow these steps:
1. Download & Install Disk Drill
Download Disk Drill on your Windows or macOS, install, and run it.

2. Select and Scan your RAW SD card
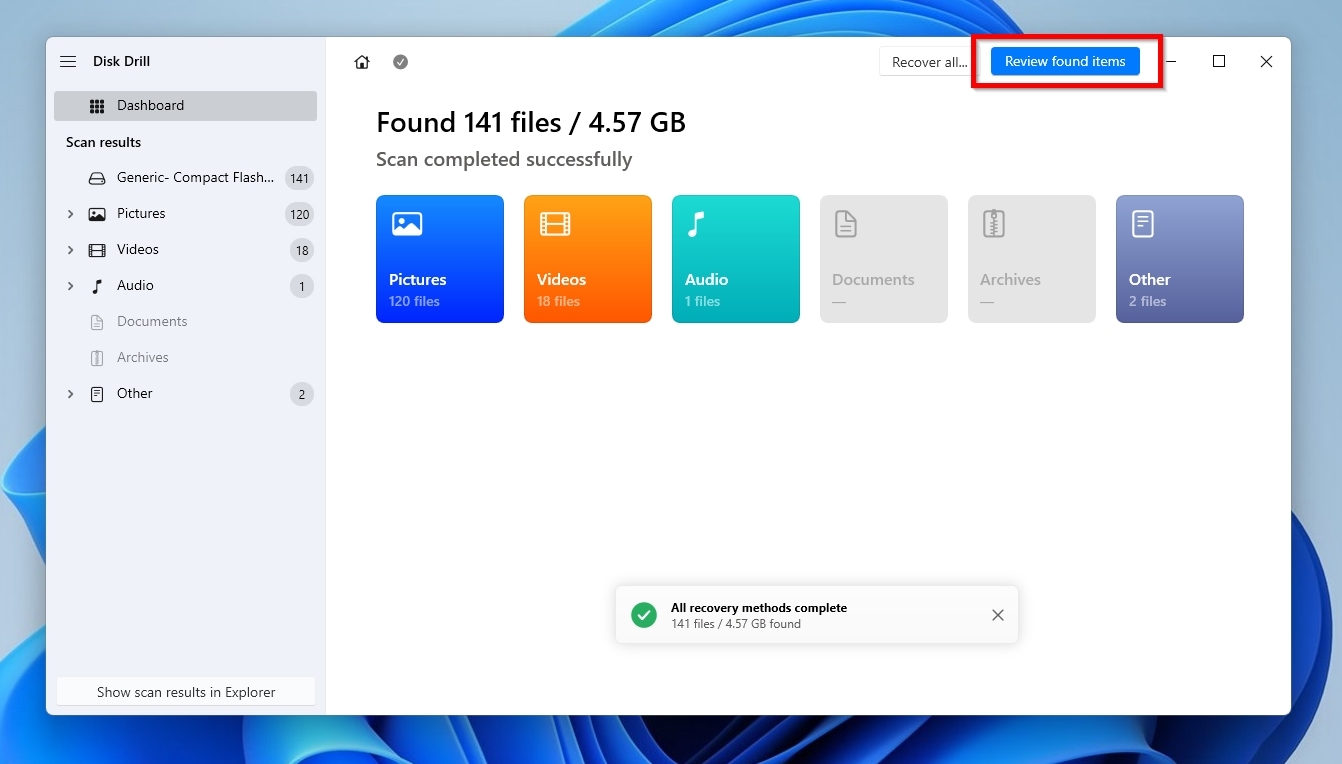
Select your RAW SD card from Disk Drill’s Device/Disk list. Note that you might see your card reader instead of the actual RAW SD card. Click Search for Lost Data, and wait for the scan process to complete. When done, click Review Found Items.
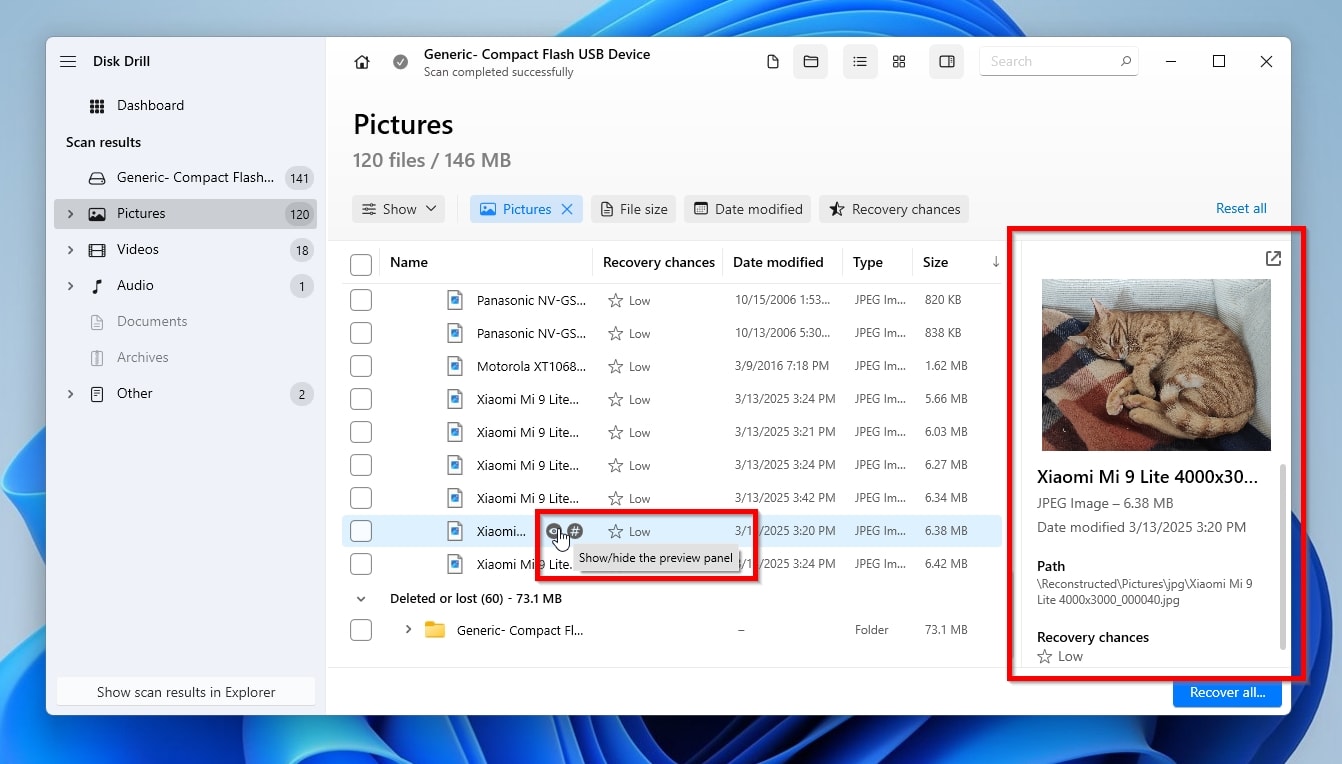
3. Locate files on your SD card using categories, filters, & previews
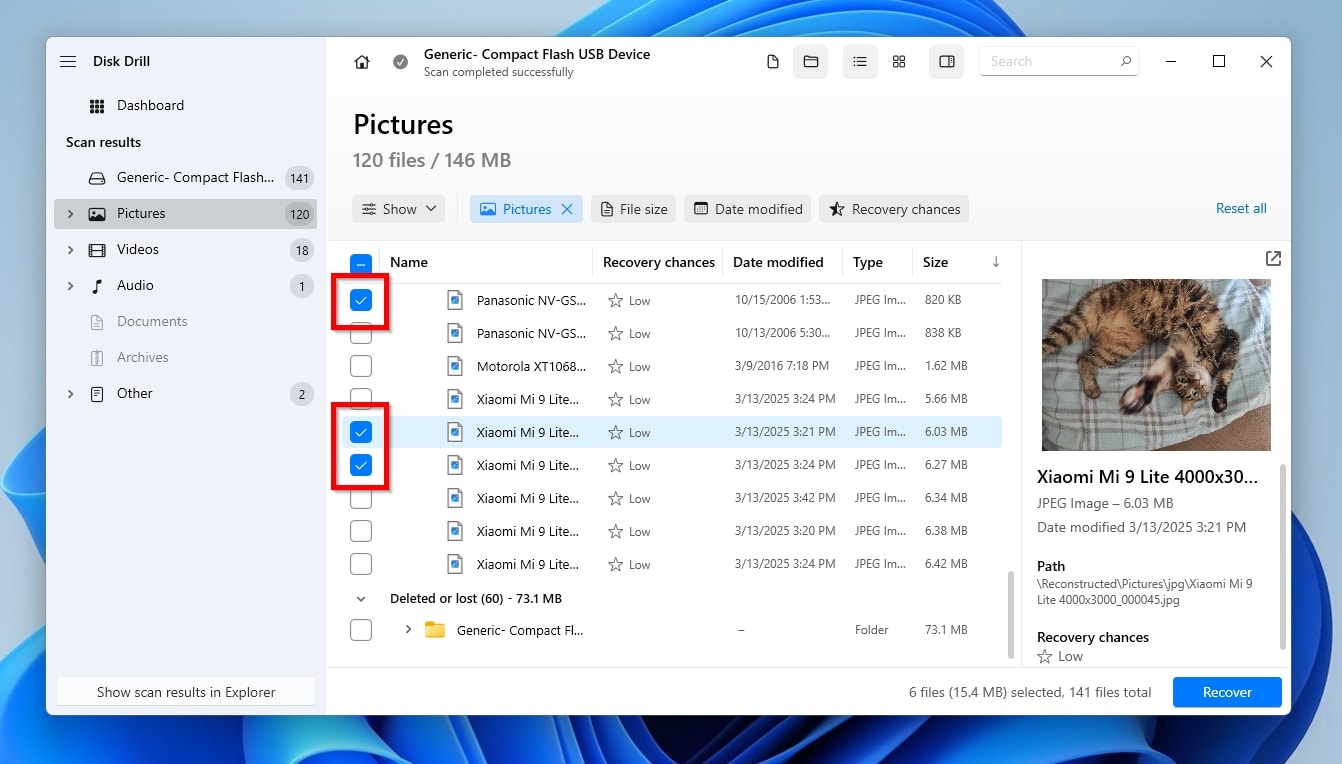
Use the app’s Categories (left) and Filters (above the results list) to locate the files you want to get back, based on properties like their file size, last modification date, type, etc. Right-click on each of them and select Preview to verify that you found the correct ones.
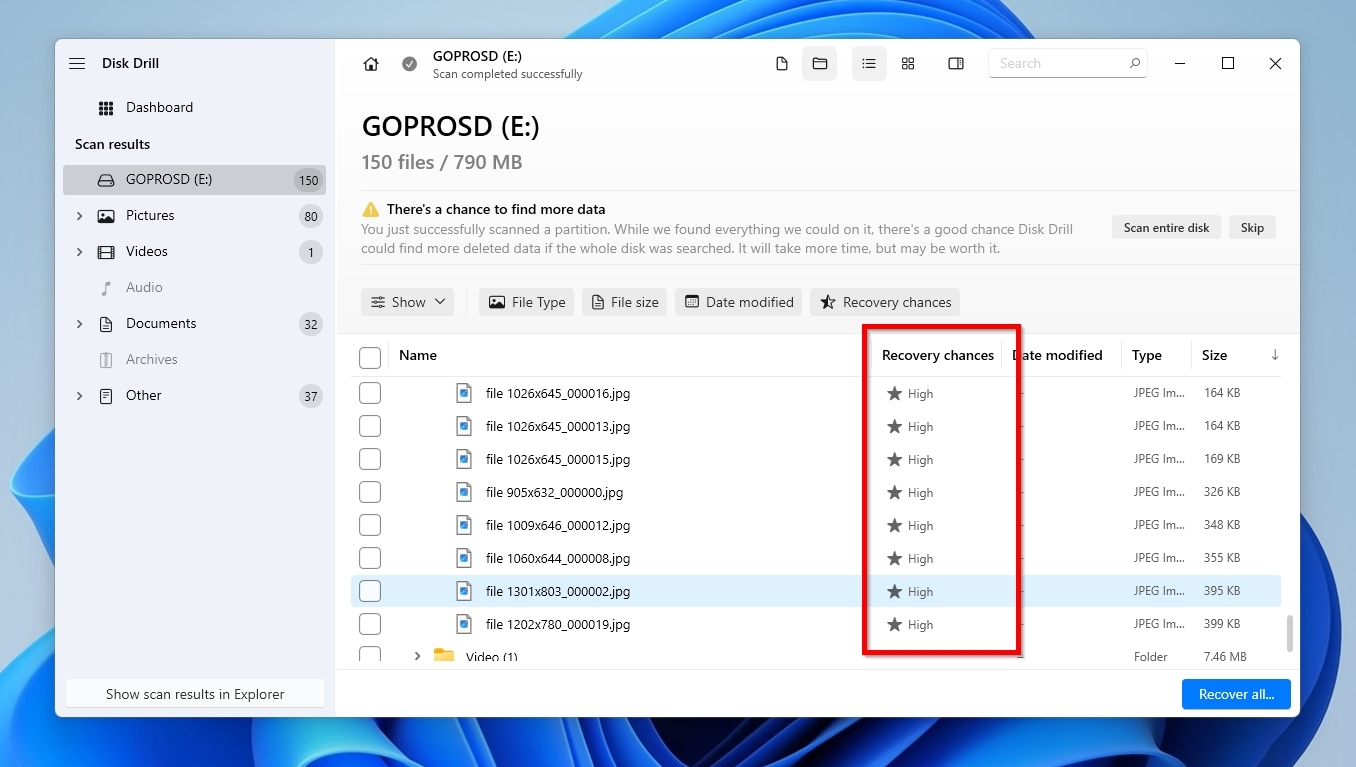
4. Prioritize files by recoverability chances
In case of a failing SD card, it’s best to prioritize the files you recover by their recovery chances. That’s crucial especially when dealing with a rapidly failing device, since files with higher chances or recovery require less time to “pull them out” of the SD card and in working condition before it fails.
5. Select files for recovery from your RAW memory card
Mark the files you want to recover by placing a check mark on their left. Then, click Recover. “Tell” Disk Drill where you prefer to store the recovered files. Click Next to start the recovery.
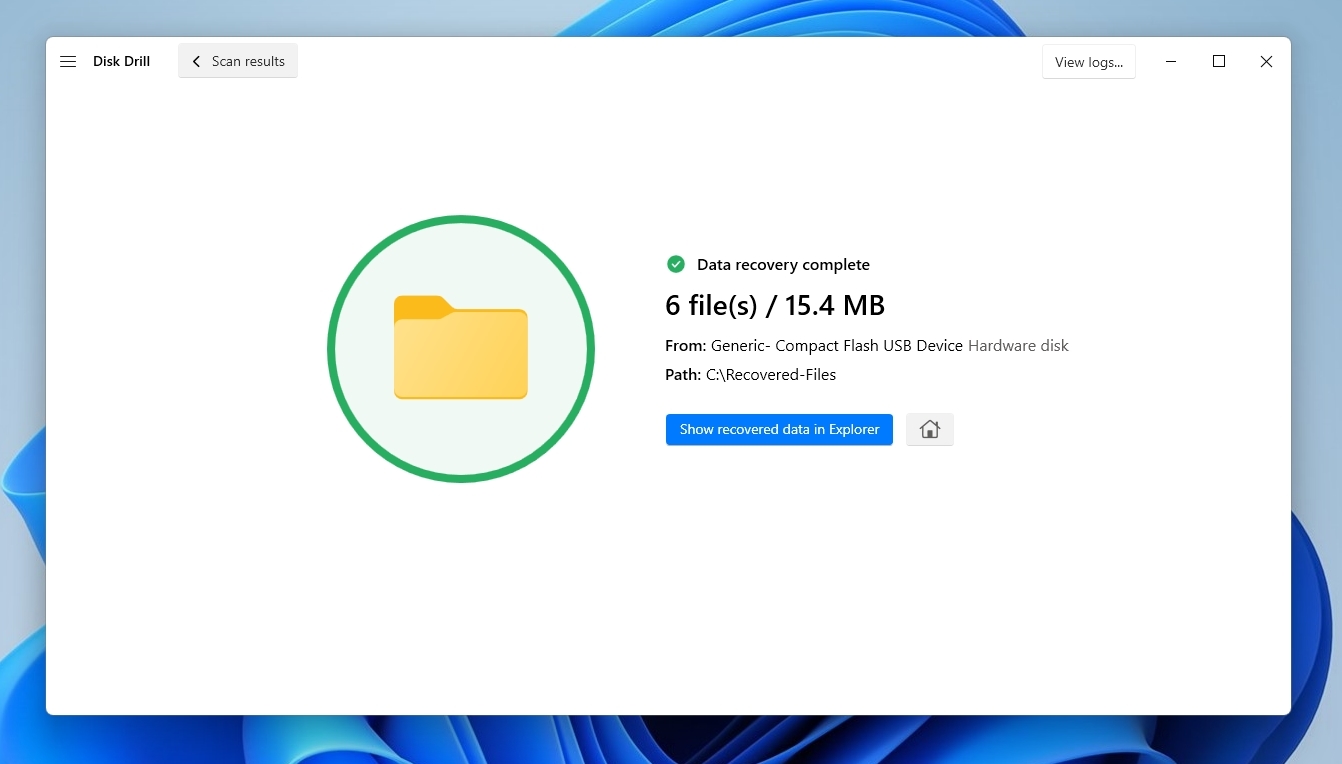
6. Check recovered files
Check out the recovered files using the default file manager with a click on Show recovered data in Explorer.
How to Fix a RAW SD Card Without Formatting
Sometimes, TestDisk can help if your SD card file system is RAW. An established and powerful open-source solution, TestDisk specializes in dealing with corrupted storage devices.
The app can analyze a “misbehaving” storage device to recover lost partitions, rebuild its partition table, or repair (some) file system problems.
As a result, instead of managing to fix a RAW SD card without formatting to regain access to your data, it’s easy to lose it all. Thus, it’s best to completely back up a storage device before you “unleash” TestDisk on it.
You can download TestDisk for free and use it without limitations to fix your raw SD card by following these steps:
- Download TestDisk from its official website and extract the downloaded archive somewhere on your computer.
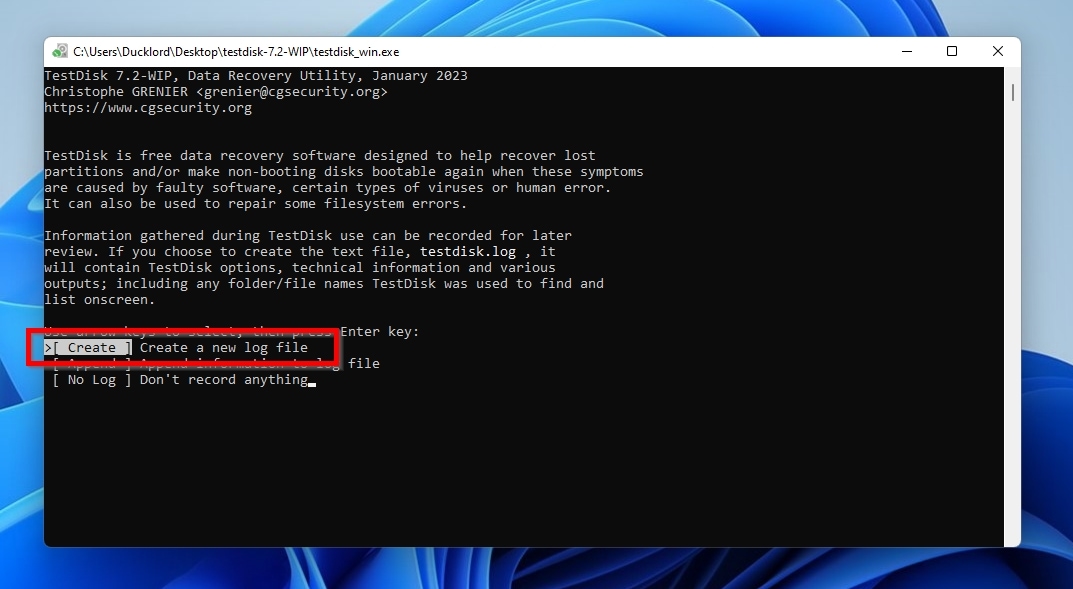
- Launch the application.
- Select Create to create a new log file.
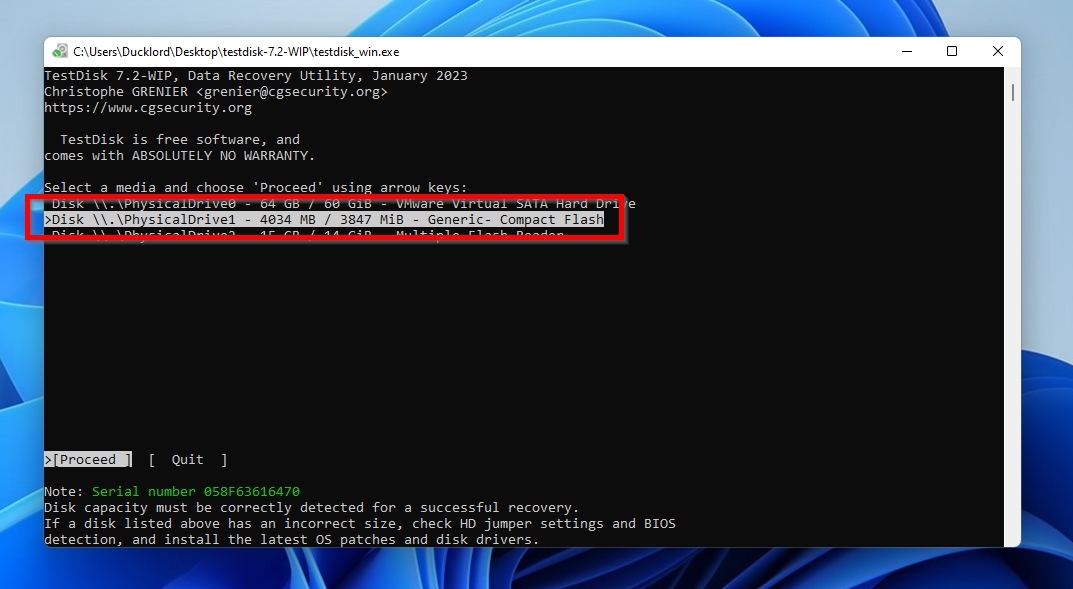
- Select your SD card. Make sure the SD card is unmounted first otherwise you won’t be able to select it.
- TestDisk tries to identify the partition table type and suggests the best possible option – in my case, it was a typical “Intel” structure. However, you can manually select the correct one if it “guesses” the wrong type.

- Select Analyse to see the disk structure.
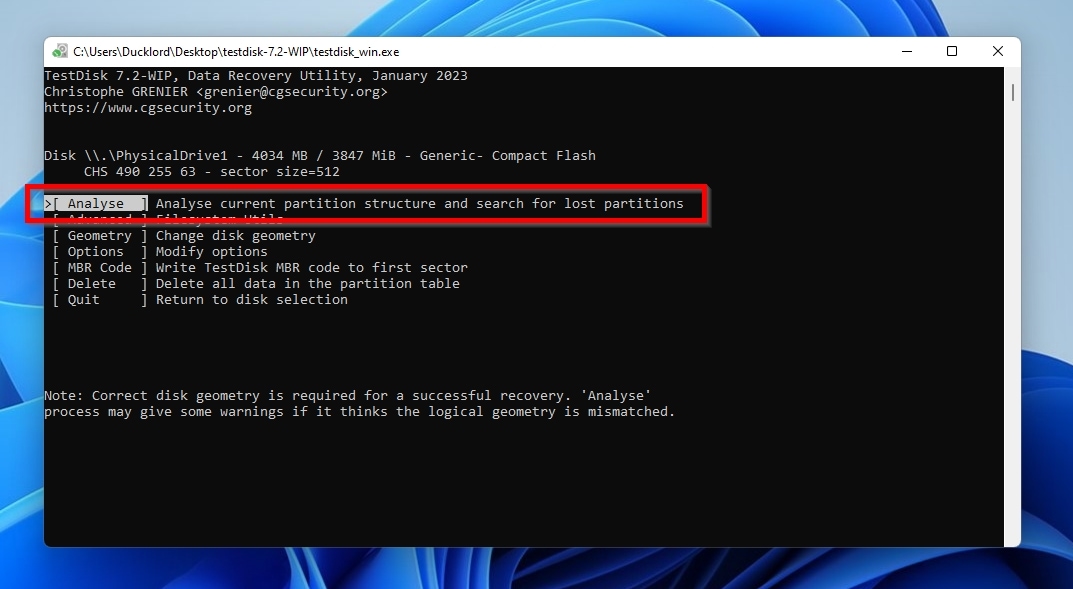
- When the disk analysis finishes, perform a Quick Search for missing partitions.
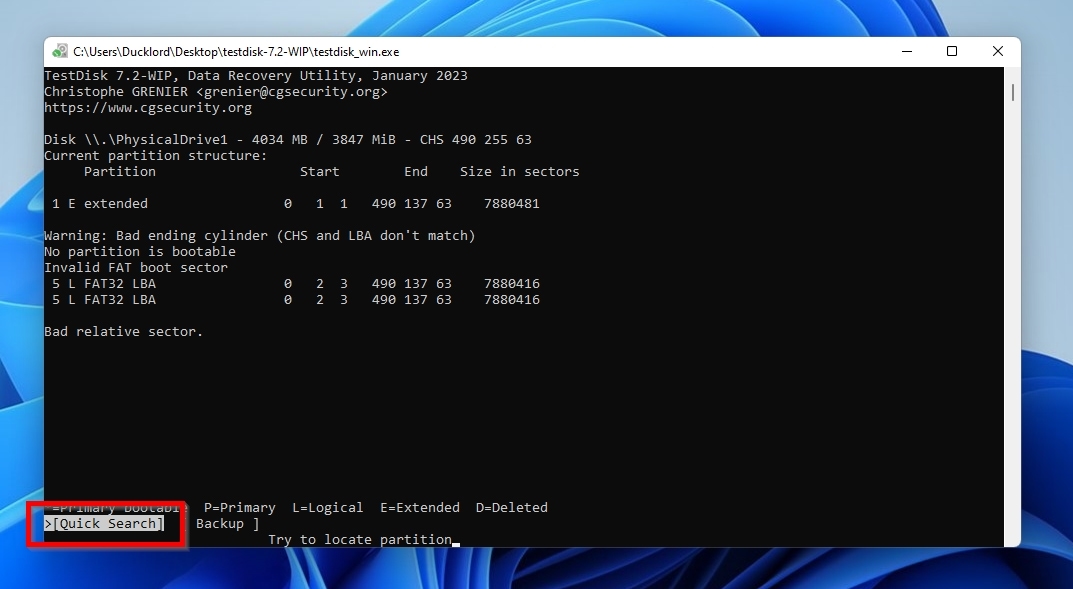
- When TestDisk presents you with the partition it found, press Enter to continue. If it didn’t find any, you can try performing a Deeper Search.
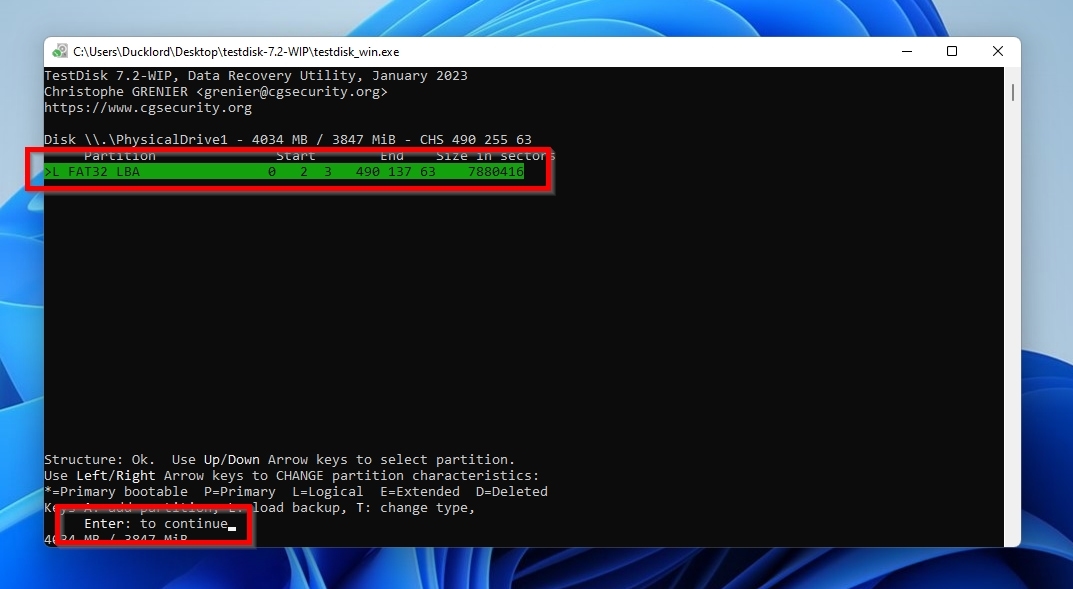
- With the RAW SD card’s lost partition(s) found, select Write to update your RAW SD card with the reconstructed partition structure.
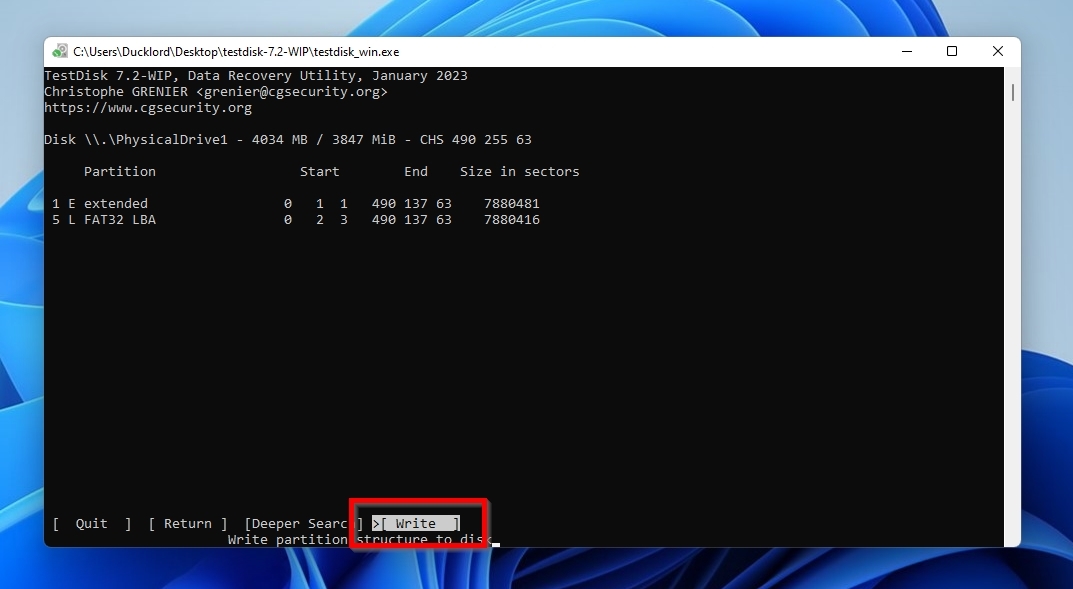
- Proceed with the recovery by following the prompts. After that, you should be able to access your SD card again using your favorite file browser.
How to Format a RAW SD Card
After successfully recovering your files off a RAW SD card, there’s no reason to throw it away as useless. There are many ways you can fix a corrupted SD card to render it usable again. One of the easiest is to format it.
Let’s see how you can format your RAW SD card.
Method 1: How to Fix a RAW SD Card Using CMD
It’s easy to format a RAW SD card with a more “hands-on” approach using the Windows Terminal (either the classic Command Prompt/CMD or the new PowerShell). First, note down the letter Windows assigned to your RAW SD card (you can see it by checking out the contents of the My Computer system folder, using Windows Explorer or another file manager).
With its letter noted down, do the following to format and fix your RAW SD card using CMD:
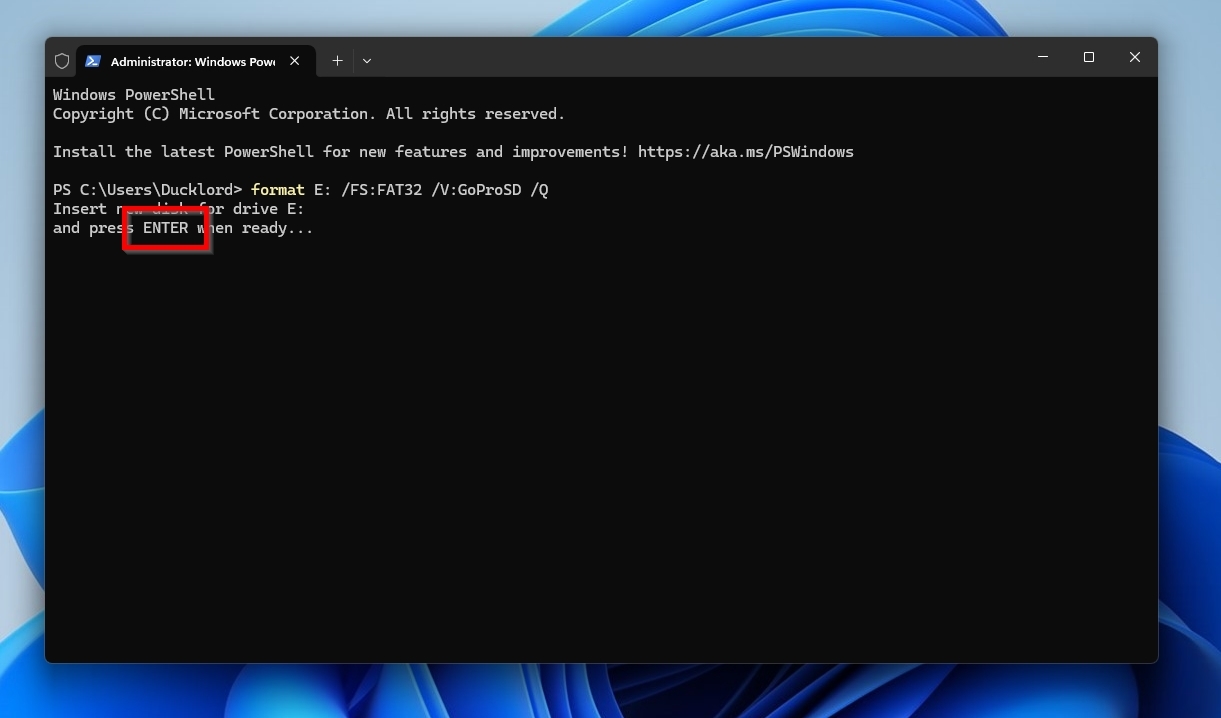
- Press Windows Key + X and choose the Admin version of the Windows Terminal.
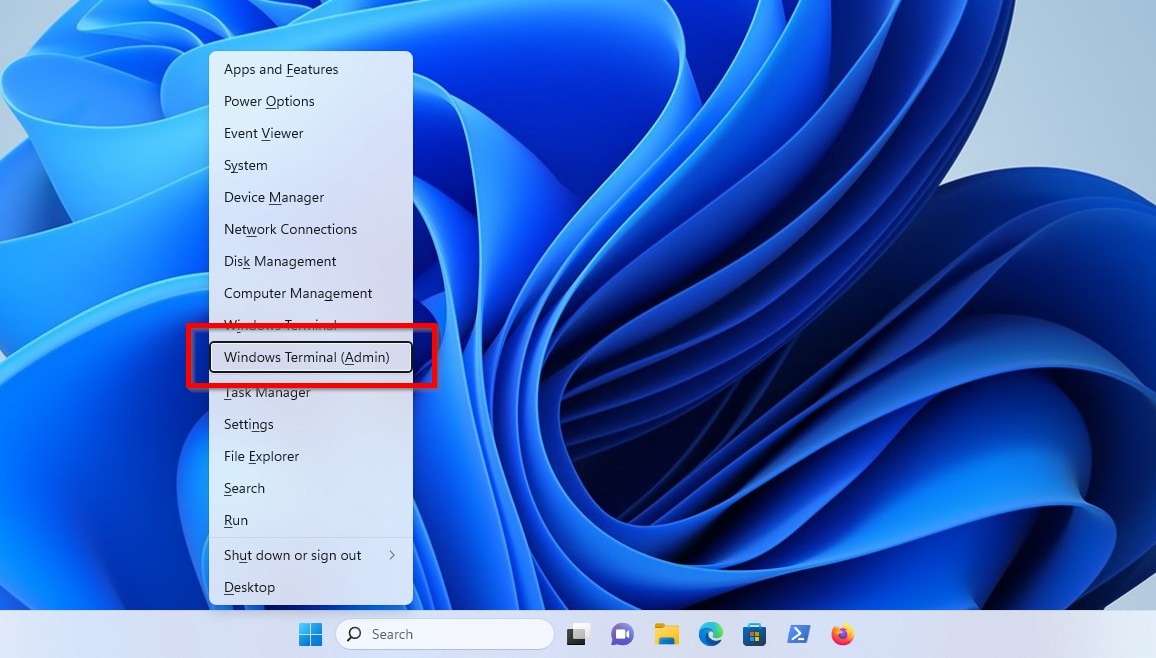
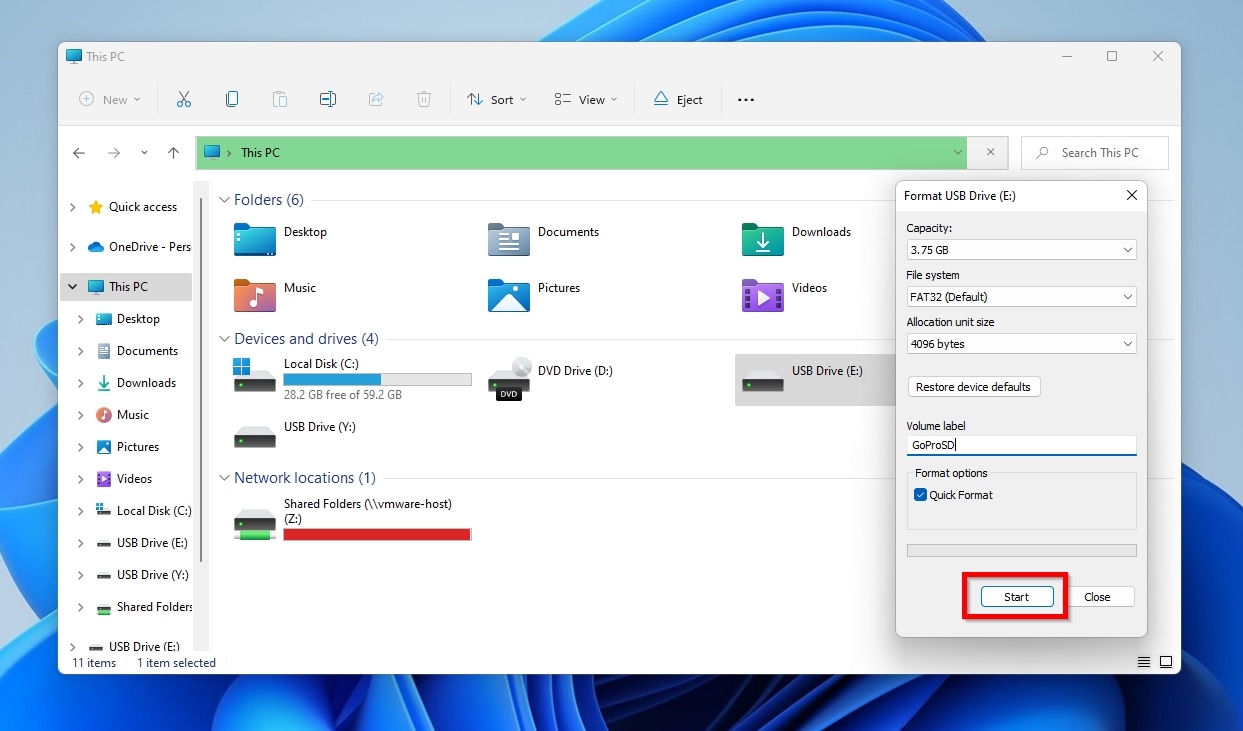
- Use the command format E: /FS:FAT32 /V:GoProSD /Q to a) quick format your RAW SD card that’s b) mounted “behind” the letter E, c) using the FAT32 file system, and d) assigning it the name “GoProSD“. Make sure to adjust those values according to how your PC detected your SD card (it might be using a different letter), and the file system and name you’d prefer to use. Lose the “/Q” switch if you’d prefer to perform a full instead of a quick format.
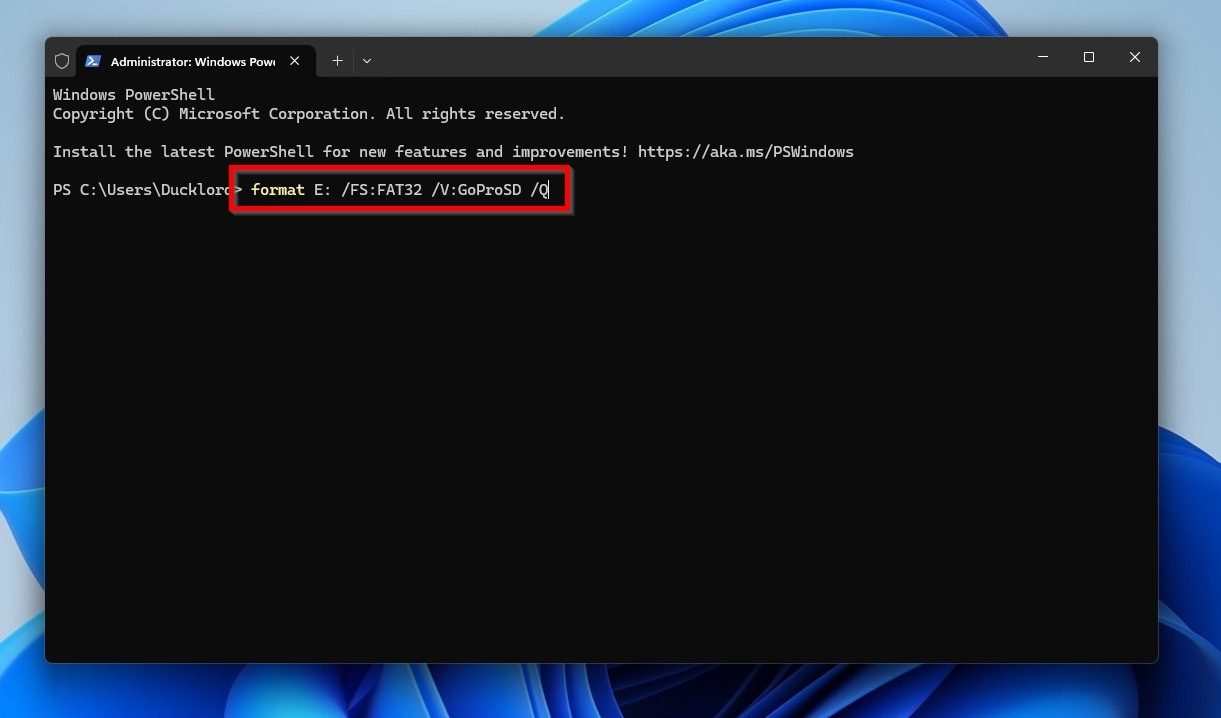
- Press Enter when prompted to perform the format.
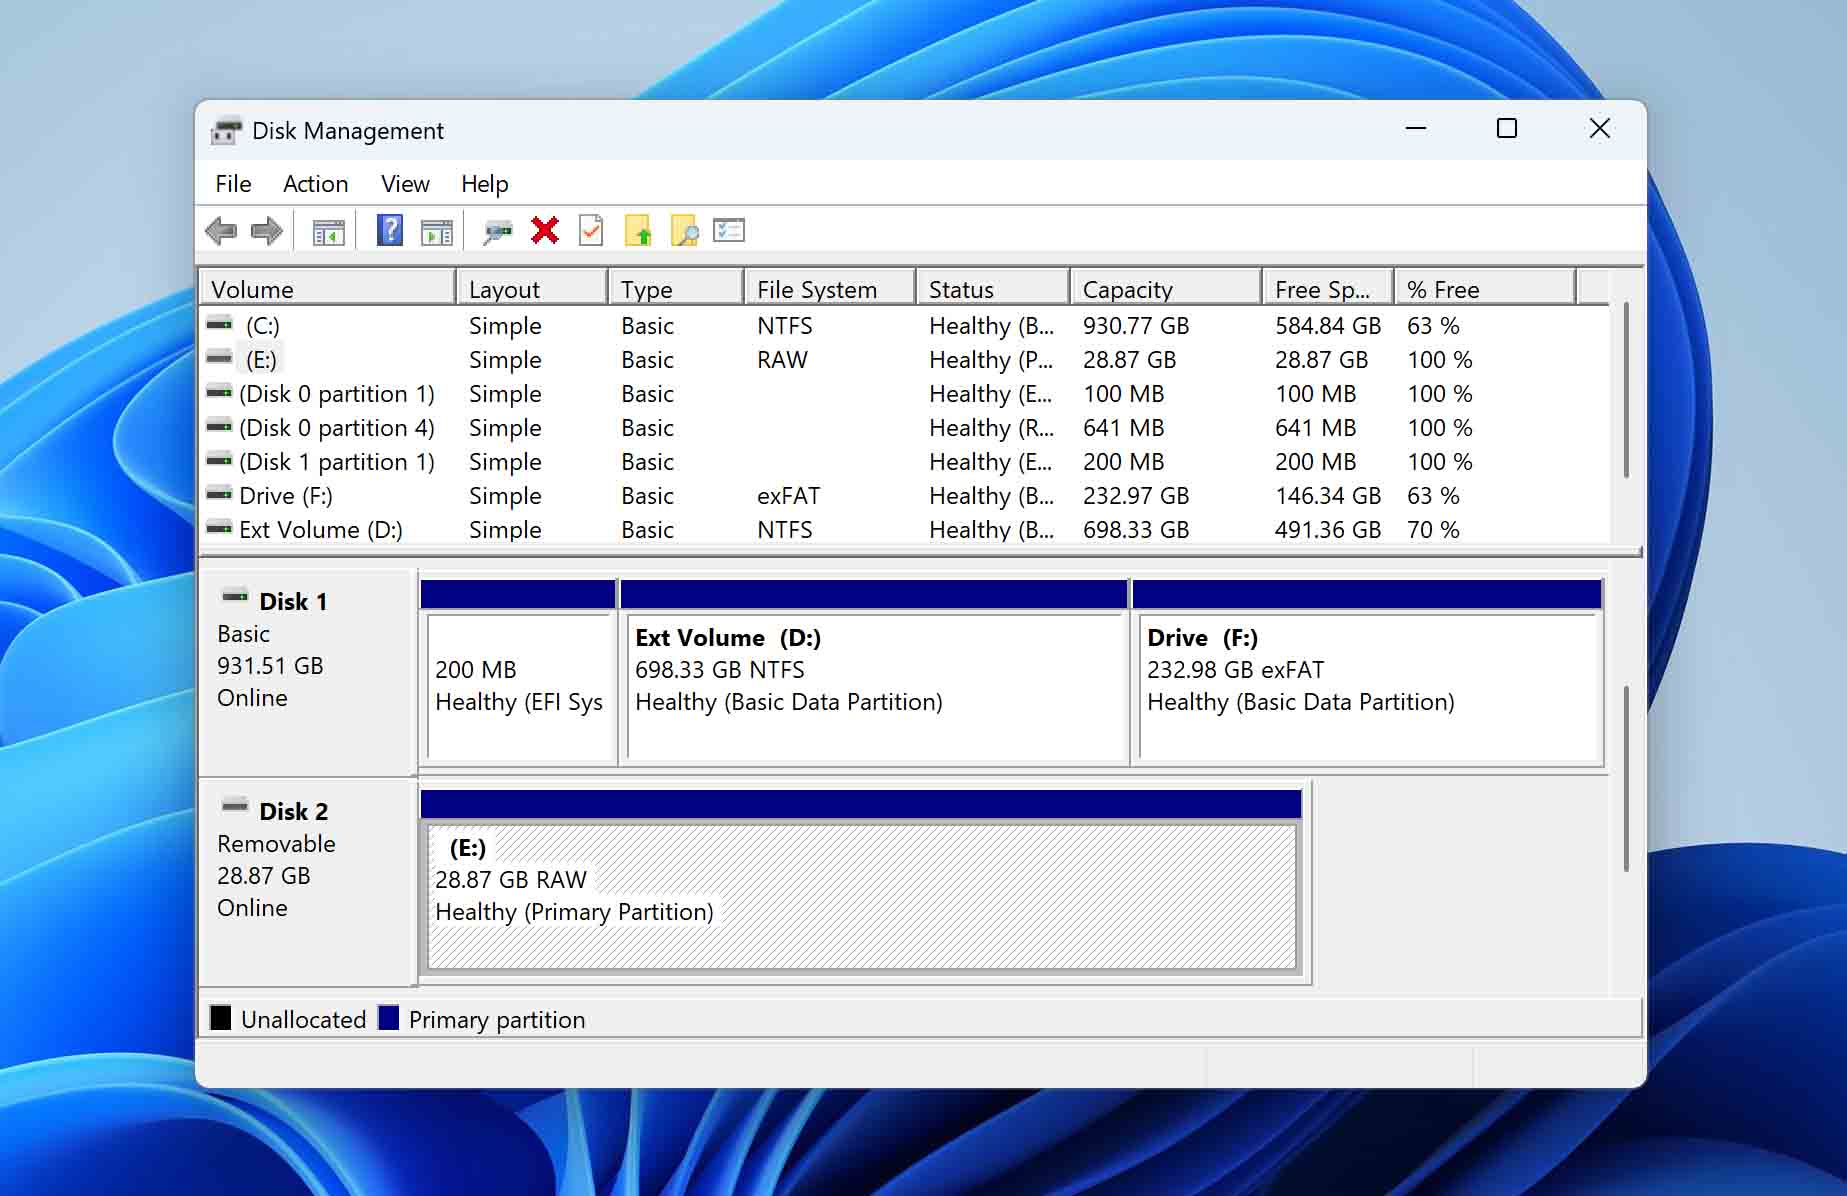
Method 2: Format SD Card with Disk Management
If you prefer using your mouse instead of typing commands, you can use the Disk Management app to format your currently-raw SD card.
- Press Windows Key + X to access Windows 10’s quick menu of administrative tools. This time choose Disk Management.
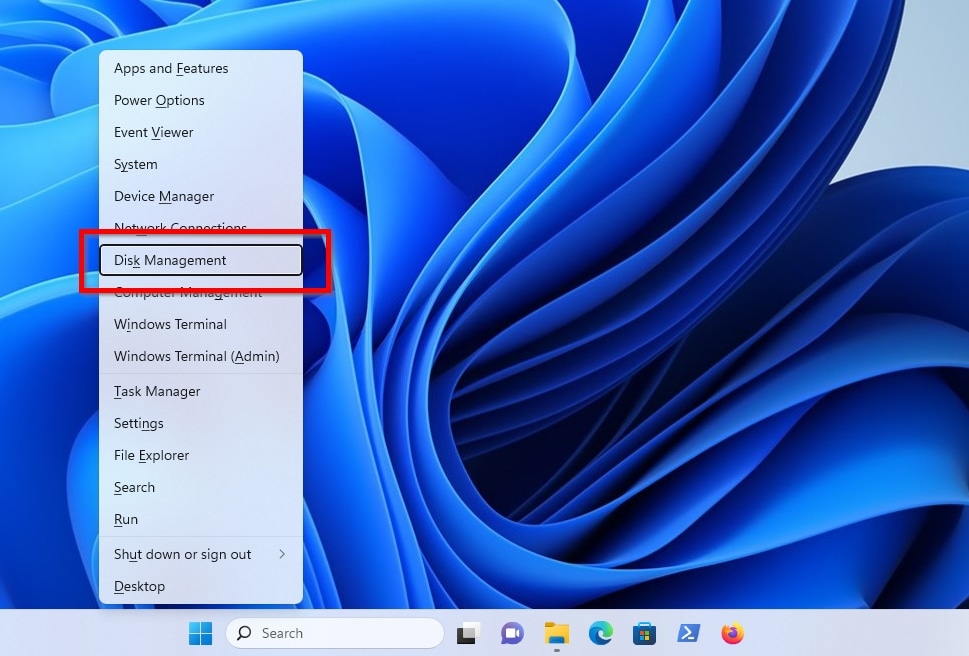
- Right-click on your SD card’s RAW partition (don’t mind it being recognized as “a disk”) and choose Format.
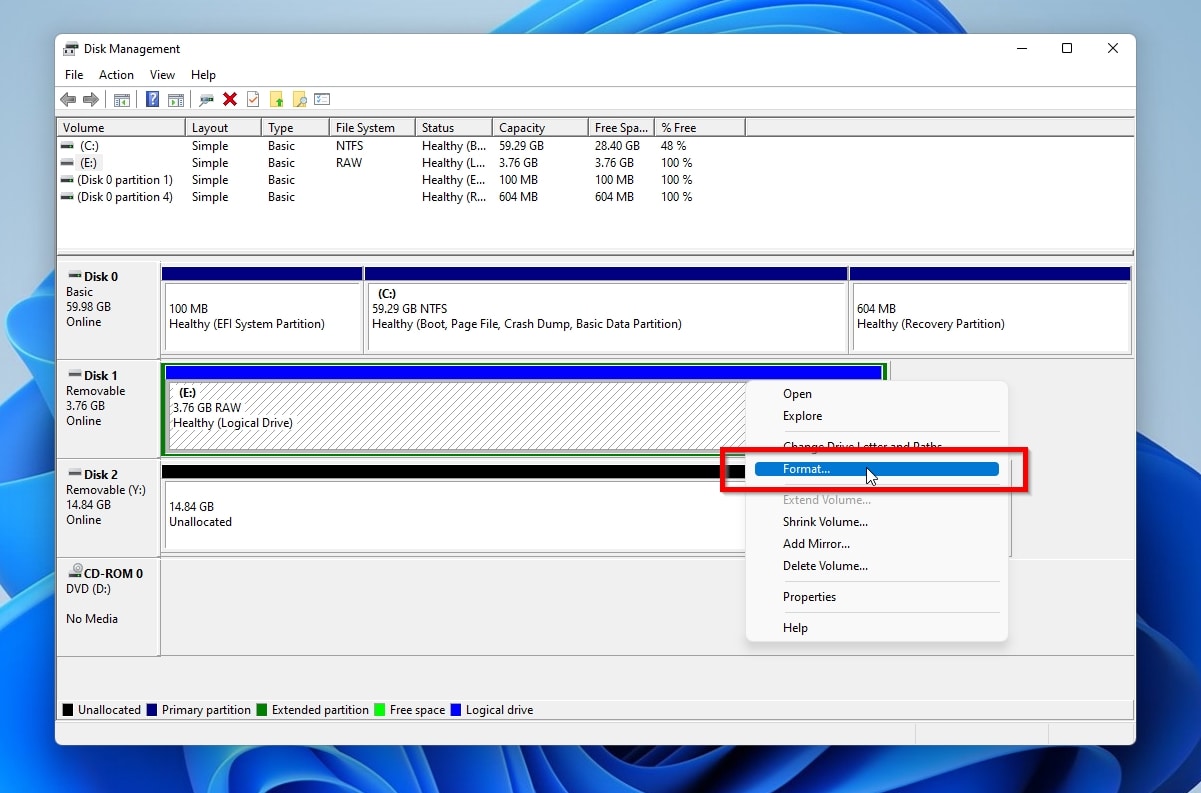
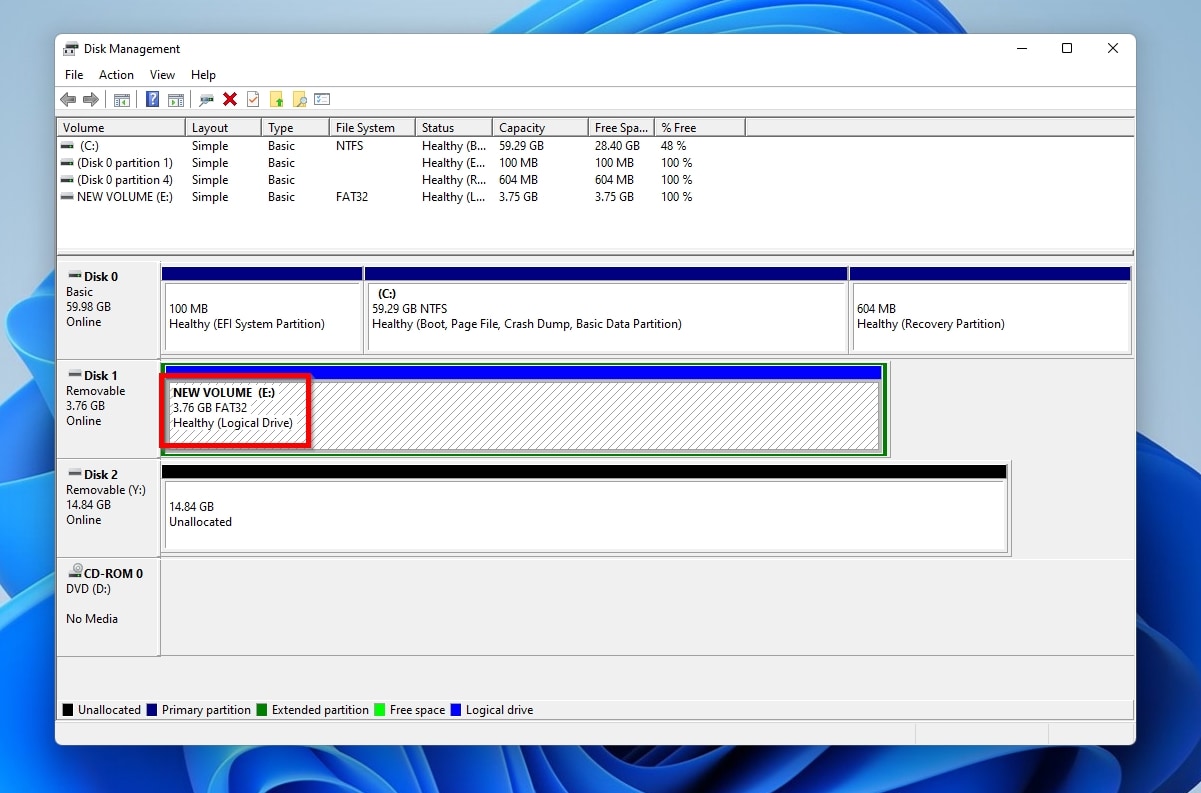
- Customize the Format options as you prefer, defining a name for the SD card, choosing the file system that will be used, and if you’d like to perform a quick or full format. We suggest you leave the Allocation size option as is. Then, click OK.

- Acknowledge the final warning that the existing contents of the SD card will be gone after the format process with a click on OK.

- Soon after, your RAW SD card should be formatted and accessible again.
Method 3: Format RAW SD Card With File Explorer
We left the File Explorer approach for last because many users manage to format the wrong device this way. However, if you don’t misidentify your devices and double-check what you’re doing, it’s the quickest and easiest Micro SD RAW fix.
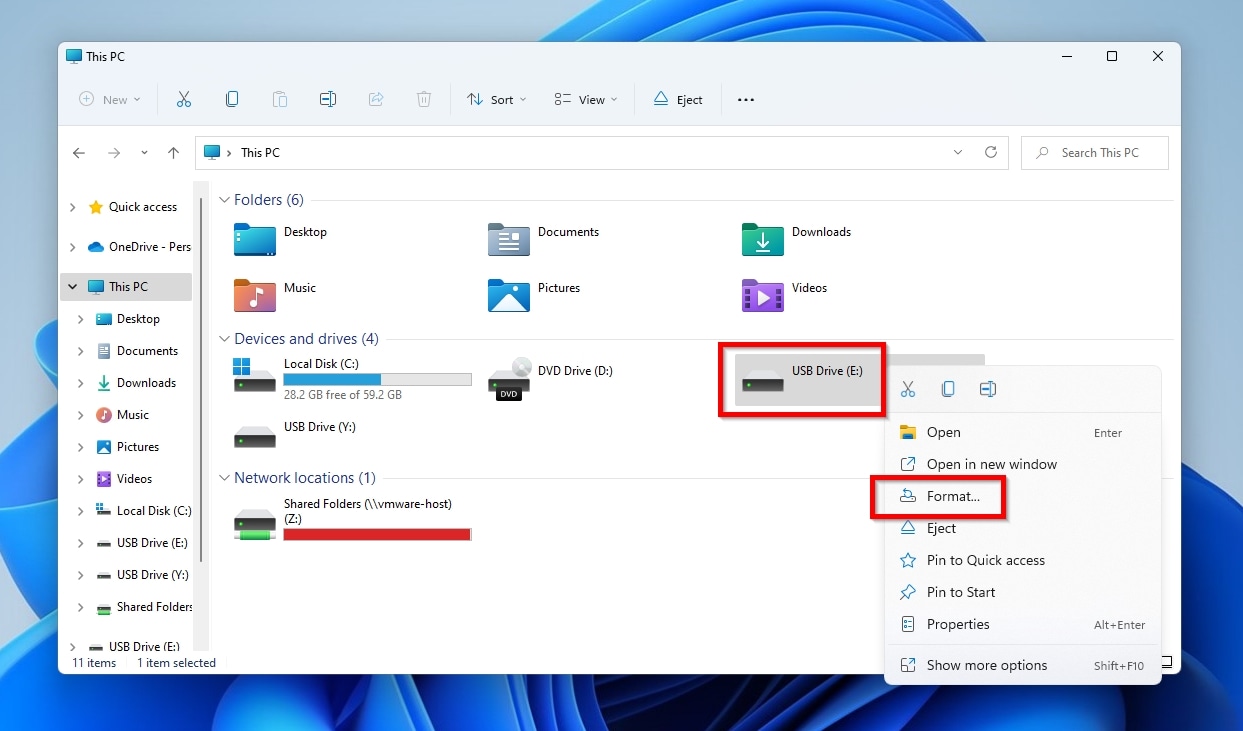
- Run File Explorer – the quickest way is with the Windows Key + E shortcut. Choose “This PC” from the menu on the left, and turn your attention to the Devices and drives section. Among them, you’ll find your SD card. In our case, thanks to our card reader, it appeared as a USB drive. Right-click on it and choose Format.
- Alternatively, if you try to access an inaccessible storage device, File Explorer will nudge you to format it before you can use it.
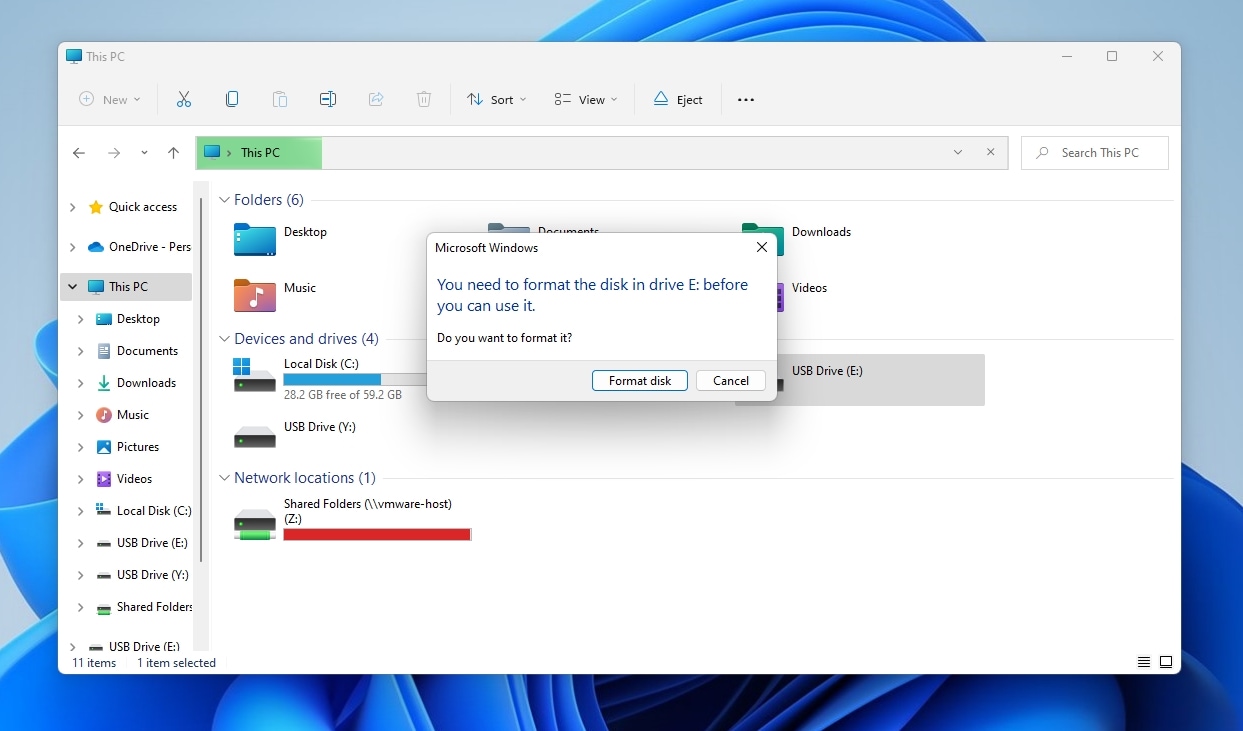
- Both options lead to the same dialog, a new floating window, where you can set the formatting process parameters. We won’t go over them again since they’re the same as what we saw with Disk Management. Set them up as you wish and click on Start to begin the formatting process.
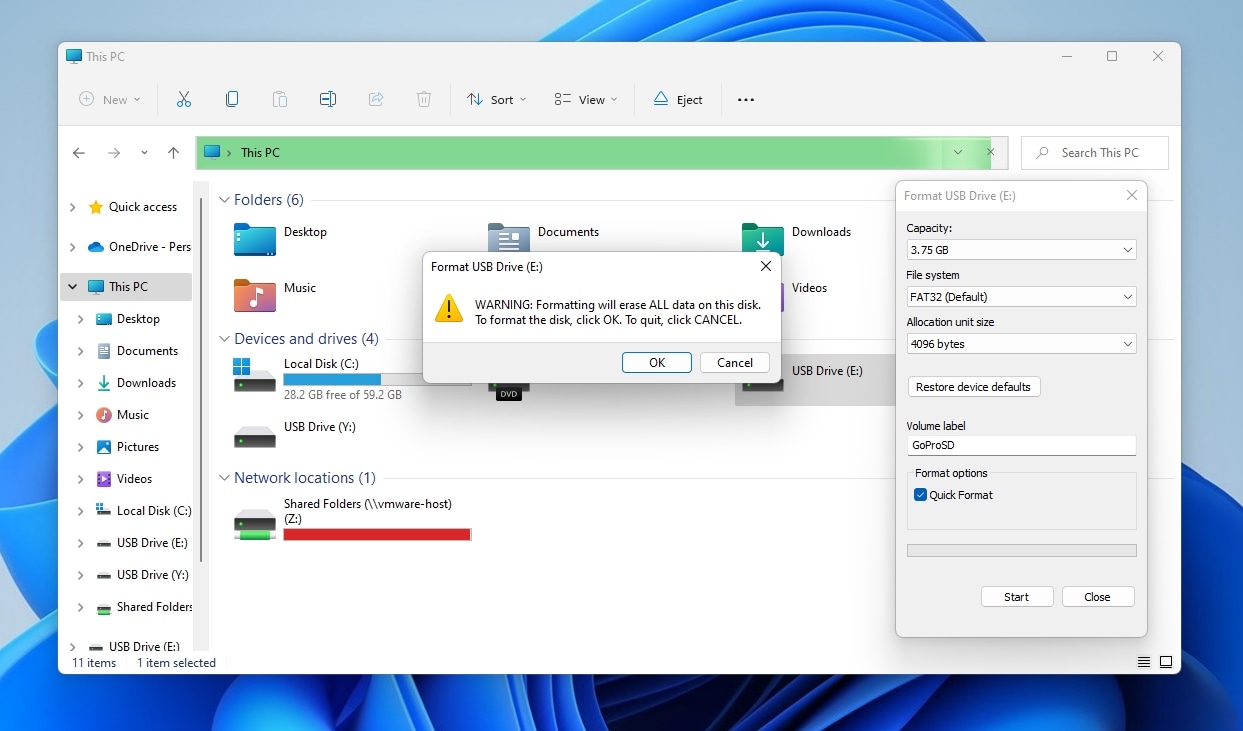
- Acknowledge that all data will be erased on your SD card. Double-check that you’re acting on the correct storage device and click OK to start formatting your raw SD card.
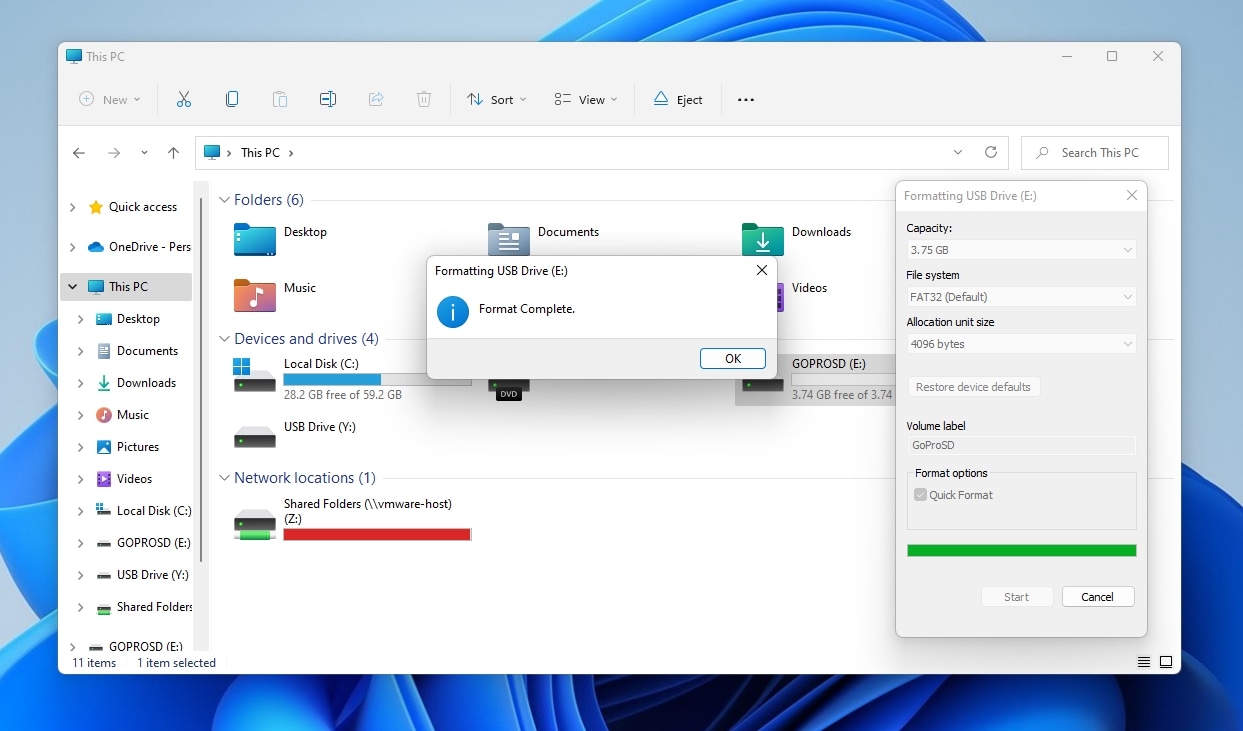
- Soon after, you’ll see a new window pop-up informing you that the format’s complete. Click on OK, and when you return to File Explorer, you’ll have your SD card back.
How to Fix RAW SD Card When Other Methods Fail
Was it impossible to format a RAW SD card with the usual approaches? Then, maybe you could “revitalize” and render it usable again with the more drastic approach for RAW memory card repair: wiping it clean.
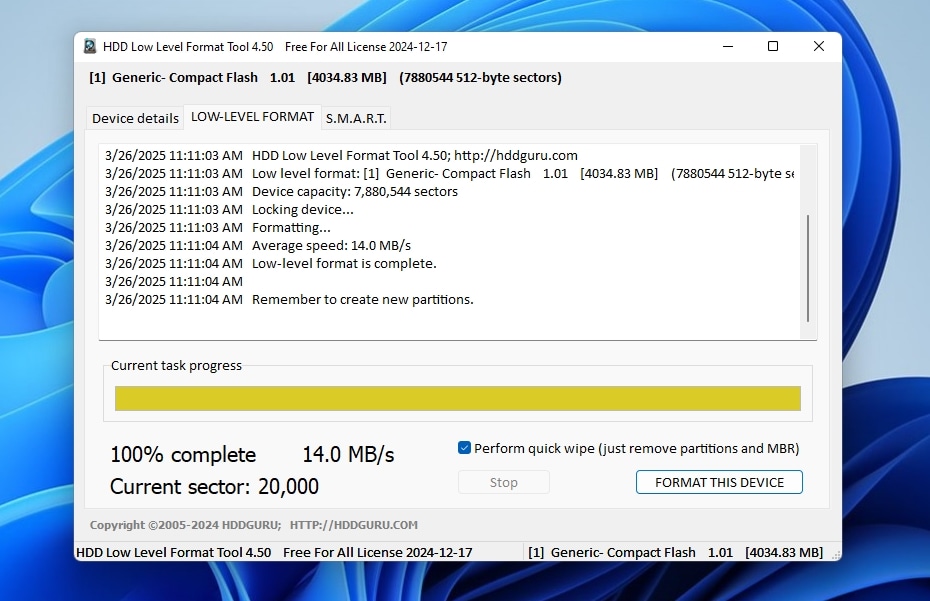
HDD Guru’s Low Level Format Tool may be able to help with that.
- Download the tool, and run it.
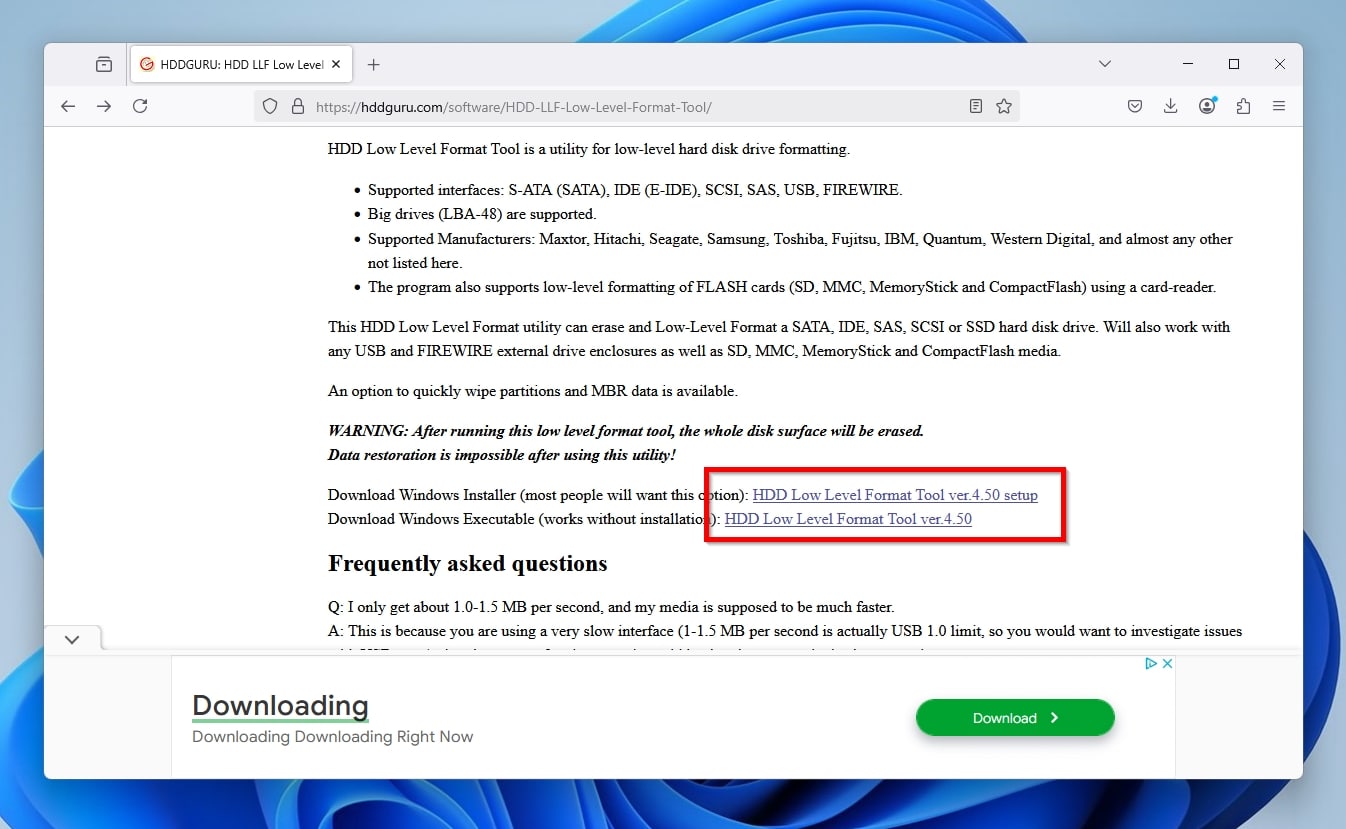
- Select your RAW SD card that won’t format normally.
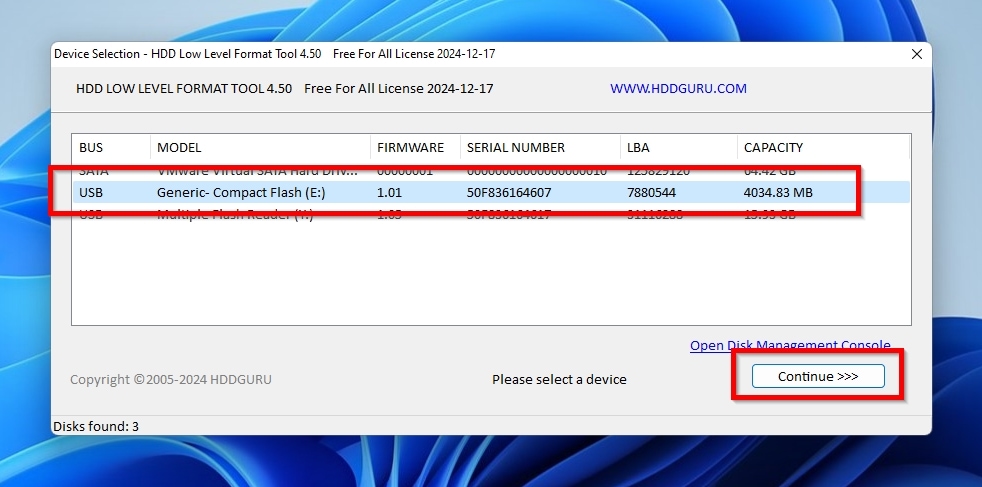
- Perform a quick wipe (just remove partitions and MBR).
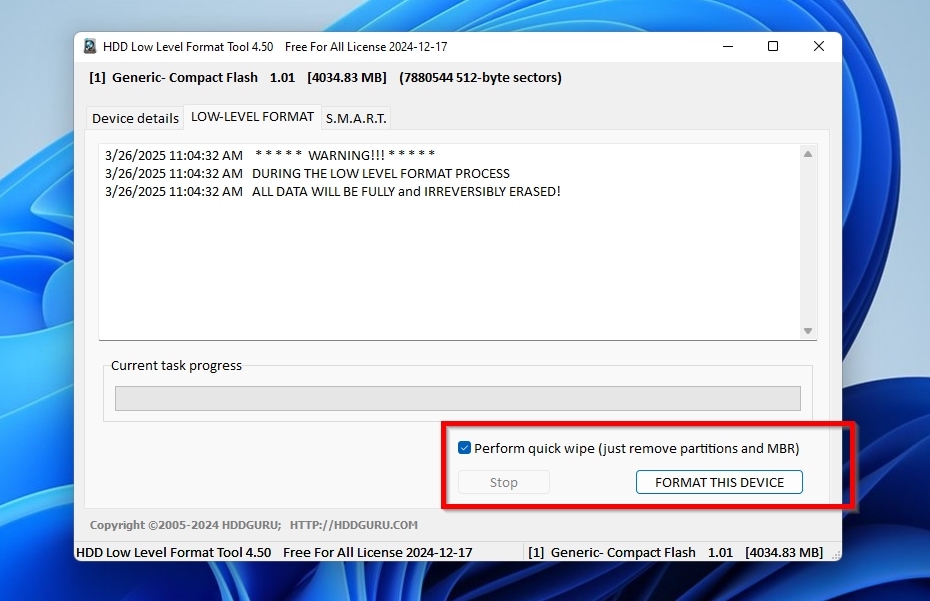
- When the process completes, try to format it again with your file system of choice as if it were brand new.
If that doesn’t help, try a complete low-level format as a last resort.
Why Do SD Cards Become RAW and How to Prevent It
There are many ways an SD card you were using without issues may “become RAW”. However, with SD cards being quite affordable today, you should first ask yourself if it would be worth your extra time and effort to try fixing it after recovering your files.
If there was seemingly no rational reason your SD card became RAW, that could be a sign of impending hardware failure. In such a case, if you fix and keep using your SD card, you might be betting your files on it, for it could “turn RAW” again in the future, and it would be better to replace it.
Unfortunately, most SD cards don’t support something like S.M.A.R.T., as found on Solid State Drives (SSDs) and Hard Disk Drives (HDDs), so there’s no easy and foolproof way to analyze them to check their “health” status. Still, if you know why your SD card became RAW, you can also safely guess if it would be relatively safe to try repairing it and keep trusting your files on it.
For example, consider the following scenarios that can make a card appear as RAW and render its contents inaccessible:
- 🪂 You might have unplugged it in a rush while a file transfer or formatting process was still underway without noticing that it was actively writing on your SD card. As a result, crucial metadata could have been damaged. To eliminate that possibility, always use the OS’s option to safely eject or unmount your SD card before physically unplugging it. If using a camera, as this Reddit user found out the hard way, it’s best to turn it off or put it in standby mode before removing the SD card.
- 🔥 Your card reader might have heated up too much, as this Reddit user reports, or a faulty connection (because of a shoddy USB plug or cable), or a power spike (that this Reddit user has to often deal with), or your laptop’s battery running out, ended up interrupting a transfer of data between your SD card and your computer. To eliminate any chances of corruption because of such issues, you should tackle them at their source: always use card readers from trusted manufacturers, high-quality cables, and a power surge protector or an Uninterruptible Power Supply (UPS). If using a laptop, it’s best if it’s fully charged and, ideally, connected to a power outlet during large transfers. Always keep an eye on and occasionally check your card reader. If it overheats, interrupt the transfer to let your gear cool down and avoid hardware damage, and resume the process later.
- 📹 If you try accessing an SD card on your computer that you formatted on another device, and your computer’s OS “doesn’t recognize” the data structures on it, it will label them as a RAW file system. However, you should be able to access the card’s contents from the device you used to originally format it. You should only try to “fix the issue” if your SD card isn’t accessible on any of the devices on which you’ve used it.
- 🐶 You’ve dropped your SD card or accidentally stepped on it (or, like this Reddit user, “drove over it” with your chair), causing a visible break or chipping. Or, you forgot it and left it sunbathing in your car during a hot day, and it melted and deformed. Or your dog used it as a chewing toy, poking holes in it. In such cases, unfortunately, physical damage is unfixable with DIY approaches. Only a data recovery specialist can help get any files out of such a “semi-destroyed” SD card, and using it further won’t be possible.
- 🧓 You’ve been actively using an SD card for years and have probably written on it and read from it terabytes of files. It may still look almost brand-new, but you know that it’s actually old and tired. Potential hints of that would be slower transfer speeds, random files becoming inaccessible occasionally, or other signs of corruption.
Conclusion
As we saw, RAW SD card recovery is more than possible, and in all but the worst-case scenarios, you can format a raw SD card and keep using it.
In all cases, the first step when dealing with a RAW SD card is to try to get your precious files off it as soon as possible. Advanced specialized data recovery apps like Disk Drill can help with that.
With your files safely recovered and stored elsewhere, you can try to fix your SD card using the methods we saw in this article.
If those solutions fail, with SD cards being widely available and extremely affordable nowadays, you’d be justified to consider the time and effort you’d “waste” trying to fix it more precious than the cost of purchasing a replacement. Or two.
FAQ
To recover files from a RAW SD card, follow these steps:
- Download, install, and run Disk Drill.
- Select your RAW SD card and scan it.
- Check the files Disk Drill found on it and mark those you want to recover.
- Select where to save them.
There’s no definitive answer, since it depends on the data loss scenario you’re facing. “The best” app for your case would be the one that will enable you to recover the vast majority of files, of the types you care most about, while guiding you through the process so that your data will remain safe and intact. Ideally, it should also come with functionality for keeping your data protected and monitoring your storage devices’ health, to be able to entirely avoid having to ever deal with data loss.
You try to fix partition-related errors on your RAW SD card with TestDisk. However, this will rarely produce the desired result, and you probably won’t be able to avoid a format.
If the SD card “became RAW” because of partition or file-system errors, TestDisk might be able to help. However, without more trustworthy alternatives available for repairing, it’s best to first recover your files off it and then reformat it.
Although they share the same term, “raw”, RAW files and raw filesystems are unrelated. The term “RAW files” usually refers to uncompressed photographs stored from a camera in an SD card with the highest possible quality. You can open such files with image and photo editing apps, like Photoshop, Lightroom, etc.