When your USB drive unexpectedly turns RAW, it might seem like all is lost, but thankfully, data recovery is possible with the right tools and techniques. In this article, we will guide you through the process of RAW USB drive recovery and show you how to fix the issue without losing your data. It doesn’t matter if your drive was manufactured by Western Digital, Seagate, SanDisk, Kingston, or Lexar—the process remains the same.

USB drives and memory cards that have gone RAW are tackled in the same way.
Common Reasons Why a USB Drive Turns RAW
Several factors can cause your USB flash drive to turn RAW, and knowing the root cause can help you prevent it from happening again in the future. Here are some of the most common reasons why a USB drive turns RAW:
- Corruption: USB drives can become corrupted due to various reasons, including improper ejection, power outages, and viruses. When a drive becomes corrupted, the file system may become damaged, causing it to turn RAW.
- Formatting errors: Formatting errors can occur when the drive is formatted incorrectly or incompletely. This can happen if the formatting process is interrupted, or if the drive is formatted using an incompatible file system.
- Partition table issues: Errors within the partition table can mislead the system into recognizing the drive as RAW due to inconsistencies in the storage structure.
- Aging: Like all electronic devices, USB drives have a limited lifespan. As they age, they can develop bad sectors, which are portions of the drive that can’t hold data. This can lead to a RAW file system. If bad sectors appear in critical areas of the drive, such as the file system structure or boot sector, it can cause the drive’s file system to become RAW (unreadable by the operating system).
Understanding these common causes can help you take better care of your USB drive and prevent it from turning RAW in the future. However, if your drive has already turned RAW, don’t worry—we’ll show you how to recover your data and repair the drive.
Symptoms of RAW USB Flash Drive
#1 The most obvious symptom of a USB drive having turned RAW is that you will simply not be able to access any of the files you know are stored on it. If you look at the properties of the drive you are having problems with, you will see that the file system is RAW or – in some cases – the format may not be recognized at all.
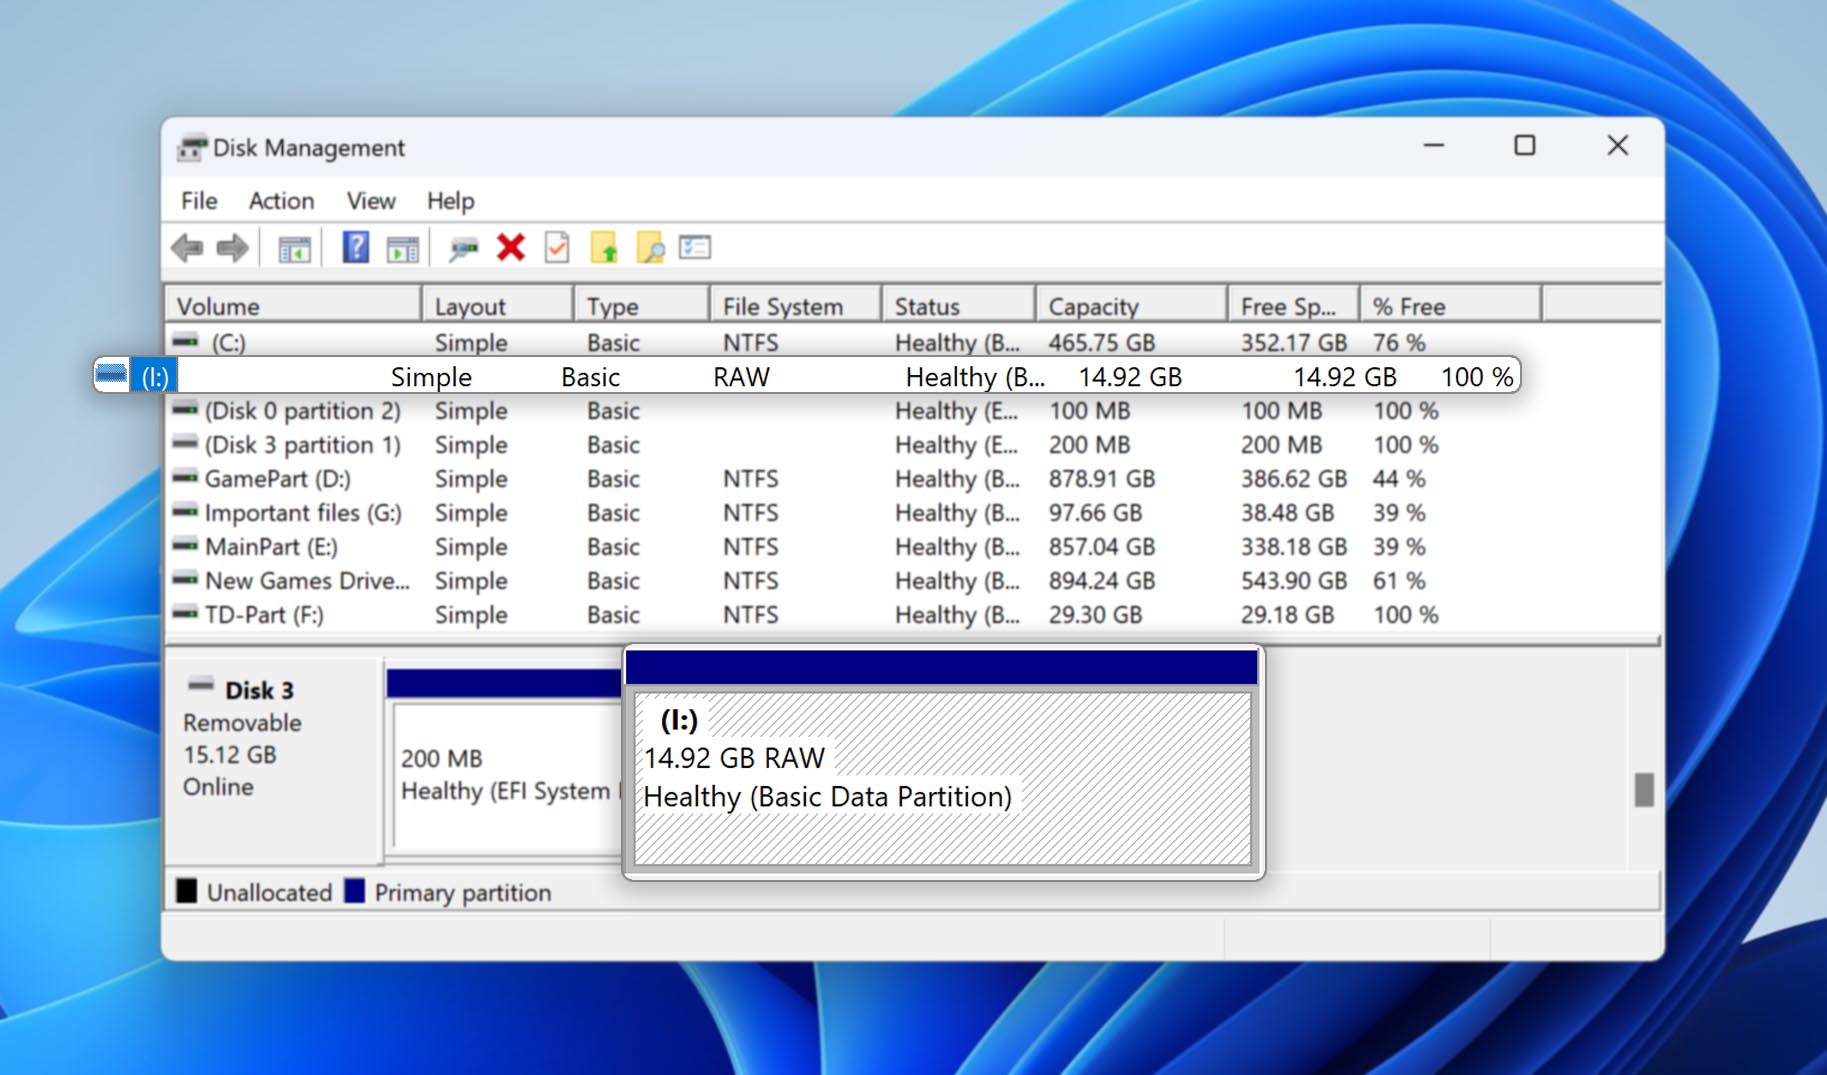
#2 You may also find that a drive you know to contain data shows up as being empty, but (confusingly) you may also notice that while there is zero free space available, the drive reports containing zero bytes of data.
#3 Another symptom of a drive turning RAW is that Windows offers to format the drive when you connect it as the operating system believes that it has not yet been formatted.
Recover Deleted Files from a RAW USB Drive
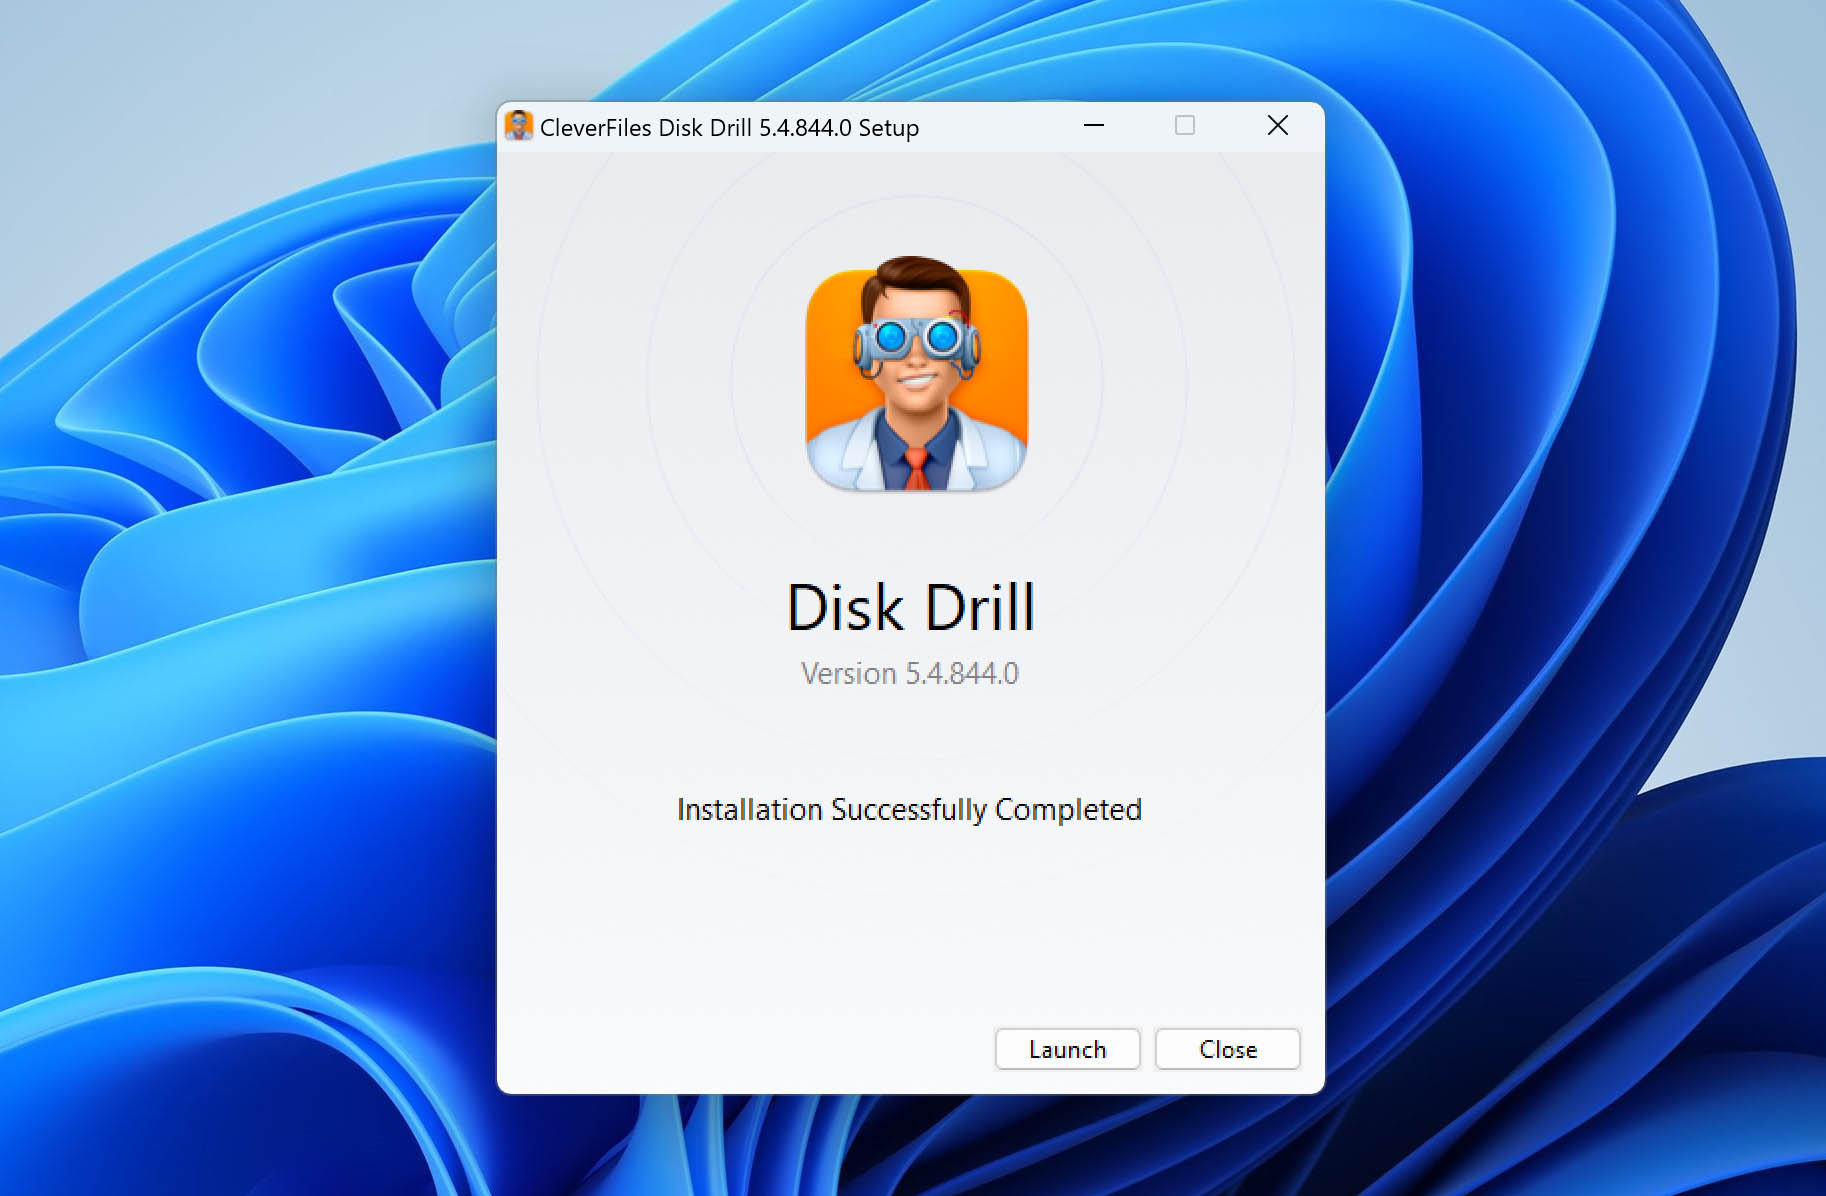
When it comes to RAW USB drive recovery, USB recovery software is your best bet. One excellent choice for RAW USB flash drive recovery is Disk Drill.
Disk Drill’s powerful RAW scanner can recognize the file signatures of over 400 file formats, and its deep scan algorithms can recover missing file system information to retrieve files from RAW drives even with their original paths and names.

On top of that, Disk Drill is extremely easy to use and packed with useful extra features, such as the ability to create a full byte-to-byte backup of the entire RAW drive before recovery. You can preview an unlimited number of files, and on Windows, you can recover up to 100 MB at no cost, enough to validate results and to recover a lot of small files that are usually stored on a flash drive.
Here are step-by-step instructions on how to recover a RAW USB drive with Disk Drill:
- Download and install Disk Drill on your computer.
- Connect your RAW USB drive to your computer. Launch Disk Drill and select your RAW USB drive from the list of available drives.
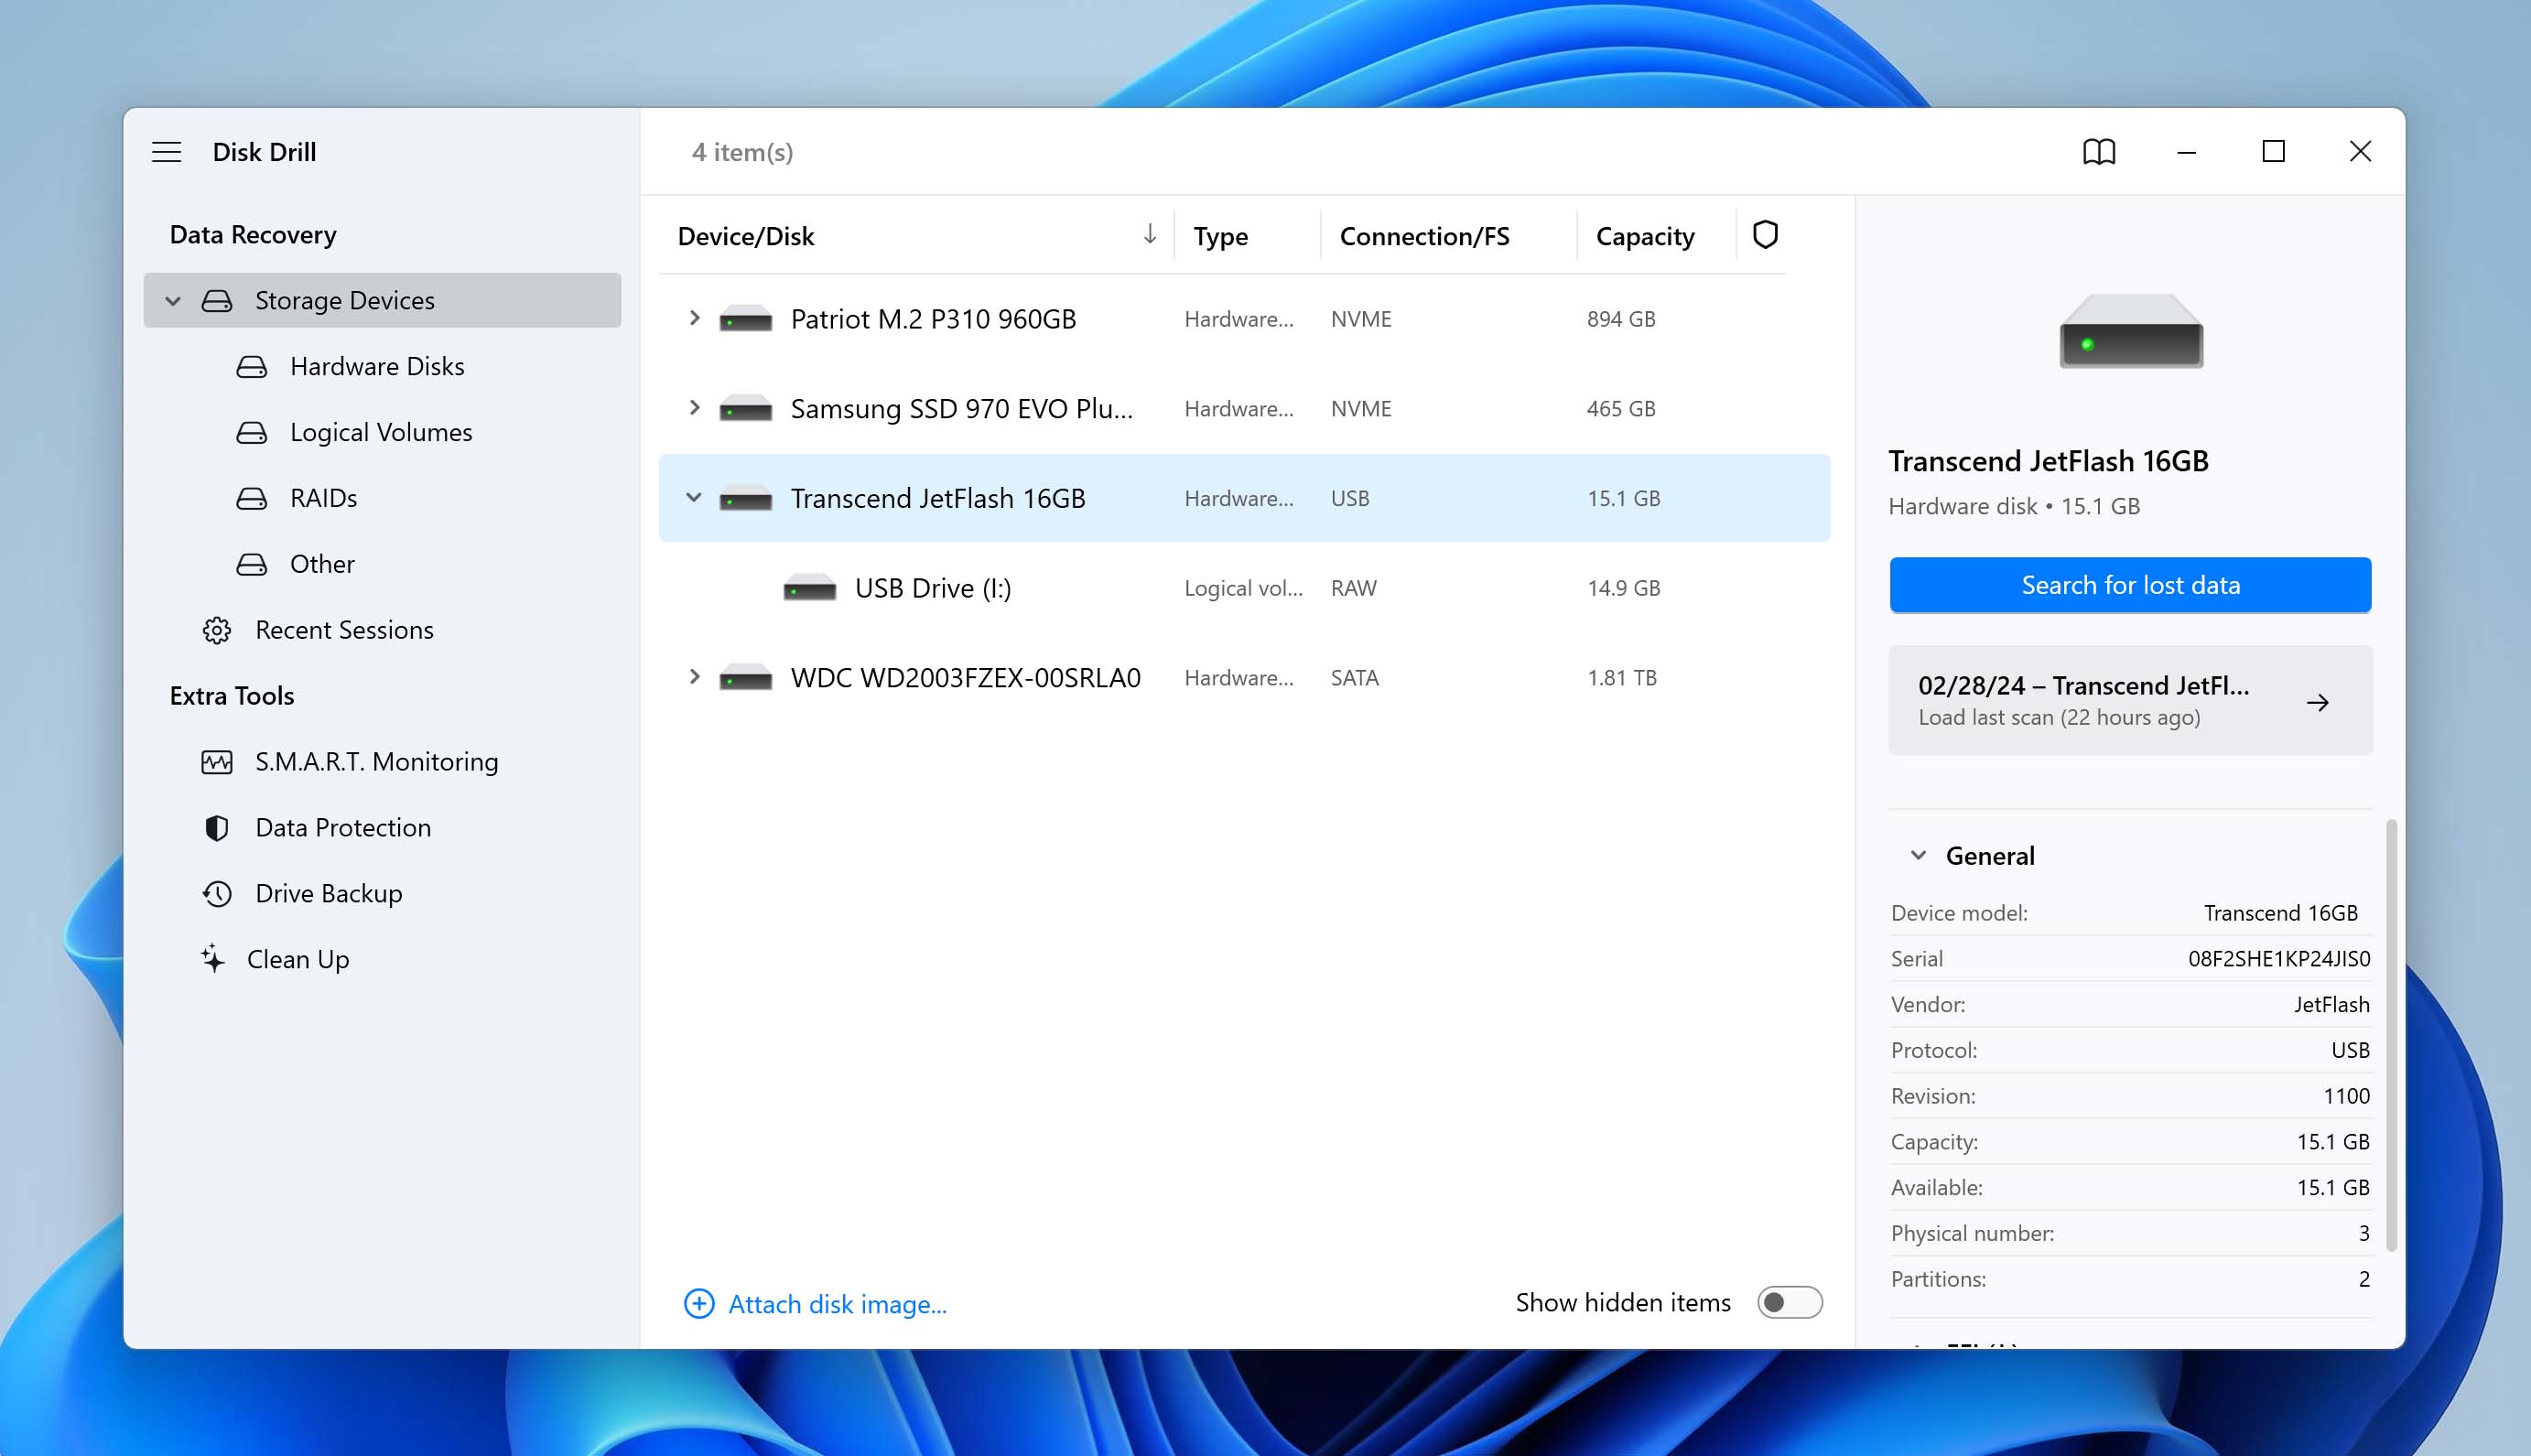
- Click the Search for lost data button to start the scanning process. Disk Drill will scan your RAW USB drive for recoverable files.
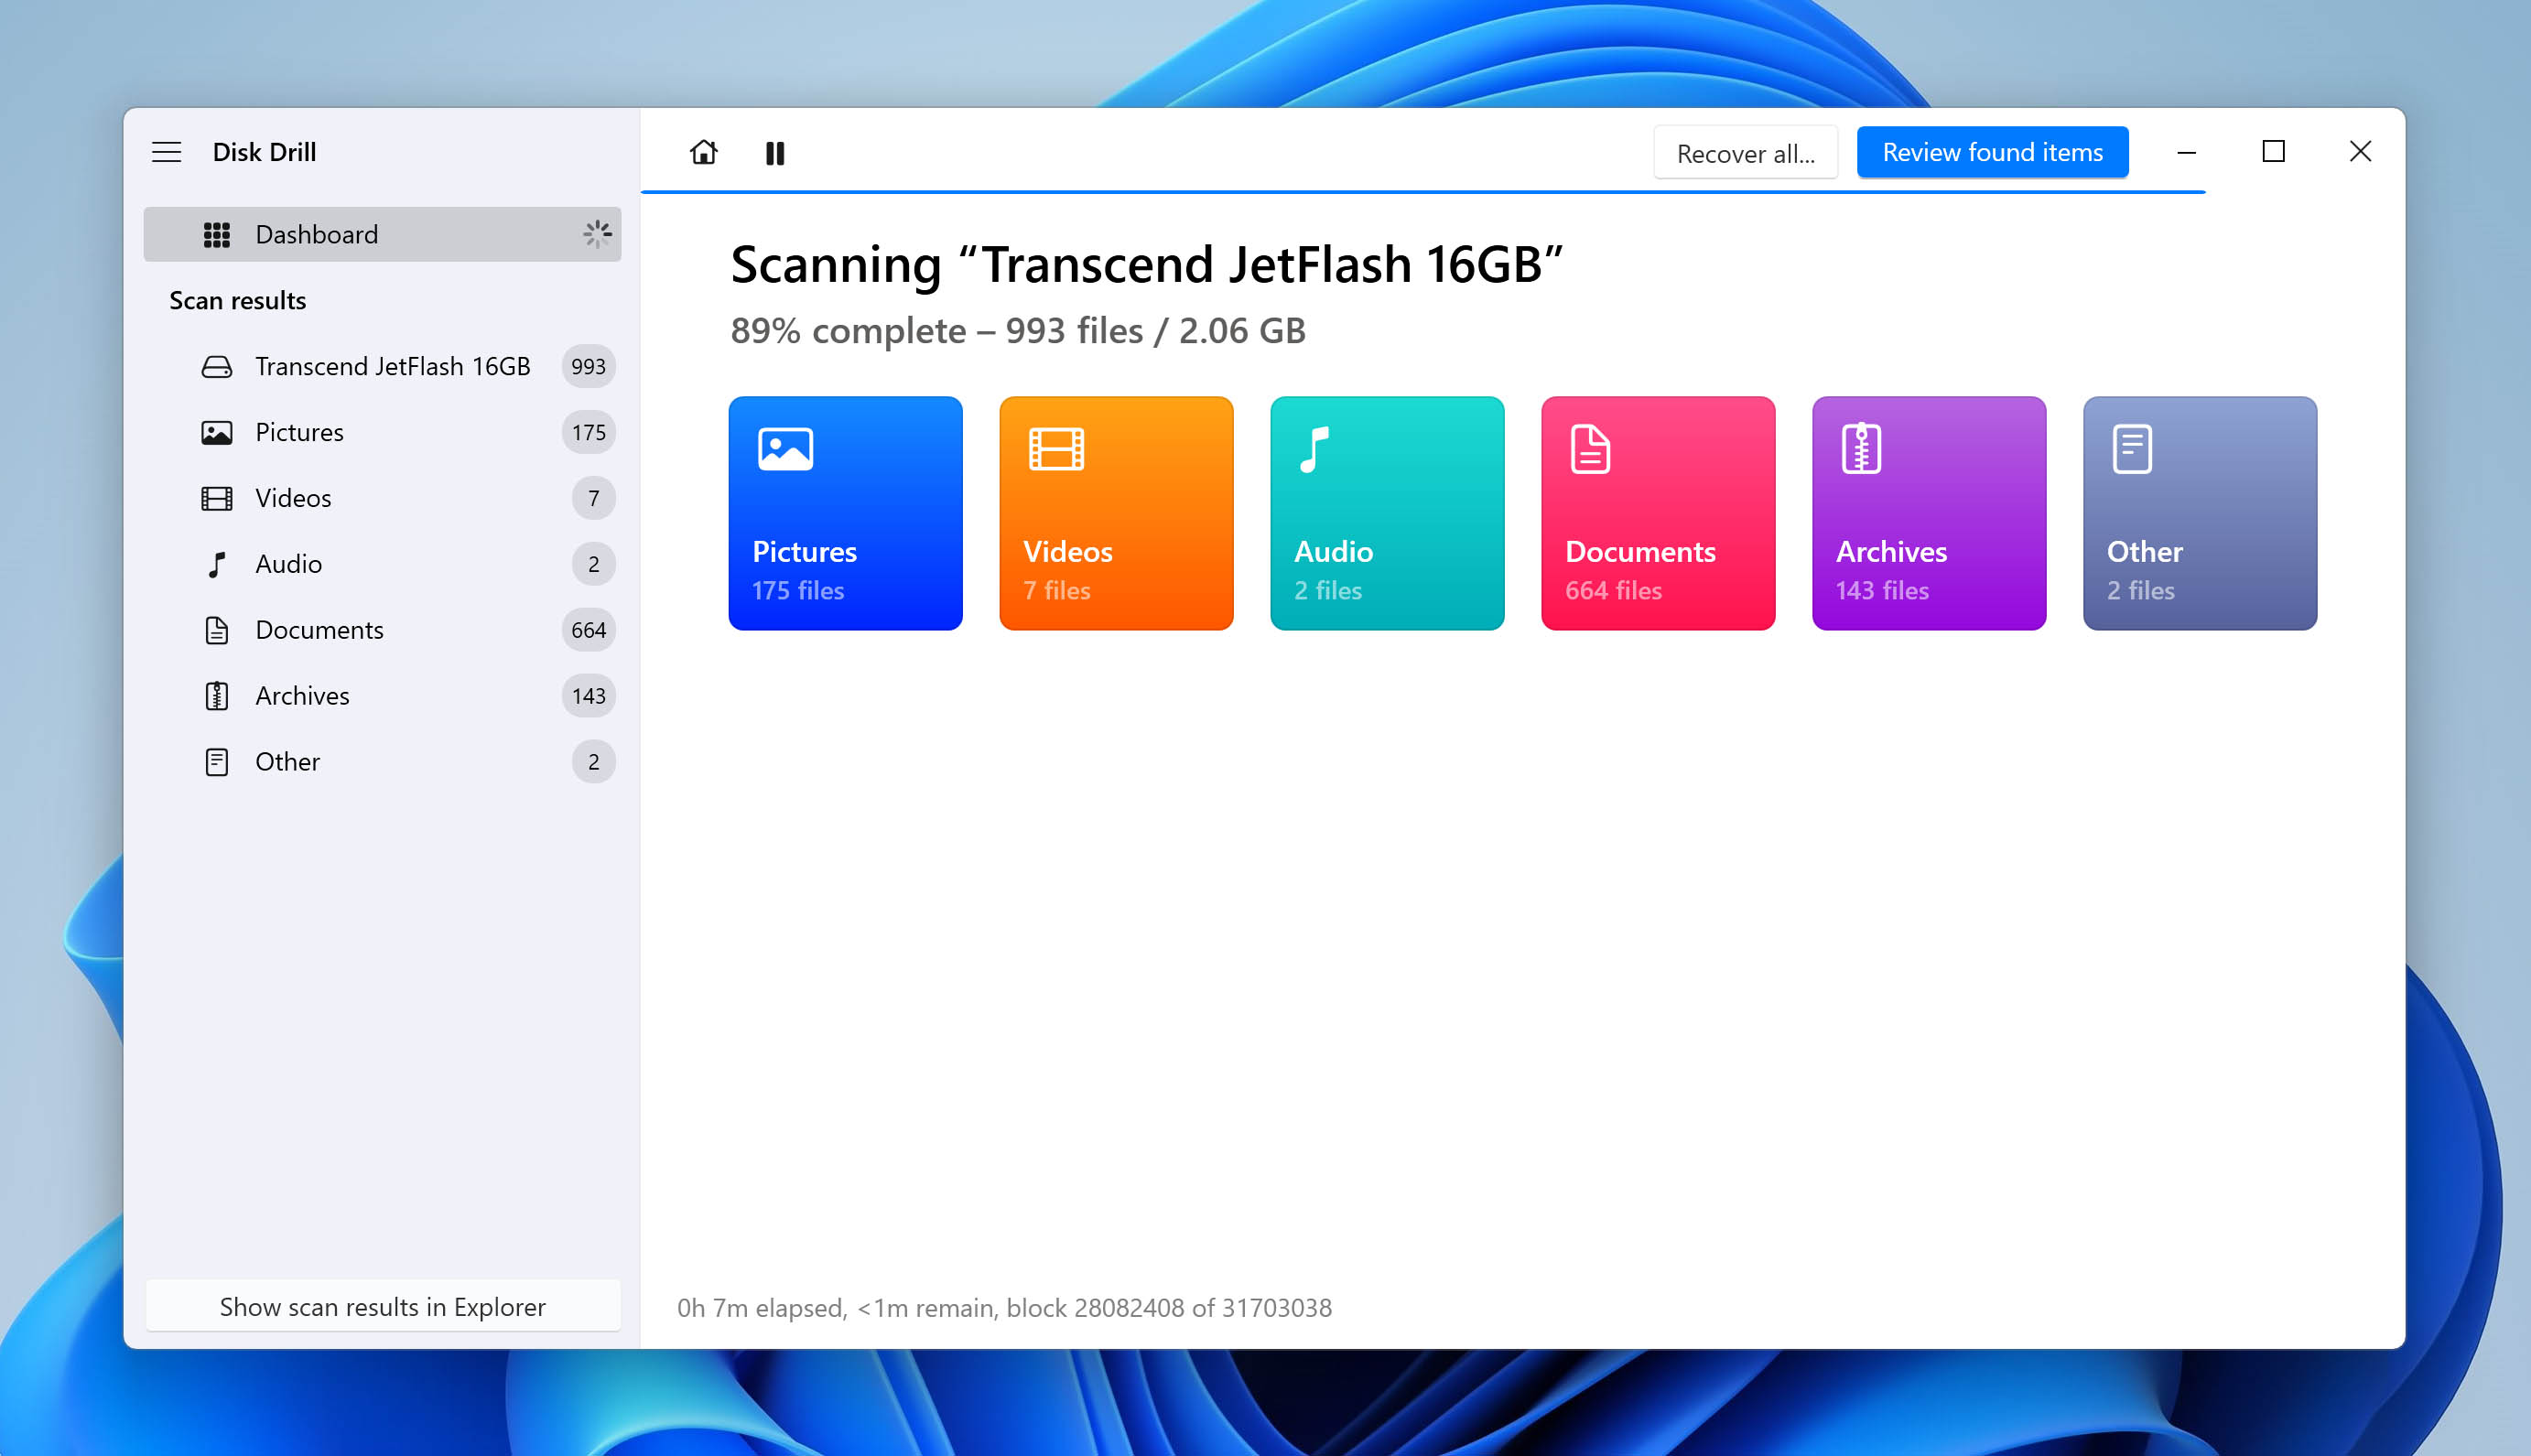
- Once the scan is complete, Disk Drill will display a list of recoverable files. You can preview the files to check if they’re the ones you want to recover.
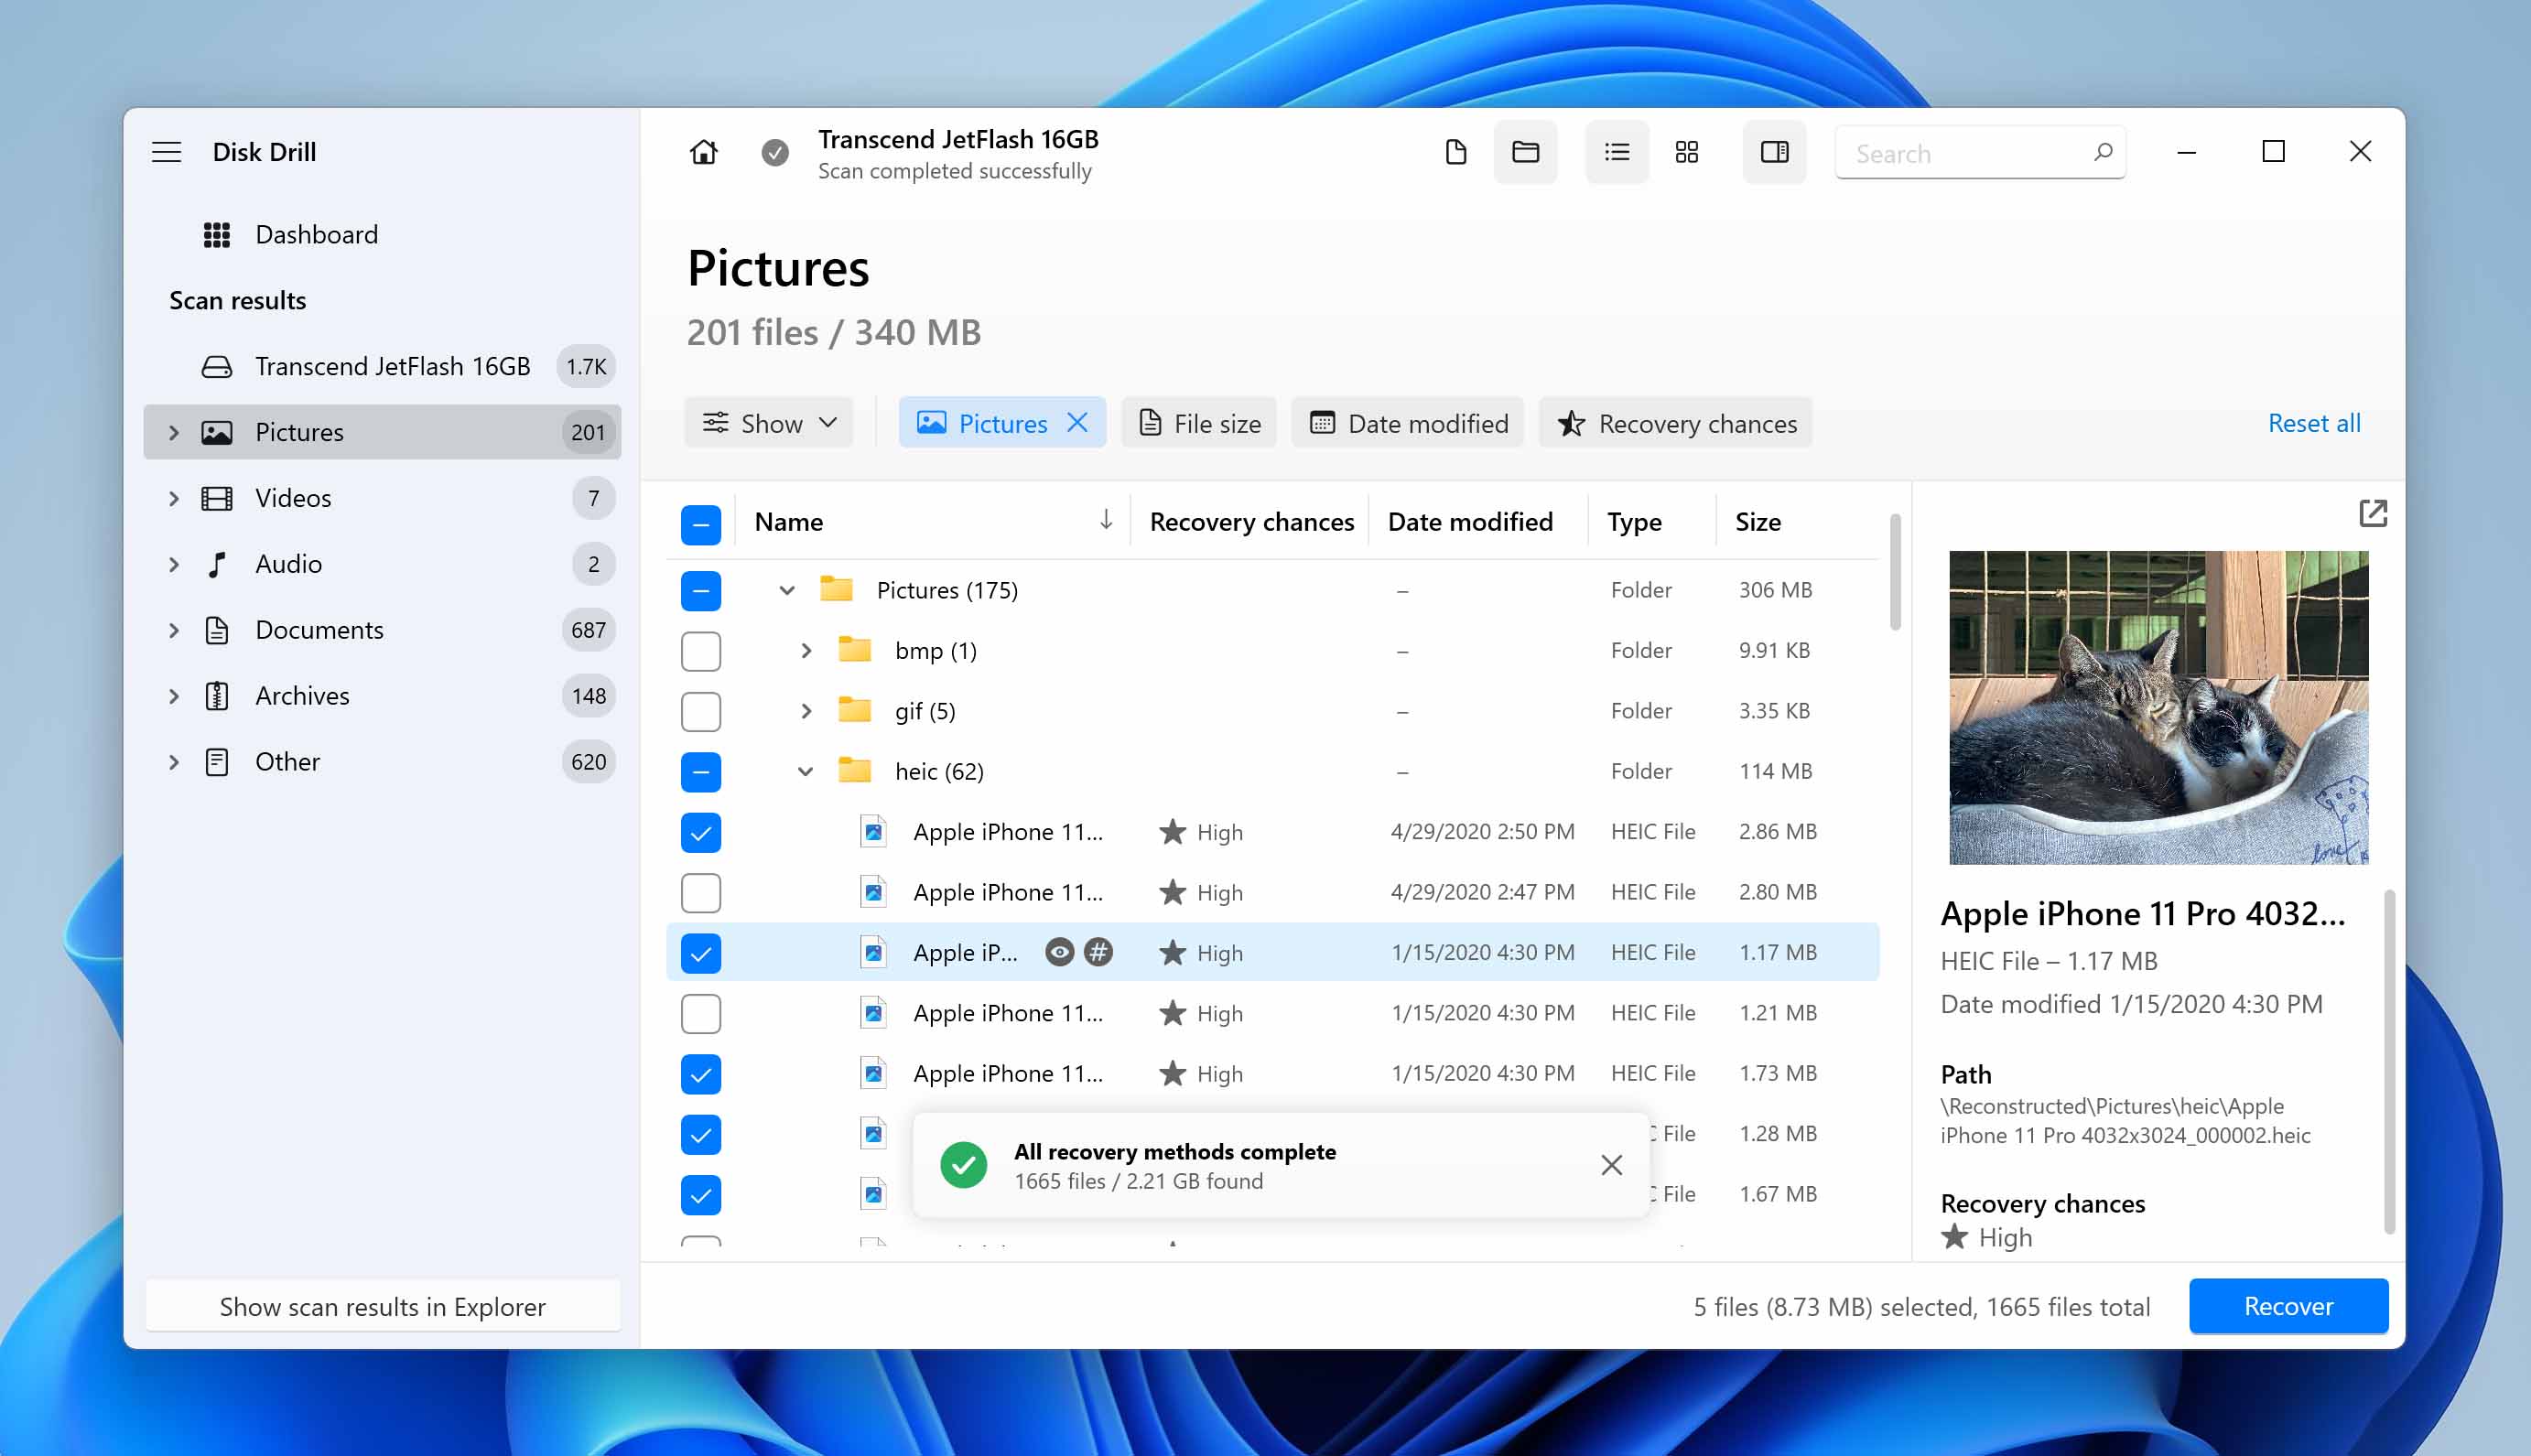
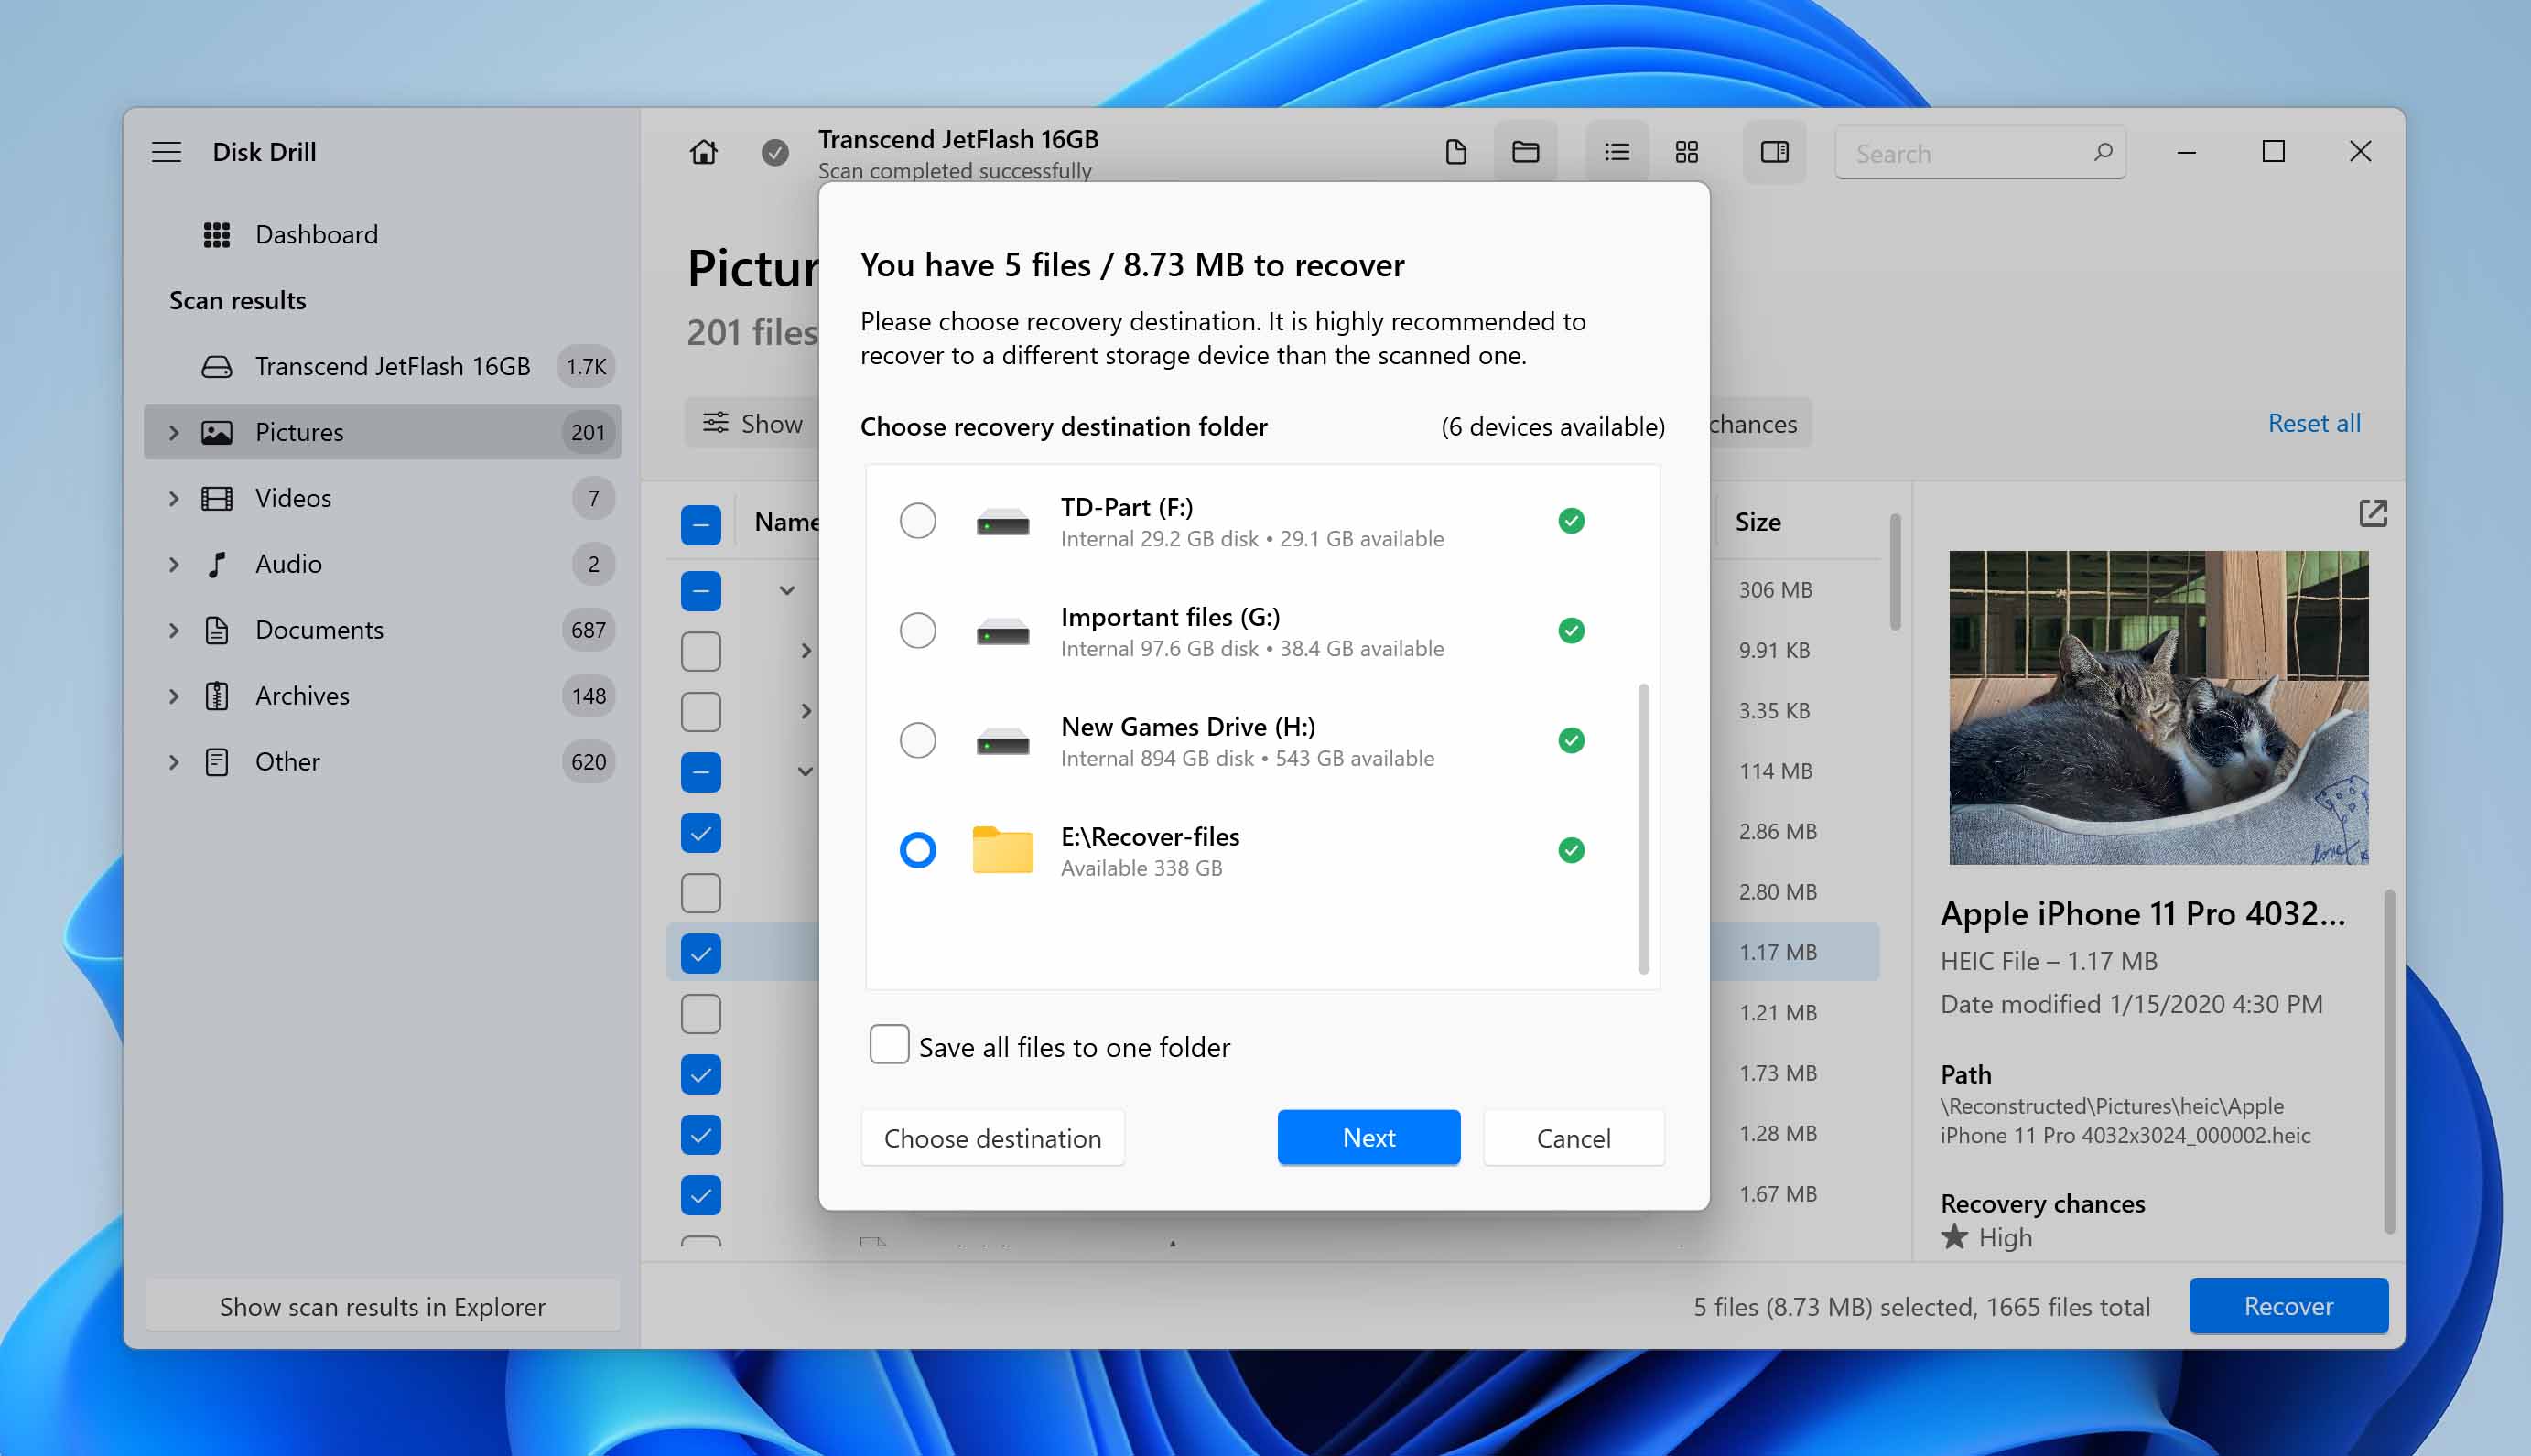
- Select the files you want to recover and click the Recover button. Choose a safe location on your computer to save the recovered files.
As you can see, RAW USB drive recovery is really a breeze with Disk Drill. That said, more ways to recover files from a USB drive do exist, and they can be invaluable in those rare situations when Disk Drill isn’t able to recover every single missing file.
3 Methods to Fix RAW USB Drive
Hopefully, you’ve managed to recover data from your RAW USB drive. Now, you should fix the RAW pen drive so that you can continue using it to store data. In this section, we explore three effective methods to fix a RAW USB drive, providing step-by-step guidance that you can easily follow.
It’s important to note that if you’re using a Mac, the process for fixing a corrupted USB drive is slightly different. For Mac users, we recommend checking out our guide on how to fix a corrupted USB drive on Mac.
1. Use the chkdsk Tool in Windows
The first thing you can try when you want to fix your RAW drive is to make use of the tools that are built into Windows itself. However, it is important to note that this method will only work if your USB drive was formatted using the NTFS file system, and its first (main) boot sector got corrupted due to any issues.
In this case, the chkdsk tool may just be able to help you out:
- Press Win + X to open the Power User menu and select Terminal (Admin).
- Enter the command
chkdsk letter: /f, where “letter” is the letter assigned to your drive (e.g. chkdsk I: /f). - Press Enter to execute the command.
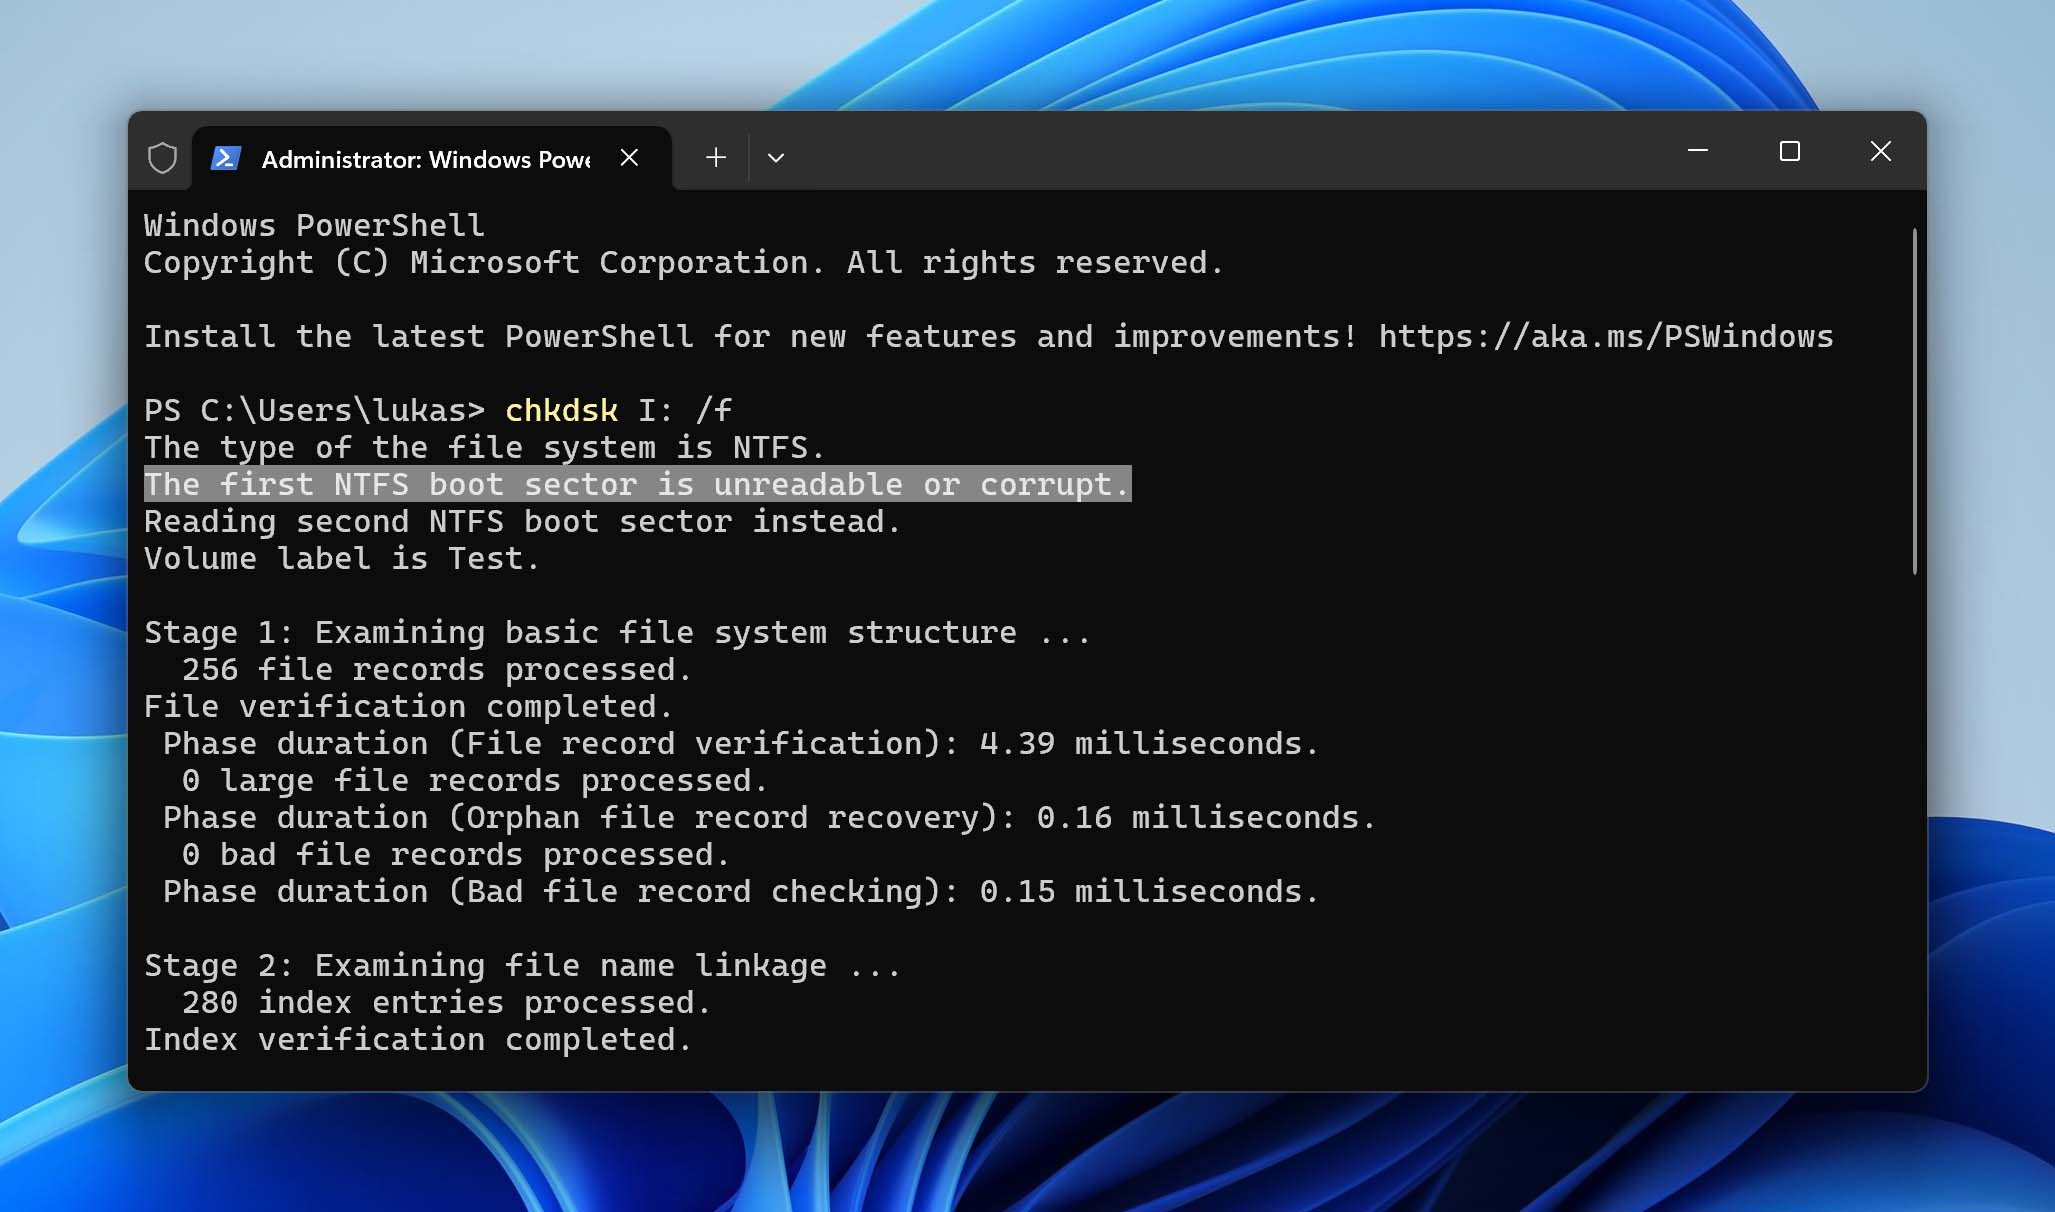
When executing this command, chkdsk will restore the functionality of the NTFS boot sector from the second (backup) boot sector.
2. Download TestDisk to Perform USB Drive RAW Format Fix
Sometimes, the built-in chkdsk tool in Windows may not resolve deeper file system corruption. If you find yourself in this situation, then you can follow the advice of Brandon Castellano, a robotics engineer specializing in computer vision, who recommends TestDisk.
“You can try TestDisk (free, cross-platform, and open source)—it works on almost all drives on a system, regardless of whether or not the drive is internal or external,” writes Brandon on Stack Exchange.
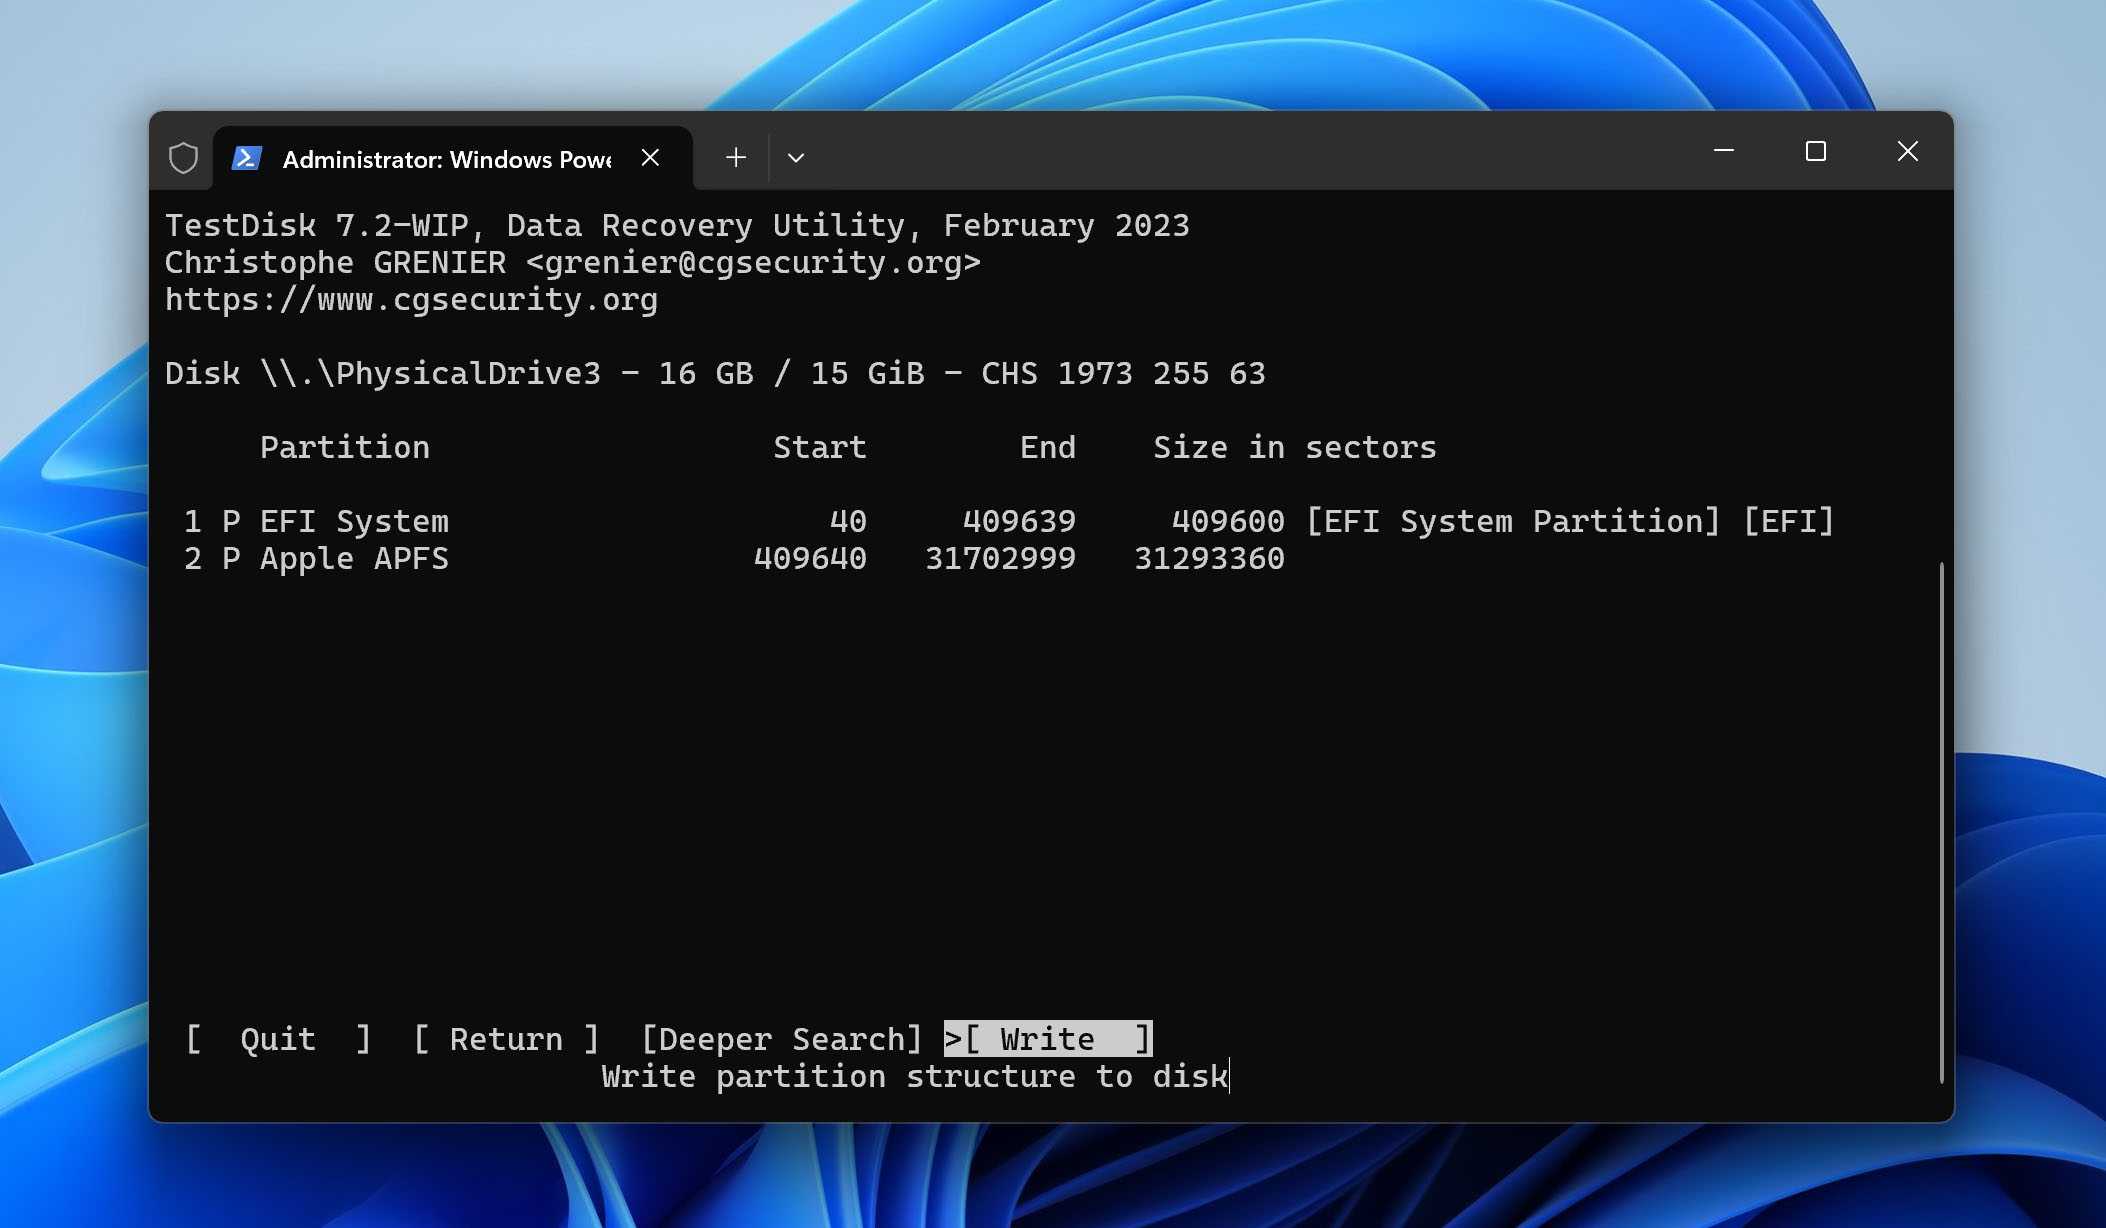
With TestDisk, you can find corrupted or missing partitions on your RAW USB flash drive and then repair the partition table. Alternatively, you can also use TestDisk to recover lost files without repairing the partition table (works only with FAT, exFAT, NTFS, and ext2/ext3/ext4 file systems). TestDisk is a command-line tool, so it may appear intimidating to less tech-savvy users. However, it comes with a clear step-by-step guide to help you through the process.
3. Access the RAW USB Flash Drive Using GParted
If your USB flash drives appears to be RAW because it has an incompatible file system, then there’s another solution, recommended by Silver Quettier, a computer enthusiast and web/Java developer at CGI Group, that can help you: GParted.
GParted is a compact bootable GNU/Linux distribution for x86-based computers that’s equipped with an array of tools for managing disk partitions and most file systems (APFS is one major file system that’s not supported by the tool). With GParted, you can read the files stored on your USB flash drive and copy them to another location.
To use GParted, you can download the GParted Live ISO file and create a bootable USB drive using a tool like Rufus. Then, boot your computer from the GParted Live USB drive and follow the instructions in the official GParted manual to access your RAW USB flash drive, recover your data, and, if necessary, create a new file system on it.
Bonus: How I Learned to Love the Eject Button (A Cautionary Tale)
I used to think that I knew it all when it came to using USB drives. I would plug them in, transfer files, and yank them out without a second thought. However, one fateful day, I learned the hard way why it’s so important to properly eject your USB drive before unplugging it.
I was working on an important project and had saved all of my progress onto a USB drive. As I was wrapping up, I decided to quickly transfer some files over to my colleague’s computer. I plugged in my USB drive, copied the files, and then hastily pulled it out without using the Safely Remove Hardware option.
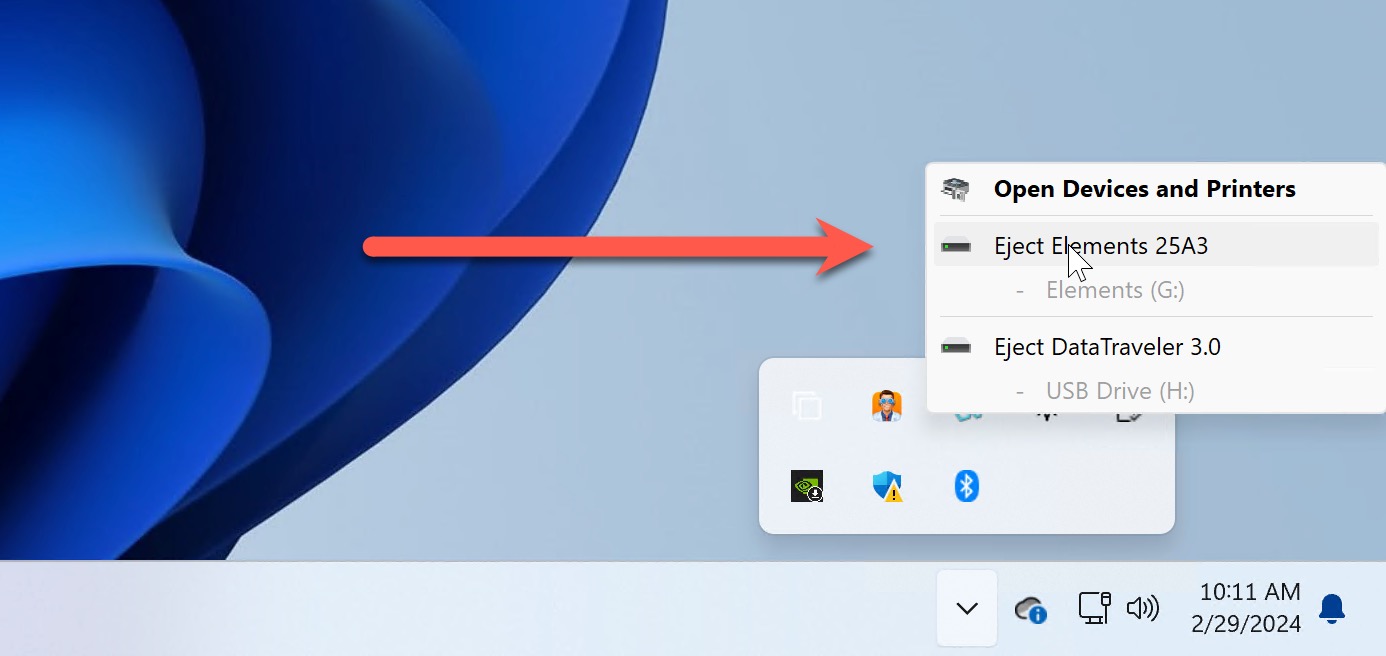
To my horror, when I plugged the drive back into my own computer, I couldn’t access my files. In fact, I couldn’t even find the USB drive listed among connected devices in File Explorer because it turned RAW! After doing some research, I realized that by not properly ejecting my USB drive, I had caused file system corruption.
This could have been easily avoided if I had simply taken the extra few seconds to use the Safely Remove Hardware option. I urge all of you to learn from my mistake and always properly eject your USB drive before unplugging it. It may seem like a small step, but it can save you from potential data loss.
Conclusion
As we’ve demonstrated, it’s often possible to recover a RAW USB flash drive. We highly recommend starting with Disk Drill, a reliable data recovery tool available on both Windows and Mac OS. Its user-friendly interface and robust features make it an excellent choice for both beginners and professionals.
After recovering your data, you can then explore various free tools like the Error Checking tool in Windows or TestDisk to make the RAW drive usable again. It’s also a good idea to follow certain best practices, such as always ejecting USB flash drives properly, so that you never have to fix a RAW USB flash drive ever again.


FAQ
While it may look complex initially, recovering data from a RAW USB drive is actually possible. The Windows operating system has in-built options that will assist you in trying to find out the issue that your drive is facing and resolve it. However, in case it is not able to resolve the issue, a third-party app such as Disk Drill will help you in recovering your data. The app is available for free and has a user-friendly interface that makes it easy to use even for beginners.
To fix a RAW USB without formatting, you can try using the command-line utility chkdsk in Windows. Although chkdsk doesn’t work with RAW devices in most cases, there is one exception when the main NTFS boot sector is damaged; in this case, CHKDSK may help recover it. If chkdsk is not able to repair the file system errors on your RAW USB drive, you can try using TestDisk, a free and open-source data recovery tool that can repair partition tables and file systems on a variety of storage devices, including USB drives.
If you want to fix a RAW USB drive without losing data, the most important thing is to avoid formatting the drive. When Windows detects a RAW drive, it often prompts you to format it, but doing so will erase all the data on the drive. Instead, use a data recovery tool like Disk Drill to recover your data first. Once you have recovered your data, you can then use tools like chkdsk or TestDisk to try to repair the RAW file system without formatting.