As useful as external hard drives are for storing our favorite photos, videos, documents, and music, data loss is a looming threat that can appear out of nowhere. Even if you take the utmost care of your external hard drive, there’s no telling when an issue will spring up and cause some of your data to disappear.
Thankfully, data loss is nothing new. We know of several ways to recover data from an external HDD that have proven invaluable to many of our readers in the past. In this article, we’ll explain some common reasons behind external hard drive data loss and how you can get your files back.
Reasons for Data Loss from an External Hard Drive
Data loss can happen to any external hard drive, including those from the likes of Seagate, Toshiba, WD, and Samsung. A data loss event refers to anything that has caused some or all of your data to become lost, inaccessible, or deleted. Such issues are divided into two categories: logical and physical. We’ll be focusing on logical ones, as you can solve them yourself, whereas physical ones require the intervention of recovery services. Here are a few common reasons why data loss can occur:
- 📝 Accidental file deletion or formatting – Mistakes happen, as seen by this Reddit user who deleted all of their data in one fell swoop. It could be that you knocked the Del key when all of your files were selected, or perhaps you were meant to format a drive and selected the wrong one.
- 🚩 System or hardware error – As a mechanical device with moving parts, external hard drives are prone to wear over time. Beeping noises, as this user experienced, are a sign of drive failure, which can point towards issues like a head crash or motor failure.
- 🤖 Virus or malware attack – Pesky malware can even infect your external hard drive if it manages to access it. It could be in the form of ransomware, where your files become encrypted and unusable, or a virus, which attacks your drive directly.
- 🔋 Sudden power loss or surge – Power-related issues are a common cause of data loss. Improper shutdowns can lead to file system corruption, causing your data to become inaccessible. Contrarily, a sudden surge of power after power loss can fry hardware components if your system isn’t protected by a surge protector.
- 🌊 Physical or environmental damage – Due to their portable form factor, external hard drives commonly experience data loss from being dropped. They can also be significantly impacted due to contact with water, and in rare cases, if they’re used in extremely hot or cold temperatures that are outside their safe operating range.
These are just a few reasons why it’s valuable to know how to recover data from external hard drives. Using the table below, you can jump straight to the recovery solution that best describes your situation.
| Data Loss Scenarios | Possible Recovery Solutions |
| Deleted your pictures, videos, etc., by accident. |
|
| Formatting your drive/Damaged Partitions. | |
| Files disappeared from my disk | |
| File system corruption | |
| Unsaved files due to power cuts, system crashes, etc. | |
| Physical damage to the external HDD. |
Is It Possible to Recover Files from the External Hard Drive Recycle Bin?
Yes, you can recover files from the external drive’s Recycle Bin. And honestly, it should be one of the first places you check. There is a chance that your files were sent there, but it really depends on the scenario. For instance, files deleted with Shift + Delete skip the Recycle Bin entirely. Still, it’s worth checking to see what you can restore.
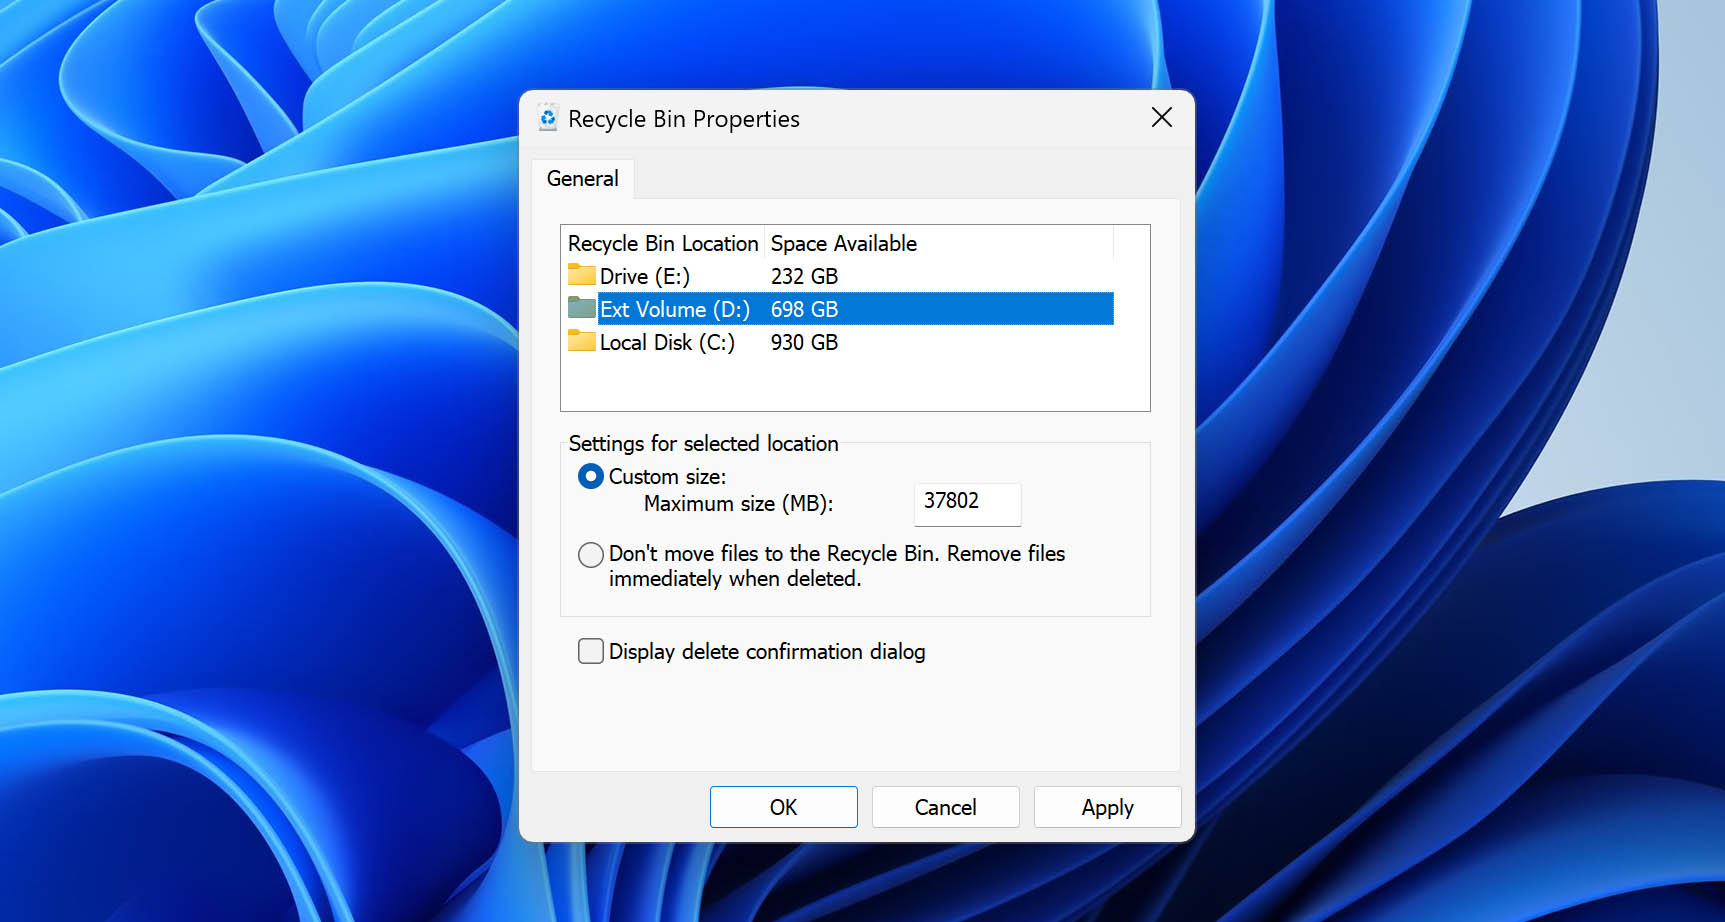
Each hard drive has its own Recycle Bin folder that’s hidden from view. When you click on the Recycle Bin icon located on your Desktop, what Windows shows is actually a combined view of all Recycle Bin folders that are present on your computer, letting you access Recycle Bin folders located on external hard drives.
You can see a list of all Recycle Bin locations by right-clicking the Recycle Bin on your Desktop and selecting Properties.
The problem is that when most people realize that they need to recover data from an external hard drive, the files they’re looking for are no longer present in the Recycle Bin.
Files that bypass or are emptied from the Recycle Bin or Trash are not immediately physically erased from the drive. However, they will be inaccessible, and before long, overwritten permanently. Therefore, your last chance to recover them is with a hard drive data recovery solution. Disk Drill is one such option that can find and recover data using the records left by most common file systems (including NTFS, exFAT, FAT32, and APFS), even restoring the original file names and folder structure. In cases where that’s not possible, it’s capable of recovering over 380 file formats by their unique file signatures.
7 Effective Methods to Recover Data from an External Hard Drive
While there are numerous possible solutions to help you recover data from external hard drives, one may be more favorable than another based on your unique circumstances. As such, we’ve included a range of recovery solutions. Before we look at them though, here are a few helpful pointers to maximize your probability of successful data recovery:
- ❌ Stop using your external hard drive as soon as you discover that you’re missing data. The more time you spend using your external hard drive after data has been lost or accidentally deleted, the greater the chance that some application or even the operating system itself will overwrite the data and make it impossible to perform external hard drive recovery.
- 💿 Don’t format the external hard drive. Many hard drive issues can be solved by formatting the hard drive and starting from scratch, but data loss isn’t one of them. When you format a hard drive, all storage space on the drive is marked as empty and a new partition table is created, making it much more difficult to recover deleted files. So, even if Windows keeps asking you to format due to partition damage, disregard the prompt.
- 🔧 Avoid DIY recovery attempts if physical damage is present. Dealing with a physically damaged disk is extra risky, so you shouldn’t use it, let alone attempt any DIY fixes you come across. Instead, it’s best to leave it alone until you can consult a professional recovery service.
Method 1: Recover Data from an External Hard Drive Using Data Recovery Software
Data recovery software is necessary if you don’t have a backup or the files skipped the Recycle Bin/Trash, as it’s designed for use in even extreme data loss scenarios. In this case, Disk Drill is a great choice because not only can it recover files after deletion (including those that have been lost to formatting) on Windows and macOS, but it can also scan and recover data from external hard drives that have become RAW, uninitialized, or otherwise corrupted.
To recover deleted files from an external hard drive:
- Download Disk Drill for Windows or macOS and install it.
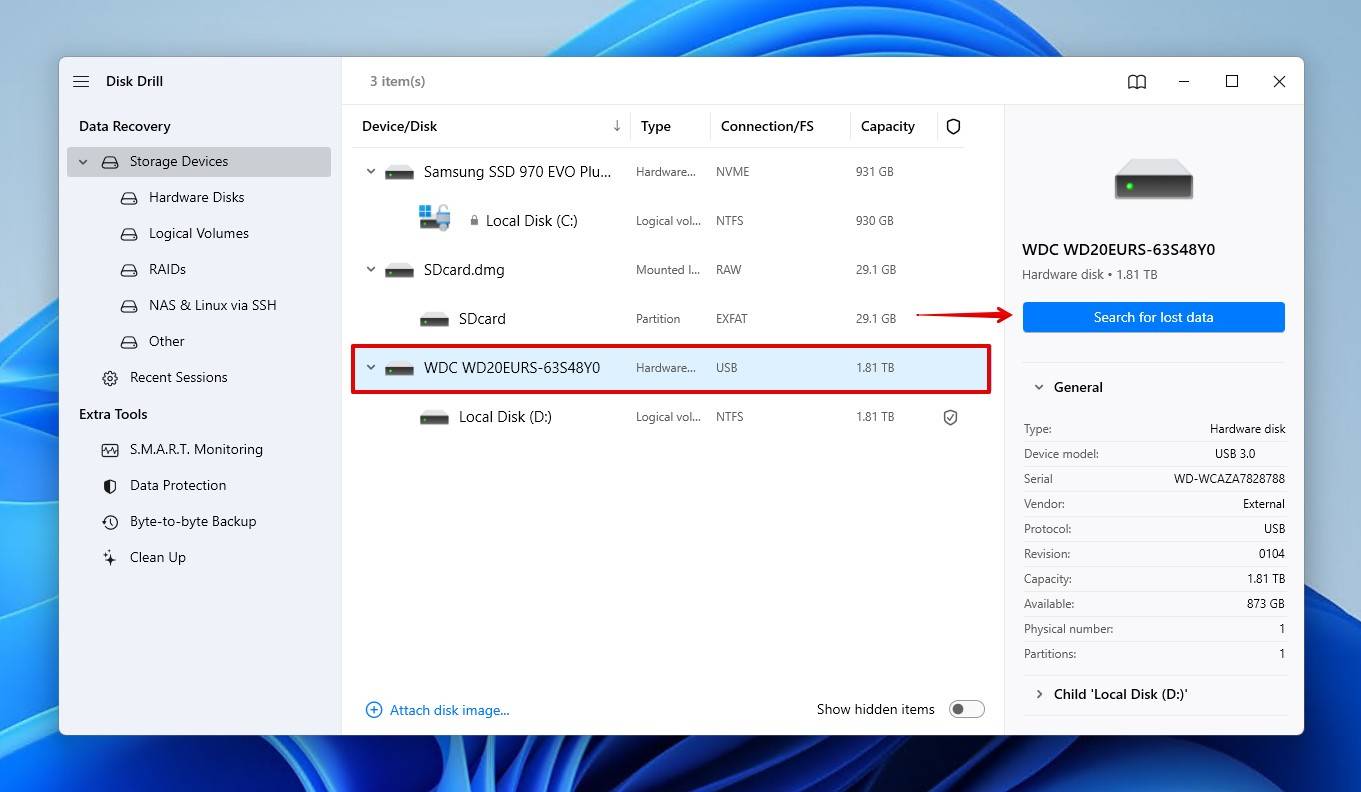
- Connect your external hard drive.
- Launch Disk Drill and click the Search for lost data button next to your external hard drive. When scanning external drives and disk images, you’ll need to choose between two scans: Universal Scan or Advanced Camera Recovery. In this case, the Universal Scan is best.
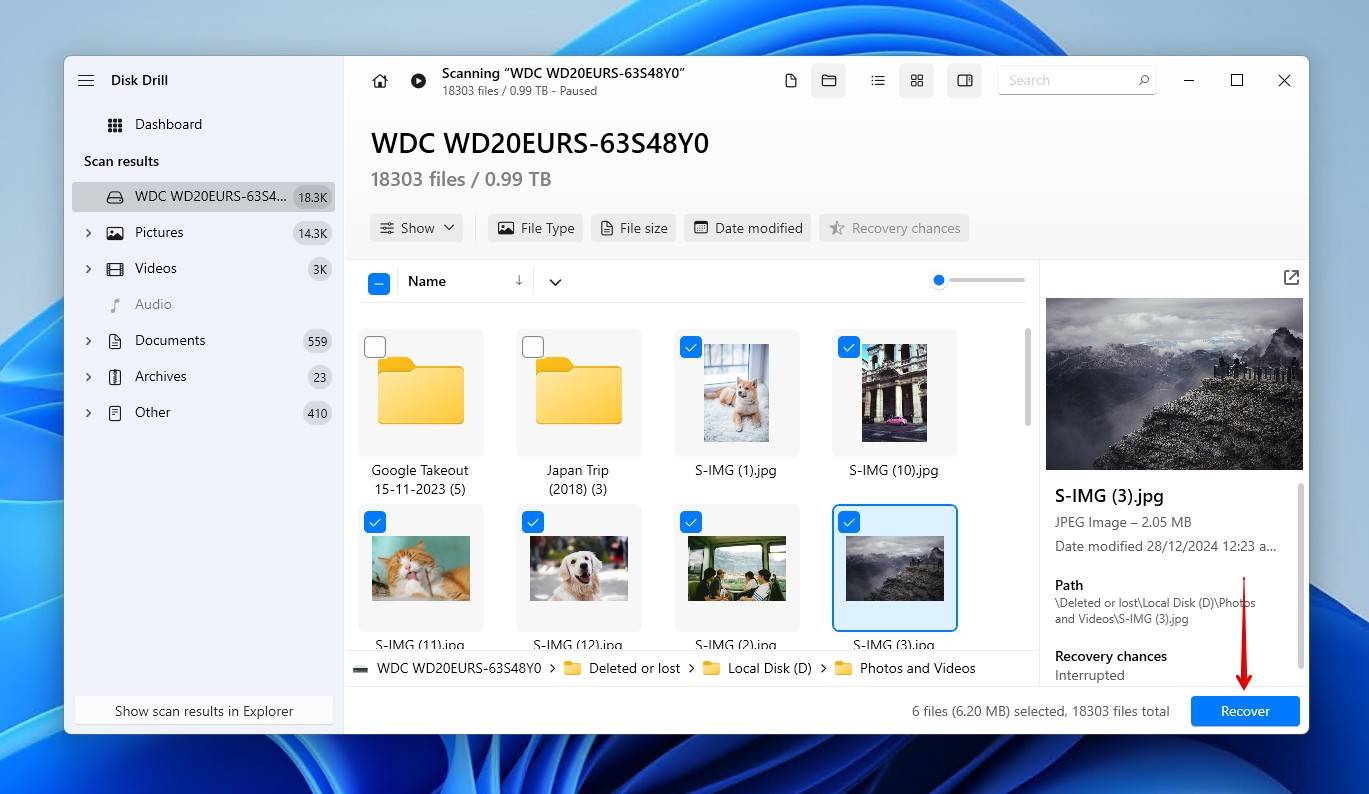
- Select which files you want to recover.
- Start the recovery process by clicking the Recover button.
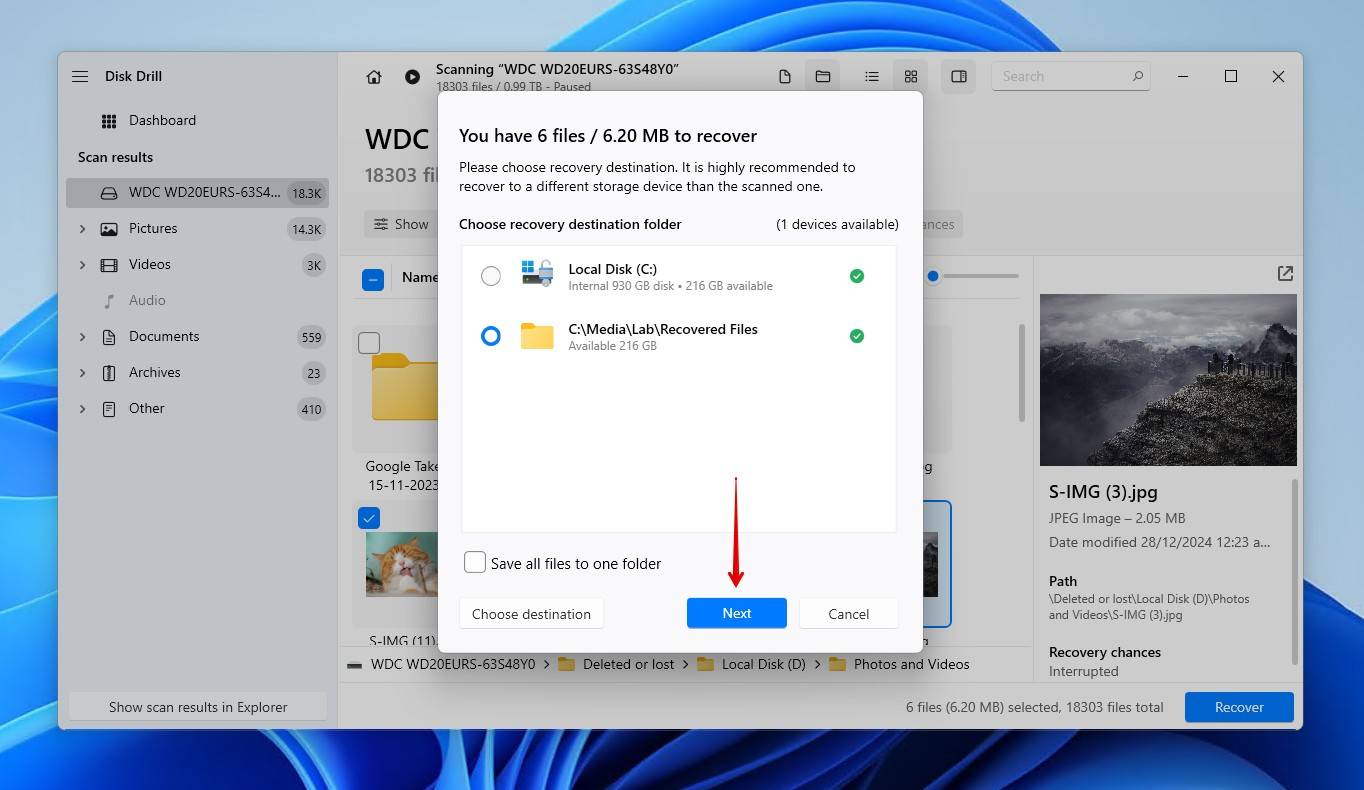
- Now, all that’s left is to select the destination for your file recovery. Be sure that you choose a recovery location on a separate physical drive to avoid corrupting the files.

You can repair the corrupted external hard drive after the data has been recovered. If you’d prefer to back the drive up before doing anything, you can use the backup feature in Disk Drill to create a byte-to-byte image first.
Method 2: Unhide Files Using the Command Prompt
Also known as CMD, the Command Prompt provides you with much finer control over your operating system by allowing you to give your computer text commands. This comes in handy when dealing with data loss caused by malware, specifically those that hide the files stored on your external hard drive by giving them the hidden attribute.
Instead of painstakingly fixing the attributes of each and every file on your computer, you can simply use a single command to fix them all at once.
To recover deleted files from an external hard drive using CMD:
- Connect your external hard drive to your computer.
- Press Win + R keys to launch the Run program.
- Type cmd and click OK.
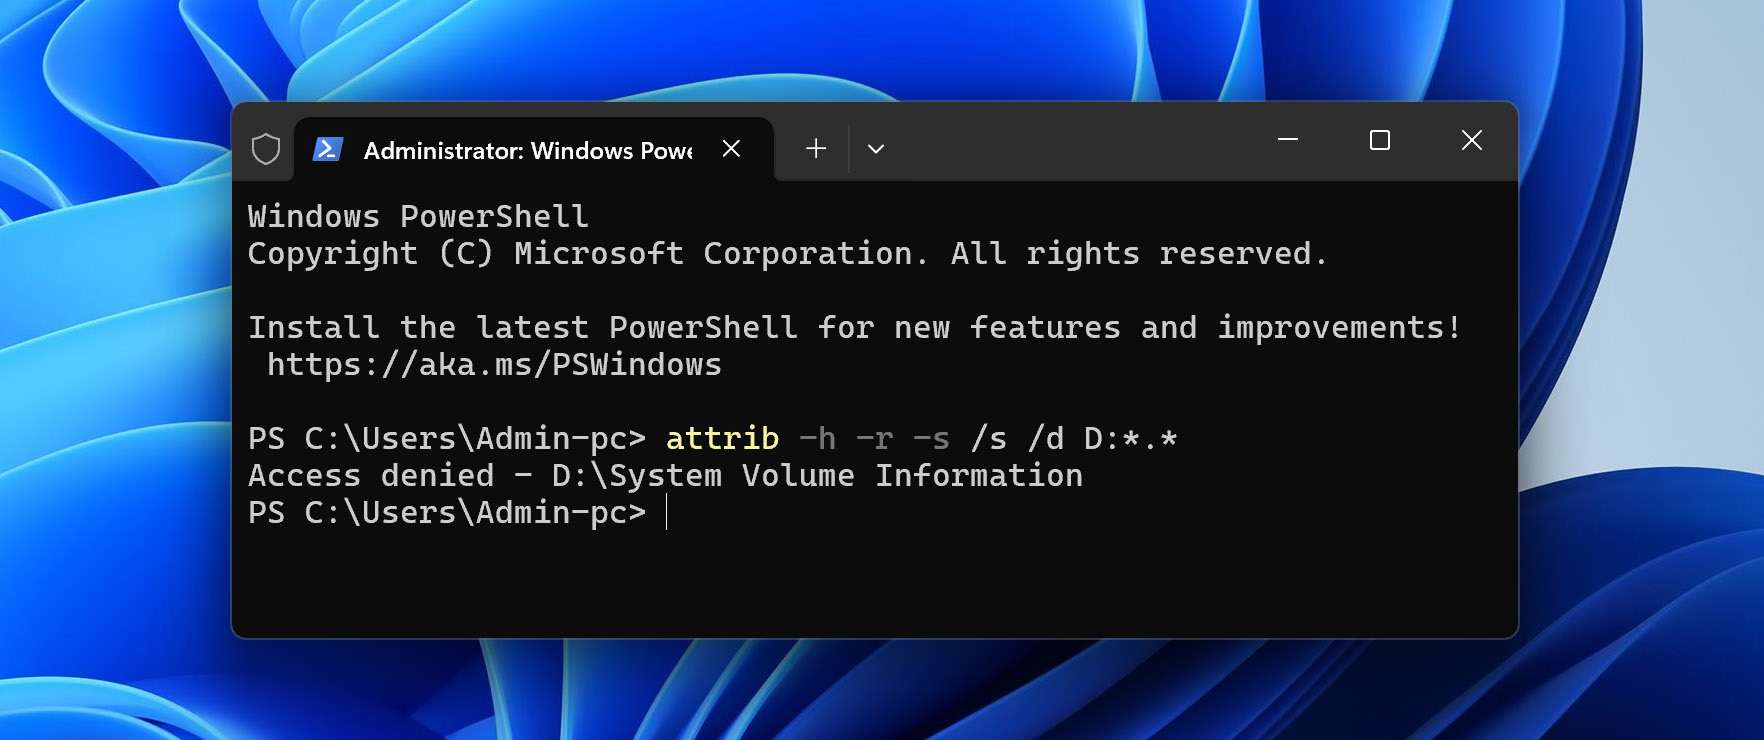
- Type the following command in the CMD window, replacing X: with your own drive letter, and hit enter:
ATTRIB -H -R -S /S /D X:*.*
Method 3: Restore a Previous Version
File History is a handy Windows feature. It allows you to go back in time and restore previous versions of files, even if the original files have since been deleted. For File History to work, it’s necessary to activate it manually.
You can do this by typing “File History” into the Windows search bar and clicking on ‘Restore files using File History.’ This will lead you to the Control Panel, where you can turn on File History. In the unlikely event that you had set up File History to keep a copy of the files stored on your external hard drive, you can restore a copy of them.

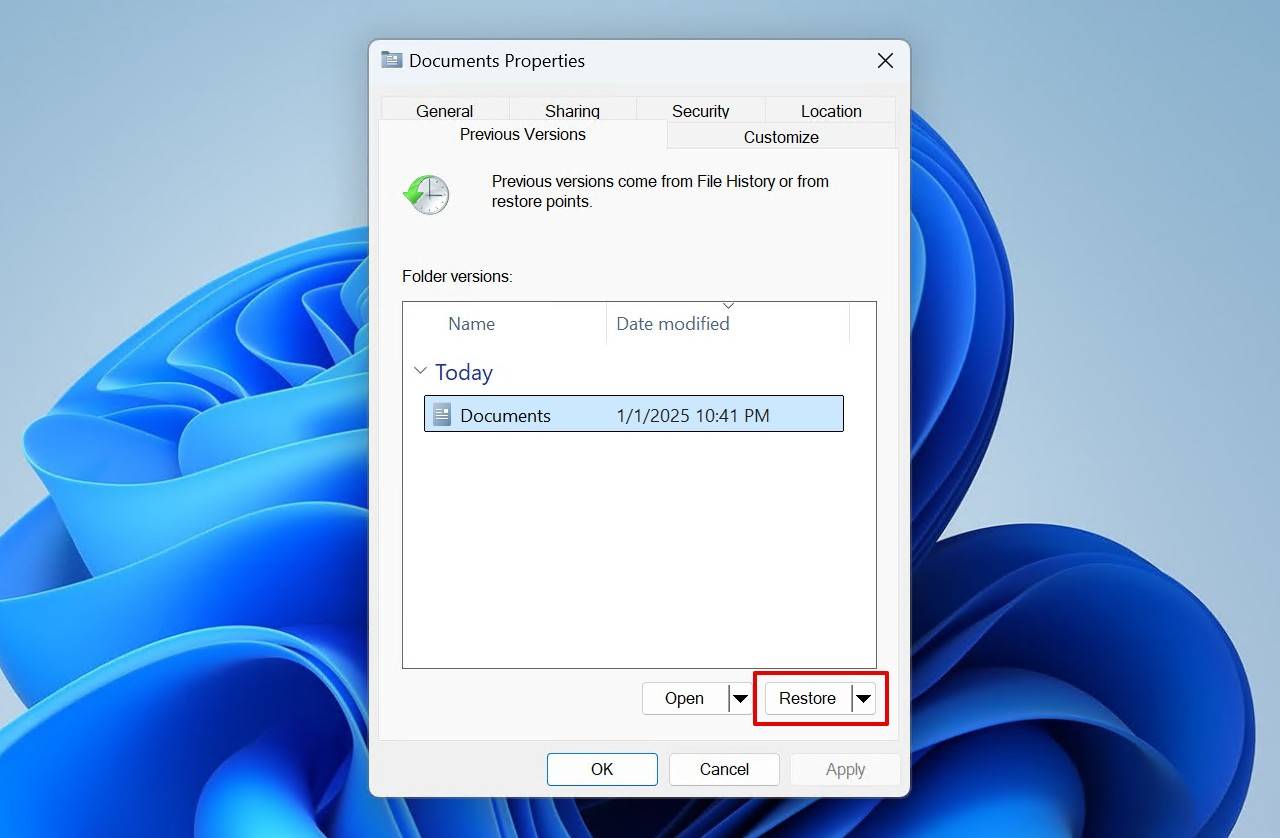
To restore a previous version of a file using Windows file history:
- Navigate to the folder where your files were stored before deletion.
- Right-click inside the folder and select Properties.
- Open the Previous Versions tab.
- Select which previous version you want to recover.
- Click the Restore button.
The macOS equivalent to Previous Versions is Time Machine backups, which uses a similar versioning feature, but these may not always be available, considering external devices are not backed up by default.
Method 4: Use the CHKDSK Command
CHKDSK isn’t a replacement for recovery software or other solutions, but rather a means of fixing file system issues that could be causing the data to be inaccessible. However, due to how it interacts with data on the disk, there is a risk to your data. Because of that, you should only use CHKDSK if the data isn’t valuable, or if it has already been recovered or backed up.
Follow these steps to run CHKDSK on the drive’s volume:
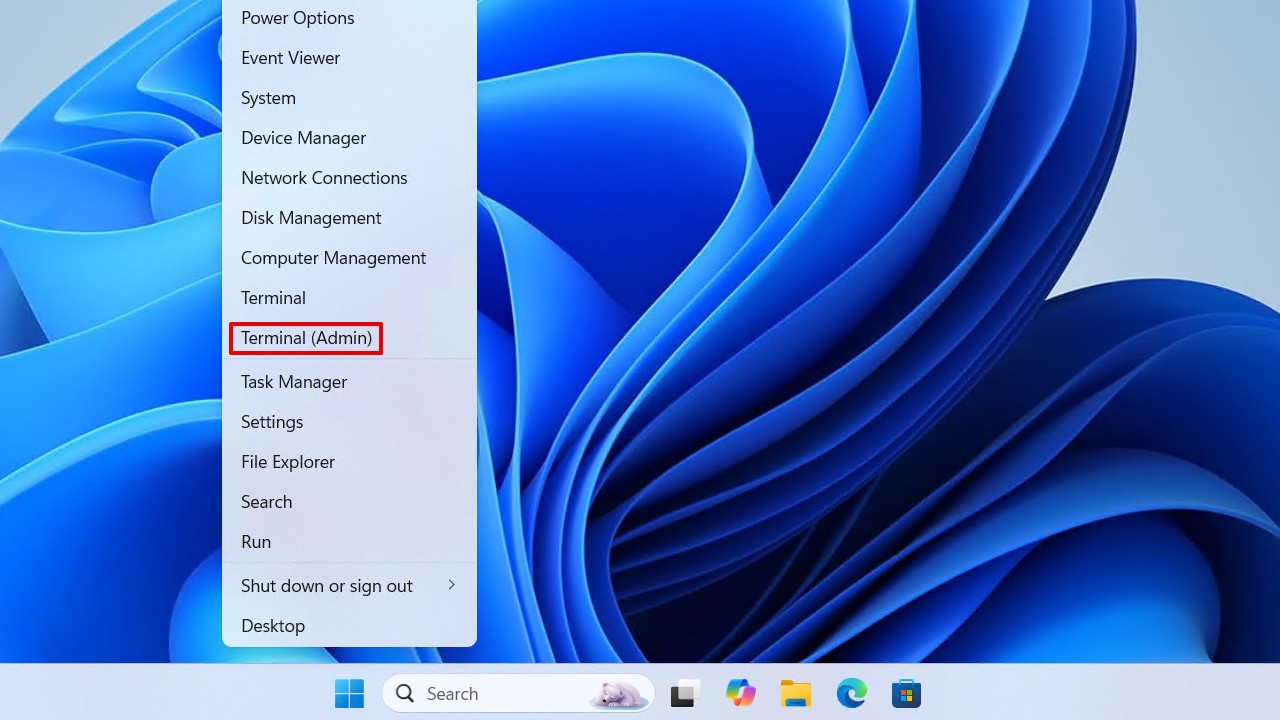
- Right-click Start and click Terminal (Admin).
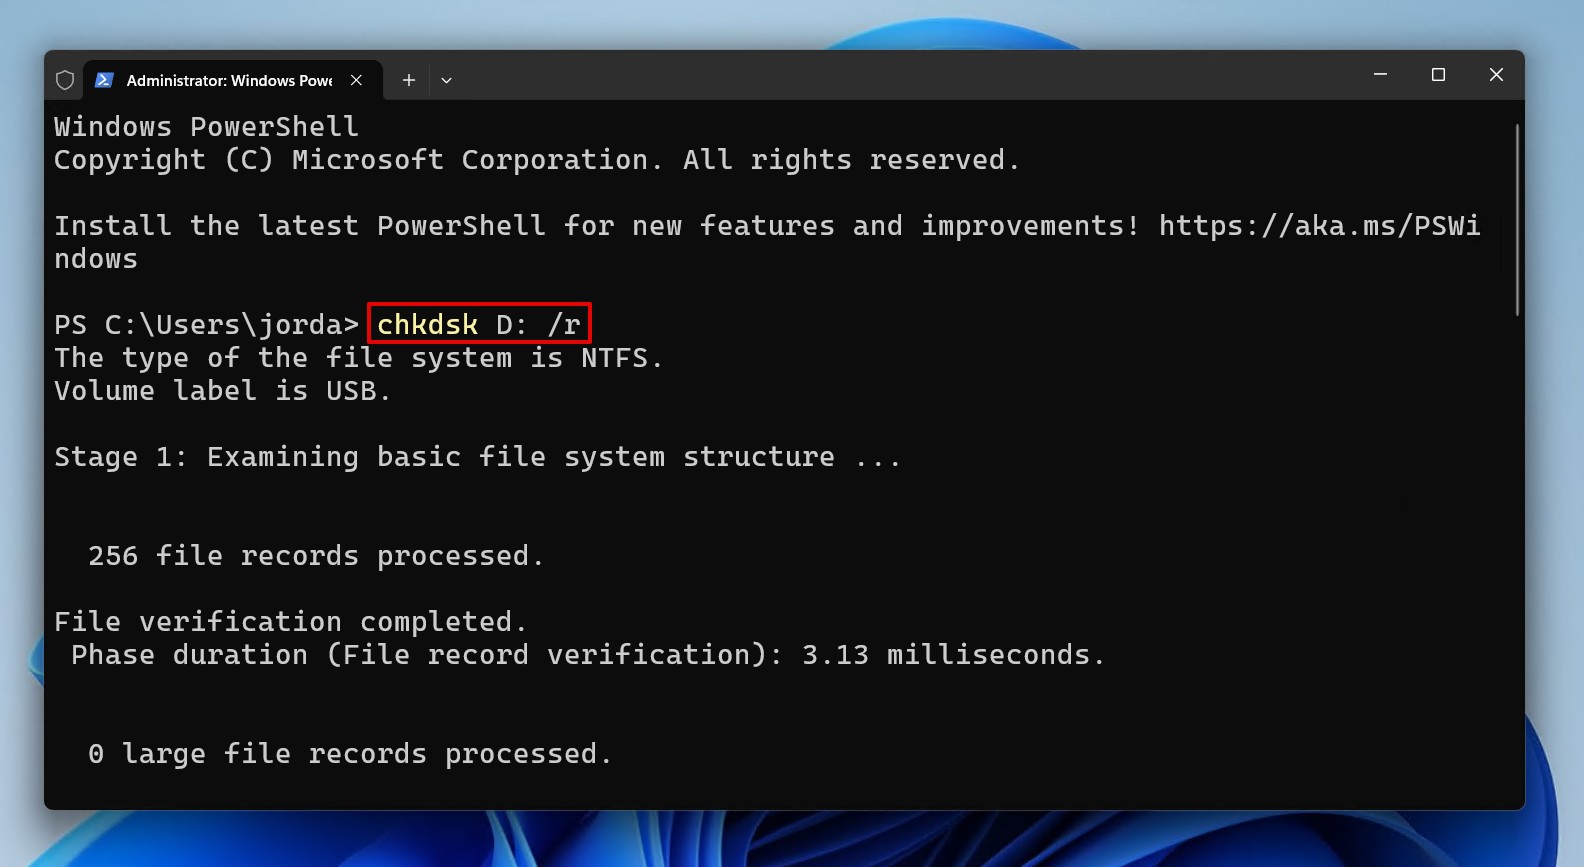
- Type chkdsk *: /r. Replace * with your drive letter, then press Enter.
Method 5: Use a Previous Backup
Where possible, it’s best to restore from a backup of your files is ideal. Of course, this is useless info in hindsight, but it’s good to have a look around to see if there’s a backup you made previously but forgot about. Look for previous backups on external hard drives, USB flash drives, NAS devices, or any other network-connected storage (for example, USB drives attached to your router).
If you use cloud storage like OneDrive, Google Drive, or Dropbox, there’s a chance that a copy of your data was copied to the cloud – especially if you installed the app associated with it on your PC. These platforms also have their own deleted item bins you can check for any deleted files before they’re permanently deleted.
Method 6: Restore Deleted Data Using TestDisk
TestDisk is an open-source partition recovery tool capable of recovering deleted partitions and restoring access to the files it contained. It’s also regularly used for partitions that have become RAW and partition tables that have been corrupted, as it focuses on addressing the underlying problem rather than individual file recovery.
It can be a little bit tricky to use since it runs through a command-line interface (CLI), but these steps should be enough to guide you through using TestDisk:
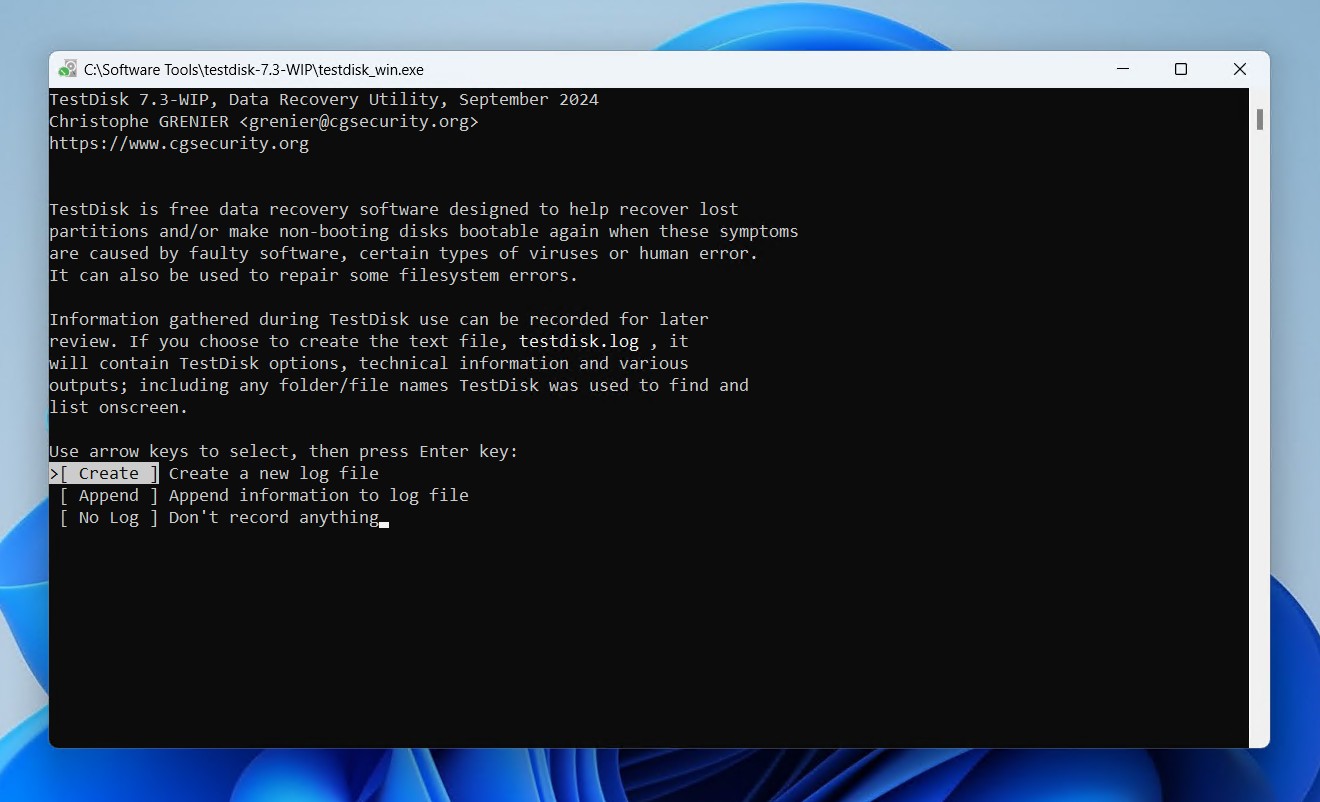
- Download and extract the contents of TestDisk. Open testdisk_win.
- Press Enter to create a log file.
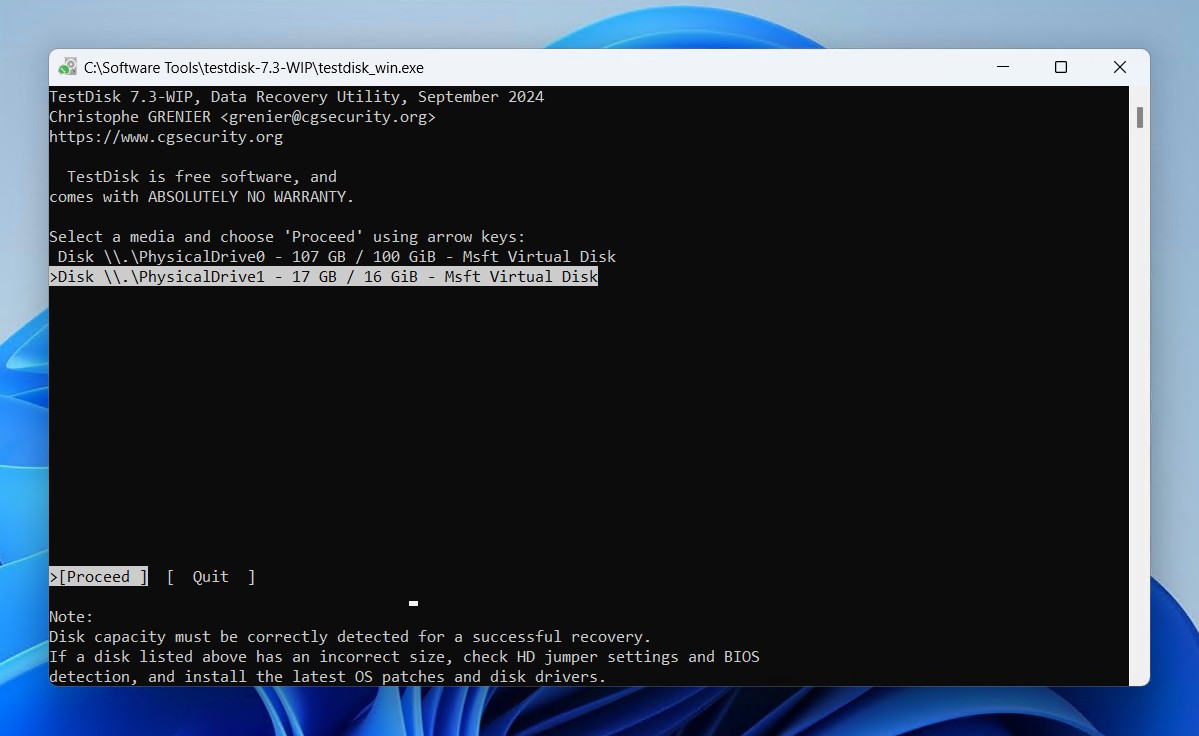
- Highlight your external hard drive and press Enter.
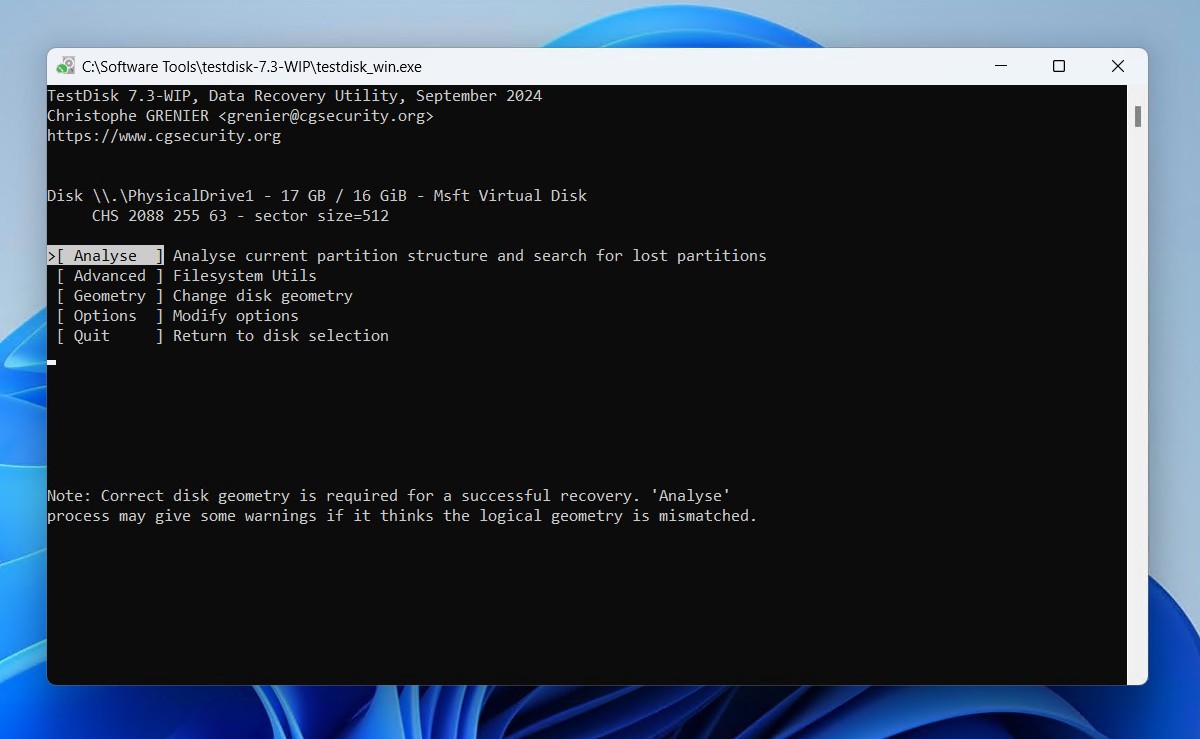
- Choose your partition table type and press Enter.

- Press Enter, choosing the option to analyze.
- Press Enter to begin the quick search for lost partitions.
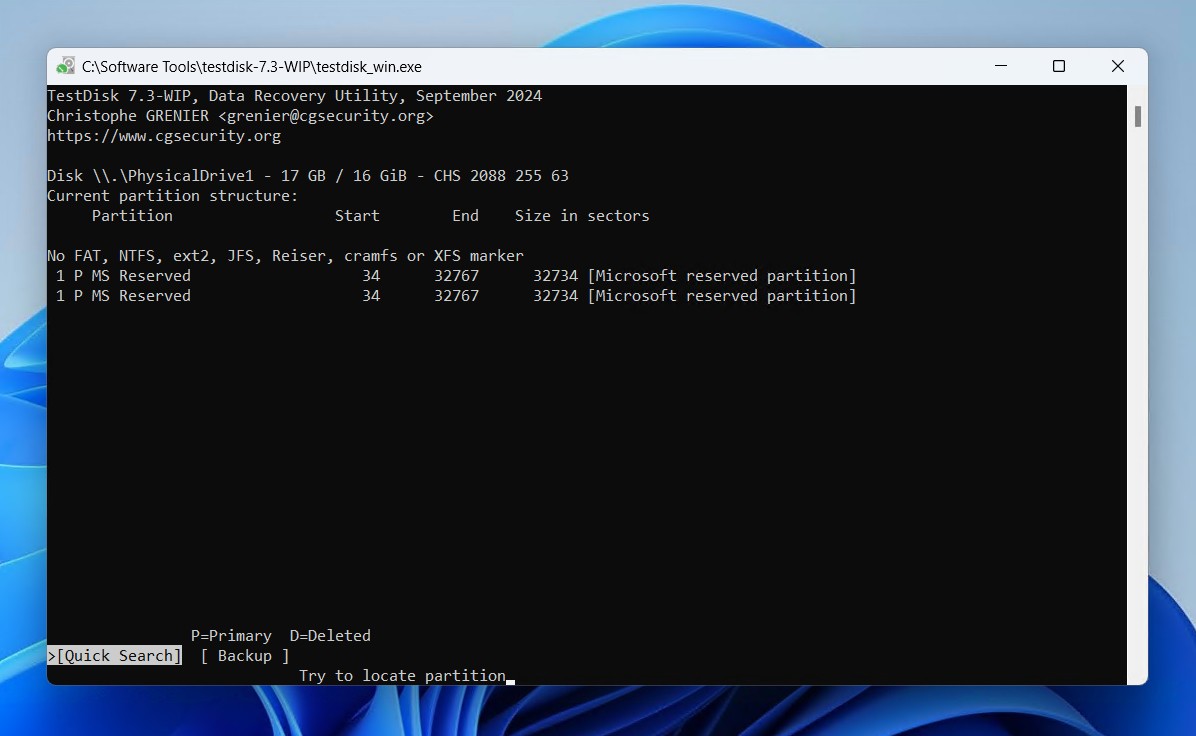
- Press Enter. If nothing was found, you can try doing a deeper search.
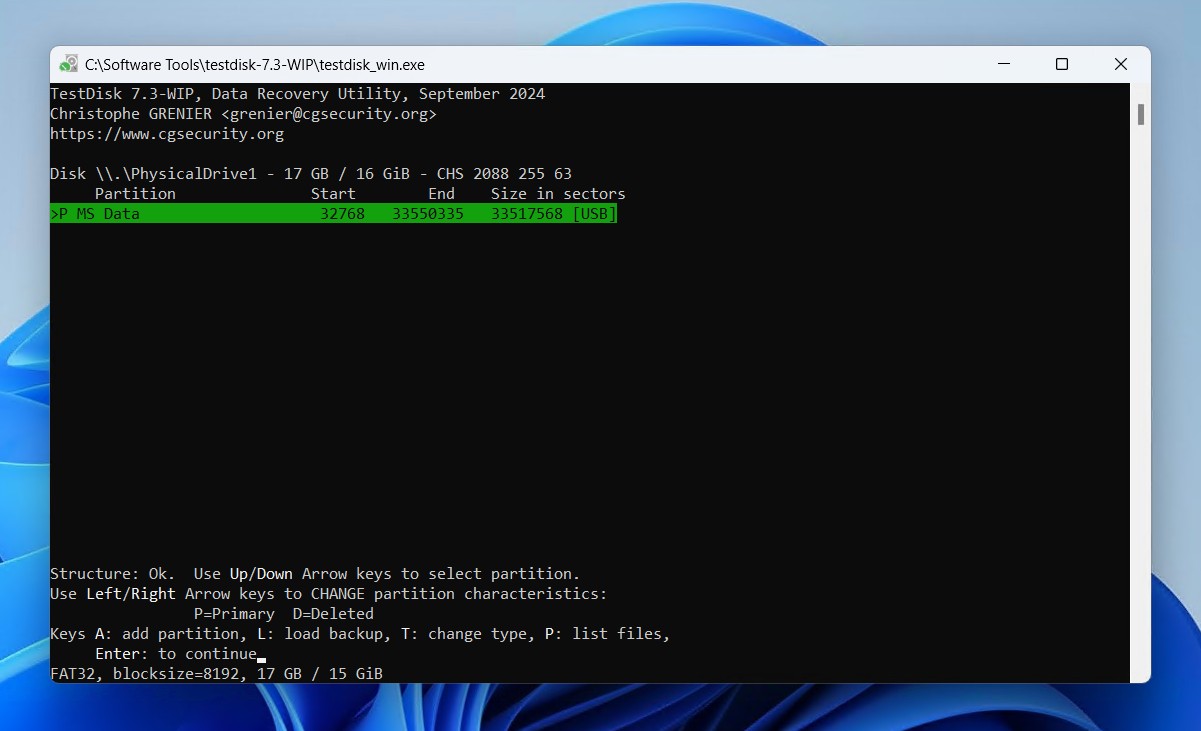
- Move over to the Write option, then press Enter.
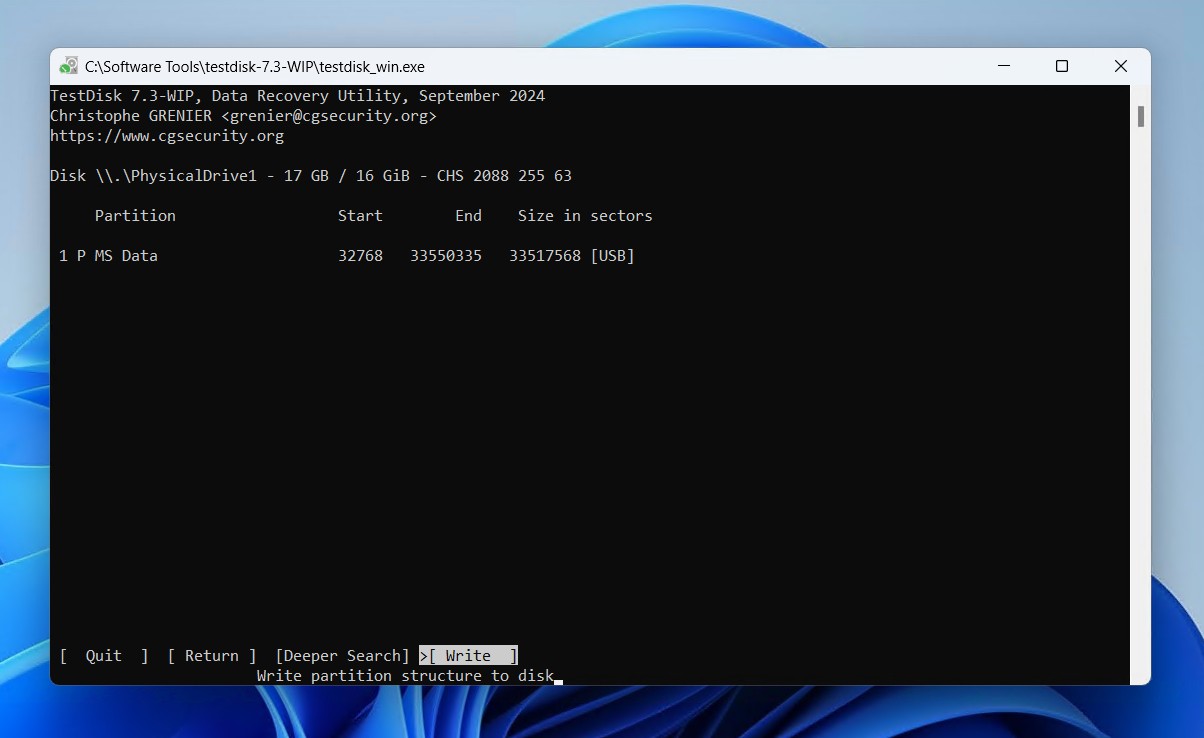
- Press Y to confirm.
After writing the new partition back to the table, you’ll need to safely disconnect your external hard drive, and then reconnect it. For internal drives, you’ll need to restart your computer instead.
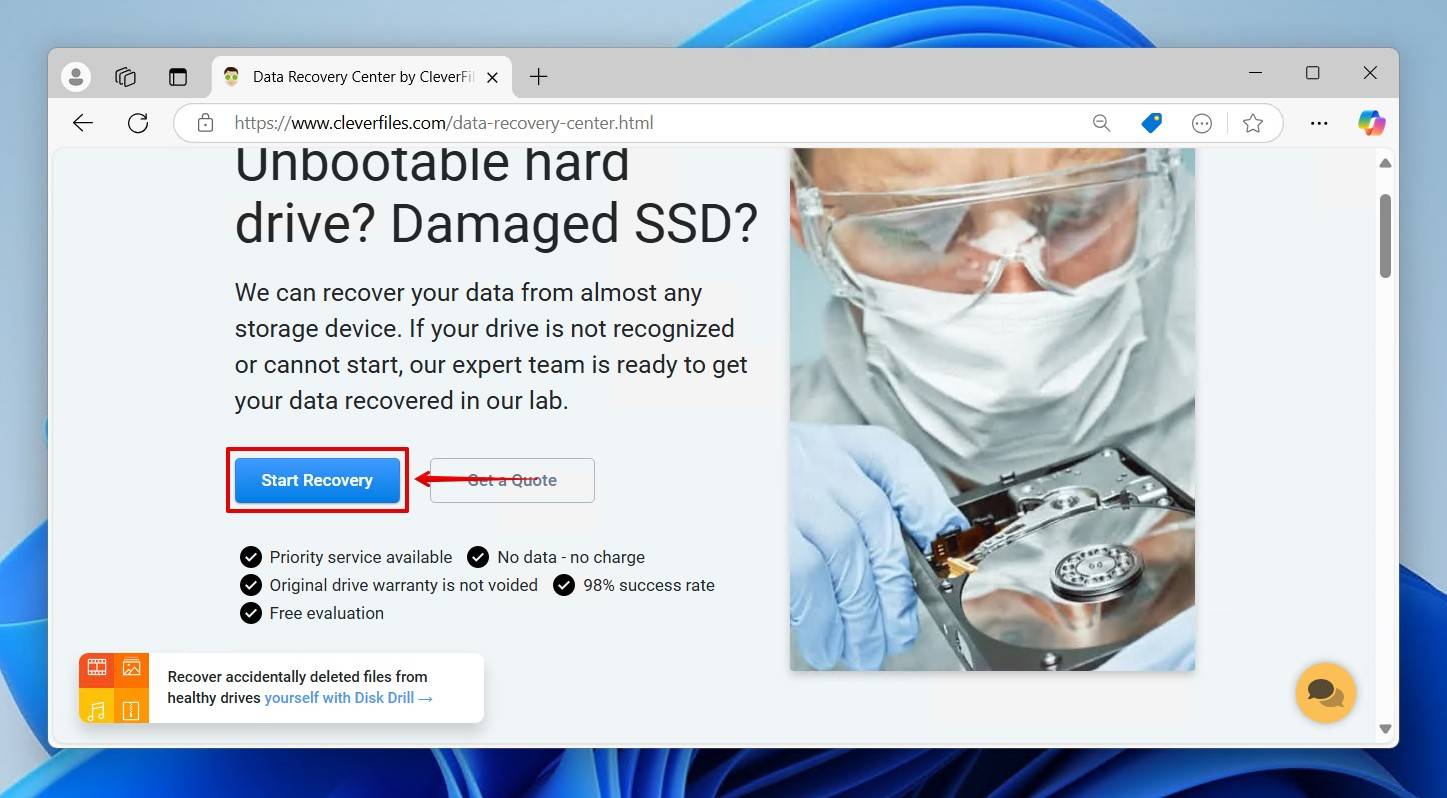
Method 7: Use a Data Recovery Service
If none of the above methods work for you or you’re still facing issues during data recovery from an external HDD, the best option is to approach a data recovery service. In the case of physically damaged disks, a data recovery service should be your first and only option.
Here’s a very quick look at what this process involves:
- Start the recovery process.
- Complete the application form. At this point, you choose the level of service you want and provide information such as your contact details, storage device, and data loss problem.
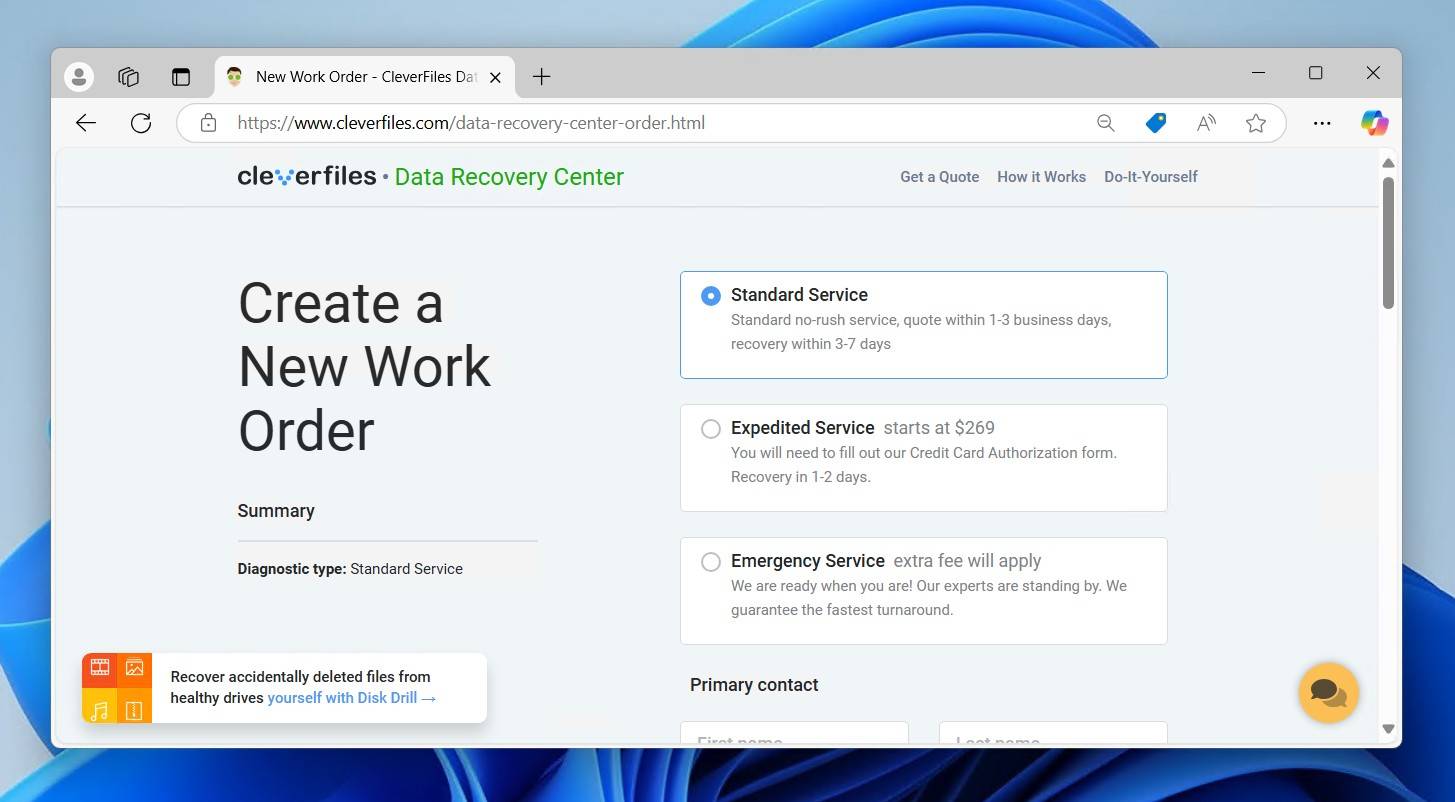
- Submit the work order and send your external hard drive away.
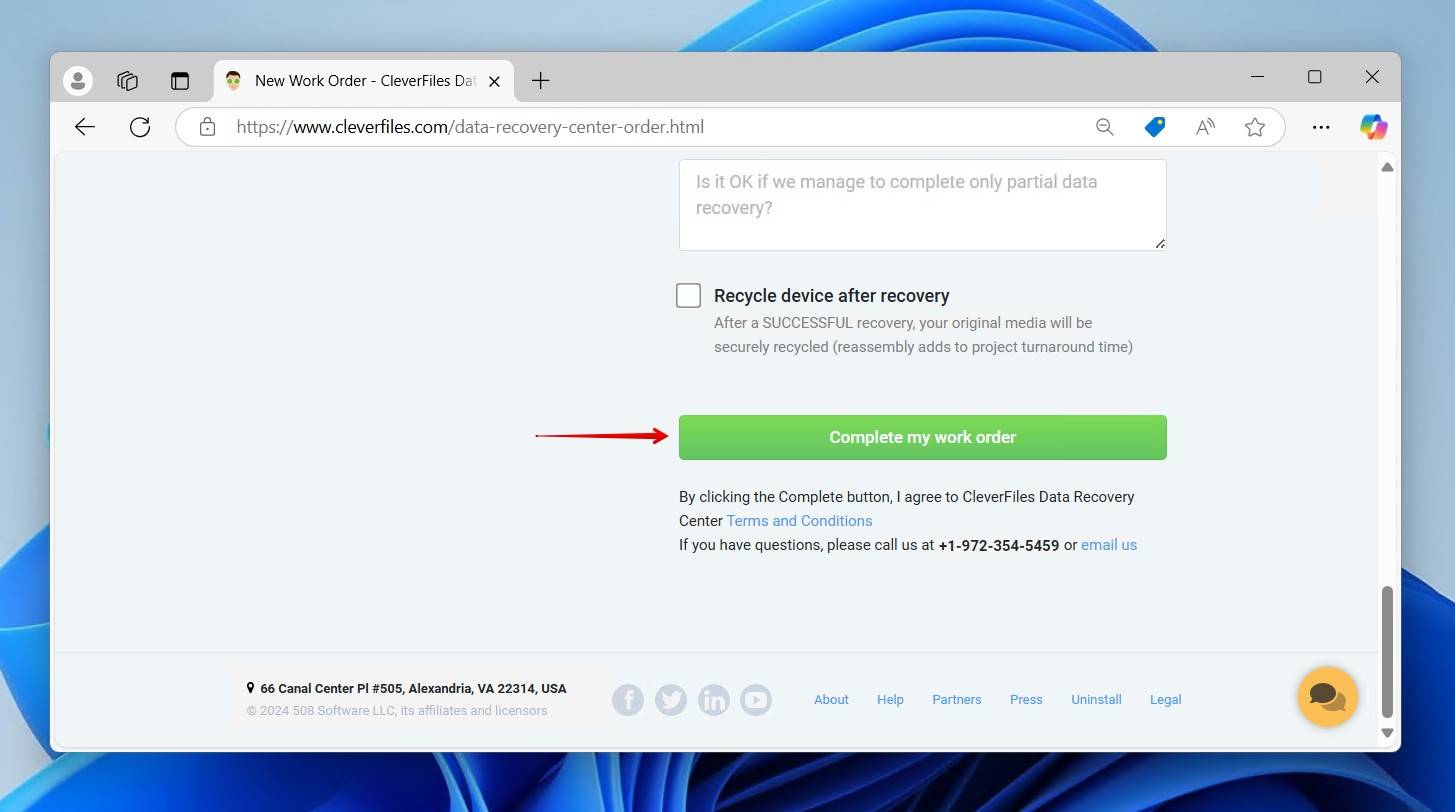
While this particular solution would be more expensive than the rest, it will significantly increase the chances of data recovery. It will be sent off to a recovery lab where experts who focus on dead hard drive recovery can safely recover what is left on the drive.
Here are some typical data loss scenarios that should be considered essential to engage a data recovery service:
- 🔨 Damaged connectors – When your drive has bent or missing pins, it will prevent a consistent connection. In order to recover the data, a professional must perform an interface bypass in which the drive is disassembled and connected directly to a system through a SATA or IDE connection.
- 🔊 Unusual noises – External hard drives are prone to mechanical issues like failing read/write heads, damaged platters, and worn-out bearings. These issues will result in noises like grinding, screeching, beeping, or buzzing. All of these are serious signs of failure and can only be addressed by a professional.
- 💥 Signs of physical damage – Signs of physical damage are easy to spot. Exposed circuitry, bent casing, and cracks are all immediate indications of physical damage. Disks like this should remain powered off until they can be inspected.
Conclusion
In any instance where the data you lost is important, your first priority should be to recover it with data recovery software, or preserve it in a byte-to-byte backup for later recovery. If you’re working with a problematic drive, a backup is even more important. Before long, the data will be overwritten, and data recovery software is the last safe and reliable option if the data was, for example, deleted by a format or made inaccessible due to corruption.
With data that’s less important, you can try fixing the root issue first with CHKDSK or TestDisk. However, keep in mind that these aren’t used for data recovery per se, but rather to address drive issues that result in the data becoming inaccessible or missing. Because of their risk to your data, you should still at least make a backup before using them.
When your drive isn’t appearing anywhere, including recovery software, then you should contact a data recovery service instead, as the problem is likely physical and unsolvable on your own.

FAQ
Yes, so long as you have the necessary decryption key or password to access the drive. In an encrypted state, the data will be unintelligible, even after recovery.
Ideally, you’ll want to have another drive of equal or more size that will act as a mirror. Then, set up a backup schedule to either clone or create an image of your primary external hard drive to the secondary.
The easiest way to recover deleted files from an external hard drive without any software is by restoring the files from the Recycle Bin. If the deleted files are not in the Reyclce Bin, they will need to be restored from a File History backup (either directly or using the Previous Versions feature), or if available, an older Backup and Restore backup.
If they’re under the size limit, deleted files will go to the Recycle Bin of their respective drive and only appear in the main Recycle Bin when connected to a PC. Otherwise, if they’re permanently deleted, the physical location where that data resides is marked as available. Eventually, new data will overwrite the old data, rendering it unrecoverable.
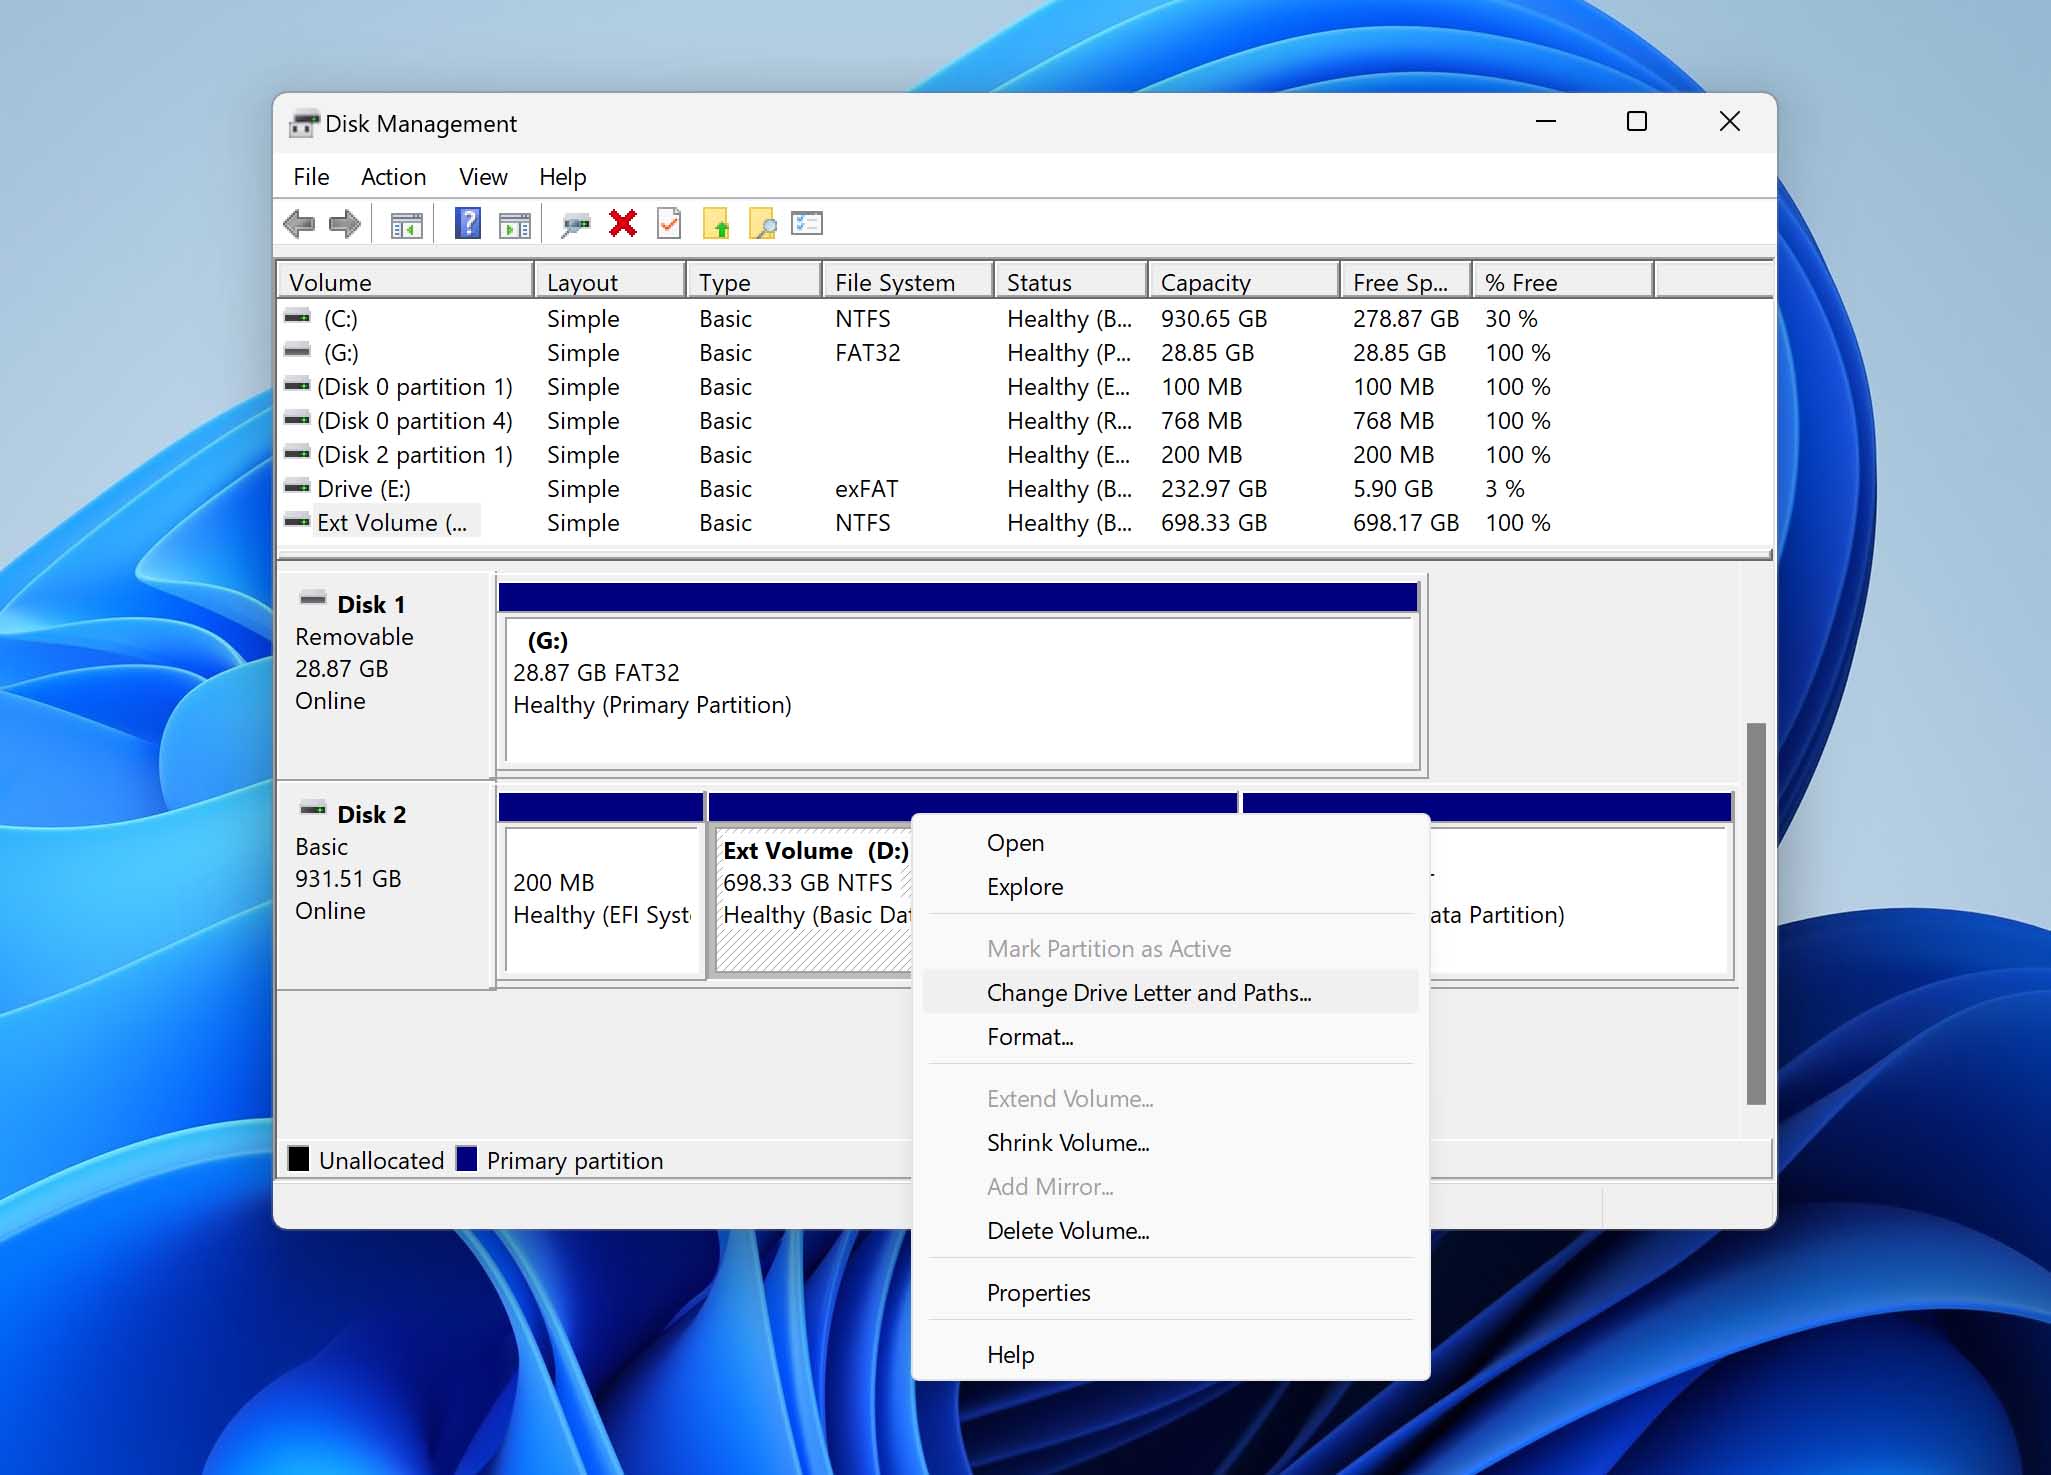
Yes, you can recover data from an external hard drive that isn’t detected in apps like File Explorer. The drive has to at least be visible in Disk Management and read the correct capacity. In many cases, the drive doesn’t appear as it hasn’t been assigned a drive letter. You can correct with the steps below, or simply scan the drive with data recovery software is nothing else helps.
- Right-click Start and click Disk Management.
- There, right-click on your external hard drive.
- Select Change Drive Letter and Paths.
- Pick any available letter.
With Disk Drill, external hard drive recovery is free if all you need is to recover 100 MB of data or less. For many users, that allowance equals a full recovery, not merely a test run. In comparison, some professional data recovery services charge hundreds of dollars for just a few files.
Yes, the free version of Disk Drill allows you to recover up to 100 MB of data for free. A sensible free limit that often covers everyday mishaps. If you want to explore options with completely free and unlimited recovery, you can try software like Recuva, PhotoRec, and TestDisk.
Restoring data from a dead external hard drive is a very complicated process that often requires the hard drive to be disassembled in a dust-free environment. If you’re experiencing data loss due to hardware failure, it’s best to contact data recovery professionals and ask them for help.