When we hear that a hard drive is “dead,” it often conjures images of irrevocably lost data. However, this grim diagnosis is not always as final as it may seem. While some scenarios may indeed spell the end for your device, many situations allow you to get your files back from a dead hard drive – you just need to use the right recovery method. This article explains when a dead hard drive can and can’t be recovered, and it provides a detailed, step-by-step guide for you to follow.
How a Hard Drive Becomes Dead or Damaged
Unlike solid-state drives that use memory cells, hard drives use rotating magnetic platters to store your data. A head moves across the platters to locate where data is stored so it can be read by your system. This gives HDDs an inherent vulnerability. According to enterprisestorageforum.com, the average HDD is expected to last 4-7 years, but this value heavily depends on factors like hardware quality, environmental conditions, and hours of operation. It’s not a matter of if the drive will fail, it’s when.
Here are a few reasons why a hard drive can become dead or damaged:
- Physical damage – Bumps, drops, and other forms of physical shock can cause the platters to become misaligned.
- Power surge – A sudden influx of power following a power outage can short electrical components of the drive.
- Overheating – Extremely hot conditions impact the performance of your drive and cause it to degrade faster than normal.
- File system corruption – If a file system becomes corrupted, your hard drive won’t know how to access the data.
- Malware attack – Malware comes in many forms and can cause various forms of logical damage, an example being the Annabelle ransomware virus.
Keeping an eye on your drive’s S.M.A.R.T. status is a great way of staying on top of its health. Next, we’ll look at the viability of recovery in a few common data loss scenarios.
Is it Possible to Recover Data from a Dead Hard Drive?
As much as it would be good to have an easy answer, the truth is your odds of recovering data from a dead hard drive really depend on what caused it to become “dead” in the first place. Physical problems can be tricky and usually warrant manual recovery by a professional. Otherwise, logical problems have a very good chance of being fixed with software.
Logical Damage Recovery
Yes, its possible to recover data from hard drives that have suffered logical damage. Typically, logical damage is due to an issue with the file system, like it’s missing or corrupted. Without a file system, the data is inaccessible through traditional means, but it’s still there. To access it, you will need to use data recovery software, which can bypass the file system to scan the drive and recover the data.
Physical Damage Recovery
For physically damaged hard drives, where components like the magnetic platters are misaligned or scratched, recovery at home is nearly impossible. These types of damage require a cleanroom environment to prevent further damage during the recovery process, so it’s best to consult professional data recovery services, which have the necessary tools and environment to attempt a safe recovery.
The only physically damaged hard drives that can be successfully recovered at home are those with superficial damage that does not affect the internal components critical for data storage and retrieval. Examples of superficial damage include issues with the hard drive’s external casing. As long as such drives can communicate with a computer, data recovery can be attempted.
How to Recover Deleted Files from a Dead Hard Drive
Before looking at ways to recover data from your dead or damaged hard drive, it’s essential to undertake a couple of foundational steps to set the stage for a successful recovery process.
Step 1. Assess the Damage
Before attempting any form of recovery, you need to determine whether the drive has suffered physical or logical damage. Here’s what you need to do:
- Remove and inspect the drive. Check for visible signs of oxidation, damage, or burned-out contacts.
- Reattach the hard disk. While doing so, check data and power cables for damage or loose connections.
- Listen to the drive. When powered, it will spin. Keep an ear out for any strange sounds, like scratching or clicking.
- Check Disk Management. This will indicate if the drive is being recognized and read as a healthy drive.
Is the drive appearing in Disk Management with the correct size? Then proceed to the next step. If it’s not appearing or it’s showing the incorrect capacity, you should consult a data recovery professional.
Step 2. Create a Byte-to-Byte Backup
While a dead hard drive that has suffered light physical damage or any form of logical damage isn’t really dead in the truest sense, you still need to proceed carefully because you don’t want to make the data loss situation worse.
A byte-to-byte backup that includes the entire contents of your disk allows you to:
- Reduce the need for repeated access to the damaged disk, thereby preserving its current state and preventing additional damage.
- Avoid the added stress of scanning the drive directly, which is much more taxing than the creation of a backup.
- Employ various recovery techniques in a controlled environment.
- Verify and validate the data before recovery.
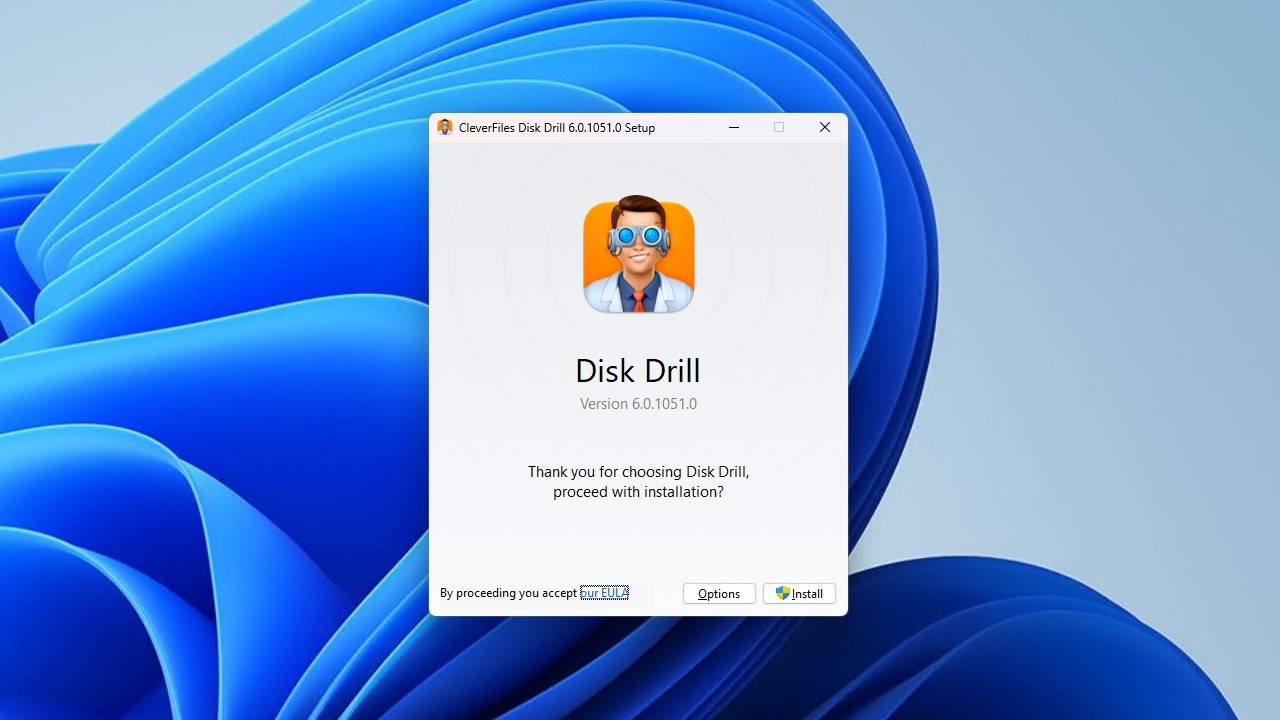
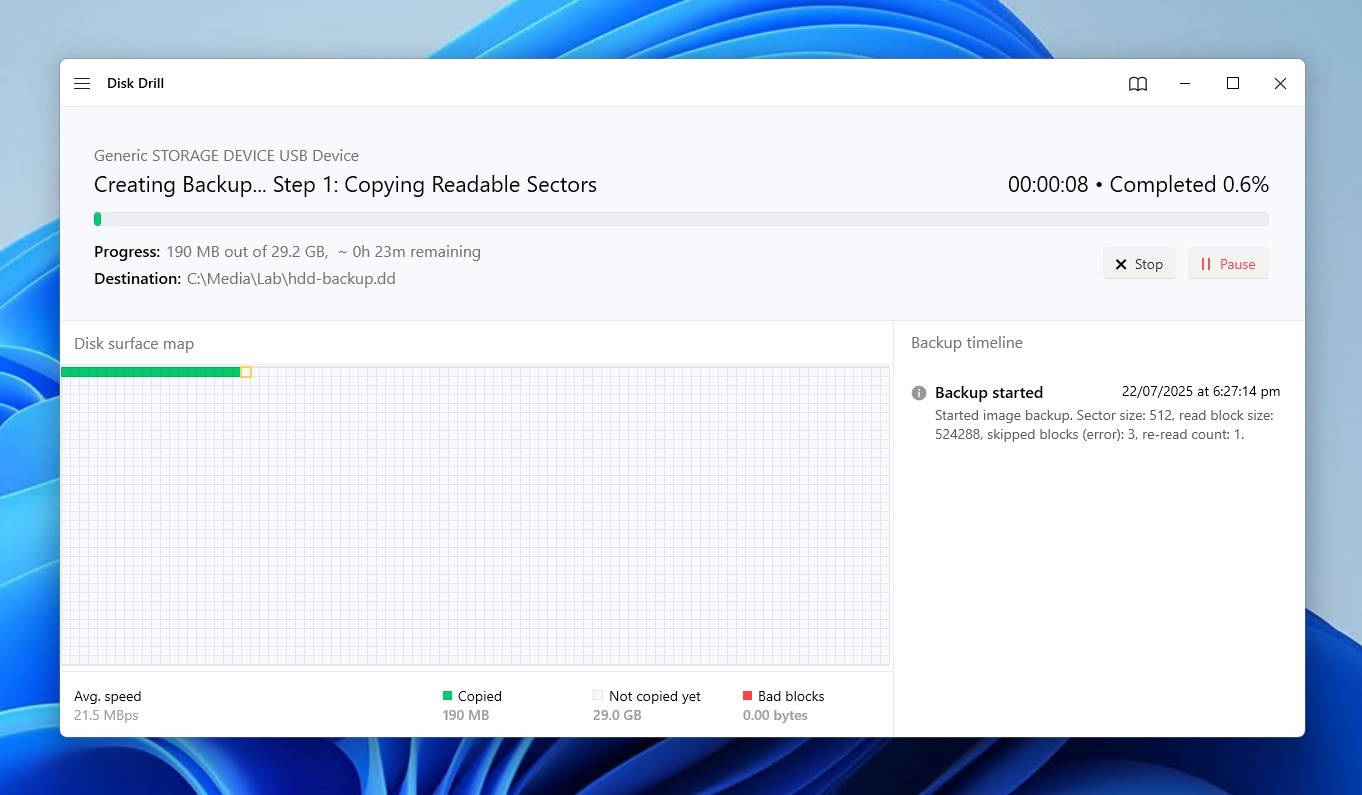
To create a byte-to-byte backup of your dead hard disk, we recommend you use hard drive data recovery software called Disk Drill, whose image backup feature is completely free and easy to use:
- Download and install Disk Drill on a working storage device. Make sure the computer on which you install Disk Drill has enough free storage space to accommodate the backup of your dead hard drive.
- Launch Disk Drill and click Byte-to-byte Backup in the left panel.
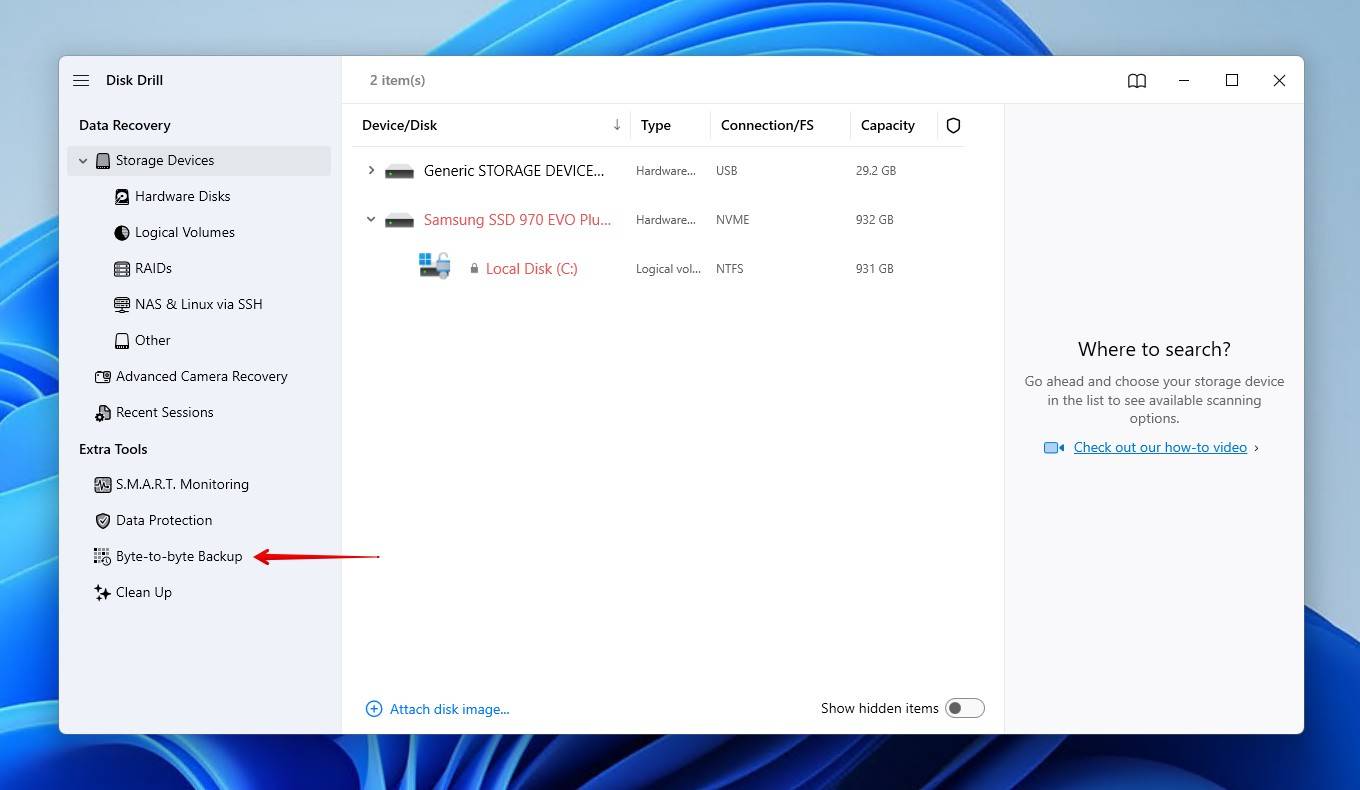
- Choose the dead hard drive you wish to back up from the list of available drives.
- Click Create backup and select a destination for the backup file. Ideally, the destination should have about 5-10% more free storage space than the total size of the dead hard drive.
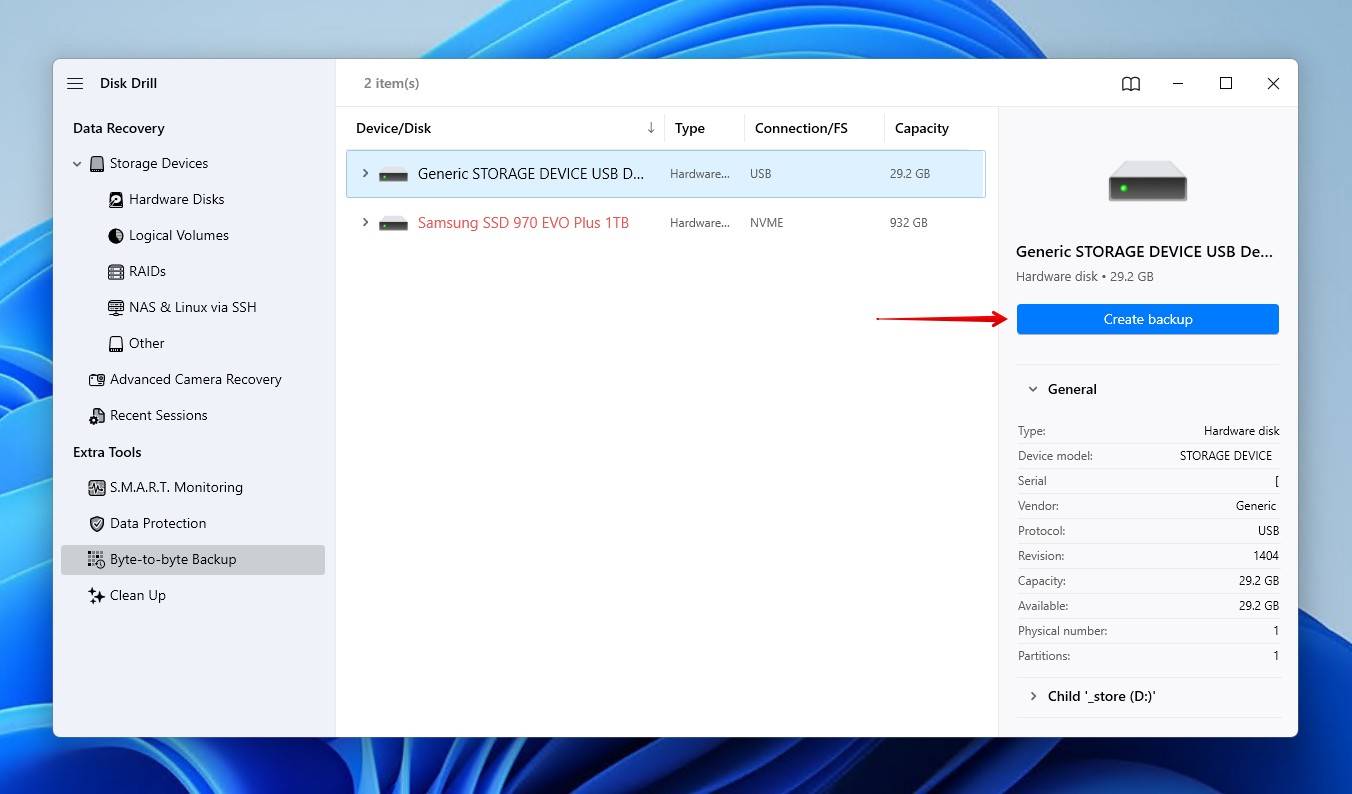
- Start the backup process. Disk Drill will display the progress, and you can pause and resume the backup as needed.
Step 3. Recover Files from a Dead Hard Drive Using Recovery Software
Once you have created a byte-to-byte backup of your dead or damaged hard drive, you can proceed with the recovery process without further risking the original drive’s integrity. How? With the same software that enabled the backup: Disk Drill.

To recover deleted data from a damaged hard drive:
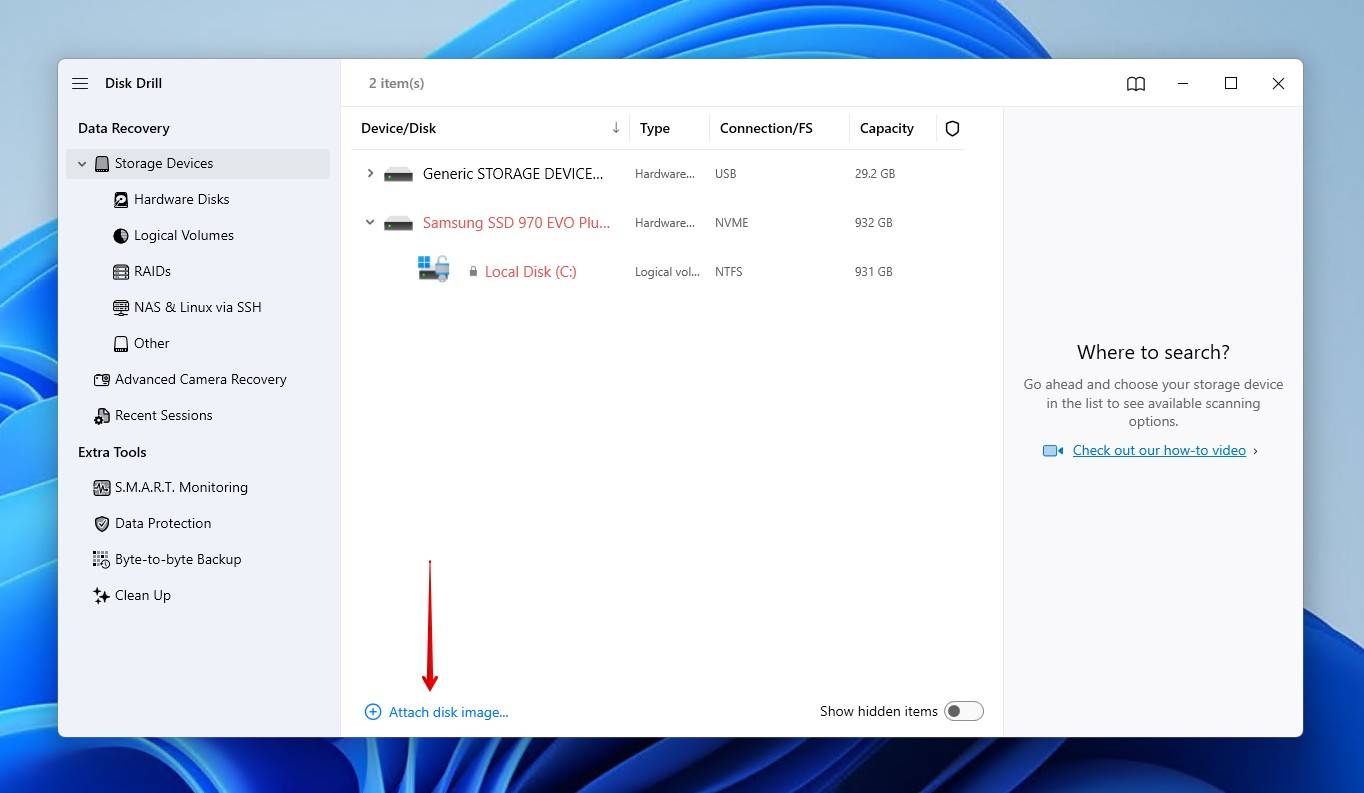
- Disconnect or eject the original hard drive from your system to avoid any accidental writes or further damage.
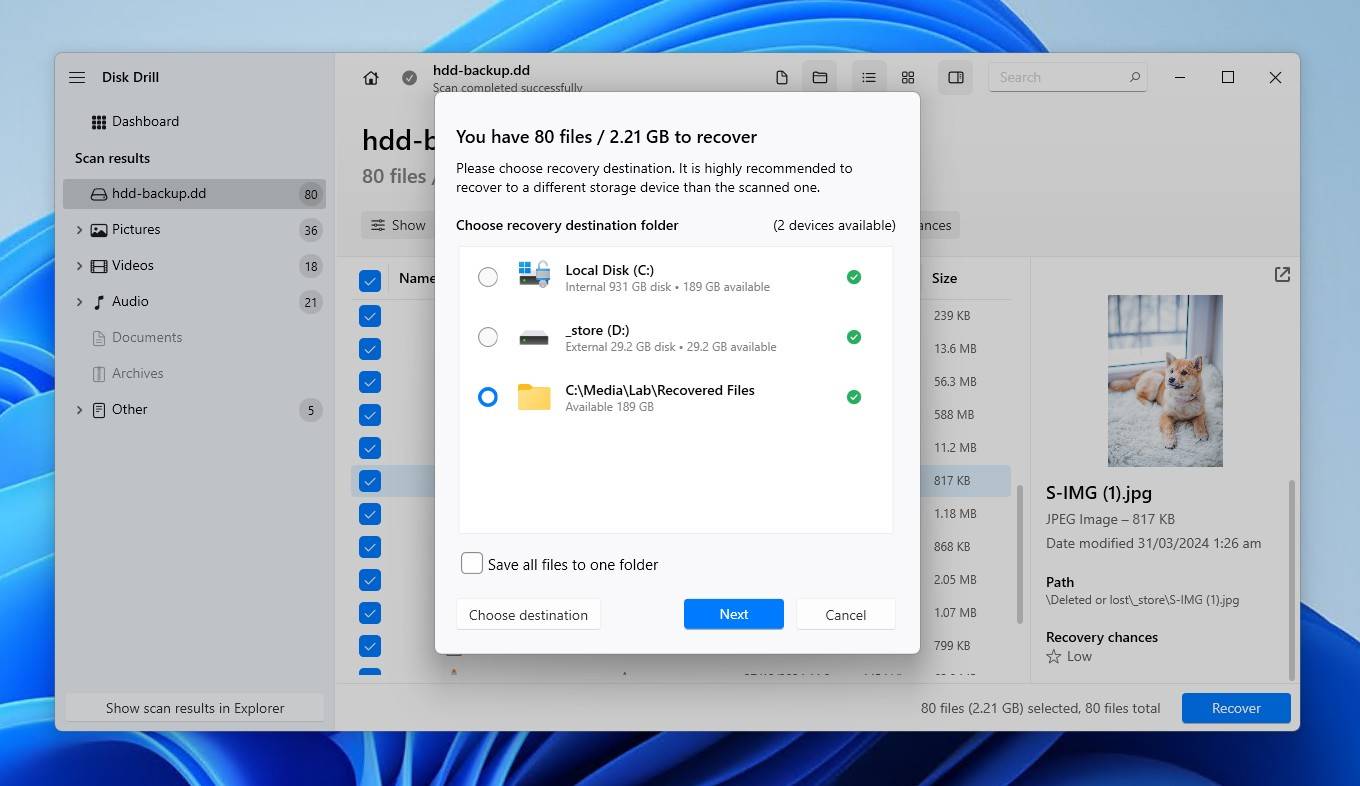
- Navigate to the Data Recovery section in Disk Drill, select the Storage devices category, and click Attach disk image to load your byte-to-byte backup file.
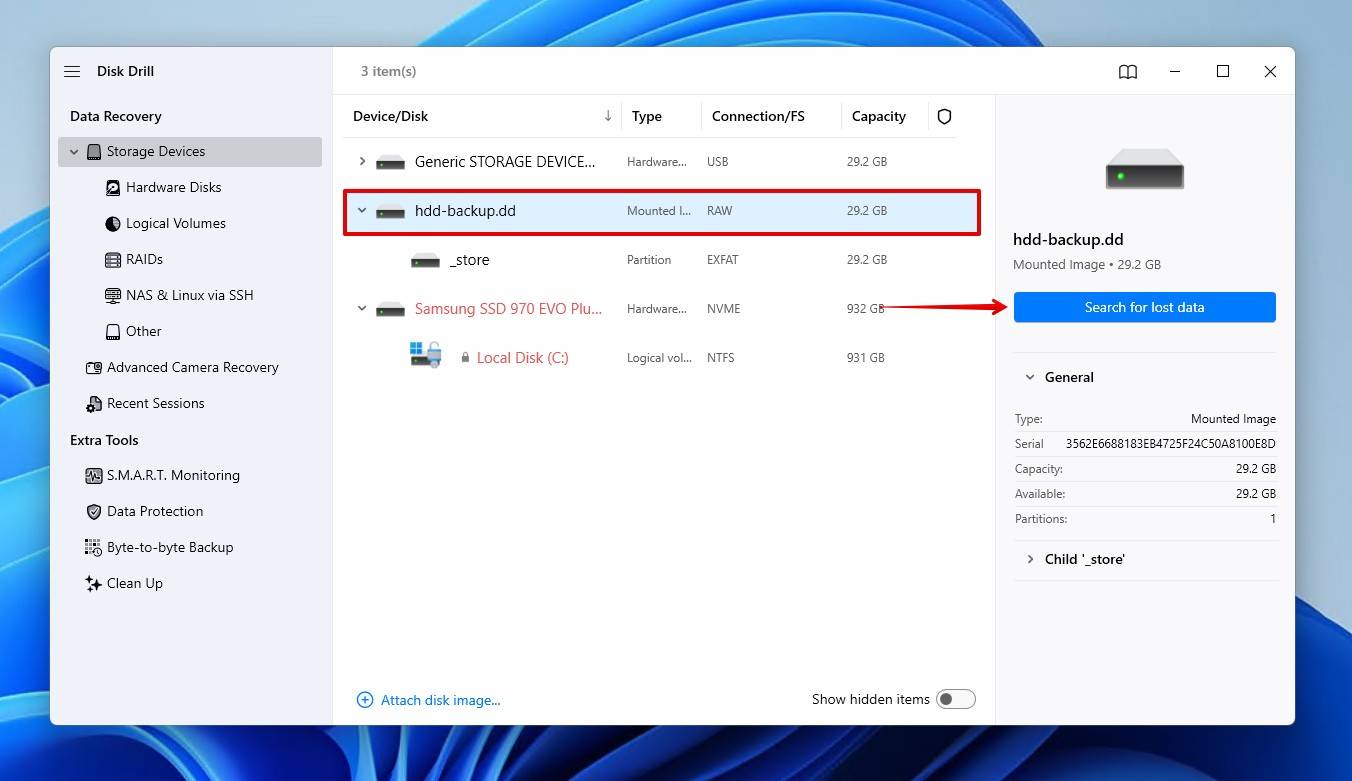
- Choose your backup file from the list and click Search for lost data, then click Universal Scan to start the search.
- Select the files you wish to recover. Disk Drill allows you to preview files before recovery to verify their integrity. You can also narrow down the recoverable files using search filters in the left pane.
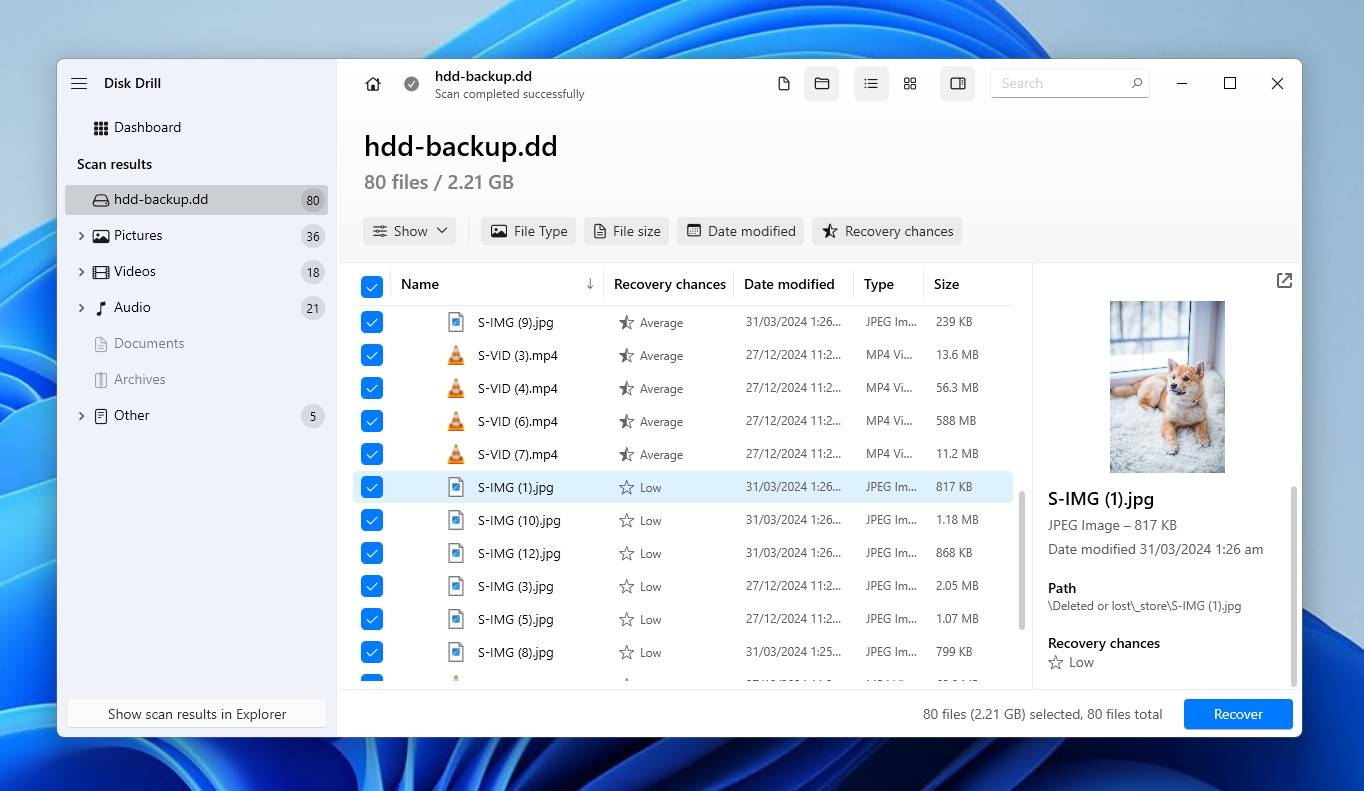
- Click the Recover button to complete the recovery process. You will be asked to choose a destination for your files (select a different from the source drive to avoid overwriting data).
Following these steps with Disk Drill maximizes your chances of recovering valuable data from a damaged hard drive.
Other Methods to Recover Deleted Files from Dead Hard Drive
While data recovery software is the most effective and reliable method to recover deleted files from a dead hard drive that has suffered cosmetic physical damage or any kind of logical damage, alternative methods do exist. Such methods can complement software solutions or serve as viable options when software alone doesn’t suffice.
Method 1. Restore From a File History Backup
Restoring from a backup is the easiest way to retrieve your data. Of course, it’s only possible if you have a backup to recover the data from. Windows includes File History, which, when enabled, backs up Libraries (Pictures, Videos, Music), Desktop, Contacts, and Favorites. Then, you can restore a working version of the files in these locations whenever convenient.
If you have File History enabled, follow these steps to restore a copy of your files.
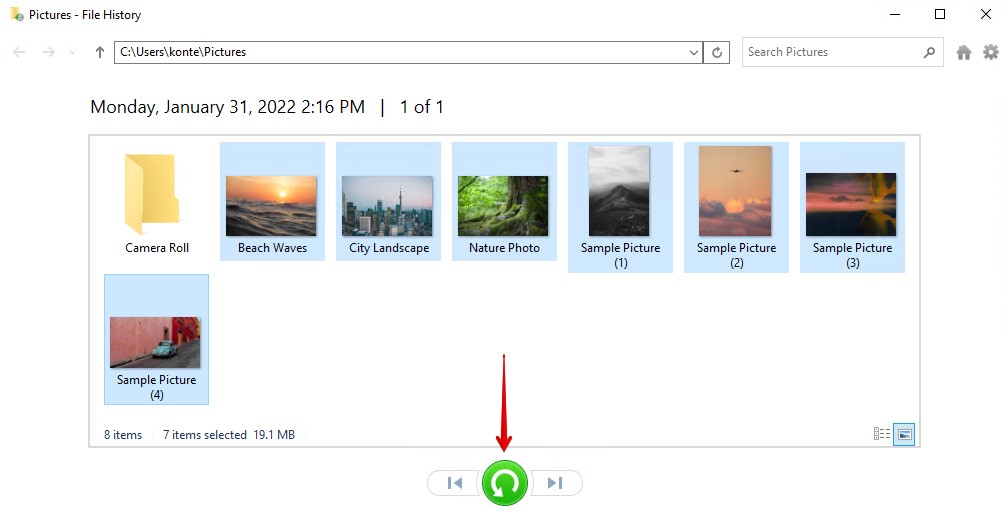
- Launch the Start menu and enter “file history.” Select the File History (Control Panel) search result.

- Click the Restore personal files option in the File History Control Panel window.
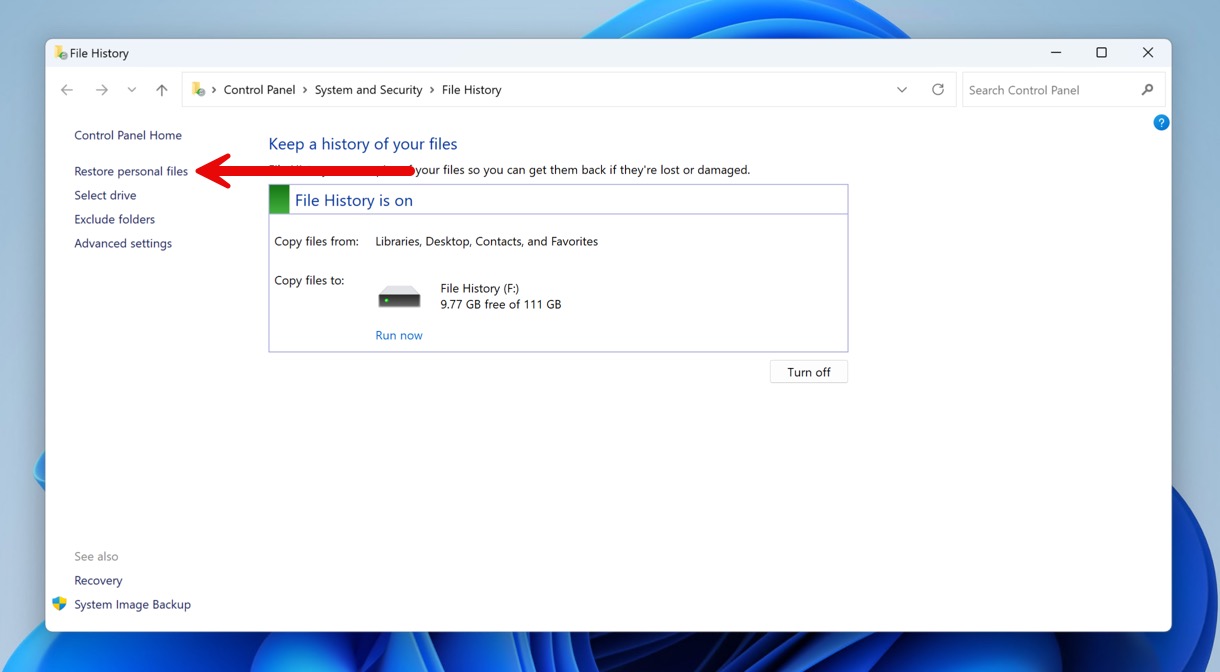
- Navigate to the location where your files were stored, and use the navigational arrows to go to a point in time where the files were in the folder. Select what files you want to restore, then click the green restore button. Once restored, you will find the files back in the folder.
Method 2. Restore from OneDrive
If you signed in to a Microsoft account when you installed Windows, or you simply set up OneDrive before the data loss occurred, it may still hold a copy of your data. OneDrive is Microsoft’s cloud storage service, which syncs files between its own servers and your computer.
This is how you restore a file from OneDrive:
- Go to onedrive.live.com and sign in to your Microsoft account.
- Locate your files by exploring My files in the left panel.
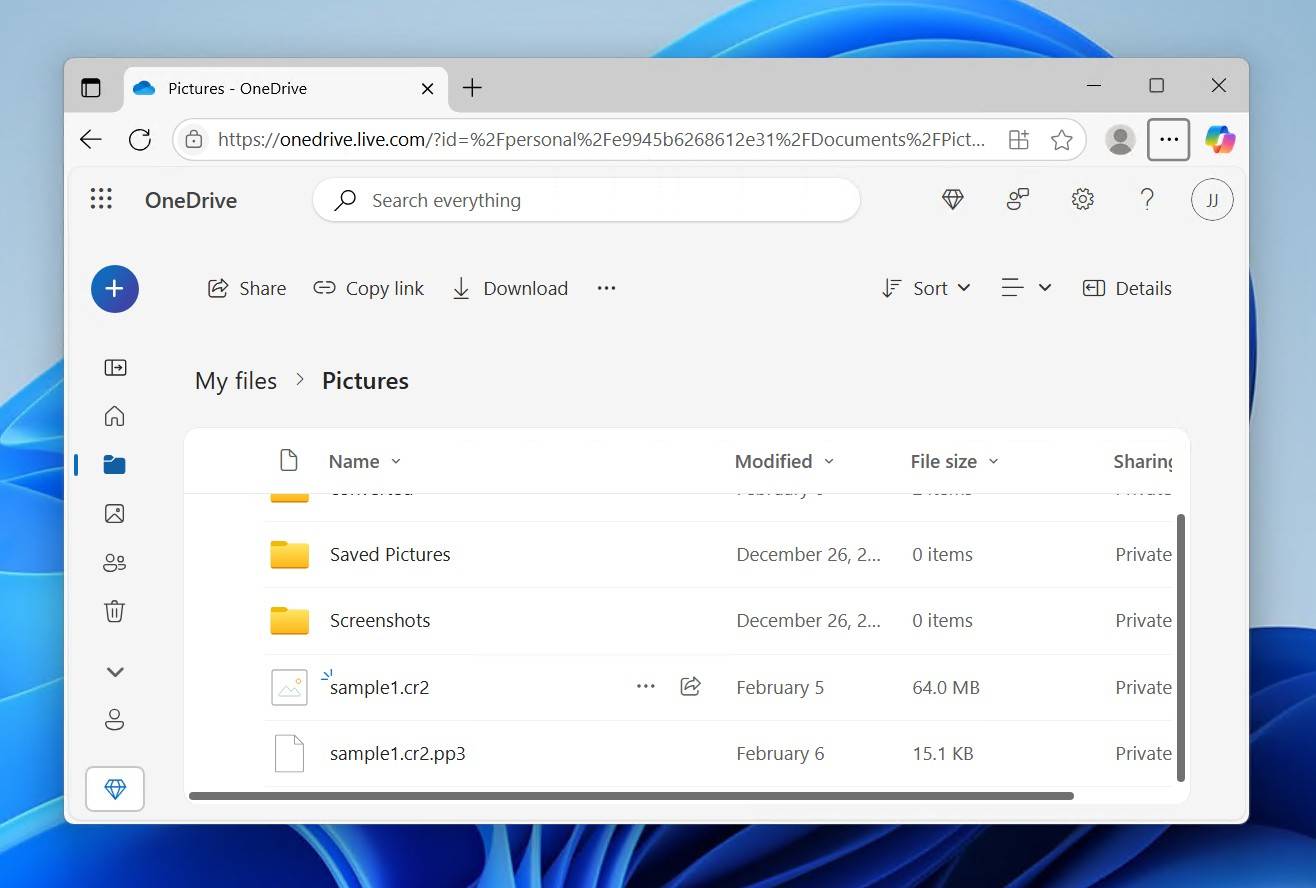
- Select your files, then click Download.
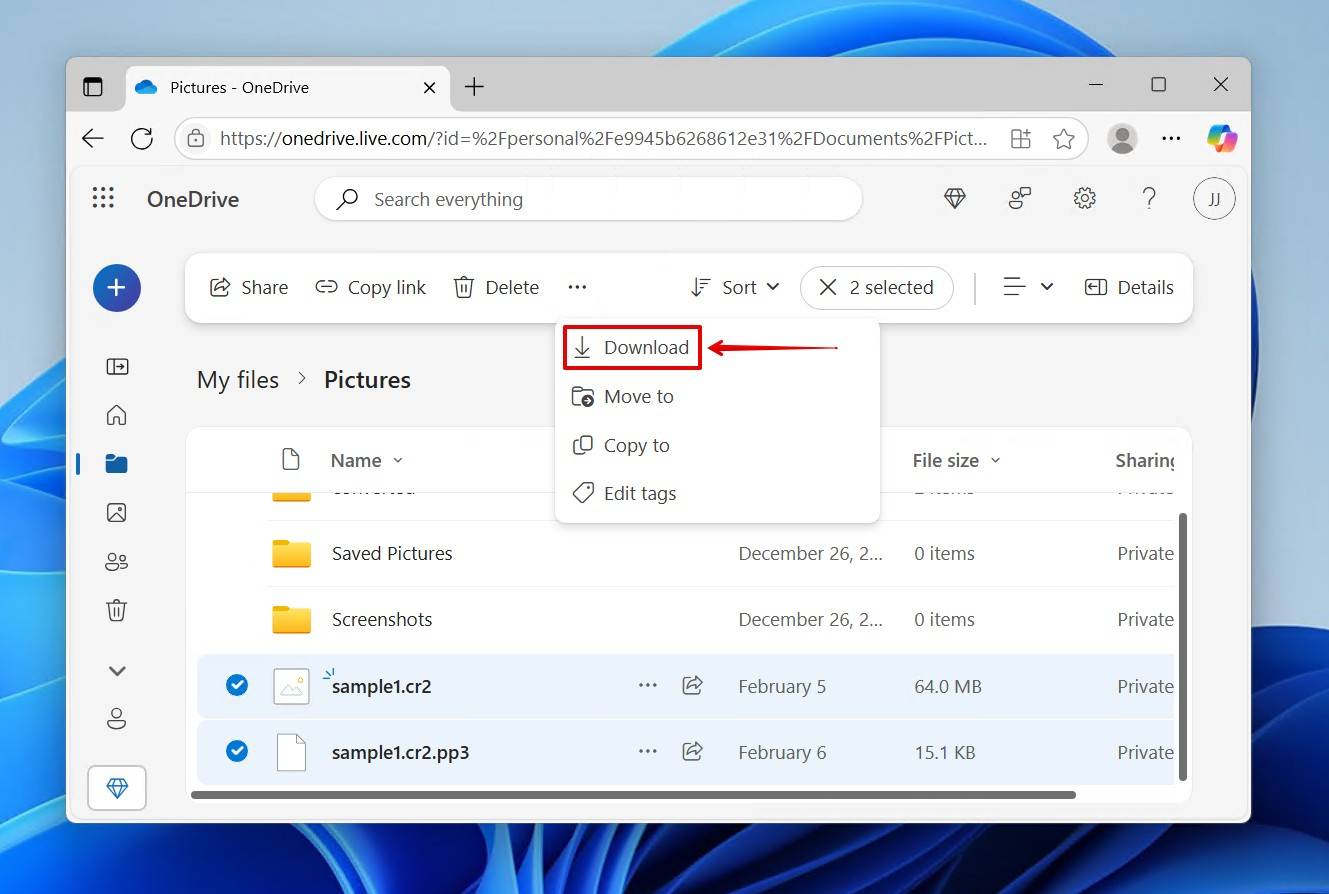
- Extract the contents of the zip file.
How to Repair a Corrupted, Damaged, or Dead Hard Drive
While some forms of damage can put your hard drive in a state that’s beyond repair, there are many others that are relatively minor. Once you’ve recovered your data from the drive, try some of the solutions below to fix your corrupted hard drive.
Method 1. Repair Using CheckDisk (CHKDSK)
CheckDisk is a file system repair utility that can be used to repair logical errors on your drive. Using parameters, you can instruct CheckDisk to scan your drive for errors and automatically fix them. This includes the ability to locate bad sectors and mark them as unavailable space so no data is saved there accidentally.
Follow these steps to repair a drive’s file system using CheckDisk.
- Right-click Start and select Windows PowerShell (Admin) in Windows 10 or Terminal (Admin) in Windows 11. Click Yes if prompted by UAC.
- Type chkdsk /f /r D:. Replace D: with the letter of your own drive. Press Enter.

After running the command, it won’t take long to complete (longer drives may experience longer wait times). See if the damage is repaired once the process is finished.
Method 2. Fix Damaged Windows Files
If any of your Windows files have become corrupted or missing, it could prevent your system from running correctly. In such cases, you can use the System File Checker (SFC) utility. Like CheckDisk, the SFC utility is another tool included in Windows. But, instead of fixing file system-related issues, it can scan for missing or damaged Windows system files and restore them.
Use these instructions to restore damaged or missing Windows files using SFC:
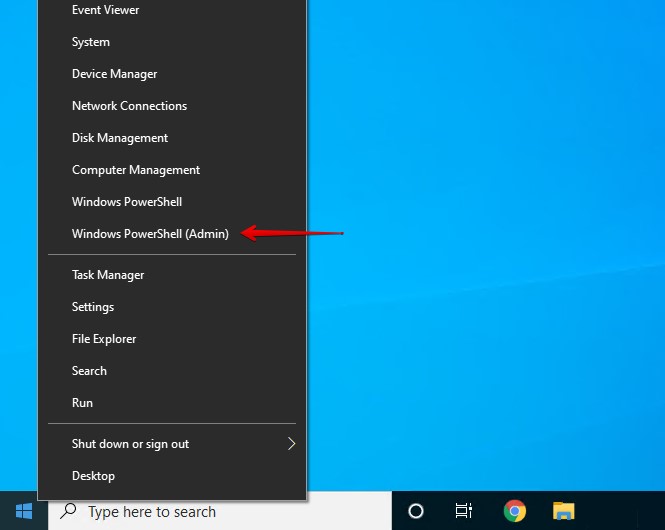
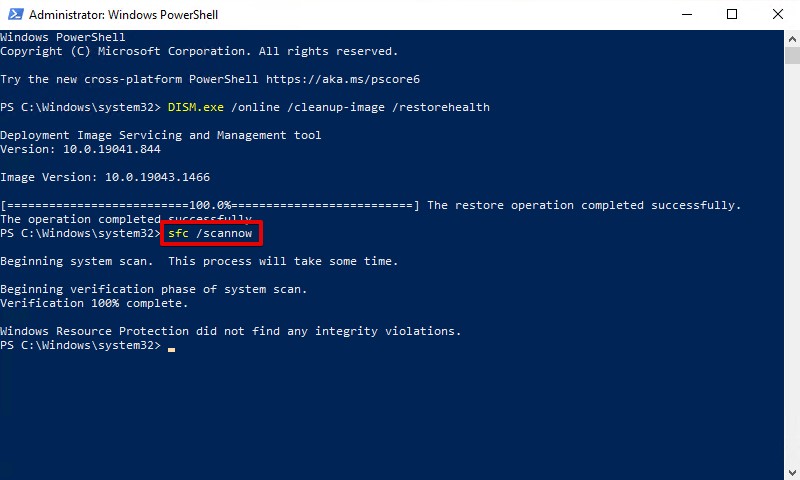
- Right-click Start and select Windows PowerShell (Admin) in Windows 10 or Terminal (Admin) in Windows 11.
- Type DISM.exe /online /cleanup-image /restorehealth and press Enter. It will take a few minutes. This command uses Windows Update to pull the files that are used to fix corruption.
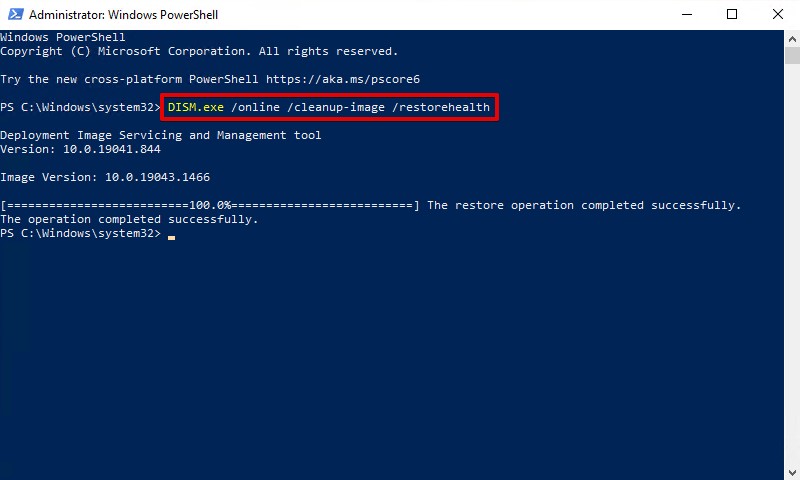
- Type sfc /scannow and press Enter. This command will scan all system files and replace any corrupted ones with working versions.
Method 3. Scan for Viruses
As we mentioned earlier, viruses can be the culprit behind the damage your drive has sustained. Scanning your drive for viruses may be the solution to restoring it to working order. If you don’t have an antivirus program installed, you can make use of Windows Security.
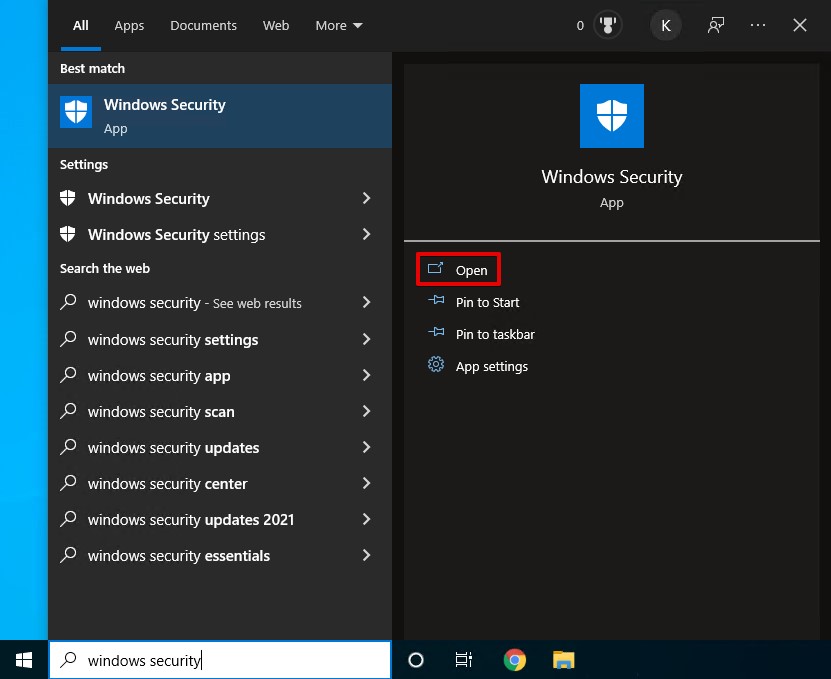
Follow these instructions to scan your drive for viruses using Windows Security.
- Press Windows Key + S and search Windows Security. Open it.
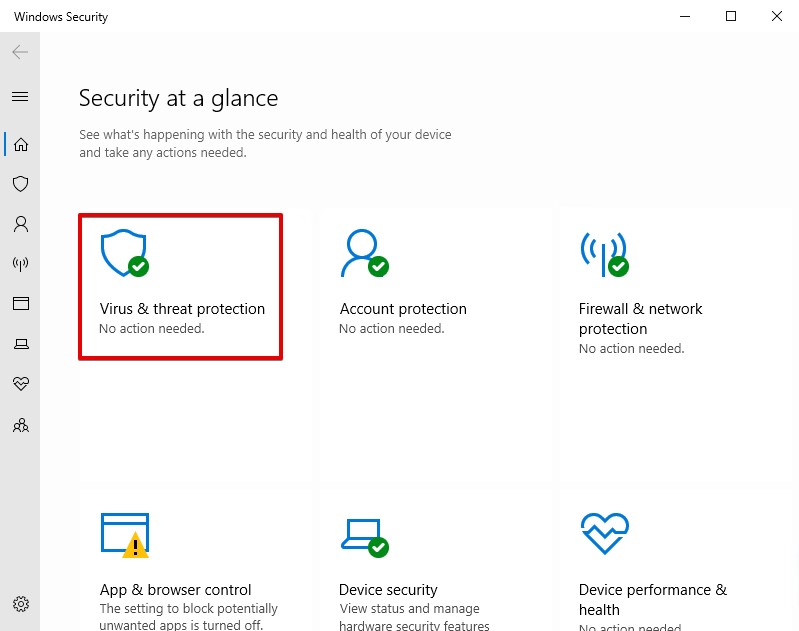
- Click Virus & threat protection.
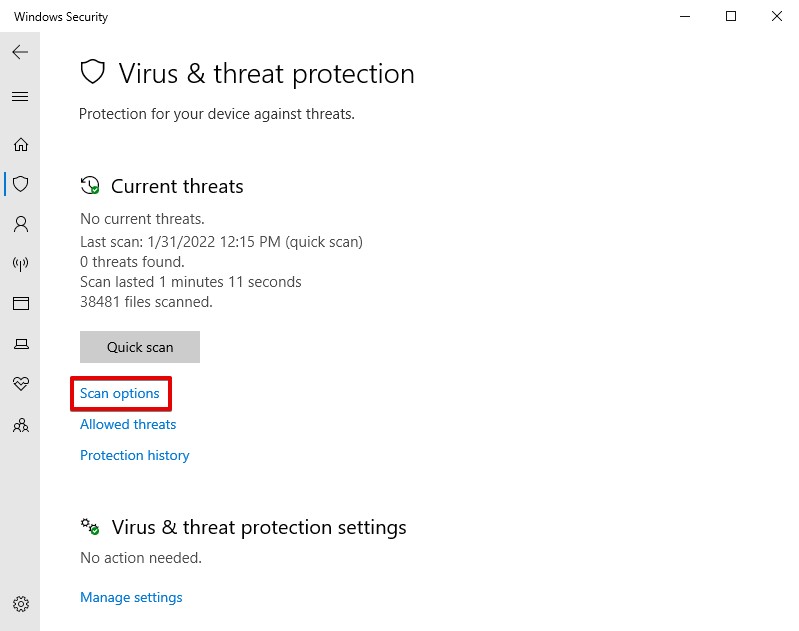
- Click Scan options.
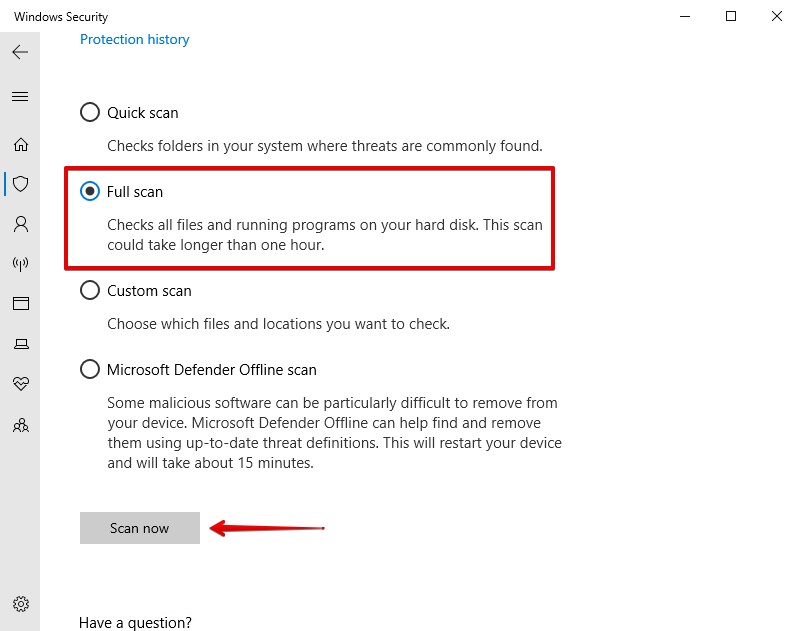
- Choose your scan type. A Full scan is the most effective. When ready, click Scan now.
Conclusion
If your hard drive seems dead, don’t lose hope. The term “dead” can often be misleading, as many situations that appear dire can still be resolved with the correct recovery techniques. Logical issues, for instance, can frequently be remedied with the right software and a bit of know-how, and the same goes for cosmetic physical damage.
But if your drive has sustained physical damage and all methods in this article have failed, you can always consider reaching out to a data recovery center to have a professional see what further options are available.


FAQ
First, you need to determine if the hard drive is recognized at all. If you can see it in BIOS, it usually means that the hard drive is recognized, and you can use a utility like TestDisk to scan it and rebuild the master boot record (MBR) or fix any other issues that make it impossible to boot from the drive.
That depends on what you mean by dead. If you mean a hard drive that has suffered physical damage, then we have bad news for you: you most likely won’t be able to recover any data from it at home. But if you mean a corrupted or formatted hard drive, then you can use data recovery software to get back your data.
If your operating system cannot see your hard disk in File Explorer, but it’s visible in Disk Management and reading the correct size, data recovery software will still be able to scan and recover data from it. However, if the drive is not appearing even in Disk Management, recovery must be done by data recovery professionals.
Absolutely! In many cases, moving an old hard drive to a new computer is a simple matter of disconnecting it from one machine and connecting it to the new one. In the event that your old hard drive suffers from drive corruption or other logical issues, follow the steps in our guide on getting data off an old hard drive.
Common signs of HDD failure include strange noises like clicking or whining, overheating, data transfer errors, performance issues, boot problems, random crashes, and missing files and folders. Many of these issues occur only when the situation is really bad, which is why it’s important to keep an eye on your HDD’s S.M.A.R.T. parameters with a tool like Disk Drill, which includes a S.M.A.R.T. monitoring feature free of charge.
Before recovery, make sure the hard drive is actually dead by checking and replacing faulty cables, inspecting connection points, and looking for visible signs of damage. After that, follow these next steps to recover your files from a dead hard drive:
- Attach the non-functional hard drive to a working computer.
- Make sure the system recognizes the drive.
- Install Disk Drill on the computer.
- Create a byte-to-byte backup image of the dead hard drive.
- Scan the backup image using Disk Drill.
- Review the discovered files for recovery.
- Select the desired files and recover them to a secure location.
Absolutely. Disk Drill supports all Windows (FAT16/FAT32/exFAT, NTFS, NTFS5, ReFS) and macOS (HFS, HFS+, APFS) file systems on each operating system. So even if Windows is unable to recognize the macOS-formatted damaged hard drive, Disk Drill will be able to
A hard drive that isn’t recognized in BIOS or Disk Management suffers from a physical problem that’s incapable of being repaired at home. Instead, you’re encouraged to keep it unplugged. The data on the drive needs to be repaired by a data recovery service, after which it can be copied to a new, healthy drive.