The partition table is an essential part of your hard drive. Without it, your data is essentially an unorganized mess, making it impossible for your operating system to figure out where everything is. When a partition table becomes corrupted or damaged, it results in the data in that affected partition becoming inaccessible.
Thankfully, there are plenty of partition table recovery tools available for you to restore your partition table to working condition. Read on to find out more.
What is a Partition Table?
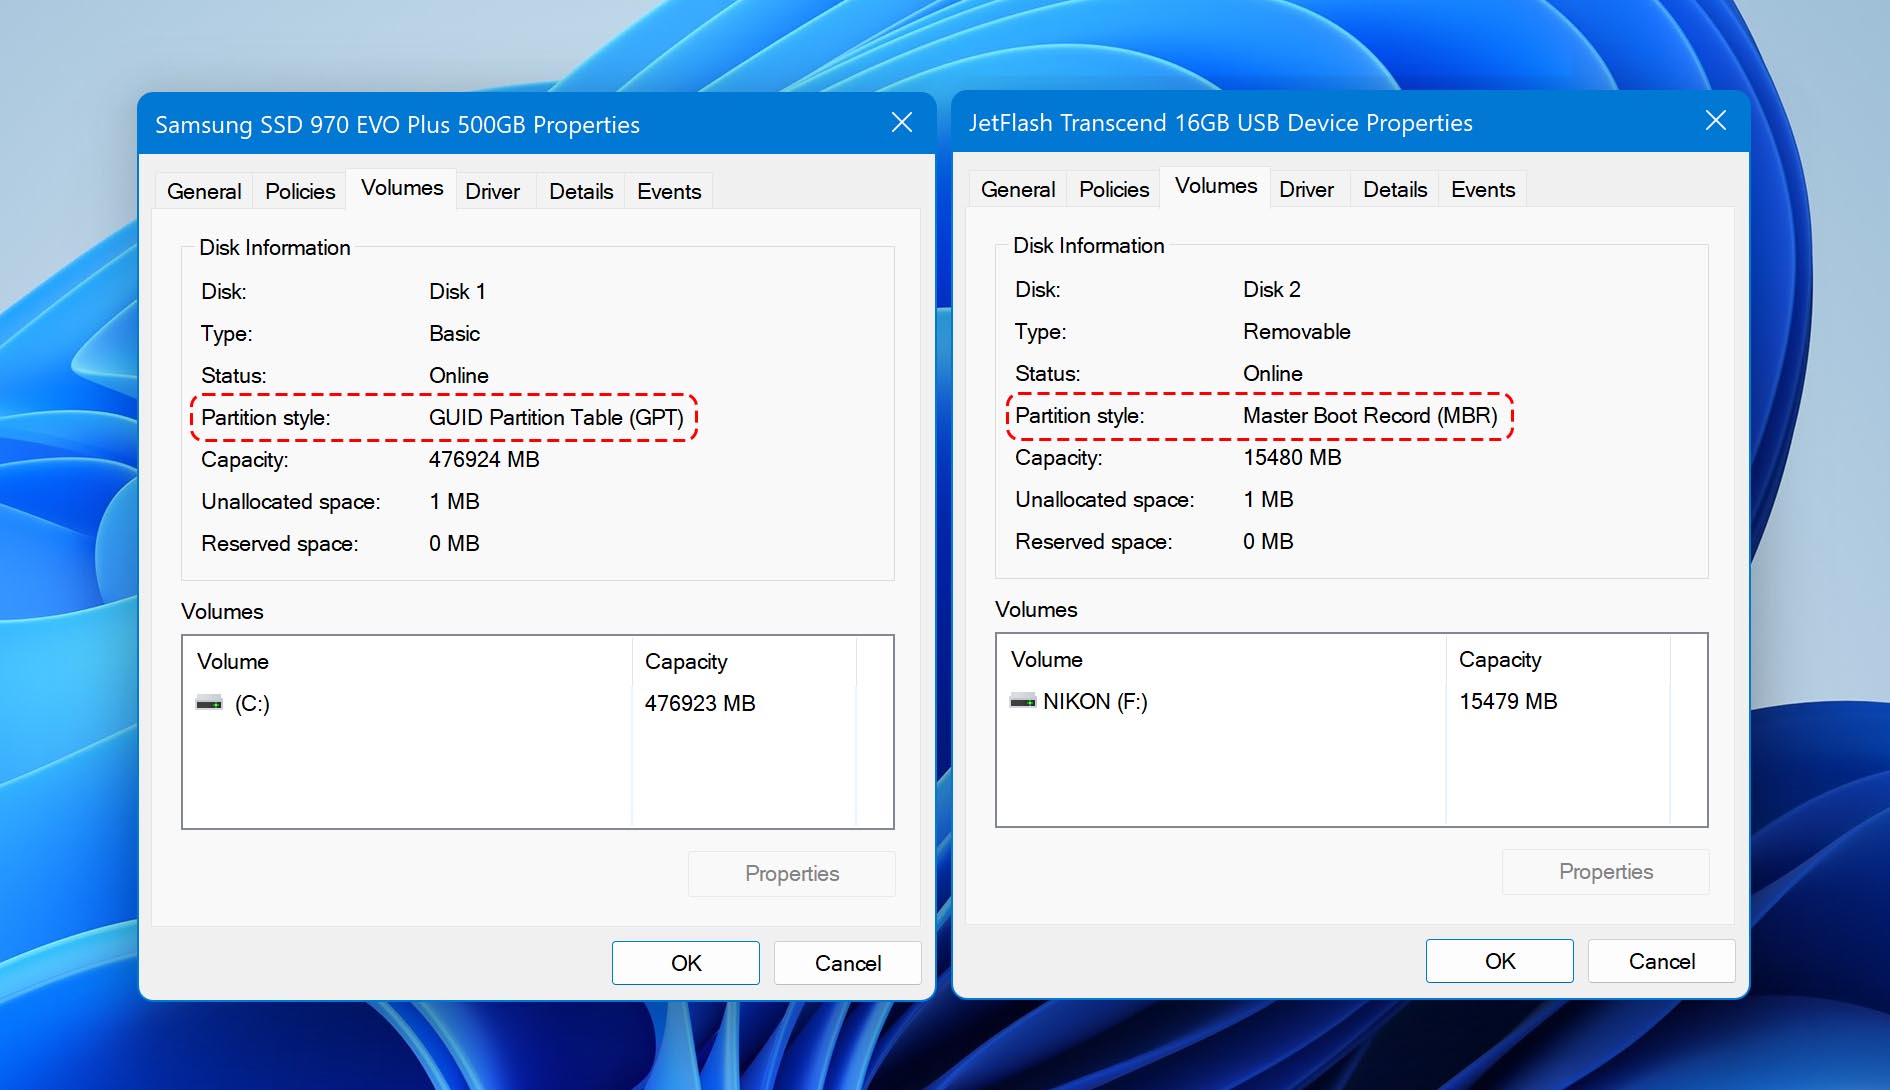
Before you can store data on your drive, a partition table needs to be created for you to create partitions that you can format. There are two types of partition tables: MBR and GPT. MBR is the older partition table type compatible with older types of hardware. GPT is newer and contains more features, but may not work with older hardware and operating systems.
When a partition table becomes invalid or corrupted, your computer will not be able to read the partitions on your drive, therefore your data will be inaccessible. Fixing the partition table will restore access to it. Alternatively, you can directly recover your deleted files and create a brand new partition to replace the damaged one.
Fix Your Lost or Invalid Partition Table
In some instances, your partition table may be fine, but your computer may be having some difficulty reading it. In such cases, the error message “Invalid partition table” will appear on your screen when you boot your computer. To fix this, you need to correct the boot sequence your computer goes through when it turns on.
Here’s how you can restore the correct boot sequence through your BIOS:
- Boot into your BIOS. This process is slightly different depending on the manufacturer of your machine. If you’re unsure which button to push, find more information here.
- Navigate to the Boot section of your BIOS. Here, you can modify the boot device priorities.
- Make sure your hard drive is set as the first boot option.
- Once complete, go to the Exit tab and exit the BIOS. Be sure to save changes.
How to Recover/Rebuild/Repair Partition Table Without Data Loss:
Of course, most people who run into this issue already have data on their drives that they want to preserve. There are a few ways you can rebuild your partition table without losing the data currently stored on the drive. Here’s how.
Solution #1 Repair Using Bootrec
You can quickly and easily fix your invalid partition table using the Bootrec command. Bootrec is a troubleshooting tool included with Windows that allows you to repair the master boot record of the drive. It has a few different options that serve different purposes, which we’ll show you in the below instructions.
Follow these steps to repair your partition table using the bootrec command:
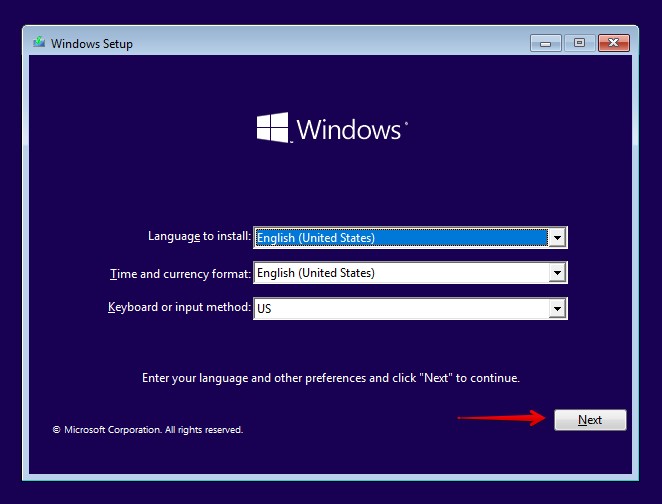
- Boot into Windows RE (Recovery Environment) using your Windows installation media (either a DVD or bootable USB drive). Click Next.
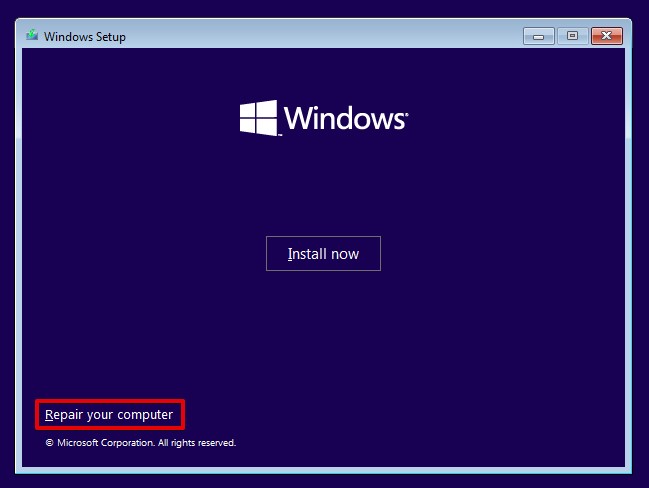
- Click Repair your computer.
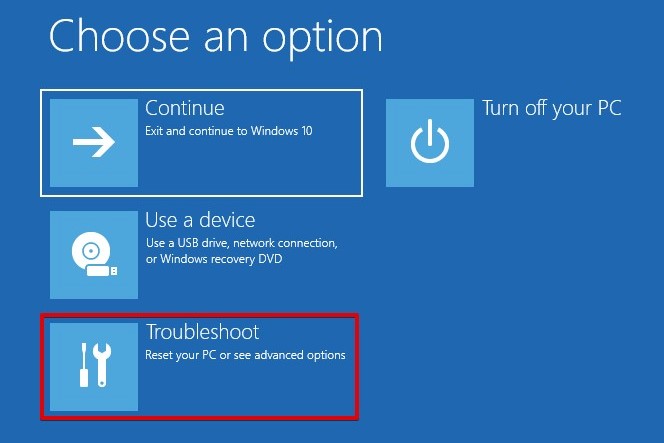
- Click Troubleshoot.
- Click Command Prompt.

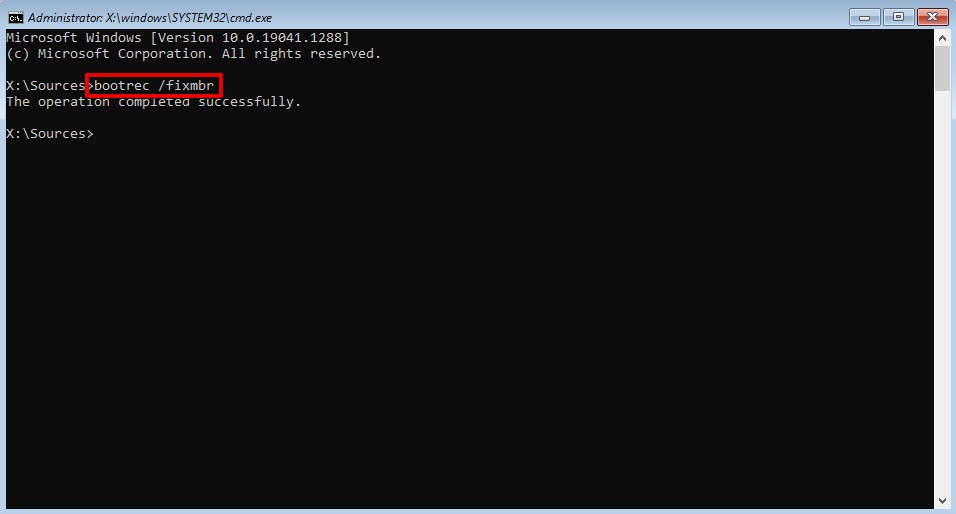
- Type bootrec /fixmbr and press Enter.
- Type bootrec /fixboot and press Enter.
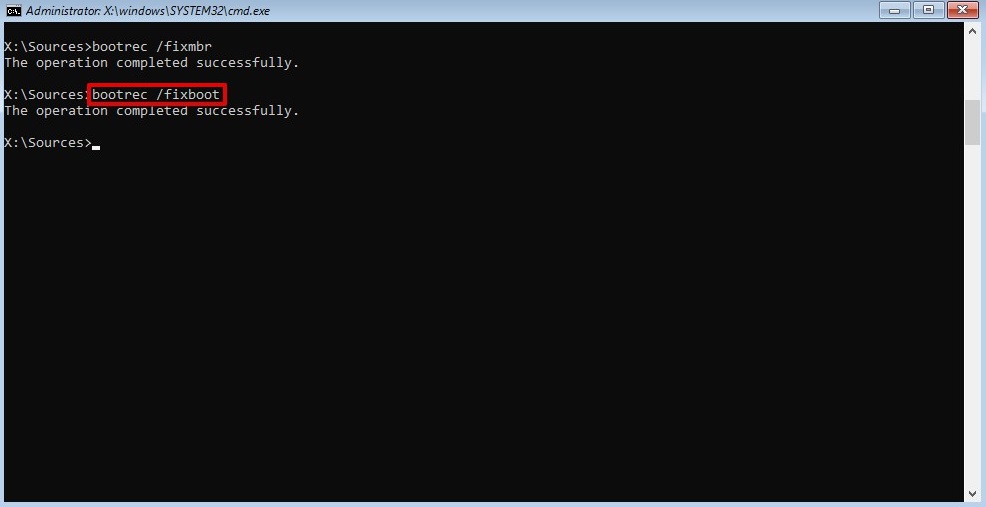
- Reboot your computer.
Solution #2 Recover Using Disk Drill
![]() If your partition table cannot be repaired automatically using software, you can recover your data from the lost partitions and rebuild your partitions manually. Disk Drill is a data recovery tool capable of finding lost partitions and restoring the data from them. While it may not be able to restore the partitions in place, it allows you to at least restore the data that was on them so you can recreate the partitions that were lost.
If your partition table cannot be repaired automatically using software, you can recover your data from the lost partitions and rebuild your partitions manually. Disk Drill is a data recovery tool capable of finding lost partitions and restoring the data from them. While it may not be able to restore the partitions in place, it allows you to at least restore the data that was on them so you can recreate the partitions that were lost.
This is how you can recover the data from your missing partitions using Disk Drill:
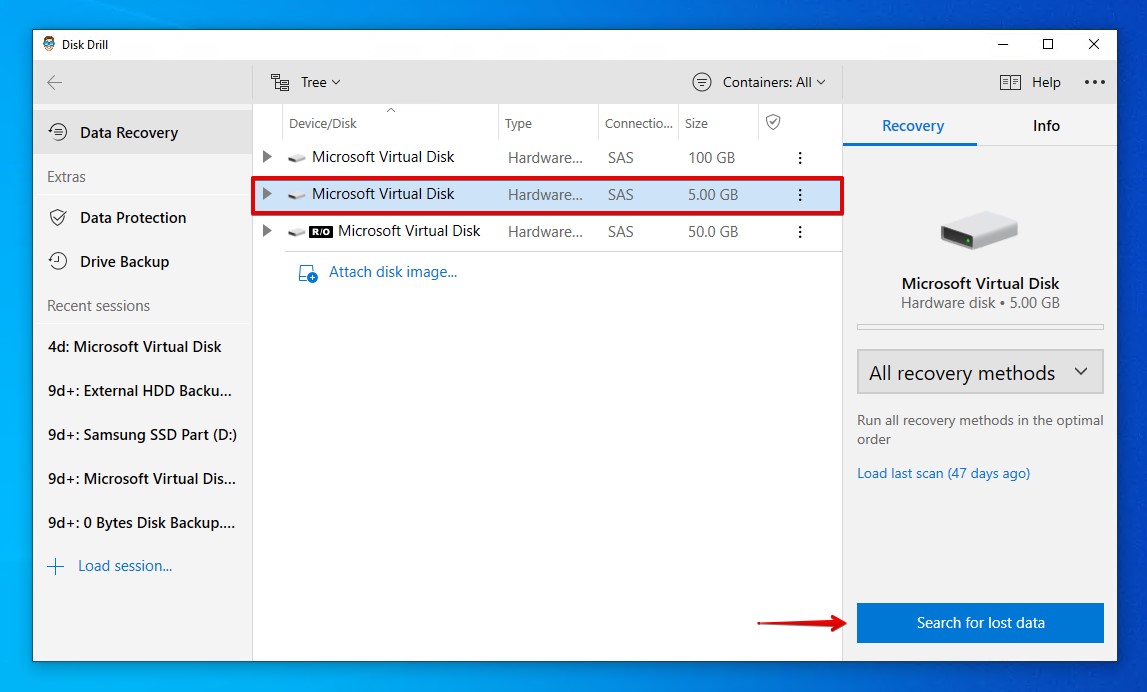
- Download and install Disk Drill to a separate disk. Open it.
- Select the affected drive and click Search for lost data.
- Click Review found items once the scan is complete.
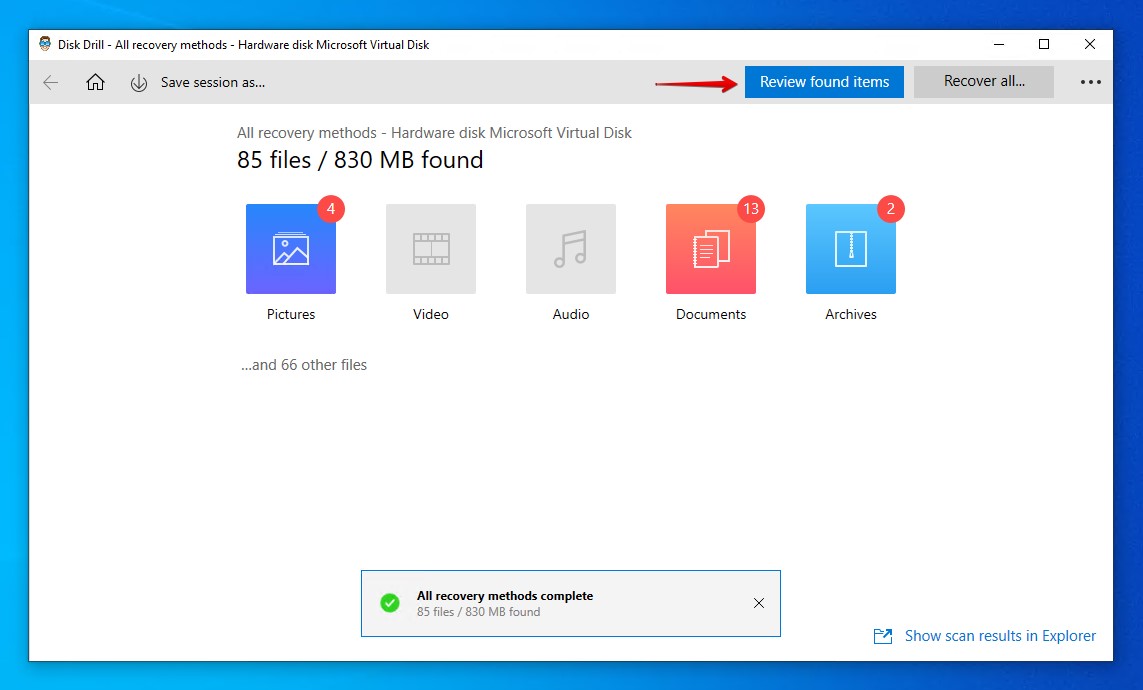
- Mark the files you want to recover. Use the Recovery chances column to see which data has the best chance of recovery. Most data should be recovered if it was only the partition table that was lost. Click Recover when ready.
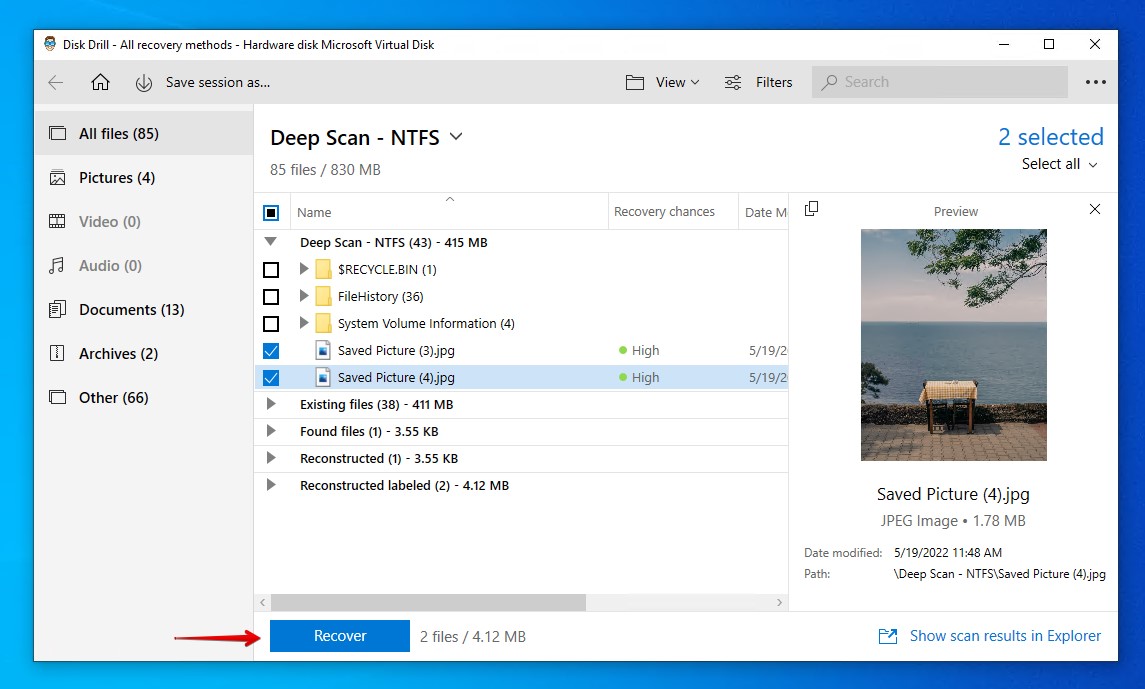
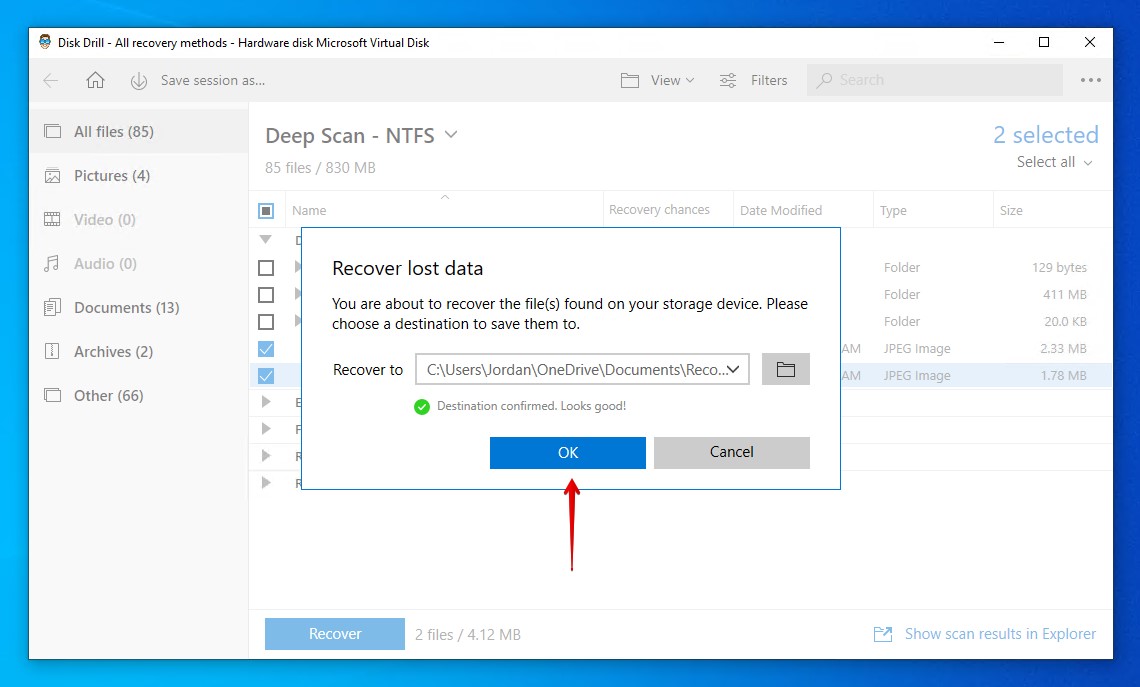
- Select an output location. Make sure you’re not saving it to the same affected drive you’re recovering from. Click OK to complete recovery.

Solution #3 Recover Using DMDE
 DMDE is a powerful recovery tool that’s capable of restoring your lost data and partitions. It can scan your drive for any lost or damaged partitions and give you the ability to write them to your partition table. This will, effectively, restore the partitions and re-establish access to the data on them.
This is how you can repair partition tables using DMDE:
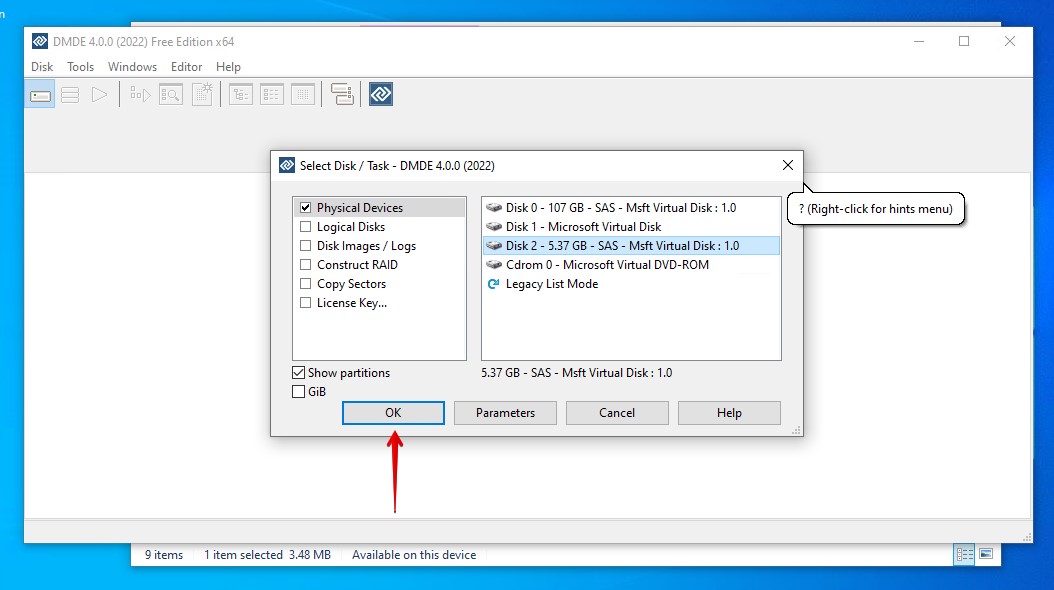
- Download and extract DMDE. Open DMDE once extracted.
- Select your language and review and accept the license agreement.
- Select the affected drive and click OK.
- Right-click the partition and select Advanced Mode.
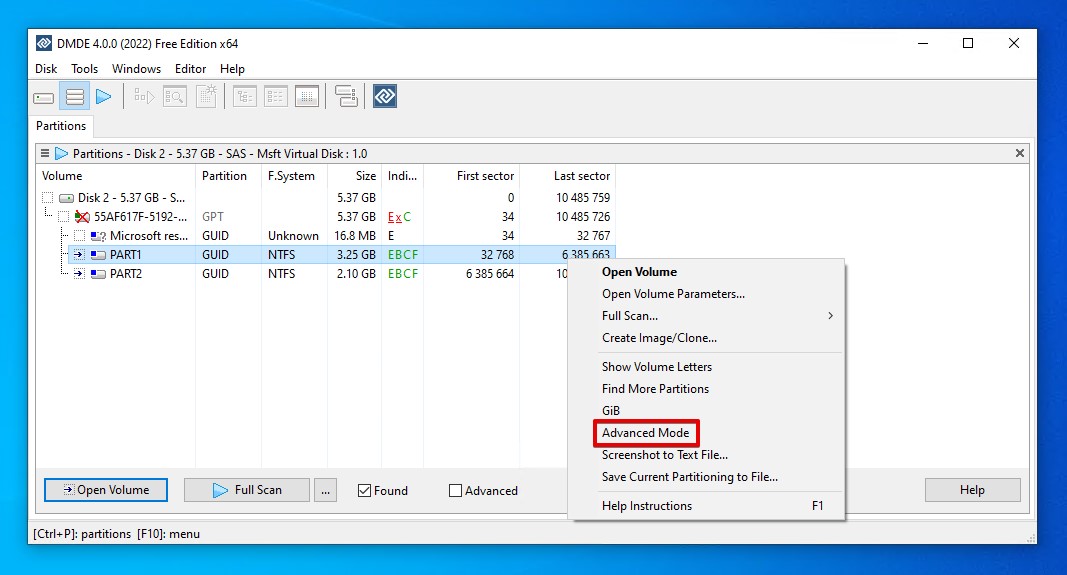
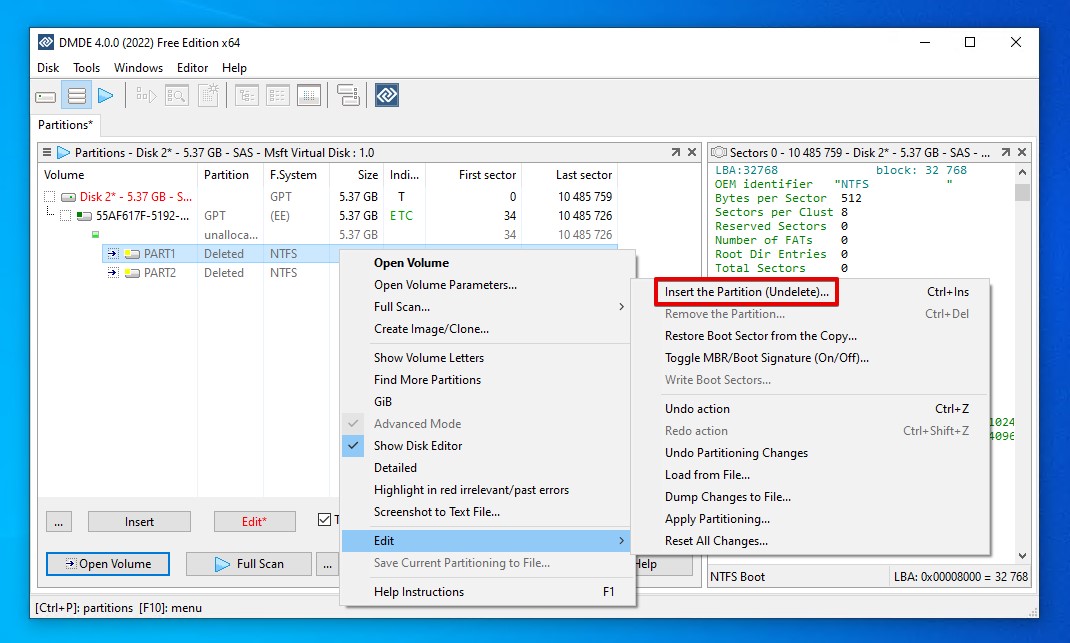
- Right-click the partition again, hover over Edit, then click Insert the Partition (Undelete). If this option is greyed out, click Remove the Partition first, then the option should be clickable.
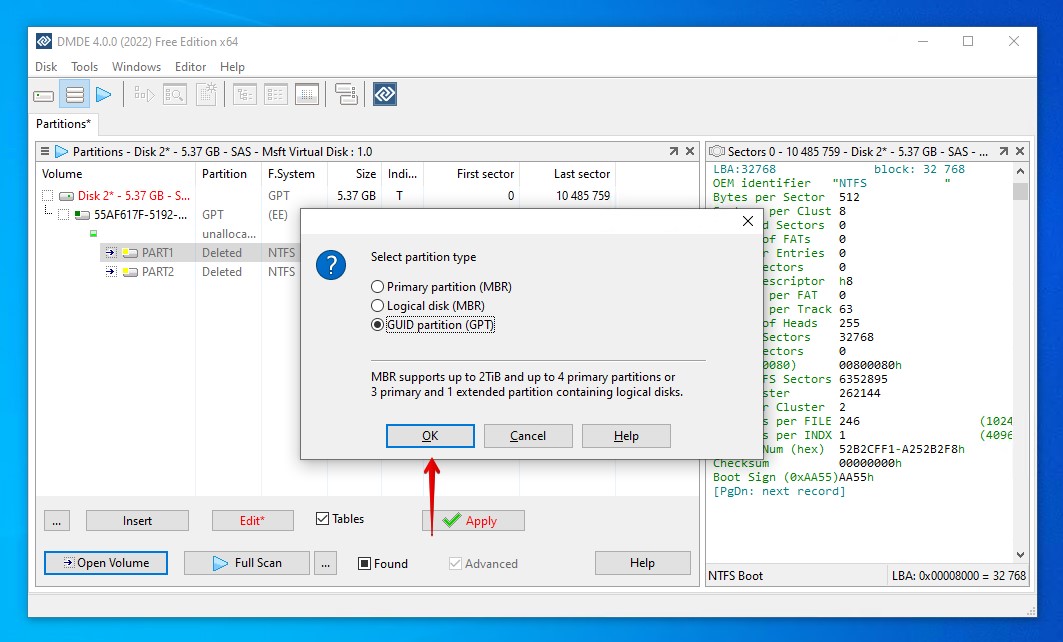
- Select the partition type that was used previously. Click OK. Repeat this step for any other partitions you wish to restore.
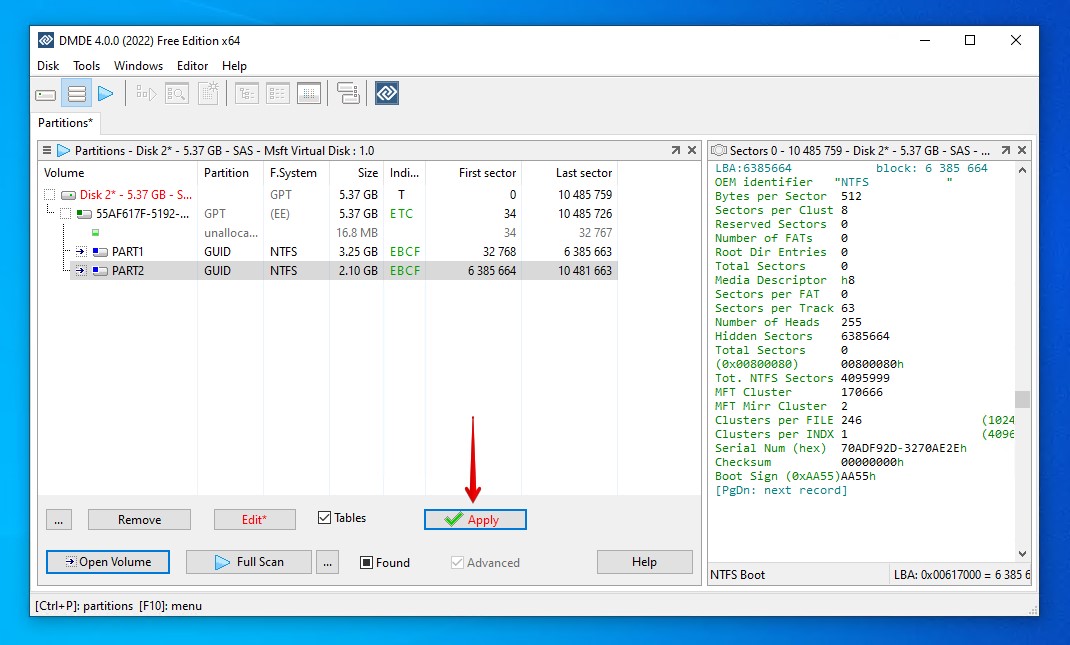
- Click Apply when ready.
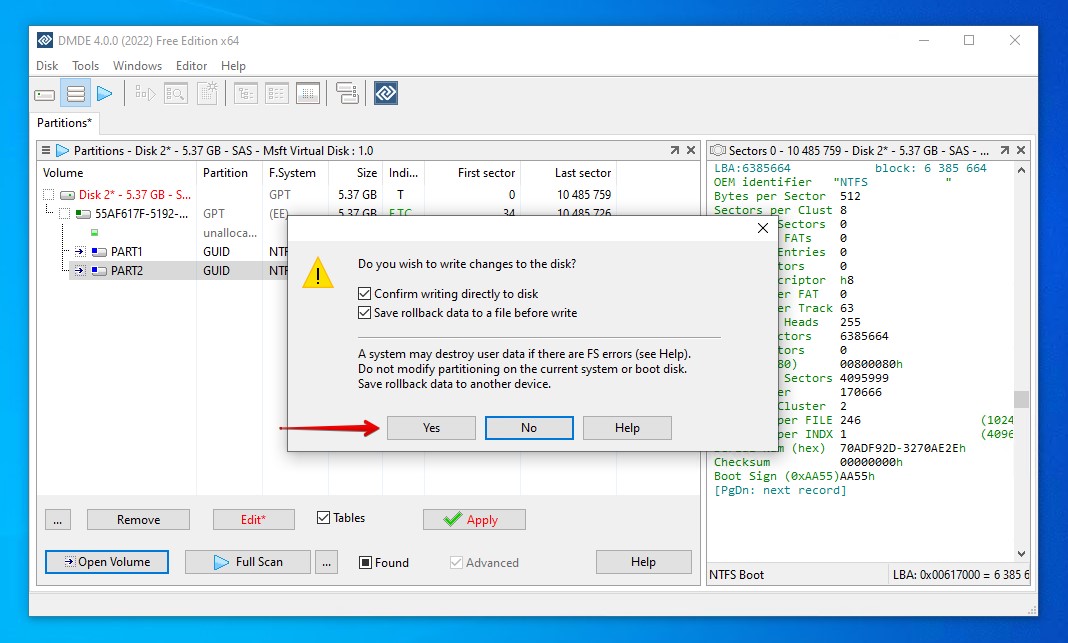
- Tick Confirm writing directly to disk and agree to the pop-up that appears stating you understand the risks involved with writing to the disk. Click Yes. Save the dumpback file to an external storage device.
- Restart your computer. The partitions should be back in place.
Solution #4 Recover Using DiskGenius
 DiskGenius is a data recovery tool that specializes in regular data recovery as well as partition recovery. It’s packed with lots of useful recovery features, some of which are great at recovering and repairing your partition table. Using DiskGenius, you can recover your partition table in no time to restore access to your data.
Here’s how you can perform partition table recovery using DiskGenius:
- Download and open DiskGenius.
- Select the affected drive and DiskGenius may automatically ask you if you want to correct the damage straight away. If so, click Correct.

- Click Partition Recovery while the affected drive is selected.
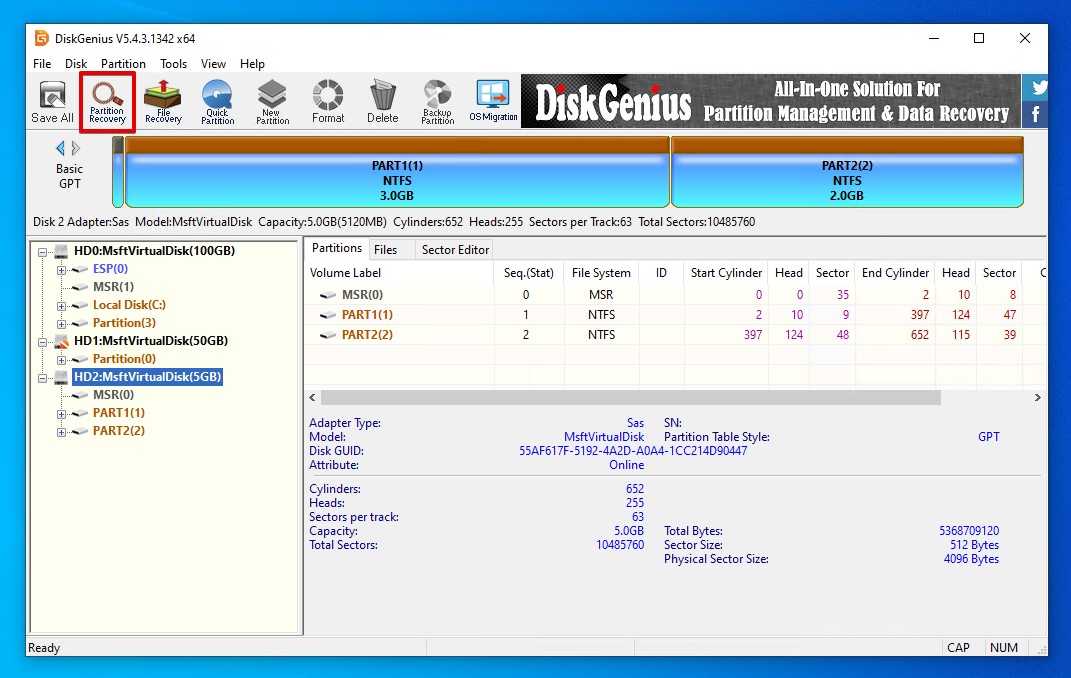
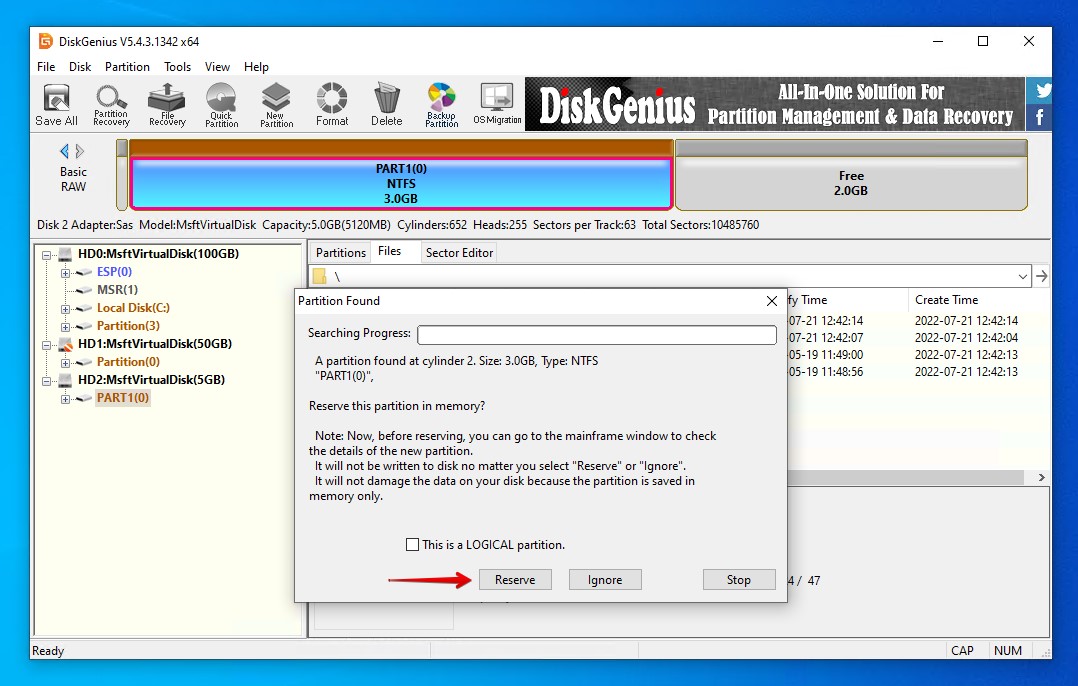
- Click Start.

- Click Reserve on your found partitions as DiskGenius finds them. Click OK once the scan is complete.
- Click Disk, then Save Partition Table.
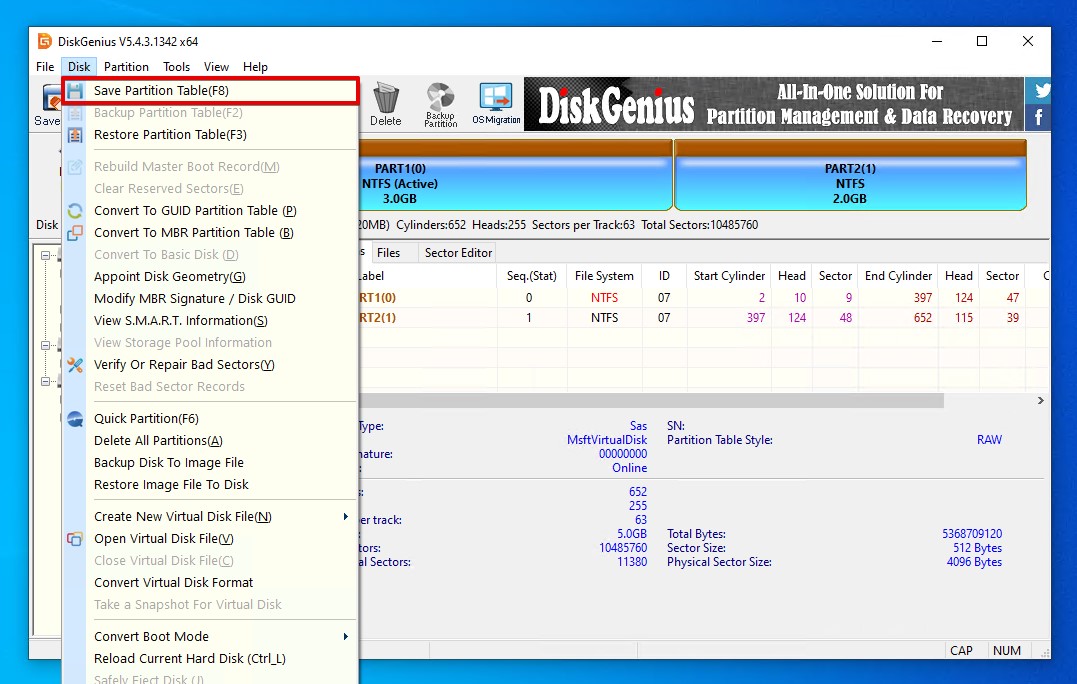
- Click Yes to confirm and select your partition style. Click OK.
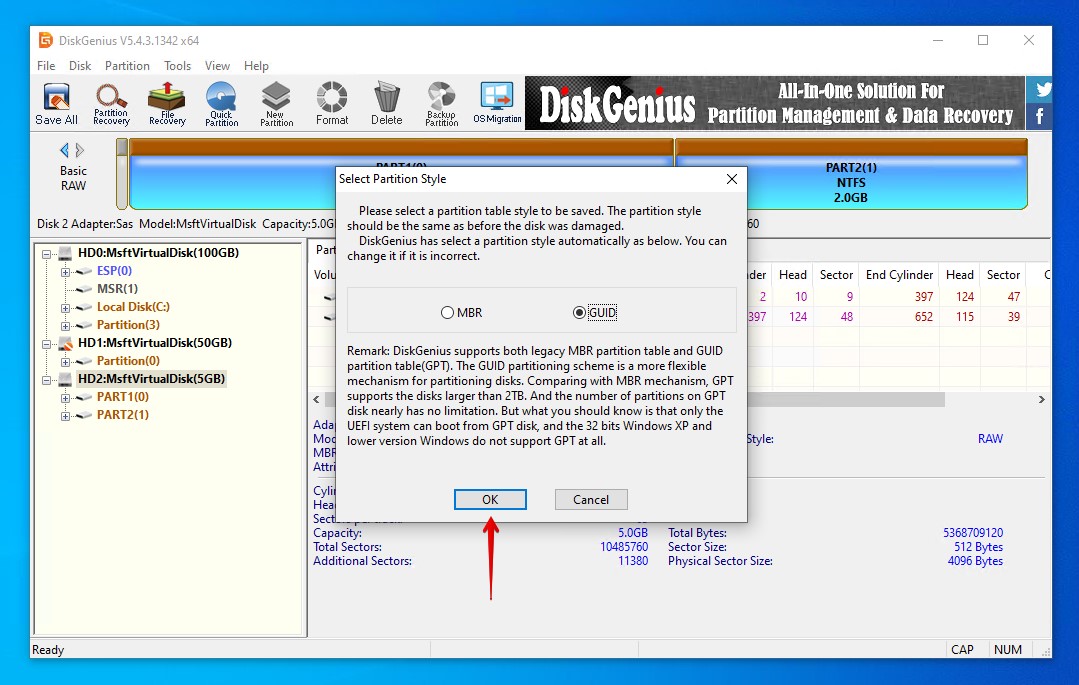
- Check Disk Management to confirm the partitions are restored.
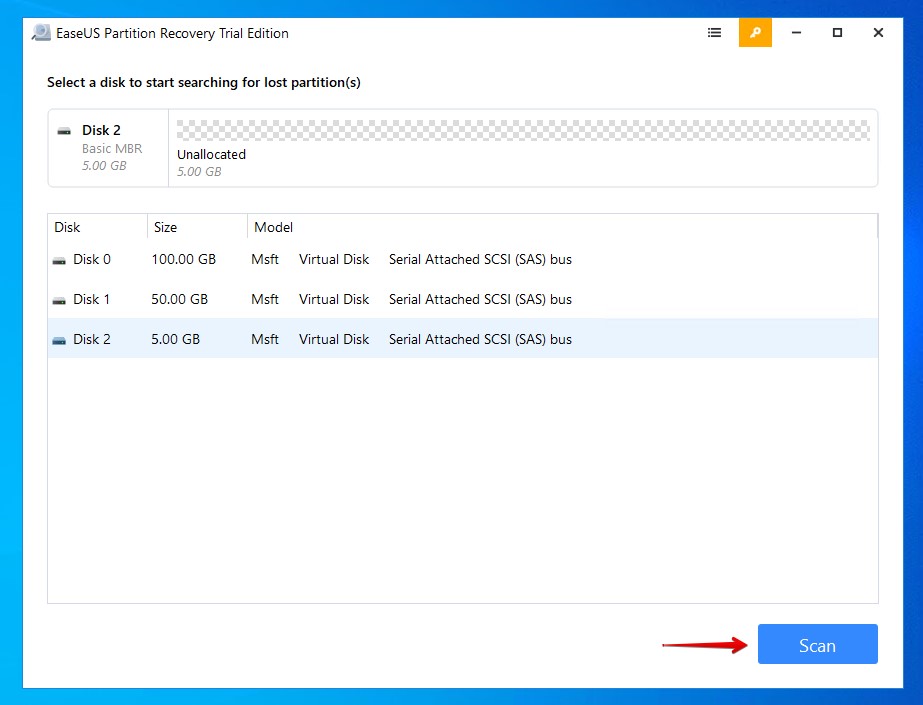
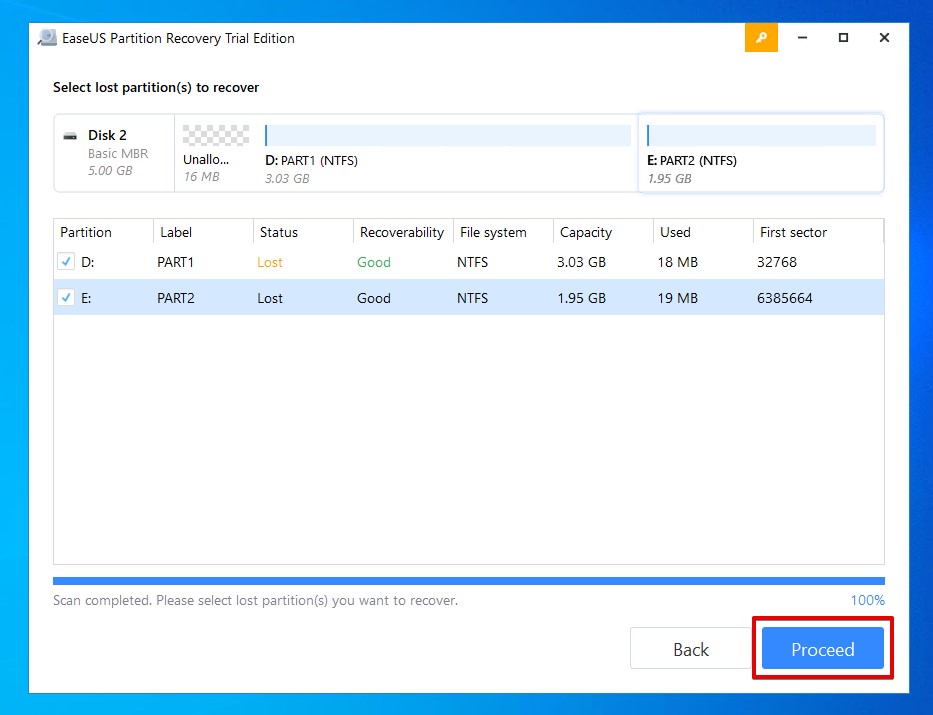
Solution #5 Recover Using EaseUS Partition Recovery
 EaseUS Partition Recovery is a great way to recover NTFS, EXT3, EXT2, FAT32, and FAT16 partitions. It’s capable of scanning your affected drive for lost partitions and restoring the partition table to its original state, along with the data in it.
These steps will guide you through repairing the partition table using EaseUS Partition Recovery:
- Download and open EaseUS Partition Recovery.
- Select the affected drive and click Scan.
- Preview each partition by double-clicking it to view its contents. When you’re ready, mark them for recovery and click Proceed.
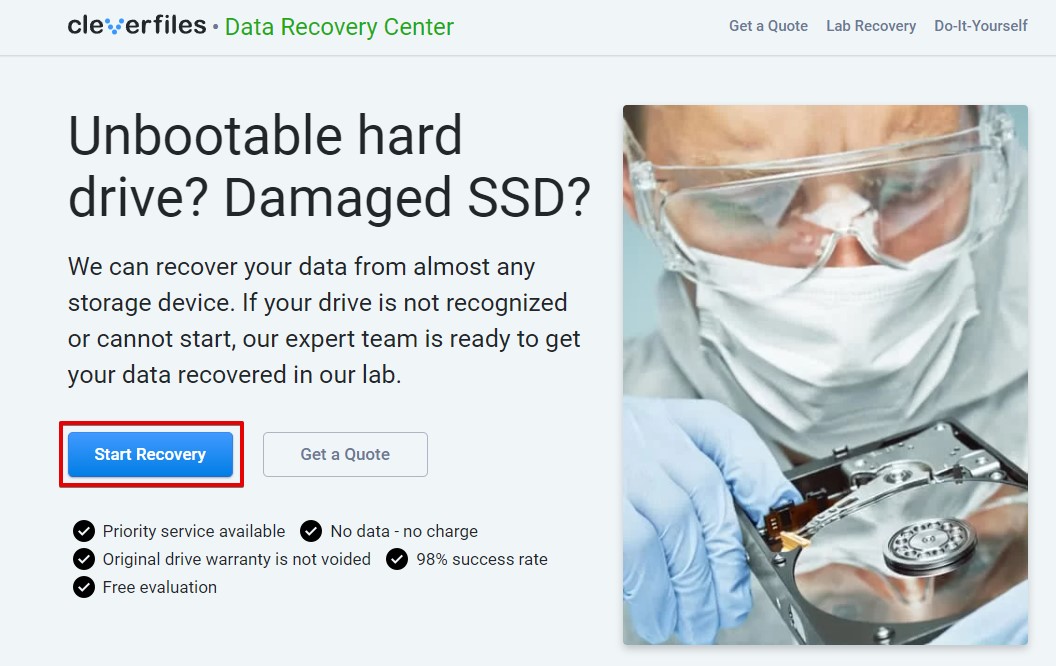
Solution #6 Recover Using a Data Recovery Service
Sometimes recovery is beyond the ability of partition table recovery tools. In such cases, your best chance at recovering your lost partition table is by leaving it to a professional. A professional data recovery service specializes in the recovery of data from almost any data loss situation.
Using commercial-grade equipment, a team of data recovery professionals is more than equipped to recover your data. This is, by far, the option with the highest rate of success if you don’t have a backup of the data.
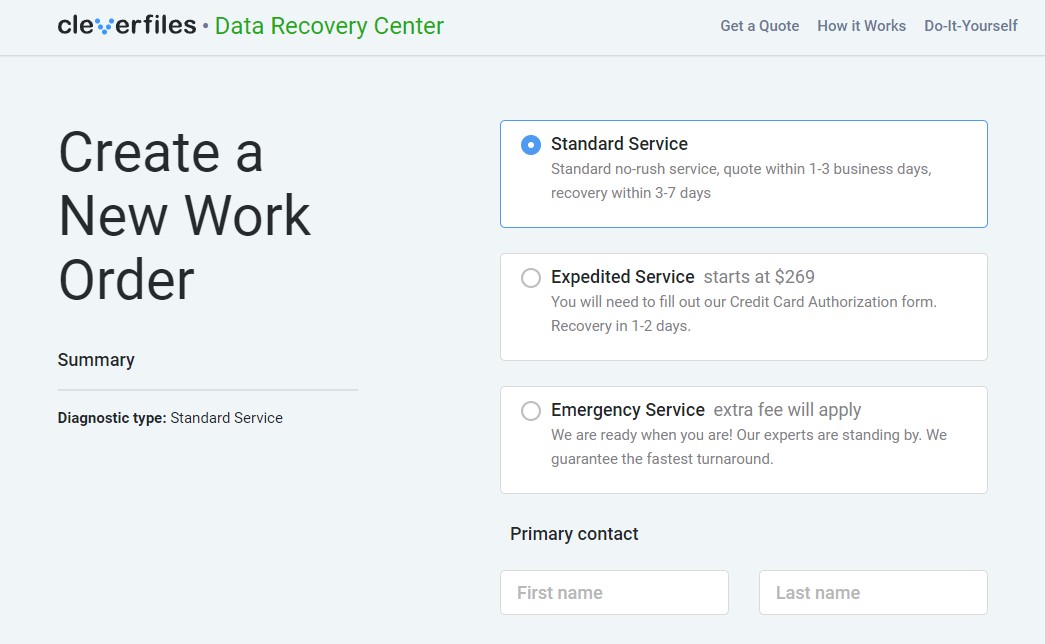
Here’s a brief look at the process:
- Click Start Recovery.
- Specify the type of service you need. You have the option of paying more to get your data recovered faster. You will also need to fill out device information and contact information for when the data is ready to be returned to you.
- Click Complete my work order. Once the work order is completed and your device is sent away, the rest is handled by the data recovery team.
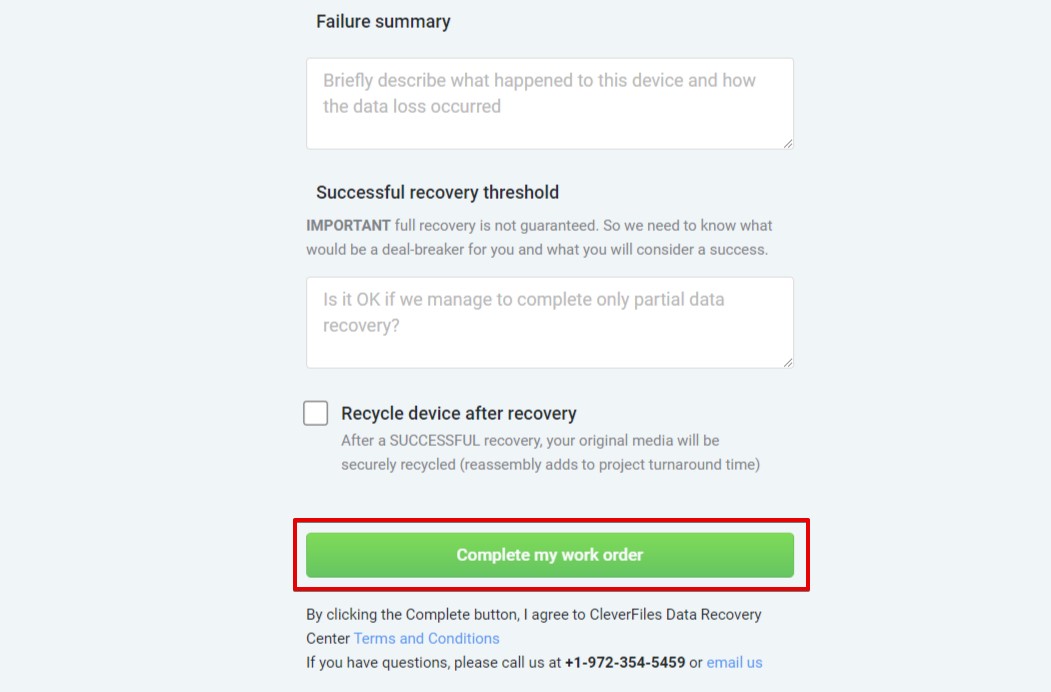
Upon the recovery of your data, it will be returned to you on a USB drive or DVD. Your original device will be either recycled or returned to you, depending on the option selected in the work order.
How to Fix/Recover Corrupted Partition Table
A surefire way of fixing partition tables is by initializing the disk again and creating a new partition to replace it. Creating a new partition will overwrite the old partition, replacing it in the partition table and allowing you to store data on it. This method, however, will result in the loss of the data that is stored on the partitions that were lost. Therefore, only perform this if you have the data backed up or you’re prepared to lose it.
Here’s how you can fix the corrupted partition table by creating a new partition table:
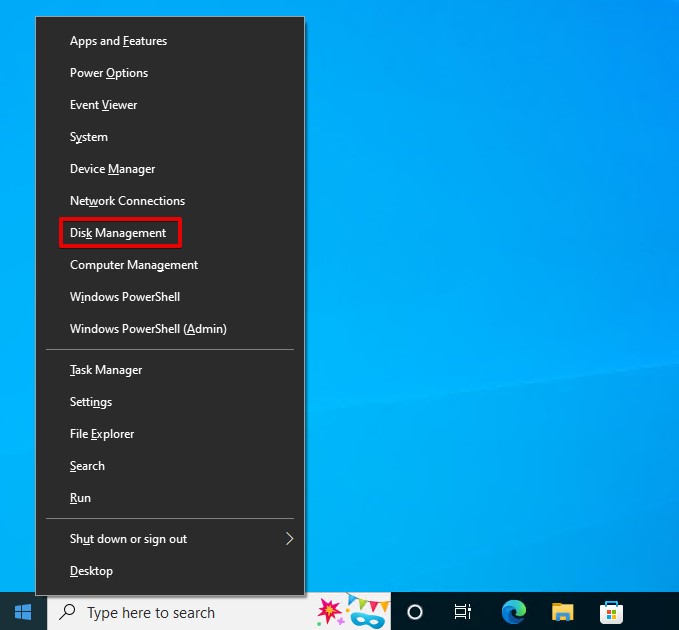
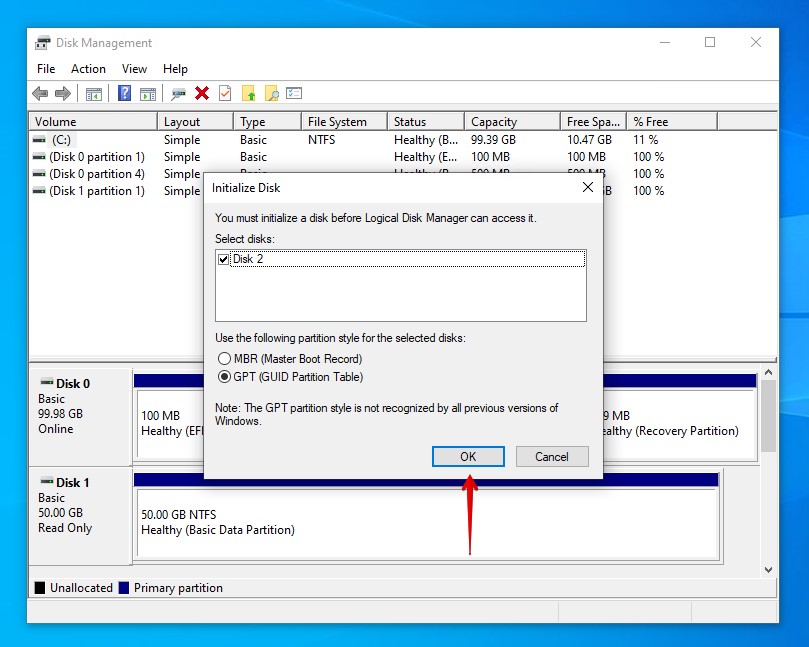
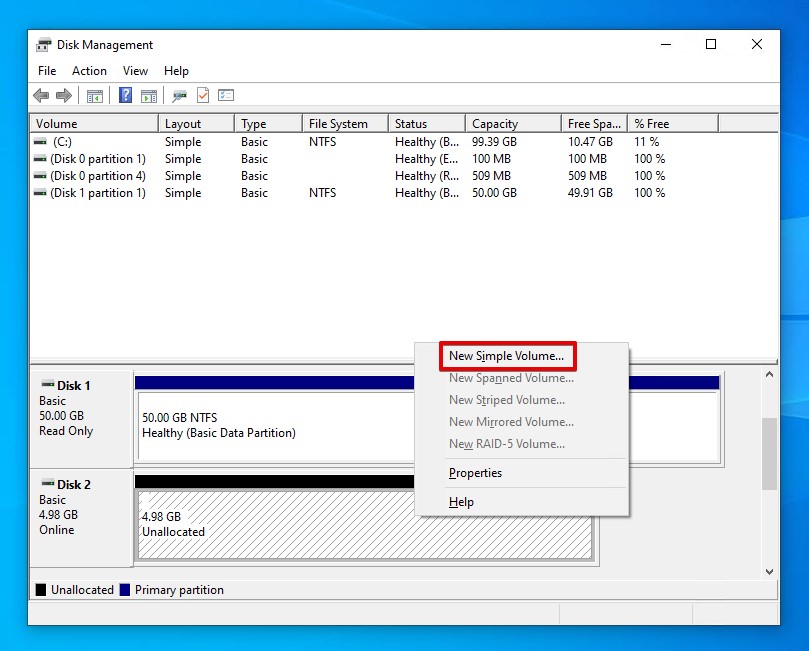
- Right-click Start and select Disk Management.
- Select the partition style you want to use and click OK.
- Right-click the partition, then select New Simple Volume.
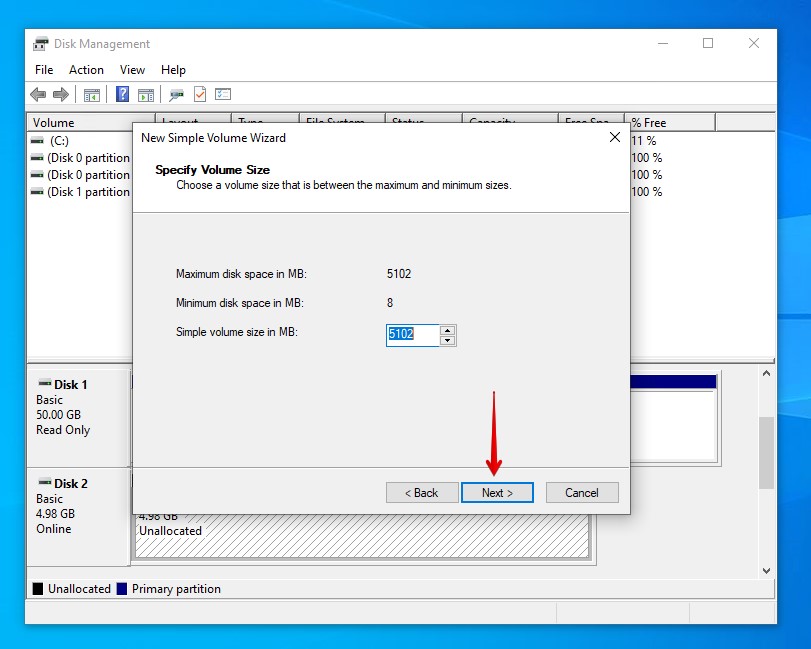
- Click Next, then specify the size you want. Click Next.
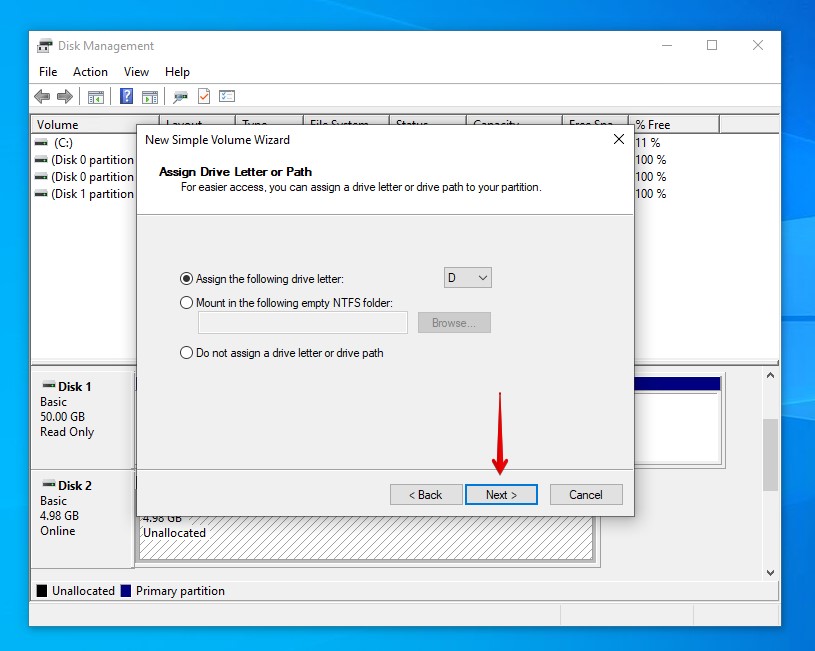
- Specify the drive letter you want and click Next.
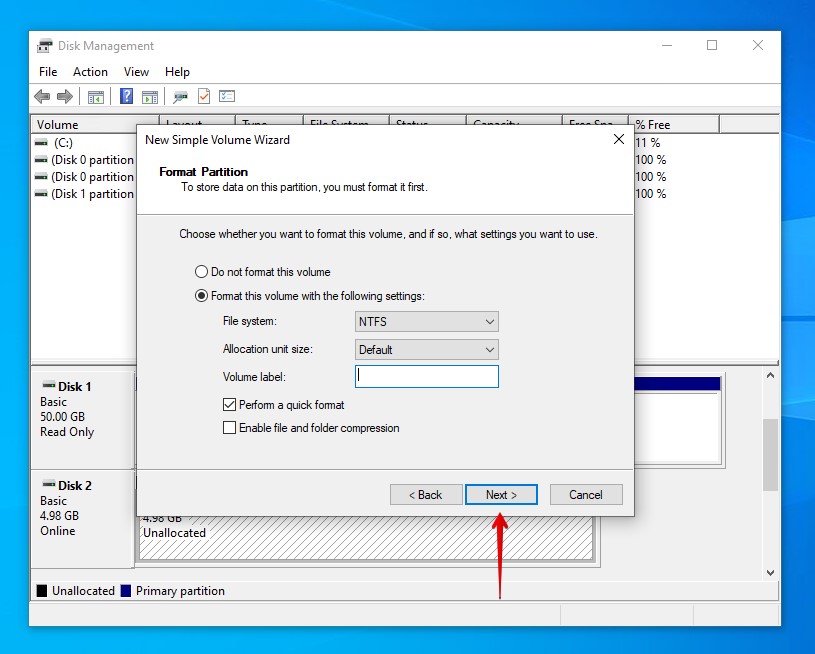
- Specify your file system and volume label. Ensure Perform a quick format is selected and click Next.
- Click Finish.
Protect Hard Drive Data with Regular Backup
By far the most reliable way of keeping your data safe is setting up a reliable and consistent backup routine. Having a copy of your data allows you to quickly and easily restore it as if it was never lost. These backups should be stored on a separate storage device. To protect yourself further, create an additional backup and store it off-site.
There are lots of great backup solutions available online, but you also can’t go wrong with the backup solutions included with Windows, like Backup and Restore and File History. Follow these instructions to configure a backup using File History:
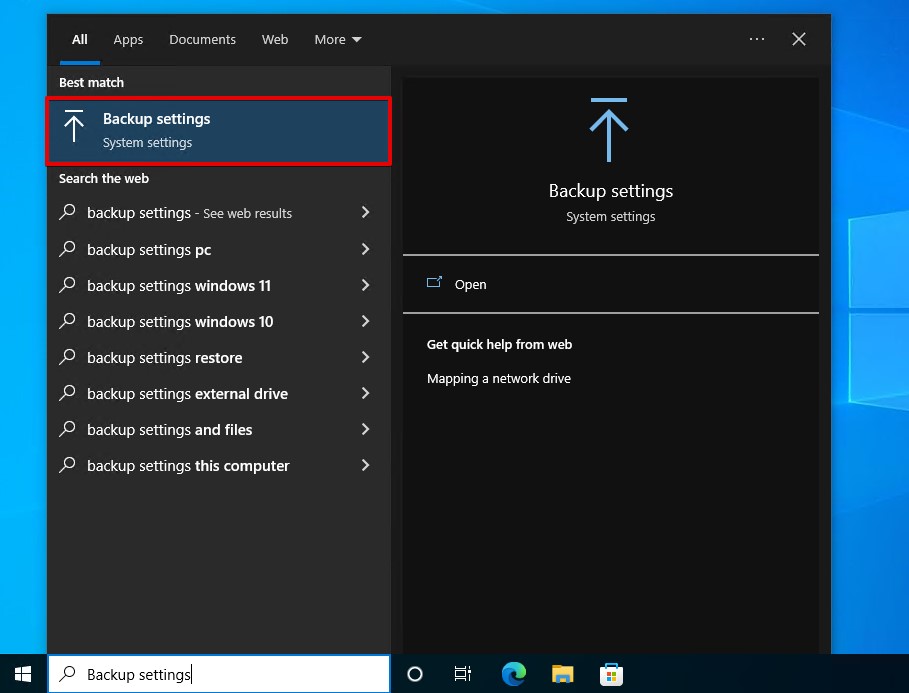
- Press Windows Key + S and search Backup settings. Open the first result.
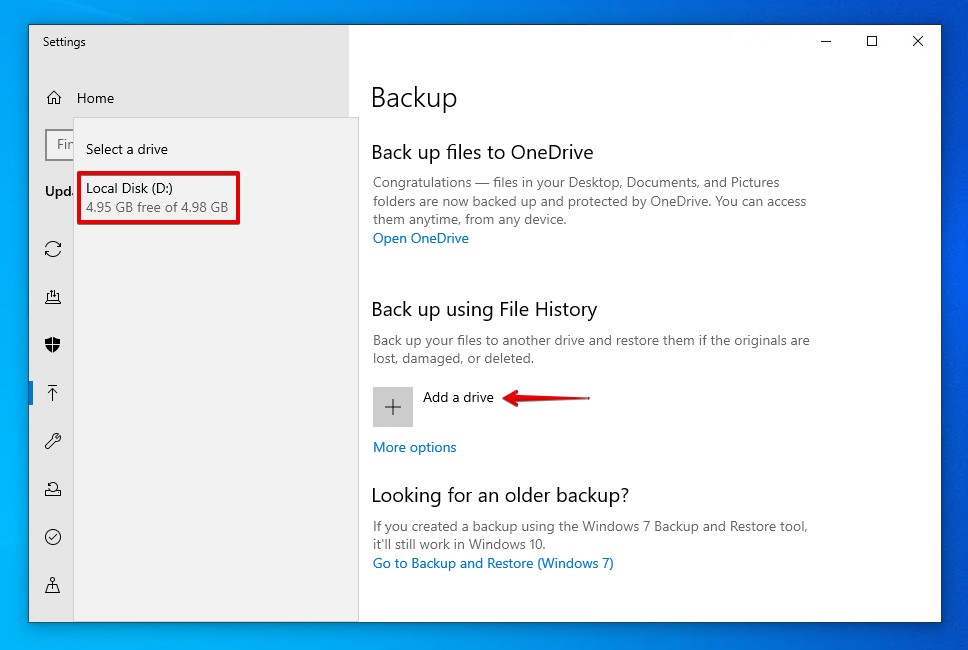
- Click Add a drive and select the drive where you want the backup to be stored.
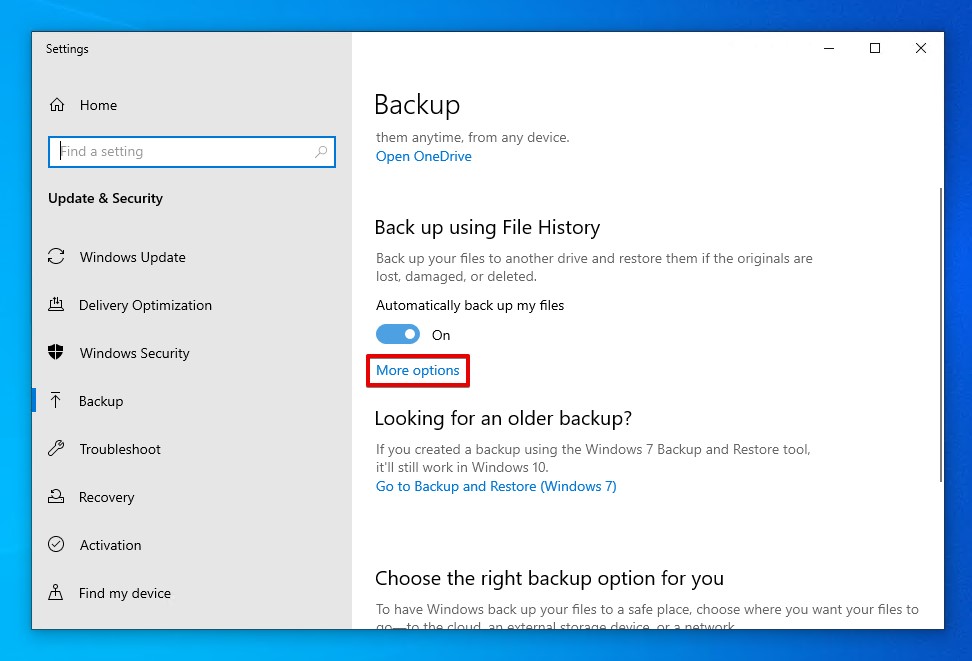
- By default, File History automatically backs up Documents, Music, Pictures, Videos, and Desktop folders. If you want to specify additional folders to back up, click More options.
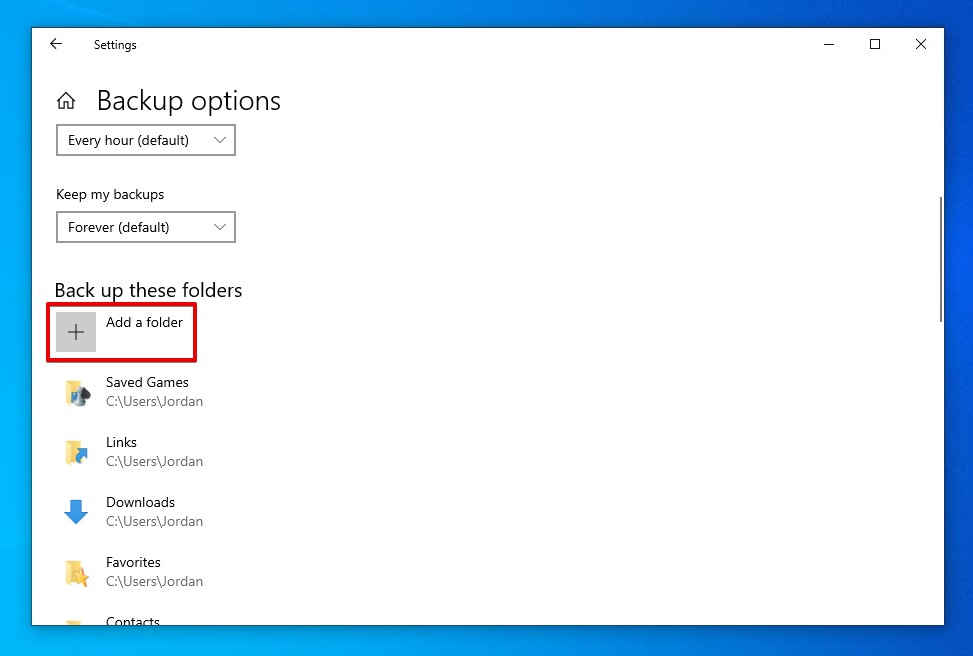
- Click Add a folder under Back up these folders. Once you add a folder, File History will back it up going forward.
Conclusion
The loss of your partition table can be a very frustrating occurrence. The solutions prepared for you in this article should be more than enough to get your partition table back in working order. Remember, once you’re back up and running, be sure to implement a reliable backup schedule to avoid future loss. If it happened once, it can happen again.


FAQ
You can restore a partition table simply by creating a new one. Be warned this process is effectively overwriting your old partitions with new ones. Any lost data will remain lost, therefore you should perform data recovery before you attempt this.
- Right-click Start and select Disk Management.
- Select the partition style and click OK.
- Right-click the partition and select New Simple Volume.
- Click Next. Specify the size. Click Next.
- Specify the drive letter you want. Click Next.
- Specify your file system and volume label. Ensure Perform a quick format is selected and click Next.
- Click Finish.
You can attempt to repair your partition by using the Windows command bootrec. This will require a bootable USB or DVD containing a copy of Windows, as you will be booting into the Windows Recovery Environment.
- Boot into Windows RE. Click Next.
- Click Repair your computer.
- Click Troubleshoot.
- Click Command Prompt.
- Type bootrec /fixmbr and press Enter.
- Type bootrec /fixboot and press Enter.
- Reboot your computer.
DiskGenius is capable of restoring your partition table without the loss of the data inside your partitions.
- Download and open DiskGenius.
- Select the drive and click Correct if DiskGenius presents you with a prompt.
- Click Partition Recovery.
- Click Start.
- Click Reserve on your found partitions. Click OK once the scan is complete.
- Click Disk, then Save Partition Table.
- Click Yes to confirm and select your partition style. Click OK.
Upon completion, check your partitions in Disk Management to ensure they’re all back to normal and the data is accessible.