Have you ever accidentally deleted something important or opened a folder and found files missing for no obvious reason? In most cases, it’s possible to recover deleted files on Windows 11 if you know where to look.
I’ve analyzed dozens of real user cases across Reddit, Microsoft forums, and tech communities, and I’ve personally tested every recovery method covered in this guide. Below, you’ll find both built-in Windows 11 solutions and more effective third-party options for situations where native tools fall short. If you want to skip straight to the recovery methods without reading through the scenarios first, jump to this section below.
Situations That Commonly Lead to Windows 11 Data Loss
After spending time reading through Windows 11 support threads, I started to see the same handful of patterns come up again and again. Specifically, I noticed that most users don’t come to forums saying, “I deleted my files.” Some do, of course, but what they far more often describe is something closer to “my files just disappeared, and I have no idea why.” Here are the scenarios that come up most often, and what to do about each one.
Deleted Files Missing From Recycle Bin
Sometimes files don’t end up in the bin at all, even when you didn’t mean to permanently delete them.
- 🗣️ What users say: “I have deleted a few files, and they are NOT in my recycle bin when I then go check. They seem to have just disappeared,” says one Reddit user.
- 📝 What it usually means: The file skipped the bin (Shift + Delete), it was deleted from a location that doesn’t follow Recycle Bin rules (some removable drives, certain apps or file paths), or it was simply too large for the bin’s size limit.
- ✅ What you should do: If you’ve already checked the Recycle Bin (Method 2), check whether you have existing File History backups (Method 4), or use data recovery software to scan for recoverable files (Method 3).
Desktop Reset After Update Or Restart
You restart your PC after a Windows update and the desktop is blank. Files, shortcuts, and customizations have all vanished.
- 🗣️ What users say: “I ran the most recent Windows 11 update yesterday. After the update, all files on my desktop are missing. It just has recycle bin,” reports one user on Microsoft Q&A.
- 📝 What it usually means: The update may have created a new temporary user profile, meaning your files are likely still on the drive under your old profile folder (usually C:\Users\YourName). In some cases, OneDrive backup settings activated during the update may have moved your files to the cloud. In rarer cases, the update may have reset or rolled back system settings.
- ✅ What you should do: First, check C:\Users\ to see if your original profile folder still exists. If it does, your files are likely all still there. If the profile appears missing or corrupted, try restoring from a File History backup (Method 4) or a system image backup (Method 5). If neither is available, run a scan with data recovery software (Method 3).
OneDrive Sync Makes Folders Appear Empty
You open a folder you’ve been using for months and it’s suddenly empty, or entire directories seem to have been wiped.
- 🗣️ What users say: “I lost all of my work and all of my icons for the things I used in my daily work… When I signed in all of my icons were gone on my desktop and those that were left started receiving green checks and clouds next to them,” explains a user on Microsoft Q&A.
- 📝 What it usually means: OneDrive’s sync can remove local copies of files when cloud-only mode is enabled, or sync conflicts can cause files to be moved, renamed, or hidden. In some cases, signing out of OneDrive or changing sync settings causes local files to disappear from their expected location.
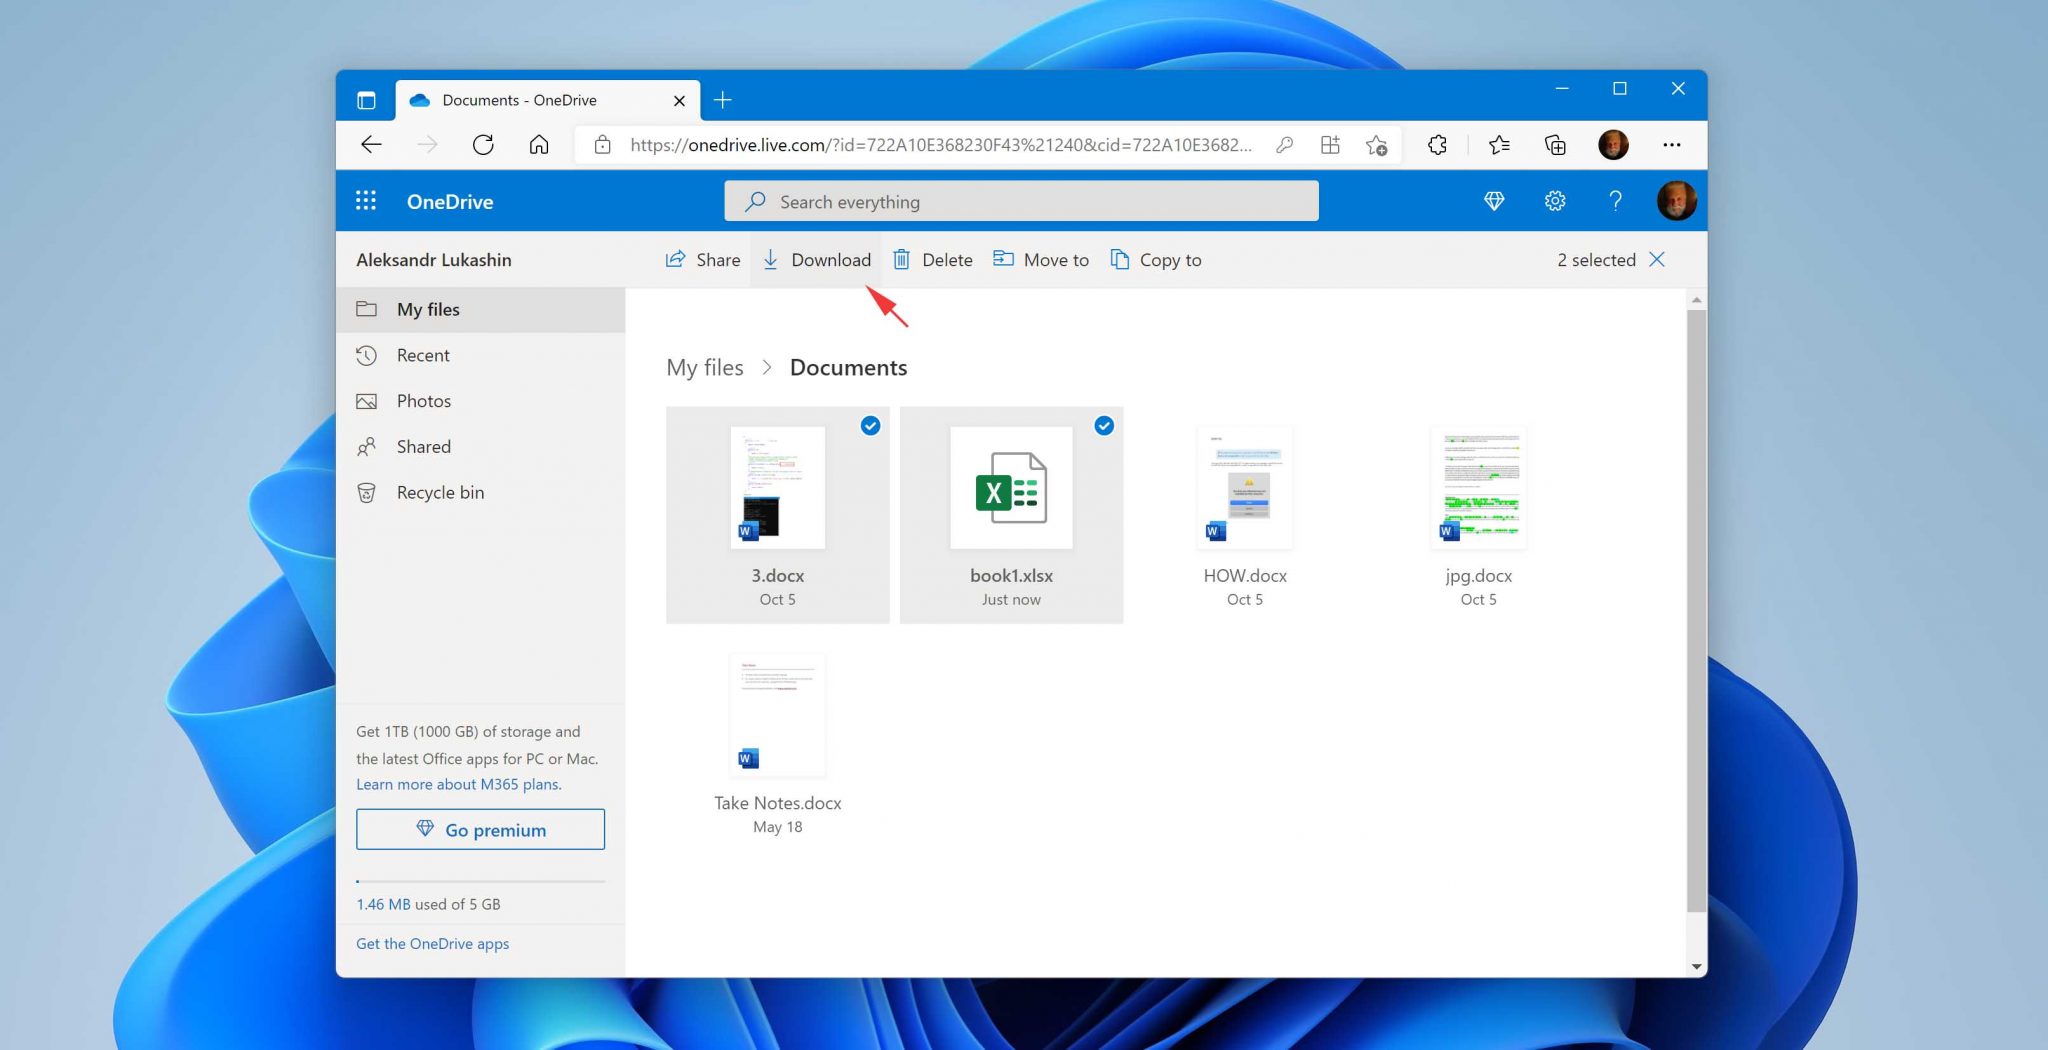
- ✅ What you should do: Check the OneDrive Recycle Bin online at onedrive.live.com. Deleted synced files often end up there even if they’re not in your local Recycle Bin. Also check the OneDrive Personal Vault and any folders marked as cloud-only. If the files aren’t recoverable through OneDrive, use data recovery software to scan the local drive (Method 3).
Files Removed Or Quarantined By Antivirus
A file you downloaded or created is suddenly gone, and you suspect your antivirus quarantined or deleted it.
- 🗣️ What users say: “Windows Defender on my Windows 11 computer mistakenly deleted some of my important files, probably due to a false alarm. Now the files are either deleted outright or quarantined,” writes a user on Microsoft Community Hub.
- 📝 What it usually means: Windows Security (Microsoft Defender) or a third-party antivirus flagged the file as potentially dangerous and either quarantined or outright deleted it. This commonly happens with downloaded executables, scripts, cracked software, or even legitimate tools that trigger false positives.
- ✅ What you should do: Open Windows Security > Virus & threat protection > Protection history to check if the file was quarantined. You may be able to restore it directly from there. If it’s not in quarantine, try recovering it with data recovery software (Method 3). To prevent this from happening again, consider adding Windows Security exclusions for trusted folders (covered in the protection tips section below).
Drive Prompts For Format And Appears Empty
You connected an external drive or inserted a memory card, a pop-up appeared asking to format it, you clicked through it, and now the drive appears empty.
- 🗣️ What users say: “I have a 2-year old 1TB WD external hard drive which stores my backups for my family photos and videos. It worked fine until last night. I plugged it to my laptop and a message pops up saying ‘You need to format the disk in drive G: before you can use it,'” shares a user on the DiskGenius forum.
- 📝 What it usually means: When Windows can’t read a drive’s file system (due to corruption, an unsupported format, or a damaged partition table), it prompts you to format. Clicking Format erases the file system metadata, making all files on the drive invisible. But the actual data usually remains on the drive until it’s overwritten.
- ✅ What you should do: Stop using the drive immediately to avoid overwriting data. Do not save any new files to it. If you already clicked Format and the drive is now empty, use data recovery software to scan it (Method 3). In most cases, the majority of files can still be recovered. If the drive wasn’t formatted but simply isn’t being recognized, try the CHKDSK command (Method 8) as a first step.
If you look at the scenarios above, you’ll notice that (in most cases) when files aren’t sitting in the Recycle Bin and there’s no backup to fall back on, data recovery software is the most reliable way to get your files back. That’s why we recommend it as the go-to method in most of the scenarios above.
8 Methods to Recover Deleted Files on Windows 11
In this section, we’re taking a detailed look at the most useful solutions for recovering deleted files on Windows 11. Since each solution is useful in a different data loss situation, we recommend you first review the scenarios in the previous section to determine which one you should start with.
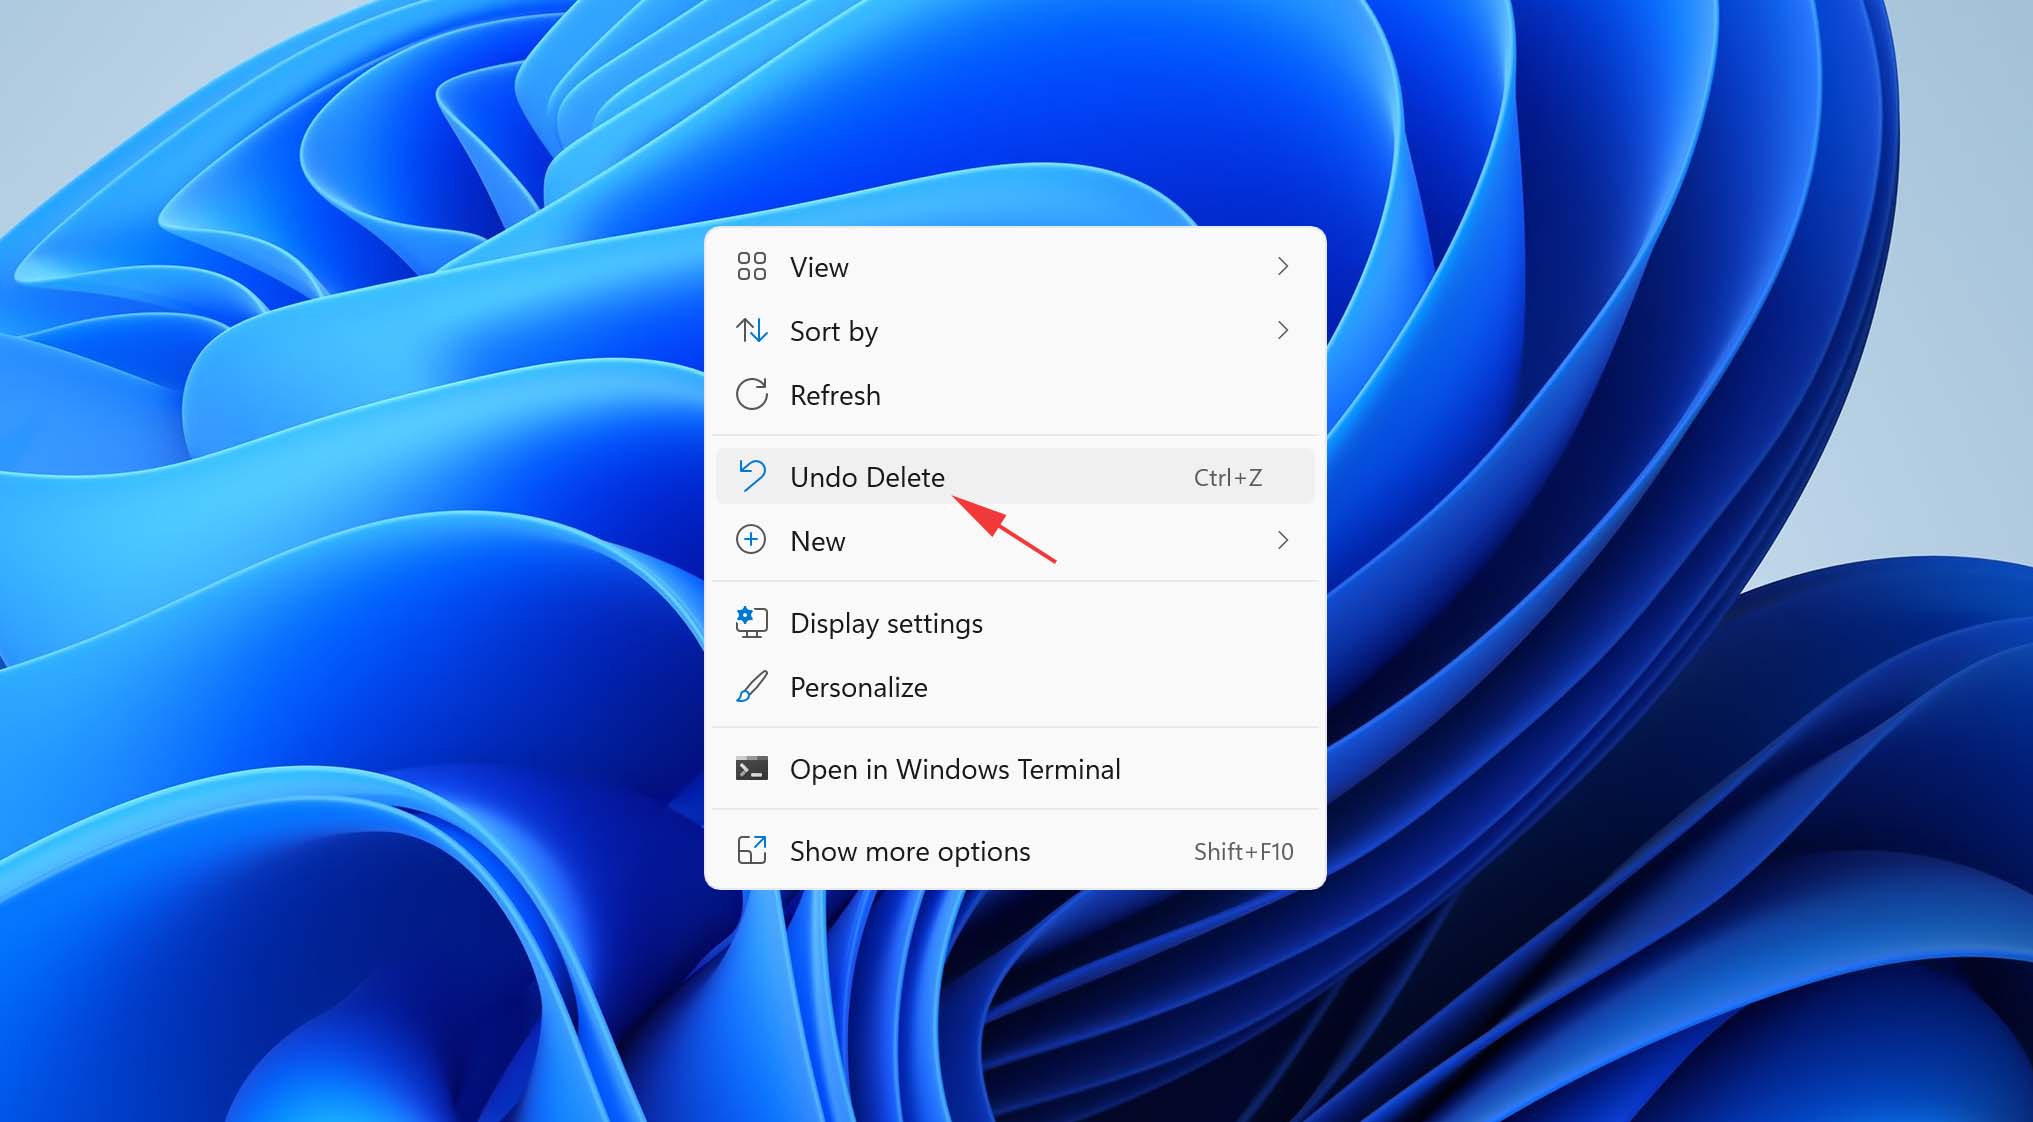
Method 1: Recover Files using Undo Delete
Whenever you perform an action on your Windows computer, you can use the Undo feature to take the action back. This feature can come in handy when you make a mistake when using your Windows 11 computer and accidentally delete a file you actually wanted to keep.
Let’s imagine that you’ve deleted an important image from organizing your photo collection. To get it back:
- Make sure the folder where your photos are located is in focus.
- Press CTRL + Z on your keyboard.
- Alternatively, you can right-click anywhere in the folder and choose the Undo Delete option.
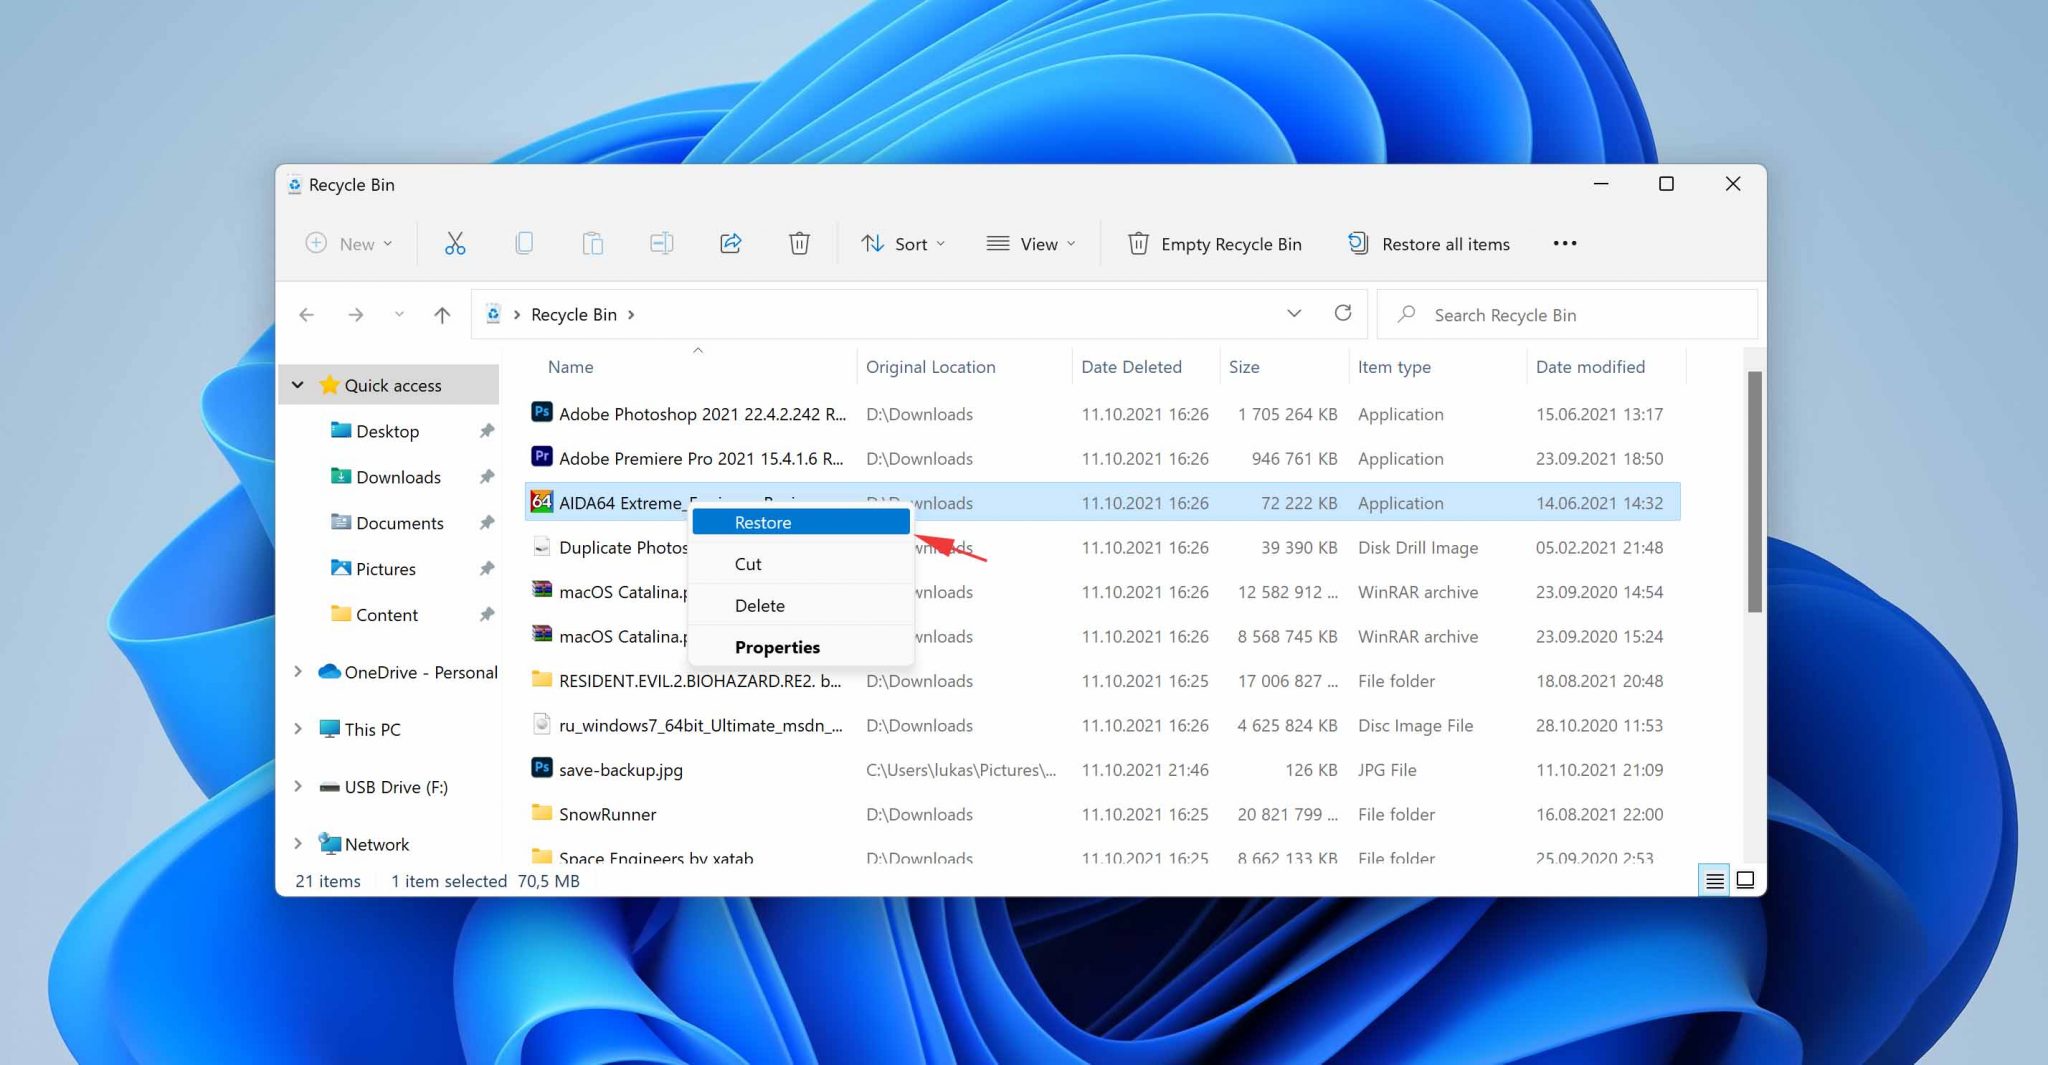
Method 2: Recover Deleted Files from a Recycle Bin in Windows 11
Windows 11 comes with a slightly redesigned Recycle Bin compared to Windows 10, but it functions exactly the same, allowing you to undelete recently deleted files without software. As mentioned in the scenarios above, files won’t be in the Recycle Bin if:
- You used Shift + Delete to permanently delete them.
- The files exceed the Recycle Bin’s size limit (which you can adjust in Recycle Bin properties).
- The files were deleted from USB flash drives or SD cards (though files from external SSDs and HDDs do go to the Recycle Bin).
If you believe that your deleted files had a chance to end up in the Recycle Bin, here’s how to recover them:
- Double-click the Recycle Bin icon on your Desktop.
- Select the files you want to recover.
- Right-click any of the selected files and choose the Restore option.
- Alternatively, drag and drop the selected files to a location of your choice.
Method 3: Recover Permanently Deleted Files Using Third-Party Data Recovery Software
When files are permanently deleted, emptied from the Recycle Bin, or lost due to formatting or corruption, a third-party data recovery application is often the most effective way to get them back. Disk Drill is one such tool that works well for this.
Data recovery software is the fastest way to find out whether your data is still recoverable and which specific files can actually be restored. The workflow is simple. Install the application, scan the drive your files were deleted from, and review what comes back. More often than not, you’ll know within minutes whether your files are still on the disk or whether they’ve already been overwritten.
Here’s how to find deleted files on Windows 11 using Disk Drill:
- Download and install Disk Drill for Windows.
- Select your storage device and click Search for lost data. If you’re scanning an external device and a pop-up appears with scan mode options, select Universal Scan. If you’re trying to recover unmodified videos from a memory card that was used in a camera or drone, select the ACR mode instead.

- Wait until your storage device is scanned or click the Review found items button to view scan results in real time.
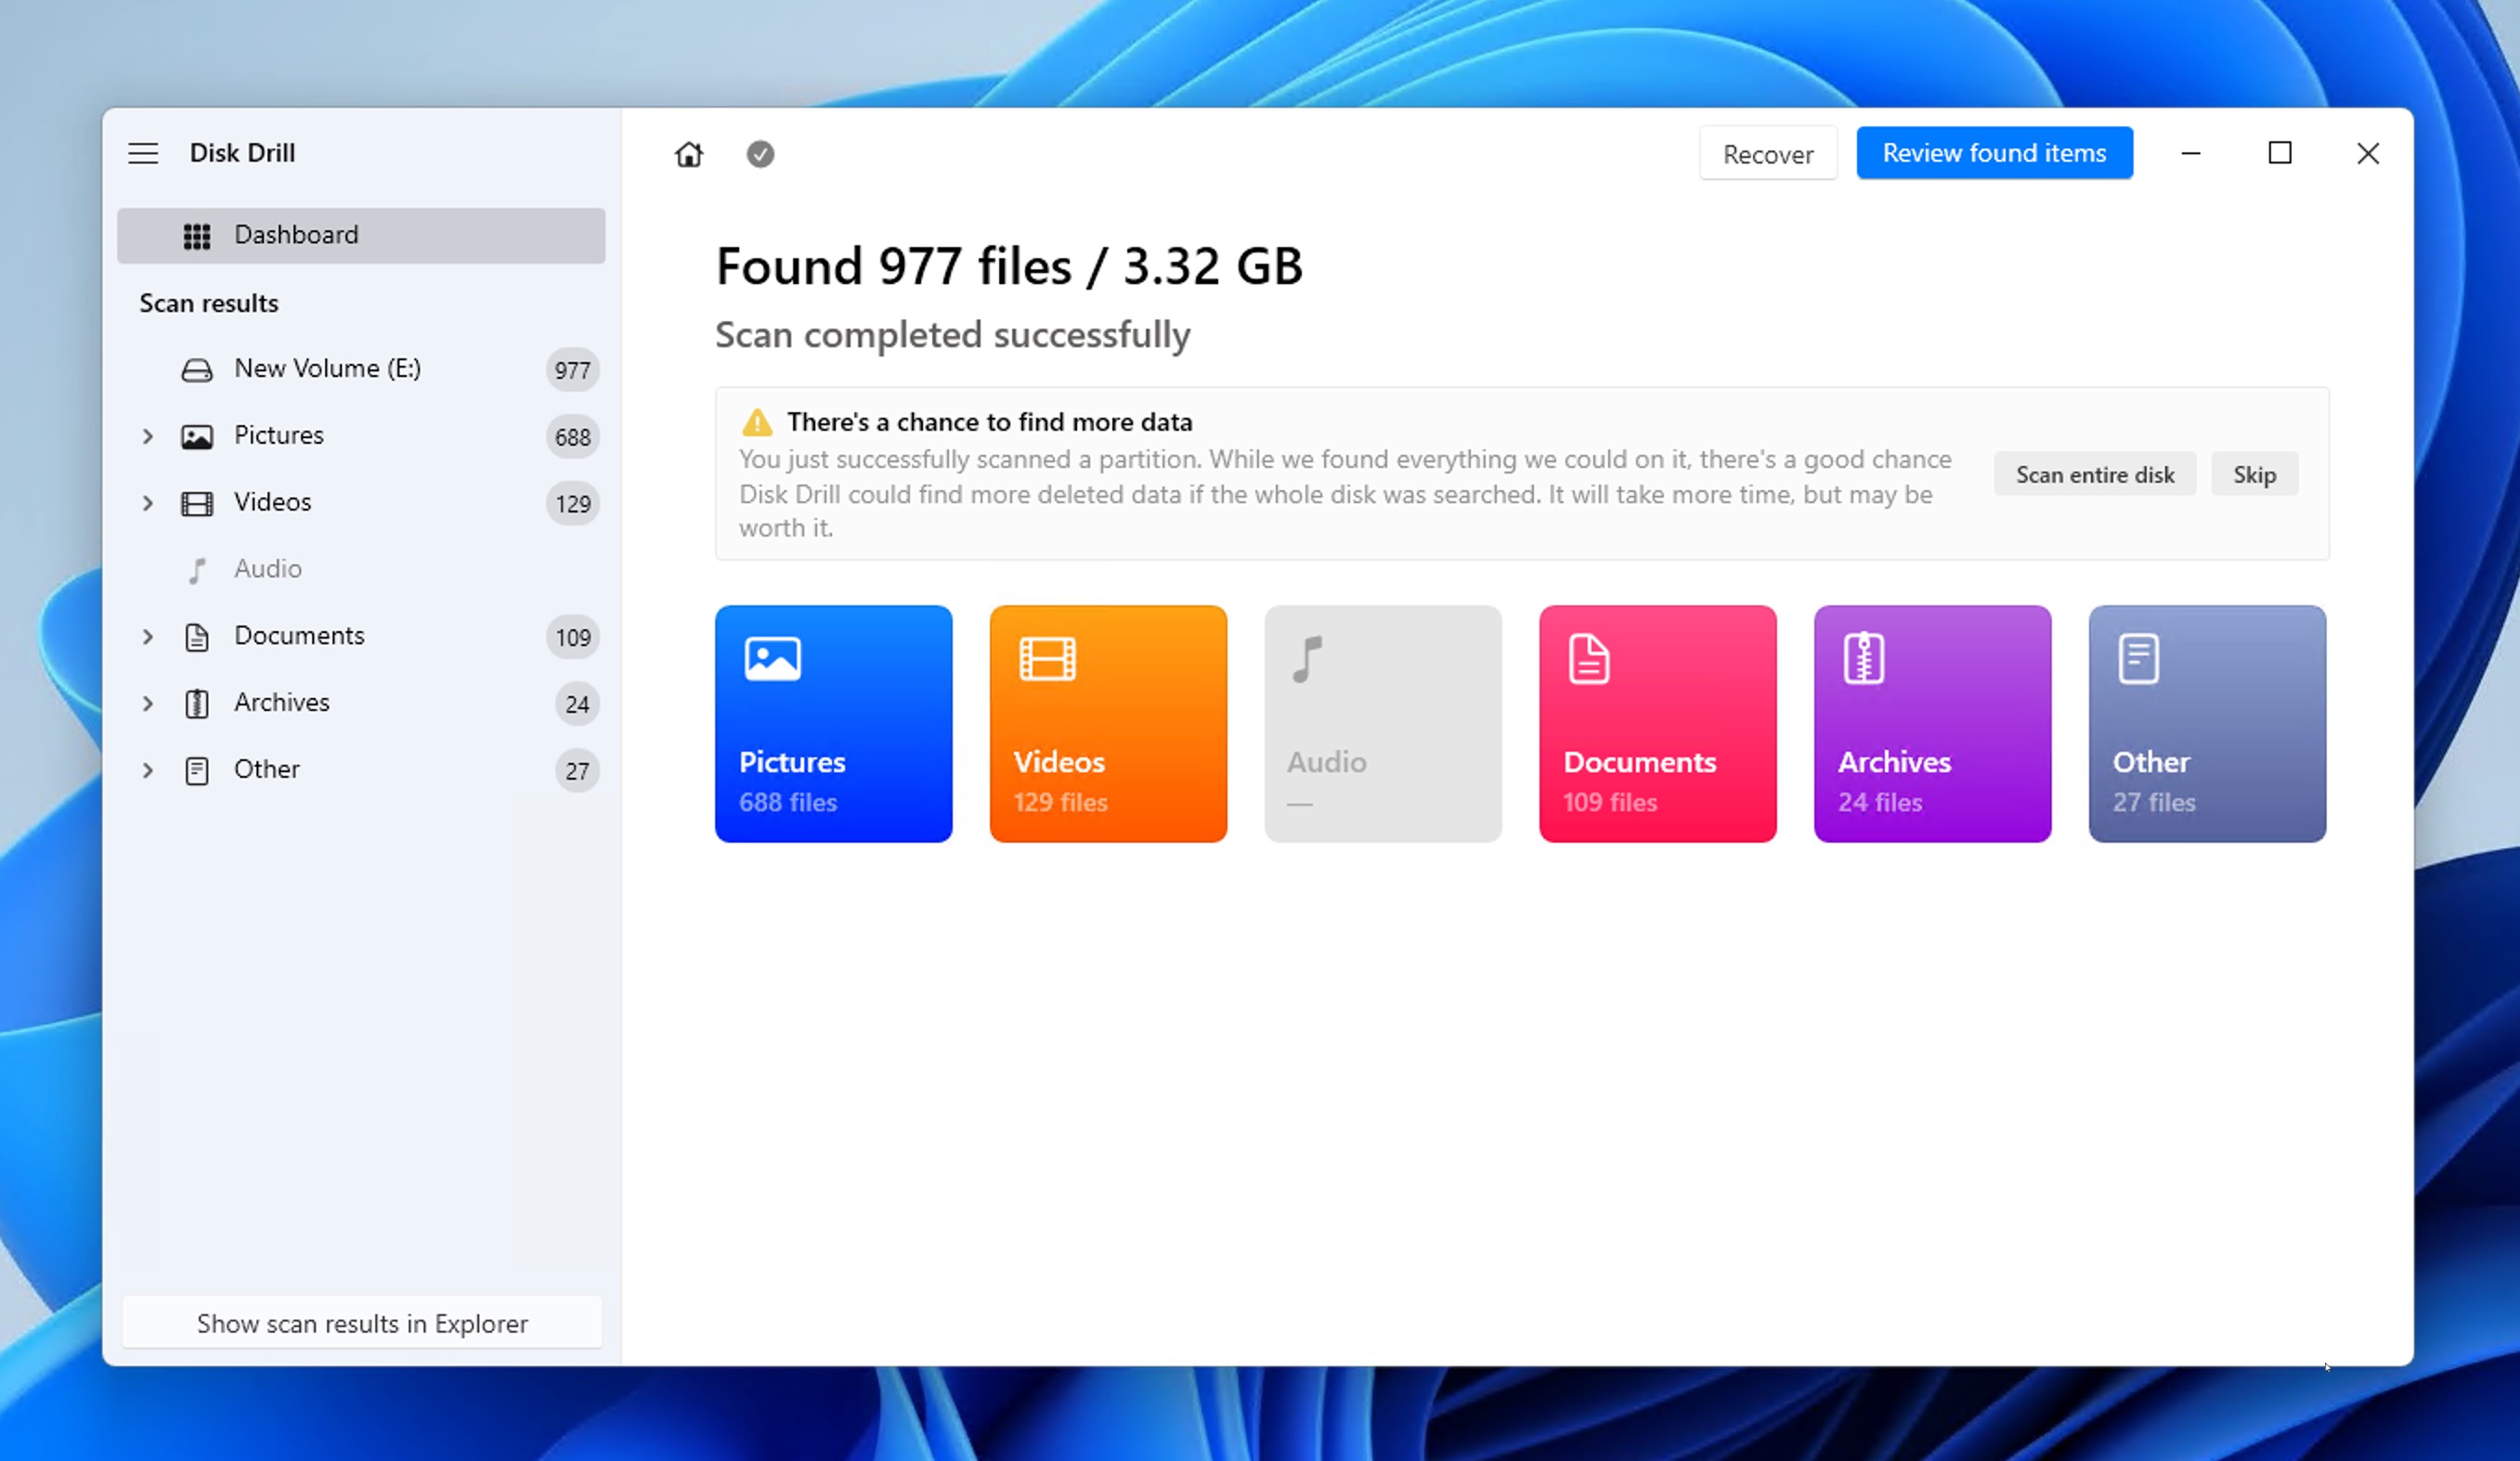
- Preview and select your files. If the number of found files is overwhelming, you can narrow the list down using file type, file size, and other filters.
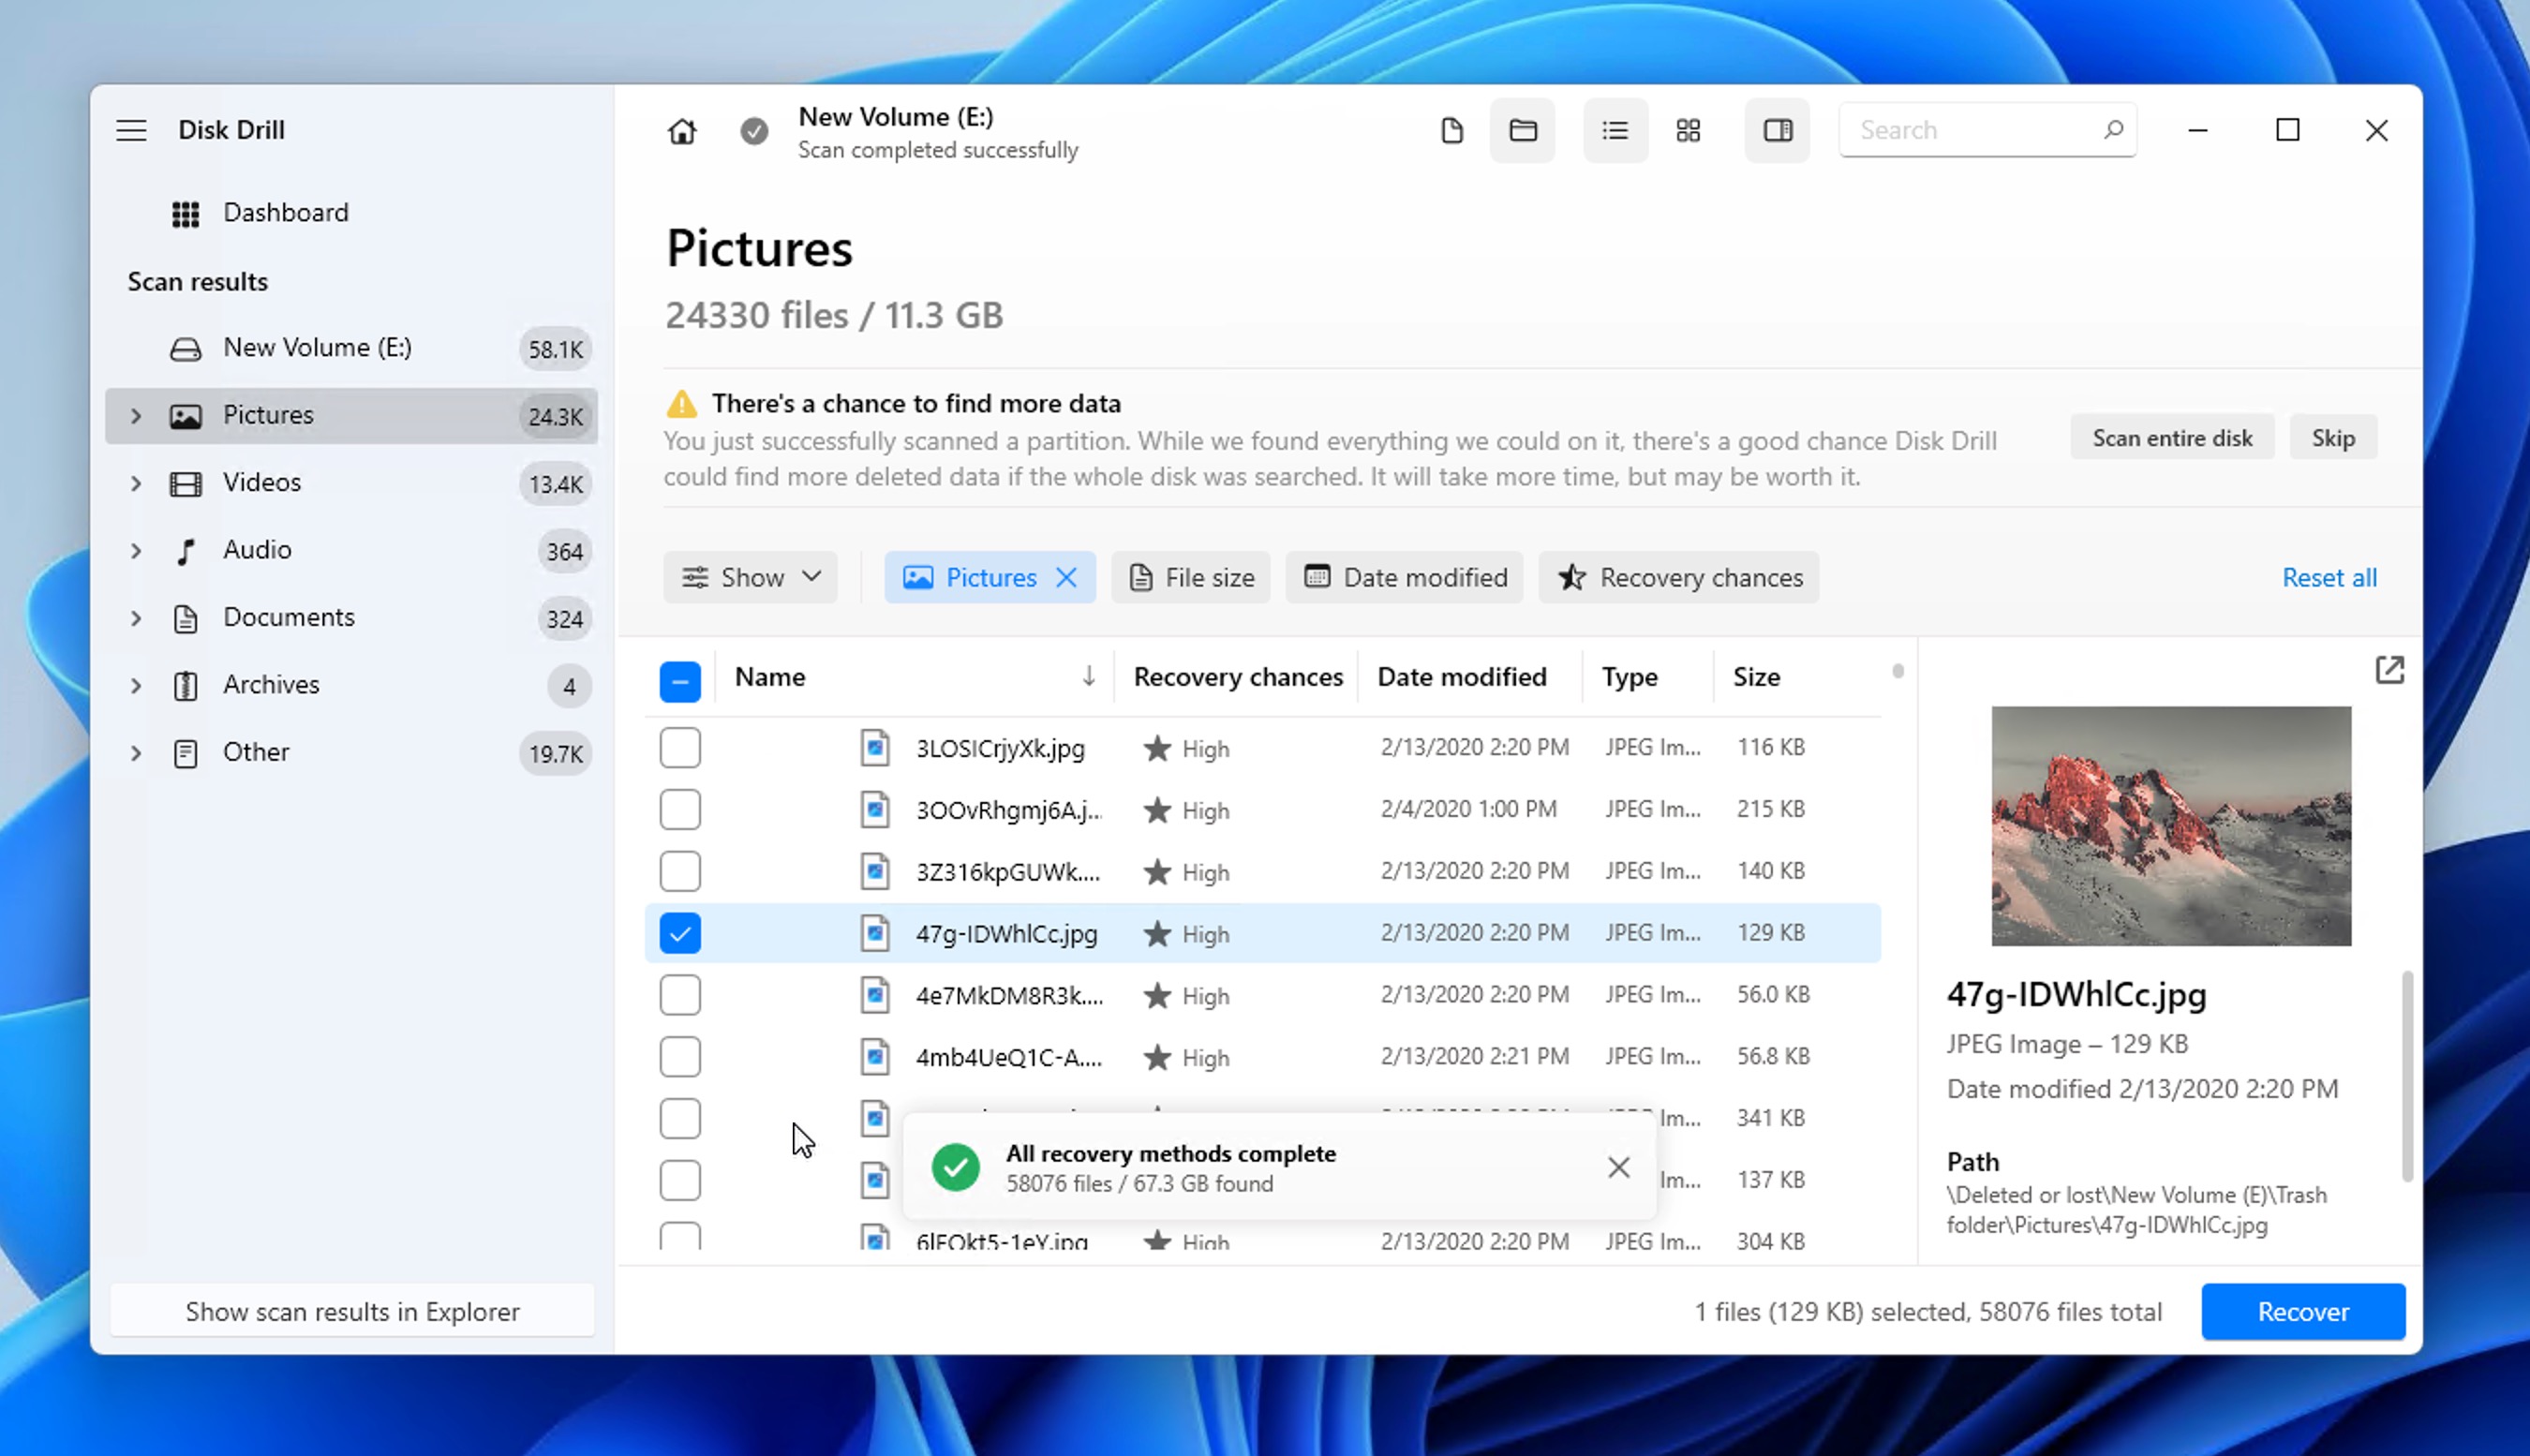
- Click the Recover button and choose where to save the recovered files. Always recover to a different partition or drive than the one the files were deleted from. Writing recovered data back to the same location can overwrite the very files you’re trying to restore, which may make other deleted files permanently unrecoverable.
Disk Drill is compatible with all standard Windows file systems, including:
- NTFS (the default Windows file system)
- FAT32 (commonly used on external drives)
- exFAT (for larger external storage devices)
- ReFS (Resilient File System, Windows’ newest file system optimized for data integrity and RAID configurations)
You can use Disk Drill to recover permanently deleted files such as Shift deleted from most types of storage devices supported by Windows 11, but it works best with traditional spinning drives and flash-based storage devices that don’t take advantage of the TRIM command to improve performance by reclaiming data blocks that are no longer in use.
In other words, Disk Drill and other similar data recovery software solutions struggle to deliver good data recovery results when recovering data from a TRIM-enabled SSD. You can check if TRIM is enabled on your SSD in Windows 11 by entering the following command in Windows Terminal:
fsutil behavior query DisableDeleteNotify
![]()
Method 4: Restore Files Using the File History Feature
The File History backup feature has saved countless files from permanent deletion since its introduction in Windows 8, and you can still use it to undelete files in Windows 11 – even those that no longer appear in the Recycle Bin.
Keep in mind that File History can only help recover your files if you enabled it before the data loss occurred. However, even if you haven’t explicitly enabled File History, you might still be able to recover your files from a system restore point.
Here’s how to recover deleted files in Windows 11 not in Recycle Bin using File History:
- Open the Start menu and type in Control panel.
- Launch the Control Panel app.
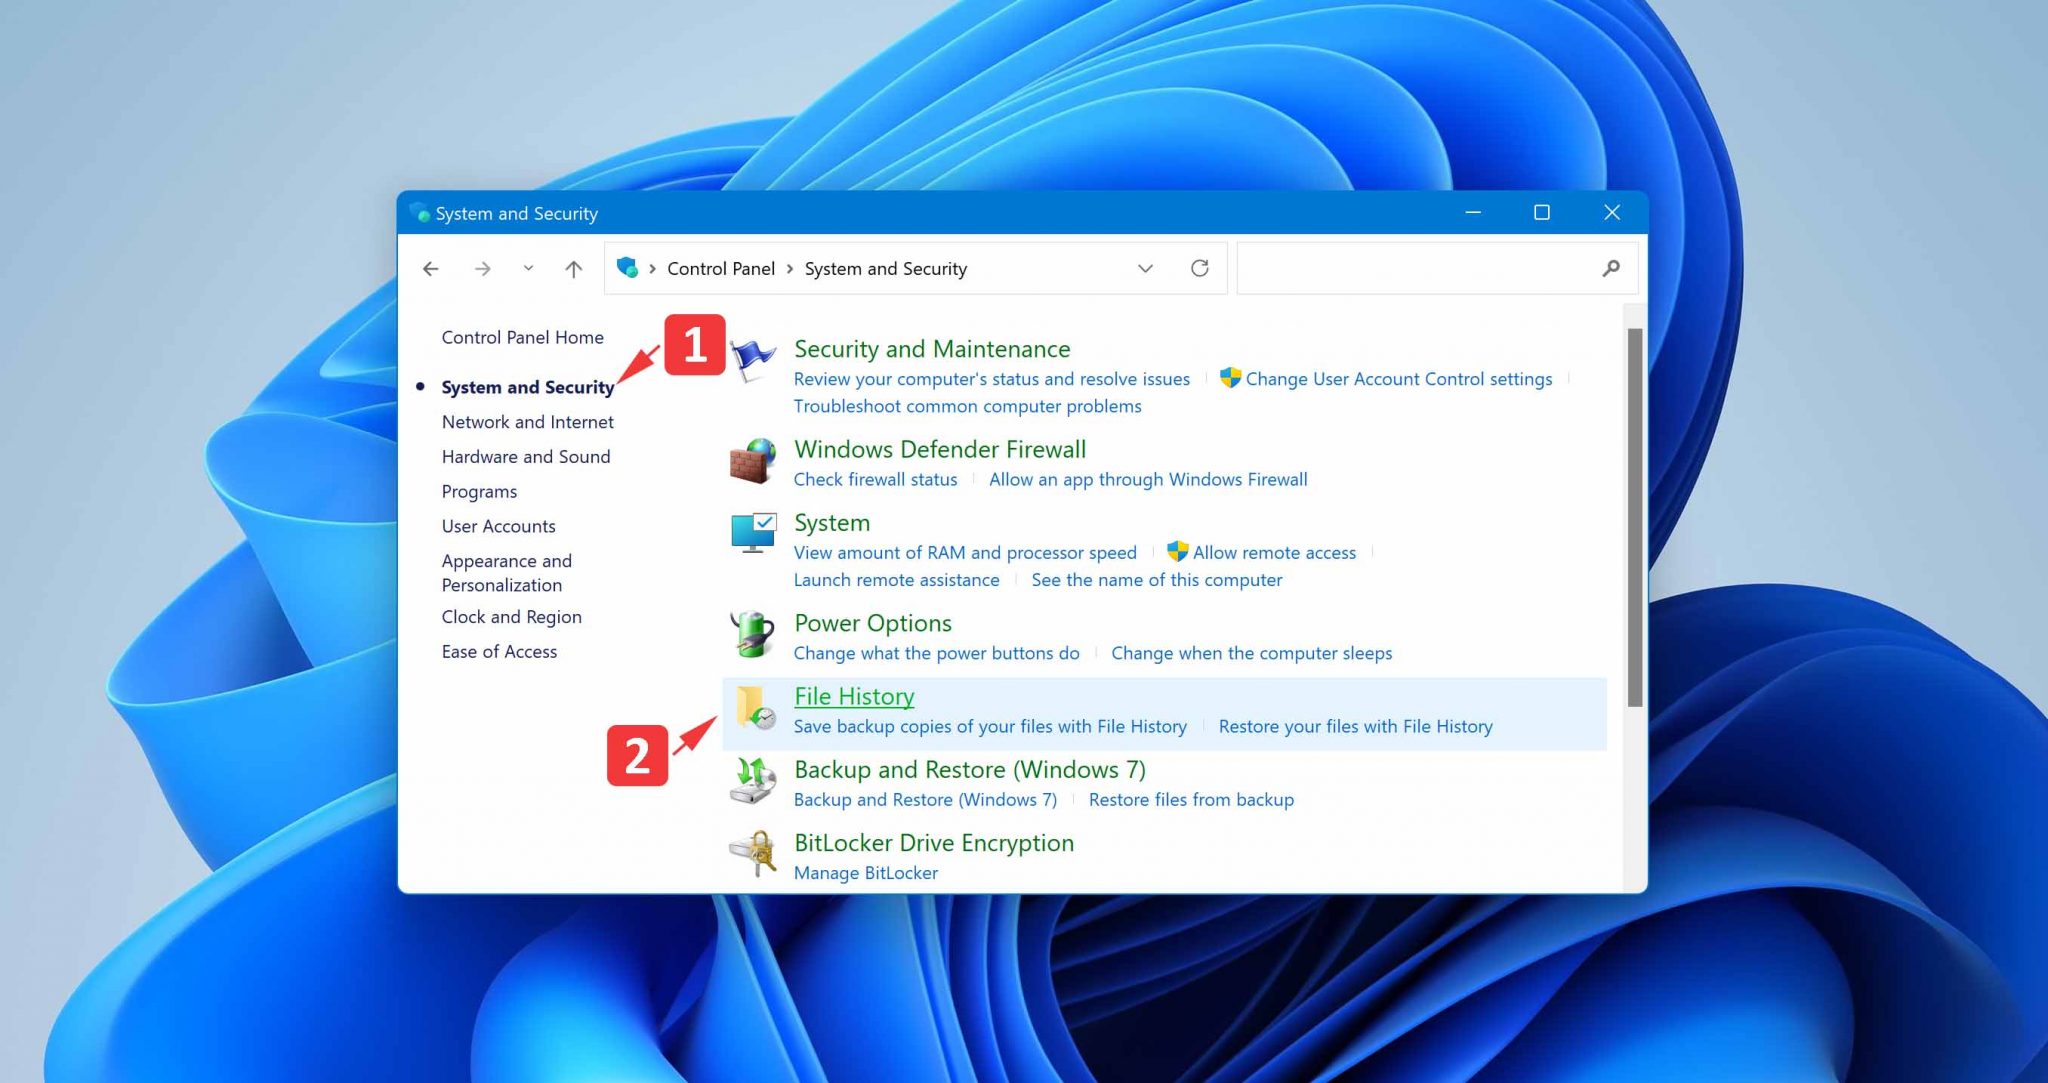
- Navigate to System and Security > File History.
- Click the Restore personal files option located in the left sidebar.
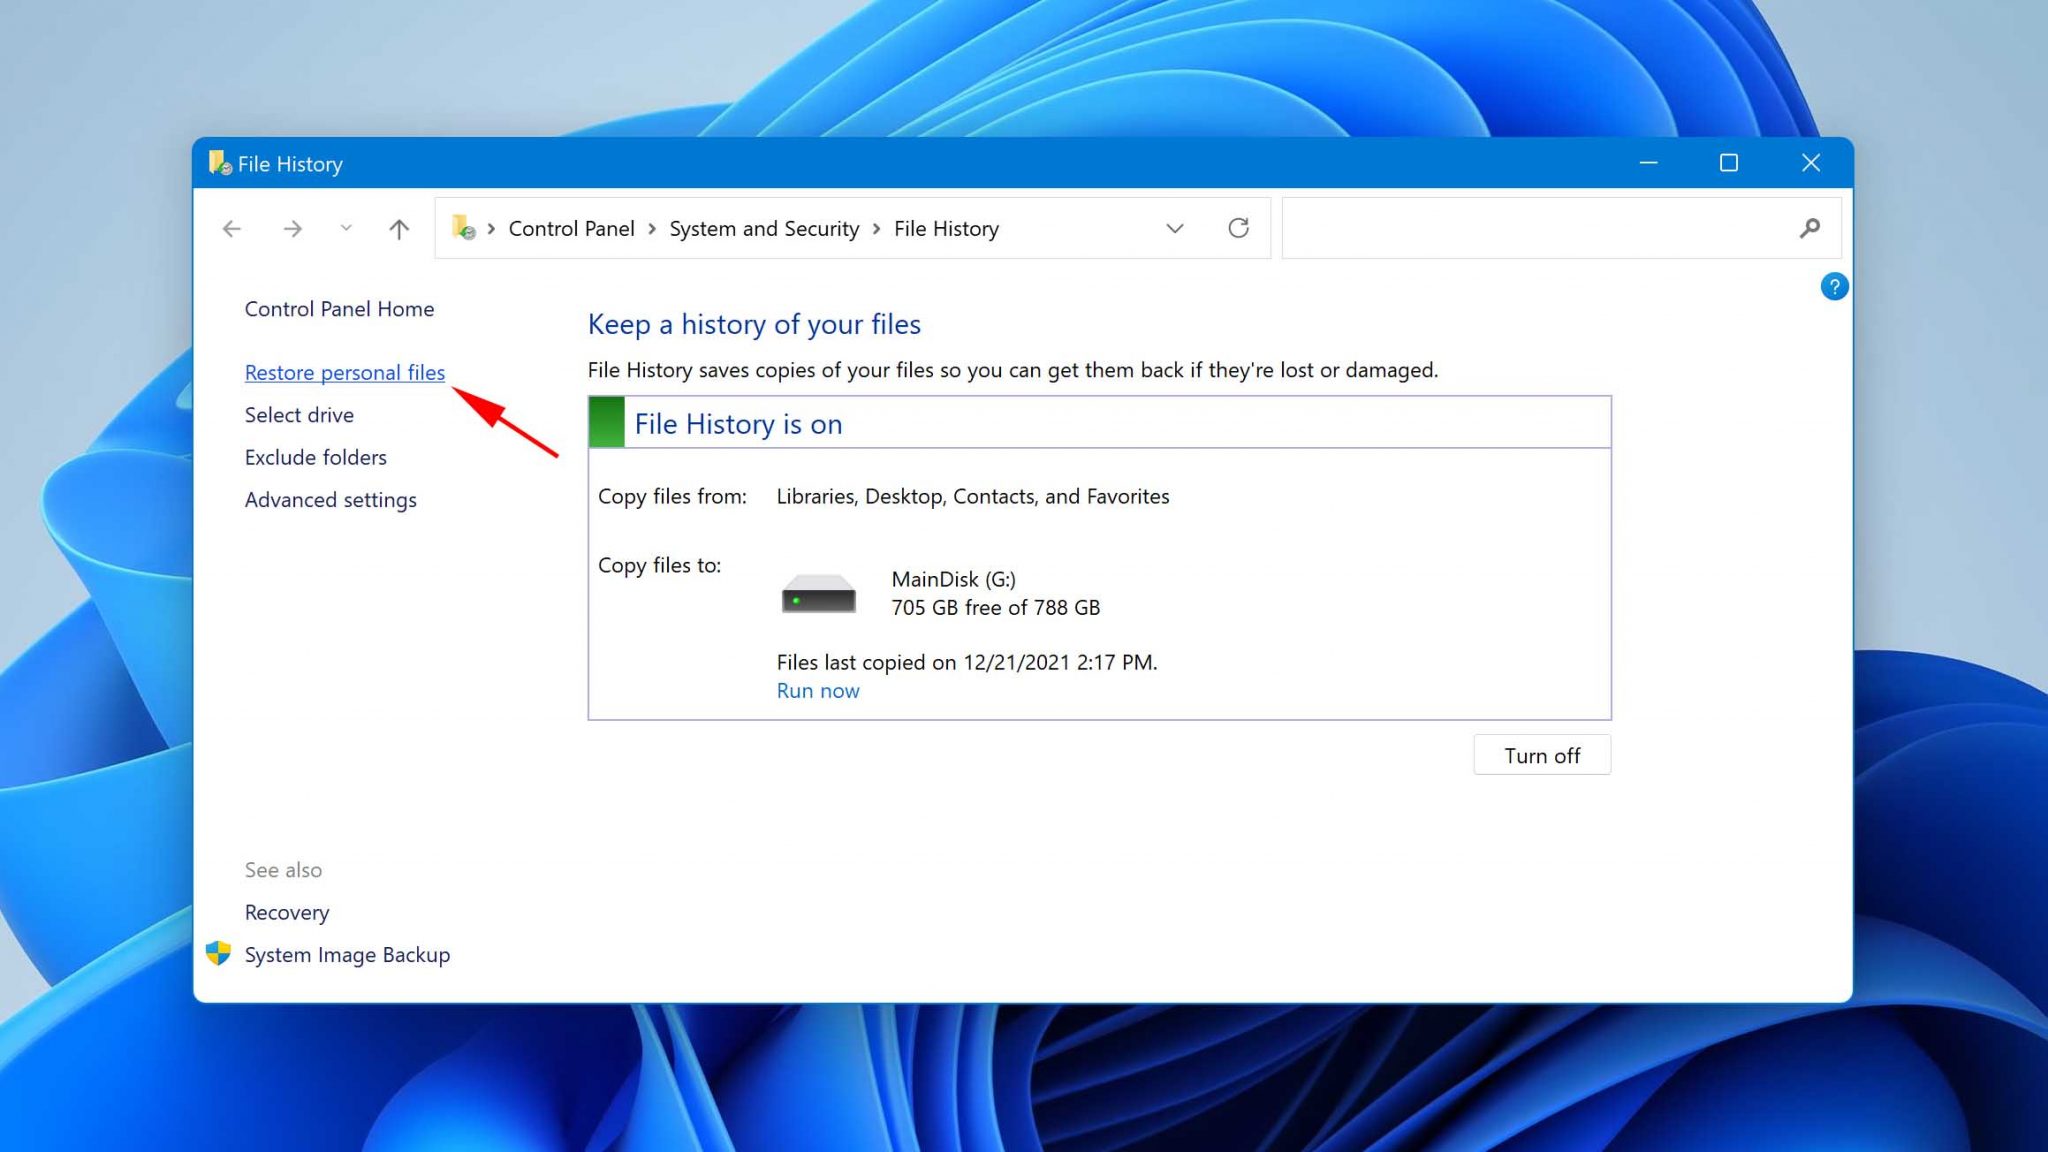
- Go back in time until you find a backup copy that contains the files you want to recover.
- Select your files.
- Click the green recover button.

![]()
If you want to recover files that were present in some other location than those backed up by File History, your best bet is to use a different recovery method.
Method 5: Recover Permanently Deleted Files from an Older Backup
One of the oldest data recovery features still present in Windows 11 is Backup and Restore, carried over from Windows 7 (and Windows Vista). If you’ve previously configured it, this tool can create a complete system image or back up selected files and folders, giving you a way to recover lost data.
Since we’re focused on recovering individual files here, the simplest approach is to restore them directly through the Control Panel:
- Open the Start menu and type Control Panel.
- Navigate to System and Security > Backup and Restore (Windows 7).
- Click Restore my files.
- Use the Browse for files or Browse for folders button to locate the data you want to recover.
- Select your files and choose a destination to restore them to.

The biggest advantage of the Backup and Restore feature is the fact that the system image created with it contains a full copy of all drives required for Windows to run, so you can use it to address even the most desperate cases of data loss. In Windows 11, you can also recover your Microsoft Store apps and OneDrive folders.
Method 6: Use Microsoft’s Windows File Recovery Tool
Microsoft developed its own data recovery software application, called Windows File Recovery, and you can download it from the Microsoft Store. Windows File Recovery runs on Windows 11, and it can be used to recover many commonly used file formats from local storage devices. It supports NTFS, ReFS, FAT, and exFAT file systems.
![]()
Unlike Disk Drill and other feature-packed data recovery solutions, Windows File Recovery doesn’t have a graphical user interface. Instead, the tool is controlled from Command Prompt. This is what its syntax looks like:
winfr source-drive: destination-drive: [/mode] [/switches]
You can find a detailed explanation of the syntax and available modes and switches on Microsoft’s website. For the purposes of this article, we’re focusing only on how to recover a deleted folder in Windows 11 using Windows File Recovery:
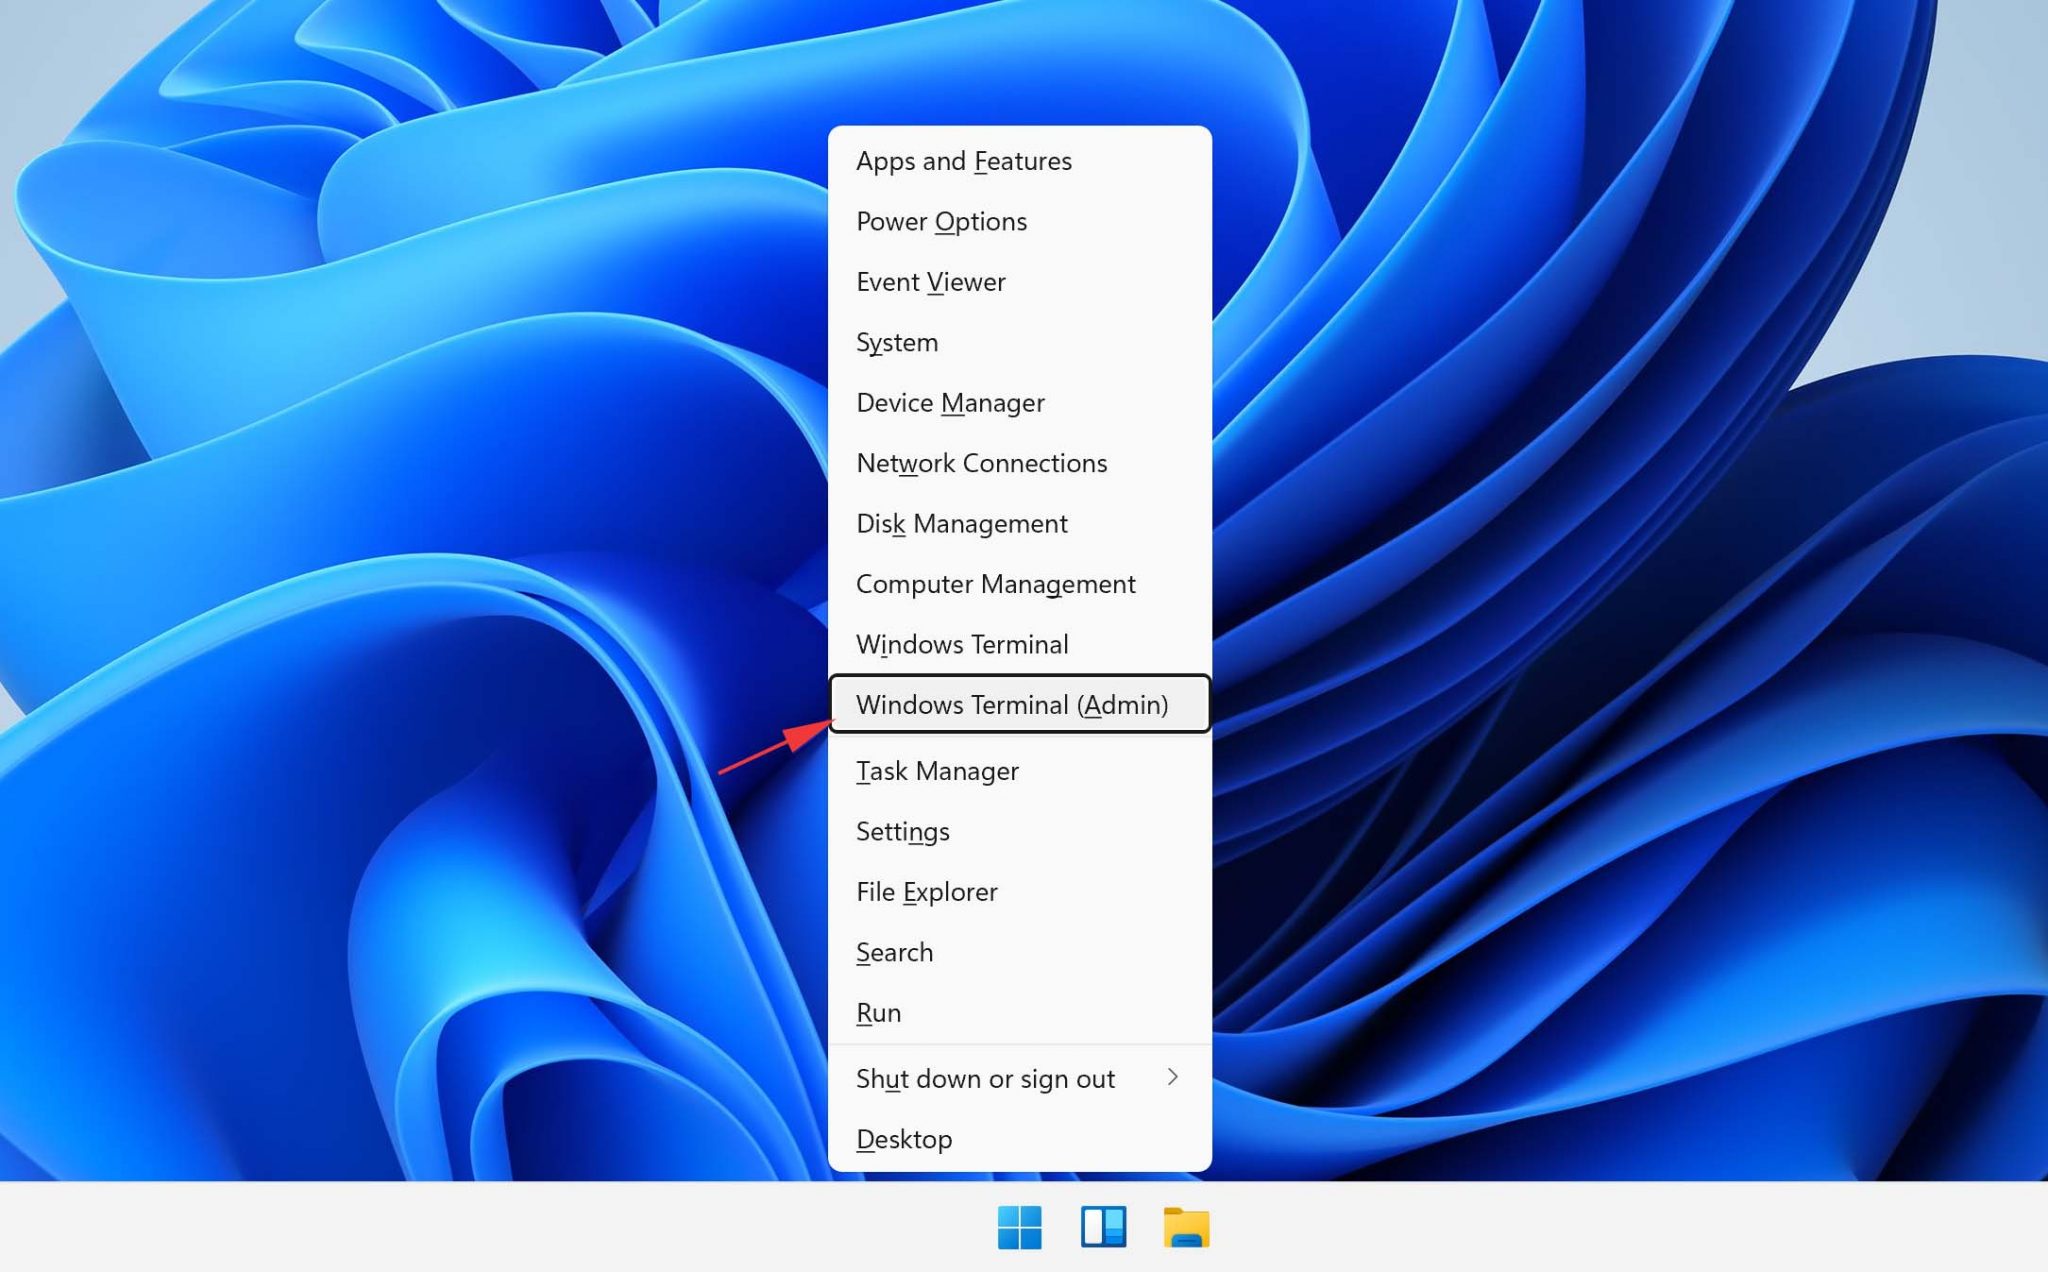
- Press Win + X and select the Windows Terminal option.
- Type in the following command to recover the Documents folder on drive C to drive E:
winfr C: E: /regular /n \Users\<username>\Documents\
![]()
Of course, you can replace the path to the Documents folder with any path you want, and you can also pick a different source and destination drive. Check out the full Windows File Recovery Tool review here.
Method 7: Retrieve Lost Data from a Cloud Backup Using OneDrive
Integrated into Windows 11 is Microsoft’s cloud backup service, OneDrive. Using OneDrive, you can back up your files to the cloud and retrieve them from any device with a connection to the internet:
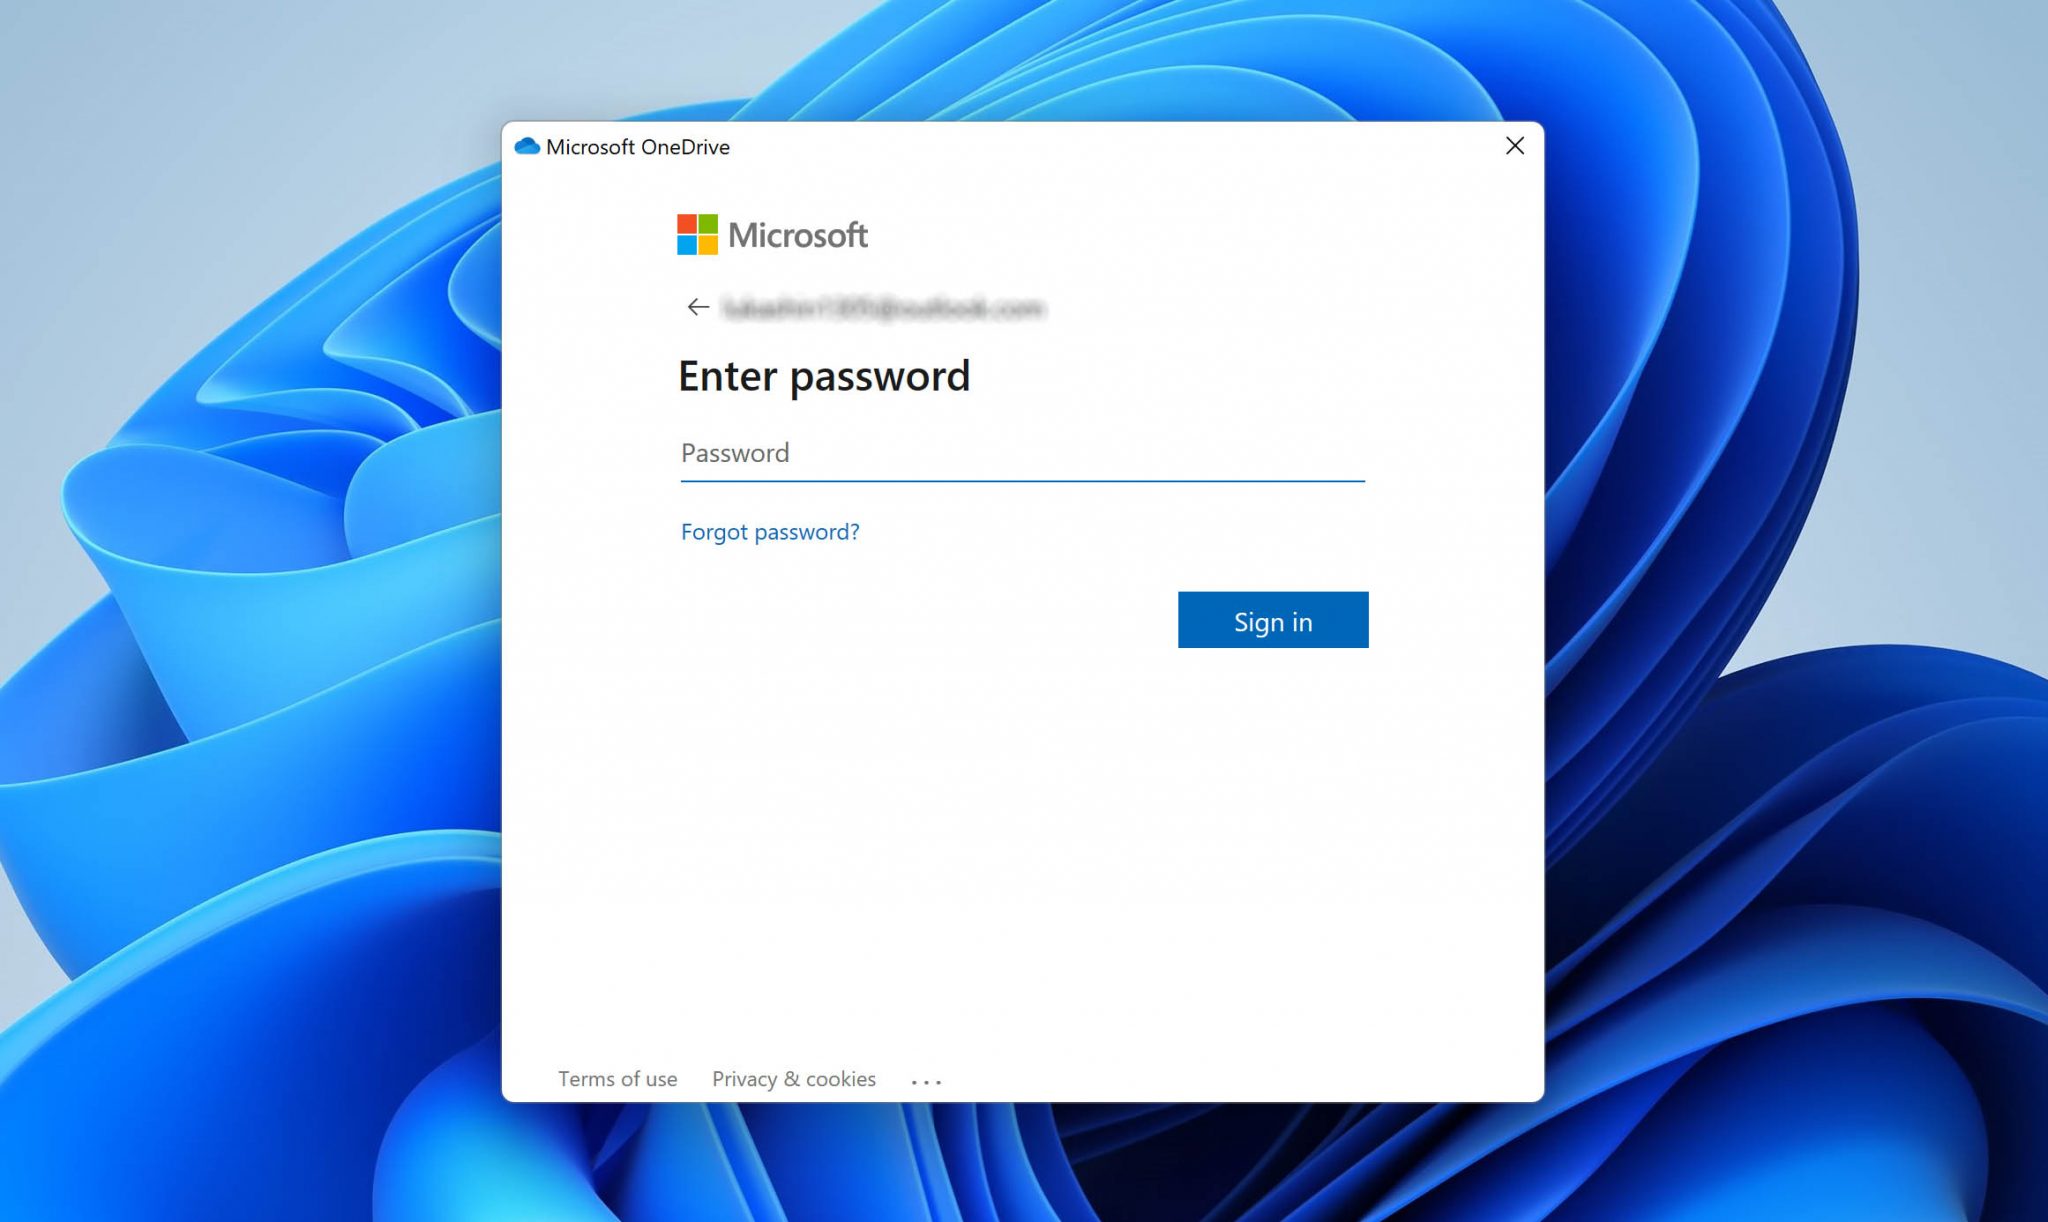
- Go to the OneDrive website (or open OneDrive in your browser).
- Log in with your Microsoft email address and password.
- Select the files you want to retrieve and click the Download button.
If you haven’t done so already, we recommend you take advantage of the OneDrive application that’s included with Windows 11 so that you can access your cloud files directly from File History and enjoy automatic data backups:
- Click the OneDrive icon in the system tray.
- Click Sign in.
- Log in with your Microsoft email address and password.
- Select the location of the OneDrive folder.
- Complete the initial setup process.
Remember that OneDrive can back up your files only if you have a working connection to the internet. If you’re often on a laptop with no internet access, you might be better off relying primarily on a local backup solution. What’s more, OneDrive’s free tier is limited to 5 GB, so be sure to upgrade if you need more storage space.
Method 8: Recover without Third-Party Software using Command Prompt
Windows 11 includes several command-line tools that can resolve certain file system issues and, in some cases, help you regain access to files that appear to be deleted even though they’re technically still on the drive.
That said, these tools have limited usefulness compared to the other methods in this guide. CHKDSK and SFC only address file system-related problems, so if a file is genuinely deleted, they won’t help. ATTRIB can reveal files that have been hidden by malware or system errors, but it can’t recover anything that’s actually been deleted. I’ve placed this method last because in most real-world data loss situations the methods above will get you much further.
CHKDSK
CHKDSK is a built-in command-line tool that scans and repairs file system errors. It can sometimes make previously inaccessible or “disappeared” files reappear by fixing corruption in the disk’s file system structure.
You can access CHKDSK either directly from Command Prompt (cmd.exe) or from storage device Properties.
Command Prompt:
- Press Win + X and select the Windows Terminal (Admin) option.
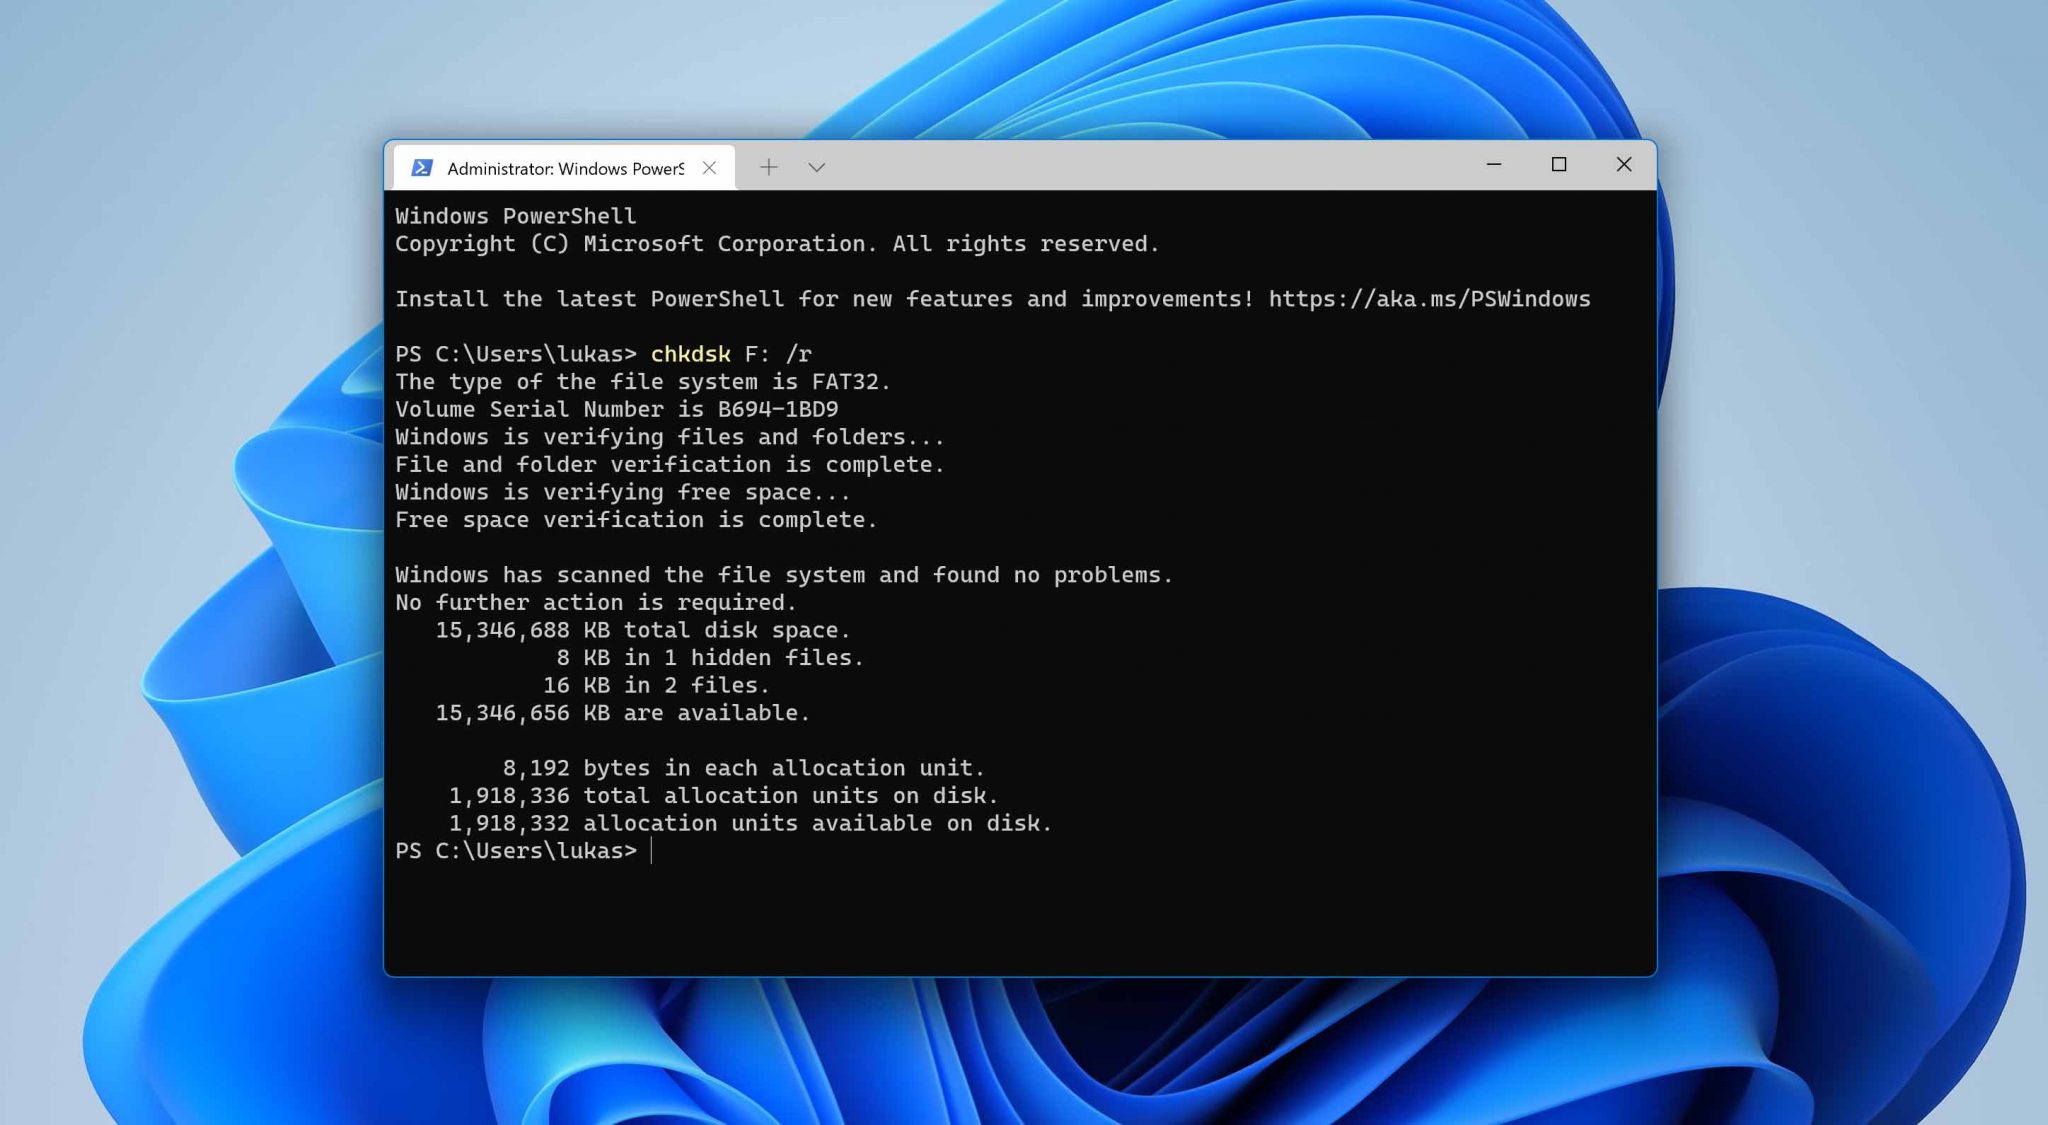
- Type in:
chkdsk volume: /r(make sure to replace “volume” with the letter assigned to your storage device). - Press Enter on your keyboard and wait for CHKDSK to scan and repair your storage device.
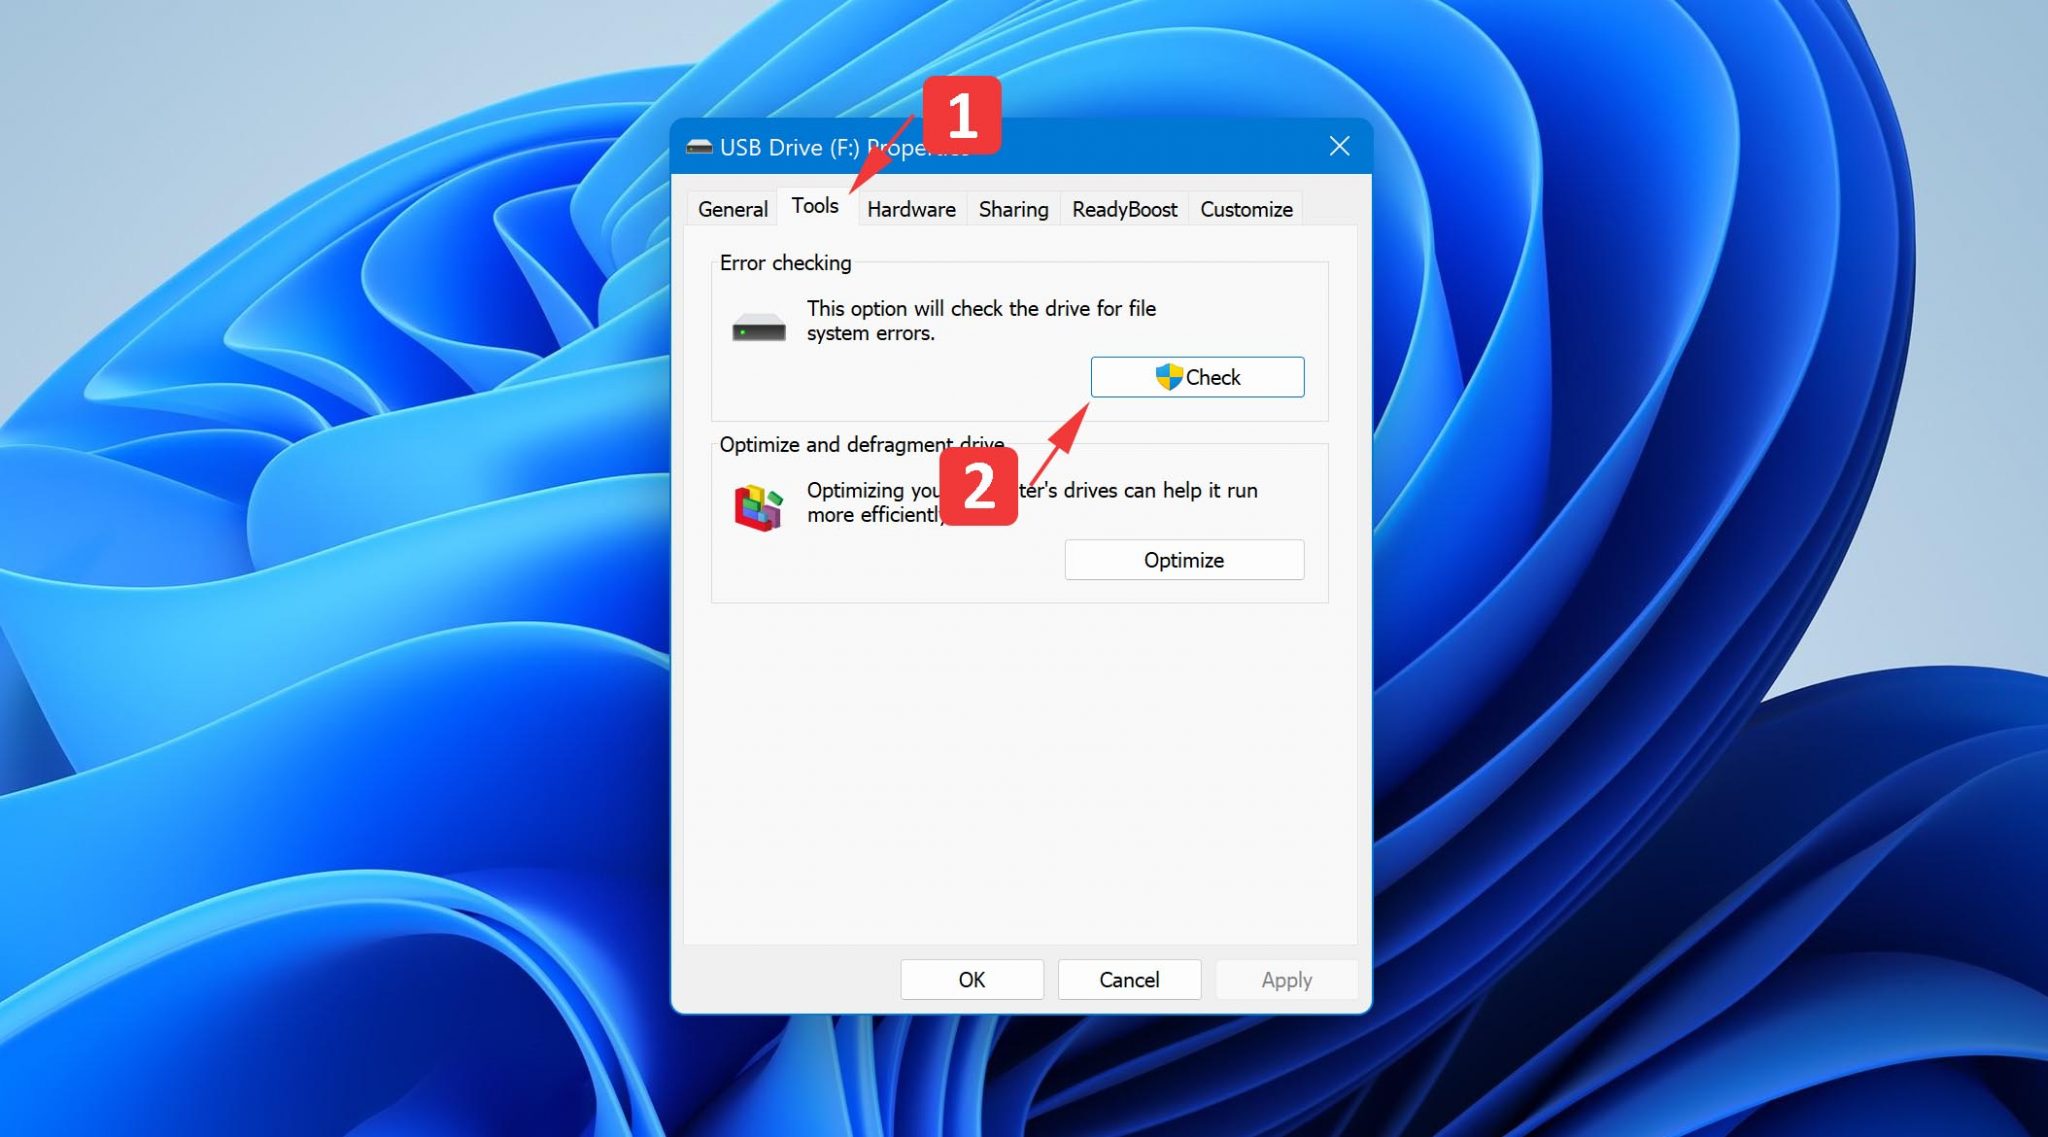
Properties:
- Launch File Explorer.
- Select This PC from the list of locations in the left sidebar.
- Right-click the storage device you want to repair and choose Properties.
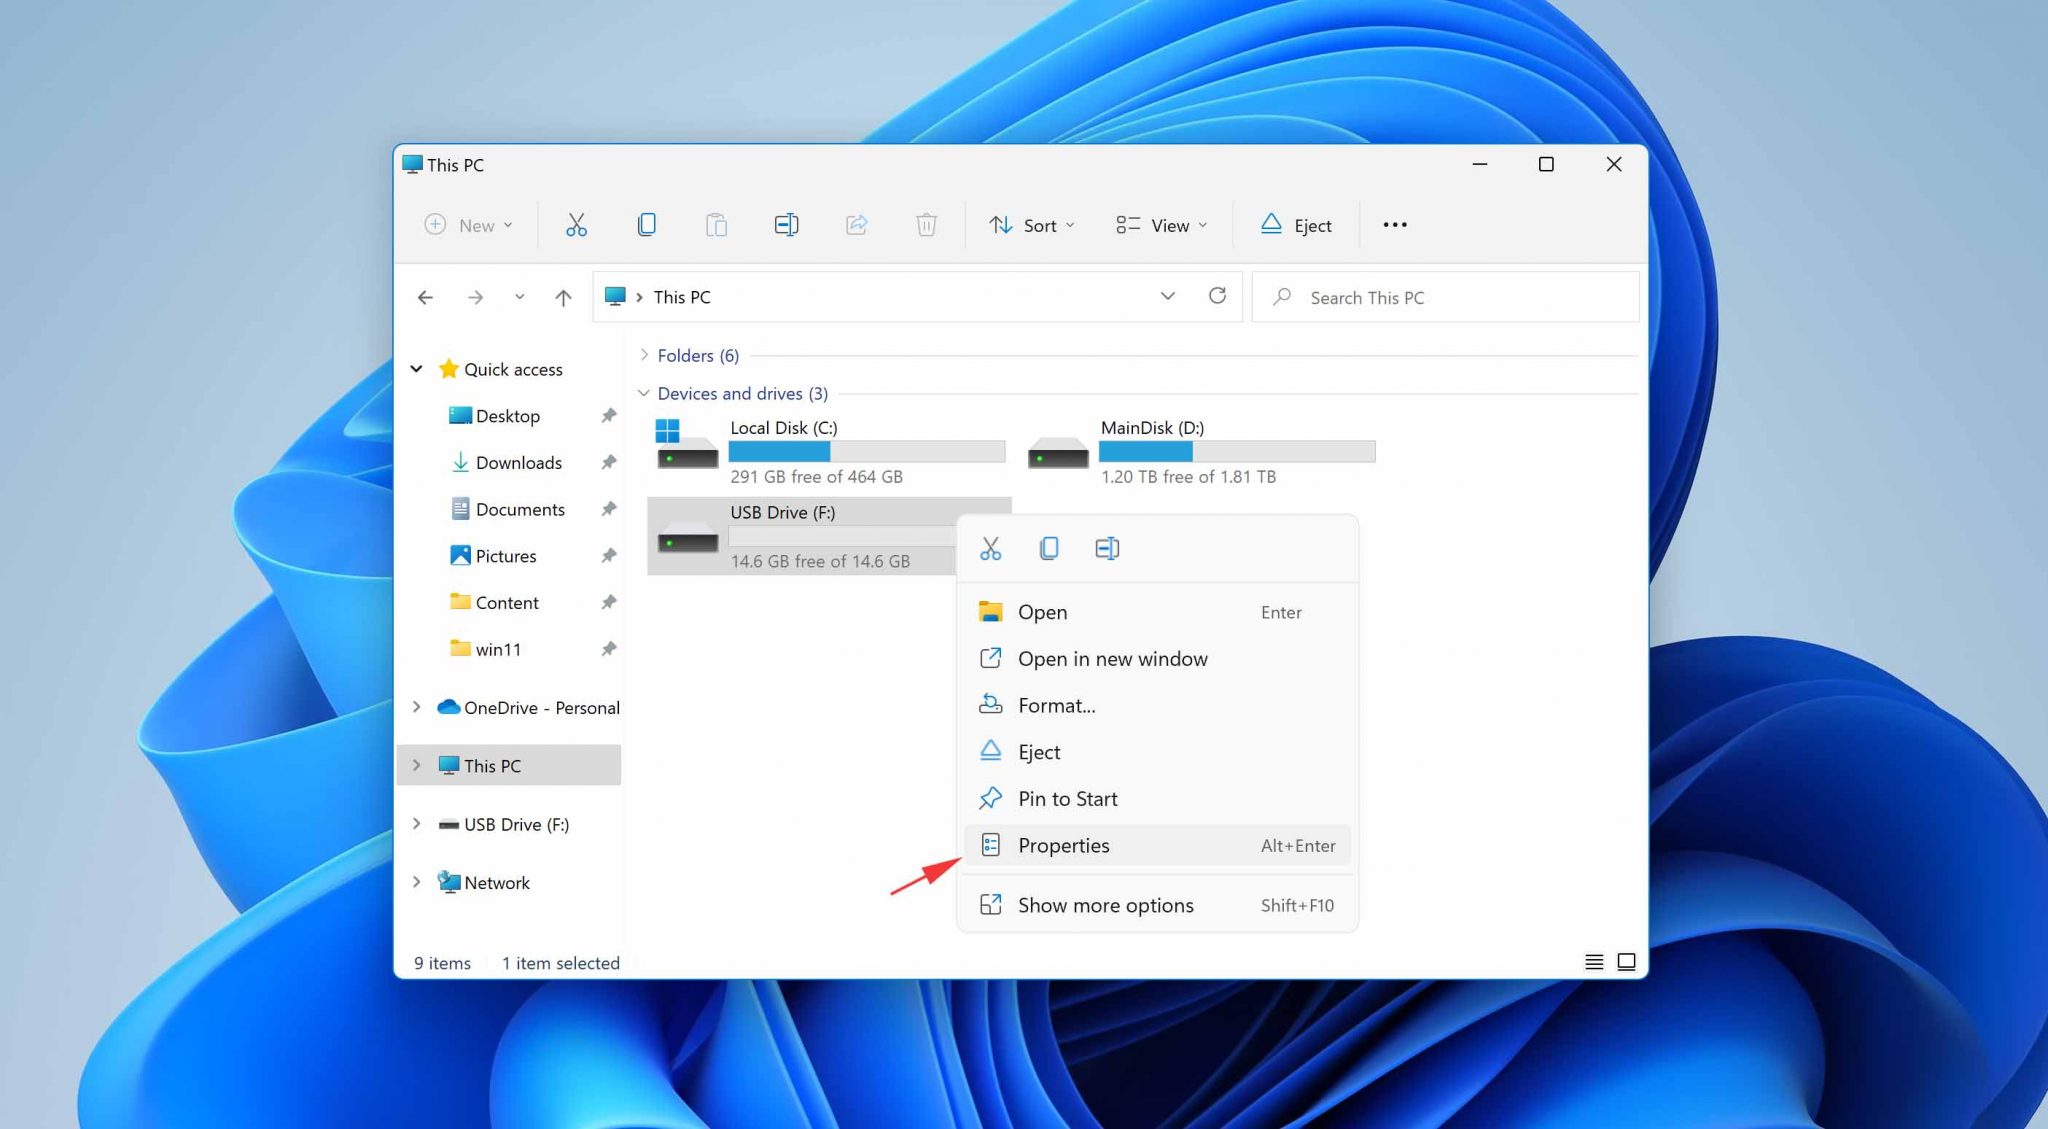
- Select the Tools tab.
- Click the Check button.
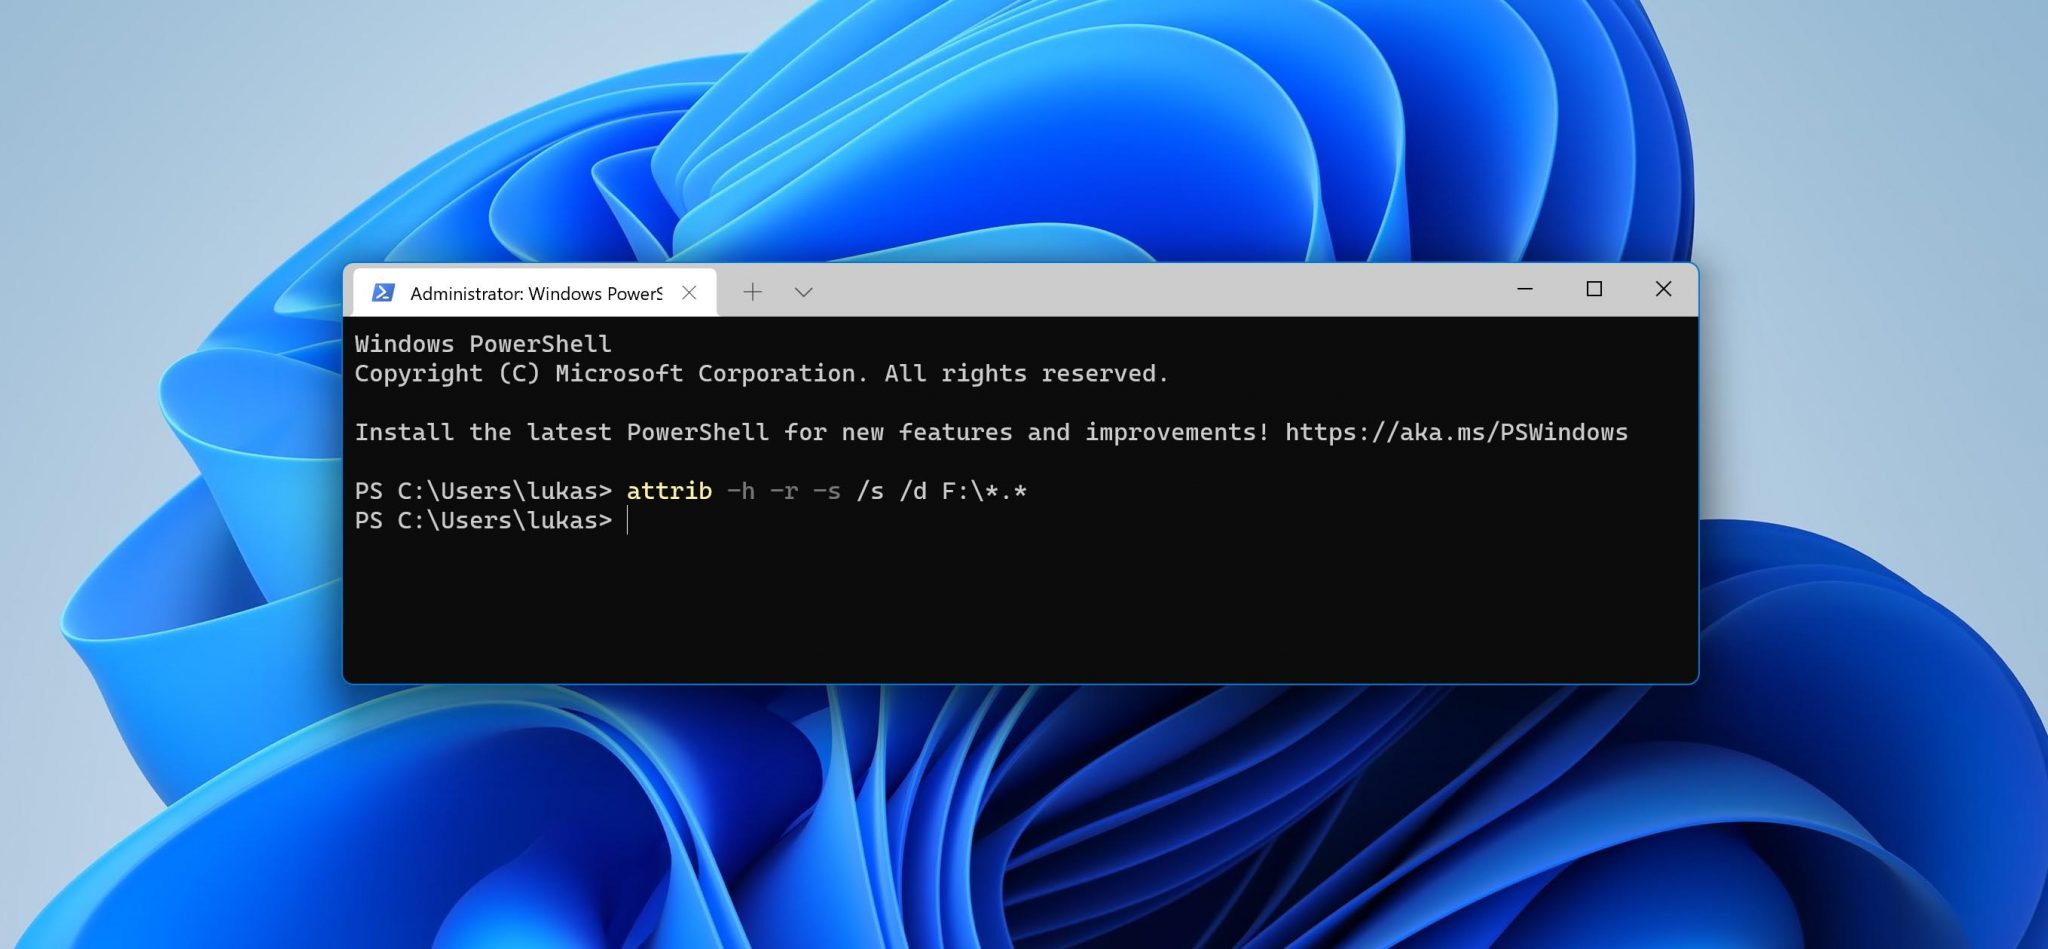
ATTRIB
In addition to CHKDSK, Windows 11 also comes with a tool called ATTRIB. You can use this tool to change various characteristics, or “attributes,” of a computer file or directory. For example, you can unhide files that have become hidden by malware. Here’s what you need to do:
- Press Win + X and select the Windows Terminal option.
- Type in:
attrib -h -r -s /s /d volume:\*.*(replace “volume” with the letter assigned to your storage device). - Press Enter on your keyboard.
How to Protect Your Files on Windows 11
Recovering files after the fact is often possible, but preventing data loss in the first place takes a lot less effort. The following practical actions are something all Windows 11 users should implement:
- ☁️ Enable OneDrive cloud backups – Windows 11 makes it easy to back up files to the cloud using OneDrive, Microsoft’s file hosting service and synchronization service. Free users get 5 GB of free personal cloud storage, and you can choose from multiple subscription plans to get a lot more. OneDrive users can further protect their most sensitive data by enabling the Personal Vault feature, which includes file encryption, malware scanning, and monitoring.
- 🛡️ Keep antivirus software enabled and updated – Windows 11 comes with capable antivirus software, Microsoft Defender, whose purpose is to protect users against viruses and other malware. Some malware can hide your files, encrypt them with ransomware, or delete them entirely, so keeping your antivirus active and up to date is worth the occasional false positive (as we covered above). Microsoft Defender is enabled by default and consumes minimal system resources, so resist the temptation to turn it off. Microsoft Defender SmartScreen also helps filter out untrusted apps and suspicious websites before they cause problems.
- ✅ Enable the Delete Confirmation Dialog – By default, Windows 11 sends deleted files straight to the Recycle Bin without asking first. You can add an extra safety net by turning on the delete confirmation prompt. Right-click the Recycle Bin on your Desktop, select Properties, and check Display delete confirmation dialog. It’s a small change, but it’s saved me from careless mistakes more than once.
- 🔒 Set “Deny” Permissions for Important Folders – If you have folders you absolutely cannot afford to lose, consider restricting delete permissions on them. You can do this through Windows by right-clicking the folder, going to Properties > Security > Advanced, and setting “Deny” permissions for the Delete action for other users. Alternatively, third-party tools like Disk Drill’s RecoveryVault feature can add an extra protection layer by keeping a record of deleted file metadata, making recovery much more reliable if something does go wrong.
- ⚙️ Configure Storage Sense – Windows 11’s Storage Sense feature can automatically delete temporary files, empty the Recycle Bin, and remove old Downloads content to free up space. While this is helpful for managing disk usage, the default settings may be more aggressive than you’d like. Go to Settings > System > Storage > Storage Sense and review the cleanup schedule to make sure it’s not set to automatically remove files you might still need.
- 🛑 Add Windows Security Exclusions – While keeping your antivirus active is important, Microsoft Defender can occasionally flag legitimate files as threats and remove them, causing the very data loss you’re trying to avoid. If you work with files that are regularly being flagged (development tools, scripts, etc.), go to Windows Security > Virus & threat protection > Manage settings > Exclusions and add the relevant folders. Just be careful to only exclude folders you trust.
Taking a few minutes to configure these settings can save you hours of recovery work down the line.
TL;DR
To quickly summarize, the fastest path to getting your files back on Windows 11 is as follows:
- Verify first. Before jumping into recovery tools, confirm that the files are actually gone. Use Windows Search, check the Recycle Bin, look through your user profile folders, and verify whether you have any existing backups through File History, OneDrive, or a system image. You’d be surprised how often “deleted” files turn out to be moved, hidden, or synced to a different location.
- If they’re truly gone, scan the drive right away. Download data recovery software like Disk Drill and run a scan as soon as possible. In most cases, the results will quickly tell you whether your files are still on the disk or whether they’ve been overwritten and are beyond recovery. From there you can decide how to proceed, and the sooner you act, the better your chances.
- Figure out what went wrong and prepare for next time. Once you’ve recovered what you can, take a moment to identify what caused the loss in the first place. Then set up at least one reliable backup method, whether that’s File History, OneDrive, or a dedicated external drive, so you’re not starting from scratch if it happens again.

FAQ
You can recover permanently deleted files in Windows 11 from an existing backup or using data recovery software, which is available from Microsoft as well as a number of third-party software developers.
Yes. Microsoft offers a free tool called Windows File Recovery (command-line). If you’d rather use a graphical app, there are third-party options. For example, Disk Drill, despite having a 100 MB limit for free recovery, provides you with higher odds on tricky cases (older deletions, RAW/corrupted volumes, unknown partitions) and a simpler flow.
Windows 11 comes with multiple native data recovery capabilities, including the Recycle Bin folder, the Undo feature, and File History.
If you delete files on your Windows 11 computer, they will go directly to the Recycle Bin folder. However, if you use the Shift + Delete shortcut to delete them, you won’t be able to find them there. When you empty the Recycle Bin or use the shortcut to delete files, Windows removes all pointers to them and makes the files invisible for you.
It depends on how much time has passed after deleting the files. When you delete a file on a Windows 11 computer, the file becomes invisible to you but remains present on the hard drive. So if the operating system still hasn’t overwritten the deleted files with new data, it may be possible to recover them.
Even if you haven’t been backing up your files on a Windows 11 computer, you still have some options when it comes to recovering deleted files. Here’s what you should try:
- Check the Recycle Bin folder
- Use the Undo Delete tool
- Use the File History feature
- Use Command Prompt
- Use third-party data recovery software