Let’s face it. Having your files conveniently organized according to a partition structure that you created is a good feeling.
But, what happens when something goes wrong and one of your partitions is damaged? Suddenly, you boot into your computer and find that a large number of your files are missing.
This is a problem that many have faced before. In this article, we’re going to talk about what causes partition damage, how you can recover your data, and even how to repair the damaged partition.
What is a Partition?
Pictures, videos, music, documents – all are different types of data. All of this data is stored on your hard drive. While most can get by with using the hard drive the way it arrives in their computer, others want more control over where their data is stored.
Partitions are a way of separating portions of your hard drive to better organize your data and reduce data corruption across your entire disk. Each partition can have its own file system, like NTFS. Each partition has its own allocation of hard drive space.
What Causes Partition Damage?
When a partition is damaged, you will receive messages from Windows saying that the drive needs to be formatted, or that the file or directory is unreadable. Partition damage can be caused by a number of things. Most commonly, it’s caused by:
- ⚠️ Corrupted or damaged partition table – The partition table holds information pertaining to the partitions on your drives. This includes what types of partitions you have, as well as how your operating system can access the contents on the disk. If this table is corrupted or damaged, it could result in one of your partitions being damaged. A broken partition table can be fixed using the Command Prompt.
- 🦠 Virus attack – Viruses can be created to specifically target your partitions and the data inside them. If a virus has found its way to your machine, chances are your damaged partition could be a result of a virus attack. Thankfully, there are countless antivirus applications available online, with many being free.
- 💾 Failed partition size modification – Expanding or shrinking the size of a partition is a delicate process. If this process is interrupted, it can result in data loss and damage to the existing partitions. To prevent your partition being damaged because of this, be sure to have your computer plugged into a reliable power source that won’t disconnect during the expanding/shrinking process.
- 🔍 Bad sectors – Physical and logical damage can cause bad sectors on your hard drive. A bad sector refers to a physical space on the drive that no longer accepts read or write requests because it has become defective. If bad sectors are detected, any files that were once stored there will no longer be accessible by the operating system. Logical bad sectors can be overwritten with zeros to fix them. Physical bad sectors, however, cannot be fixed, and you should instead replace the drive.
- 💥 Physical damage – Traditional hard drives use spinning platters to read and write information. If your drive has sustained significant damage, it can displace moving parts within the drive, preventing the data from being read. Solid-state drives aren’t immune to fall damage either, as it can snap delicate components on the internal circuit boards. If your drive has sustained extensive damage, try to recover what you can from the drive. Otherwise, send the drive to a data recovery center.
Regardless of what has caused the partition damage, let’s look at ways of recovering your data and fixing the partition so you can use it again.
How to Recover Data from a Damaged Partition
There’s hardly ever a 100% chance of data recovery. It depends on the type of damage the drive has sustained and how long ago the partition was damaged.
If you act with haste, you give yourself a better chance at recovering the data that’s on the damaged partition before it’s permanently lost, even if it’s on a RAW partition.
Method #1: Disk Drill
Recovering data yourself has never been easier. There are myriads of data recovery tools available online, with many of them offering trials which may suffice if you only have a small amount of data to recover.
Today we’re going to use a Disk Drill. It has a proven record of successful recoveries, an easy-to-use interface for any type of user, and its impressive array of additional features that help protect your data from further loss.
- Download, install, and open Disk Drill.
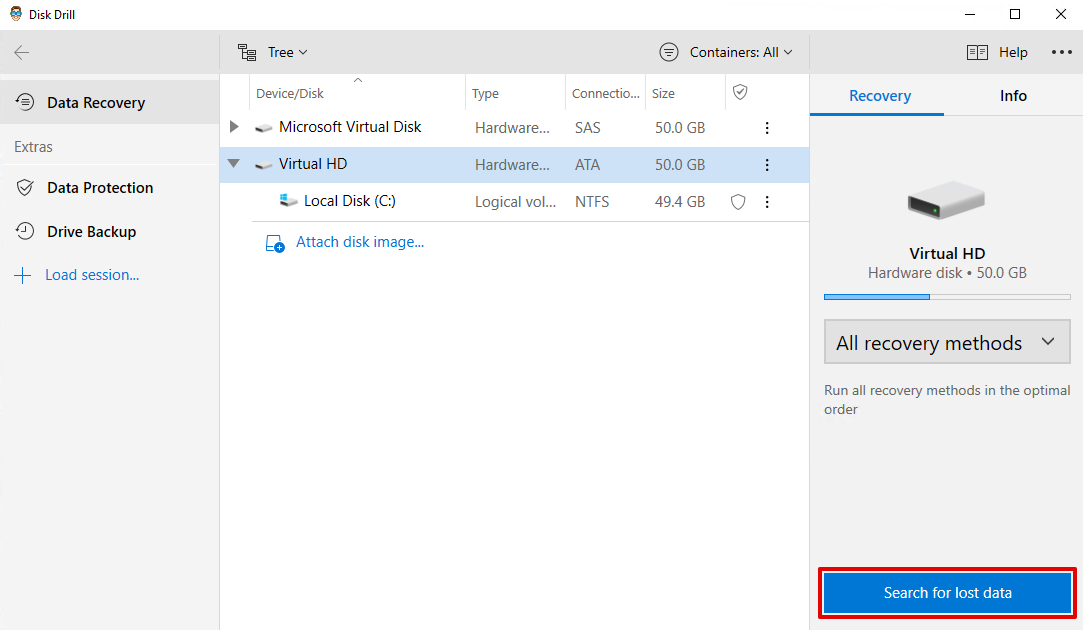
- Select the drive that the damaged partition belongs to and click Search for lost data.
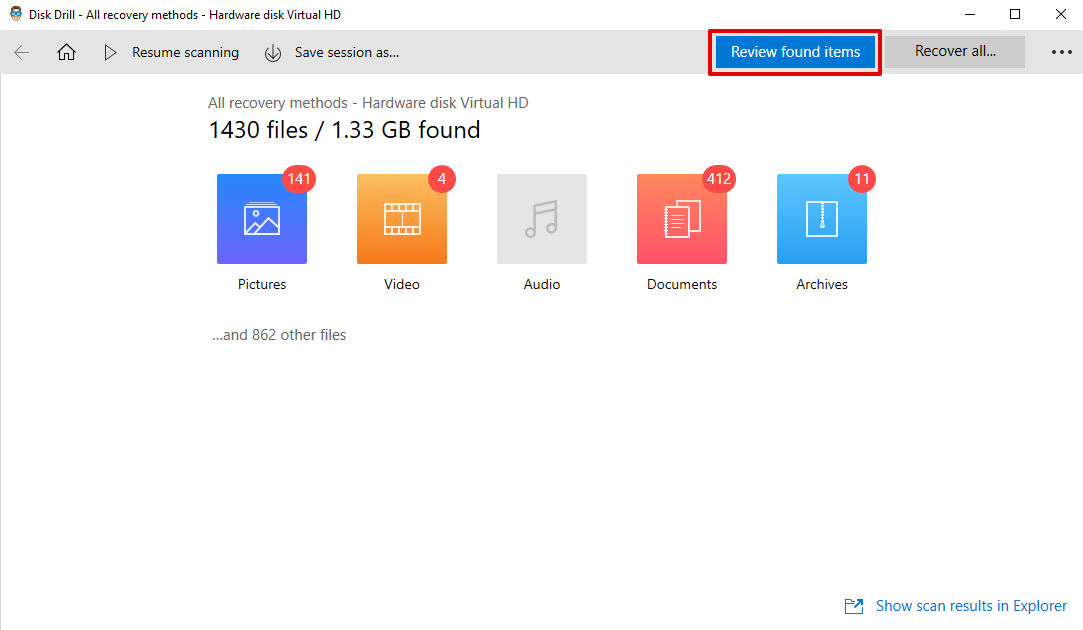
- When the scan has finished, click Review found items.
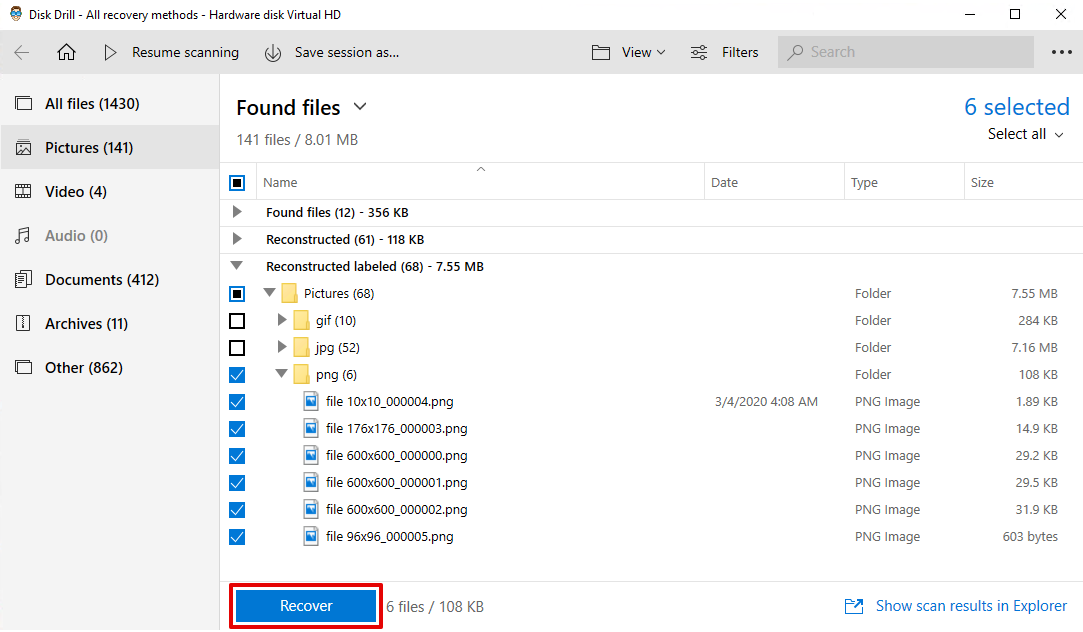
- Using the dropdowns, mark the files you want to recover by checking their checkbox. Click Recover when ready.
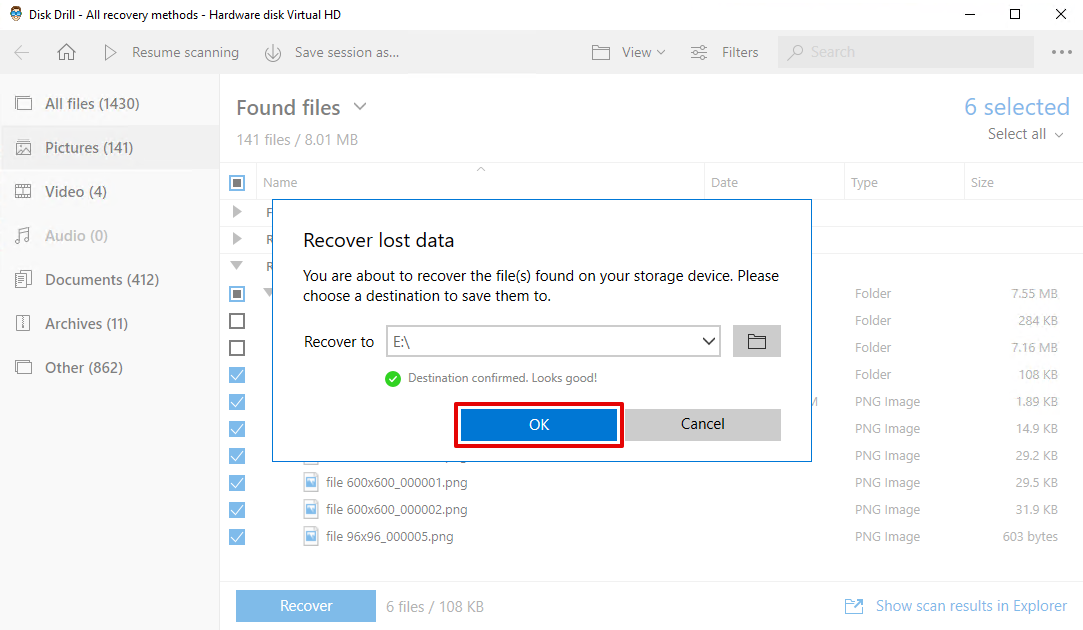
- Select a recovery location for the files. To avoid the files being lost again, it’s highly recommended that you restore them to a storage location that’s not on the drive that has the damaged partition. Press OK.
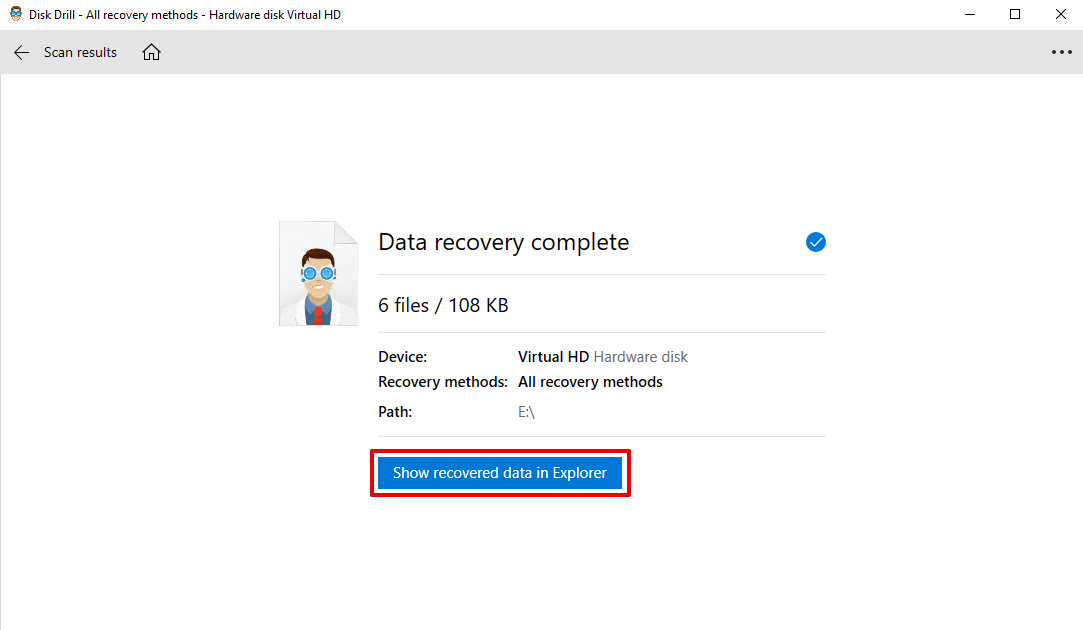
- When the recovery is finished, you’ll be presented with an overview screen. Click Show recovered data in Explorer to be taken directly to the recovered files.
Method #2: Windows File Recovery
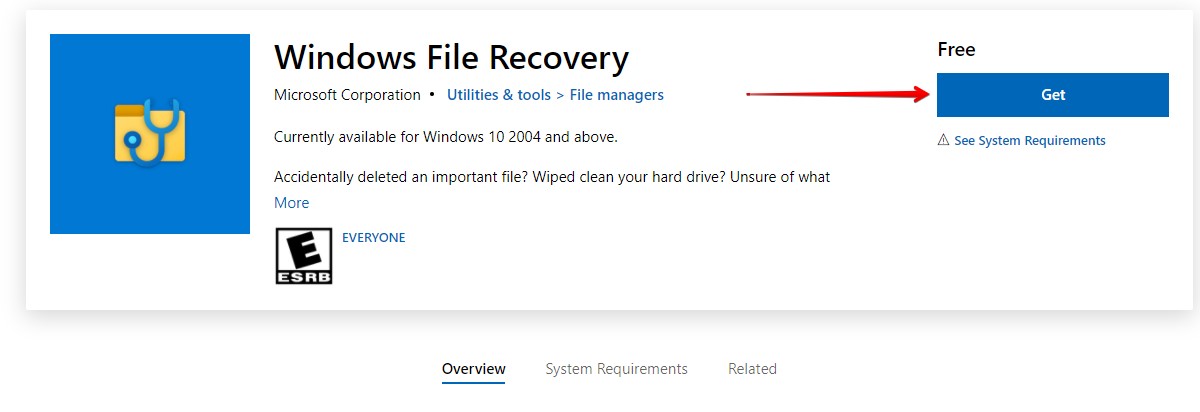
Microsoft has its own data recovery tool called Windows File Recovery. It’s still quite new compared to other recovery tools, having only been released in May 2020. However, it’s an appealing option for many as it allows you to recover files at no cost. All you need is a Microsoft account.
The below steps will guide you through installing and using Windows File Recovery to recover your data.
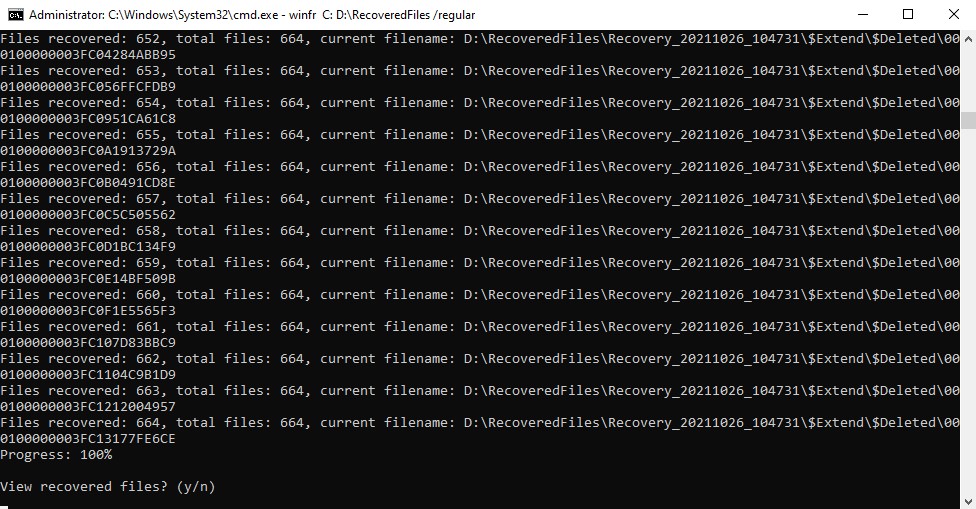
- Download Windows File Recovery from the Microsoft Store. Open it.
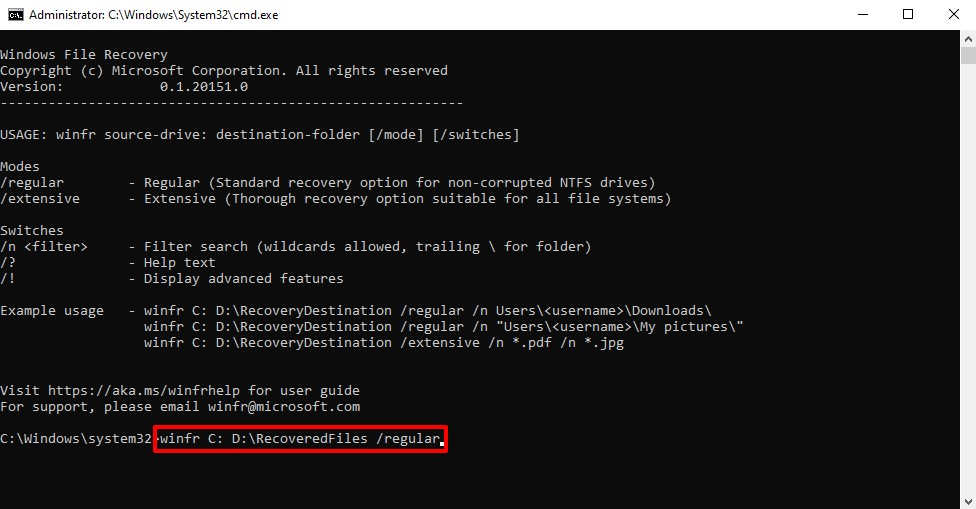
- Type winfr C: D:\RecoveredFiles /regular. Replace C: with the drive letter you want to recover from, and D:\RecoveredFIles with your chosen output path. Press Enter.
- Press Y to proceed. When the command is finished, press Y again to open the recovered files.
Method #3: Data Recovery Service
Recovering data yourself doesn’t always work. If using Disk Drill hasn’t worked for you, or if you find the ‘do it yourself’ method too technically challenging, you can instead let the professionals handle it for you!
Data recovery services employ data recovery specialists who use commercial-grade tools to recover your data for you. Most of the time, it’s as easy as sending your drive to them. The hardest part is waiting for the drive to be returned.
How to Repair a Damaged Partition
Let’s look at various ways you can repair your damaged partition. Before attempting any of the below methods, ensure you have recovered and backed up your data first to ensure you don’t lose any further data.
Method #1: Add or Change Drive Letter
If something has caused your drive letter to vanish, you may find that you’ve lost access to your partition. In some cases, even changing the existing drive letter can restore access to the partition, as well as your data on it.
Follow the below steps to add or remove a drive letter.
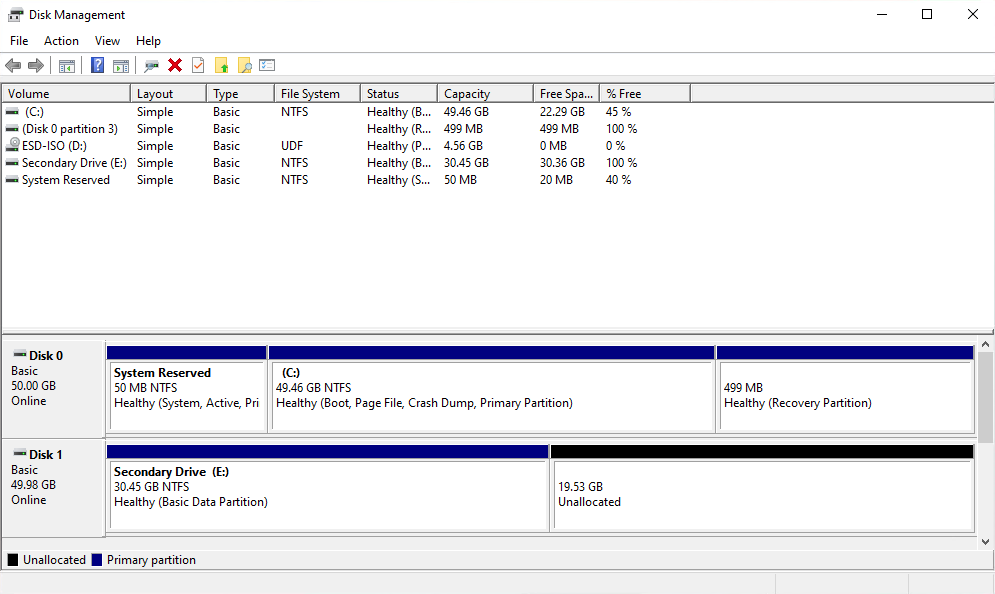
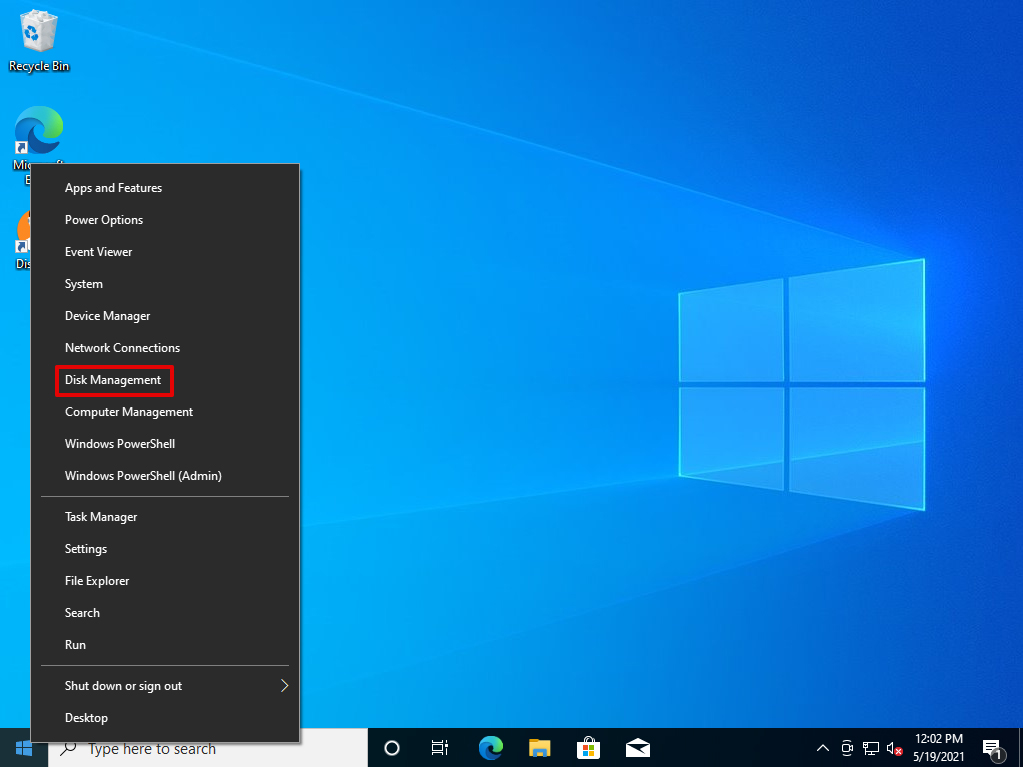
- Right-click Start and select Disk Management.
- Right-click the damaged partition and click Change Drive Letter and Paths.
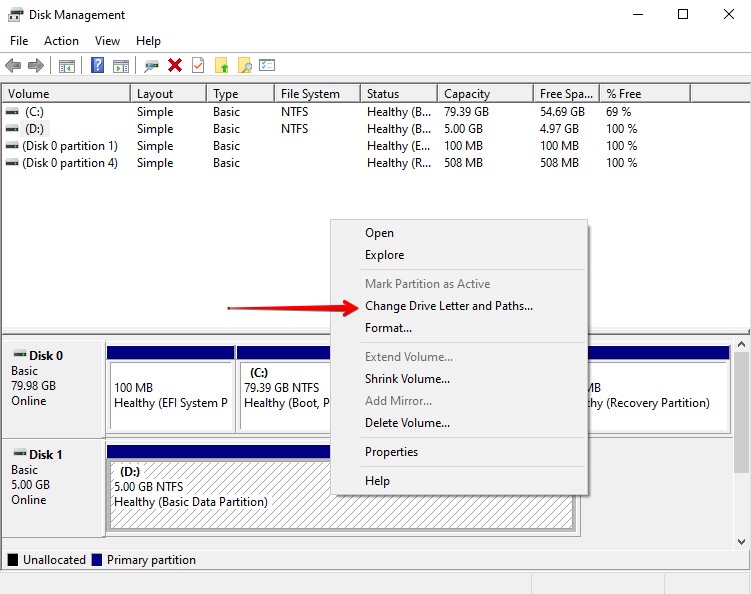
- Click Change. If you don’t have a drive letter, click Add instead.
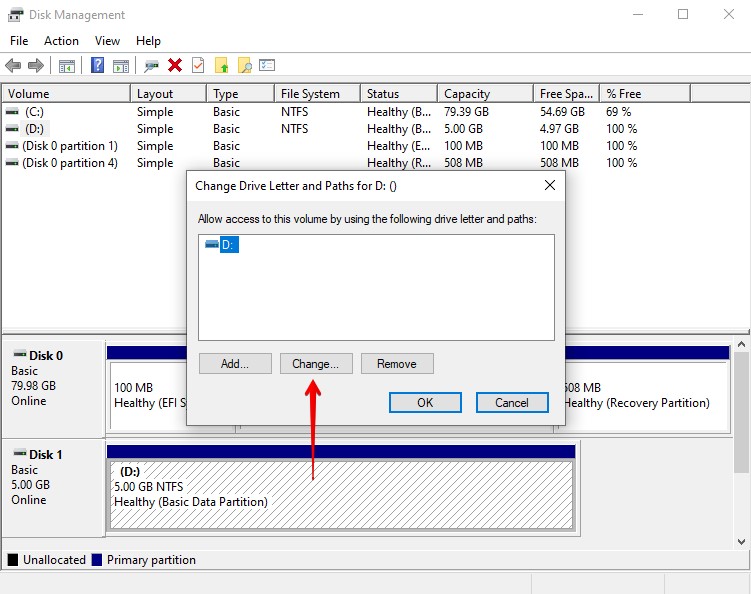 Select a new drive letter from the dropdown list and click OK.
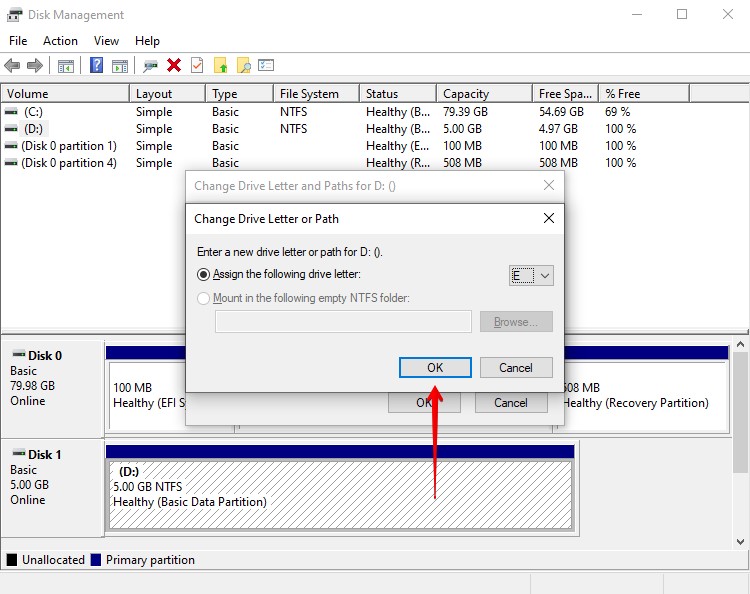
Method #2: CheckDisk
CHKDSK is a Windows command that checks the file system and file system metadata for errors. With additional parameters, it can also be used to fix any errors found on the volume.
Before we run any commands, let’s look at the command and what each syntax does:
- chkdsk – When run alone, it scans the disk for any notable errors.
- /r – This parameter locates any bad sectors on the disk and recovers readable information. It also includes the functionality of /f, which only fixes errors on the disk.
In full, the command is going to be chkdsk *: /r (the asterisk will be replaced by the drive letter).
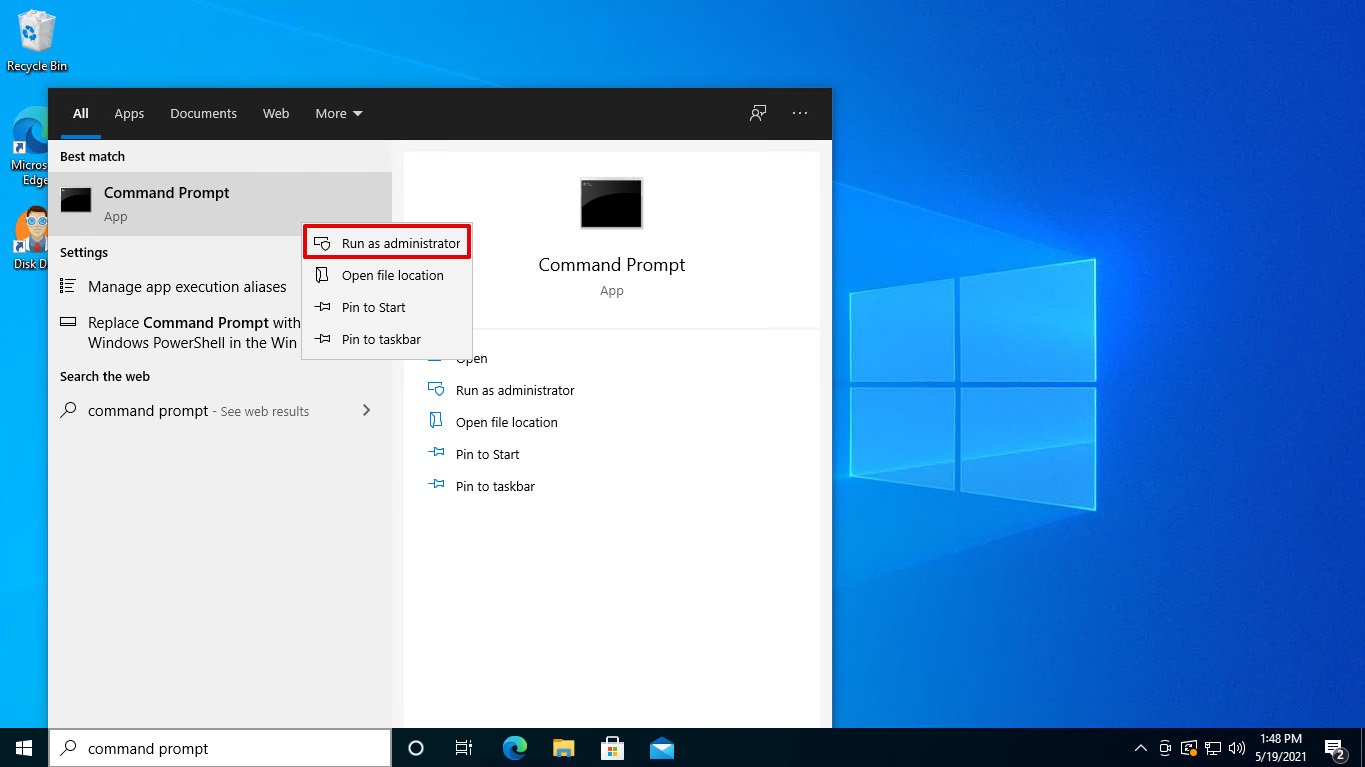
- Click the Start button and search for Command Prompt. Right-click and select Run as administrator.
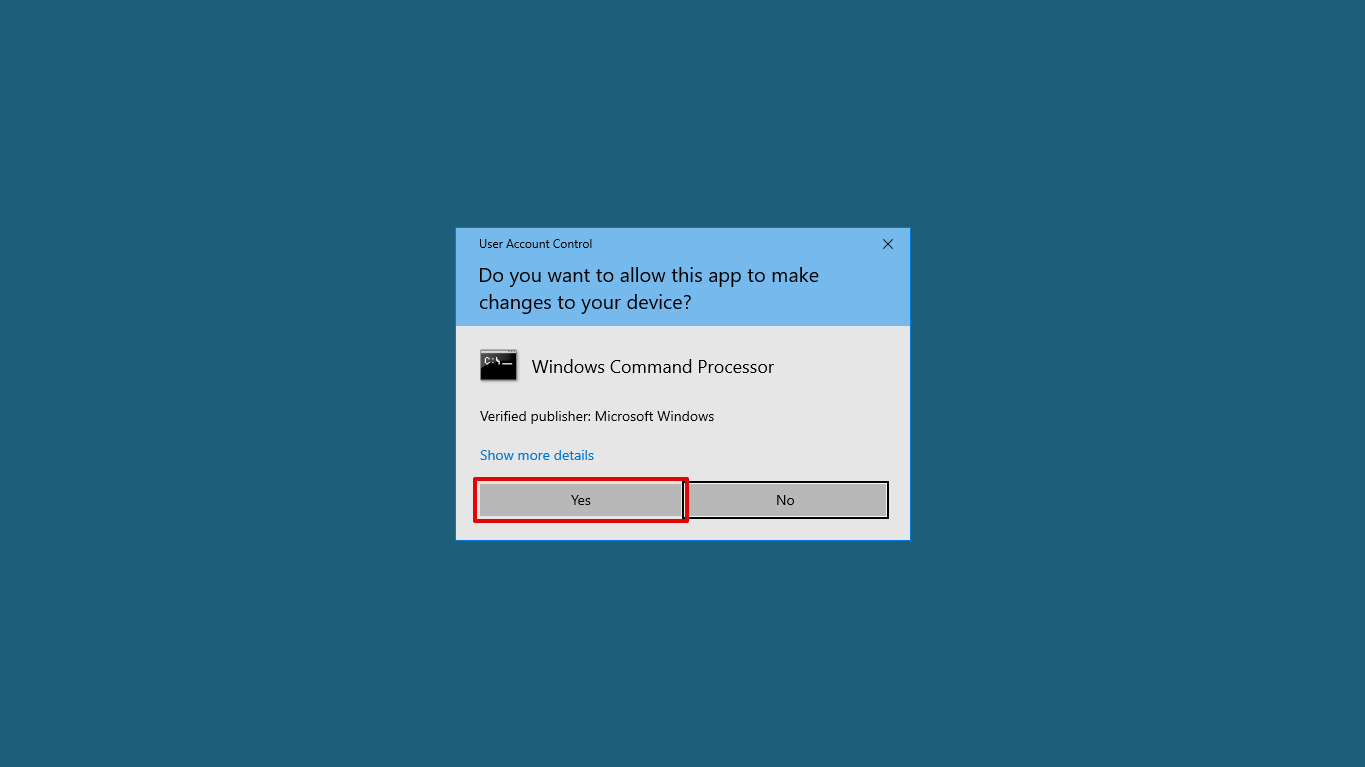
- If you’re asked to allow the app to run, click Yes.
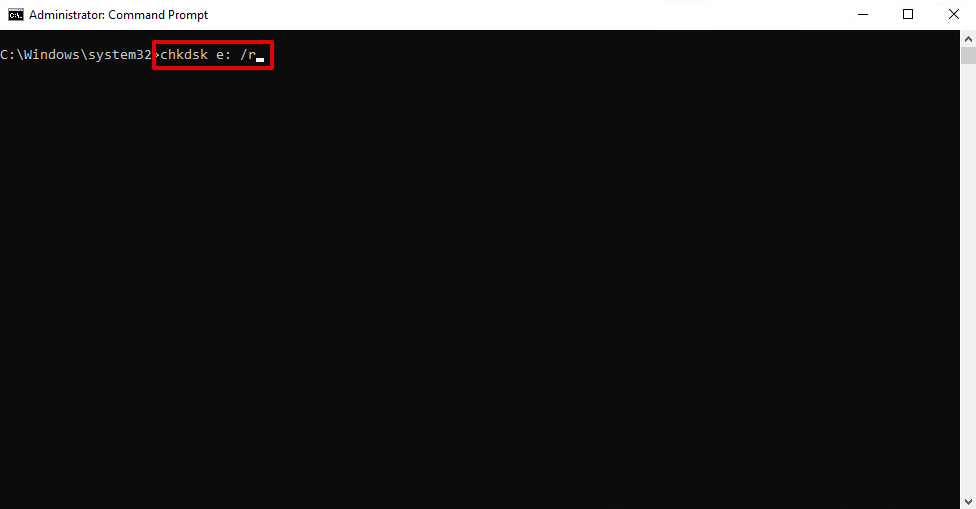
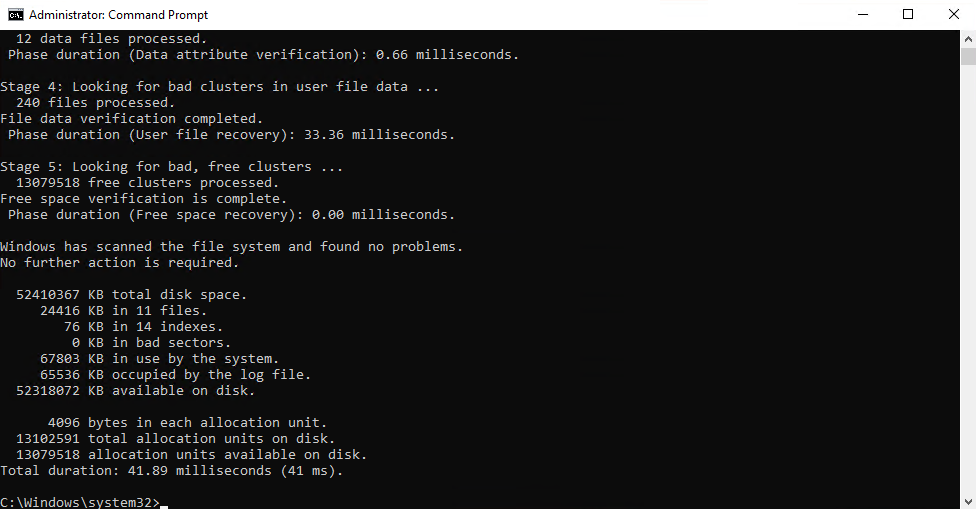
- Type chkdsk *: /r (replace the asterisk with your drive letter) and press Enter.
- After the command has finished running, you’ll be given an overview of what actions were performed.
Method #3: Format
Once a partition is damaged and it can’t be fixed using CHKDSK, the best way to repair it is to format it back to its original state. Formatting is the process of erasing anything on that partition. As a result, you’re left with a clean slate to start again from.
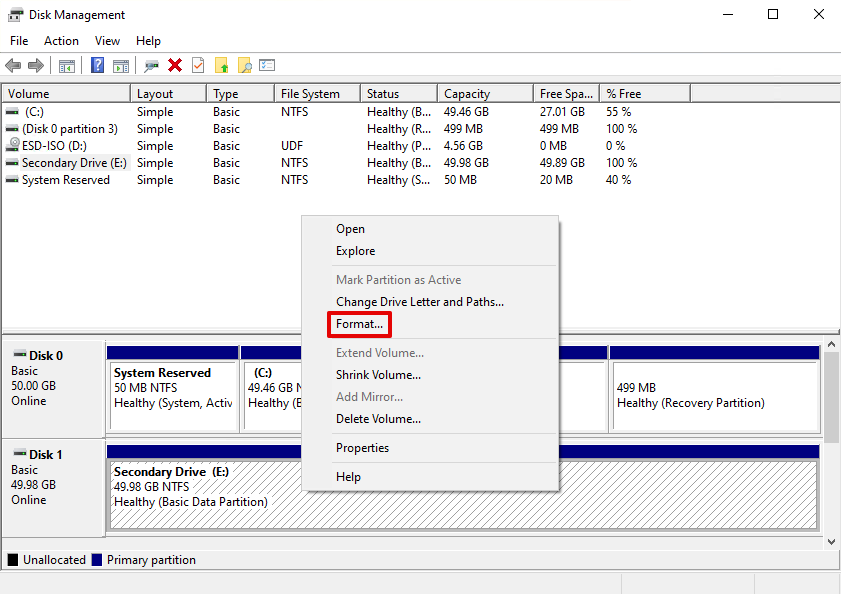
- Right-click on the Start button and select Disk Management.
- Right-click on the partition you want to repair and select Format.
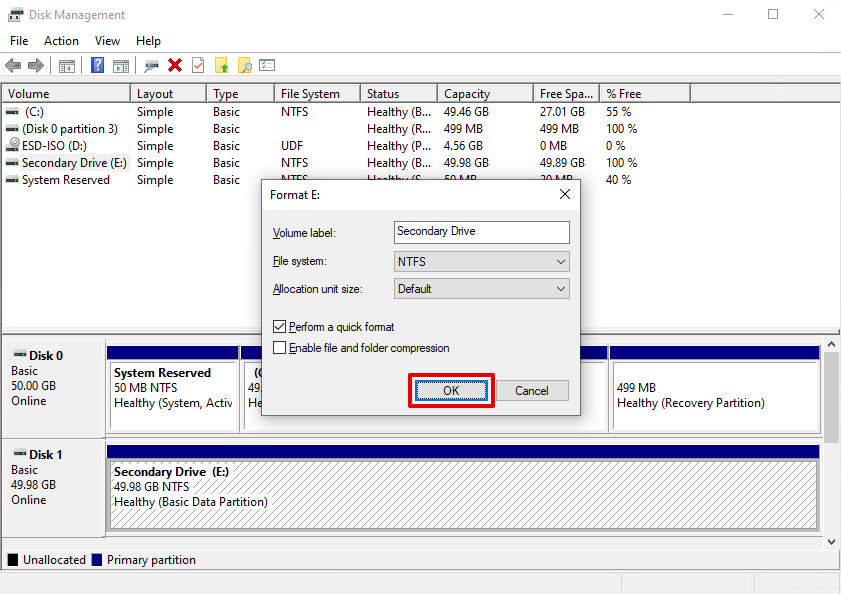
- Add a name for the new partition and make sure Perform a quick format is ticked. Press OK.
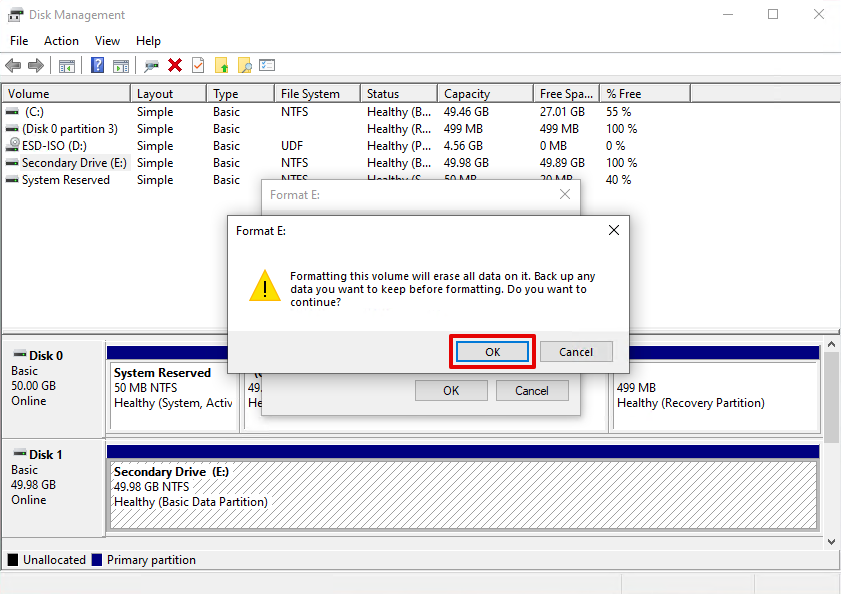
- A final confirmation message will remind you to back up (in this case, recover) any data that you need before formatting. Press OK.
- Once the partition has been formatted, you can move your files back across (as long as you’re confident the disk is in good health).
Method #4: TestDisk
TestDisk is an open-source partition recovery tool that is designed specifically to recover lost partitions. It’s free to use and is funded solely on donations. It uses a command-line interface to get the job done, but recovering the partition is easy enough if you follow along with our instructions.
If none of the above solutions have worked for you, try using TestDisk instead.
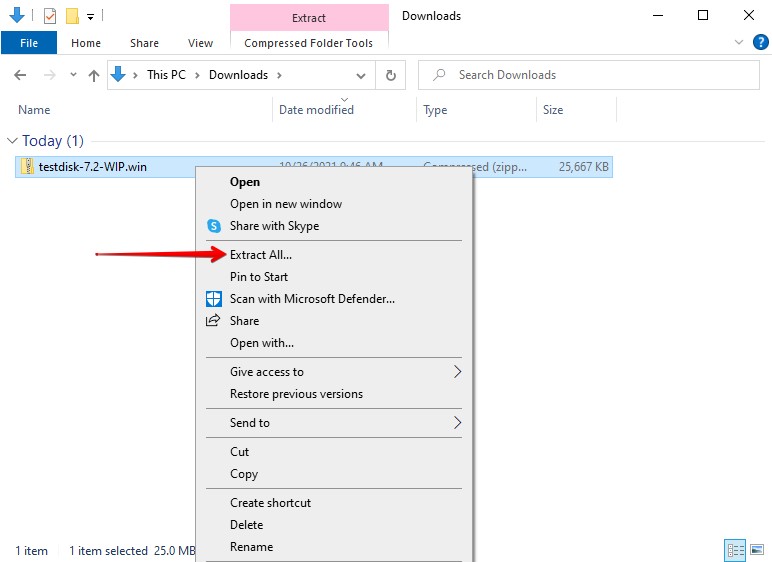
- Download and unzip the TestDisk folder.
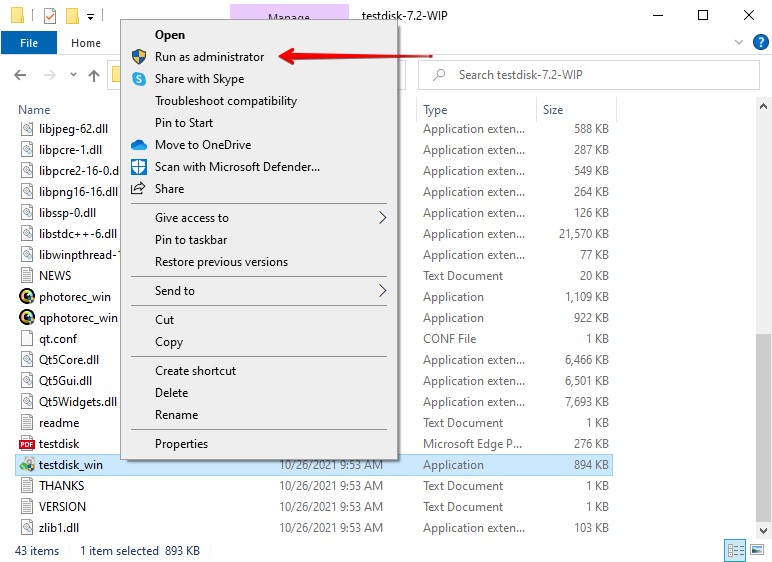
- Right-click testdisk_win and click Run as administrator. If Microsoft Defender SmartScreen prevents you from opening it, click More info then Run anyway.
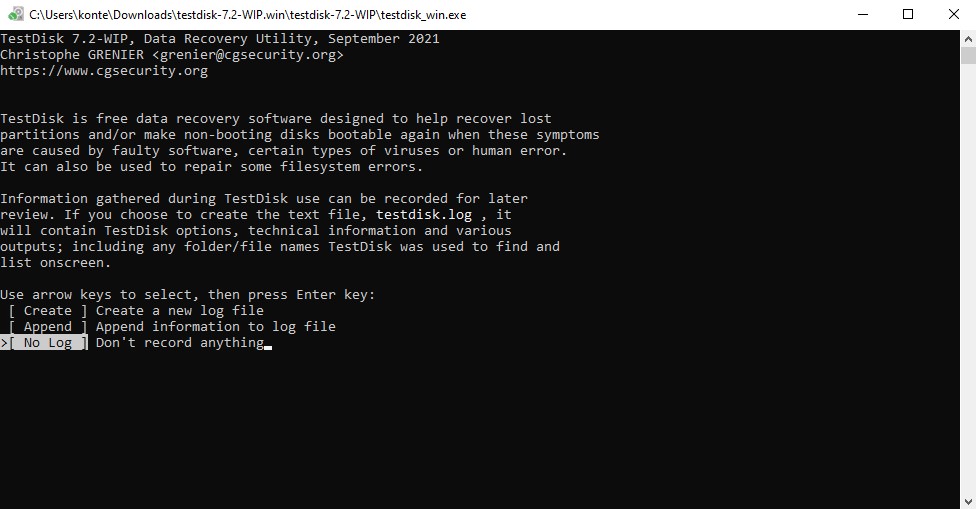
- Use the arrow keys to select No Log, then hit Enter. You are welcome to create a log if you choose.
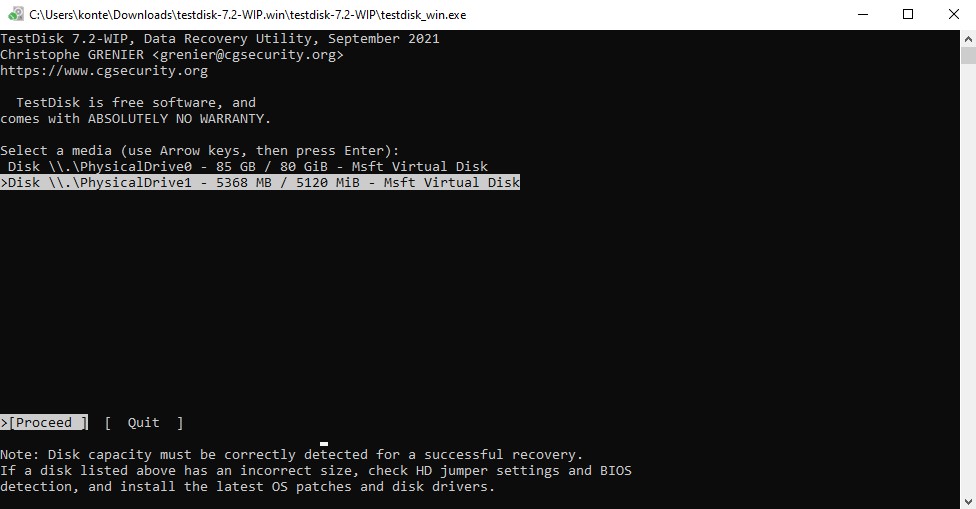
- Select the hard drive that contains the damaged partition and press Enter.
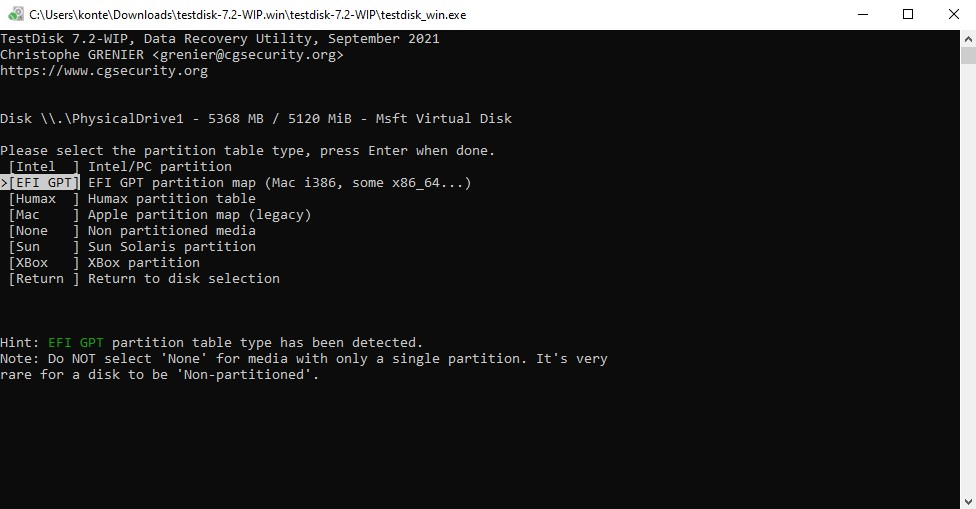
- Select the partition table type. TestDisk usually automatically detects this and moves to the right option. Press Enter.
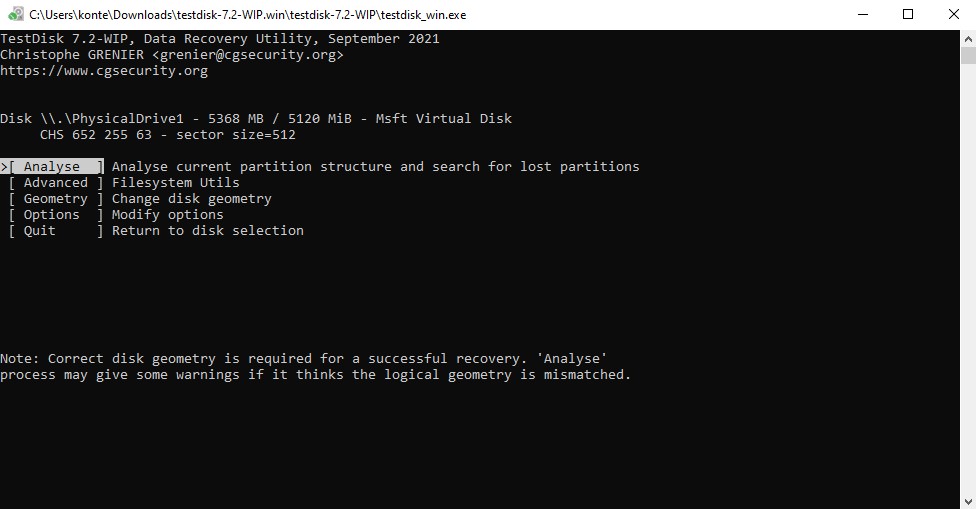
- Press Enter to have TestDisk analyze the disk.
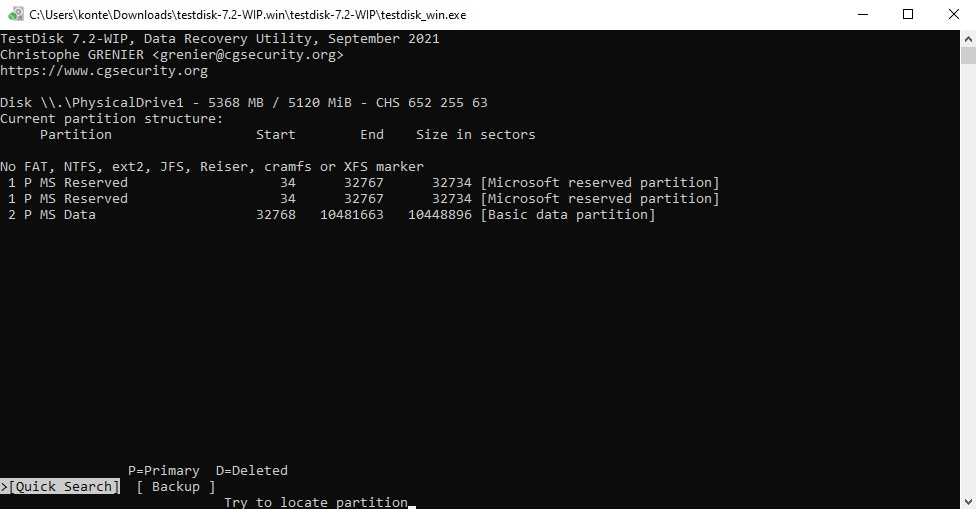
- Press Enter again to start the Quick Search.
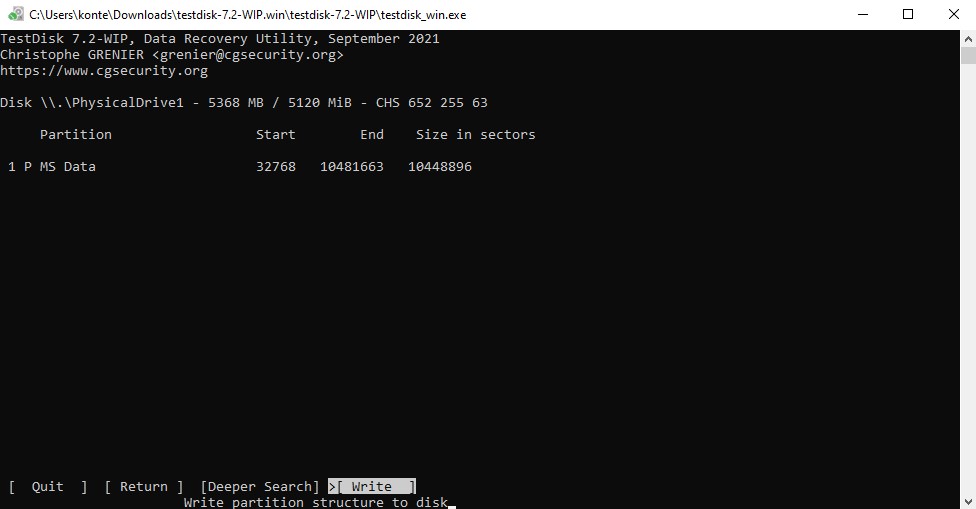
- Select the lost partition and press Enter after the scan has been completed.

- Move to the Write option and press Enter.
- Press Y to write the partition table.
- Press Enter, your computer will need to reboot.
How to Prevent Damaged Partitions Going Forward
To save yourself the time and effort of recovering your data, there are ways you can reduce the chances of your partitions being damaged.
- Be vigilant of your drive’s health – Hard drives don’t last forever. Not even Solid State Drives (SSD) last forever. If you notice that your drive is acting erratically, perhaps it’s time to replace it. Some important symptoms include disappearing data, applications crashing, and clicking noises coming from the physical drive.
- Use an antivirus – As we discussed, damaged partitions can be the result of a malware getting into your system, like a virus or ransomware attack. To save your data and device, make sure to have an antivirus active that’s scanning your system regularly for malicious activity. If anything happens, the antivirus will quarantine and eliminate threats.
- Modify your drive correctly – The beauty of hard drives is that you can set them up to your liking. You can organize data and dictate how much space each partition will have. But, this can quickly turn sideways if you don’t understand what you’re doing. Before making any adjustments to your drive like formatting, shrinking, or expanding, make sure you understand what you’re doing to ensure you don’t make any mistakes.
- Eject media safely – External drives can have partitions too. Before removing any external drive from your computer, be sure to safely eject it first. Safely ejecting the device ensures that there are no write processes being interrupted that could otherwise corrupt the data or partitions on the drive.
Conclusion
A damaged partition isn’t useful to anyone. When it happens, it’s almost always unexpected. Luckily, using the methods in this article, you can recover the partition and its data without much hassle!
The most important part of recovering from a damaged partition is implementing solutions to prevent it from happening again. Take care of your data by regularly backing it up so you can bounce back in the event of data loss.


FAQ
Before attempting to fix a damaged partition, you should first recover all data from it first.
You can fix a damaged partition using the CHKDSK command:
- Click the Start button and search for Command Prompt. Right-click and select Run as administrator.
- If you’re asked to allow the app to run, click Yes.
- Type chkdsk *: /r (replace the asterisk with your drive letter) and press Enter.
- After the command has finished running, you’ll be given an overview of what actions were performed.
Recovering files from a damaged partition is a delicate process, but it doesn’t have to be a complicated one. Through the use of data recovery software, you can scan and recover lost files from the damaged partition.
Here’s how you can recover files from a damaged partition:
- Download, install, and open Disk Drill.
- Select the drive with the damaged partition and click Search for lost data.
- Once the scan is complete, click Review found items.
- Mark the files you want to recover by checking their checkbox. Click Recover.
- Select a recovery location for the files. Press OK.
In the event of a system error where your computer cannot boot, the recovery partition holds data that allows you to restore to factory settings.
Many dislike it and would prefer to delete it entirely. Others like the idea of having a recovery solution that’s ready to go if anything happens.
If your recovery partition has been corrupted, the only way to create a new one is by reinstalling Windows. Before doing so, it goes without saying that you should back up all necessary data before resetting anything.
- Right-click the Start button and select Settings.
- Click Update & Security.
- Click Recovery.
- Under Reset this PC, click Get started.
When reinstalled, Windows will create a backup partition again by default.