Among all the files people lose, the loss of photos arguably has the greatest overall emotional impact. After all, we’re not exactly attached to documents and spreadsheets the same way we are to the memories of a wedding day, a family vacation, or a child’s first steps.
Photo loss most commonly happens on smartphones since that’s where most photos are taken, stored, and shared today. But phones aren’t the only device at risk. Formatted SD cards from a DSLR, wiped partitions on a laptop, and corrupted external drives clearly demonstrate that images can be lost on pretty much anything with storage.
The good news is that recovering deleted photos is often possible, even when they seem permanently gone. This guide covers how to do it across every major platform: Android, iPhone, Windows, Mac, and digital cameras. We start with smartphones since that’s where the bulk of photo loss happens, then move on to computers and camera memory cards.
How to Recover Deleted Photos on Android
You can use several different methods to get deleted pictures back on an Android device. The one you choose will be based on whether you use cloud storage or need to recover from the device itself. Here are the techniques that actually work.
Method 1: Restore from the Cloud: Google Photos; Microsoft OneDrive; Dropbox
Cloud storage has become the go-to solution for smartphone users who take a lot of photos. Services like Google Photos, OneDrive, and Dropbox automatically sync your images to the cloud, which means deleted photos may still exist on the remote server even after they’ve been removed from your device. Whether you can actually recover them depends on the service, how long ago the deletion happened, and your account settings. Here’s how to check.
📷 Google Photos
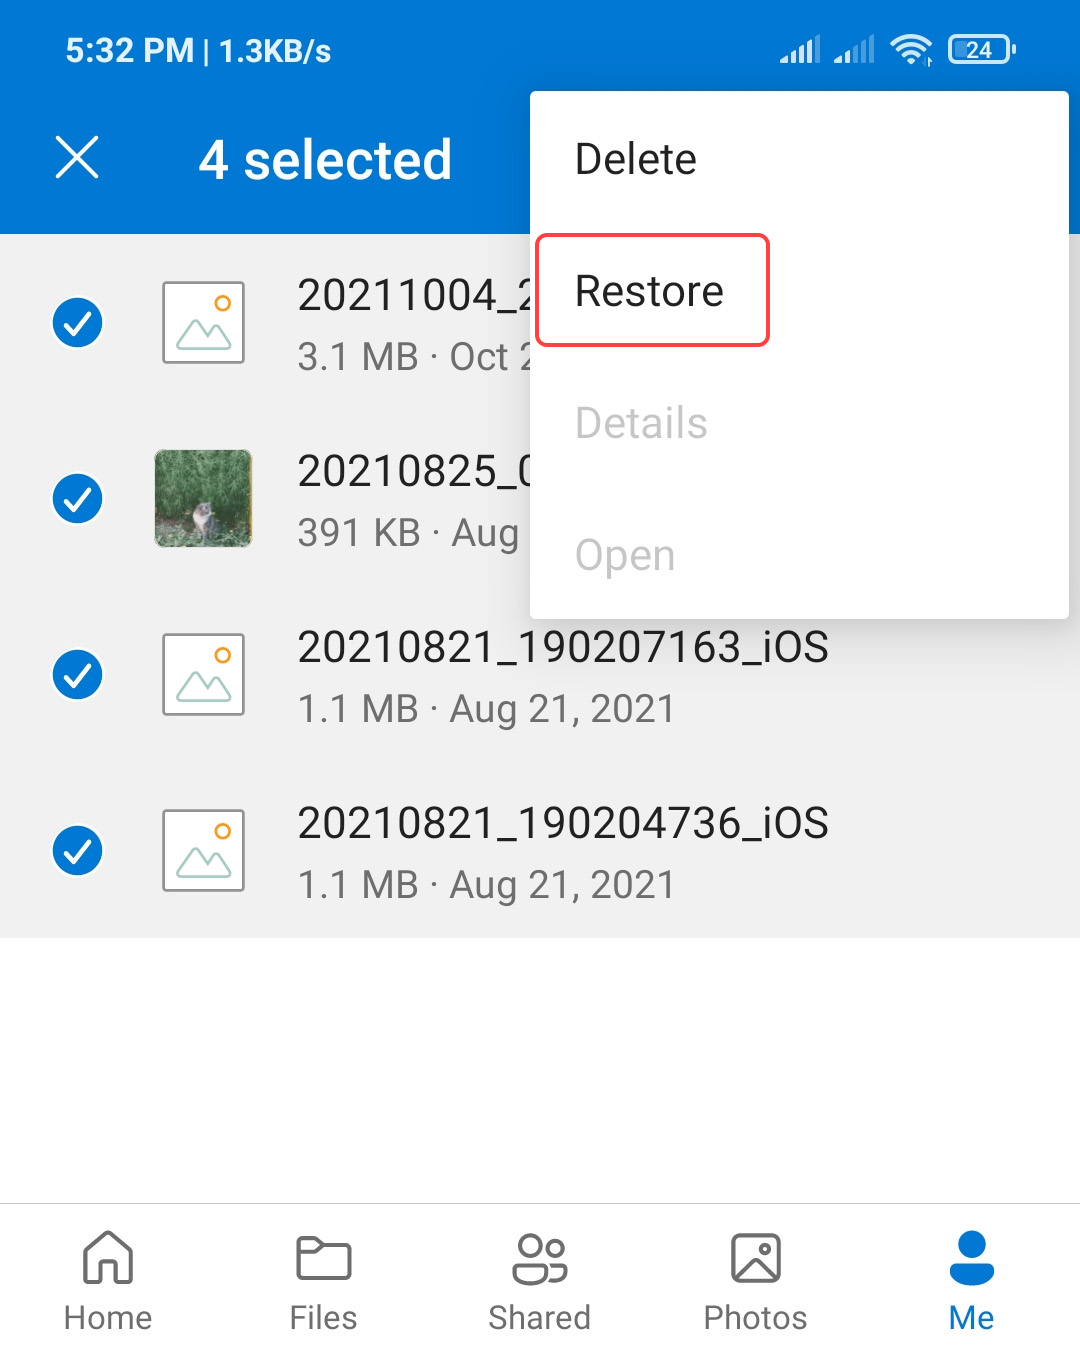
Google Photos keeps deleted images in the Trash, but how long depends on whether the photo was synced to the cloud. If it was uploaded to Google Photos (i.e., backed up to the cloud), you have 60 days to restore it. If the photo only existed locally on your device, that window shrinks to 30 days. Once that time runs out, or if you’ve manually emptied the Trash, this method won’t work.
To recover deleted photos from Google Photos:
- Open the Google Photos app on your Android device.
- At the top left, tap Menu > Trash.
- Touch and hold the photo you want to recover.
- Tap Restore at the bottom of the screen to get the deleted picture back.

☁️ Microsoft OneDrive
If you use OneDrive on your Android device (for work through a Microsoft 365 account or because you set it up to auto-upload your camera roll), then deleted photos may still be sitting in the OneDrive Recycle Bin. Even if you don’t remember using OneDrive, there’s a chance that you have OneDrive’s camera backup feature turned on without even realizing it. In such a case, photos get synced automatically in the background.
To recover photos from OneDrive:
- Launch the OneDrive app on your Android device.
- Select Me in the bottom navigation pane.
- Select the Recycle Bin.
- Choose the photos you want to recover and click Restore.
🗃️ Dropbox
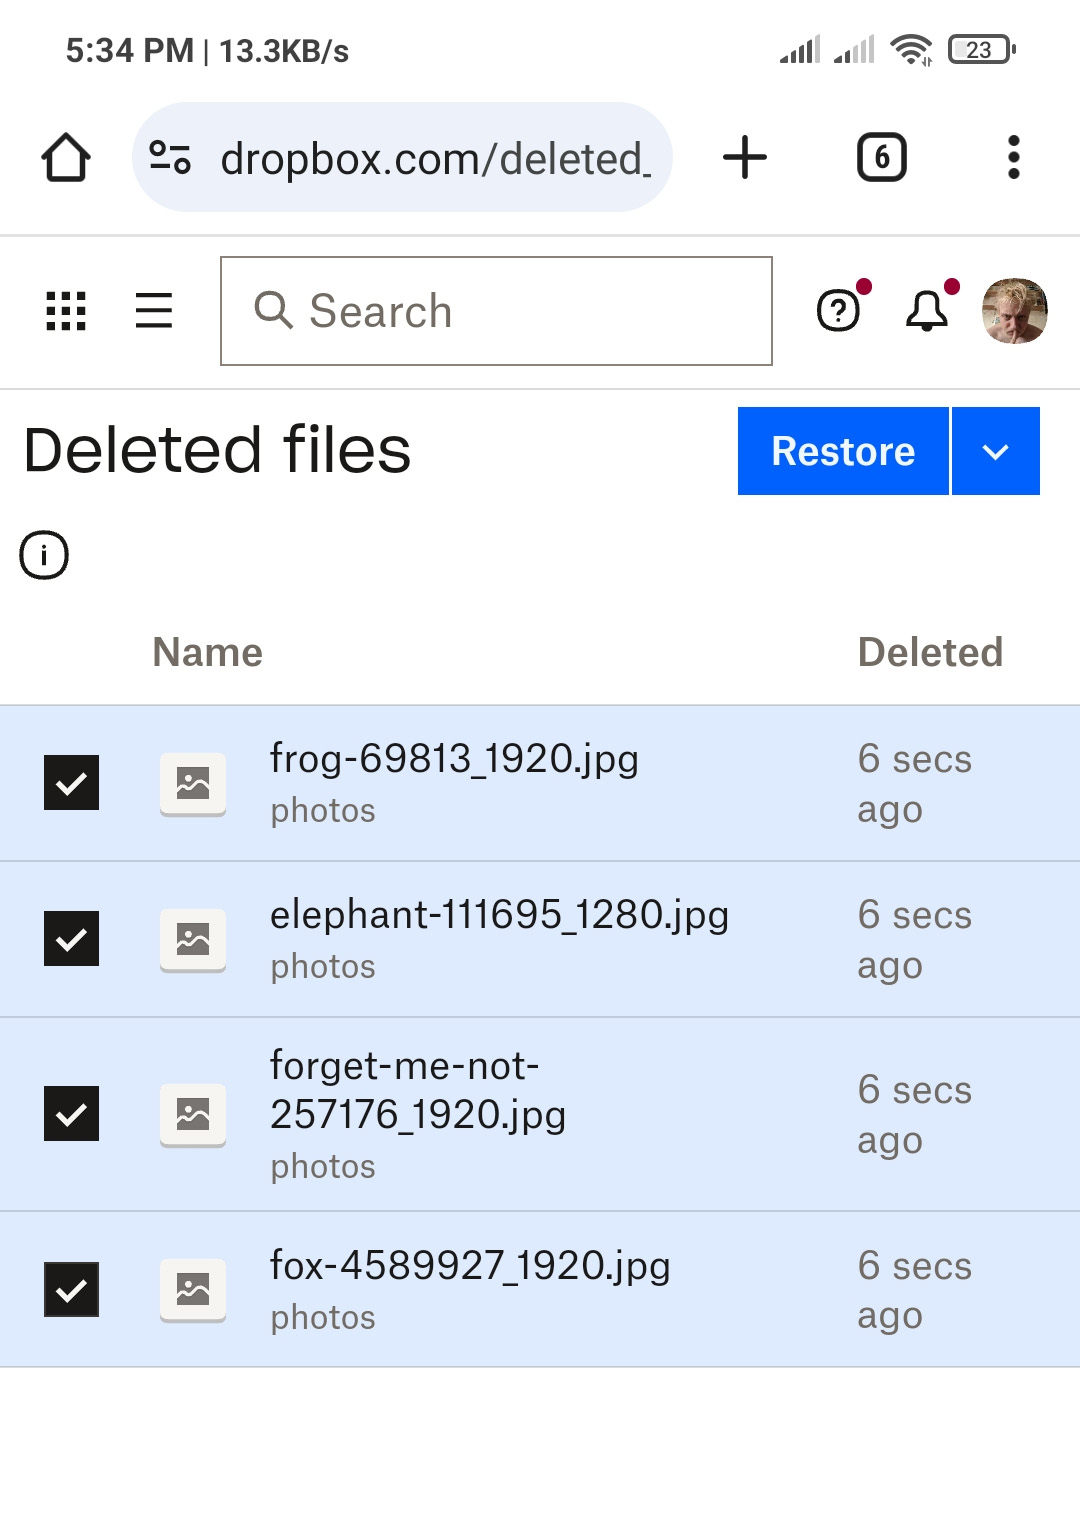
Dropbox users should follow these steps to recover deleted pictures.
- Open your web browser on your Android device. We are using Chrome for this demonstration.
- Navigate to https://www.dropbox.com. This opens the Dropbox website.
- Use the options in the top right to request a desktop site.
- Sign into your Dropbox account.
- Tap Files in the left sidebar.
- Select Deleted files.
- Tap on the file you wish to recover.
- Tap Restore to return the file to its original Dropbox location.
Method 2: From an SD Card
If you need to recover deleted photos from an Android SD card, the most effective approach is to remove the card from your phone and connect it to a computer. Then, you can scan the card using photo recovery software for macOS or Windows, such as Disk Drill.
Just know that Android SD cards can be used in two different ways and one of them makes data recovery impossible:
- As removable storage (default): In this mode, the SD card works like any other external drive, storing photos in an unencrypted format. This allows you to recover deleted photos using standard data recovery software.
- As adopted storage (internal storage extension): When formatted this way, Android encrypts everything on the SD card and ties it to that specific device. This means you can’t remove the card and scan it on a computer, since the data will be unreadable. Recovery is only possible on the device itself, for example using an app like DiskDigger with root access.
If your SD card was used as removable storage, follow these steps to recover deleted photos using Disk Drill. The steps below are shown on macOS, but the process is exactly the same on Windows.
- Download and install Disk Drill on your computer.
- Connect the SD card to your Mac or Windows PC using a card reader.
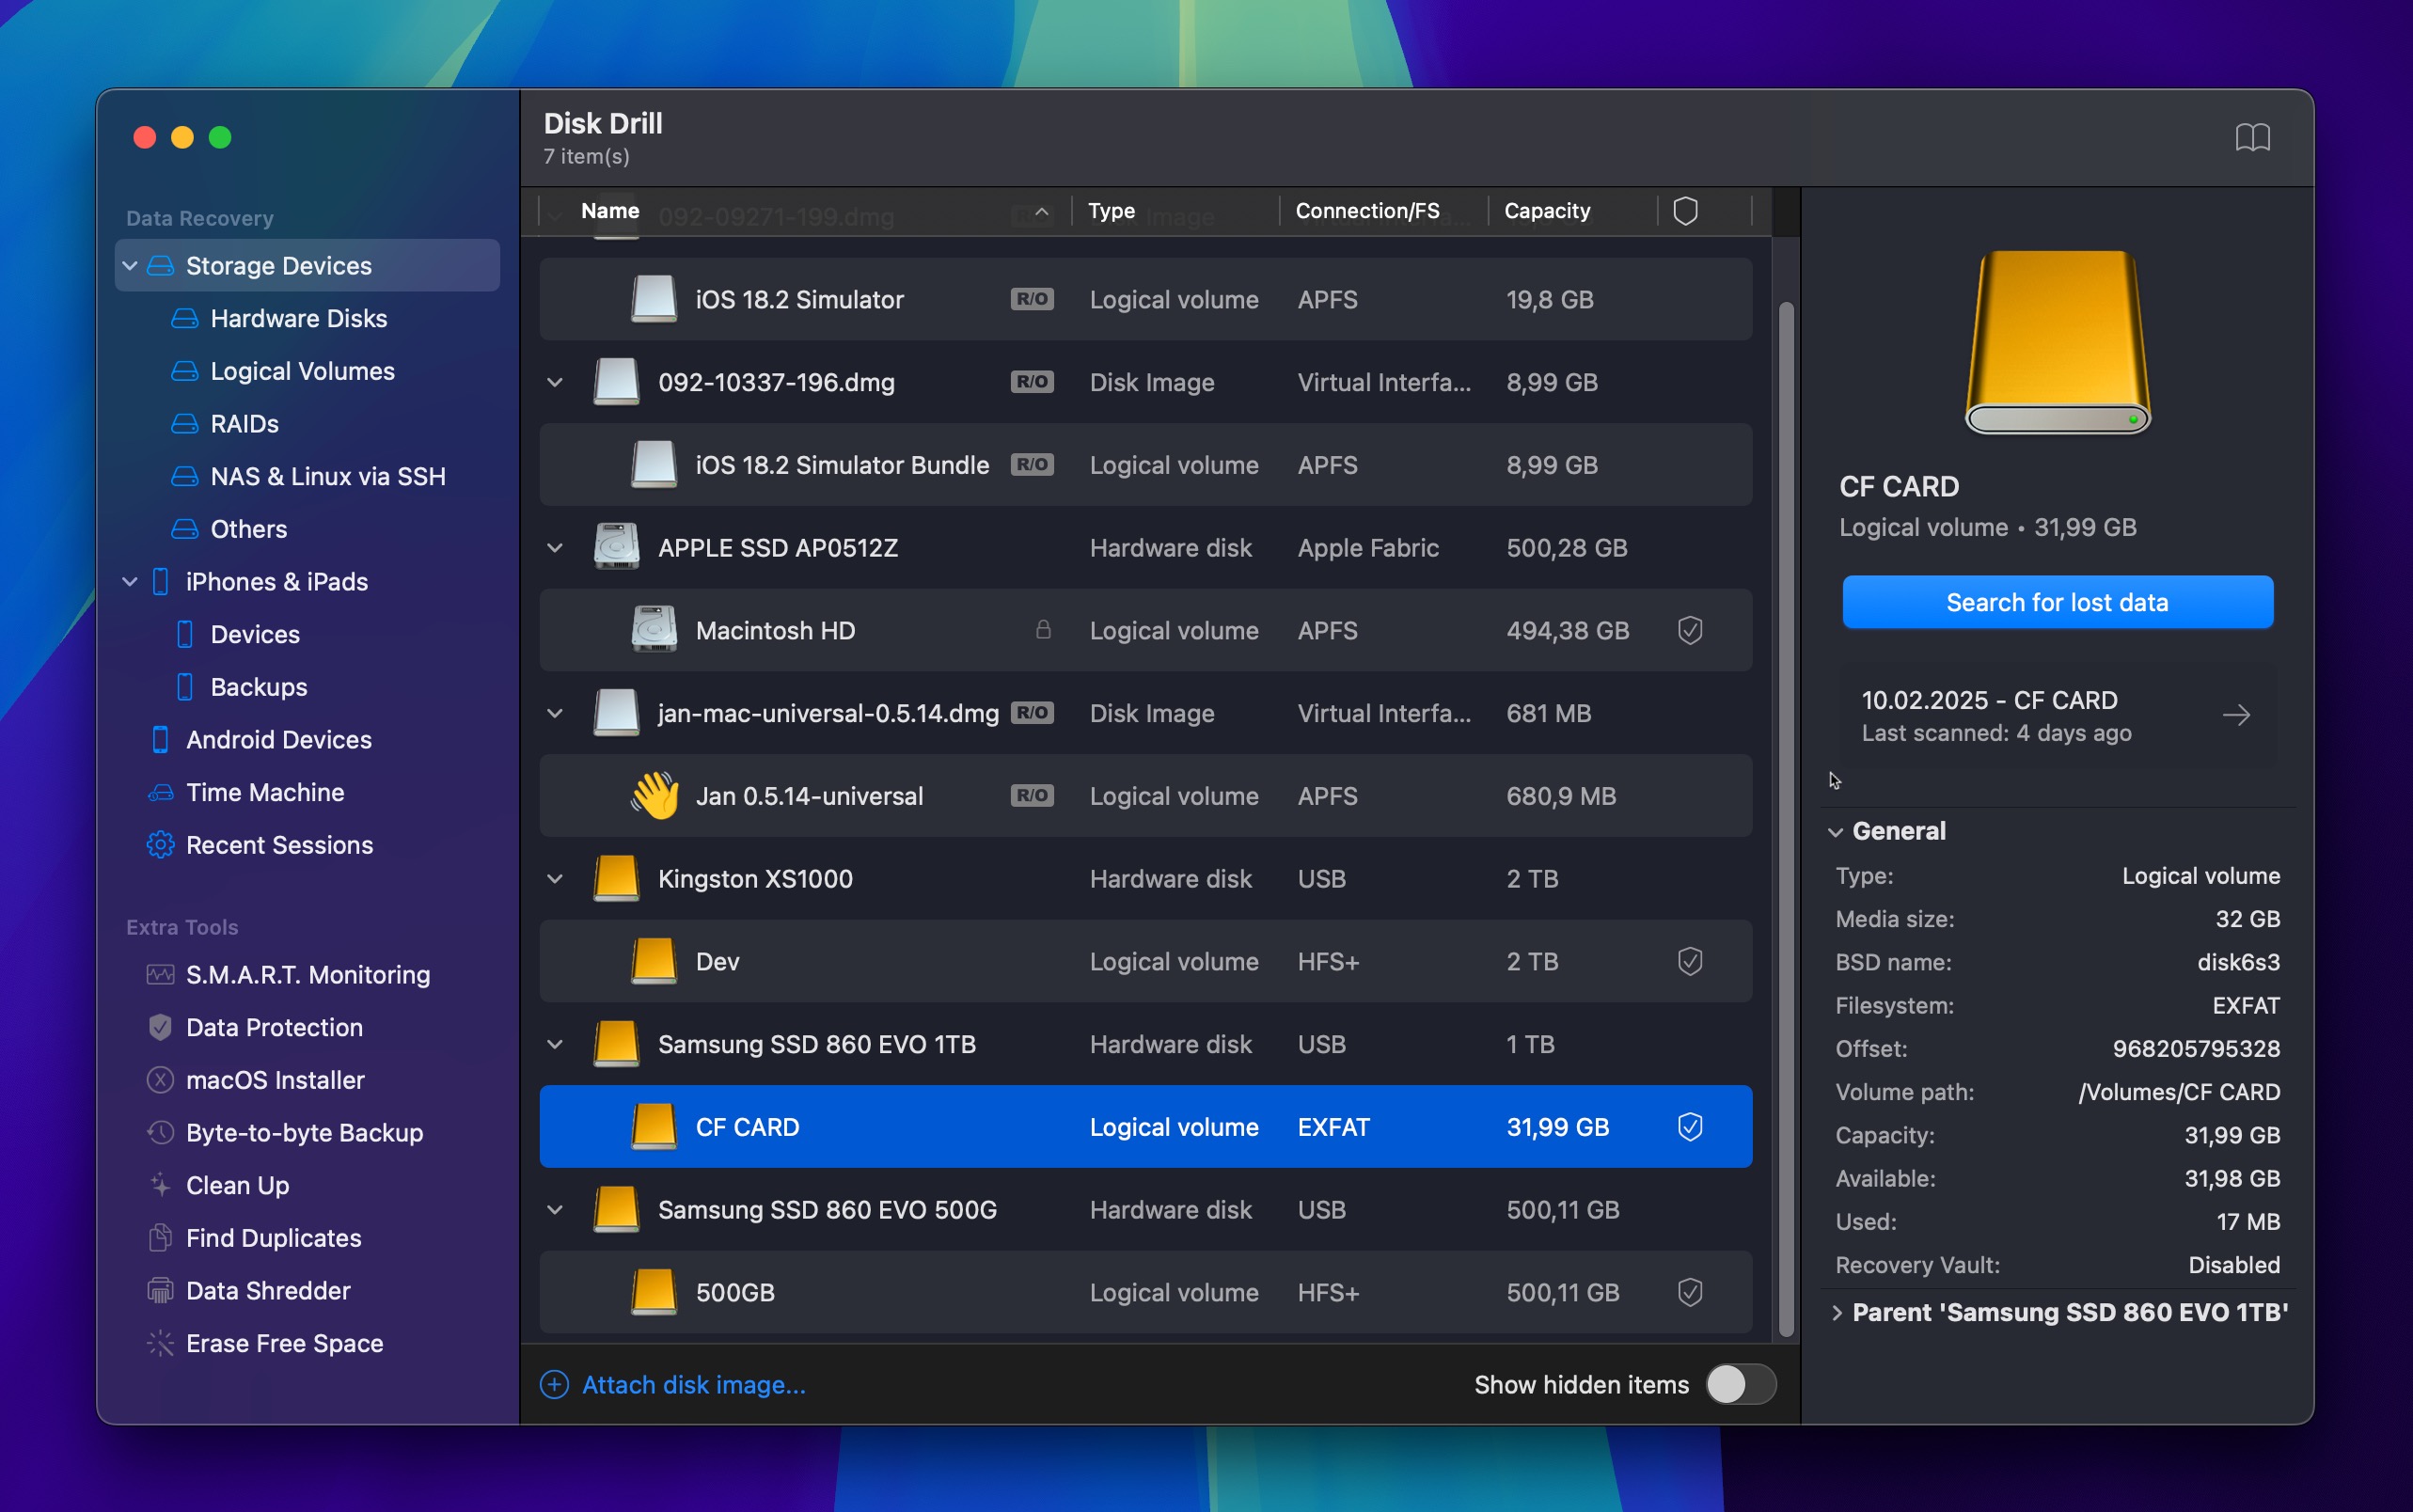
- Select the card from the displayed disk list.
- Click Search for lost data to begin scanning the card. Disk Drill will give you the option to choose between a Universal Scan and Advanced Camera Recovery (ACR). Since you’re recovering photos from an Android device rather than a dedicated camera, select Universal Scan here. ACR is designed specifically for reconstructing fragmented video files from cameras and won’t be necessary for this type of recovery.

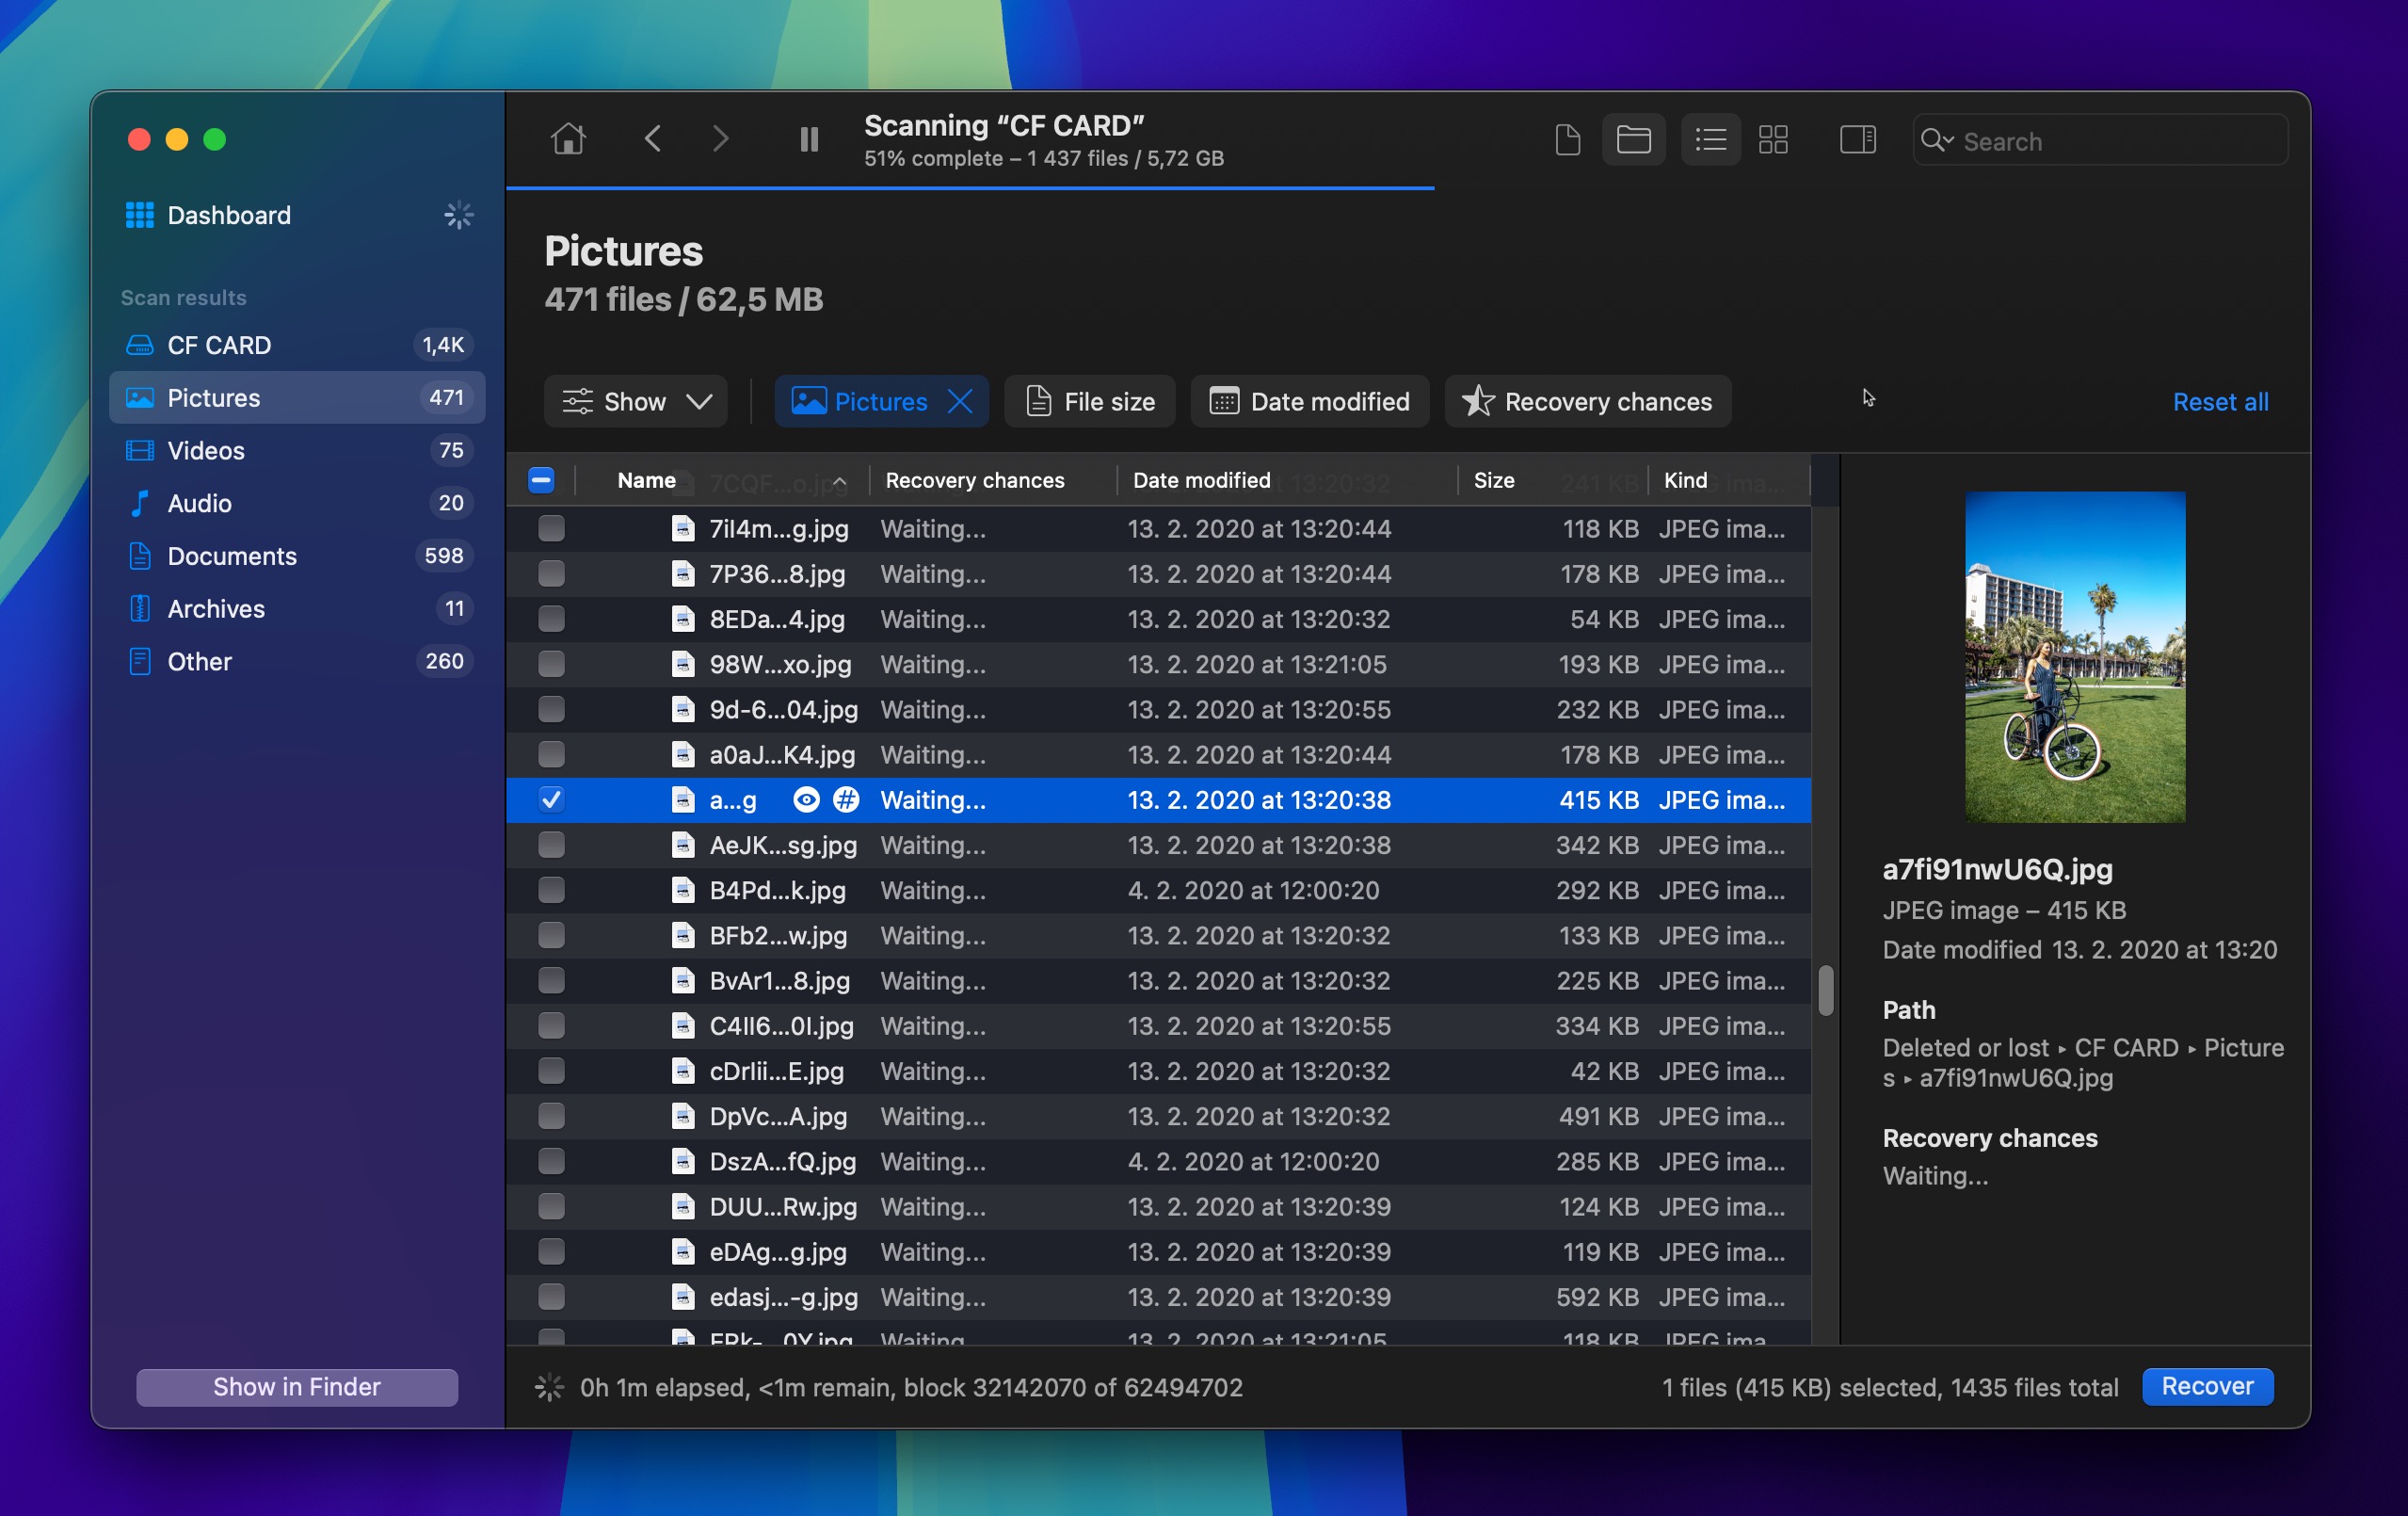
- Preview the photos found by the tool and select the files you want to recover.

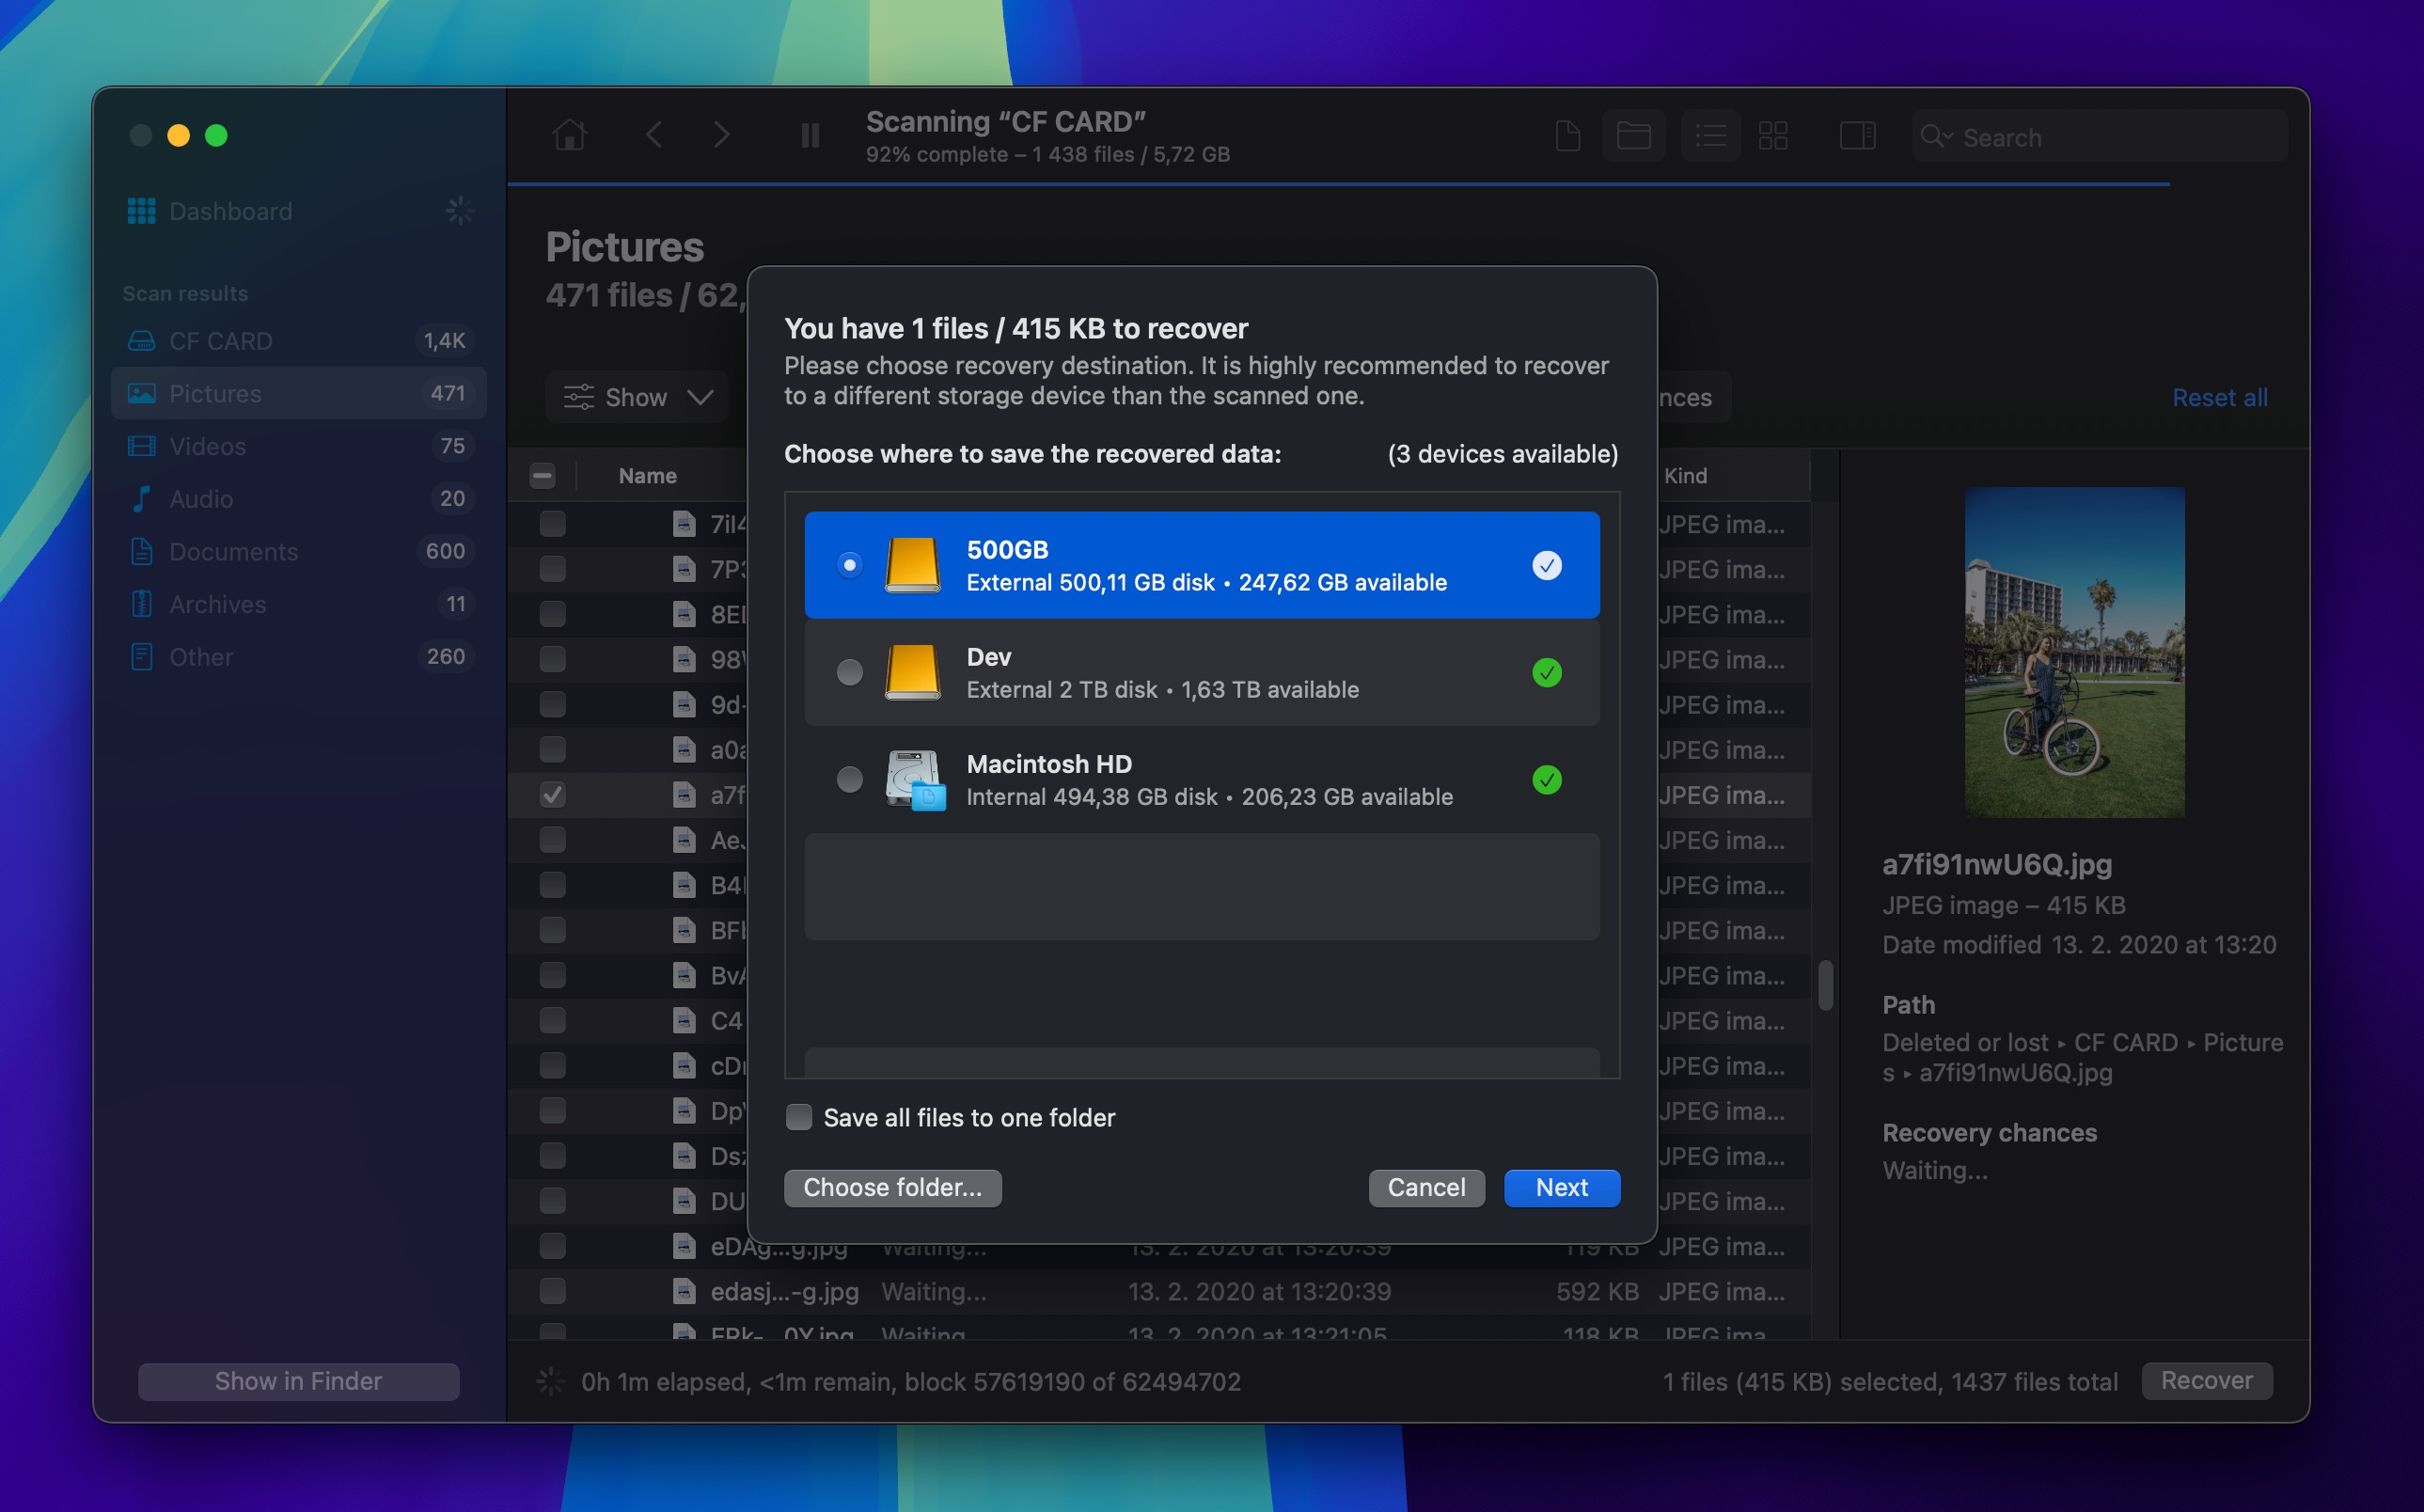
- Click Recover to restore your lost images.

Method 3: Via Photo Recovery Software (PC version for Mac and Windows)
The recovery of deleted photos from the internal storage of an Android device can be challenging because modern Android smartphones and tablets are encrypted and occasionally run TRIM-like commands that delete data from the device without a trace.
As if that wasn’t enough, photo recovery software for Mac and Windows works only with rooted Android devices, but you can’t root your device after losing your photos because the rooting process itself would almost certainly overwrite your lost photos and make them impossible to recover.
🍏 Disk Drill for Mac
But if your Android device isn’t encrypted and you’ve already rooted it in the past, then you can follow these simple steps to get your pictures back from an Android device:
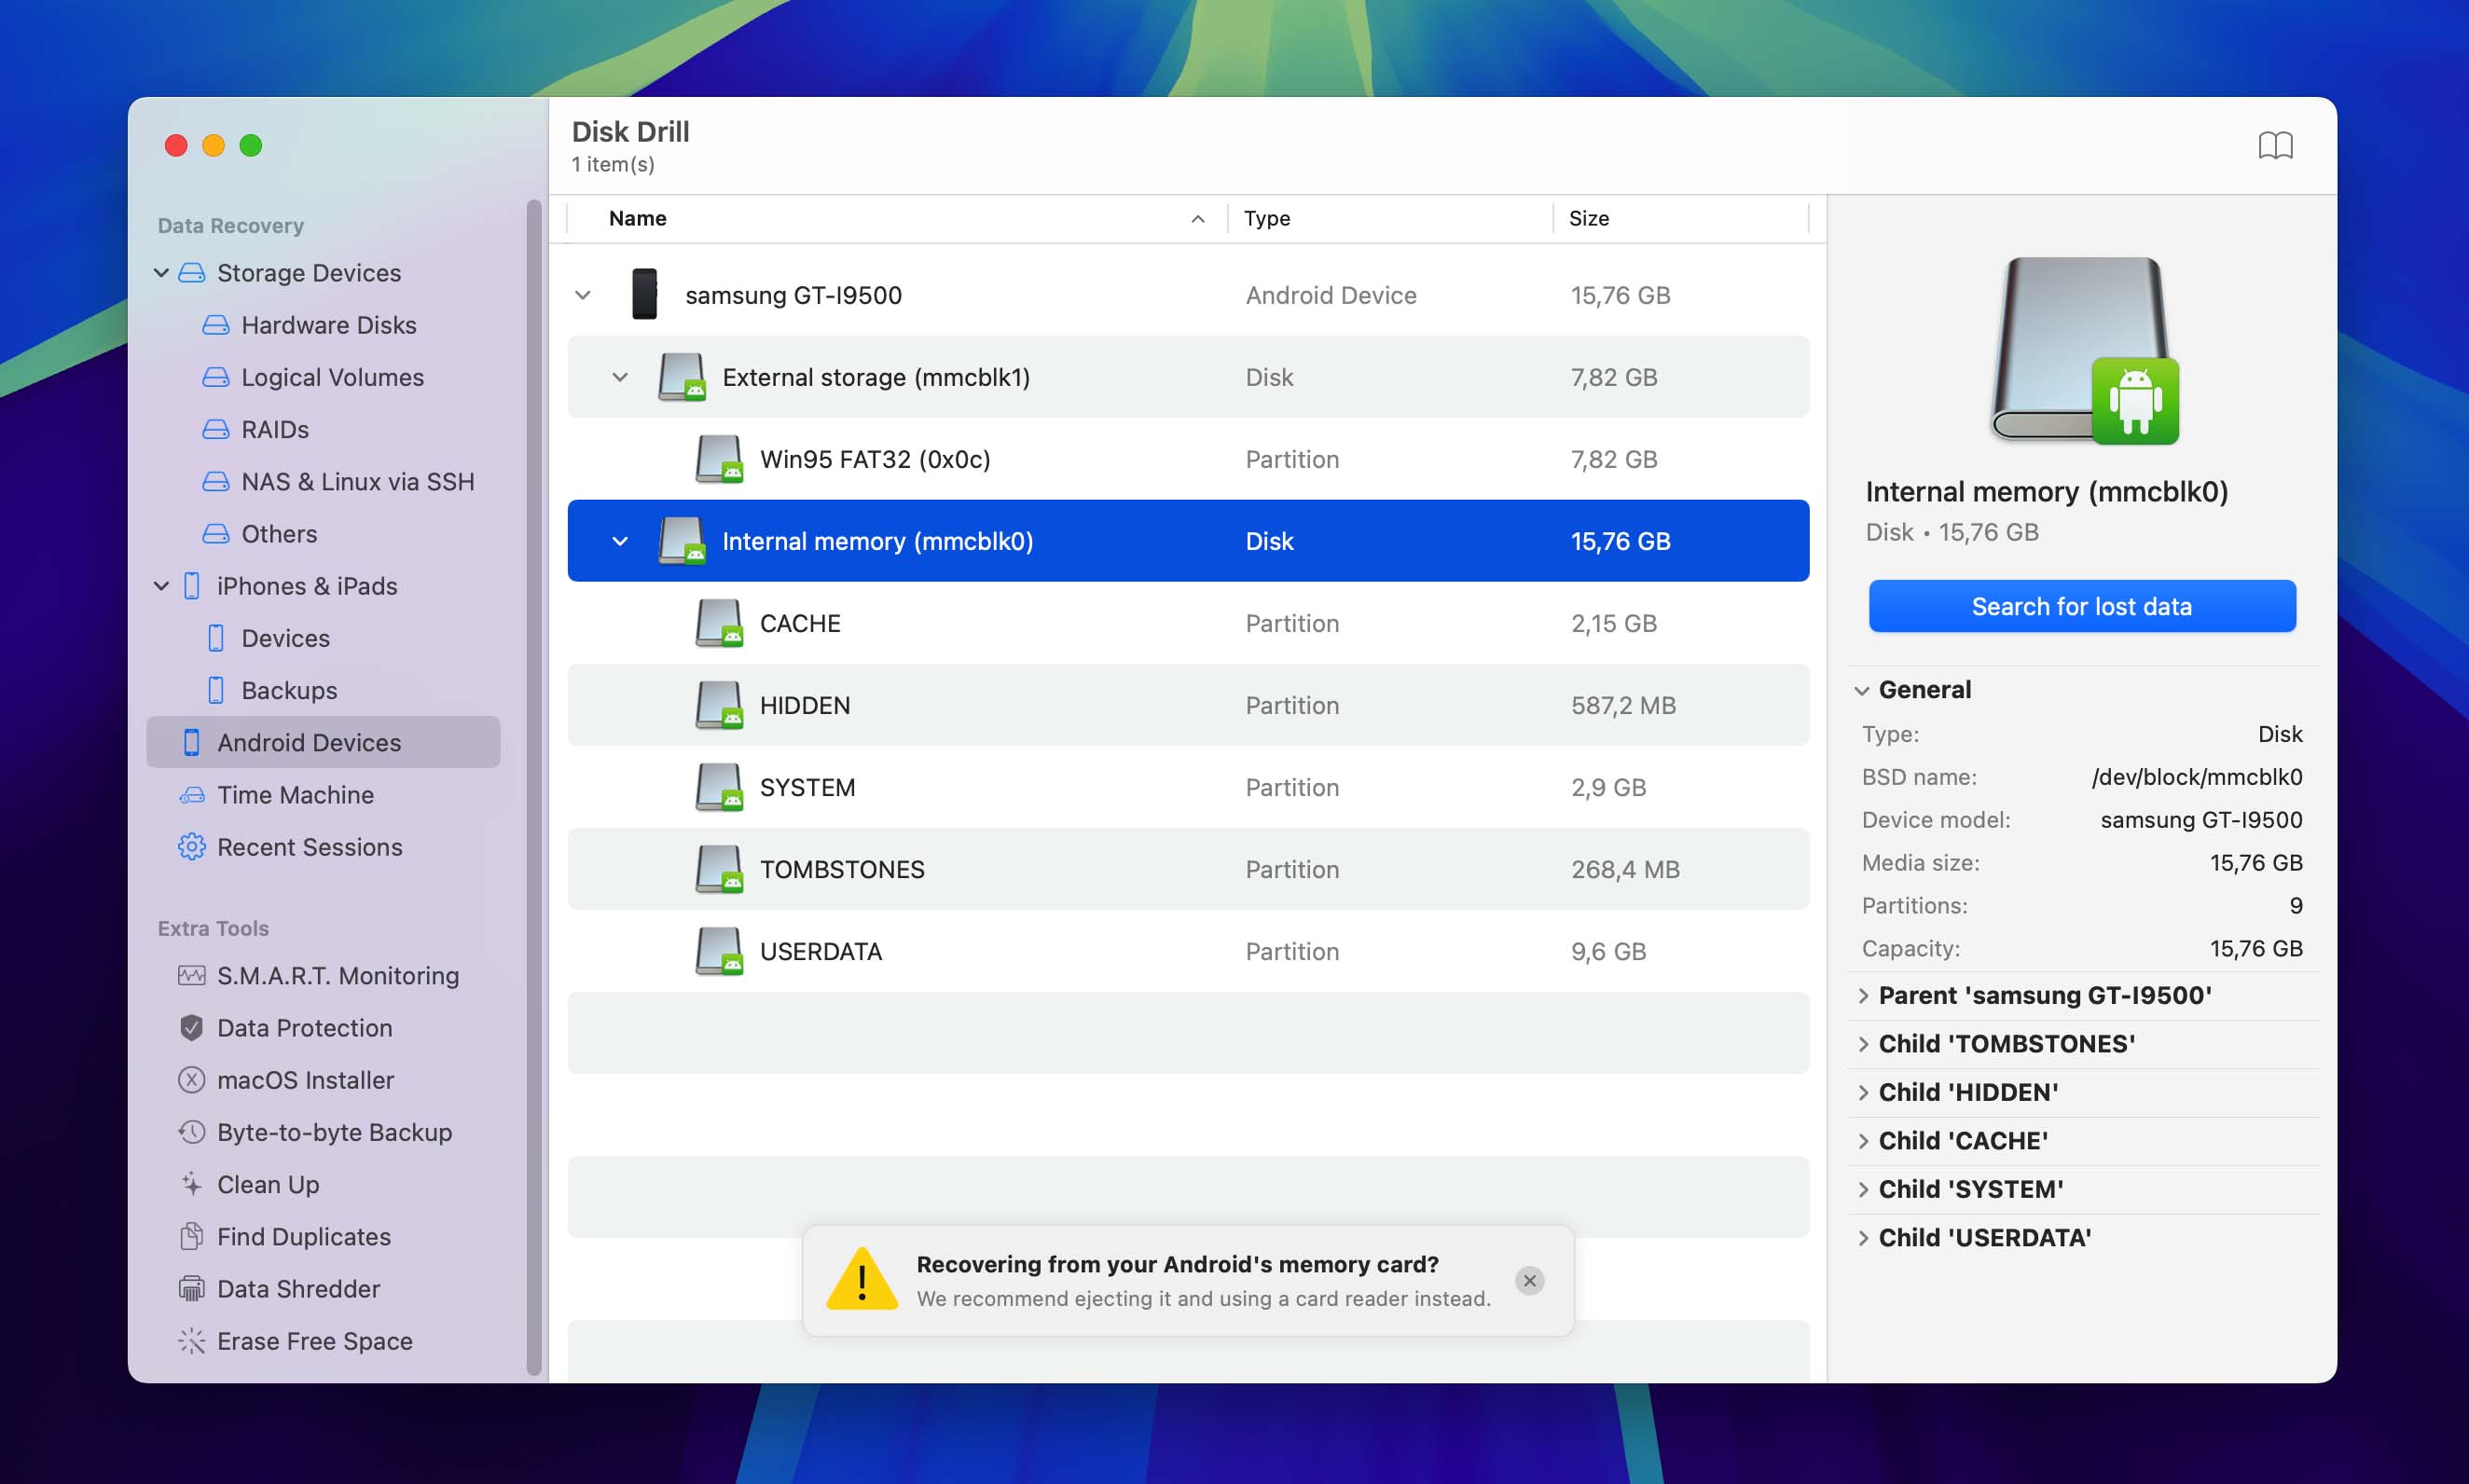
- Download and install Disk Drill for Mac.
- Connect your Android device that contained lost photos to your Mac via USB and allow Disk Drill to access your device.
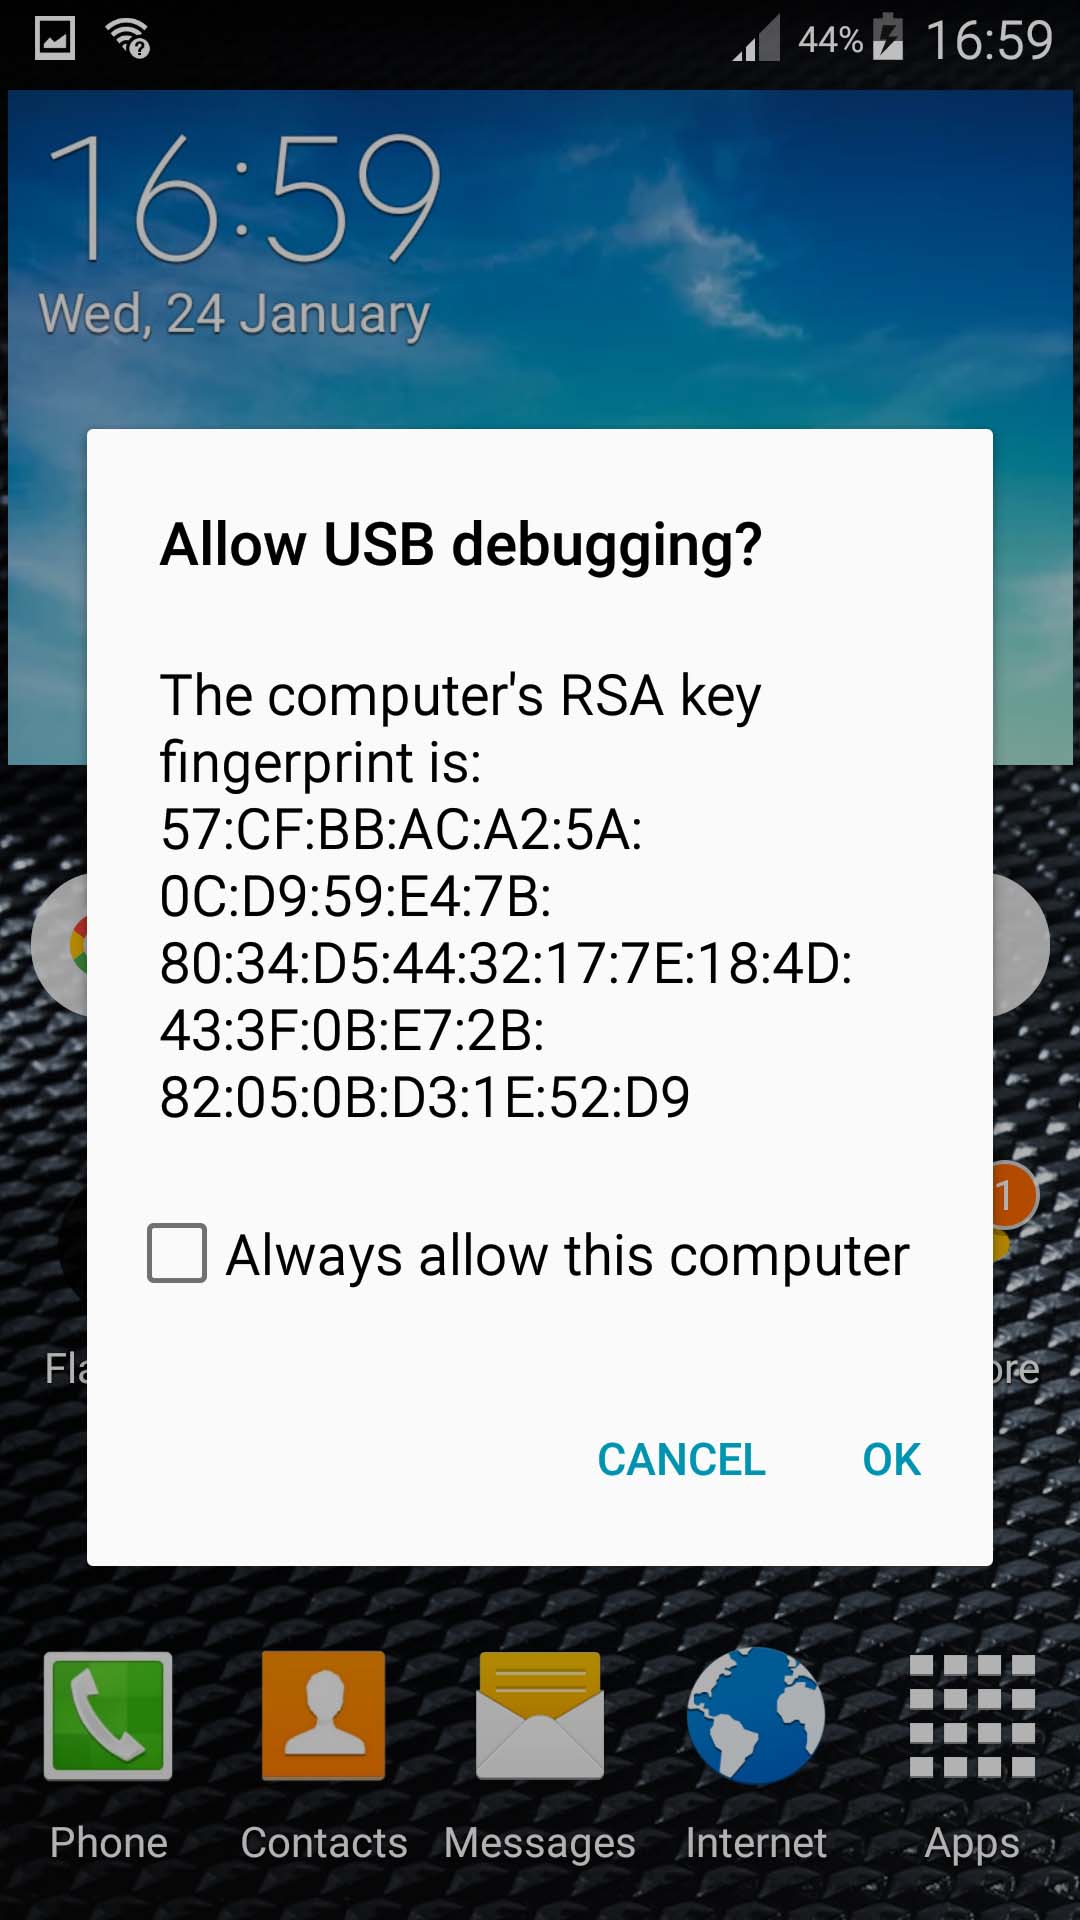
- You will need to root your device at this point to enable Disk Drill to recover your files. The app can recover files from internal and external memory.
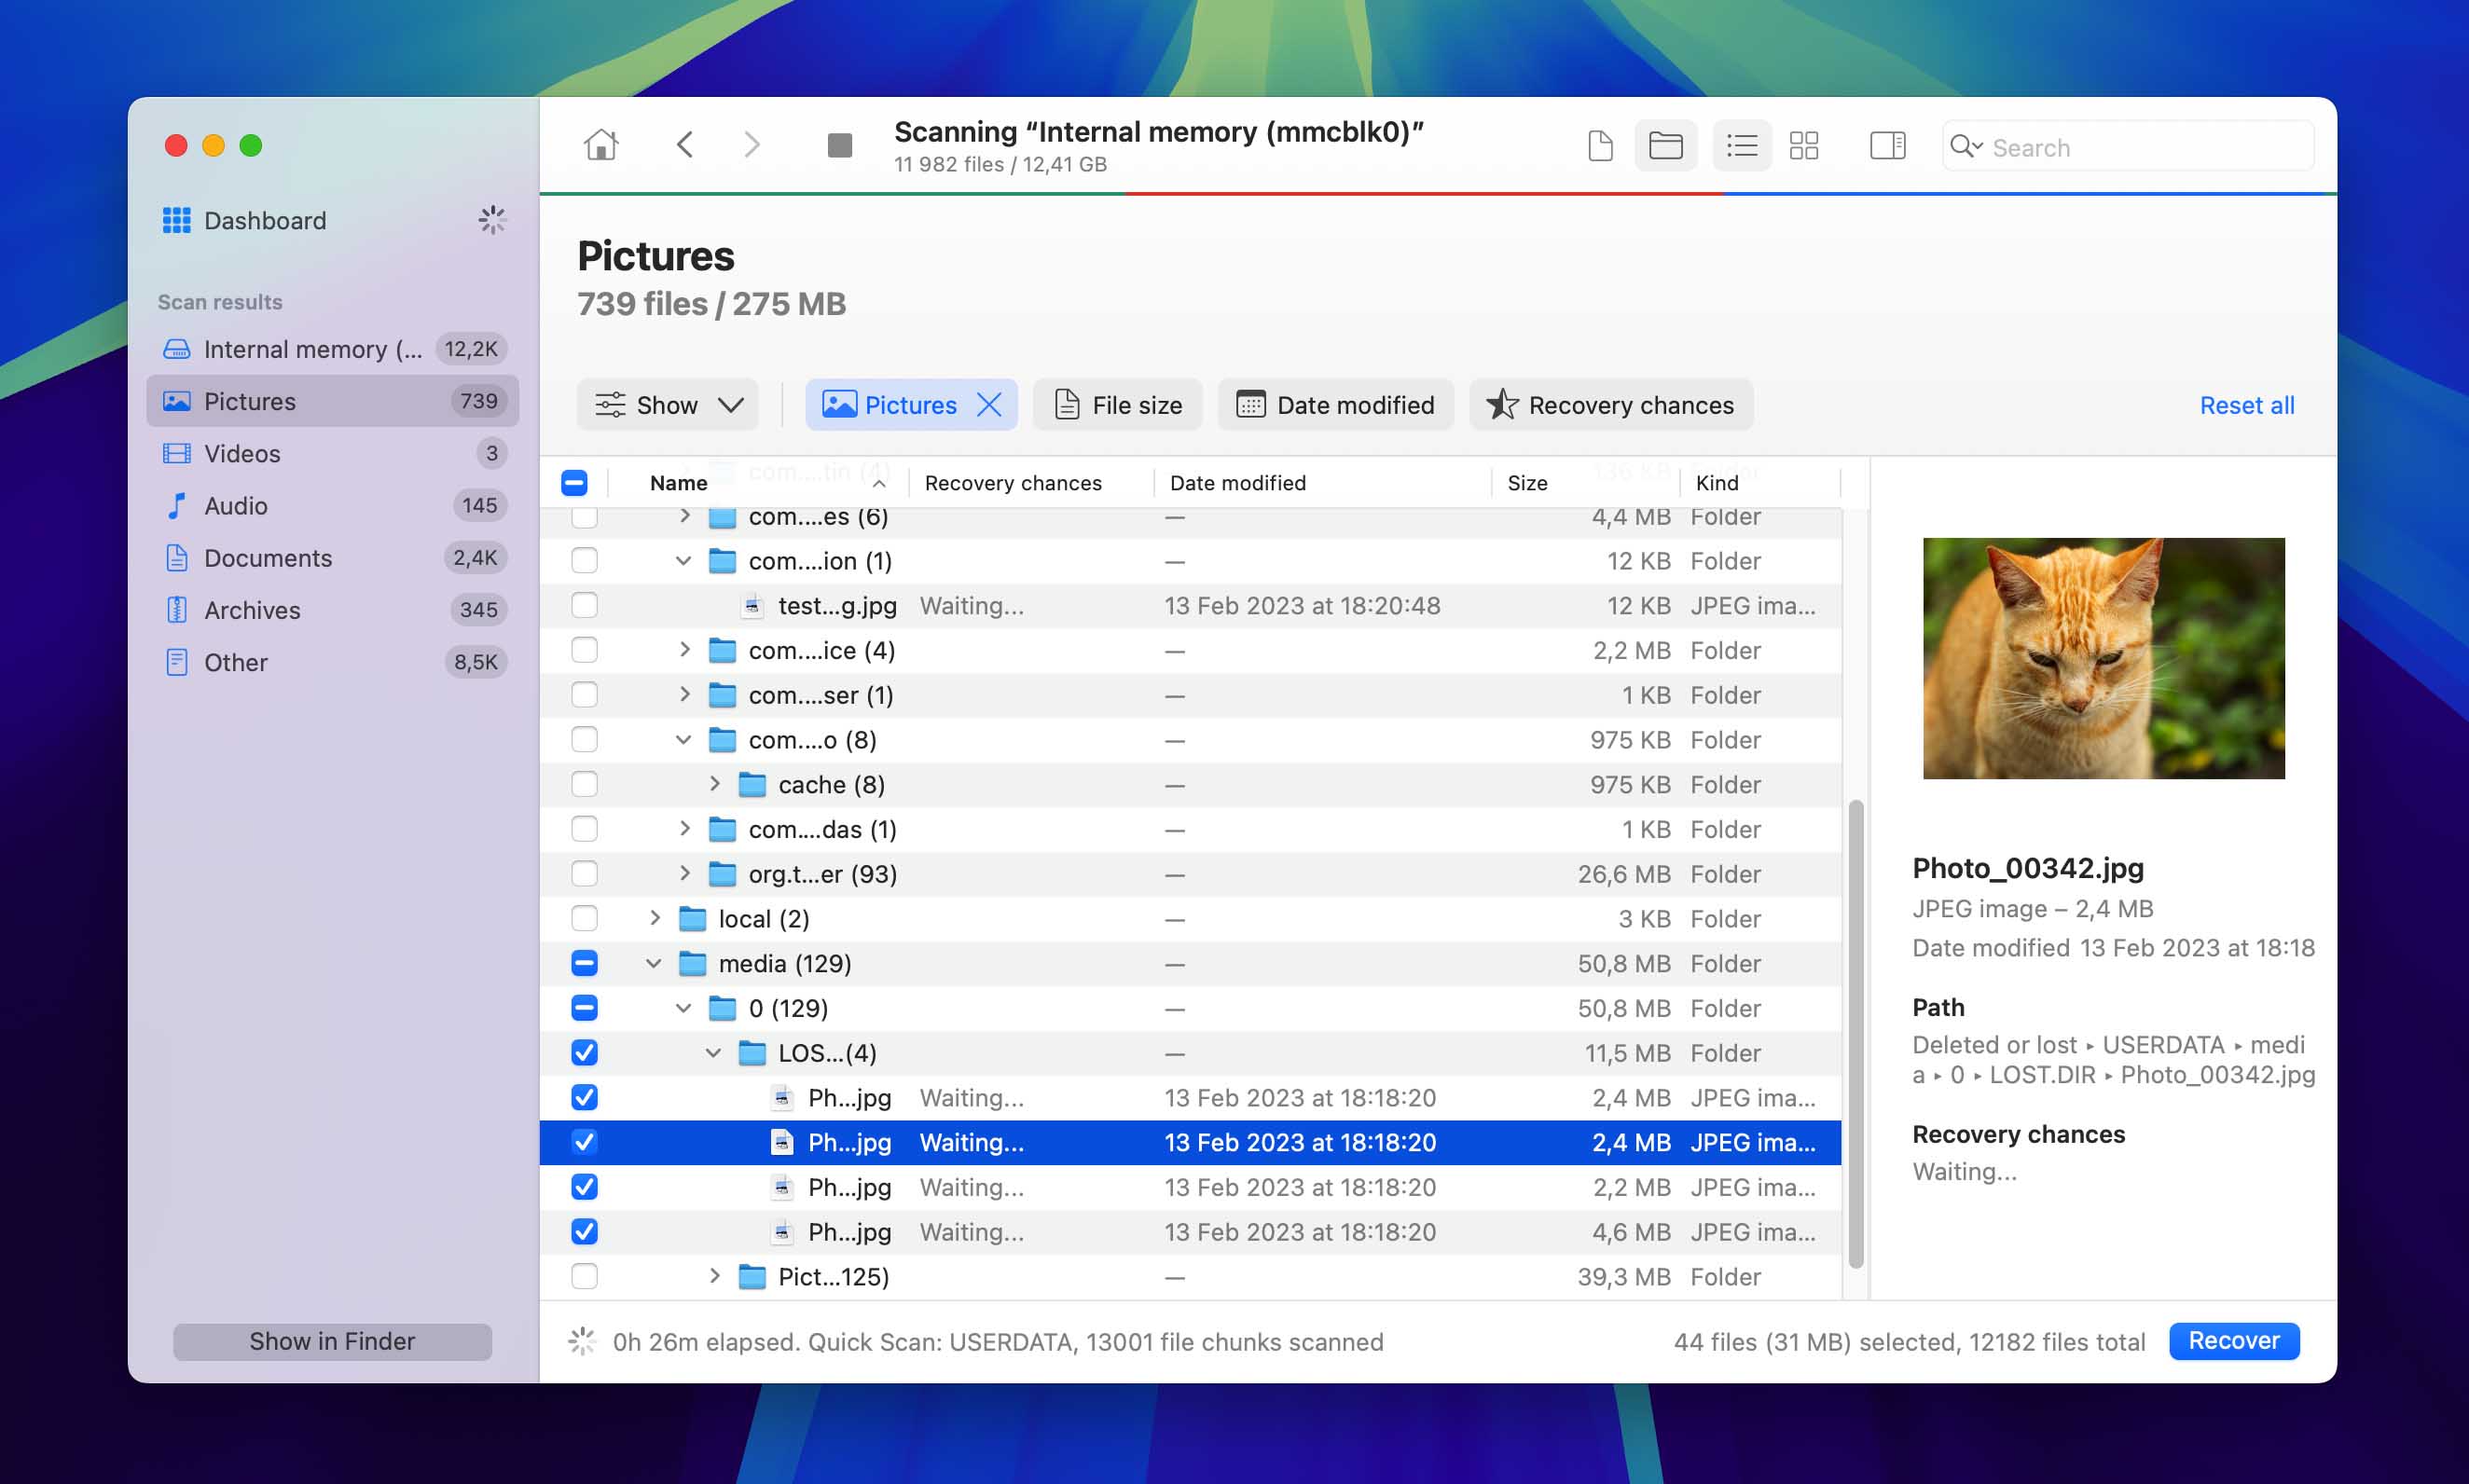
- Launch the program and select your disk from the displayed list.
- Click Search for lost data to scan for lost data.
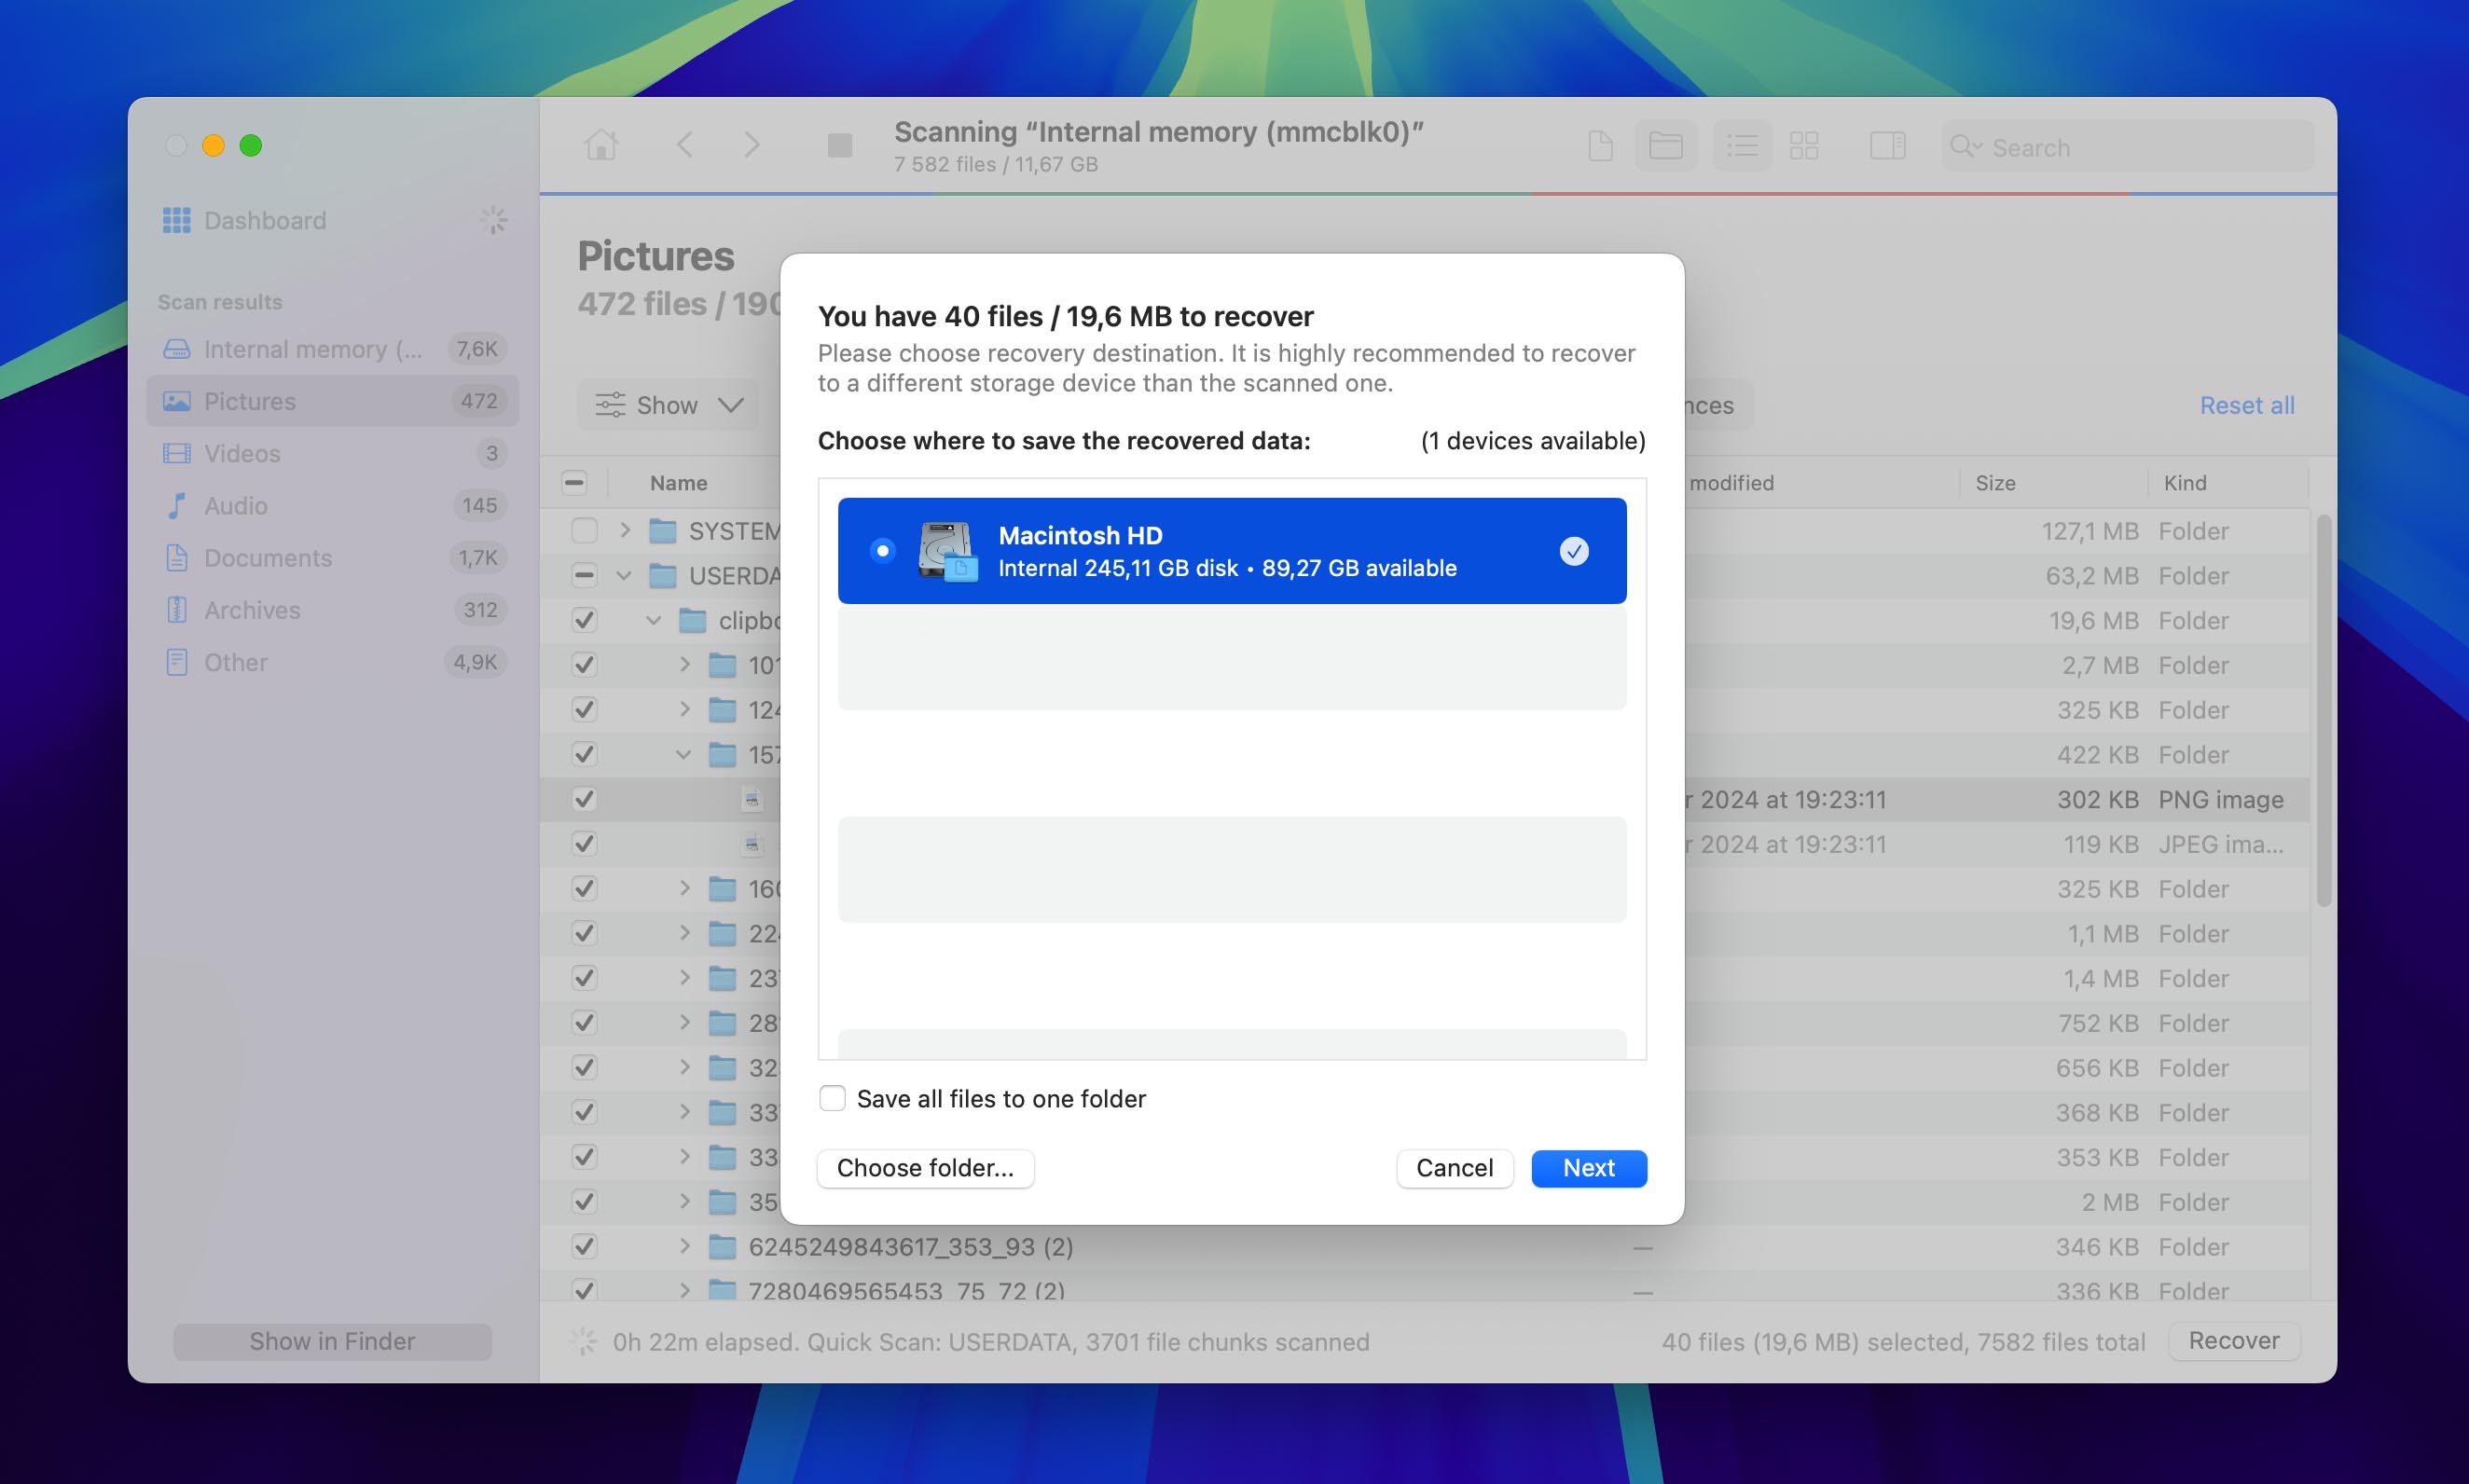
- Preview the pictures that can be recovered and make your selections.
- Click Recover to perform the recovery.
Method 4: With an App that Restores Deleted Photos
There are several apps available that can help you recover deleted photos on an Android device. One that you can get at the Google Play Store is DiskDigger.
Here’s how to use this recovery app:
- Download DiskDigger. The Free version is suitable for restoring photos and videos.
- Select the memory partition to scan if the device is rooted and grant the app root access. If not, tap the Start basic photo scan button to continue.
- Choose the type of files that you are looking to recover.
- Scan for files that match your search criteria.
- Save the found picture to an app, to the device, or as an FTP upload.

How to Recover Deleted Photos from iPhone
When you need to perform data recovery after deleting photos from your iPhone, then your options are similar to when recovering from an Android device, but with some Apple-specific features that can help.
In fact, the available native methods to recover recently deleted photos from an iPhone give you the best chance of success, so we recommend you start with them.
Method 1: Without Software
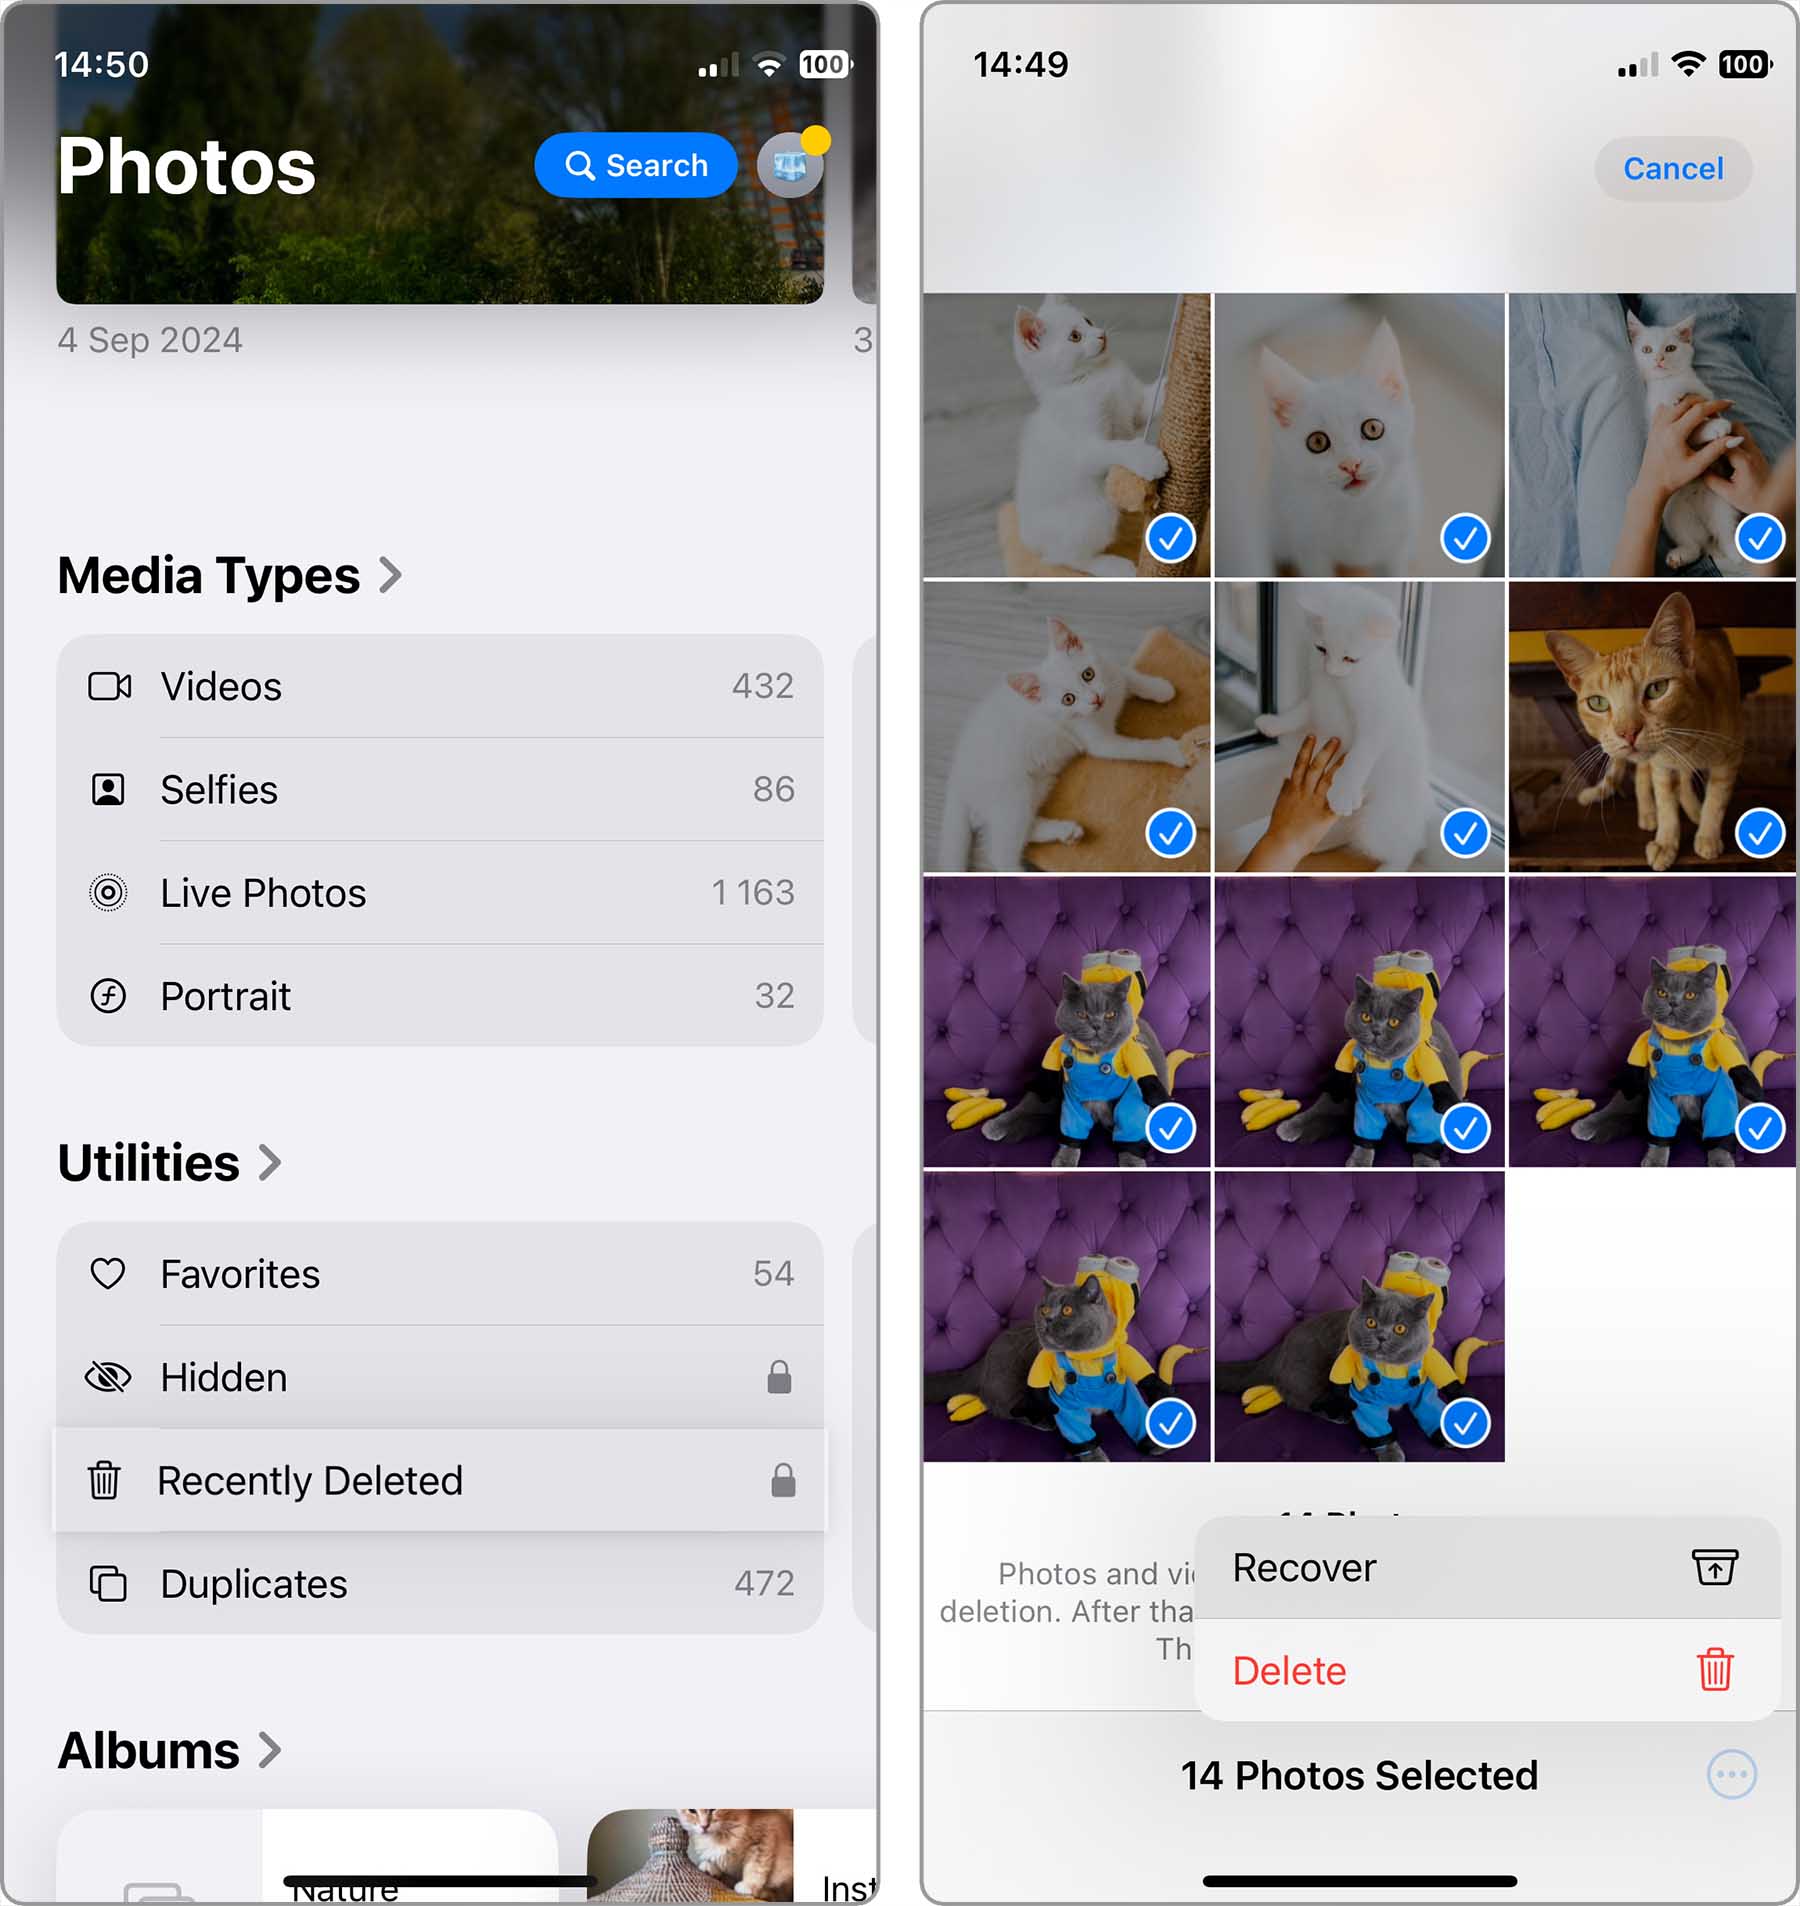
Photos deleted on iOS are moved to the Recently Deleted folder for a limited amount of time, usually 30 days. If you’ve noticed the deletion within this timeframe, then you can follow these steps to retrieve them from the folder:
- Open the Photos app on your iPhone.
- Scroll to the bottom of the display and choose the Recently Deleted folder.
- Locate the photos you want to recover.
- Select the file and tap on Recover to restore the photo.
Method 2: With an Image Recovery Tool
While direct photo recovery from iPhones is limited by iOS security features, you can still use iOS photo recovery software like Disk Drill to retrieve deleted photos from iPhone backups.
The biggest advantage of recovering from your iPhone backups over using the same backups to perform a complete iPhone restore is the ability to recover only the missing photos, so you can leave your other data, apps, and settings intact.
🍏 For Mac
Follow these simple steps to recover photos from your iPhone with Disk Drill:
- Download and install Disk Drill for Mac.
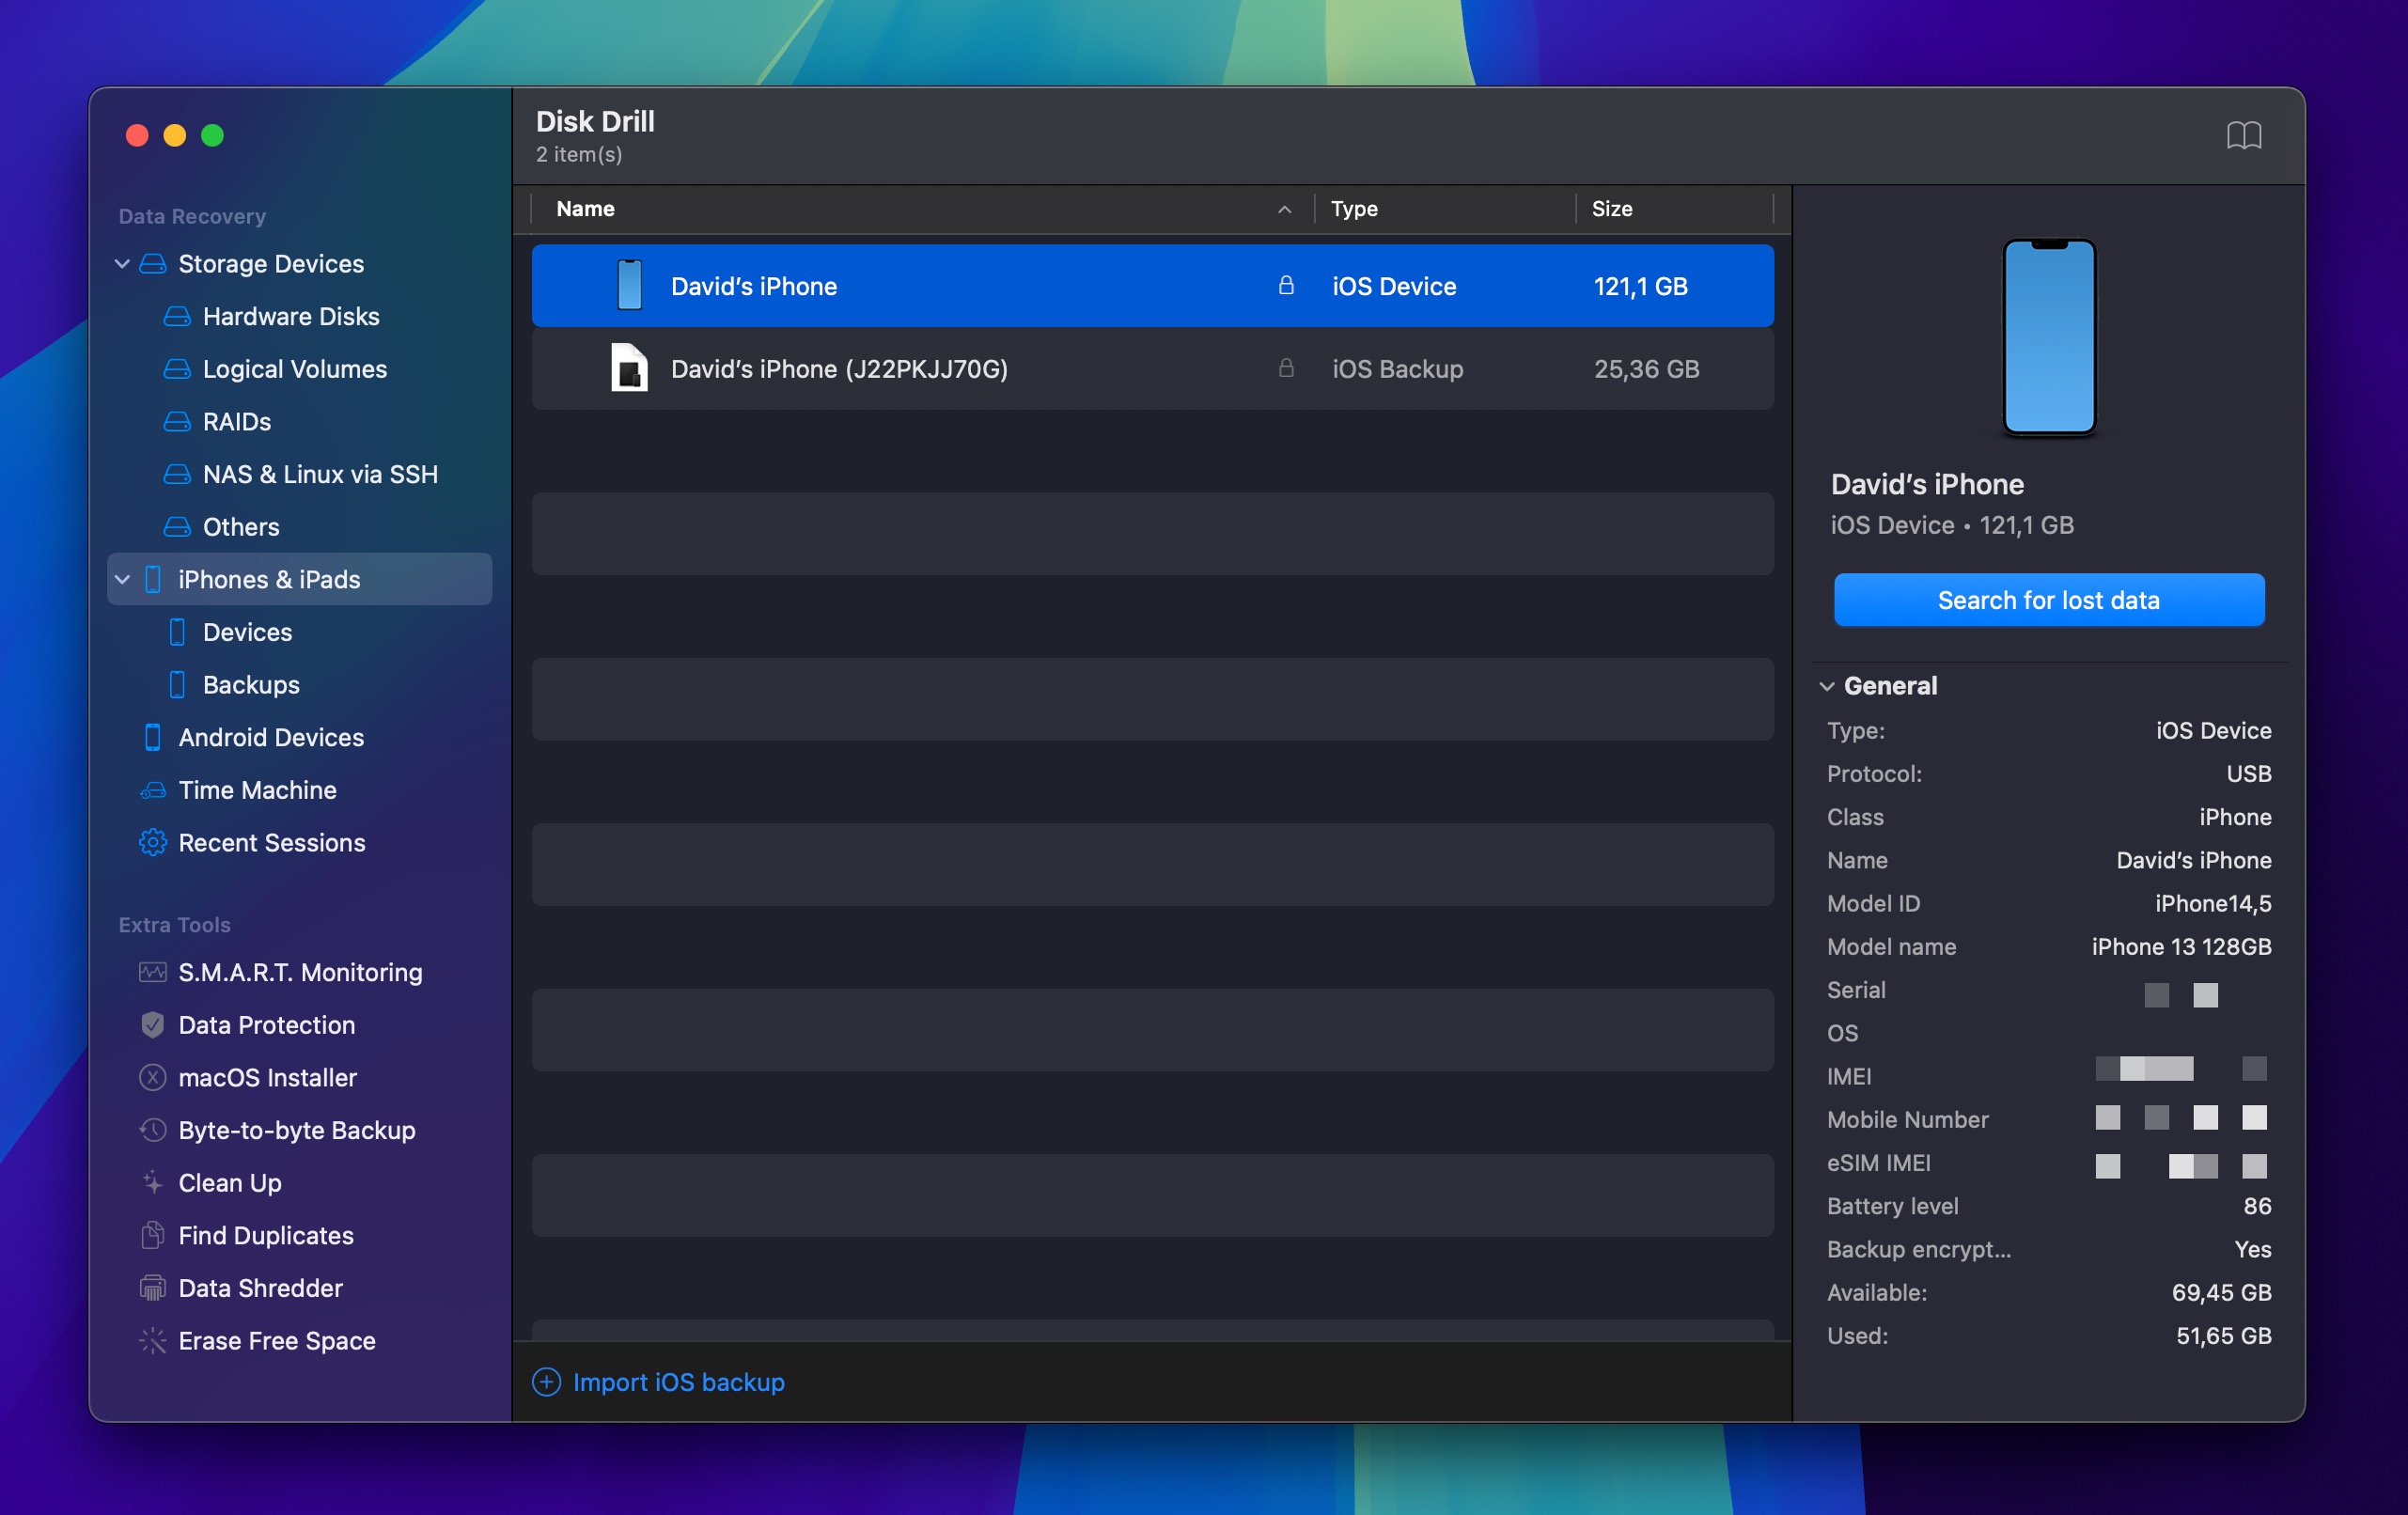
- Connect your iPhone to your Mac. Tap Trust on your iPhone when the trust dialog appears.
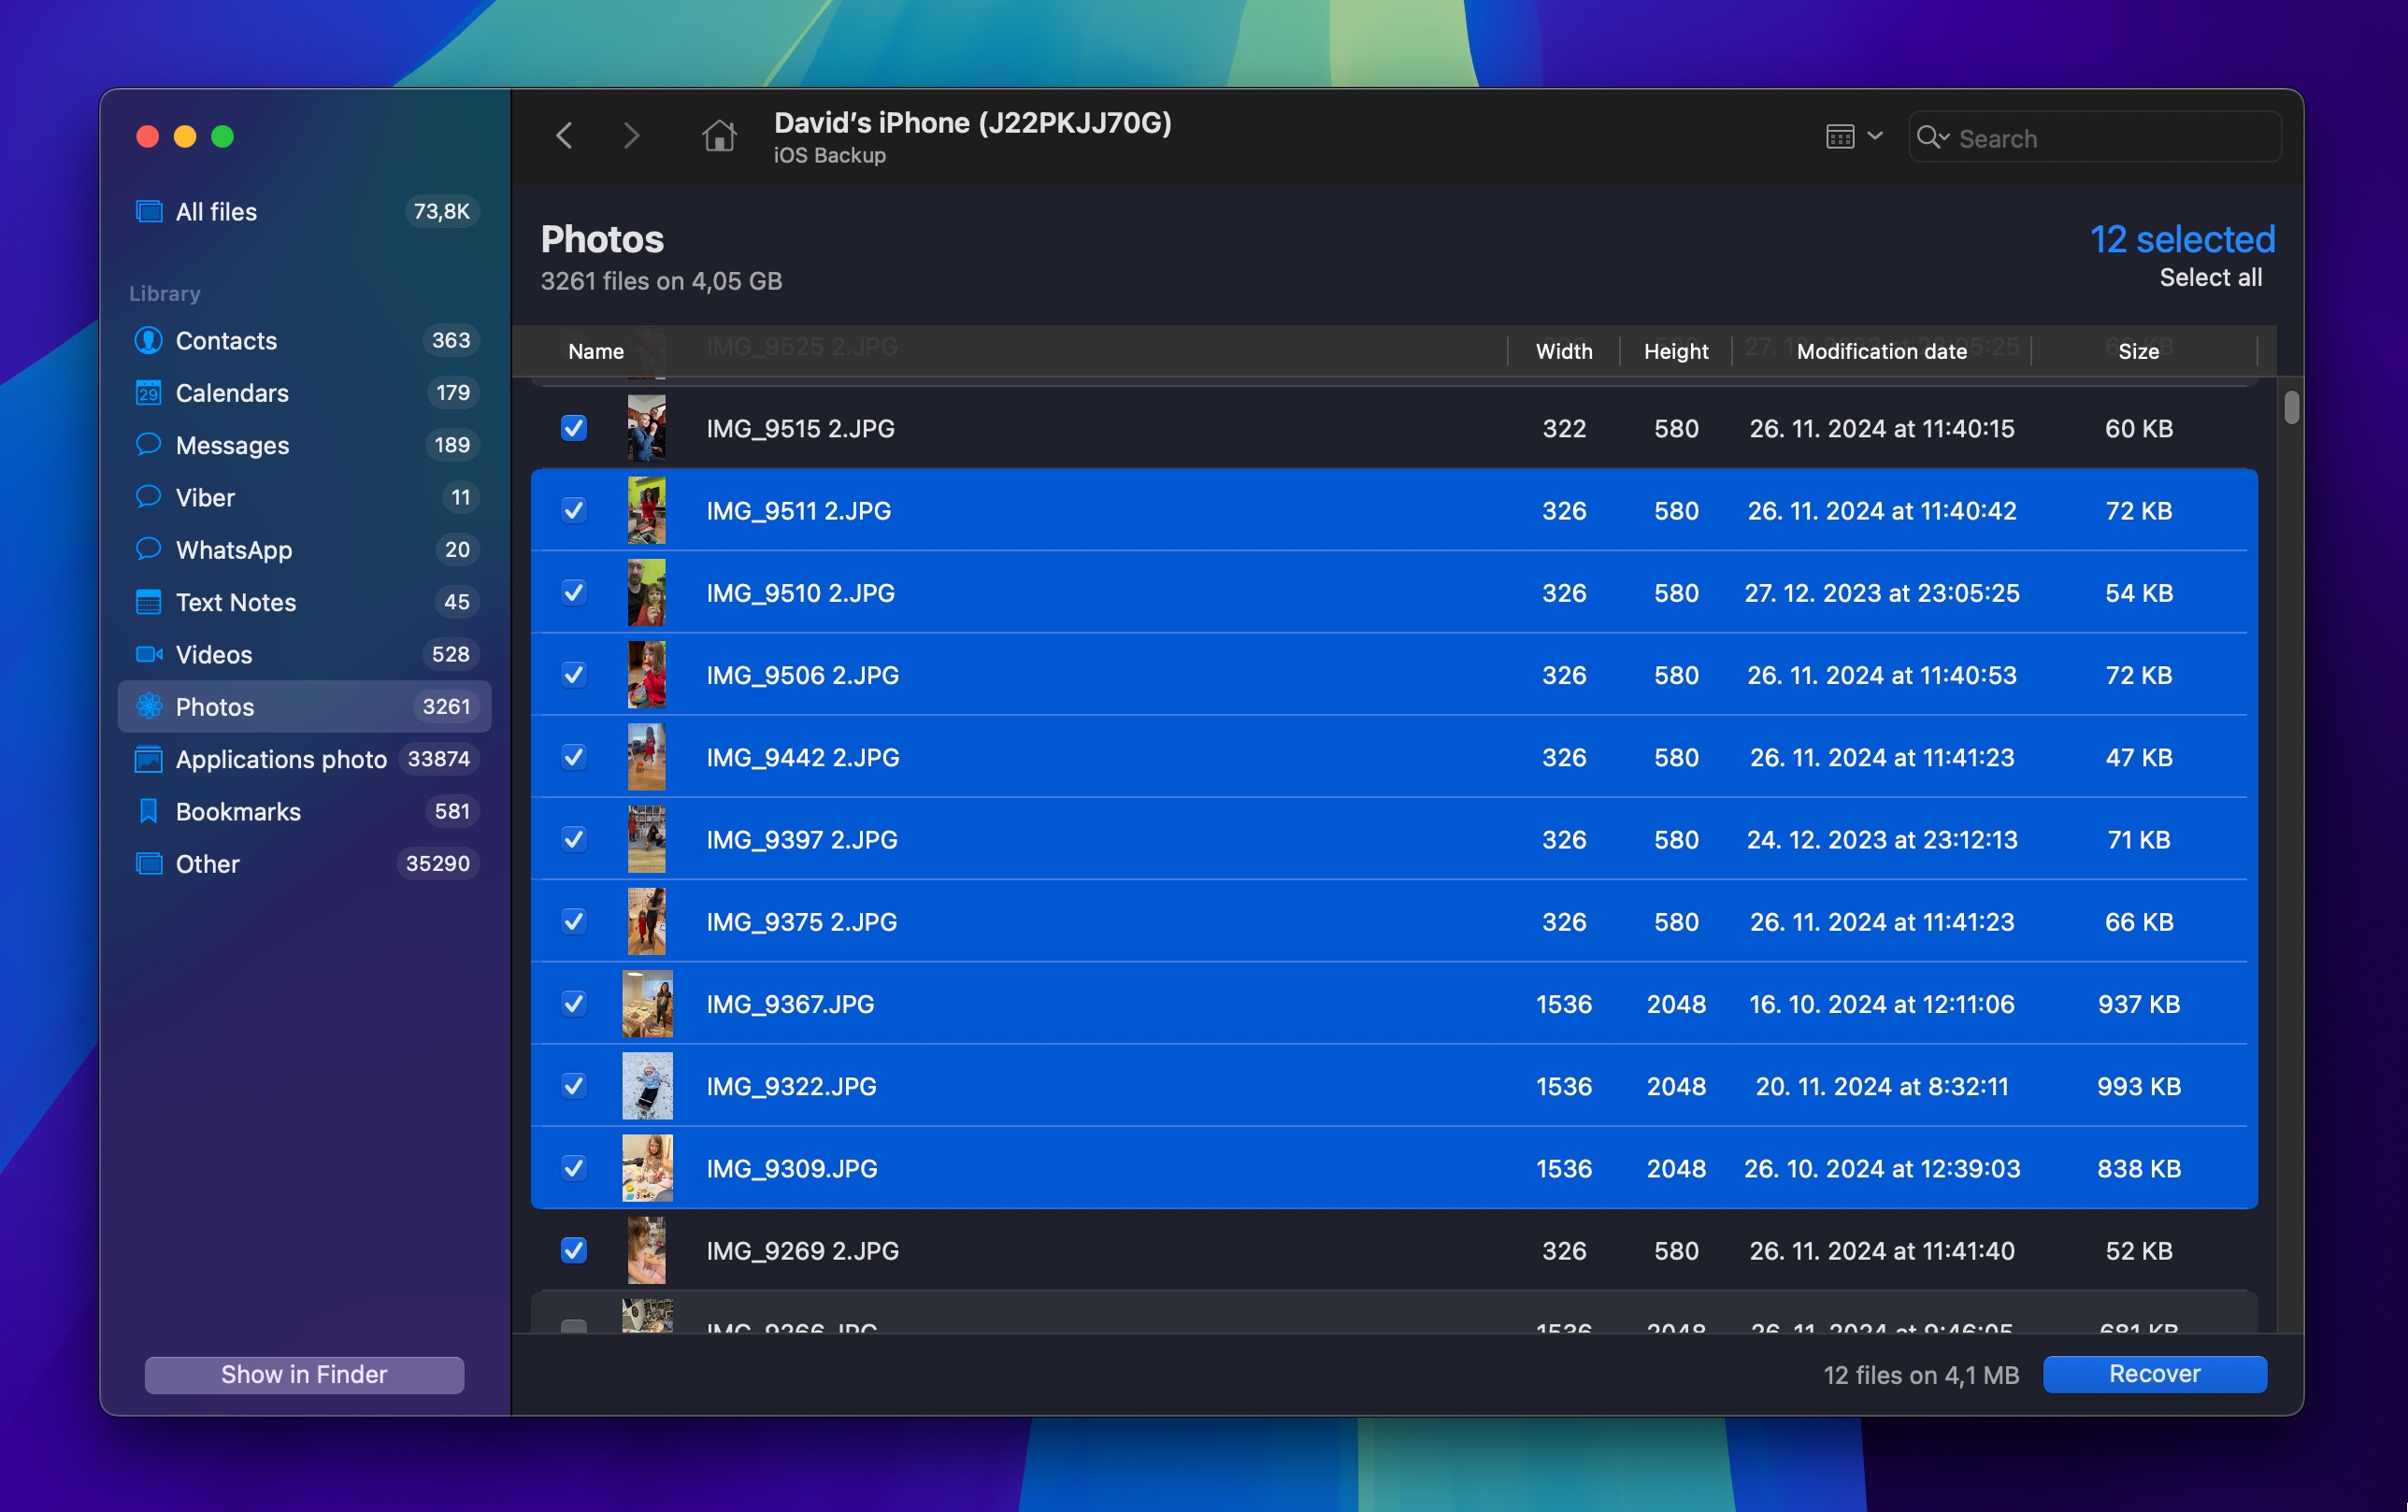
- Launch the program and choose the iPhone from the disk list. You’ll need approximately twice your iPhone’s storage capacity in free space on your Mac to recover your photos, as Disk Drill creates a backup of your iPhone for safe data retrieval.
- Click Search for lost data to scan the device for lost data and enter your iPhone’s password when prompted.
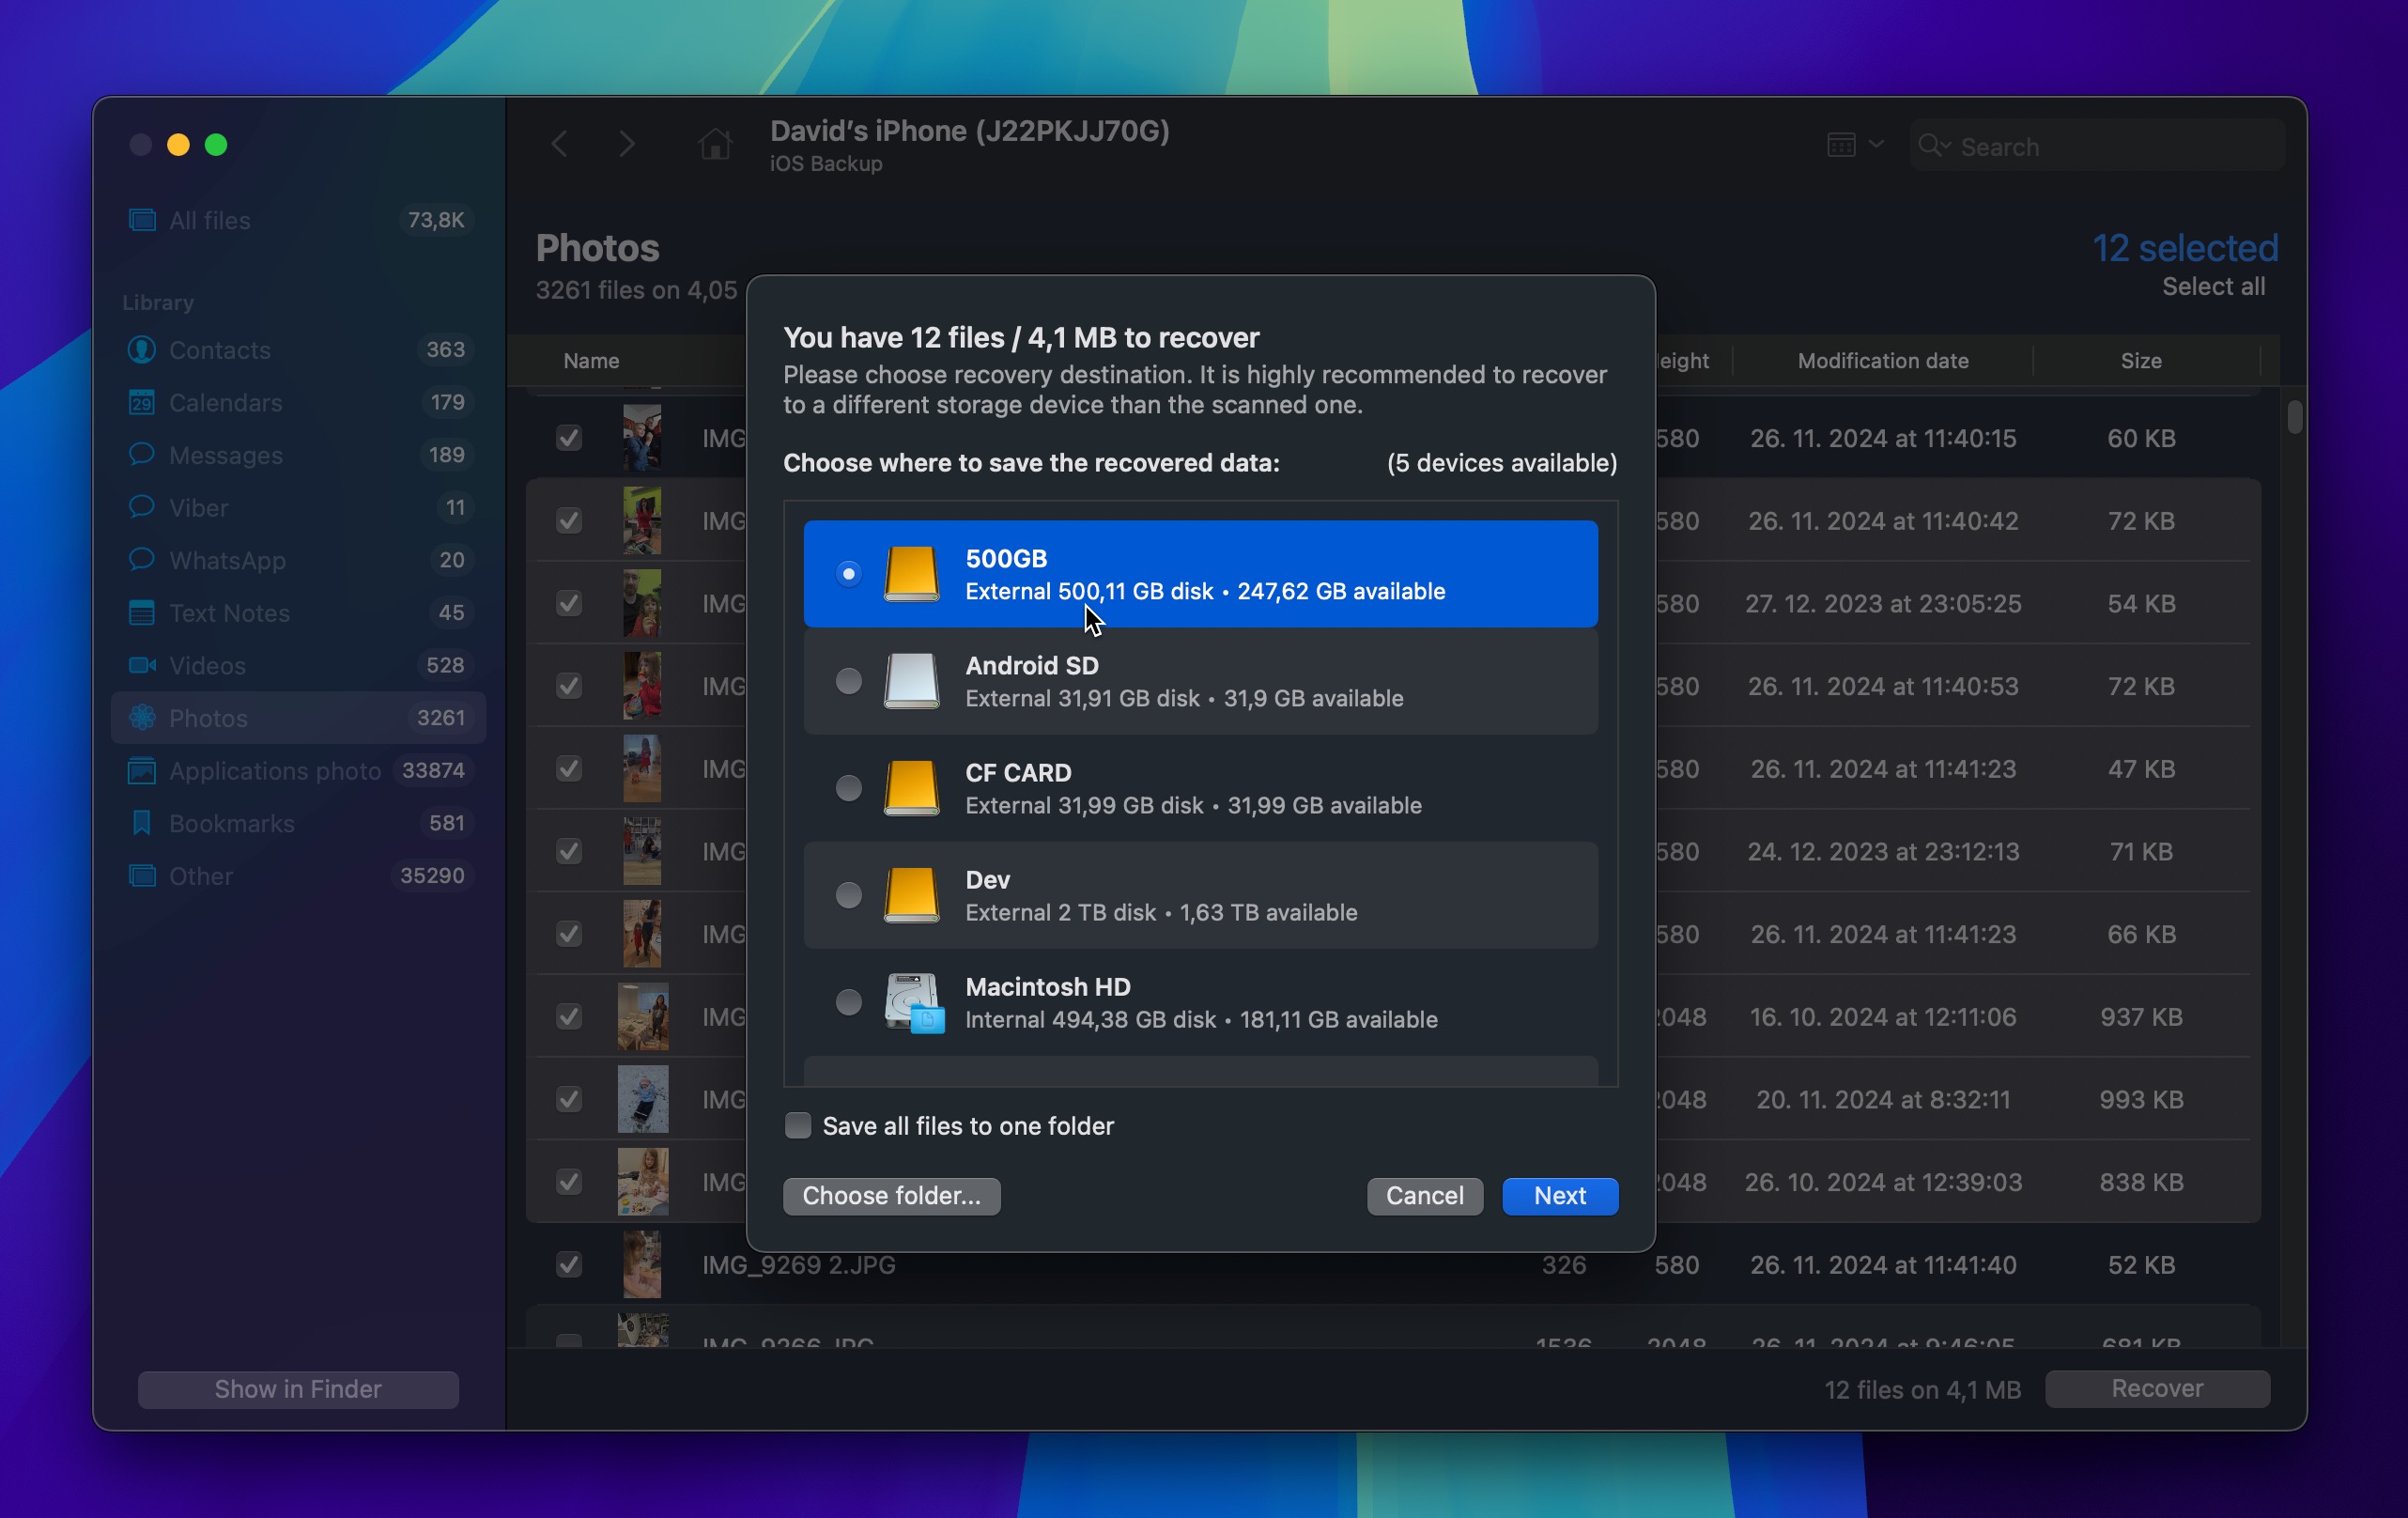
- Preview the photos that the app can recover and choose those you want to restore.
- Click Recover to finish the recovery.
🪟 For Windows
Here are the steps to use with Enigma Recovery software to get back lost photos from an iPhone:
- Download and install the Enigma Recovery tool.
- The utility gives you the option to recover from the device, iTunes or iCloud.
- Select recover from your device and trust the computer when prompted by your device.
- Choose the type of data to search for and click the Start Scan button.
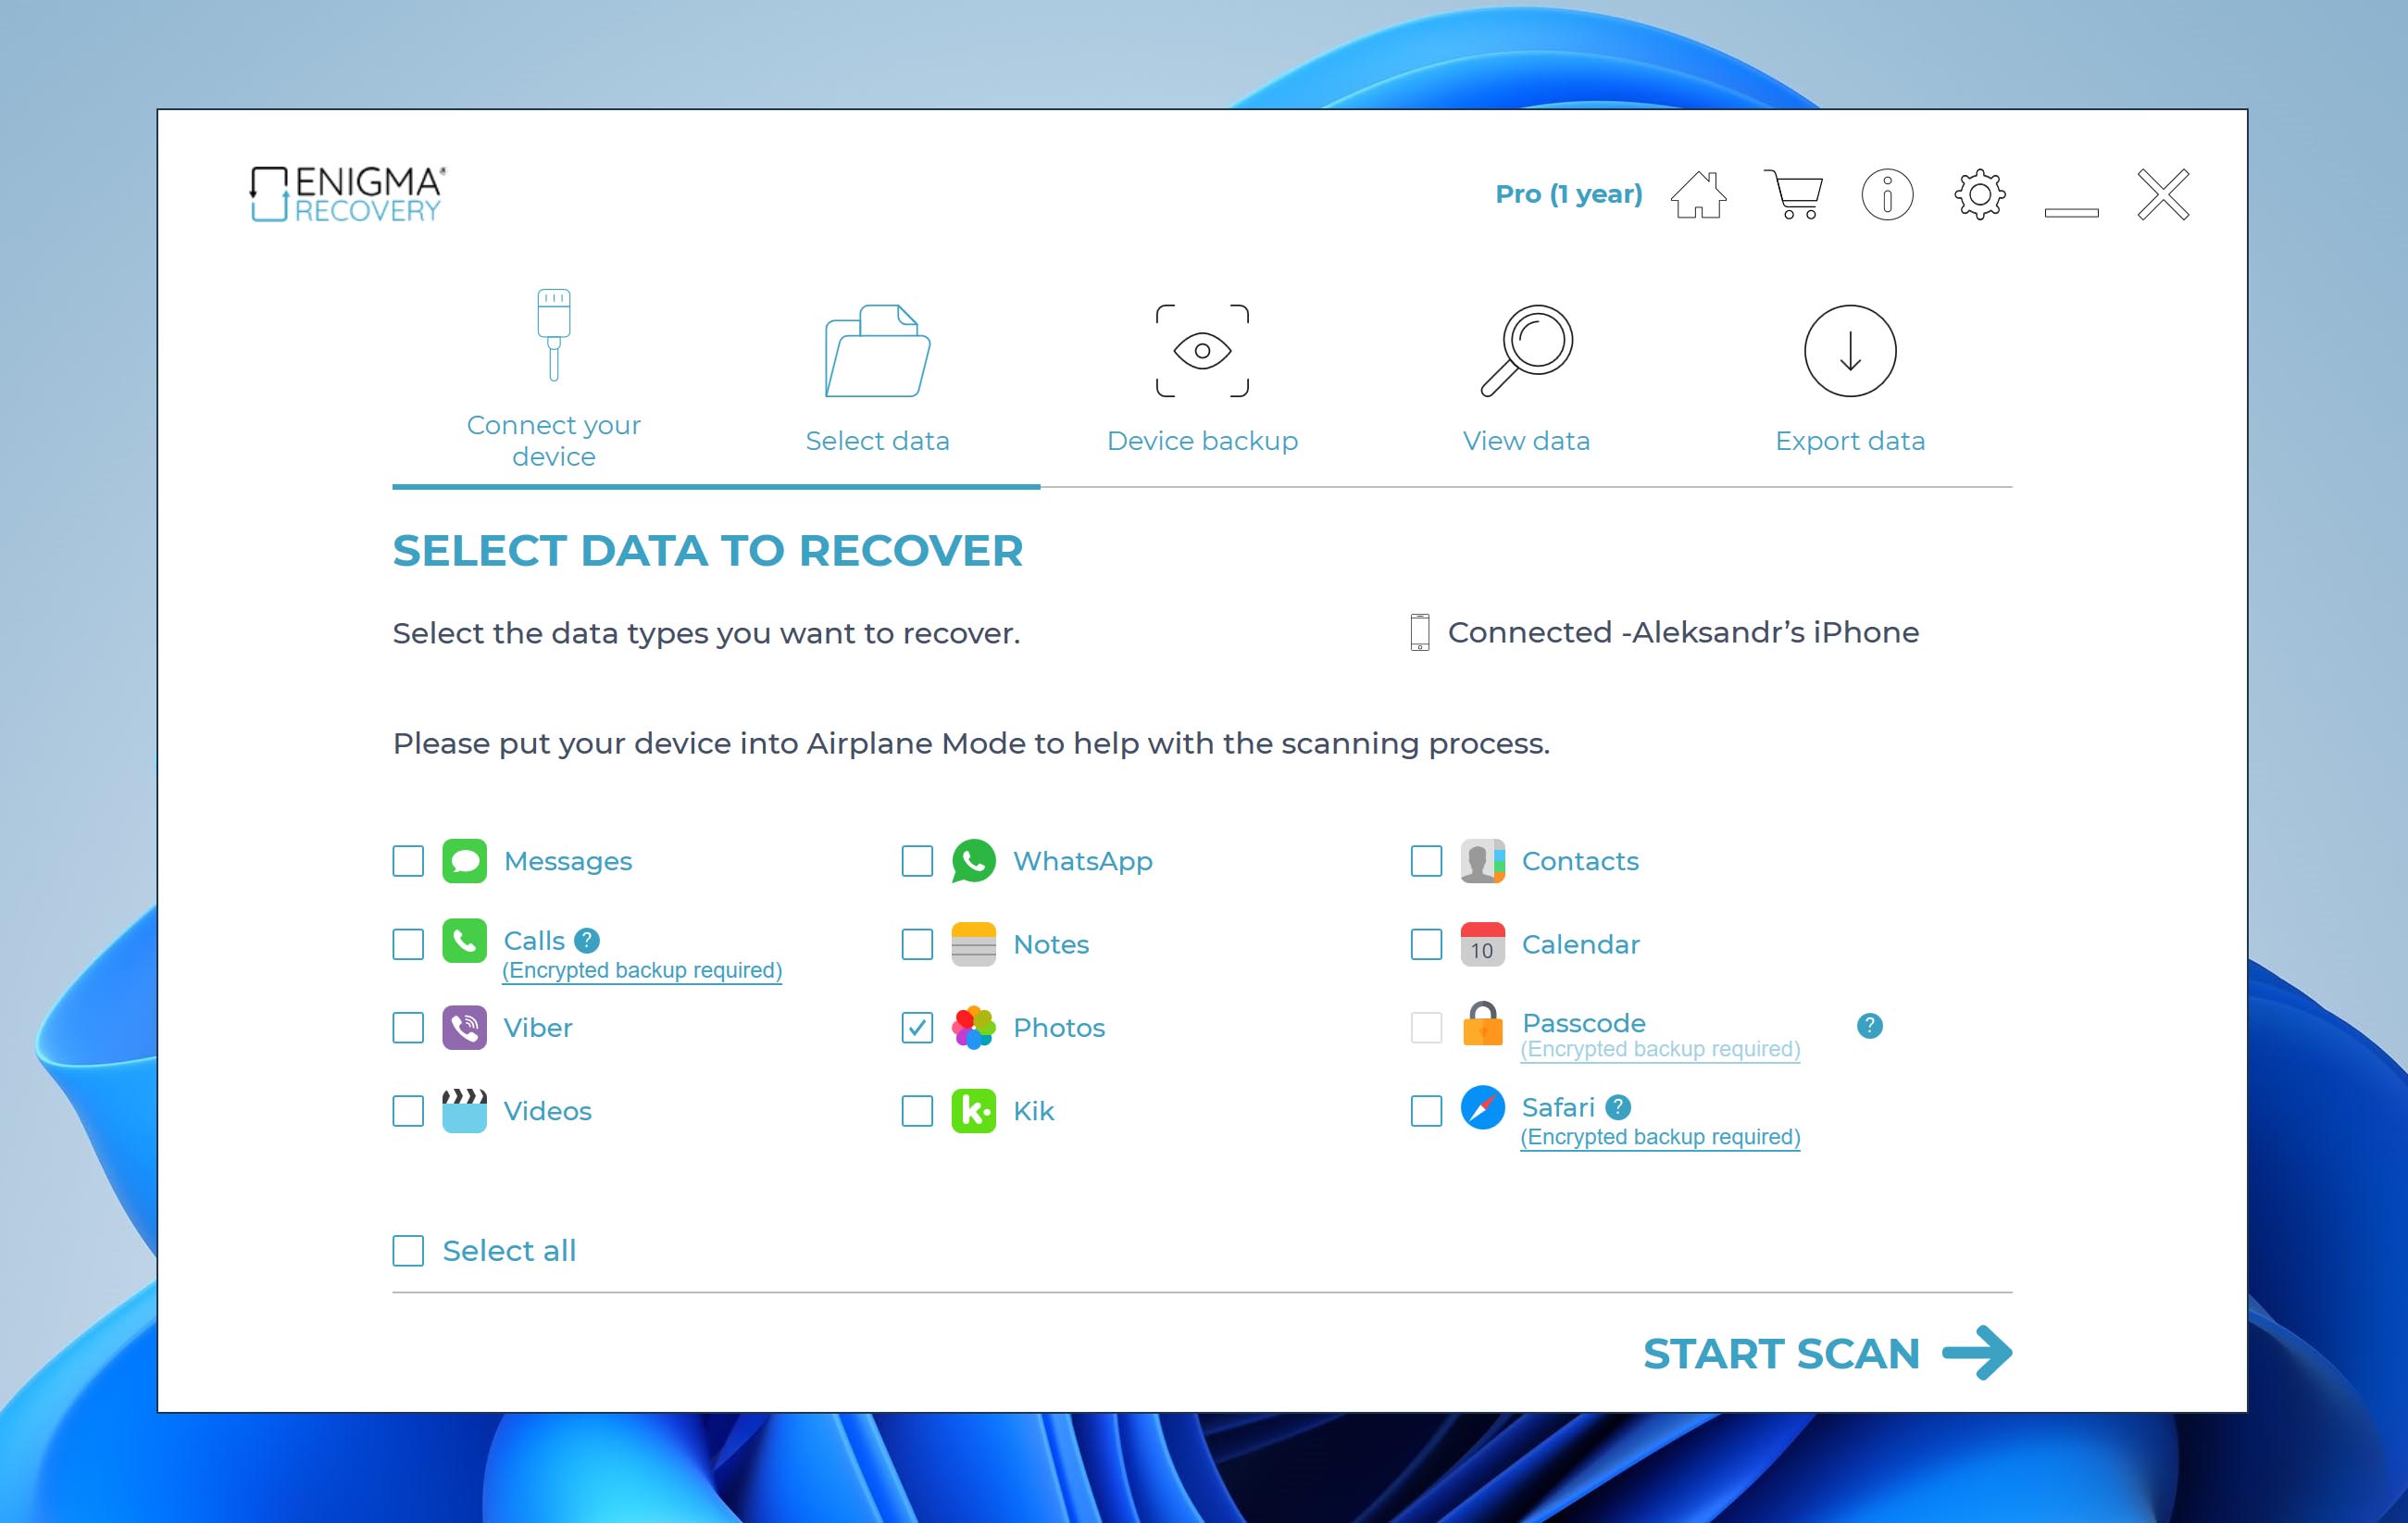
- Select the found files you want to recover and click Recover to finish the restore.
Method 3: From an iPhone Backup
Don’t want to use photo recovery software and are willing to restore your entire iPhone to a previous state? Then you can recover deleted photos through a complete backup restore.
Before you spend time on this method, check if iCloud Photos was enabled on your iPhone when the backup was created. If it was, your photos won’t be included in the backup at all. This is because when iCloud Photos is turned on, photos are stored in your iCloud Photos library instead of device backups.
To recover photos from an iPhone backup:
- Go to Settings > [your name] > iCloud > Manage Storage > Backups on your iPhone.
- Verify you have a valid backup to use for the recovery.
- Navigate to Settings > General > Reset and then tap Erase All Content and Settings.
- On the Apps & Data screen, tap Restore from iCloud Backup.
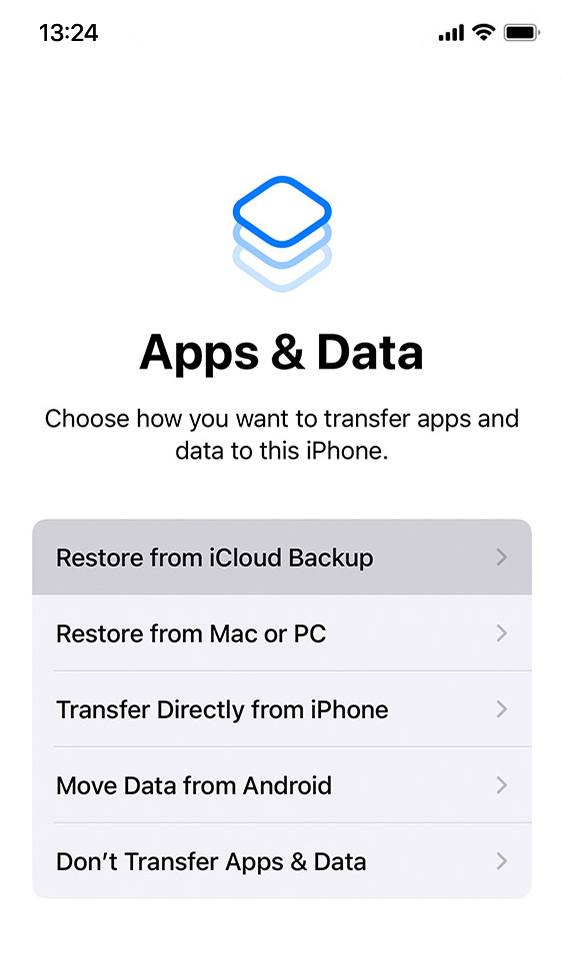
- Sign in with your Apple ID.
- Select Choose backup and choose the iCloud backup you want to use for the recovery.
- Follow the prompts to complete the procedure.
Method 4: From an iTunes/Finder Backup
Like the iCloud backup method, restoring from an iTunes/Finder backup can help you recover deleted photos, but the same considerations apply:
- This method will erase all current data on your iPhone and replace it with the backup content.
- iTunes/Finder backups only contain photos if iCloud Photos was turned off when the backup was created.
If you’re sure your photos should be in the backup and you’re okay with restoring your entire iPhone to a previous state, here’s how to recover lost photos to your iPhone from an iTunes backup:
- Connect the iPhone to your computer and open iTunes.
- Click the device icon when it appears.
- Select Restore Backup.
- Choose the backup that contains the deleted photos.
- Click Restore.

How to Recover Deleted Photos on Windows
We now present four ways to restore deleted photos for Windows users. They may not all be appropriate for your particular situation, but one of them should do the trick. In some cases, you can get your images back through the tools built into the operating system. If that fails, there are more reliable ways to restore your files, even if they have been deleted some time ago. Let’s take a closer look at your options.
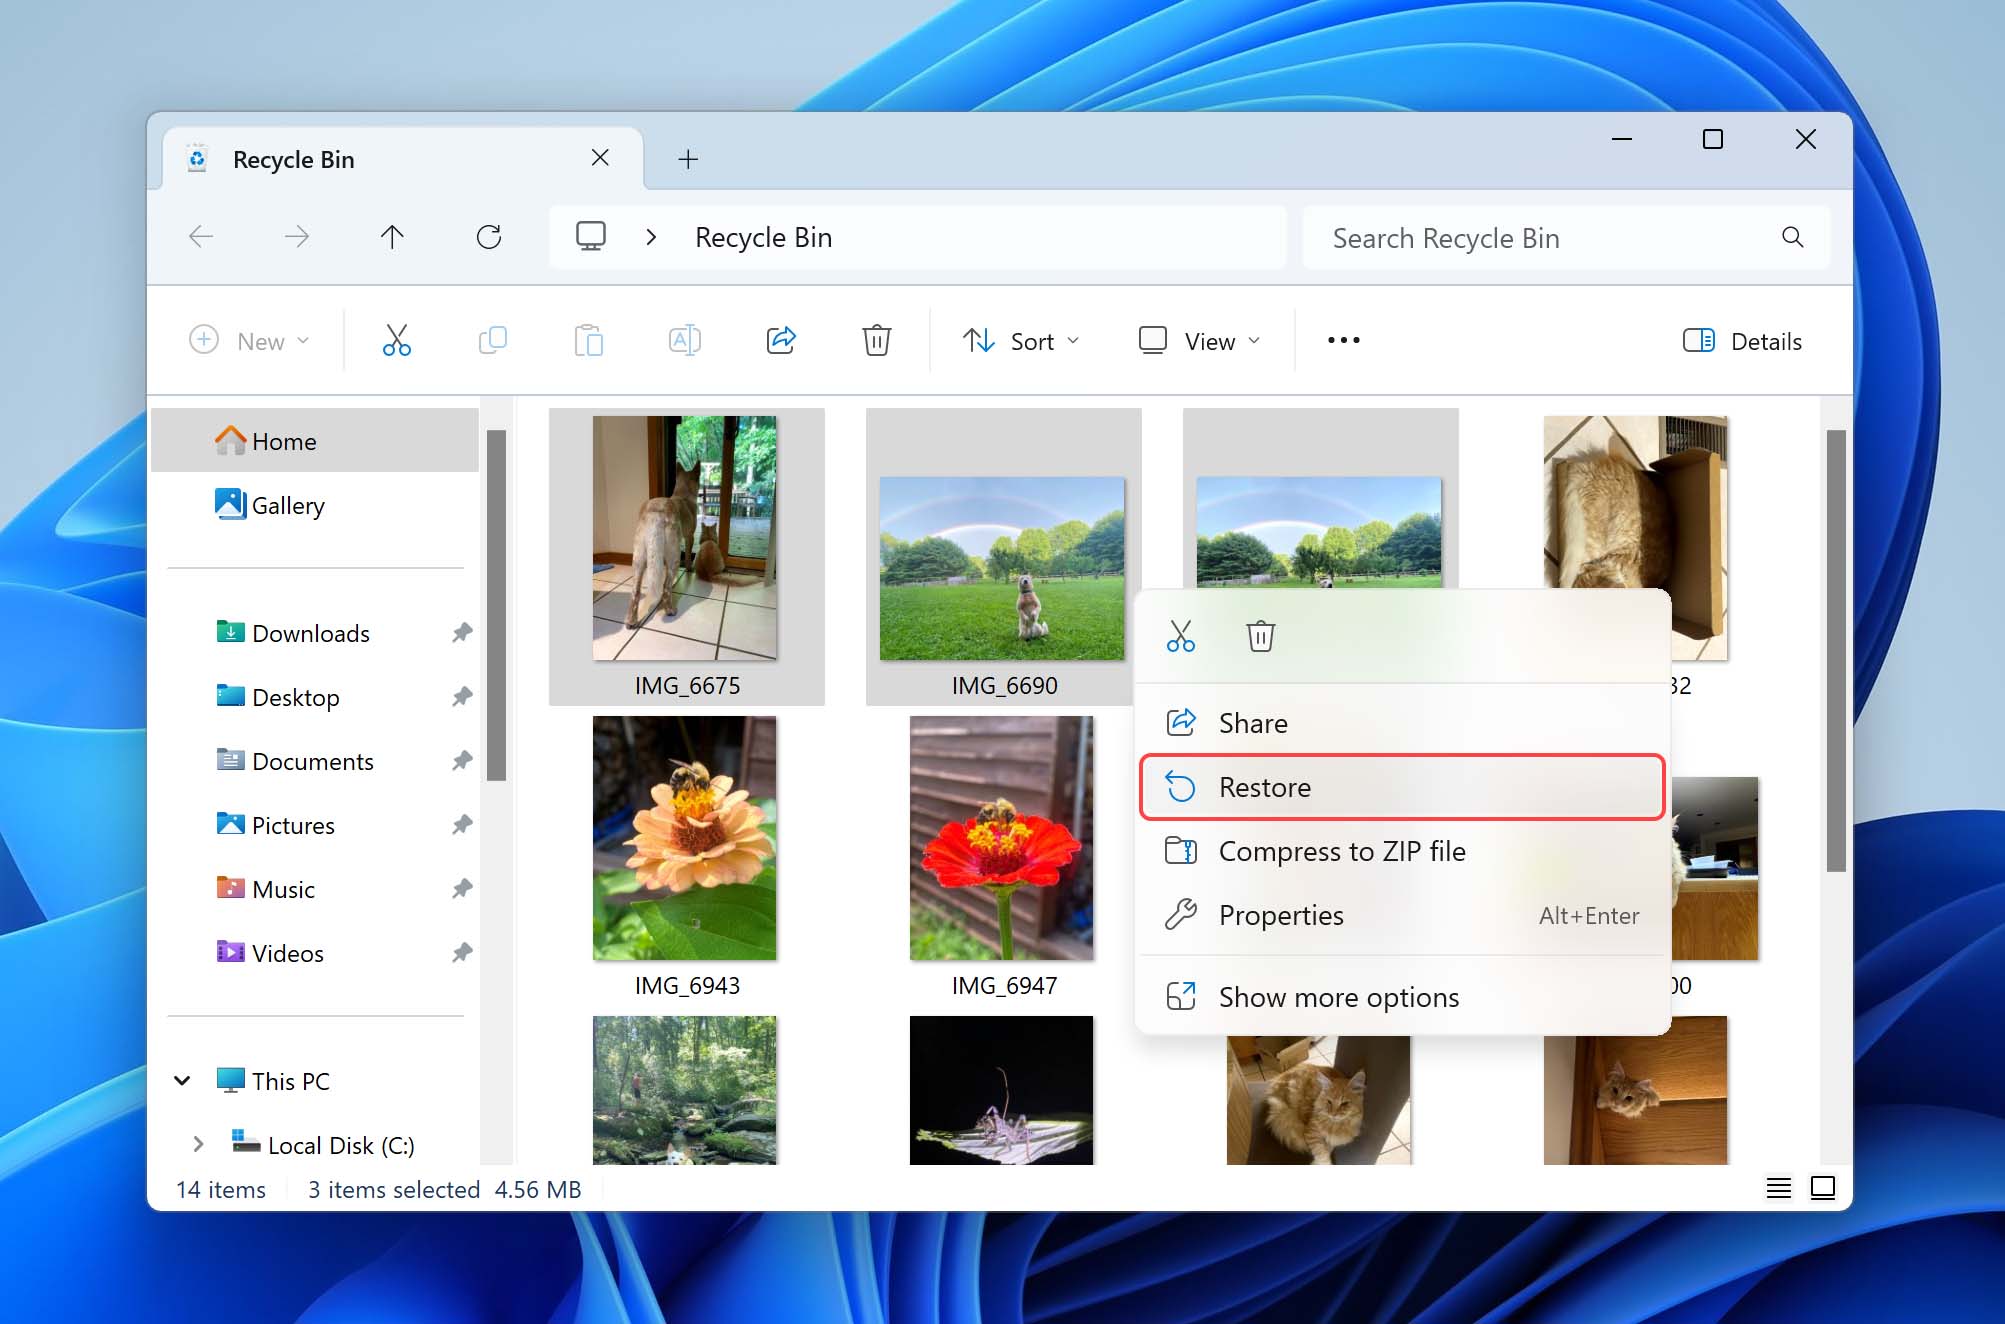
Method 1: From the Recycle Bin
The Recycle Bin is the first place to look for deleted images on a Windows computer. It’s a special folder that the operating system uses to temporarily store photos that have been recently deleted using the regular delete function (the Delete key or right-click > Delete). In such cases, files remain in the Recycle Bin for a predetermined length of time or until the bin is emptied.
- You use the Shift + Delete key combination to skip the Recycle Bin.
- You delete the photos from an external SD card or flash drive.
Try these simple steps to recover deleted photos from the Recycle Bin:
- Open the Recycle Bin by double-clicking on its icon.
- Locate and select the images you want to recover.
- Take note of the Original Location of the files as that is where they will be restored.
- Right-click on your selection and choose Restore. You can also drag and drop files from the Recycle Bin to a folder of your choice.
- Wait for the process to complete and verify your files are back.
Method 2: From Backup Files
You should be backing up your computer regularly to protect your important data. It’s in data loss scenarios such as lost photos that the value of these backups is demonstrated.
The Windows OS comes with a backup and recovery tool, called File History, that can help you get deleted photos back, but there are some important prerequisites:
- Backups must have been enabled before your photos were lost.
- The photos must have been present on your internal drive during at least one backup.
- The backup drive must be accessible and not corrupted.
To recover deleted photos from a backup you need to:
- Connect the storage media containing the backup to your computer.
- Right-click the Windows Start button and then Control Panel > System and Maintenance > Backup and Restore.
- Choose either to Restore my files or Restore all users’ files.
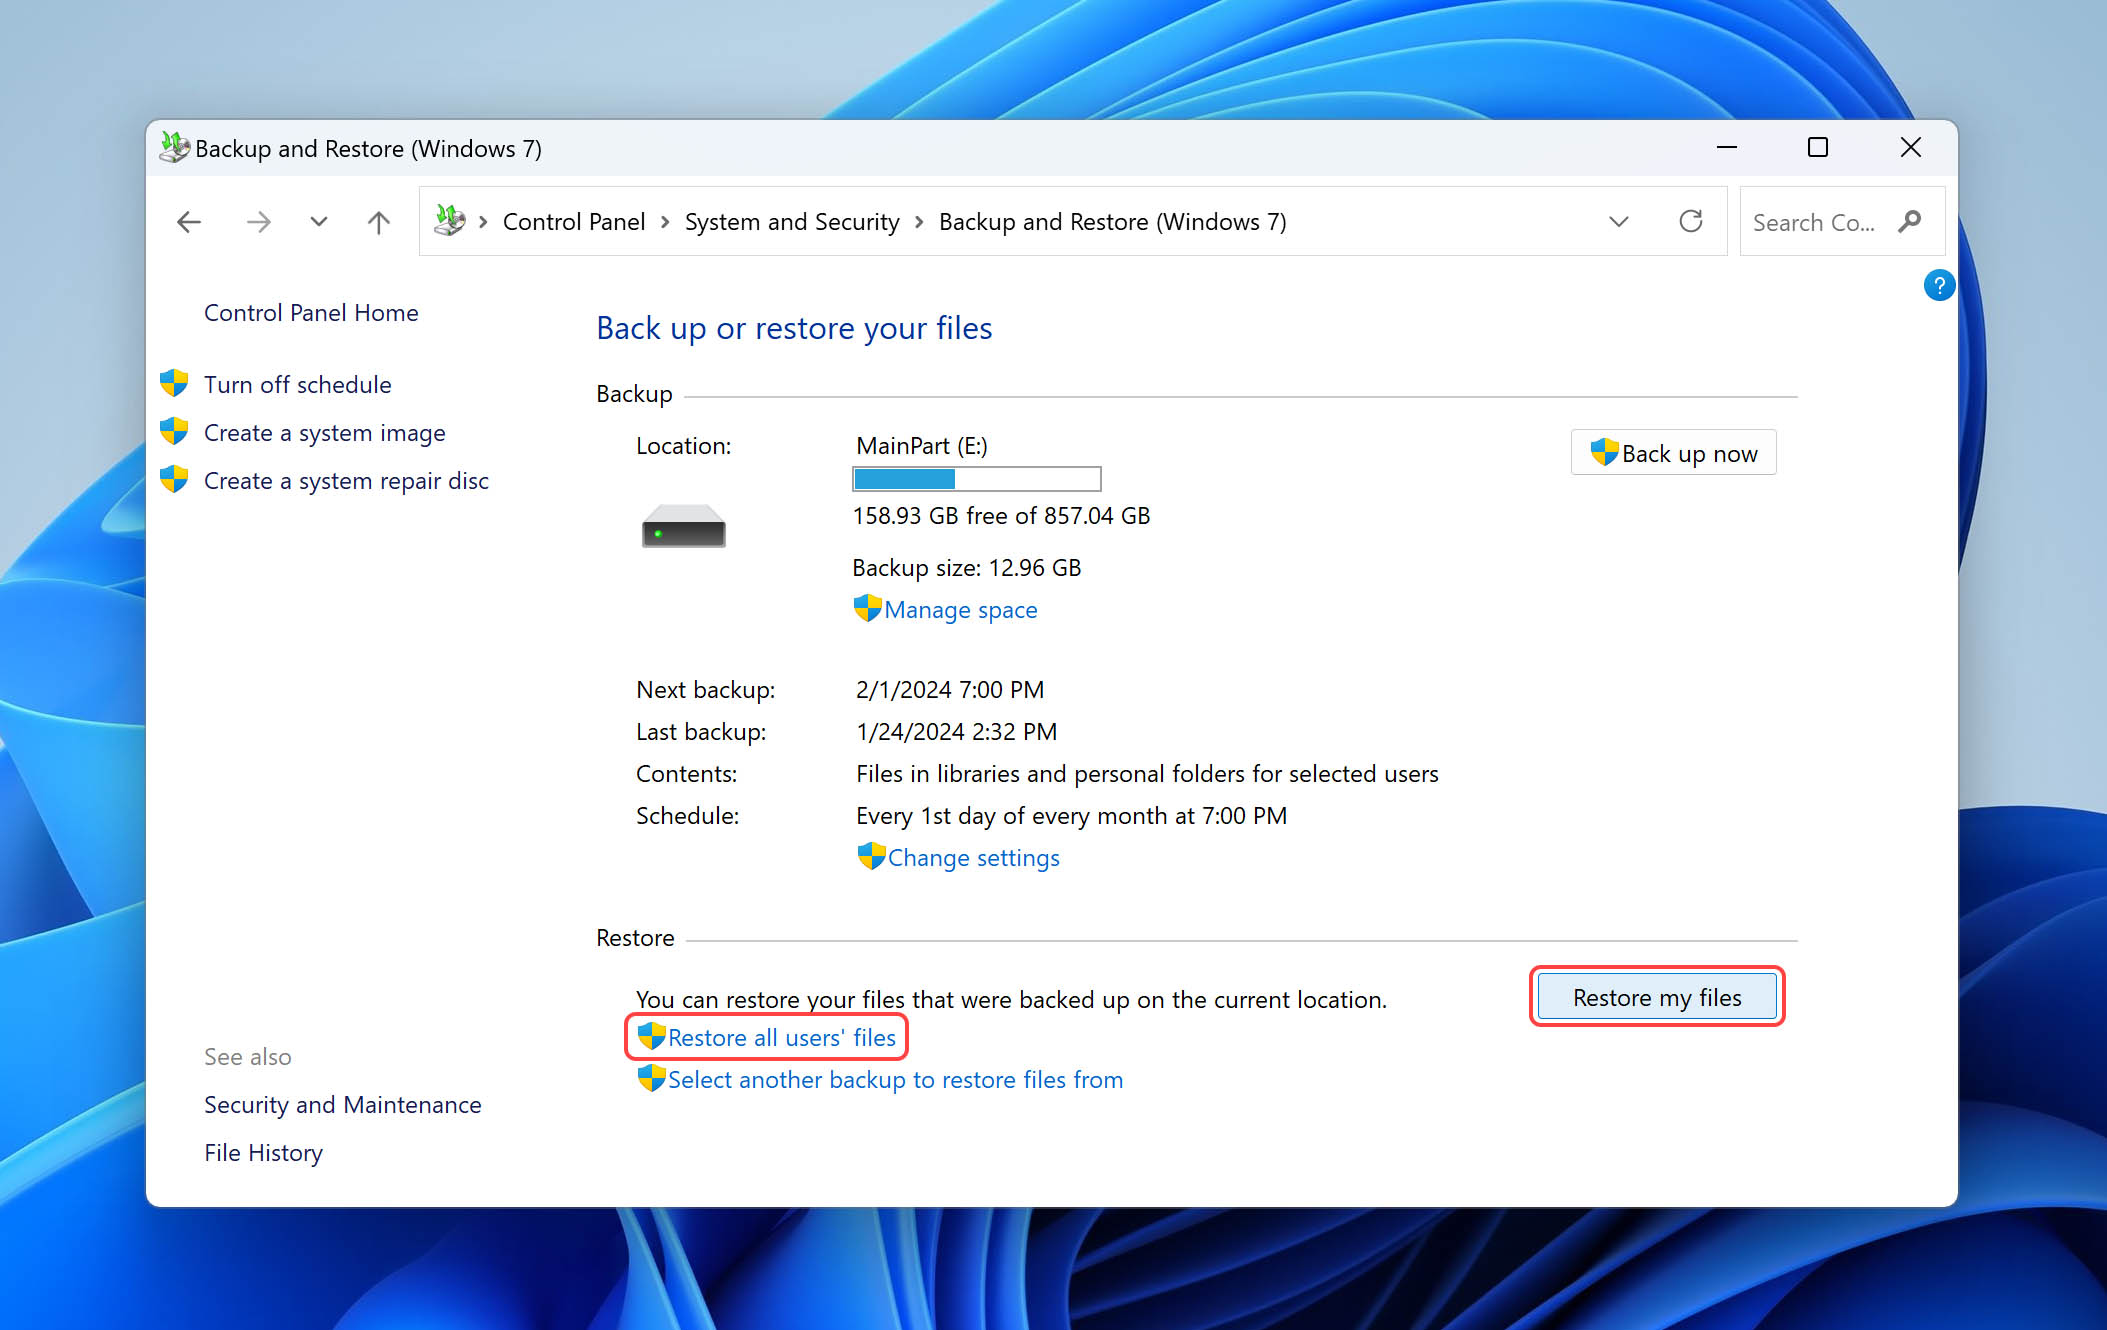
- Search for your lost photos by using the Browse for files or Browse for folders option. You cannot see individual files when browsing for folders.
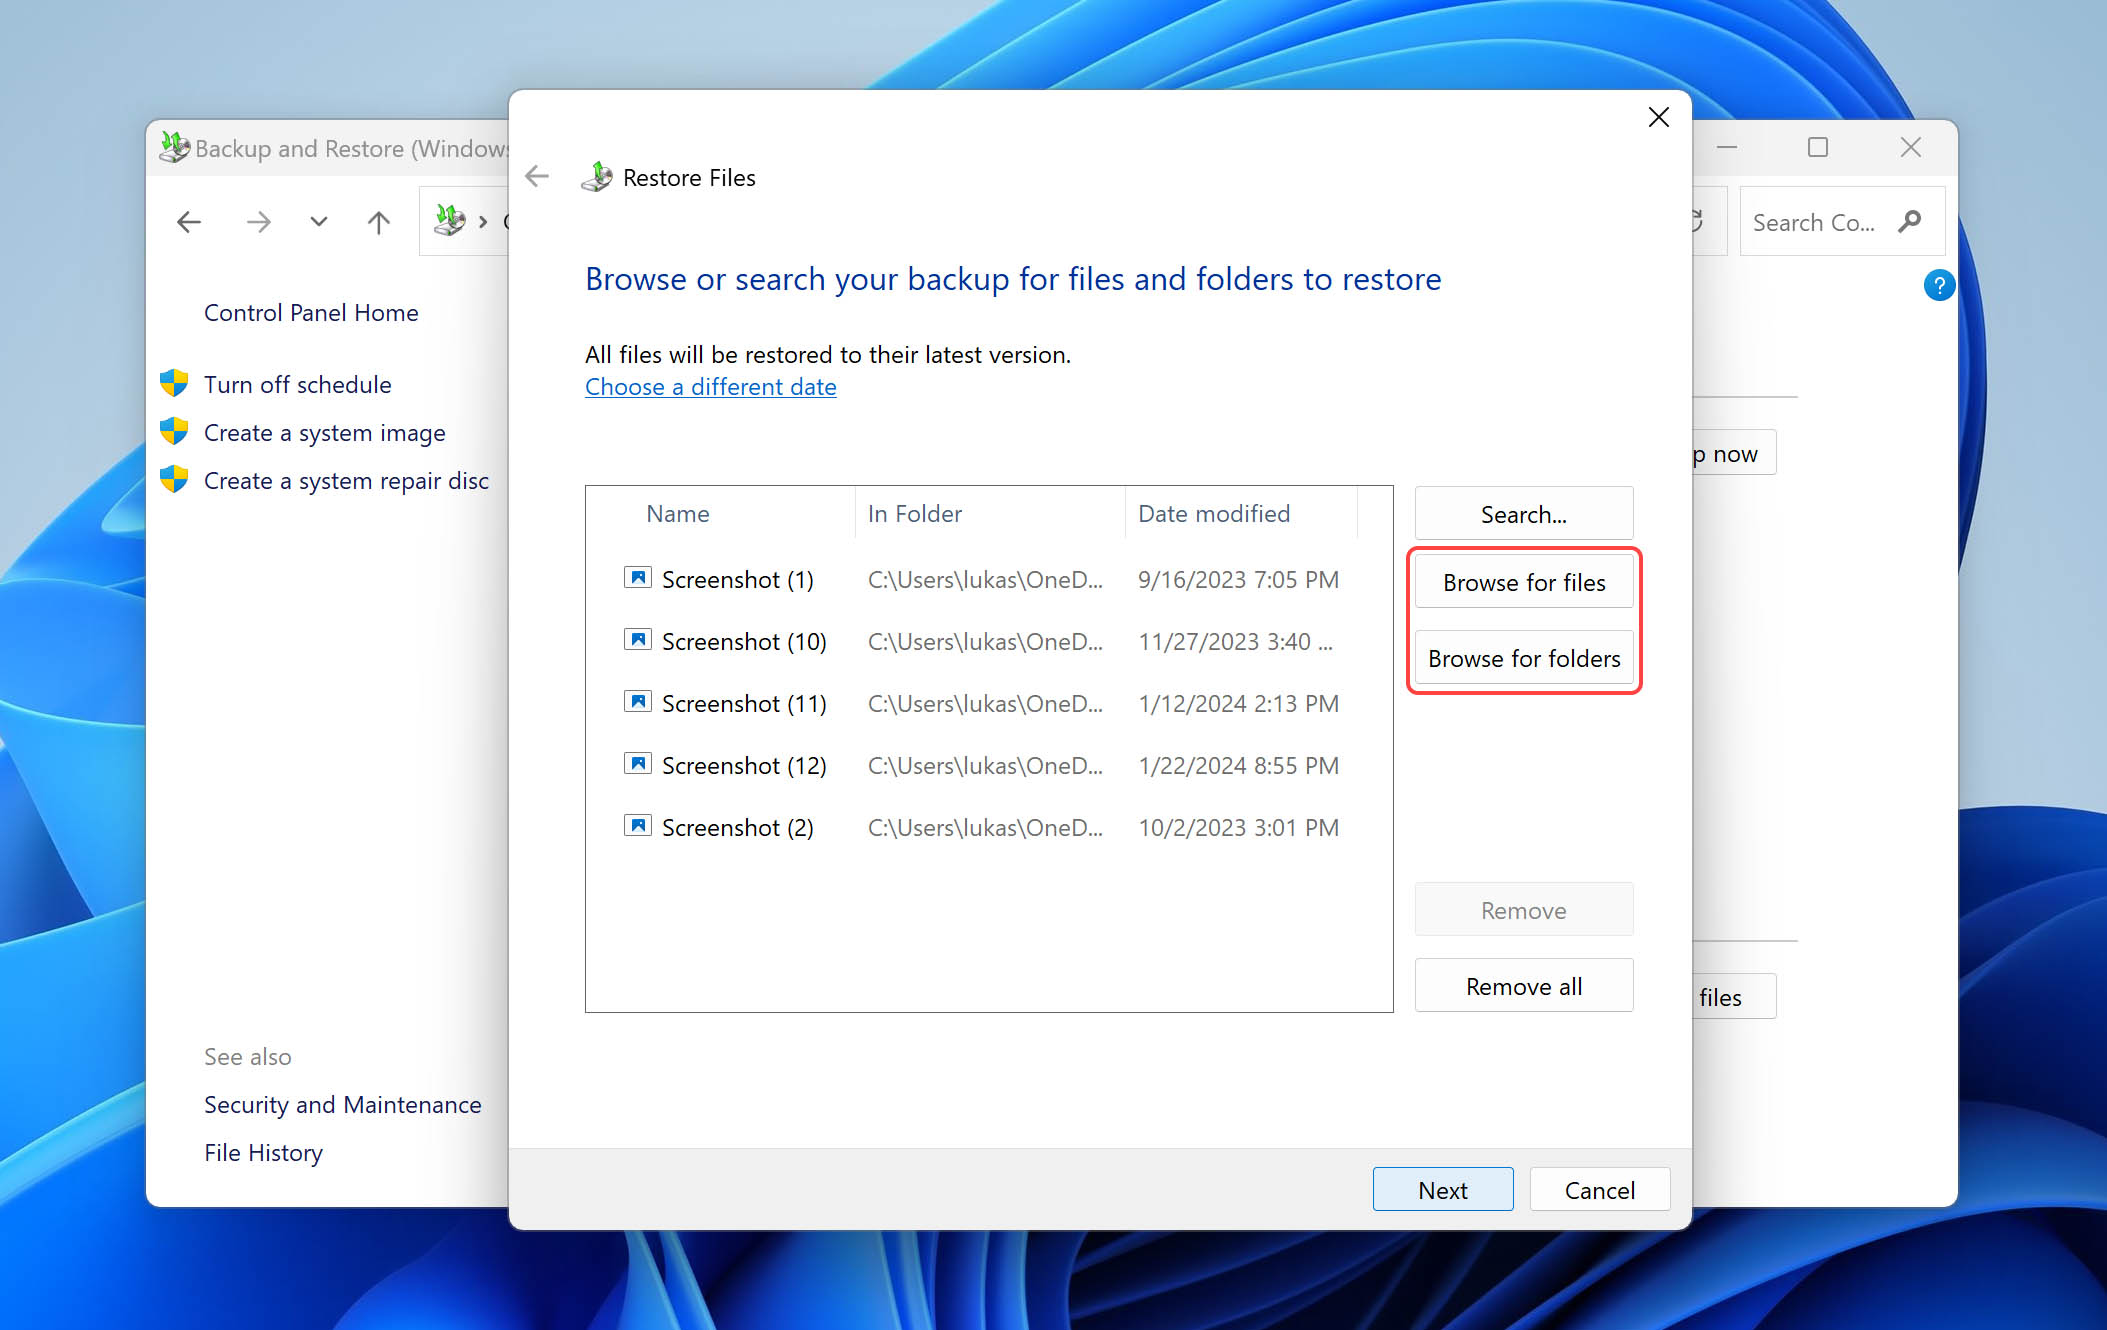
- Select your files and click Restore to recover them.
Method 3: Using Photo Recovery Software
When you need to recover deleted photos without backup or after they’re permanently deleted from the Recycle Bin, photo recovery software is often your best solution.
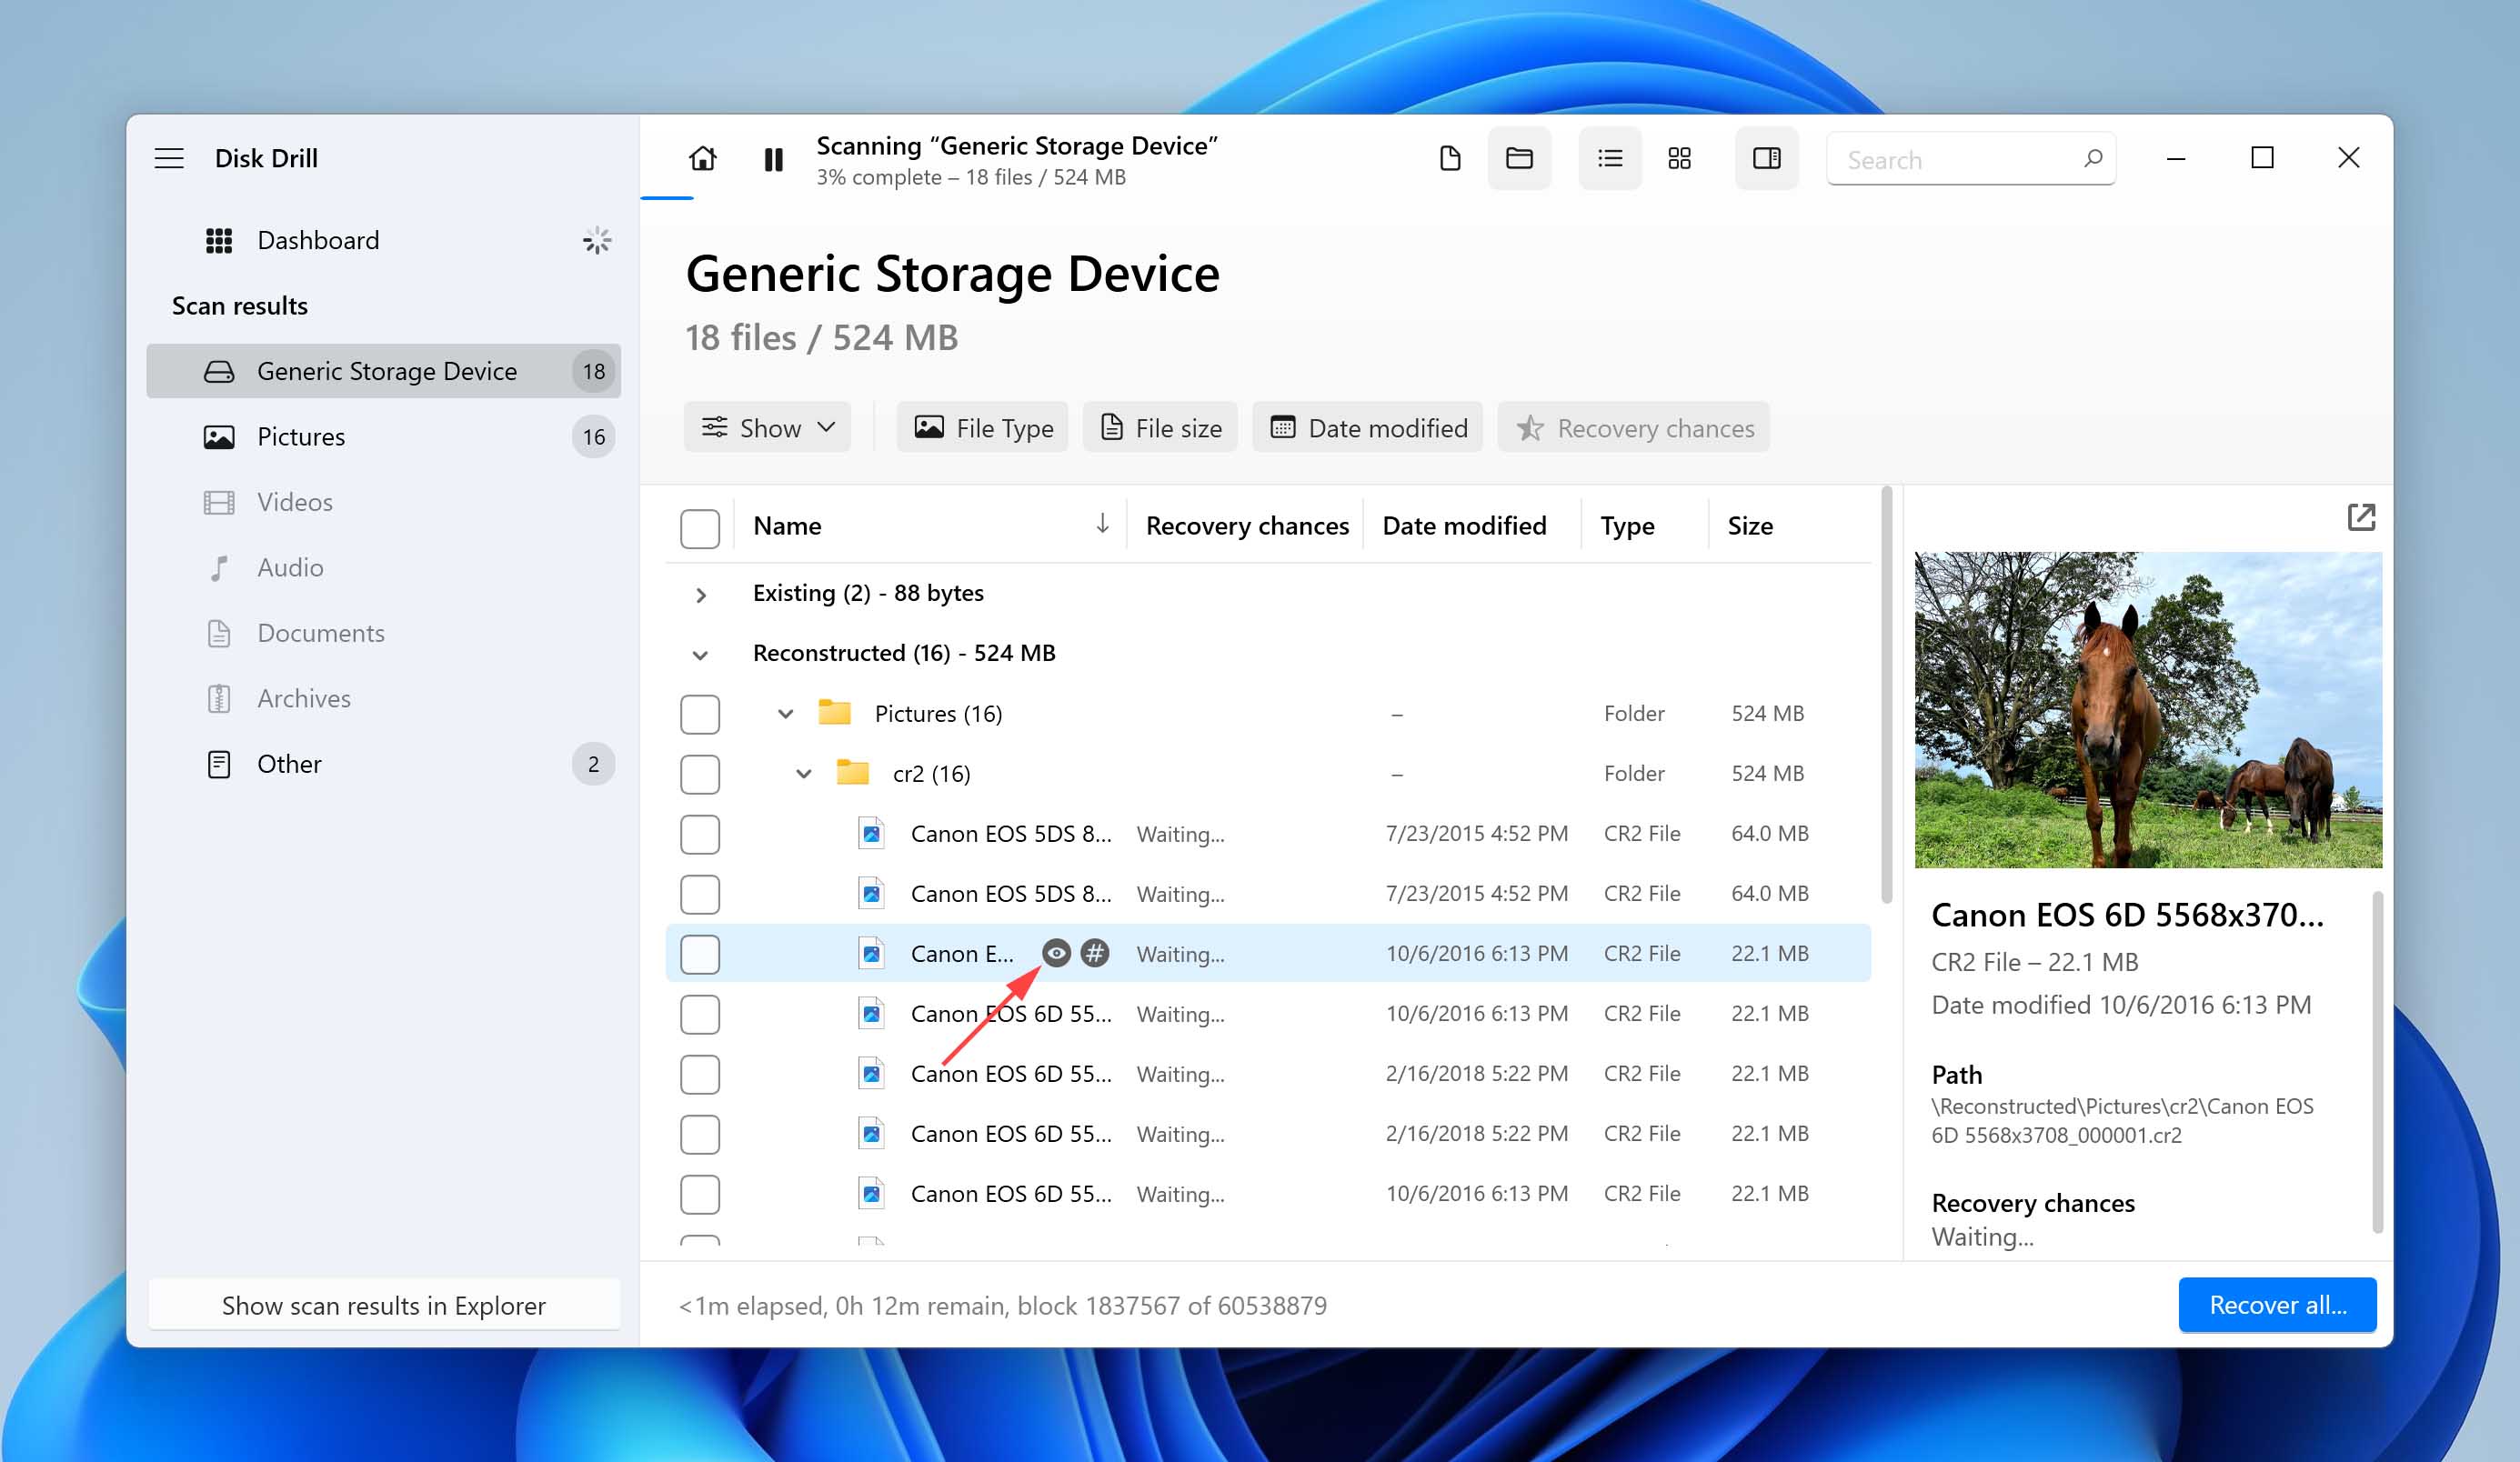
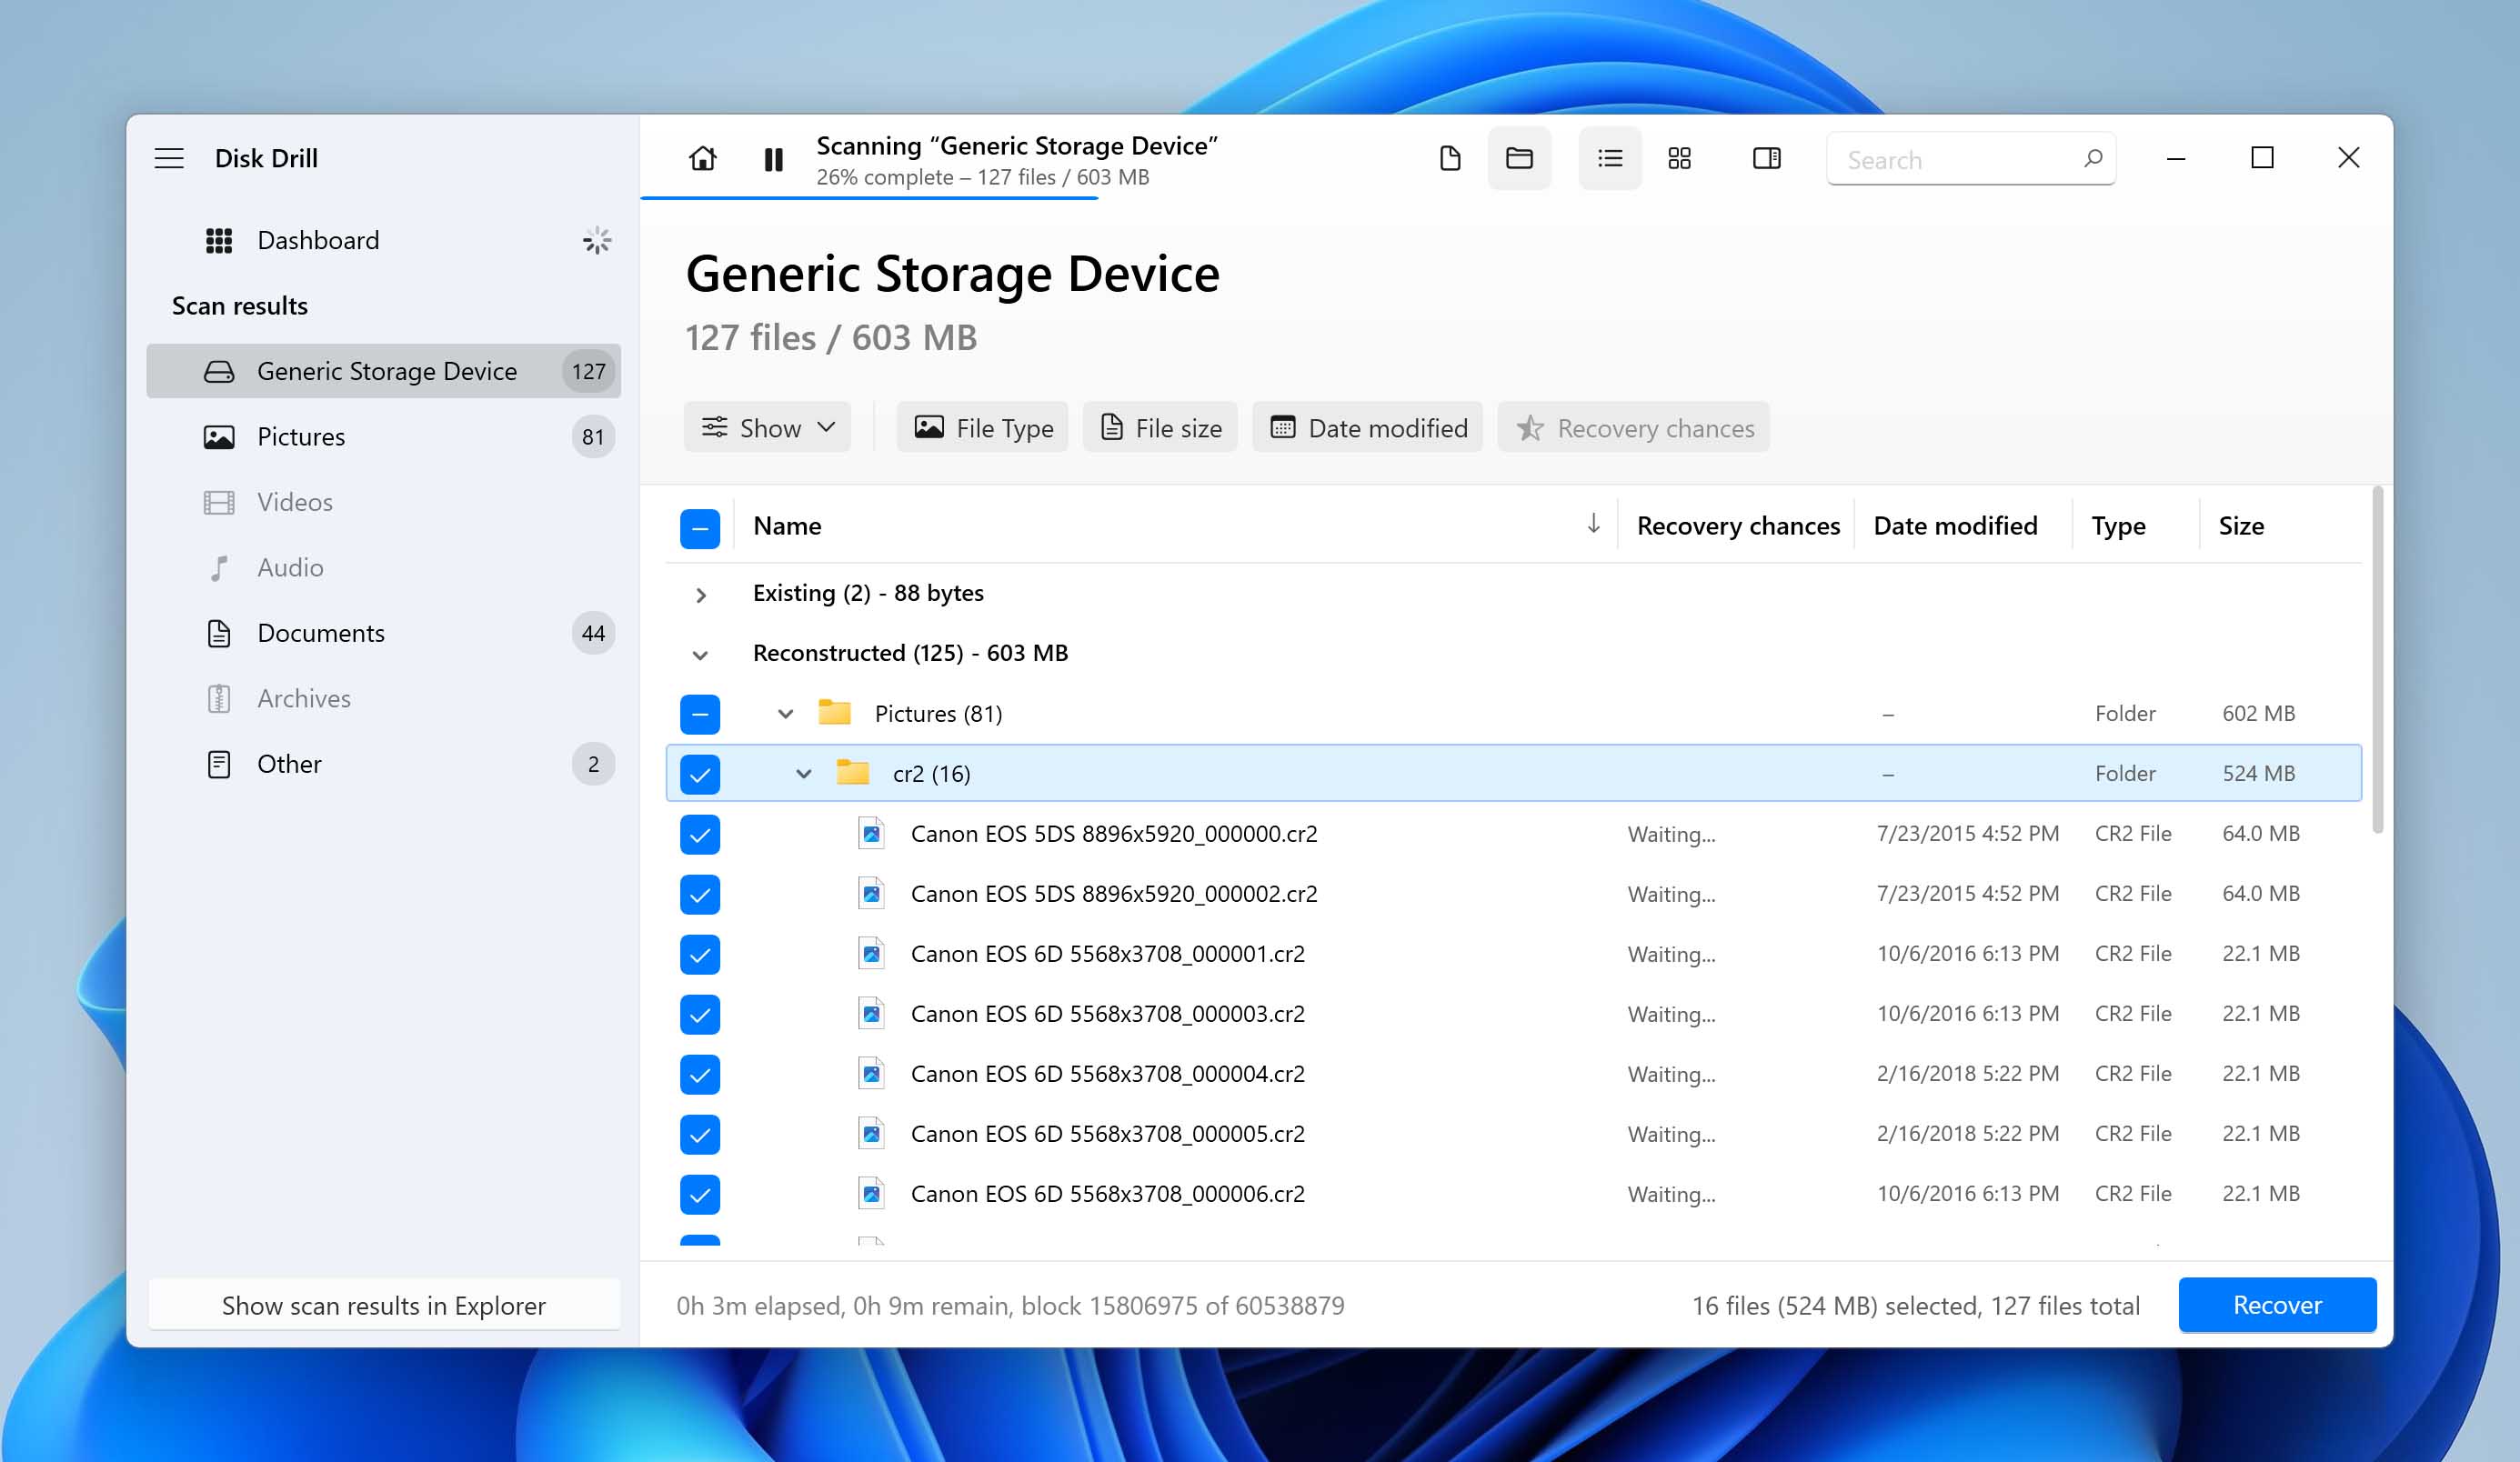
We recommend Disk Drill photo recovery software for its comprehensive features and proven ability to retrieve lost images. The software excels at recovering a wide range of image formats, from common JPEG and PNG files to RAW formats like CR2, NEF, ARW, and DNG. It also supports camera-specific formats, Adobe PSD files, and high-dynamic-range images.
Whether your photos were lost from your computer’s internal drive, an external hard drive, or removable media like SD cards and USB flash drives, Disk Drill can help you get your image files back.
Follow these steps to recover permanently deleted photos on Windows 10/11 using Disk Drill:
- Download, install and launch Disk Drill for Windows.
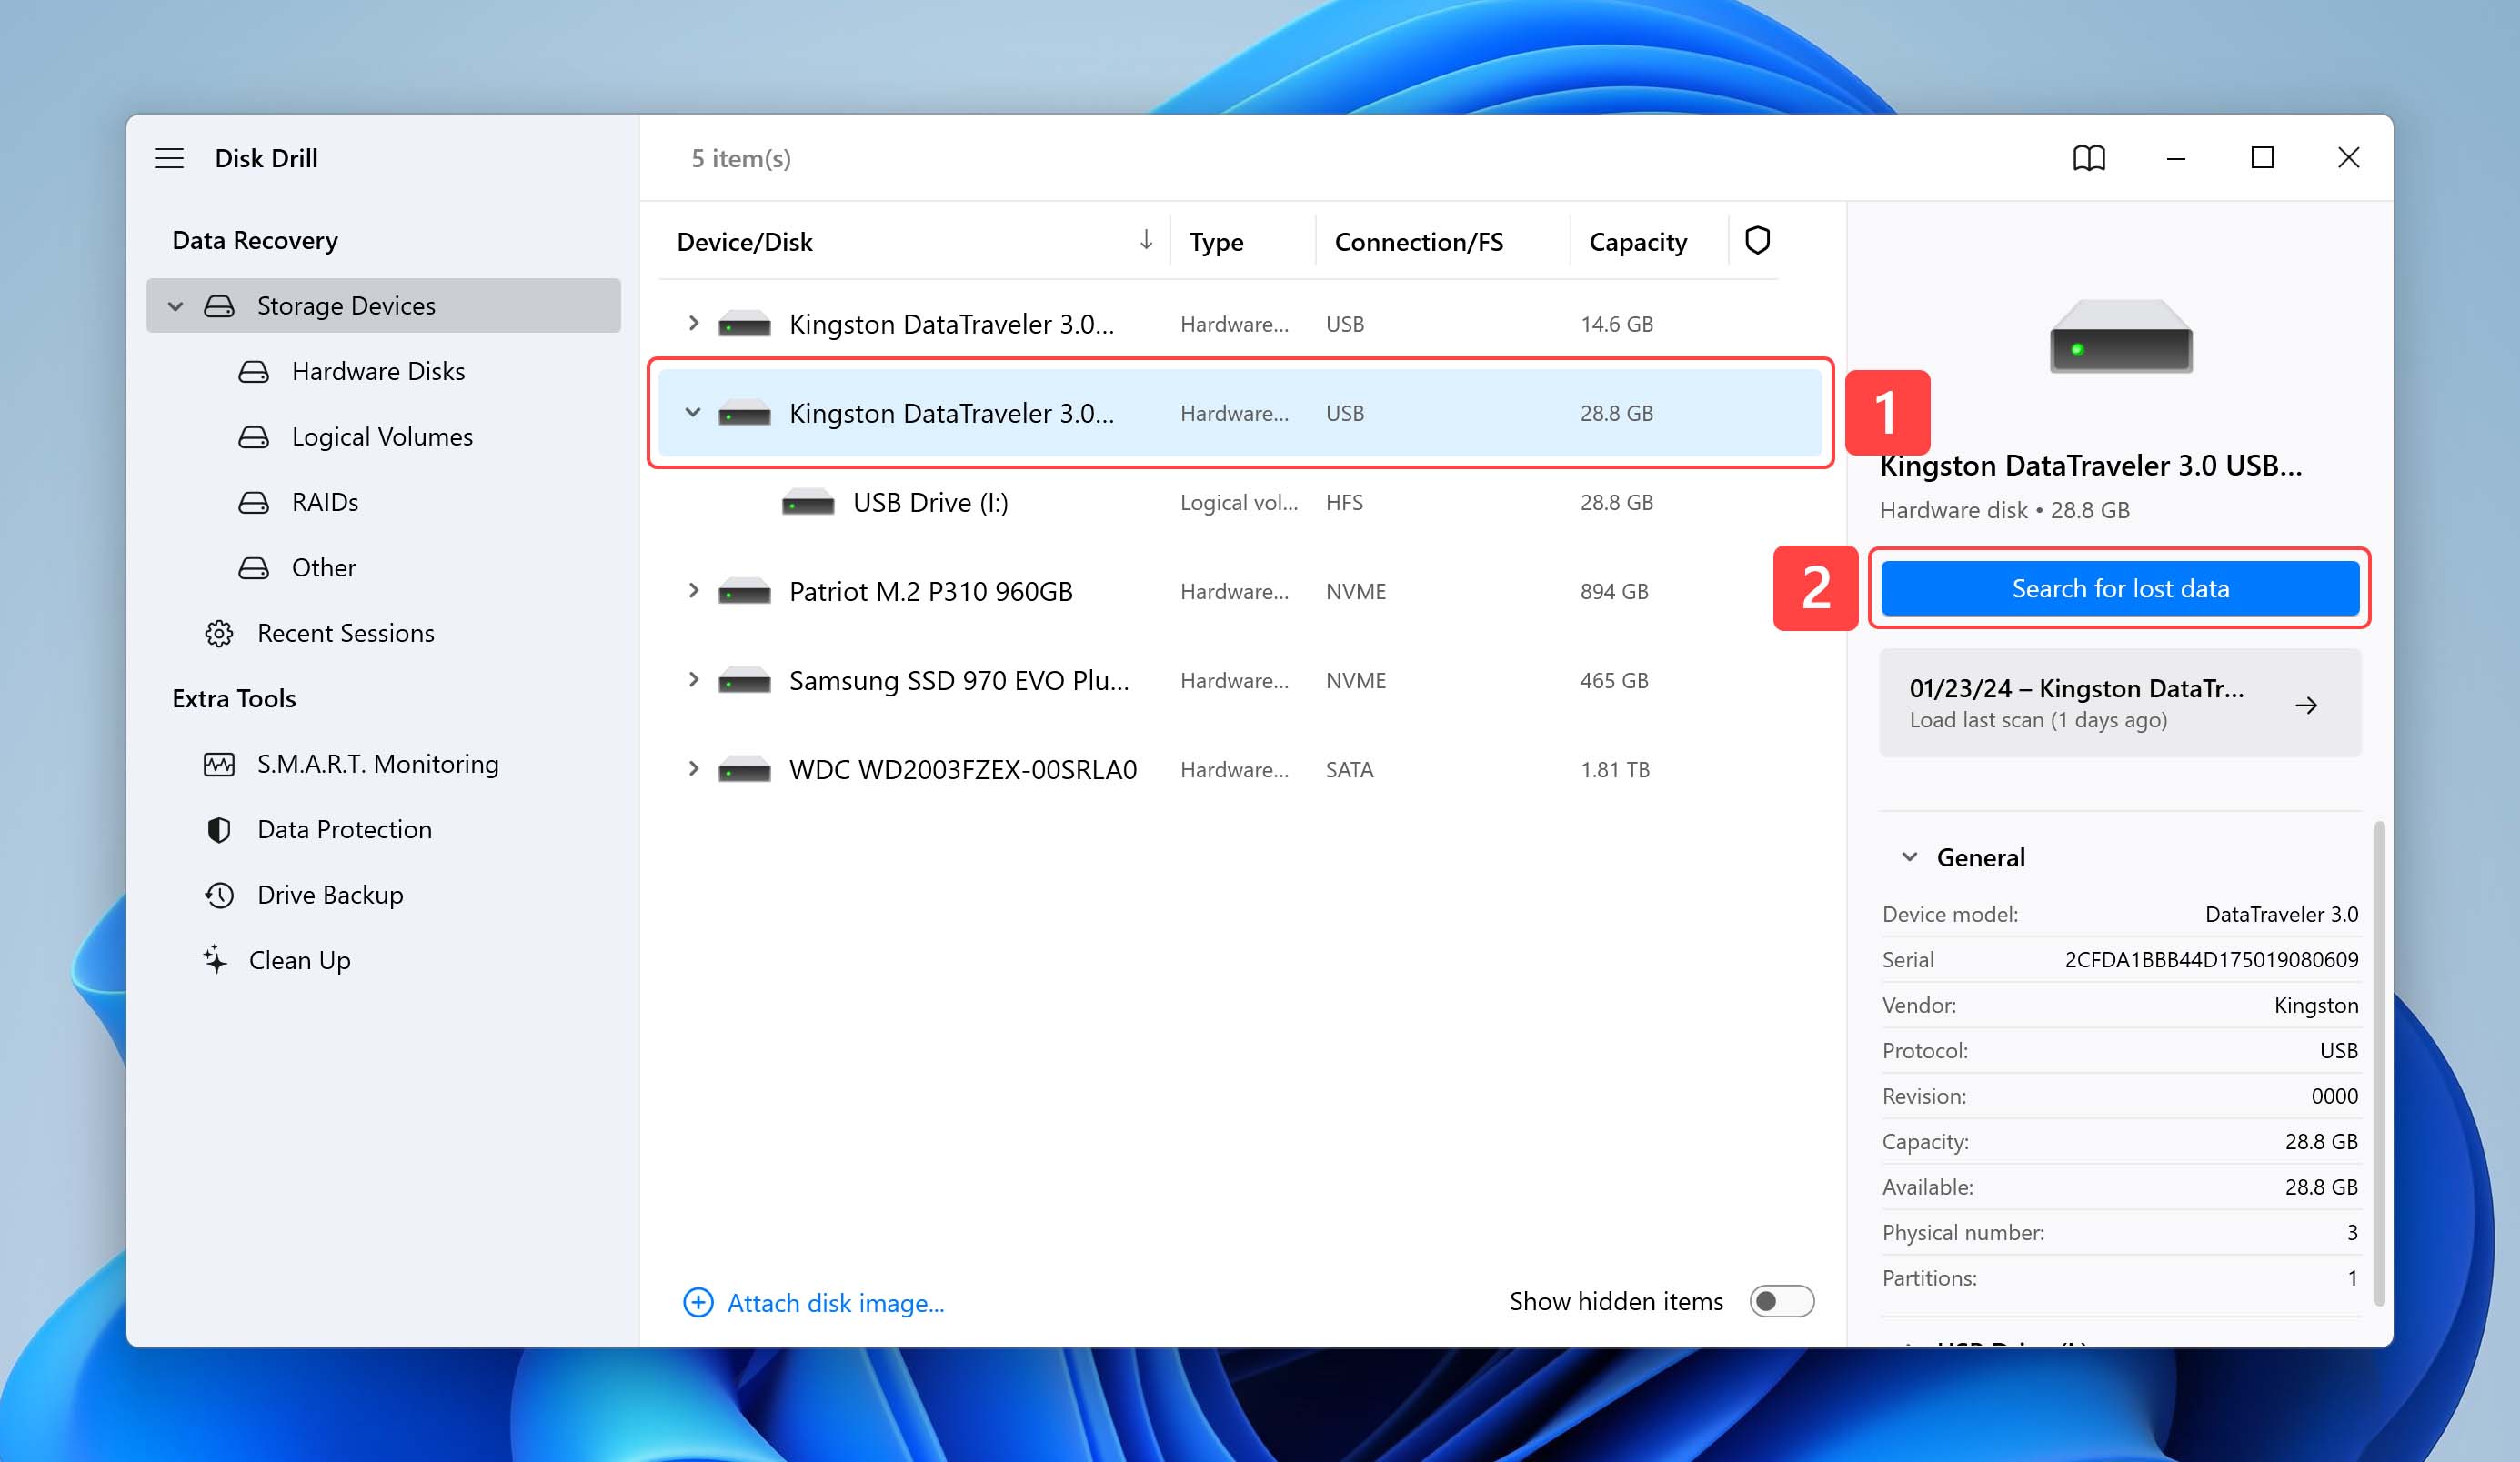
- Connect an external device if that was where the data was lost.
- Select the disk from the app’s disk list.
- Click the Search for lost data button to start scanning the disk. If you’re scanning a removable device like an SD card or USB drive, Disk Drill will ask you to choose between Universal Scan and Advanced Camera Recovery (ACR). For general photo recovery, go with Universal Scan. ACR is built for reconstructing fragmented video files from cameras and isn’t needed for standard photo recovery.
- Preview the photos that you want to get back from the Pictures folder.
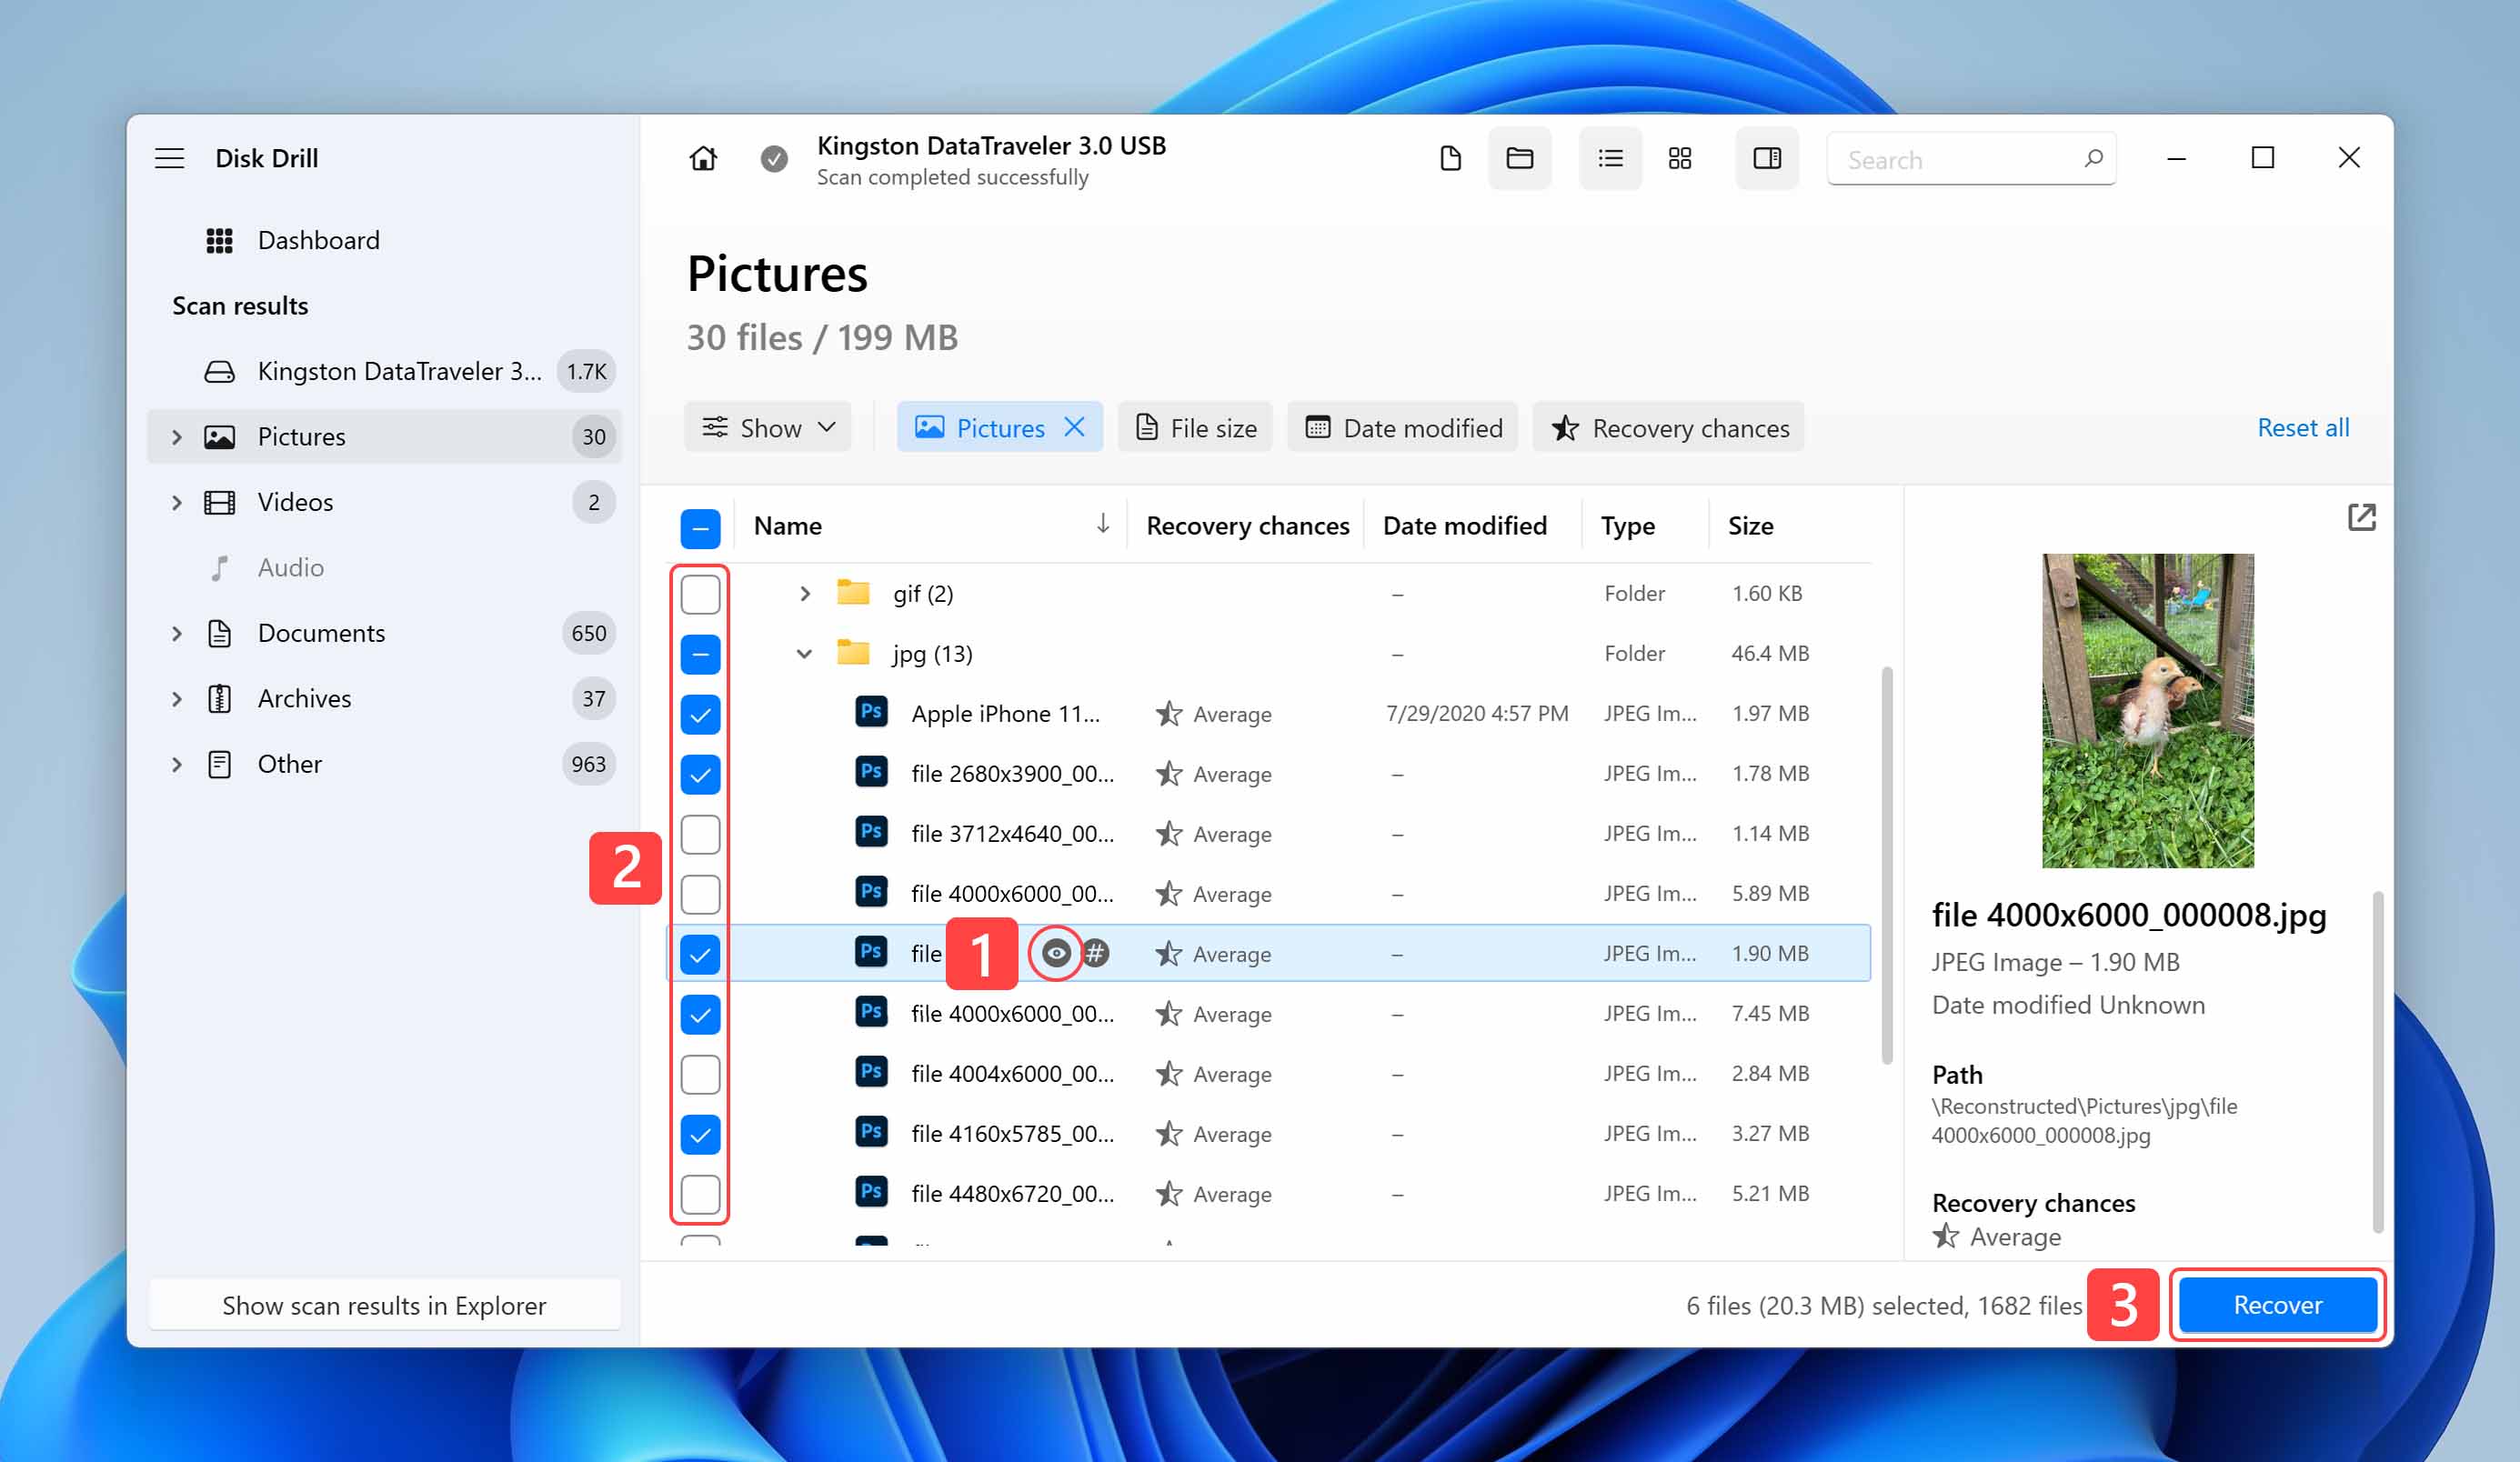
- Make your selection and click Recover.
- Choose a new location where the photos will be saved.

The free version of Disk Drill for Windows can recover up to 100 MB of photos, which might be enough to cover an entire data loss incident.
Method 4: Via a Data Recovery Service
For most photo loss situations on a PC, Mac, Android, or iOS device, the software-based methods we’ve covered in this guide will get the job done. In fact, most professional data recovery services use the same types of tools that are available to regular users.
That said, there are scenarios where DIY software simply isn’t enough, such as when dealing with physically damaged memory cards, USB drives with broken connectors or bent pins, mechanically failing hard drives that make clicking or grinding noises or aren’t recognized by your system at all, and laptops or devices that have been damaged by water, dirt, or power surges. In situations like these, you’re better off sending your device to a professional recovery lab with the proper equipment to handle hardware-level issues.
Here are some general guidelines to follow when searching for a local data recovery service:
- Type “data recovery services near me” in a Google search to review your options.
- Use Google Maps and customer reviews to make your selection.
- Follow the steps outlined by the recovery service you select.
How to Retrieve Deleted Photos on Mac
You can retrieve deleted photos on Mac using a variety of methods. If the files were recently deleted, you might be able to recover them instantly by looking in the Trash Bin. Apple also offers multiple ways to back up your pictures so they are protected and can be recovered if the need arises.
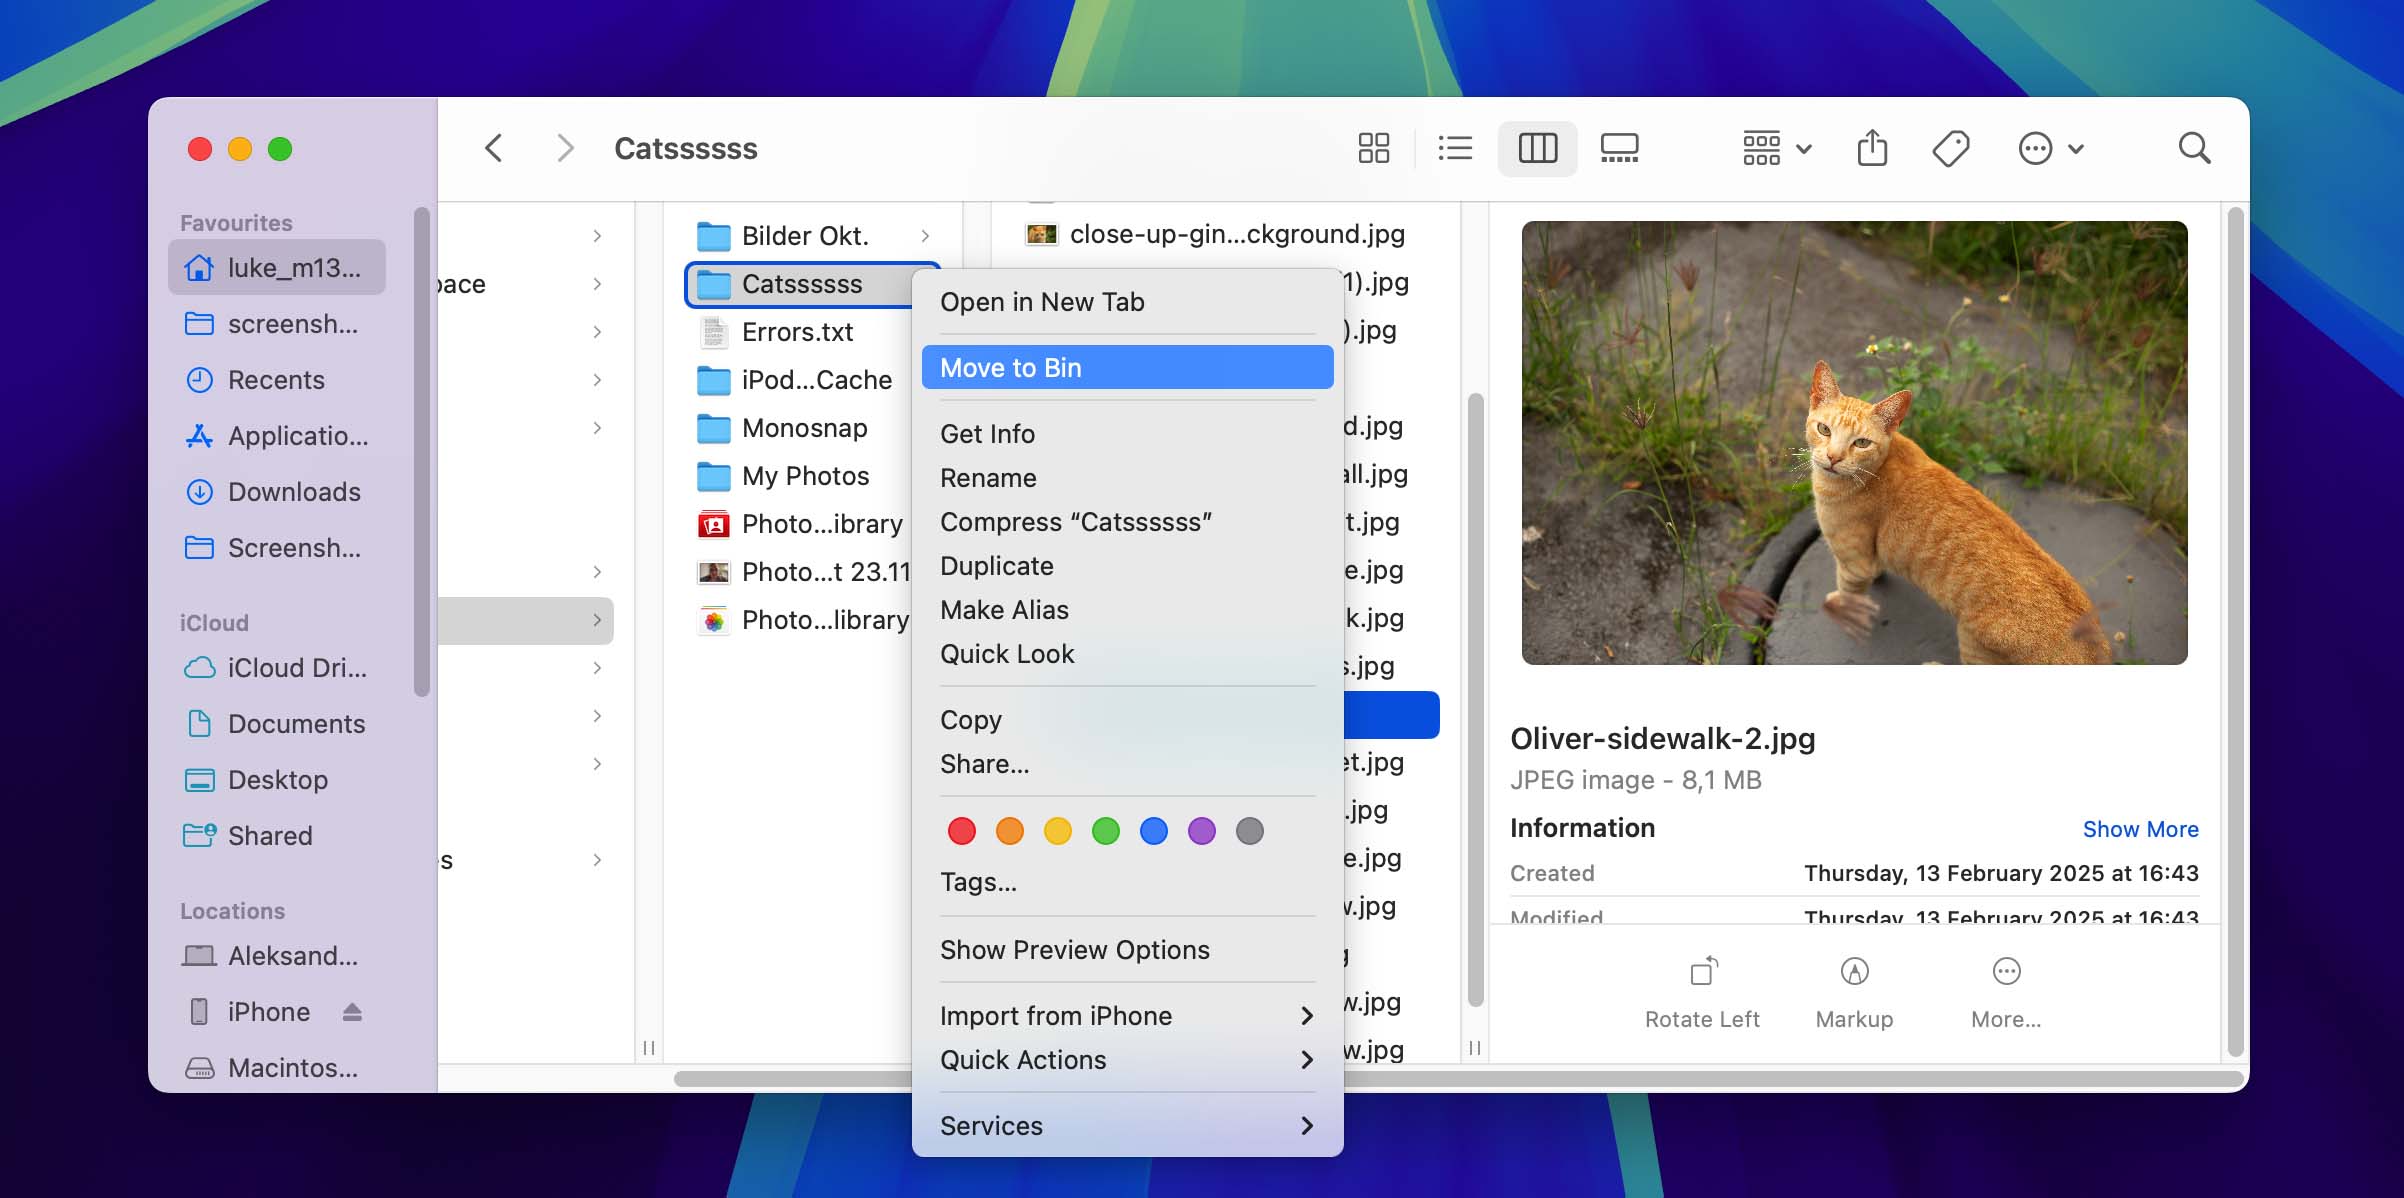
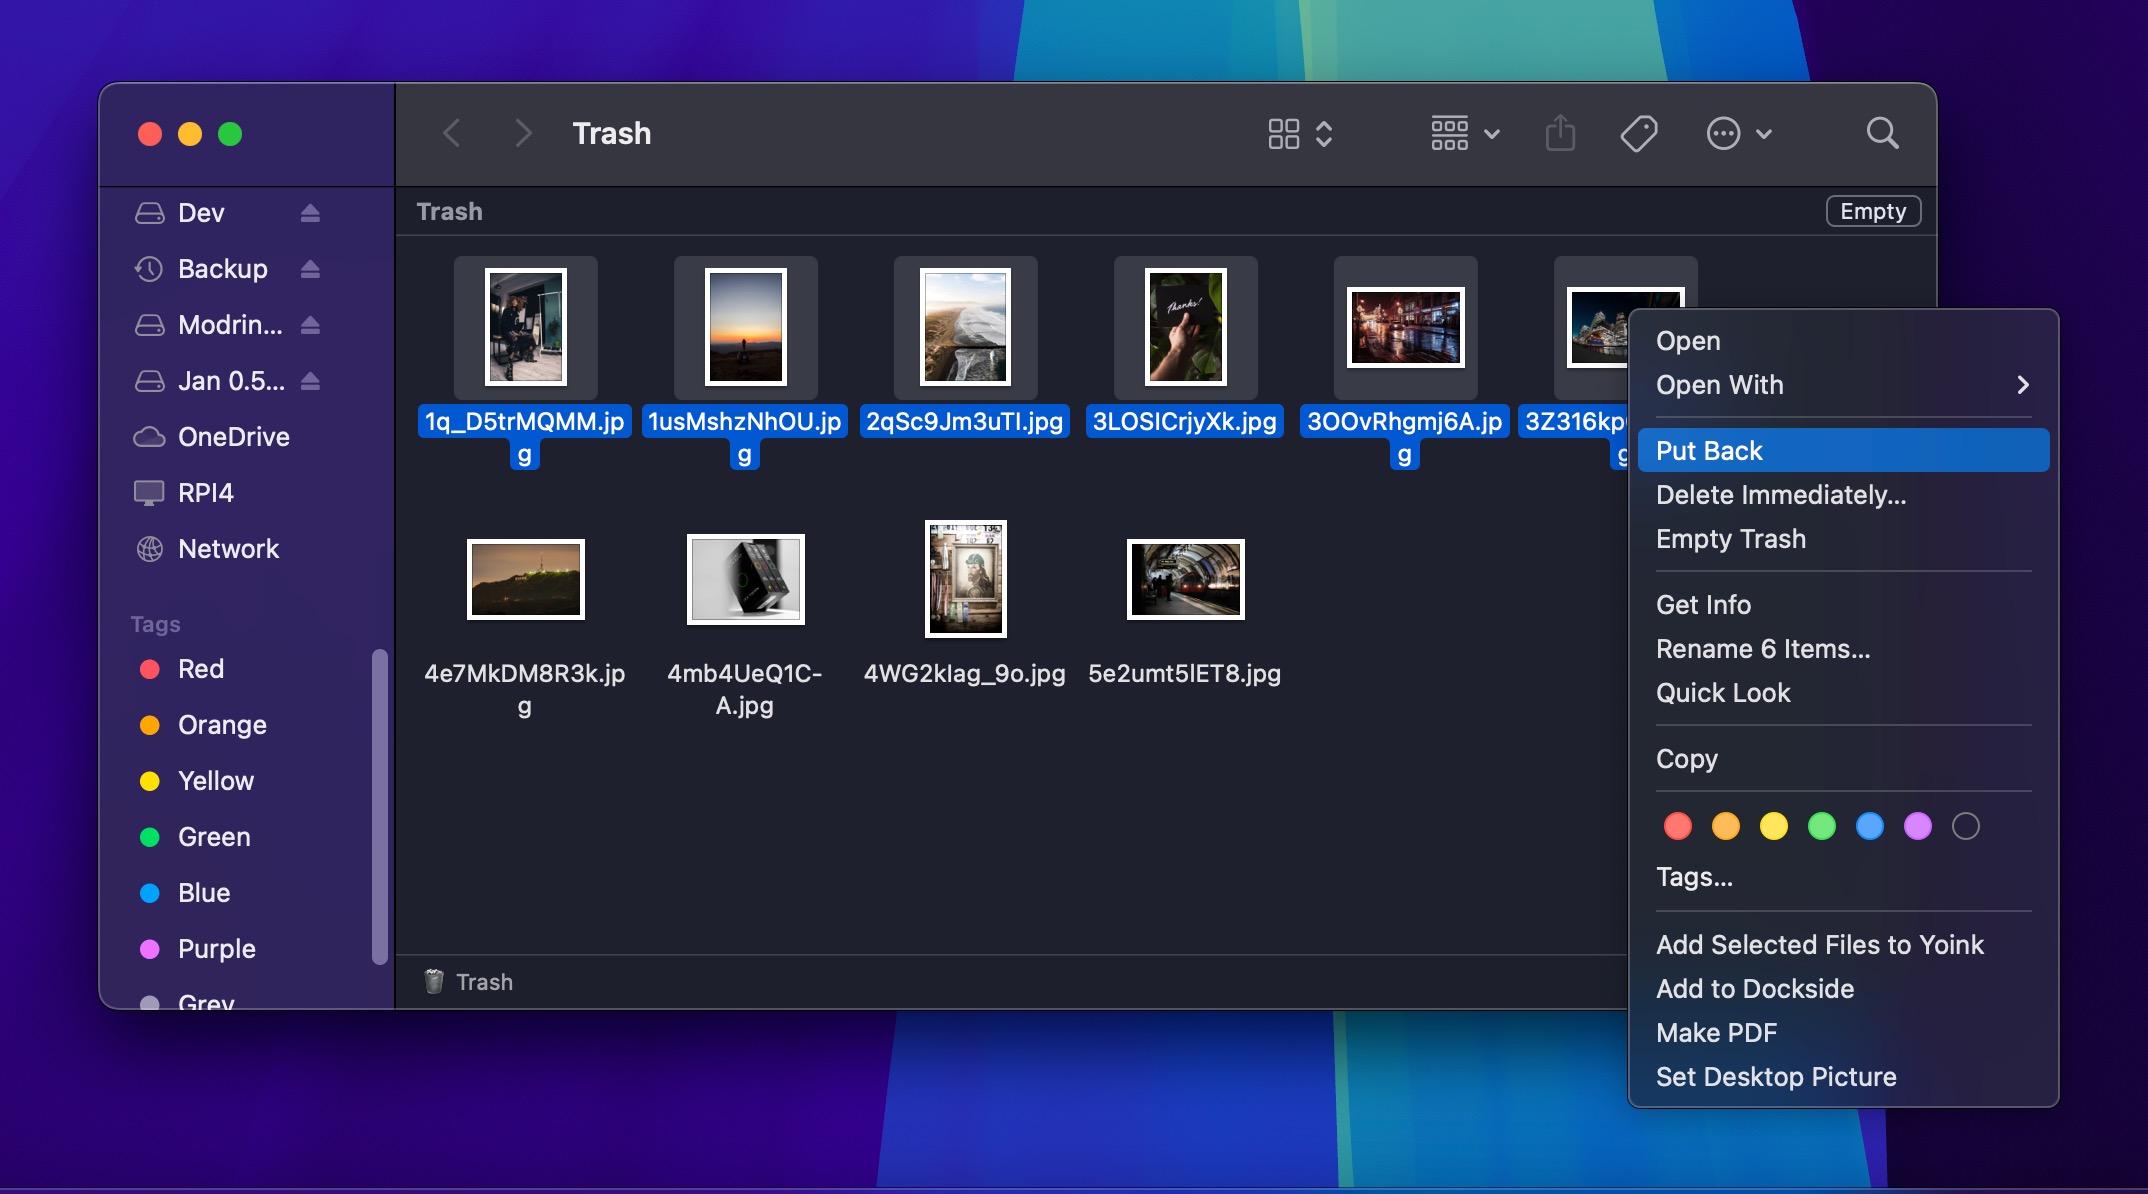
Method 1: From the Trash
Your Mac’s Trash Bin is the first place you should look for deleted photos or files. When a deletion occurs, macOS moves the deleted file to the Trash Bin temporarily to make it available for a quick recovery. Items roll off the bin after a set amount of time, when it gets full or when you empty it.
Here’s how to restore a deleted image from the Trash:
- Open the Trash Bin by clicking on its icon.
- Locate the photo you want to recover.
- Right-click on the item and select Put Back. The photo will be restored to its original location.
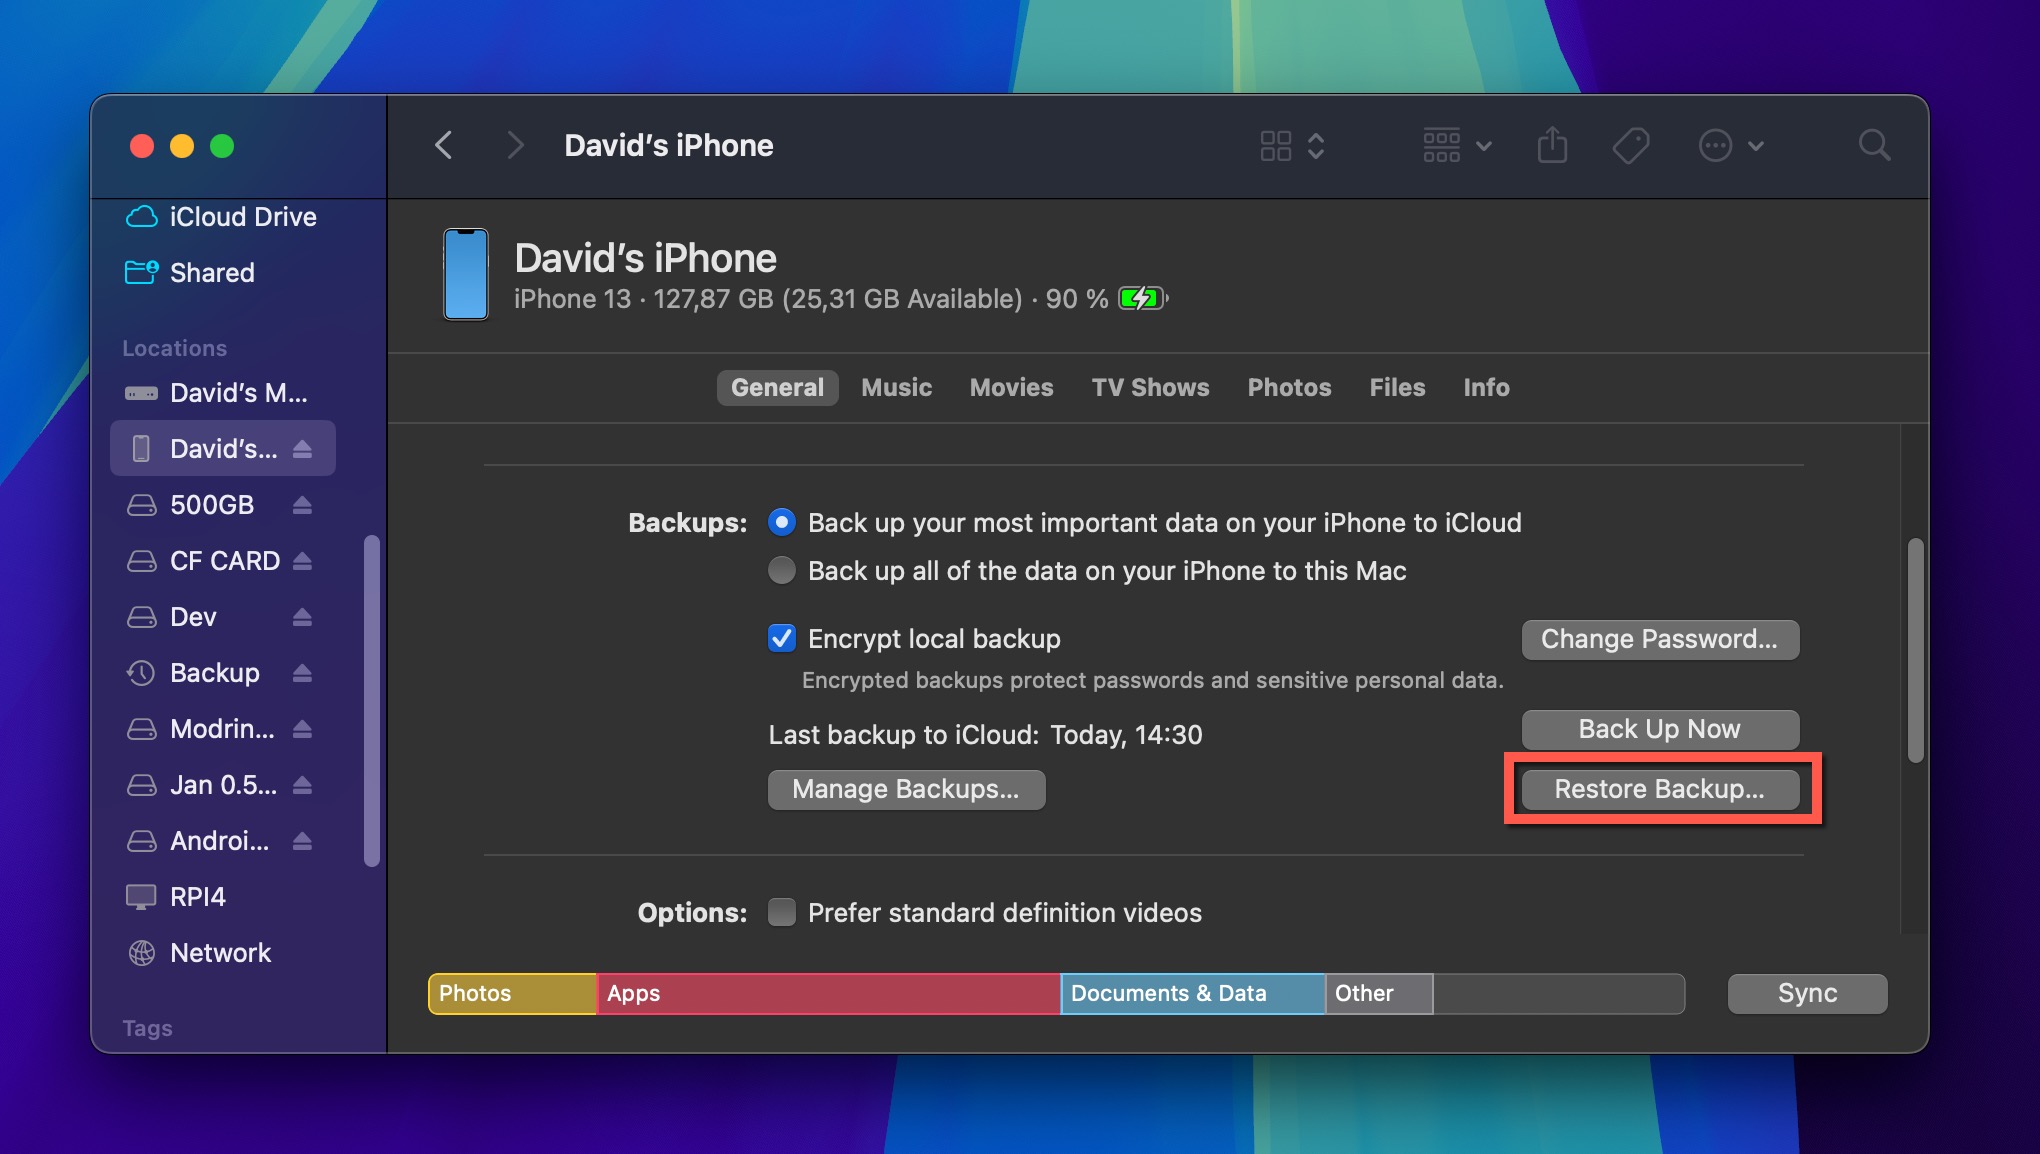
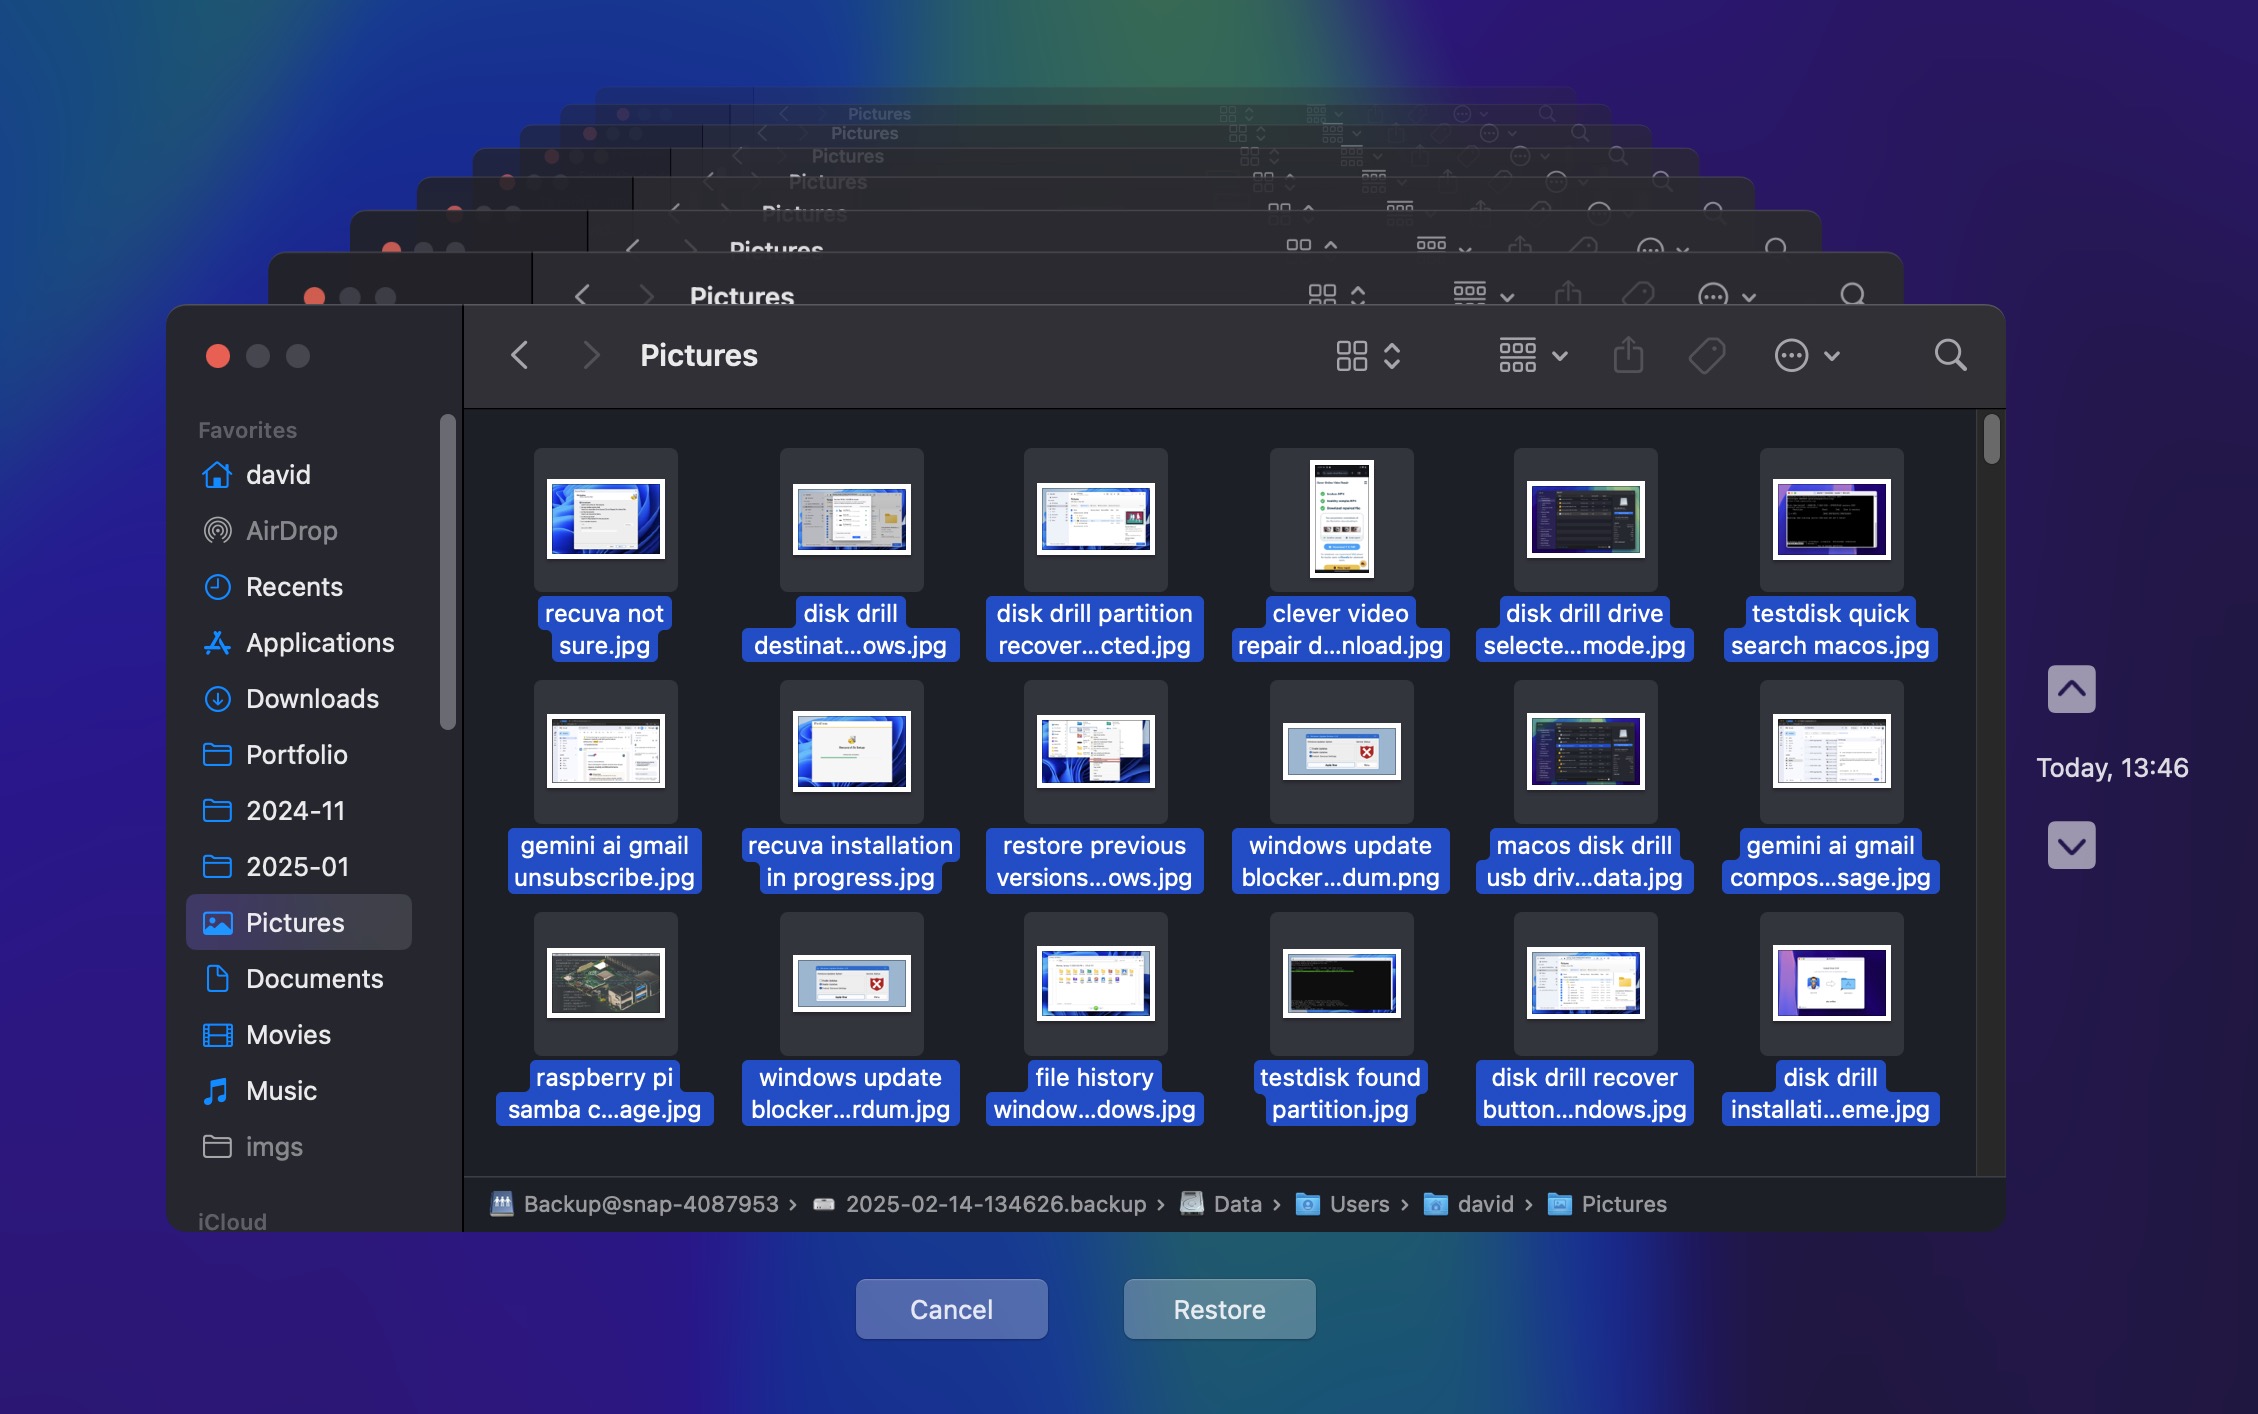
Method 2: From a Time Machine Backup
Time Machine is the built-in backup and recovery tool that comes with Mac’s operating system. If you are using it to make backup copies of your data and at least one backup was created prior to the loss of your photos, you can attempt to retrieve photos that were lost from your computer.
To use Time Machine for photo recovery, use the following steps:
- Connect the backup disk to your Mac.
- Open a Finder window in the folder where the photos were located.
- Open Time Machine by clicking on the clock icon on the Mac’s menu bar and select Browse Time Machine Backups.
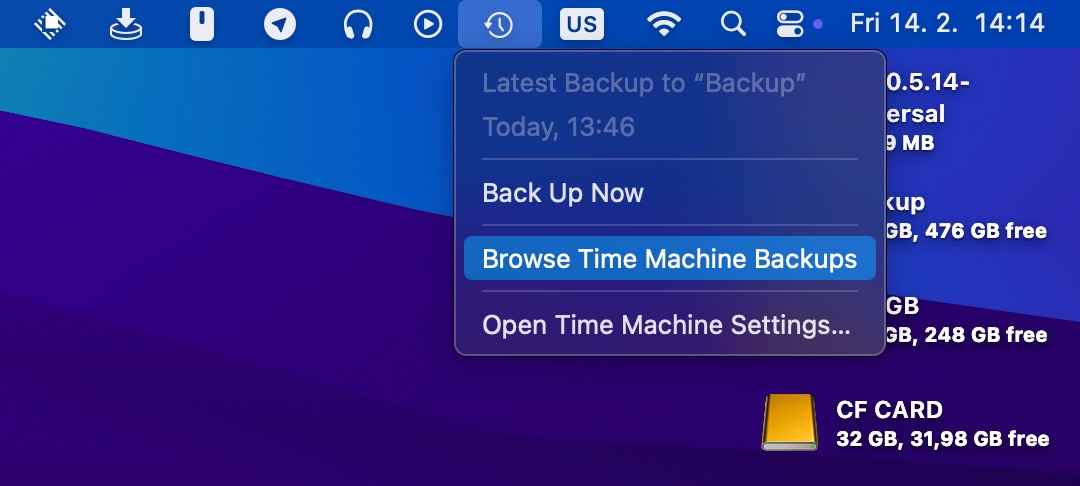
- Locate the items you want to recover.
- Click Restore to recover the selected photos.
Method 3: Restore Images with a Photo Recovery Software
Photo recovery software for Mac can help you retrieve deleted photos when they’re no longer in the Trash or if you don’t have a backup copy.
Our top recommendation for Mac photo recovery software is the same as for Windows photo recovery software: Disk Drill. With it, you can recover all photo files created by popular cameras from Canon, Nikon, Olympus, Sony, Fujifilm, Panasonic, Pentax, GoPro, and Samsung. The software handles not just standard photos but also recovers image files created by professional software like Adobe Photoshop, Adobe Lightroom, Capture One, and GIMP.
Follow these steps to use the Disk Drill image recovery tool to get your pictures back:
- Download and install Disk Drill for Mac.
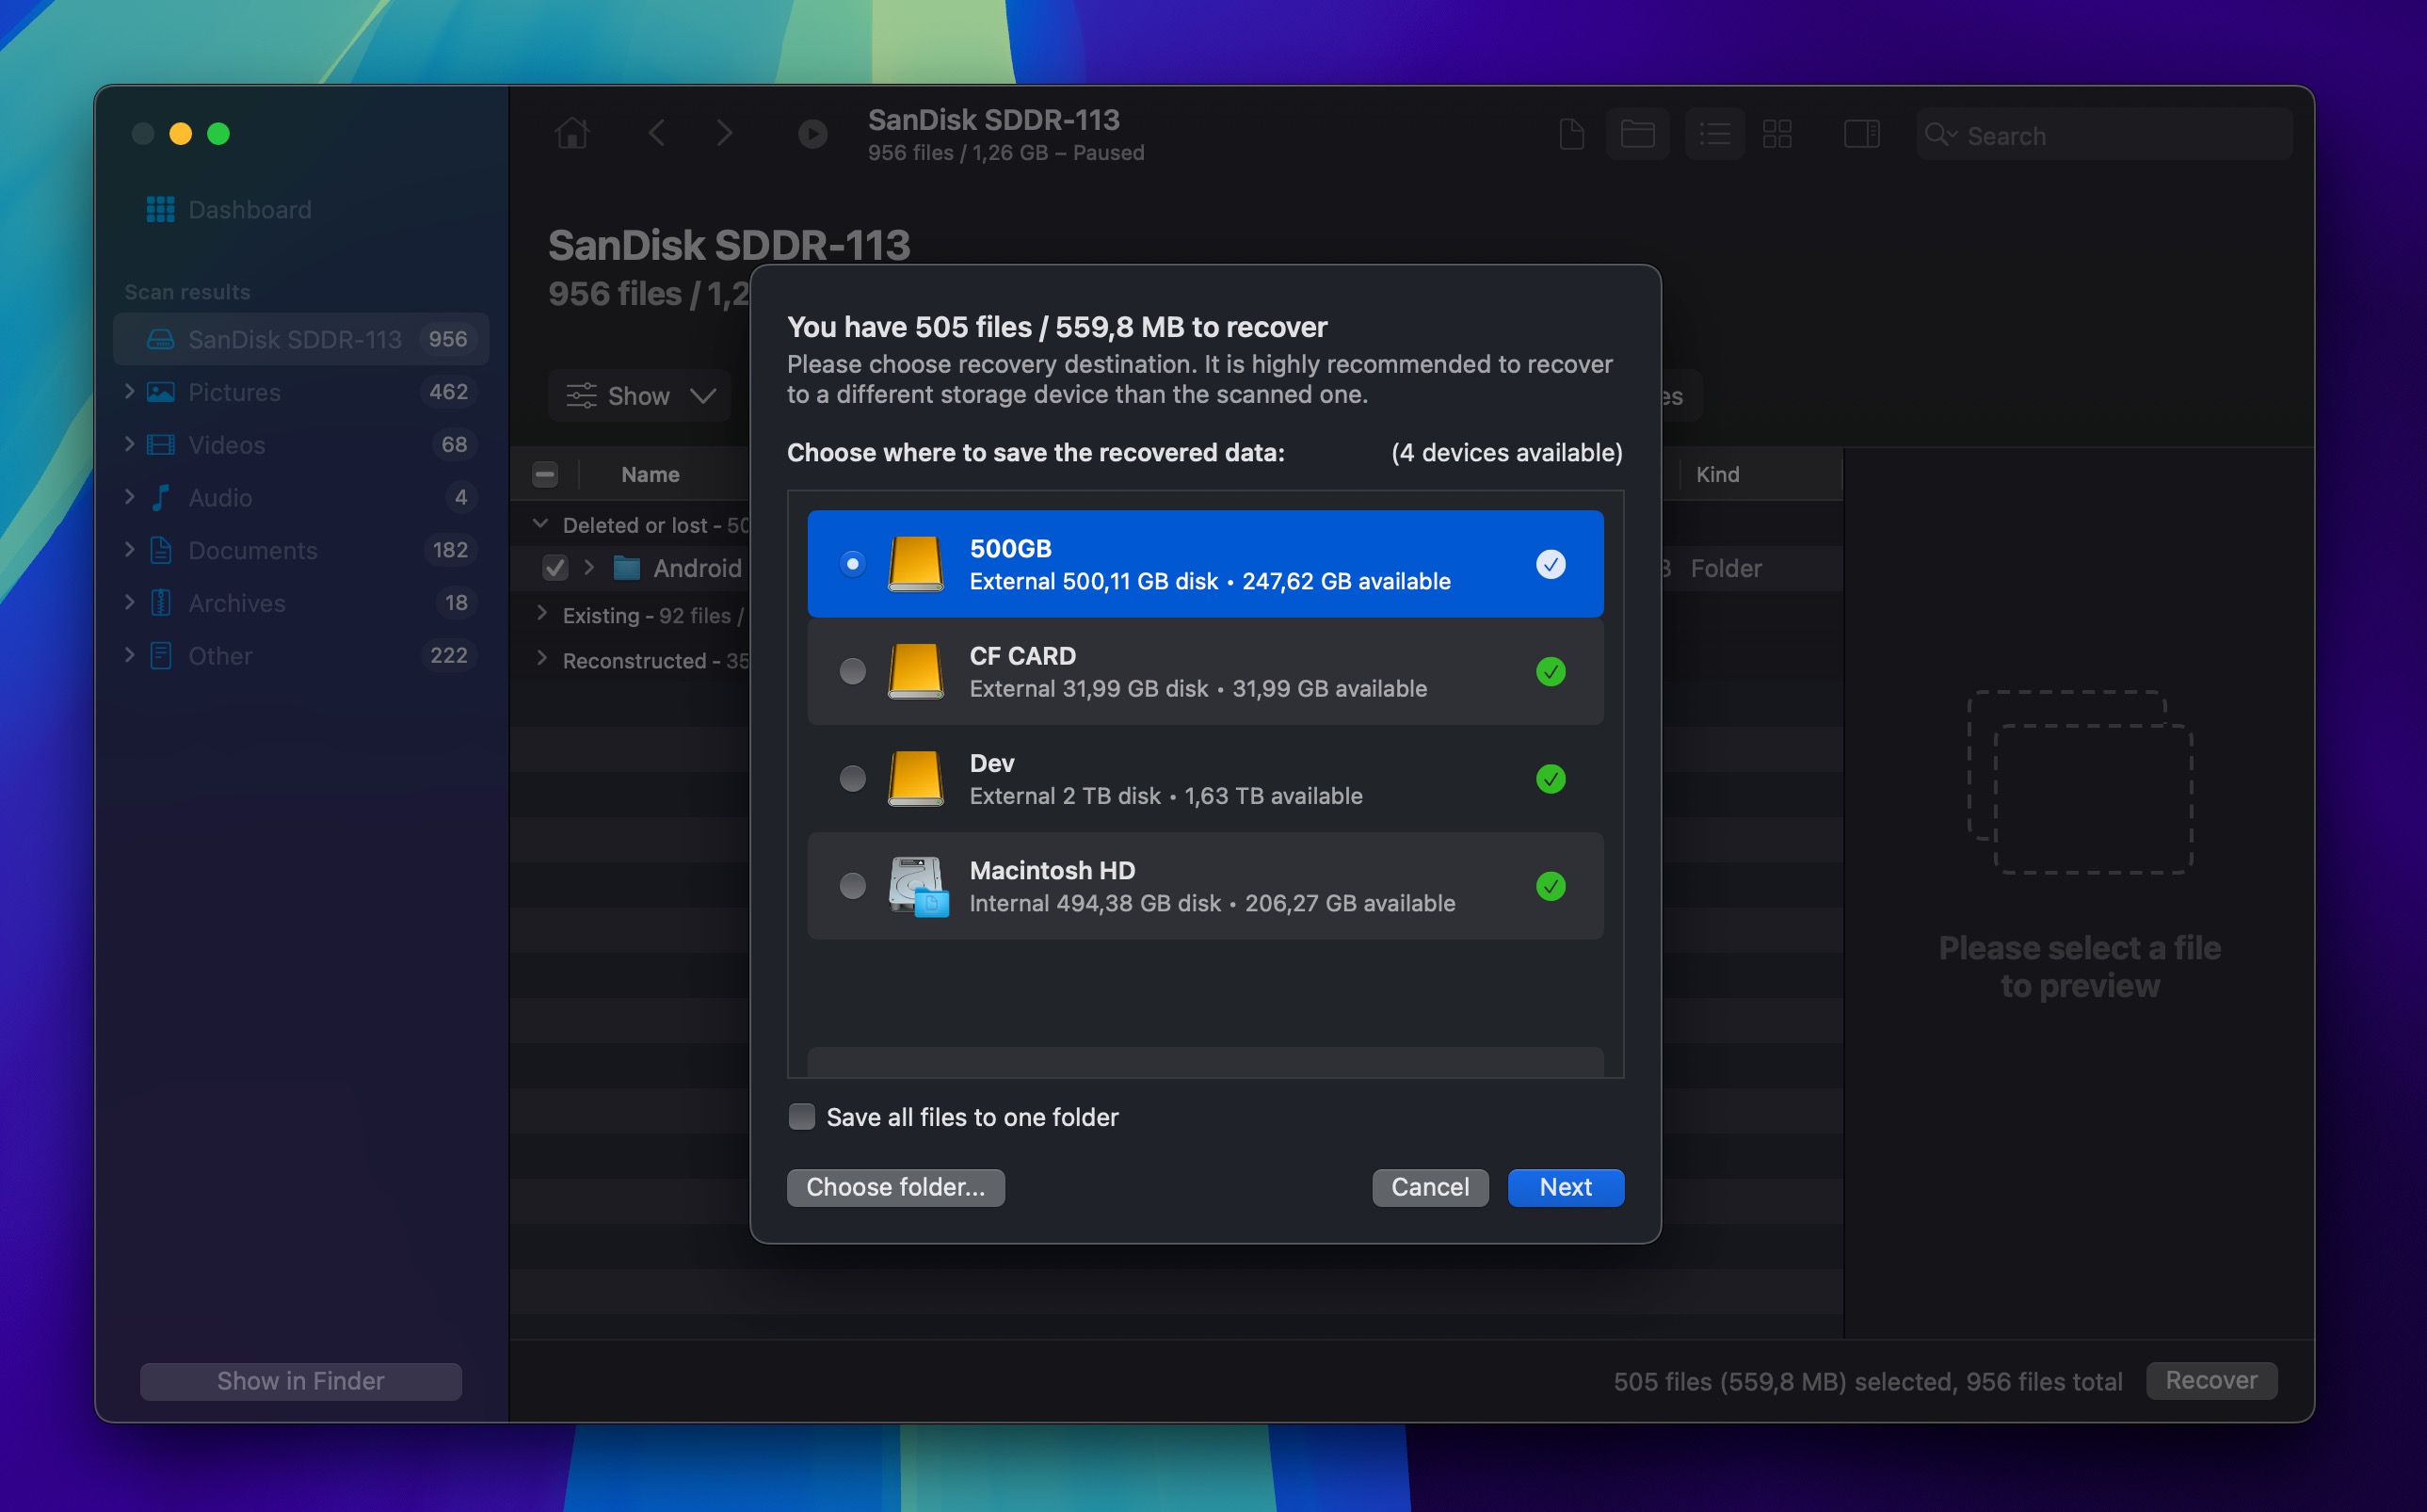
- Launch the program and select your disk from the displayed list. If your photos were stored on your Mac’s internal SSD, keep in mind that the TRIM command may make recovery impossible, as TRIM automatically wipes deleted data blocks on SSDs.
- Click the Search for lost data button to scan for lost data.
- Use the Pictures filter to narrow down the scan results to just image files, or search by file name to find specific photos more quickly. Preview the files that can be recovered and make your selections.
- Click Recover and select a suitable recovery destination (a different storage device than the one where your deleted photos were located).
How to Recover Deleted Photos from a Digital Camera
Modern digital cameras, whether from Canon, Nikon, Fujifilm, or other manufacturers, typically store photos on removable memory cards (SD or CF cards) rather than internal memory.
To recover deleted photos stored on your camera’s memory card, the most effective approach is to remove the memory card and scan it directly using your computer. If the photos are stored on the internal storage space, then the recovery process is similar, but the camera must be connected to your computer in USB Mass Storage mode.
Follow these steps to recover deleted photos from your digital camera’s memory card or internal storage:
- Download and install Disk Drill on your computer.
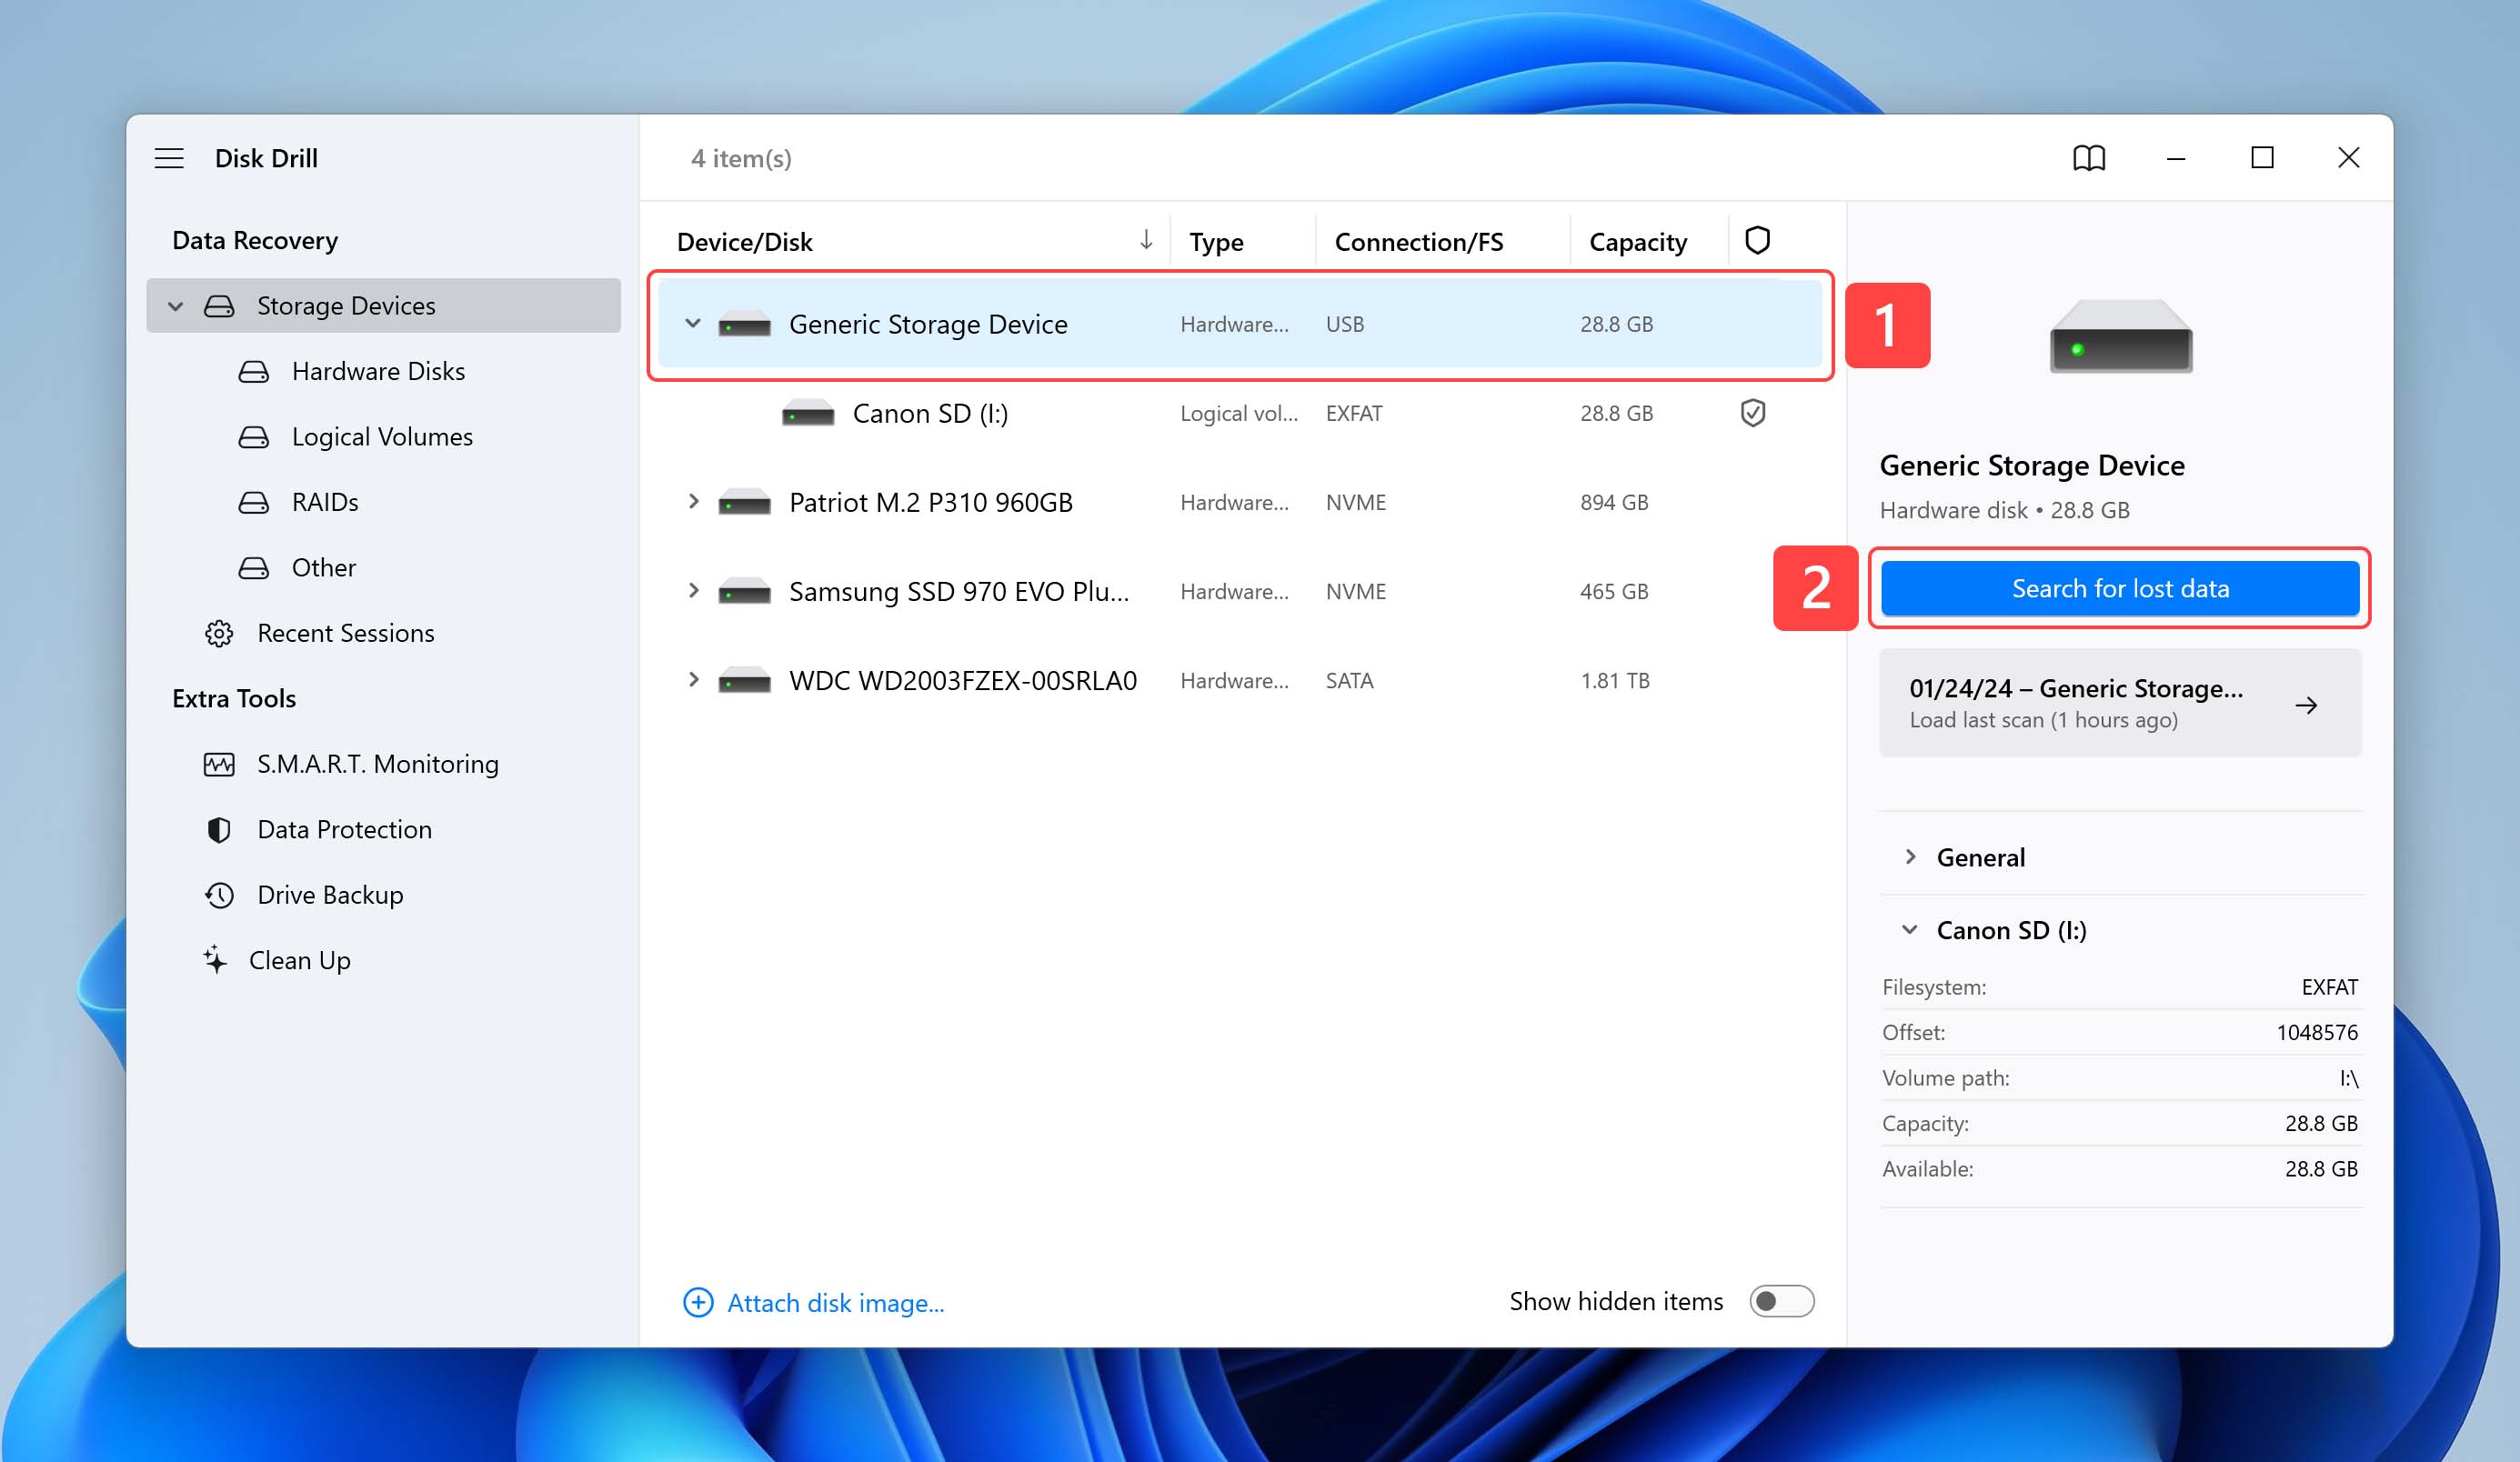
- Connect the camera to your machine (or the SD card via a card reader) and launch the program.
- Select the camera (or memory card) from the list of available storage devices.
- Click Search for lost data to start the scanning process.
- Preview the photos found by the tool and select the files you want to recover.
- Click Recover to retrieve the lost photos.
Tips to Avoid Photo/Image/Picture Loss
While it’s great that there are many ways to recover deleted photos, preventing data loss is always better than recovery. By putting into practice a handful of tips, you can avoid the loss of precious pictures:
- 💽 Back up. Professional photographers often keep at least three copies of their photos, on two different types of storage media, with one copy stored off-site (this approach is called the 3-2-1 backup strategy). For example, they have their main (working) data archive on a computer, which is then backed up to an external hard drive using a tool like Time Machine or File History and to cloud storage using a solution like OneDrive or Google Photos. Some even have a RAID storage system or a NAS (Network Attached Storage) device for safer and more efficient local backups.
- 📱 Regularly Offload and Organize Photos. Large, cluttered photo libraries increase the chance of accidental deletion. Periodically transfer pictures from your phone or camera to a computer or external drive, then organize them with tags and folders, so that you always know where everything is and don’t delete something important by mistake.
- 🖼️ Never Write New Photos to the Place Containing Lost Images. When faced with a photo loss scenario, it is vitally important that you stop using the device that contained the lost files. This is because when files are deleted or a disk is formatted, the data is still physically on the device until it is overwritten. If you write to the device you risk overwriting or corrupting the lost files before you have a chance to use data recovery software to get deleted pictures back.
- ☁️ Auto-uploading photos to the cloud. When taking images on Android or iOS devices, it’s best to automatically upload them to the cloud using a cloud backup solution like Google Photos and iCloud. If you have unlimited mobile data, then you can back up your photos almost as soon as you take them, so you should theoretically never lose more than a few pictures (not even if someone snatches your device right out of your hands).
- 😐 Think Twice Before Deleting Files. Human error is one of the most common reasons for losing photos. It’s very easy to press the wrong button or format an important partition. One simple way to protect against accidental deletion is to use the physical write-protection features available on your storage media. For example, most camera SD cards have a tiny lock switch on the side. Sliding it to the “locked” position can protect your images from accidental deletion or formatting until you’re ready to back them up.
Conclusion
As we have demonstrated, there are many ways to undelete photos no matter what type of computer or device was used to store them. You should consider taking steps to prevent photo loss in the first place, but if you are affected, Disk Drill will get your pictures back when other methods fail. It also provides free photo protection tools to help keep your precious photos safe.
FAQ
Even though permanently deleted images can’t be easily recovered from the Recycle Bin, they can still be undeleted with the help of a photo recovery software application. Windows File Recovery is a good example of basic recovery software, while Disk Drill provides a whole host of extra features and an easy-to-use user interface.
Mac users can recover permanently deleted photos from Time Machine or iTunes backups, and they can also use photo recovery software like Disk Drill. Unfortunately, it’s not possible to recover permanently deleted photos from Trash.
Yes, in many cases, it’s possible to restore deleted pictures from an Android phone. Here’s what you can do:
- Restore them from a cloud backup.
- Remove the SD card and scan it with photo recovery software on Windows or macOS.
- Use a photo recovery app for Android.
If you’re a Windows 11 user, you can recover permanently deleted files with Disk Drill. Just follow these simple steps:
- Download and Install Disk Drill on your Windows or macOS.
- Once you’ve launched the program, select a drive and click Search for Lost Data.
- Preview the files you want to recover.
- Click Recover and your files will be restored.
You can also go to a data recovery service to retrieve your files professionally.
Similar to file recovery from an iPhone, you can use the following methods to recover permanently deleted photos from your iPod:
- Recover from iTunes.
- Recover from iCloud.
- Data Recovery software (e.g., Disk Drill).
You can follow these steps to recover your deleted photos from an iPod:
- Download and Install Disk Drill for macOS.
- Connect your iPod to your Mac.
- Select the iPod from the list of connected devices and click Recover.
- Preview the photos on the app and choose the ones you wish to restore.
- Now, click Recover to get your files back.
If you own a Chromebook, you must keep in mind that the Chrome OS doesn’t have a native recycle bin or a trash folder. It’s only recently that a temporary trash folder has been added to files on Chromebook. However, you must ensure that the Trash folder is enabled. Otherwise if you delete a file, it goes away permanently. To prevent such a situation, you can back up your photos to Google Drive or external flash drives. Since Chromebooks also have limited storage, it is important to create these backups. Moreover, if your photos are backed up, you can recover them from another computer using the following methods:
- Recover from cloud backups or external drives.
- Recover with software such as Disk Drill.
When it comes to recovering permanently deleted data, you can try employing the following methods:
- Recovery from the Recycle Bin / Trash
- Backup Files (Cloud or OS backup data)
- Data Recovery Software
- Data Recovery Services