How to Recover Deleted Files from an SD Card on Mac

Disk Drill is an effective and reliable SD card recovery software for Macs running macOS 10.15+, including macOS Sequoia. It can recover deleted files on all types of SD cards on Mac OS X, including SDHC, SDXC, MicroSD, CompactFlash Cards, XD Cards, Sony Memory Sticks, MMC Cards, and virtually any other card your Mac can read. In this article, we will show you how to use Disk Drill as well as other methods to recover lost data from an SD card on Mac. macOS Sequoia Ready!

!

Disk Drill can recover files from memory cards even in some of the most challenging data loss situations, but every data recovery tool has its limits. For example, there's no tool capable of recovering physically overwritten data.

At CleverFiles, we're aware of the anxiety this uncertainty can cause, which is why Disk Drill offers a no-risk approach to data recovery. It's free to try and operates in a read-only mode, which means it never exacerbates your data loss problem. You will need to upgrade to Disk Drill PRO only when you've confirmed the recoverability of your SD card data.

Below is a quick overview of the steps required to recover deleted files from an SD card on Mac using Disk Drill. For more detailed guidance, our Knowledge base includes many comprehensive tutorials, including How to Install Disk Drill and How to Recover Lost Files with Disk Drill Basic.

1. Get Disk Drill for Mac

Download and install the free version of Disk Drill for Mac. Since you will be recovering data from an external memory card, it’s safe to install the software on your computer’s main disk.

  • Download Disk Drill
    1

    Download Disk Drill

  • Drag to Applications Folder
    2

    Drag to Applications Folder

  • Launch Disk Drill
    3

    Launch Disk Drill

2. Connect the memory card to your Mac

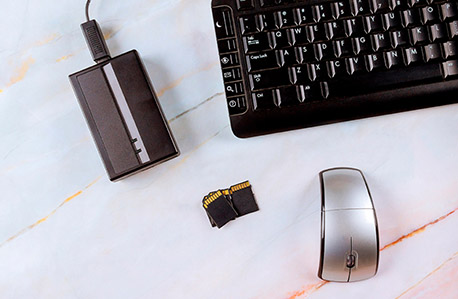
You can use your computer’s built-in card reader or grab an external one to connect your SD, microSD, CF card, XD card or any other memory card.

restore files from sd card mac

3. Launch Disk Drill and choose the SD card

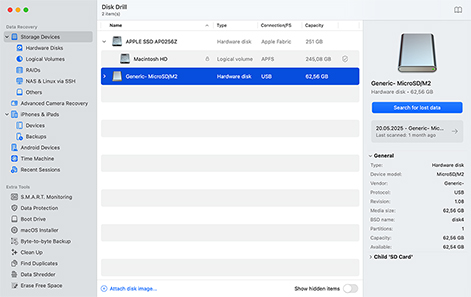
With your SD card connected, you can launch Disk Drill and choose your SD card in three different ways depending on your specific data loss situation and the condition of your memory card.

Launch Disk Drill and choose the SD card
Standard SD Card Recovery

3.1 Standard SD Card Recovery

The standard recovery method works best when you need to recover non-video files like photos, music, documents, and other data types. In such cases, you can simply select your card in the Storage Devices section before beginning SD card data recovery on your Mac as explained in the next step. While this method can technically recover video files too, we recommend using the Advanced Camera Recovery (ACR) module instead because it performs better on average when dealing with deleted or formatted files.

Advanced Camera Recovery (ACR)

3.2. Advanced Camera Recovery (ACR)

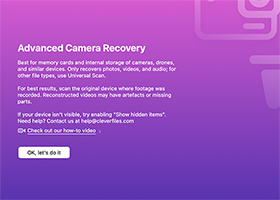
If you've lost GoPro videos, DJI drone footage, or any camera recordings due to accidental deletion or formatting, then you should navigate to the Advanced Camera Recovery (ACR) module instead and choose your SD card there because it can piece together fragmented video streams. The module will ask about your camera model and cluster settings. If you don't know, then it can usually figure out the correct settings automatically.

Safe Recovery

3.3 Safe Recovery

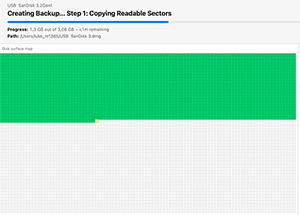
If you suspect that your SD card is corrupted because it has been showing read/write errors, disconnecting randomly, or otherwise acting strangely, then it's best to use Disk Drill's improved Byte-to-Byte Backup module to create a complete sector-by-sector copy of your SD card as a DMG file. Once the backup is complete, click Attach disk image in the Storage Devices tab and select the attached image instead of your SD card. 

4. Scan your memory card

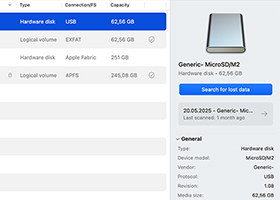
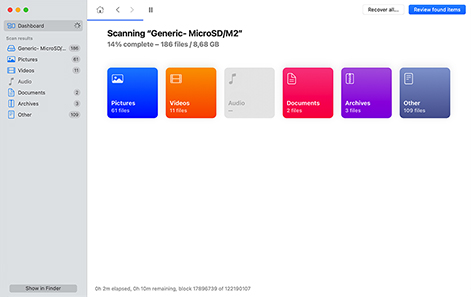
With your memory card or memory card image selected, you can click the Search for lost data button to start Disk Drill's scanning process. As the scan progresses, you will see an intuitive display of the scan's progress, including a time estimate for completion and a list of files being found in real-time. Should you need to pause the scan for any reason, Disk Drill offers the flexibility to do so.

Scan your memory card

5. Narrow down the scan results

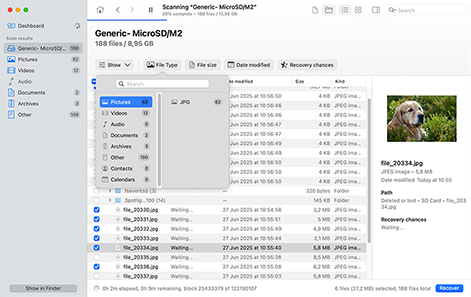
After the scan completes, you'll see all recoverable files. If there are too many results, use Disk Drill's filtering options to find what you need quickly. You can search by filename, filter by date, or select specific file types. You can also switch between different view modes. The tree view is great when you want to examine specific folders, while the icon view lets you quickly spot images and videos by their thumbnails.

Narrow down the scan results

6. Preview and choose files for recovery

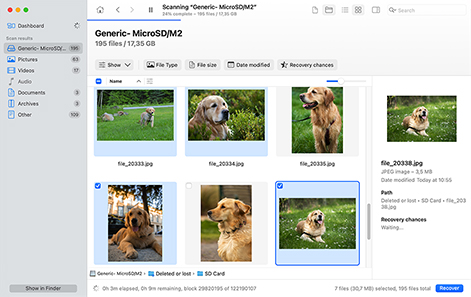
Use Disk Drill's preview feature to verify that files are recoverable before proceeding. To do so, hover your mouse cursor over the file you want to preview and click the "eye" icon. If the preview looks good, the file will recover perfectly. You can select a single file by clicking on it directly, multiple files by ticking their individual checkboxes, or all files at once using the checkbox above the file list.

Preview and choose files for recovery

7. Recover the deleted Mac data from your SD card

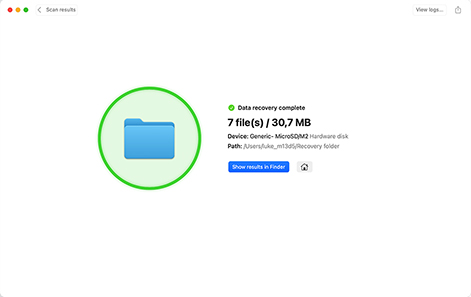
Finally, click the Recover button and choose a safe destination on your Mac to save the recovered files. This destination should be different from the memory card you're recovering to prevent overwriting. At this point, if you're using the free version of Disk Drill, you'll need to upgrade to Disk Drill Pro to complete the recovery process.

Recover the deleted Mac data from your SD card

Considerations for Mac SD Card Recovery

Keep in mind that the less you use the memory card from which you want to recover data, the higher the chance of successful SD card data recovery on Mac. Most cameras don't wipe deleted or even formatted data completely to speed things up. Instead, they only erase the file system references that point to your data, while your photos, video, or other types of deleted data remain on the memory card until they are overwritten.

By continuing to use the card (taking new photos, recording videos, or saving any files), you're essentially writing new data over the space where your deleted files still exist. That's why Disk Drill has a very good chance of recovering recently deleted files, but if you've already filled the card with new content after deletion, those original files may be gone for good.

!

When your memory card has been formatted or shows signs of corruption, we recommend starting with Deep Scan because this more time-consuming method gives you the best chance of recovery by examining your card at the deepest level possible using its advanced signature scanning technology that recognizes about 400 different file types, including some of the latest ones. To use Deep Scan, simply right-click on your memory card in Disk Drill's list of Storage Devices and select Deep Scan from the menu.

Reasons for Data Loss on SD Cards

There are multiple reasons that you might experience data loss on an SD card. Here are some of the most common causes of lost files on your memory card.

Accidental Data Deletion

Accidental File Deletion

Accidentally deleting files from an SD card is very easy to do. All it takes is a second and a misplaced command or incorrect click and you can lose a lot of valuable data quickly.

Formatted SD Card

Formatted SD Card

Accidentally formatting the wrong SD card can wipe out all your data in seconds. Even using the same card between different devices (like cameras and computers) can trigger data-loss-causing reformatting if they use incompatible file systems.

Virus Infection

Malware Infection

Infection with malware or a virus can lead to data loss and SD card corruption. Exposing your SD cards to strange devices or computers increases the probability that you will pick up an infection that potentially compromises your data.

Physical Damage

Physical Damage

Physical damage to an SD card can result in the loss of all of the files that were on the storage device. Cards can easily be damaged by being crushed in the bottom of a bag or by too much heat or moisture.

SD Card Corruption

SD Card Corruption

Your card's file system structures get damaged for many possible reasons, including removing the card during write operations, malware infections, switching between devices with incompatible file systems, faulty card readers, bad sectors, or NAND flash degradation.

Power failure

Power Failures

A power failure that occurs while you are reading or writing to the card can result in files being lost or corrupted. Make sure you have enough battery power in your device before using it to transfer data.

Recover Deleted Mac Data From any Memory Card

Disk Drill is compatible with any type of memory card from all manufacturers such as SanDisk, Lexar, Sony, and Olympus. If you can connect the device to your Mac, Disk Drill can scan it and recover its lost files. Easily restore photos, videos, and other data from SD cards in digital cameras, smartphones, drones, and other types of digital devices.

SD Card
SD Card

SanDisk®, Sony®, Lexar®

SDHC Card
SDHC Card

PNY®, Genuine SanDisk®, Lexar®

microSD/miniSD Card
microSD/miniSD Card

Delkin®, Verbatim®, Silicon Power®

MMC Card
MMC Card

Transcend®, Johnziny®, Canon®

xD Picture Card
xD Picture Card

Olympus®, xD-Picture®, Fujifilm®

CF Card
CF Card

MyMemory®, EgoDisk®, Delkin®

Tip: To recover data from a damaged SD card that cannot be accessed by your computer, contact Cleverfiles Data Recovery Center.

Files Types Supported for SD Card Recovery

Disk Drill recognizes and can reconstruct and recover over 400 different file signatures when performing a deep scan. This means that virtually any type of file can be recovered with this flexible recovery application. Below we have listed just some of the filetypes that can be recovered with Disk Drill.

Images
Images

JP2, BMP, TIFF, JPEG, GIF, PSP, DNG (Digital Negative), CDR (CorelDRAW), VSD (Visio Drawing file). Mac OS X Icon: ICNS. Polaroid/Sigma: X3F. Adobe: AI, IDML, INDB, INDD, PSD and more

Video
Video
FLV (Flash video), M4V (iTunes video), MOV (Apple QuickTime movie), OGM (OGG Media), M4P (iTunes Music Store audio), MP4 (MPEG-4 video), MPG (MPEG video), SWF (Flash movie) and more
Audio
Audio

AAC (Advanced Audio Coding), CAF (Core Audio File), MP3 (MPEG Audio Stream, Layer III), ALP (Ableton Live Pack), M4A (Apple Lossless Audio), WAV (DTS-WAV), VOC (Creative Labs Voice) and more

Archives
Archives

ZIP (Extended Zip File), JAR (Java Archive), DMG (Mac OS X Disk Image), RAR (WinRAR Compressed Archive), ISO (ISO-9660 CD Disc Image), MBX (Apple Mail mailbox file), 7Z (7-Zip Compressed) and more

Documents
Documents
PDF (Portable Document Format), EMLX (Apple Mail Message), FMP12 (FileMaker Pro 12), APK (Android Package), IPA (iPhone or iPod Touch Application), DOCX (Microsoft Word) and more
Other Files
Other Files

DD (Forensic DD images), ISO (Uncompressed disk images), ACCDB (Microsoft Database), OTF (OpenType Font), SQL (bundled SQL queries), BIN (Generic disk images), VMDK (Virtual VMWare disks) and more

Methods for Recovering Deleted Files from an SD Card on a Mac without Software

There are several ways to recover lost files from an SD card without using data recovery software. Here are three methods that you can try.

METHOD 1

Recover from your Mac’s Trash

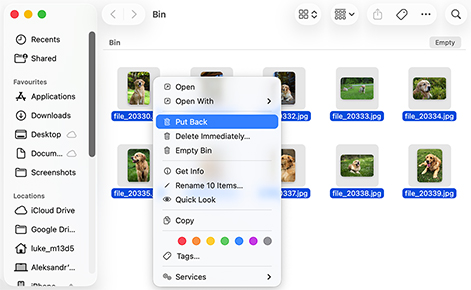
Files deleted from an SD card while it's connected to your Mac end up in a hidden Trash folder on the card itself. As long as your card is connected to your computer, the content of the hidden Trash folder is automatically displayed when you open your Mac's regular Trash by following these steps:

  1. Click the Trash icon on the right side of the Dock.
  2. Locate the files you want to recover.
  3. Right-click on them and select Put Back.

Important: If you deleted files directly on your camera or another device, they won't appear in your Mac's Trash.

Recover from your Mac’s Trash
METHOD 2

Recover with a Time Machine backup

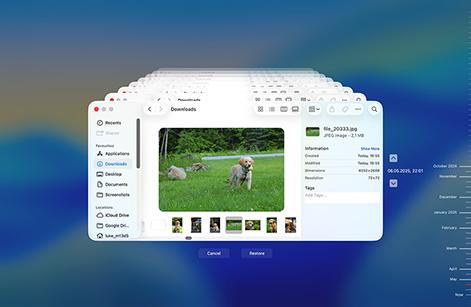
Your Mac comes equipped with a backup and recovery tool called Time Machine. Since Time Machine is designed to back up your Mac's system drive, it can help you recover your SD card's files only in situations where those files were previously copied to your Mac and included in a scheduled backup. If you believe that such a situation might have happened, here's how to check:

  1. Connect the storage media containing your Time Machine backup to your Mac. Enter the backup drive password if prompted to do so.
  2. Click the Time Machine icon in the Menu bar and select Browse Time Machine Backups. Alternatively, you can launch Time Machine from the Applications folder.
  3. Browse back through the timeline to when the files might have existed on your Mac and navigate to the Mac location where you stored them.
  4. Select the files you want to restore and press Spacebar to preview them if you want to.
  5. Click the Restore icon to recover the selected files to their original location.
Recover with a Time Machine backup
METHOD 3

Restore from other backup solutions

Many camera manufacturers offer companion apps that automatically transfer photos and videos from your SD card to your phone or tablet. If you've been using apps like Canon Camera Connect, Nikon SnapBridge, Sony Imaging Edge Mobile, Fujifilm Camera Remote, or Panasonic Image App, your missing files might already be safely stored on your mobile device, so make sure to check your device's gallery. And if you use an automatic cloud backup solution or sometimes back up files to the cloud manually, then check that too.

Restore from other backup solutions
METHOD 4

Recover lost files by fixing file system issues

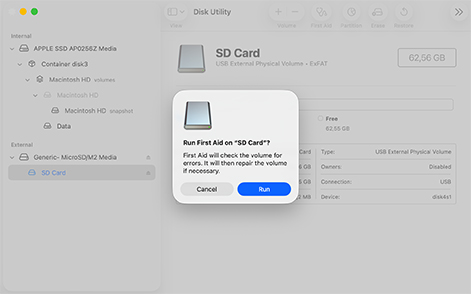
If you're getting errors when trying to access files on your memory card, the file system itself may be corrupted. While macOS's First Aid tool can fix these issues, repairs can sometimes make data recovery more difficult. That's why we strongly recommend following the Safe Recovery method described in Step 3.3 above to create a byte-to-byte backup of your SD card using Disk Drill first, then run recovery on the backup image.

When you've backed up your data (or if you're willing to proceed without a backup), you can instruct First Aid to repair the file system issues:

  1. Connect your SD card to your Mac.
  2. Launch Disk Utility (Applications > Utilities > Disk Utility).
  3. Select your SD card from the list of storage devices on the left.
  4. Click the First Aid button in the toolbar.
  5. Confirm your decision to check the SD card and repair errors by clicking the Run button.
Recover lost files by fixing file system issues

Advanced Camera Recovery: Specialized Recovery for Camera Footage

Disk Drill 6 introduces Advanced Camera Recovery (ACR) technology that can reconstruct fragmented video files from cameras, action cameras, drones, and other devices, which is something standard recovery methods often fail to do because such files are often split across multiple locations on the SD card.

Cameras
Cameras

Canon: EOS R5, PowerShot G7 X, EOS Rebel T8i; Sony: Alpha a7 III, ZV-E10, RX100 VII; Nikon: Z6 II, D850, COOLPIX P1000; Fujifilm: X-T5, X100V, GFX100; Panasonic: Lumix GH6, Lumix S5, HC-VX1

Action Cameras
Action Cameras

GoPro: HERO10, HERO9, MAX; Insta360: ONE X2, GO 3, X3; DJI: Osmo Action 4; iCatch: SPCA6330M, SPCA6350

More
More

Drones: DJI Air 3, Pocket 2; Security cameras: Appcam Solo+, Guardian G955; Body cameras: Boblov PD70, W1, KJ21

Tips to Maximize the Chance of Successful Data Recovery

Here are some tips that can help you reduce the probability that you will lose data from an SD card. Following these recommendations will also make it more likely that you can perform a successful recovery with data recovery software.

Stop using the disk

Stop using the card

Stop using the card as soon as you suspect that data loss has occurred. Continued use of the device exposes its contents to being overwritten or corrupted.

Back up the drive

Backup your data

Backing up your data is the best defense against any type of data loss scenario. You should make it a regular habit to create a backup of all of your valuable data.

Use a high-quality card

Use a high-quality card

Use high-quality SD cards from reputable manufacturers such as SanDisk. Saving a little money can come back to bite you when the card fails and you lose data.

Steer clear of viruses

Steer clear of viruses

Try to keep your SD cards free of virus infection by limiting the number of unverified devices you connect it to and using antivirus software on your Mac.

Handle the card gently

Handle the card gently

Take good care of your SD cards and they will last longer and keep your data safe. Keep them away from excessive heat and moisture and protect them in a case.

Dont remove the card during data transfer

Allow data transfers to finish

Removing the card while data is being transferred can cause corruption and result in the loss of data. Make sure the process is complete before taking out the card.

Protect Your Data

While Disk Drill excels at recovering lost files from SD cards, the best strategy is to prevent data loss in the first place. For data that you regularly transfer from your SD card to your Mac, Disk Drill offers two free protection features that can make recovery instant if you accidentally delete it from your computer:

  • Recovery Vault monitors designated folders on your Mac and remembers the metadata (filename, location, etc.) when files are deleted. Use it to protect your photo/video library.
  • Guaranteed Recovery creates invisible copies of files sent to your Mac's Trash to make them immediately available for recovery, and it works automatically for all files, including those you've previously transferred from SD cards.
 Protecting Your Data in Advance is the Best Solution

Technical Specifications for Disk Drill for Mac

OS support
OS support:

Versions of Disk Drill are available for all versions of macOS from 10.5 through the newest version macOS Sequoia (15.5).

Stable release
File Systems Supported:

FAT16/FAT32/exFAT, NTFS, NTFS5, ReFS, HFS, HFS+, APFS, EXT2/EXT3/EXT4, BTRFS and any RAW disk

Hardware Requirements
Hardware Requirements:

Disk Space: 1GB minimum free space
CPU: 64-bit (x86-64) compatible CPU 1.0 GHz or faster
RAM: at least 4GB

Frequently Asked Questions

by Disk Drill Team

How to recover files from an SD card on macOS?

There are many methods we have covered that you can use to recover deleted files from SD card on Mac. However, in most cases, you will have to turn to data recovery software and follow these simple steps:

  1. Download and install Disk Drill for Mac.
  2. Connect the SD card to your Mac.
  3. Launch Disk Drill SD card recovery software for Mac.
  4. Choose the SD card from the list of available disks.
  5. Click Search for lost data to initiate the scanning process.
  6. Preview the files that Disk Drill can retrieve.
  7. Select the items to restore and click Recover.
How can I recover corrupted SD cards on Mac?

The recovery of corrupted SD cards on Mac is tricky because the corruption can unexpectedly get worse or the card may stop working entirely. That's why it's best to always start with the creation of a complete backup of the card using something like the Byte-to-byte Backup feature in Disk Drill. You can then mount the image in Disk Drill using the Attach disk image option at the bottom of the Storage Devices section. After mounting, you can recover data from the image just like you would from a normal SD card, but without the risk of further damaging the original corrupted card.

How can I recover deleted files from SD Card on Mac for free?

To recover deleted files from your SD card without spending any money:

  1. Open Finder and display the content of your SD card.
  2. Reveal hidden files by pressing CMD + Shift + >.
  3. Navigate to the .Trashes folder and open the Trash folder inside.
  4. Select the files you want to recover.
  5. Move the selected files to a safe location.

How can I recover a formatted SD card on Mac?

If the card hasn't been overwritten during formatting (full format options in many cameras or the secure format options on Mac do overwrite all data), then you can recover it by connecting it to your Mac and scanning it with Disk Drill or another Mac-compatible tool capable of locating and restoring leftover data structures.

How can I format an SD card on Mac?

Follow this procedure to format an SD card on your Mac.

  1. Connect the card to your Mac with an external card reader.
  2. Open the Disk Utility application.
  3. Locate the SD card in the left window pane. It may appear with no name.
  4. Click the ERASE tab in the middle of the window.
  5. Click the Format dropdown menu. Select MS-DOS (FAT) if the card is 32 GB or smaller. For larger cards, use the ExFAT format.
  6. Respond to the verification prompt by clicking Erase.

How can I recognize memory card corruption?

Here are some of the signs that indicate your memory card has experienced some form of corruption.

  • Missing files.
  • Strange error messages.
  • Black screen on your camera or mobile device.
  • Read and write failures.
  • The SD card is not recognized by your computer.
  • The card displays no files.

How can I open an SD card on Mac?

You can use an external card reader or the one built into your Mac. Follow these steps.

  1. Carefully insert the card into the card reader. Ensure that the metal tabs on the edge of the card are facing down.
  2. The SD card will appear on your Mac’s desktop and in a Finder window.
  3. Make sure to eject the card before removing it from your computer to prevent possible corruption.

How can I recover deleted files from a MicroSD card on Mac?

The process is no different from the recovery of a regular SD card. First, stop writing new data to the card so that the deleted files don't become overwritten. Next, connect the microSD to your Mac using a suitable memory card reader and run a scan with Disk Drill or another Mac-compatible recovery tool. If the card is not recognized, then you should check for physical damage. MicroSD cards are tiny, so it doesn't take much to crack them. If you do notice physical damage, then your best course of action is to send the card to a professional data recovery service for an assessment.

How can I recover deleted files from an SDHC card?

SDHC cards hold only up to 32 GB of data, and that's not much in this day and age. A couple of 4K videos written to your SDHC card after the deletion of your files could easily overwrite most of the available storage space and make their recovery impossible. Except for this urgency, the recovery process is the same: connect to Mac, download recovery software like Disk Drill, and run the recovery scan.

How to recover deleted photos from an SD card on Mac?

Deleted photos can be restored from an SD card with this procedure:

  1. Download and install Disk Drill.
  2. Connect the device with the SD card to your Mac.
  3. Launch the app and select the SD card.
  4. Hit the Search for lost data button to start scanning for deleted pictures.
  5. Select the photos from the list of recoverable files.
  6. Click Recover to restore your images.

How can I recover deleted videos from my memory card for free?

In many cases, all you need to do is perform standard data recovery using software like Disk Drill. Some cameras, however, record multiple streams of data to different parts of the memory card at once, and this fragmentation can make standard data recovery techniques less effective. That's where Disk Drill shines. Its Advanced Camera Recovery feature (available in version 6) can reconstruct fragmented video files from GoPro, DJI, and similar cameras. You can preview recoverable videos at no cost before deciding to upgrade.

What is the best SD card recovery software for Mac in 2025?

In most cases, Disk Drill is the best choice for SD card recovery on Mac, as it combines ease of use with comprehensive functionality for recovering all kinds of data. Tech-savvy users who are willing to sacrifice some usability for granular control over the recovery process should also check out R-Studio because it allows you to edit file signatures and scan specific portions of your SD card.

If you're looking for completely free solutions, then PhotoRec is your best bet on macOS even though it lacks a graphical user interface and recovers files based only on their signatures, so you won't retain original file names or folder structures. 

How do I fix an unreadable SD card on my Mac?

You have several options to try with an unreadable SD card including:

  1. Inserting the card into a different device or slot in a card reader;
  2. Using a card reader and attempting to assign it a new drive letter;
  3. Running the macOS Disk Utility and performing First Aid on the card;
  4. Rebooting your computer and trying to reconnect the SD card.
  5. Clean the SD card contacts to free them from dust.

What is the most effective way to recover lost videos from an SD card?

The most effective way to recover lost videos from an SD card is to use the Advanced Camera Recovery (ACR) module in Disk Drill 6. This module is designed to reconstruct fragmented video files (like those from GoPro or drone footage) by automatically detecting file fragments and stitching them together in their correct sequence. For the ACR module to work correctly, make sure you connect the original SD card to your Mac via an external card reader, as opposed to keeping it inserted in the video recording device and connecting the device to your Mac using a USB cable. 

Disk Drill

Can one also recover SD card on Windows? With Disk Drill for Windows, you can!

More How To's on file recovery on macOS

How do I recover lost data?

See what Disk Drill fans say

Disk Drill, just recovered over 500MB of photos from an SD card at work an hour ago using the tool. It's easy to use and has a high success rate.
Read more
"For the most part, Disk Drill 5 recovered almost all the images I was hoping for. The memory card tested was a Lexar 600x 16GB micro SD card." - Feroz Khan.
Read more
Used by world famous companies