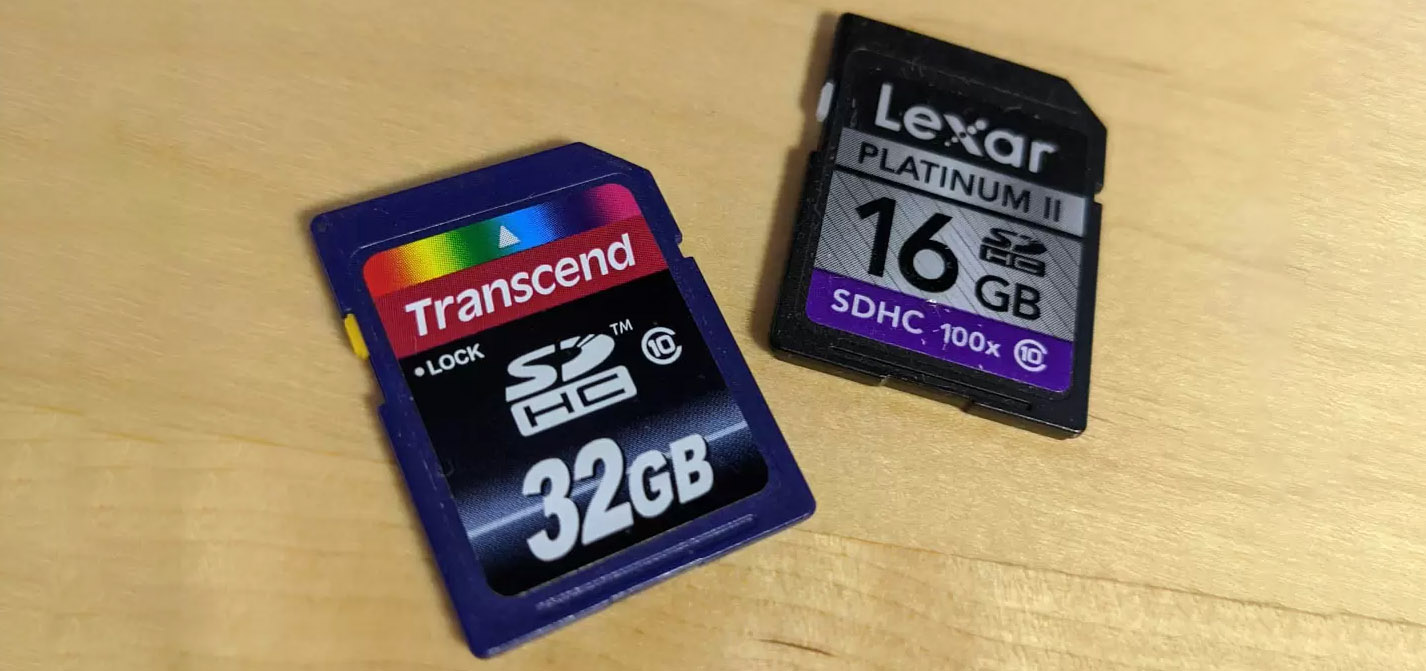
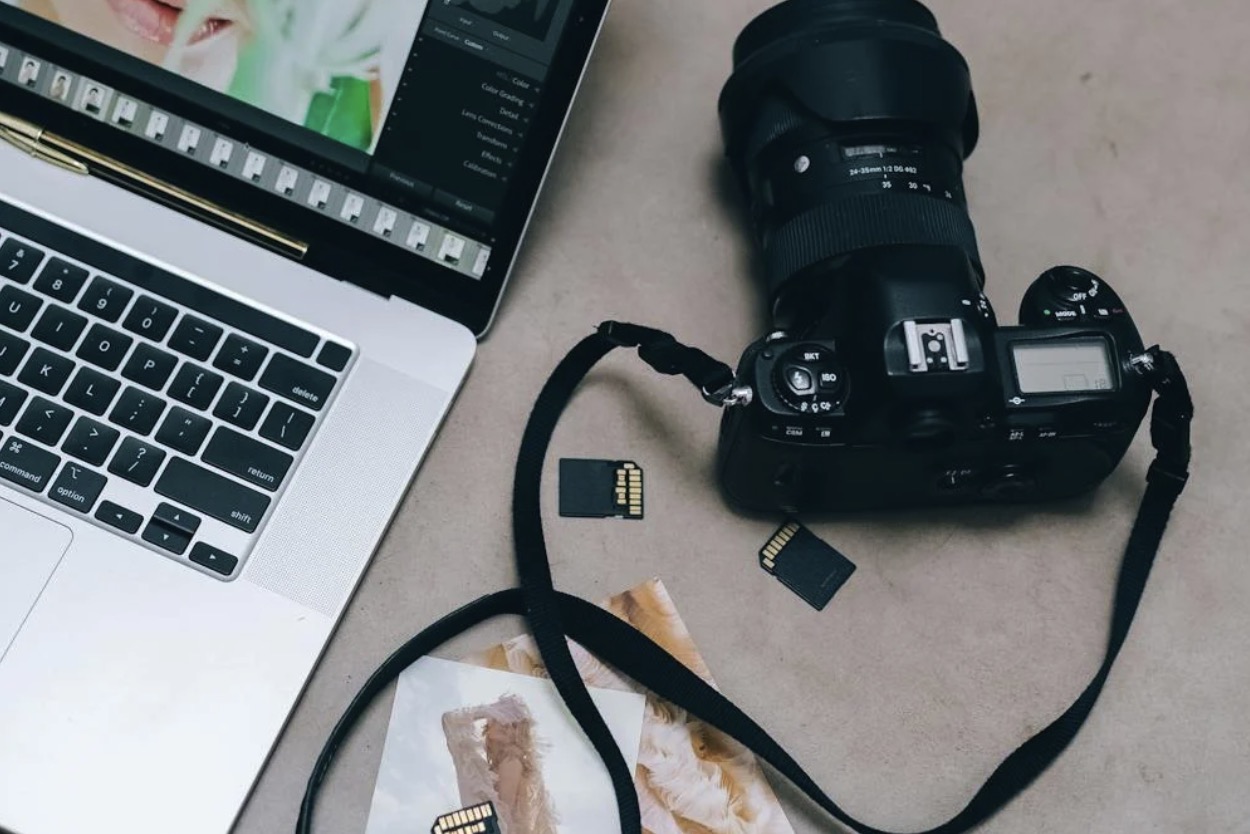
Whether you’re a professional videographer, vlogger, or someone recording family memories, SD cards (and microSD cards) from manufacturers like SanDisk, Lexar, Toshiba, Samsung, Polaroid, and Sony have become the universal storage solution for capturing video footage using everything from Android smartphones to DSLRs to GoPro action cameras. As a result, many people want to know how to recover deleted videos from an SD card on Windows or Mac, and we’re here to answer this question.
Can I Recover Deleted Videos from an SD card?
Yes, you can recover deleted videos from an SD card in many cases. When you delete a video file from an SD card, its entry in the file system is marked as deleted, but the actual video content remains physically present on the card until it’s overwritten by new data.
If you act quickly after accidental deletion and stop using the card immediately, your chances of successful SD card video recovery are very high. Even if you’ve used the card since deletion, attempting SD video recovery is still worthwhile as not all marked-as-deleted space may have been overwritten.
| Problem | Solution |
| You need to recover accidentally deleted videos (any camera, any SD card) | Use SD card video recovery software ✅ |
| Your SD card shows signs of physical damage (bent, cracked, water-damaged) | Contact a professional recovery service |
| You need to recover videos from a smartphone (Android microSD issues) | Check cloud backups (Google Photos/iCloud) or use a mobile recovery app |
| SD card with videos not showing up on PC (Windows driver conflict) | Reinstall or update drivers in Windows Device Manager |
| Recently deleted videos are still in the Recycle Bin/Trash | Restore from system trash (Windows or macOS) |
| You want to recover videos from a backup | Restore from your backup (local or cloud) |
| Videos are corrupted/unplayable after camera crash or power loss | Use specialized video repair software to fix file structure |
Method 1: Use Data Recovery Software
Many software programs can help you recover deleted files from your SD card, offering varying levels of complexity. One popular option is Disk Drill, available for both Windows and Mac users. This tool has an incredibly high success rate with SD card video recovery.
To get started with Disk Drill, you need to download it from its official website. You will be automatically redirected to the correct version of the program whether you are using Windows or macOS. Once downloaded, launch the installer and install the software on your computer. Then, follow the Windows or Mac guide below.
How to Recover Videos from SD Card on Windows
It takes just a few simple steps to recover deleted videos from a memory card on Windows using Disk Drill.
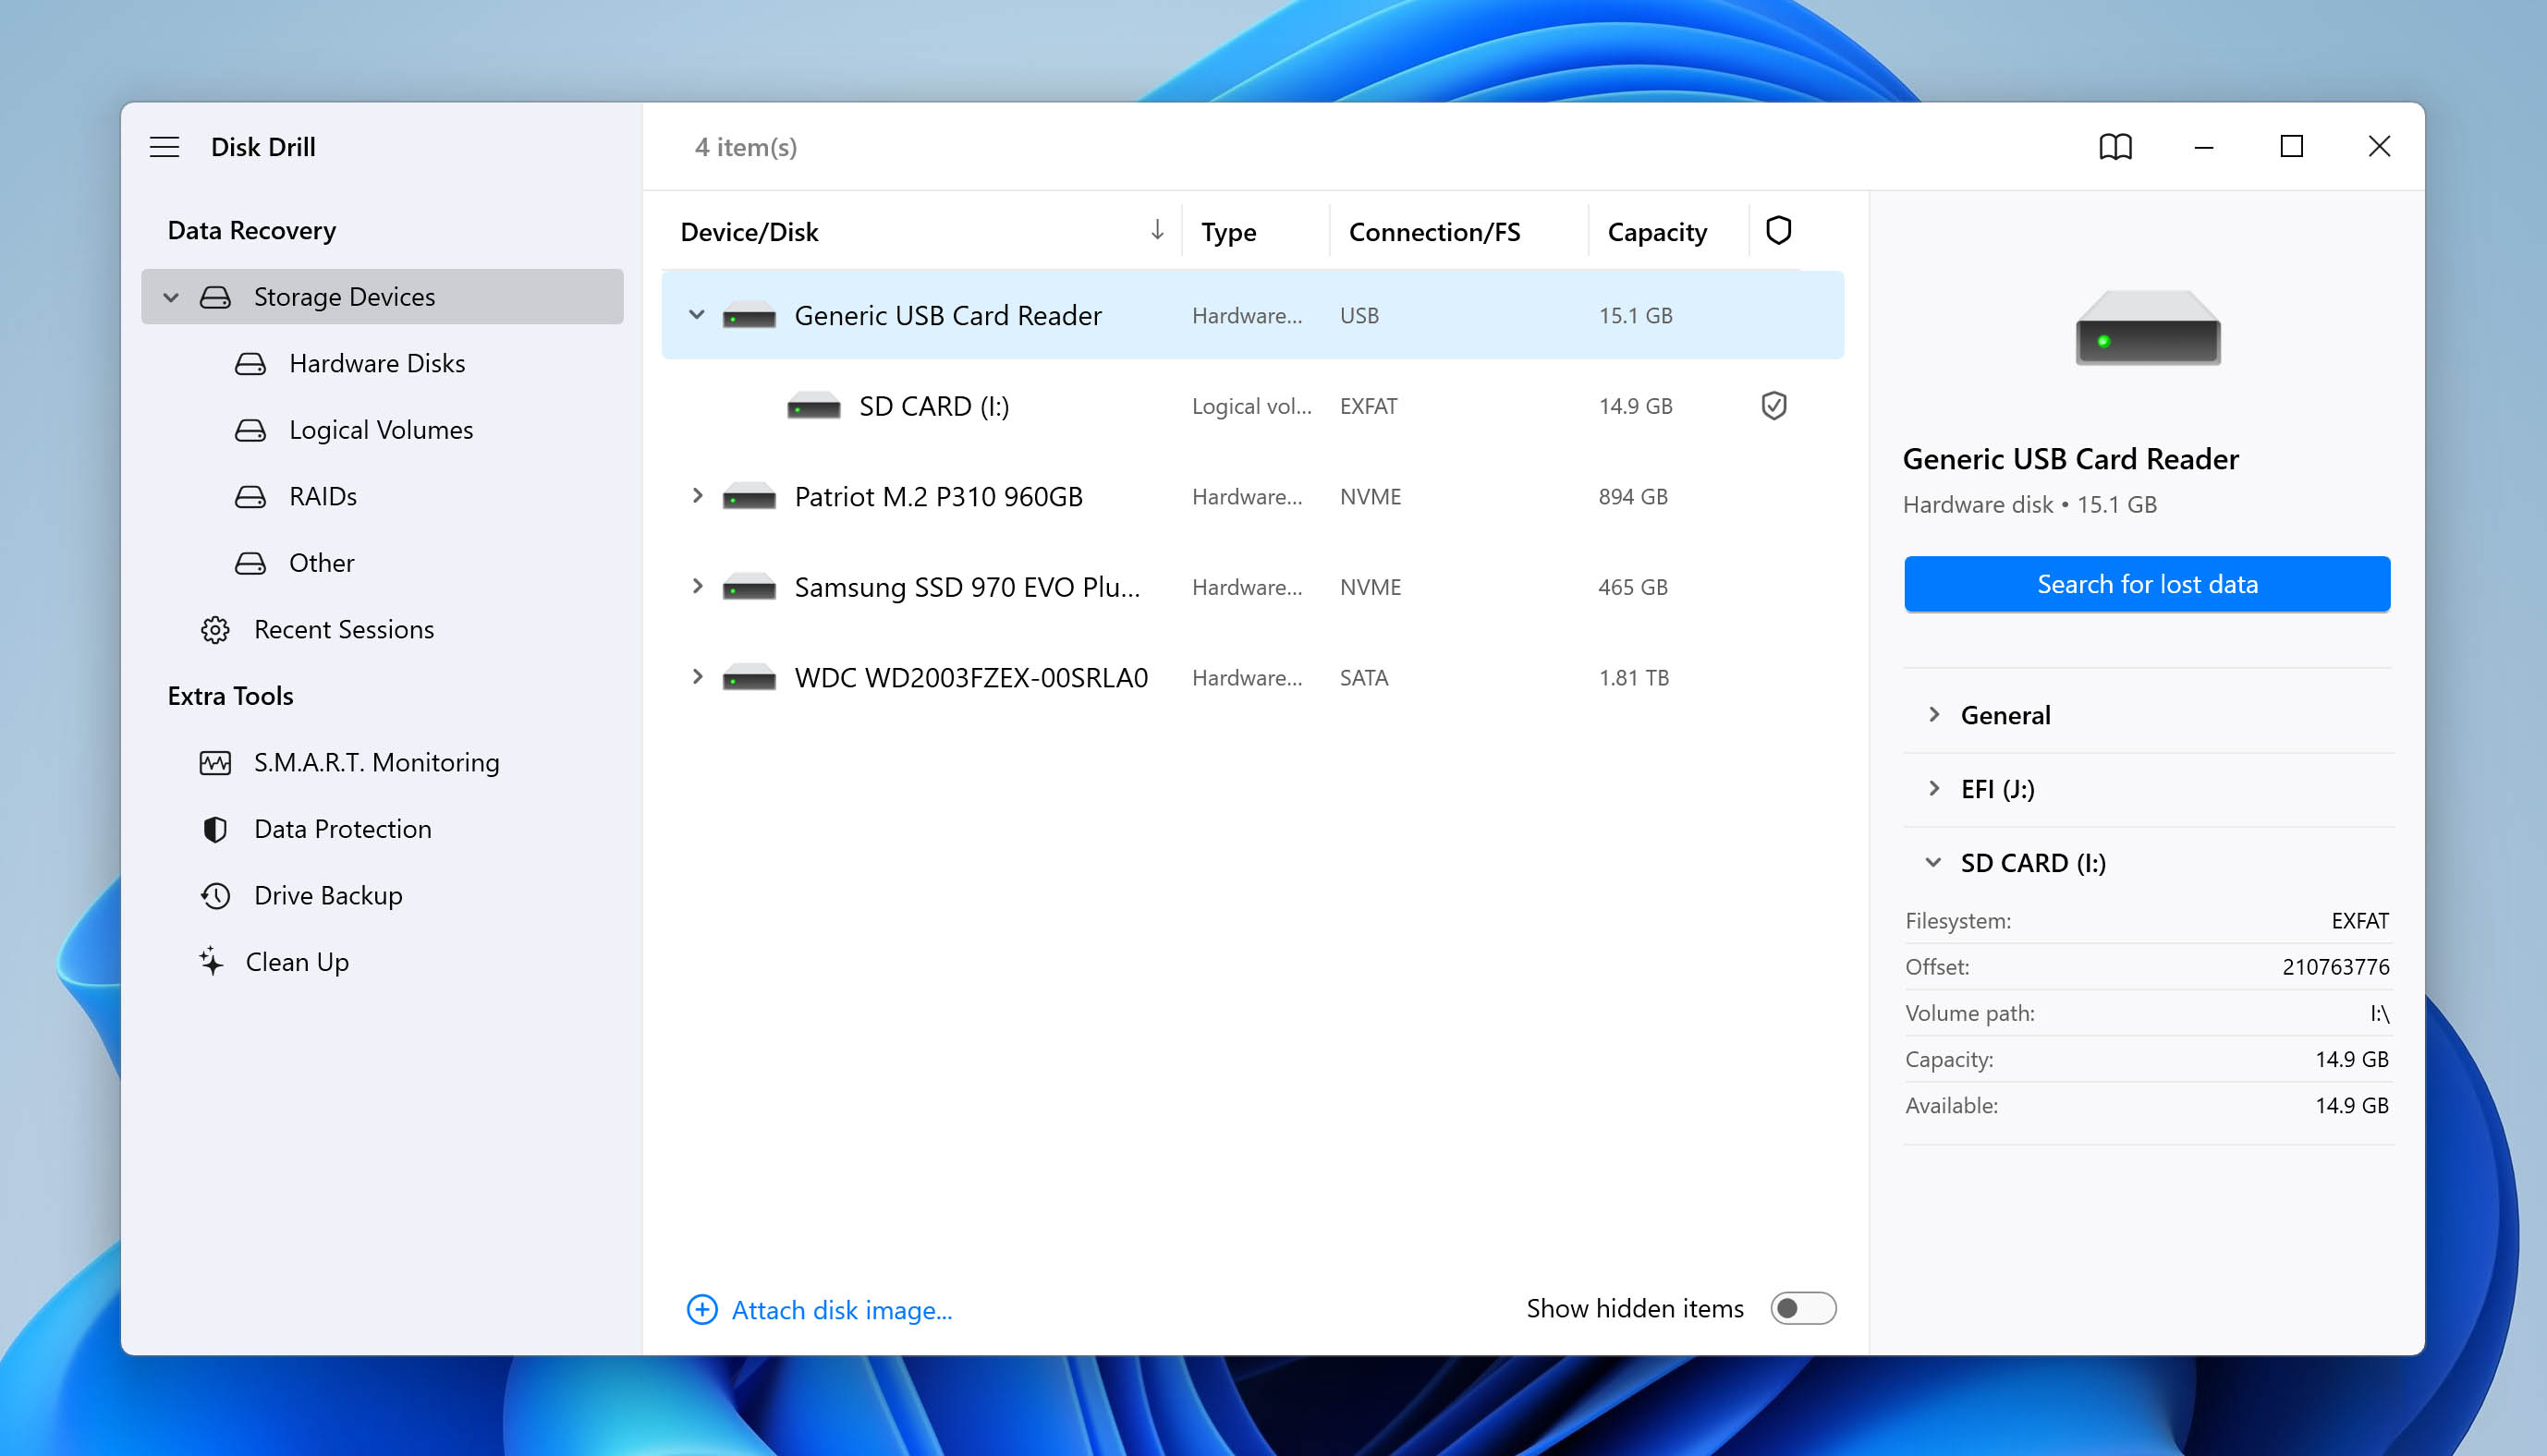
Step 1. Insert your SD card and locate it in Disk Drill.
To begin recovering videos from your SD card, insert it into your computer’s card reader or connect it via a USB card reader. Launch Disk Drill and locate your SD card in the main window. You should be able to easily identify it based on its capacity (its name can be confusing because it may be listed under your memory card reader).
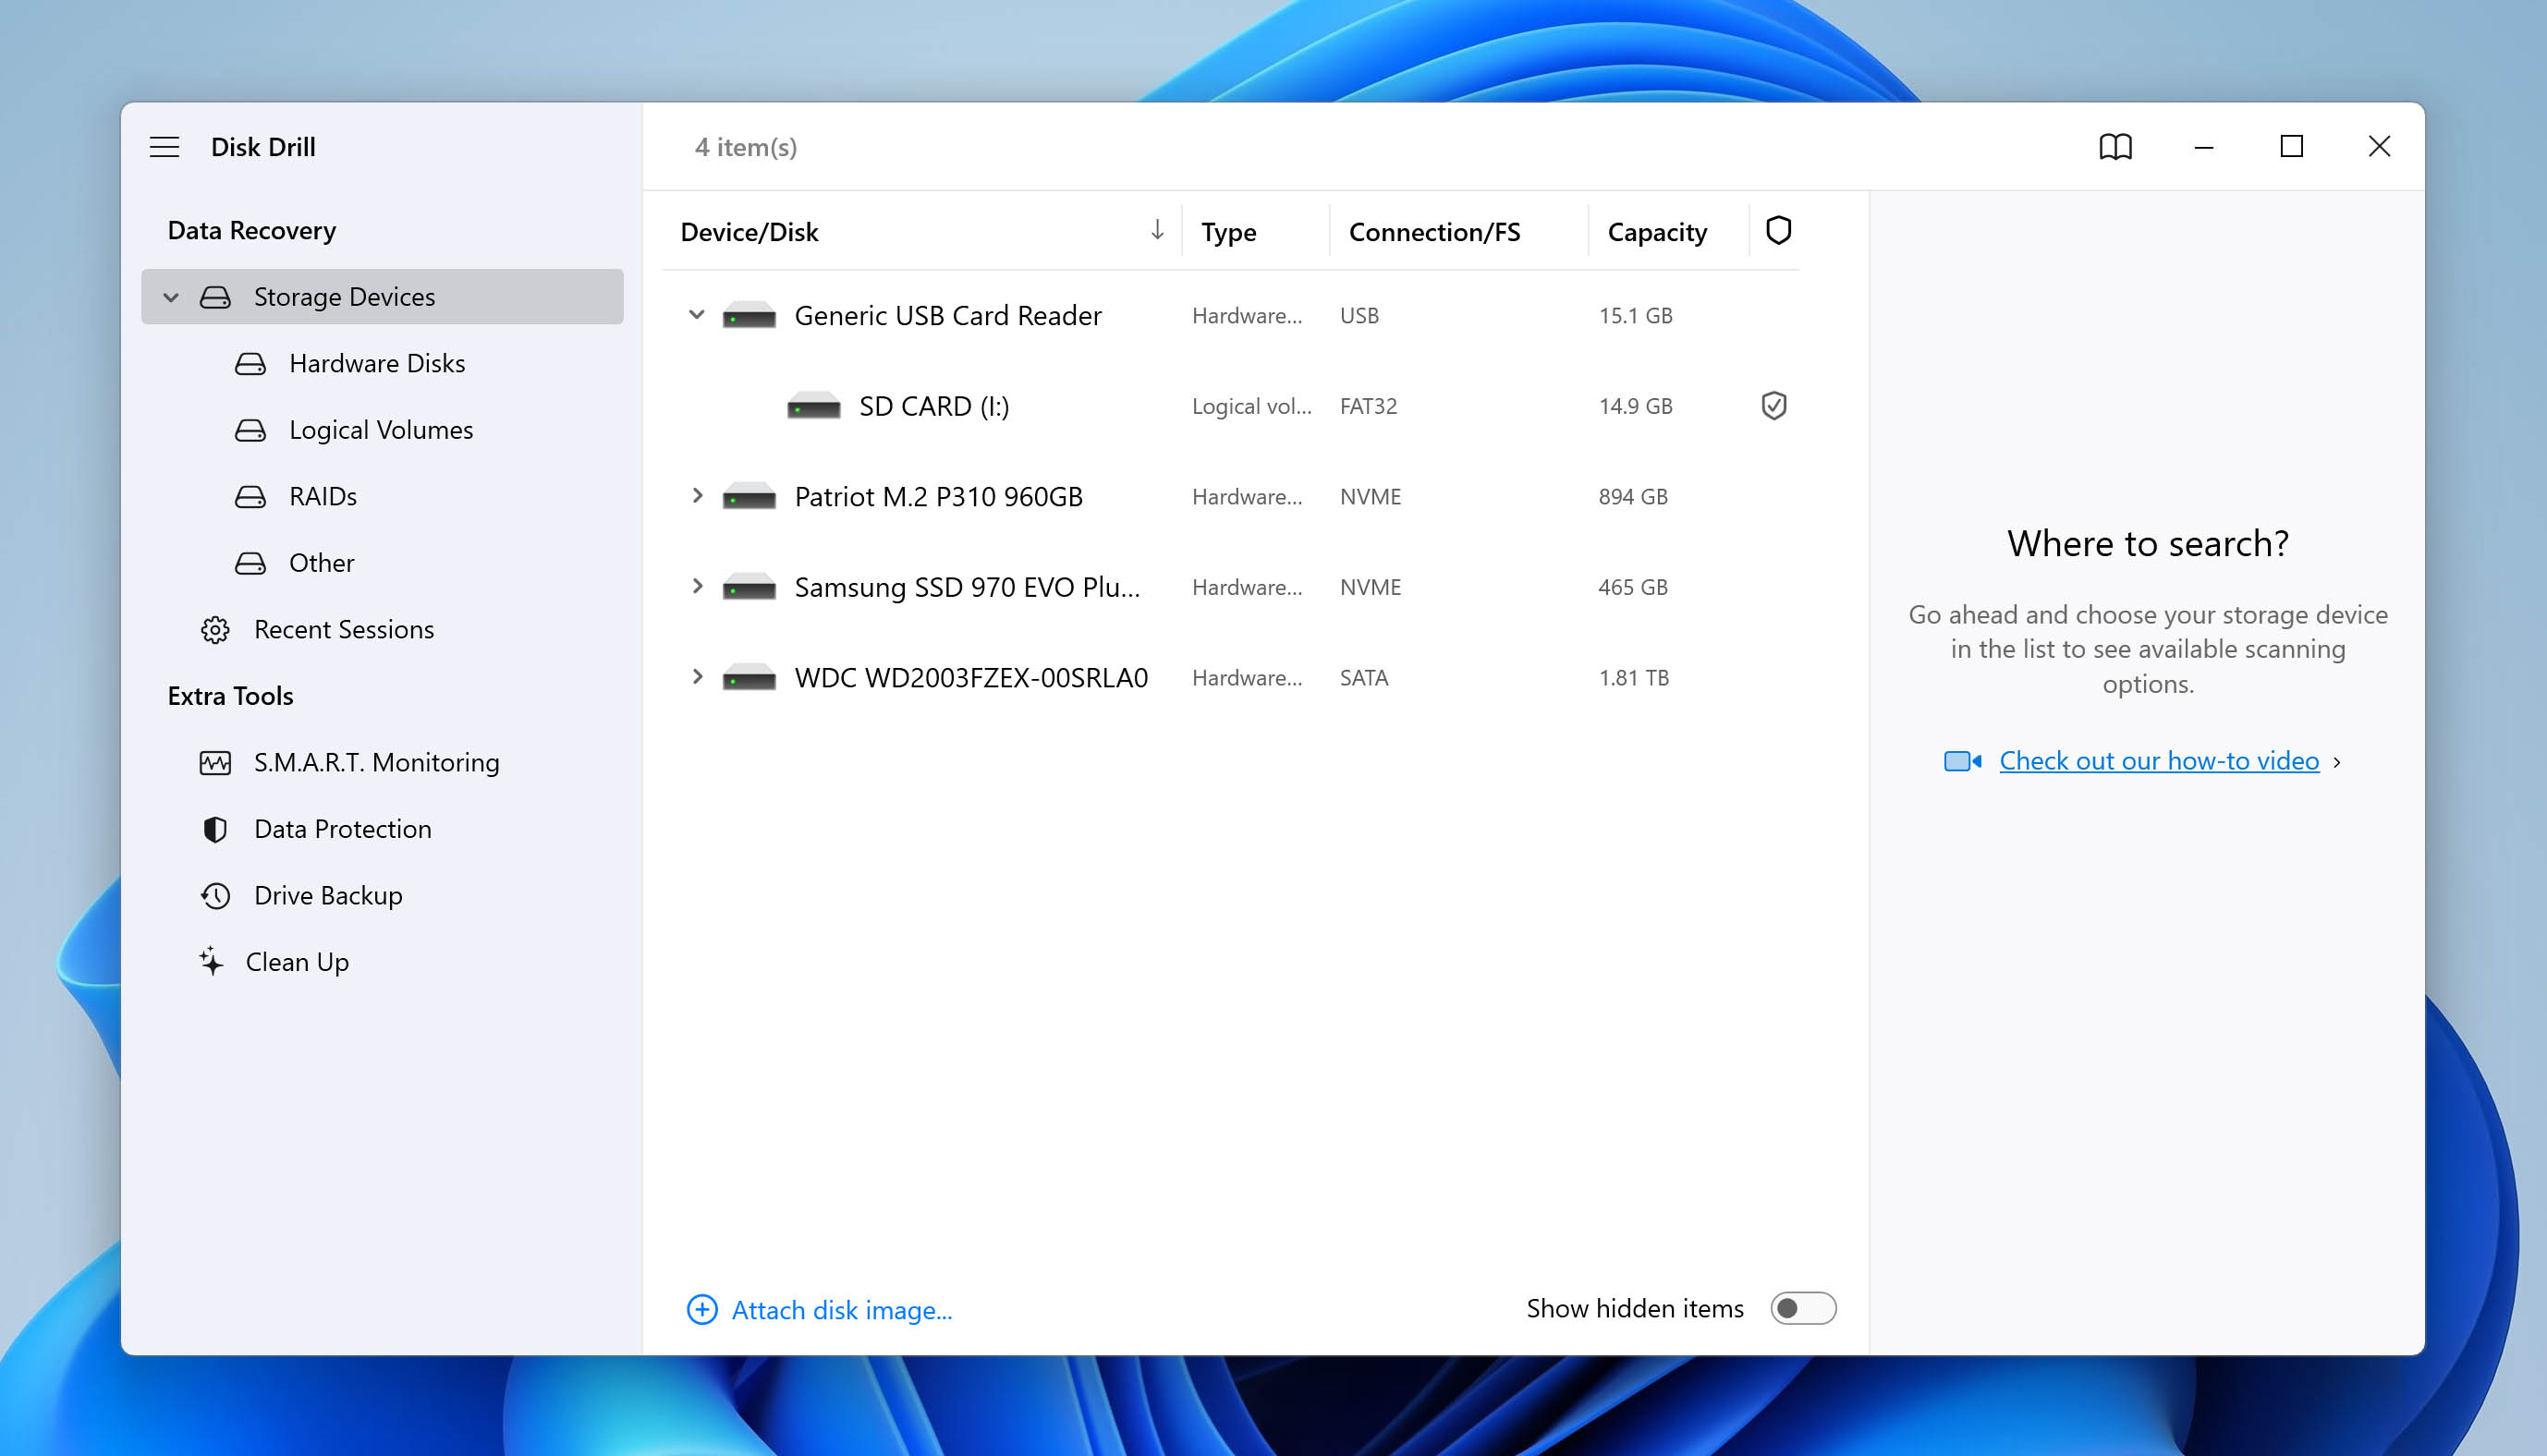
Step 2. Initialize the search.
Select your SD card from the list and click Search for lost data. Disk Drill will automatically use the most optimal video recovery approach.
Step 3. Allow the scan to complete.
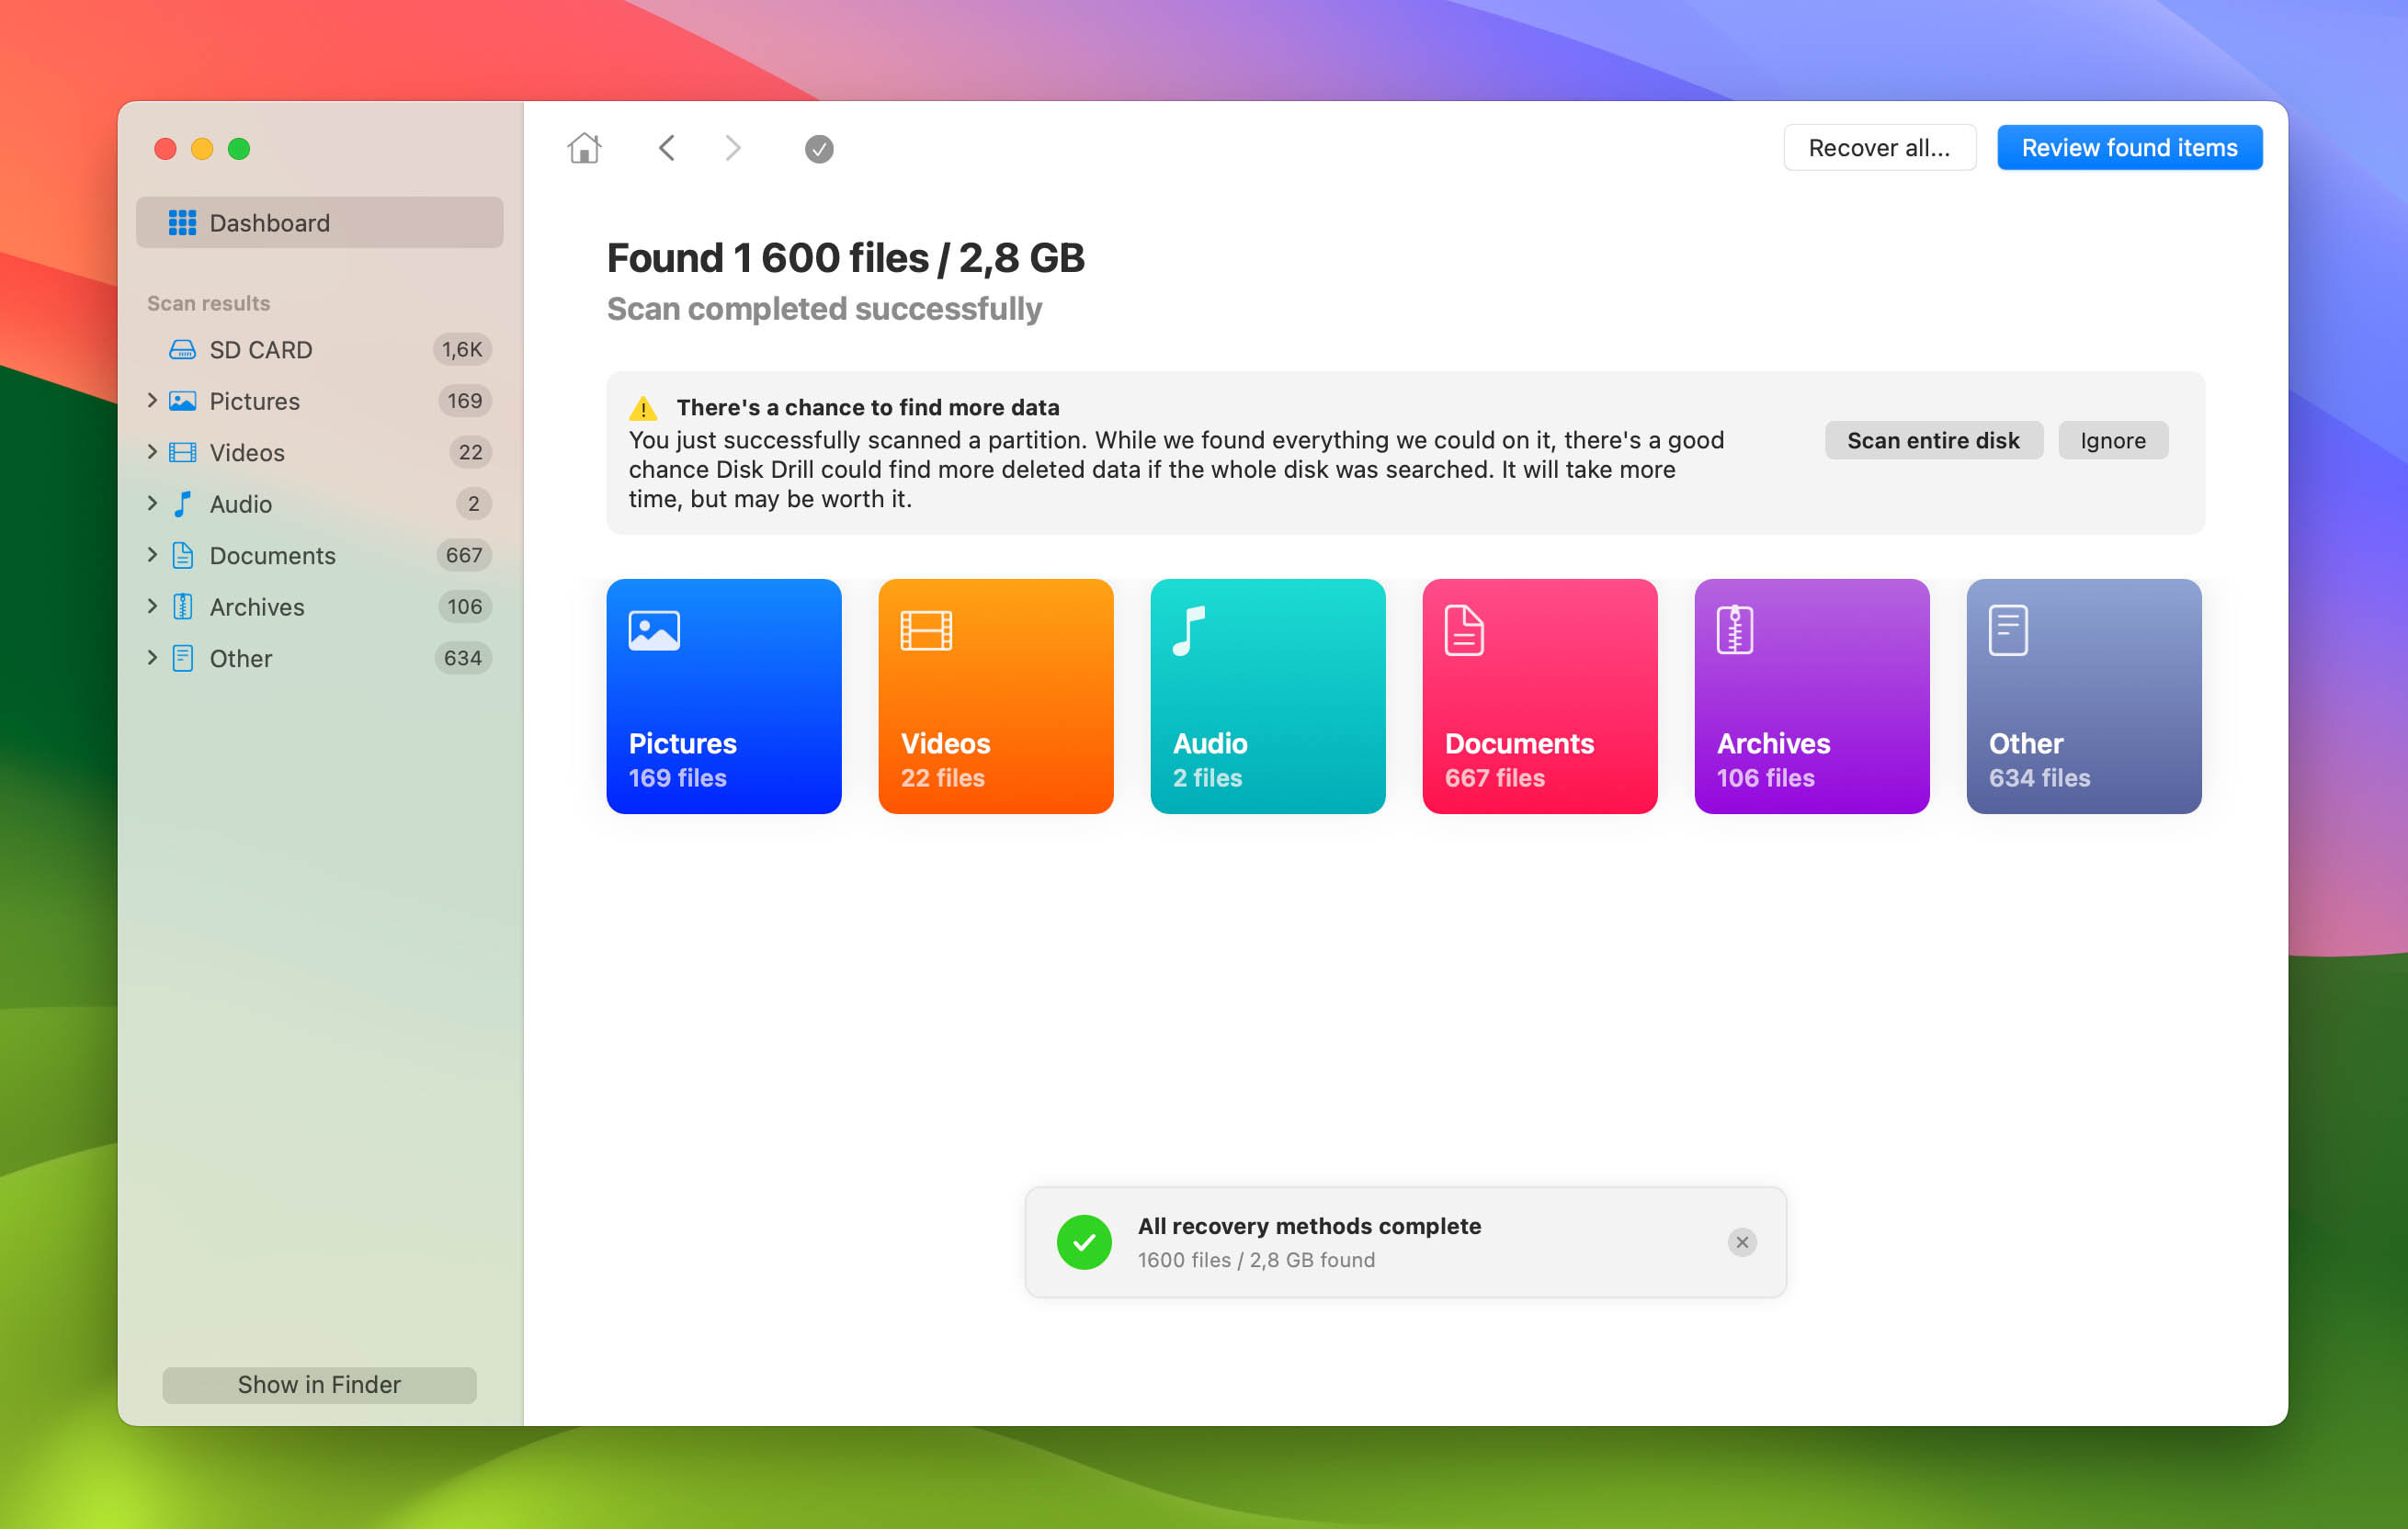
During the scan, Disk Drill will display found files in real-time. You can either wait for this scan to complete or click Review found items to check if your deleted videos have already been found.
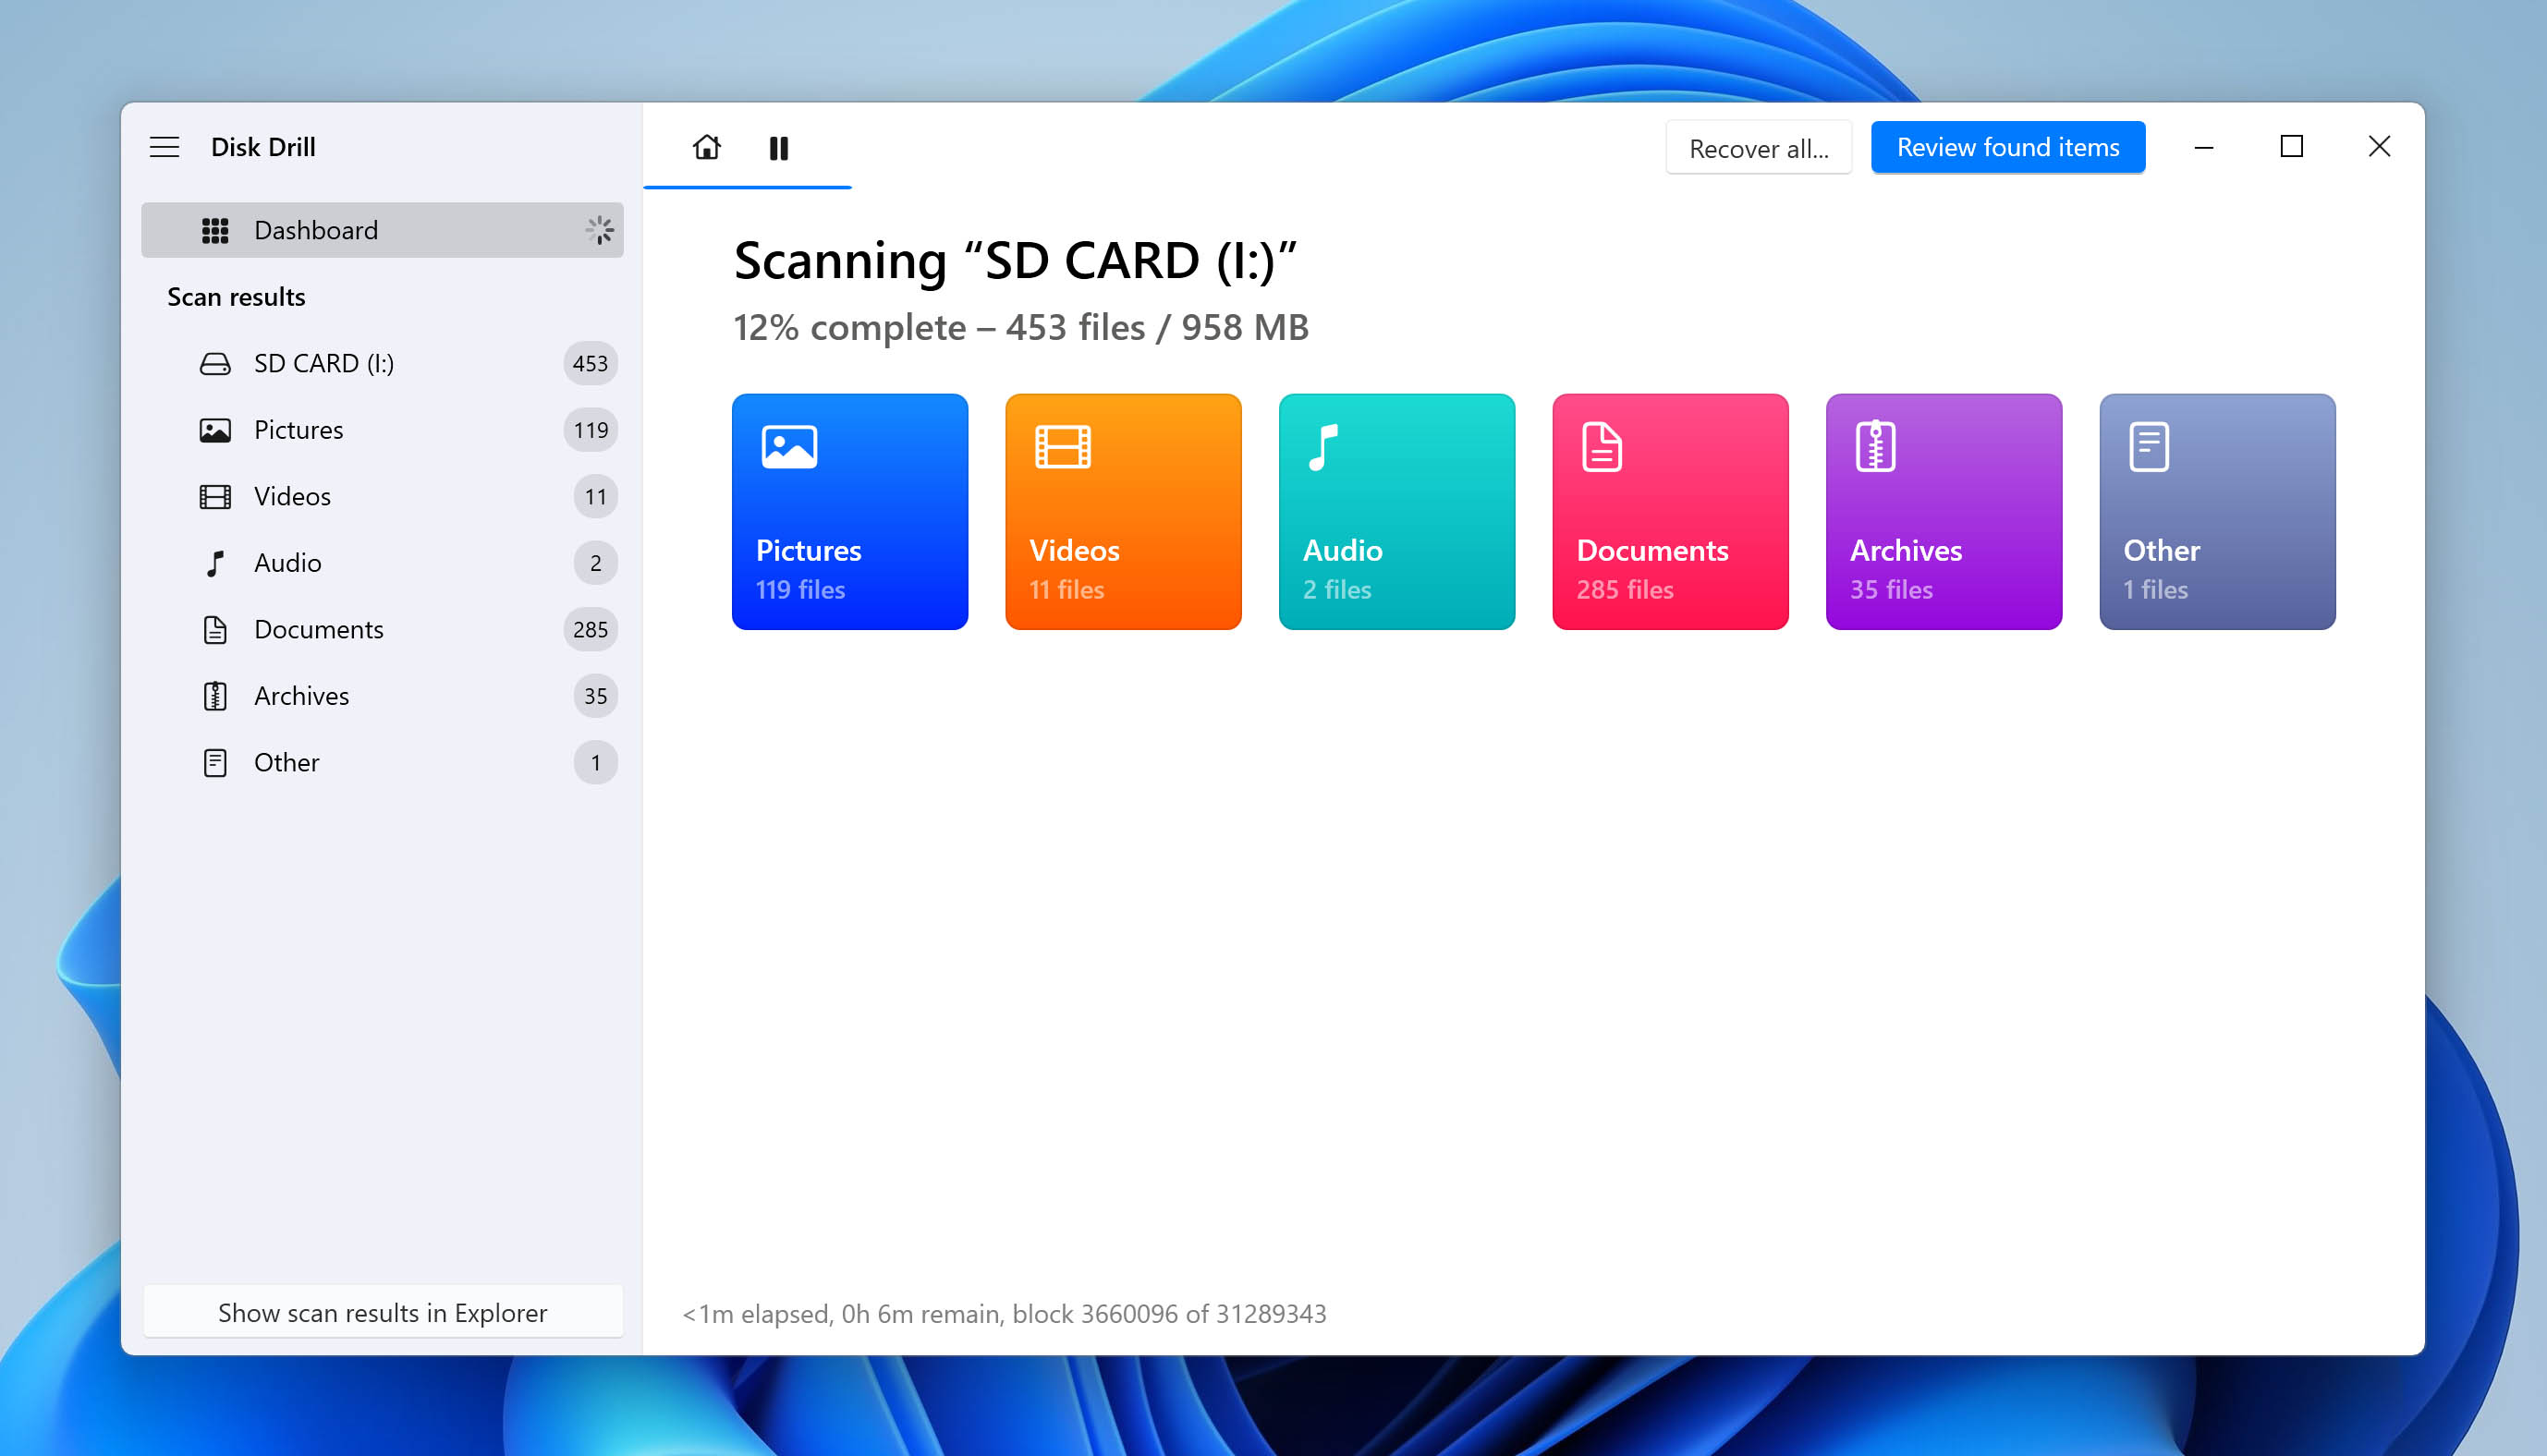
Step 4. Scan the entire SD Card.
If the initial scan doesn’t find any lost video files and you’ve only scanned a specific partition, click Scan entire disk for an even deeper scan. The deeper scan will look beyond the scanned partition to deliver the best results possible.

Keep in mind that the deeper scan may take a bit longer to finish because it covers the entire SD card, so be patient and allow it to finish.
Step 5. Locate the missing file.
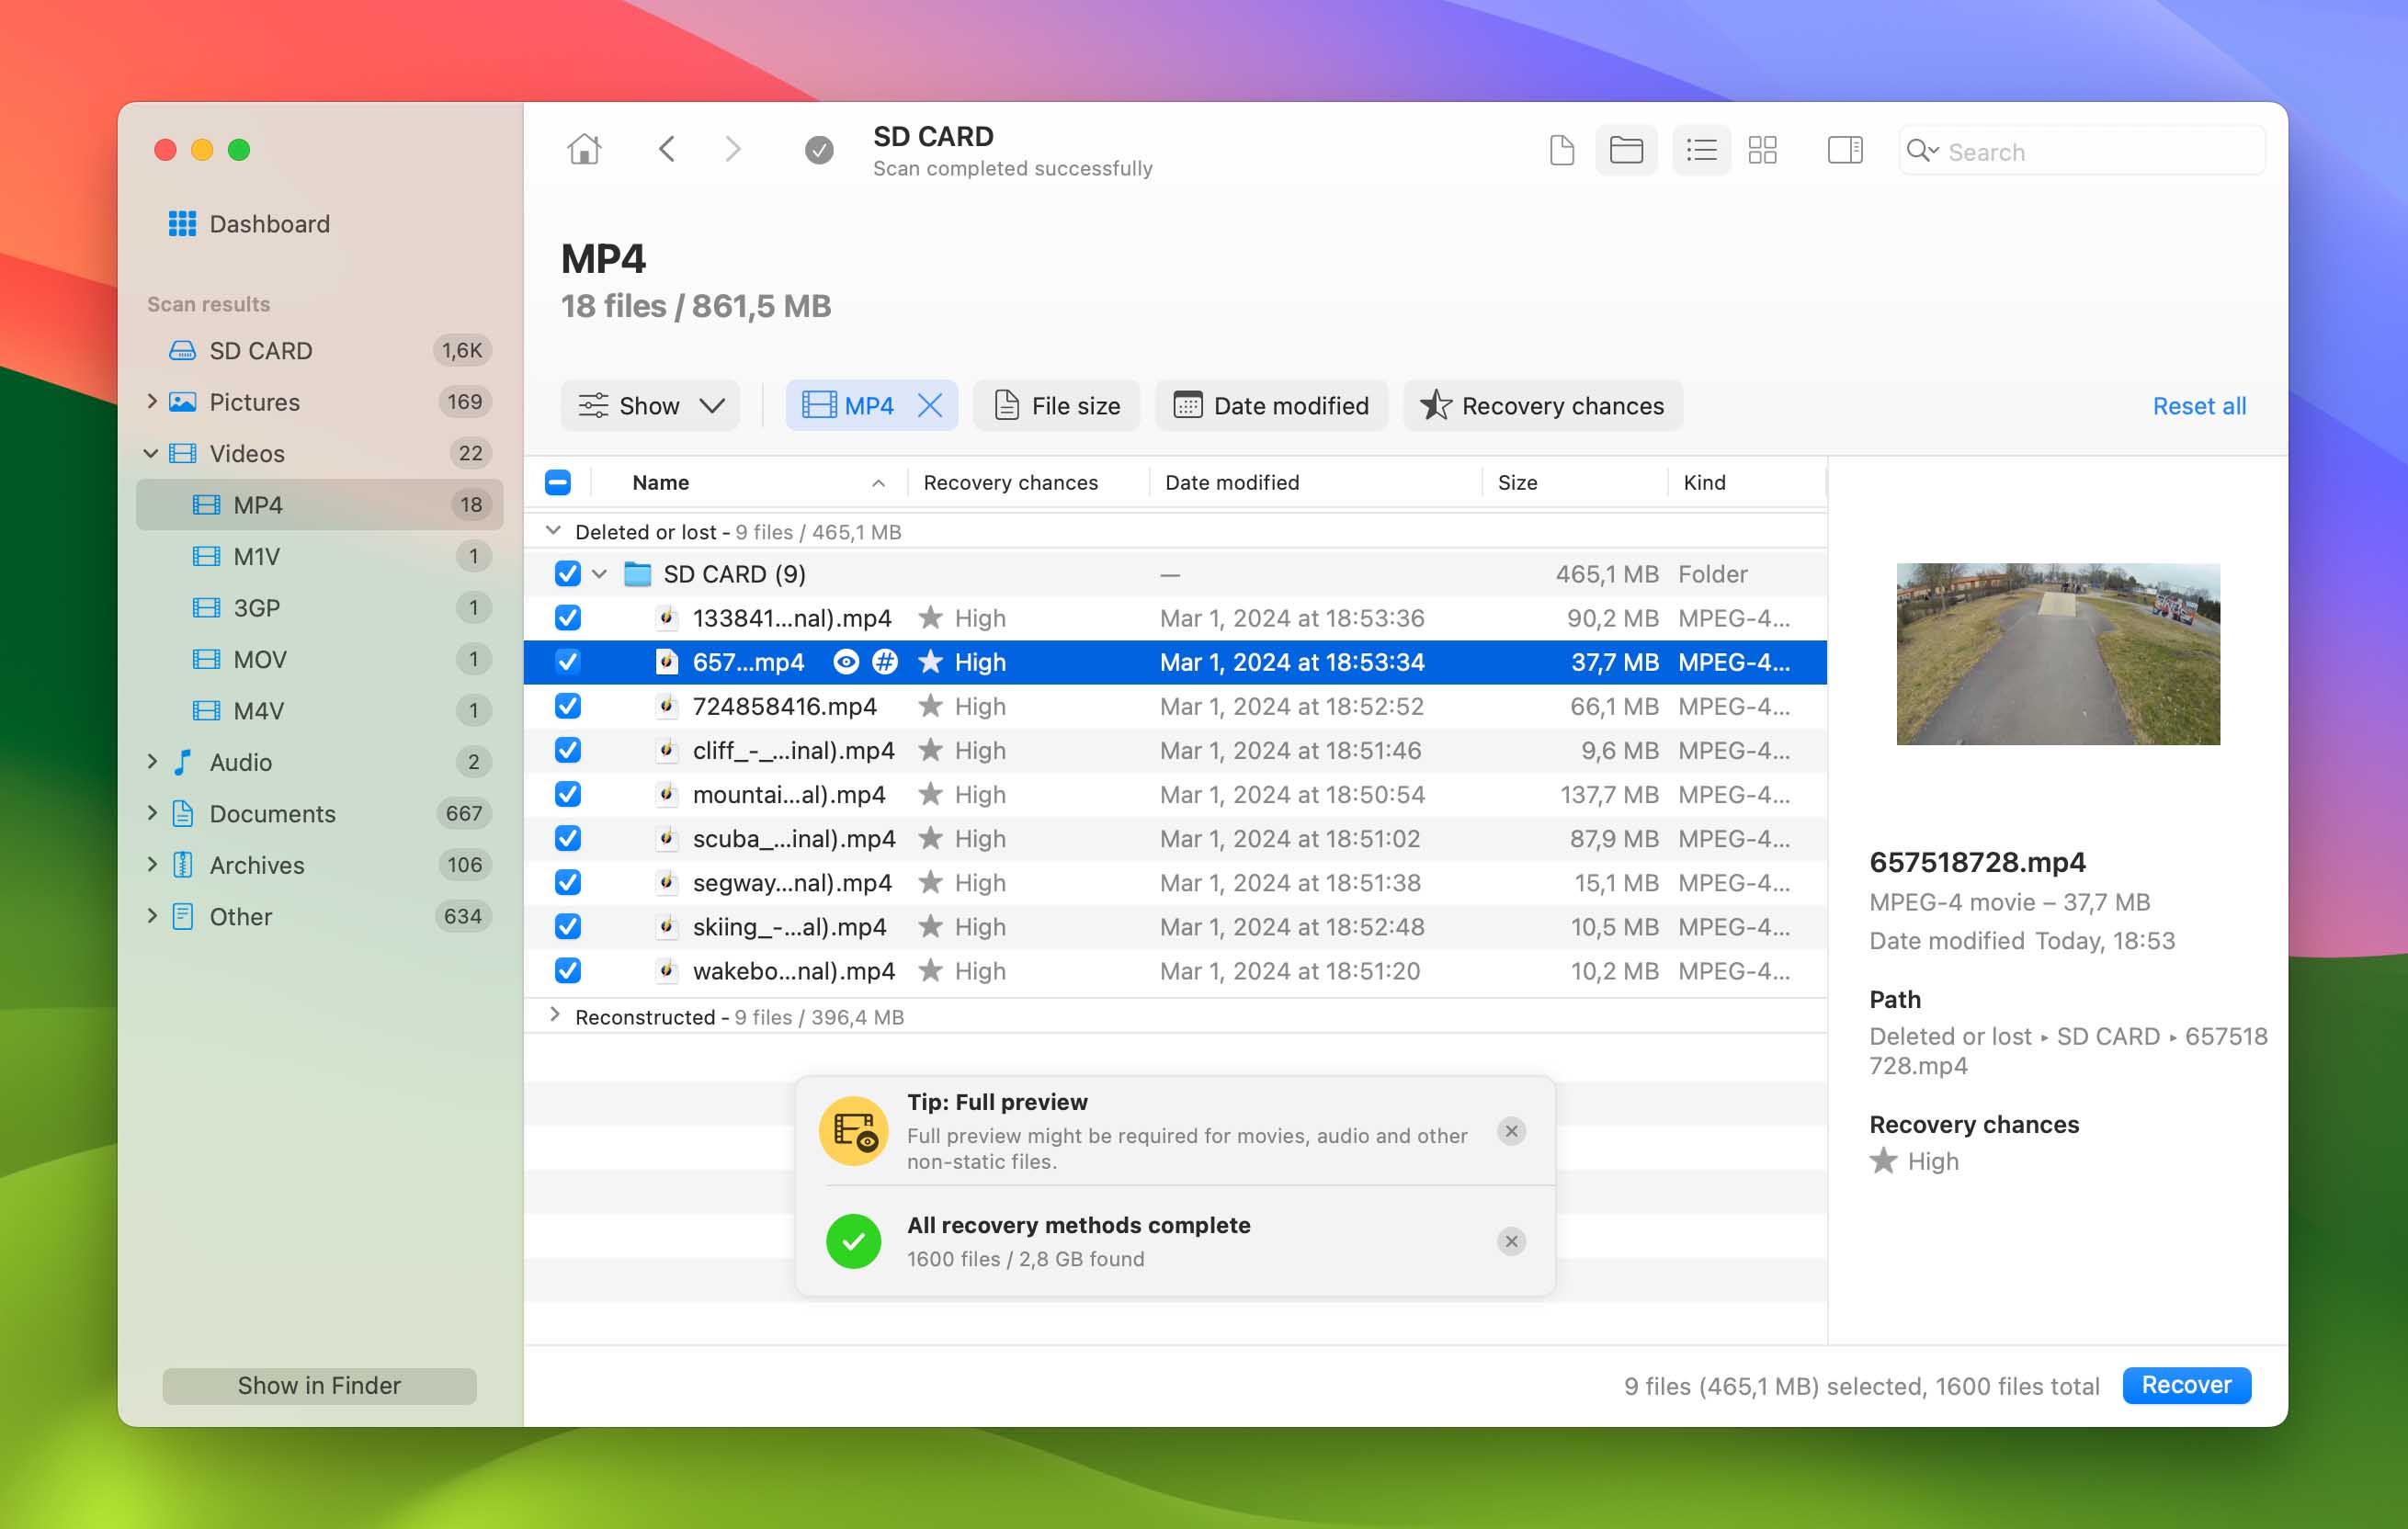
Navigate to the Video category in the scan results. One of Disk Drill’s key features is the ability to preview found videos before recovery. Use the preview feature to verify file integrity. Select the checkboxes next to the videos you want to recover.
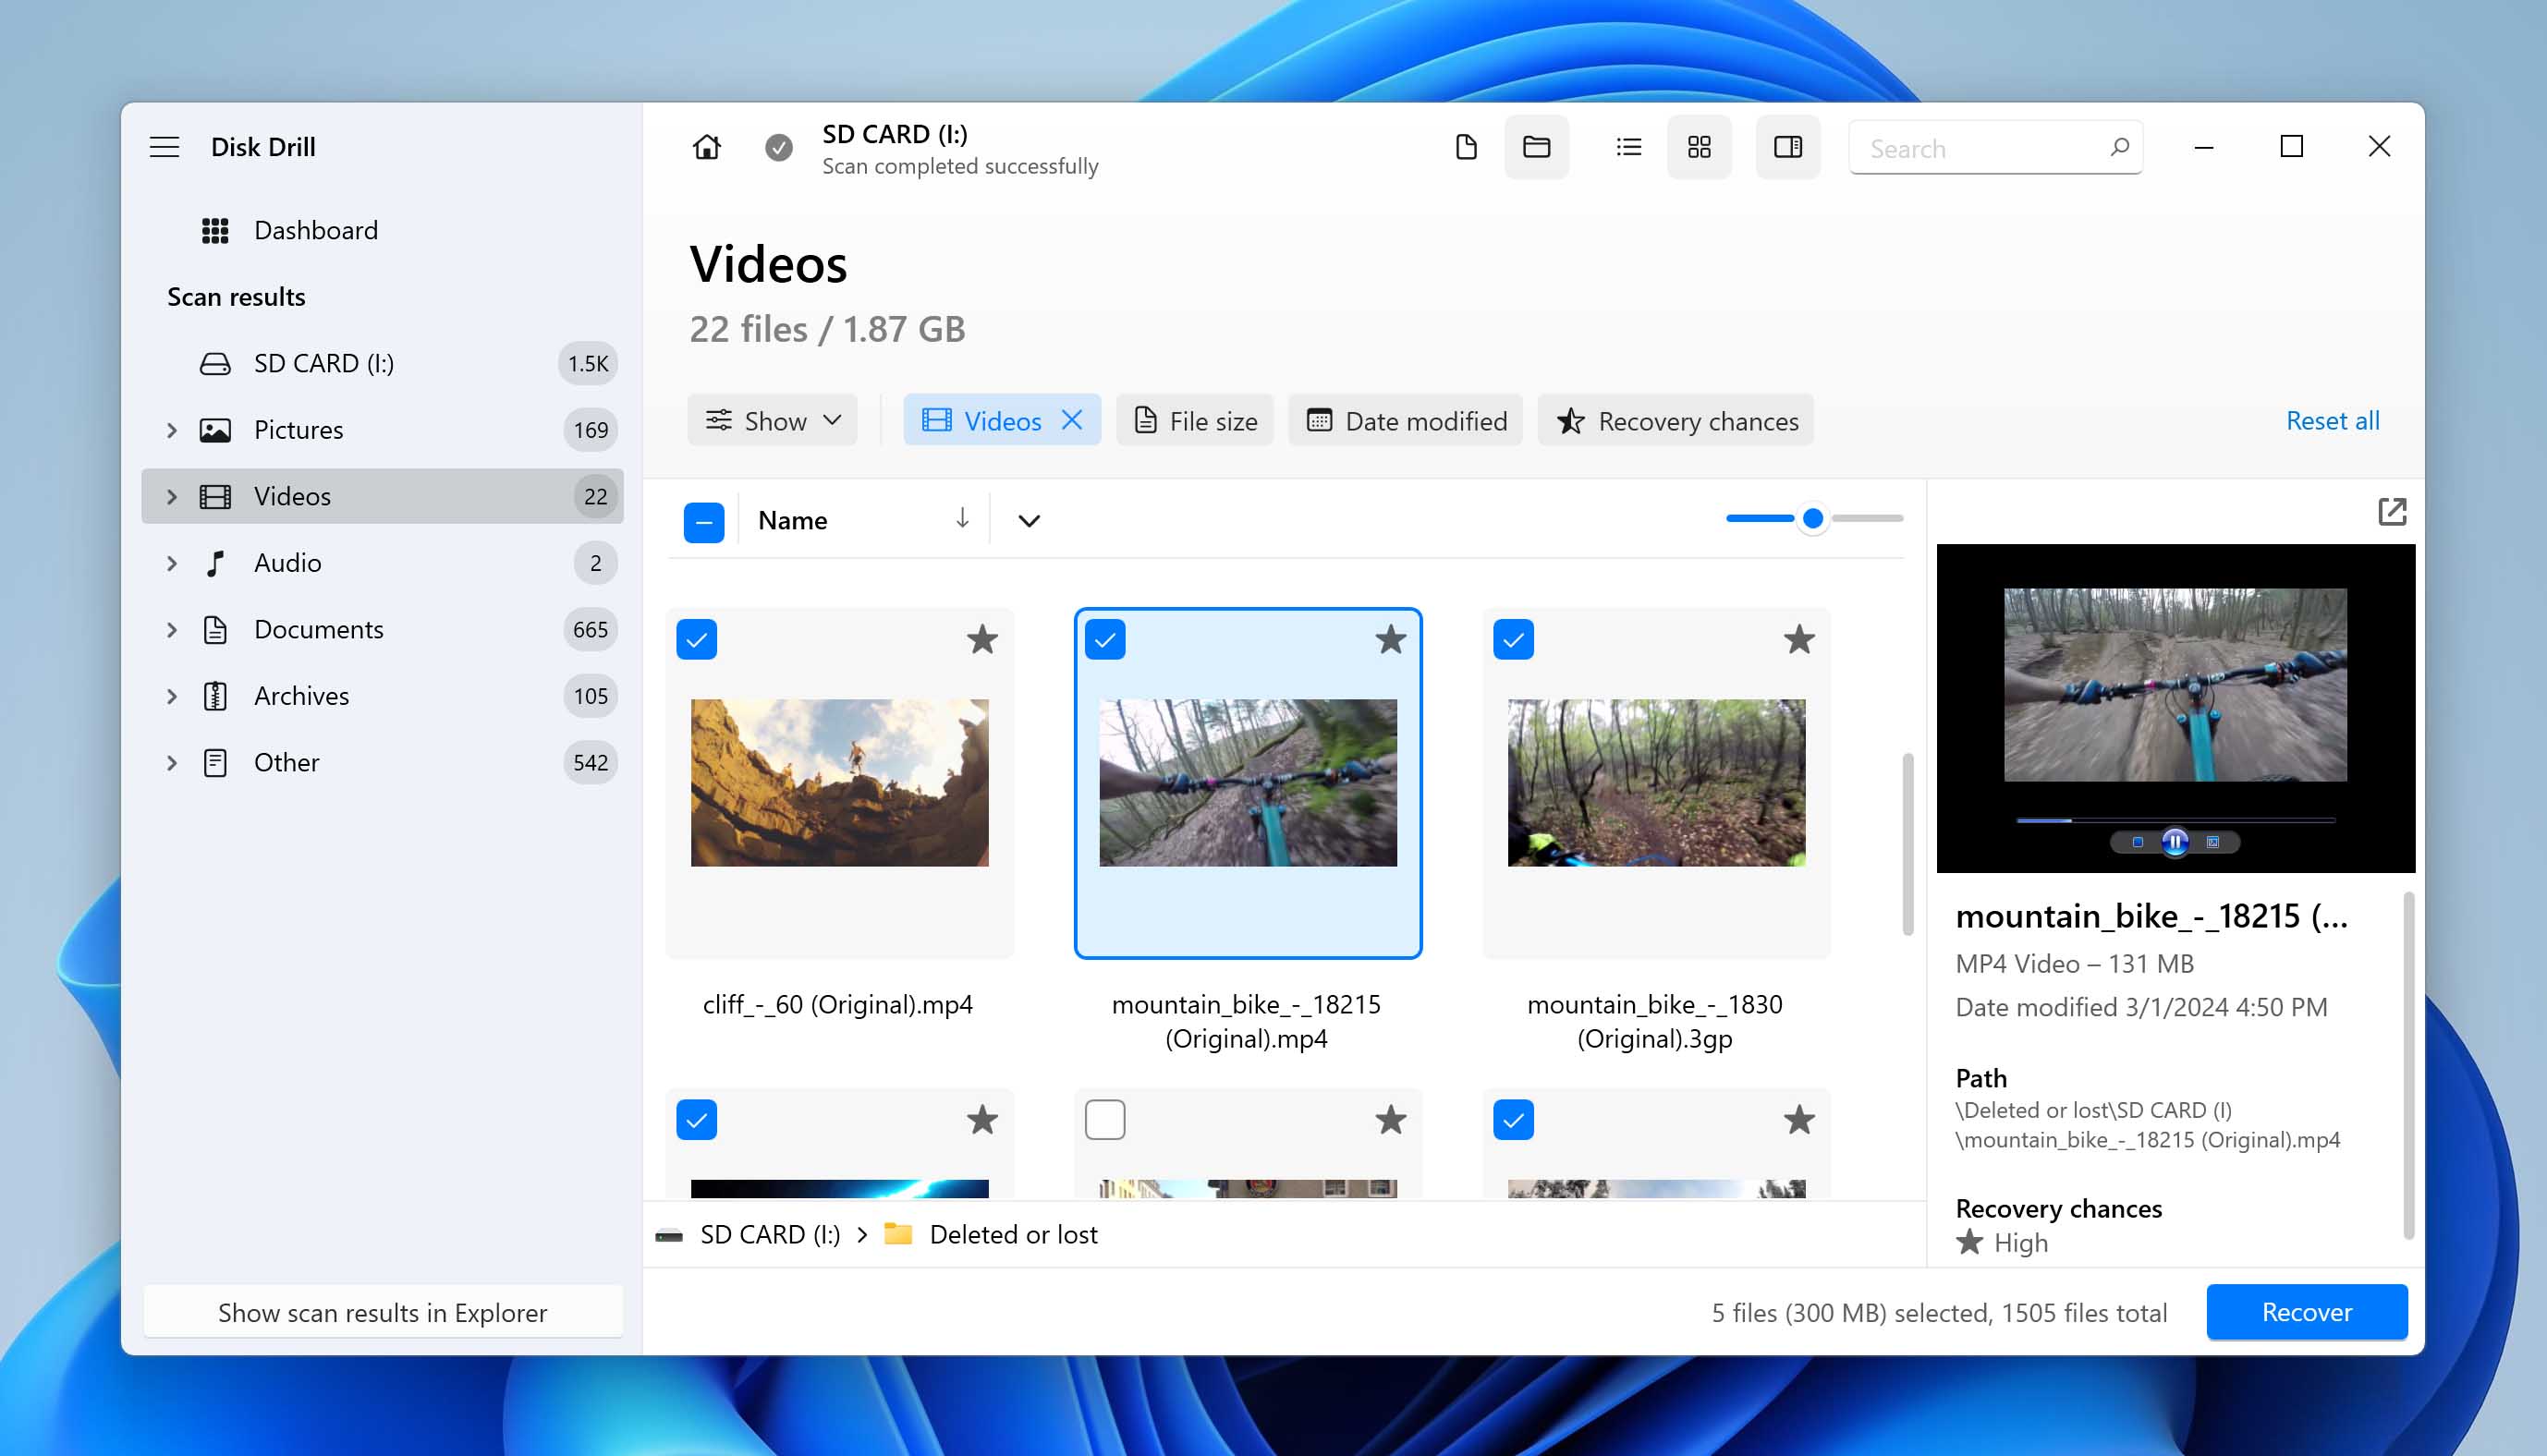
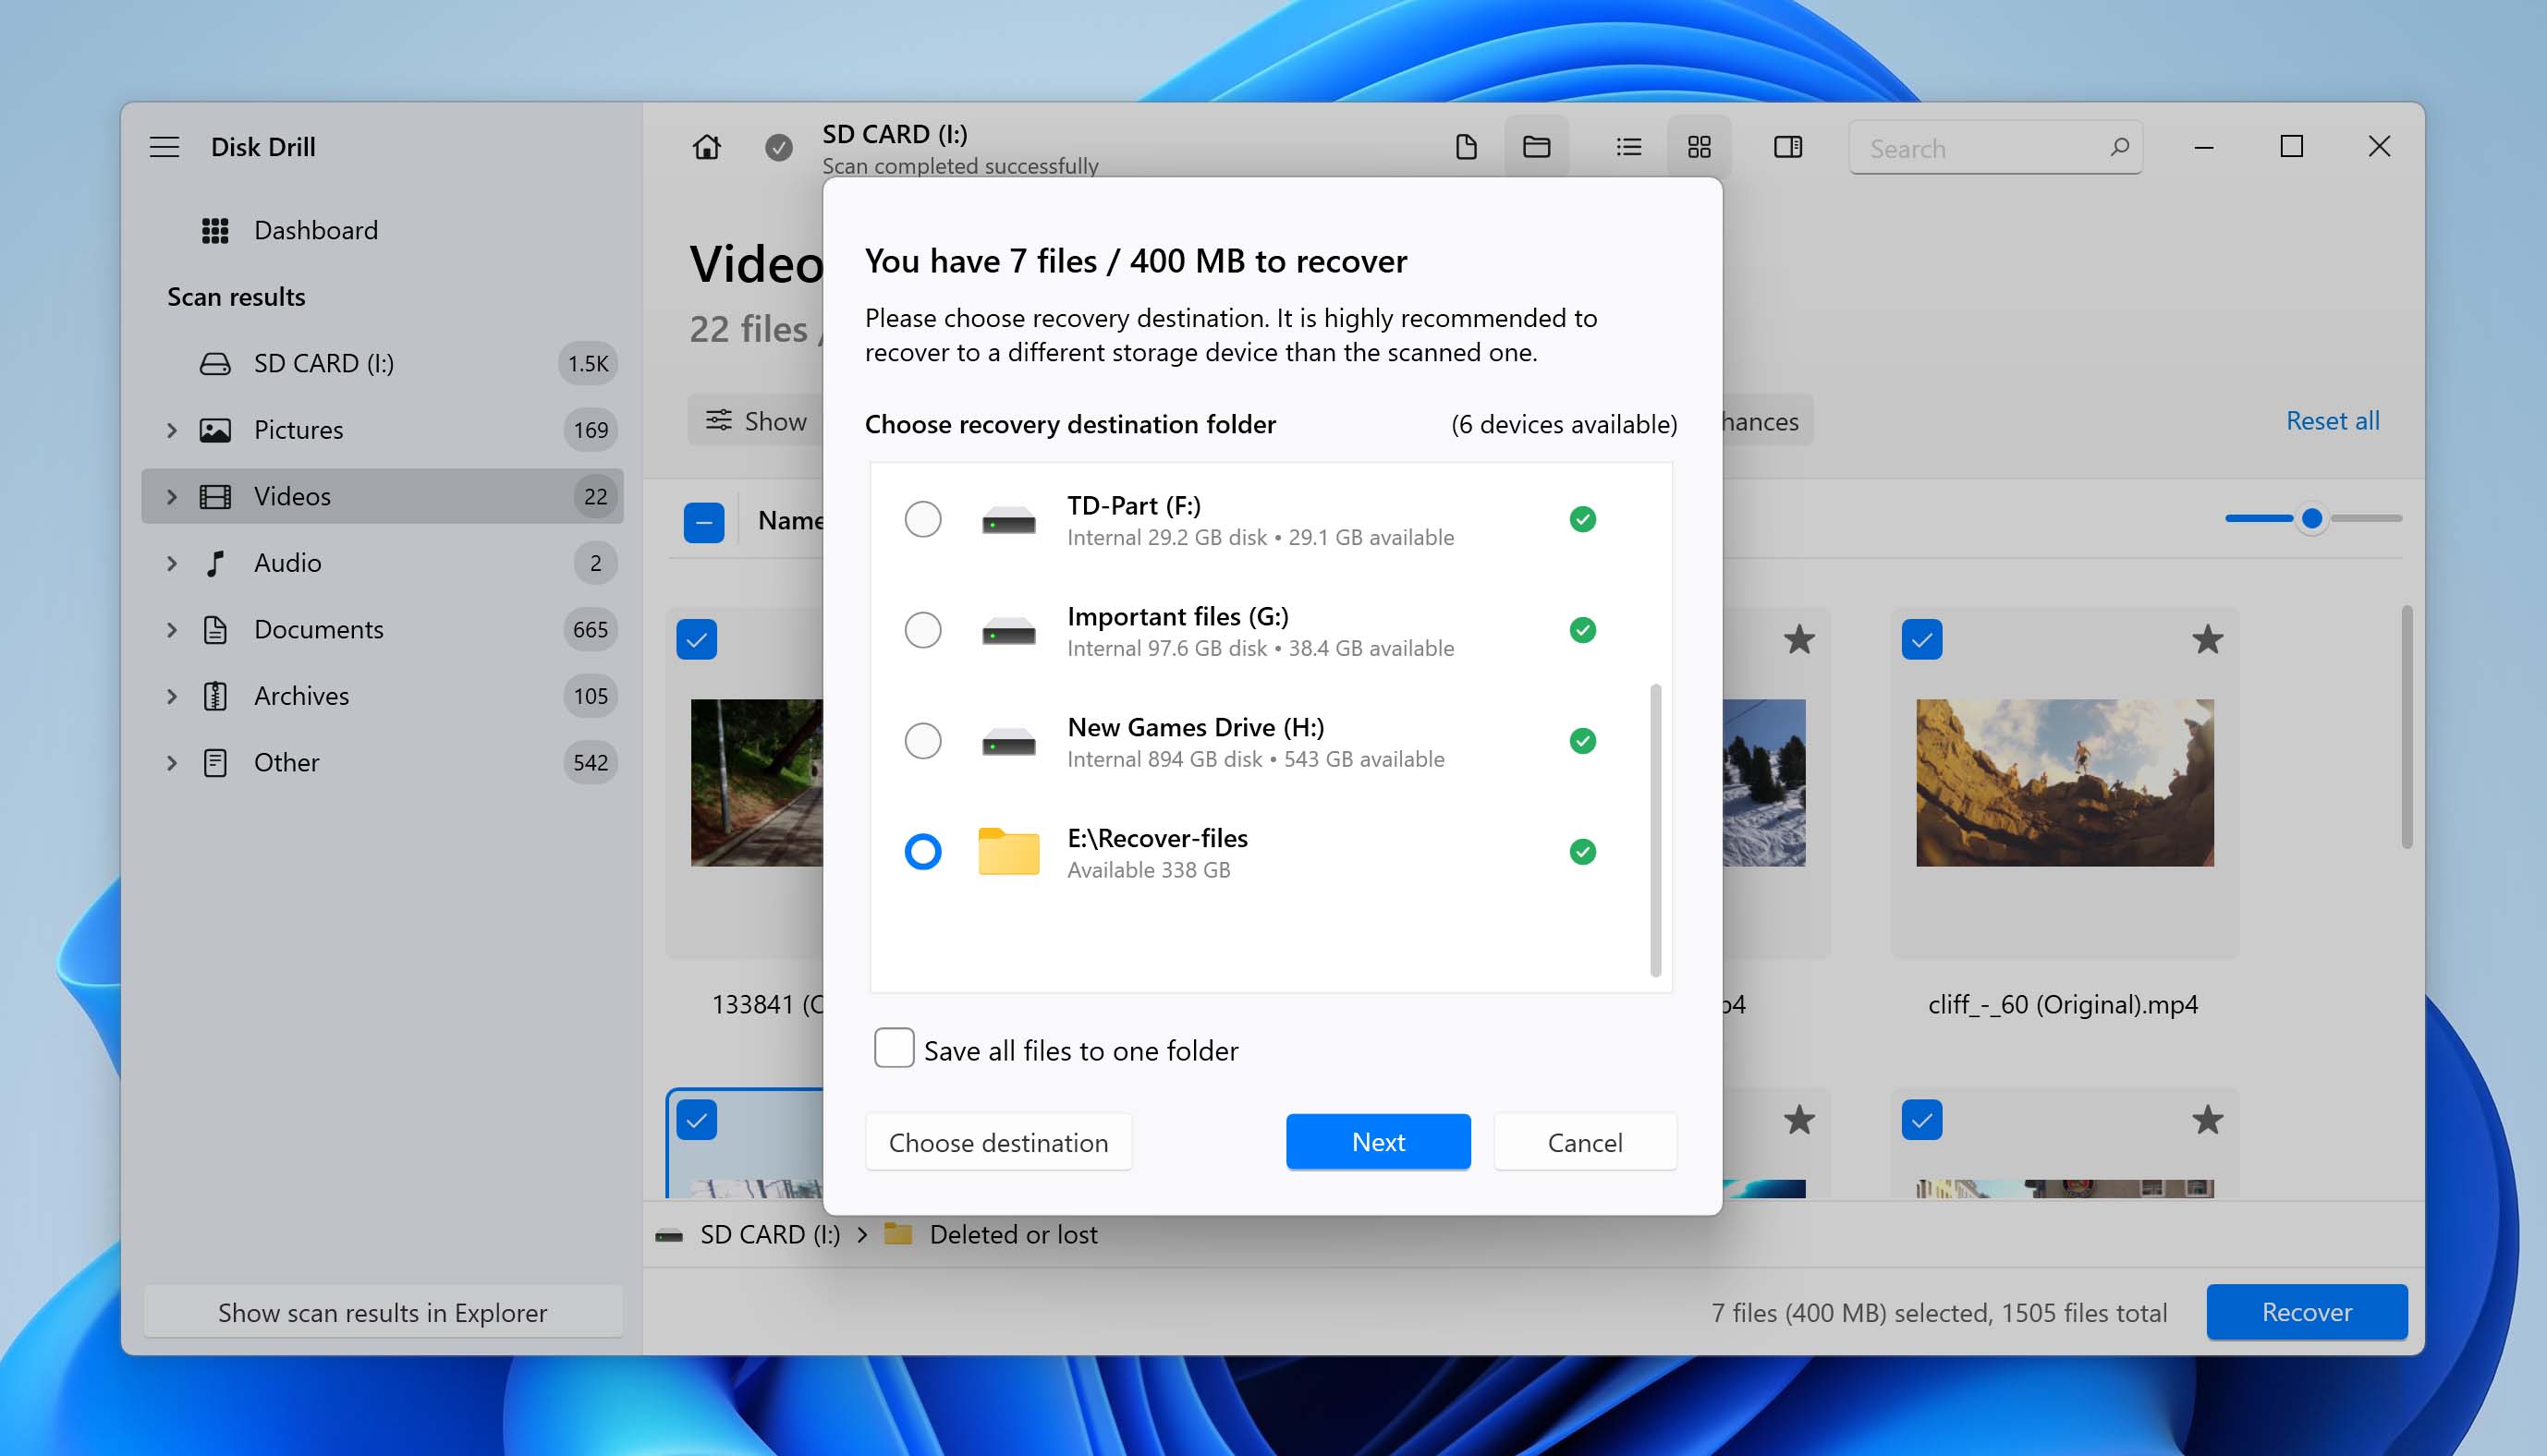
Step 6. Select a folder to house the recovered file from your SD card.
Click Recover and choose a suitable recovery destination, such as your computer’s internal drive. Click Next to finish the recovery process. You can view the recovered files in File Explorer.
How to Recover Videos From SD Card on Mac
The process for recovering lost videos with Disk Drill Pro on macOS is similar to that on Windows.
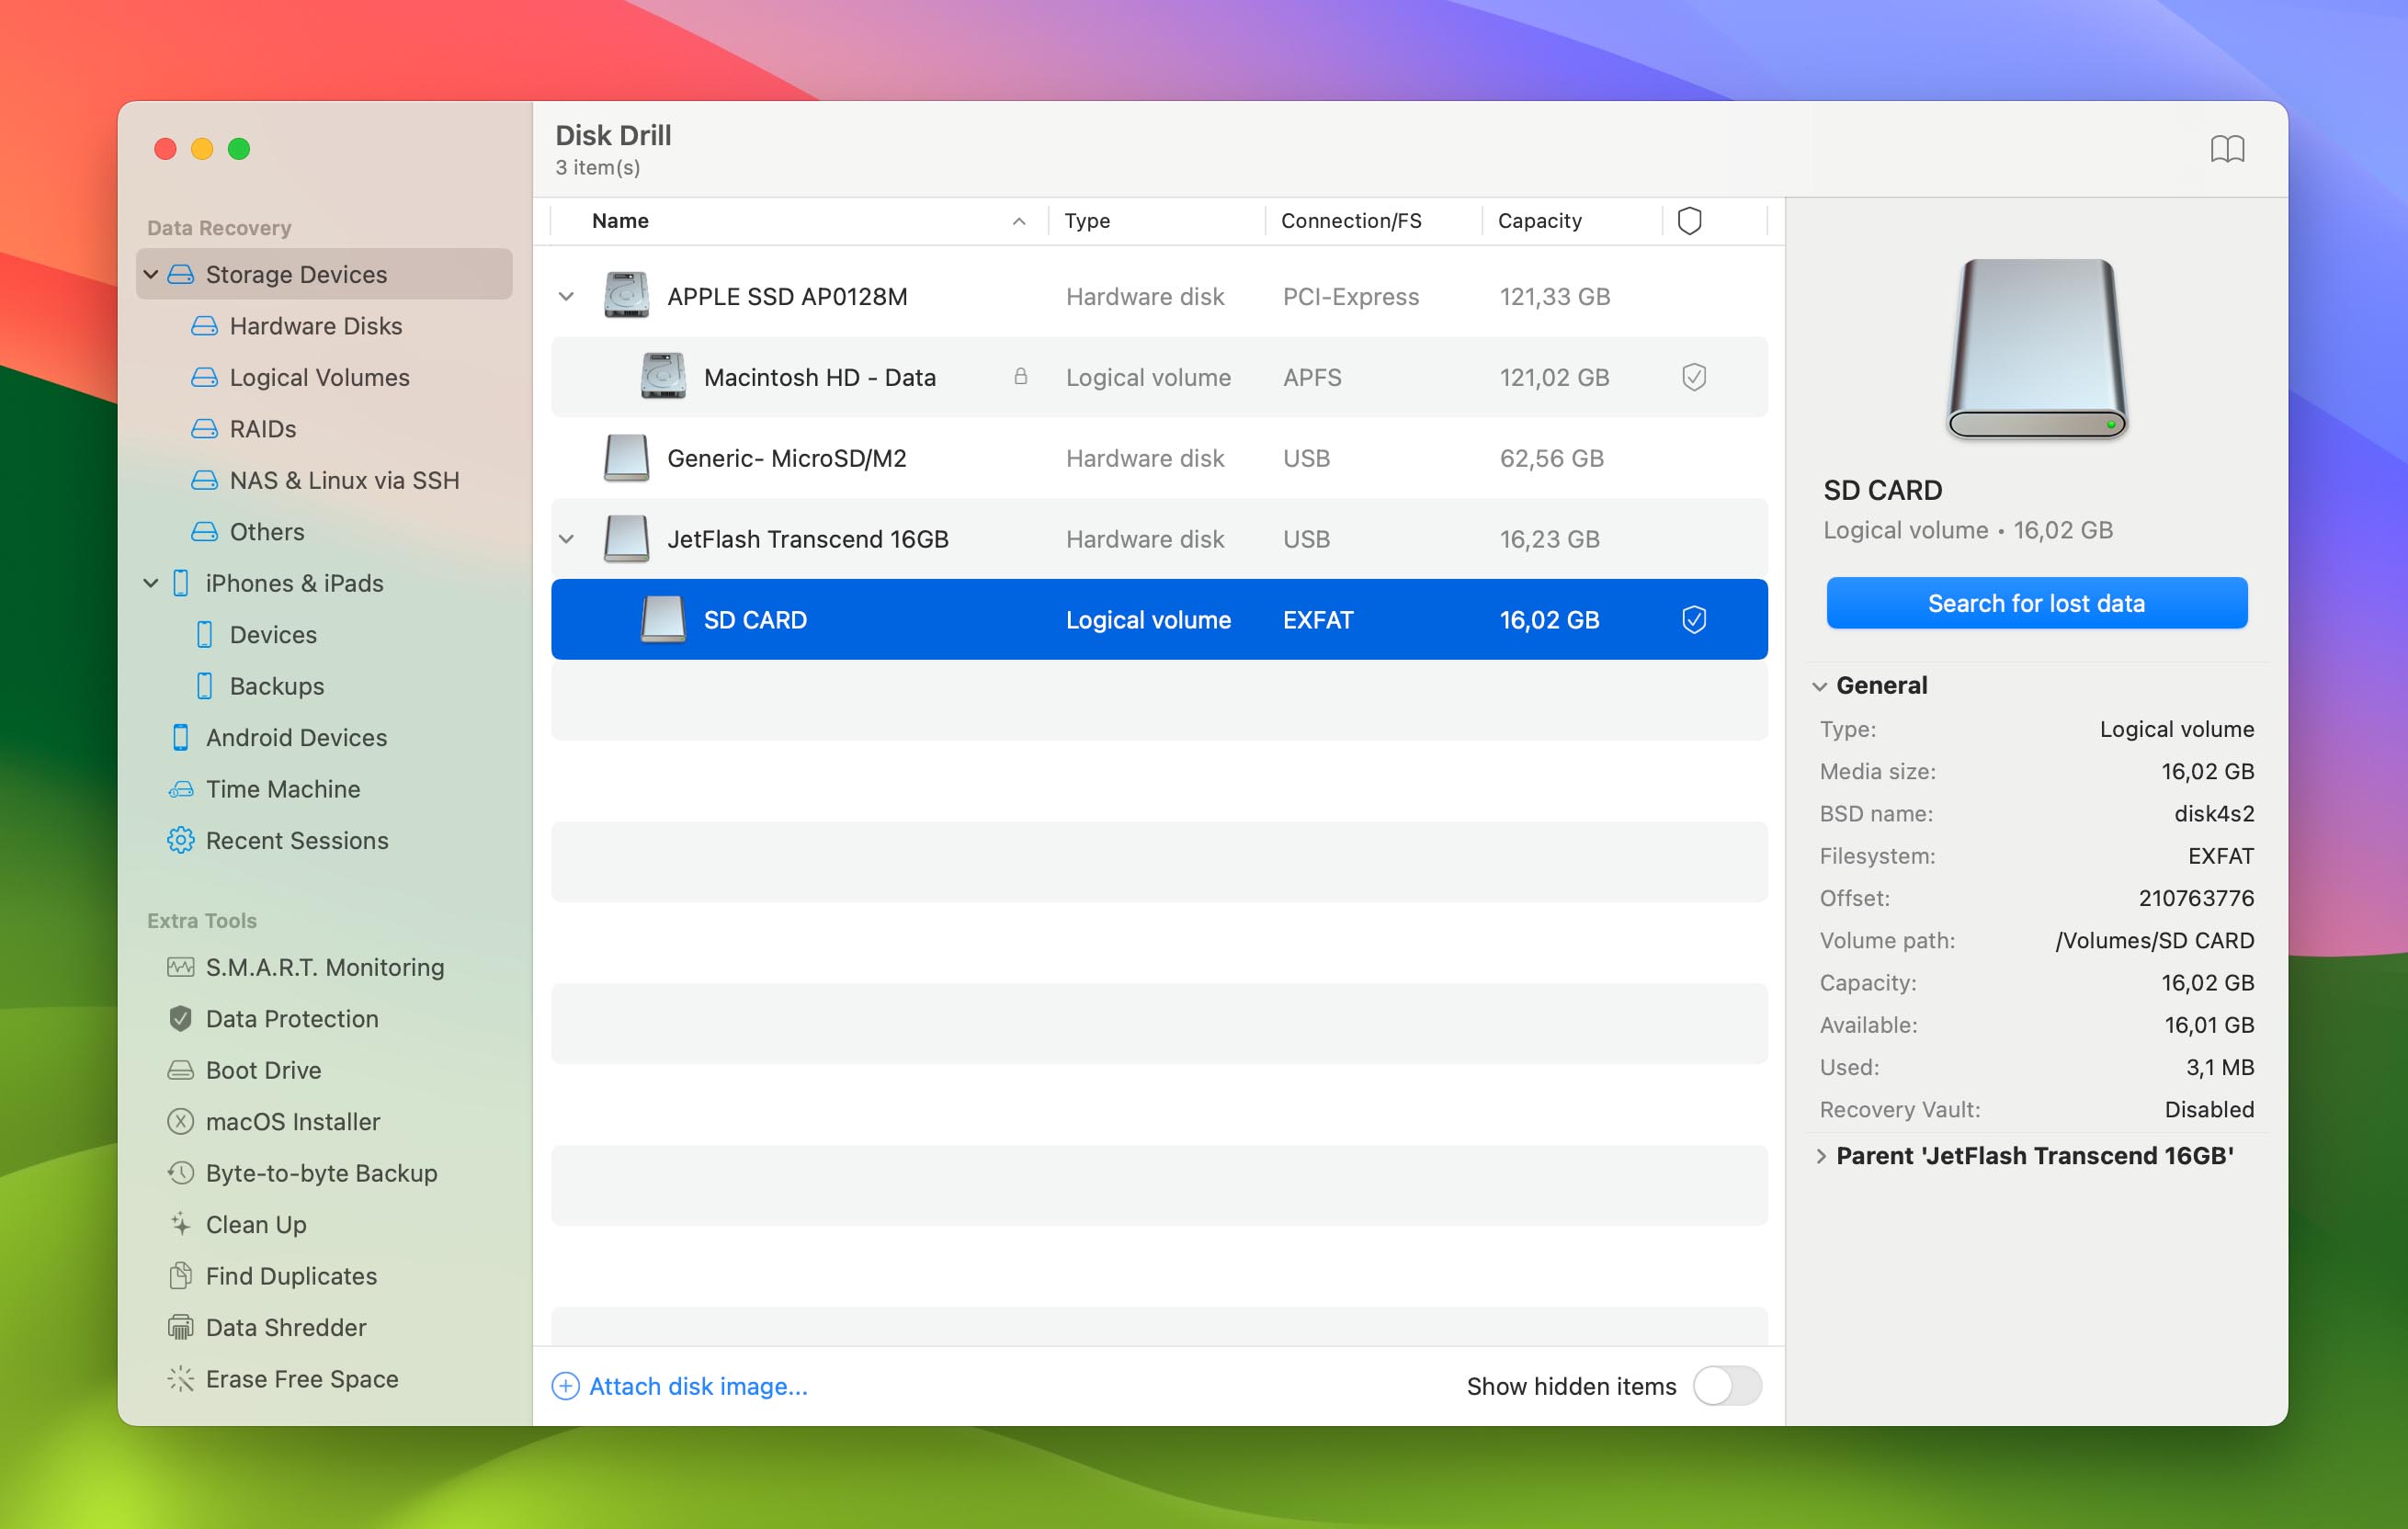
Step 1. Insert the SD card to your Mac computer.
Insert your SD card using either your Mac’s built-in card reader or an external USB card reader. Launch Disk Drill and wait for your SD card to appear in the device list. On macOS, SD cards typically appear with their volume name, but you can always easily identify it based on its storage capacity.
Step 2. Initiate the scan of your memory card.
Select your SD card and click Search for lost data. Disk Drill will automatically choose optimal recovery settings.
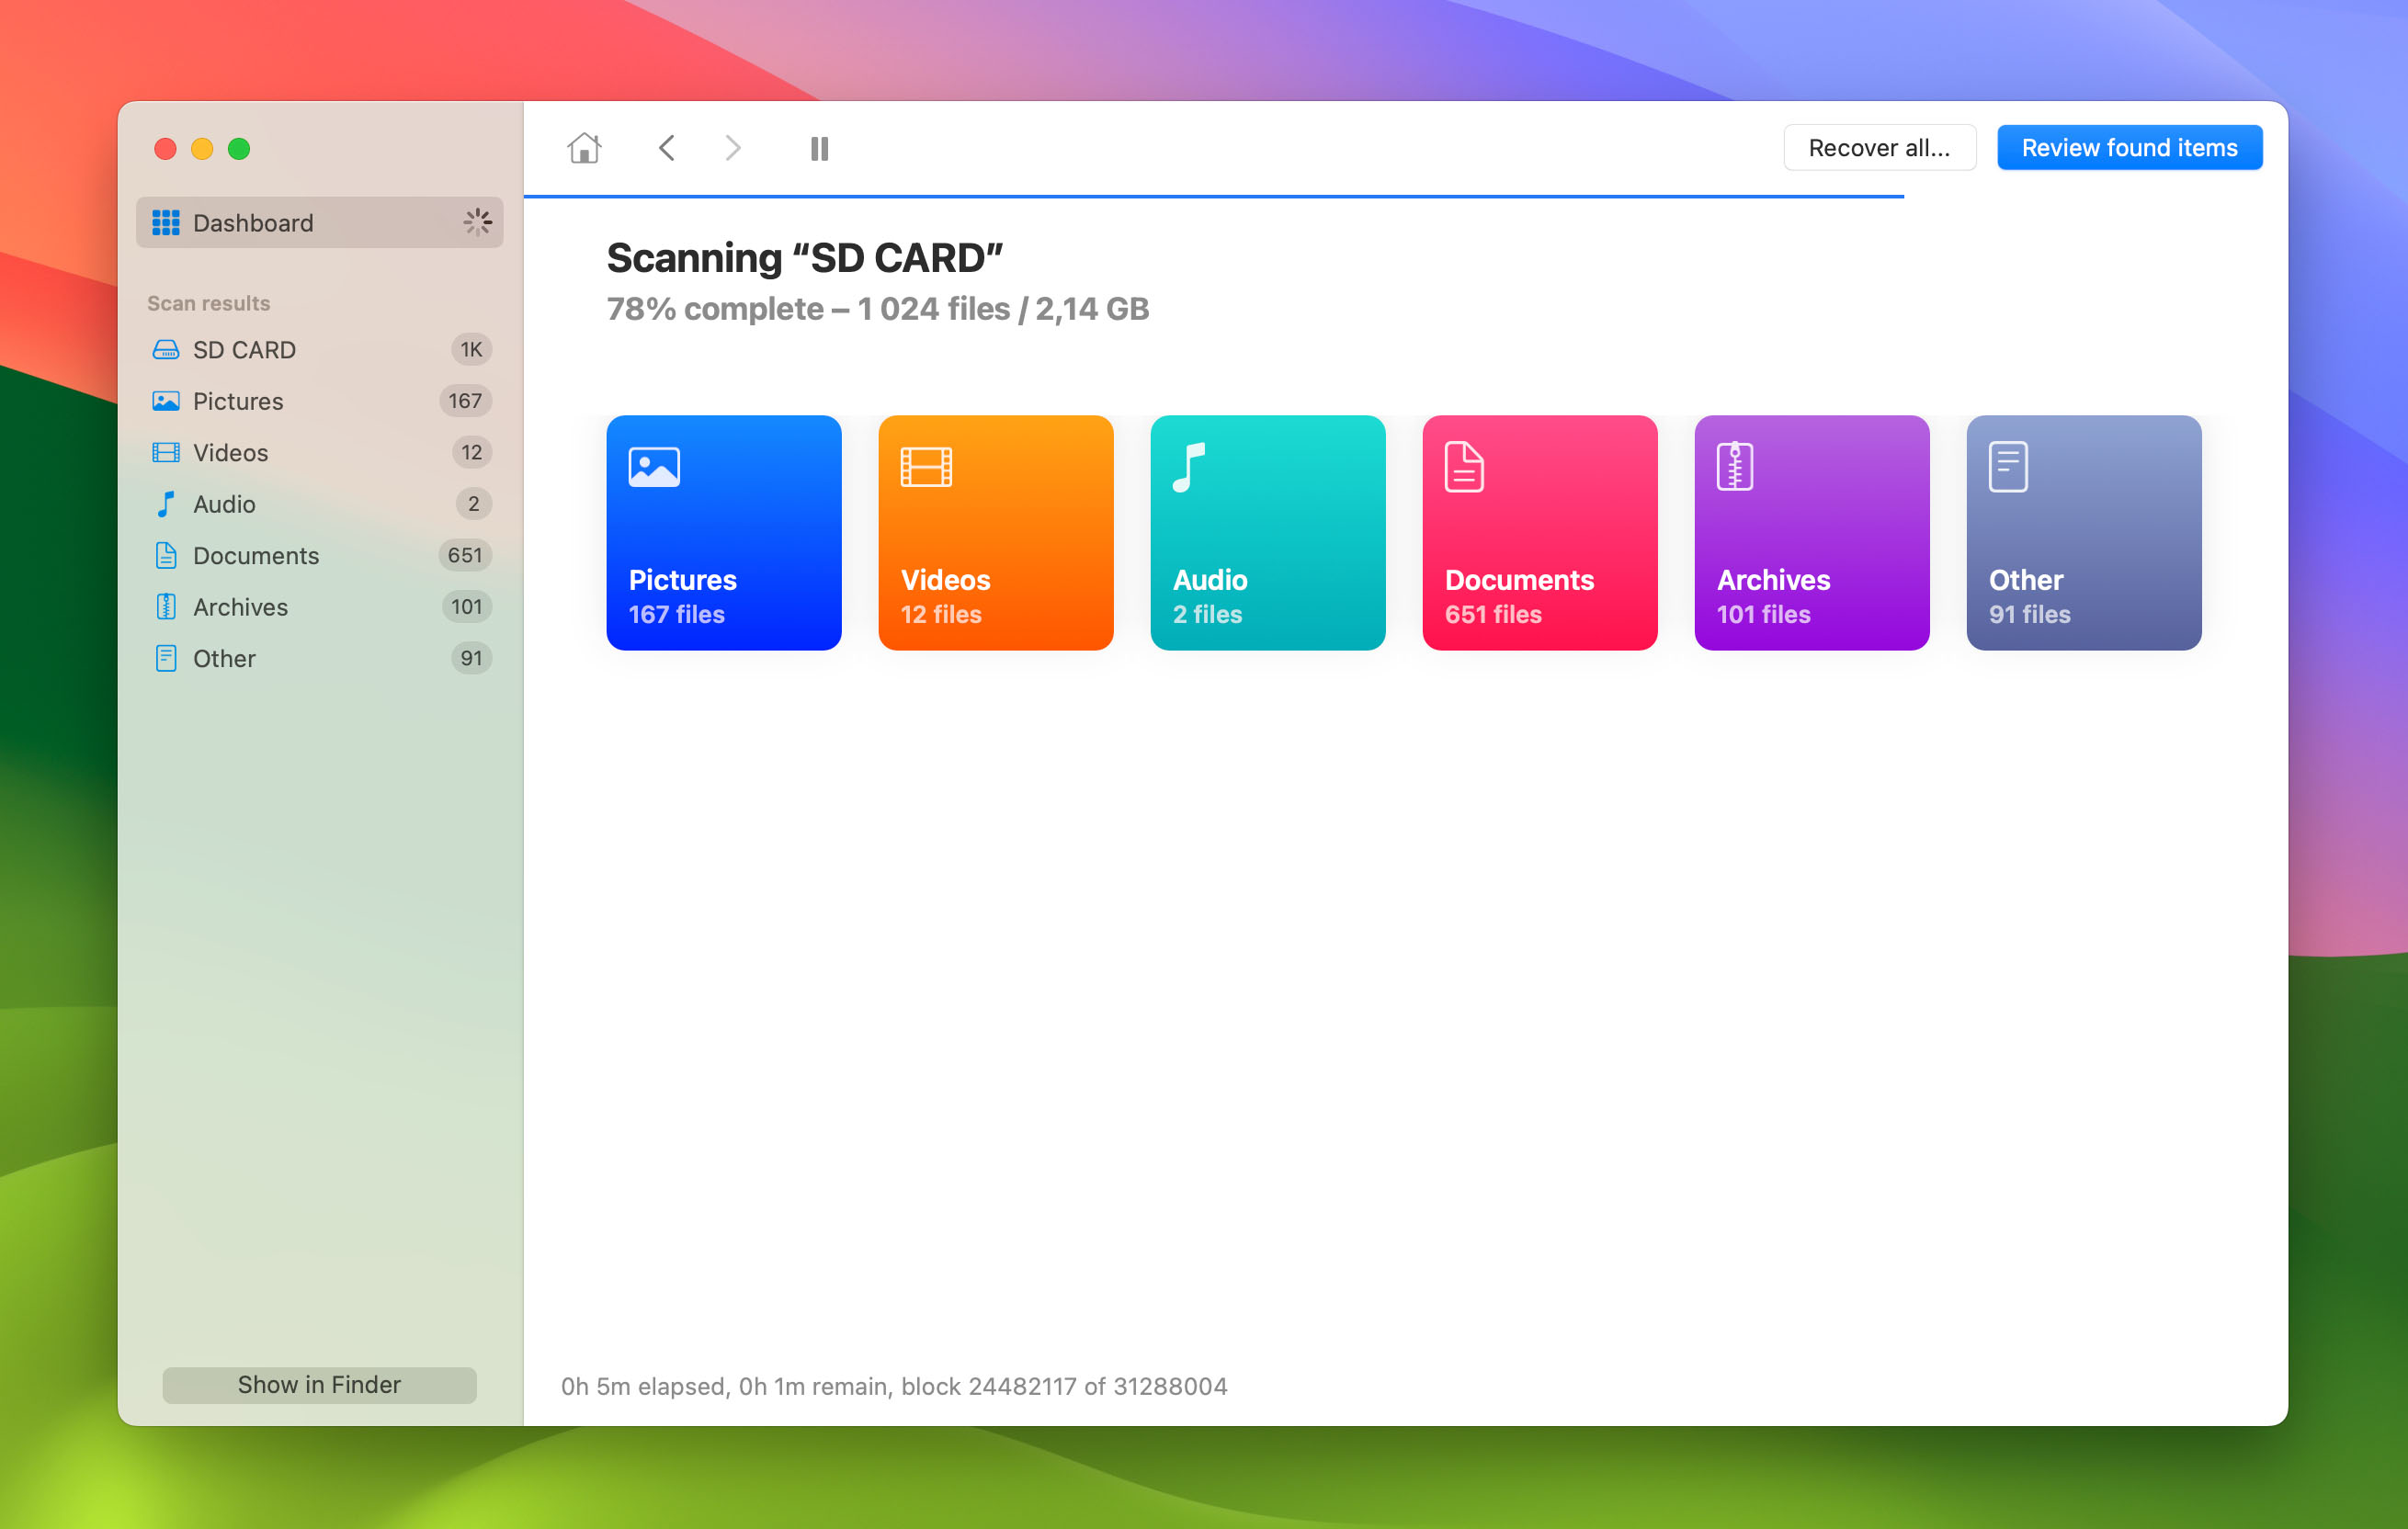
Step 3. Scan the entire SD card.
The scanning process will start immediately, showing found files in real-time. If your SD card has multiple partitions and the initial scan doesn’t reveal anything, then you can click Scan entire disk to examine all partitions on your SD card.
Step 4. Filter the results.
Wait for the scan to complete, and then select Videos from the Scan results. Use the preview feature to locate your video files and verify their integrity.
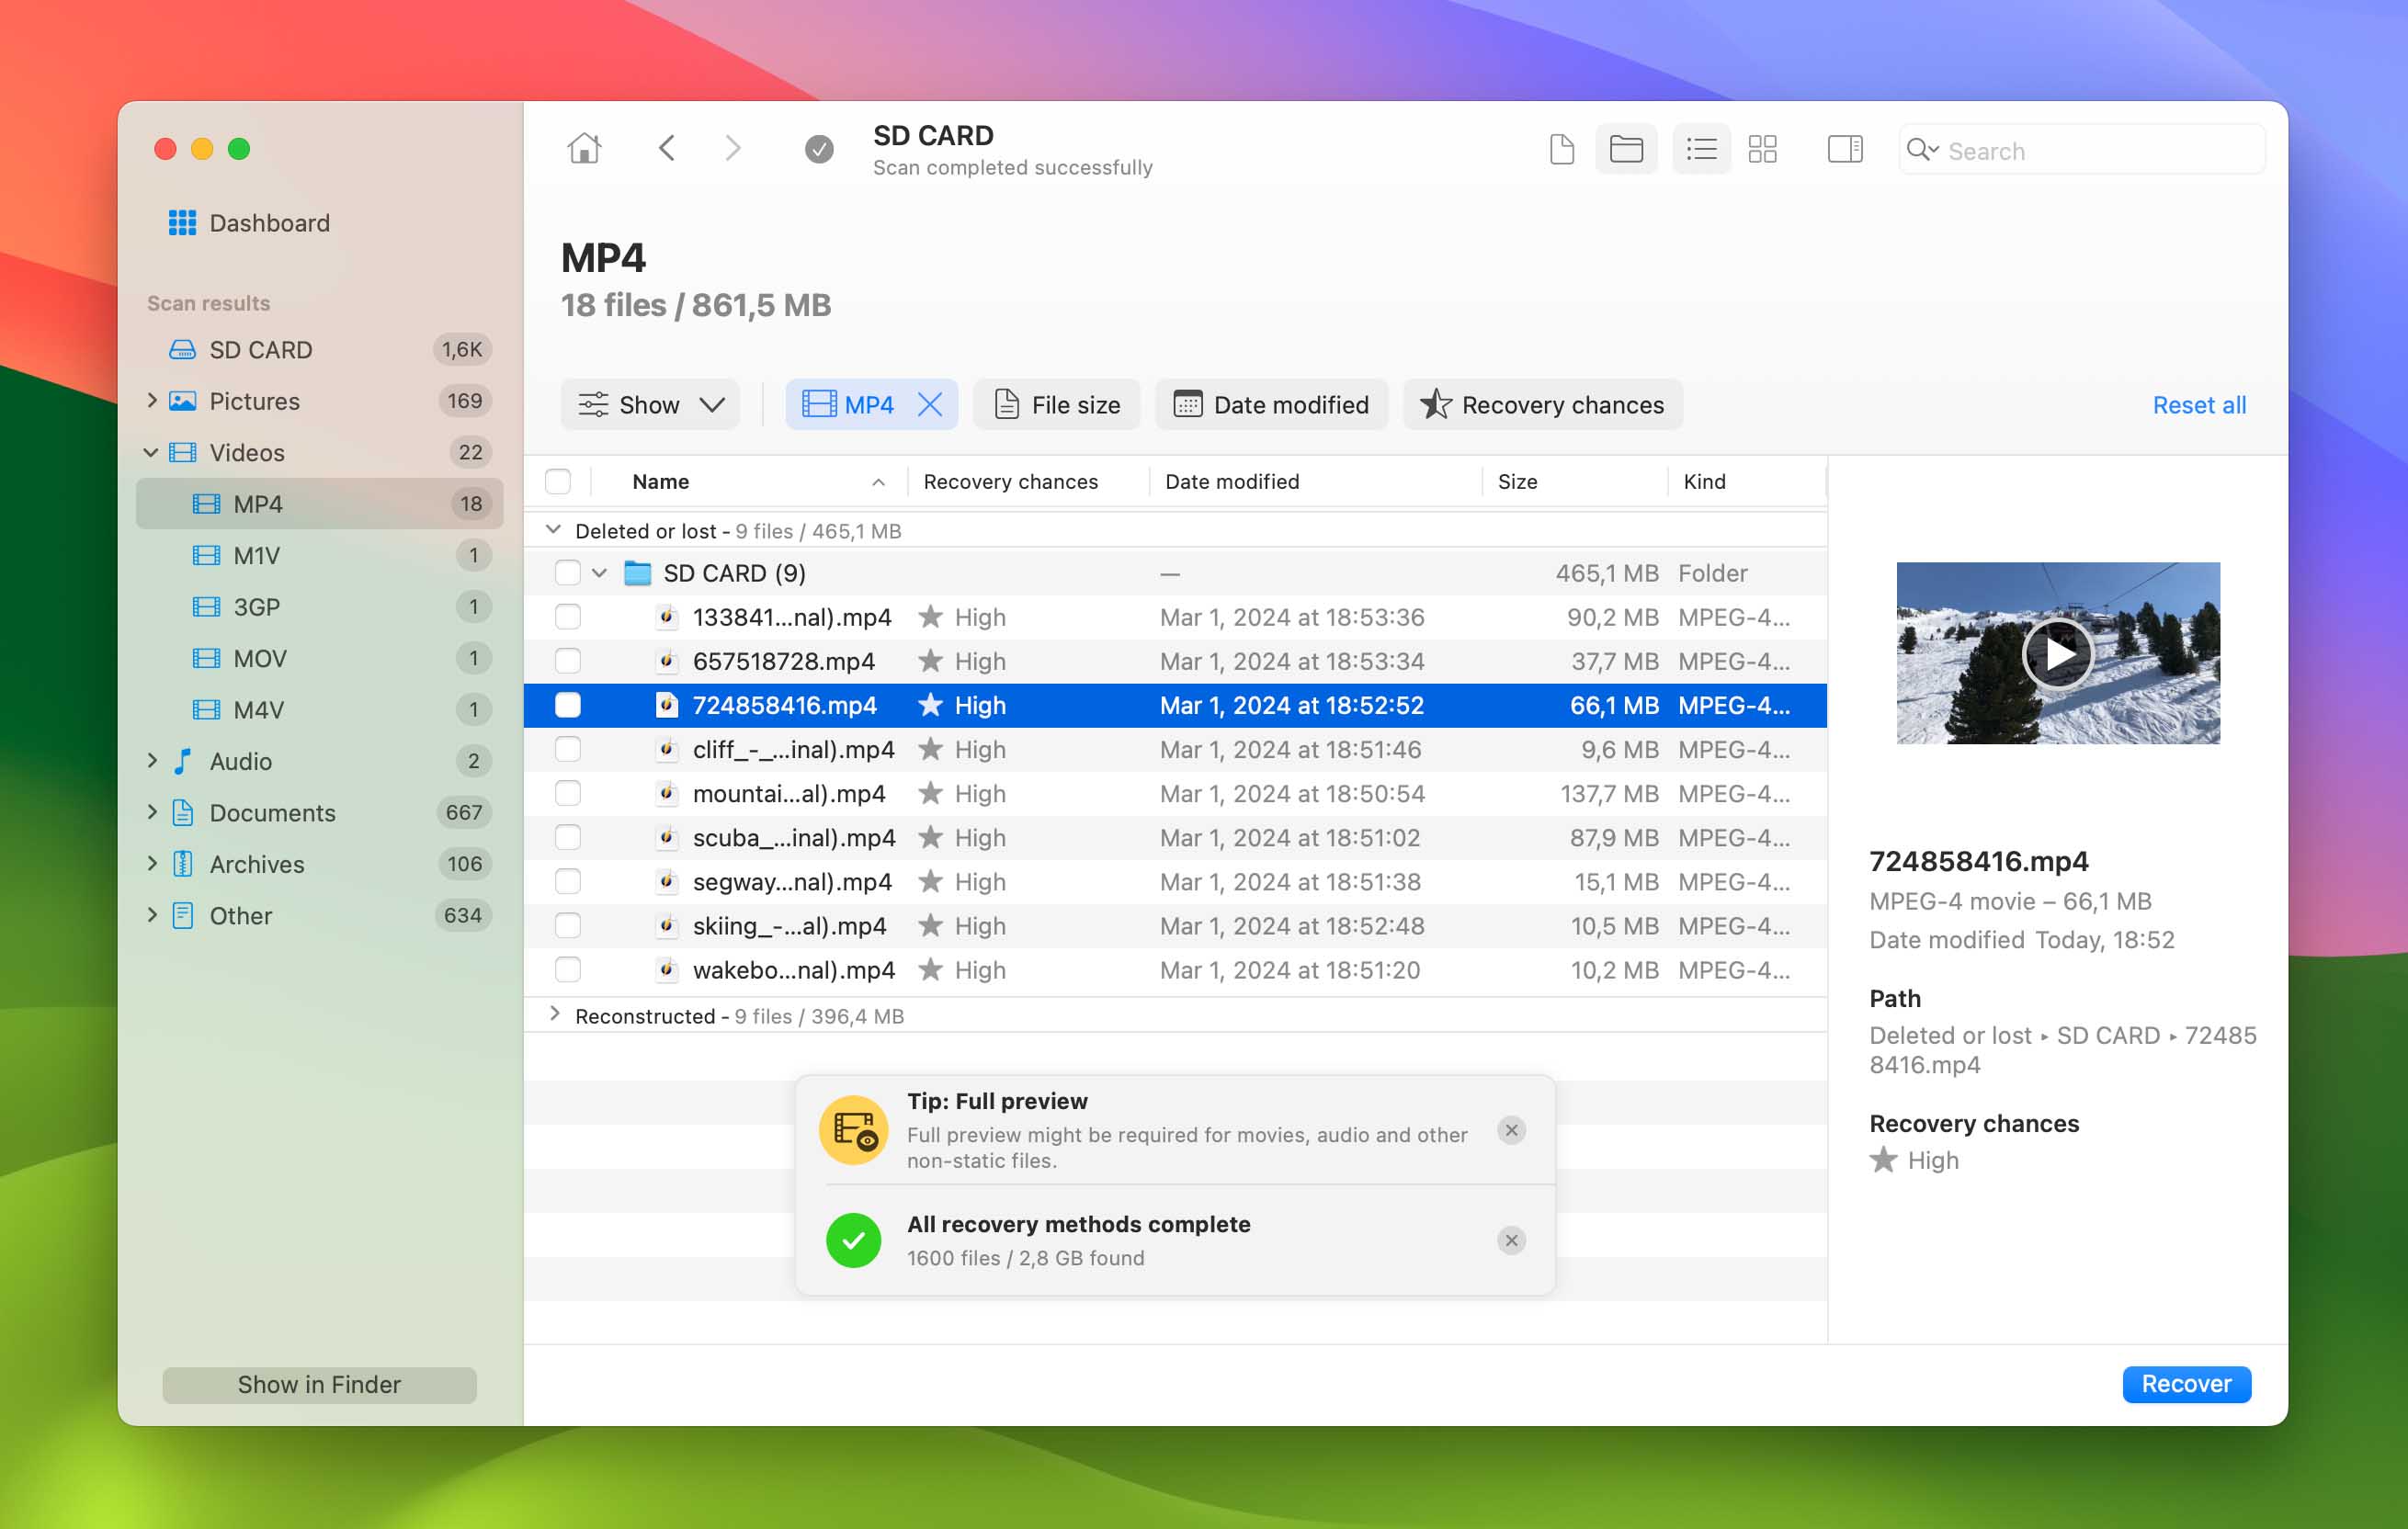
Step 5. Preview and Recover the video file.
Click the checkbox associated with each video file you want to recover. Then click the Recover button and choose a recovery destination on your Mac’s internal drive or some other external storage device (not your SD card).
That’s it, you’ve successfully recovered deleted videos from an SD card storage device.
There are two versions of Disk Drill:
- Free – which can find & preview deleted files on an SD card. The Windows version of Disk Drill can additionally recover up to 100 MB of data for free. This may solve a small or medium-sized data loss end-to-end.
- Pro – which can recover deleted files from an SD card.
Method 2: How to Recover Corrupted Video Files from SD Card
After successfully recovering videos from your SD card using data recovery software, you might discover that the recovered videos don’t play properly (audio without any image, freezing, playback error messages, and so on) or at all due to corruption.
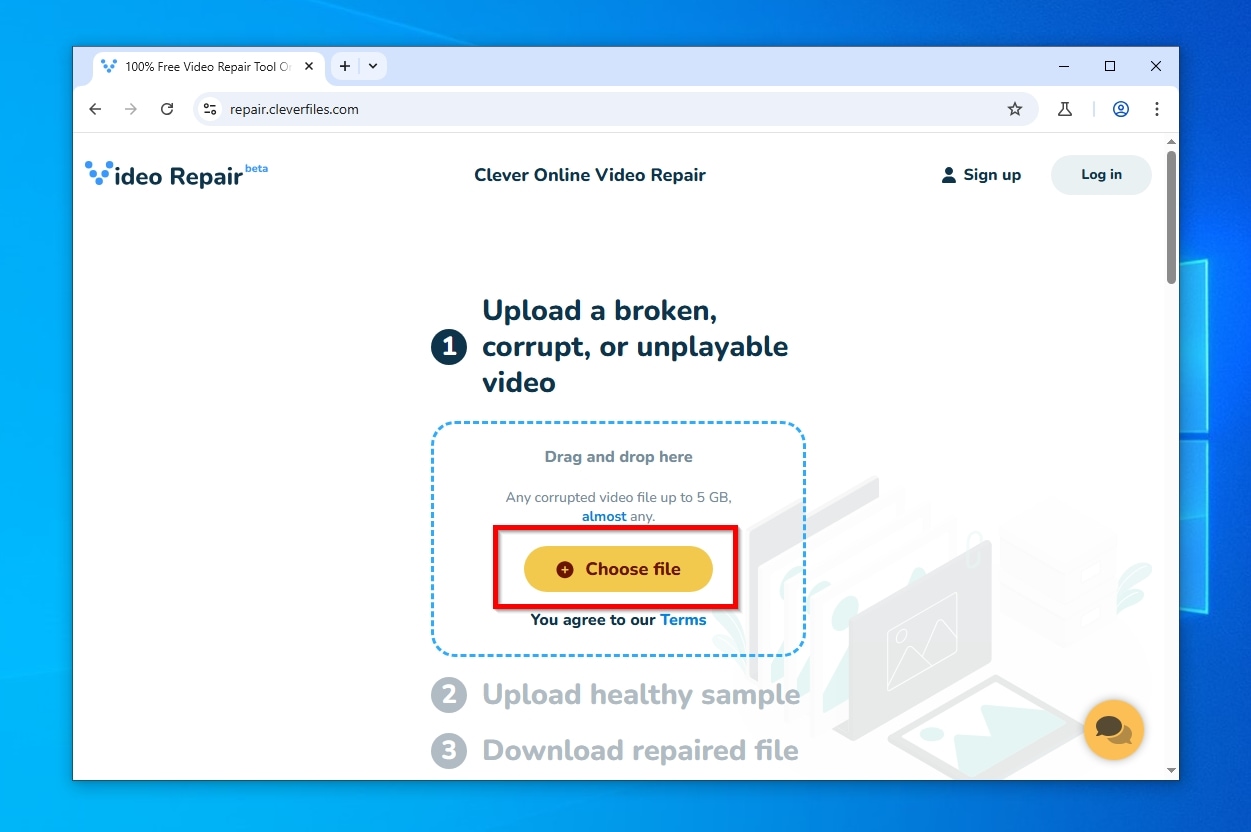
Fortunately, specialized video repair tools can often fix these issues by rebuilding the video file structure, and the best solution available to Windows and Mac users is Clever Online Video Repair because it supports the most popular video file formats (MP4, MOV, 3GP), requires no technical expertise, is completely free, and respects the privacy of its users.
Here’s a step-by-step guide to help you repair your corrupted videos using Clever Online Video Repair:
- Open your web browser and visit the repair.cleverfiles.com page.
- Click the Choose file button to select the corrupted video file from your computer or device or drag and drop the video file directly into the designated area on the webpage.
- Provide a healthy sample video after uploading the corrupted video. The healthy sample serves as a reference point for the tool to analyze and repair the corrupted video, which is why it must come from the same camera and be recorded using the same recording settings
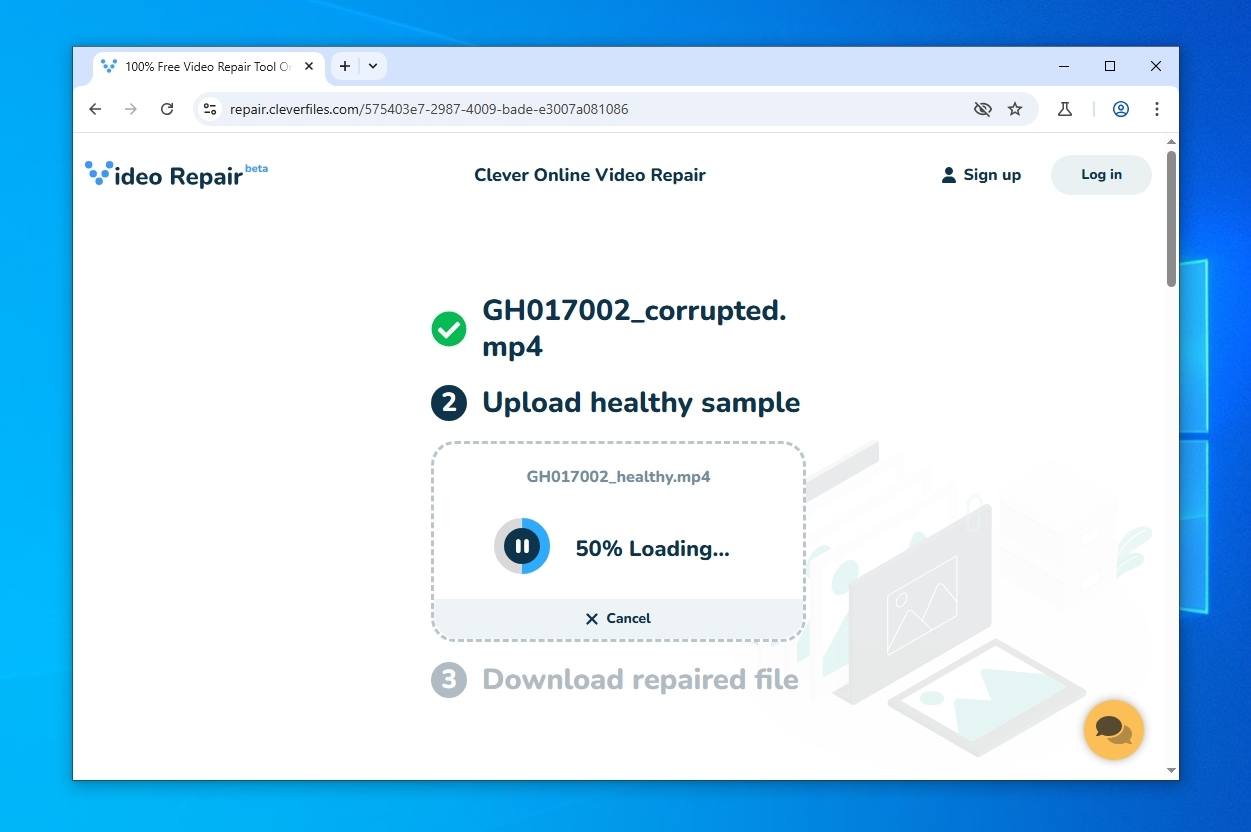
- The tool will begin analyzing the files and repairing the corrupted video, and you just need to wait for a short while.
- Click the download link to retrieve the fixed video.
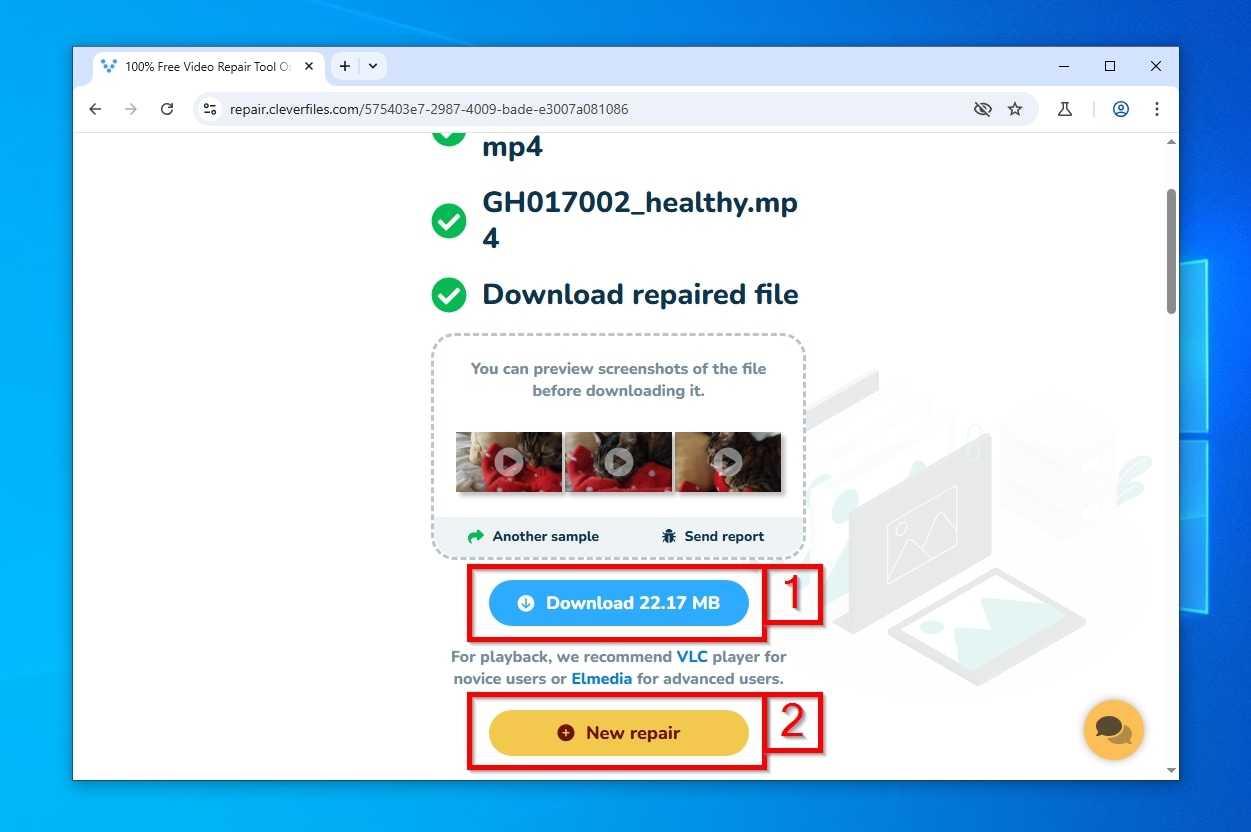
Using Clever Online Video Repair, you can fix corrupted SD card videos that are up to 5 GB large, and you can do so from any device, including your smartphone.
Method 3: Recover Deleted Videos from a Physically Damaged SD Card
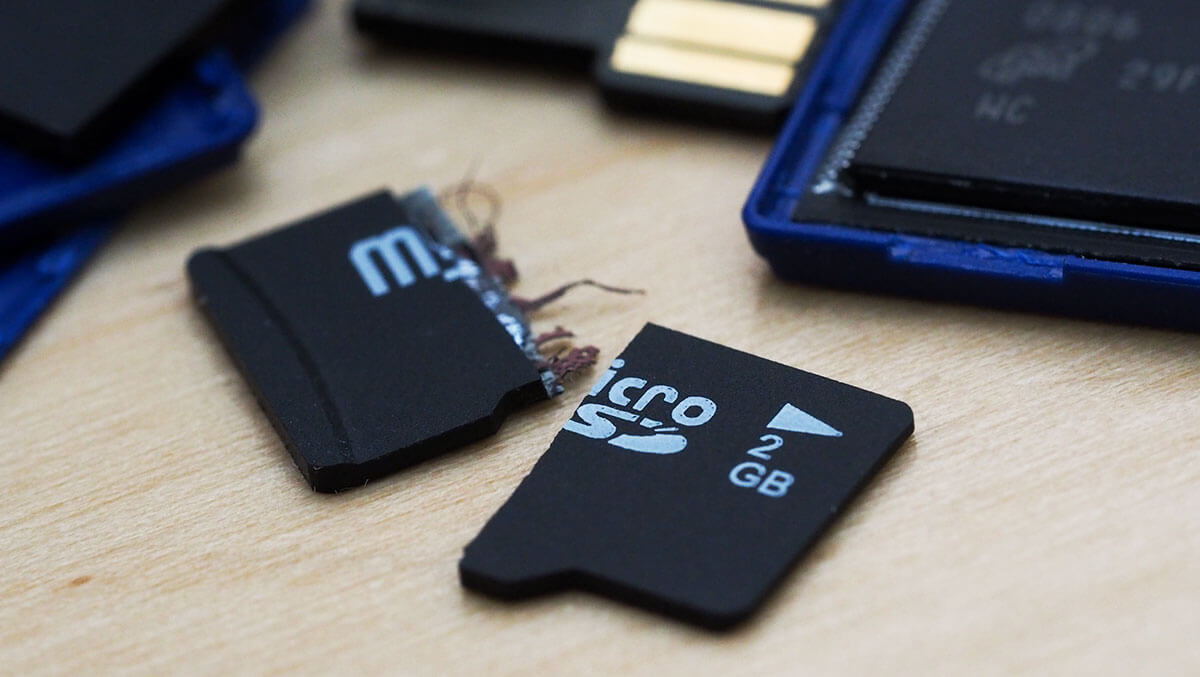
If your SD card has become physically damaged (perhaps you accidentally pulled it out of an adapter too quickly, or if it has been exposed to water or other physical stresses) typical consumer-grade software might not suffice for recovering deleted videos. In such cases, you should consider using a professional recovery service.
One reputable service is offered by CleverFiles, which operates on a “No data, no charge” policy. To initiate a recovery, visit their order page, where you can select the urgency of your SD card video recovery request. You’ll then need to ship your SD card to them and await a recovery estimate that you can either approve to proceed with the recovery or decline.
Method 4: Recover Deleted Videos from your Phone
When you discover missing videos on your smartphone, you should start by opening your gallery app and navigating to the Trash folder. Deleted videos typically stay there for up to 30 days or until manually removed.
If you can’t find your videos in the temporary deletion folder, your next best option is to check your cloud storage services. Many users automatically back up photos and videos to cloud services like Google Photos, Dropbox, or OneDrive. This automatic backup happens in the background whenever you’re connected to Wi-Fi (and optionally even on cellular data), so there’s a good chance your deleted footage is safely stored in the cloud even if you no longer don’t remember setting it up.
Last but not least, you might have also created a complete backup of your Android or your manufacturer’s backup software. If so and your videos are included in it, then their recovery is definitely possible, but you may have to restore your entire device.
Method 5: Recover Deleted Videos from SD Card on Android
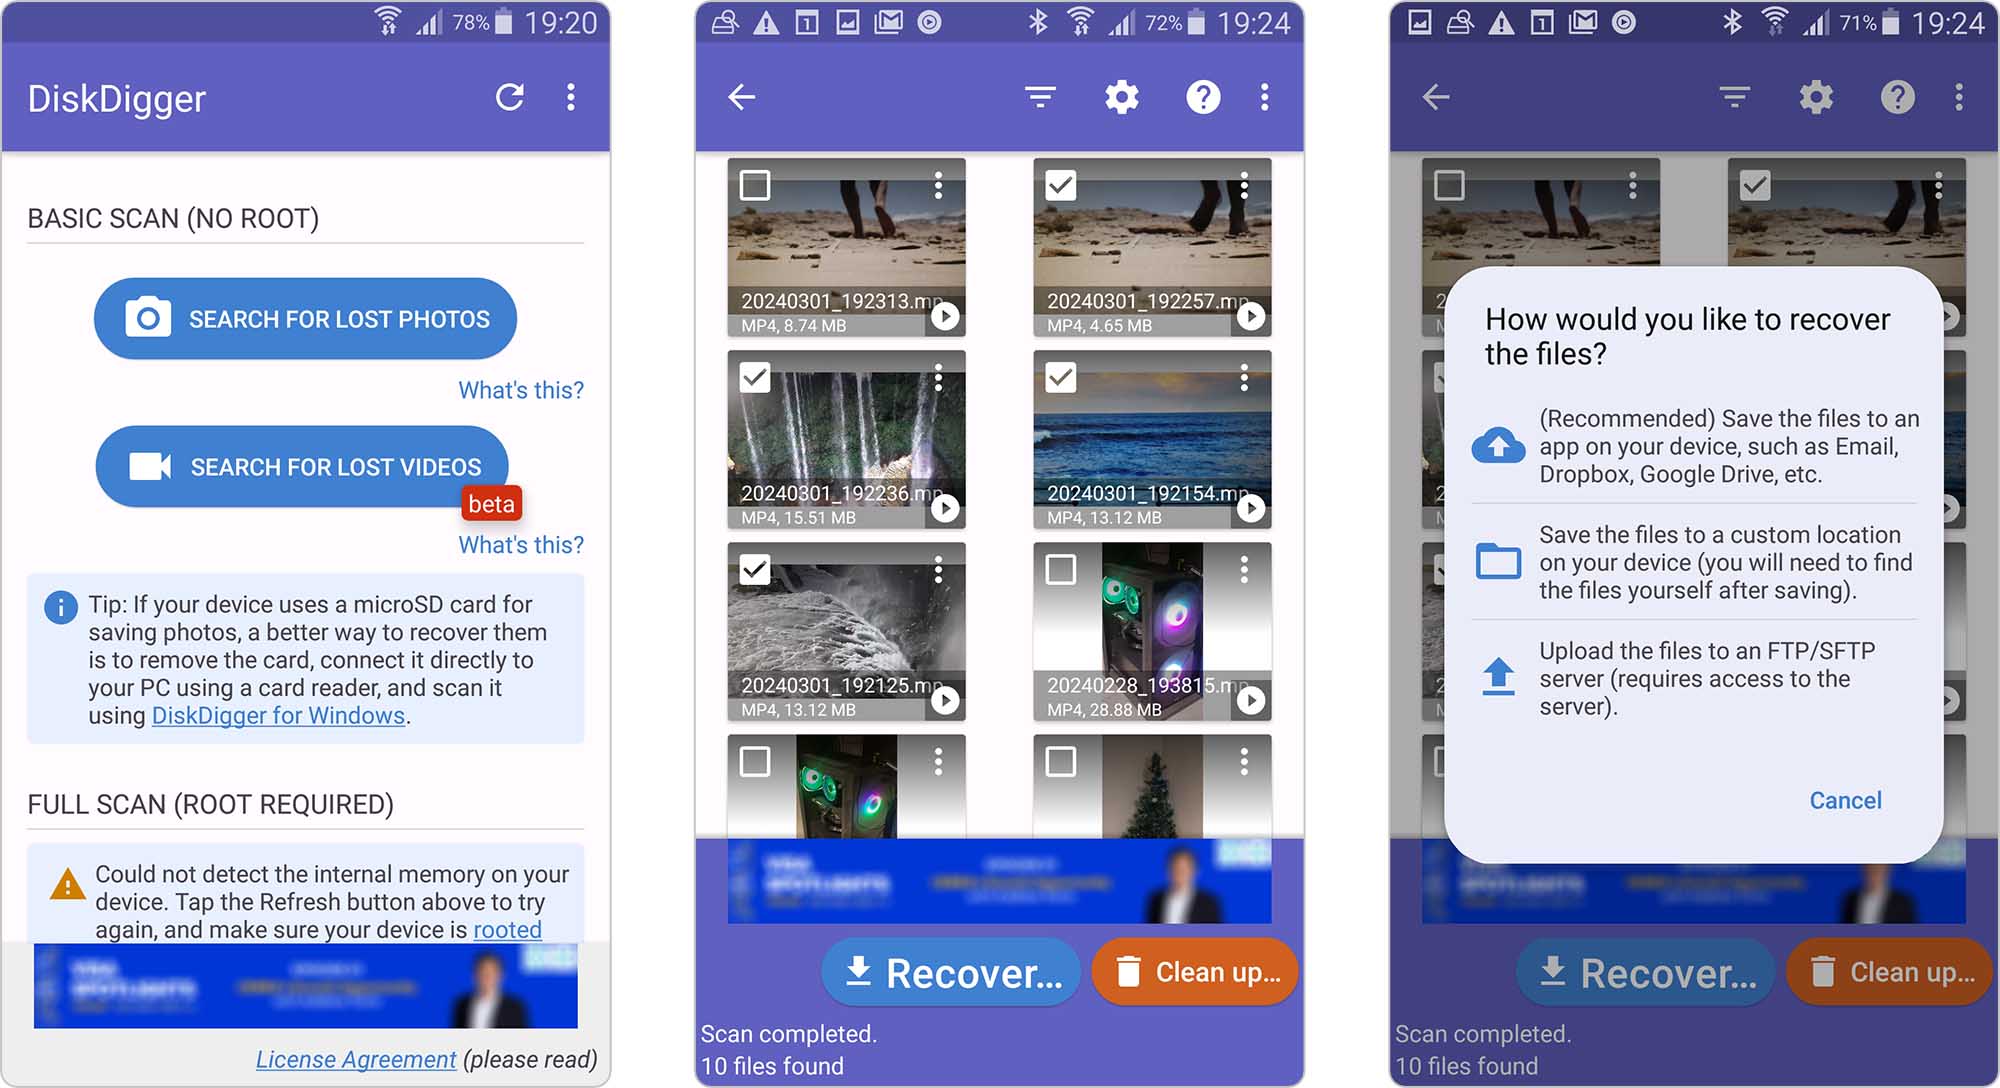
If you’ve mistakenly deleted a video from your Android phone or from the microSD card on your phone, don’t worry just yet. In most cases, you should be able to recover your files as long as you act fast and don’t let your device overwrite the data. A quick and effective solution to such an issue is to use a specialized app such as DiskDigger.
DiskDigger is a data recovery app created for recovering lost videos from Android phones. It is capable of finding and recovering deleted photos and videos on either your phone’s built-in storage or microSD card.
Here’s what you should do to recover videos on your Android phone:
- Use Google Play Store to install the DiskDigger app.
- Launch the app and tap Search for lost videos to search for the lost videos.
- When prompted, allow the app to access your device’s storage.
- Look through the found photos and videos and select the ones that you wish to recover.
- Tap the Recover button.
- Choose how you want to restore the files (it’s recommended to use an online storage service for the recovered data).
While Disk Digger can sometimes deliver on its promise of microSD card recovery without a computer, a more effective solution is to remove the micro SD card from your phone and recover the videos using computer-based recovery software like Disk Drill. Just know that Disk Drill will be able to help only if your SD card is configured as removable storage rather than adopted storage (where it’s encrypted as an extension of internal memory).
Method 6: Reinstalling/Updating Drivers
Before attempting to recover lost videos, you might encounter a situation where your SD card isn’t recognized by Windows at all. This can happen due to driver issues, especially when using third-party card readers. While this isn’t directly related to recovering deleted content, fixing driver problems is often a necessary first step before you can begin any video recovery process.
Follow these steps to reinstall/update your SD card reader drivers:
- Press Windows + X on your keyboard and select Device Manager.
- Go to Portable Devices or Disk drivers and right-click your SD card reader.
- Select the Uninstall device option and reconnect the SD card reader.
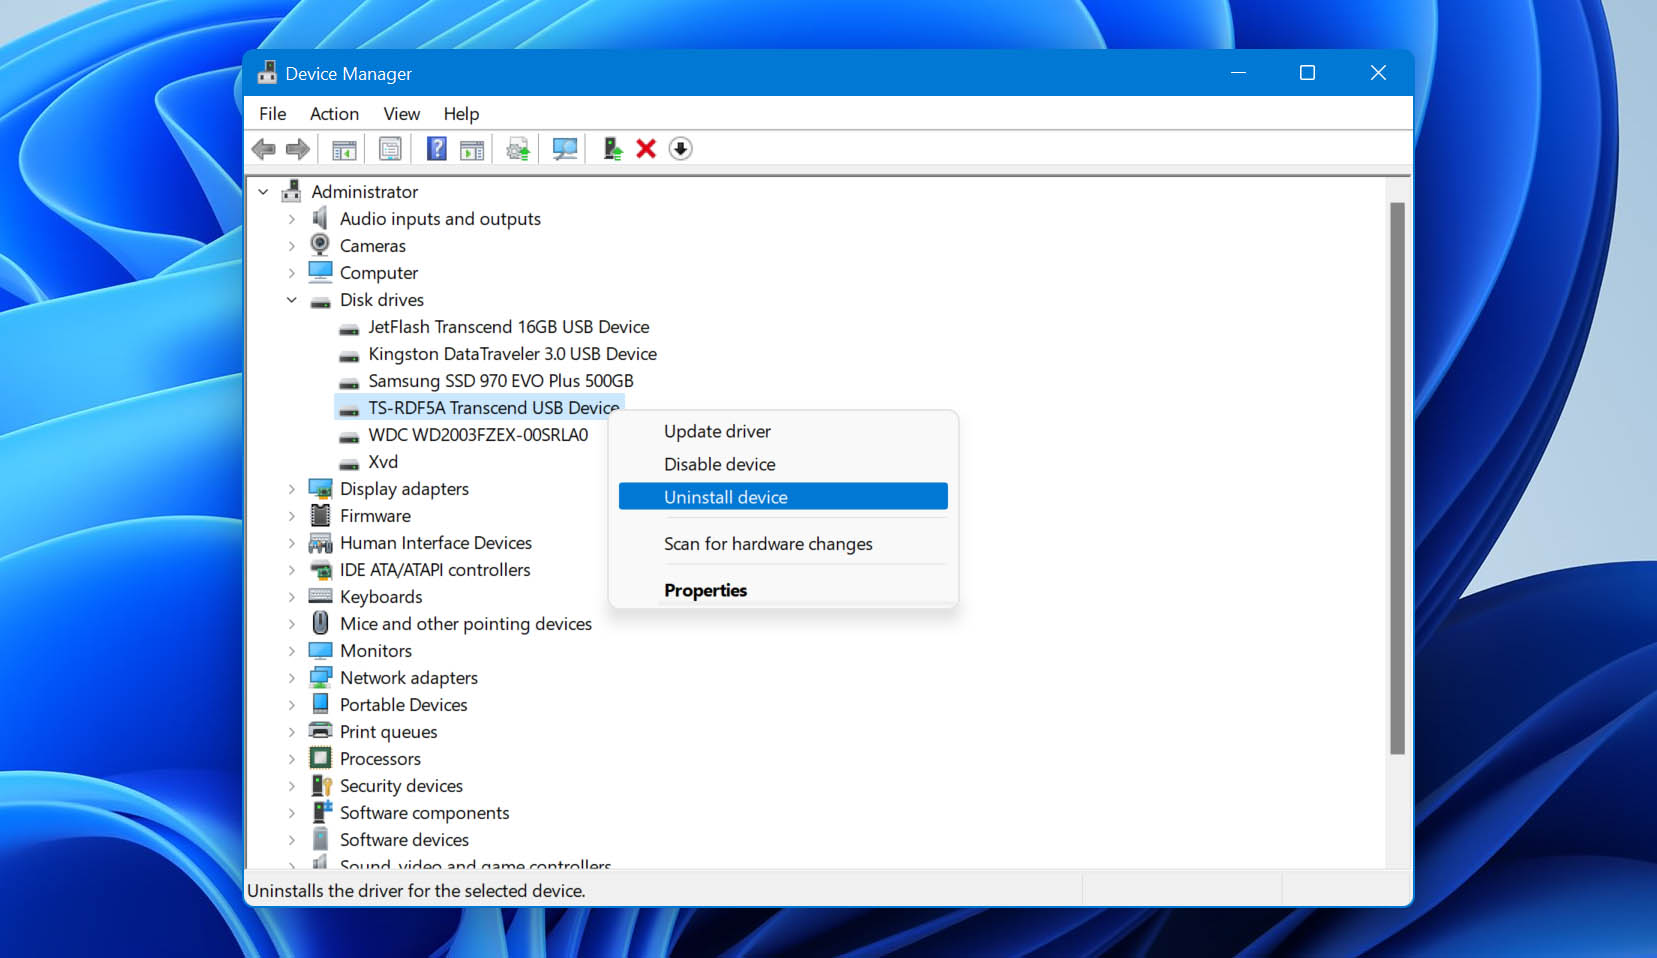
You can now restart your computer, connect your SD card reader again, and attempt to recover deleted footage from your SD card. Hopefully, the SD card will be detected. If not, we recommend you try a different reader.
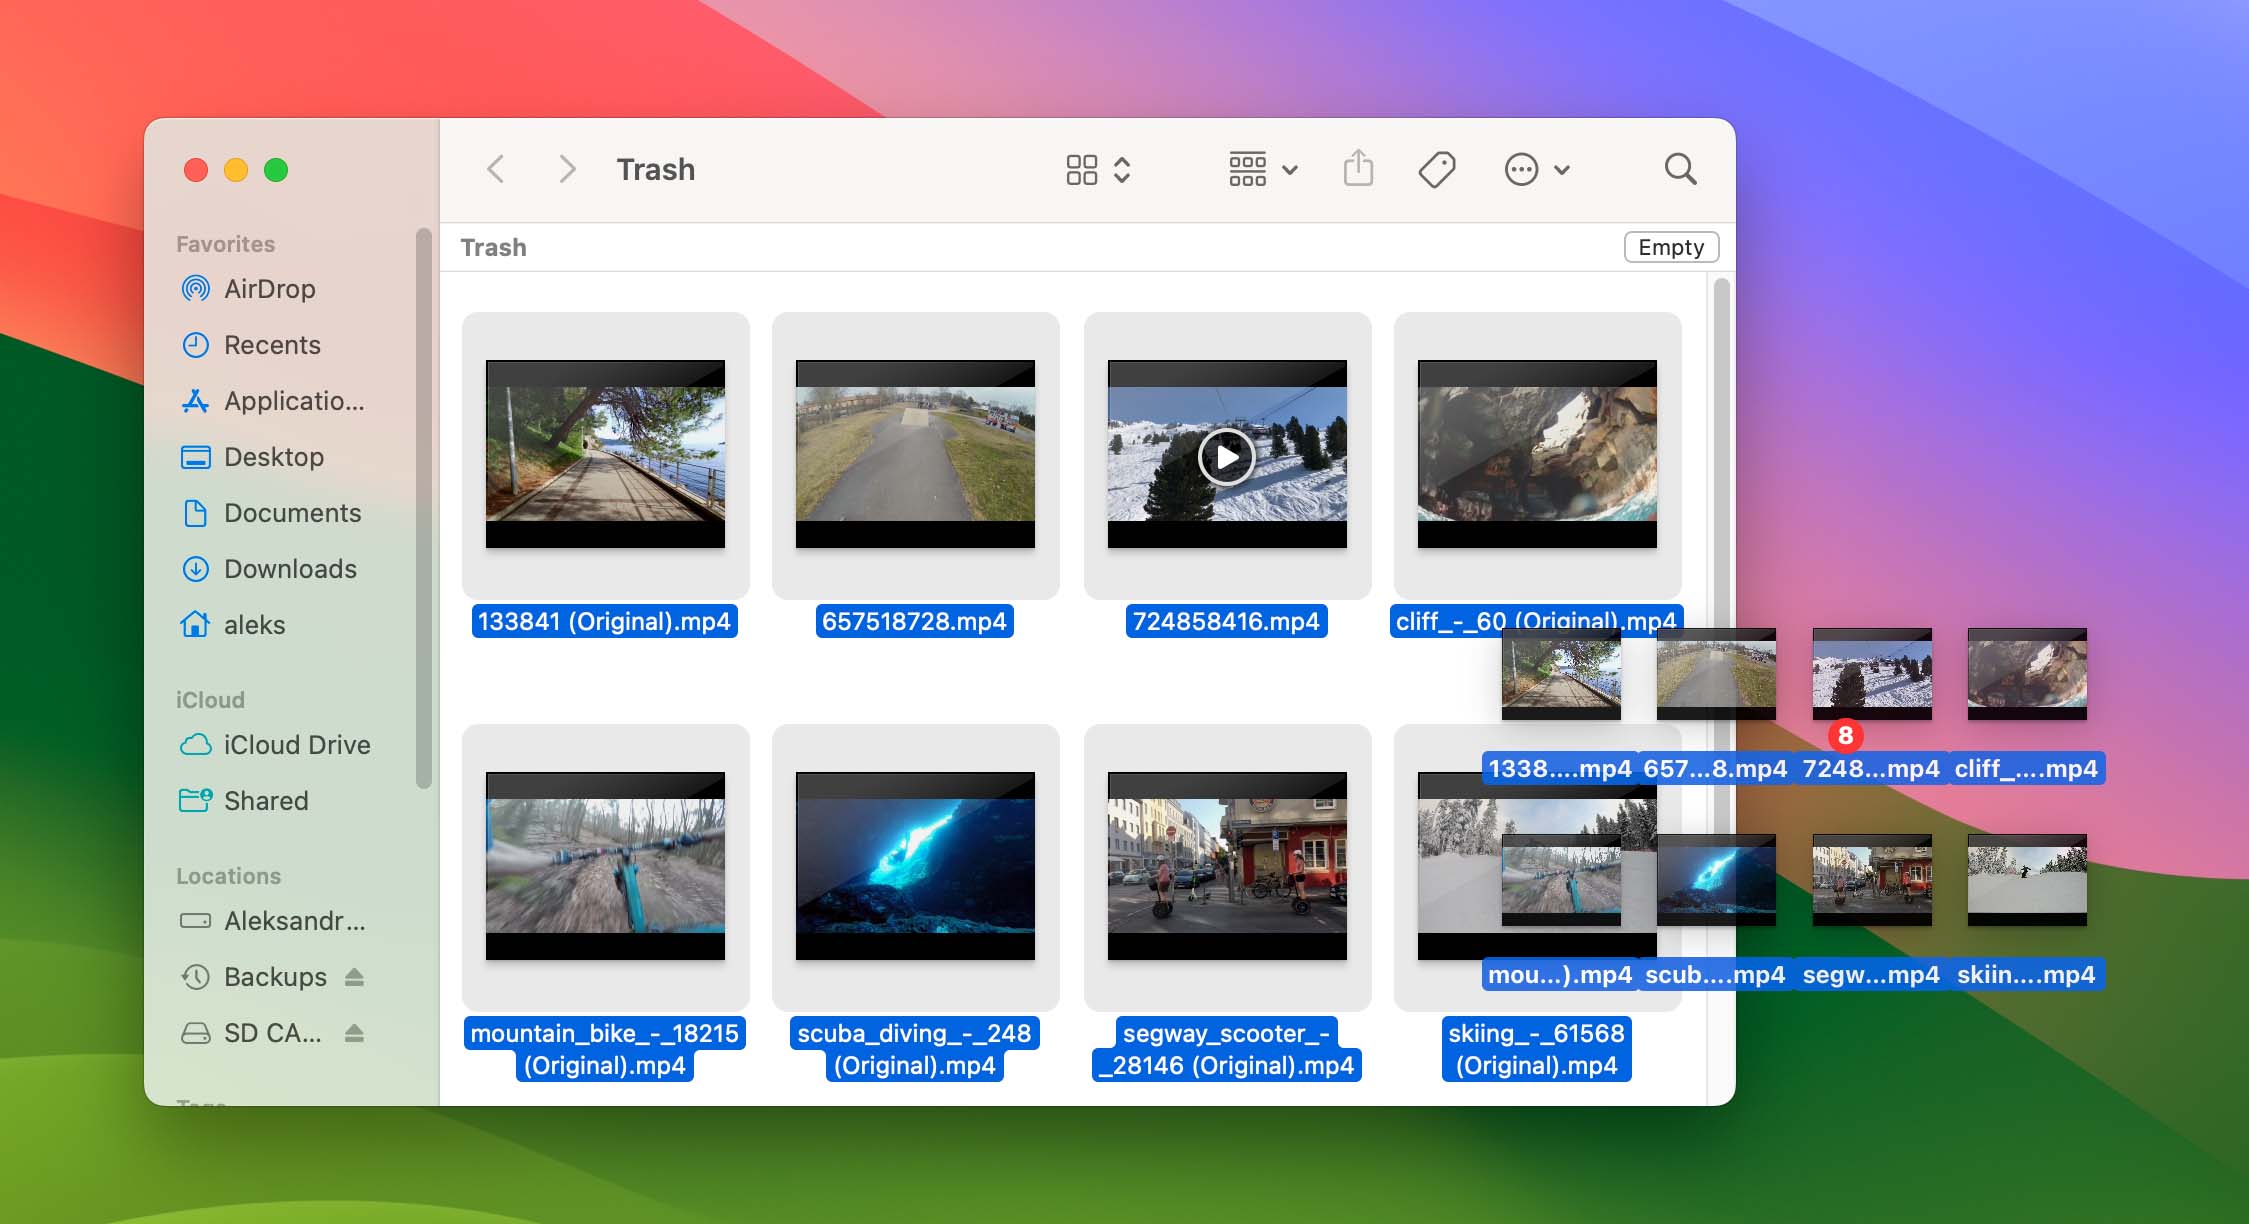
Method 7: Restore Video Files from the Recycle Bin/Trash Folder
On Windows, when you delete files from an SD card, they bypass the Recycle Bin and are deleted immediately. This means you’ll need to use dedicated recovery software like Disk Drill to recover video files from SD card.
When you delete videos from an SD card connected to a Mac, the files are moved to a hidden “.Trashes” folder on the SD card itself. As long as the card is connected to your Mac, you can recover the deleted files directly from your Trash:
- Open the Recycle Bin or Trash depending on whether you use Windows or macOS.
- Select the video files you want to recover.
- Drag them to a new location.
Method 8: Check Device-Specific and Manual Backups
Many modern devices that use SD cards for video storage can also create device-specific backup copies.
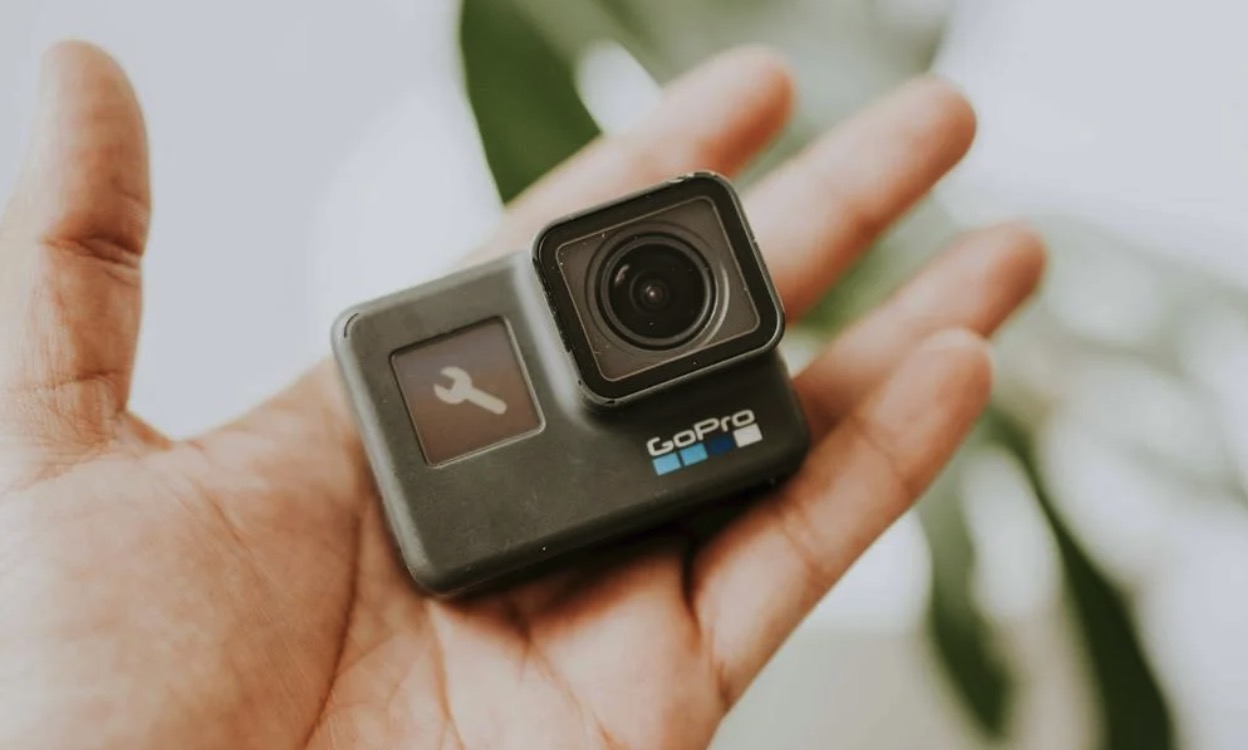
For example, GoPro action cameras can automatically upload your videos to cloud storage when your camera connects to your phone via the GoPro Quik app. Security cameras and dash cams frequently use rolling backup systems that store footage both on the SD card and in cloud storage.
Finally, if you regularly transfer videos to your computer, check your local backup systems. Windows File History and Mac Time Machine both keep previous versions of files, which might include your deleted videos. External backup drives or manual copies you’ve made to your computer could also contain the footage you’re trying to recover.
Method 9: Recover Deleted Videos from Camera SD Card
Unfortunately, most digital cameras don’t have an equivalent of the Recycle Bin in Windows or Trash in macOS. When you delete videos through your camera’s interface, they’re immediately marked for deletion. Fortunately, they remain physically present on the SD card until overwritten by new data.
To recover lost videos from your camera’s memory card, you first need to connect it to your computer, and you can do that in two different ways:
- Remove the SD card from your camera and connect it using a card reader.
- Connect your camera directly to the computer via USB (if it supports Mass Storage mode).
Once connected, you can use data recovery software like Disk Drill to recover SD card videos. Follow our detailed Windows or Mac recovery guides above. If your recovered videos appear corrupted, you may need to use specialized video repair software to fix any damaged file structures, and we cover this process in our video repair guide.
How to Protect Your SD Card Videos Against Deletion
While you can often recover lost SD card videos, prevention is always better than cure. The following tips should help you greatly reduce the risk of data loss caused by the deletion of a video from an SD card:
- ⚙️ Enable device-specific auto-backup features: Many current-generation cameras support automatic backup features that can save your videos as you shoot. For example, it’s possible to automatically upload footage to the cloud through the Quik app from your GoPro SD card.
- 🛜 Wirelessly download videos from your SD card: Canon’s Camera Connect app provides wireless transfer capabilities, while Nikon and Sony offer similar functionality through their respective apps. Take advantage of these and other similar apps and always download all important videos from your SD card to a backup location as soon as you can.
- 💾 Use two SD cards: Professional photographers and videographers should consider cameras with dual memory card slots for instant backup. Many high-end cameras support simultaneous recording to both cards, effectively creating an immediate backup of your footage. For example, Canon’s 5D Mark IV and EOS R5 feature dual card slots, as do Nikon’s D850 and Z-series cameras, Sony’s Alpha series, and Panasonic’s professional Lumix models.
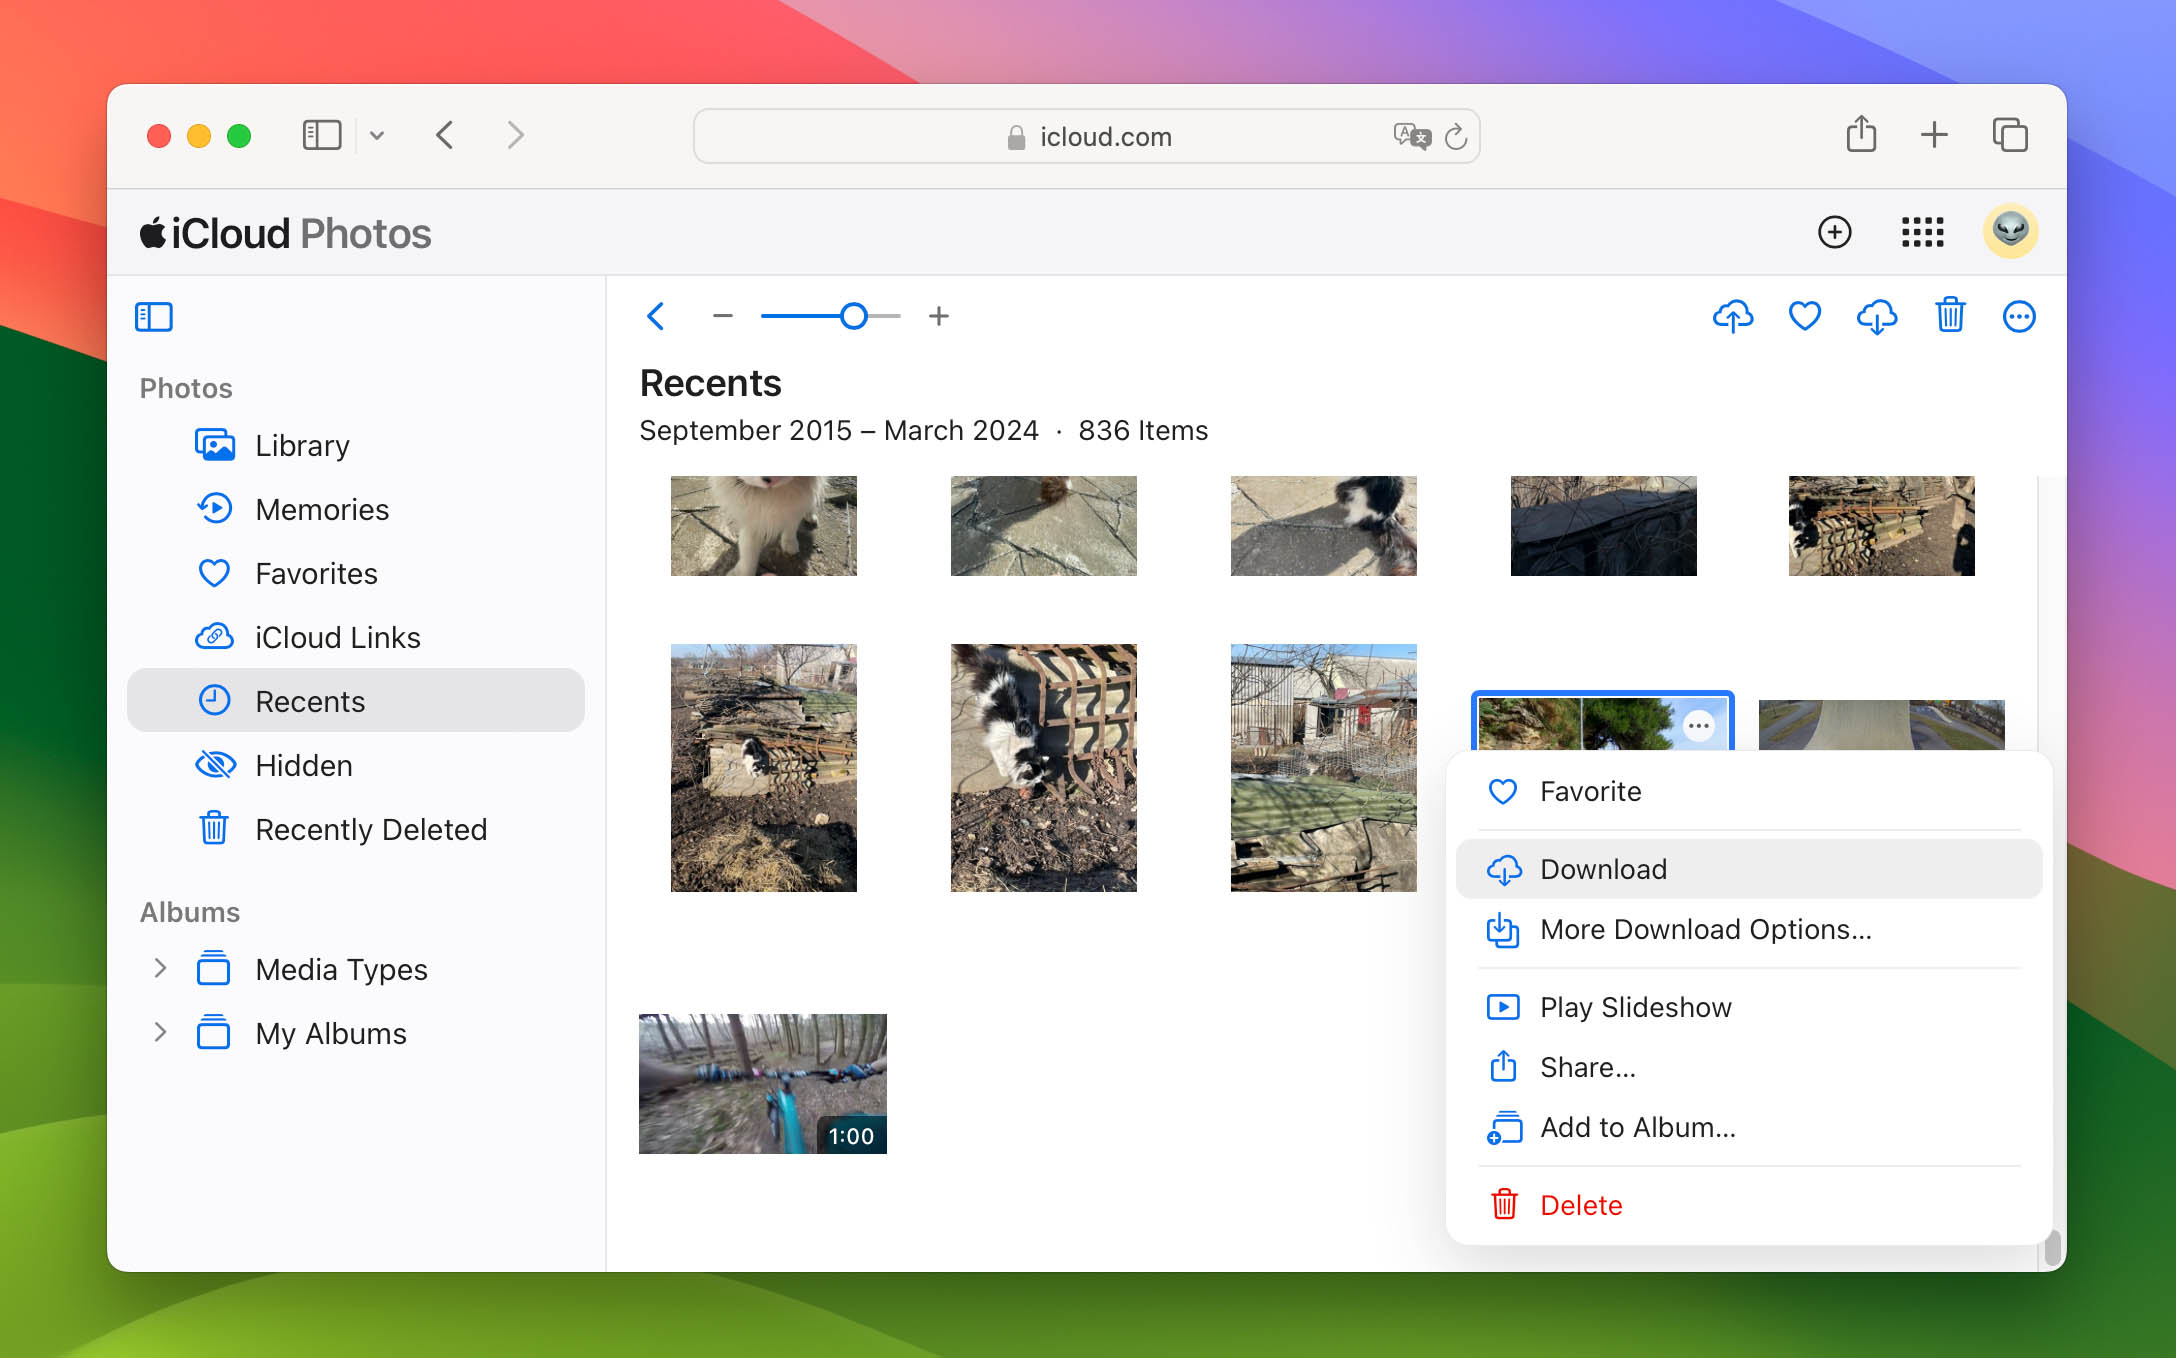
- ☁️ Take advantage of cloud backups: Most smartphones can automatically sync videos to services like Google Photos or iCloud, while many security cameras include cloud storage in their service plans. Such automatic backups provide an extra layer of protection against accidental deletion and make it easier to recover videos accidentally deleted from an SD card.


FAQ
To recover deleted videos from an SD card:
- Download and install an SD card recovery application on your computer.
- Connect the SD card to your computer.
- Launch the SD card recovery application and scan your SD card.
- Select your deleted videos.
- Recover the selected videos to a safe location.
When it comes to Android SD card recovery, you have two basic options:
- Native Android recovery apps: Apps like DiskDigger can recover deleted videos right on your Android device, but they rarely deliver the same great results as their desktop counterparts.
- Windows/macOS recovery software: To recover as many lost videos as possible, it’s best to remove the SD card from your Android device and scan it with Windows or macOS recovery software like Disk Drill.
Yes, you can recover deleted videos from an SD card even after reformatting. But keep in mind that the data recovery results depend on whether the deleted videos were already overwritten with new data or not. Therefore, it is essential to stop using the SD card as soon as you realize that you need to restore files from it.
The easiest and quickest way to recover videos from a Sandisk SD card is with the help of data recovery software. This method is suitable for both Mac and Windows-powered computers.
Follow these steps to recover videos from a Sandisk SD card:
- Download and install Disk Drill on your computer.
- Insert the SD card in your computer and launch Disk Drill.
- From the list of devices, click your SD card.
- Click the Search for lost data button.
- Wait for Disk Drill to finish scanning the SD card and then select the missing videos. You can use Disk Drill’s scan results filters, search bar, and preview feature to effortlessly find what you’re looking for.
- To preview the files, click Review found items. Choose the videos that you wish to retrieve and then click Recover.
- Select the location which you want to use for the recovered videos and click OK.
If you’ve noticed videos or other files disappearing from your SD card, it’s possible that the card is corrupted or damaged. In such a case, stop using the SD card immediately and perform data recovery to get back those videos.
If you want to recover permanently deleted videos from your Android without root, you can try using DiskDigger. While this app can scan your phone and SD card, keep in mind that it can only find existing lost videos, not ones that have been deleted. Still, it’s worth trying as a first step:
- Download and install DiskDigger on your Android.
- Tap Allow to grant access to data.
- Choose Search for lost videos.
- Tap the videos that you wish to restore and then tap Recover.
- Choose how you want to save the files.
If DiskDigger doesn’t find your videos and they were stored on your SD card, your best option is to remove the card from your phone and scan it using data recovery software on your computer.
If you’ve deleted the videos from your SD card, then they might still be present in a special hidden folder on the card. To recover them, you need to do the following with the card connected to your Mac or PC:
- Open the Trash or Recycle Bin folder.
- Look through the files to find the ones that you need.
- Drag and drop the deleted video to a different location on your computer.