You may have absent-mindedly chosen the wrong drive, or didn’t realize that formatting it, as suggested by the OS to fix some errors and render it usable again, would also leave it empty. Now, with all your files seemingly gone, and, to make things worse, not having kept any backups, you’re seeking solutions on how to unformat an HDD
Although there’s no way to literally “unformat” a storage device, there are dozens of tools that can help with such situations and basically undo the formatting effect on files stored on the device. Our team of data recovery experts has tried all possible solutions for any formatting scenarios and picked the best tools to get data back.
What Are the Chances of Unformatting a Hard Drive Successfully
As we already said, it’s technically impossible to provide a solution on how to unformat a hard drive on Windows 10 or later operating system(s), because a format process erases everything on a storage device, and irreversibly “resets” and “re-establishes” the necessary data structures for storing files and folders on it.
Thankfully, as long as the data on the disk hasn’t been overwritten, it should still be possible to recover it. This “recoverability” of a formatted drive’s data depends primarily on two factors: the format method and the drive’s type.
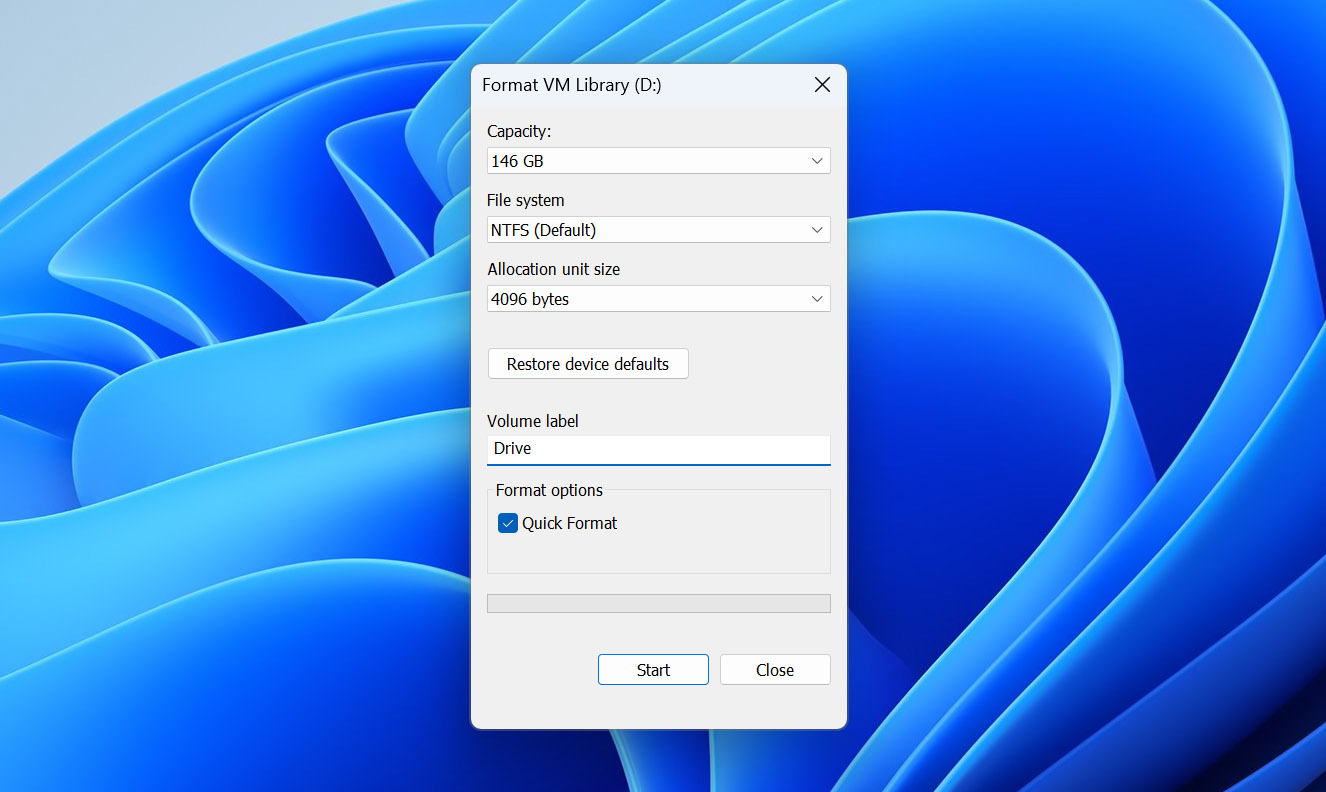
- 🔵 Format method: A drive can be formatted in three ways: a quick format creates a new blank index, making the drive appear empty, but leaves all data untouched and, thus, recoverable.
In contrast, a full format overwrites all data with zeroes, while a secure format goes the extra step by replacing those zeroes with character patterns. Since both a full format and a secure format overwrite all existing data, they render all files unrecoverable. - 🟡 Drive type: Old mechanical HDDs store data by moving multiple “heads” over spinning magnetic platters. As long as the computer can detect them, and all their metallic bits and pieces are in working order, most files on them are recoverable after a quick format. HDDs have been all but replaced by the much faster SSDs or the even newer M.2 drives, which store data on blazing-fast memory chips. As a countermeasure for the finite number of writes those memory chips can take, both SSDs and M.2 drives “spread the wear” equally among all chips using a feature called TRIM. TRIM re-arranges the data on them and “cleans” obsolete files, but it also “garbles” or actually removes all data marked as deleted, complicating or entirely preventing any attempt at recovery.
In this article, we’ll be dealing with a quick-formatted external drive that was used as secondary storage, since that’s the most popular scenario. Still, everything we’ll see also applies to secondary internal drives. Internal and external drives can both be formatted with the same methods, and it’s possible to recover data from either. What complicates things, though, is if the active OS booted from them.
To prevent damaging its files, an active OS prevents formatting the disk from where it booted, and where its files are stored. Still, it allows formatting all other storage devices, internal or external, regardless of whether they’re used for storing files or housing secondary OSes. Additionally, if there’s such a secondary OS installed on another drive, or you boot from OS installation media, it’s also possible to format the disk with the primary OS (and even render the computer unbootable).
How to Unformat a Drive With Recovery Software
While it’s not possible to click a button on a GUI and have any formatted storage device return to its previous state, it is possible to recover most (if not all) of the files and folders from a recently quick-formatted HDD and sometimes an external SSD.
In the following sections, we’ll explore two variations of the core process, which will show you how to unformat an external hard drive on Windows 11 by recovering the files on it to a secondary storage device using Disk Drill and PhotoRec. However, we won’t go over the actions that follow, after recovering files from a formatted hard drive on a Windows PC or a Mac, like copying the files back to their original locations and reorganizing them to match their initial hierarchy.
Method 1: Use Disk Drill
Disk Drill is one of the best data recovery apps you can choose for unformatting an HDD’s contents. The app can work with all types of disks (as long as the computer and OS detect them in Disk Management), supports most popular file systems used by all major OSes, and can even recover data from devices that lack a file system, are corrupted, and appear empty, or RAW. Thus, you don’t have to worry about “the details” and can simply scan your quick-formatted disk through Disk Drill’s streamlined interface to find and recover your files.
To recover files from a formatted HDD using Disk Drill:
- Download the app from Disk Drill’s official site, install it, and run it. While on the Storage Devices page, choose your formatted HDD from the app’s Device/Disk list. Note that if there is more than one formatted partition on the disk, selecting the whole “parent device” instead of a specific partition allows Disk Drill to locate more files. Proceed by clicking Search for lost data.
Disk Drill will ask you if you want to perform a Universal Scan, which finds all kinds of files on any storage media, or an Advanced Camera Recovery, that specializes in locating photos and videos on the types of media used in cameras and drones. Since in this article we’re working with a USB-connected drive used mainly with Windows-based PCs and want to locate all types of files, we went for the first option of the Universal Scan.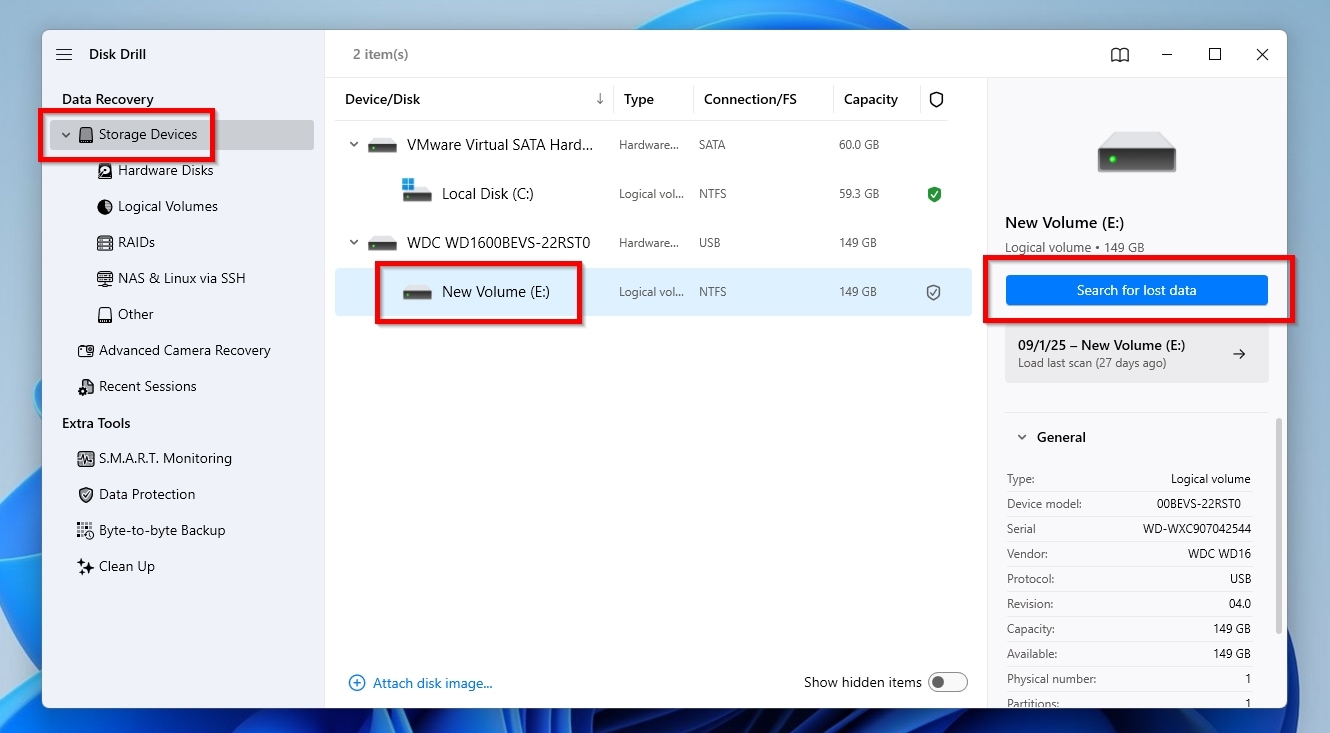
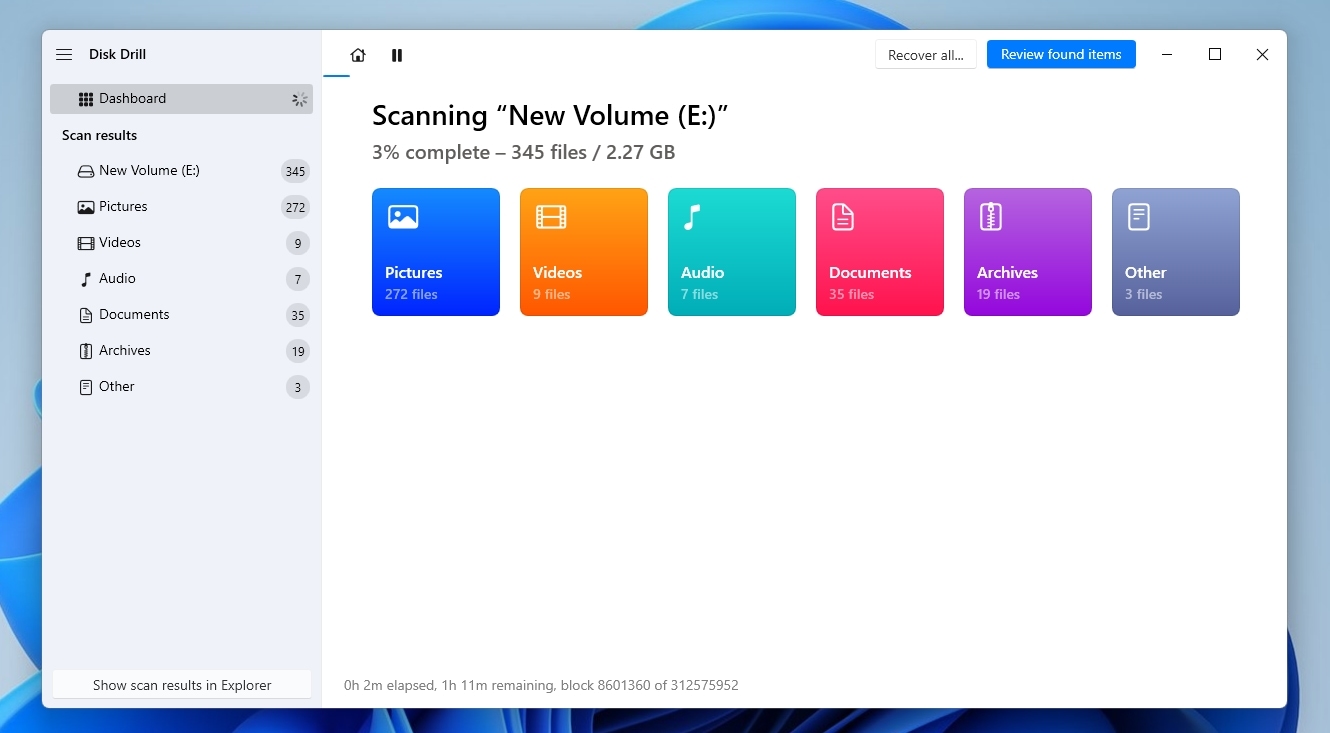
- Disk Drill will start scanning your disk. The process can take some time, depending on the disk’s capacity, condition, and speed, as well as the speed of your computer.
- You’ll see a mini window pop up, stating “All recovery methods complete“, when Disk Drill’s done scanning the formatted HDD, and is ready to present its findings. Click Review found items to view the files it found.
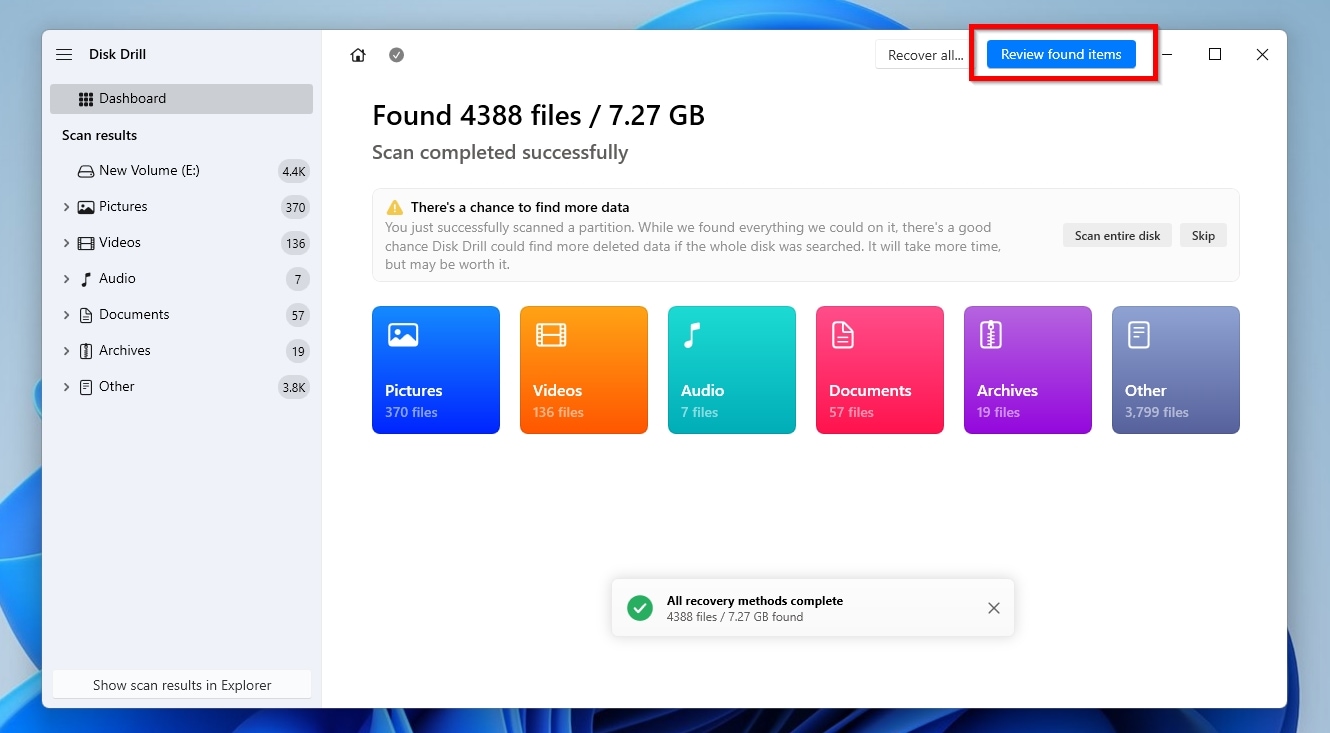
- Despite using a lightly used 150GB HDD during our testing, Disk Drill still managed to locate over 4.400 files on it. If, like us, you don’t want to recover every single file, but only the most important ones, you can use the app’s Categories and Filters to make sense out of the potentially thousands of results easily. Using those, you can effortlessly locate the most critical files, like specific work-related documents based on their type and last modification date, or the non-compressed RAW versions of your photos from a recent trip instead of JPGs, etc.
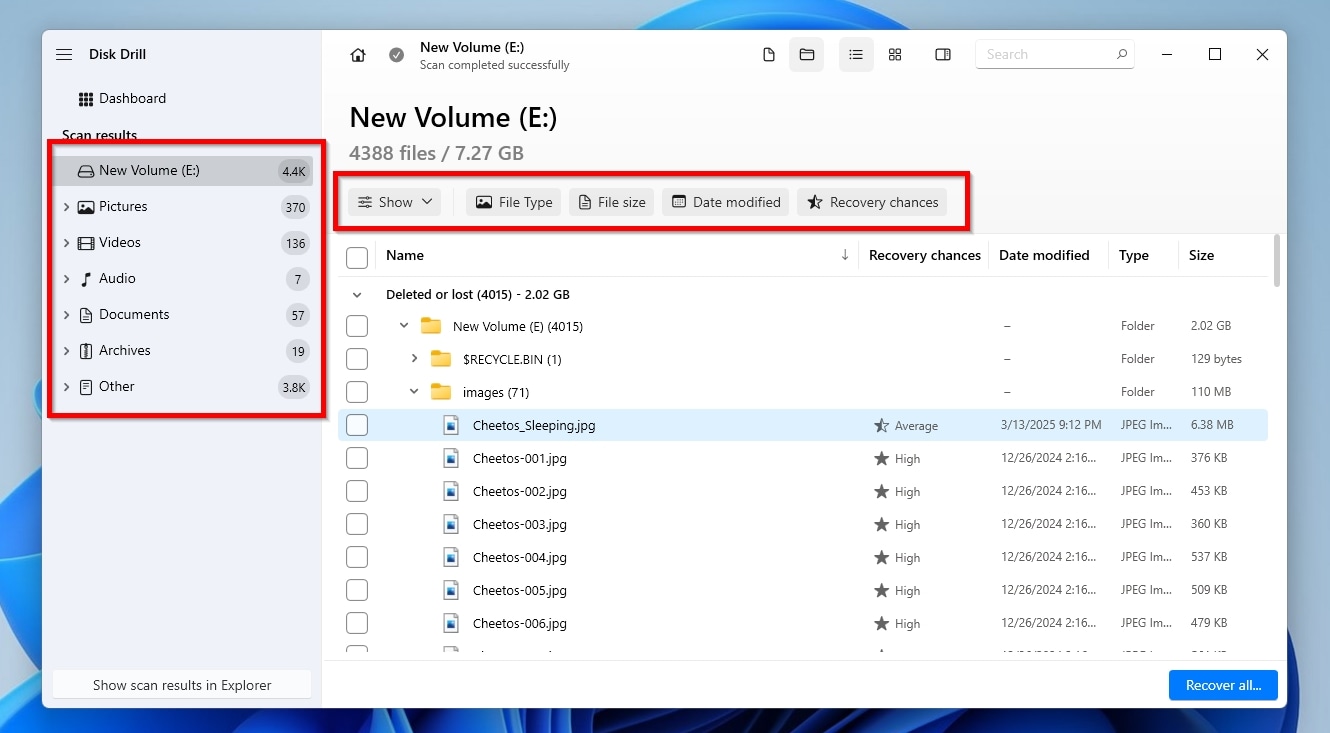
- To actually see if one of the results is among the files you want to recover, instead of guessing by its filename, click on it to see its contents in the app’s Preview pane. If the preview pane isn’t visible, right-click on the result and select Preview.
The feature supports many popular file types, like JPG images, TXT documents, and more, and also works with files that Windows can preview “natively”, or for which a default viewer/reader application is available. Crucially, previewing a file also works as a confirmation that its contents are intact and, thus, it should be recoverable.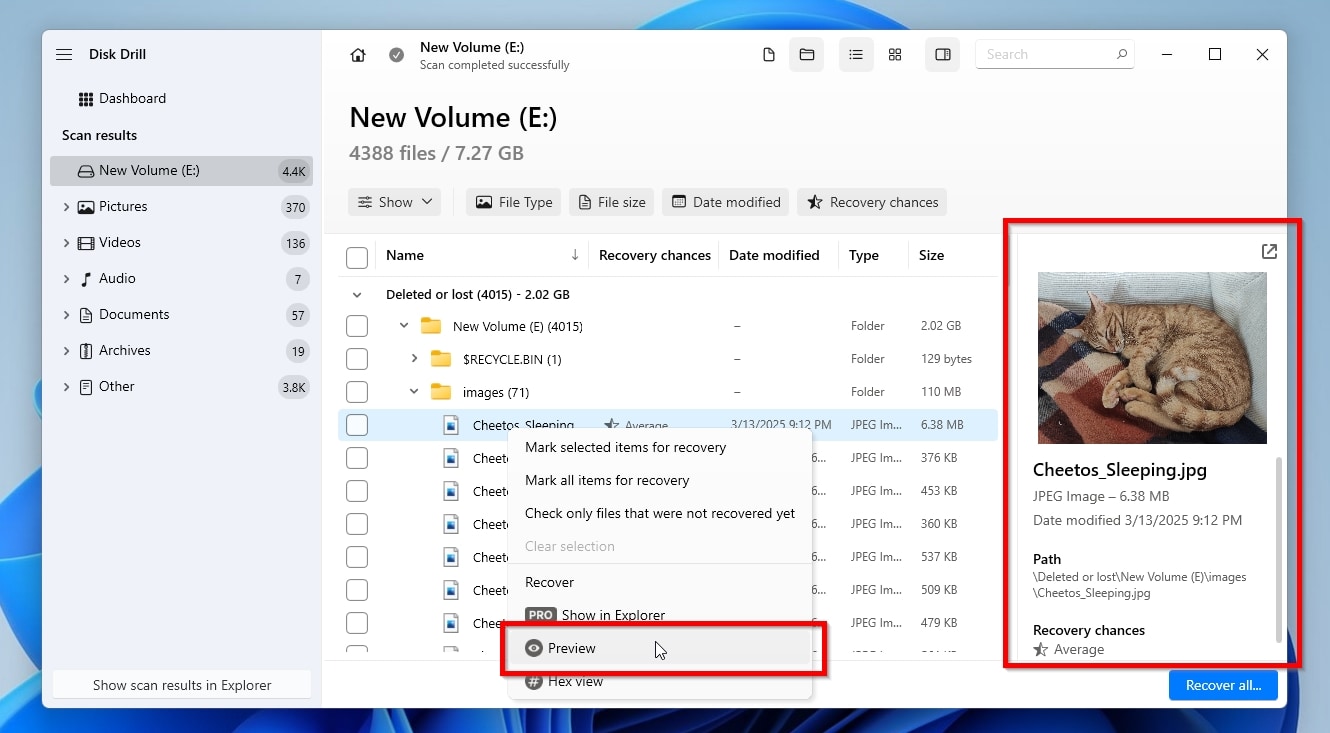
- Mark any of the results you want for recovery by placing a check mark on the left of their entry. When you’ve marked all the files you want to get back, click Recover.

- Disk Drill will show a list of “destinations” where it can store the files it recovers. If you used the app before, you’ll also see the paths you had previously used on this list. If the one you want to use this time isn’t among them, click Choose destination and select another folder.
Remember to double-check that it has sufficient free space to store the recovered files and, ideally, is located on a separate storage device. Click Next to start the recovery process.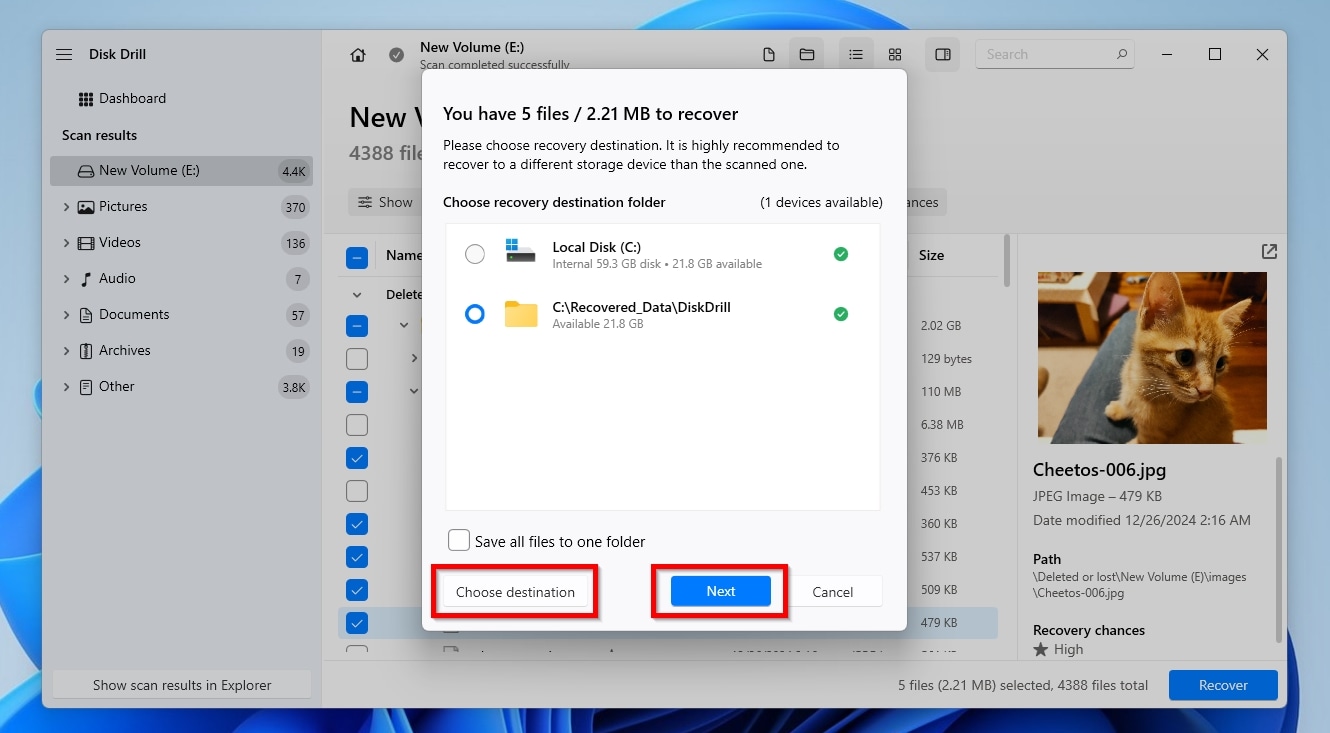
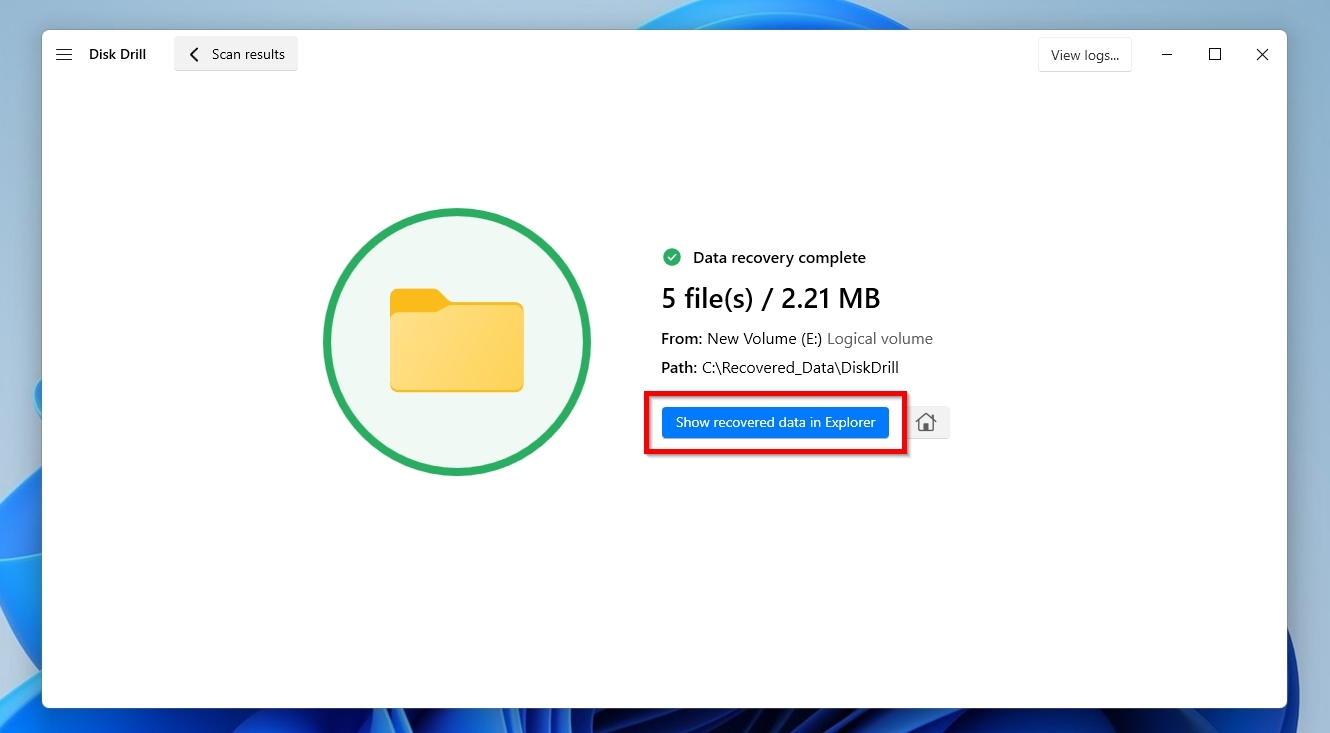
- When Disk Drill completes the recovery process, it will show you a summary of its outcome, and a big, friendly, blue button, stating “Show recovered data in Explorer“. Click it to visit the destination folder you selected using the OS’s default file manager, and check out the recovered files.

As we just saw, Disk Drill makes recovering your files extremely easy. That’s because its stylishly designed interface “hides” an advanced scanning and recovery engine, the product of years of development from specialists with decades of experience in the field of data recovery. Instead of boring you with technical details, here’s why all this matters from a typical user’s perspective:
- It’s almost a given that Disk Drill will scan, analyze, and recover files from virtually any disk you throw at it (hopefully not literally)! The app can work with almost any storage device, internal or external, from any manufacturer, as long as the computer and OS detect it.
- Choosing a recovery app that is intimately familiar with the types of files you want to get back is crucial for their successful recovery. That’s because, after a format, the actual file system that provided the structure for storing and organizing files is gone. Thus, Disk Drill has to seek each file individually in a chaos of data, based on their “fingerprints” that define their type and content. Thankfully, Disk Drill “knows” about close to 400 of the most common, and even some relatively obscure ones, so the ones you want to recover are probably among them.
That’s why we’ve selected it as the primary solution for unformatting an HDD’s contents and rendering them accessible again.
Method 2: Try PhotoRec
If your top priority is cost, and preferably kept close to zero, PhotoRec is one of the top options. It’s safe and secure, as it’s open-source and anyone can review its code. In turn, this also means it’s free to use, without any limits or restrictions.
Still, PhotoRec also has some significant cons: it looks archaic, feels “unfriendly” to use, and offers almost zero customizability. If you don’t mind them, those shortcomings don’t diminish the app’s value and usefulness, since PhotoRec can produce similar results to commercial apps for the enticing price of absolutely free. To learn more about it, make sure to check our review of PhotoRec.
To recover your files from your formatted disk with PhotoRec:
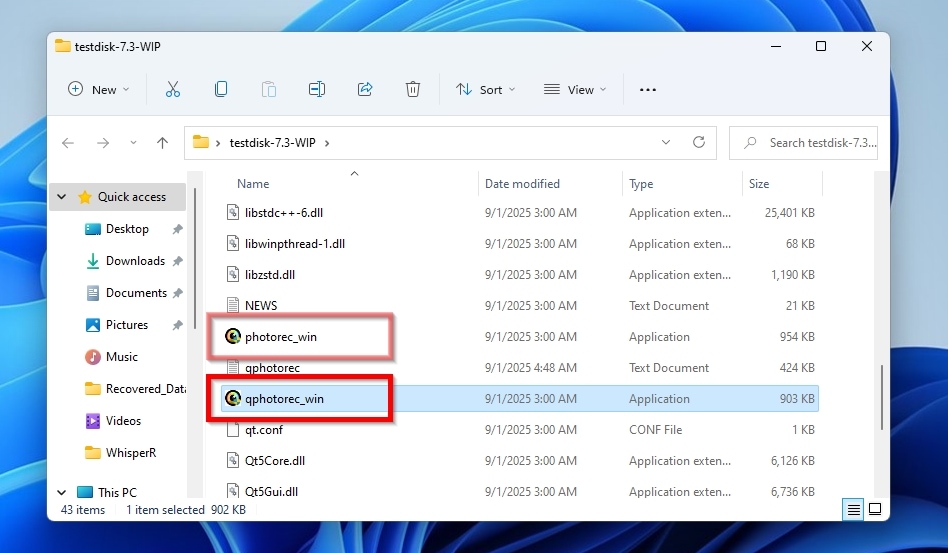
- Download the TestDisk+PhotoRec bundle from its official site. Extract the downloaded archive into a folder, and then visit that folder with your favorite file manager. Inside it, among various files, you’ll find two PhotoRec executables, photorec_win.exe for the variant that works in the terminal, and qphotorec_win.exe for the alternative version with the QT-based GUI. Although you can follow along no matter which one you choose, in this article, we’ll be using the second one.
- Select the formatted storage media from where you want to recover data.
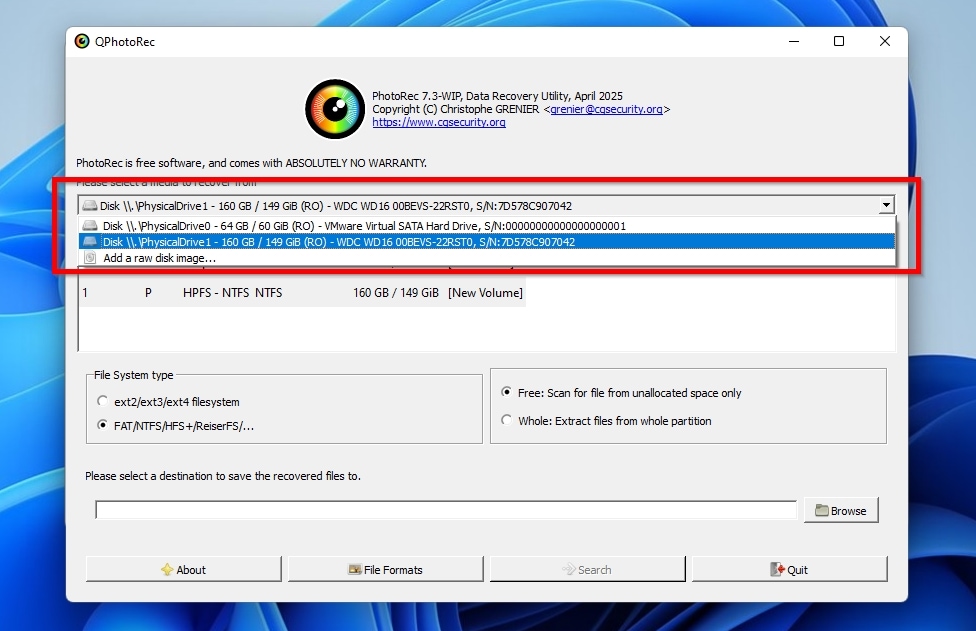
- The list underneath the menu from which you selected the storage media will update, showing you an entry for the whole device, followed by one or more entries for the partitions on it.
If you formatted only one out of multiple partitions, the scanning and recovery processes will be much quicker if you choose it instead of the entire disk.
If there was only a single partition taking up all of the disk’s space, or if you are unsure about what to choose, it’s best to select the “No partition” entry to have the app scan the entire disk.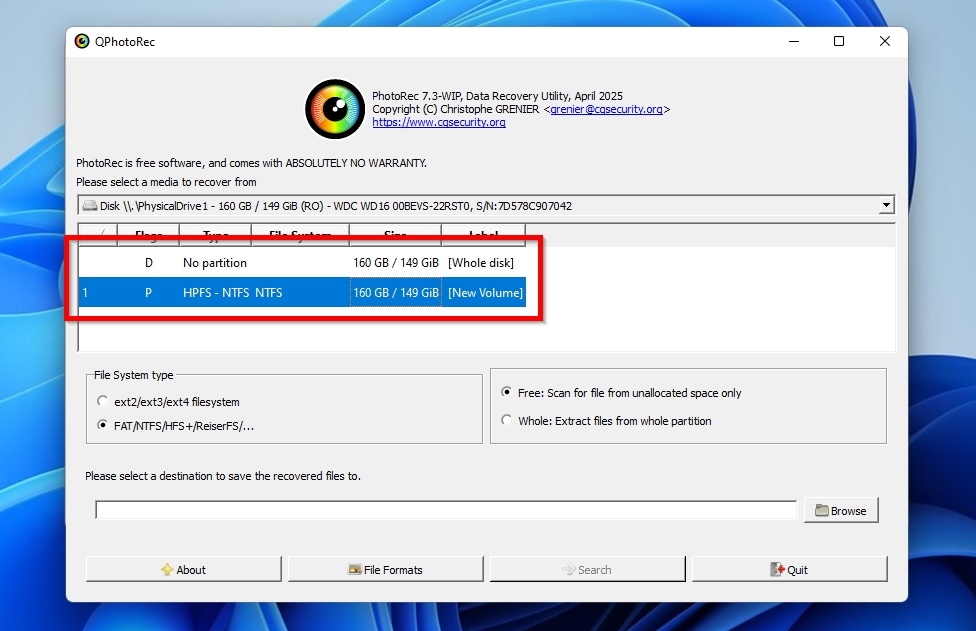
- PhotoRec tries to detect and preselect the correct file system for the selected device, so it’s probably safe to leave that setting as it is.
If you’re unsure about the proper choice and were using the device with Windows, are trying to unformat a mac drive that was formatted directly on macOS, or are certain you were using the ReiserFS file system under Linux, choose the FAT/NTFS/HFS+/ReiserFS/… option.
If you used the disk with a modern Linux distribution, formatted with its default options, and PhotoRec failed to detect and make the correct choice for you, go for the other option: ext2/ext3/ext4 filesystem.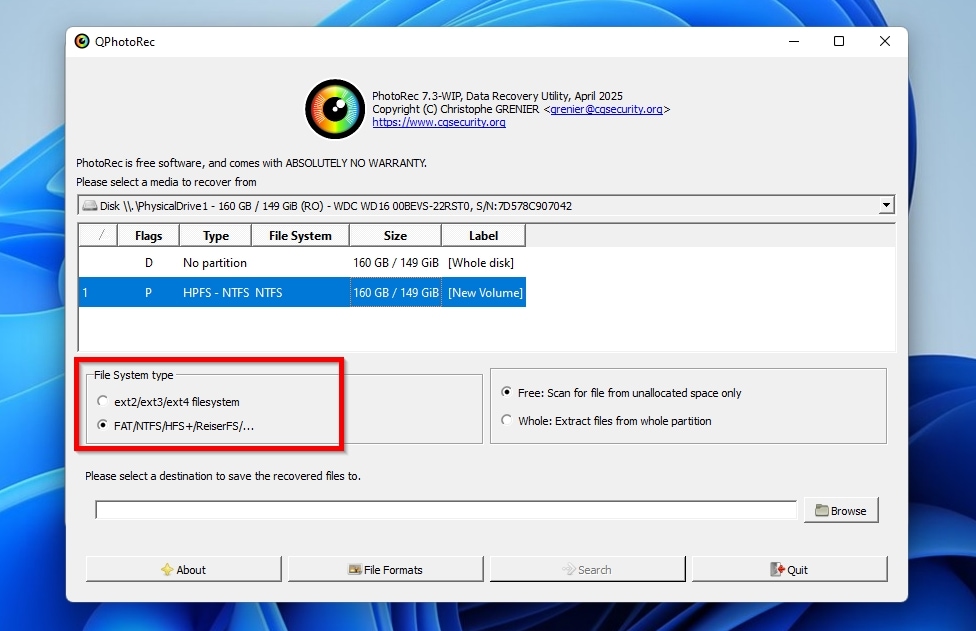
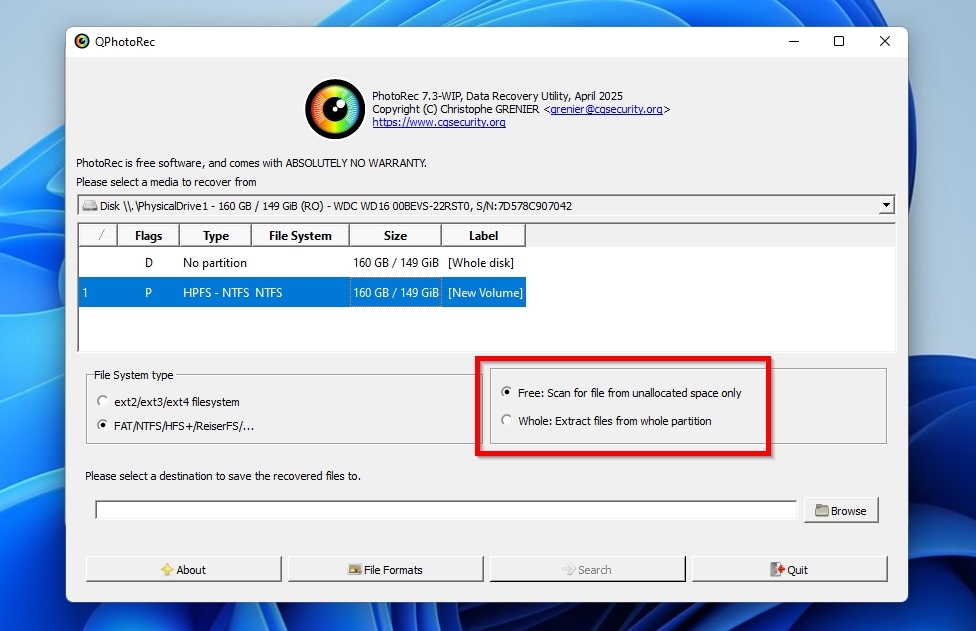
- Choose the Whole option if you’d like PhotoRec to scan the whole space of the selected disk/partition, or Free to check only what appears as unallocated space. The “Free” option is generally best for recovering deleted files from devices with working and accessible file systems, or if, as in the main scenario we’re dealing with in this article, you’re dealing with quick-formatted devices that appear empty and haven’t been used since they were formatted. For all other cases, the “Whole” option will usually reap more results.
- Click Browse and select the destination folder where you want PhotoRec to store all the files it recovers. It’s best if it’s on a different device than the one from which you’re restoring data. Make sure it has enough space to hold all the files PhotoRec will recover (remember, it can be up to as much as the whole space occupied by files on the formatted disk from which you’re recovering).
The full path of the folder you selected will appear in the field to the left of the button. For reasons that will become apparent later, it will be helpful to select and copy the entire path to the clipboard before proceeding to the next step.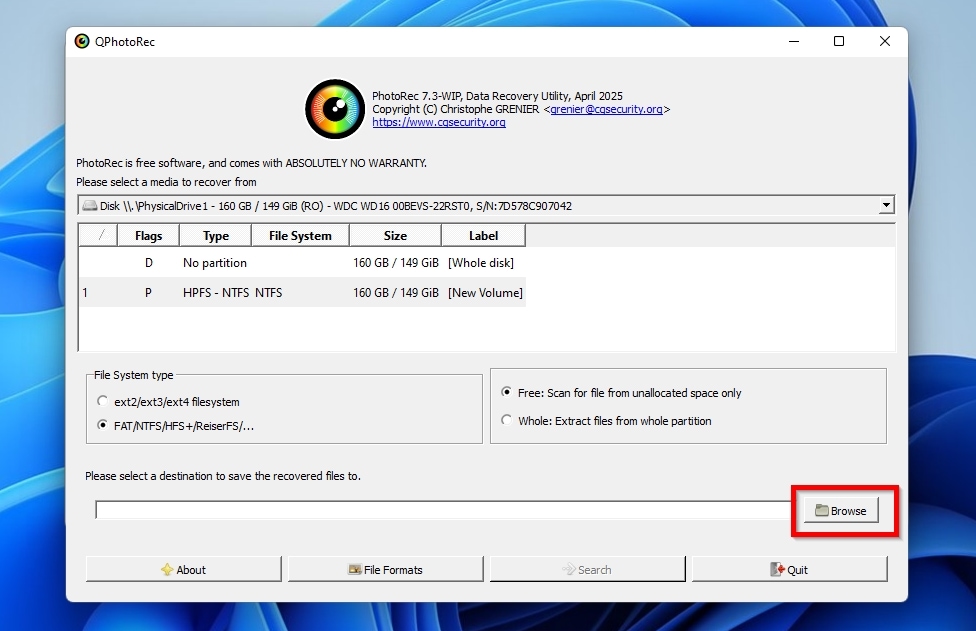
- You don’t need to recover every single file from your formatted drive, and only care about particular file types like work documents, vacation photos, voice recordings, etc.? Then, click File Formats, and enable only the types of files you care about from the list that appears.
PhotoRec’s list is quite extensive, and initially, all file types are enabled. So, if you only want to recover a handful of file types, it’s easier to click Reset to deactivate all of them, and then seek and enable the ones you want. Note that, to avoid seeking them manually, it’s quicker to click on any file type on the list, and then type the shortcode for the extension of the one you want to find (like “jpg” for JPEG images, “doc” for Microsoft Word documents, etc.), to “jump” directly to its entry. Click OK to confirm the changes to the list and exit the File Formats window.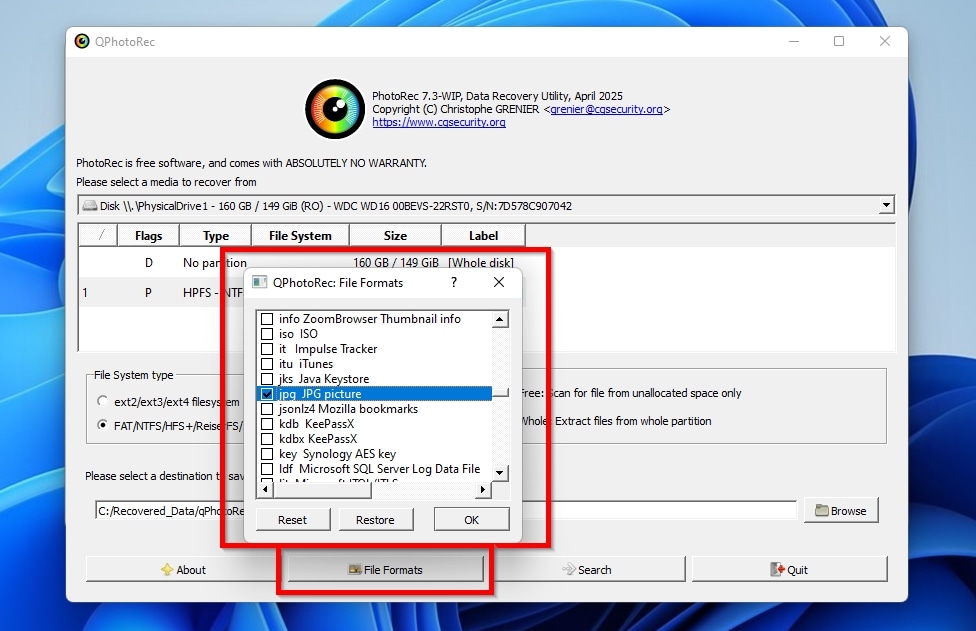
- Click Search to have PhotoRec start searching for and recovering your files from your formatted HDD. As with any recovery app, the process can take a while, with the storage devices’ capacity, state, and speed (for both the source and destination devices) being the most significant factors, followed by the computer’s CPU speed.
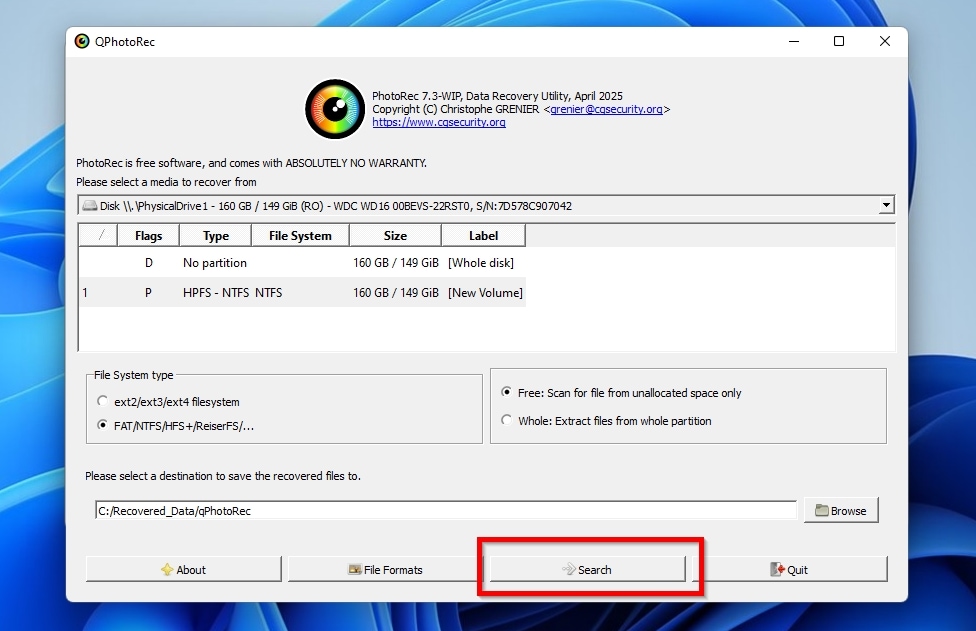
- Keep an eye on PhotoRec’s progress bar and its reported status, for the app won’t notify you in any way when it’s done searching and recovering your files. It will merely change its active status to “Recovery completed“, while the progress bar will stay stuck at 100%. After that, you’ll find your files in the destination folder you had selected.
That’s why we suggested you copy the destination path to the clipboard earlier: PhotoRec doesn’t provide a helpful shortcut for that, but you can run a file browser (like Windows’ default File Explorer), and paste the copied path in the file browser’s address bar, to visit it instantly instead of seeking it within folders and subfolders.
Important Do’s and Don’ts of Unformatting a Hard Drive
Even the best data recovery solution may fail to produce any worthwhile results in particular scenarios. That’s because some actions we take can help, hinder, or render completely futile any attempt at data recovery. Let’s review the key dos and don’ts for successfully unformatting a hard disk.
DO’S
- Make sure that you have a separate storage device that you can use as the data recovery target, where the recovered files will be stored.
- Verify that this secondary storage device has enough space for all the files you want to recover.
- If you decide to go for the second method that we will see, and choose Photorec, keep in mind that the app doesn’t allow you to select which files to recover. Your secondary storage device, which will serve as the data recovery target, should have as much free space as the sum of the files stored on the formatted drive.
- If you had backed up or synchronized the files you want to recover with a cloud service, check if it’s possible to get them back from there. Restoring files from a backup is usually easier and quicker than data recovery.
- Act quickly, and try to get the files you need back from your formatted drive as soon as possible. The longer you wait, the more your installed software and the operating system itself will continue to access the formatted hard disk drive, reducing the chances of a successful recovery.
- Take a complete byte-to-byte backup of your formatted drive, using a specialized app like Clonezilla, or the related tools found in apps like Disk Drill or AOMEI Partition Assistant. This way, even if something goes wrong during the recovery process, your files will still be safe within that backup.
- Skip what we’ll see here if the reason you can’t access the files on your disk isn’t a format, but because it somehow got corrupted or appears as RAW. For such scenarios, check our specialized guides on how to recover a corrupted external hard drive without losing data, and how to recover data from a RAW hard drive.
DON’TS
- Don’t keep using, or even try to use, the newly formatted hard disk drive from which you need to recover files. Any intentional or unintentional write processes will reduce your chances of getting your files back.
- Avoid using random apps to see “if they may find your files”, or questionable data-recovery tools. With your files at stake, choose a trustworthy data recovery solution with a proven track record. Check the fine print, reviews, and other people’s opinions to make sure it won’t attempt to write on the drive from which you are trying to recover files, and that it’s equipped with a speedy and robust scanning and recovery engine.
- Do not allow any non-essential apps to keep loading automatically during the computer’s boot, and don’t use any software you don’t really need. Even if you actively avoid using your formatted disk, an app may still occasionally access it for its own purposes, such as storing temporary files or checking if the contents of a folder have changed.
- Take any information you meet online with a massive grain of salt and don’t believe it until you cross-check it with trustworthy sources.
- Don’t trust any advice and suggestions a stranger might “kindly” offer on a site like Reddit, since you can’t know beforehand if they are really trying to help, or convince you to install a piece of malware on your computer. Avoid acting immediately based on their instructions, especially if they involve terminal commands or scripts, until you research what they’re about and if they’re safe to try out.
- Do not mistake the formatted drive’s available storage as actual empty space. Consider it a Harry-Potter-esque “invisibility veil” placed over your files, that still exist underneath, waiting for you to find them.
- Don’t try to unformat your HDD following the steps we’ll see, which refer to quick-formatted disks, if you’re dealing with a deleted or corrupted partition. Those won’t help you solve the issues you’re facing, unlike our guides on how to recover NTFS partitions or how to recover unallocated partitions.
- Do not downplay the issue and postpone recovery for when you really need some files. By then, they may be gone forever.
- Don’t interrupt the scanning or recovery process “because it takes too long” or “to check the files that have been found up to now” unless you’re sure the data recovery app you’re using supports resume. Otherwise, it might have to restart from scratch and, counter-intuitively, end up requiring more of your time to find and recover your files.
Can Data Recovery Services Help to Unformat a Hard Drive?

When dealing with typical data loss cases, data recovery specialists often use the same tools, and techniques you can use at home. However, they can also deal with more difficult scenarios, and can the maximize the chances of a successful recovery, since they have more experience in their field than the average user, as well as access to professional software, hardware, and the expertise to utilize it optimally. That, though, still doesn’t guarantee they’ll be able to salvage files from any data loss scenario.
One should also consider the other minor cons that come with professional recovery services: you must send the “problematic” storage device to them, wait for it to arrive, and then wait some more until they analyze it, without guaranteed results, or even mentioning the (justifiably) high costs of their services.
And yet, depending on the data loss scenario, they might be the best choice. Casual users don’t have access to the necessary professional gear and years of experience required to handle physically damaged drives, hard disks that produce clicking sounds when powered on, or external drives that are undetected by typical computers. They’re unfamiliar with the required processes for recovering business documents protected by NDAs and sensitive personal data. Plus, if cost and waiting are no issues, why “waste” your time and energy when there’s the effortless solution of delegating the task to the experts, like CleverFiles Data Recovery Center?
Because of all of the above, there’s a better but slightly more complicated question to ask:
Which approach, DIY recovery or sending the HDD to data recovery specialists, will be the best for a particular case of data loss after a quick format, offering the highest chances of successfully recovering, if not all, at least the most critical files, at the lowest possible cost?
When You Should Prefer DIY Recovery
It’s (usually) best to try to recover your files by yourself:
- From a perfectly-working HDD, SSD, or other storage device that was quick-formatted mere hours ago, and you haven’t actively used in the meantime.
- If dealing with a storage device that the computer can detect, but which now appears empty.
- When faced with file system corruption, or some files are inaccessible/produce “garbled” results when opened.
When To Go For Data Recovery Services
You should skip the DIY approach and go for a professional data recovery service when:
- There’s visible physical damage on the device (“bent” casing on HDDs, broken connectors on SSDs, chipped SD cards, etc.).
- The drive cannot be detected, and there are easily perceptible signs of significant problems (clicking, ticking, or whirring/spinning sounds signifying mechanical damage in HDDs, blue screens and abrupt shutdowns when using SSDs, etc.).
- The disk is detected and accessible as a device, but its former contents remain inaccessible, no matter what you’ve tried.
- The OS keeps asking to format the drive, or it keeps being randomly connected, detected, and then disconnected.
- You don’t want to invest the time or energy to try to perform recovery on your own, or prefer to maximize your chances of recovery and are afraid your actions may worsen the situation.
Conclusion
Formatting doesn’t always mean that all your files are erased. The solutions we covered will usually allow you to recover most of them, and our extensive list of Do’s and Don’ts can help you maximize the chances of a successful recovery.
Still, data recovery isn’t a true unformat equivalent, and the results aren’t guaranteed. Even the most advanced data recovery solutions may fail to restore your files to their original pristine condition from a formatted drive, especially if you continued using it after formatting. That’s why it’s best to take some actions beforehand to be prepared for such adventures.
- Set up automatic backups using a third-party solution or one of the tools that accompany Windows, like File History (as we saw in our article on how to recover shift-deleted files in Windows). Ideally, back up everything from every drive you use to secondary devices. If you can’t afford the time and space for full backups, at the very least, make sure you back up your most important files.
- Synchronize your local data with a cloud service provider to secure your most essential files and keep them readily available.
- Even if not using automatic backups, and have never done so before, invest the time to take a manual backup of your crucial files or copy them to a secondary storage device before formatting a hard disk drive.
It’s worth noting that only methods like those described in this article will enable you to recover your files from a formatted hard disk drive. Common myths about how you can type some commands in the Windows terminal or use System Restore to bring your files back from oblivion are just that: myths, urban legends born from misconceptions about what those solutions can do and how storage devices work.
The key point to remember is that, unless you performed a complete or secure format and acknowledged that all files on the affected hard disk drive would be permanently deleted, it’s highly probable that you’ll recover most of them with one of the solutions we saw.
FAQ
There is no solution for literally unformatting a storage device, either built into any modern OS or available as a third-party app, period. The only realistic options are:
- Getting the files out of a backup.
- Copying them back to local storage from a cloud service provider.
- Fishing them out of the formatted hard disk drive using data recovery software.
We should clarify that you could, indeed, find an “unformat” command accompanying ancient versions of Microsoft’s DOS. However, despite its name, it was actually closer to backup software than a magic method for making files reappear out of thin air.
There is no need to seek alternative information on how to unformat a hard drive on Macs: both Disk Drill and PhotoRec are also available on Apple’s computers and work similarly, despite the OSes’ radical differences. So, you can use them as we saw here to recover your files from a formatted hard drive on an Apple computer.
First, we should clarify that the drives within the latest generation of gaming consoles are actually M.2 drives, and not classic mechanical hard disk drives as those used in older consoles like the Xbox One and PS4. Apart from that technicality, the bad news is that, unless there’s a secret option in some hidden menu for developers that we haven’t seen, it’s impossible to unformat a hard drive directly on a gaming console. The even worse news is that gaming consoles encrypt their drives to prevent direct access to their content, as a security and anti-piracy measure. Thus, a casual user can’t recover files from them even when using a computer.
There are ways to recover files, even in such scenarios. Unfortunately, they’re in a grey legal zone, as they require soldering skills, and fooling around with custom, unofficial hardware and software, to “rip” the encryption keys from the console’s chips and then use them to decrypt and access the drives. Since circumventing such protective measures and bypassing any security is generally deemed illegal in most countries, even when the goal is to access personal data you own, we’ll skip the details.