Every Live Photo on your iPhone stores a 3-second video clip alongside the image. The extra motion can make precious moments even more fun to relive, but it also consumes a significant amount of storage space. While Apple makes it easy to take Live Photos, they haven’t made it nearly as simple to convert Live Photos to still images when you want your space back.
If your iPhone keeps warning you about low storage, or you’re just tired of Live Photos because you never actually watch them (honestly, how often do you long-press on a photo just to see 1.5 seconds of camera shake?), this guide will show you how to strip the motion from them. We’ve tested every method ourselves to give you up-to-date instructions that lead to the result you expect. Spoiler: the fastest method isn’t the one Apple provides.
3 Easy Methods to Convert Live Photos to Still on iPhone
After testing every way to convert a live photo to a still on iPhone, we found that most methods fall into two camps. The first three options below are the ones you’ll probably use most often because they’re quick, straightforward, and cover the majority of situations, including bulk conversion. We’ve also included some alternative approaches in a separate section for edge cases, like when you want to preserve Live Photos in their original form while also creating still copies.
Quick overview of the recommended methods:
| Situation | Recommended Method | Why Use It |
| Bulk conversion and storage cleanup | Method 1: Convert Live Photo to Still Using Third-Party Apps | Fastest option for converting many Live Photos and deciding whether to keep or delete the originals. |
| Built-in conversion without installing an app | Method 2: Duplicate the Photo Without the Live Effect | Creates still copies directly in the Photos app, but leaves the originals behind. |
| Reusable automation for batch conversion | Method 3: Create a Shortcut to Convert Live Photos to Still | Good if you want a built-in batch workflow and don’t mind setting it up once. |
Method 1: Convert Live Photo to Still Using Third-Party Apps
As we hinted earlier, unfortunately, Apple doesn’t offer a direct way to convert all live photos to still on iPhone. The built-in Photos app lets you disable the Live effect on individual photos (we’ll cover that in the Turn Off the Live Effect on a Photo workaround), but that process is tedious if you have dozens or hundreds of Live Photos to deal with.
That’s exactly why so many third-party apps exist to fill the gap. Among the apps we tested, Clever Cleaner stood out because it handles conversion quickly and gives you instant control over what happens to the originals (keep them or delete them on the spot). The app is a completely free cleaner with no ads (at least for now), and according to the developers, early users who download it now will keep all features free even after future updates.
Here’s how to convert Live Photos to still images using Clever Cleaner:
- Download and open Clever Cleaner on your iPhone.
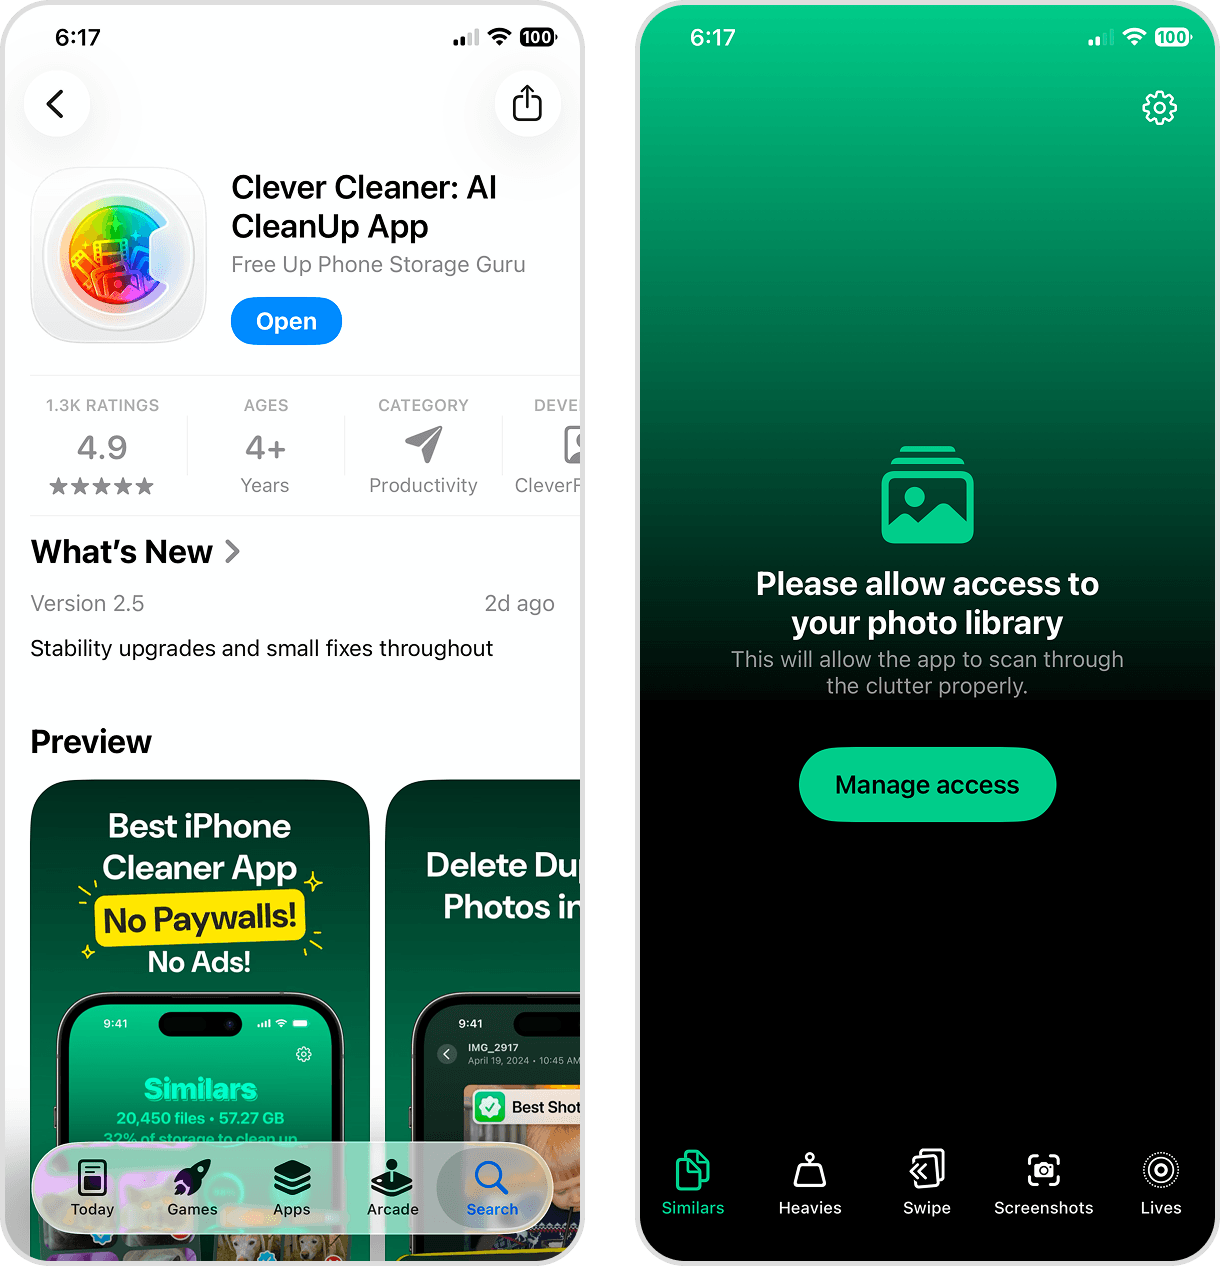
- Grant the app access to your photo library when prompted.
- Wait for the initial scan to complete (this usually takes under a minute).
- Tap Lives at the bottom of the screen.
- You’ll see all your Live Photos listed with their file sizes. Tap any of them and select the ones you want to convert, or tap Select All to grab everything. The app shows you exactly how much storage you’re reclaiming as you make selections, which is helpful if freeing up space is your main goal.
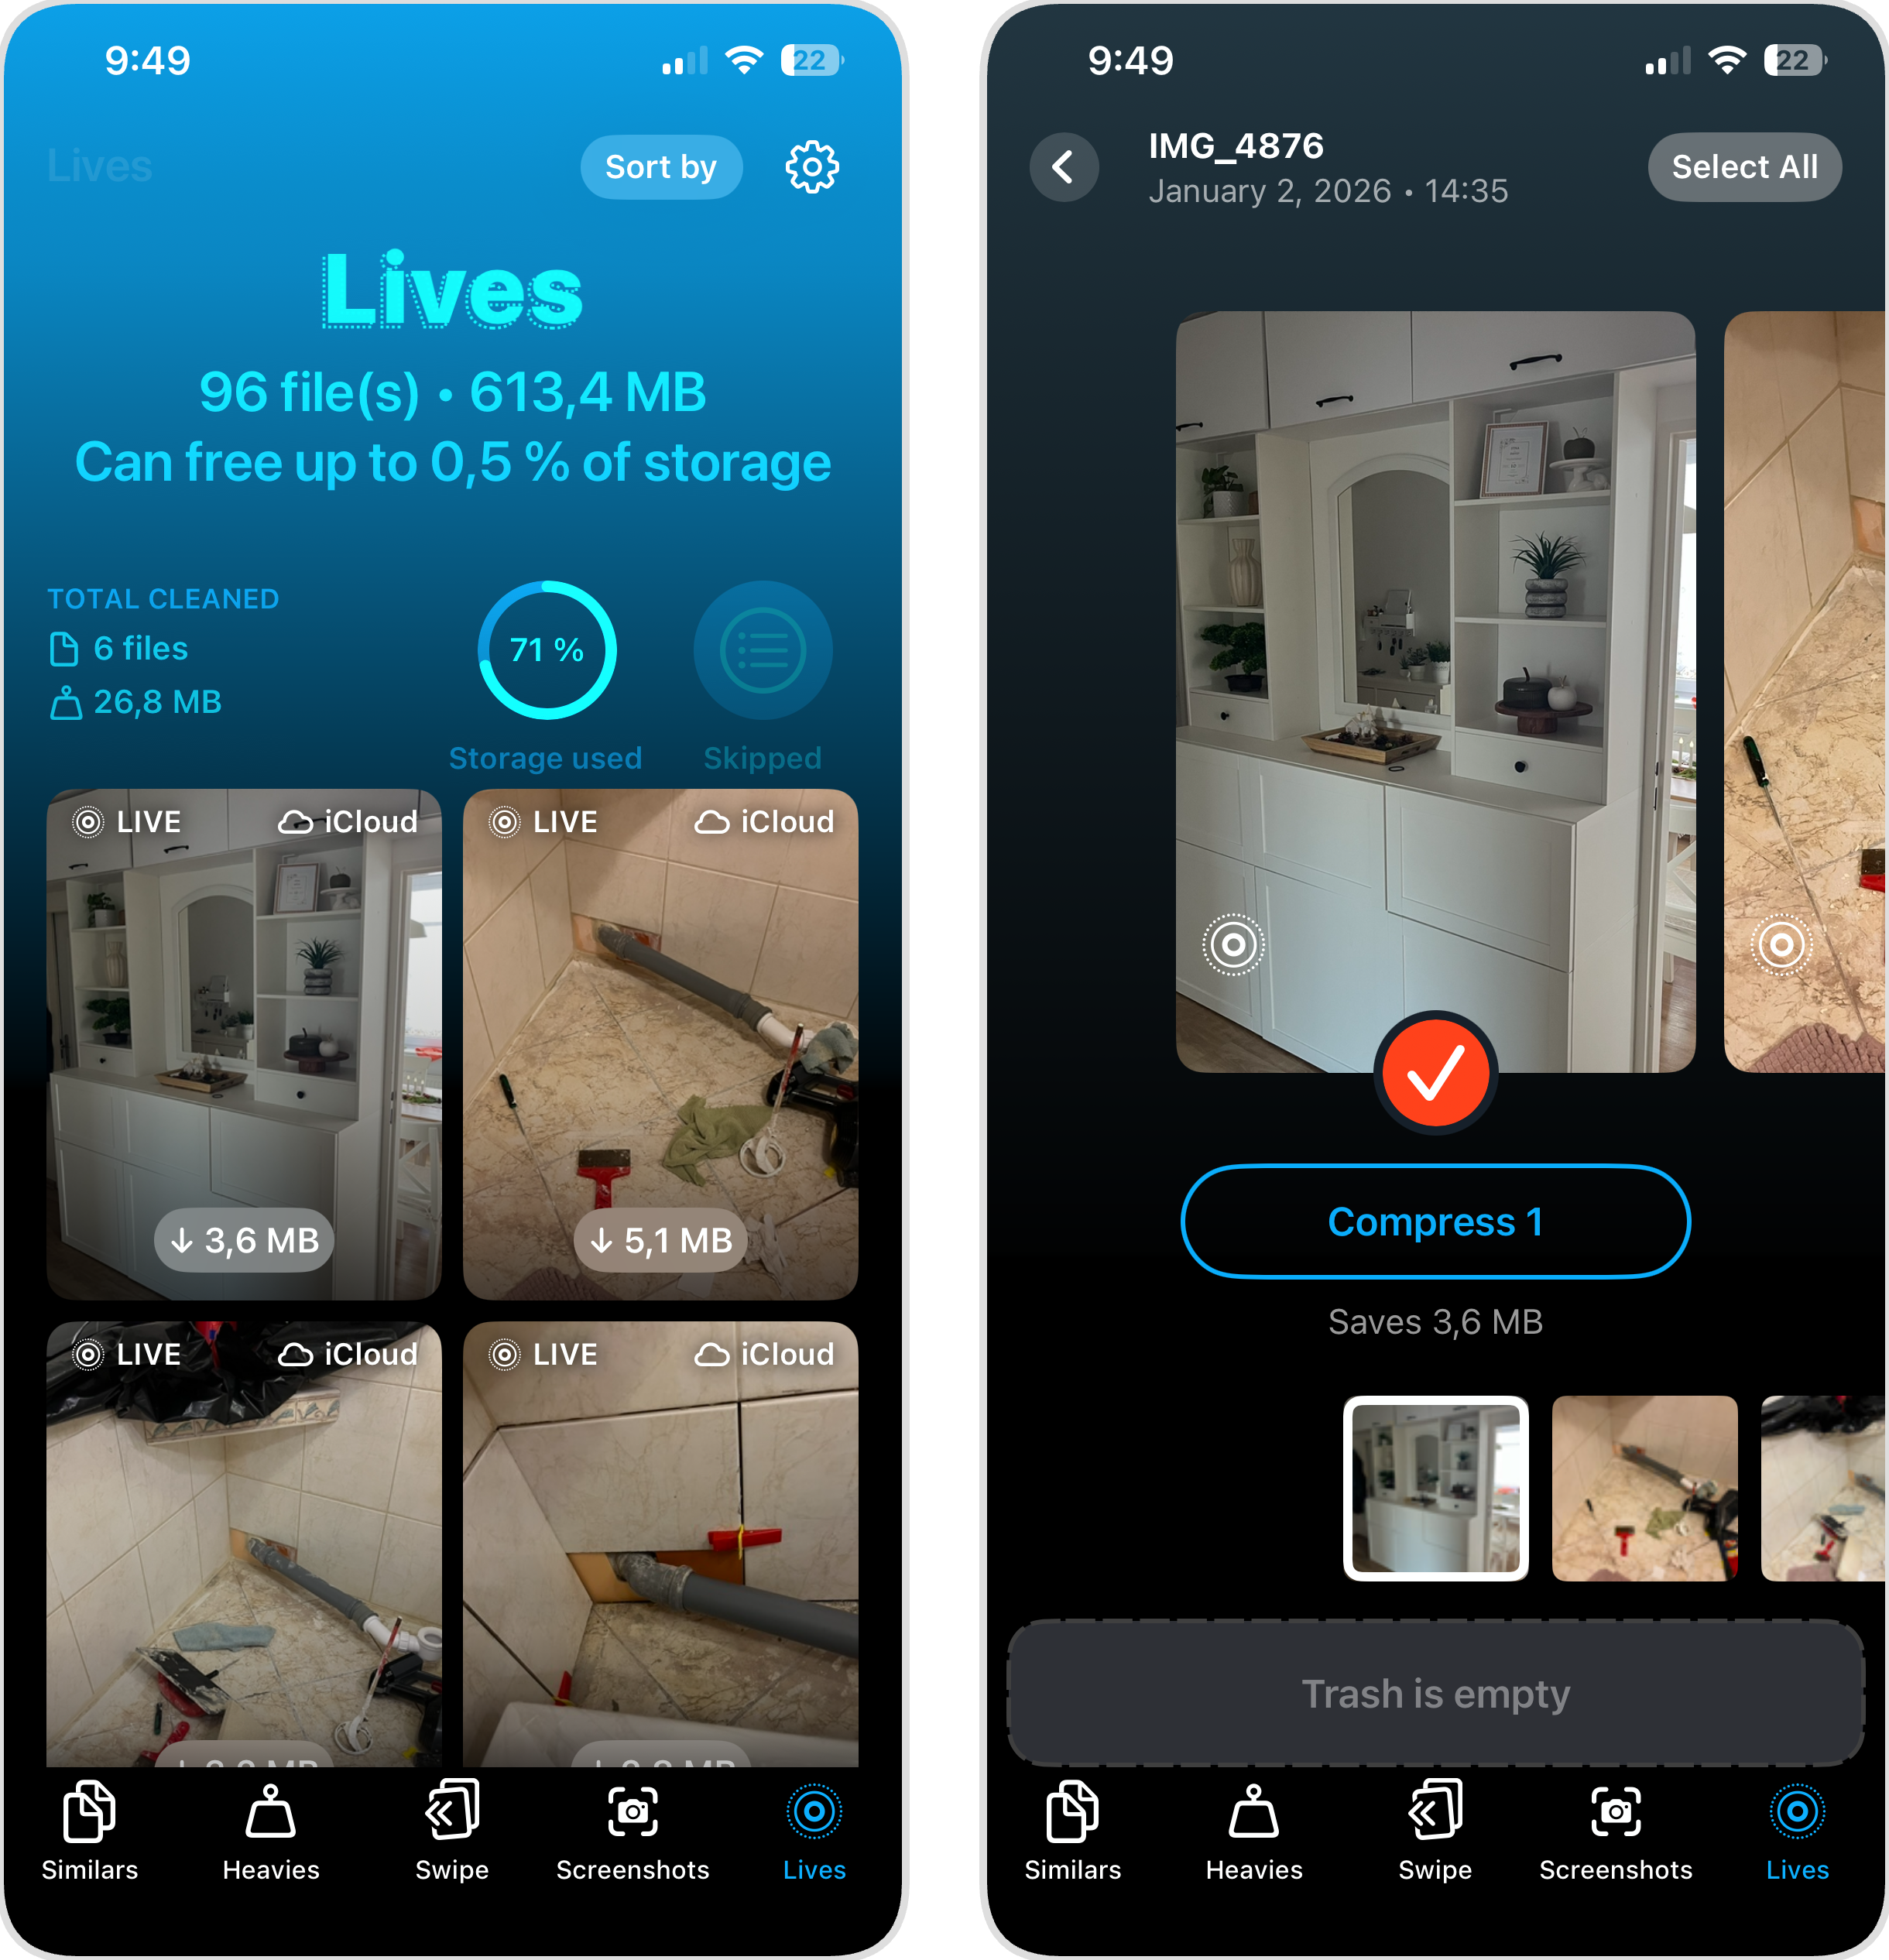
- Tap Compress to strip the video portion and keep only the still image.
- Choose whether to delete the original Live Photos or keep them alongside the new stills.
If you’re converting Live Photos primarily to save storage, you’ll probably find these other Clever Cleaner tools useful as well:
- Similars: Finds duplicate and near-duplicate photos that the iPhone’s built-in duplicate detector misses. This includes burst shots, slightly different angles, and images that are almost identical. You can let the AI pick the best shot automatically or review each group yourself.
- Swipe: Shows your entire photo library organized by month. Swipe right to keep a photo, swipe left to delete. It’s a fast way to clean up without sorting by category.
- Screenshots: Screenshots add up quickly and rarely serve a long-term purpose. This feature calculates how much space they’re using and lets you delete them all at once or review them first.
- Heavies: Identifies the largest files in your library (usually videos) and sorts them by size so you can quickly spot what’s eating up the most storage. Alternatively, you can compress large videos to save space without deleting them.
Clever Cleaner is designed as an all-in-one cleanup tool, which is great if you want to tackle storage from multiple angles. That said, there are other apps in the App Store that specialize purely in Live Photo conversion and offer more flexible output settings, such as converting to video or GIF formats. If you need those extra features, they’re worth exploring, though most of them require a paid upgrade or display ads in their free versions. There are also more general-purpose iPhone storage cleaners similar to Clever Cleaner. We rounded up the best iPhone storage cleaners in a separate guide, and Clever Cleaner still came out on top.
Method 2: Duplicate the Photo Without the Live Effect
If you’d rather not install an app, your iPhone has a few built-in ways to convert multiple live photos to normal images. One such option is duplicating.
You can create a still copy of any Live Photo directly in the Photos app. The catch is that this method doesn’t delete the original Live Photo automatically. You’ll end up with two versions (the Live original and the still duplicate), and you’ll need to remove the original manually if you want to free up storage.
Here’s how to duplicate multiple Live Photos as stills:
- Open the Photos app and navigate to your Live Photos.

- Tap Select in the upper-right corner.
- Tap each Live Photo you want to convert (a checkmark will appear on selected images).
- Tap the three dots in the upper-right corner.
- Tap Duplicate.
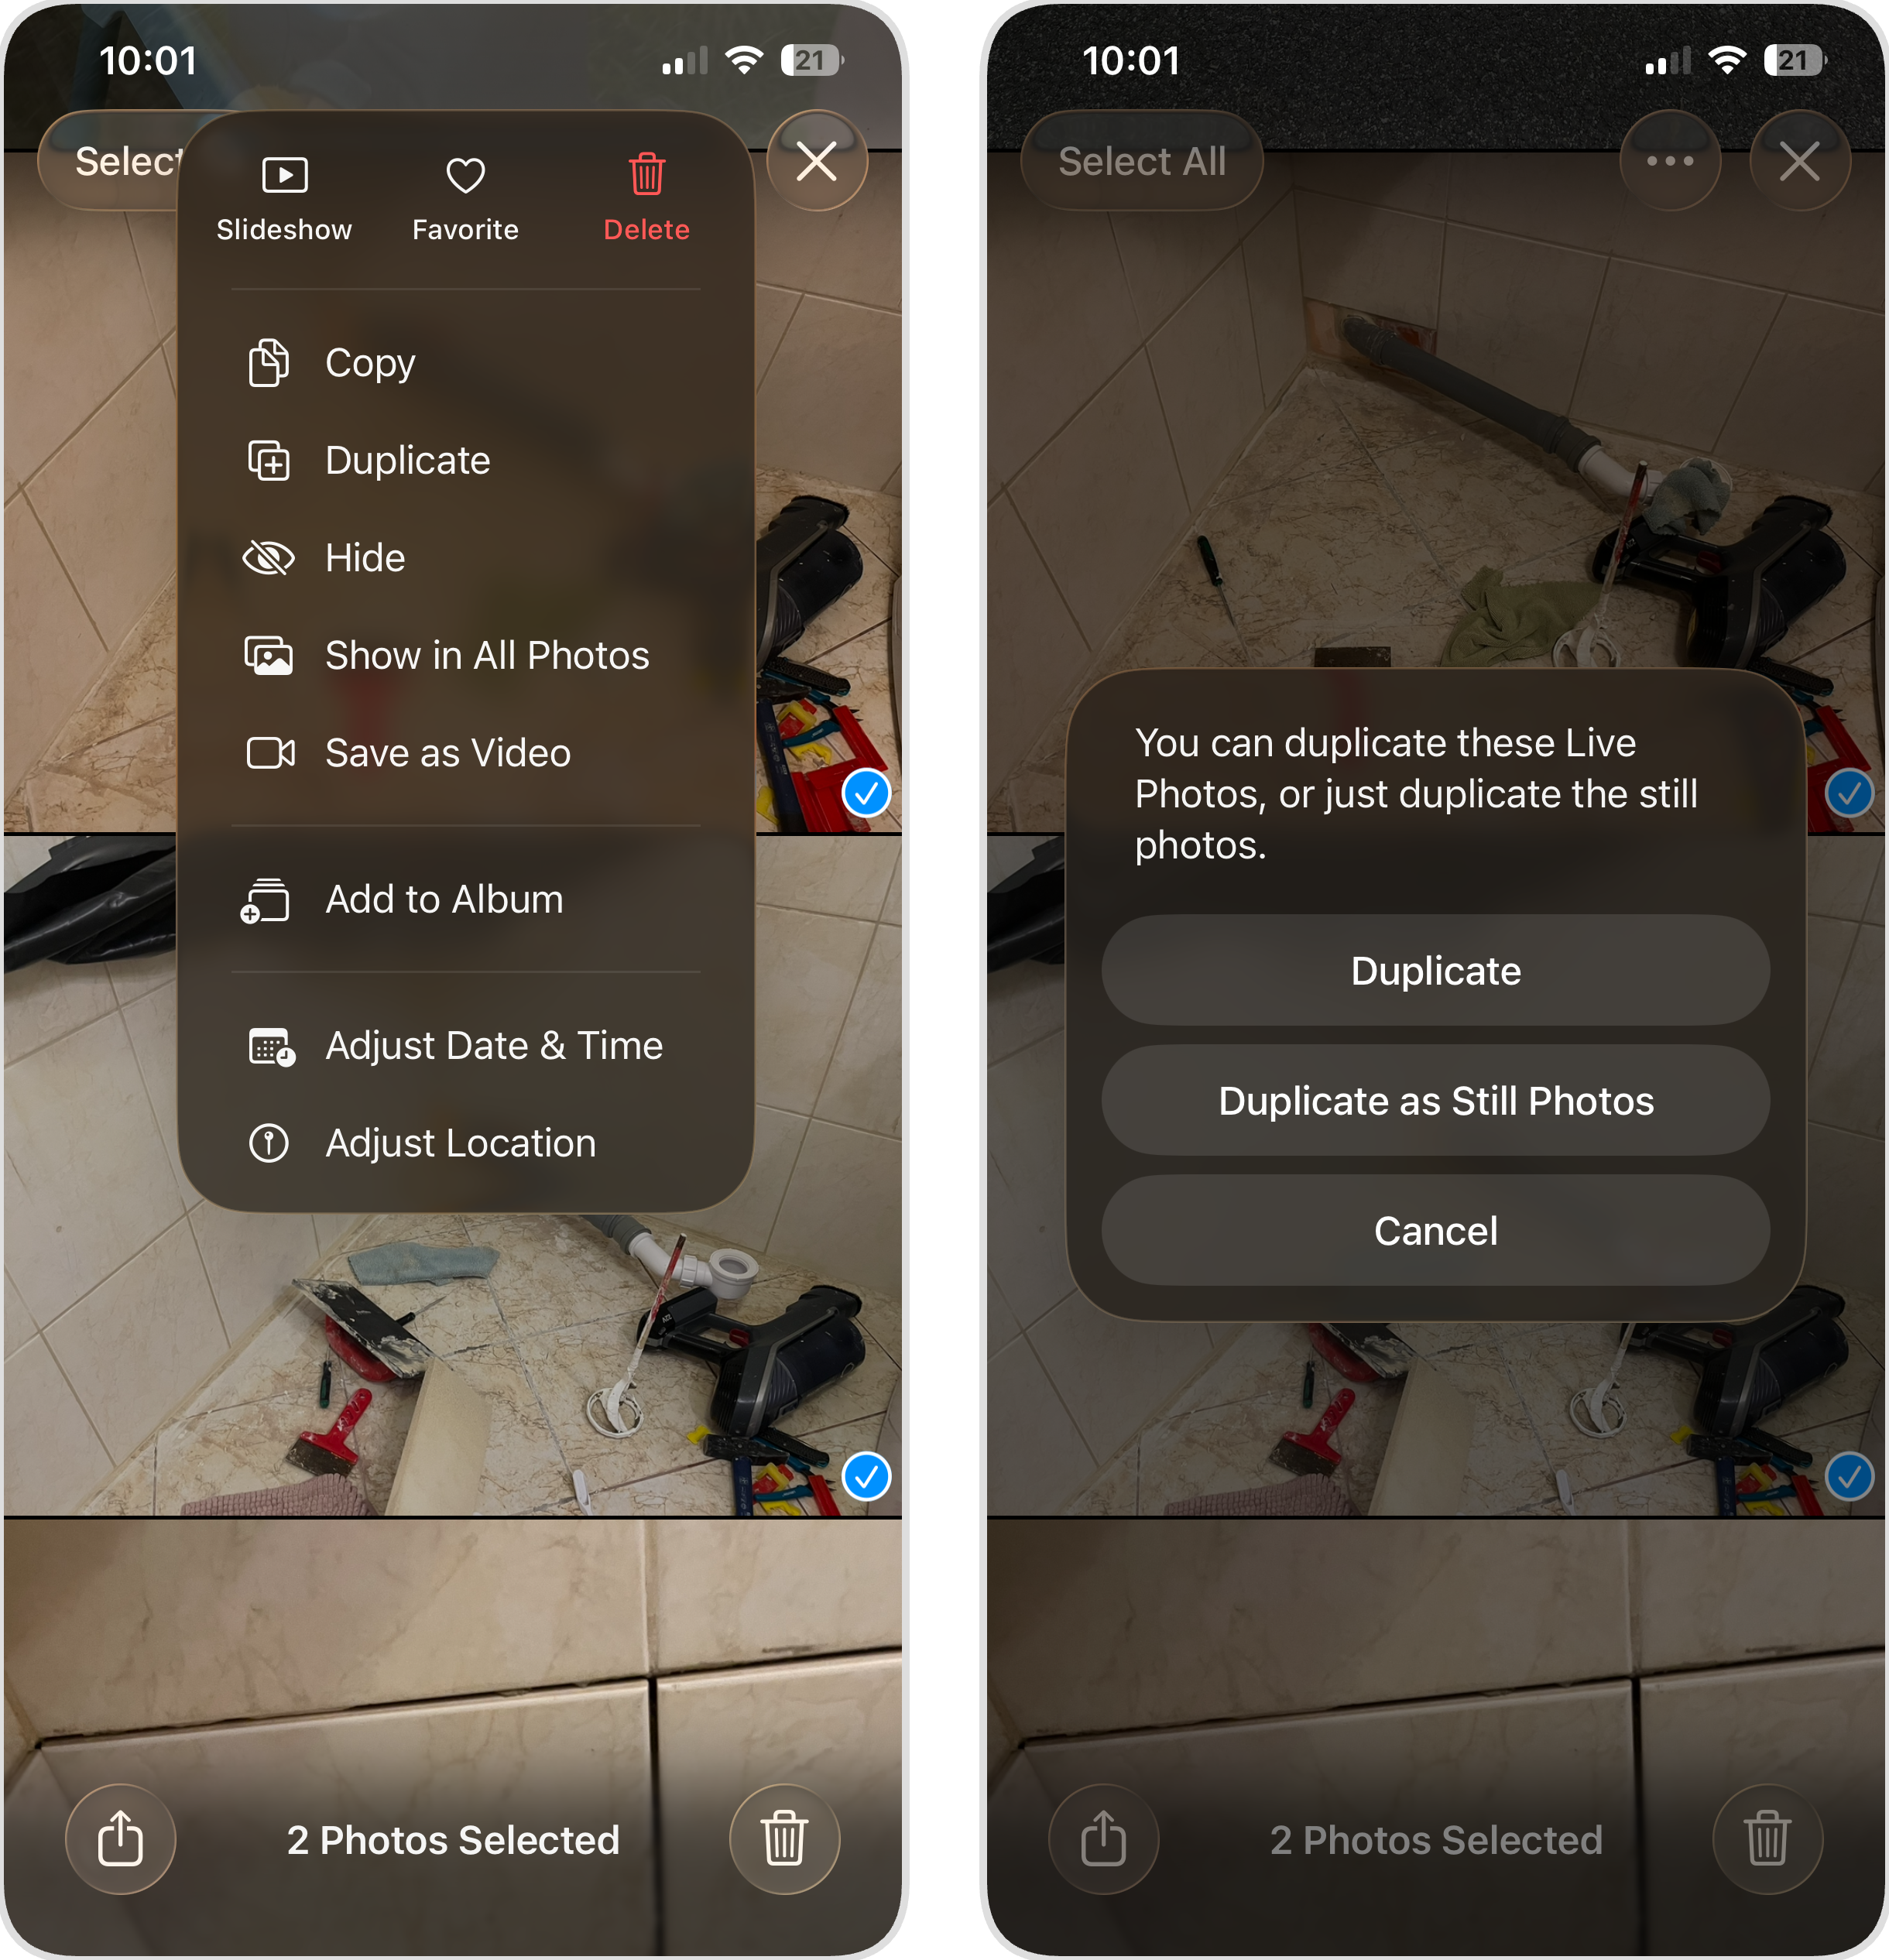
- When prompted, choose Duplicate as Still Photo.
- The still copies will appear in your library alongside the originals. To free up space, go back and delete the original Live Photos manually.
The same steps work for individual photos, too. Just open a single Live Photo, tap the Share button, select Duplicate, and choose Duplicate as Still Photo. This is useful when you only want to convert a specific image without going through a batch selection process.
Method 3: Create a Shortcut to Convert Live Photos to Still
The Shortcuts app on iPhone lets you build custom automations – small programs that combine multiple actions into a single tap. If you want to make all live photos still without installing third-party apps or duplicating files one by one, you can create a shortcut that does the work for you.
Fair warning: setting this up isn’t the most intuitive process. The Shortcuts app has a bit of a learning curve, and building the right sequence of actions takes some trial and error. That said, once you’ve configured the shortcut, you can reuse it whenever you need to batch-convert Live Photos. We’ve broken down the steps below to make the setup as straightforward as possible.
Here’s how to create a shortcut that converts Live Photos to stills:
- Open the Shortcuts app on your iPhone. If you’ve never used it, it comes pre-installed on iOS.
- Tap the + button in the top-right corner to create a new shortcut.
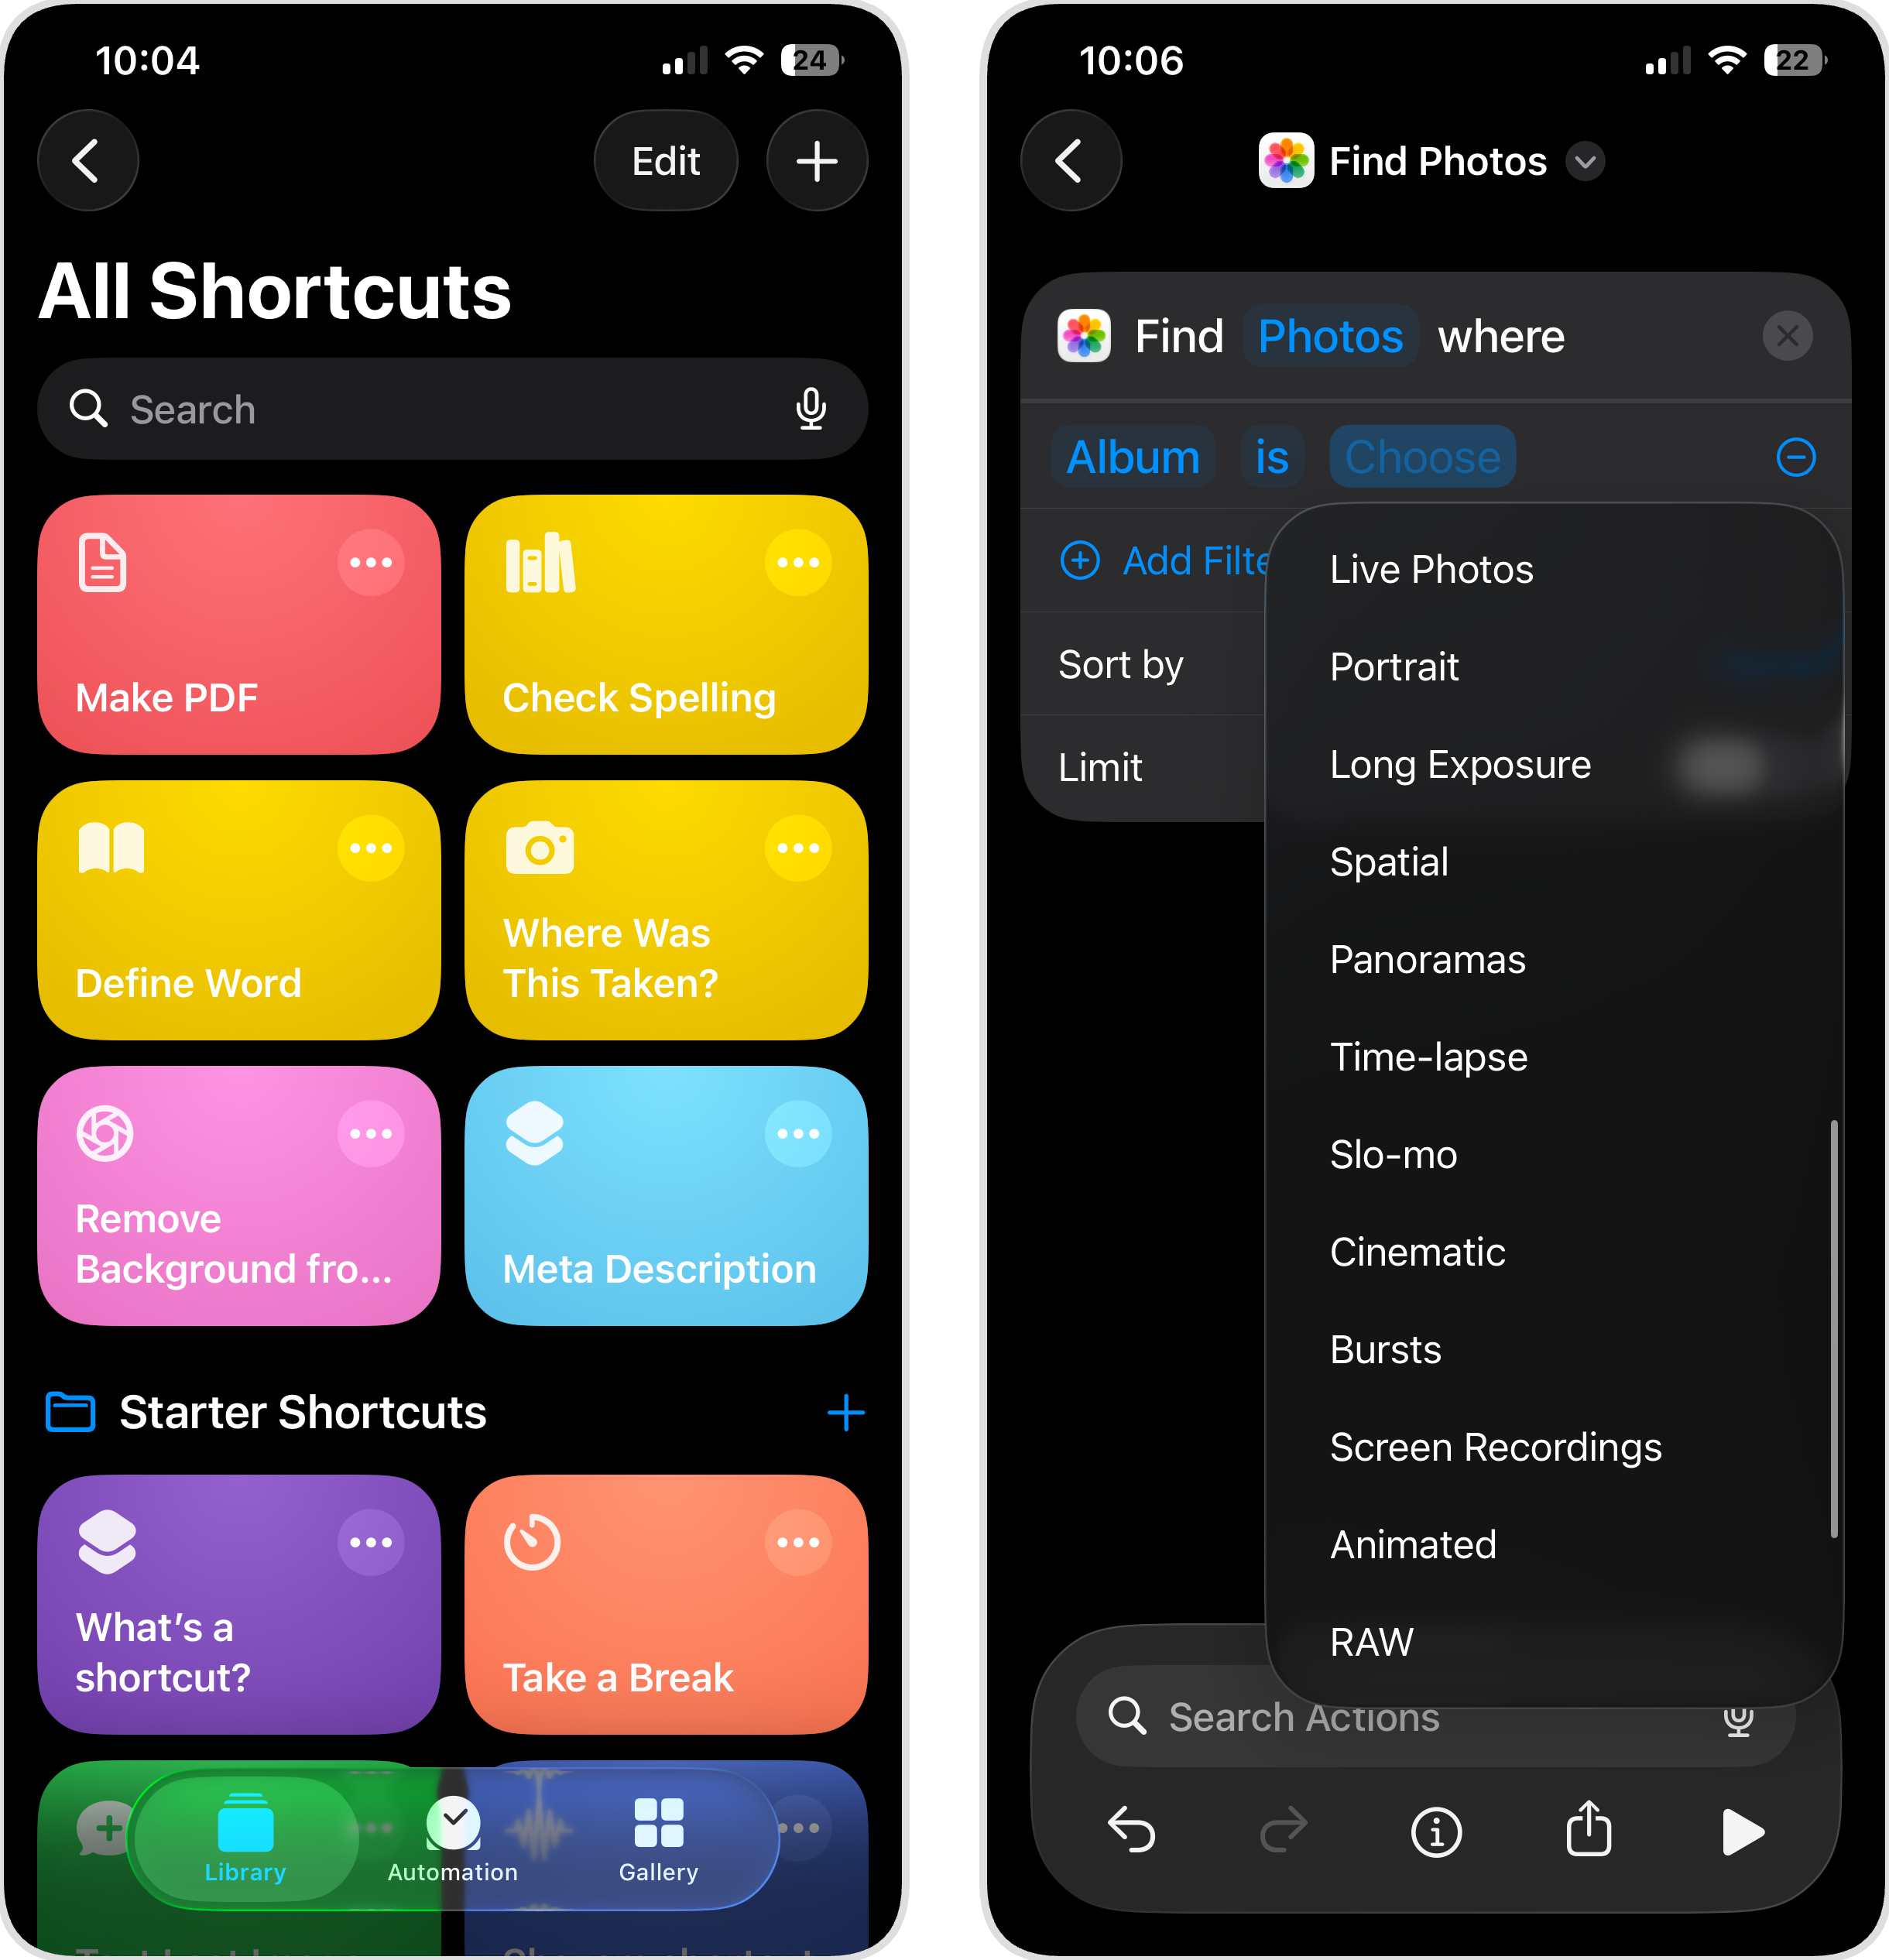
- In the search bar, type Find Photos and select the Find Photos action.
- Tap Add Filter, then set the filter to Album is Live Photos. This tells the shortcut to only grab photos from your Live Photos album.
- Search for and add another action: Convert Image.
- In the Convert Image settings, make sure the format is set to JPEG (or your preferred image format).
- Add the Save to Photos action. This will save the converted still images to your library.
- Finally, add the Delete Photos action. This removes the original Live Photos after conversion.
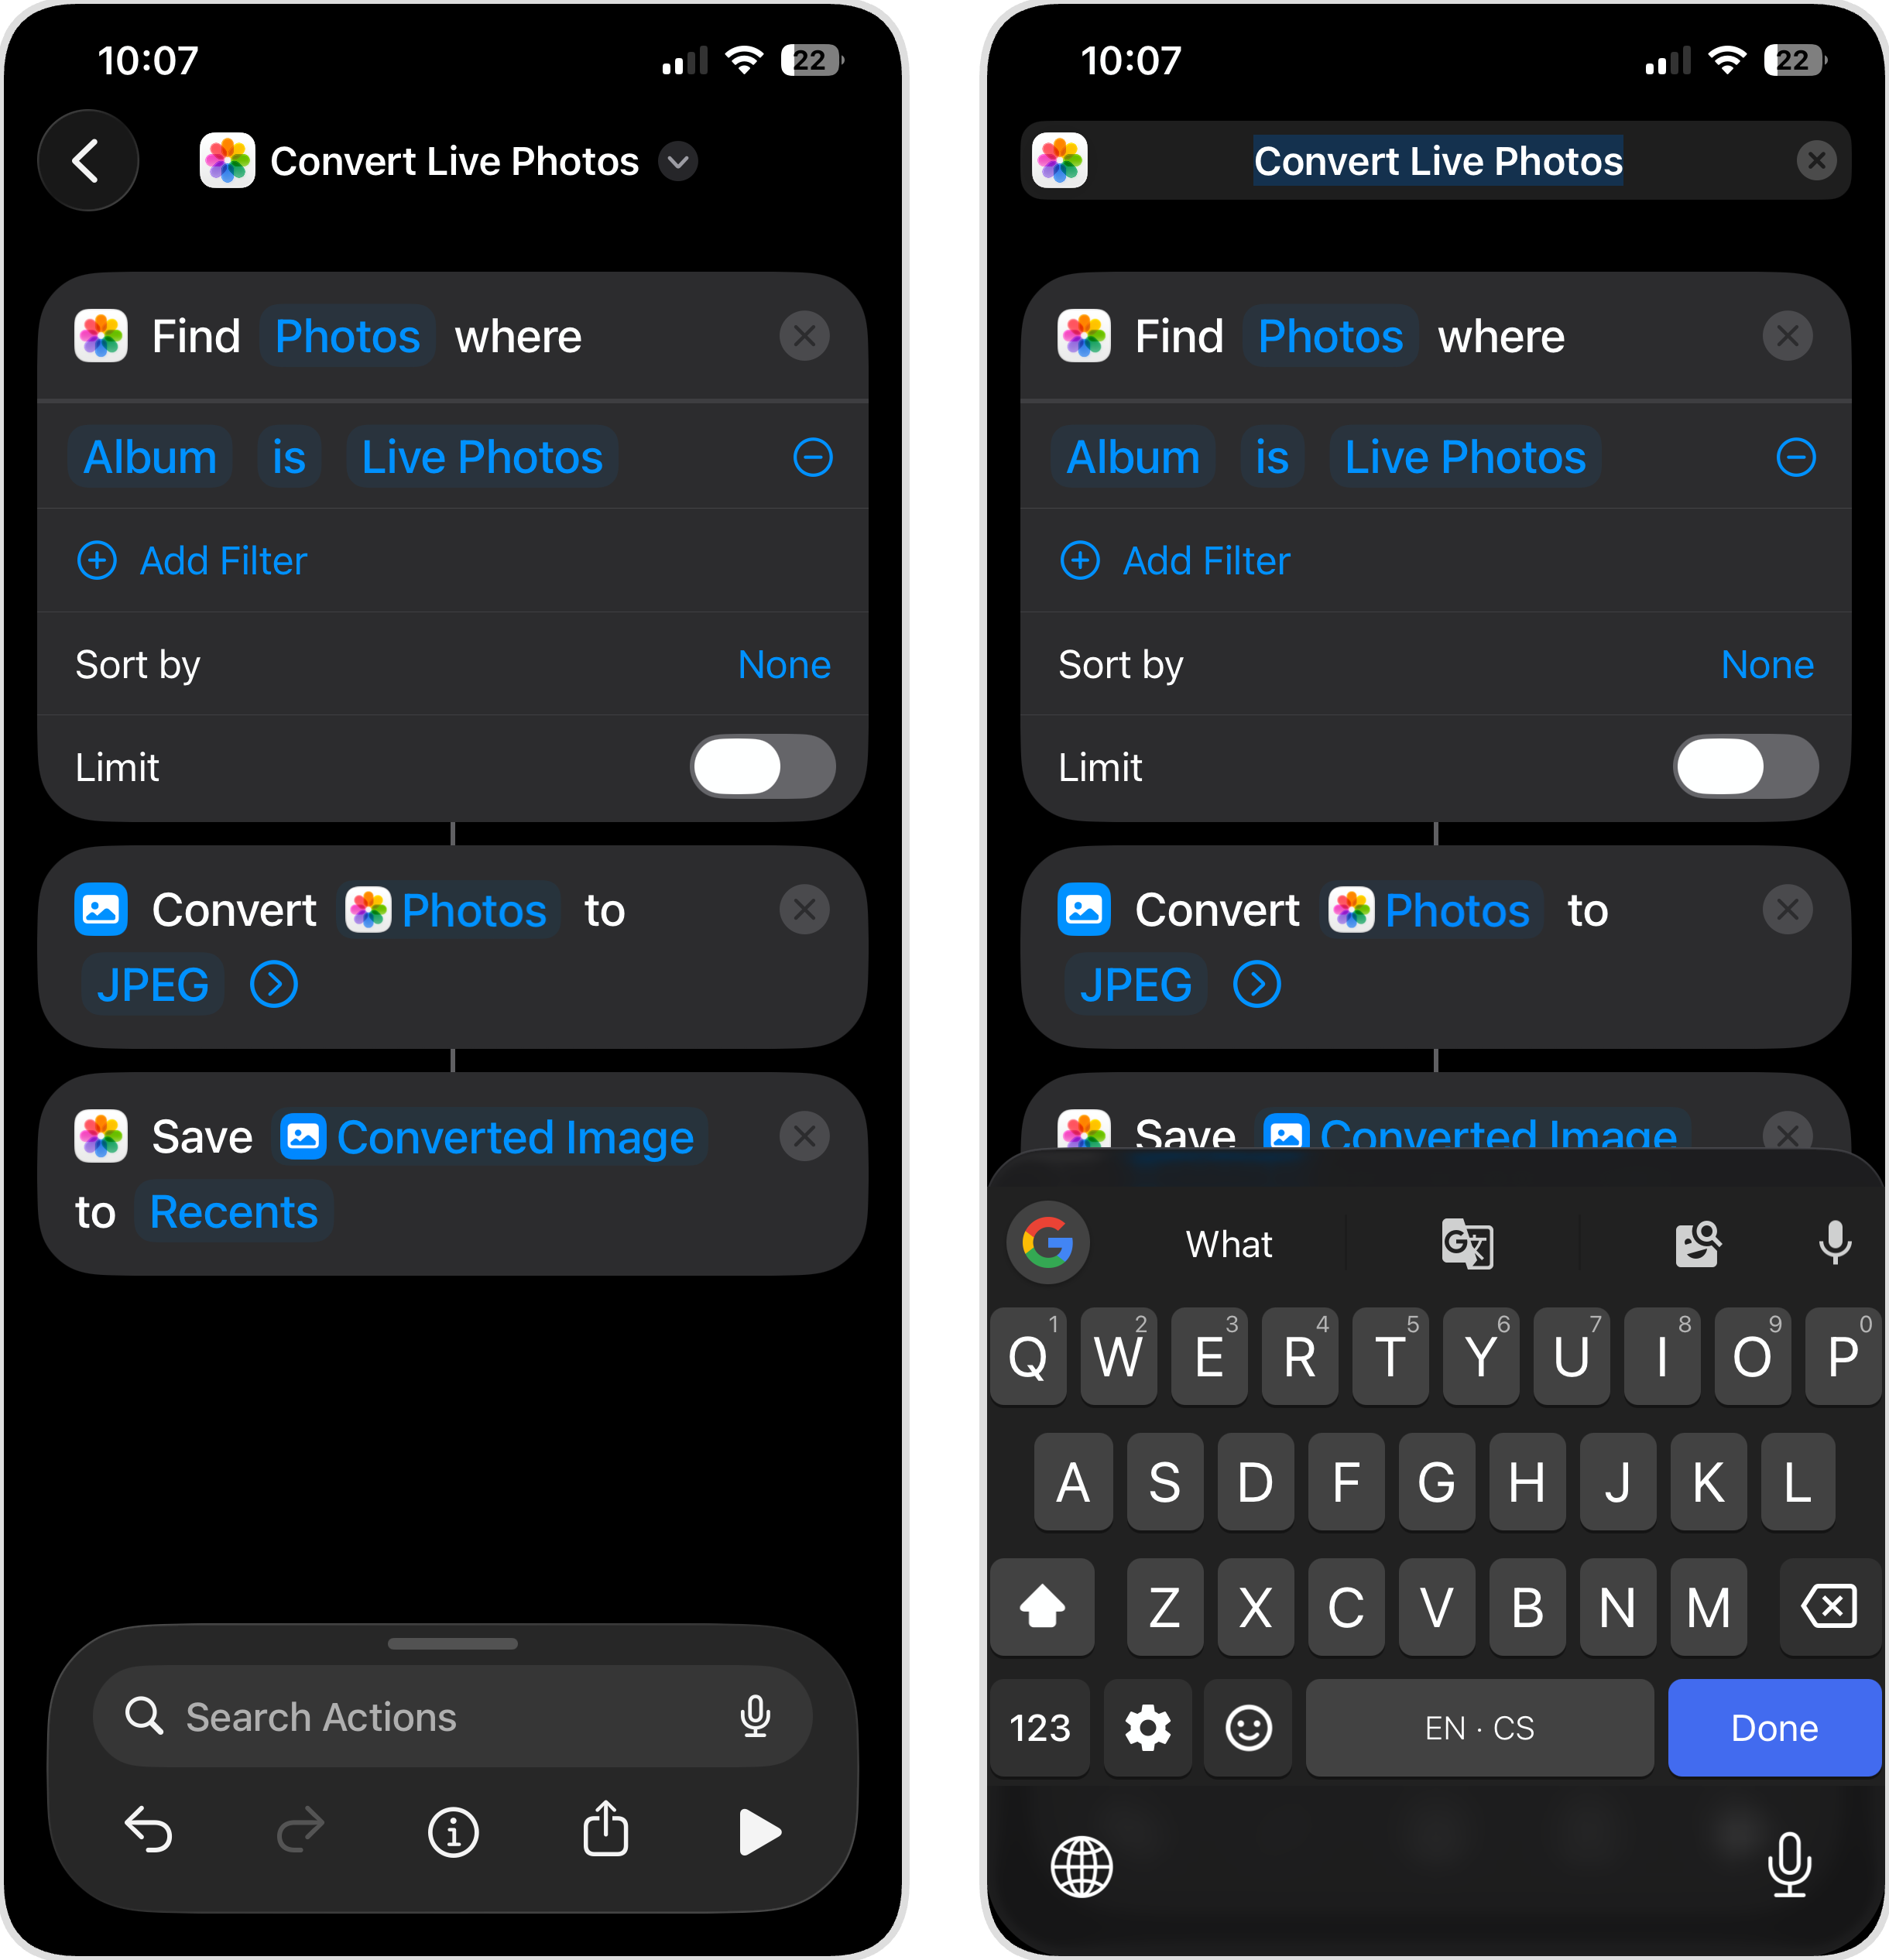
- Tap the shortcut name at the top and rename it to something like Convert Live Photos so you can find it easily later.
- Tap the back arrow to save the shortcut.
- To run it, open the Shortcuts app, find your new shortcut, and tap it. The shortcut will find all Live Photos, convert them to stills, save the new versions, and delete the originals.
If you’d rather not delete the originals, simply skip step 8. Without the Delete Photos action, the shortcut will create still duplicates while leaving your Live Photos untouched. You can always go back and remove them manually later.
How to Change Live Photos to Still with Quick Workarounds
As promised, here are a few additional ways to turn all live photos into normal images. We’ve placed these in a separate section because they are more situational, but they can be useful depending on what you’re trying to accomplish.
Method 1: Turn Off the Live Effect on a Photo
When you might need this: You want to temporarily disable the Live effect but keep the option to restore it later and don’t really care that you won’t save any storage space.
If you simply want a photo to behave like a still image (no animation when you press it, no motion when scrolling), this is the quickest way to change live photo to still without making permanent changes.
Here’s how to turn off the Live effect:
- Open the Photos app and select the Live Photo you want to modify.
- Tap the Live icon (the concentric circles).

- Select Live Off from the options that appear.
The photo will now behave like a regular still image. If you ever want the Live effect back, repeat the same steps and select Live instead of Off. Keep in mind that you won’t save any storage space by going through the steps above.
Method 2: Save a Live Photo as a Still Image in the Files App
When you might need this: You want to archive a photo outside the Photos app, or you need a standard image file to edit in another app.
When you save a Live Photo to the Files app, iOS automatically strips the video portion and keeps only the still image. This gives you a regular JPEG file that you can move, share, or edit without any Live Photo behavior attached.
Here’s how to save a Live Photo as a still in Files:
- Open the Photos app and select the Live Photo you want to save.
- Tap the Share button (the square with an arrow pointing up).
- Scroll down and tap Save to Files.
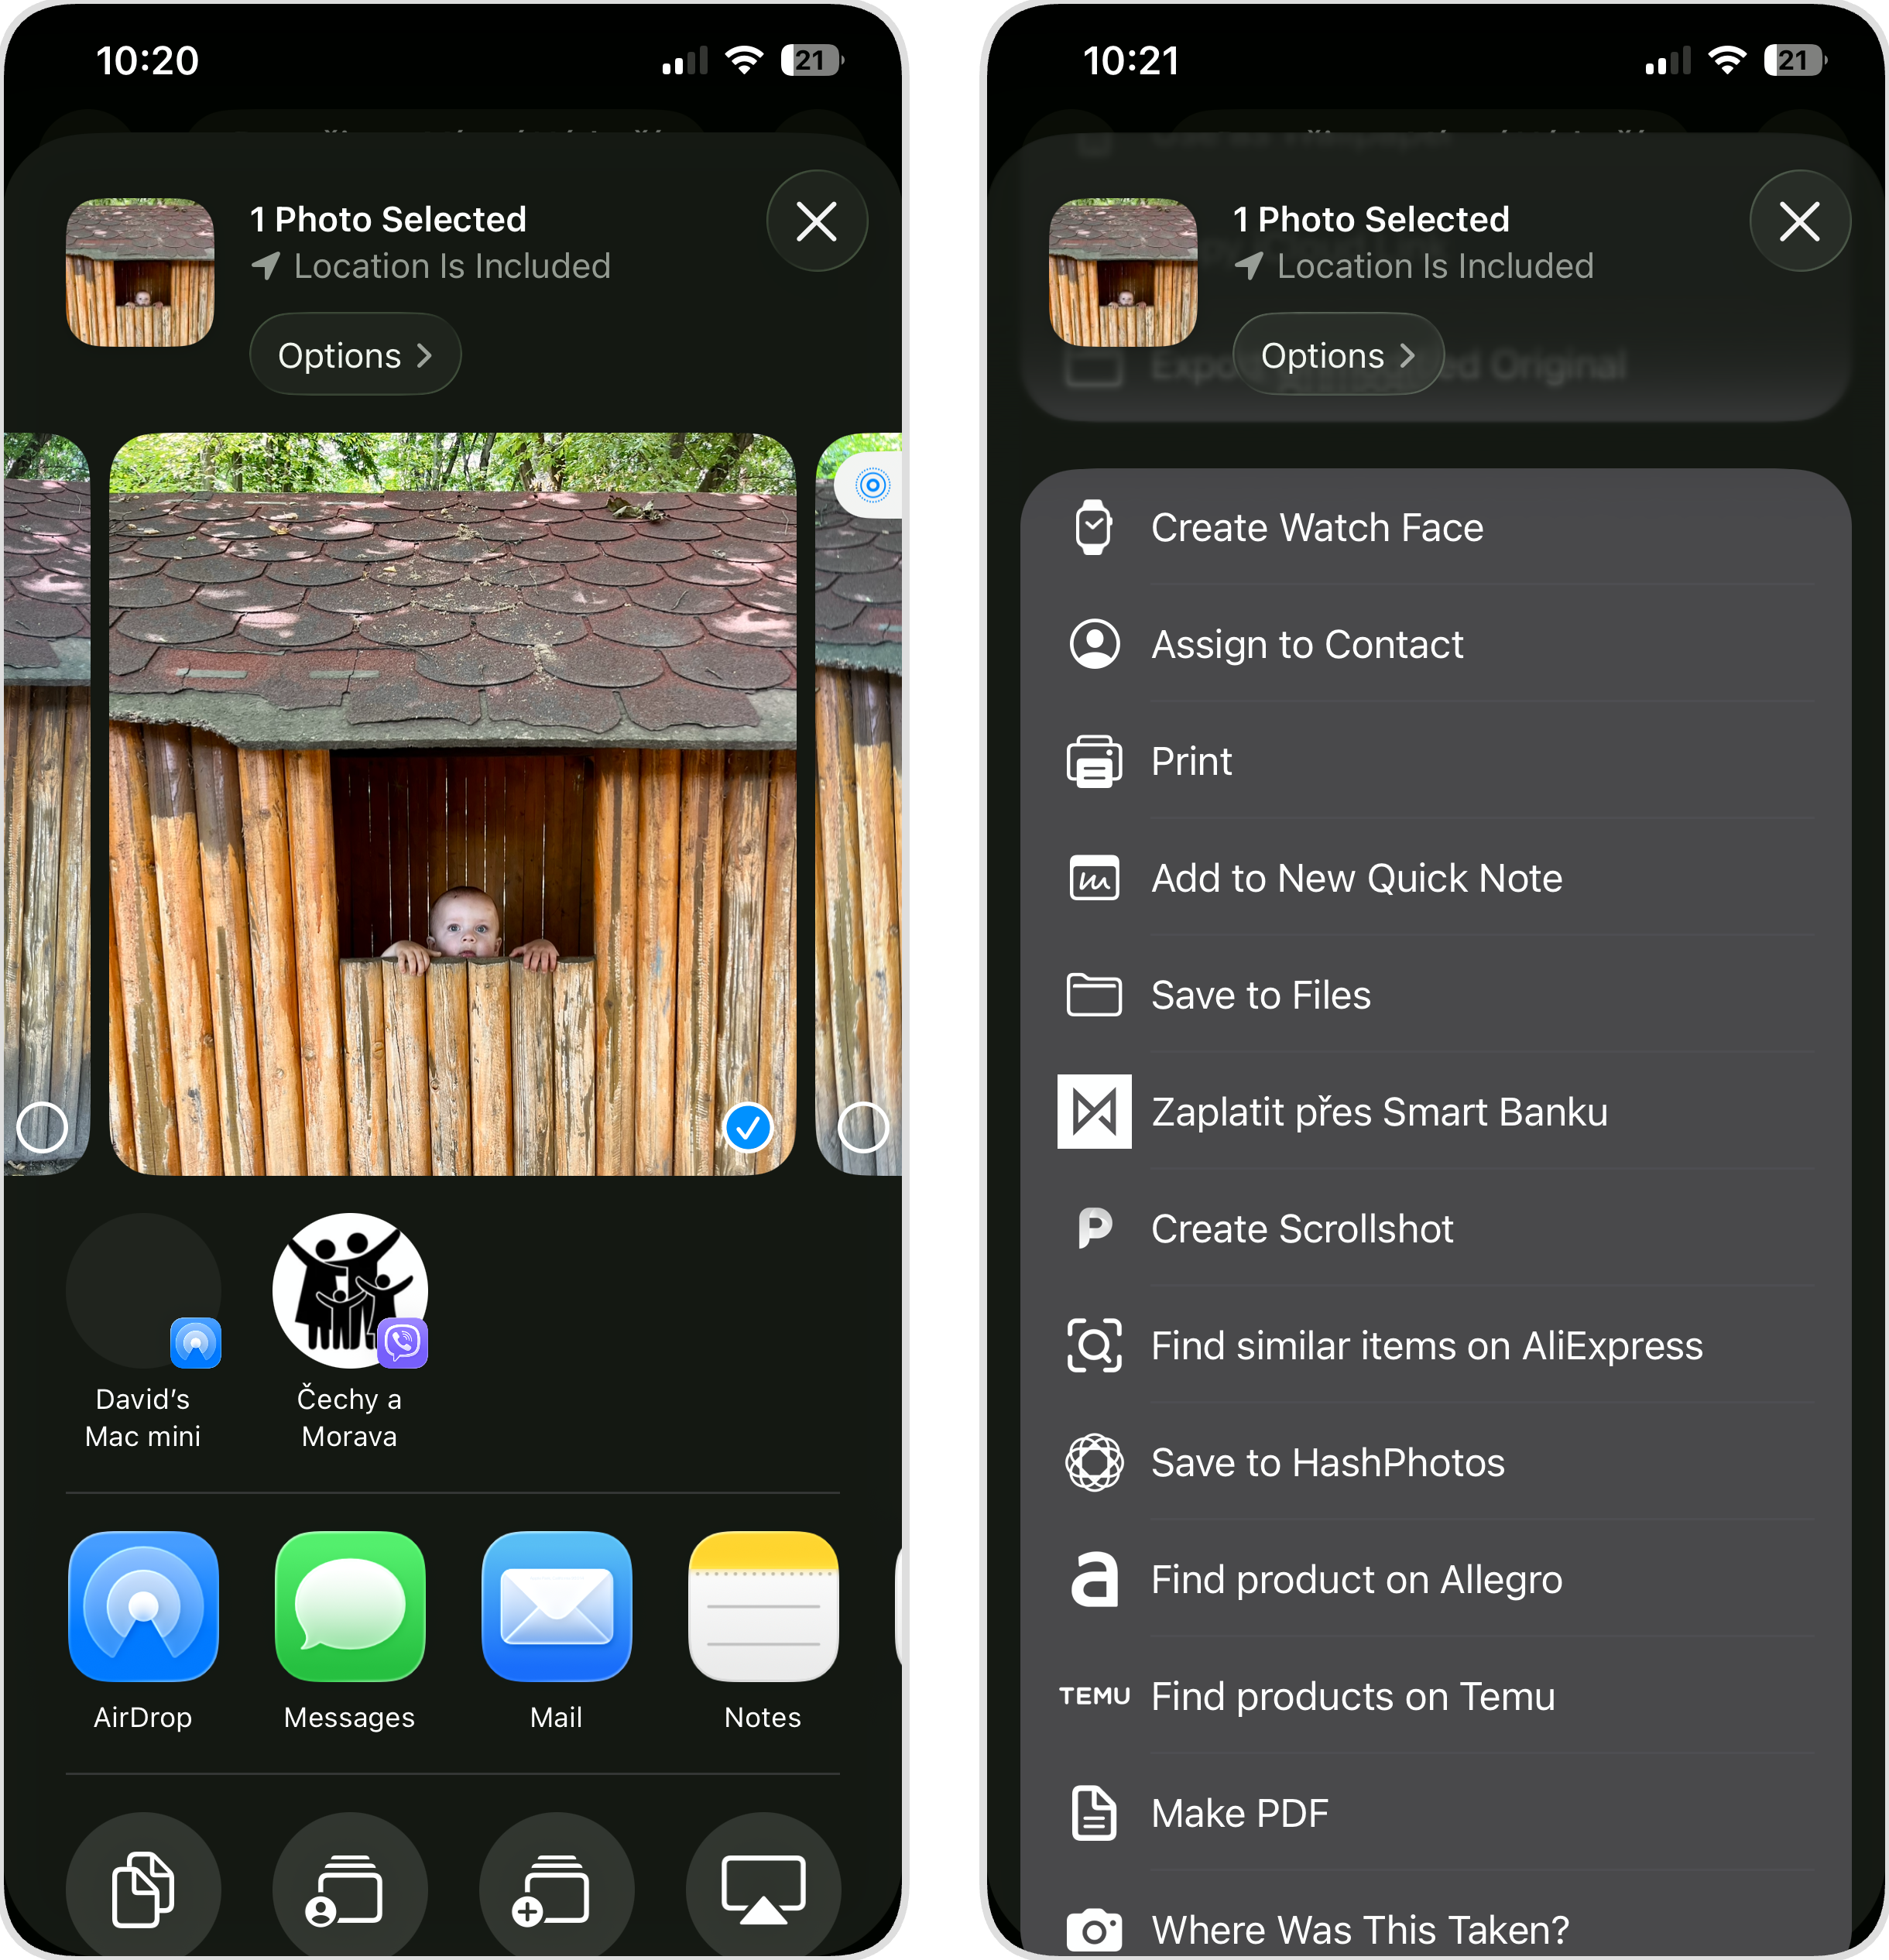
- Choose a location in the Files app (iCloud Drive, On My iPhone, or any folder you prefer).
- Tap Save.
The saved file will be a standard JPEG image without any Live Photo data. The original Live Photo remains in your Photos library unchanged, so, again, no storage space is actually saved this way.
Method 3: Take a Screenshot of the Live Photo
When you might need this: You need a still image right now and don’t have time for other methods.
When you quickly want to share the static part of a Live Photo with someone and don’t care about quality or resolution much, then you can simply take a screenshot when viewing the photo. Needless to say, you should never use this method when, for example, you want to print the photo or edit it on your computer.
Here’s how to screenshot a Live Photo:
- Open the Photos app and select the Live Photo you want to capture.
- Make sure the photo fills as much of the screen as possible (pinch to zoom if needed).
- Press the Side button and Volume Up button at the same time to take a screenshot.
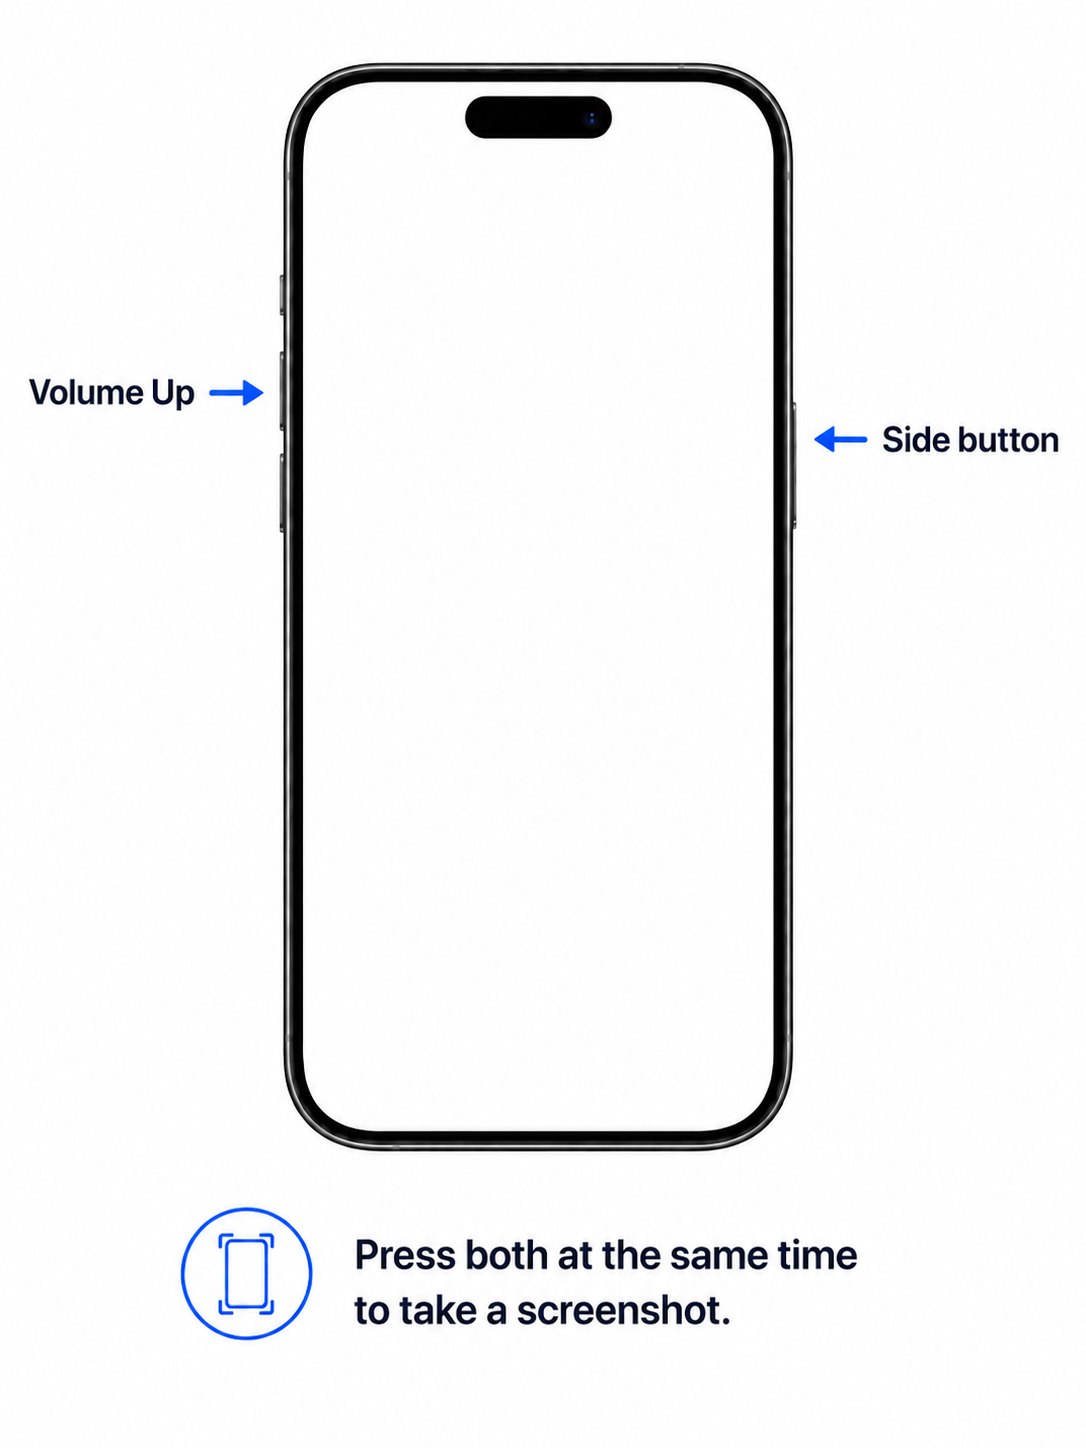
The screenshot will appear in your Photos library as a regular still image. To keep things organized, you should delete the screenshot from your camera roll after moving or sharing it, otherwise you’ll end up with duplicates cluttering your library. If that’s already happened, then you can download a duplicate-cleaning app like Clever Cleaner (see Method 1 in the previous section) and use its Screenshots cleaning tool to get rid of unnecessary screenshots in bulk.
Don’t Want to Take Live Photos Anymore? Turn It Off
If you’ve decided that Live Photos aren’t worth the extra storage space, then you should disable the feature permanently. The problem is that just tapping the Live Photo icon in the Camera app doesn’t work because the setting resets every time you close the app.
Here’s how to disable Live Photos permanently:
- Open the Settings app on your iPhone.
- Scroll down and tap Camera.
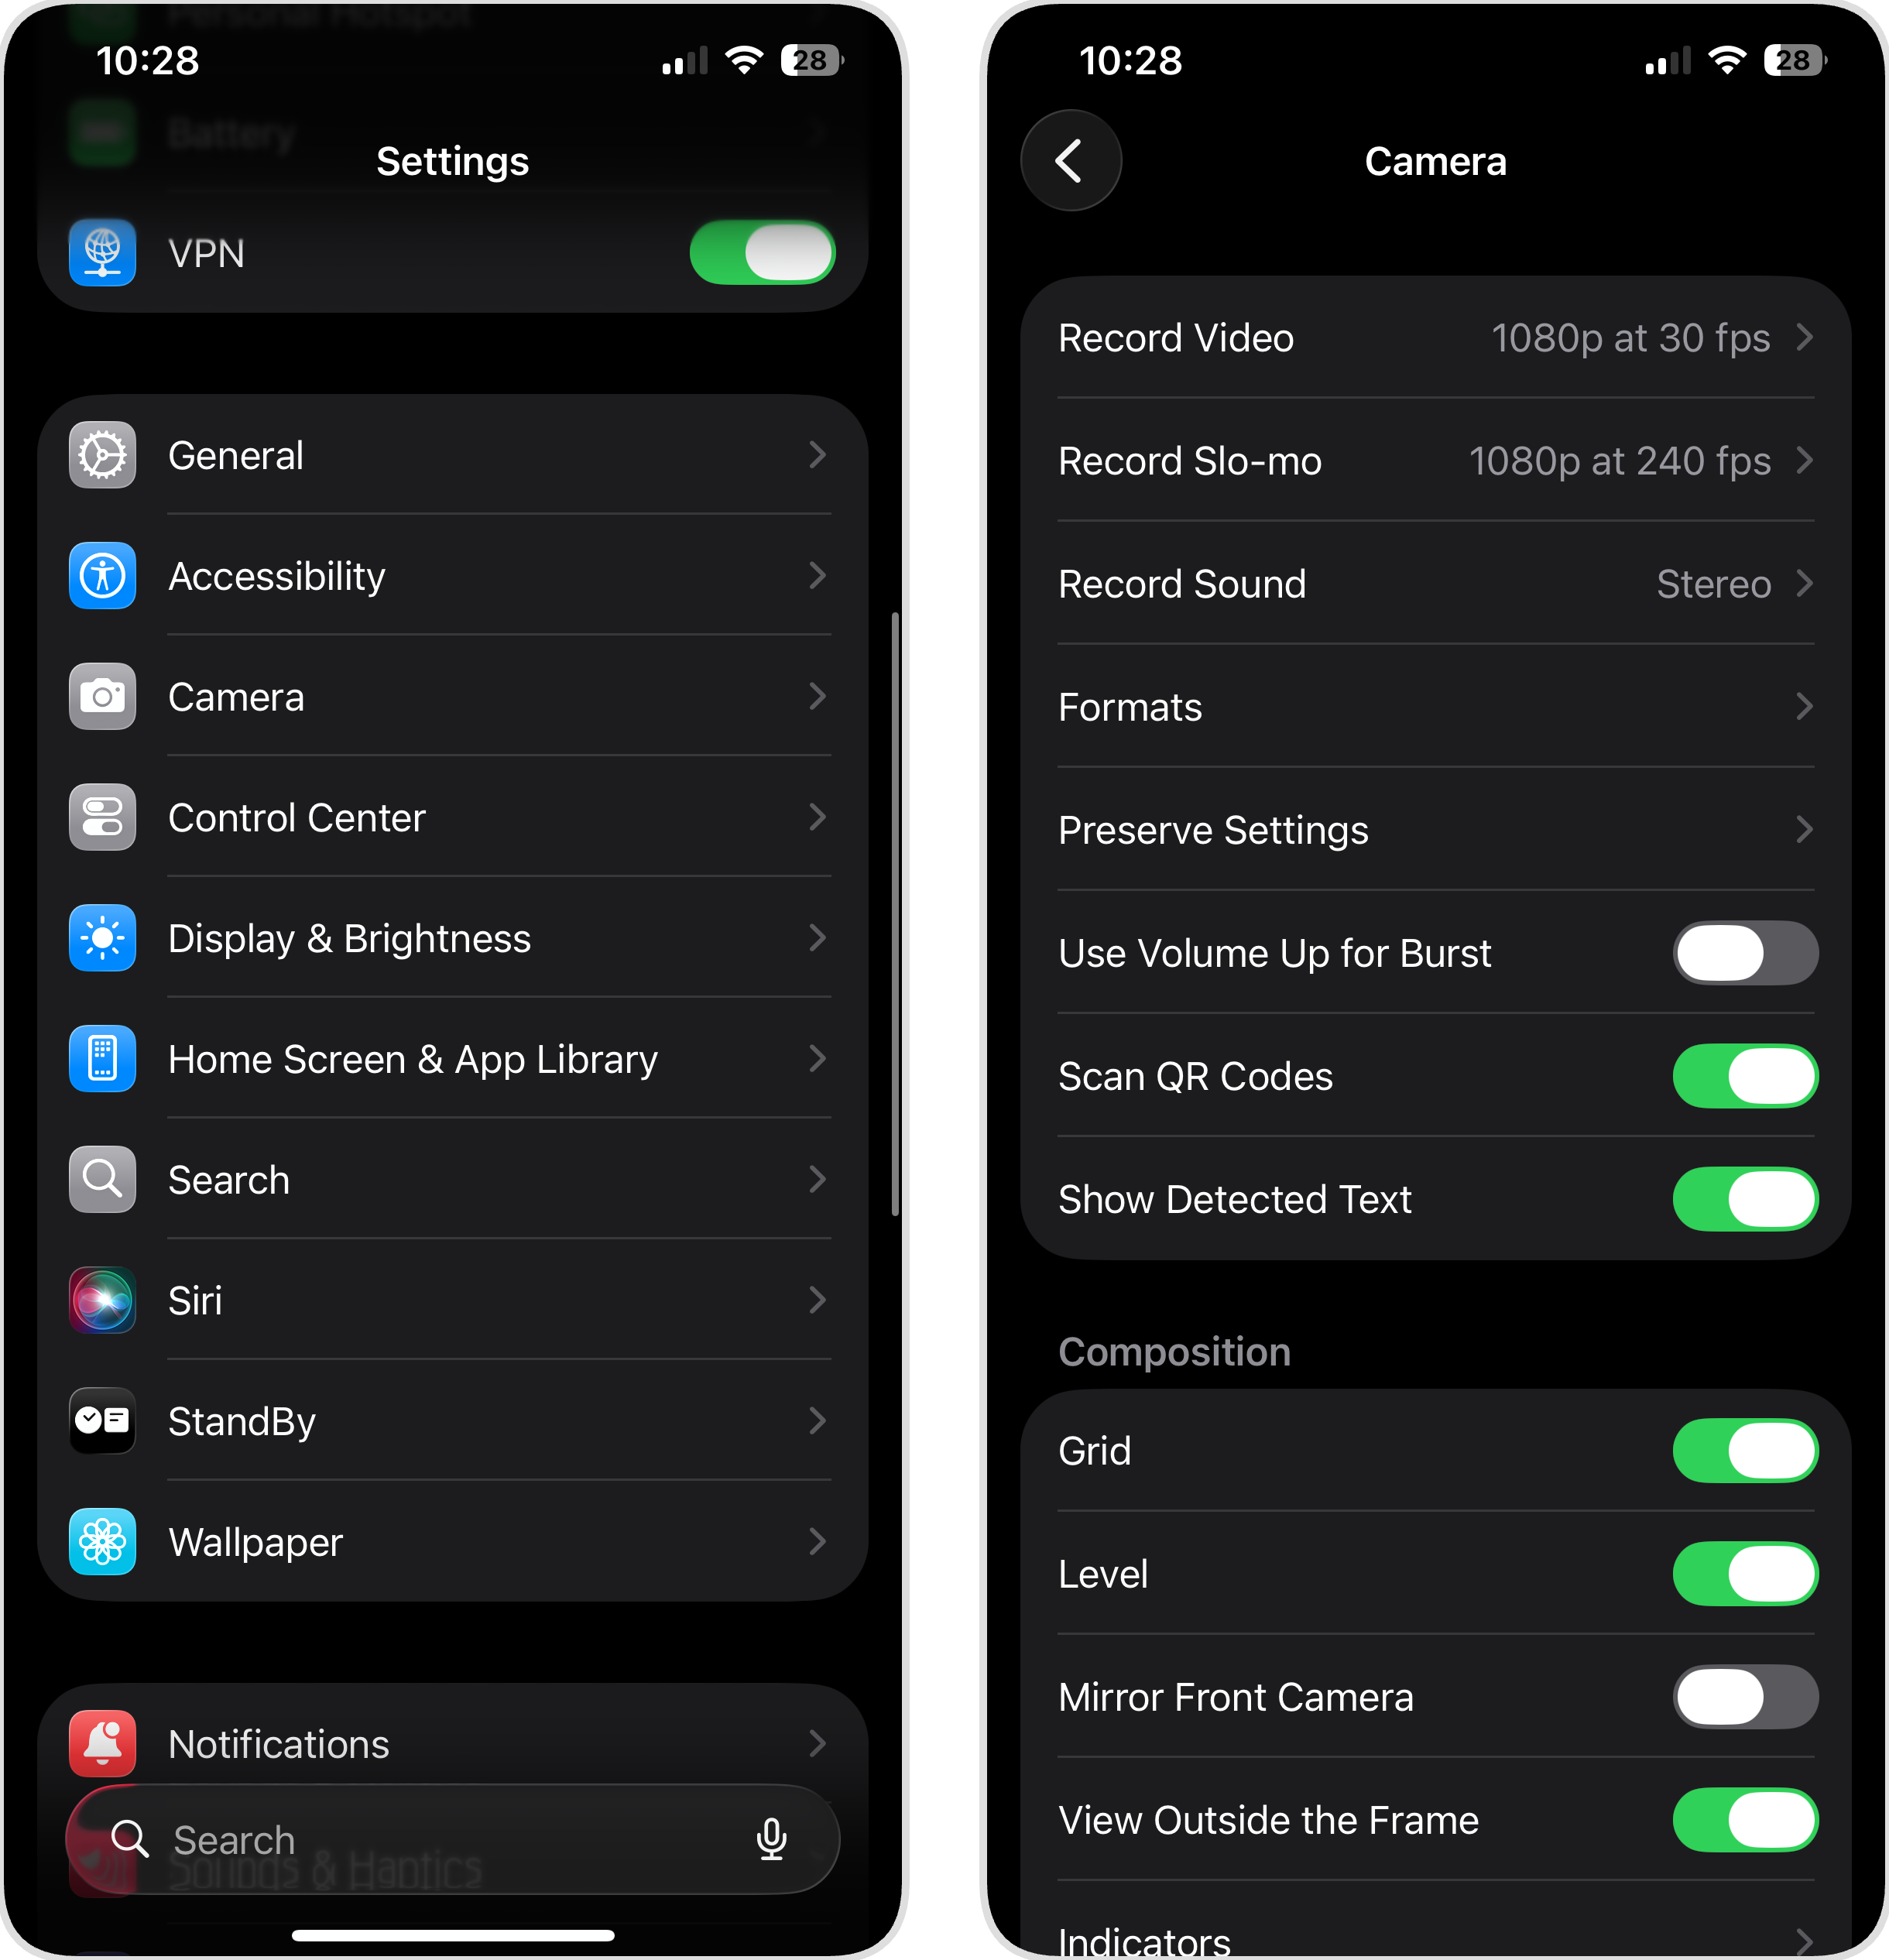
- Tap Preserve Settings.
- Toggle on Live Photo.
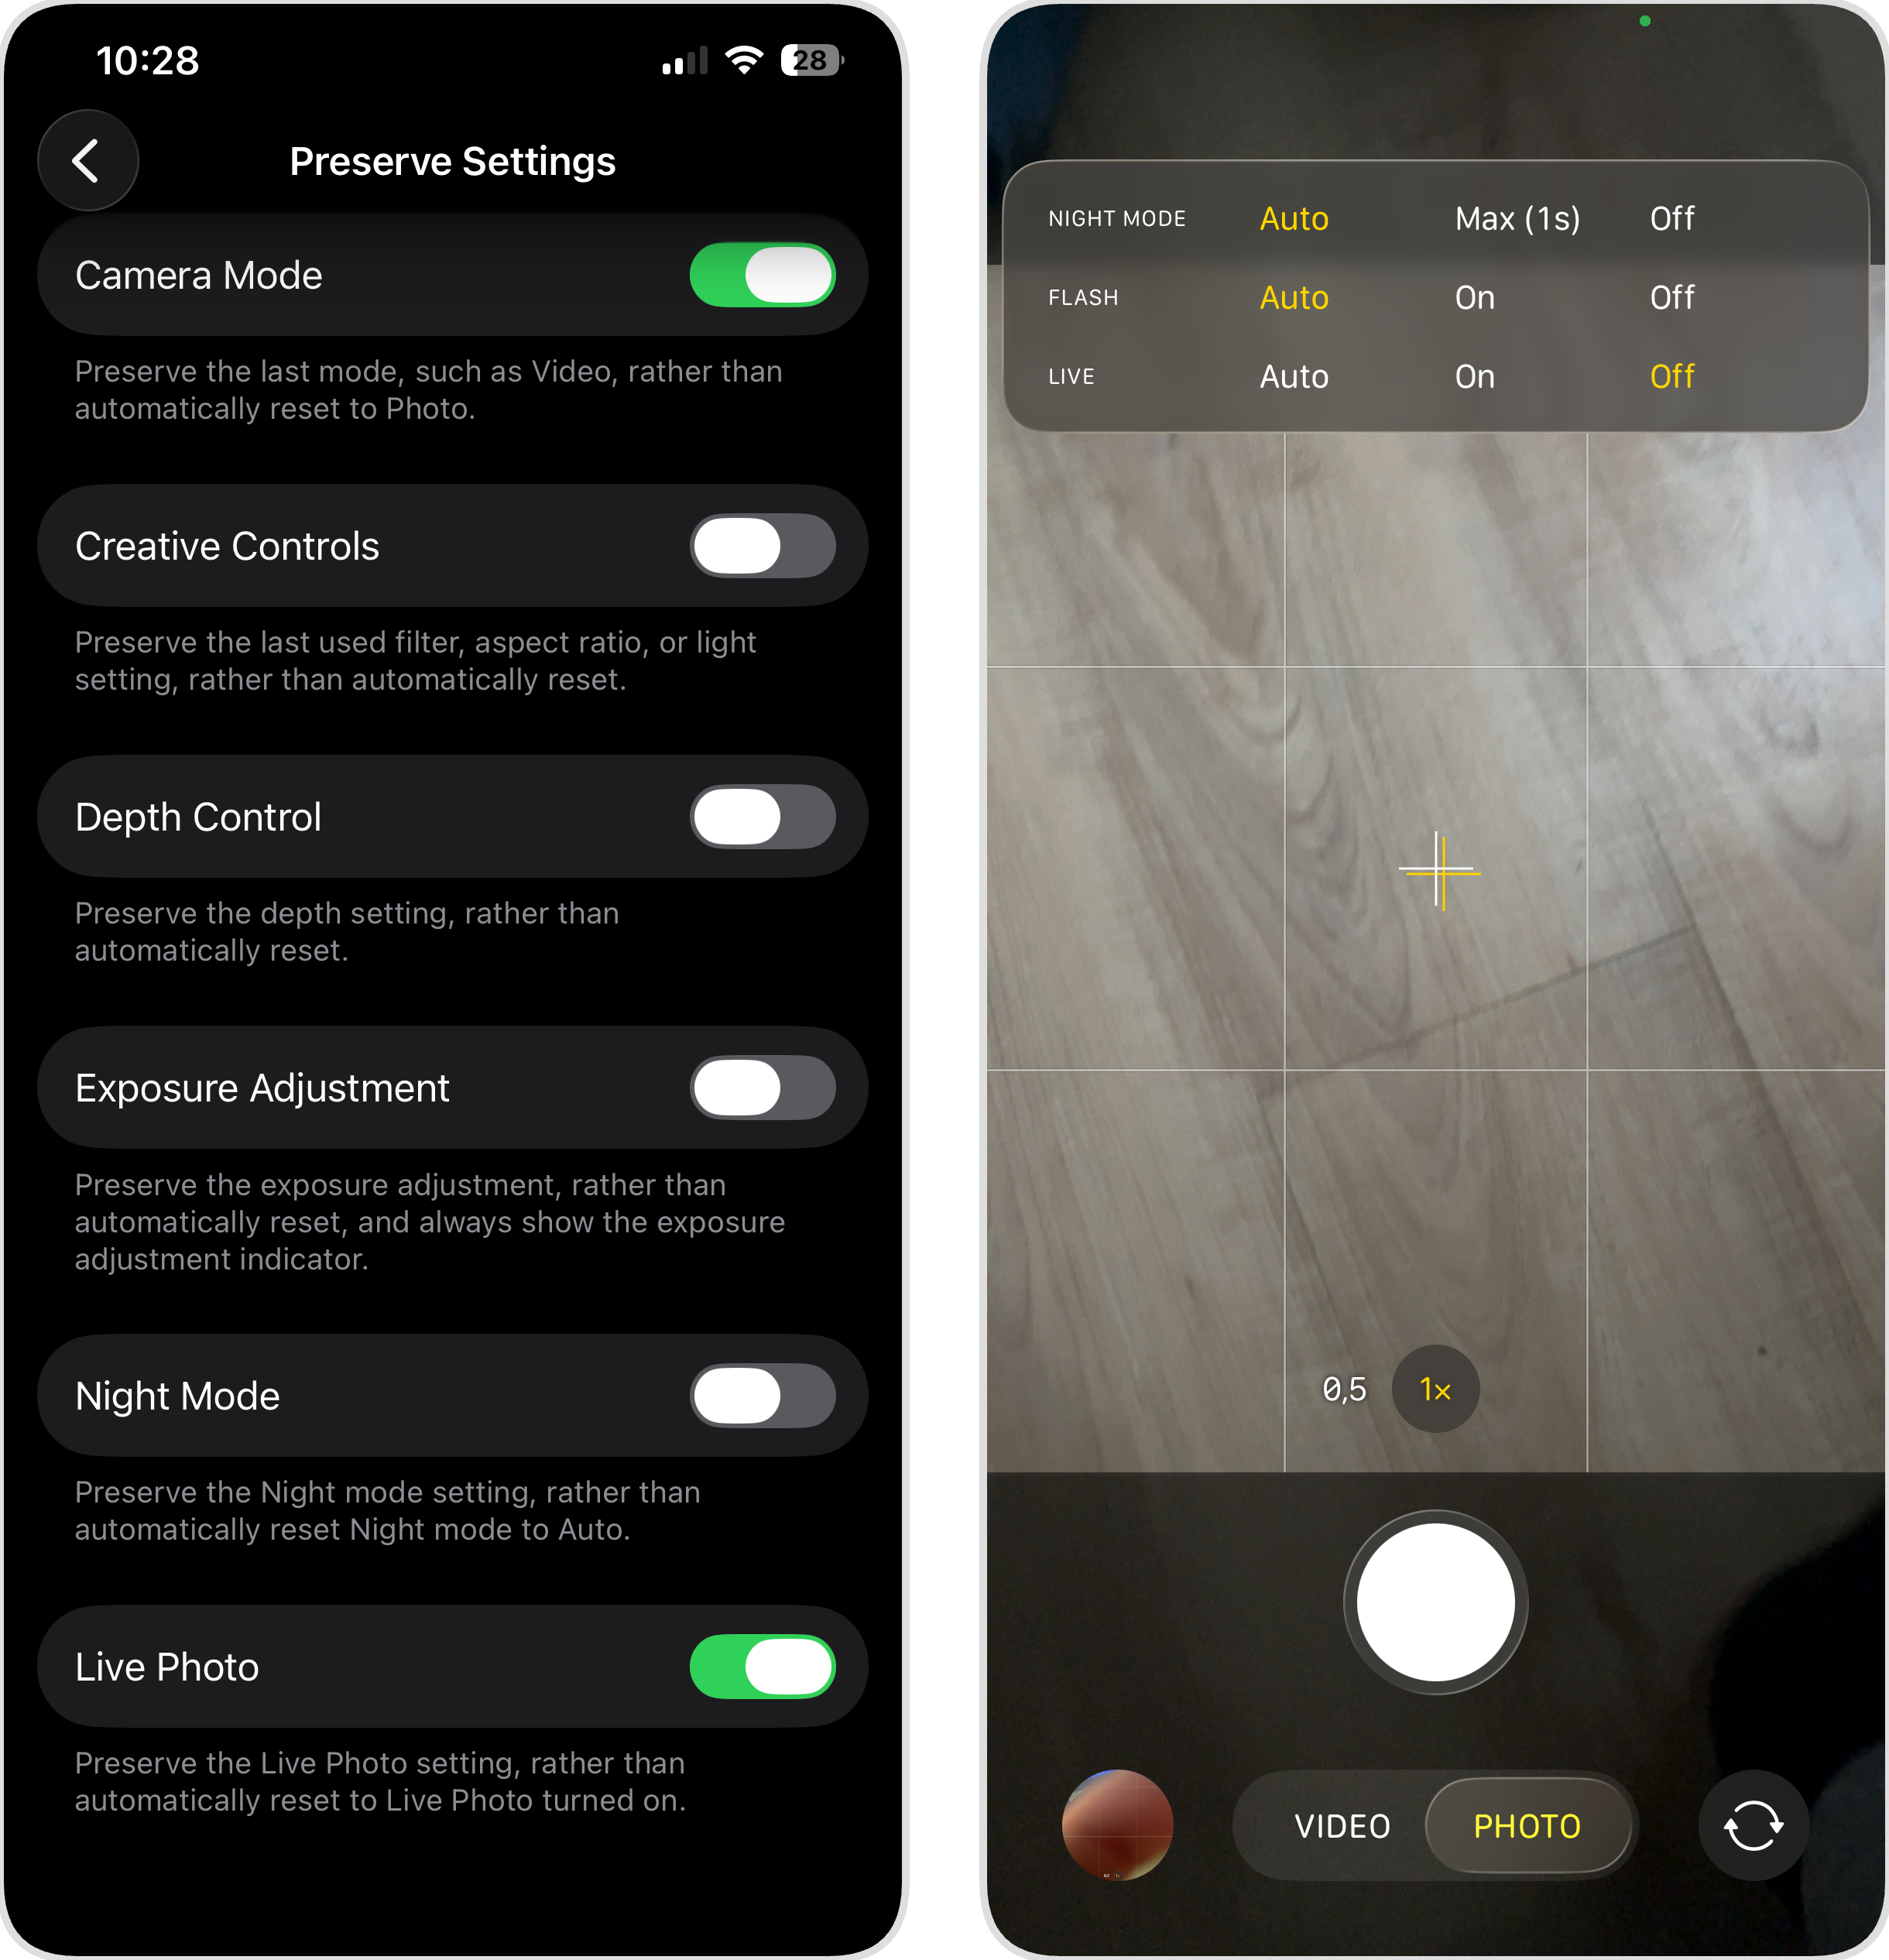
- Now open the Camera app and tap the Live Photo icon (the concentric circles in the top-right corner) to turn it off if it’s not turned off already.
From now on, your iPhone will remember that you turned off Live Photos and won’t re-enable it automatically. Every photo you take will be a regular still image unless you manually turn Live Photos back on.
Conclusion
Live Photos can be fun to look at when used intentionally. In such situations, the extra storage space is definitely worth it. But there’s no reason to keep Live mode on by default. If your library is already packed with Live Photos you don’t need, the methods above will help you reclaim that space. If you need to change live photos to still in bulk, a third-party app like Clever Cleaner is the fastest option. If you prefer built-in tools, the duplication method, or a custom Shortcut can get the job done with a few more steps.
For more ways to free up iPhone storage, check out these guides:
- How to Free Up Space on iPhone
- How to Clean Junk Files on iPhone
- How to Clear System Storage on iPhone
FAQ
If you turned off the Live effect through the Photos app’s Edit menu (see Turn Off the Live Effect on a Photo above), then you can go back and re-enable it anytime. But if you converted the Live Photo to a regular still photo using Clever Cleaner, the Shortcuts method, or duplicating as a still, then there’s no way to restore the Live effect because the new file doesn’t contain the necessary data.
It depends on the method used. When you convert using Clever Cleaner, the duplication method, or the Shortcuts method, the still image retains its original resolution and quality. But if you simply take a screenshot of the Live Photo displayed on your phone, then its resolution will be limited to your screen’s resolution (enough for social media sharing but not for more serious applications).
On Mac, you can turn off the Live effect for individual photos in the Photos app (double-click the photo, click Edit, then click the Live button and select Off). iCloud doesn’t offer any built-in conversion tools. If your photos sync across devices, you can convert them on your iPhone or Mac, and the changes will reflect in iCloud automatically.
No. The converted still images are separate files in your photo library. Deleting the original Live Photos won’t affect the new copies.