Has your USB flash drive stopped “allowing you” to access your files, and will formatting a USB drive erase all its contents? Can you recover your files from it and, ideally, continue using it as before? And how can you use it on a device that doesn’t support its current file system?
As we will see in this article, you can recover your files from your flash drive and then format it to “revive” it, or to make it compatible with a different device. Even better, if it’s functioning without serious issues, you may skip the format and convert its current file system to another one without losing the files already stored on it.
Does Formatting a USB Delete Everything?
It doesn’t matter if you want to format a pendrive without losing data to fix an error, because the OS suggested you format it to keep using it, or to convert it to a compatible file system that will allow both your Smart TV and car media system to access the same content.
In all cases, a format makes a storage device look and act “empty”, as if it were new. However, depending on the type of format, most of the data on the USB stick may remain intact and recoverable.
- 🚄 Quick Format: A quick format is much zippier than a full format, since it only replaces or rebuilds the file index that points to the existing files, without deleting them, making the USB drive appear empty.
- 🐌 Full Format: A full/complete format is a meticulous process that overwrites all available space on a storage device with zeroes, and is particularly useful when you want to get rid of unwanted files, eliminate malware, or uncover bad blocks. Since all data is overwritten, it becomes unrecoverable.
- 🔒 Secure Erase: A secure erase is similar to a full format, but uses character patterns instead of zeroes to simultaneously obfuscate all data while overwriting it, and eliminate any chance of recovery.
As we’ll see next, there’s a best course of action depending on the scenario you’re dealing with.
How to Format a Flash Drive Without Losing Data
If your USB pen drive is working correctly, and its contents are accessible, you can use any file manager you like to copy your files from the USB stick to another storage device before formatting it. Since copying files is considered a basic task everyone knows about, we won’t cover it here.
But what if your USB worked properly, but now prompts you to format it? If its file system got corrupted, or its partitions disappeared, it’s best to take a complete byte-to-byte backup of its contents and scan it with a data recovery solution to retrieve the files you need.
With your USB stick’s contents safely stored in another drive, you can format it without worrying about data loss.
Step 1: Back Up or Recover Data from the USB
As we explained, to reduce the risk of device failure and minimize data loss, it’s best to back up a problematic device first, then scan that backup rather than the device itself. Thankfully, you don’t have to seek separate solutions, for Disk Drill can perform both tasks admirably from the same user-friendly interface. Disk Drill will make a copy of your entire USB flash drive, not just the currently occupied space on it. Therefore, you will need free space equal to the drive’s total volume on some of your other drives. However, when there’s not enough free space available for storing a full byte-to-byte device backup, you can skip the following step, and proceed directly to data recovery.
To take a complete byte-to-byte backup of your USB flash drive using Disk Drill:
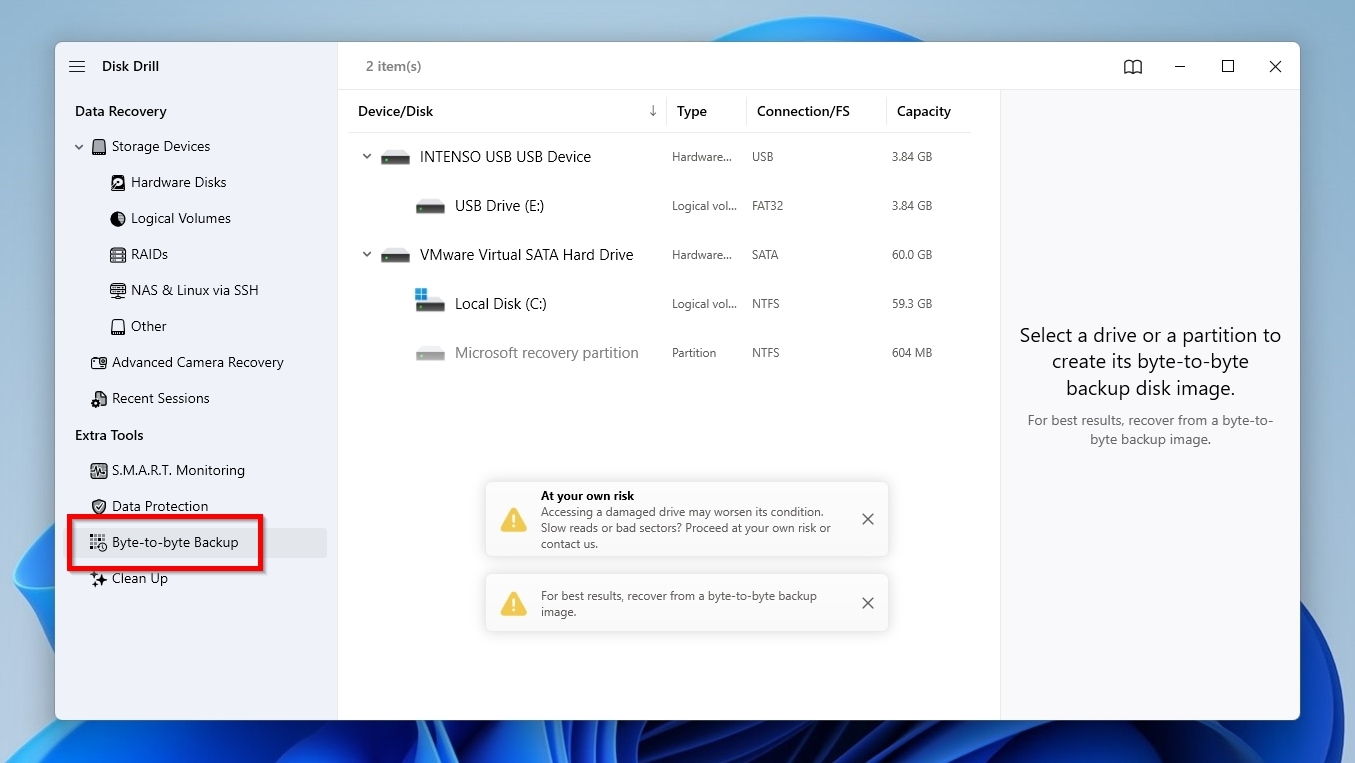
- Download the latest version of the app from Disk Drill’s official site, then install and run it. Select the Byte-to-byte Backup entry from the left.
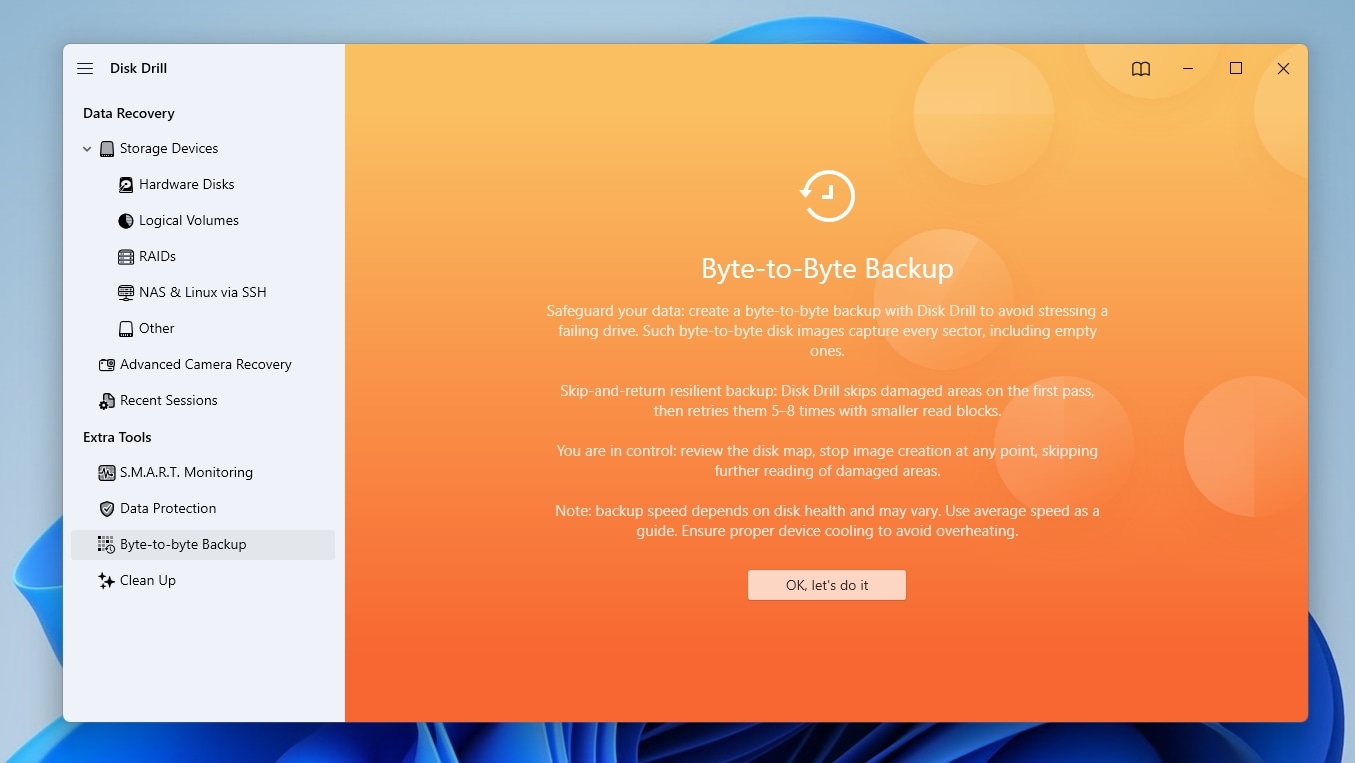
- We suggest you read the information presented in the initial screen of the byte-to-byte backup process by Disk Drill. When done, click the OK, let’s do it button.
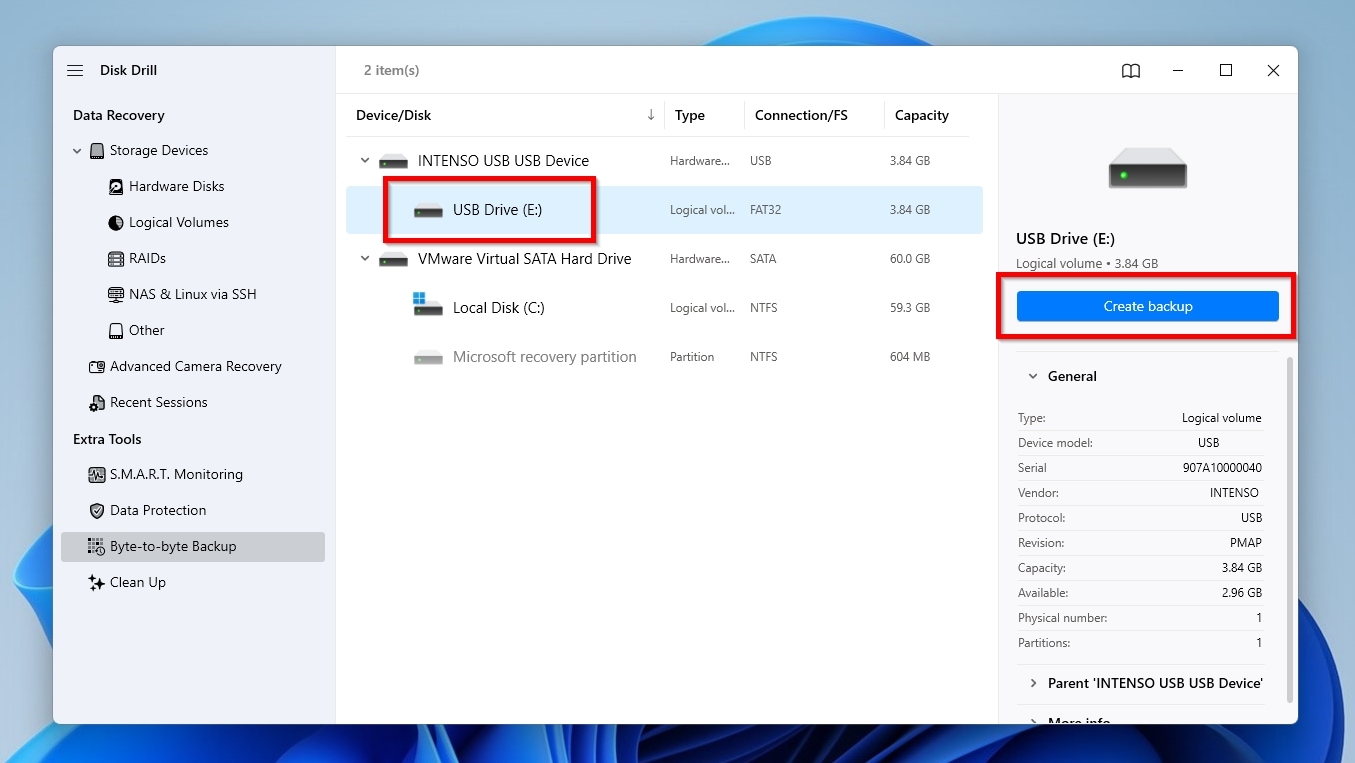
- Select your USB thumb stick from Disk Drill’s Device/Disk list and click Create backup.
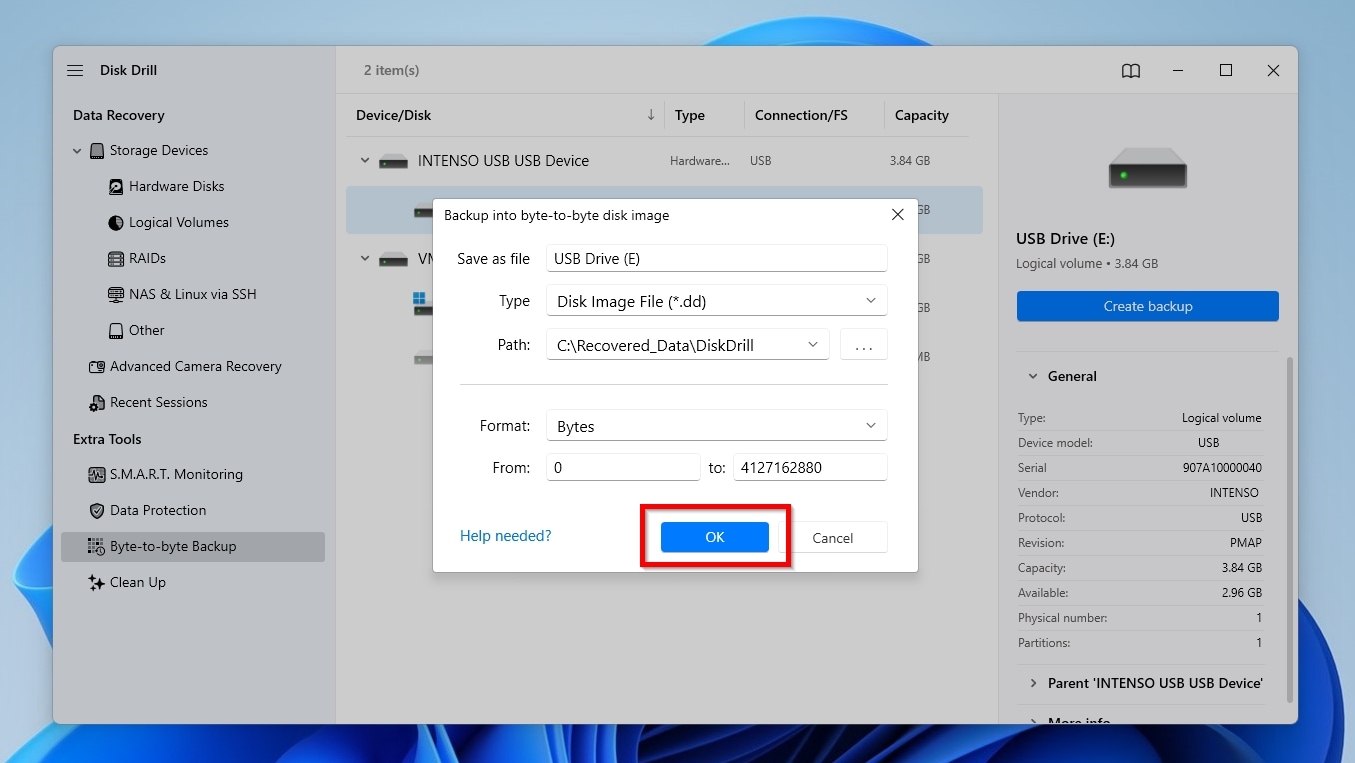
- Click the button with the three dots on the right of Path to select where you want to store the byte-to-byte backup image that Disk Drill will create. Make sure to choose a folder with as much free space as your USB disk’s capacity.
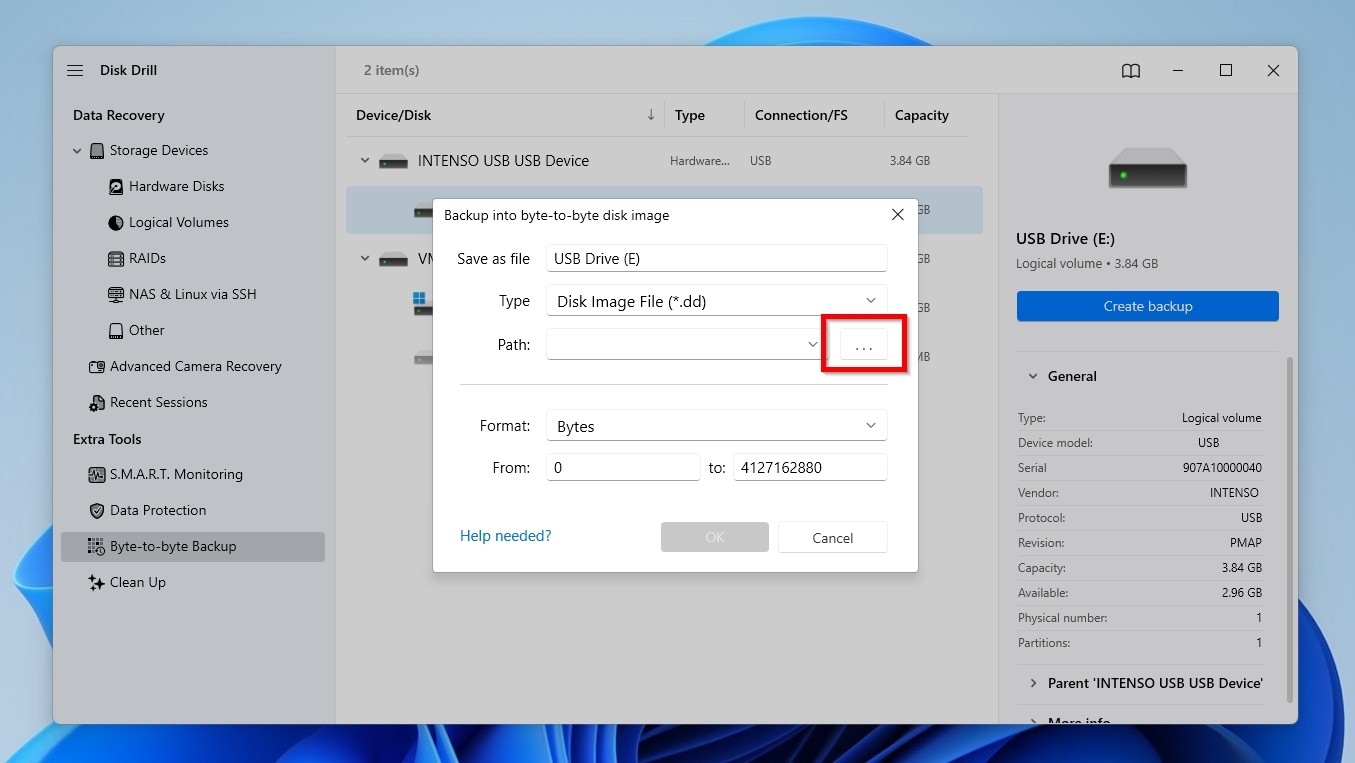
- You can leave the rest of the options as they are and click OK.
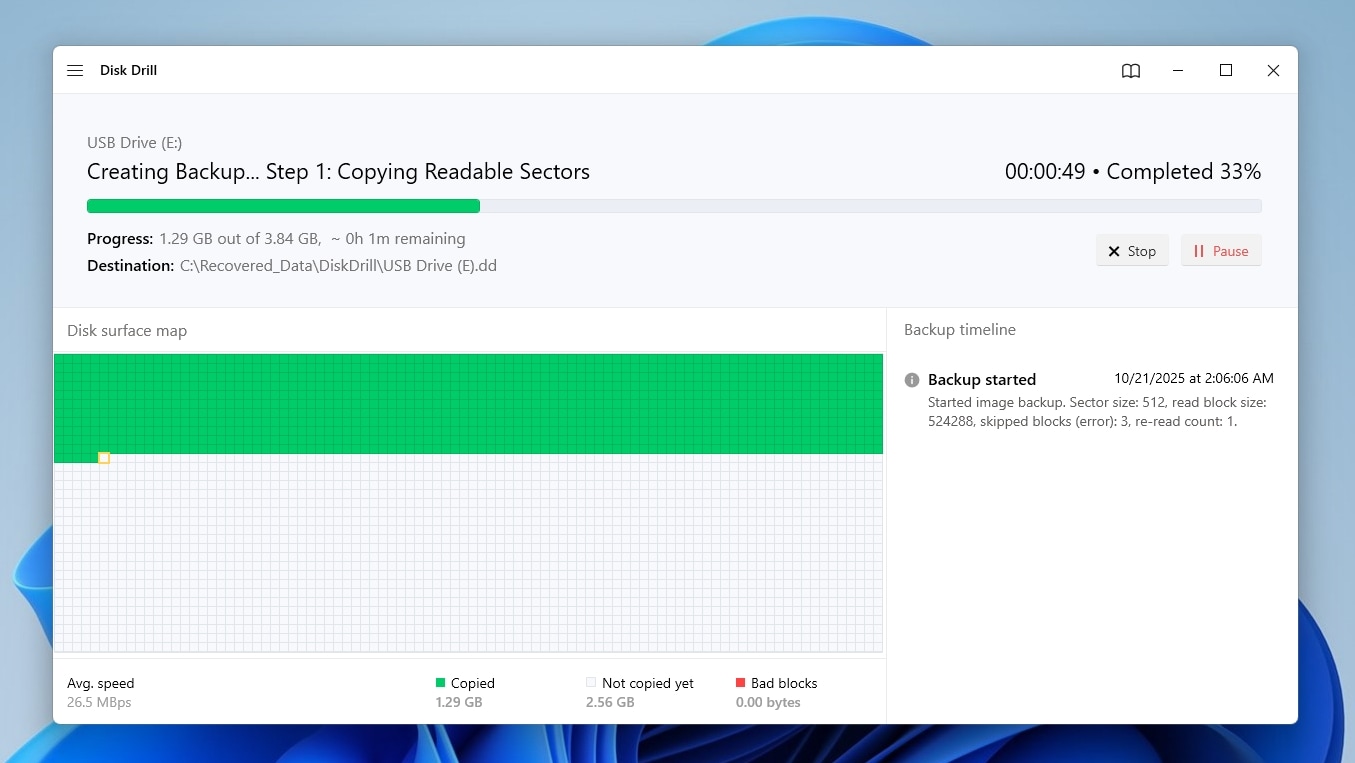
- Disk Drill will immediately start creating a byte-to-byte backup copy of your whole USB disk to the destination folder you selected. The duration of the process depends on the capacity, speed, and condition of both your USB stick and your destination storage device.
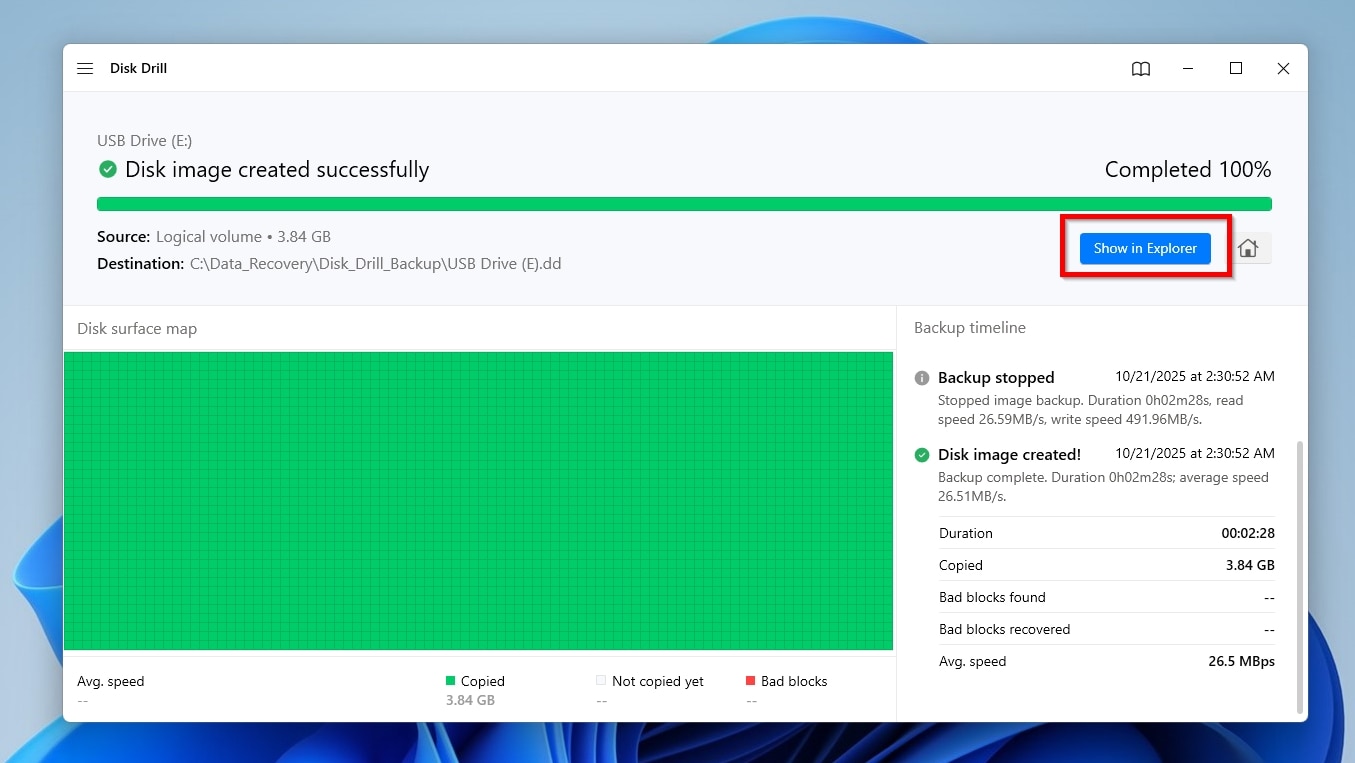
- When the process completes, Disk Drill will inform you that the Disk image (was) created successfully. You can click the Show in Explorer button to view the folder containing the created byte-to-byte backup image in the OS’s default file manager.
To recover your files from a complete byte-to-byte backup image of or directly from your USB flash drive with Disk Drill:
- With a byte-to-byte backup image available and Disk Drill installed, run the app and visit its Storage Devices page from the menu on the left. Click Attach disk image on the bottom left.
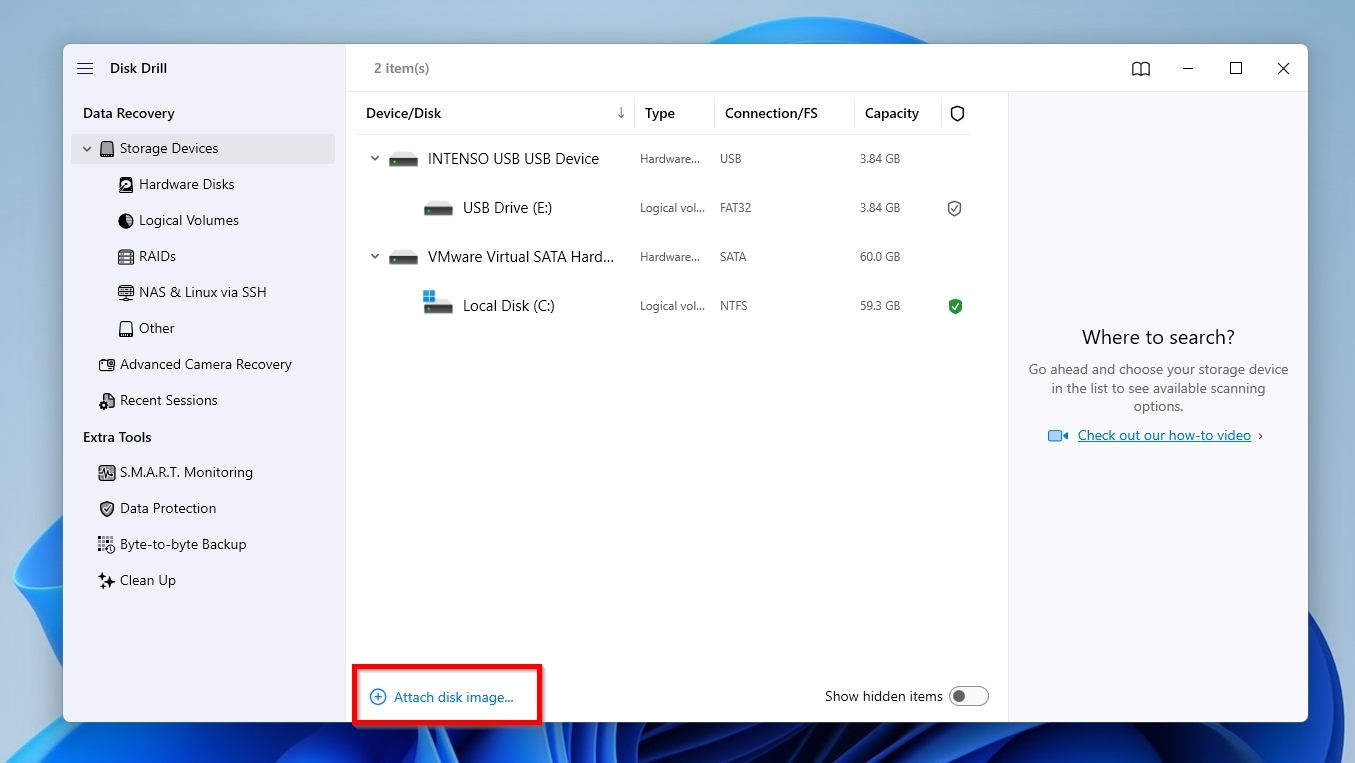
- The attached image will show up as a new virtual device in Disk Drill’s Device/Disk list. Select it and click Search for lost data. If you didn’t take a backup, you can instead directly select your USB stick from the same spot.

- Disk Drill will ask you if you want to use its Advanced Camera Recovery feature, which specializes in getting data out of camera and drone storage devices. Since we are dealing with a typical USB disk, skip that option and go with the classic Universal Scan, which works with all storage devices and file types.

- Disk Drill will start scanning your selected byte-to-byte image for any files it can locate. The process can take a while, depending on the image size and the number of files. Still, it should typically be much quicker than scanning the device from which the image was created. You can check the app’s current findings at any time, but it’s recommended that you let Disk Drills scan complete to find as many files as possible. When Disk Drill displays a pop-up window that says All recovery methods (are) complete, you can close it and click Review Found Items to see the files it found.
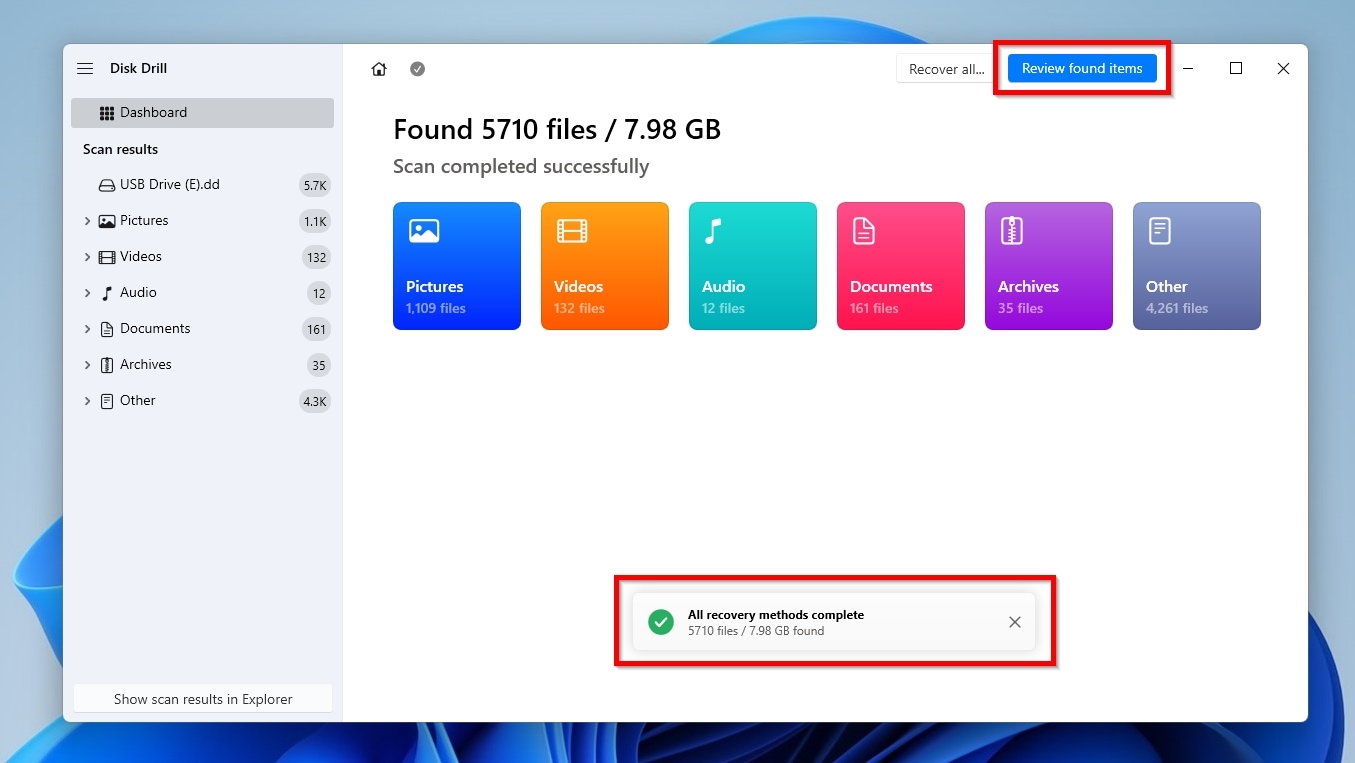
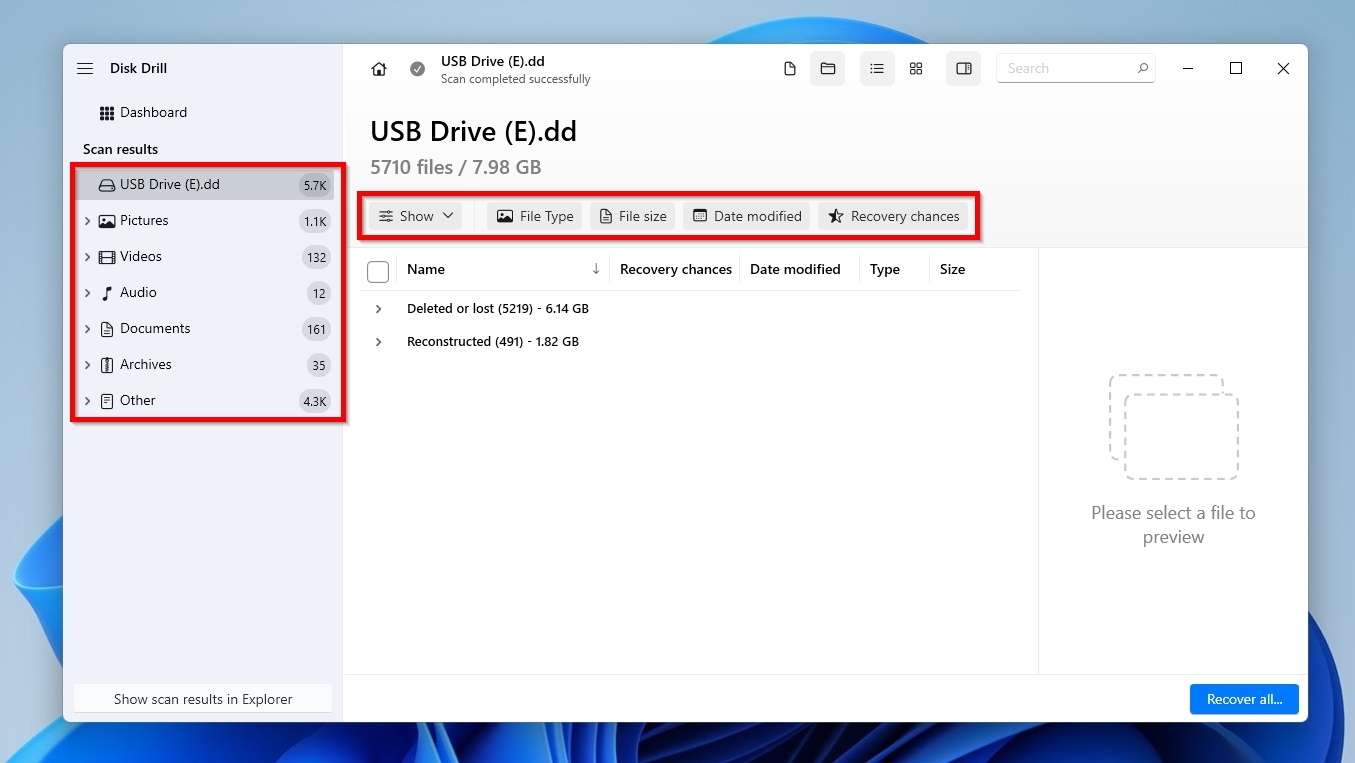
- Disk Drill does its best to organize them logically, but it’s still easy to get lost among the results. For example, in our case, on a lightly used 8GB flash disk, Disk Drill located close to 6,000 files! Thankfully, you can use categories (on the left of the window) and filters (above the results list) to only see subsets of Disk Drill’s findings, based on their type (pictures, videos, documents, etc.) or attributes (file size, last modification date, and more).
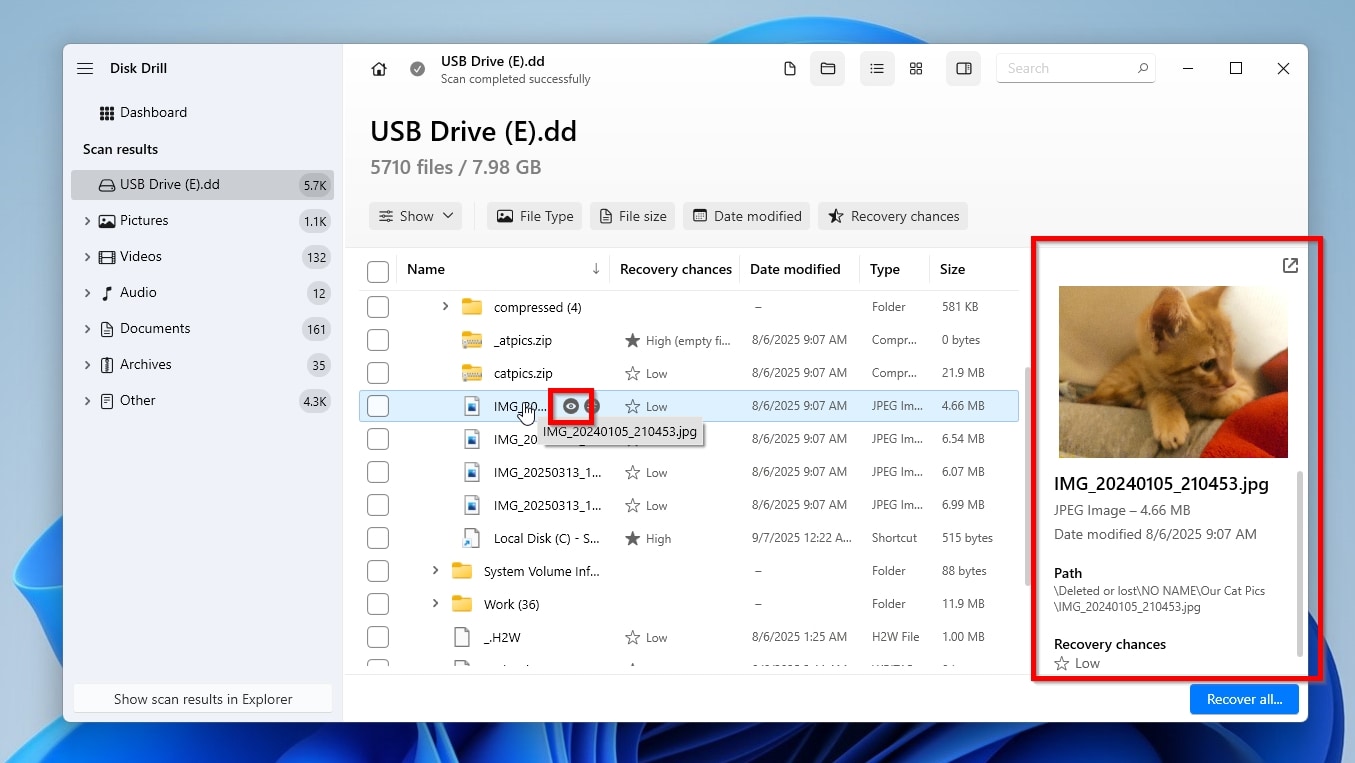
- There’s no reason to try to decide if you should recover a file purely based on its name: Disk Drill allows you to preview the contents of many of your files with a single click on them. If the app’s preview pane isn’t visible on the right, hover over a result and click on the little floating eye icon, or right-click on an entry and select Preview. The feature works with many file formats that Disk Drill and the OS’s default file manager support natively, as well as with those for which installed readers/viewers are available. An extra “pro” is that if you can preview a file, it’s likely recoverable (since a successful preview proves that its contents remain accessible).
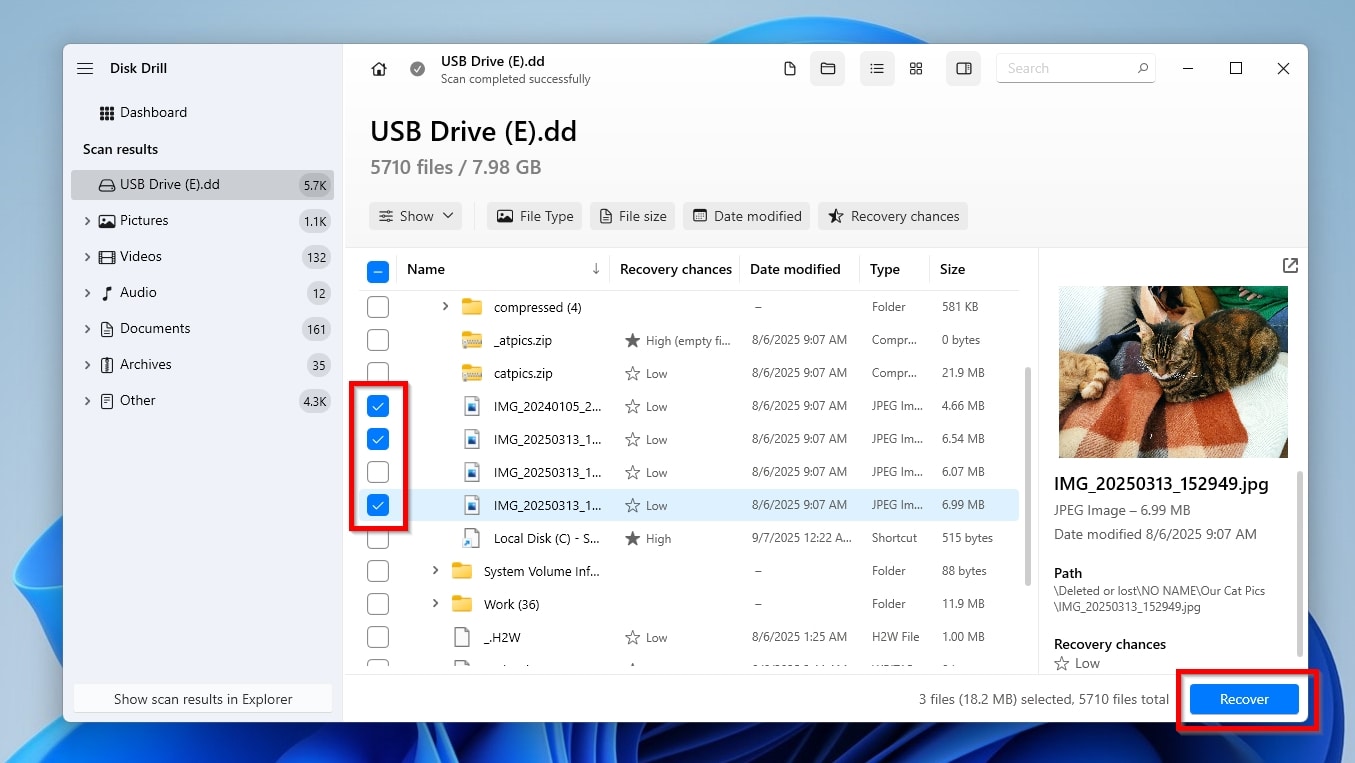
- Mark the files you want to recover with a check mark on their left. When you’ve selected all the files you want to get back, click Recover.
- Disk Drill will ask you to select a destination folder where to store the recovered files. The app will show you a list of potential destinations, including paths you may have used before. If the one you want to use isn’t among them, click Choose destination and select it. With a final click on Next, Disk Drill will start recovering your files.

- When the process completes, Disk Drill will show you a final screen with details about it, stating that “Data recovery (is) complete“. You can click Show recovered data in Explorer to visit the folder where Disk Drill stored all the recovered files using the OS’s default file manager.

Disk Drill is a great option when dealing with “misbehaving” USB flash drives, since it can work with any storage device, from any manufacturer, of any “specifications” (like capacity and speed), as long as the PC and OS detect it. It can recover deleted files from working file systems, or scan the actual storage space to uncover files based on their signatures (the app “knows about” almost 400 file types), even if the USB pen drive was formatted, or shows up as corrupted, empty, or RAW. Practically, this means that Disk Drill can work with, backup to byte-to-byte images, and recover files from almost any USB flash drive.
Yet, Disk Drill also has a minor limitation: its free version is unrestricted in functionality and doesn’t “lock away” any features behind a paywall. However, it imposes a 100 MB limit on the amount of data you can recover. This should be more than enough to recover hundreds of documents, dozens of photos, and even a handful of short videos, but not to get back your collection of Blu-ray backups. But since you will know exactly which files can be recovered and will be able to verify this using the trial limit, you will know for sure that you are not paying for a pig in a poke.
Step 2: Format the Flash Drive
After copying your files to another storage device, you can format a pen drive in Windows through the OS’s default file manager, File Explorer.
To format a USB drive without losing data using Windows File Explorer:
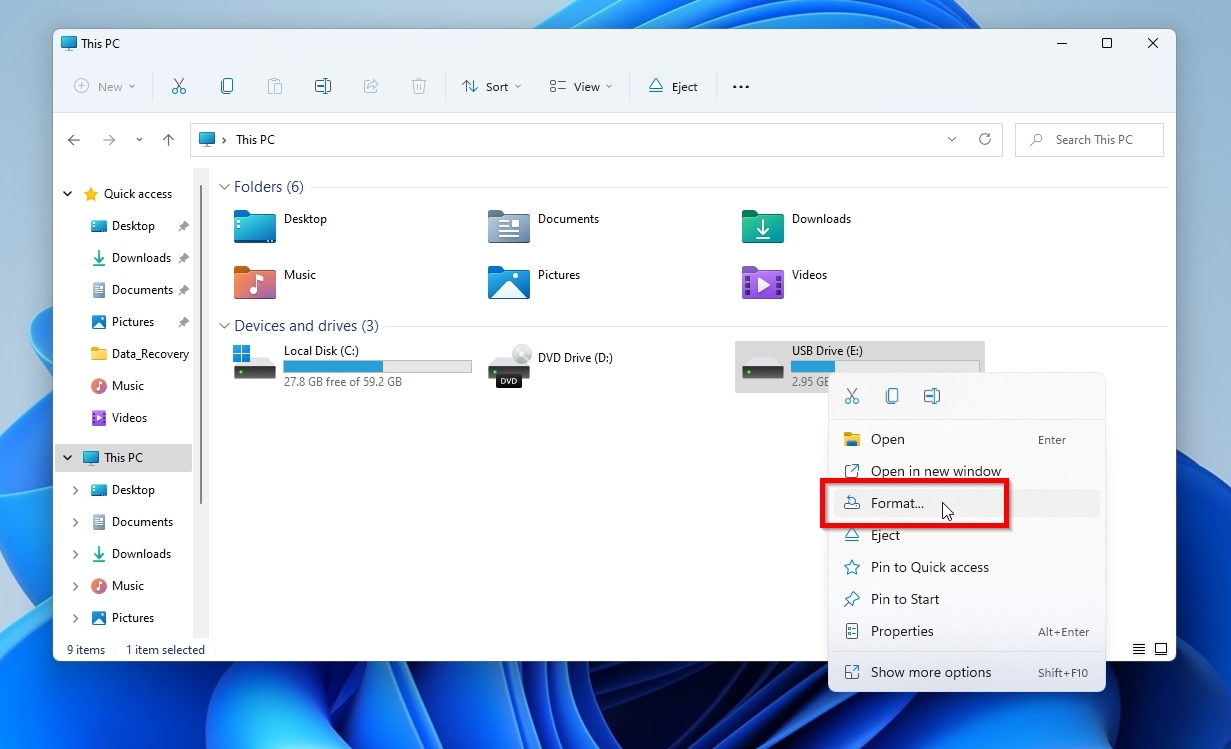
- Run Windows File Explorer – the quick and easy way is to use its OS-level shortcut, Windows Key + E. Select “This PC” in the location pane on the left, then find your USB flash drive under Devices and drives. Right-click on it, and choose Format.
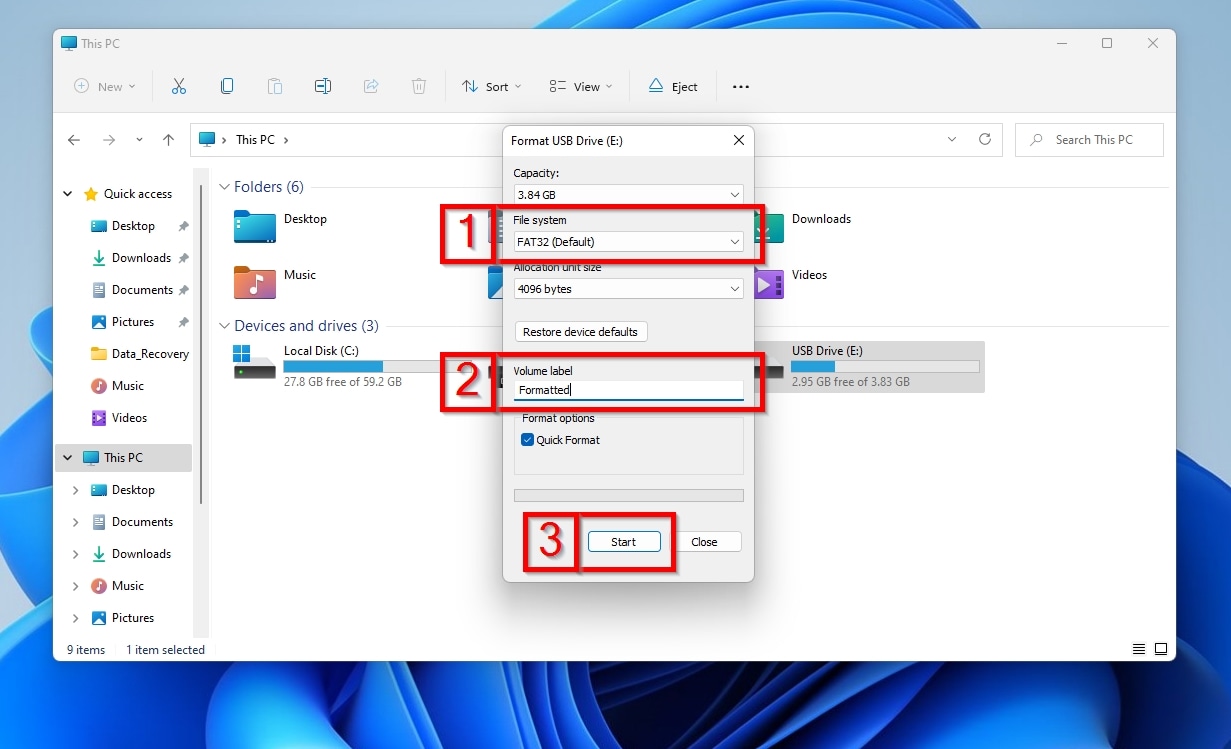
- A format dialog will show up, allowing you some customization of the process. Especially if you’re formatting your pen drive for use on another device that can’t access it with its current file format, make sure you select a file system (1) compatible with that device. Among the available options, FAT32 is the most widely supported file system. It’s often the preferred file system for cameras, printers, gaming consoles, and other devices. If you want, you can also set a name for your USB flash drive in the Volume label text field (2). If the USB stick doesn’t have any significant issues, such as bad blocks, you can go for a Quick Format. Otherwise, turn off that option to perform a complete format. When ready, click Start.
- If you’re absolutely positive you’ve copied all the files you could ever need from your memory stick to another device, or taken a full byte-to-byte backup image of everything on it, you can safely click OK to acknowledge the warning that will show up, informing you about the impending loss of all the data on the drive. If not, this will be the last chance to abort the process by clicking Cancel.

- When the drive’s formatted according to your preferences, a new window will pop up, stating that “(the) Format (is) Complete”.

Is There a Way to Avoid Formatting at All?
Your device is healthy, and you just need to change its format without copying data back and forth? Fortunately, it’s possible to convert a USB flash drive’s current file system to another while keeping all data intact, allowing multiple devices to access it.
Conversion 1: FAT to NTFS
The official way to change a USB disk’s file system format without deleting files on Microsoft’s Windows is by using the convert command, which is far from perfect and comes with two major cons:
- The process doesn’t guarantee a successful outcome. If it fails midway, it can corrupt the data on the USB flash drive or render it inaccessible.
- It can only convert older FAT file systems to the newer NTFS file system, but not the other way around.
To morph your USB pen drive’s file system from FAT to NTFS using the convert command in Windows:
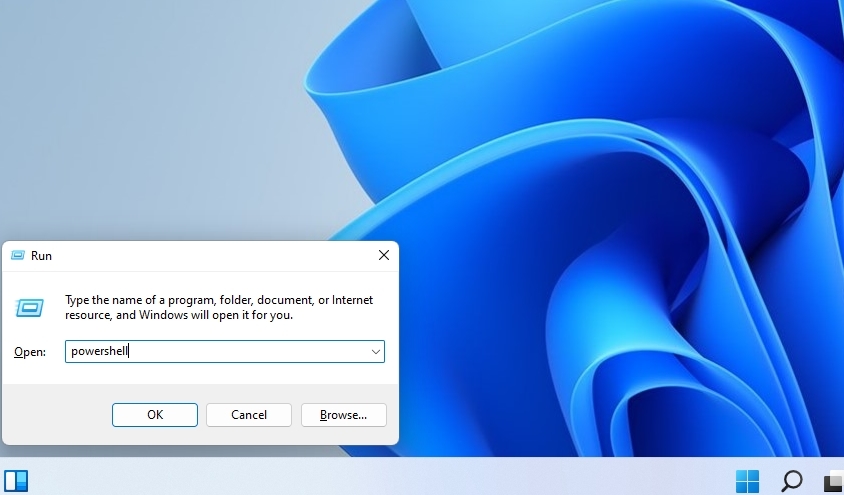
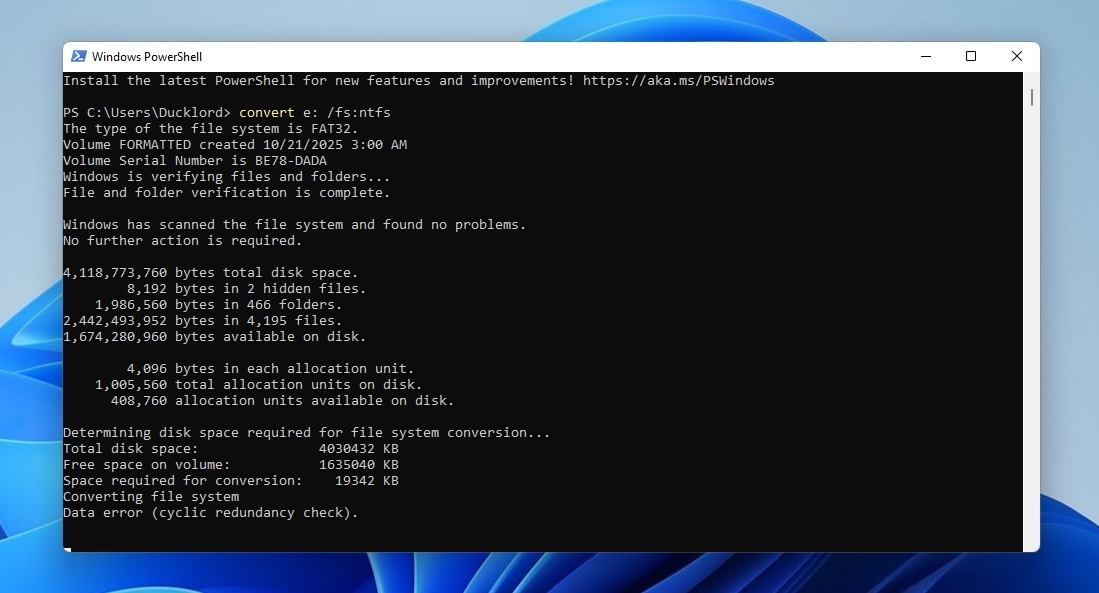
- The convert utility is accessible as a command through the Windows terminal. So, the first step to use it is to launch either the classic command line terminal or the newer PowerShell by either seeking them in the Start menu or, for quicker access, by pressing Windows key and R to open the Run dialog, typing their name (respectively CMD or PowerShell), and pressing Enter.
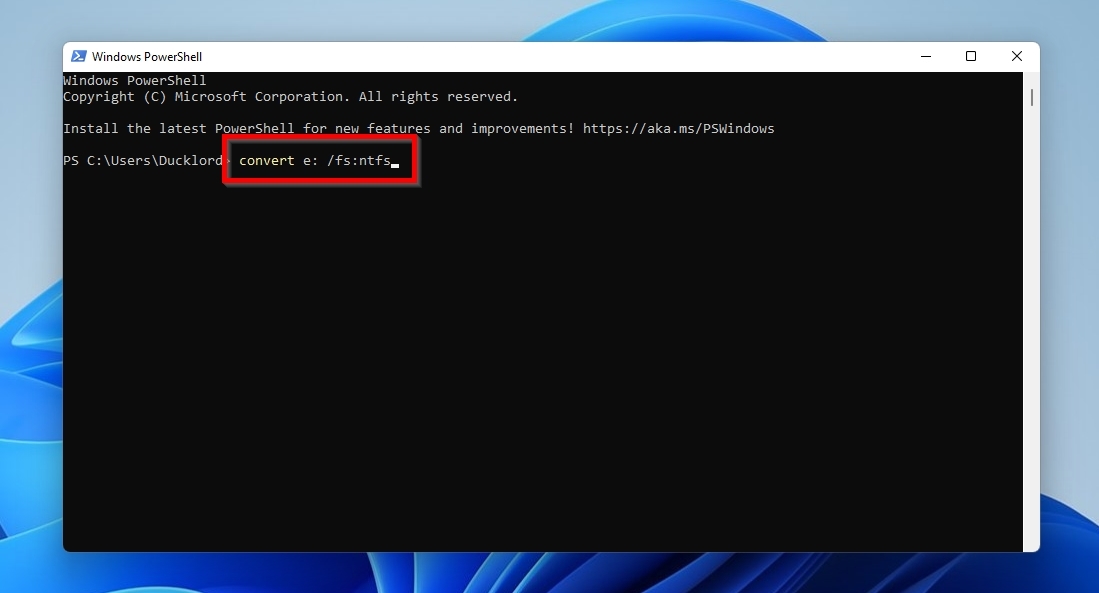
- Type
convert DRIVE_LETTER: /fs:ntfs, where “DRIVE_LETTER” is the letter through which your USB flash drive is currently accessible. For example, the USB stick we wanted to convert for this article was accessible with the letter “E”, so our version of the command was:convert e: /fs/ntfs. Then, hit Enter, and allow the conversion process to run its course.
- The duration of the conversion process depends on various factors and can take a short while. A small but nimble modern USB stick in perfect working condition, with a handful of files on it, might take a minute or two. In contrast, a large, overused, filled-to-the-brim drive will take significantly more time to convert.
- When the process completes, your USB thumb drive should be accessible as before, with all data on it intact, but using the newer NTFS file system.

Conversion 2: NTFS to FAT
Despite its limitations compared to the newer NTFS, FAT32 remains the most widely supported (and thus compatible) file system for portable devices.
Thankfully, you don’t have to move files around or perform time-consuming backups, to then format a USB stick to FAT32 if you want to use that file system: it’s possible to do the reverse of what we just saw, and convert a USB flash drive’s NTFS file system to the older FAT32. Microsoft’s convert doesn’t support that, but it’s doable using third-party software like AOMEI Partition Assistant.

To convert an NTFS-formatted USB disk to FAT32 with AOMEI Partition Assistant, after downloading and installing the app, run it, and select Convert to NTFS/FAT32 from the app’s Convert menu. Leave the conversion selection as “NTFS to FAT32“, select the device you want to convert, and follow the rest of the wizard’s steps.
Conversion 3: FAT/NTFS to exFAT
If you want to convert the file system of your USB flash drive to make it compatible with another device that doesn’t support NTFS, but you’re also using it to store files over 4 GB, you shouldn’t convert it to FAT32. As an older file system, FAT32 is much more limited in many ways, including not supporting files larger than 4GB.
Instead, look into exFAT, a more modern alternative to FAT32 that’s widely supported for use with portable media and doesn’t have that limitation. However, there aren’t any tools that convert NTFS to exFAT, so you will have to copy all of your USB stick’s contents to another disk, then format it with the exFAT file system before bringing your files back onto it.
Alternatively, if your files take up less than half of the USB flash drive’s space, you can perform some partition juggling with a non-destructive partition editor, like AOMEI Partition Assistant or GParted, to:
- Resize the USB drive’s current partition.
- Create a secondary exFAT partition in the newly-created space.
- Move your files from the old to the new partition.
- Delete the old partition.
- Resize the new exFAT partition to take up the whole USB pen drive’s space.
To sum up, we conclude that these guides are suitable for a very limited number of cases. We included them to cover all possible scenarios, even the relatively rare ones, thereby more boldly claiming the title of an “all-in-one” guide.
Final Words
As we saw, you can format a USB pen drive without losing the data stored on it, but the optimal approach depends on the specifics of each case:
⚠️ Isn’t a USB flash drive accessible anymore? Does it show up as empty or RAW, or does your OS suggest you need to format it to keep using it?
- Take a complete byte-to-byte image of its contents.
- Scan that image and recover your files from it to another storage device.
- Format the USB stick.
❓ Do you need to access the USB thumb drive and its data from a device that isn’t compatible with its current file system?
- Ideally, copy your files to another storage device or take a byte-to-byte image of everything on your USB stick to make sure your most essential data will remain available if the next step fails.
- Convert the USB disk’s current file system to one that is compatible with the device from which you want to access it.
Does your USB stick insist on “acting flaky” even after a format or conversion, maybe showing up as write-protected, occasionally not being recognized, or having its contents become inaccessible due to bad sectors? Those are telltale signs of total failure, and you shouldn’t trust it for long-term data storage. Copy your files off it as soon as possible, and replace it with a new device.
Finally, if you need the files on a USB flash drive but cannot access it, no matter what you’ve tried, don’t attempt to fix or modify it in any way, since that would further diminish your chances of getting your files out of it. Instead, contact data recovery specialists. Although that option comes at a cost, it also offers a higher chance of successfully recovering your important data.
FAQ
There’s no tool for converting between exFAT and other file systems, so “wiping”, as in copying your files to another storage device, formatting the USB stick to NTFS, and then bringing the files back onto it, seems like the best and easiest option. However, if the contents of your USB flash drive take up less than half of its space, you can temporarily resize its primary partition, create a secondary one in the available space using the desired file system, and move the files there. Finally, delete the original partition and resize the new one to fill the entire USB stick.
We must emphasize that this approach should be used only when the USB flash drive works correctly and you only want to change its file system for compatibility with other devices. If there are any issues or signs of potential failure, this process can lead to data loss or even be the last straw that pushes your USB thumb drive past the point of no return. It’s also much more time-consuming than copying the USB drive’s contents to another storage device, formatting it, and bringing them back, since all the “partition juggling” steps also take time.
You should ignore the OS’s suggestion to format a USB flash drive if you also want to preserve the files on it. Although in such cases it’s often impossible to directly copy your files from it to another device as usual, you can do it indirectly with a data recovery app like Disk Drill. Such an app will allow you to scan your USB disk, recover your files, and temporarily store them on a secondary storage device. You can then format the USB stick and copy your files back onto it afterward.
CHKDSK does not work with RAW drives (with rare exceptions) because it requires a file system to function. Formatting is one way to render a “misbehaving” USB stick usable again. Still, it does so by disregarding its existing contents and making the device appear empty. To make sure you don’t lose your files:
- Take a complete byte-to-byte image of your USB flash drive, storing it on another storage device.
- Use an app like Disk Drill to make sure that you can find all the files you need within the byte-to-byte image, and they’re fully recoverable. Skip their actual recovery for now.
- Format your USB pen drive without worrying about data loss.
- Return to Disk Drill, resume the previous scan, and recover all the files you need back to your USB pen drive.
Unfortunately, that question is vague, leading to both positive and negative answers.
- If a USB stick was bootable before, but for some reason isn’t anymore, it’s possible to reset its boot flag without affecting the rest of its contents. You can do that using an advanced partition editor, like GParted or AOMEI Partition Assistant.
- If the USB drive didn’t contain the necessary files and data structures (like partitions with reserved space for OS use, or swap files), it must be formatted through an OS installer to allow booting into that OS. You should first back up your files from the USB disk to another storage device before proceeding with such a process, since it erases everything.