When I recently connected an external hard drive to my Mac, it didn’t show up in Finder. So, I launched Disk Utility and attempted to mount the drive manually. To my surprise, instead of accessing my files, I was met with a “com.apple.DiskManagement.disenter” error message. The drive was visible in the sidebar but completely unusable, and clicking Mount did nothing.
What You Need to Know Before You Troubleshoot a DiskManagement Disenter Error
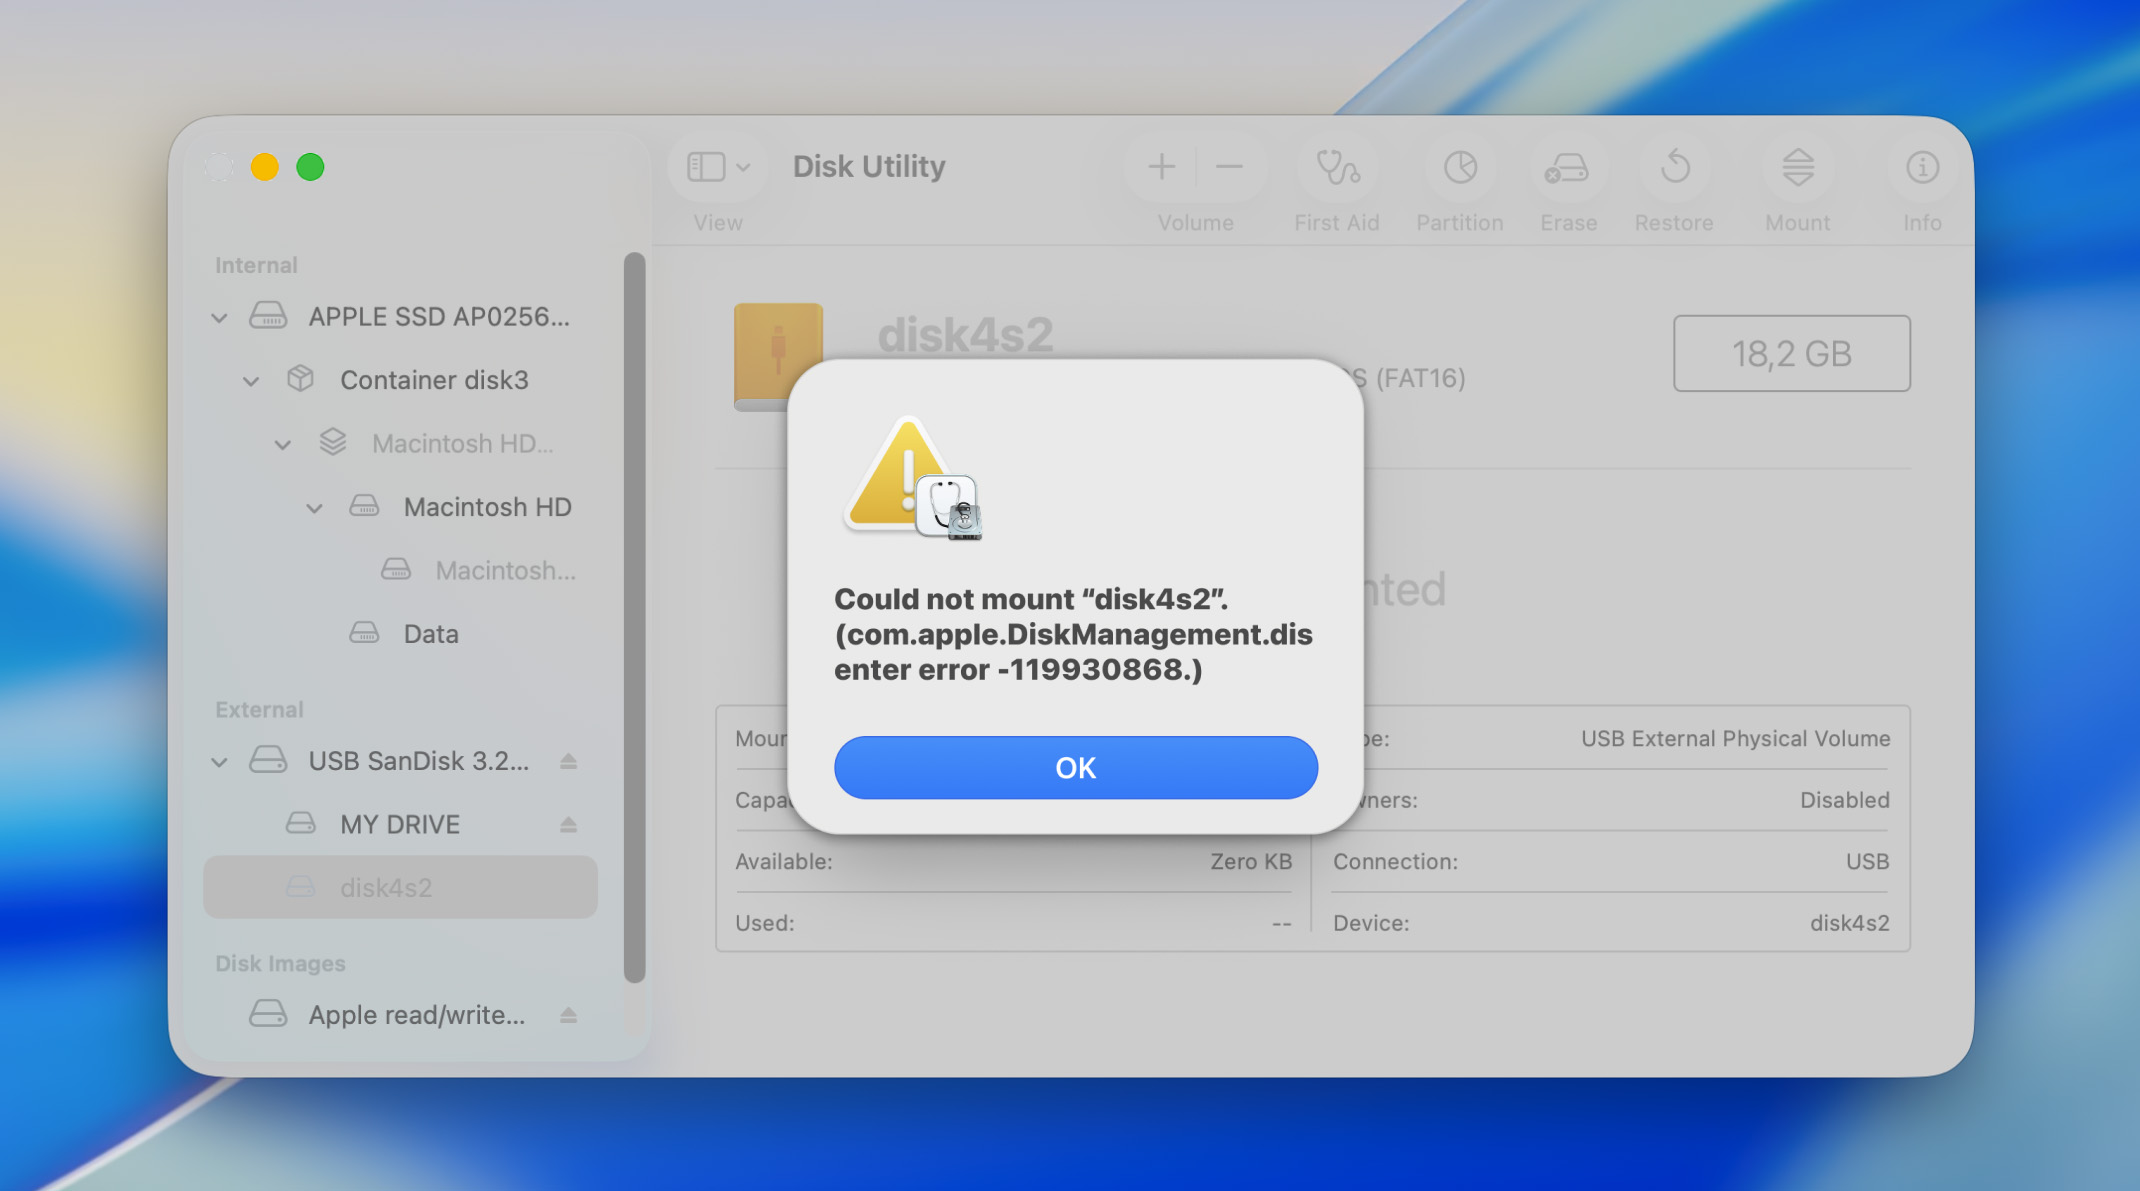
The com.apple.DiskManagement.disenter error typically occurs when macOS tries to mount your drive but can’t complete the process. You can most commonly encounter the so-called DiskManagement disenter error in Disk Utility in the form of a pop-up window that displays the error itself, plus a cryptic number like “119930868” or “49223” or “49218” next to it.
The numbers are specific error codes that tell you why the mount failed. One code might indicate file system corruption on an APFS volume, while another might point to software conflicts, and so on. In general, the root causes can be divided into physical problems (such as bad sectors and failing drive electronics) or file system corruption (such as damaged partition tables).
Since the com.apple.DiskManagement.disenter error is usually encountered in Disk Utility, many users’ first instinct is to click the First Aid button and let Disk Utility sort it out. However, running repairs before recovering your data can actually make things worse. First Aid might “fix” the file system by discarding damaged structures, which sounds great until you realize those structures contained pointers to your files.
❗️ To avoid data loss while fixing the DiskManagement disenter error, we (and other data recovery professionals) recommend the following approach instead:
- Stop all writes immediately. Don’t save anything new to the drive or let macOS attempt automatic repairs.
- Create a byte-to-byte disk image if the drive is physically unstable (or at minimum, attempt a read-only mount if the drive seems healthy).
- Recover your files from the disk image or by connecting the drive to another Mac that might handle it better.
- Only after your data is safe, attempt repairs using First Aid, Terminal commands, or reformatting.
How to Recover Data When a DiskManagement Disenter Error Blocks the Mount
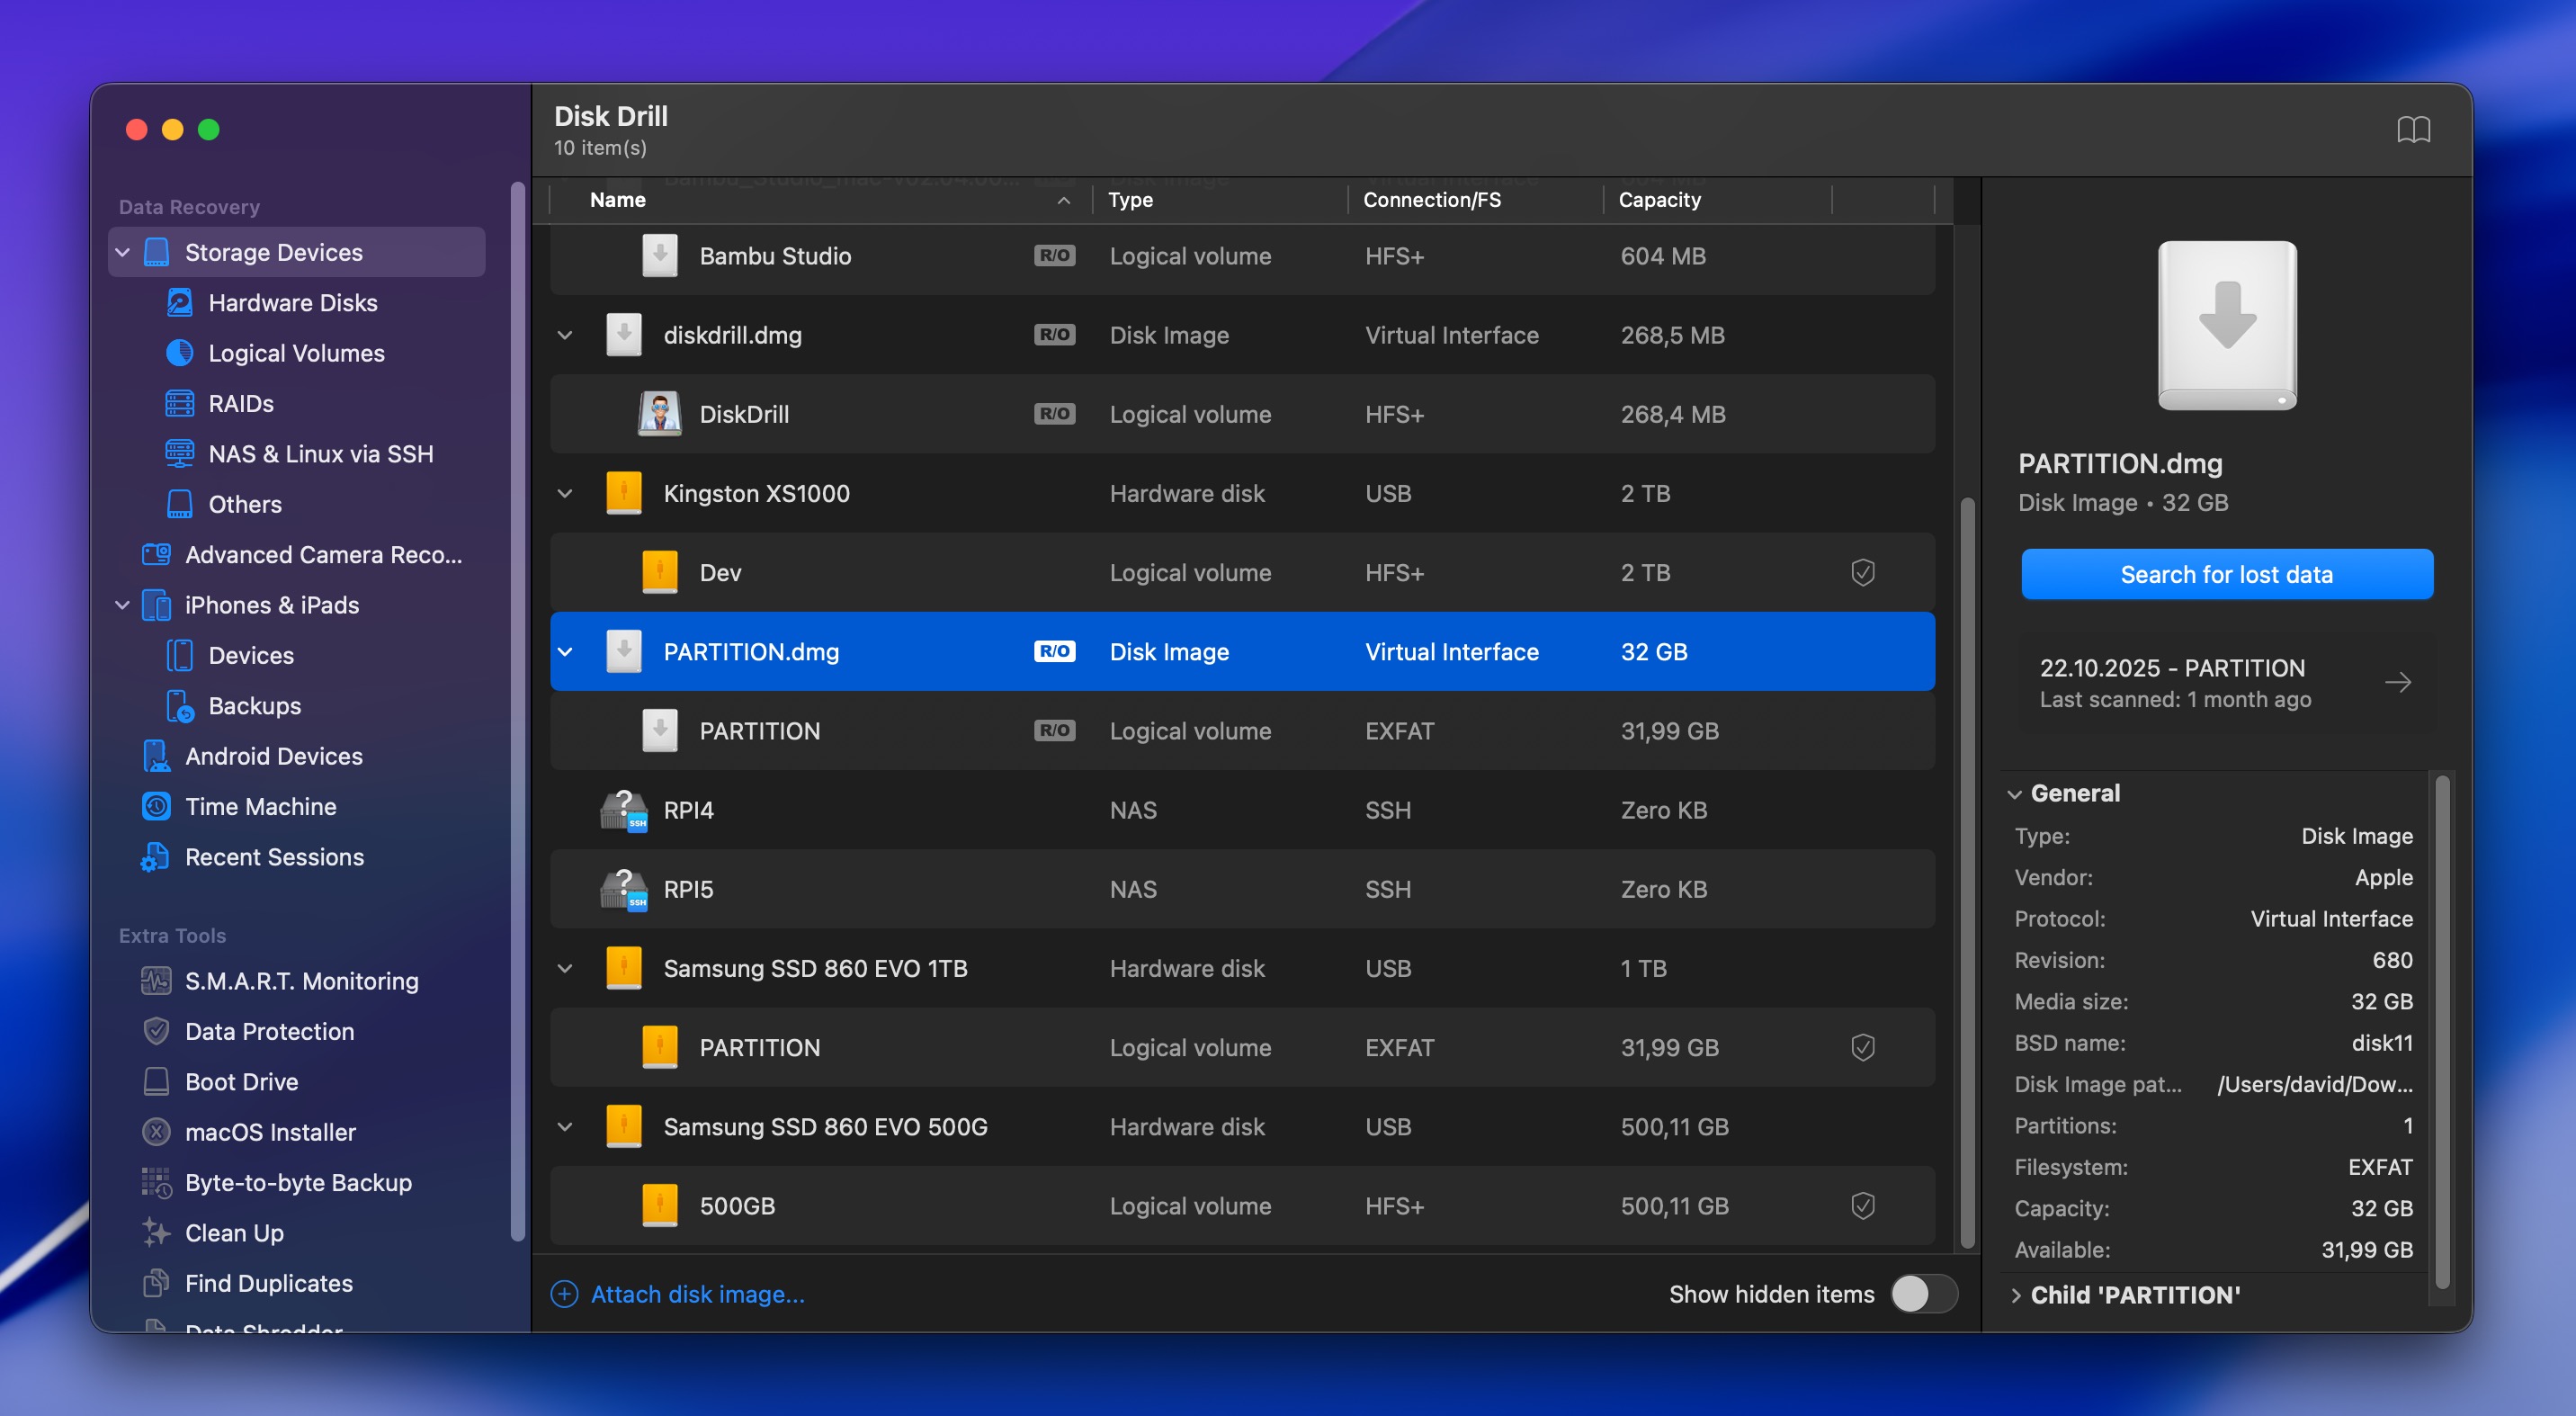
If your drive appears in Disk Utility (even as an unmounted volume), there’s a strong chance you can extract your data using hard drive recovery software like Disk Drill, which doesn’t need the drive to mount normally and be accessible in Finder. It just needs macOS to recognize that the physical device exists.
Disk Drill’s free version is an excellent choice because it lets you scan the drive completely free to confirm your files are actually recoverable before you spend a dime. You’ll see preview thumbnails for photos and videos, file names, and folder structures. Only after you’ve verified everything is there do you need to decide whether to upgrade for full recovery.
Step 1: Download and install Disk Drill for Mac
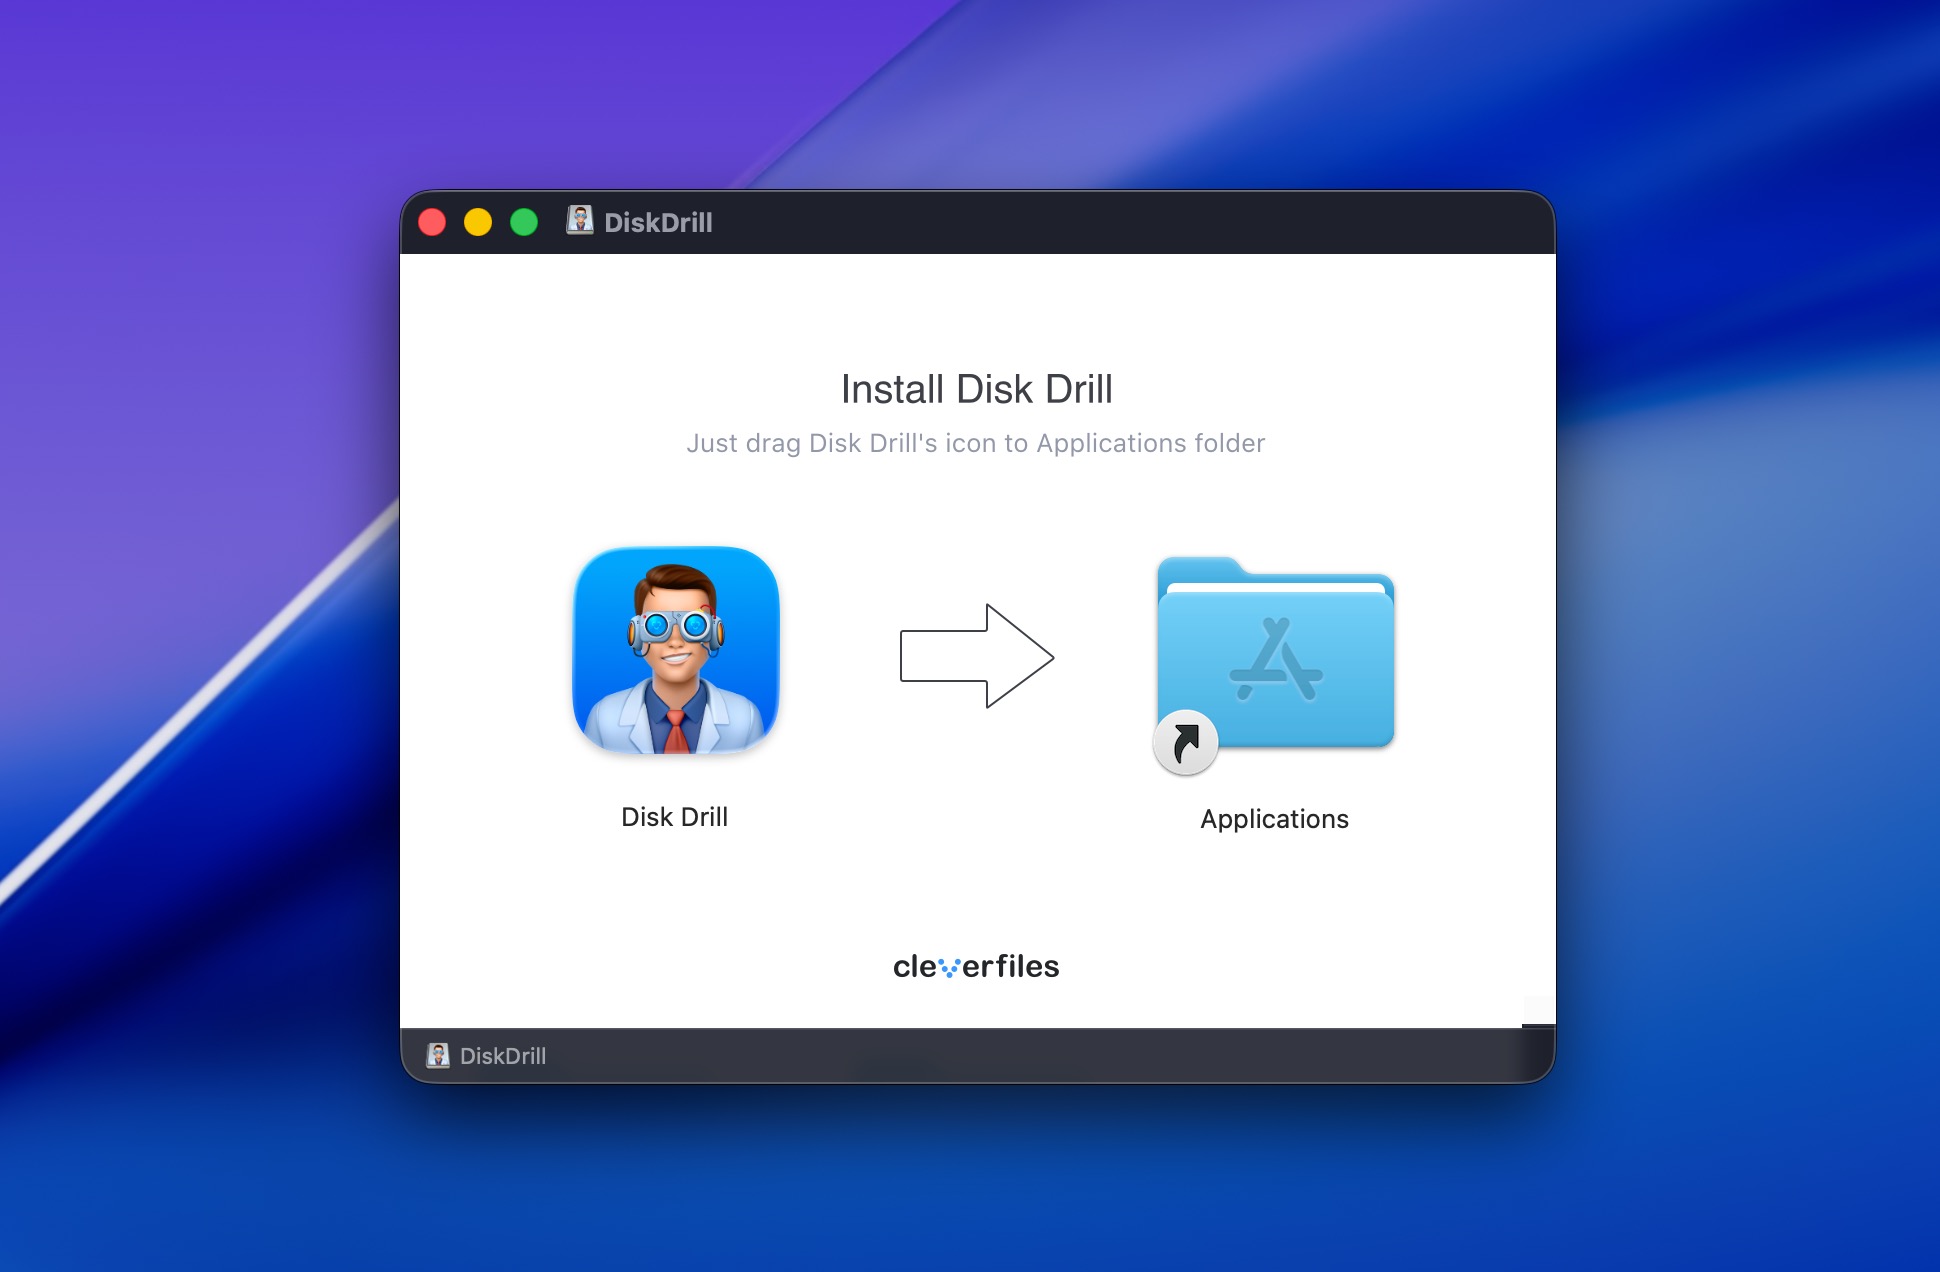
Download Disk Drill from the official website and install it on your Mac. Once installed, you can launch Disk Drill from the Applications folder or using Spotlight. Give the software the privileges necessary to find and recover lost data when asked to do so. Disk Drill is completely safe and privacy-respecting, so you don’t need to worry about granting the permissions.
Step 2: (Optional but recommended) Create a disk image
This step isn’t mandatory, but it can save the day if the com.apple.DiskManagement.disenter error is actually a symptom of your storage device being on its last leg. Sometimes, such situations are clear because the corrupted hard drive in question is making strange noises or randomly connecting and disconnecting.
To create a disk image with Disk Drill, you need to do the following:
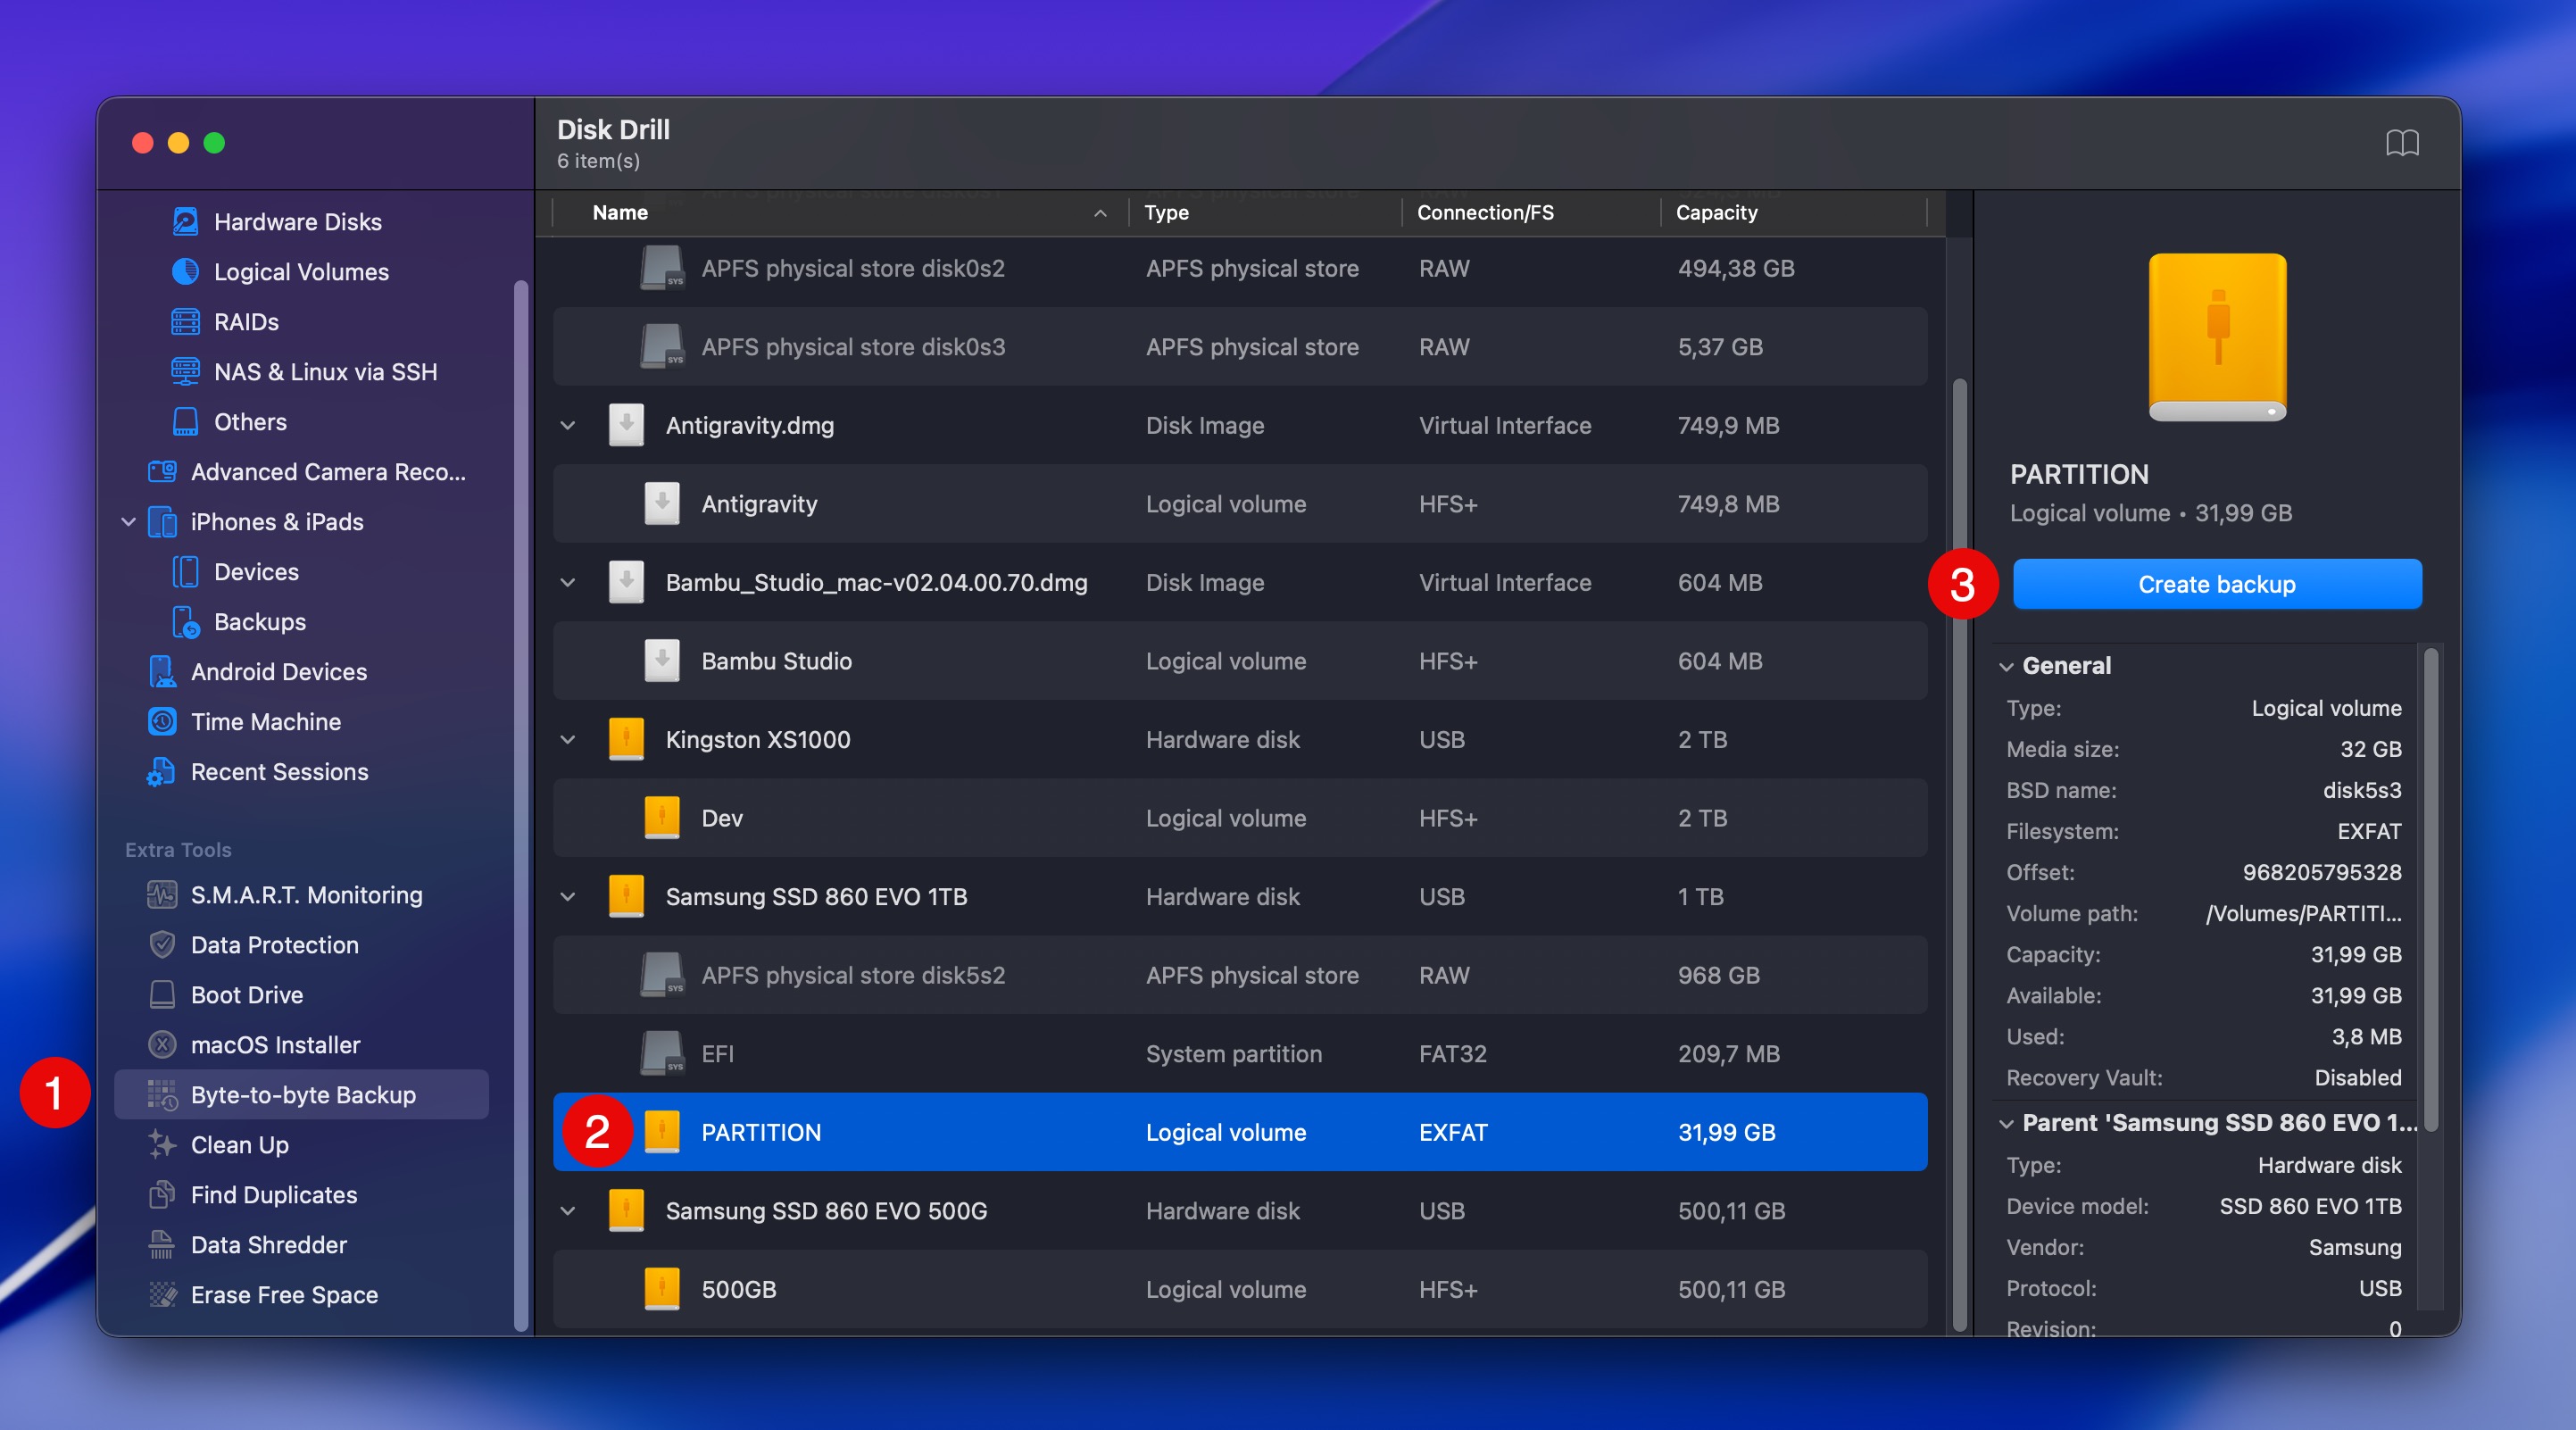
- Launch Disk Drill and look for Byte-to-byte Backup in the left sidebar.
- Select your problematic drive from the list (it should appear even if it won’t mount).
- Click Create backup and choose a destination for the disk image. Make sure you have enough free space (you’ll need roughly the same capacity as your source drive).
This process can take some time (up to several hours) depending on drive size, but it’s worth the wait. Once complete, you’ll have a .dmg file that you can scan for recovery instead of risking the original drive.
Step 3: Scan for recoverable files
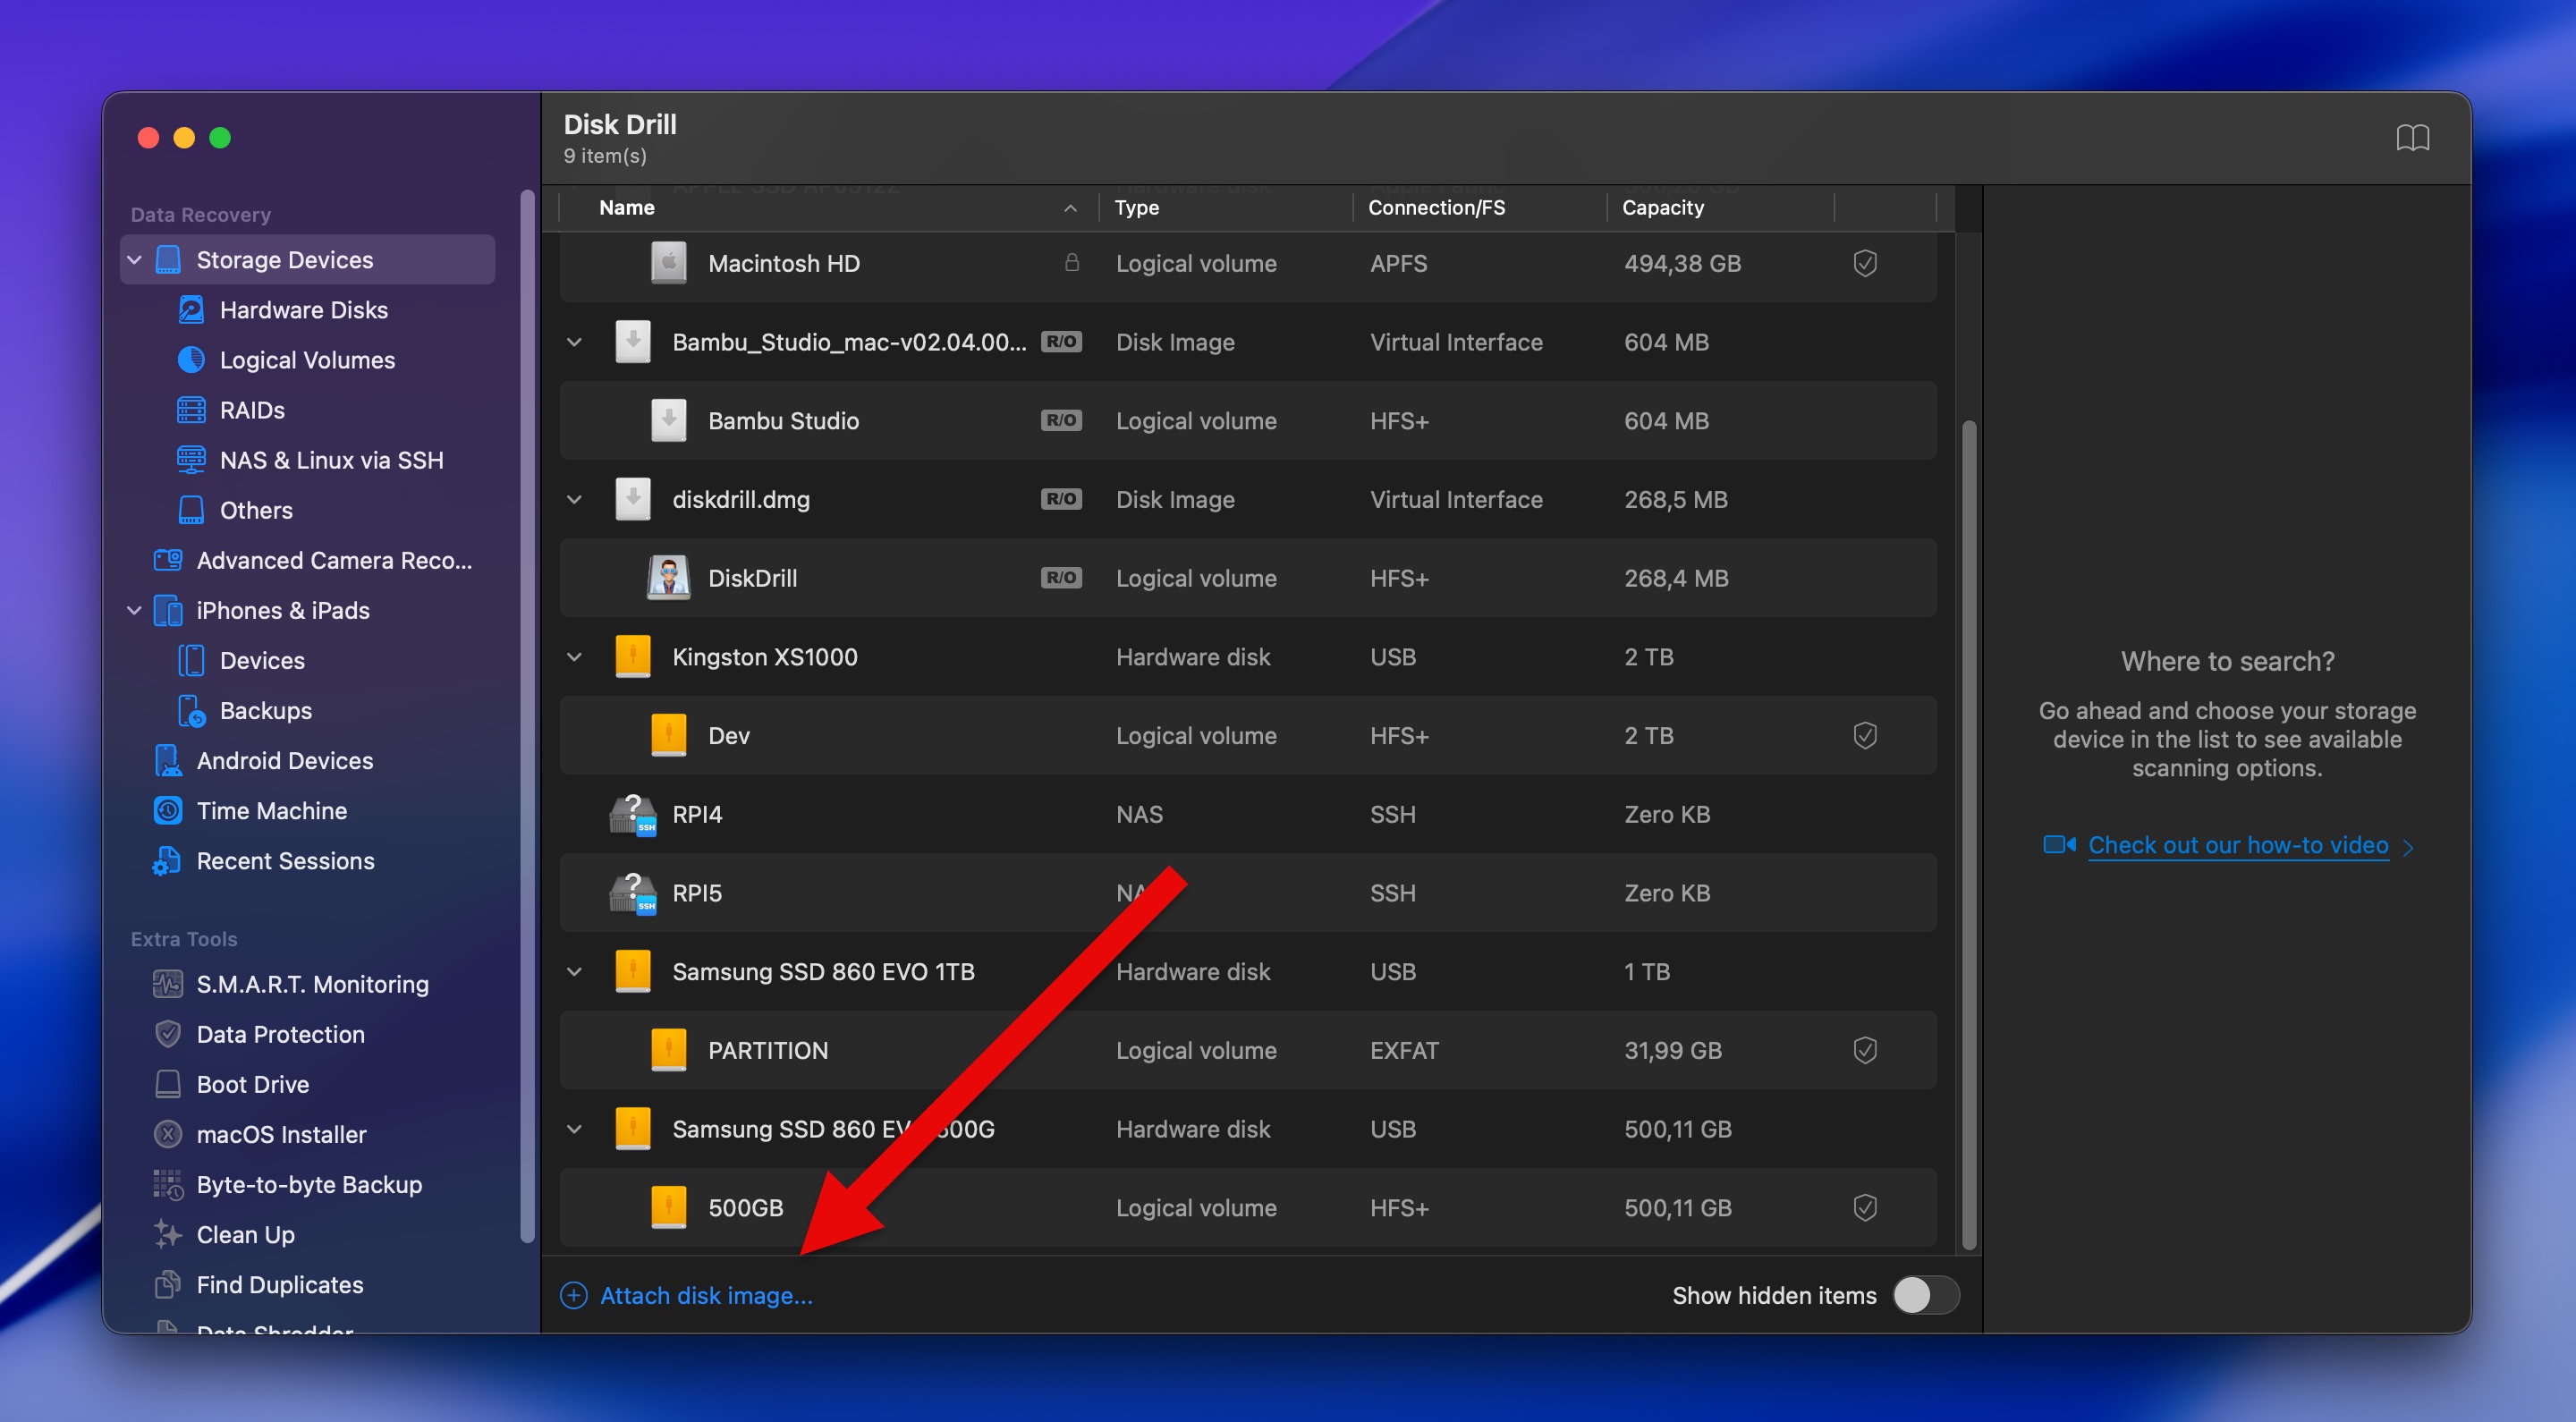
In Disk Drill’s main window, select your drive from the list of available storage devices. If you’ve created a disk image and want to scan it instead of the actual drive, then you need to first click the Attach disk image link at the bottom of the Storage devices section and then choose the image file.
With your drive or image selected, you can click Search for lost data, and Disk Drill will prompt you to choose a scanning method. The “Universal Scan” method works in most situations, but “Advanced Camera Recovery” is the superior option if you’re specifically recovering photos and videos from a camera or drone. Feel free to pause the scan if you need to, or click the Review found items button to see recoverable files in real time.
Step 4: Preview and verify your files
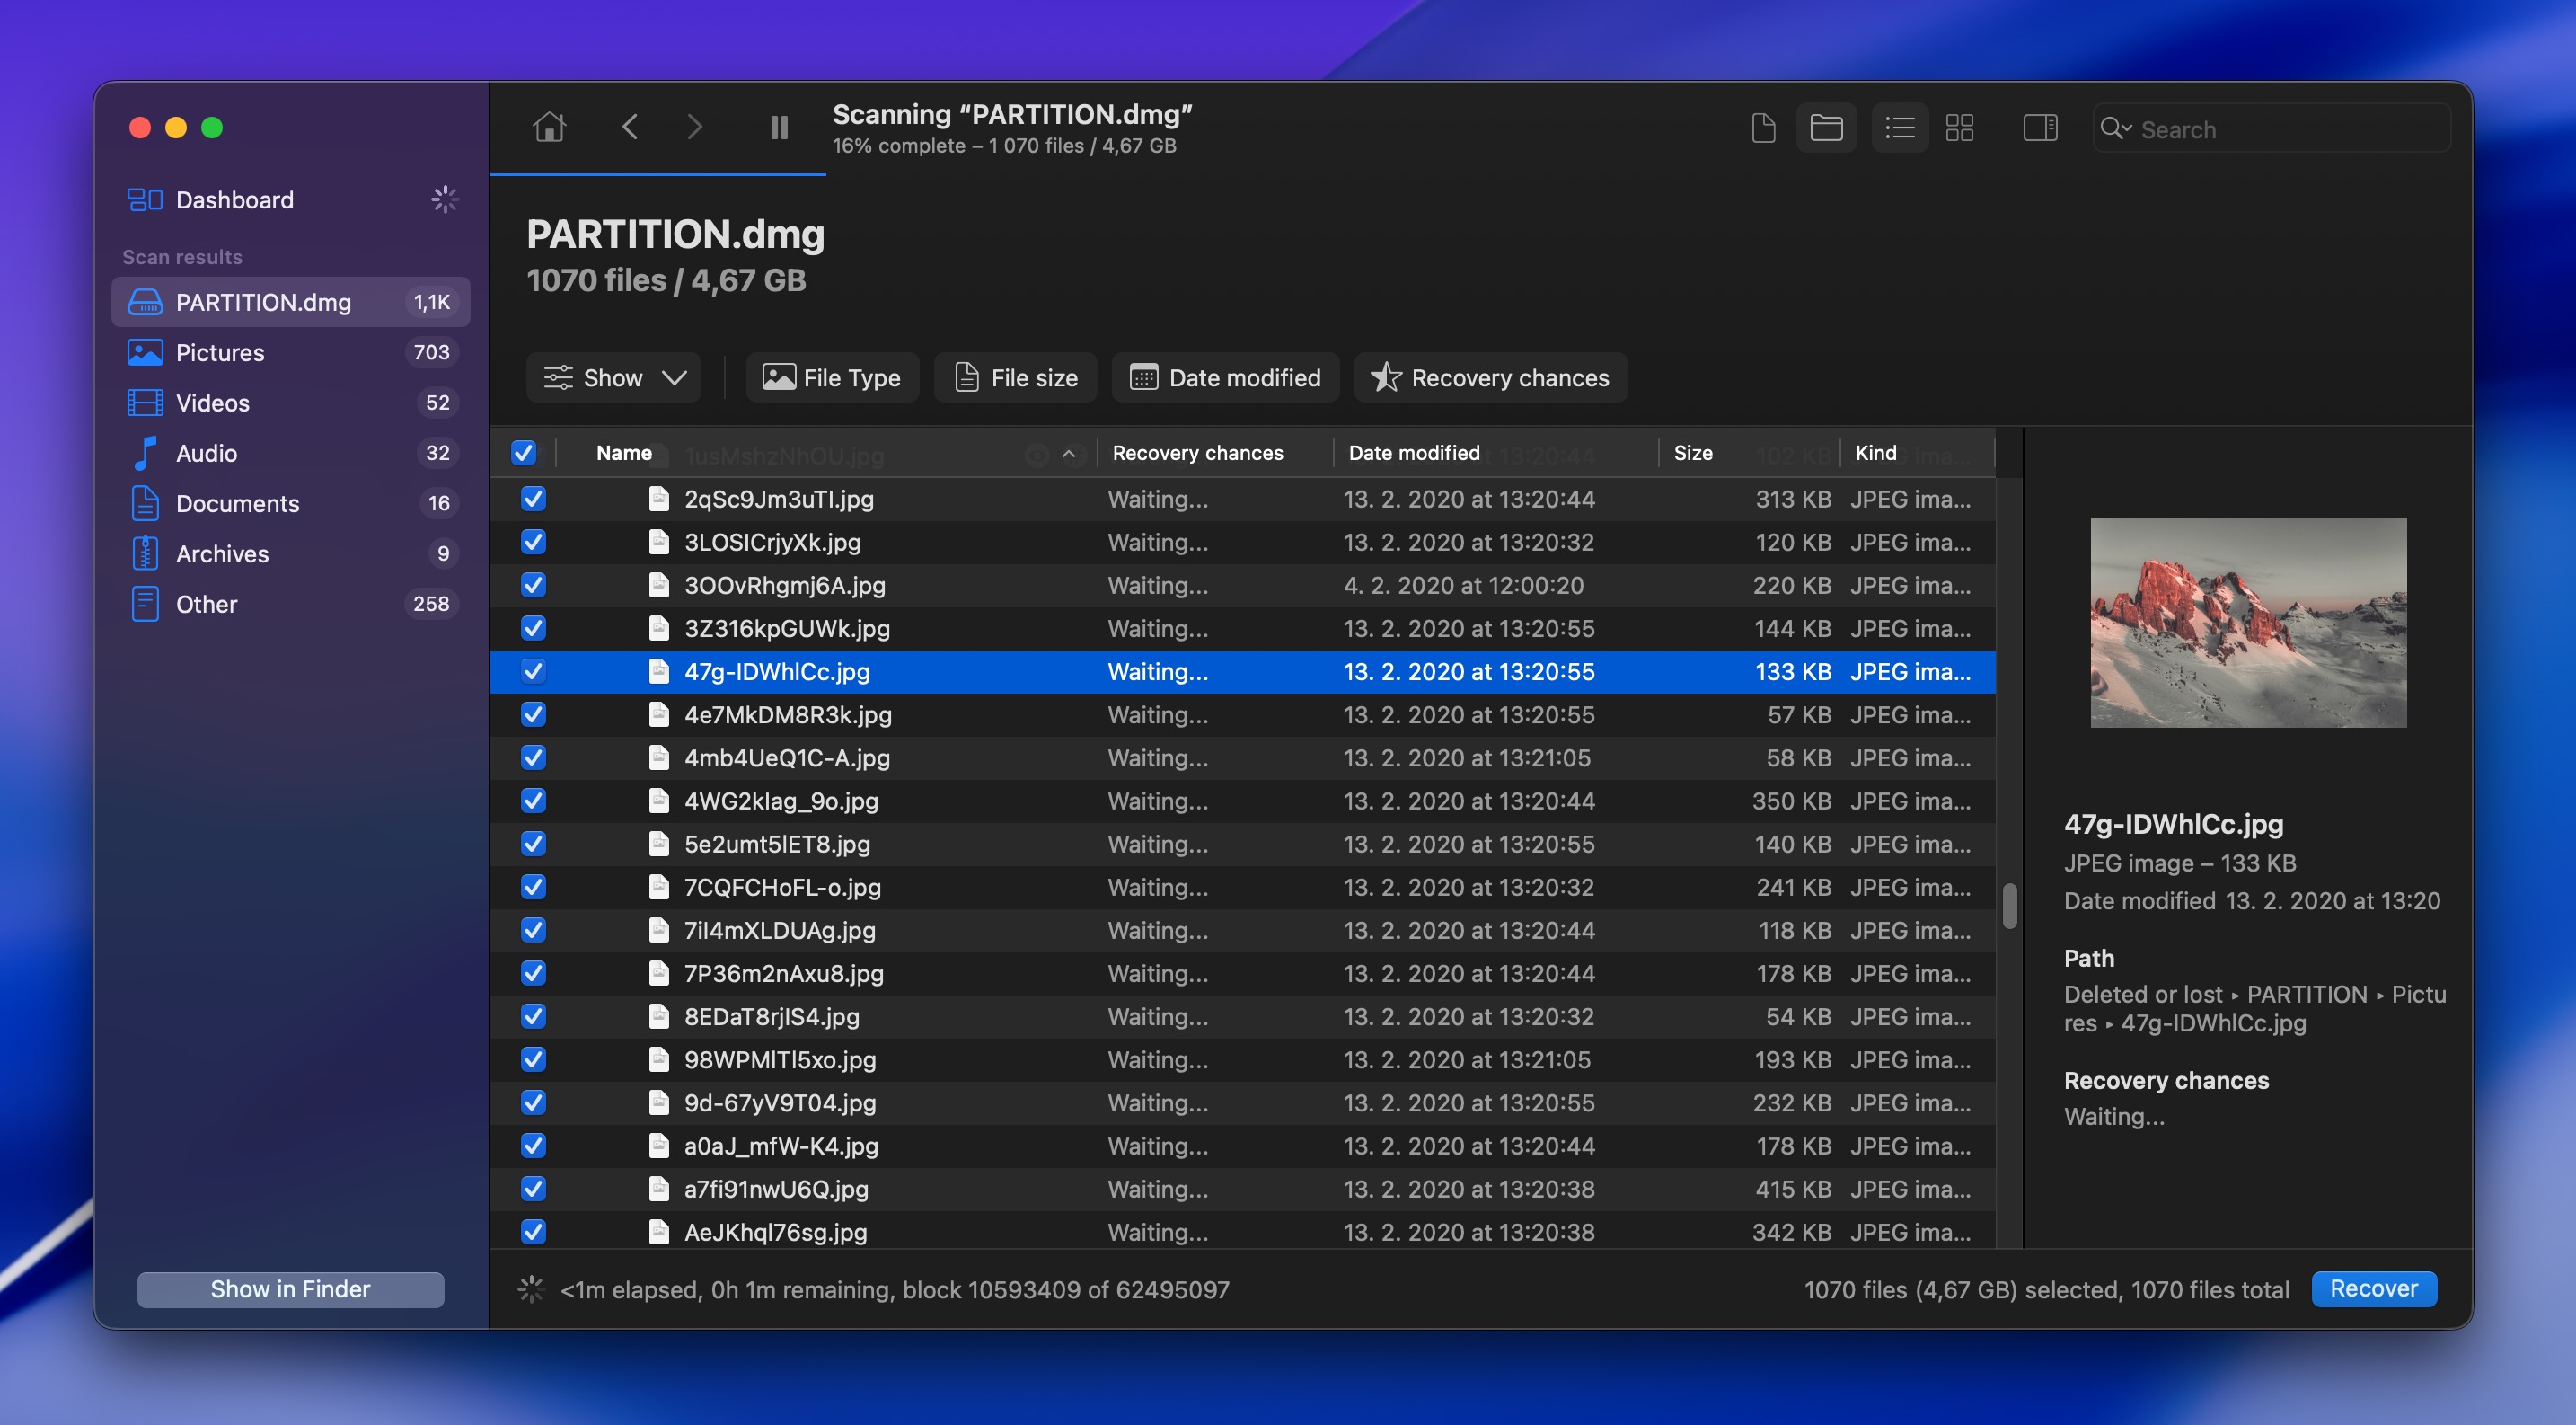
Click on any file in the results to preview it. Photos and videos play directly in the preview pane, documents show their content, and audio files can be played to verify they’re not corrupted. If you see your data and it looks good, you’re in business.
Since Disk Drill typically finds a large number of recoverable files, you might want to narrow things down using the built-in filters and search bar. You can filter by file type (documents, images, videos, archives), sort by date modified, or use the search box to find specific filenames.
Step 5: Recover your files to a safe location
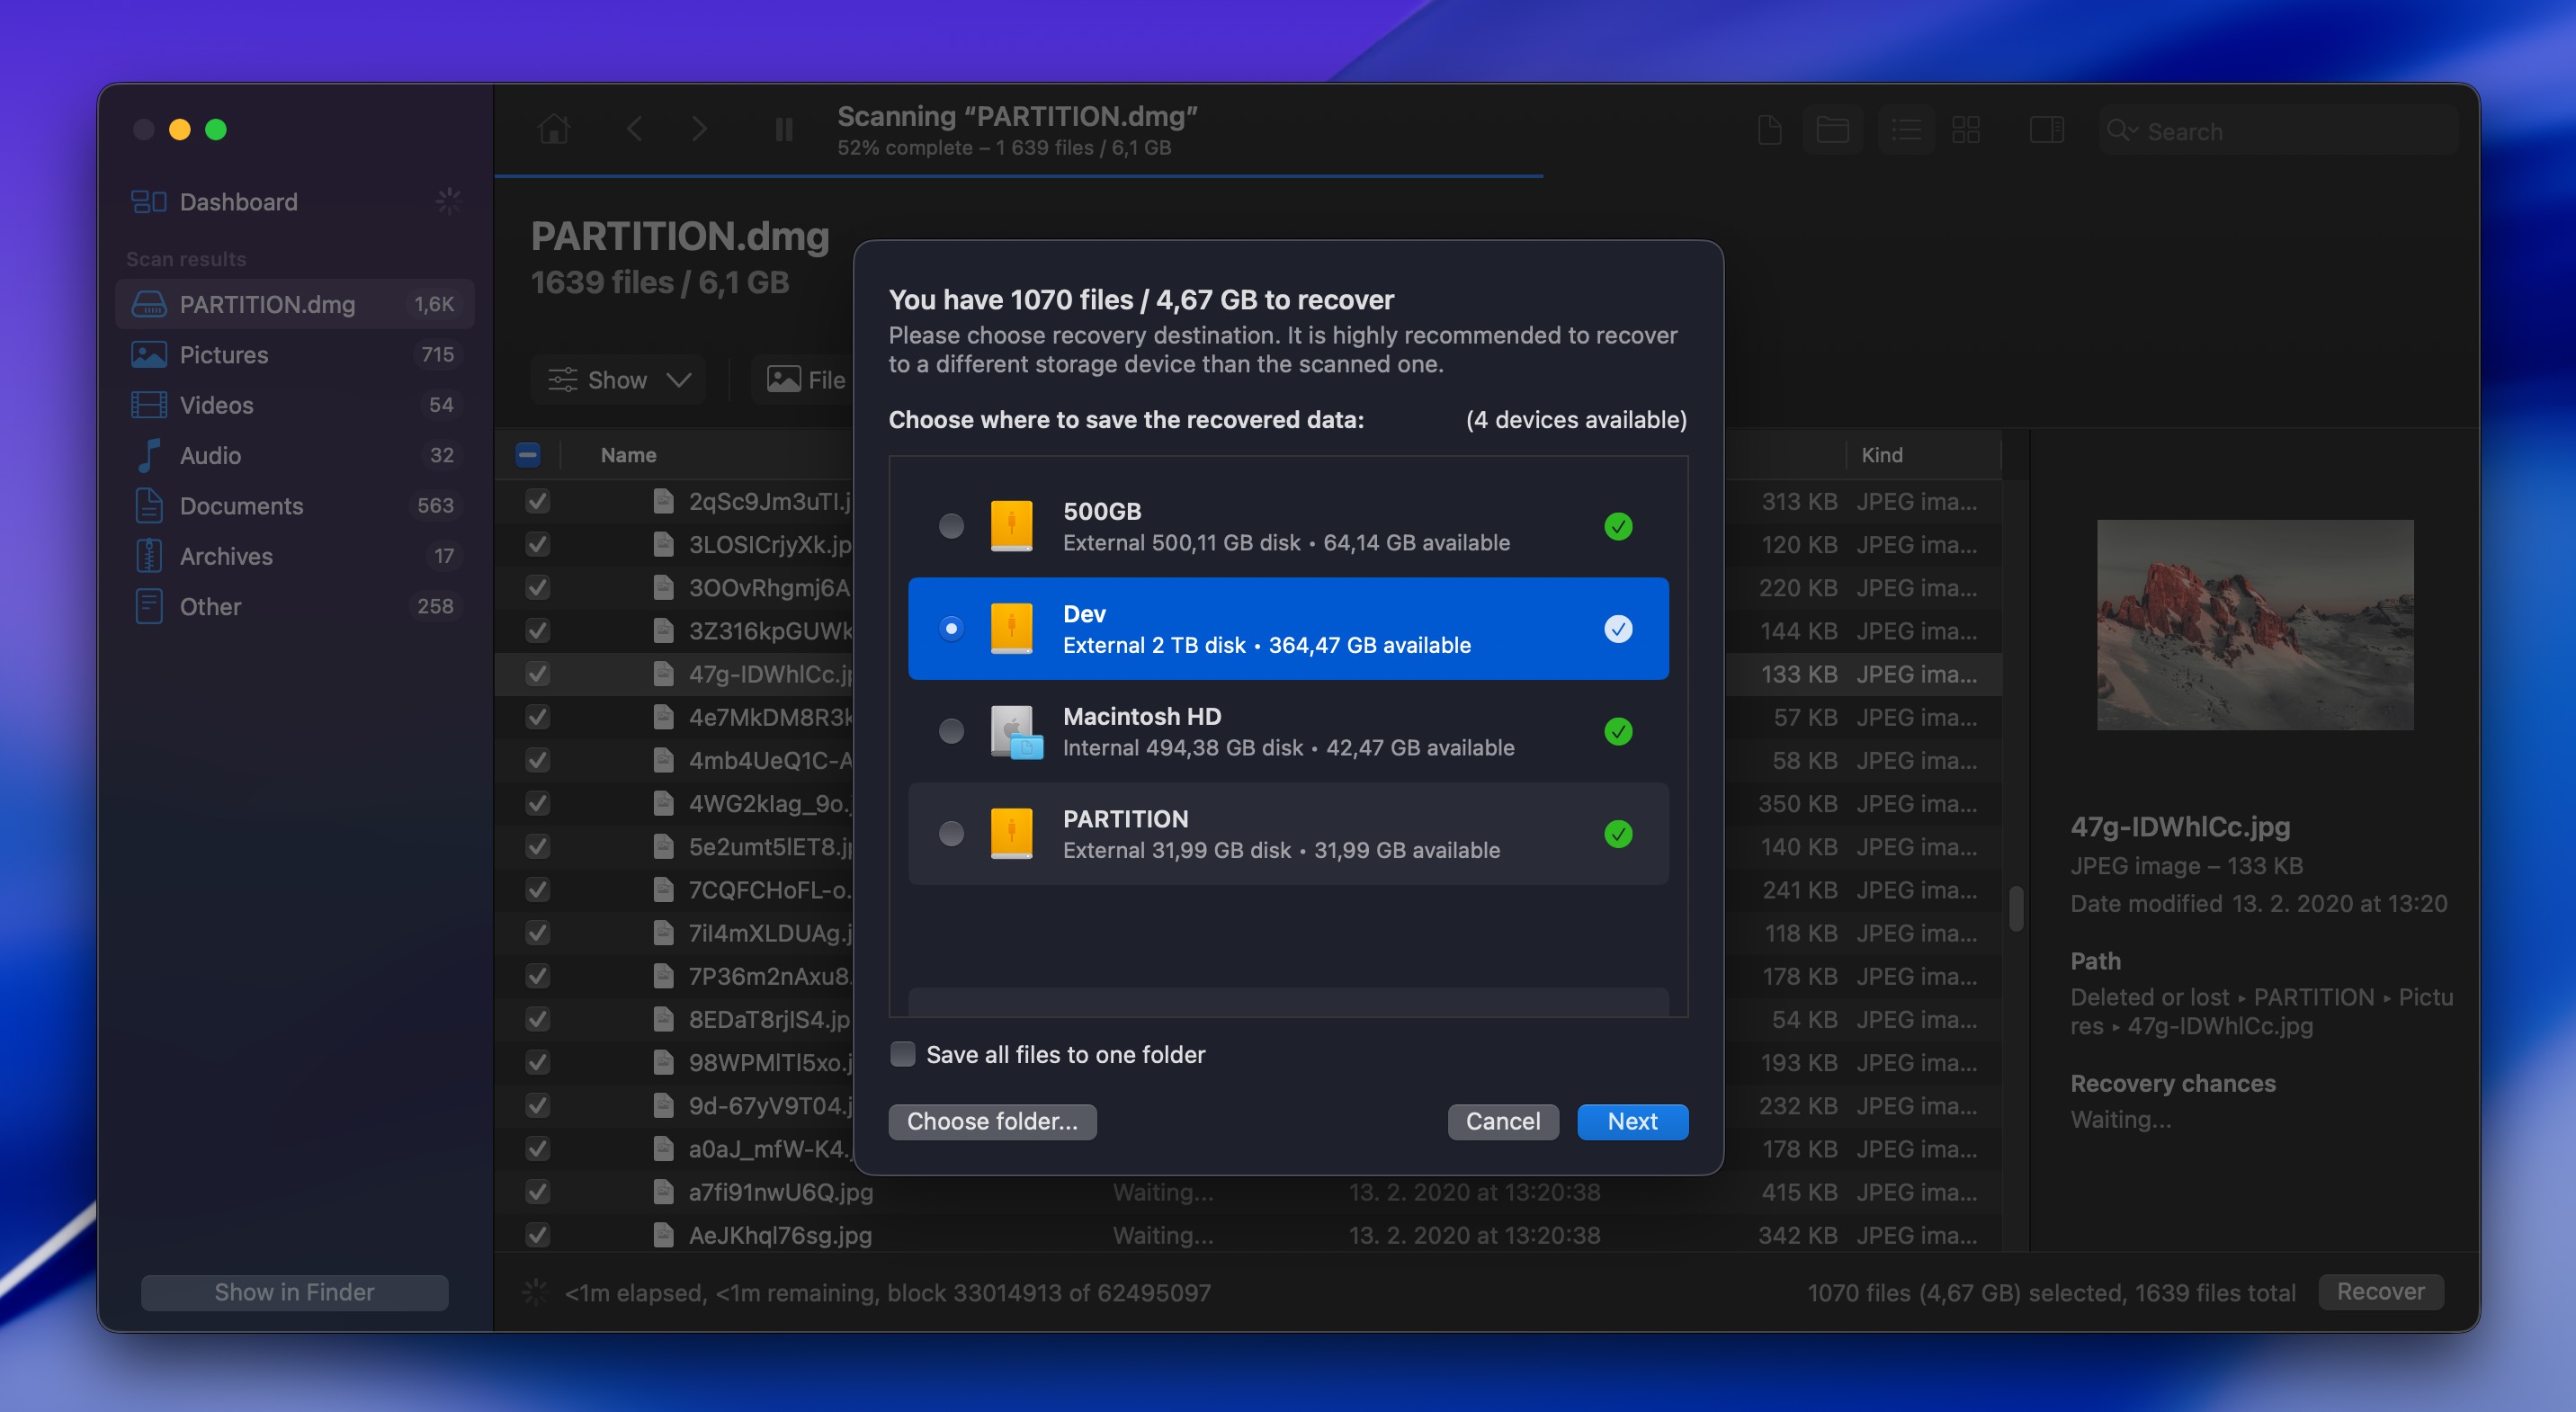
When you’ve confirmed your files are recoverable, select the files and folders you want to recover (or select all with the checkbox at the top). Then, click Recover and choose a destination folder on a healthy drive where you want to save your recovered data.
How to Repair the com.apple.DiskManagement.disenter Error
Your data should now be recovered, which means you can fix com apple diskmanagement disenter error codes and get your drive mounting normally again without any risk. Several fixes are available, and we recommend you go through them in the same order as presented, starting with the quickest, least invasive solutions before moving on to more aggressive repairs.
Method 1: Restart Mac and Check Connection
A clean restart and proper reconnection can solve more com.apple.DiskManagement.disenter error cases than you’d expect. To perform it, you need to:
- Click the Apple menu.
- Select Shut Down.
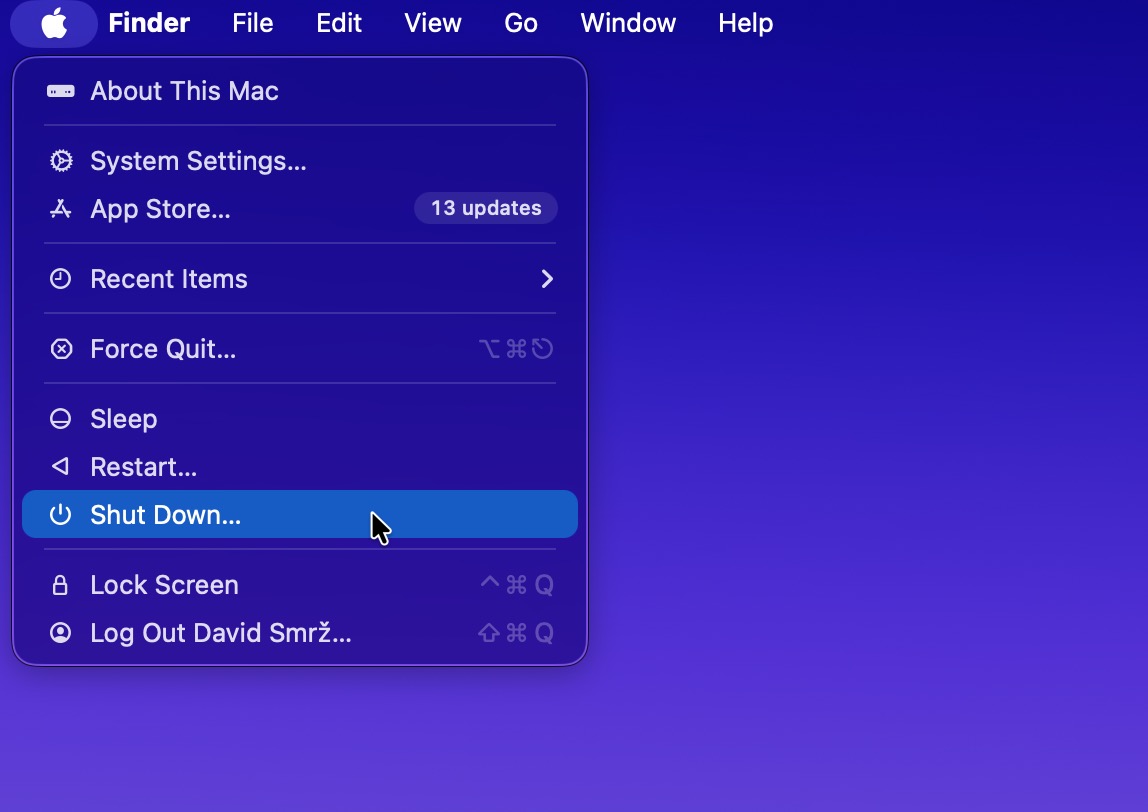
- Wait 30 seconds after your Mac powers off.
- Start it back up.
- Log in to macOS.
The above-described clean restart process clears memory caches and resets hardware controllers that a simple restart misses. Once your Mac boots up, reconnect your drive directly to a built-in port (skip USB hubs), try a different cable if you have one, and switch to another port if possible. If your drive has a power adapter, make sure it’s plugged in.
For portable drives that draw power from USB, try a port closer to your Mac’s main power supply. If your drive sits in a third-party enclosure, consider removing it and connecting the bare drive with a SATA-to-USB adapter since enclosures can introduce their own firmware conflicts.
If your drive still won’t cooperate after checking all the physical stuff, you’re likely dealing with deeper external drive mounting issues that need the repair methods below.
Method 2: Run First Aid
First Aid is a built-in macOS tool (found in the Disk Utility app) that can repair certain file system problems that prevent mounting, such as broken directory structures, catalog file errors, or invalid volume headers. Here’s how to run it:
- Open Disk Utility (Applications > Utilities > Disk Utility).
- Select your unmounted drive from the sidebar.
- Click the First Aid button at the top.
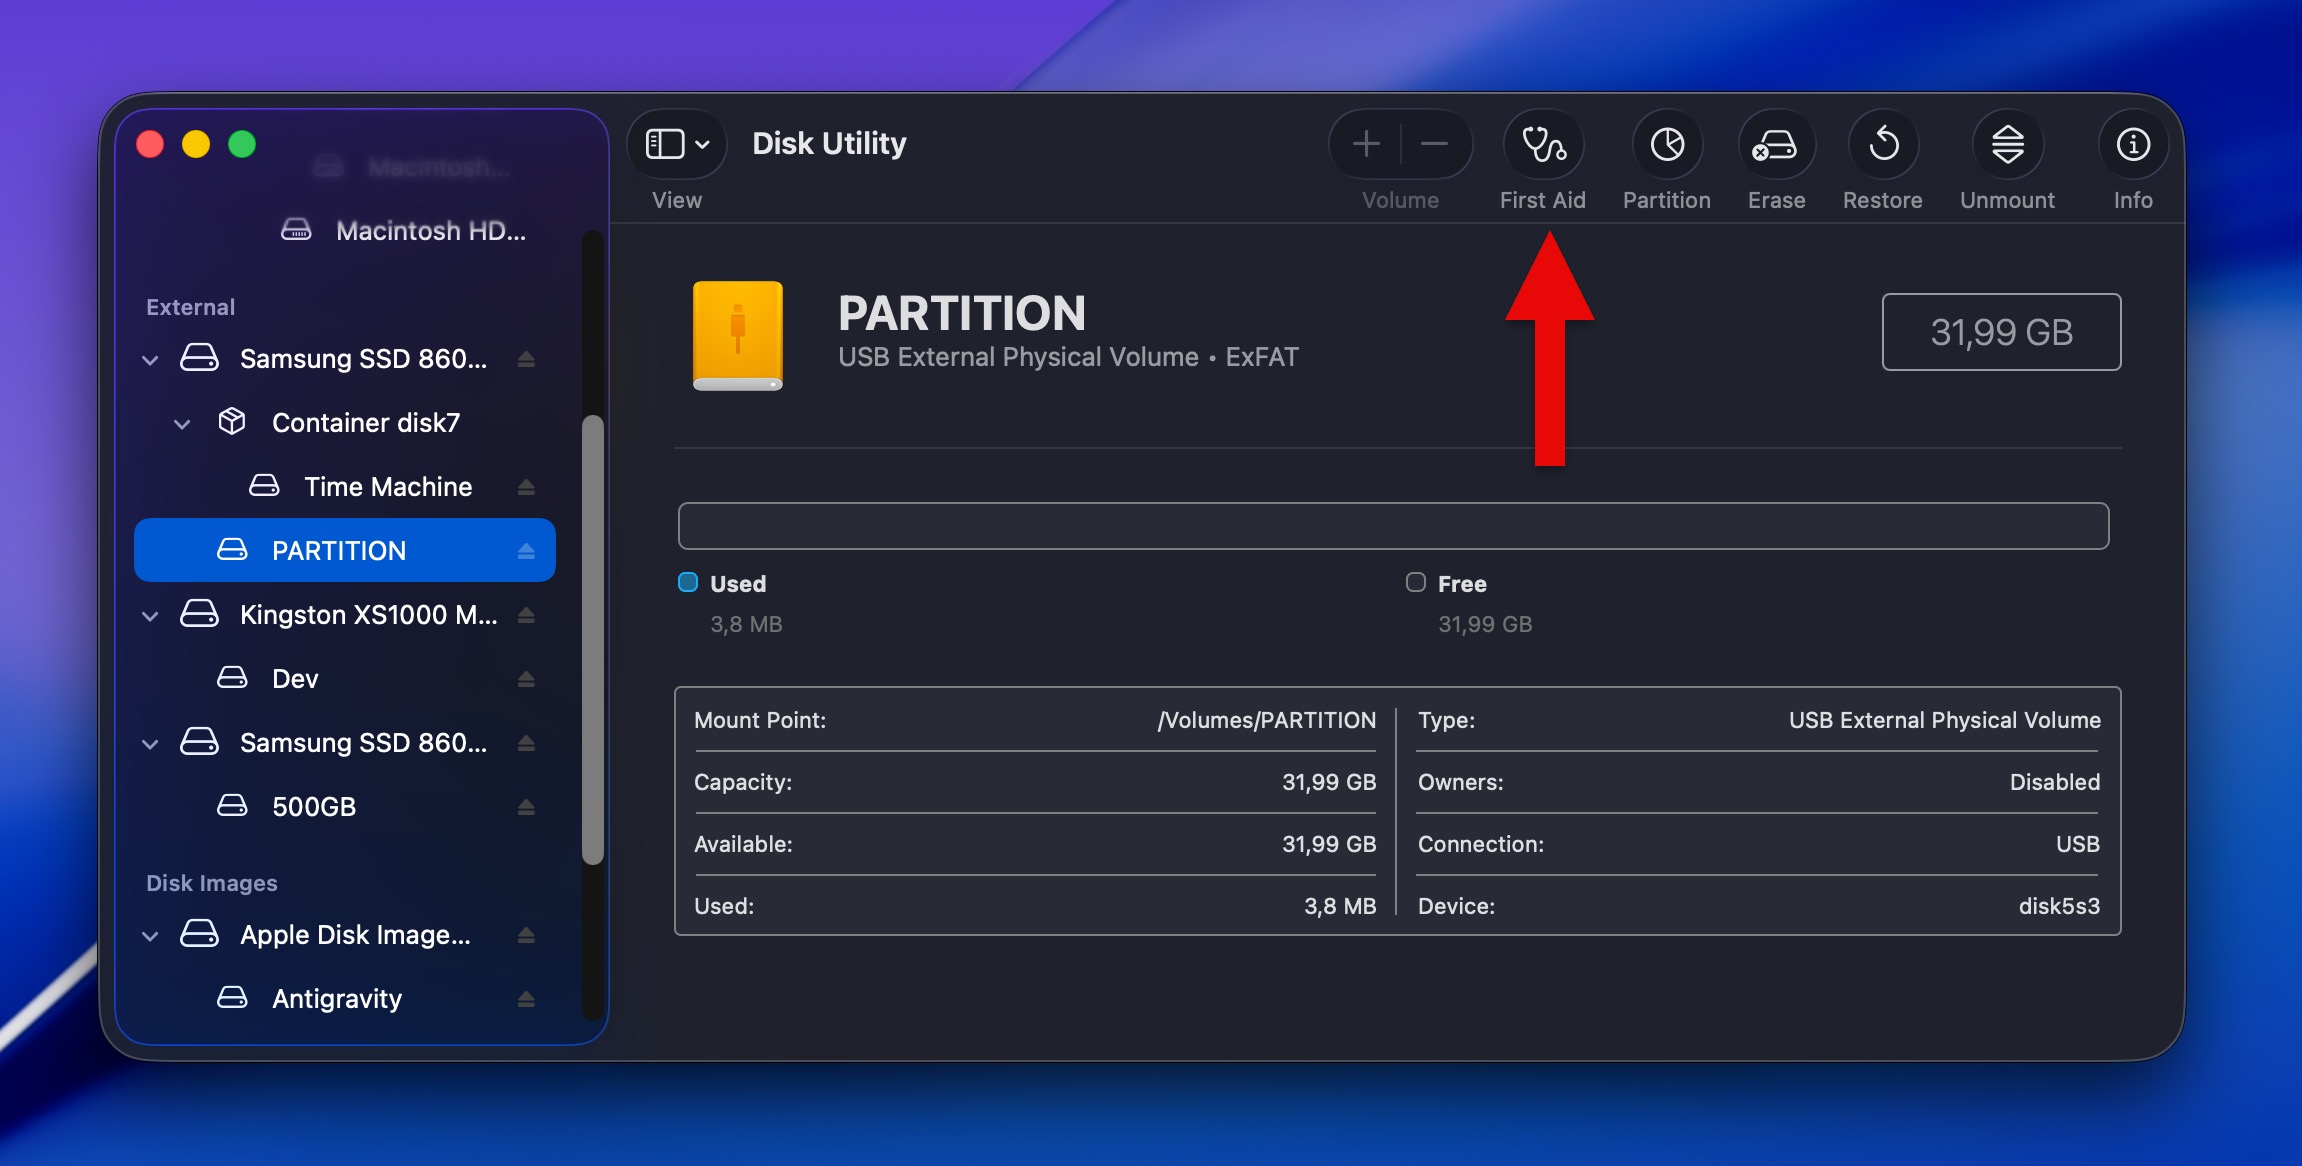
- Click Run in the confirmation dialog.
- Wait for the process to complete, which can take anywhere from a few minutes to several hours depending on drive size.
First Aid will scan the volume for errors and attempt repairs automatically. If it reports “The operation was successful,” try mounting the drive again in Disk Utility by selecting it and clicking the Mount button. If First Aid says it found errors but couldn’t fix them, or if the drive still won’t mount after a successful repair, you’ll need to move on to other methods.
Method 3: Remove or Disable Third-Party Disk Drivers
If you’ve installed third-party software to read NTFS drives on your Mac (like Paragon NTFS, Tuxera, or similar tools), there’s a chance that’s what’s causing your com.apple.DiskManagement.disenter error.
The fix is straightforward: uninstall the third-party driver software, restart your Mac, and try mounting the drive again using macOS’s built-in capabilities. To uninstall third-party disk drivers:
- Look for an uninstaller in your Applications folder (most NTFS drivers include one).
- Check System Settings > General > Login Items & Extensions.
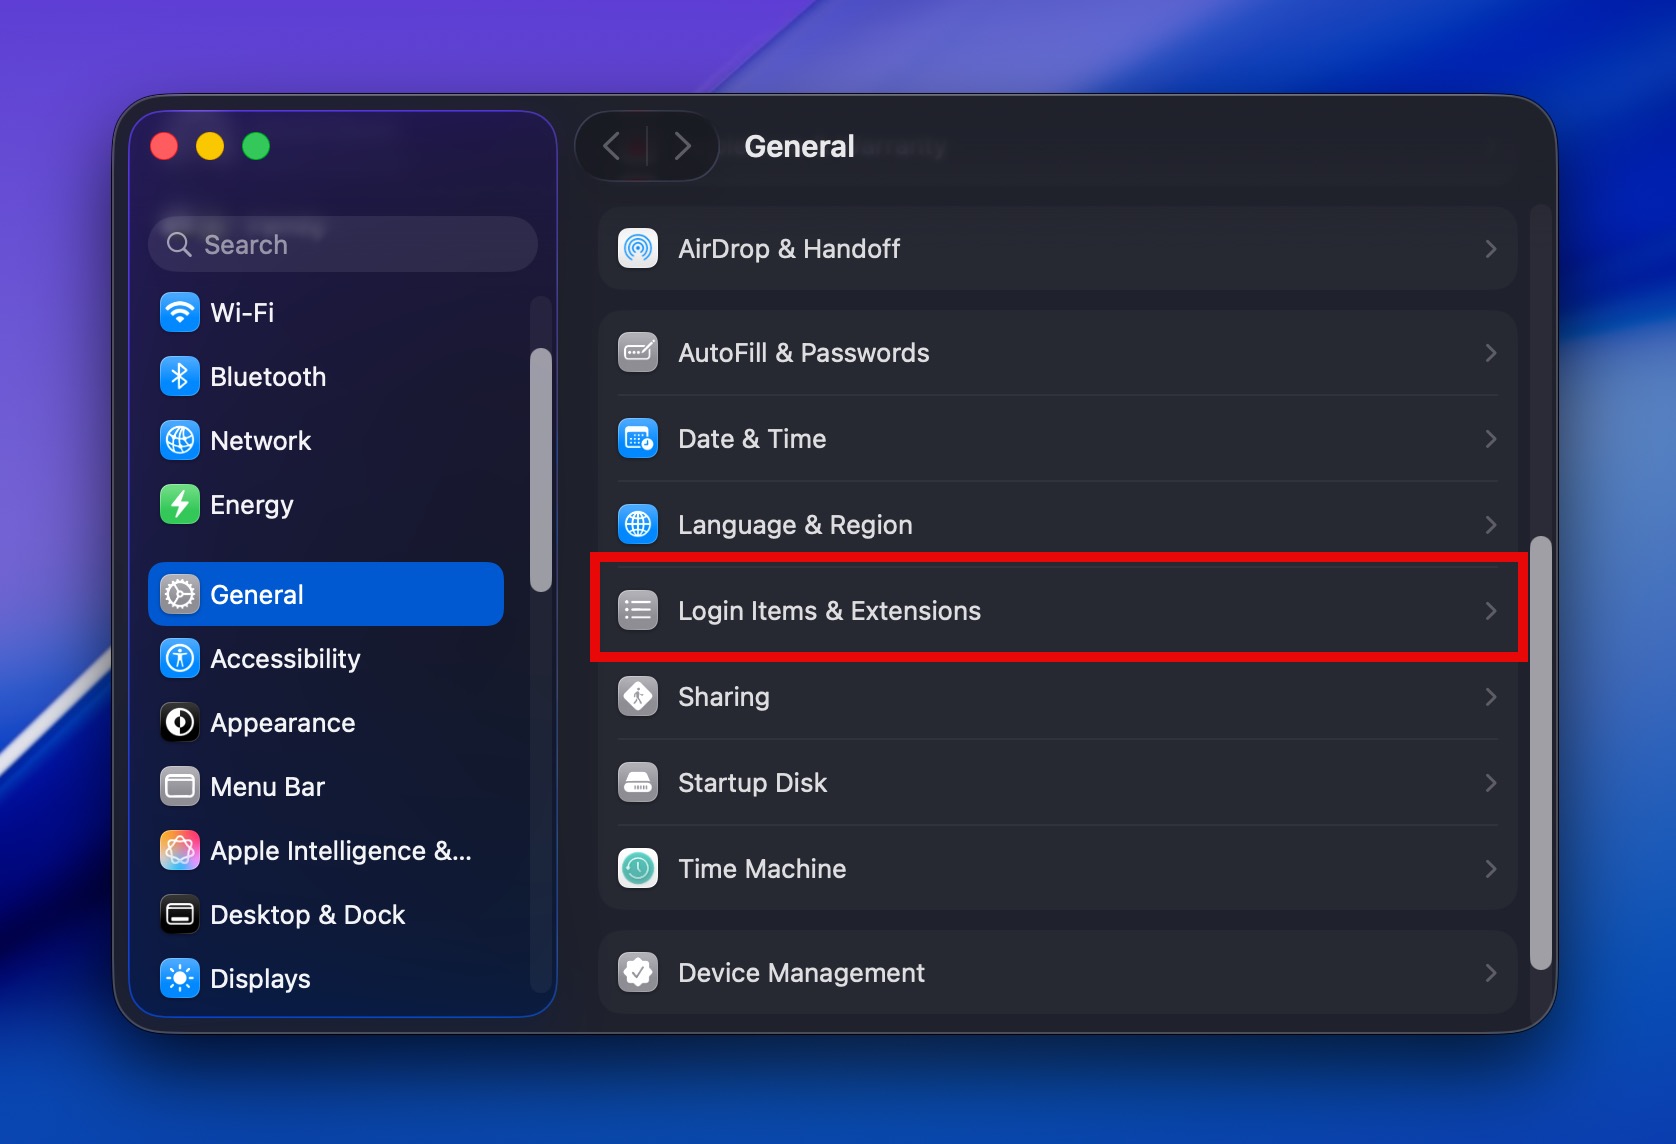
- Disable any disk-related extensions you see.
If you need NTFS write support after the uninstallation, you can reinstall an updated version of the driver (check the vendor’s website for macOS compatibility), but first confirm that the driver itself was the problem.
Method 4: Kill the FSCK Process
Sometimes macOS’s file system consistency check (FSCK) gets stuck in a loop of continuously trying to verify your drive but never finishing. The result of this can be the DiskManagement Disenter error in Disk Utility. The solution is to forcibly kill the stuck FSCK process and try mounting manually:
- Open Terminal (Applications > Utilities > Terminal).
- Type sudo pkill -f fsck and press Enter.
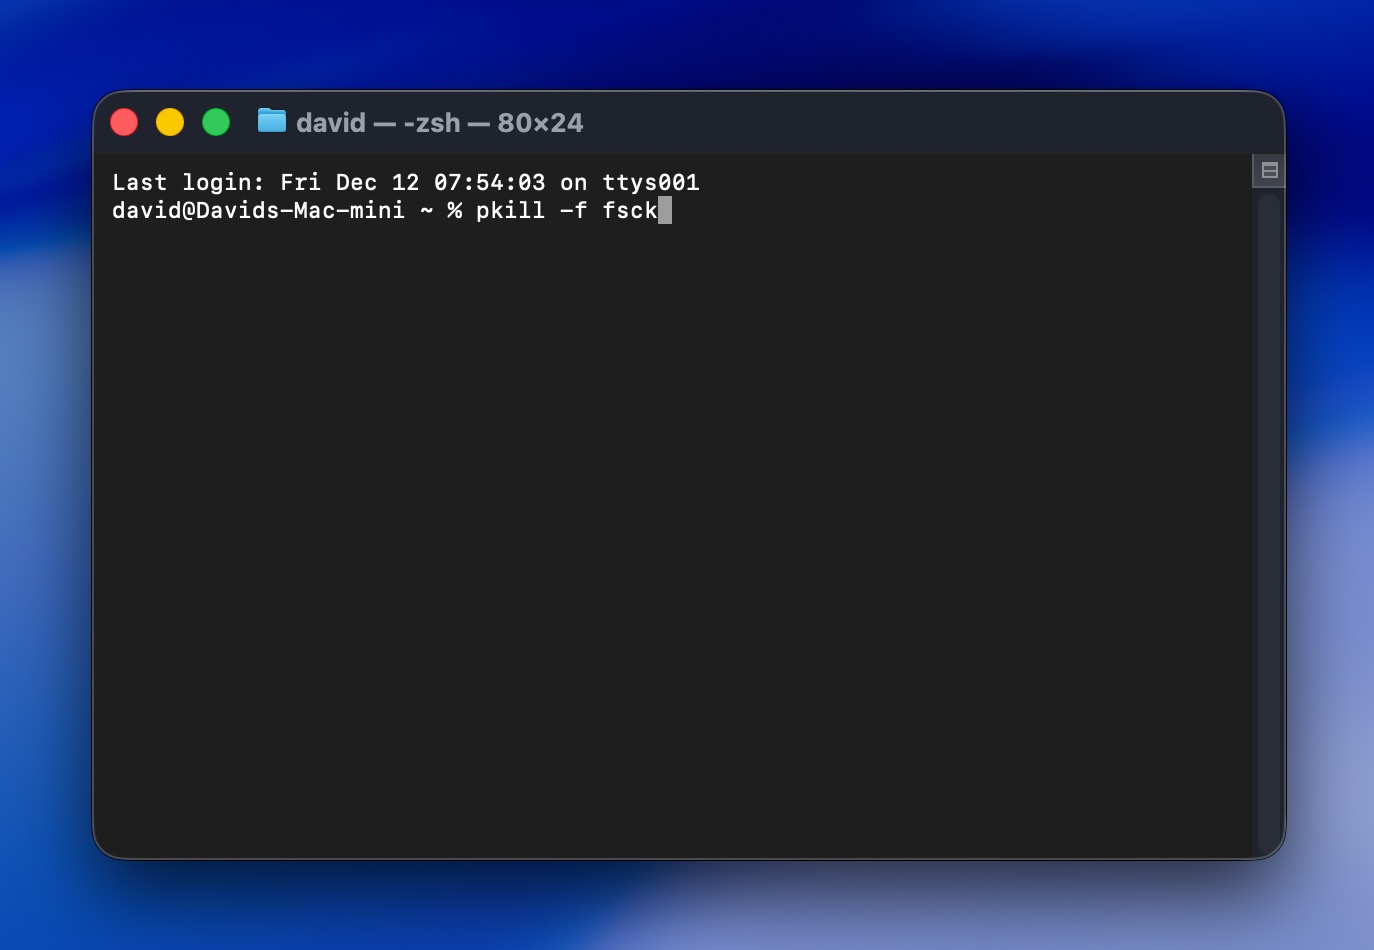
- Enter your Mac’s admin password when prompted (you won’t see the characters as you type).
- Wait a few seconds for the process to terminate.
- Go back to Disk Utility and try mounting the drive again.
If the drive mounts successfully after killing FSCK, the stuck process was your problem. If you’re still seeing mounting issues after this, the underlying file system damage is likely too severe and formatting is necessary.
Method 5: Format the Drive as a Last Resort
When none of the other methods work, formatting (the act of erasing everything on the drive and creating a fresh file system from scratch) becomes your only option to get a usable drive back. But since you’ve already recovered your data following the steps earlier in this guide, you can proceed without worry.
Here’s how to format the drive:
- Open Disk Utility (Applications > Utilities > Disk Utility).
- Select your problematic drive from the sidebar. Choose the physical drive itself, not a partition if one is shown.
- Click the Erase button at the top of the window.

- Choose a format: APFS for Mac-only use, exFAT for compatibility between Mac and Windows, or Mac OS Extended (Journaled) for older macOS versions.
- Give the drive a name.
- Click Erase and wait for the process to complete.
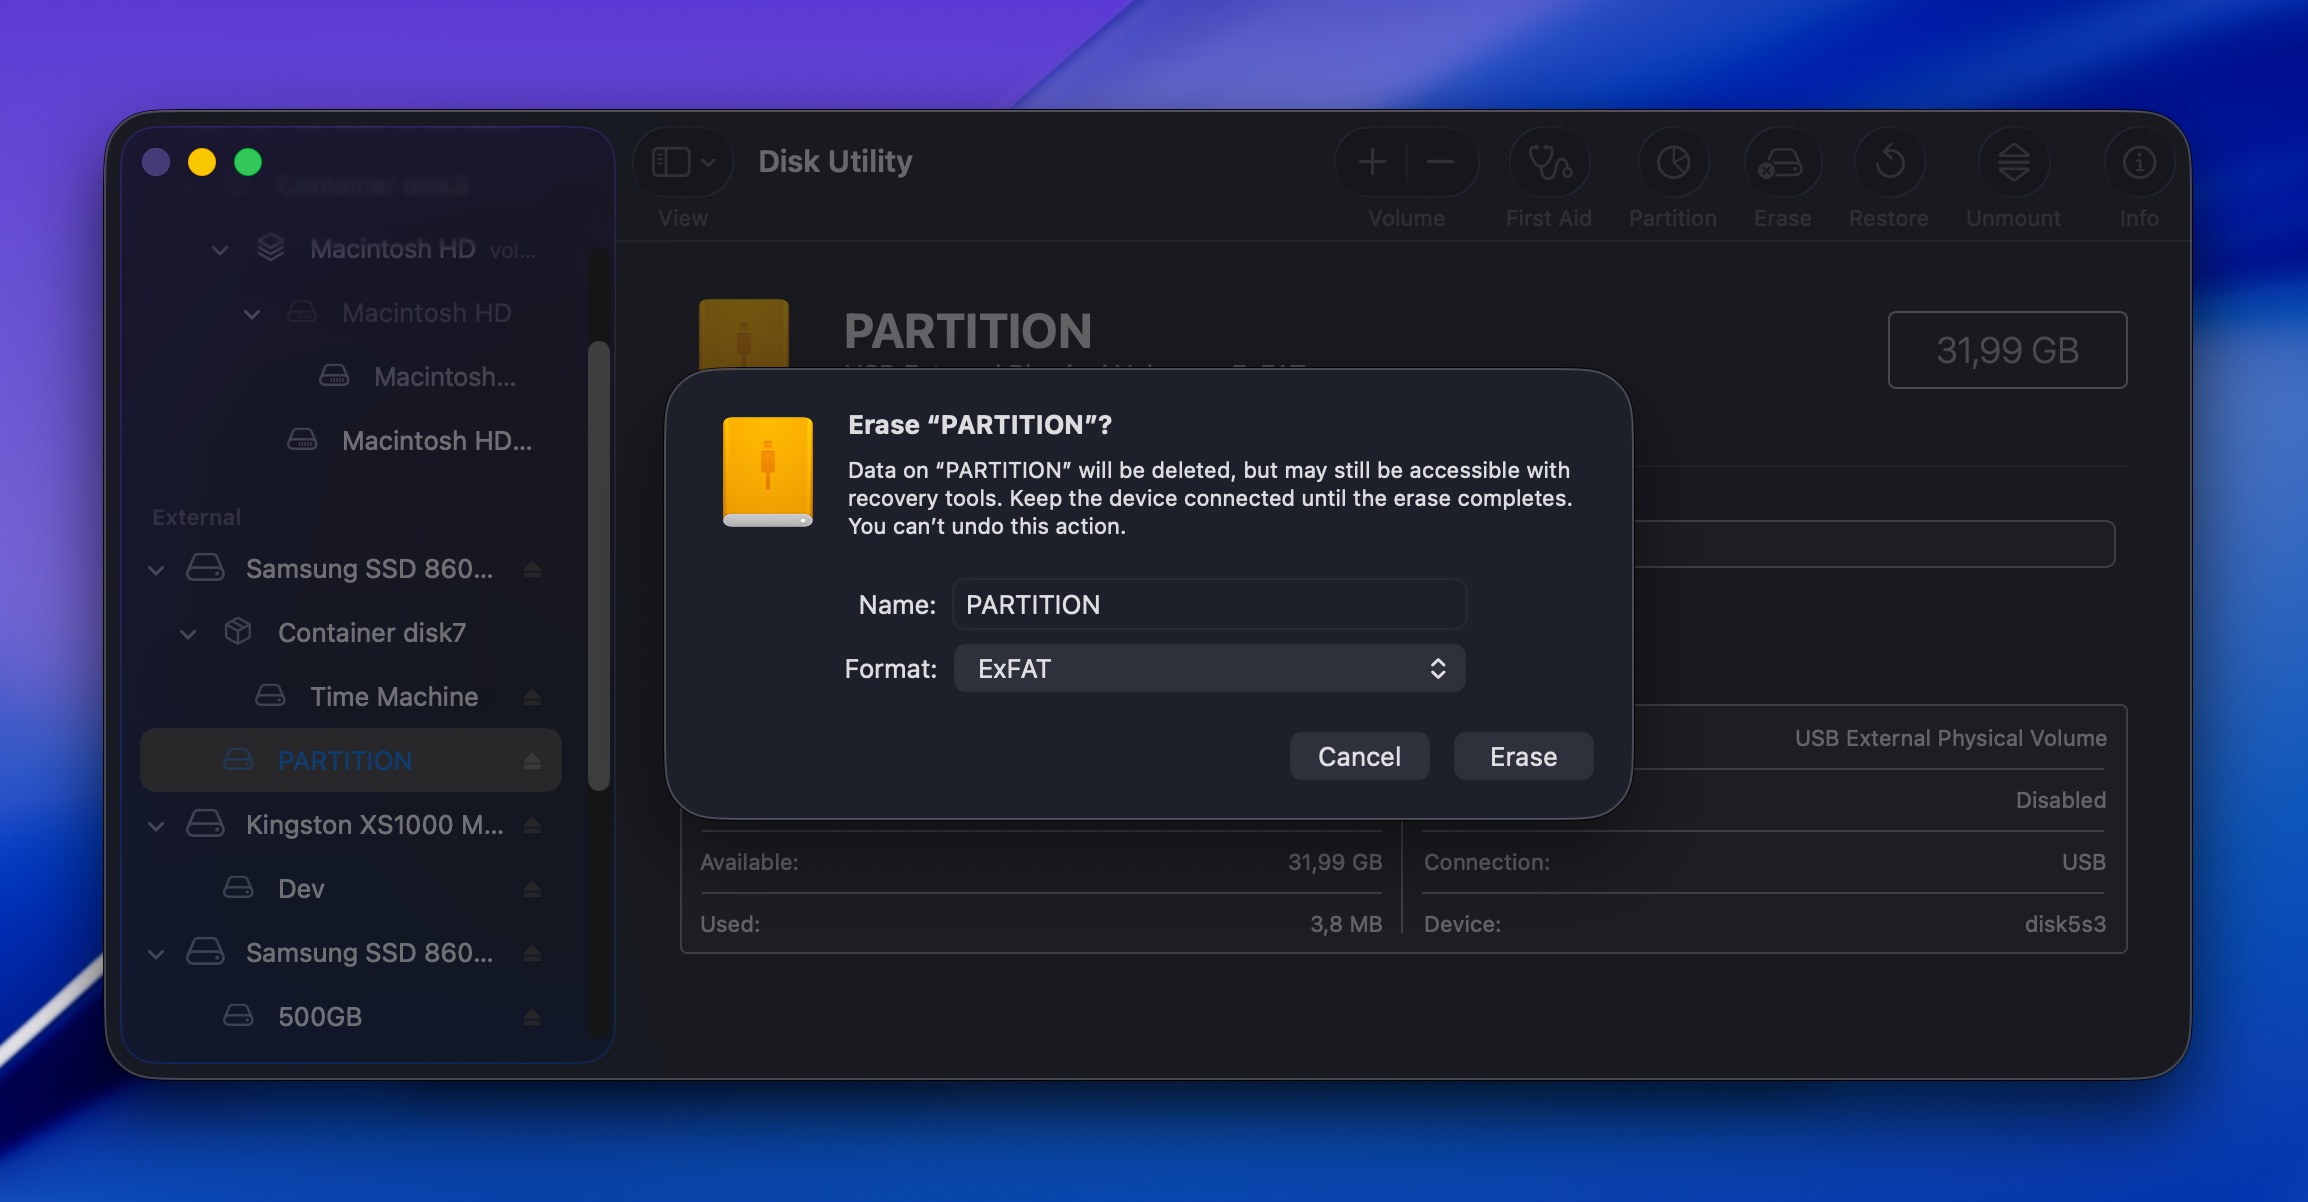
Once formatting finishes, your drive should mount normally, and you can copy your recovered files back onto it. If formatting fails or the drive still won’t mount afterward, you’re likely dealing with physical hardware damage, and the drive needs professional repair or replacement.
What Common com.apple.DiskManagement.disenter Error Codes Mean
While the general approach (recover first, then repair) stays the same regardless of the code, knowing what each number actually means can tell you a lot about the seriousness of the issue you’re dealing with. Here are the most common error codes and what typically causes them:
- Error 0: This is a generic corruption indicator that usually means the volume’s metadata or directory structure is damaged enough that macOS can’t make sense of it.
- Error -119930868: You can frequently encounter this code after macOS updates when third-party file system drivers like those from Paragon or Tuxera stop playing nice with the system.
- Error 49153: The most common cause of this error code is an incompatible file system. Formatting is typically necessary to get rid of it.
- Error 49218: Most reports of this error code point to Monterey-specific bugs. The good news is that a clean restart and proper reconnection of the affected drive often fixes the problem (at least temporarily).
- Error 49221: If you’re trying to mount an NTFS drive after updating macOS and seeing this code, you’ll likely need to reinstall macOS or use third-party mounting software because you’ve encountered a system bug.
- Error 49223: The exFAT file system is technically compatible with macOS, but Windows allows certain formatting options that Mac refuses to mount. When they’re used, the error 49223 can occur.
- Error 49244: Often appears on macOS Catalina when trying to mount certain drives. Third-party mounting tools sometimes help, but formatting to APFS is usually the permanent solution.
Most codes respond to the methods we’ve covered, but physical drive failure requires a different approach entirely. If you’re seeing hardware-related codes or if you’re recovering data from a dead device, professional help becomes necessary.
FAQ
Start by checking if you have third-party NTFS drivers installed (Paragon, Tuxera, etc.) since macOS updates frequently break compatibility with these tools. If you do, uninstall them completely, restart your Mac, and try mounting again. If that doesn’t work or you don’t have third-party drivers, then you can recover important data from the drive using data recovery software like Disk Drill before attempting a drive repair using First Aid.
Time Machine partitions use APFS snapshots and special metadata that’s more sensitive to corruption than regular partitions. When macOS Catalina (where 49244 is most common) attempts to access a Time Machine volume with inconsistent snapshot references or broken backup chains, the 49244 error is often displayed.
Try connecting the drive to another Mac to see if it mounts there, as different macOS versions sometimes handle APFS volumes differently. You can also attempt mounting the drive while booted into Recovery Mode (restart and hold Command+R), which uses a minimal system environment that might succeed where your regular macOS installation couldn’t. If neither approach works, your best bet is recovering your files with data recovery software first, then reformatting the volume as you might be dealing with snapshot corruption or container-level problems that First Aid can’t see.
Probably not the enclosure itself, but the file system formatting. If it’s an NTFS drive, macOS can only read it (not write) natively, and mounting issues often come up if Windows didn’t shut down cleanly or Fast Startup left the volume in a “dirty” state. For exFAT drives, Windows allows block sizes during formatting that macOS refuses to mount (error 49223).