Losing data can be one of the most devastating experiences for a photographer. It’s always awful to have all your hard work reduced to nothing due to just one accidental click. If you’re a GoPro enthusiast, you know that it is common to delete files on accident or lose them in some other way while taking photos and videos.
However, that doesn’t mean your files are lost! Usually, you can recover deleted files from your GoPro camera – and this article will guide you through how it’s done.
Would you prefer to skip to the main course? Check our GoPro file recovery guide by clicking here.
7 Major Causes of a GoPro Data Loss
It’s worth knowing how digital photography can go wrong, leading to losing your photos and videos. This way, you can be prepared for the rare occasion when catastrophe strikes, enabling you to undo any damage and get back your precious media.
Some of the most common scenarios we found online that can render inaccessible or outright eliminate your GoPro photos and footage are:
- ❌ Accidental deletion: You wouldn’t be the first to mistakenly delete your precious content off your GoPro, like this Reddit user who accidentally deleted their footage, or another one who erased hundreds of photos in one swift move.
- 🛜 Problematic transmission: Some users saw their files disappear after a restart after transferring them to their PC, to edit them, send them to friends, post them online, etc.
- 💾 Unintended format: In one of the most common data loss scenarios, many GoPro owners, like in this case we saw on Reddit, don’t realize they’ll lose all their files from their SD card when their camera nudges them to format it. Or like this r/gopro user who asked for help after mistakenly formatting the wrong SD card!
- 🧩 Incomplete transfer/conversion: It should be comforting for this unlucky Reddit user to know that they’re not the only one who, after copying or converting their precious footage from their GoPro to their computer, found out it’s much shorter than the original.
- 📹 Damaged or destroyed GoPro: Unlike typical cameras, GoPros are built to take a beating, making them one of the best options for fans of extreme sports, with many choosing them for climbing<, mountain biking, etc. However, “extreme” ways to use a camera also lead to increased chances of something going wrong, as a GoPro owner found when their camera’s car mount failed and sent it flying at 120 miles per hour.
- 🦠 Corrupted content: A sudden power loss or crash has caused many, like this GoPro owner, seeking solutions for file or SD card corruption.
- 🪳 Multiple corrupted SD cards: This user was correct to assume that it’s not normal to have multiple SD cards fail on the same GoPro camera.
Regardless the reason, it is always possible to find the best approach to suit each individual case.
| Problem | Solution |
| Accidentally deleted or disappeared GoPro videos, photos |
|
| Files lost after formatting a GoPro SD card |
|
| Files are inaccessible or have disappeared on a corrupted GoPro SD card |
|
| GoPro footage is unplayable because of corruption or missing parts after an interrupted copy/abrupt power loss. |
|
| Various file transfer failures |
|
How to Recover Deleted Files from a GoPro
Whether you’ve deleted your JPEGs, GPRs, MP4s, LRVs, or THMs, they may still exist on your SD card and be recoverable using a suitable SD card recovery software, as long as you don’t overwrite them by continuing to use your camera.
We recommend Disk Drill SD card recovery software because it’s a reliable and user-friendly tool that flawlessly supports all file formats used by GoPro action cameras. Disk Drill’s advanced recovery algorithms can even reconstruct lost files and work with RAW SD cards to ensure the maximum possible recovery rate possible.
We’ve prepared a step-by-step guide to help you recover your deleted GoPro photos and videos with Disk Drill, for both Windows and Mac users.
To recover deleted videos and photos from your GoPro camera’s SD card using Disk Drill:
1. Connect SD Card to Computer
Connect your GoPro camera’s SD card to your PC or Mac. You’ll have to use a third-party external SD card reader if your computer doesn’t come with one built-in.
2. Download Disk Drill
Download Disk Drill from the official website, install, and run it.

3. Scan Your GoPro’s SD Card
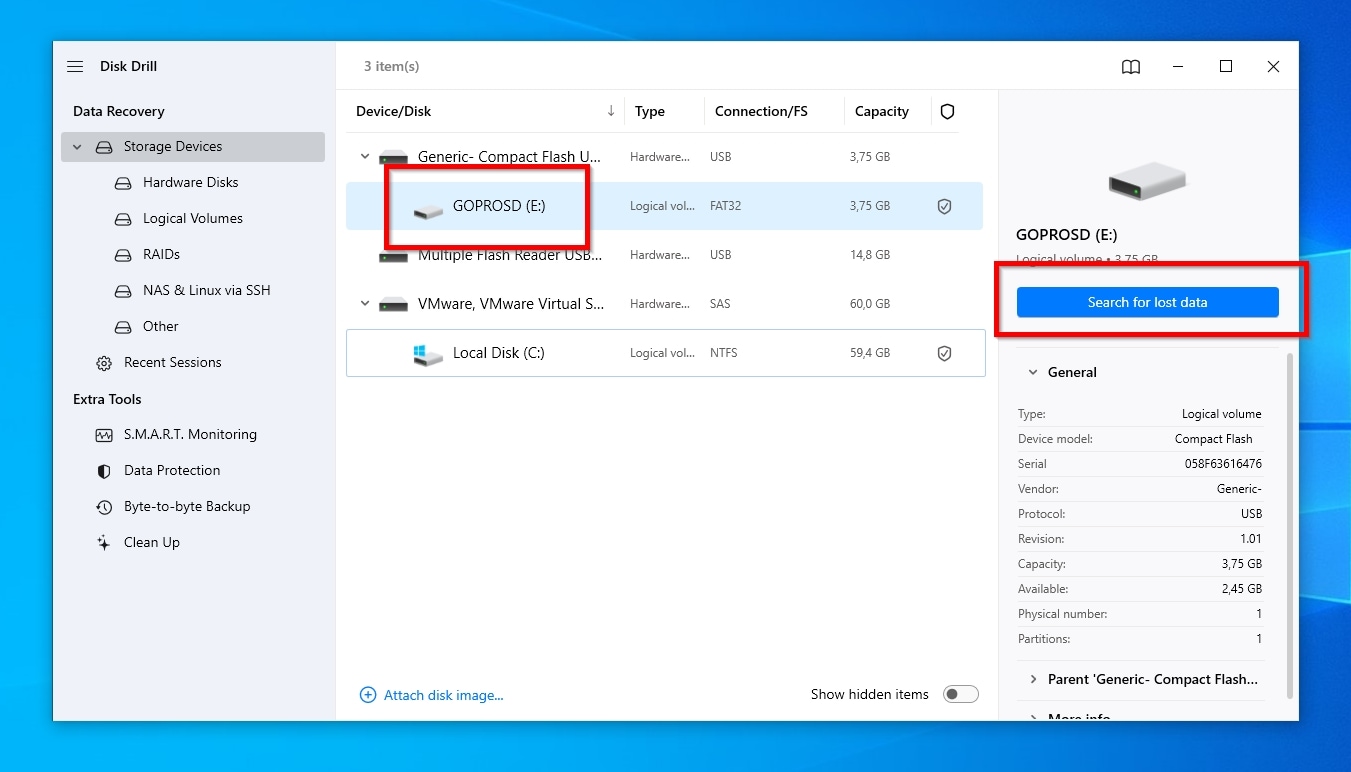
Select your GoPro’s SD card from Disk Drill’s Device/Disk list, and click Search for lost data.
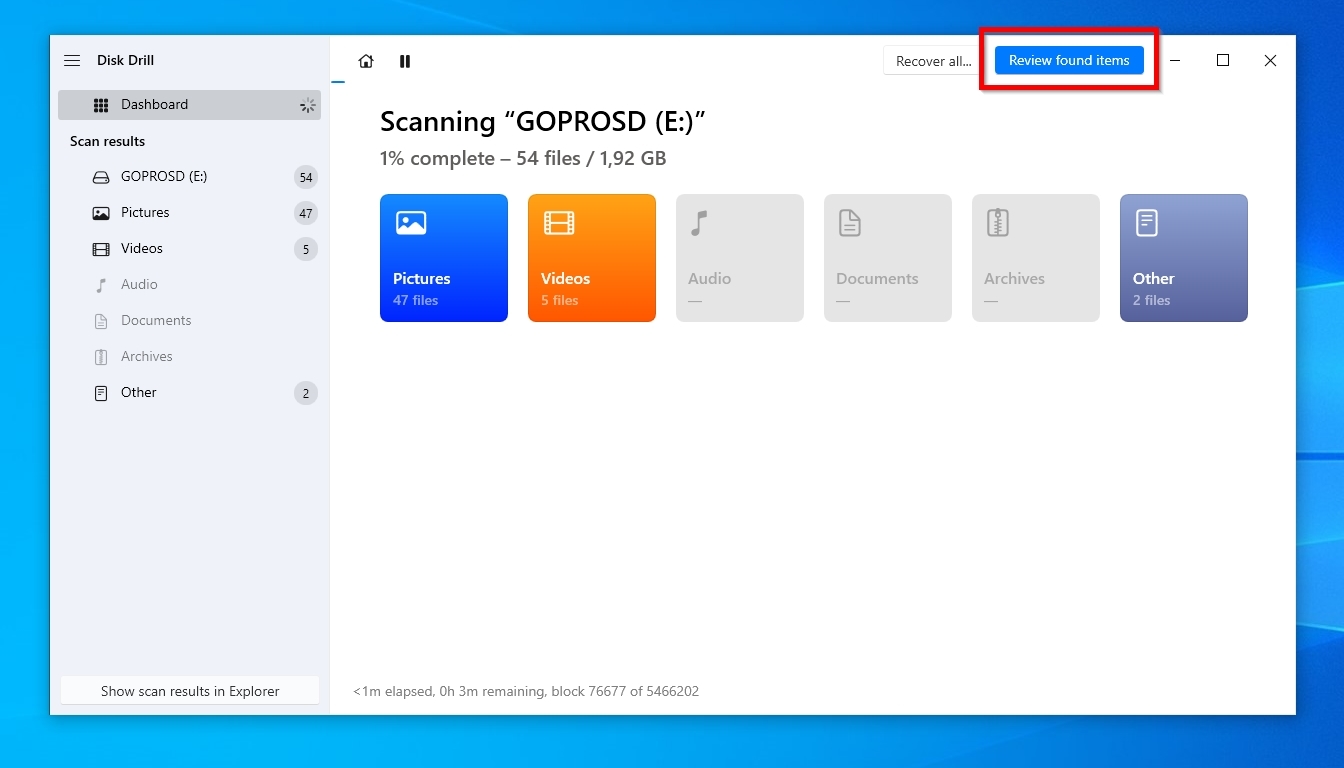
Although you can check out what Disk Drill has already located at any time, it’s best to allow it to complete its scan to ensure it finds (and enables the recovery of) as many files as possible. When the scan completes, click Review found items.
4. Preview Recovery Results
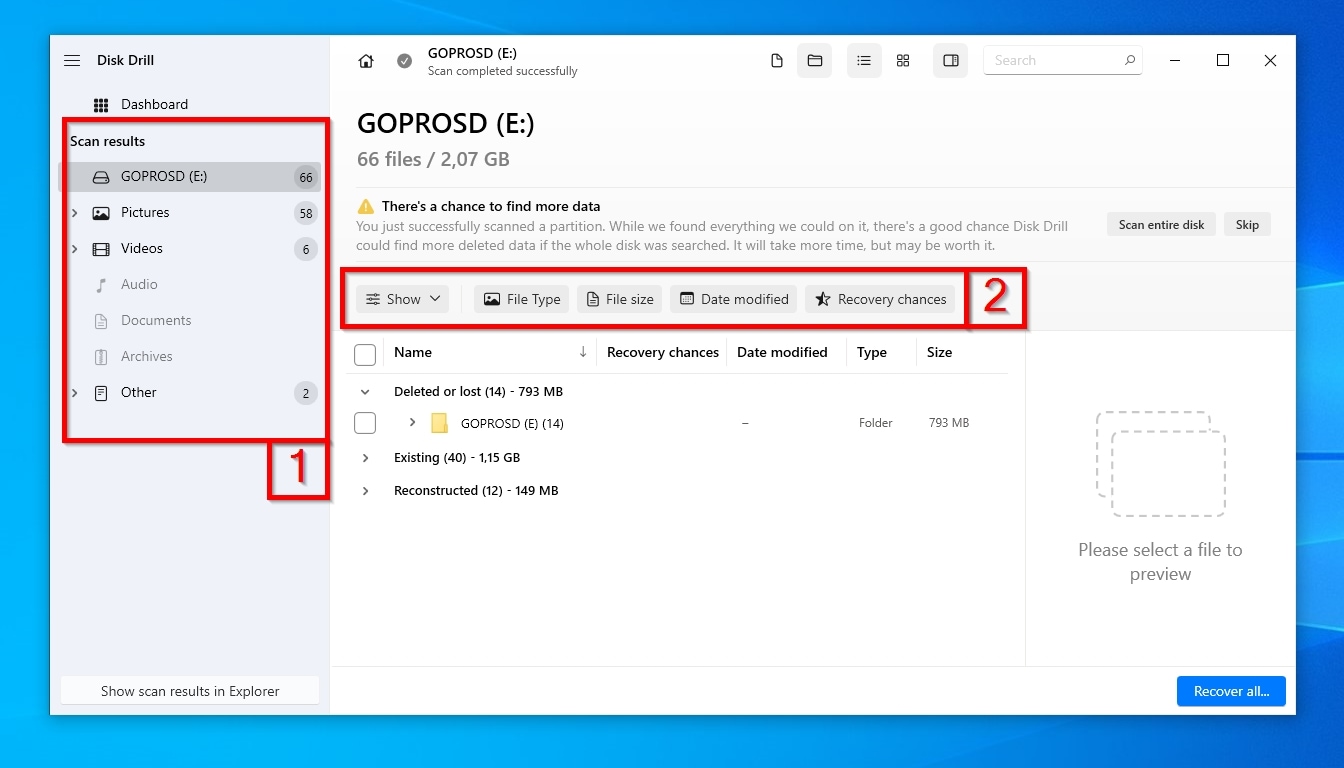
Were you using the same SD card for storing other types of files, like work documents from your laptop? Do you only want to recover the photos or the videos from your GoPro, but not both? Disk Drill’s categories (1) allow you to narrow the results based on file types. Similarly, Disk Drill offers various file filters (2) if you want to see only the largest video files, the newest photos, etc.
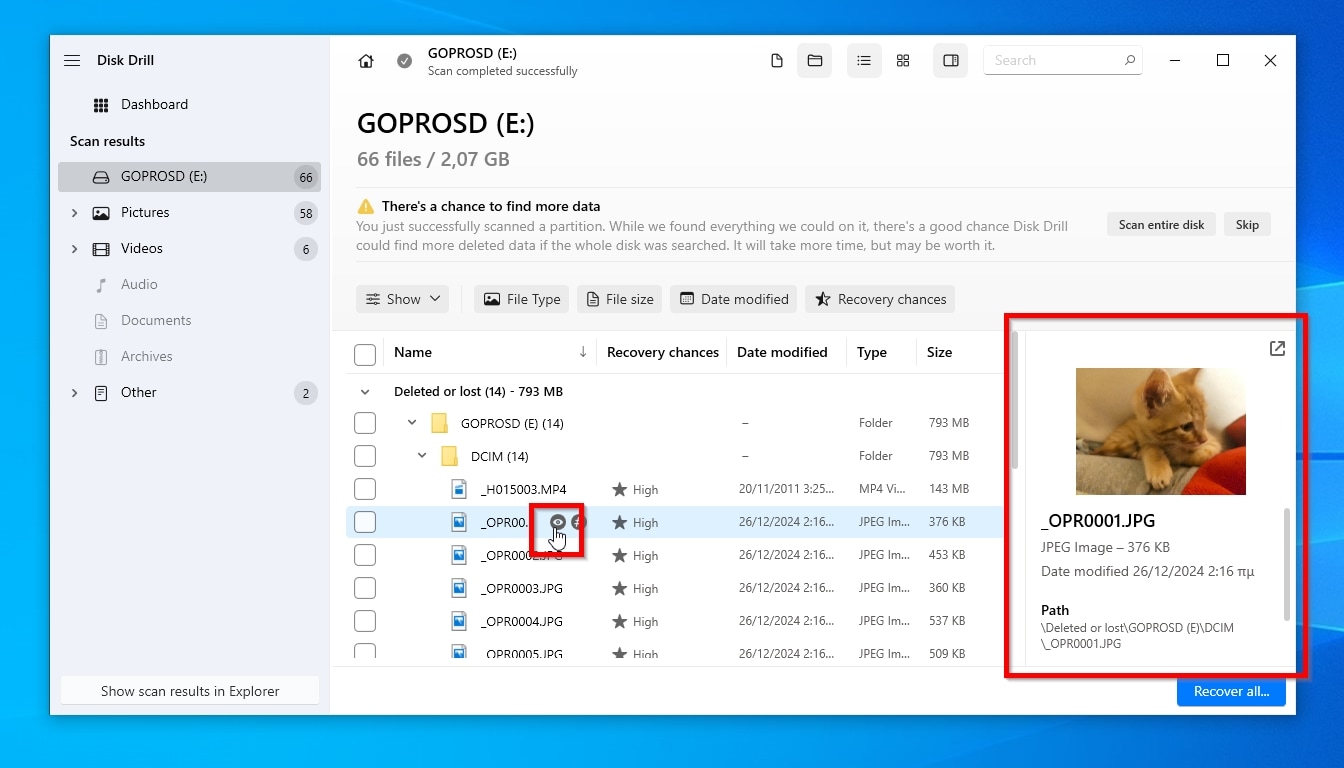
If Disk Drill’s preview panel isn’t already visible, point at any photo or video file and click the little hovering eye icon that shows up. You’ll see a preview of the selected file on the right.
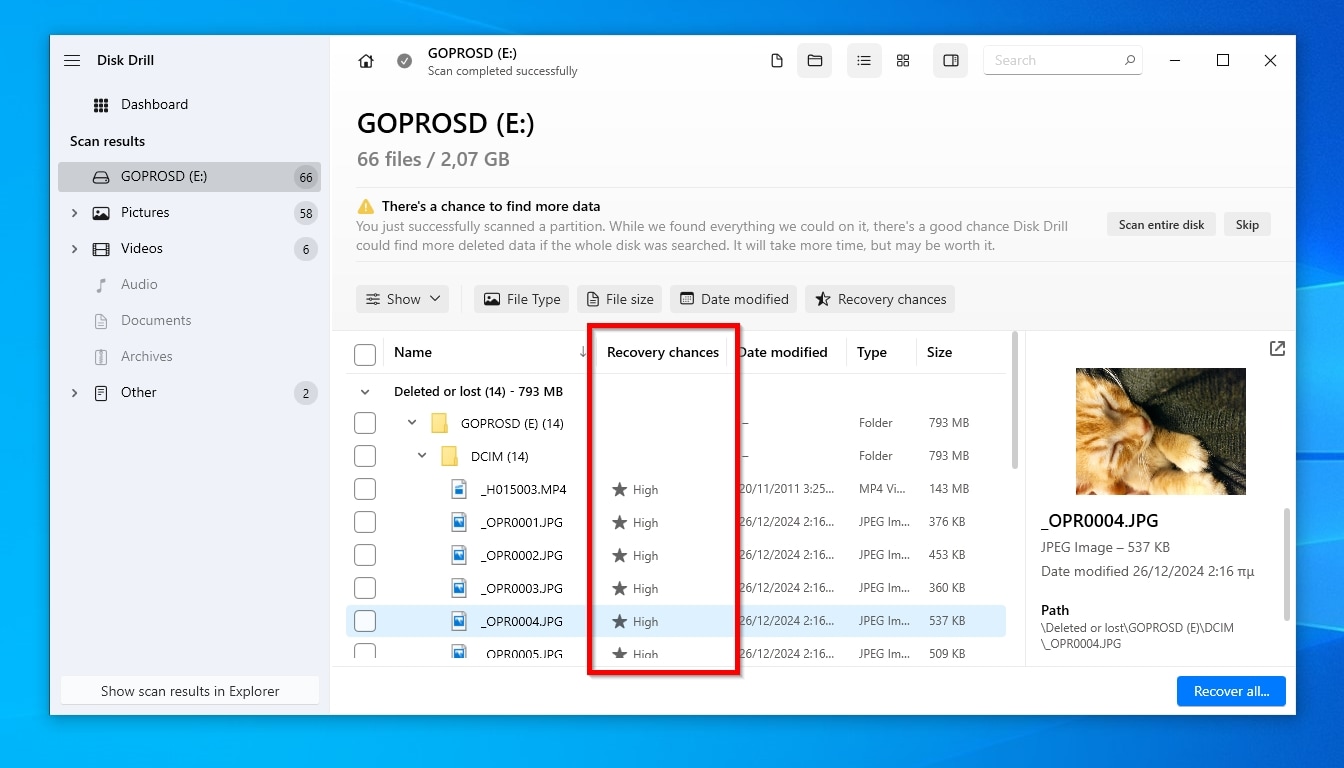
5. Check The Files’ Recovery Chances & Mark Them for Recovery
It’s also worth noticing each file’s recovery chances, especially if dealing with a problematic or failing SD card. In such scenarios, it’s best to prioritize the files with the highest recovery chances since they’ll also be the quickest to recover, and leave the “hardest cases” for last to ensure you’ll save as many files as possible before your SD card stops responding.
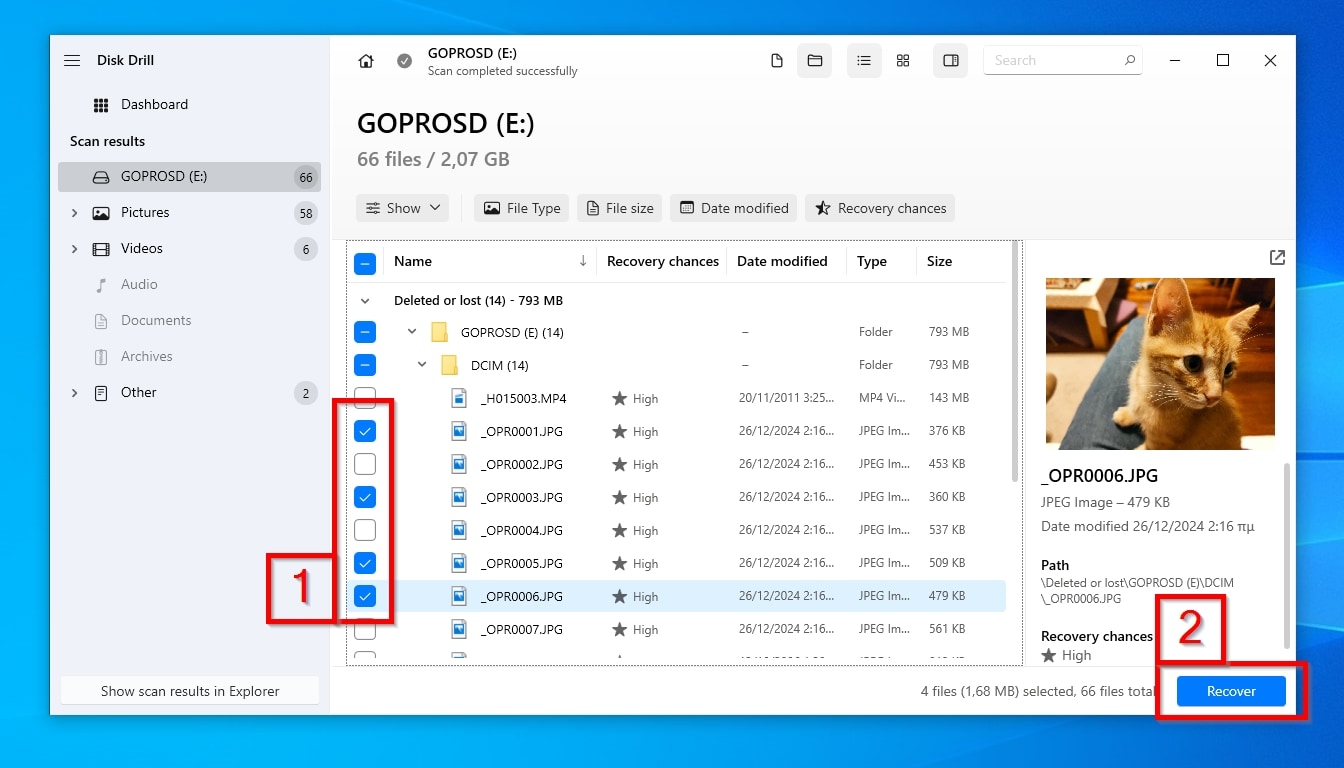
Mark for recovery, with a checkmark on their left (1), all the photos and videos you want to recover from your GoPro camera’s SD card. Then, click Next (2).
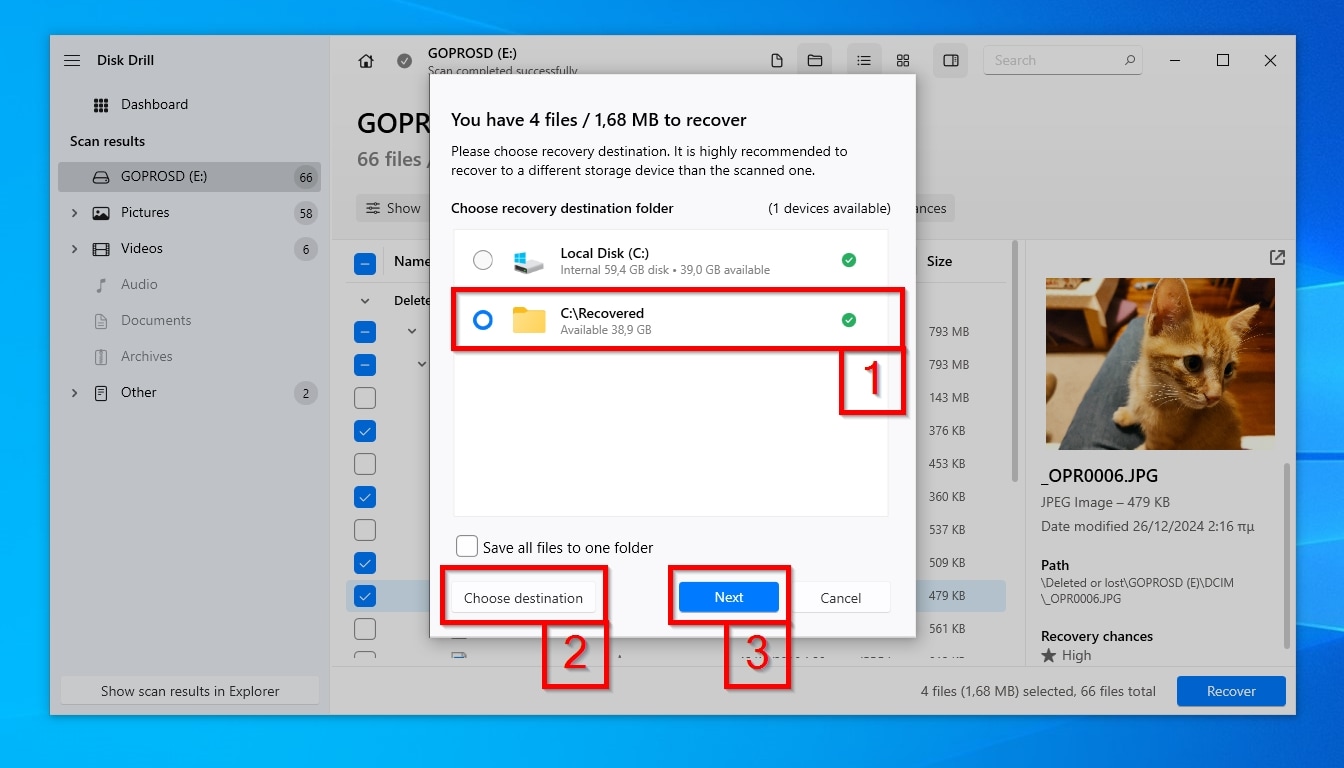
6. Choose Recovery Destination
Disk Drill suggests some locations where you can save your recovered GoPro photos and videos (1). Among them, you’ll see some paths the app “remembers” if you’ve used it before. If your desired destination isn’t among them, click Choose destination (2) and select another folder. Click Next (3) to start the recovery process.
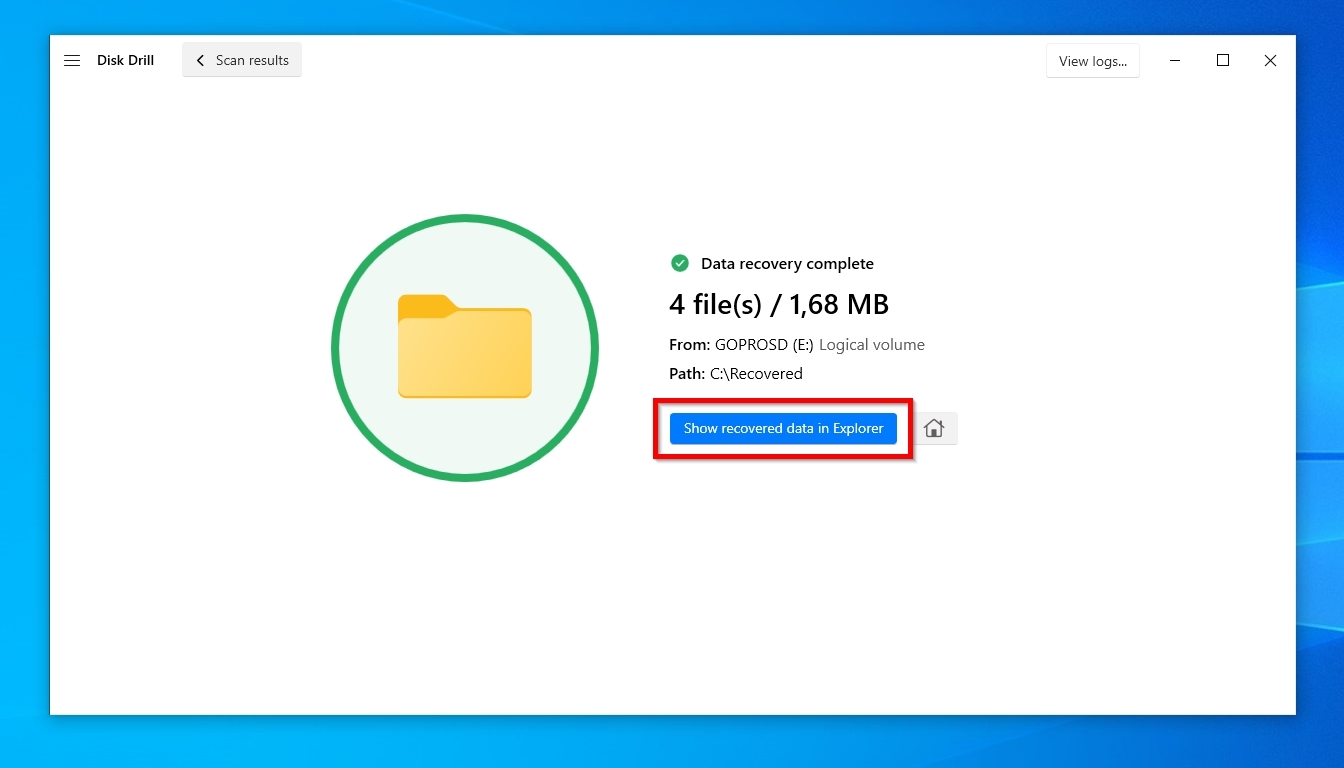
7. Check The Recovered Files
When the recovery is completed, Disk Drill will present a summary of the results. Click Show recovered data in Explorer to visit, using your OS’s default file manager, the destination folder you selected in the previous step, where Disk Drill stored the recovered files.
Whether you’re using the Hero 8, Hero 9, Hero 10, Hero 11, Hero 12, or the latest Hero 13, the recovery process remains the same. This makes Disk Drill an extremely versatile GoPro recovery software, capable of retrieving lost files from a wide range of GoPro models.
Additional GoPro Video Recovery Solutions
In most cases, Disk Drill is the best GoPro file recovery solution, but it’s not the only one. Let’s take a closer look at three alternative ways to fix GoPro data loss issues at home.
Solution 1: Recover Corrupted GoPro Video
Sometimes, it might feel like you’ve lost your GoPro footage even when it’s available. Your GoPro’s SD card and all files remain accessible, but one or more videos refuse to play, skip sections, or appear garbled.
There are many ways something like this can happen:
- 🚵 The recording process could be interrupted because your GoPro’s camera battery became detached after an “unplanned meeting” with a rock.
- 🧱 Similarly, after an unexpected smash, your GoPro’s SD card may have decided to part ways with the camera.
- 🏄♂️ Your ex-GoPro might have proven not as waterproof as users on r/gopro sub-reddit report, when you took that dive over the specified max depth.
We could keep listing possible scenarios, but the outcome would almost always be the same: a classic case of video corruption. Thankfully, there are tools that can help with that, too.
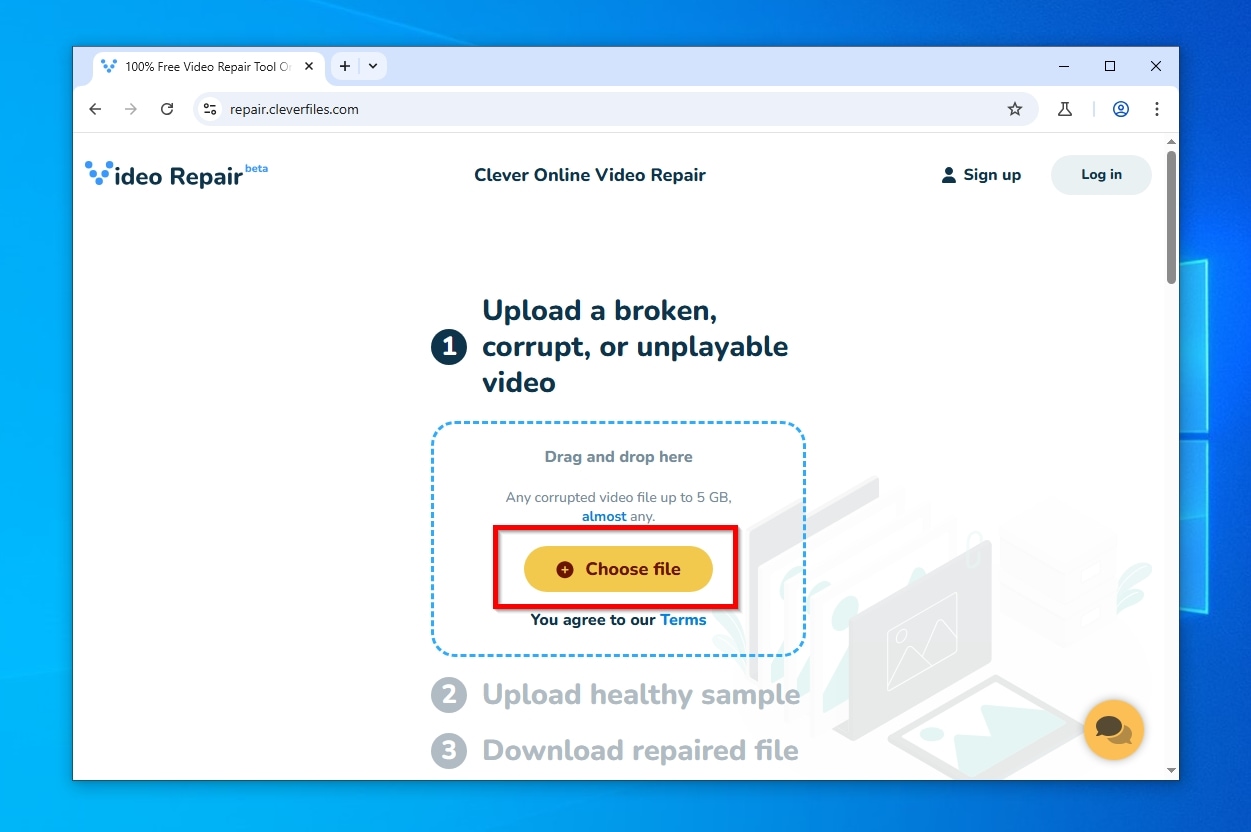
To recover your corrupted GoPro video with Clever Online Video Repair:
- Visit Online Video Repair’s official website, click on “Choose File“, and select your corrupted GoPro video. Note that you must log in to use the tool.
- Give the tool some time to analyze your video.

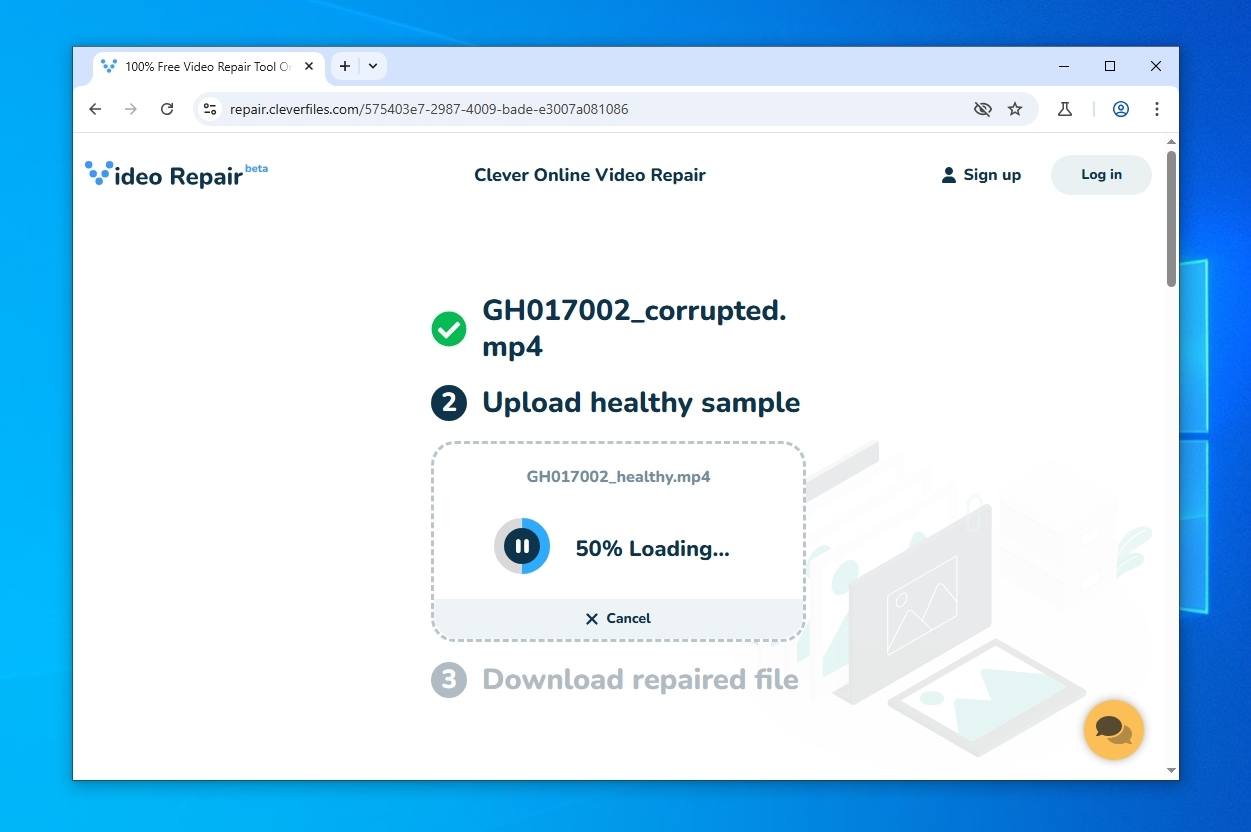
- In the next step of the process, click “Choose File” again and select a second healthy video. This will allow Video Repair to try to reconstruct your corrupted video’s destroyed parts using data from the healthy sample video as a reference. Note that the healthy video that will be used for reference should have the same characteristics as the problematic one (shot on the same camera, with the same recording settings, using the same encoding and file format, etc.).
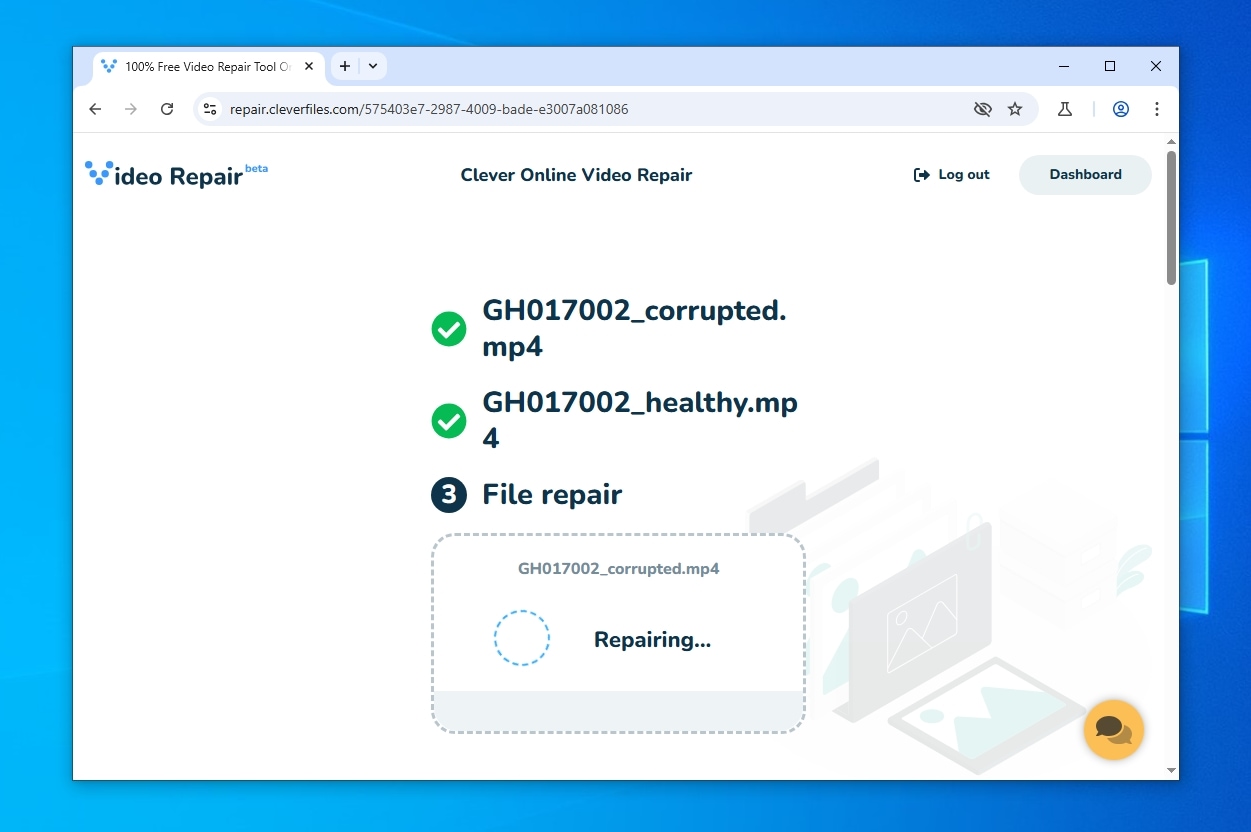
- Video Repair will need some time to analyze and compare both videos and reconstruct the corrupted one with parts from the sample. The time required for this step depends on the size and length of your video files. Although it should be quick enough, you will probably have some minutes to grab a cup of coffee until the process is complete.
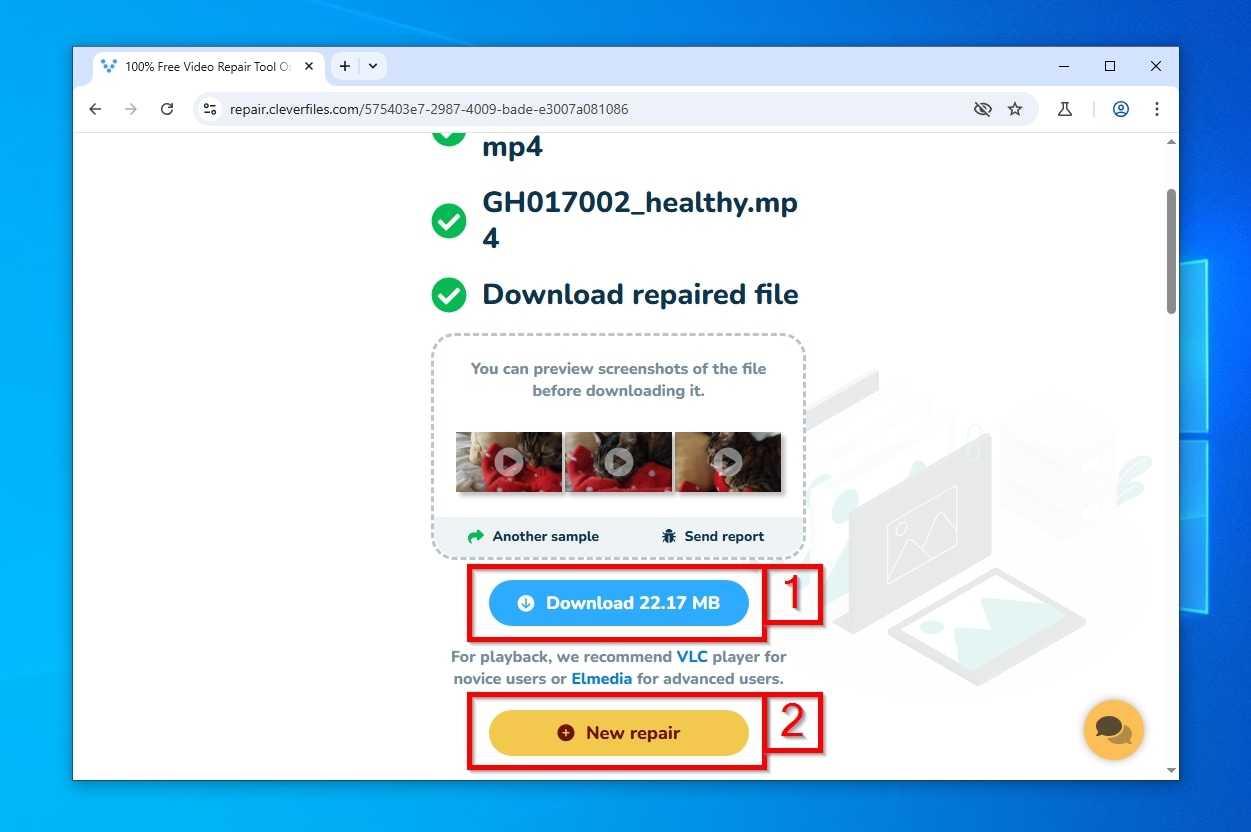
- When Video Repair is done processing your videos, it will allow you to preview screenshots from the repaired file, and offer a link to download it. If you are dealing with more than one corrupted GoPro video file, you can click “New Repair” and repeat the process with another one.
Solution 2: Extract GoPro Garbled Files With Unstoppable Copier
Can you see your GoPro files, but you meet errors when you try to copy them? Does the copy process complete, but the copied files are corrupted? It’s worth trying Unstoppable Copier.
You can think of Unstoppable Copier as a better alternative to the operating system’s native copy command. It’s designed specifically for dealing with files that seem unreadable. Unstoppable Copier performs multiple retries when reading problematic files, trying “to get the data right” before copying it to your chosen target location.
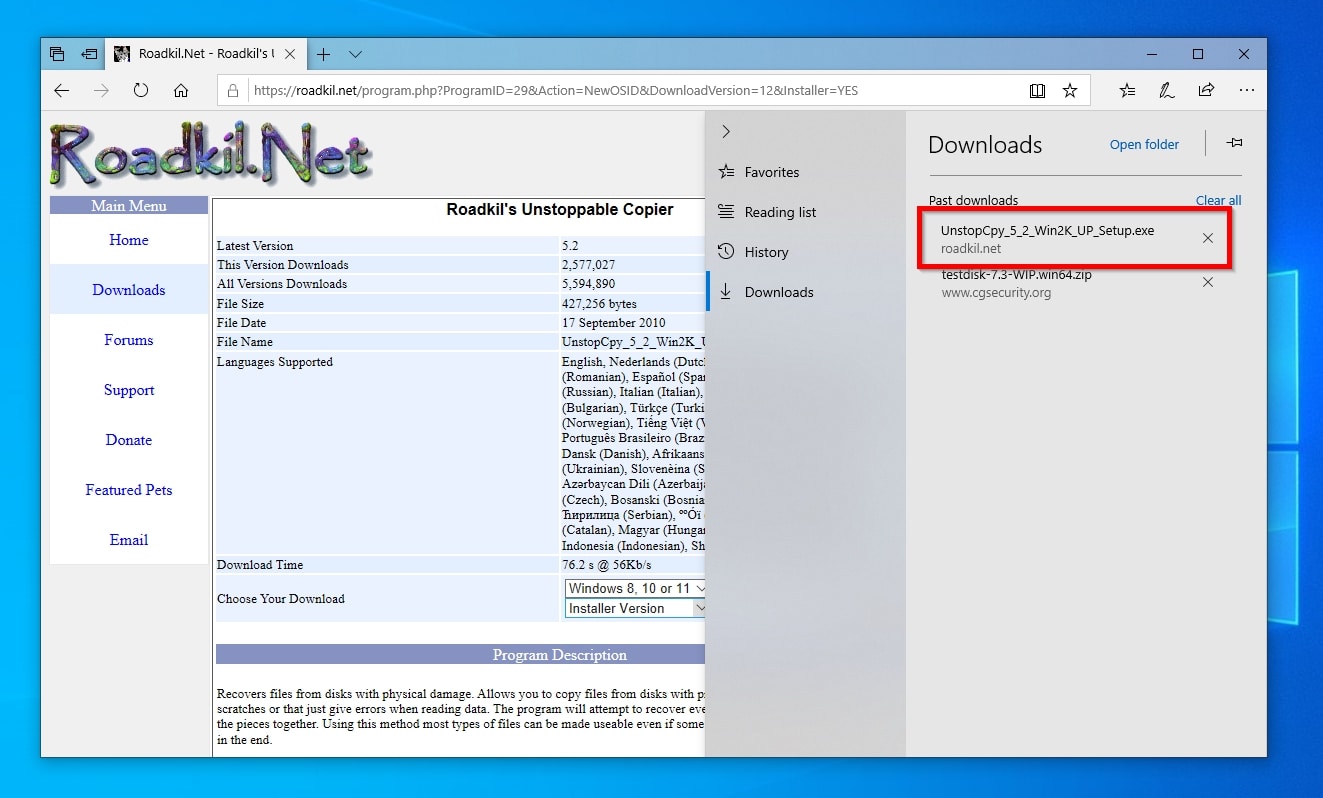
- Download Unstoppable Copier from its official site, and install it.
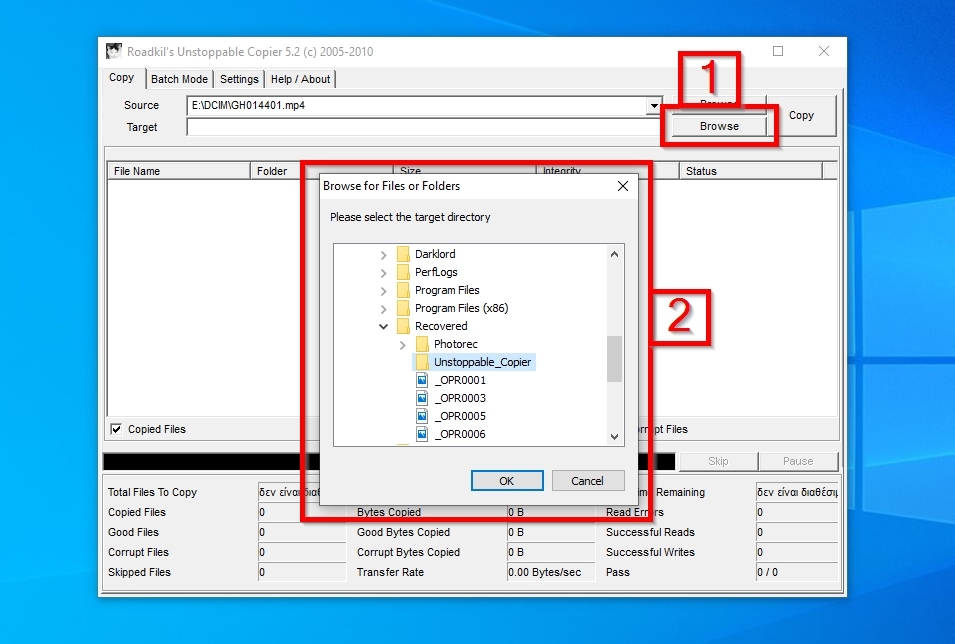
- Run Unstoppable Copier. While on the Copy tab, click on the first Browse button on the right of its window (1). Then, select one of the problematic files you’d like to copy (2).

- Click on the second Browse button (1), and choose where you want Unstoppable Copier to save your file (2).
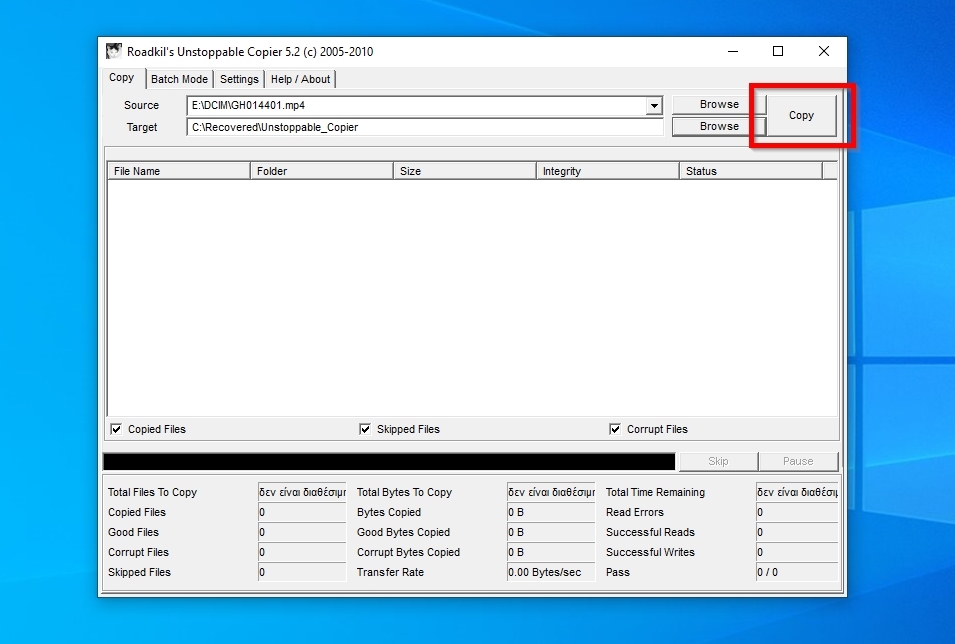
- Click on Copy on the top right, and hopefully, you’ll soon have your file back in working order.
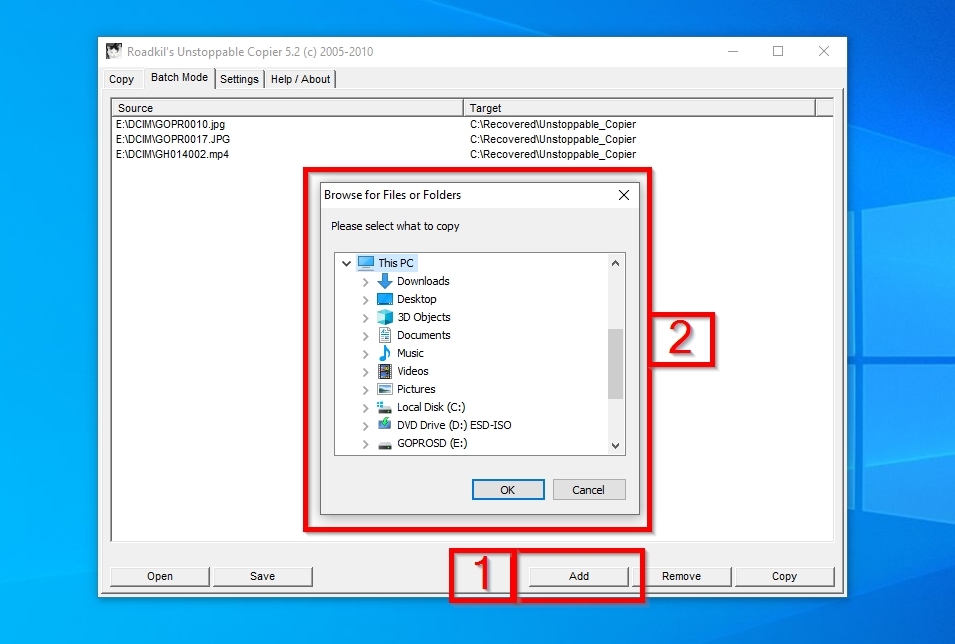
- If you want to recover more than a single file, move to Unstoppable Copier’s Batch Mode tab instead.

- Use the Add button on the bottom right (1) to add to Unstoppable Copier’s list the files you want to recover (2) and the path where you want them saved. You’ll have to repeat the steps for each of them. You can choose a whole folder, but that will take more time.
 Also, if dealing with a failing device, you should prioritize saving the files you need the most. Don’t try to salvage everything, which could push a failing device past its breaking point before recovering your most important data.
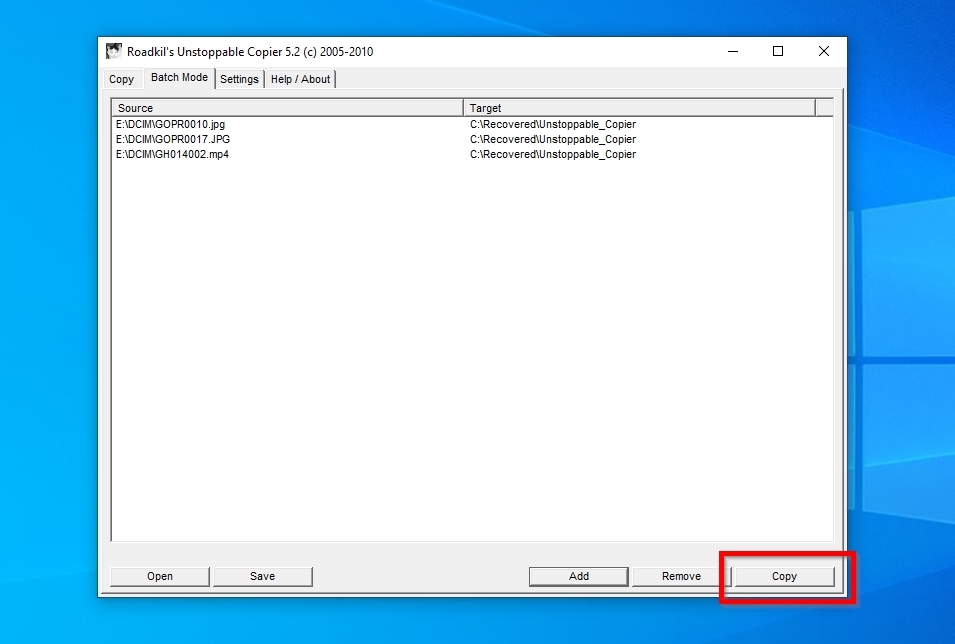
 - Finally, click on Copy to have Unstoppable Copier try to clone them to the defined target locations.
Solution 3: Fish Out Your Lost GoPro Files with a Free Tool
Do you believe Disk Drill is too straightforward, easy, or simple for your taste? Would you prefer a more hands-on approach and know your way around Windows hardware lingo? You may like PhotoRec.
PhotoRec is an open-source data recovery solution prevalent on Linux. It might not look as good as alternatives nor come with a state-of-the-art GUI, but it’s free. If cost is your highest priority, you can try recovering your GoPro videos with it.
We’ll be using its QPhotoRec variant for this tutorial, which presents an actual GUI instead of running in the command line.
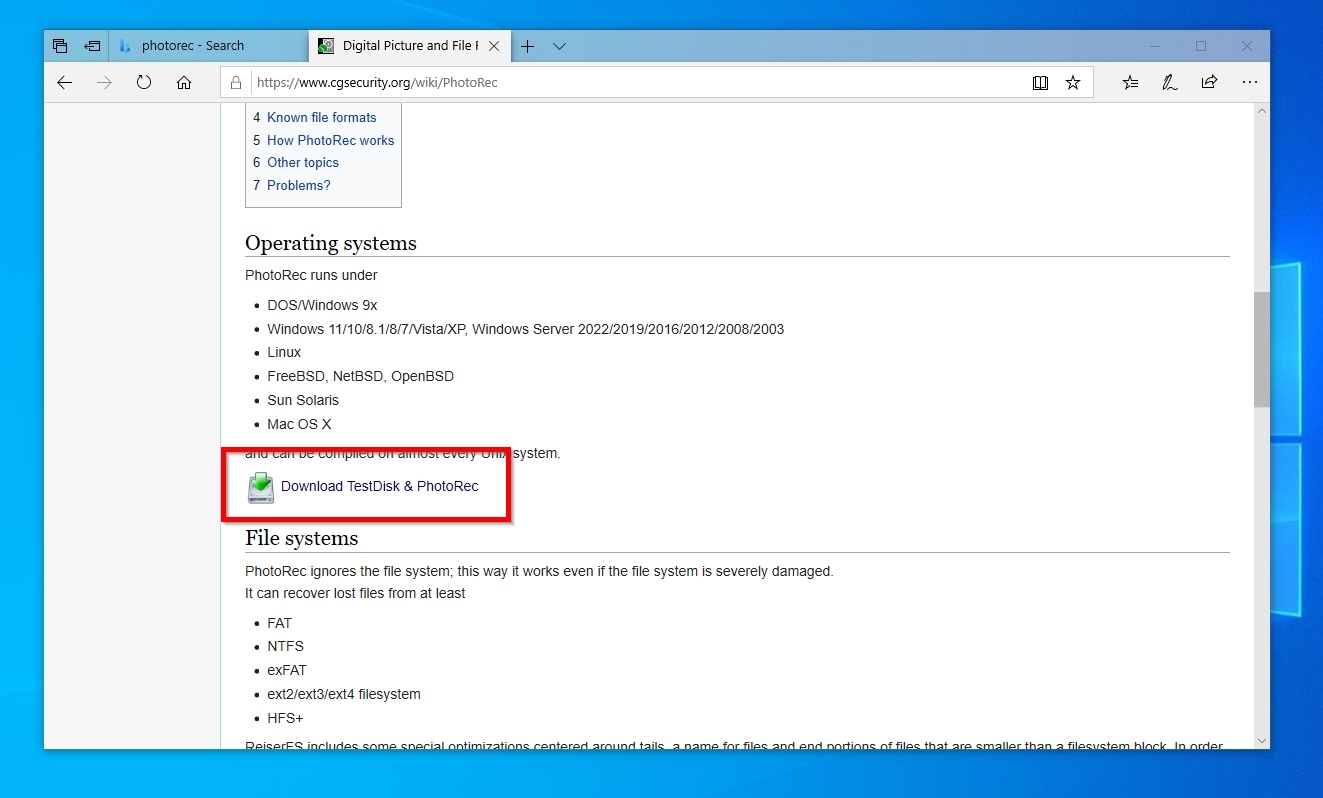
- Download PhotoRec from its official site. Note that it’s bundled with TestDisk, and the archive you’ll download also contains QPhotoRec (that we’ll use here).
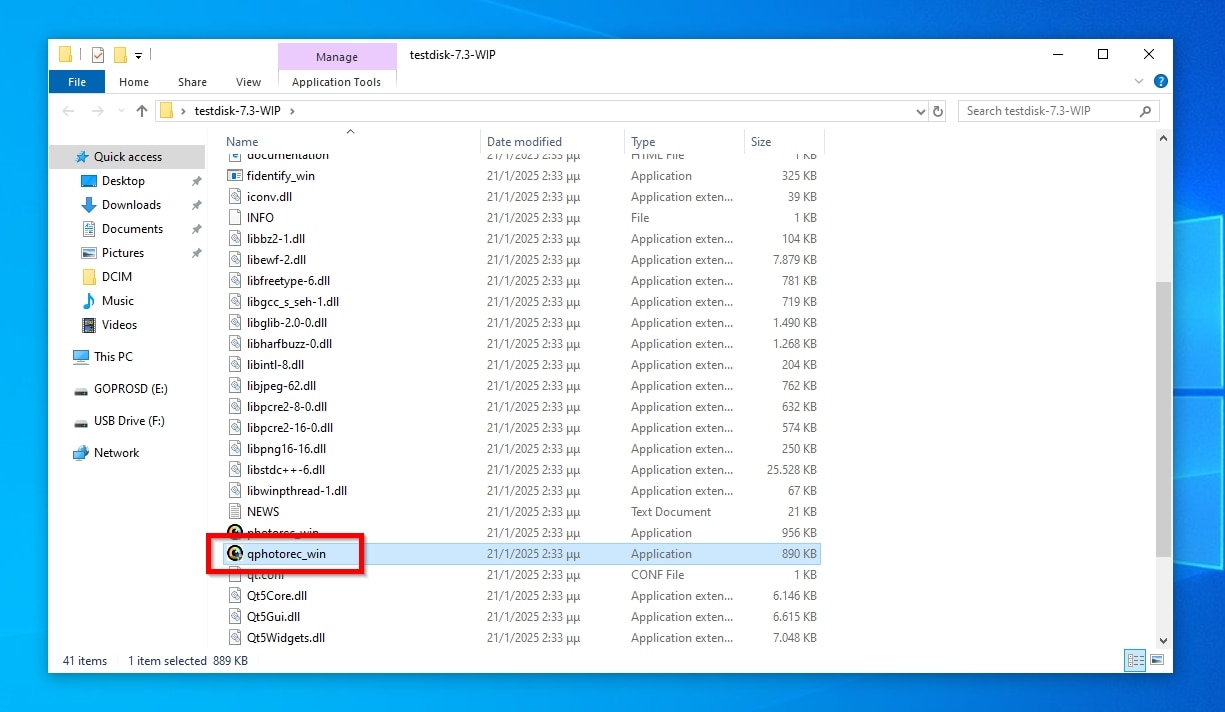
- Extract the downloaded archive to a folder. Ignore the dozens of irrelevant files and run “qphotorec_win.exe“.
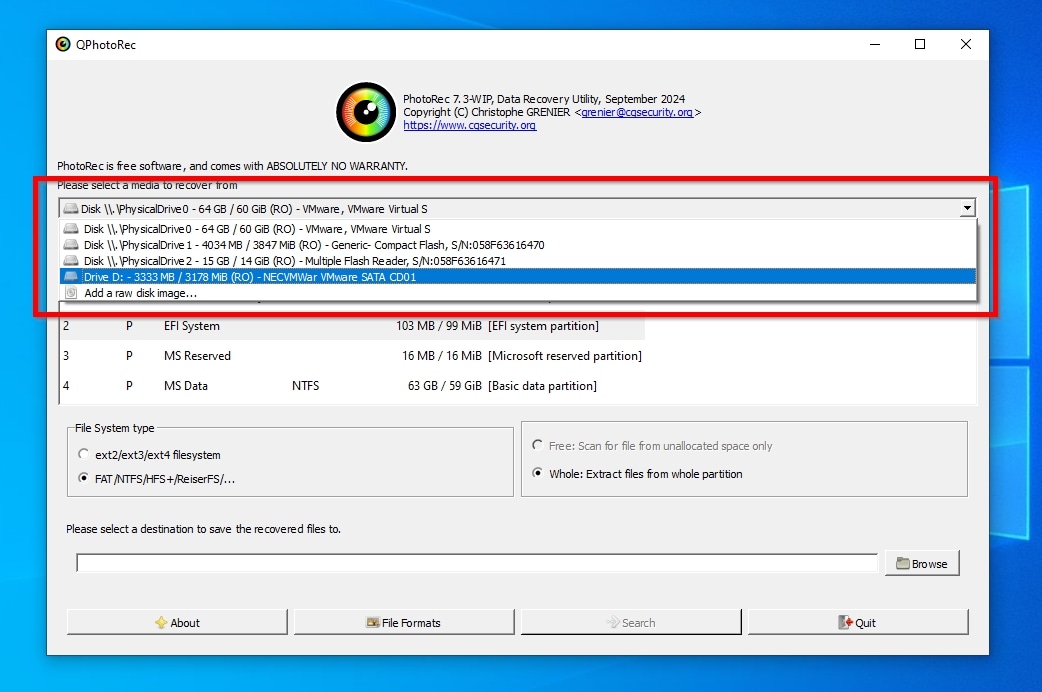
- Choose your GoPro’s storage from the drop-down menu on the top of QPhotoRec’s window.
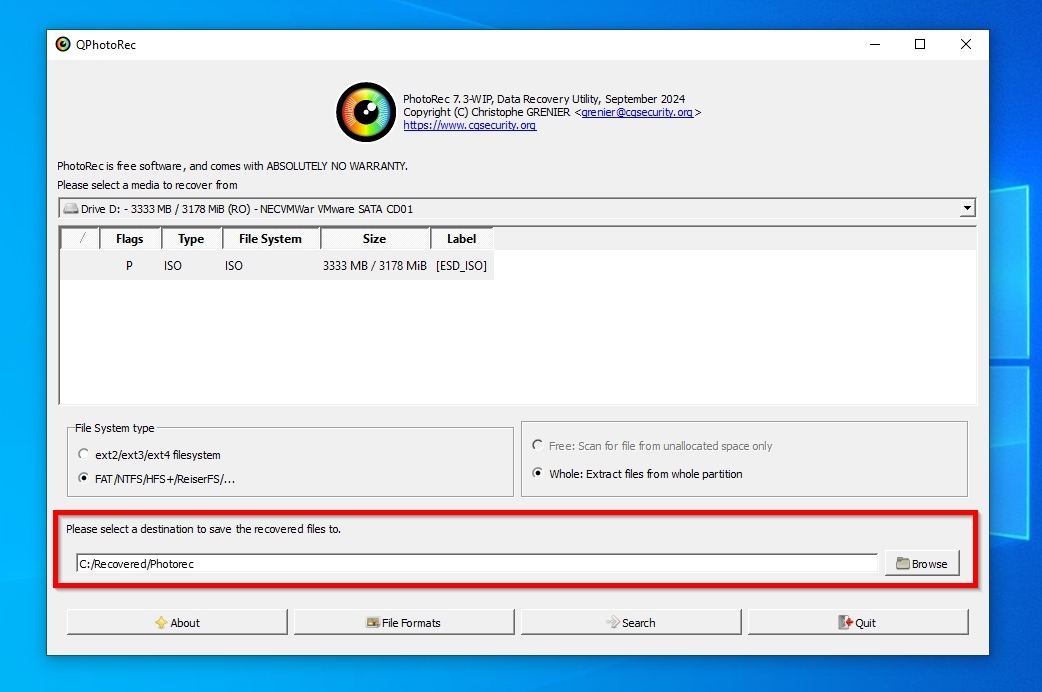
- Select the partition on the media from which you want to recover data. Choose from the unmarked panel on the right of QPhotoRec’s window if you want to perform a Free (and quick) or a Whole (and slower but more thorough) scan. Then, click on the Browse button on the bottom right of the window, and choose where you want to store the recovered files.
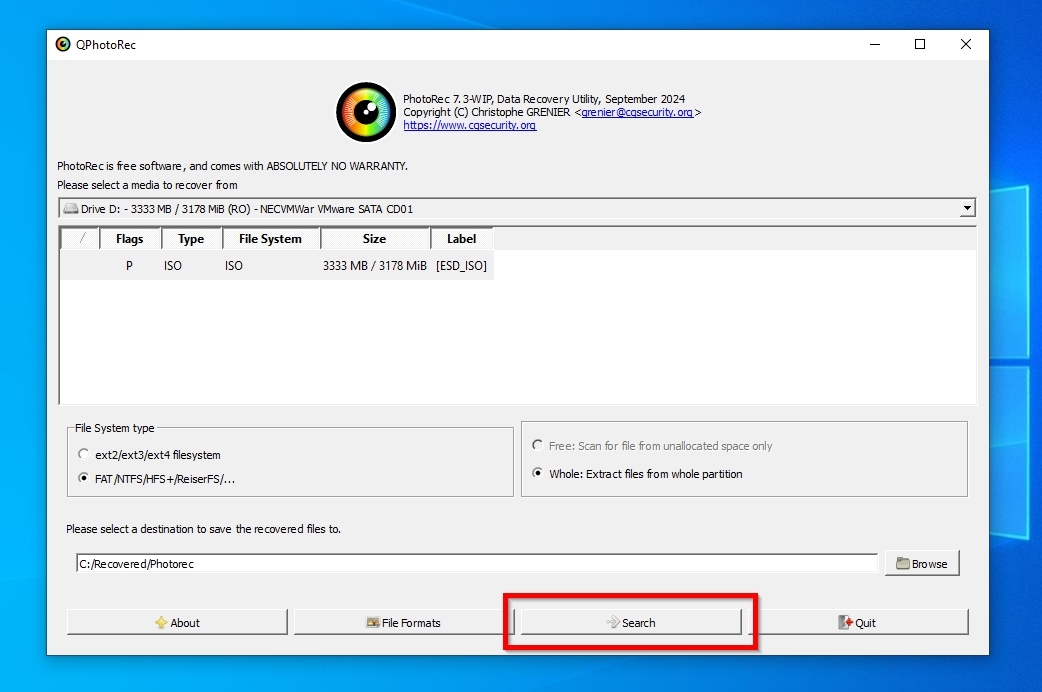
- With everything set up, click on the Search button at the bottom of the window to have QPhotoRec start scanning your GoPro’s storage for files.
- QPhotoRec will scan your GoPro’s storage and automatically recover any file it locates to the selected destination folder.
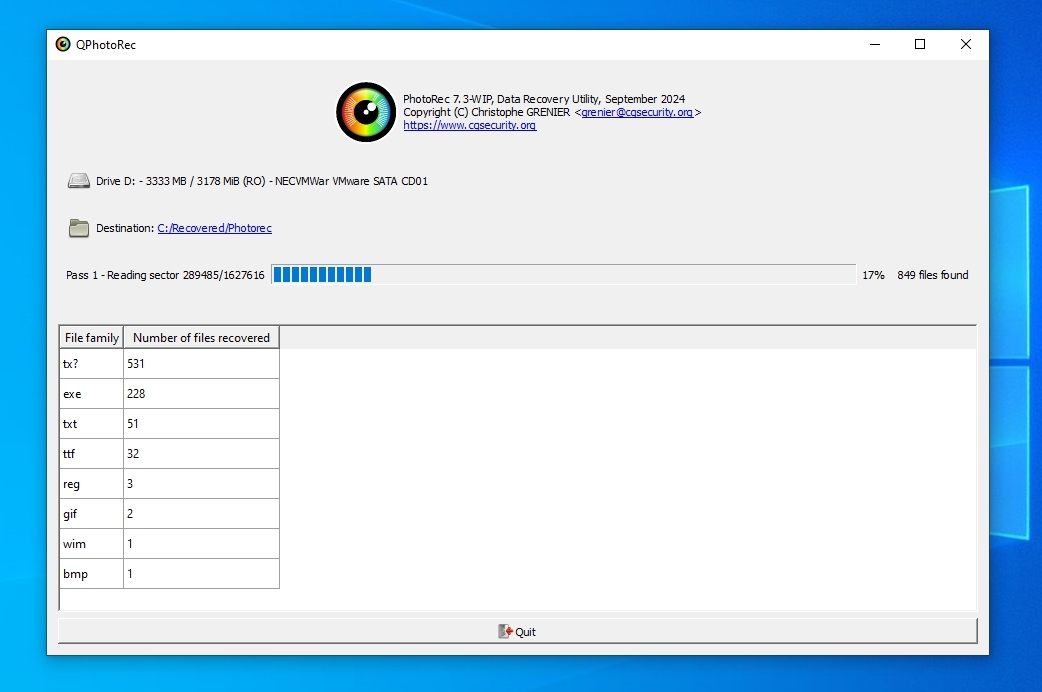
- Don’t expect a report or other warning when the process completes. When the progress bar reaches 100%, a “Recovery completed” label will appear on its left. You can then click on Quit at the bottom of QPhotoRec’s window to exit the app. You’ll find all files it managed to recover in the destination folder you selected.

Solution 4: Fix Your Corrupted GoPro SD Card With CHKDSK
If you can and would like to invest the time to learn more about how an SD card can become corrupted and the ways to deal with such issues, check our guide on how to fix corrupted SD cards. If you’d like to try doing something about it as soon as possible, you might be able to fix your GoPro SD card that appears corrupted using CHKDSK.
To fix a corrupted GoPro SD card using CHKDSK:
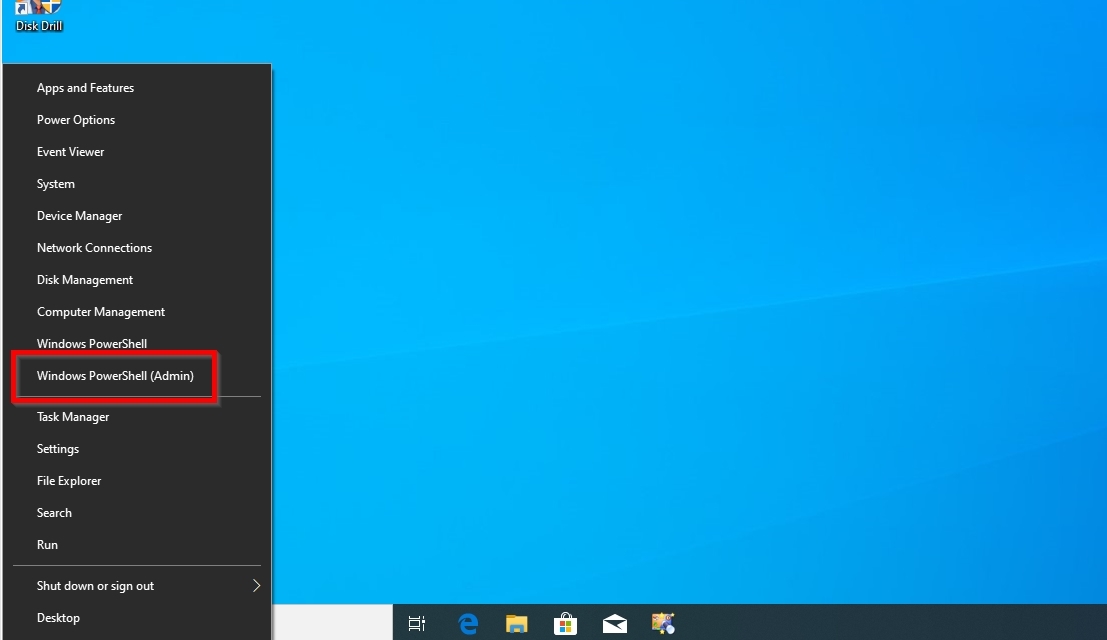
- Press Windows key + X and run either the Windows Terminal or the PowerShell. Make sure to run them with elevated privilleges (choose the version with “Admin” after its name).
- Type
chkdsk E: /f, where “E” is the drive you want to check, and press Enter. CHKDSK will start scanning your storage device’s file system for errors and attempt to fix them.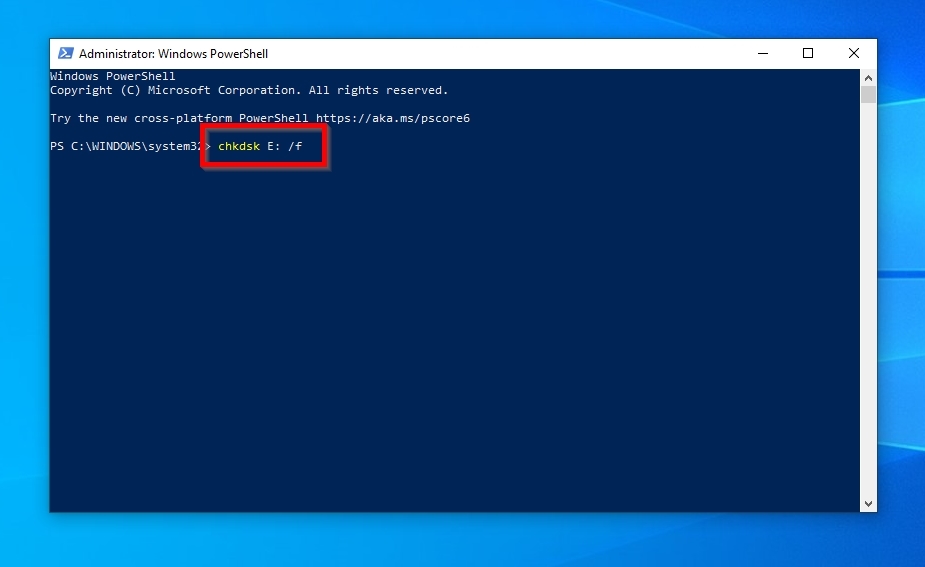
- Alternatively, type
chkdsk E: /rif you’d prefer to check the whole storage device for bad sectors. Remember to replace “E” with the letter of the drive you want to scan.


Solution 5: Format Corrupted GoPro SD Card
Do all new photos and footage you capture with your GoPro turn out corrupted? That’s rarely a problem with the camera itself: the root is often a corrupted file system on your SD card, and solving the issue can be as simple as formatting it.
GoPro’s onboard OS seems to only “quick format” SD cards while not offering a more thorough option. So, the best choice is to temporarily “transplant” your SD card to your computer and perform a full format there to ensure if it’s free from bad blocks.
To format your GoPro’s SD card on a Windows PC:
- Connect your SD card to your PC – you’ll have to use a third-party SD card reader if your computer doesn’t have such a slot. Ensure your SD card is recognized by the PC.
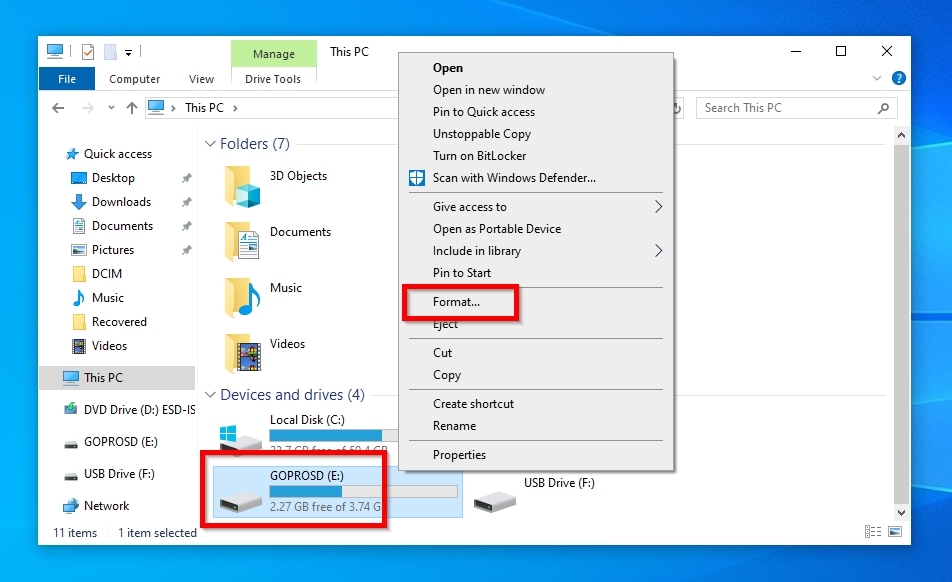
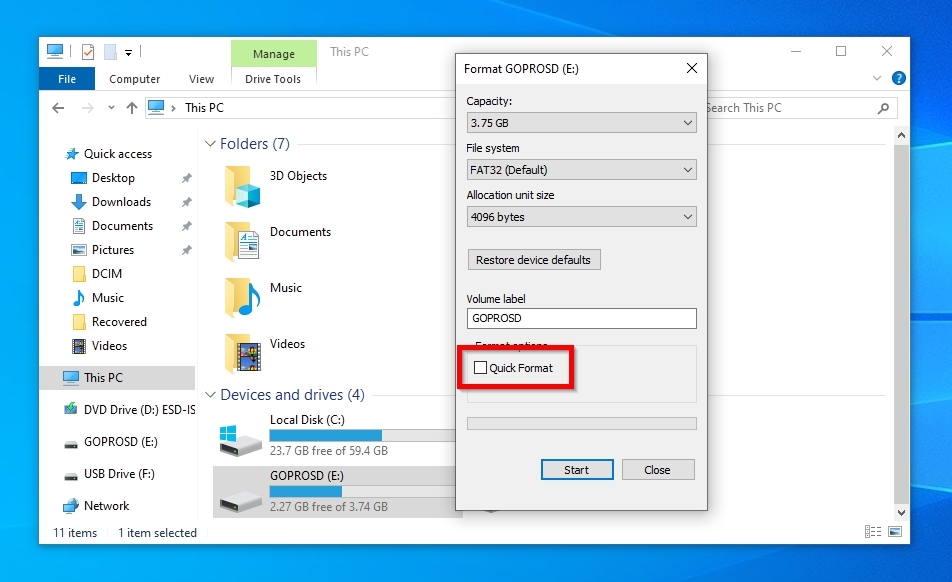
- Fire up an instance of Windows File Explorer, or any other file manager you prefer. Locate your SD card in its interface, right-click on it, and choose to Format it.
- On the format dialog that pops up, disable the option to Quick Format your GoPro’s SD card. This will have Windows perform a full format, which will also mark any bad blocks it finds as unusable.
When the format completes, safely “eject” your SD card, disconnect it from your PC, and move it back to your GoPro. Then, reformat it there, to ensure it uses the optimal block size for the best compatibility with your camera.
Challenges Associated with GoPro Data Recovery
On a surface level, GoPro cameras look deceptively straightforward: you press a button, and anything “they see” is stored as a still capture or footage. However, their reality is much more complex, and it can be hard to recover data or salvage usable versions of files from their SD cards.
GoPro cameras use multiple types of files and encoding formats for storing photos and videos. To complicate things further, those also depend on your GoPro model.
As a short guide of what you can find in a GoPro’s SD camera:
- 🖼️ Images are stored as compressed JPG files or uncompressed RAW files in GoPro’s own format with a “GPR” file extension.
- 📽️ Videos are stored in MP4 files. Those are “a container format”, a type of file within which one may find video and audio streams, text, and metadata.
- 📷 Depending on the GoPro model and the user’s settings, video streams within MP4 files may be compressed with either the older H.264 algorithm, or the newer H.265 codec (also known as HEVC – High-Efficiency Video Coding).
- 🗜️ H264/H.265 are demanding compression algorithms. To help in “managing” (previewing, seeking, etc.) such “heavy” files, GoPros create a “lighter” Low-Resolution Video version (LRV), and a thumbnail file, stored as “THM”.
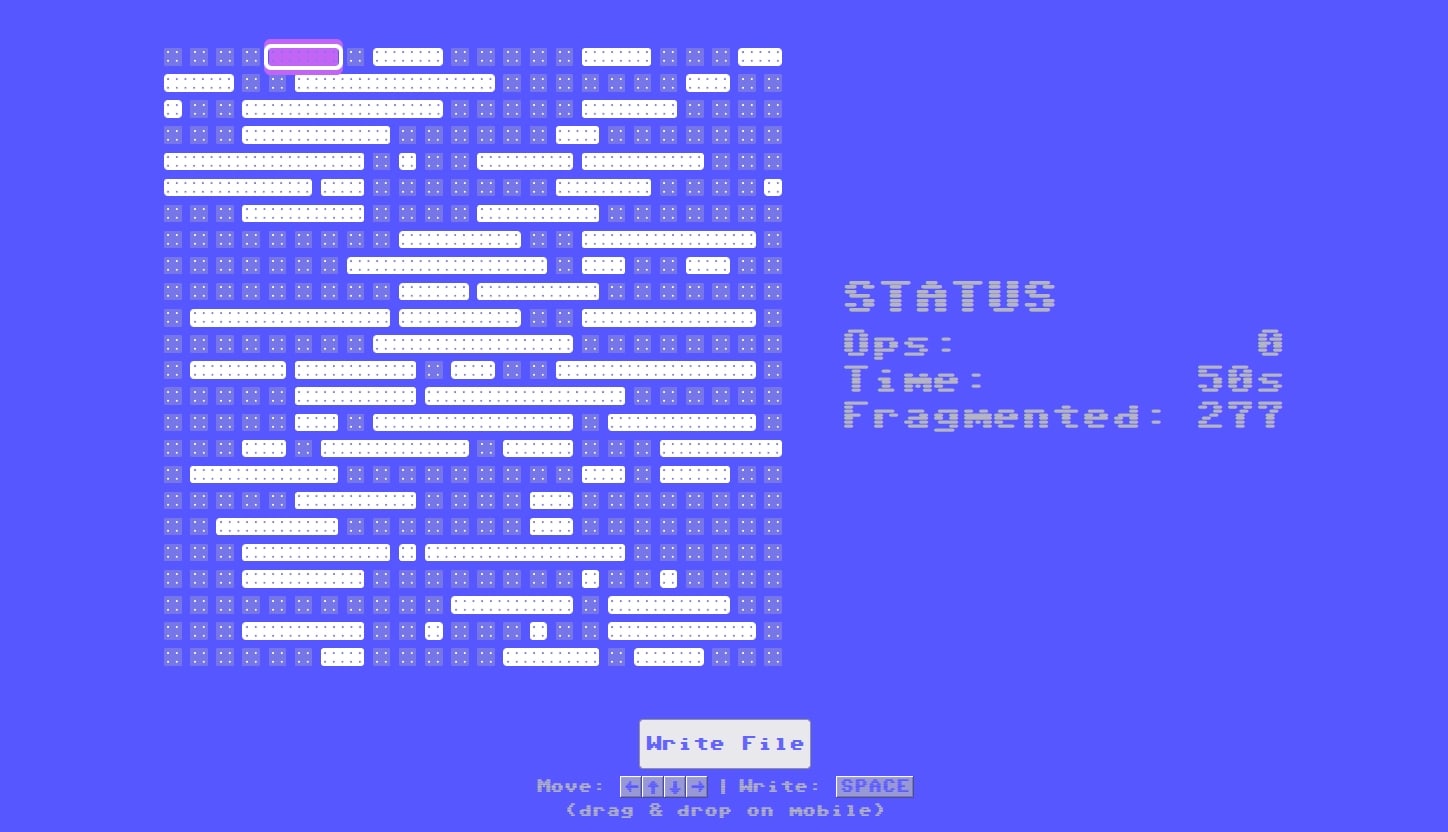
Unlike dashcams or surveillance gear, like most cameras, GoPros don’t record continuously, allowing us to take photos and videos whenever we like. However, this freedom means that larger files, like long videos, might be transparently split into separate parts to “fit between” other smaller files that already exist on the SD card. Strangely, there’s a fun way to understand how that results in a data mess: check out Defrag: The Game!
There are reports that fragmentation could slow down access to files in old mechanical Hard Disk Drives that had to seek every single part of a file to access it, but it is not a significant issue with modern memory-based media, like SSDs and SD cards, for typical daily use. But there’s an exception to this, and it’s apparent when it matters the most: segmented files are much harder to recover since instead of seeking a single file, a data recovery solution has to find and “reconnect” every single part of them into a cohesive whole. And the more the files that need to be recovered, the more fragmentation can turn into a recovery nightmare.
Thankfully, apps like Disk Drill can recover deleted GoPro footage by seeking, locating, and reassembling each video’s parts into usable files. In the case of Disk Drill, the app can recover deleted MP4 files as they are and can even find missing THM files. However, it may convert LRV and THM files to their true form hidden within their custom formats, bringing them back as MP4s and JPGs, respectively.
Usually, the results are positive. Sometimes, though, “complexity wins”, and also, depending on the type of corruption/damage, the produced files may still be incomplete or unusable.
Conclusion
GoPros are considered the tanks of the camera world, built to withstand more stumbles, falls, and hits than their cousins, making them the go-to option for fans of sports.
However, they’re not invincible, and sometimes they, too, may require some help from apps like Disk Drill, to help restore the snaps and footage from their SD cards to their former glory.
FAQ
Does a video seem gone but still takes up space on your GoPro’s SD card? Use an app like Disk Drill to recover it. Then, fix your SD card with CHKDSK, or reformat it.
If your recovered video refuses to play, try to repair it using Clever Video Repair.
The best way is with a data recovery app like Disk Drill:
- Connect to your computer and scan your GoPro or its SD card with Disk Drill.
- Mark your files among Disk Drill’s results for recovery.
- Click Recover and select where you want to store the recovered files.
Usually, it’s both possible and easy to recover deleted GoPro files. However, to maximize the chances of a successful recovery, stop using your GoPro’s SD card as soon as you realize you’ve lost some files and use a data recovery solution like Disk Drill to get them back.
GoPro cameras only allow formatting SD cards and don’t come with error-fixing tools. So, use a tool like CHKDSK on a PC instead. For example, on a PC with Windows 11:
- Press Windows Key + X and choose Terminal (Admin).
- Type chkdsk X: /r, where “X” is the letter “mapped” to the SD card.