Are you trying to compress some important videos on your iPhone because they take up too much space? Or maybe you can’t send them to someone due to file size limits. You might also have a bunch of recordings you’d otherwise delete, but would like to first consider an alternative: compressing them and keeping them in a smaller form.
Whatever your situation, you don’t need technical skills or video editing experience to fix this. Not everyone is chasing maximum compression, but to help visualize the differences and set expectations, I took the same 1080p video (filmed on an iPhone 13) and ran it through every method covered in this article. You’ll find those results next to each method, so you can see exactly what to expect before committing to one approach.
Case Guide to Reduce Video Size on iPhone
There are multiple ways to compress videos on iPhone, and the right approach depends on what you’re trying to do and where the video needs to go:
- Just need a quick fix for messaging or email? A third-party app to compress video will get the job done in seconds. You’ll see the expected file size before saving, which helps when you need to compress iPhone video for email or squeeze under a platform limit. For example, Discord free users hit a wall at 10 MB (and many complain about it online), and most email providers also max out at 25 MB for attachments.
- Want more control over quality and file size? The Shortcuts app (developed by Apple and very likely already installed on your device) lets you re-encode videos with custom settings. It takes a bit more effort but gives you flexibility without losing quality unnecessarily.
- Need to also edit the video? iMovie is your best bet. It’s free, already on most iPhones, and lets you trim clips, add transitions, adjust audio, and apply filters. When you’re done editing, you can downsize a video on iPhone by choosing a lower resolution (1080p or 720p) during export.
- Tried everything and still stuck? Send an iCloud, Google Drive, or Dropbox link instead. The recipient can then either download the original video or stream the video directly in their browser without downloading anything (this depends on the cloud service, with iCloud generally being a bigger pain to work with than the rest).
As you can see, none of the methods above require technical skills or special knowledge. You don’t need to understand codecs or bitrates to make iPhone video smaller. Just pick the approach that fits your situation and follow a few steps to get more storage on iPhone.
Compress iPhone Video in a Few Taps
If you want to compress videos on iPhone without messing around with export settings or learning video editing software, Clever Cleaner is the fastest option. It’s completely free (no hidden subscriptions or “premium” features locked behind a paywall), and the whole process takes about 30 seconds. This method is ideal if your main goal is freeing up storage. It’s not only fast and convenient, but the app overall unlocks a lot of useful capabilities in this area.
Here’s how to use Clever Cleaner to compress your videos:
- Download Clever Cleaner from the App Store and open it.
- Grant the app access to your photo library when prompted.
- Let it scan your device. This usually takes a few seconds, though larger media libraries may need a couple of minutes.
- Tap the Heavies tab, then select the Compression sub-tab.
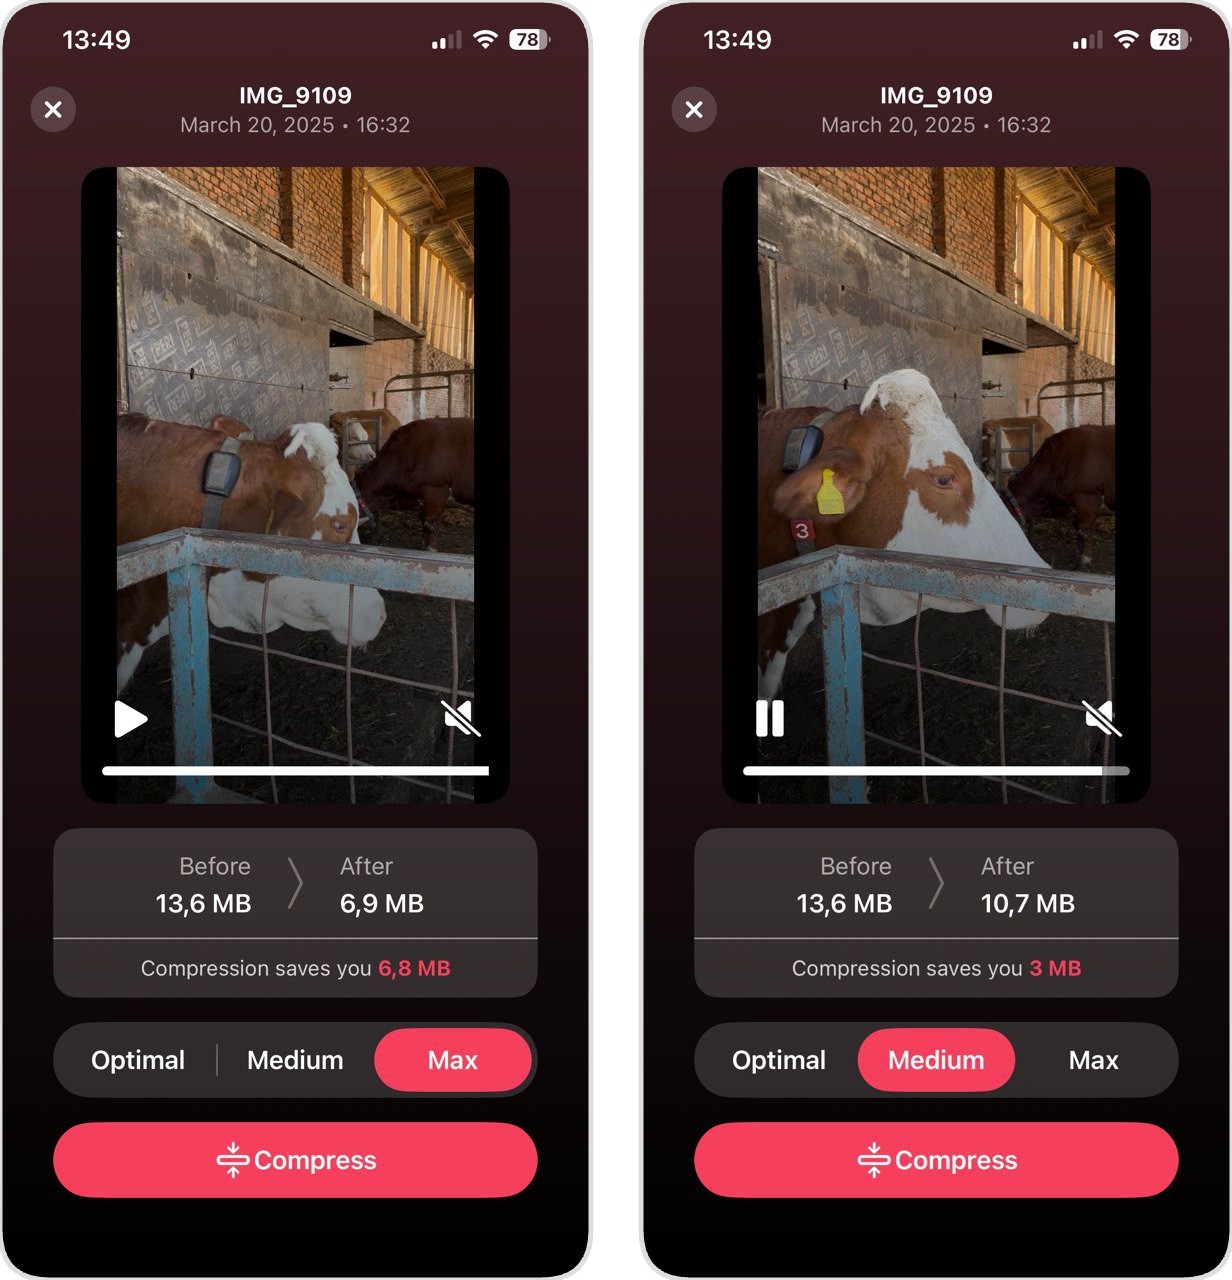
- Select the videos you want to compress. The app will show you the current file size and the expected size after compression, and you can choose between three compression levels (Optimal, Medium, and Max) depending on how much space you need to save.
- Tap Compress and wait for the process to finish.
- Done. Your compressed videos are now saved, and you can delete the originals directly from within the app using the button that appears after compression.
What we found after testing all three compression levels: Our 13.6 MB test video shrank to 12 MB with Optimal (12% reduction), 10.7 MB with Medium (21% reduction), and 6.9 MB with Max (49% reduction). Quality-wise, Optimal produced no visible difference from the original. Medium introduced very slight softness that you’d only notice if comparing side-by-side. Max showed more noticeable compression artifacts, especially in areas with fine detail. For most people, Optimal or Medium hits the sweet spot between space savings and quality retention. Use Max only when you’re desperate for storage and don’t mind some quality trade-off.
Beyond video compression, Clever Cleaner also handles duplicate photos, similar images, screenshots, and Live Photos. If your storage is constantly running low, it’s worth exploring those features too. We tested dozens of apps while creating our best iPhone storage cleaner ranking, and there’s a reason we put this one in first place.
The app was built by CleverFiles, the same team behind Disk Drill, a well-known data recovery tool. As such, it respects user privacy by processing everything locally on your device. Your videos never get uploaded to any server, which matters if you’re dealing with personal footage or anything sensitive.
How to Reduce Video File Size on iPhone with Built-In Solutions
You don’t always need a third-party app to compress iPhone video. Apple includes tools that can handle the job for free, but they do require a bit more work.
Method 1: Re-Encode with Shortcuts
This method takes the most preparation upfront, but once it’s set up, you can compress iOS video in just a few taps whenever you need to. The goal is to build a custom workflow that re-encodes videos at whatever quality and resolution you choose using the Shortcuts app (pre-installed on every new iPhone).
Here’s how to set it up:
- Open the Shortcuts app and tap the + button to create a new shortcut.
- Tap the dropdown next to “New Shortcut,” select Rename, and call it something like “Compress Video.”
- Tap Add Action and search for Encode Media. This is the action that actually compresses your video. Once added, tap the word Media in the action and change it to Shortcut Input (this ensures the shortcut uses whatever video you share with it).
- Tap the Show More arrow under the Encode Media action to reveal additional settings.
- Next to Size, tap Passthrough and select Ask Each Time (this lets you pick the resolution each time you run the shortcut).
- Search for and add a second action: Save to Photos. Make sure its input is set to “Encoded Media.”
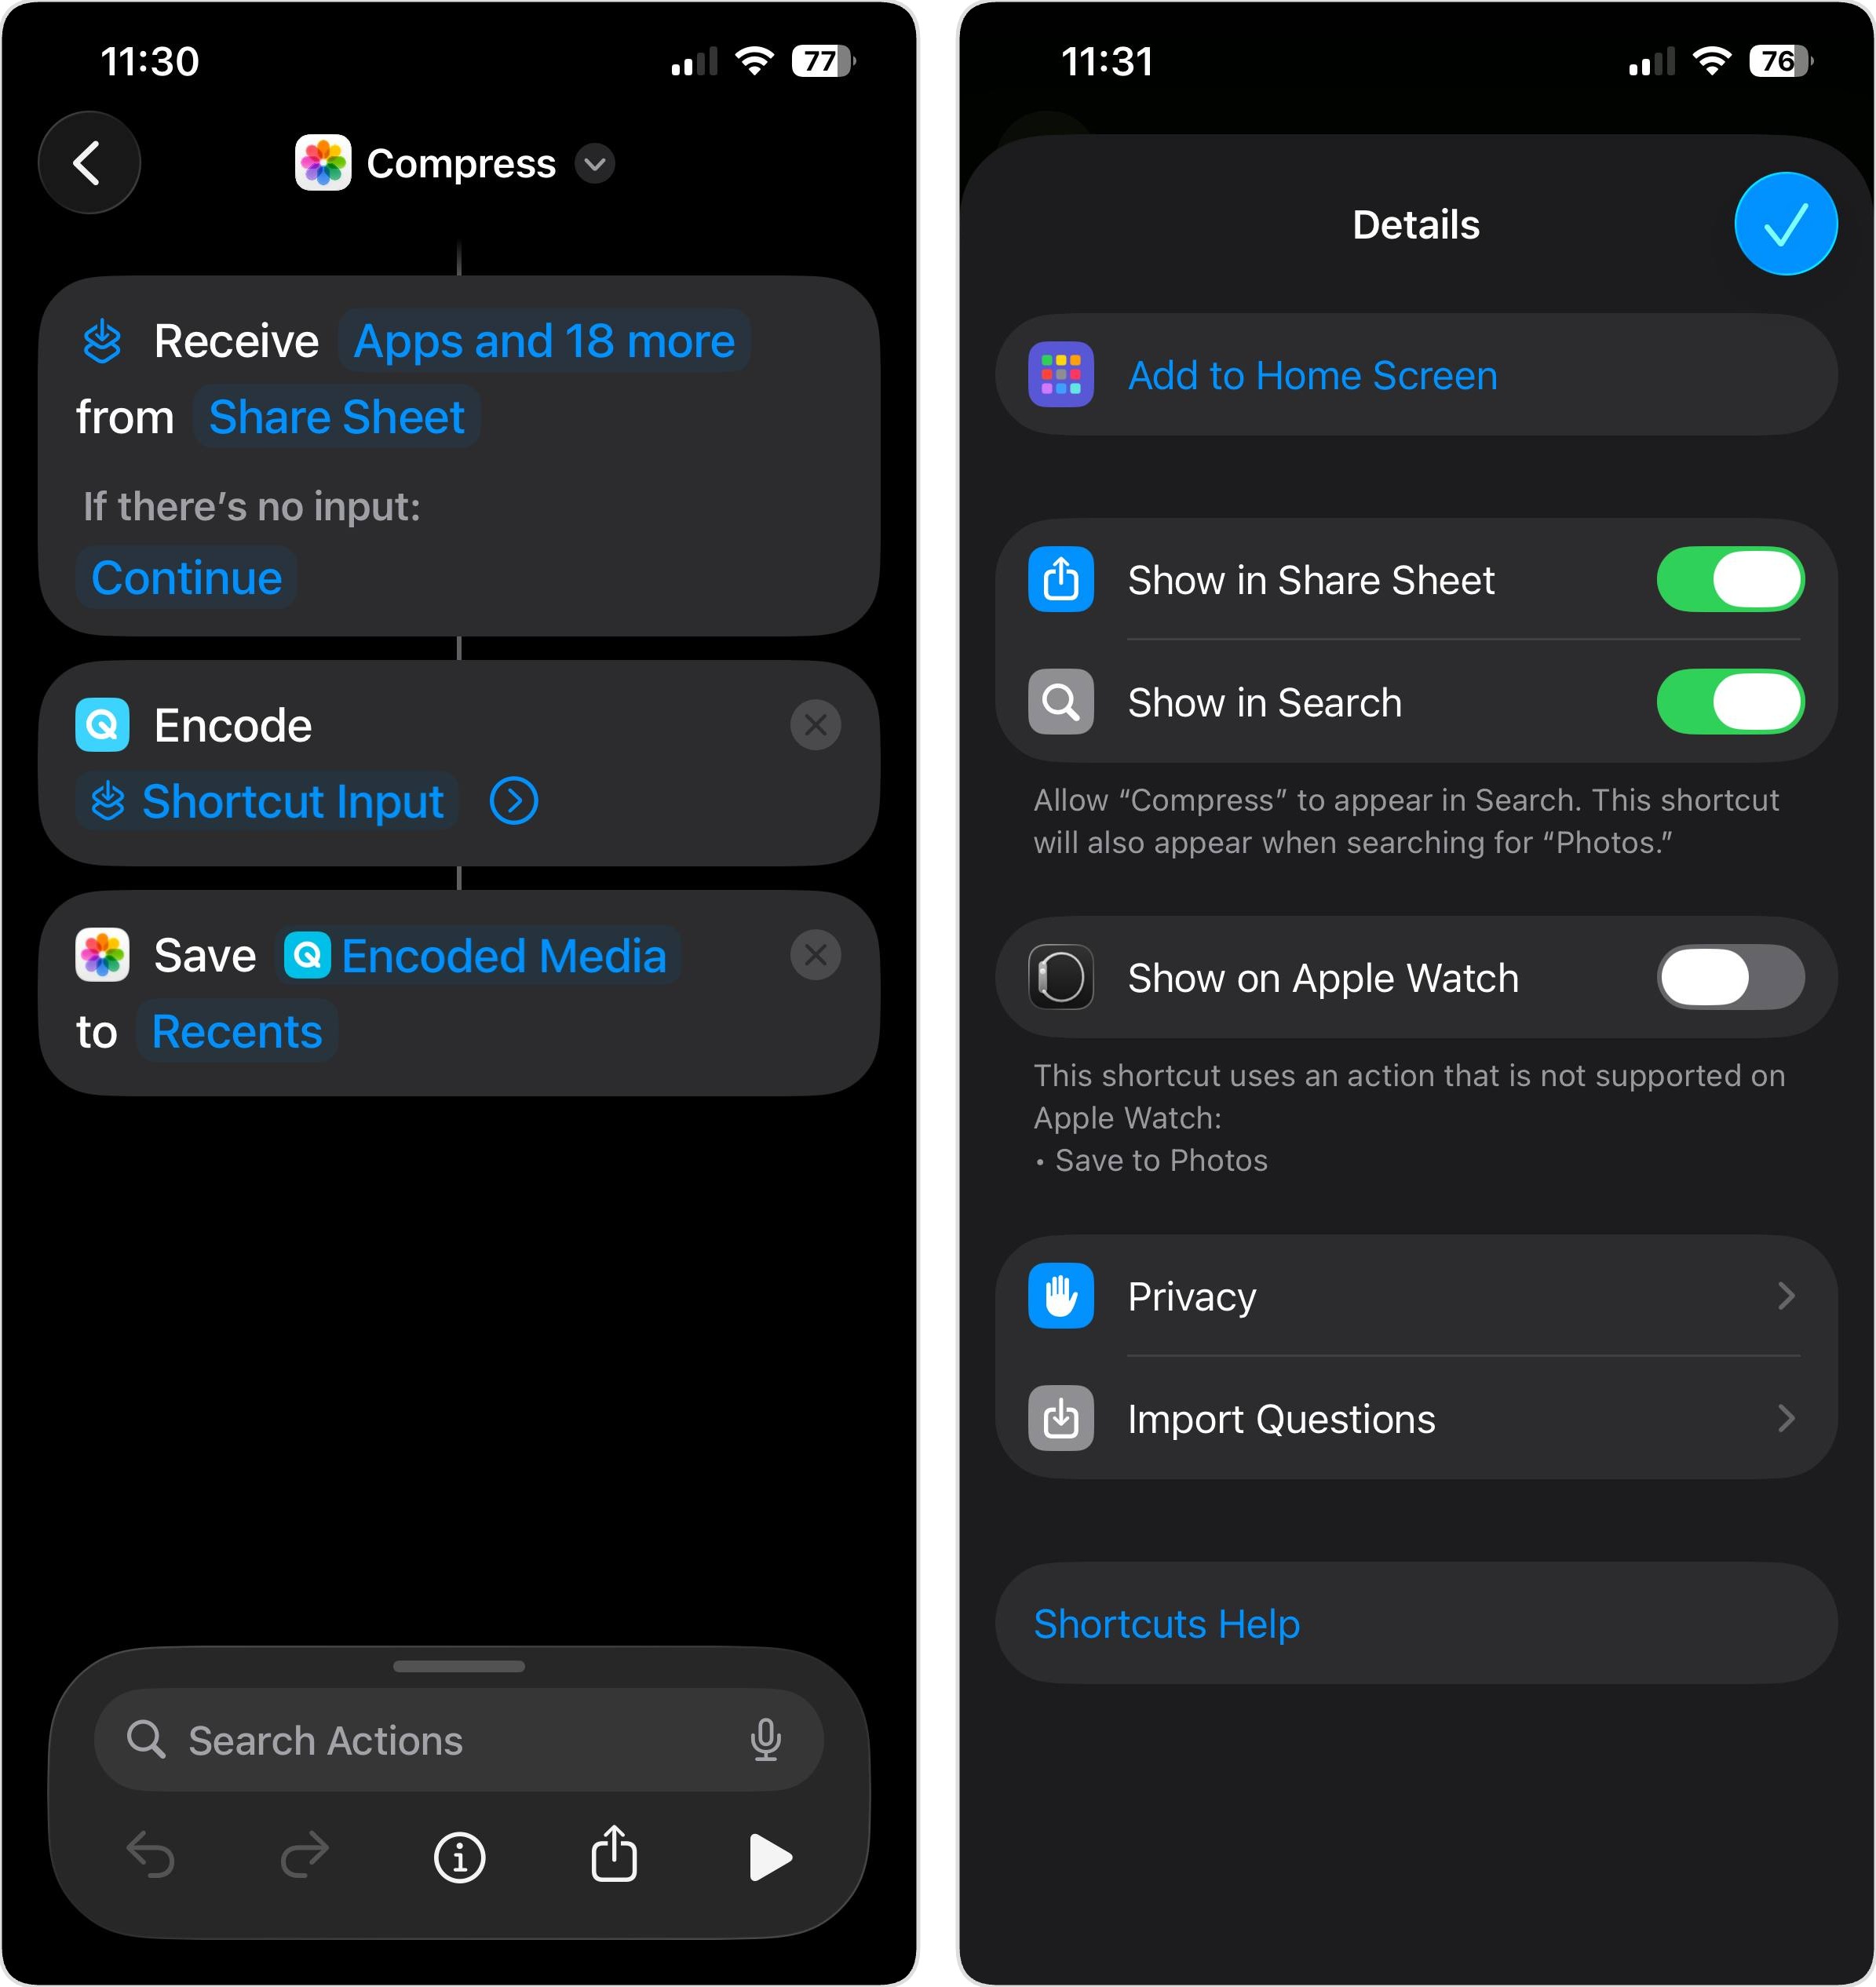
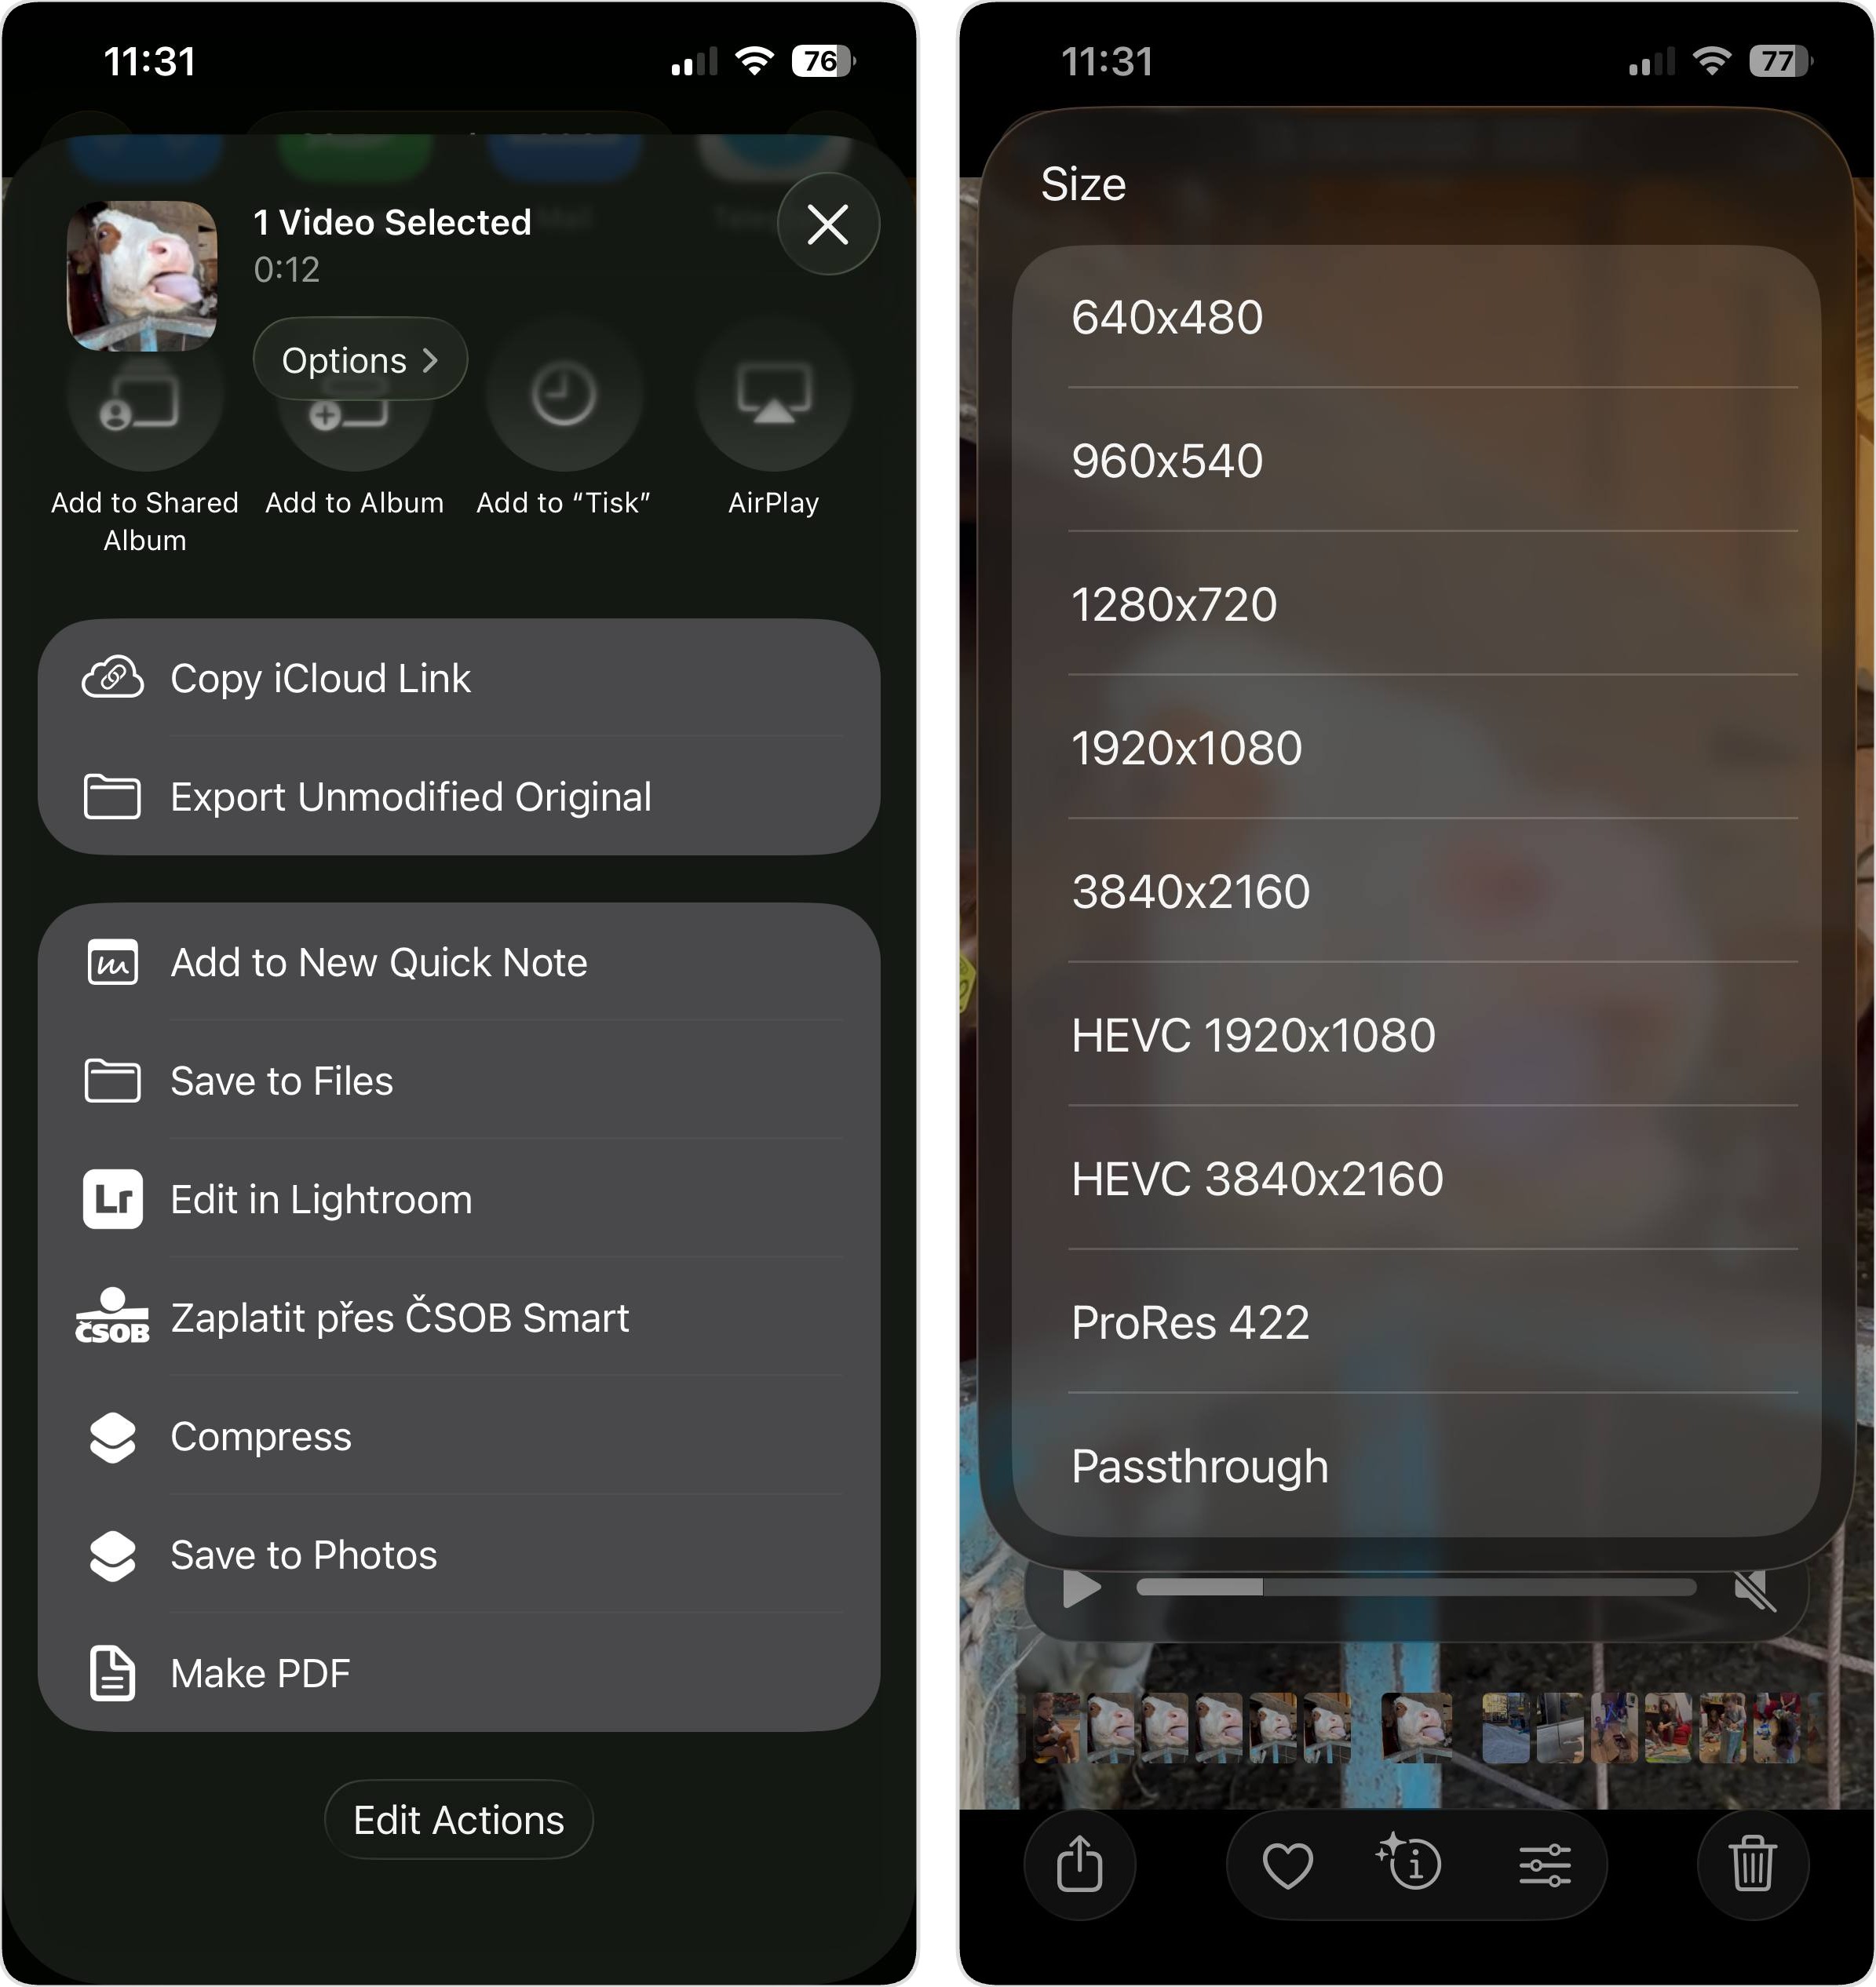
- Tap the Info icon (ⓘ) at the bottom of the screen, then enable Show in Share Sheet and set it to accept Media files only.
- Tap Done to save your shortcut.
Now, whenever you want to reduce video file size on iPhone, run your shortcut and pick a resolution. The compressed version saves automatically to your photo library.
What we found: The shortcut only saves space if you pick a lower resolution than the original. Our test video was already recorded in HEVC (H.265), so choosing 720p actually increased the file size to 16.5 MB. We had to drop down to 540p to see real savings, which brought it to 8.3 MB (39% smaller). If your original video was shot in H.264 (“Most Compatible” format), you’ll have better luck. In that case, re-encoding to Full HD HEVC can save space without reducing resolution at all.
Method 2: Downscale and Export in iMovie
iMovie gives you the most control when you need to both edit and compress a video on iPhone after recording. It’s free, already installed on most iPhones (or you can download it from the App Store), and lets you trim unnecessary footage before exporting at a lower resolution.
The editing part matters because a shorter video means a smaller file. If your 3-minute recording only has 45 seconds of usable content, cutting the rest before compression makes a real difference when clearing iPhone storage.
Here’s how to make a video file smaller on iPhone using iMovie:
- Open iMovie and tap Start New Project, then select Movie.
- Choose the video you want to compress from your library and tap Create Movie.
- Your clip appears in the timeline. To trim it, tap the clip, then drag the yellow handles at either end to remove unwanted sections from the beginning or end.
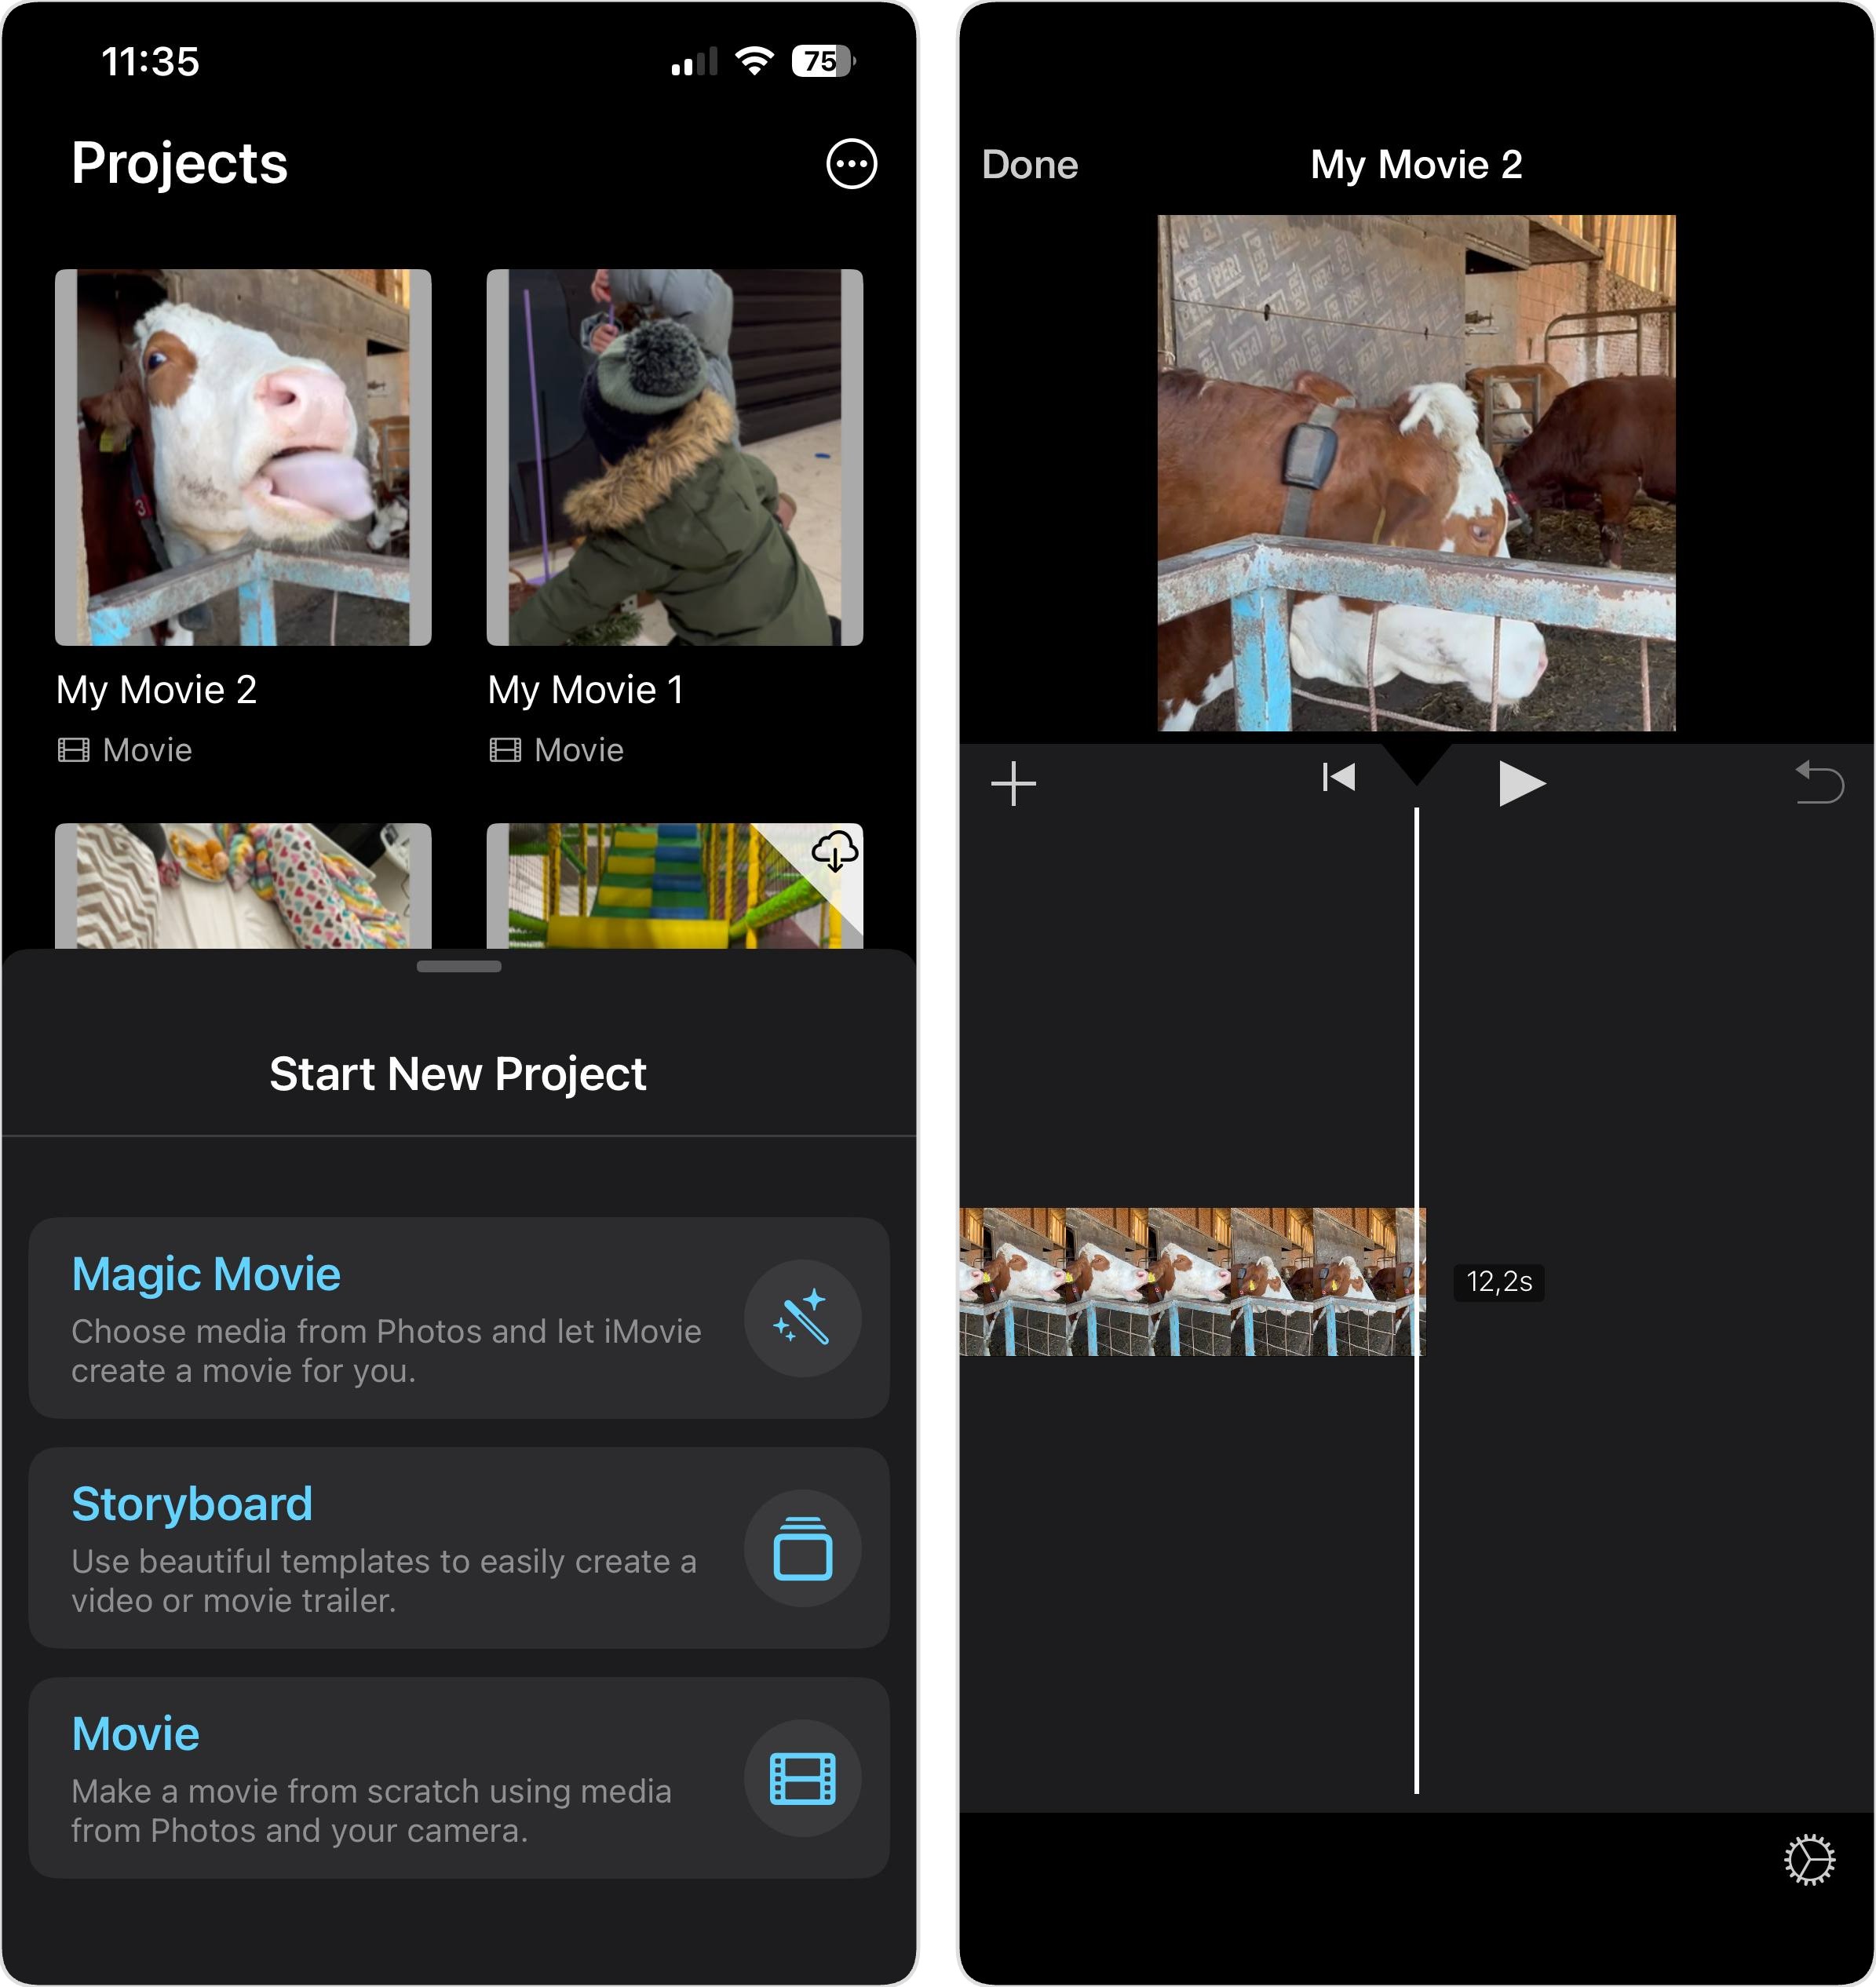
- If you need to cut a section from the middle, position the playhead where you want to split, tap the clip, then tap Split. Delete the unwanted segment.
- When you’re done editing, tap Done in the top-left corner.
- Tap the Share button (the square with an upward arrow) and choose Save or Share Video.
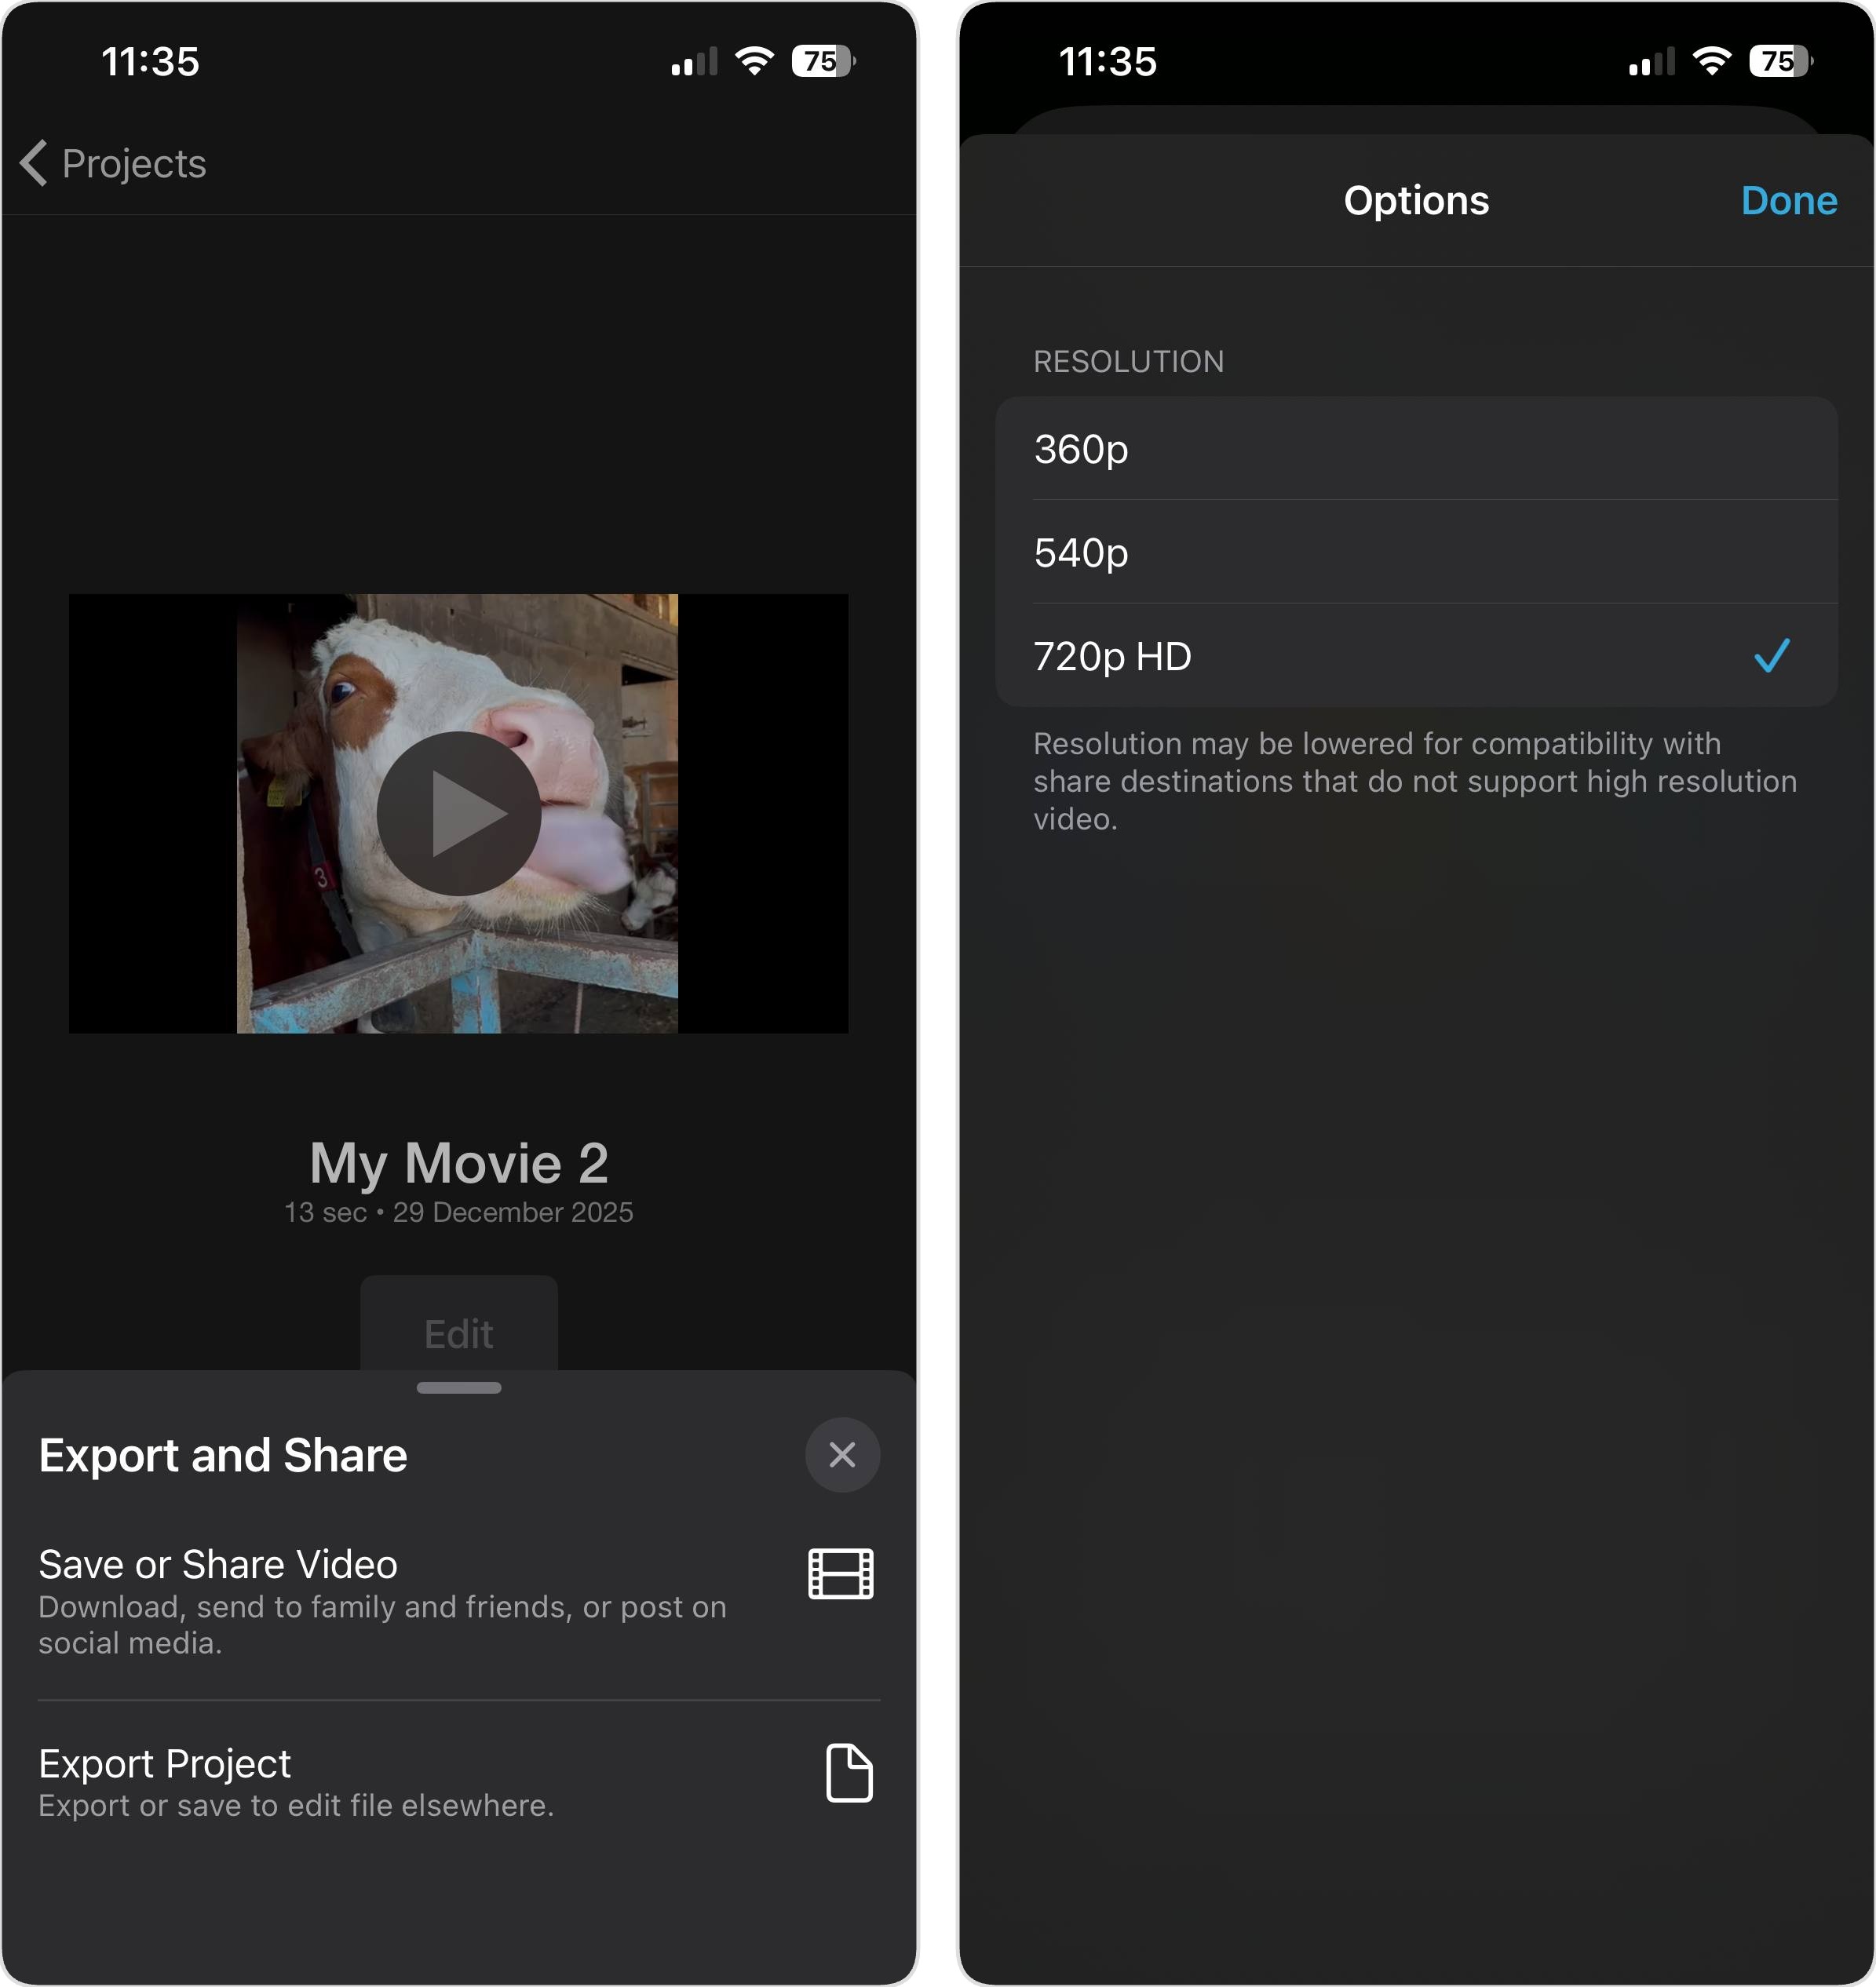
- Tap Options under the video title. Here you can choose your export resolution.
- Select a lower resolution to downsize a video on iPhone. Options typically include 1080p HD, 720p HD, 540p, and 360p. I generally go with 720p for general use, but I occasionally choose 540p when I need to fit the video into some strict file size limit.
- Tap Done, then tap Save Video to export the compressed version to your Photos library.
What we found: Similar to the Shortcuts method, iMovie struggles to compress videos that are already in HEVC. Our 13.6 MB test video actually grew to 16.3 MB when exported at 720p. We had to drop to 540p to see any savings, which brought it down to 8.3 MB. The quality loss at 540p is noticeable, especially on larger screens. If your main goal is pure compression without editing, Clever Cleaner delivers better results with less hassle. But if you need to trim or edit your footage first, iMovie remains the best built-in option.
Alternative: Share Links Instead of Trying to Make iPhone Video Smaller

Sometimes compression just isn’t the answer. For example, if you’re sending footage to a client or collaborator who needs the original quality, or if the video is so long that even aggressive compression won’t get it under email limits without turning it into a pixelated mess.
In these situations, skip the compression entirely, upload the video to the cloud, and share a link instead.
Apple’s iCloud is the most obvious choice if you’re already in the Apple ecosystem. Videos in your Photos library can be shared via iCloud links, and recipients don’t need an Apple device to view them. There are also Google Drive, Microsoft OneDrive, and Dropbox, all of which arguably handle cross-platform sharing much better.
Bottom Line
The best way to lower video file size on iPhone depends on what you’re actually trying to accomplish. A dedicated app to compress videos like Clever Cleaner is the best quick-and-easy solution, but the Shortcuts method is also worth exploring if you have a few minutes to set it up. And when you need to trim footage before compressing, iMovie gives you editing tools alongside export options.
Based on our testing, Clever Cleaner delivered the best balance of compression and quality retention. Our 13.6 MB test video shrank to 6.9 MB (50% savings) at the Max setting with acceptable quality loss, while the Optimal setting preserved visual quality almost perfectly at 12 MB. The built-in methods (Shortcuts and iMovie) struggled with videos already recorded in HEVC, often producing larger files unless we dropped the resolution significantly.
Worth mentioning: the easiest compression happens before you even record. Check your iPhone camera settings and consider whether you really need 4K at 60fps for everyday clips. Shooting at 1080p from the start means smaller files and less hassle later. You can also switch from “Most Compatible” (H.264) to “High Efficiency” (HEVC) in Settings > Camera > Formats to automatically reduce file sizes without losing quality.
It’s also a good idea to spend a few minutes getting to “know your enemy” by memorizing the limits of platforms you use regularly. If you need to lower video file size to send in email, remember that most providers cap attachments at 25 MB. Discord free users hit a wall at just 10 MB. On the other hand, WhatsApp and many other instant messengers compress everything automatically regardless of what you do, so you don’t really need to worry about anything.
FAQ
Not really. The Photos app lets you trim videos but doesn’t offer any compression or export settings. To actually reduce the file size, you’ll need to use the Shortcuts app, iMovie, or a third-party tool like Clever Cleaner.
For email, you typically need to get under 25 MB, which rules out most 4K footage unless it’s very short. Your fastest option is using an app like Clever Cleaner that shows you the compressed file size before saving. If the video is still too large after compression, either trim it down in iMovie or skip the attachment entirely and share an iCloud or Google Drive link instead.
WhatsApp automatically compresses every video you send, and there’s no way to disable this. The app prioritizes fast delivery over quality, so your crisp 4K footage becomes noticeably softer. If quality matters, send the video as a document instead of a media file (tap the attachment icon, choose Document, then select your video).
When quality is important, skip compression entirely and share the original via cloud storage. Upload to iCloud, Google Drive, or Dropbox, then send the link. The recipient can then download the full-quality file without any degradation.
Online compression services can work, but you’ll need to upload your video to a third-party server, wait for it to process, then download the result. This eats through your mobile data if you’re not on Wi-Fi, and the whole process takes much longer than using an on-device app. There are also privacy concerns since your footage passes through someone else’s servers. We tested three popular online compression services using the same 13.6 MB test video from this guide, all with default settings. The results varied widely: one service reduced the file to 7.2 MB (47% savings), another hit 6.1 MB (55% savings), and the most aggressive dropped it to just 3.7 MB (72% savings). Most services let you adjust compression levels if the defaults don’t match your needs. In general, the results are comparable to those of local apps like Clever Cleaner, which offer the added benefits of being faster and more private.