


You accidentally deleted Outlook’s PST file or, for whatever reason, the app cannot find it or open it. As a result, whenever you run it, Outlook is empty as if you just started using it, and all your mail, contacts, calendar entries, and tasks are gone. Is there any way to save the years of personal information accumulated in it?
In most cases that match the scenario we’ve described, the answer is yes.
If your file is still in the Recycle Bin, or a backup is available, you can use solutions built into Windows or Office to recover it. It’s also possible to get back deleted PSTs using recovery software – as long as an SSD’s or NVMe’s TRIM process didn’t run in the meantime, wiping some or all of their data.
Our recovery experts have tried and tested various methods and tools, with actual deleted, missing, or corrupted Outlook PST files. The results enabled us to compile the easy-to-follow step-by-step guides you will see here, which can help you to save your personal information, too.
Quick Precautions Before PST File Recovery
Before we move on, it’s best to build a recovery strategy and go over some basic rules that can maximize the chances to recover a PST file.
- 🛑 Stop using the drive and any app on your computer. Anything that writes data on the same drive where your PST file was stored diminishes the chances of getting it back. Even if you don’t actively save anything to the drive yourself, an app you are using might do so in the background.
- 🚅 The above is especially crucial on SSD and NVMe drives, where a process called TRIM runs automatically to optimize them and prolong their life expectancy. TRIM achieves this by, among other things, removing redundant data, and a deleted Outlook PST is considered part of that “redundant data”.
- 💾 In the case of data recovery, it’s best to use a different destination than the device where your Outlook PST file was stored. You can use a secondary partition or drive, but for relatively small Outlook PST files, even a USB flash drive should be enough.
You should also double-check where your personal information was actually stored:
Was your mailbox server-based (Exchange/Microsoft 365/Outlook.com/IMAP)?
Then, the local file was only an OST cache (read more about that at Microsoft’s learning hub). Outlook can recreate it, but it’s best to use server-based recovery solutions, since most attempts at local PST data recovery cannot help.
Was your data stored on a POP server or a local archive?
Then it “lived” inside a local PST file and should be recoverable. New PST files are typically found in an “Outlook Files” folder within the “%UserProfile%\Documents” or “%AppData%” directories.
If you’d prefer to jump directly to the best way to recover deleted Outlook PST files, and don’t mind using a third-party tool and investing some of your time in it, check out our Disk Drill guide. Otherwise, read on for some potentially quicker, more direct methods you can try immediately.
Try Built-In Solutions to Recover Deleted PST Files
Getting your Outlook PST file back is almost a given when using a data recovery solution like Disk Drill. However, there are various reasons it might be worth starting with the solutions we will see here first:
- Your Outlook PST file was stored on an SSD or NVMe drive, and if its TRIM functionality runs automatically, it can “nuke” your deleted Outlook PST before you have a chance to recover it.
- There’s no need to download and install additional apps when the problem can be solved with tools already available in Windows or Outlook.
- You skip the wait for a time-consuming full scan of terabytes of data on your storage to locate a single Outlook PST file.
However, the common caveat is that they all require a copy or backup of your Outlook PST file. If those exist, the following solutions can prove quicker and simpler than any data recovery app. If such copies or backups don’t exist, though, the solutions in this section usually won’t reap any useful results, and data recovery may be your last resort.
Method 1: Check the Recycle Bin
If it was recently deleted, you can usually retrieve a PST file from the Recycle Bin. That is, as long as it didn’t exceed the Recycle Bin’s size limit and wasn’t removed using Shift + Delete (which bypasses the Recycle Bin – if that’s what happened, check our guide on recovering Shift-deleted files).
To recover a deleted PST file from the Recycle Bin:
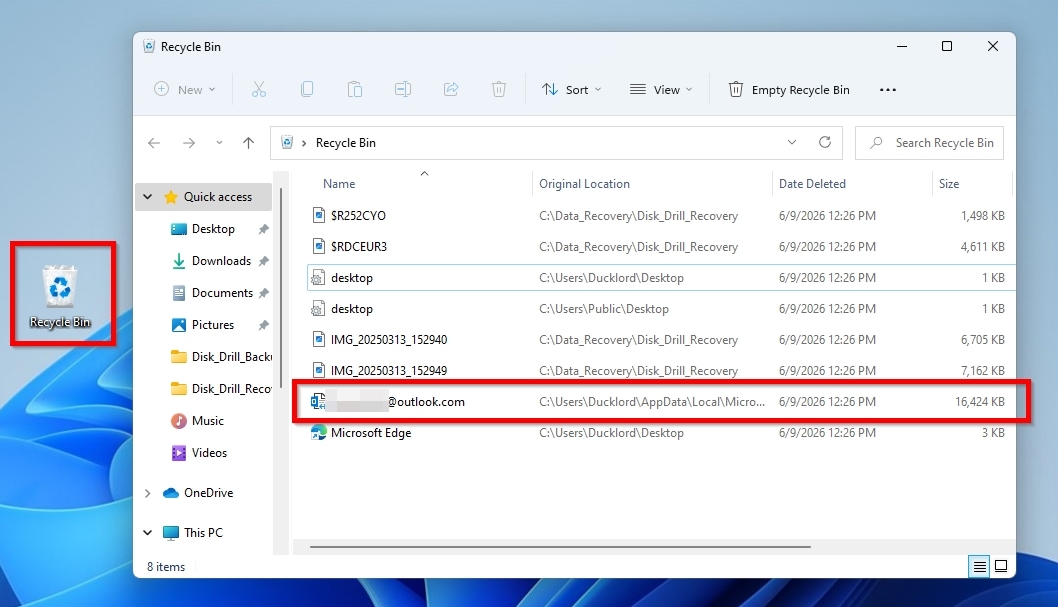
- Make sure Outlook isn’t running, and if it is, close it. Double-click the Recycle Bin’s icon on your desktop or visit its folder using Windows File Explorer (or another file manager) to access its contents. Hopefully, you will see your PST file among them.
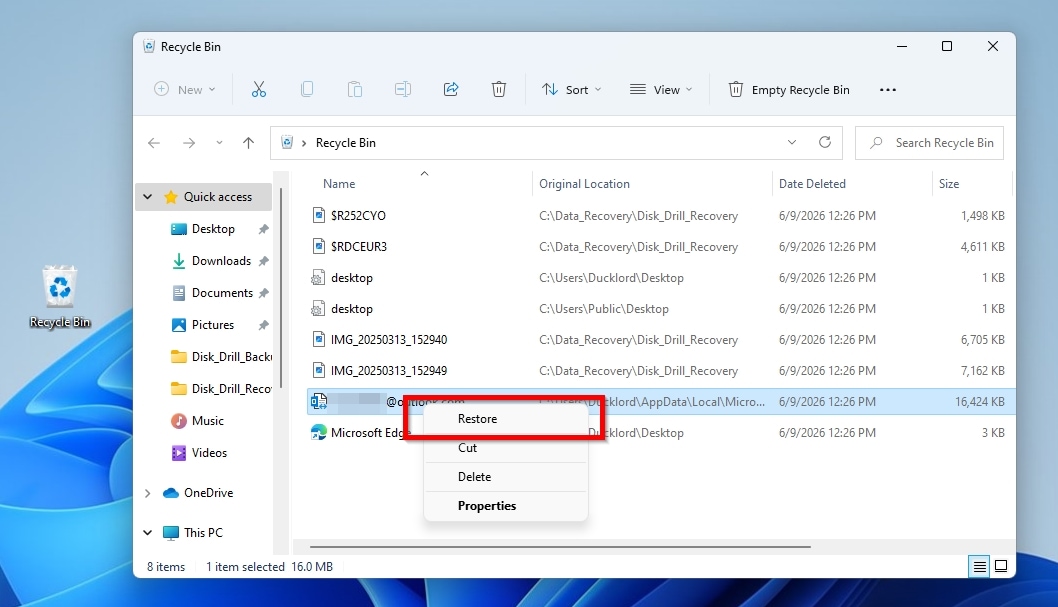
- Right-click your PST file and select Restore from the menu that appears. After a second or two, your PST file should be back to the spot from where it was originally deleted. If you run Outlook now, it should be able to find and open it like before, and all your messages, contacts, notes, calendar entries, and tasks should be accessible.
Method 2: Utilize File History Backups
Windows comes with various backup tools, with File History being the easiest way to recover a PST file. File History works in the background, creating copies of the most important files, including your account’s Documents/Outlook Files folder and the PST file within it, without requiring the user’s intervention. There are two catches, though:
- File History isn’t enabled by default.
- It requires a secondary storage device, like a USB flash drive.
If File History was enabled, you can recover your Outlook PST file from it as follows:
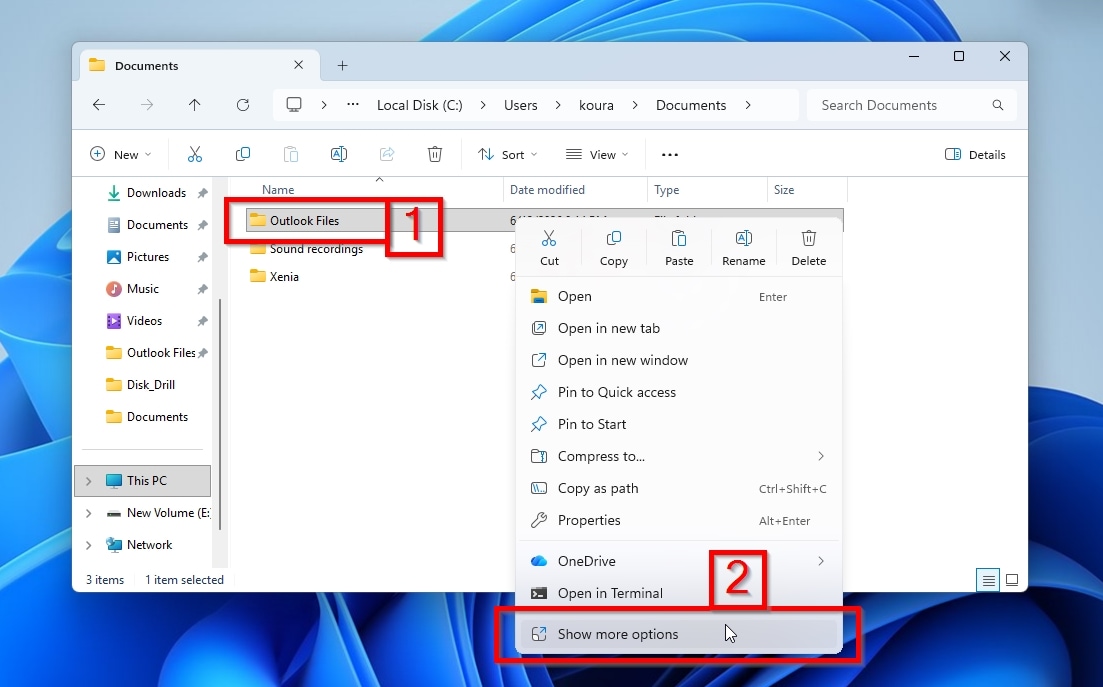
- Use Windows File Explorer to navigate to the folder where your Outlook PST used to “live” (1). Depending on your Outlook version, this folder might be
C:\Users\USER_ACCOUNT\Documents\Outlook Files(for newer versions of Outlook), orC:\Users\USER_ACCOUNT\AppData\Local\Microsoft\Outlook(for legacy versions). If you are on Windows 11, right-click on the Outlook Files folder and select Show more options. For older versions of Windows, skip directly to the next step.
- Choose Restore previous versions from the right-click menu.
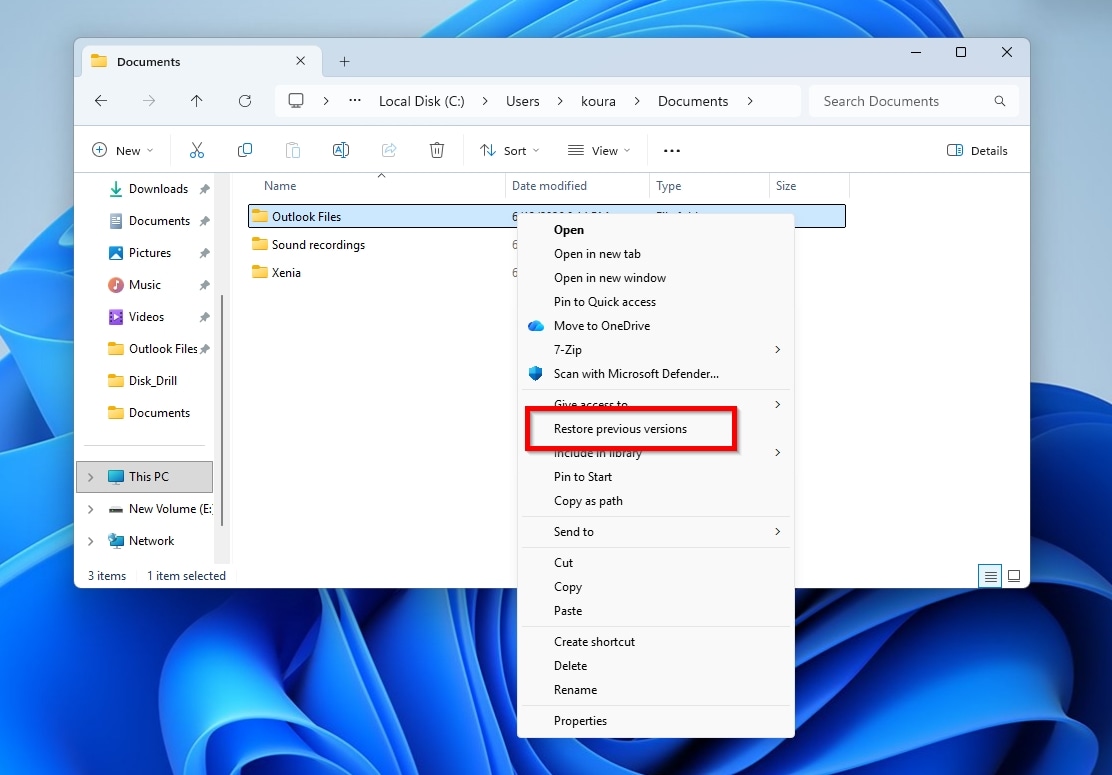
- Choose a version of the Outlook Files folder from before your Outlook PST was deleted, and click Restore.
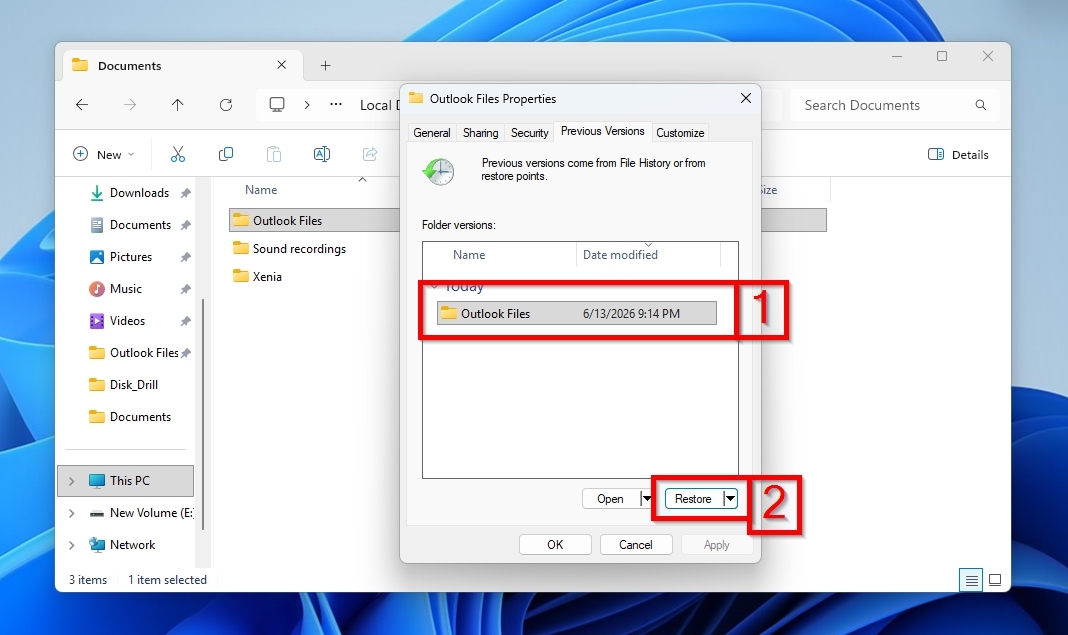
Alternatively, to recover a whole backup, including your Outlook PST file, from within File History:
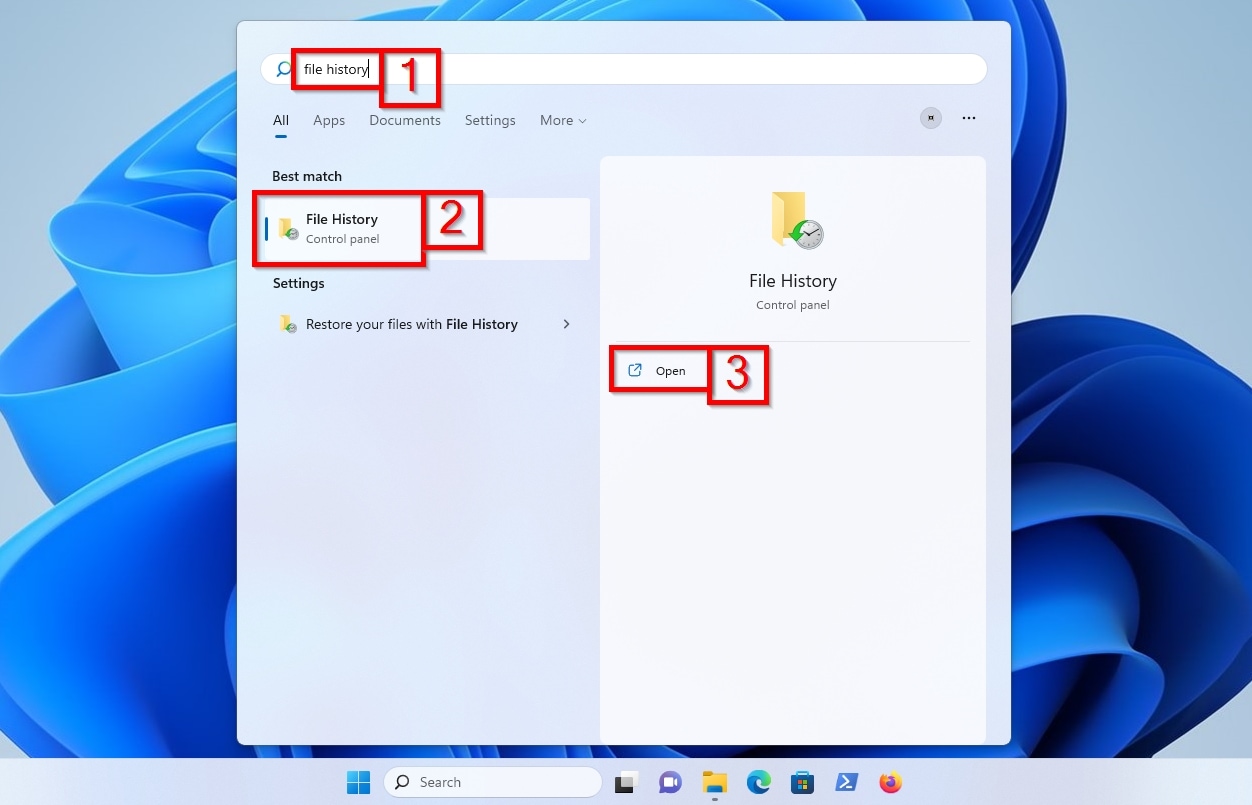
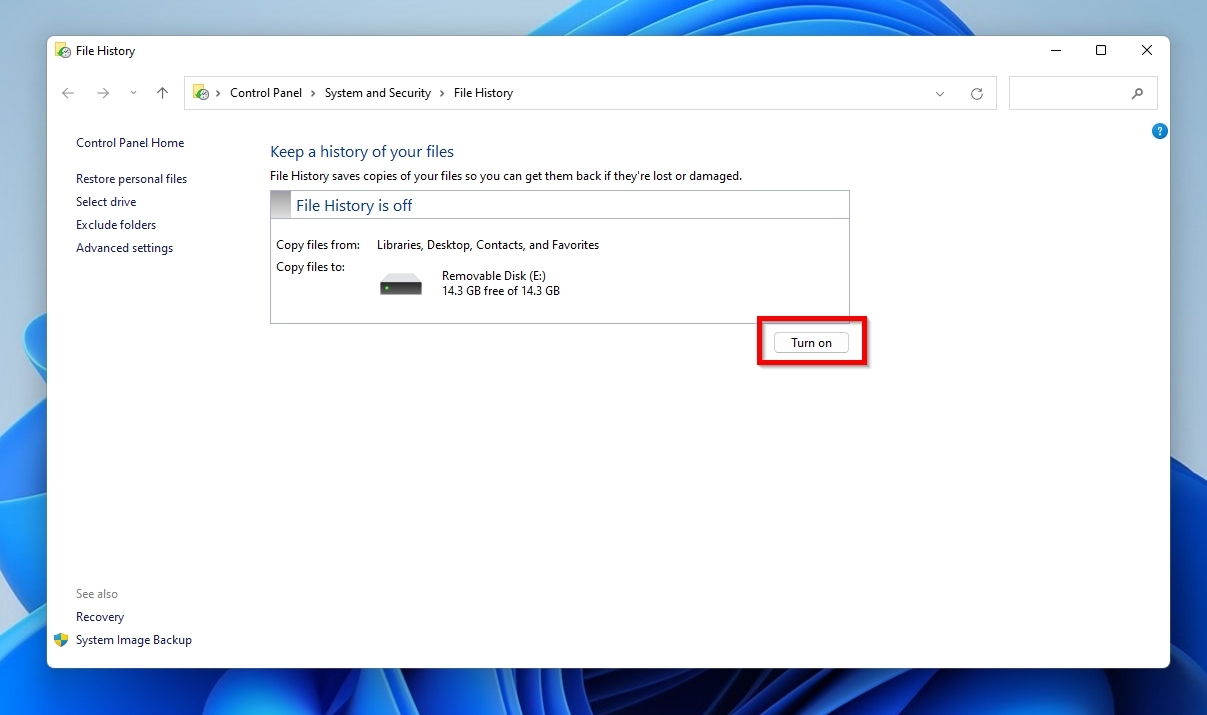
- Search for “file history” using the Start menu and open it.
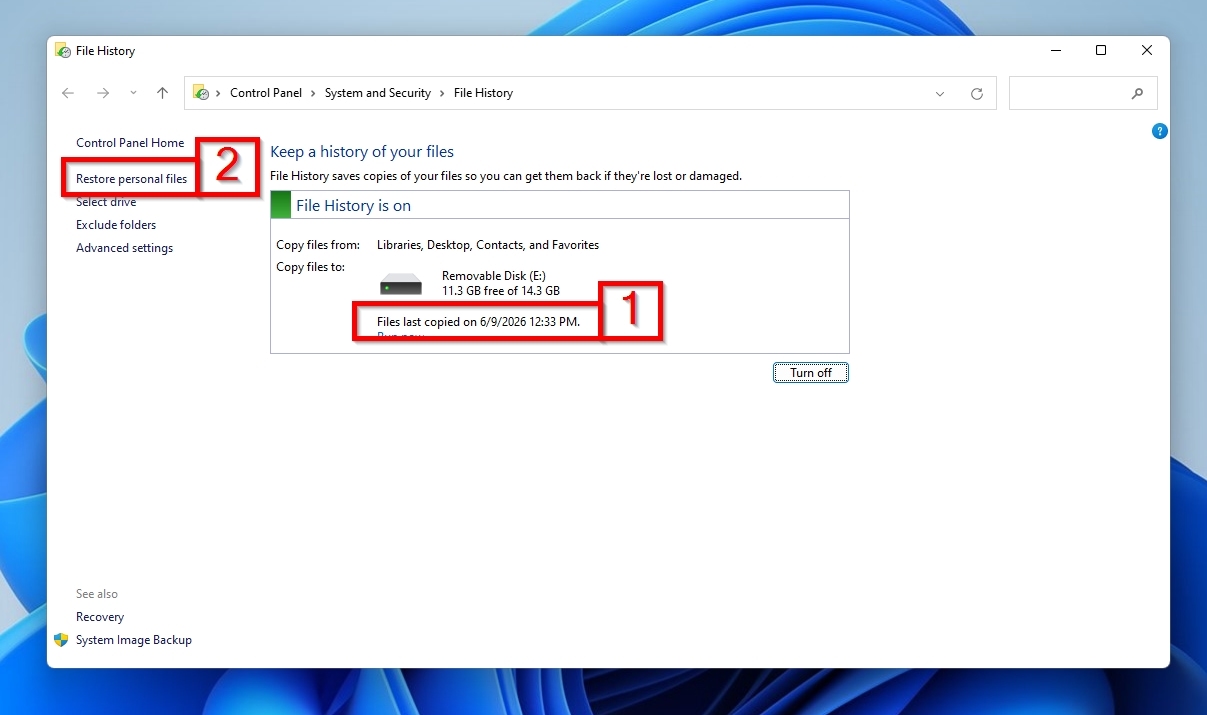
- If File History was enabled and has already captured one or more backups of your files (1), you can restore them, including your Outlook PST, with a click of Restore personal files (2).
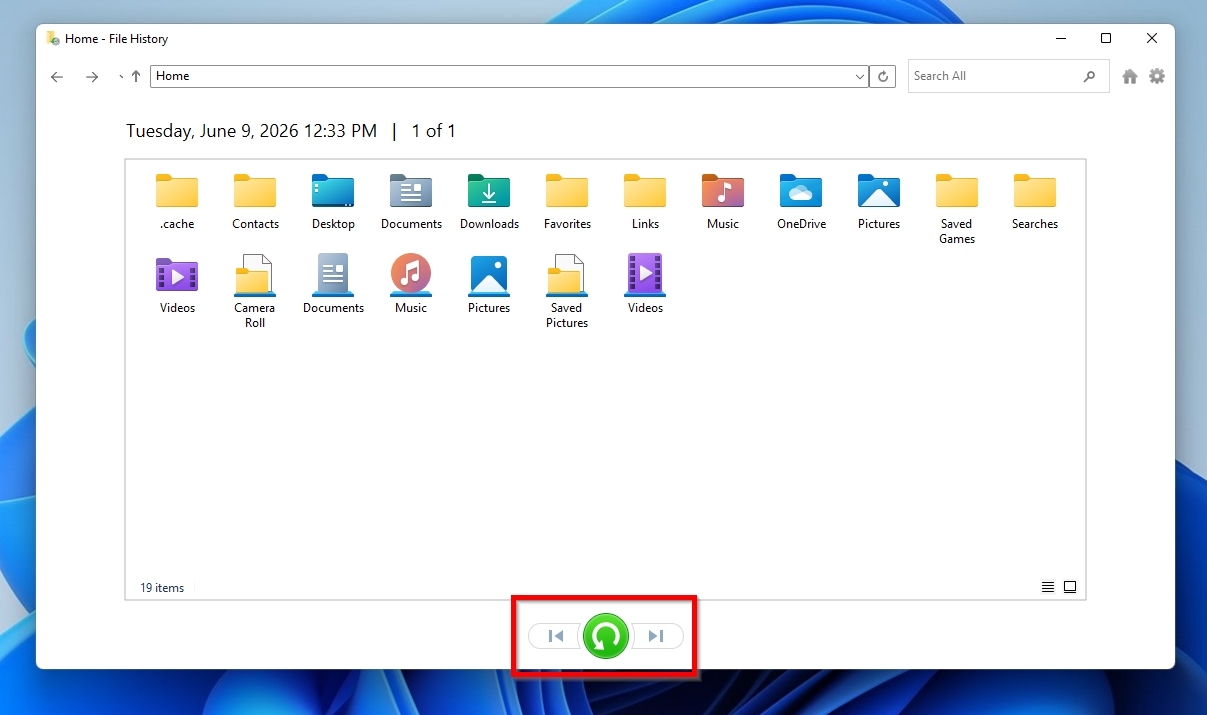
- Use the left and right navigation buttons to select a backup from when your Outlook PST wasn’t deleted, and click the center button with the green arrow to recover it.
Method 3: Use OneDrive Version History
Are you using OneDrive, and has it synchronized your user account’s data with the cloud? At the same time, did your version of Outlook store its PST within your user account’s Documents folder, or did you manually move the PST into one of the folders OneDrive monitors and synchronizes with its online servers? Then, it’s highly probable you’ll be able to download your Outlook PST file from there.
To get back your deleted PST file from OneDrive using Windows File Explorer:
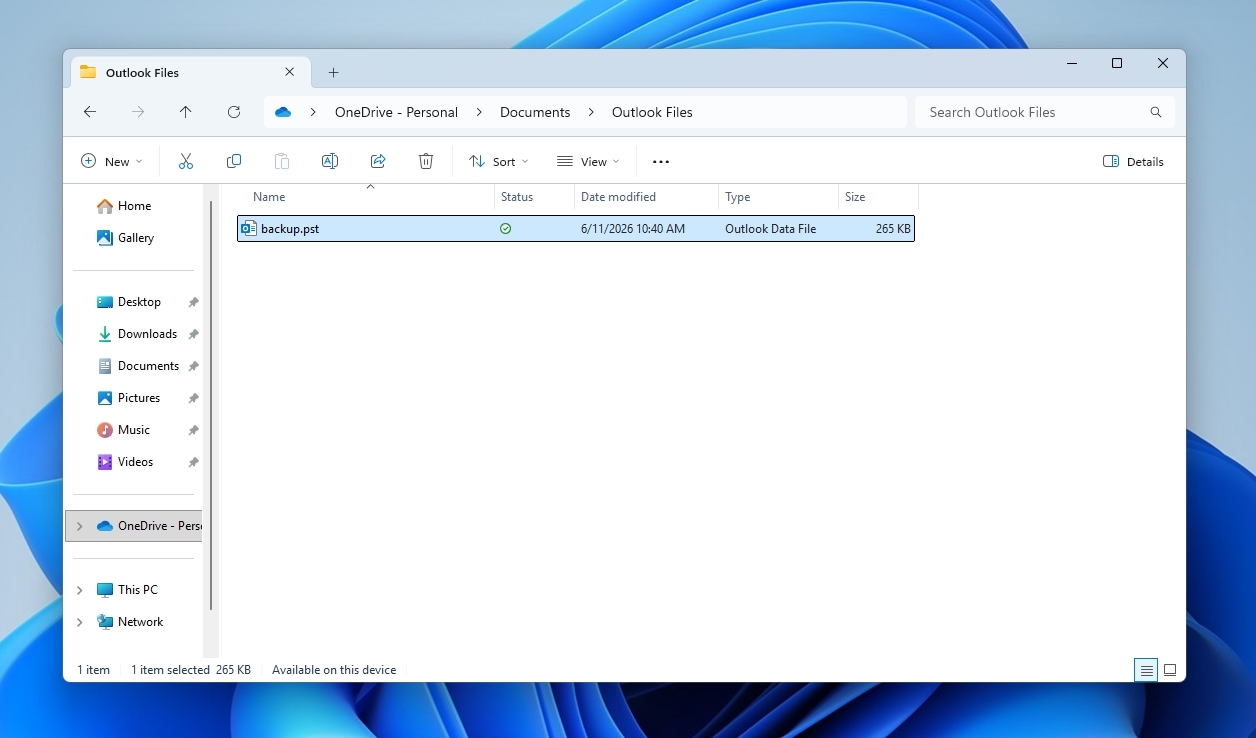
- Open Windows File Explorer and navigate to the path where your Outlook PST file used to “live”. If you ran Outlook after your PST file had been deleted, it should have created a new PST file in its place.
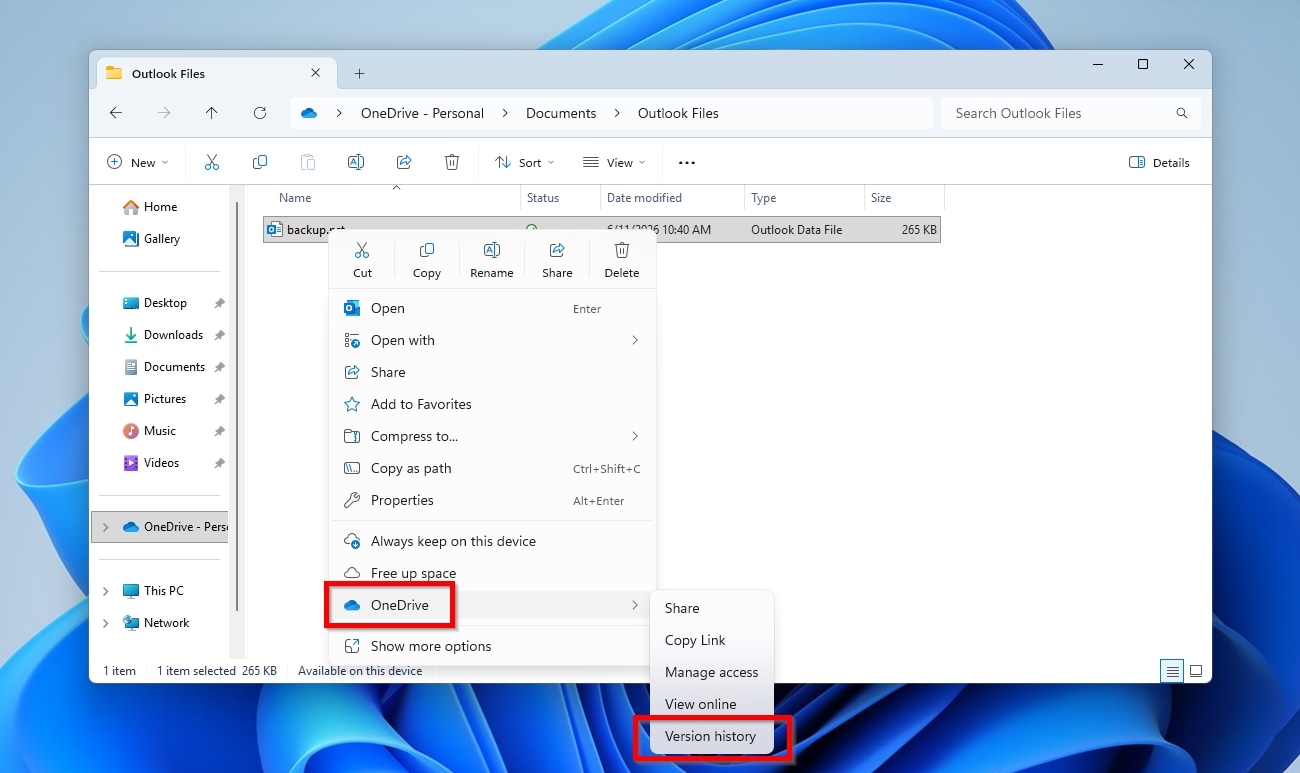
- Right-click on the Outlook PST file and select OneDrive > Version history.
- In the Version history window that appears, select the correct version of your Outlook PST file from before it was deleted and replaced with a new file.
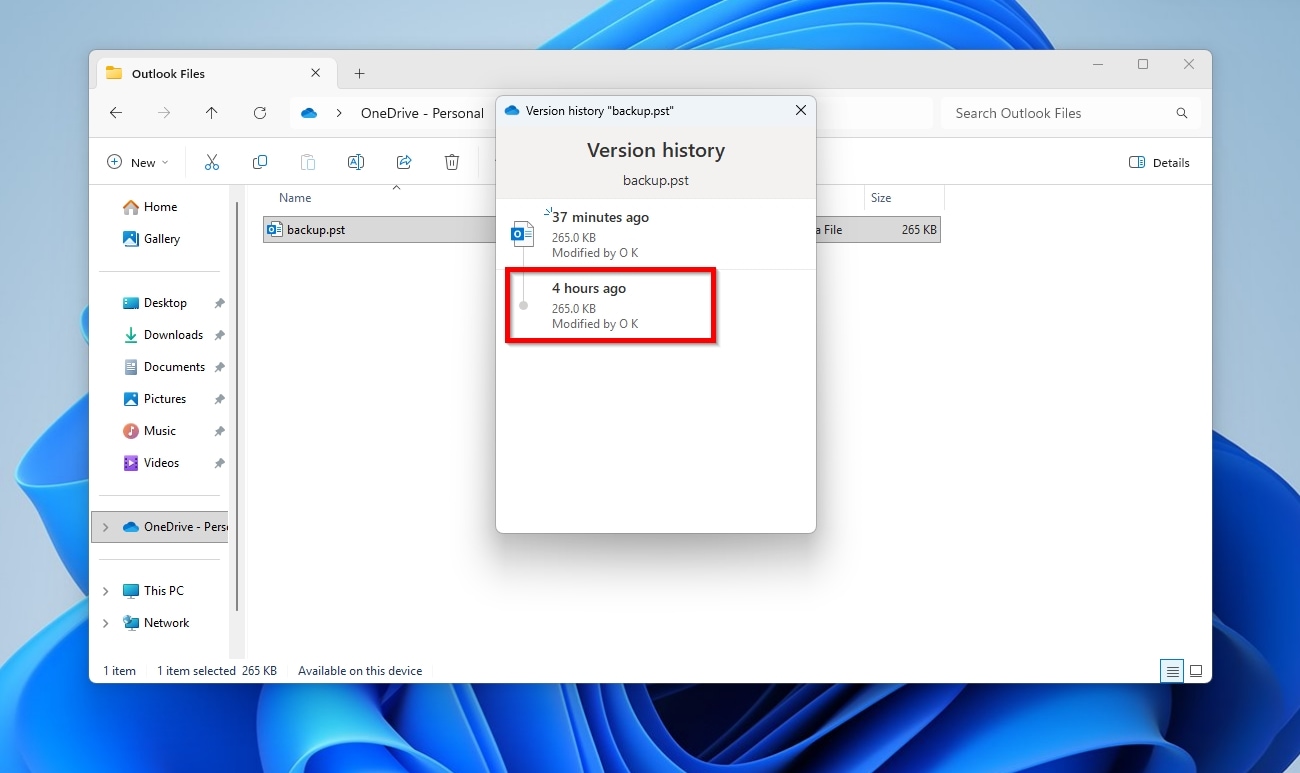
- Click the More Options button (with the three dots) to the right of the correct file version, then choose Restore.
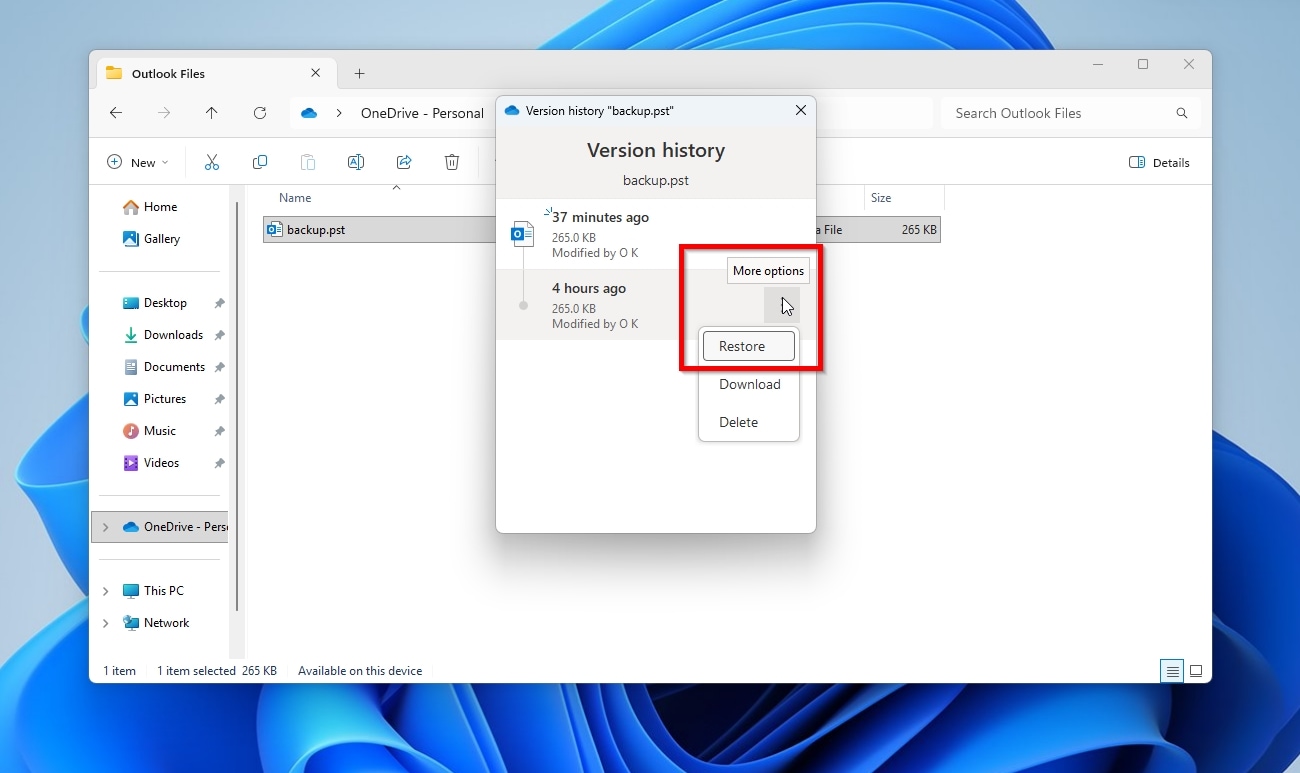
You can use the very same method through OneDrive’s web interface.
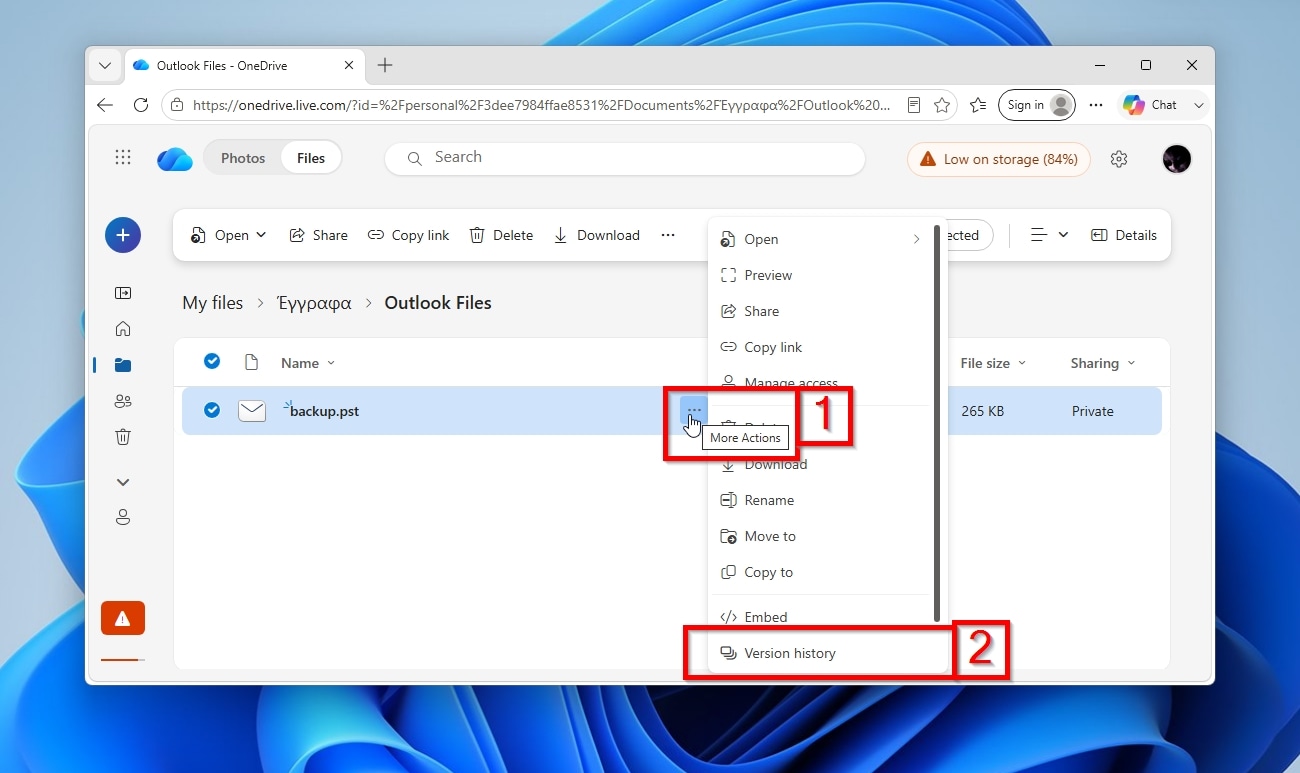
To salvage your PST using OneDrive’s web version:
- Visit OneDrive’s site and navigate to the folder where your Outlook PST file was stored on your PC. Click the More Actions button (with the three dots – 1) on the right of the file and select Version History (2).
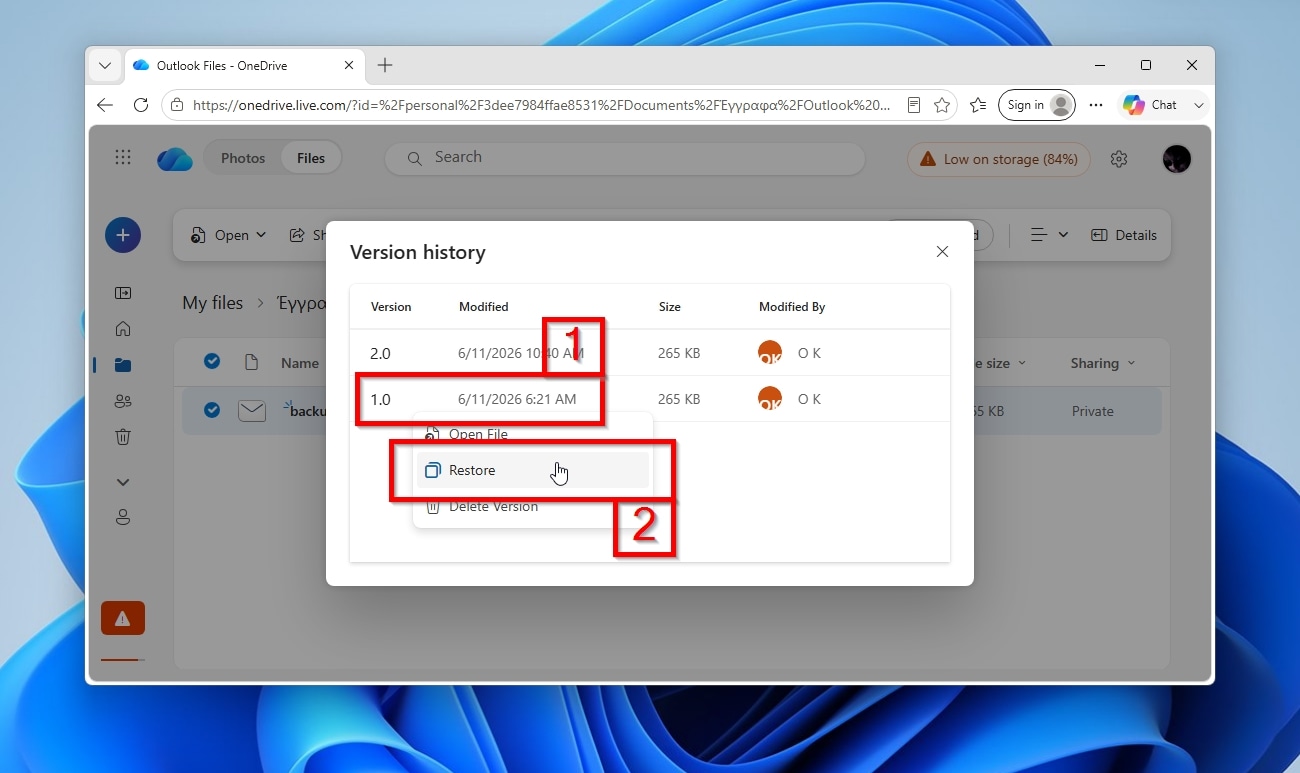
- As with the desktop-based approach, click the correct version of the file from before it was deleted, then choose Restore.
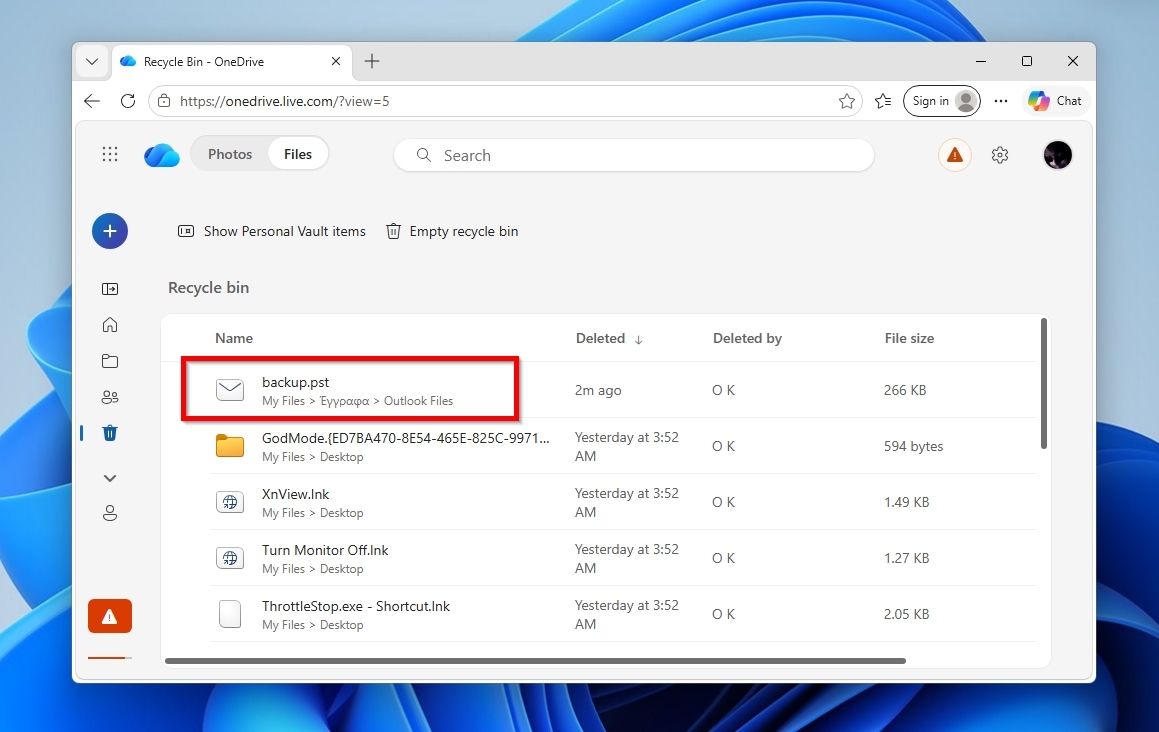
If you can’t find your Outlook PST where it used to be, don’t panic: maybe OneDrive moved the deleted file to its Recycle Bin. In that case, you can still get it back from there.
To recover PST files from OneDrive’s web version’s Recycle Bin:
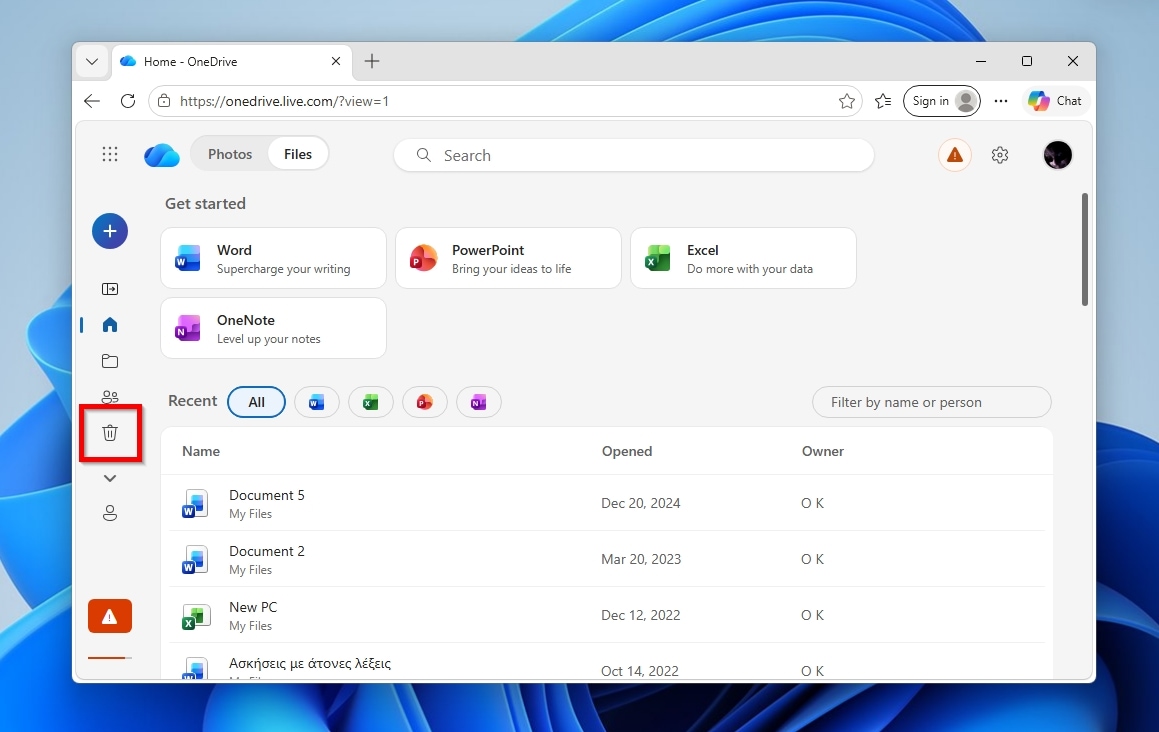
- Visit OneDrive’s site with your browser and click the Recycle Bin icon on the navigation bar on the left.
- Locate your Outlook PST among the other deleted files.
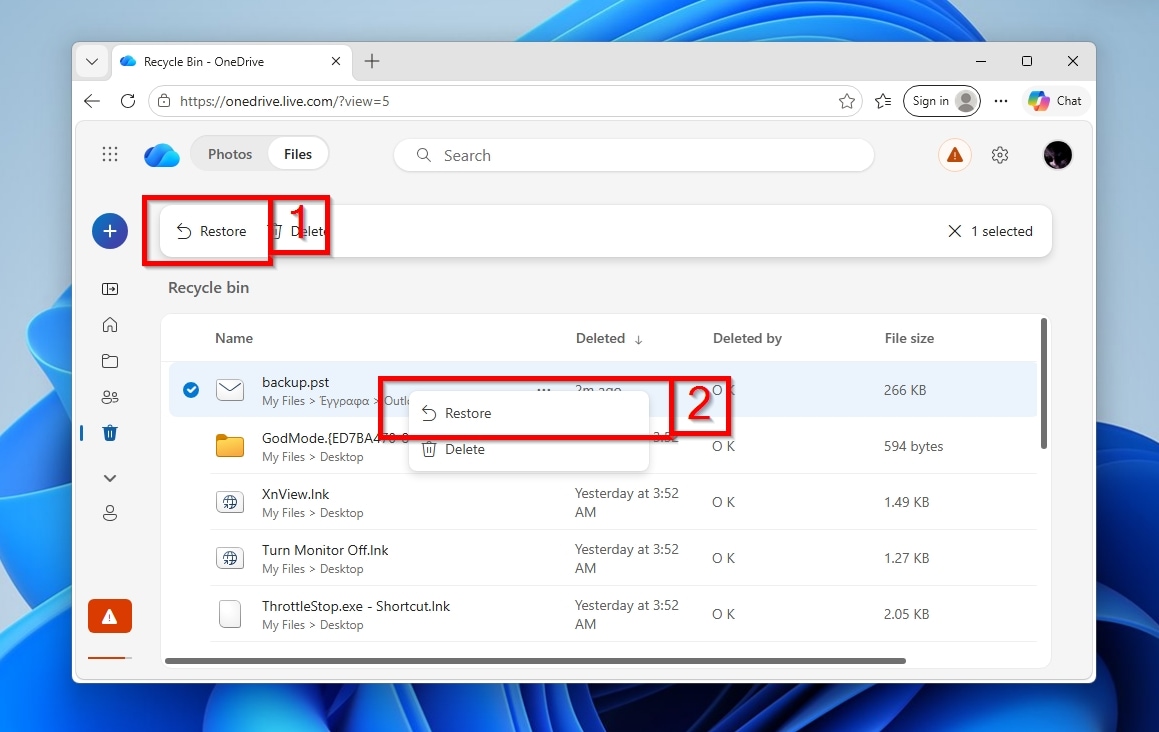
- Either click the file, then click the Restore option above the file list, or right-click it and select the same option from the menu that pops up.
Recover Permanently Deleted Outlook PST Files Using Data Recovery Software
You weren’t using a cloud synchronization solution, nor had you grabbed backups of your files? Then, the only way to find out if an Outlook PST file is recoverable is to download a data recovery app and scan your drive for deleted files. Fortunately, as we will see here, this process is quick and easy, especially when using a modern, user-friendly data recovery solution that excels at Outlook PST file recovery, like Disk Drill.
To recover an Outlook PST file using Disk Drill:
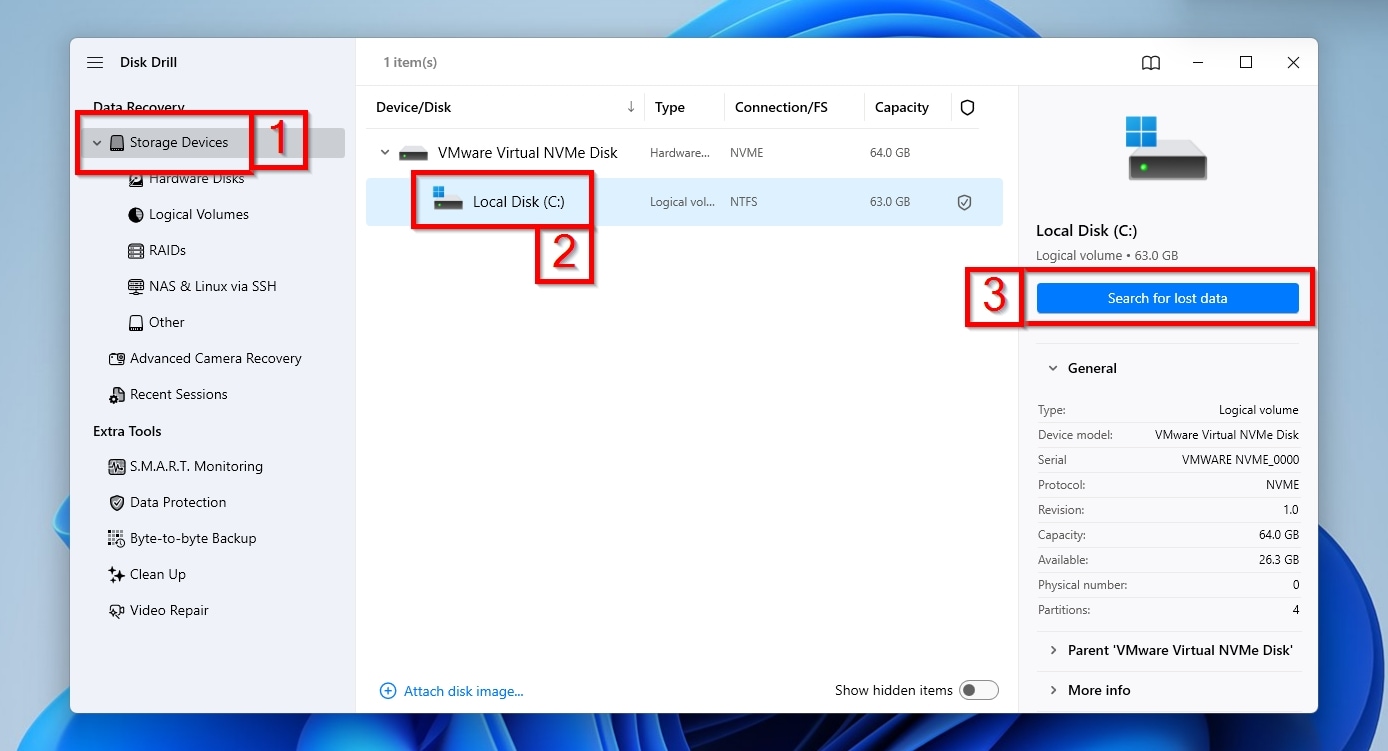
- Download our recommended file recovery software, Disk Drill, install it, and run it. While on its Storage Devices page (1), select the drive where your deleted Outlook PST was stored from the Device/Disk list (2), and click Search for lost data (3). Disk Drill will immediately start scanning your disk for any files it can find.
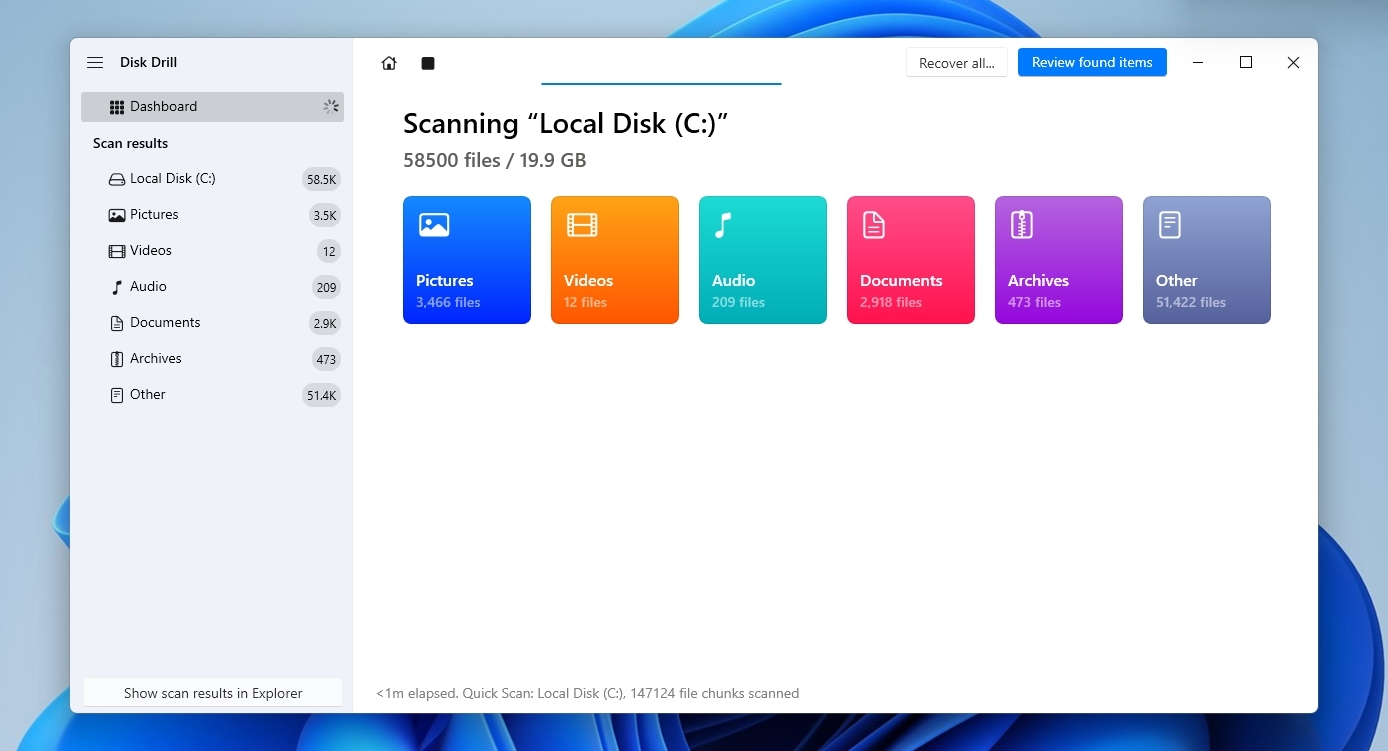
- You can interrupt Disk Drill’s scanning process at any time to check the results up to that point. However, it’s best to allow Disk Drill to complete its scan of your disk, to maximize the chances it finds your Outlook PST file. The required time depends mostly on the disk’s status, speed, and the number of files stored in it. The process may take just a few minutes with a modern NVMe drive and a relatively modest capacity, and up to hours with an old, “tired” HDD overfilled with multiple terabytes of files.
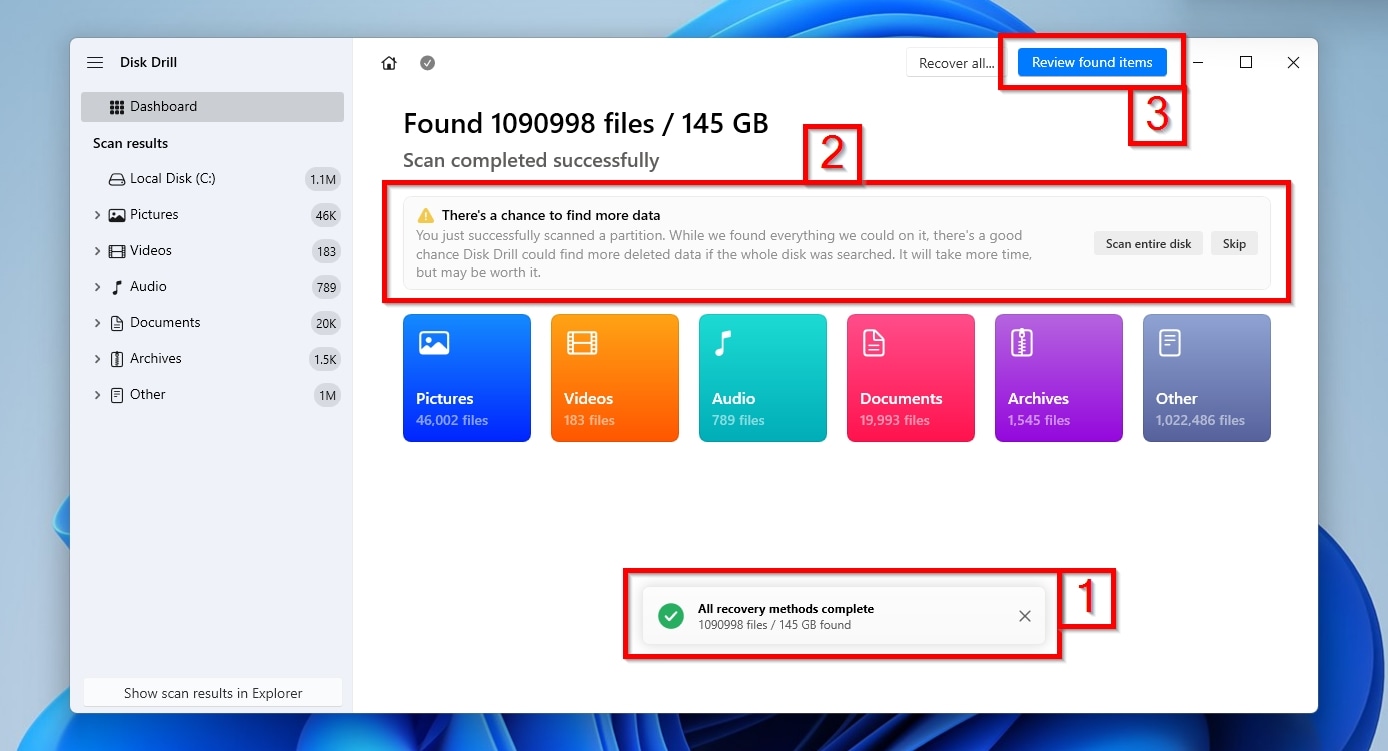
- When Disk Drill completes scanning your disk, it will notify you that “All recovery methods (are) complete” (1). You can safely close this message pop-up. If you chose to scan a partition rather than the entire disk, Disk Drill will inform you that “there’s a chance to find more data” if you perform a second, more extensive scan of the entire disk (2). In such a case, instead of immediately starting a new disk scan, we suggest that you first check the results of the current scan with a click on Review found items (3). You can perform a more thorough whole-disk scan later if your Outlook PST file wasn’t among the files Disk Drill found.
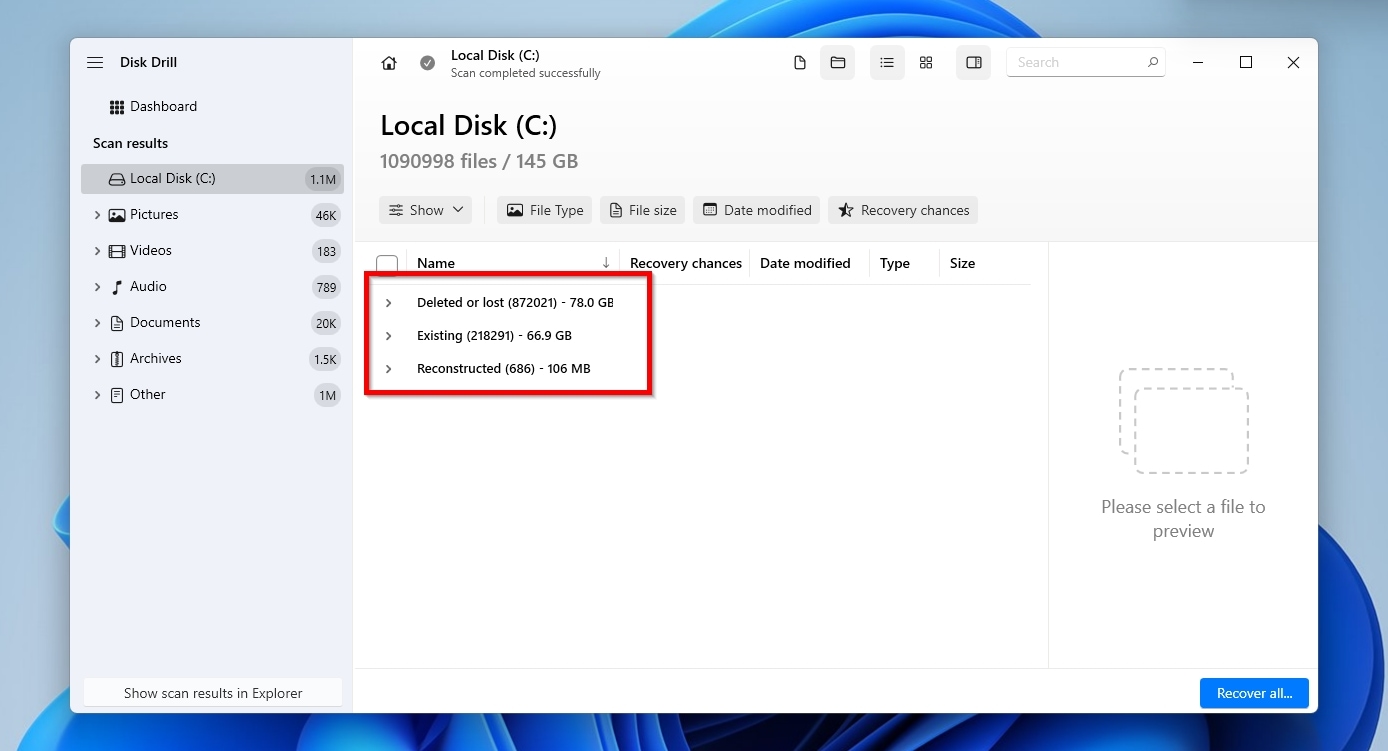
- Disk Drill organizes its results into three groups based on status: Deleted or lost contains files that have been deleted or cannot be accessed normally using a file manager or any other app. Existing contains all the files that are still viewable and accessible. Finally, Reconstructed contains all the fragmented files that Disk Drill assembled from scattered bits and pieces on the disk. Since your Outlook PST was deleted and is currently inaccessible, you will probably find it in the Deleted or lost or Reconstructed groups.
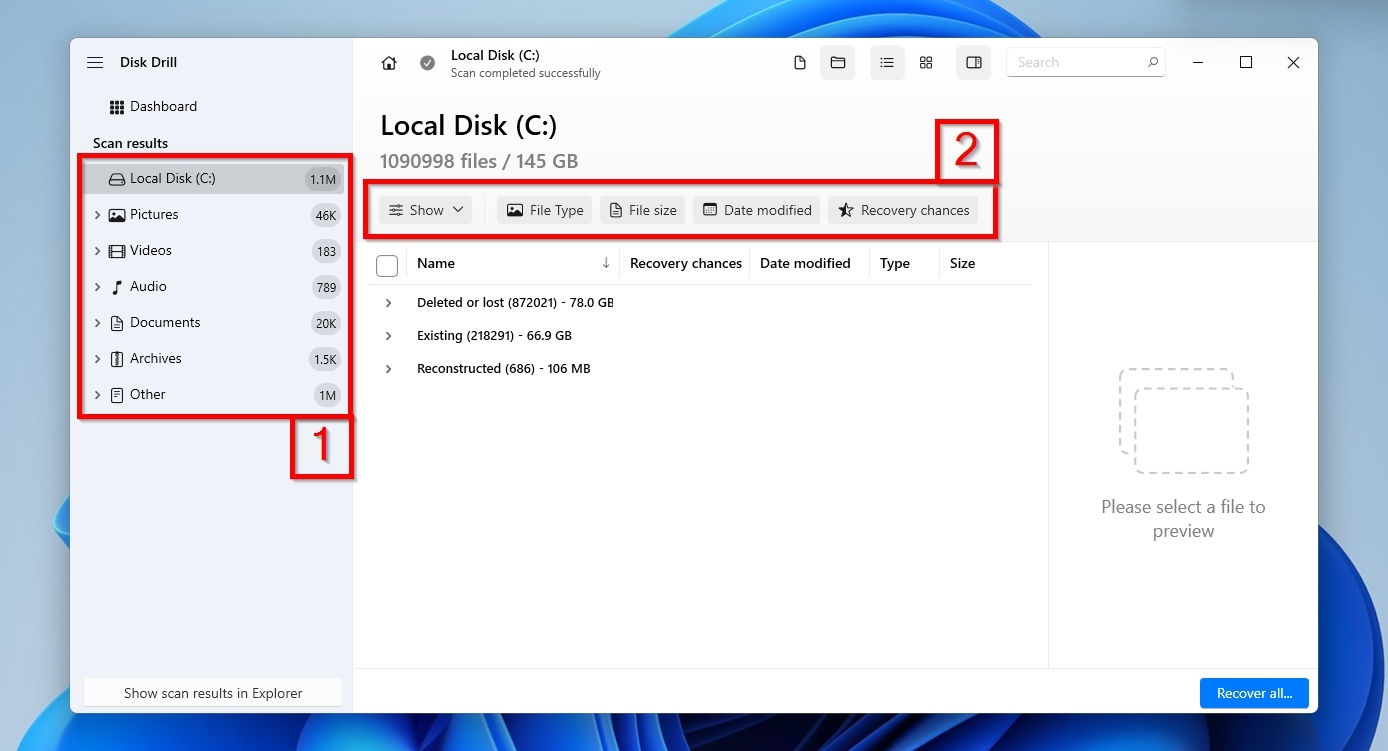
- The Categories on the left (1) and the Filters above the results list (2) allow Disk Drill to present only a subset of the files it located based on characteristics like their type, size, last date modified, and more. Thanks to that functionality, you don’t have to scroll through endless lists of files; you can ask the app to show only what you’re looking for: PST files.
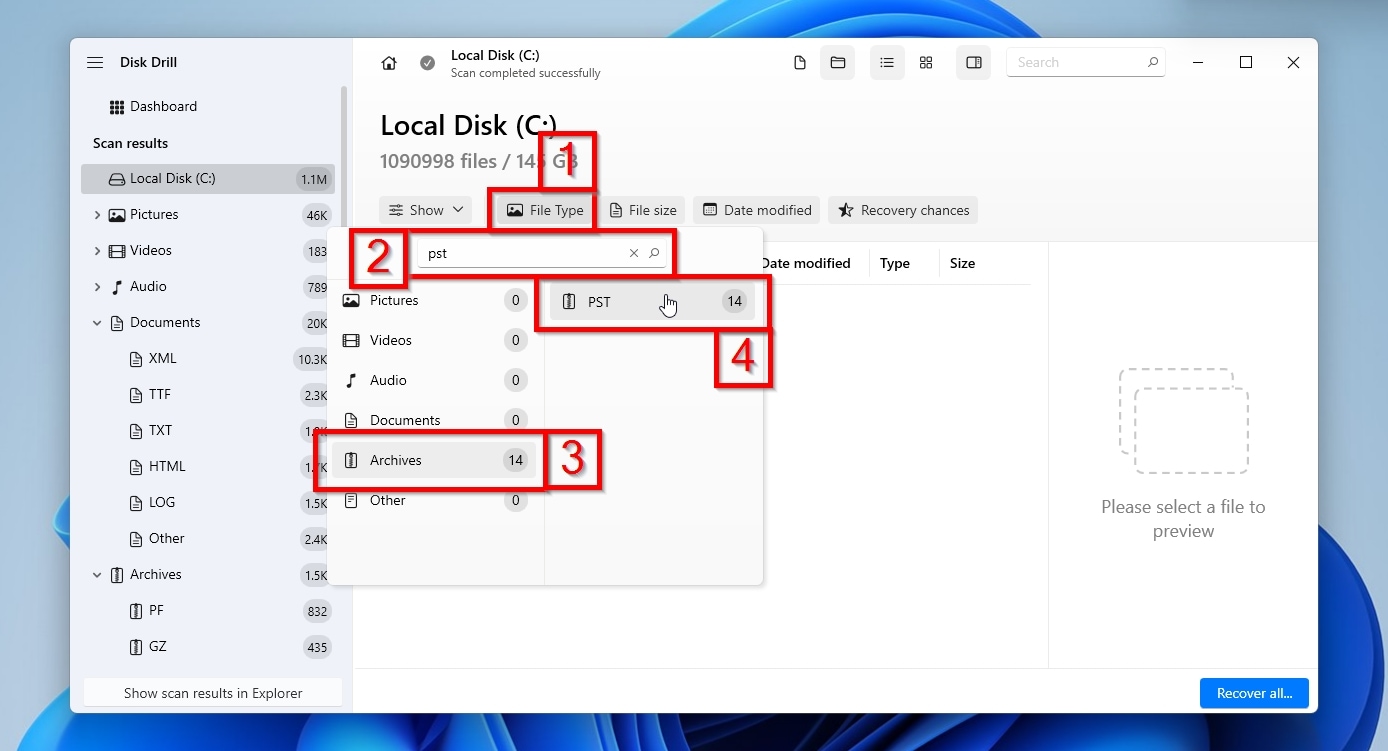
- Click on the File Type filter (1) and type “PST“ in the text box that shows up (2). Disk Drill will immediately filter its results and present those related to your query (3). Click on the recognized file type under the text box to select it (4).
- Disk Drill will update its results list to display only PST files (and the folder hierarchies “above them”).
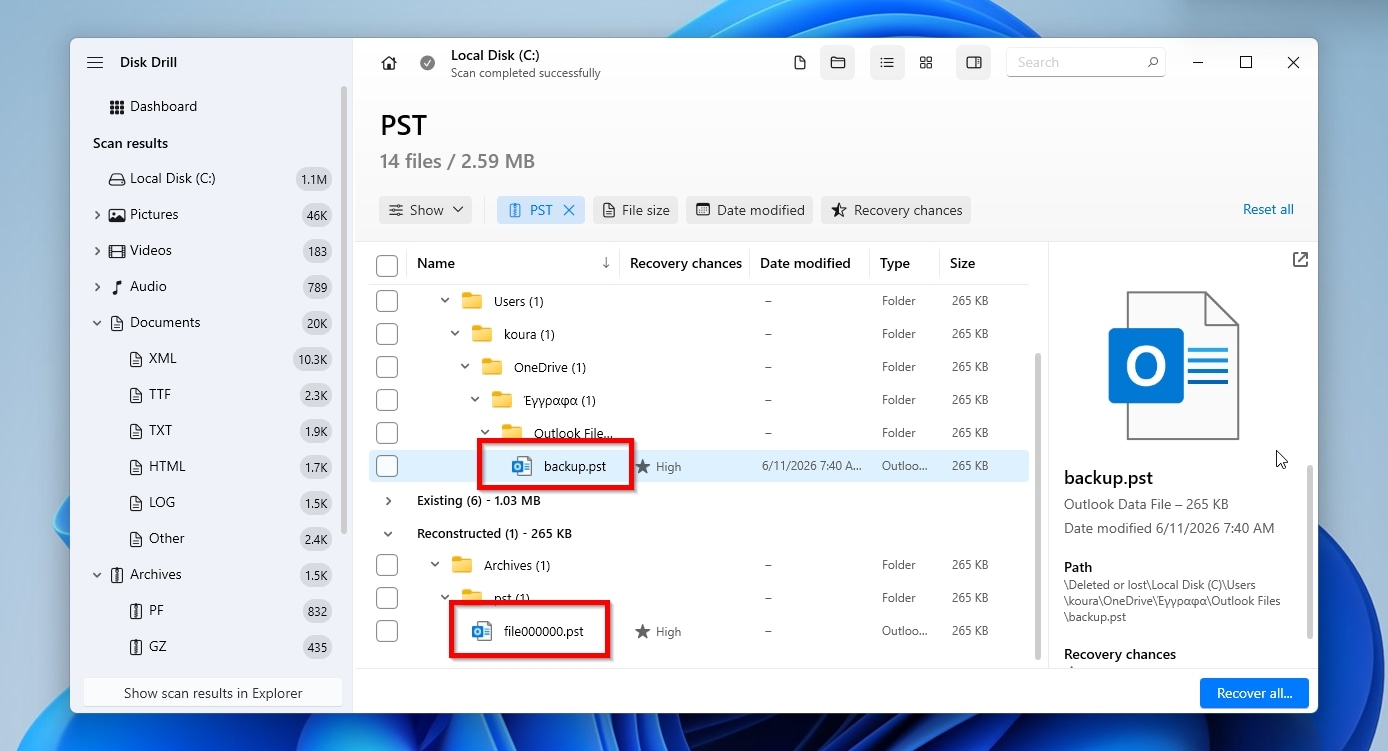
- Choose the Outlook PST file that you want to recover by placing a check mark on the left side of its entry. Then, click Recover.
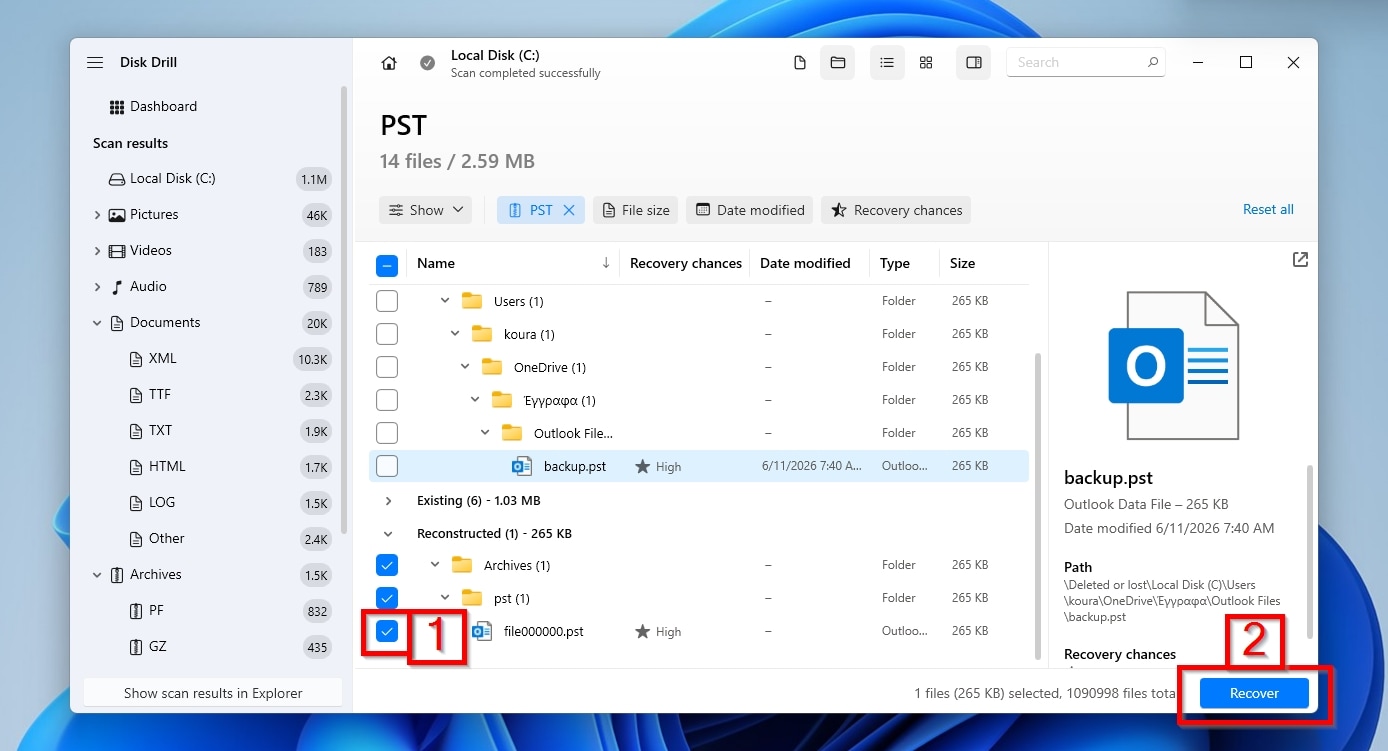
- Pick the recovery destination folder where you’d like Disk Drill to store the recovered Outlook PST file. The app presents a list of default directories and folders from past recoveries (1). If the one you want isn’t among them, select it by clicking Choose Destination (2). When ready, click Next (3).
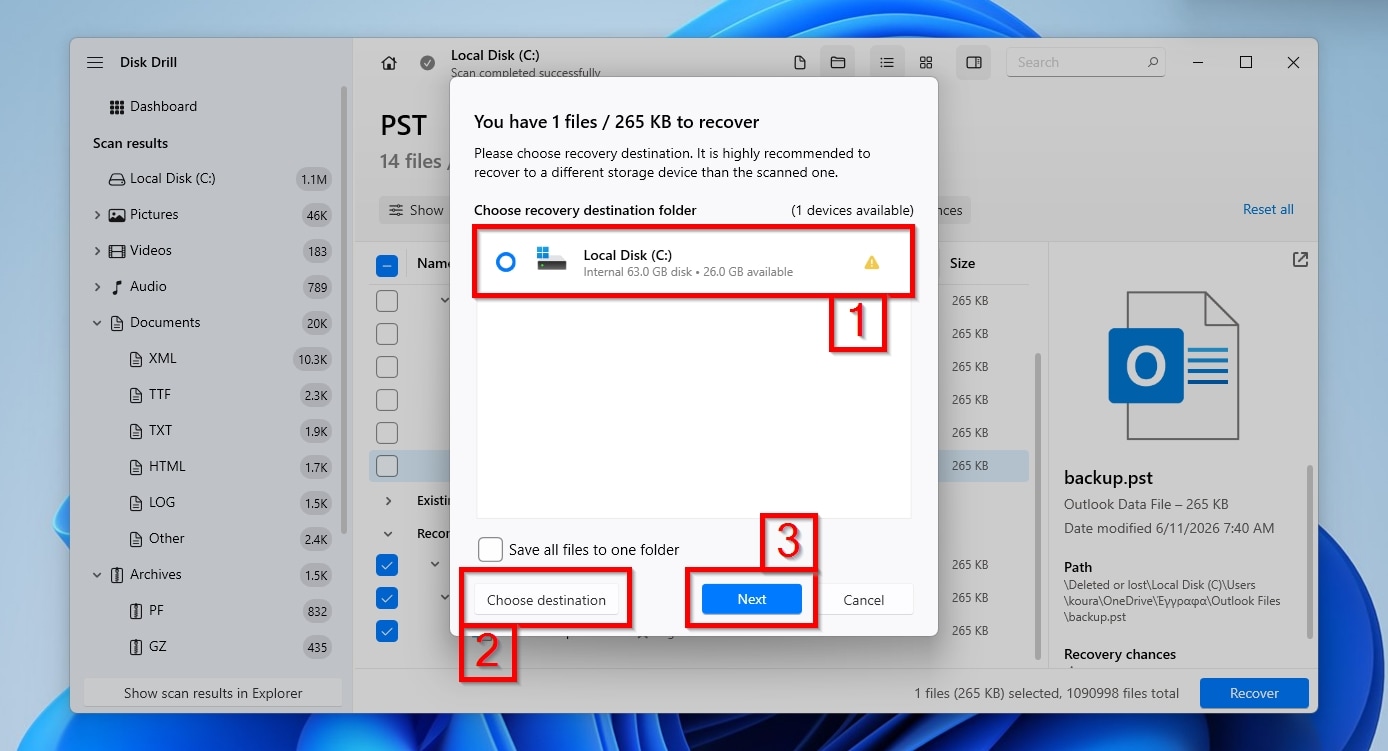
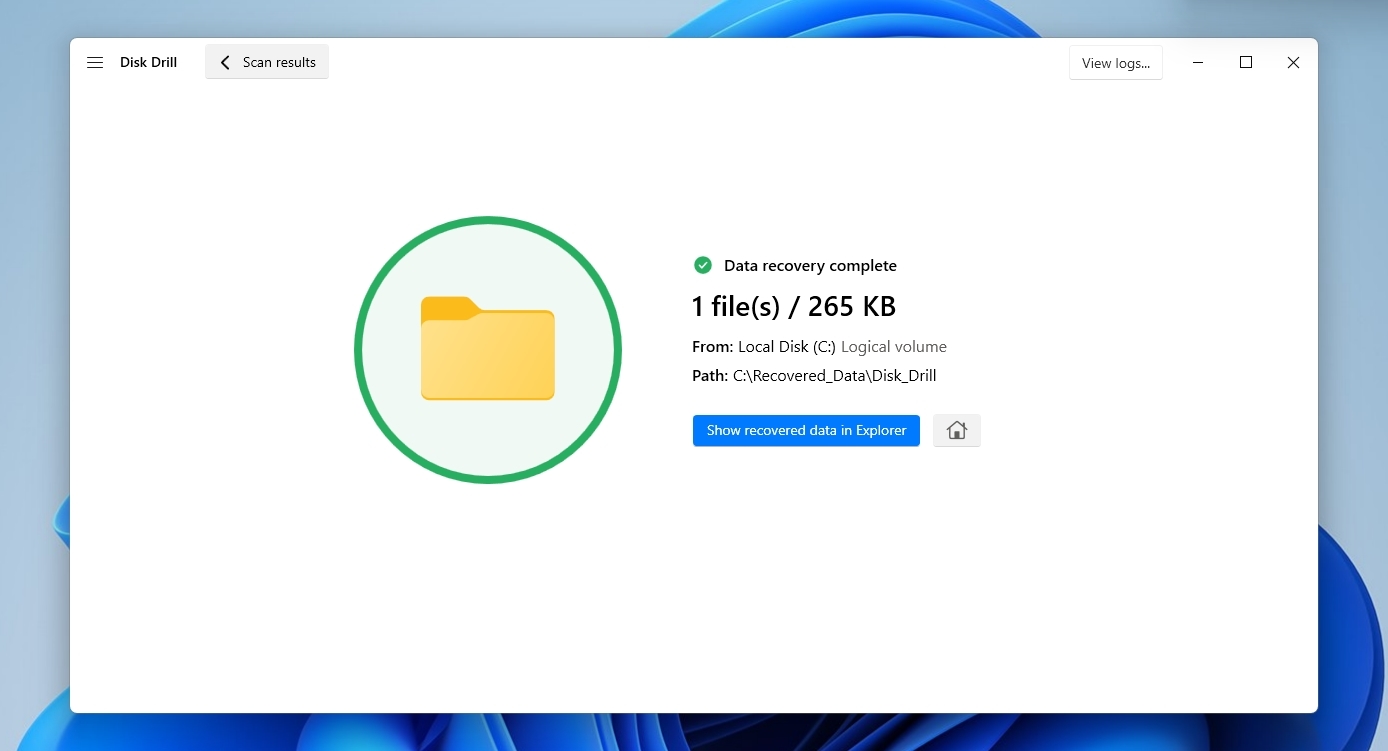
- The free version of Disk Drill can recover up to 100 MB, which should be more than enough for an average-sized Outlook PST file. Still, even if your Outlook PST is larger, a scan with Disk Drill can confirm that it’s present, intact, and recoverable. Since it only involves a single Outlook PST file, the recovery process shouldn’t take more than a few minutes. When it’s done, Disk Drill will inform you that “data recovery (is) complete” and show a brief report. You will find your recovered Outlook PST file in the destination folder you selected. To check it out with the default file manager, click on Show recovered data in Explorer.
Although Disk Drill has dozens of peers, we believe it’s the best fit for what we are tackling in this article because:
- 🗃️ It natively supports all of Microsoft’s file systems used by default in Windows (NTFS/FAT/ExFAT).
- 🖋️ It gracefully falls back to signature-based recovery when a filesystem is unavailable, reconstructing files based on their file types rather than relying on information “pulled” from the filesystem.
- ✉️ It has tested and verifiable results specifically for recovering PST files (Microsoft Outlook Personal Folders).
- 🏊 Its user-friendly interface allows you to easily locate the Outlook PST file you are seeking using the app’s filtering capabilities, instead of having to wade through thousands of irrelevant files manually.
What to Do with a Recovered PST File?
Recovering a deleted PST file is the most significant win, but still not enough, since the file is useless on its own. After a successful recovery, another step is needed to regain access to the contents of your Outlook PST: loading it back into Outlook.
To load your recovered Outlook PST file back into Outlook:
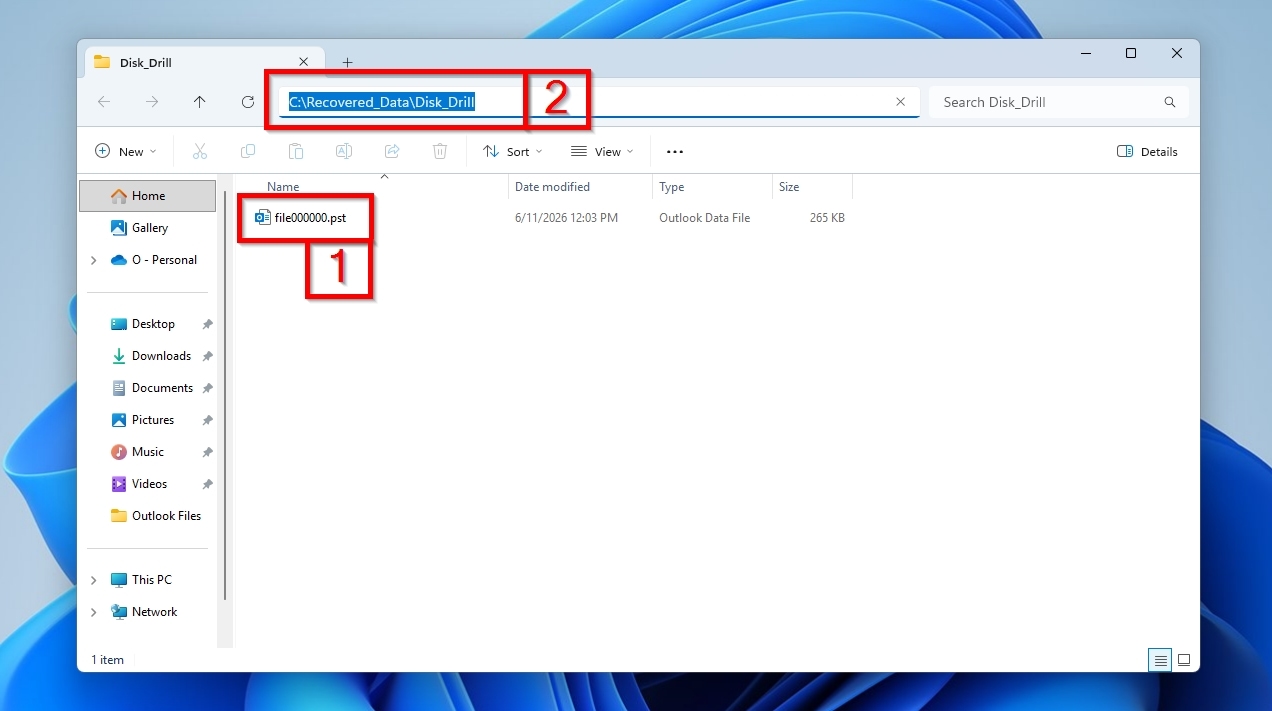
- Use Windows File Explorer or another file manager to visit the folder where your Outlook PST file was recovered (1). Notice the complete path to that folder (2), and to make the next steps easier, select it and copy it (CTRL + C) to the clipboard.
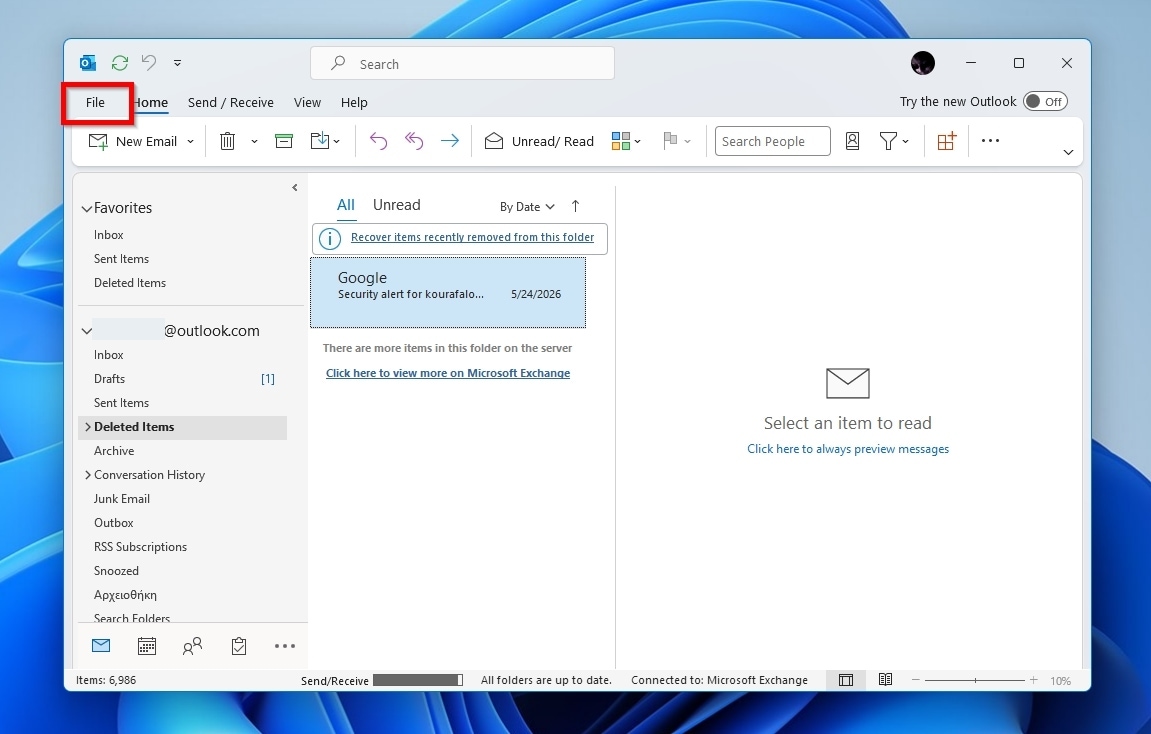
- Run Outlook and click File to access the app’s storage-related panel.
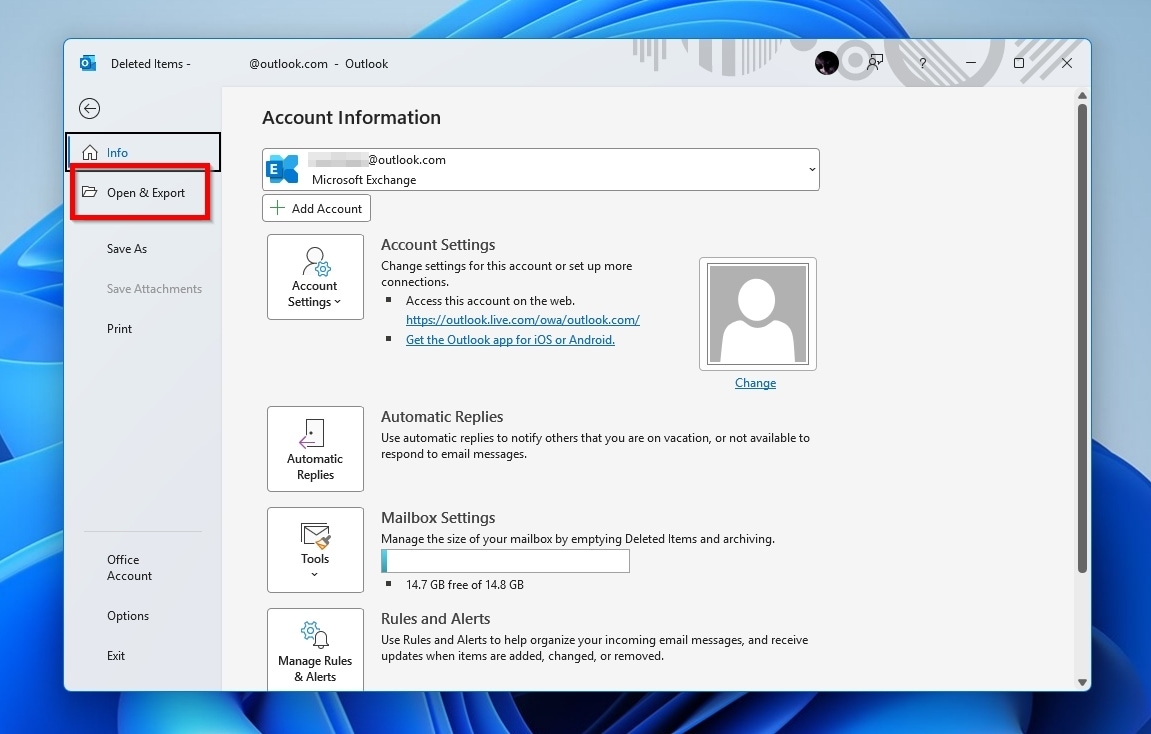
- Select the Open & Export entry from the panel on the left.
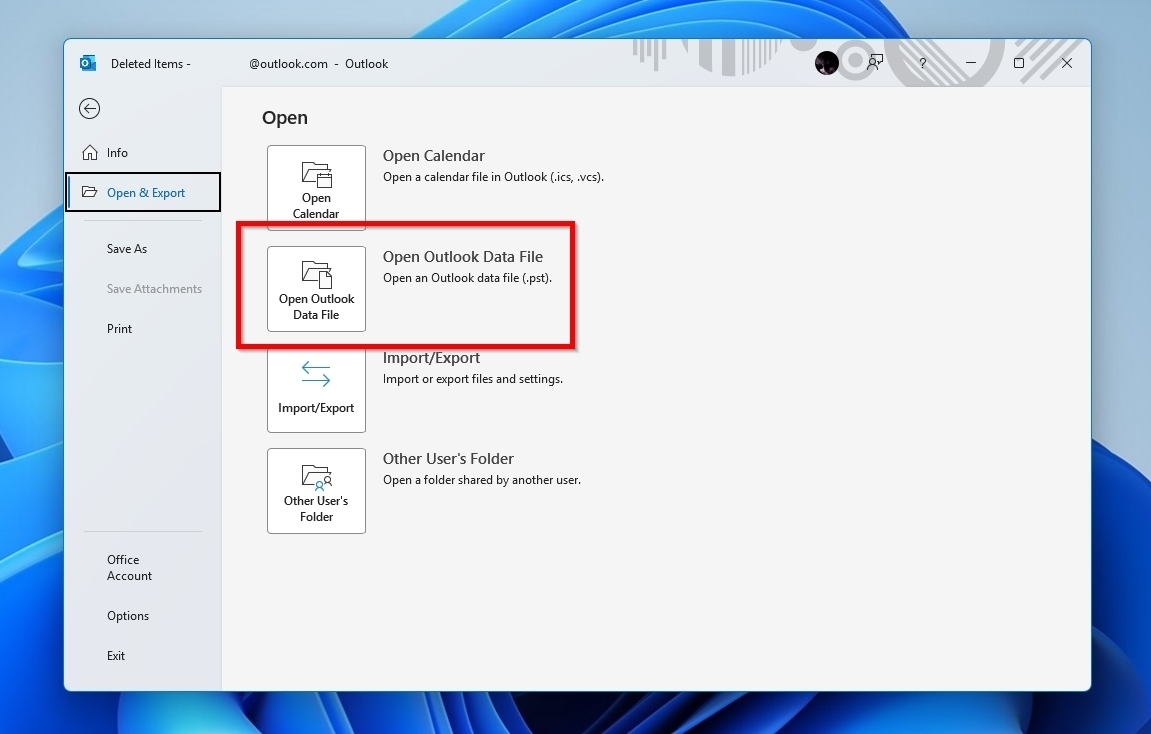
- Click on the second option on that page, Open Outlook Data File.
- Point the file requester to the path of your recovered Outlook PST file. If you copied it to the Clipboard as we suggested earlier, you can paste it (CTRL + V) into either the path field at the top or the File name field at the bottom of the window. Then, press Enter to move directly to that folder.
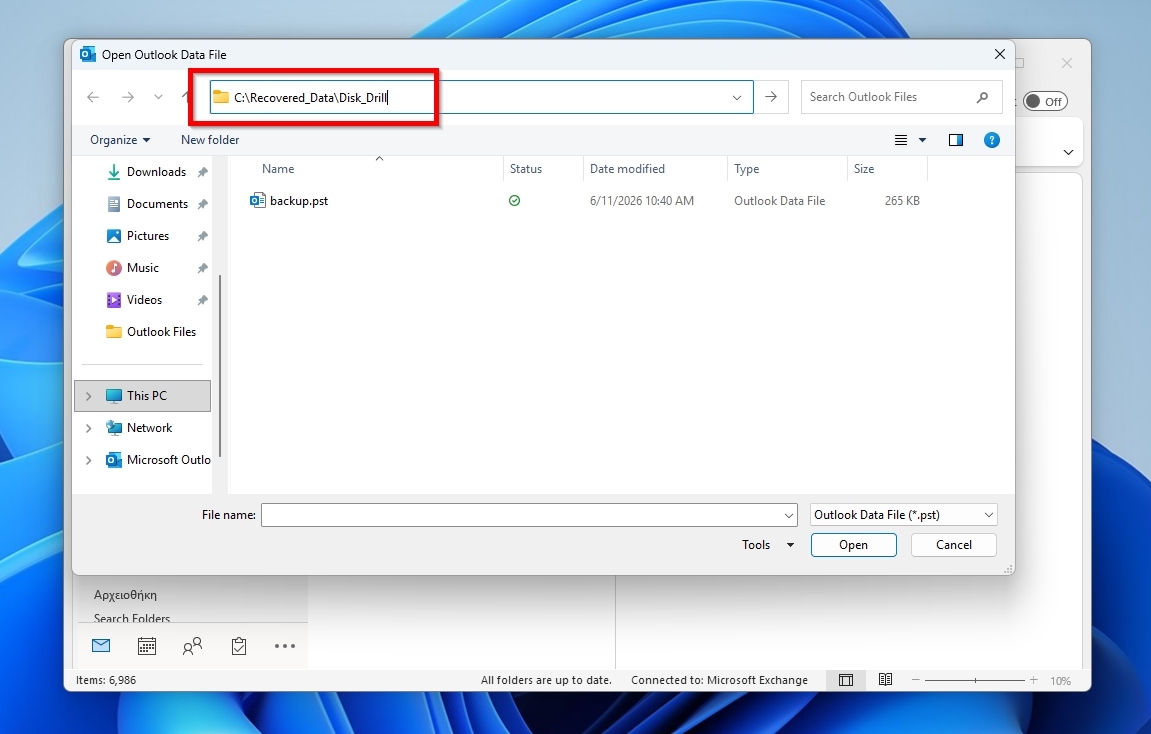
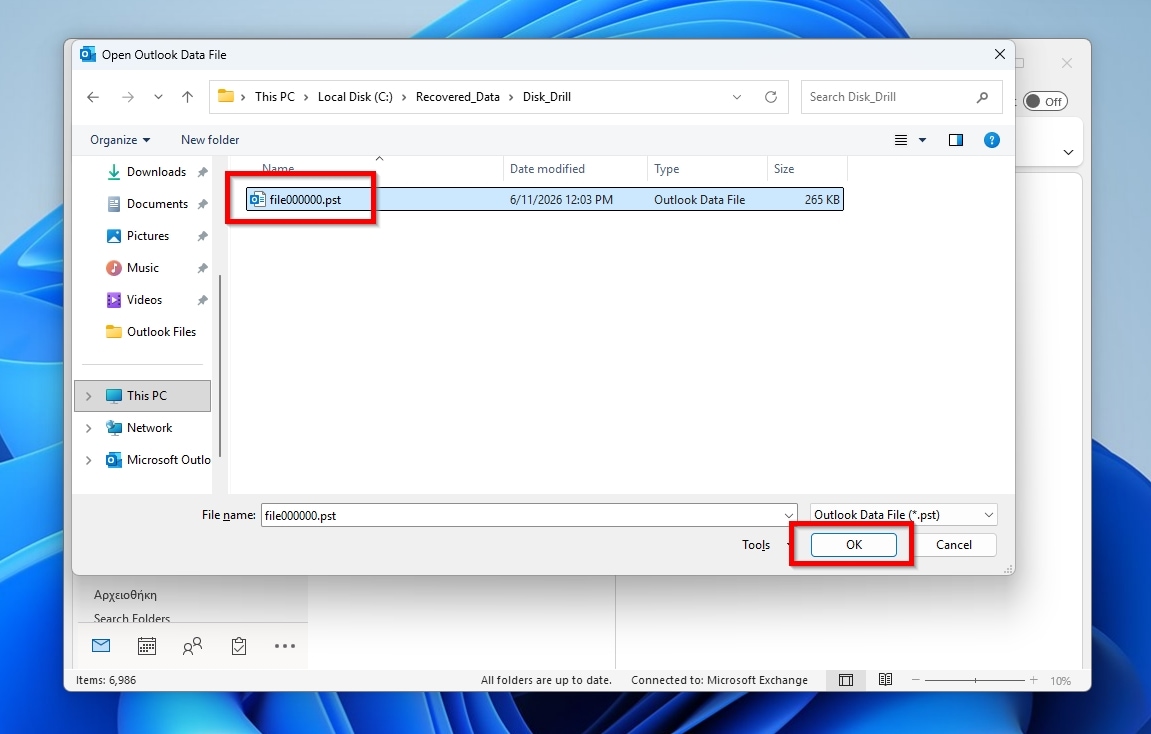
- Select your recovered Outlook PST file and click OK to load it back into Outlook.
If Outlook cannot open your recovered PST file or reports it as corrupted, you can try repairing it using the ScanPST tool that accompanies the desktop versions of Outlook. However, ScanPST isn’t usually “exposed” in the Start menu or via an easily accessible shortcut, so you will have to find it first.
To repair your Outlook PST file with ScanPST:
- Outlook is considered an integral part of Microsoft Office, and even when you are only using that app, it’s still installed in a subfolder under a related parent folder. That’s also the spot where you will find the ScanPST tool. For example, for the latest versions of Windows 11 and Outlook, the path is “
C:\Program Files\Microsoft Office\root\Office16“.
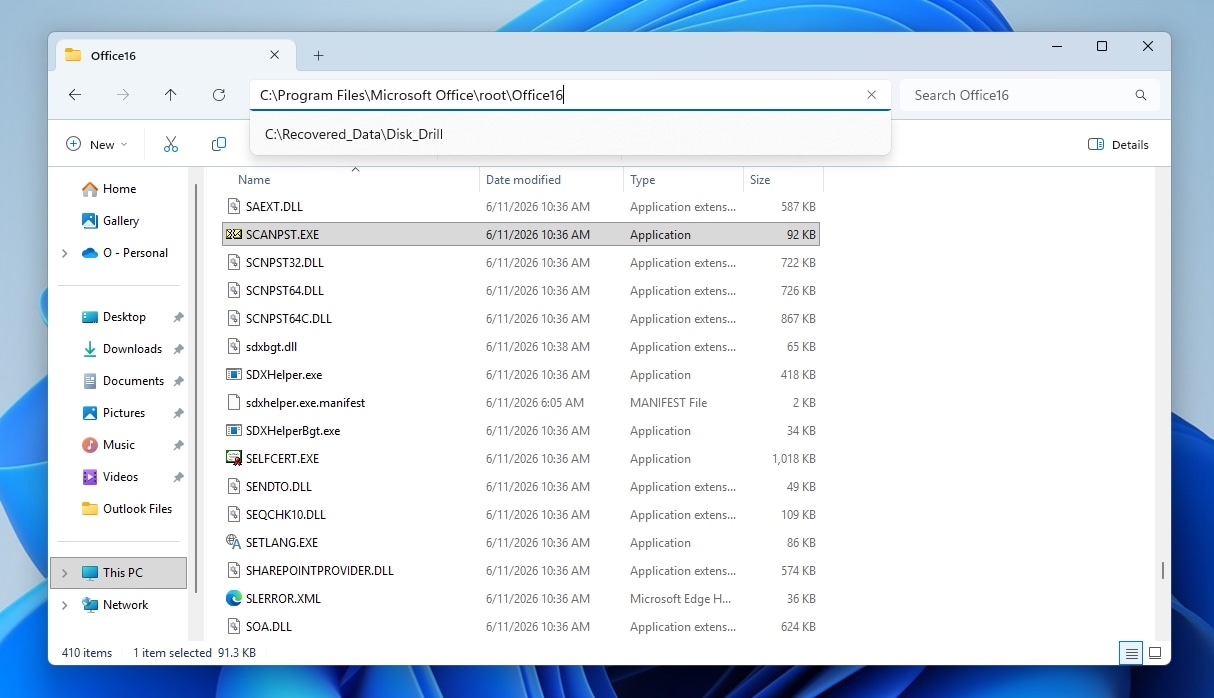
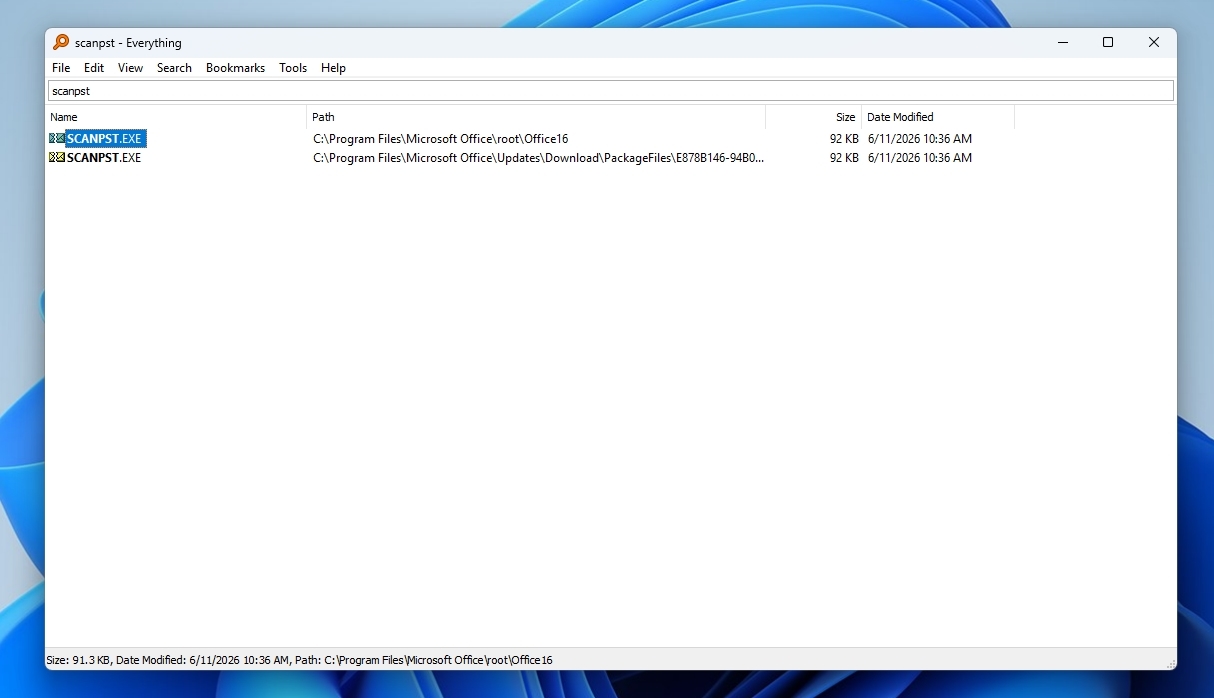
- Since the installation path can vary across Windows and Office versions, it’s probably easier to install a global file search app like voidtool’s Everything and use it to find the “scanpst” executable. Then, run it.
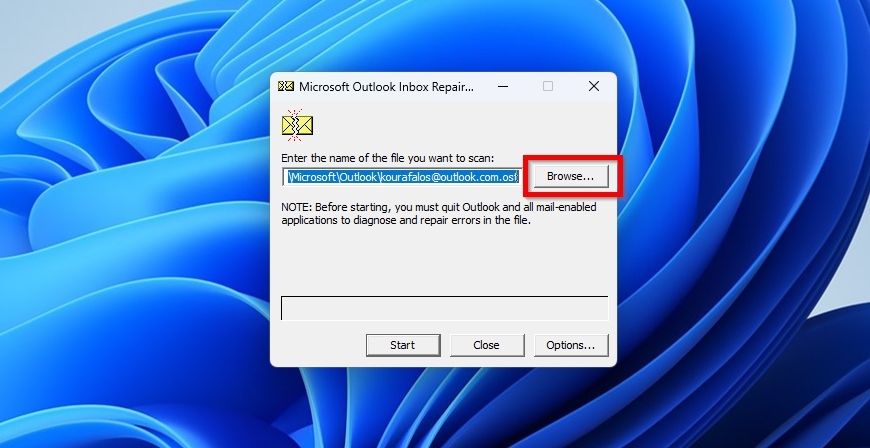
- Click the Browse button and point the ScanPST’s file requester to the Outlook PST file that you want to repair.
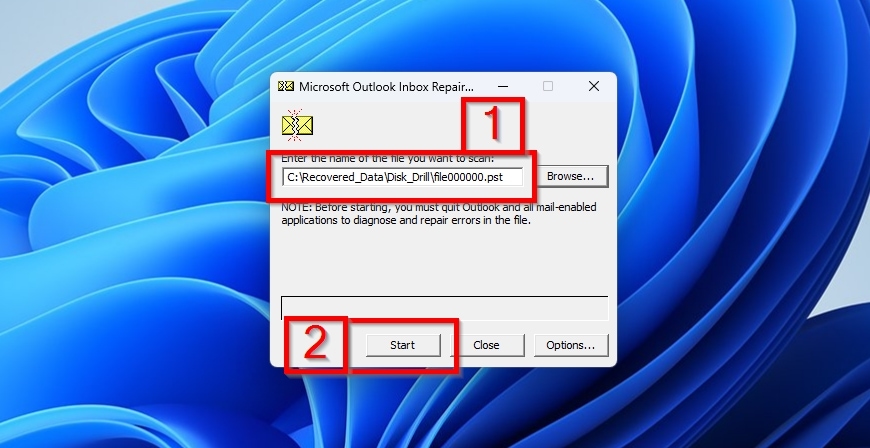
- ScanPST will display the complete path to your selected Outlook PST file before the Browse button (1). Click Start to have the app analyze the file (2).
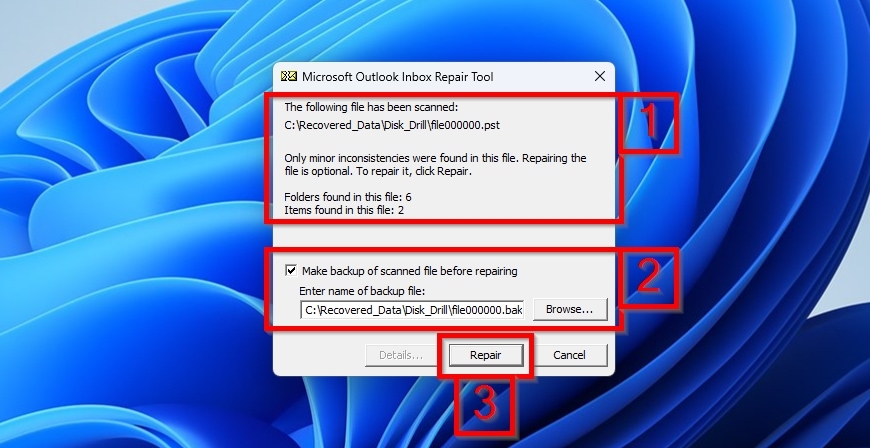
- Next, ScanPST will inform you about its findings (1). The app will also offer the option to make a backup of the scanned file before repairing (2), which we suggest you enable and point to a different storage location. Finally, click Repair (3) to have ScanPST try to fix your Outlook PST file.
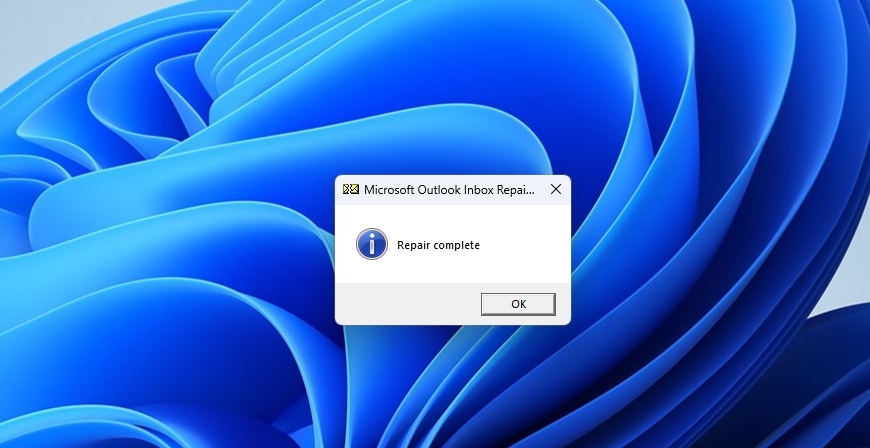
- When done, ScanPST will report that the “repair (is) complete”. You can close that window by clicking OK, and then retry importing the now hopefully unproblematic Outlook PST file into Outlook.
We should clarify that ScanPST’s name is apt: it specializes explicitly in PST files. If you want to recover other work-related files, it would be best to check our step-by-step guides on recovering deleted Word documents, Excel files, and PDFs.
FAQ
You can use a data recovery app, like the Mac version of Disk Drill, to scan the drive from which an Outlook PST file was deleted. A catch is that since the PST format was created by Microsoft specifically for use in Outlook, you might not be able to access the contents of the recovered PST file with similar Mac-native solutions. Still, you can install a legacy version of Outlook for Macs and import the Outlook PST file, or use an app like PST Viewer & Converter.
This can happen when an Outlook PST file isn’t recovered in its entirety, or “reassembled correctly” after the process.
- Regarding the first point, many data recovery apps follow the mindset that “some” is better than “nothing” and prefer to produce partial results rather than come entirely empty-handed. Such files often lack crucial bits of data compared to the originals and can even be entirely unusable. Unfortunately, there’s not much you can do about that, apart from trying to re-recover the file.
- As for the second case, it’s often possible to “fix” a lightly corrupted PST with a tool like ScanPST.
Microsoft doesn’t offer an official way to “unprotect” a PST file by removing its password or otherwise bypassing it. There are third-party apps that specialize in that. However, we won’t cover them here because, depending on local laws, providing tools or information to bypass data protection measures may be considered illegal.
