


If you’ve lost an important Excel spreadsheet, whether from accidental deletion, closing it before saving, or overwriting it with the wrong version, the data is often still recoverable. This guide covers every practical way to recover deleted Excel files, along with unsaved, overwritten, and lost XLSX and XLS spreadsheets.
We’ll start with built-in recovery options, then move to dedicated Excel recovery software to address more difficult cases. We have tested each method on Windows and Mac, so you’ll be getting only verified advice with plenty of tips based on our extensive data recovery experience.
Excel File Recovery Scenarios (and the Best Method for Each One)
Excel files can stop being accessible in a few different ways, and each one has its own quickest fix. Use the table below as a map that shows you the best path from your situation to the most suitable method you can apply to solve it and restore access to the lost Excel spreadsheet.
| Excel loss scenario | What that means | Best recovery path |
| You deleted the file by mistake | It probably still sits in the Recycle Bin, or it’s readable on the drive. |
Look in the Recycle Bin. If it’s empty, scan the drive with recovery software. |
| The file is missing from its folder | It was likely moved, renamed, synced to another PC, or deleted. |
Use the File Explorer search feature. Check your backups. If that draws a blank, scan the drive. |
| Excel closed before you saved | Excel most likely made an AutoRecover copy in the background. |
Open Excel’s Recover Unsaved Workbooks list. |
| You saved the wrong version on top | An older copy may sit in File History or in OneDrive. |
Restore through Previous Versions. Or use OneDrive version history. |
| The file vanished from a USB stick, SD card, or external drive | It’s often still on the device (at least until new files overwrite it). |
Stop writing to the device and scan it with recovery software. |
| The file opens to an error, or not at all | It’s likely corrupted rather than deleted. |
Repair it with Excel’s Open and Repair. Then try an earlier version. |
How to Recover Deleted Microsoft Excel Files
We start with deleted Excel files because it’s how people lose a spreadsheet most often, and it’s usually the easiest case to fix. Try the three methods below in order. The Recycle Bin is the quickest check, so it makes sense to start with it. Backups come next because their existence makes recovery easy. Finally, data recovery software is the fallback when the first two fail to deliver the desired results.
Method 1: Check the Windows Recycle Bin
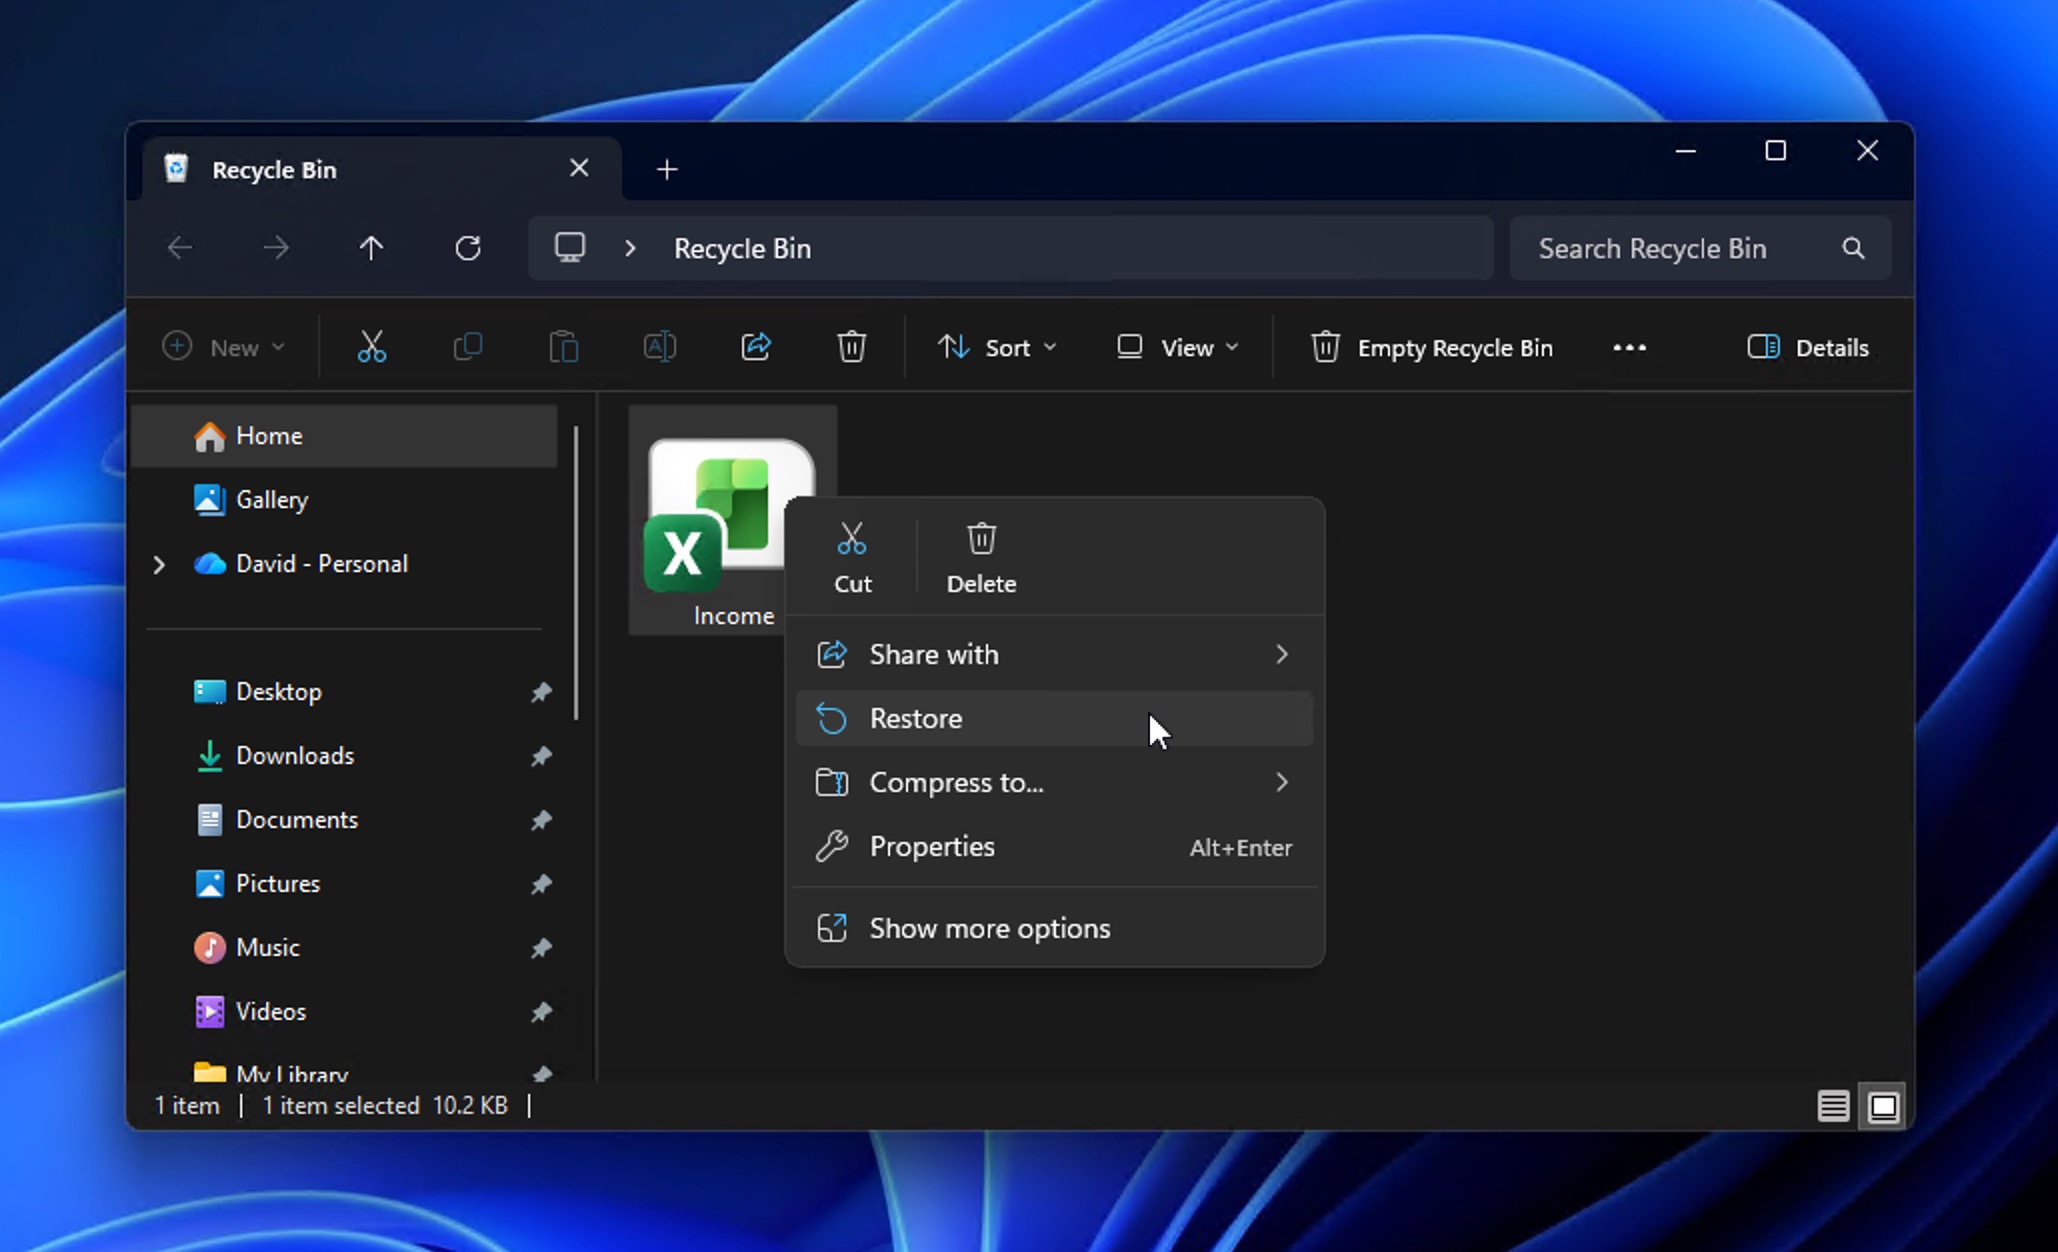
If you’ve accidentally deleted your XLSX or XLS files, the first place to look is the Windows Recycle Bin. It’s quite common to delete an important file by mistake, and the Recycle Bin is in place to rectify such a situation. It’s a folder that the Windows operating system uses to temporarily store your deleted files until you empty the bin.
Follow these steps to recover a deleted Excel file using the Recycle Bin:
- Open the Recycle Bin.
- Locate the item you want to retrieve.
- Right-click the item and select Restore.
Method 2: Check your Backups
One of the best practices to safeguard your files against unforeseen data loss scenarios is to regularly back up all your data. You can do this with the native Windows operating system facility known as File History, or back up your files to the cloud. For the purpose of this article, we’ll look at Excel file backups made with File History on your Windows 10/11 system.
Follow these steps to recover your XLSX and XLS files backed up by File History:
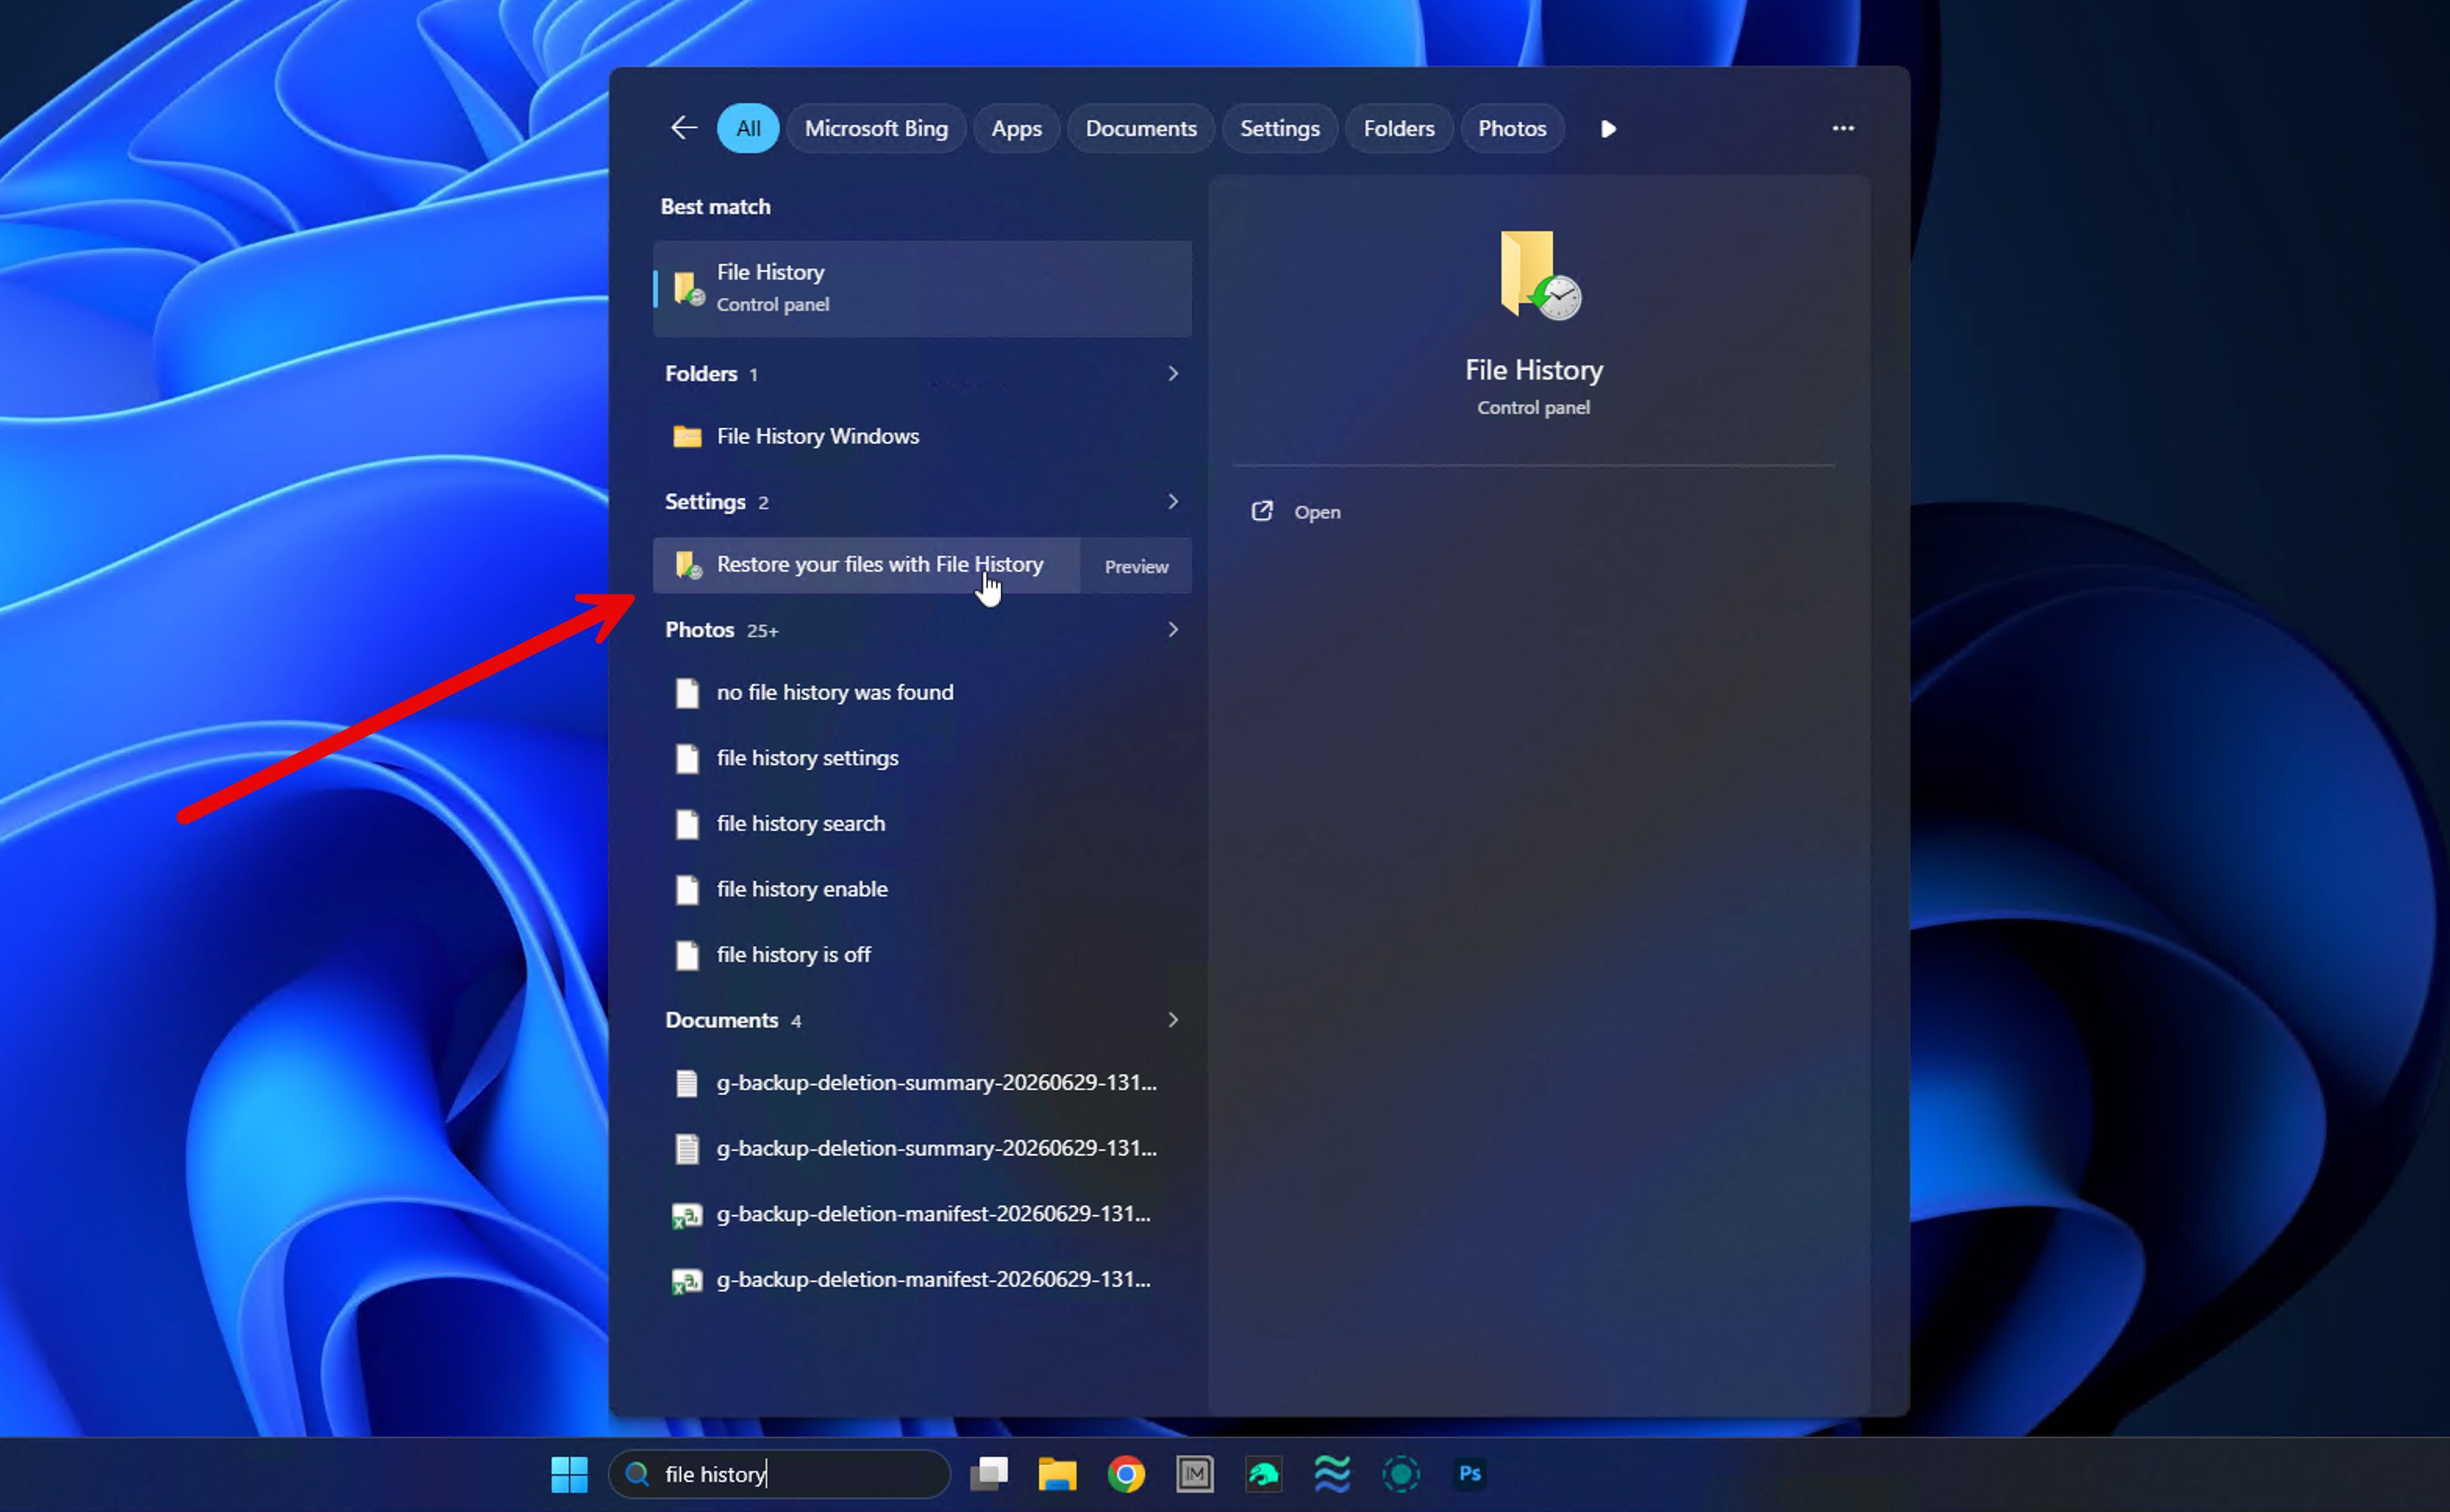
- In the taskbar’s search box, type File History and select the Restore your files with File History setting.
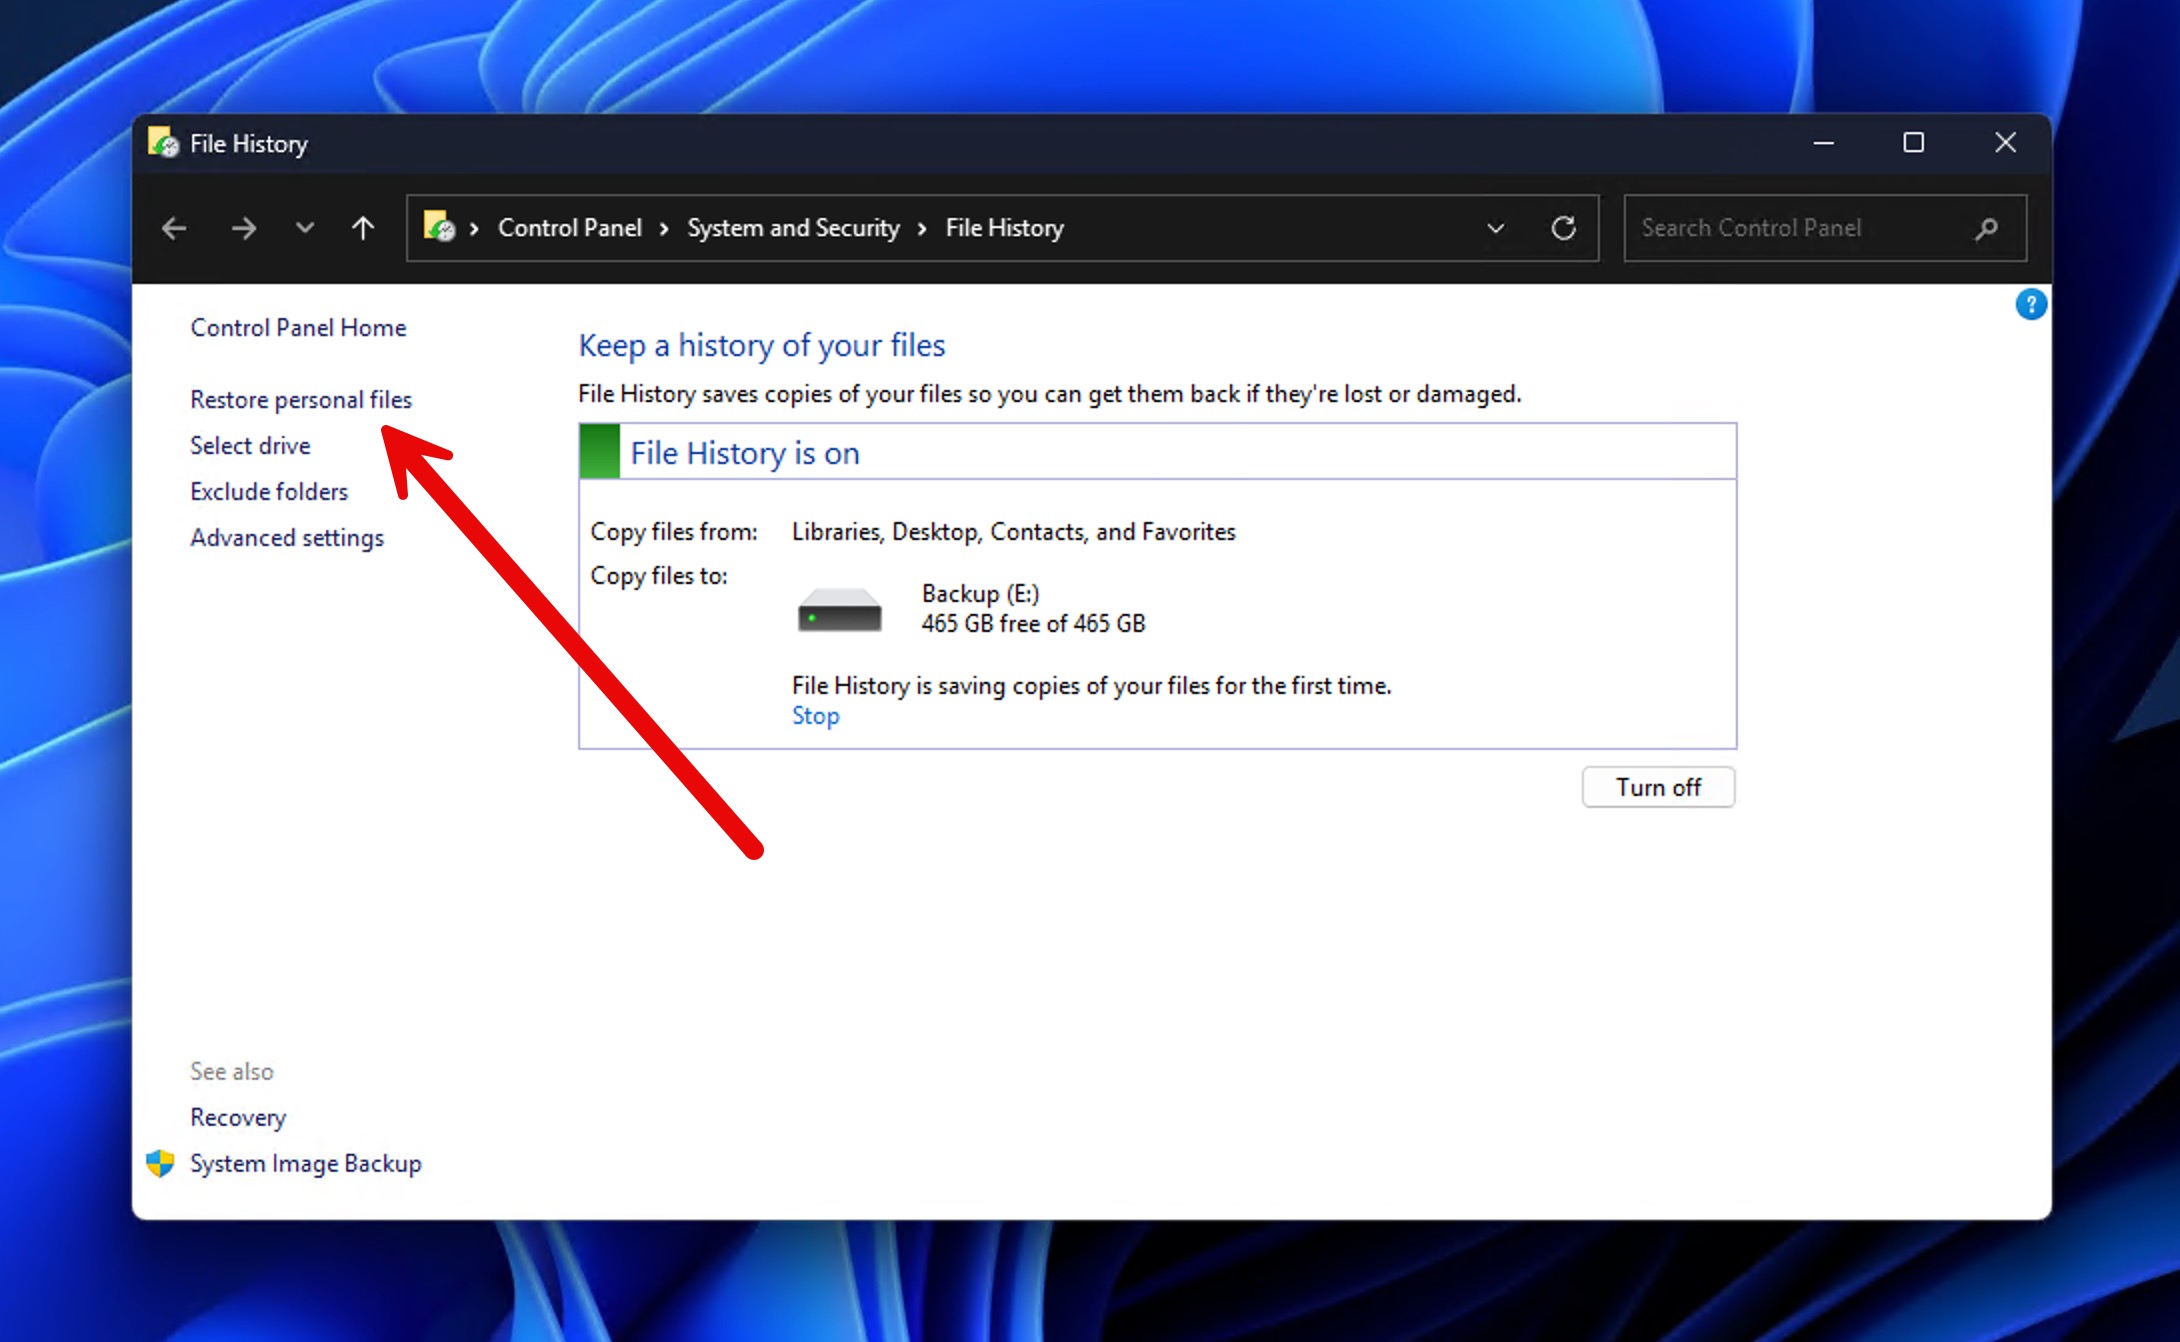
- Make sure File History is switched on. Read the note below if it isn’t.
- Click Restore personal files in the left panel.
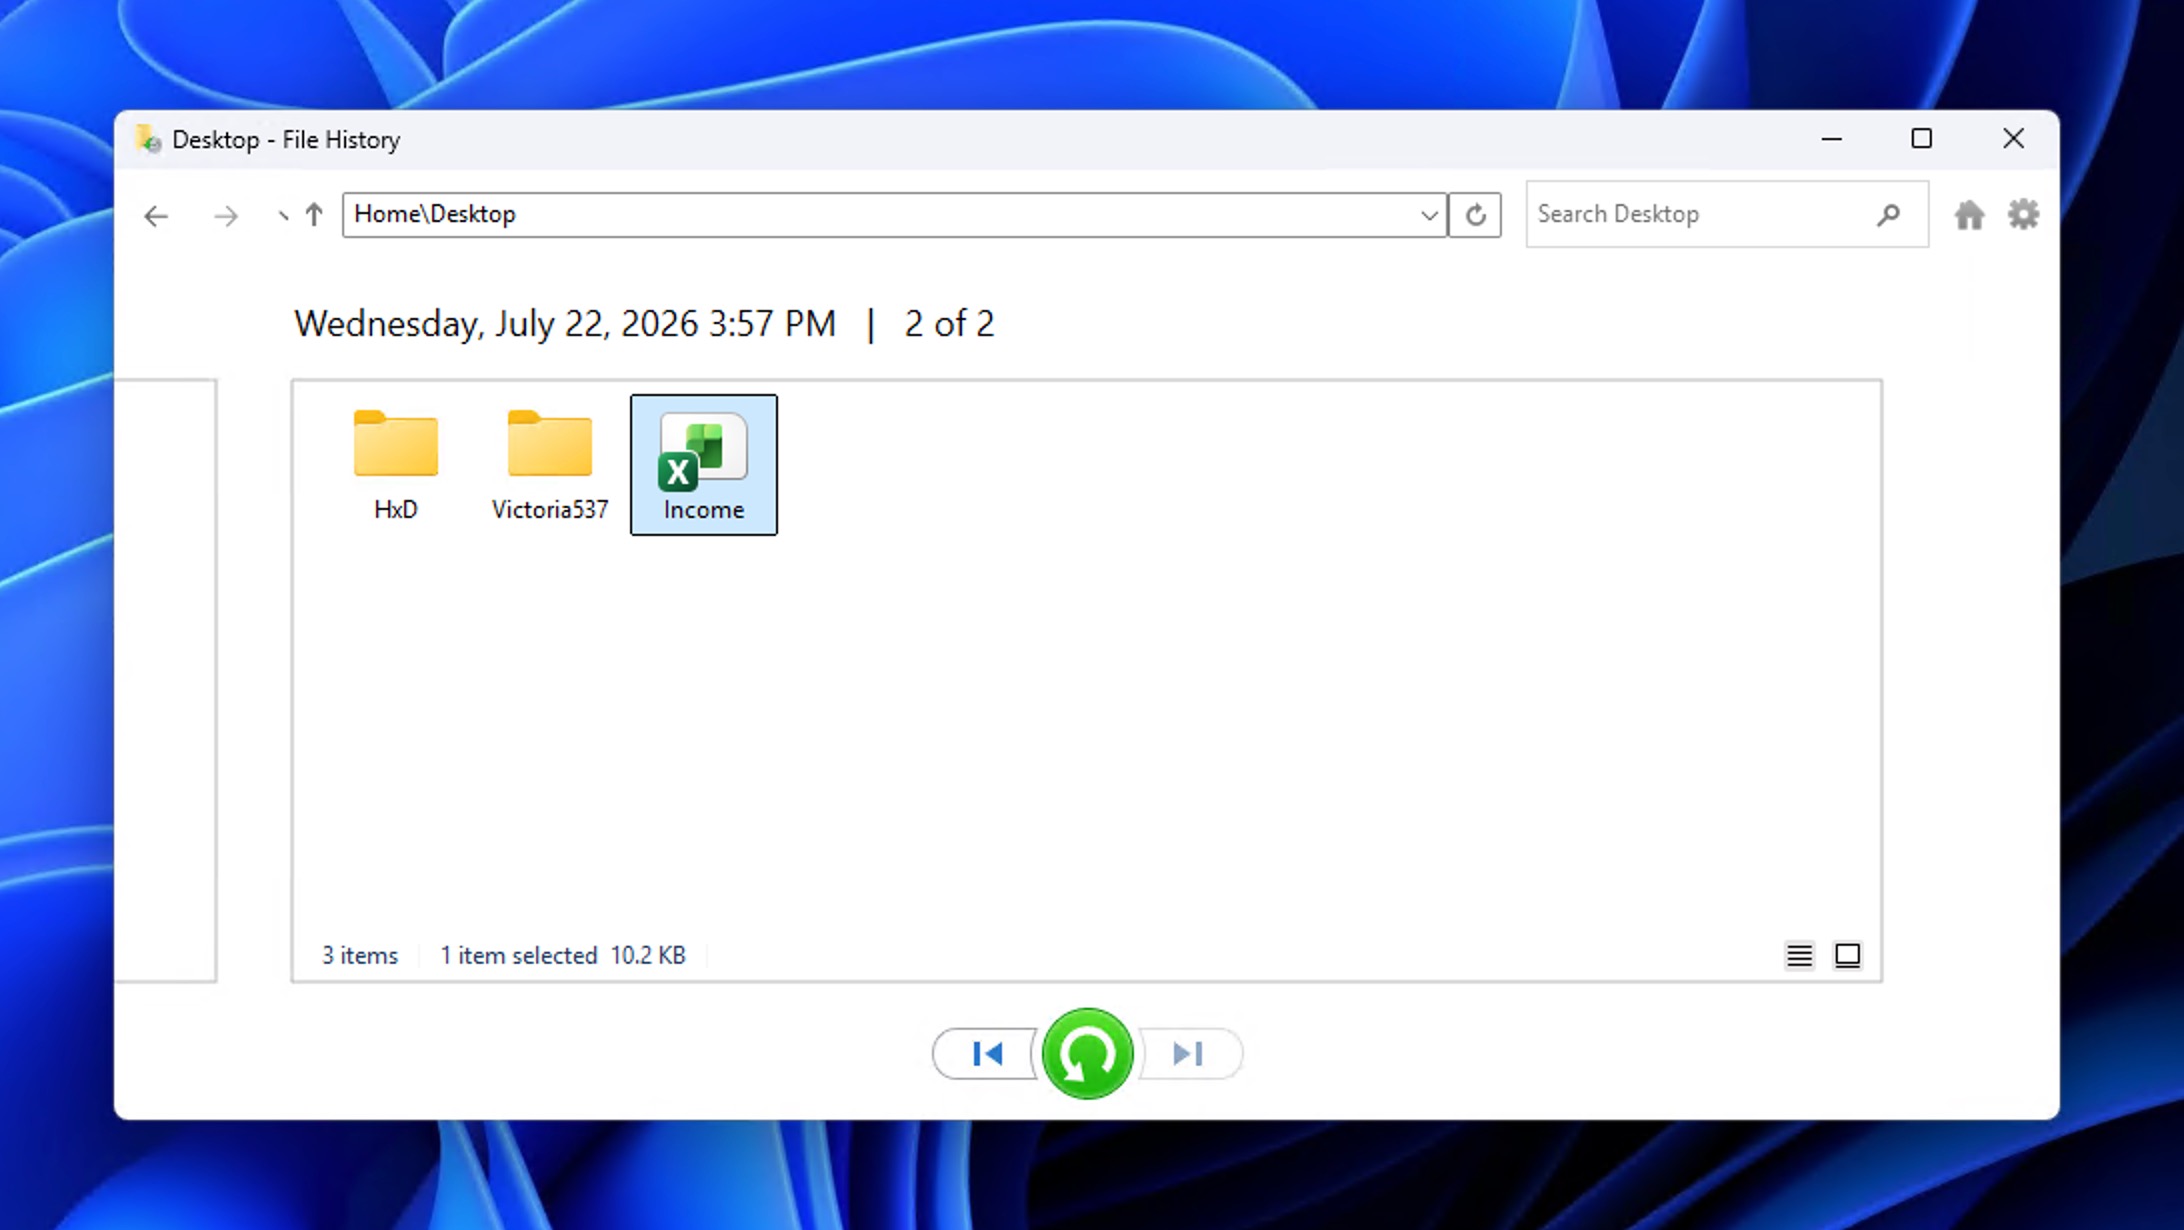
- Locate the Excel file you want to recover.
- Select the file and click the green Restore button.
Method 3: Use Data Recovery Software
Because plenty of people don’t use File History or any other backup solution (and because the Recycle Bin works only in some cases), data recovery software is more often than not what actually gets lost data back.
In this part of our article, we explain how to recover Excel documents using Disk Drill, while providing easy-to-follow step-by-step instructions that you should be able to easily replicate without any special knowledge. Disk Drill is a great choice for Excel recovery thanks to its fantastic support for spreadsheet file formats like XLSX and XLS files, as well as the file systems on which such files are most commonly stored. Disk Drill even lets you preview each spreadsheet before you restore it, so you know you’re getting the right one.
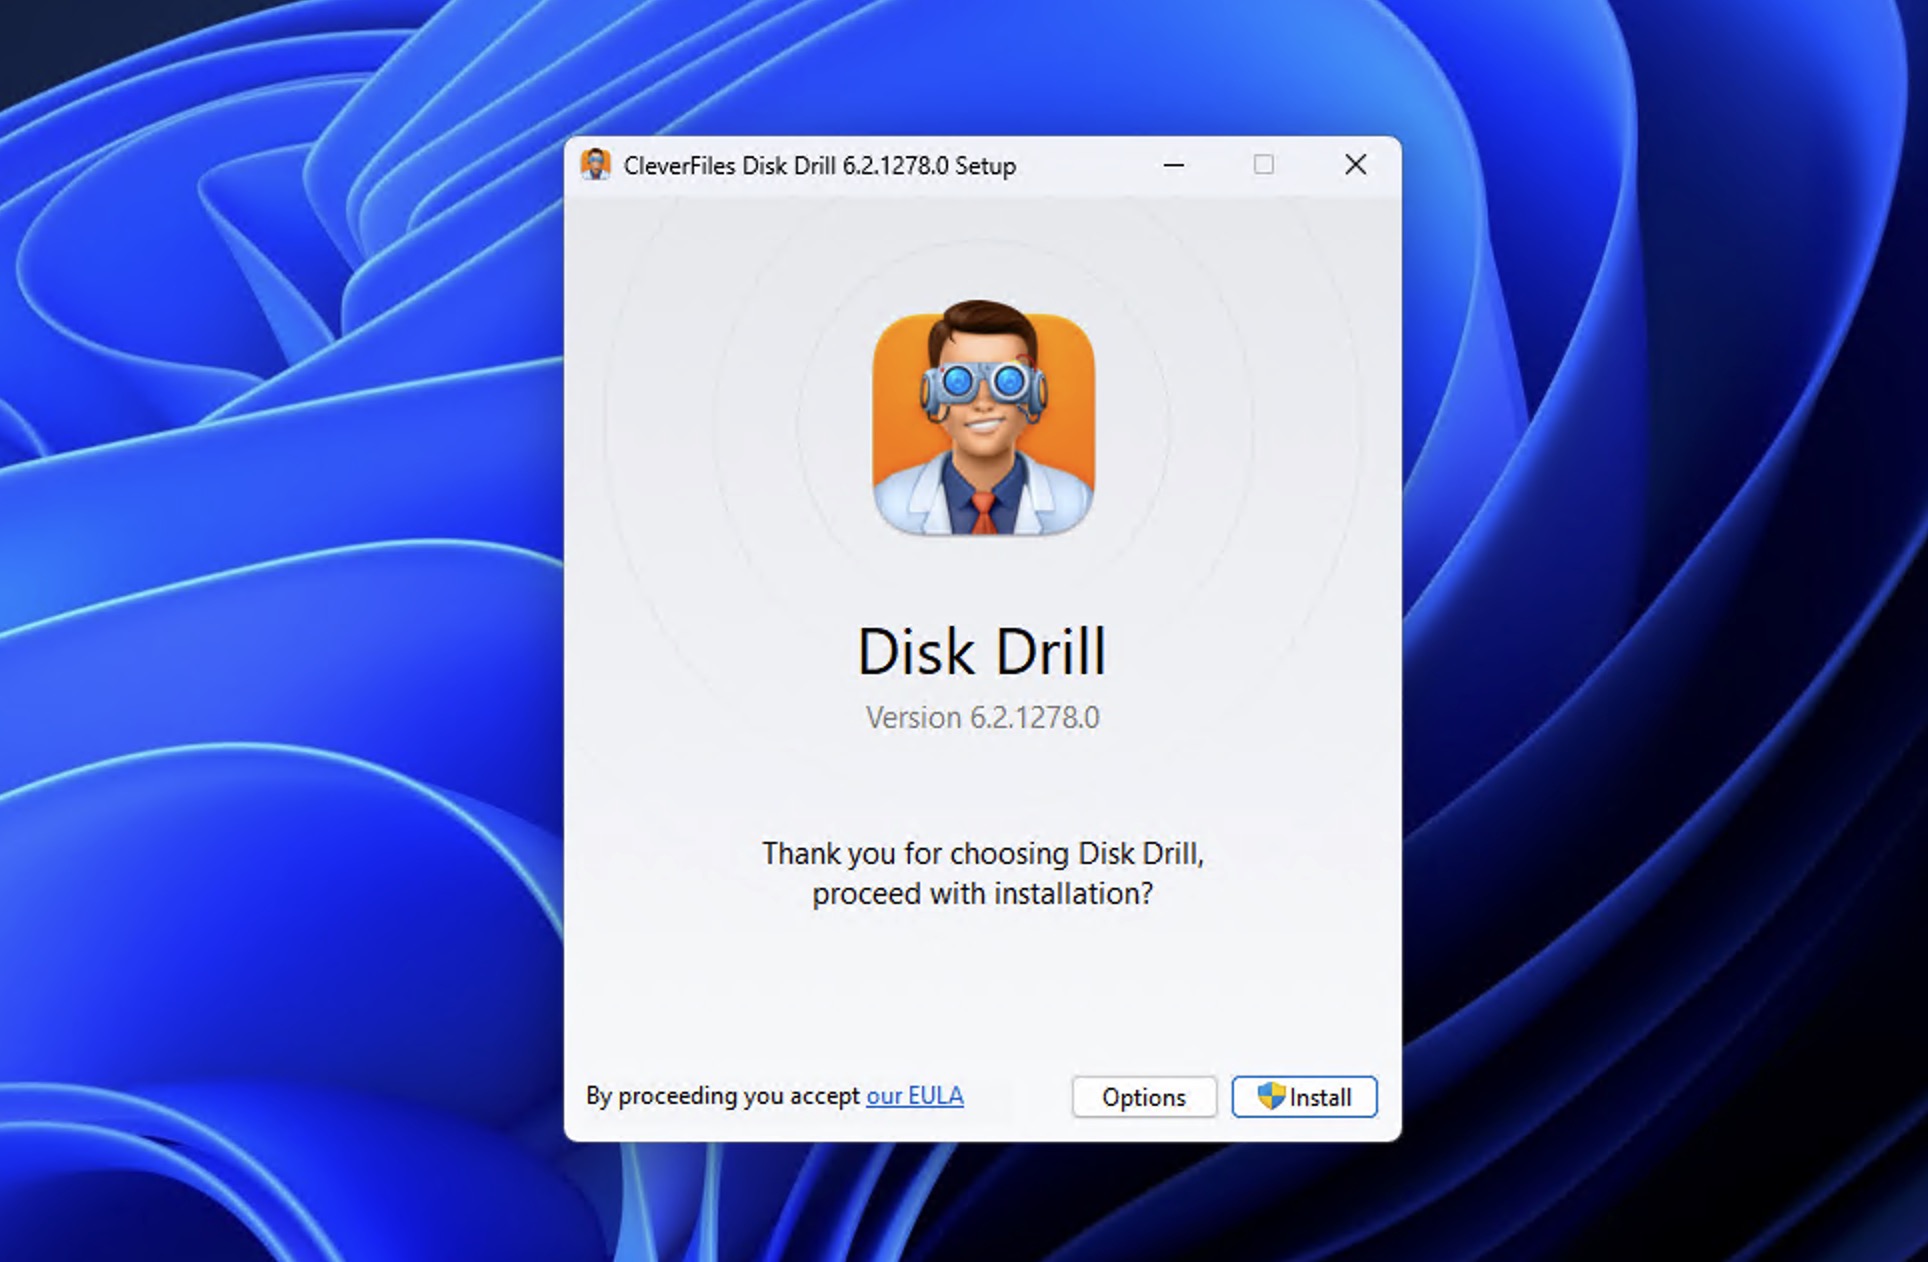
C: drive, put Disk Drill on another physical drive, or run it from a second computer. A separate physical drive is safest because another partition on the same disk can still overwrite lost data. SSDs are trickier: their TRIM feature can clear deleted data on its own, so recovery there is less predictable.- Download, install, and launch Disk Drill (Free Download for Mac, Windows).
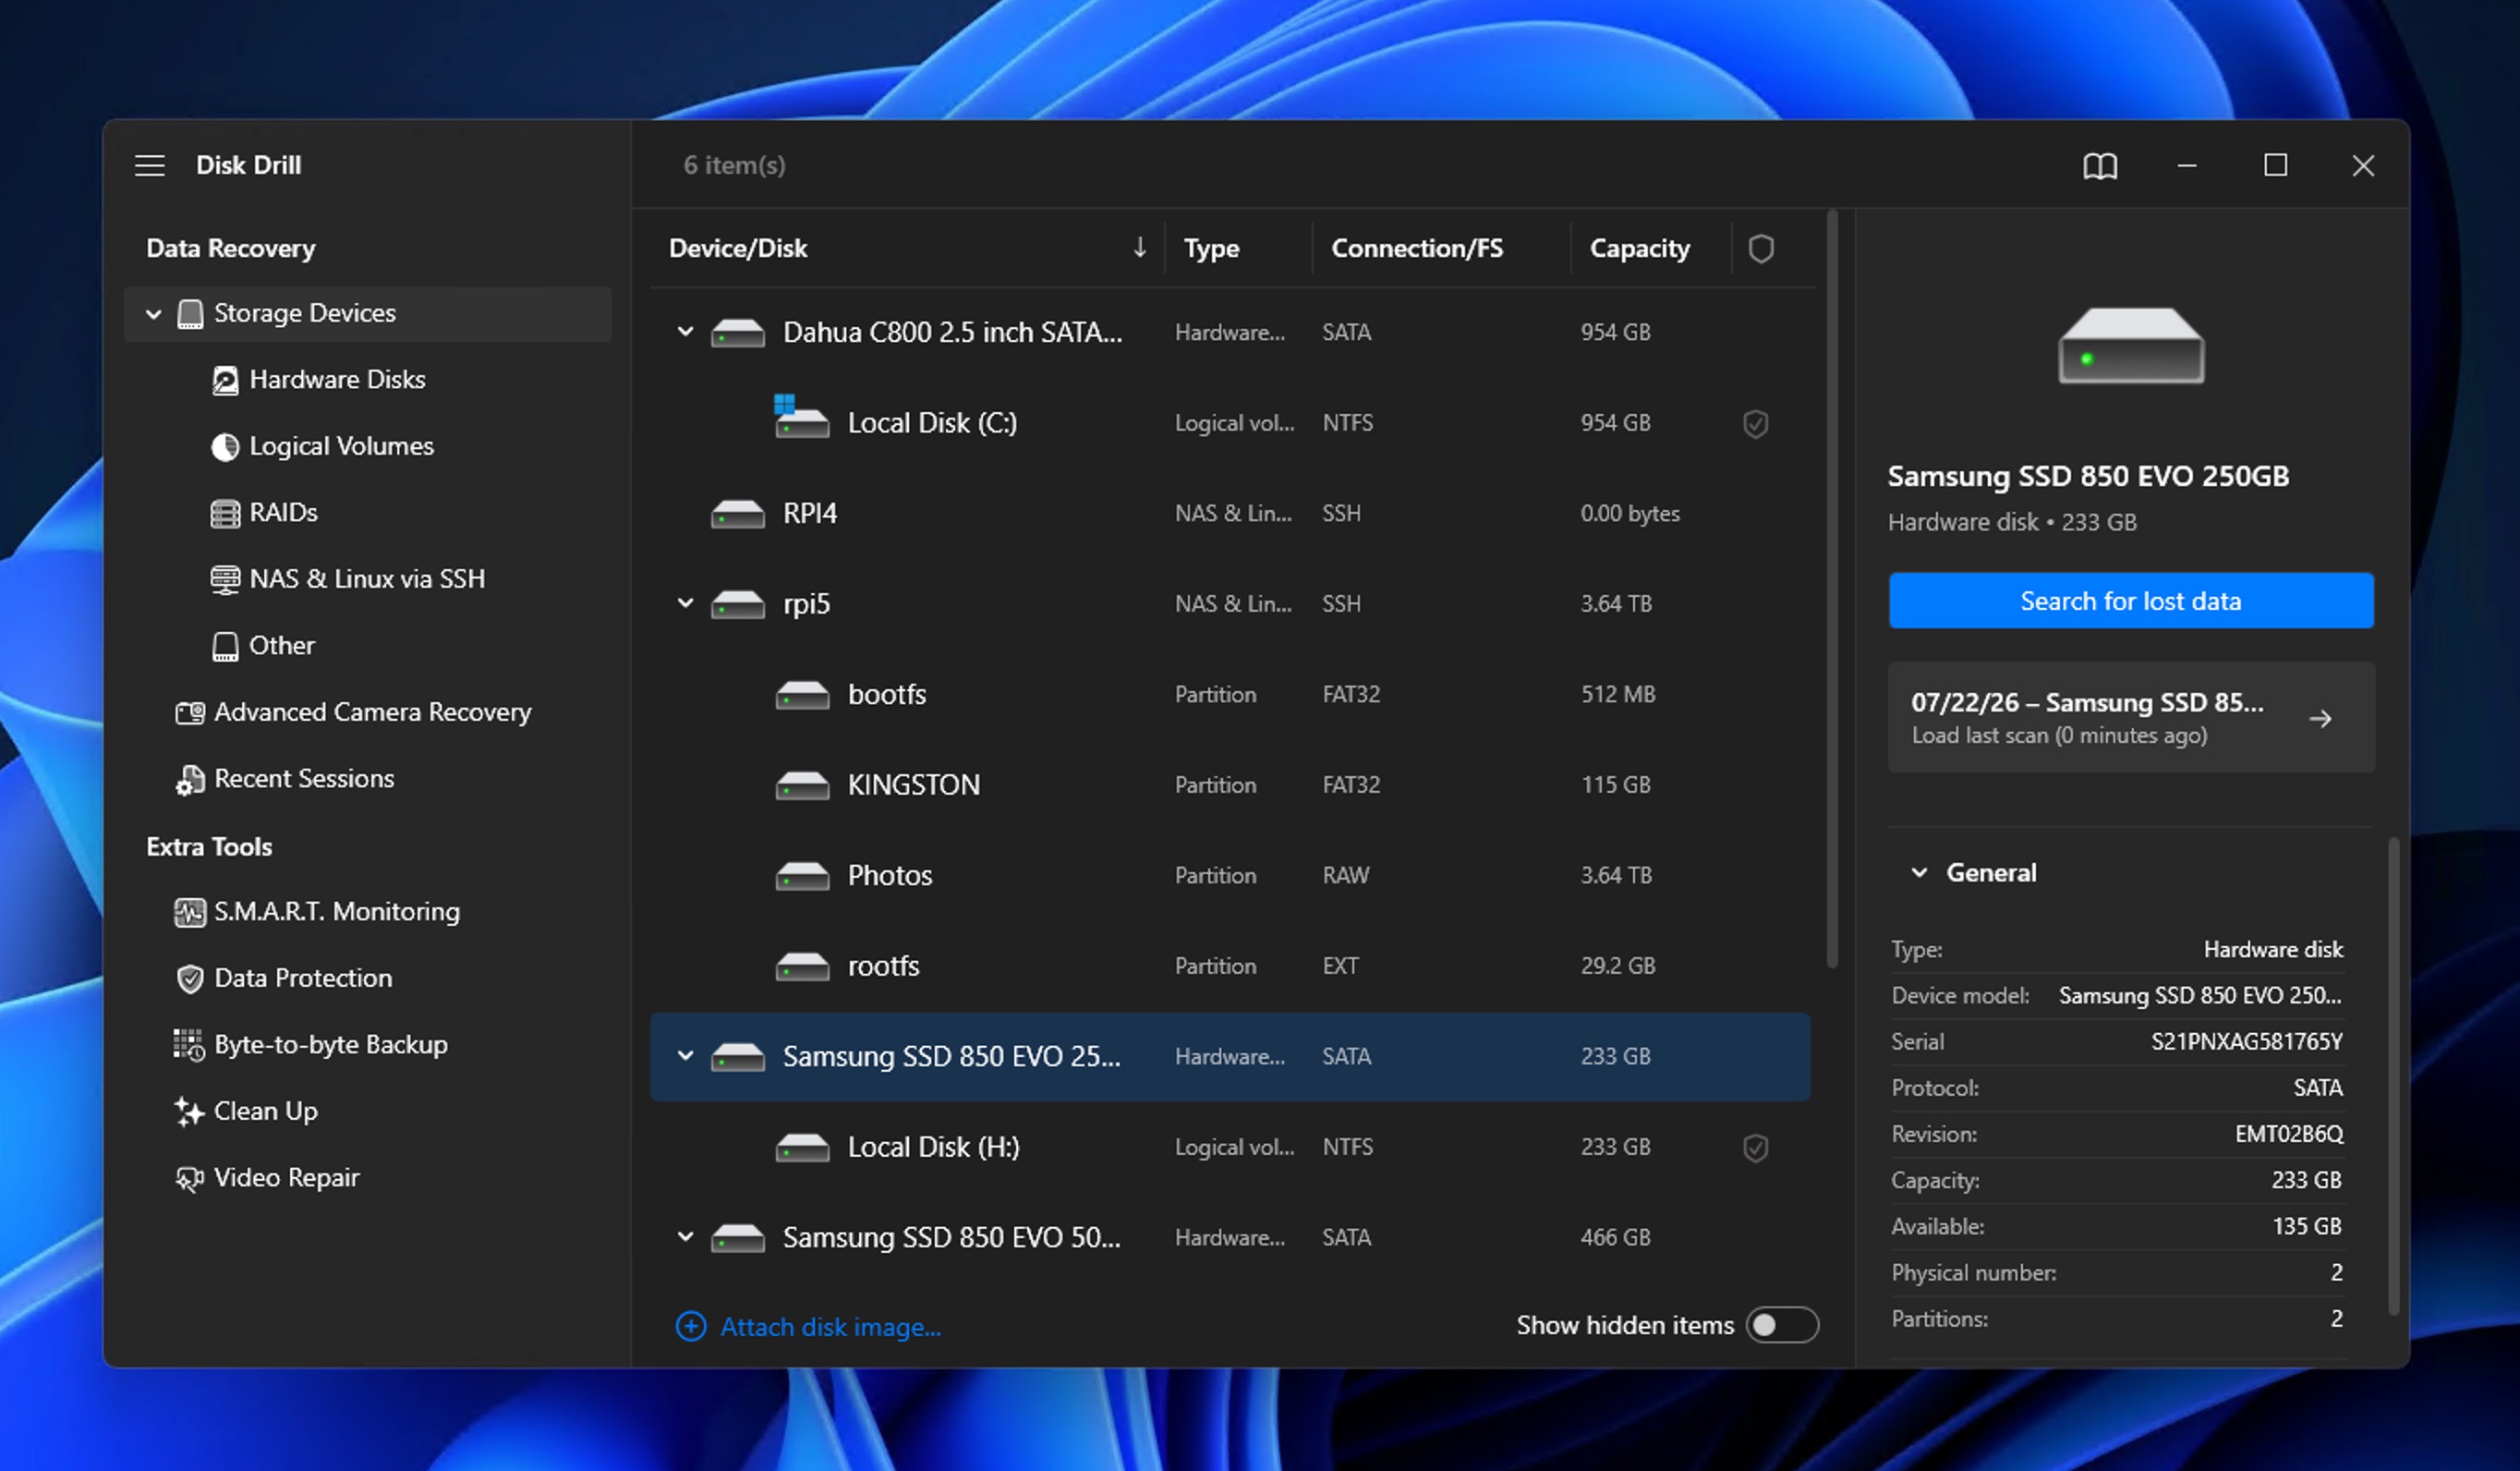
- Select the drive containing your Excel files if it’s connected to your computer already, or connect the storage device with the lost XLSX and XLS files and wait for Disk Drill to recognize it before you select it.
- Click the Search for lost data button to initialize the scan of the selected storage device. If Disk Drill asks which scan method you want to use, choose Universal Scan.
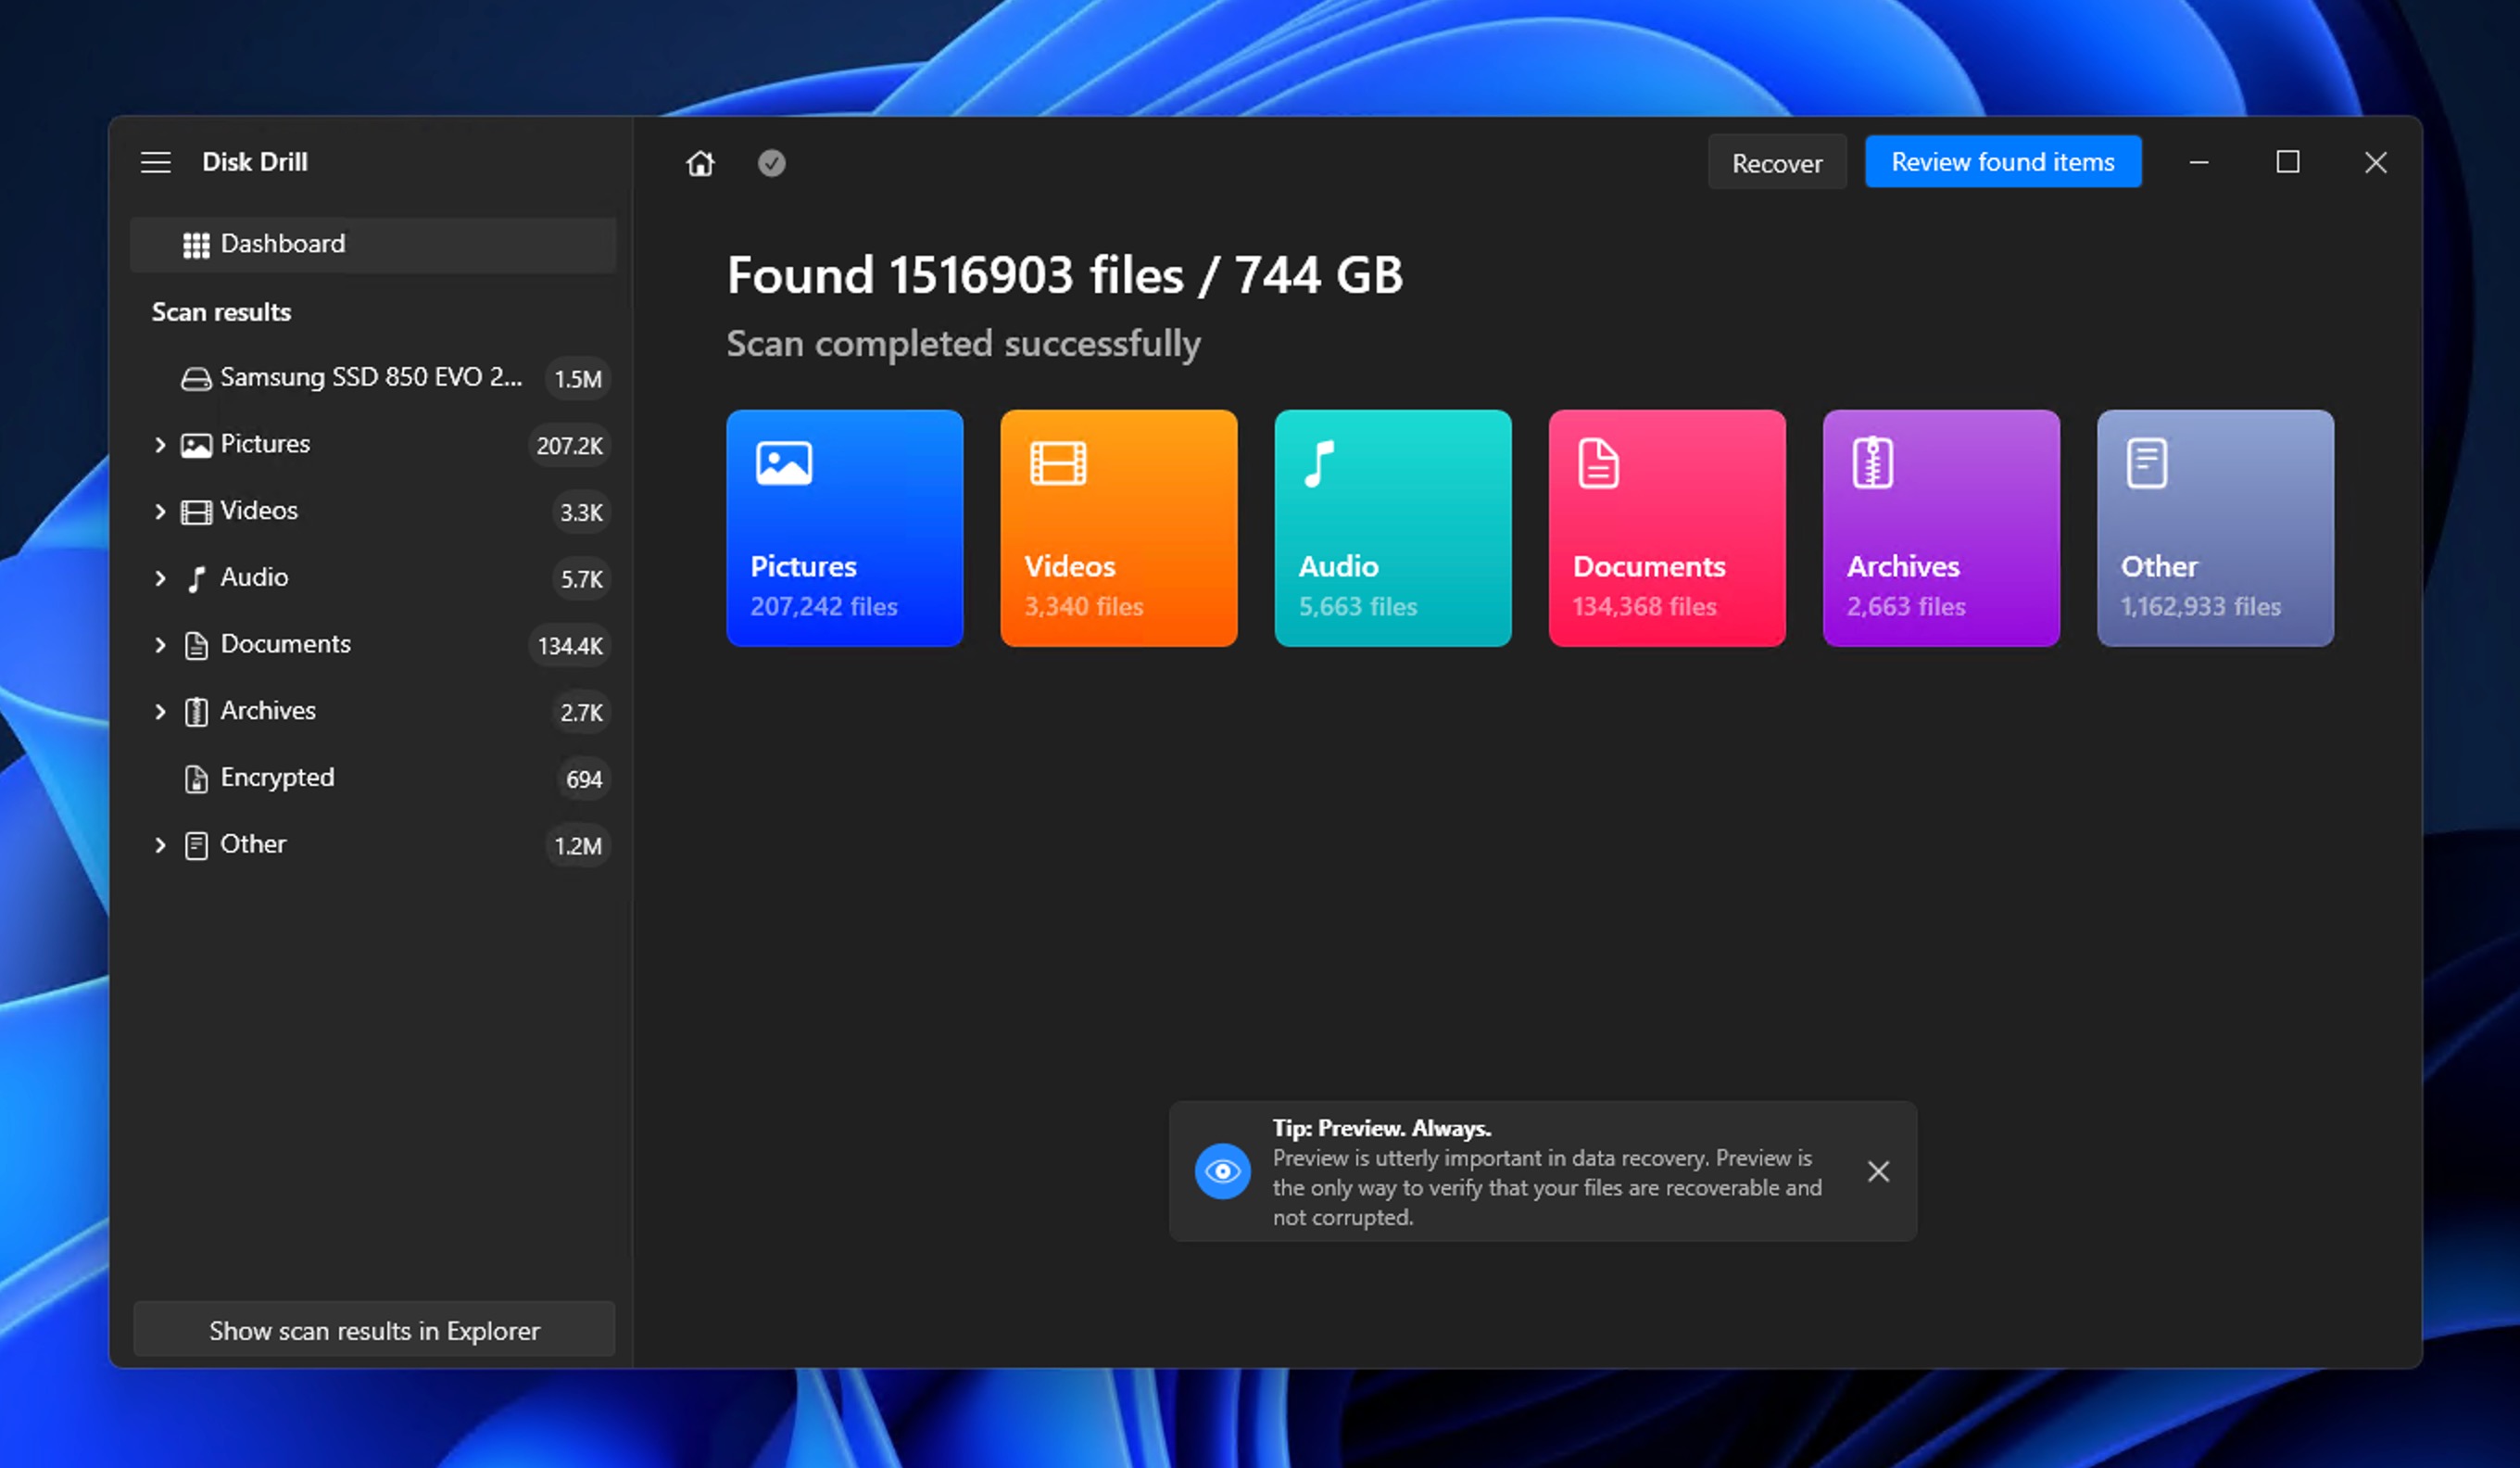
- Wait for Disk Drill to scan the storage device and present you with a list of recoverable files.
- Narrow the results to Documents with the file-type filter, or type a spreadsheet extension like
xlsxor the specific file name of your missing spreadsheet into the search box to find it fast.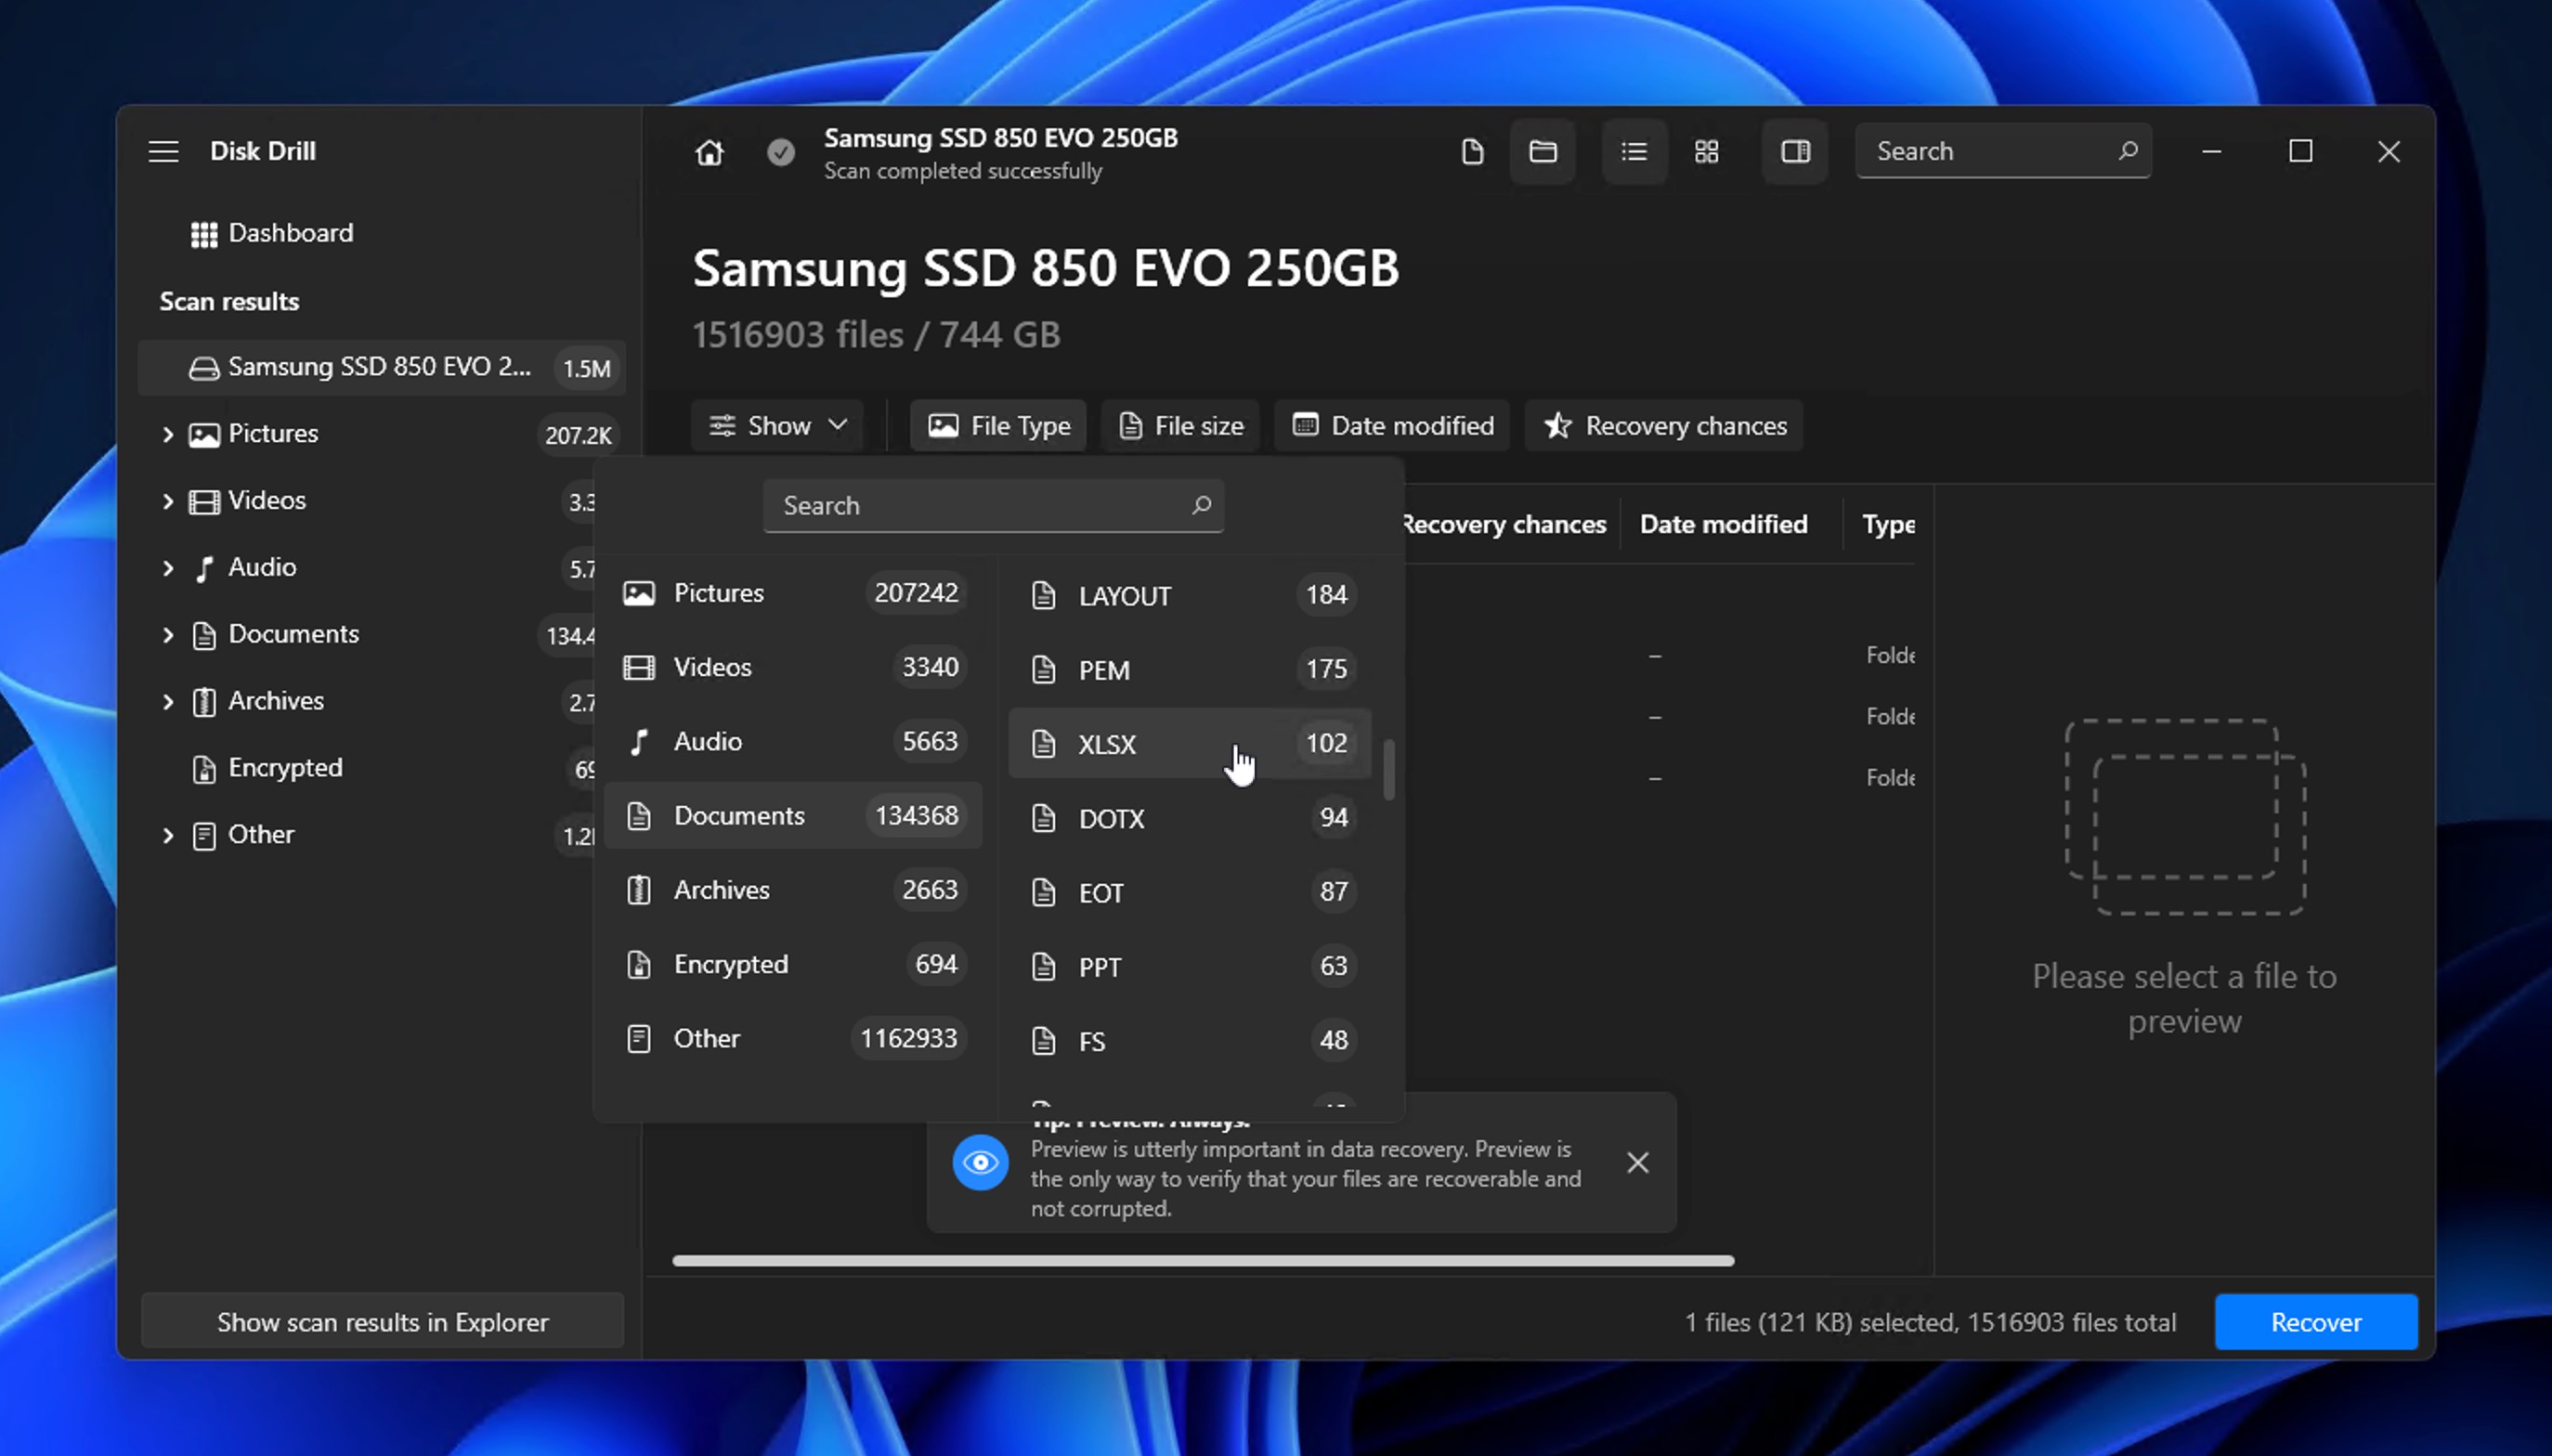
- Choose the XLSX and XLS files that you want to recover, then preview them to check the contents before you restore them.
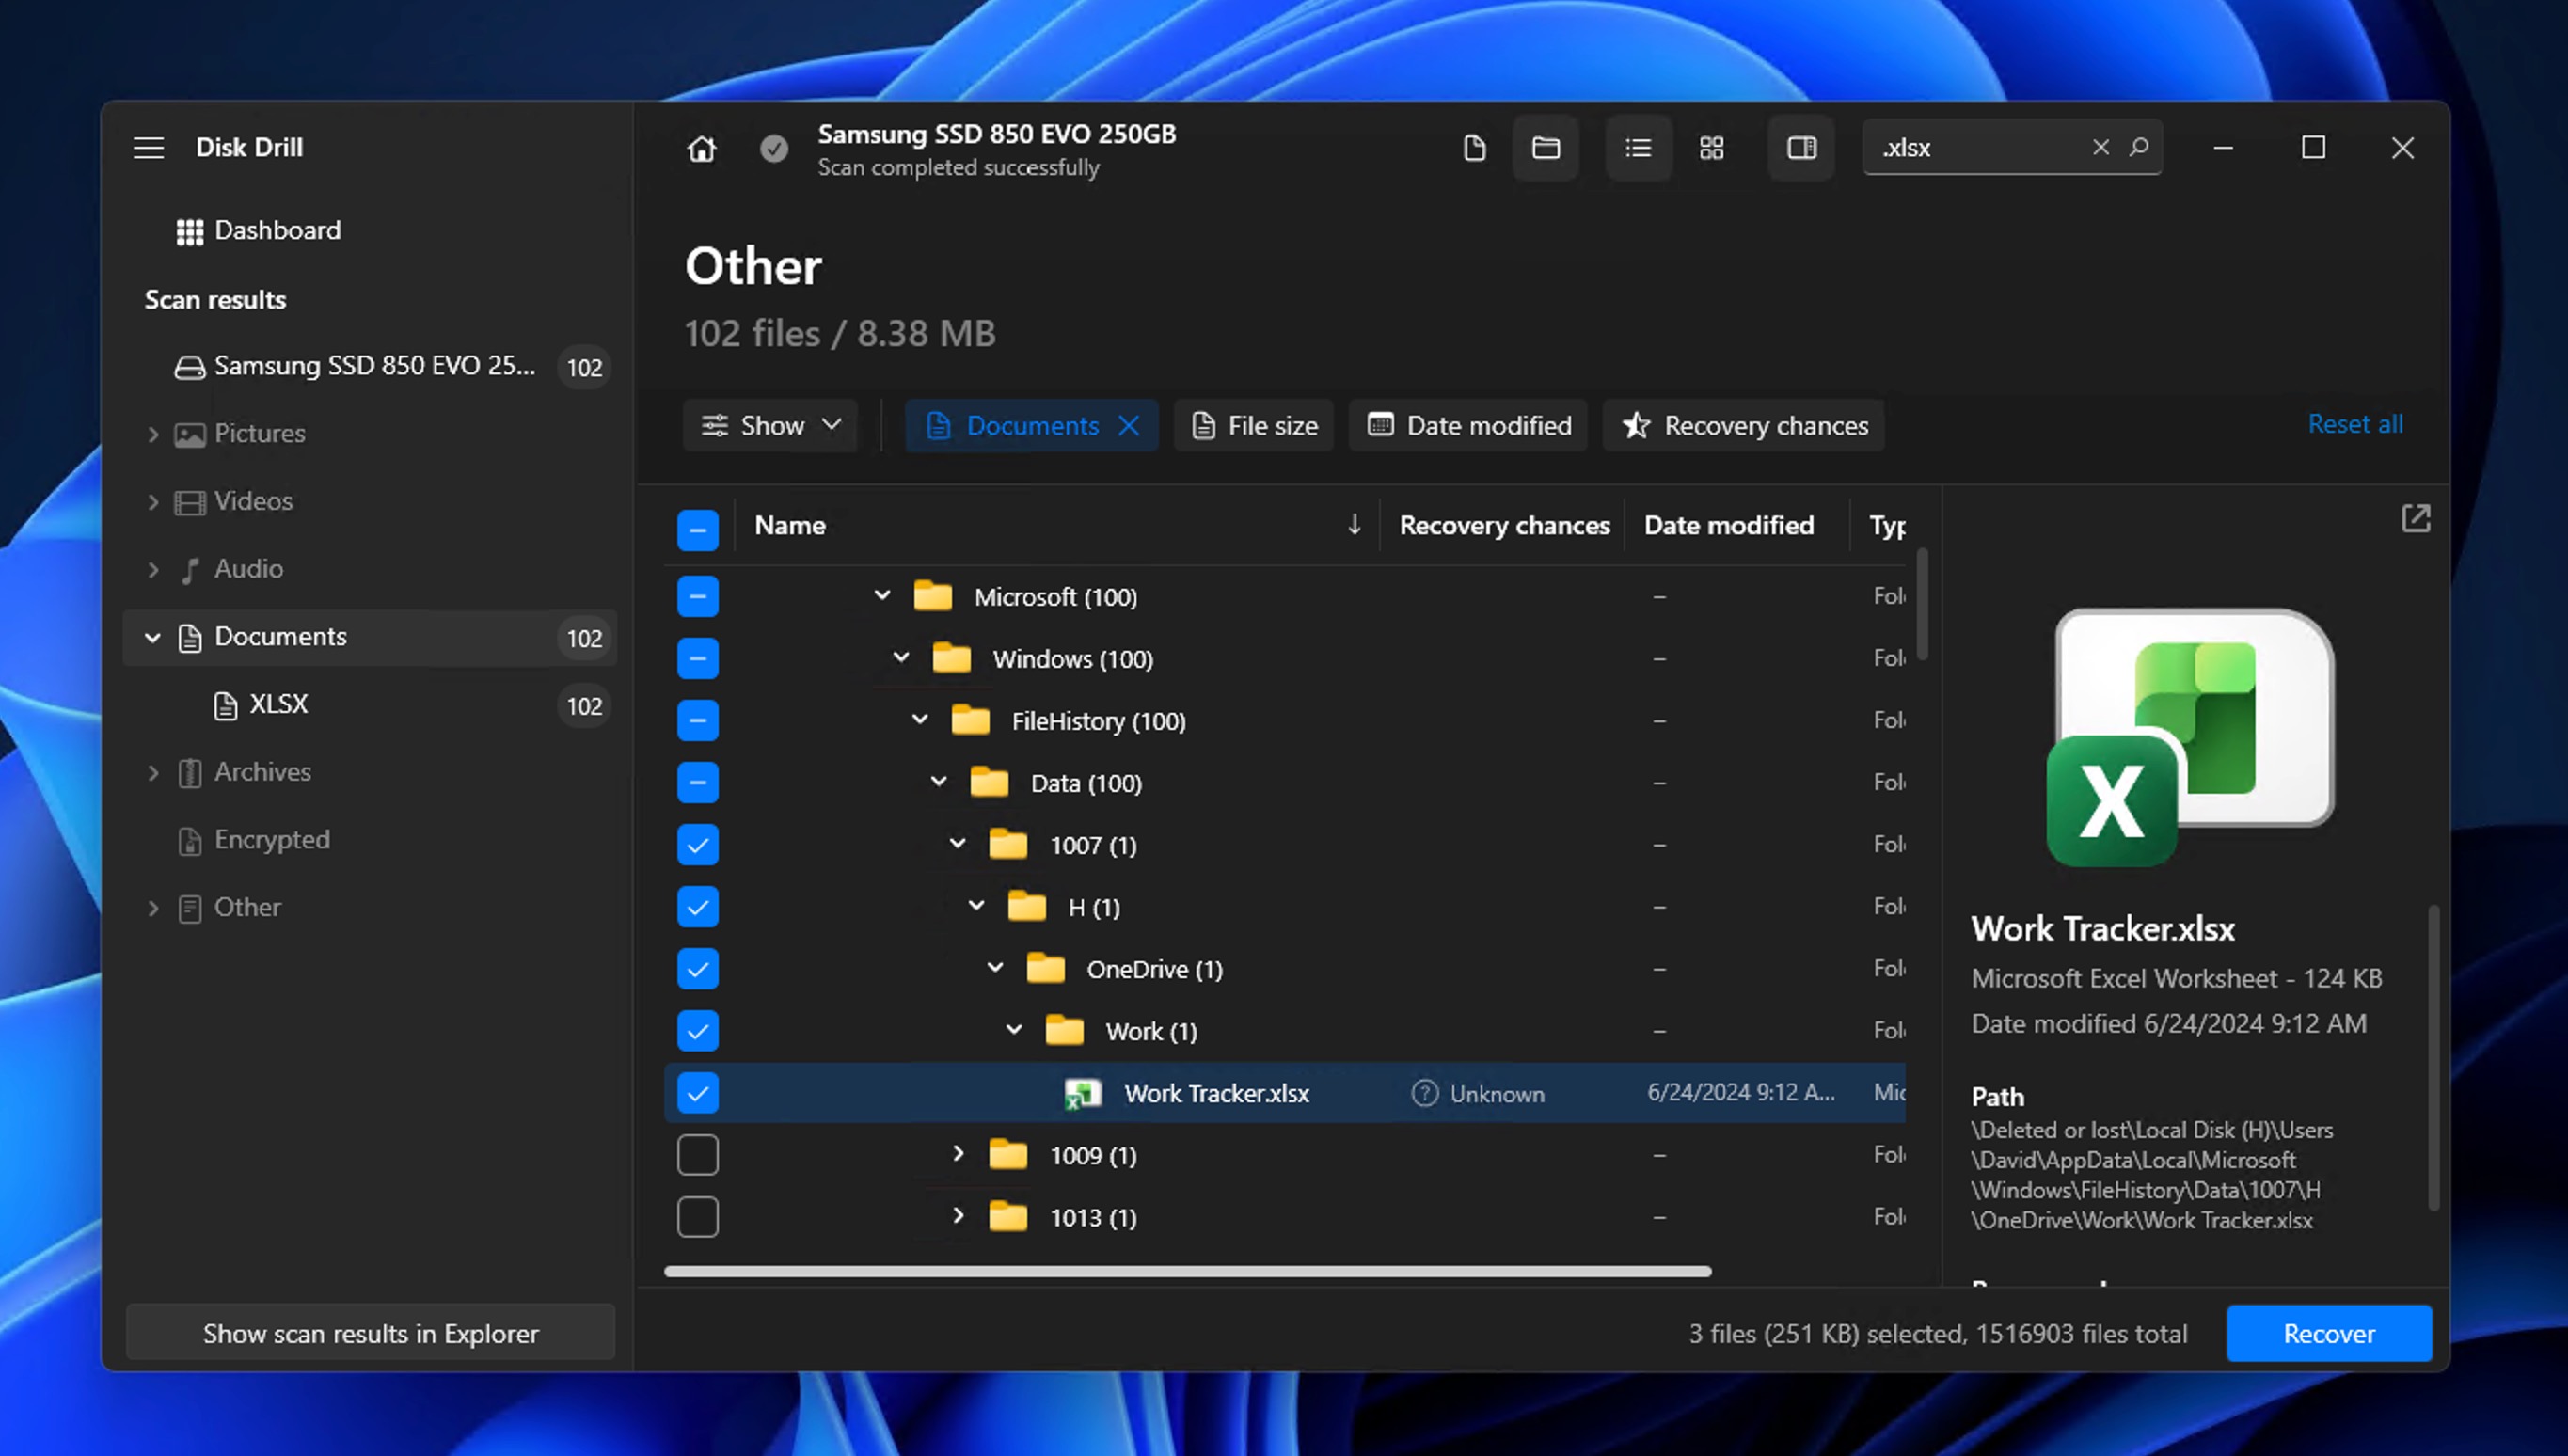
- Begin the recovery process by clicking the Recover button, and save the files to a different drive than the one you just scanned.
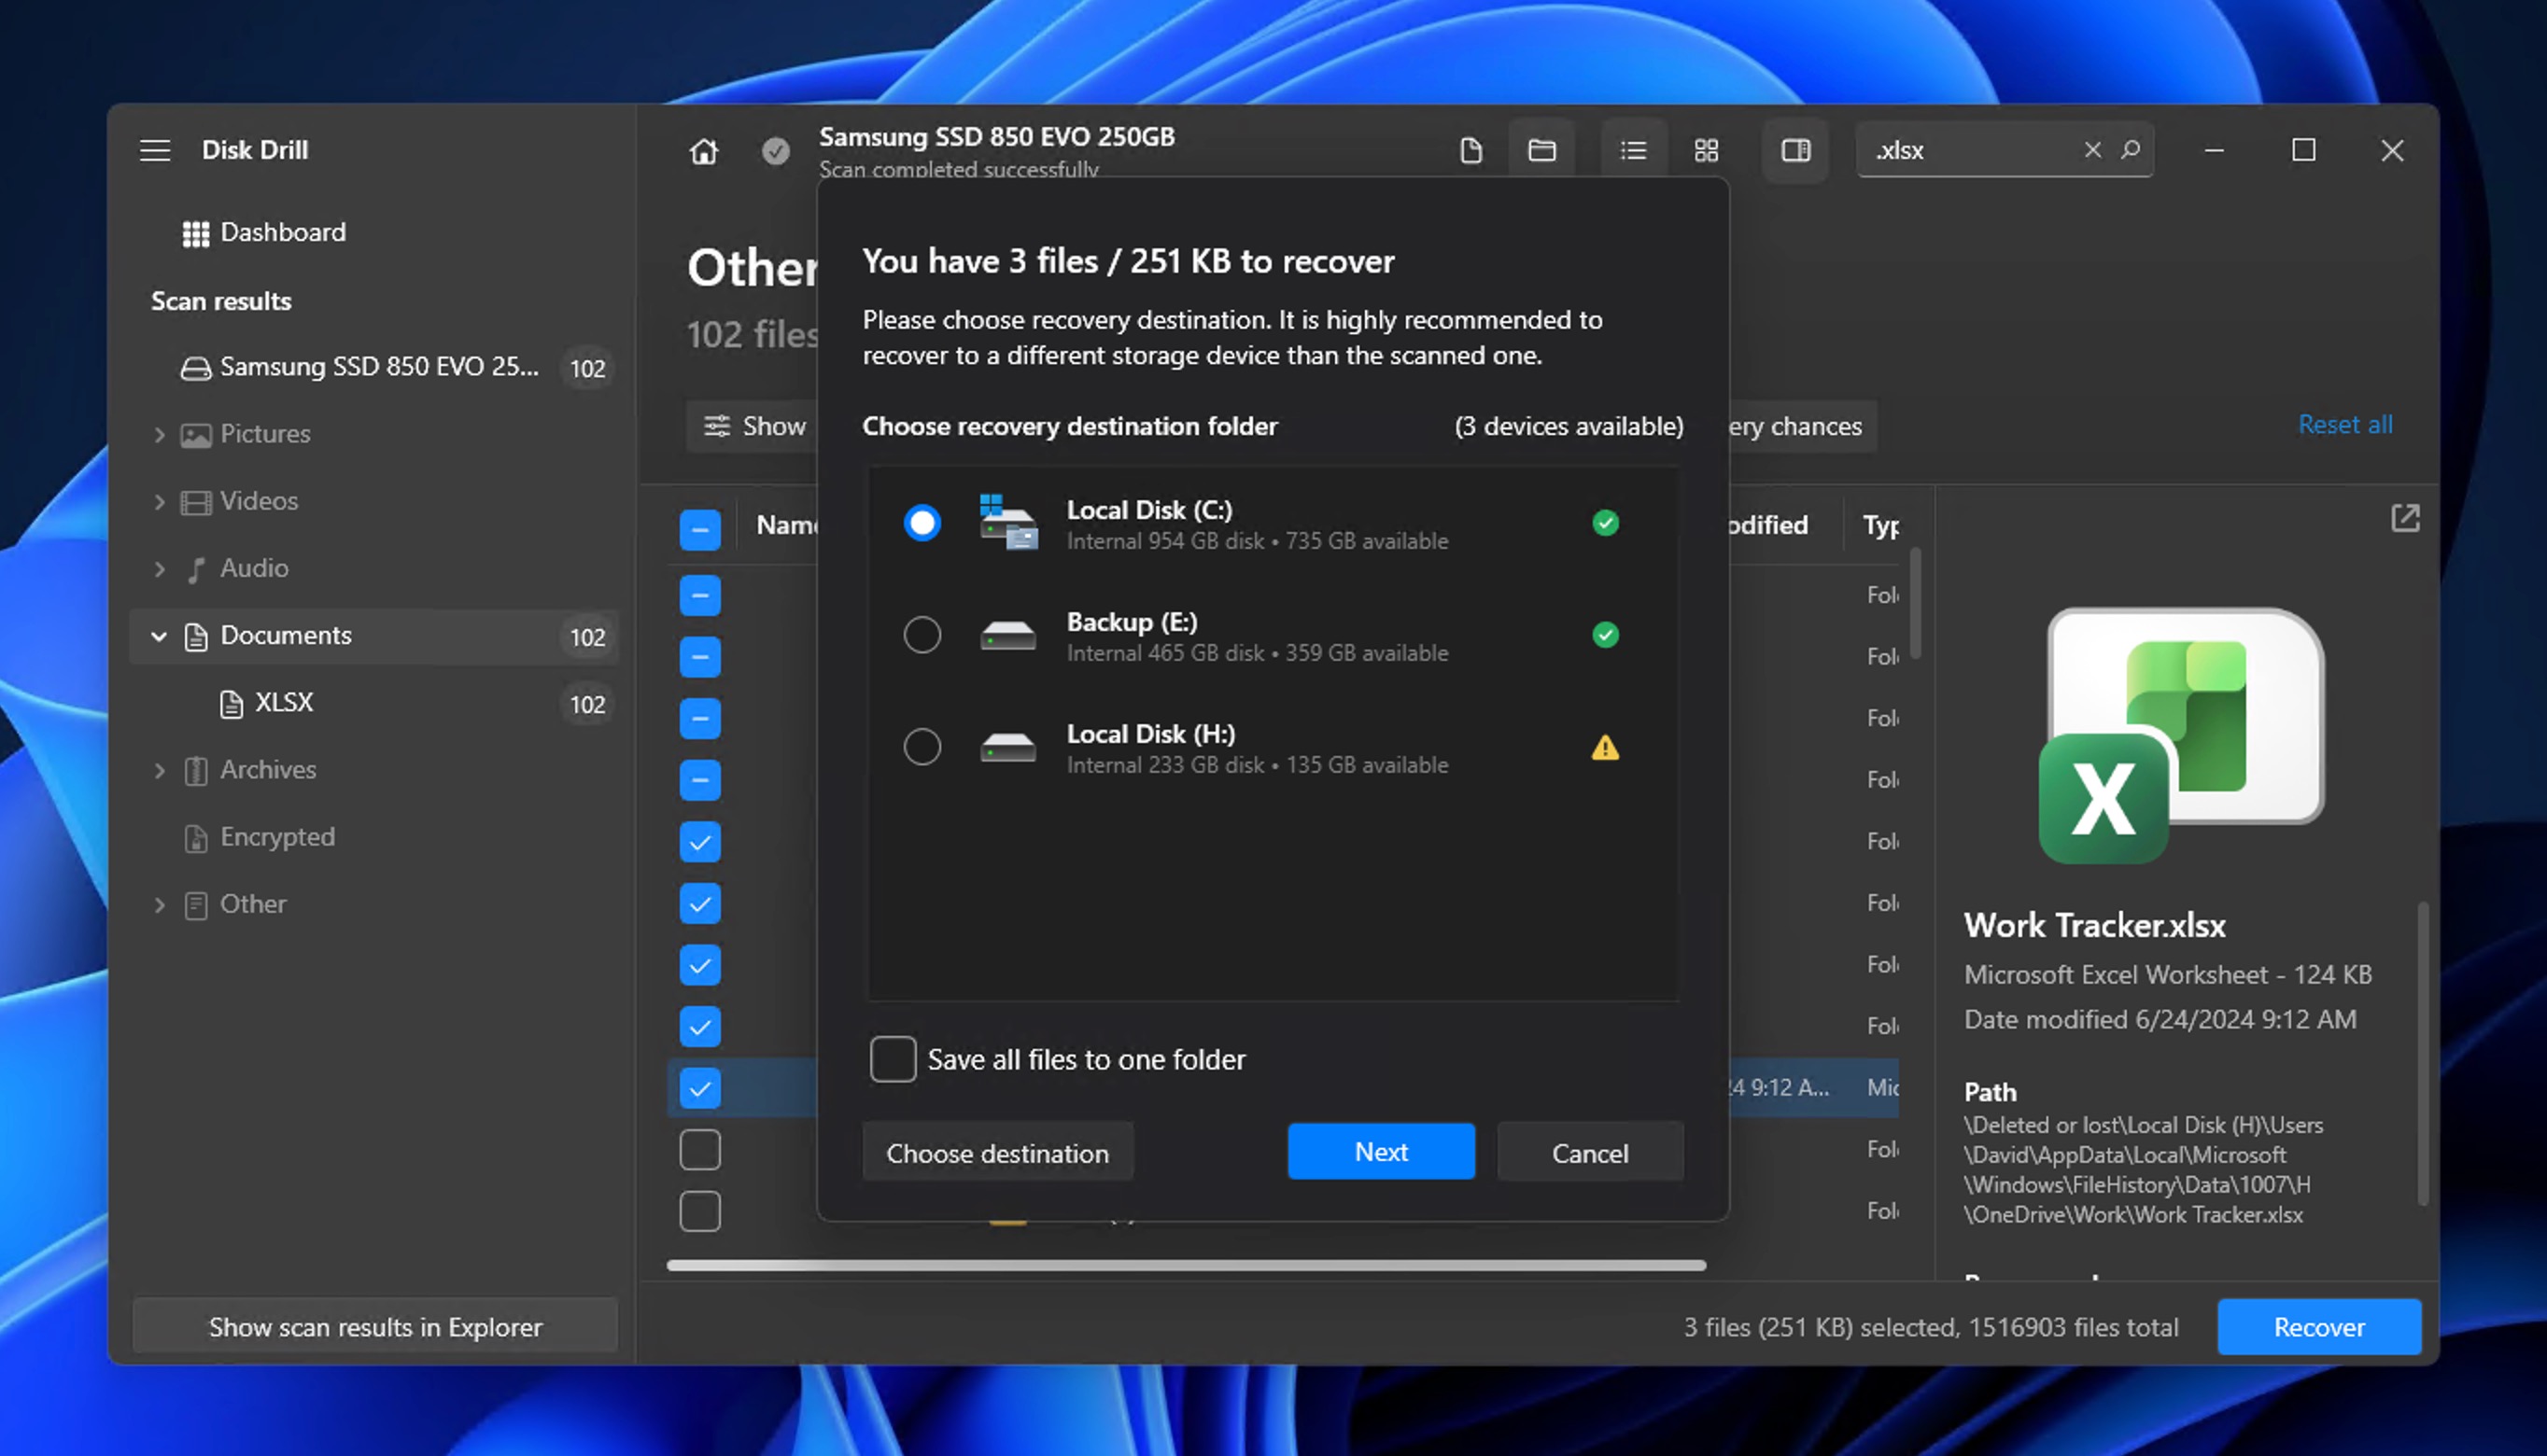
The beauty of Disk Drill lies in its simplicity. Even though it can recover around 400 file formats from virtually all storage devices that you may ever come across, all you have to do to retrieve deleted Excel files with Disk Drill is press a single button.
Along with a simple UI, the free Windows tier of the Disk Drill data recovery tool gives you up to 100 MB of actual recovery, plus unlimited preview. For Excel, that typically covers a healthy batch of spreadsheets and dozens of CSVs. Even if that’s not all, it’s enough before you consider upgrading to Pro.
How to Recover an Unsaved Excel File
This section covers situations where your Excel file isn’t saved properly because Excel closed on its own, crashed, the computer shut down, or you clicked away from a workbook before saving. If the file never reached the disk, ordinary recovery tools can’t help, but Excel and OneDrive both keep temporary copies that often can. Here’s how to recover an unsaved Excel file.
Method 1: Use Excel’s Recover Unsaved Workbooks option
Microsoft Excel for Windows 11/10/8/7/XP and Mac does everything it can to save your work at regular intervals. This method is especially useful when your computer crashes because of RAM shortage or an abrupt power disruption.
By default, Excel displays the AutoRecover file automatically when you reopen the application. If it doesn’t, check for the file manually using the steps below:
- Reopen Excel and check the Document Recovery pane for the workbook you were working on.
- If it doesn’t appear, go to File > Info > Manage Workbook > Recover Unsaved Workbooks in Excel for Windows. On Mac, check Excel’s AutoRecovery folder.
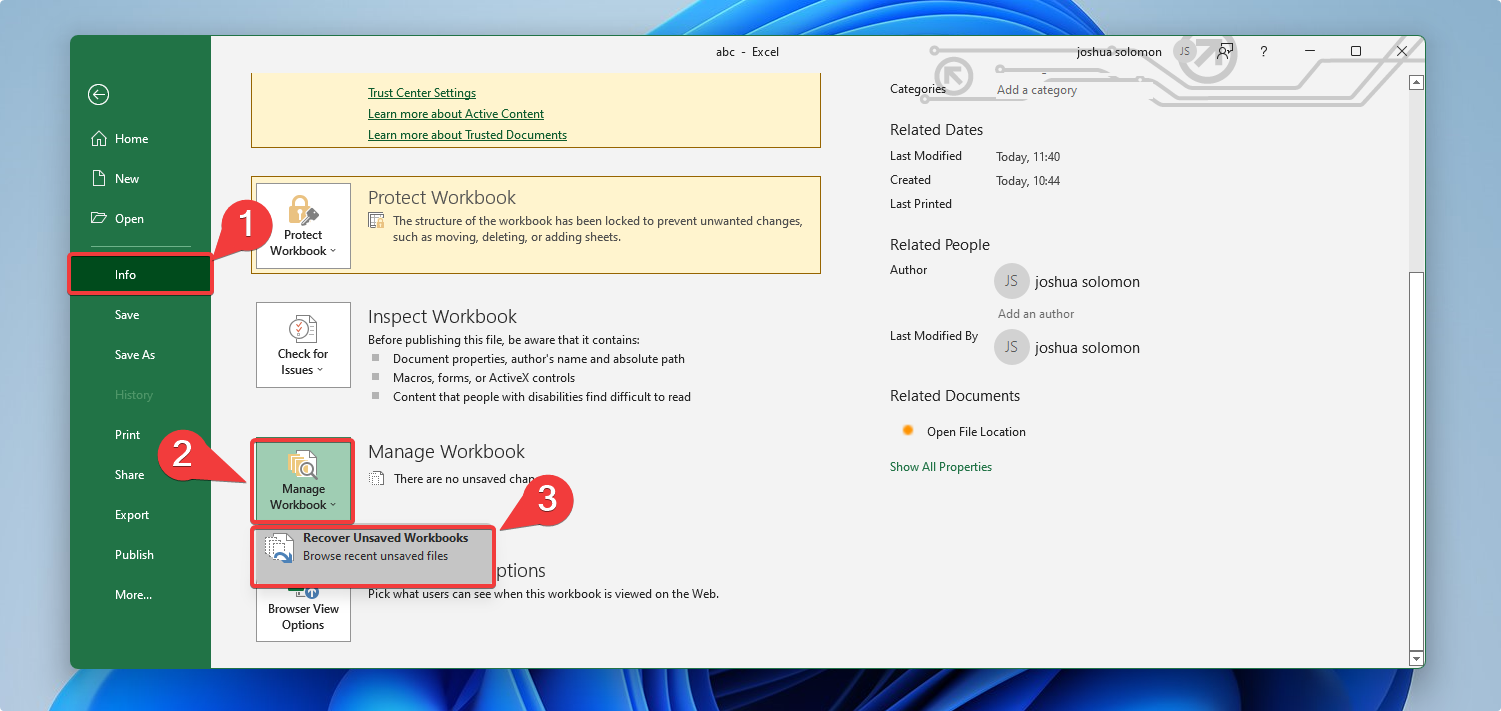
- In the dialog that opens, select the unsaved file, click Open, then Save As straight away so you don’t lose it again.
Just keep in mind that Excel may not be able to recover the most recent version of your XLSX and XLS files simply because it’s not possible to recover an Excel file not saved on your hard drive.
To make it more likely for you to successfully recover Excel spreadsheets, go to File > Options > Save and activate the AutoRecover feature. By default, it should be set to 10 minutes, but you can change it to 1 minute, which means that Excel will automatically save your progress every single minute.

Method 2: Check OneDrive/SharePoint
If your workbook lived in OneDrive, OneDrive for Business, or SharePoint with AutoSave turned on, a copy of your work is in the cloud even after the local session is gone. AutoSave records your changes every few seconds, so the latest version is usually waiting for you online.
- Sign in to onedrive.live.com, or open your organization’s SharePoint site in a web browser.
- Open the folder where the workbook was stored and look for the file.
- To step back to an earlier state, right-click the file, choose Version history, then open and restore the version you want.
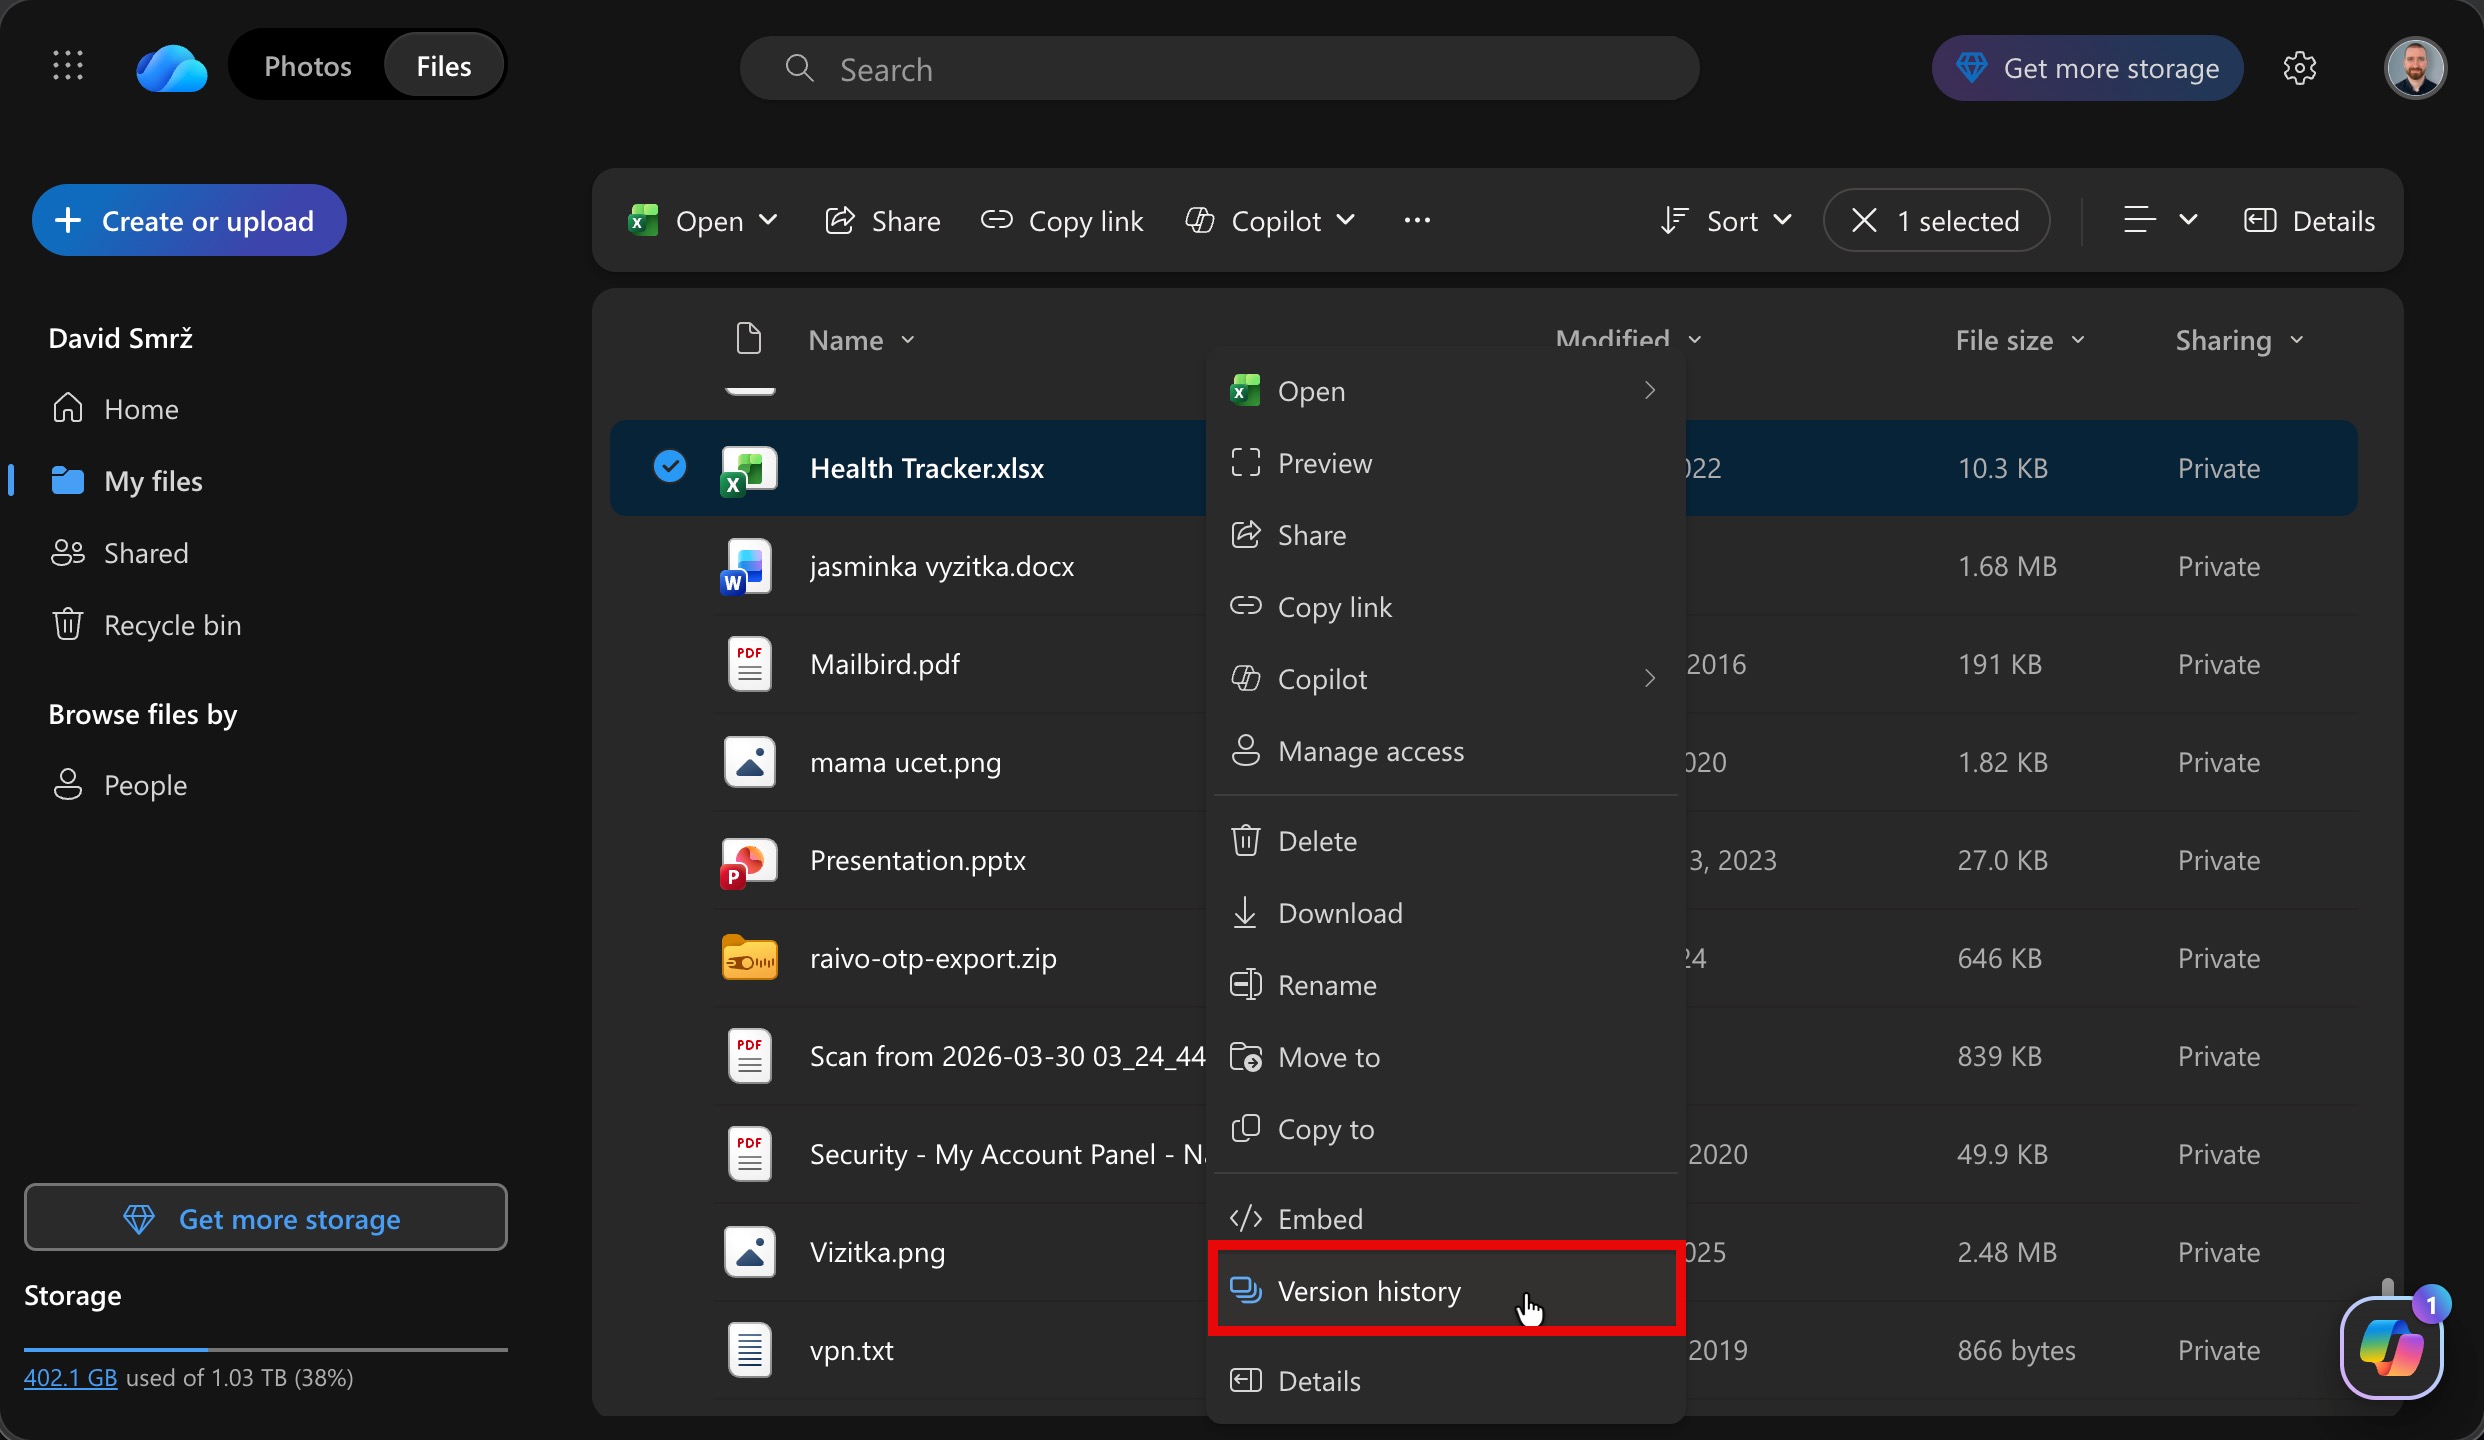
Because of how useful and straightforward the AutoSave feature is, we recommend you leave it switched on (the toggle is in the top-left corner of Excel) whenever possible. Alternatively, keep your workbook in a synced folder from Google Drive, Dropbox, or iCloud Drive. They don’t enable Excel’s AutoSave, but each manual save (Ctrl + S) uploads a new copy you can roll back to from the service’s version history on the web.
How to Recover an Excel File That Was Saved Over
Saving over the wrong Excel file is a common and painful slip, and Microsoft users ask about it all the time (see this Microsoft Tech Community thread). The good part is that Windows and the cloud both sometimes store older versions of your files, so there’s potentially a way to recover an Excel file saved over by mistake.
Method 1: Use Previous Versions in File History
Previous Versions is the main local Windows option for getting back an Excel file you saved over, and it works nicely for recovering old Excel files in general. It relies on File History and System Protection, so it only helps if one of those was already running before the overwrite. When it’s on, Windows keeps dated snapshots you can restore in a couple of clicks.
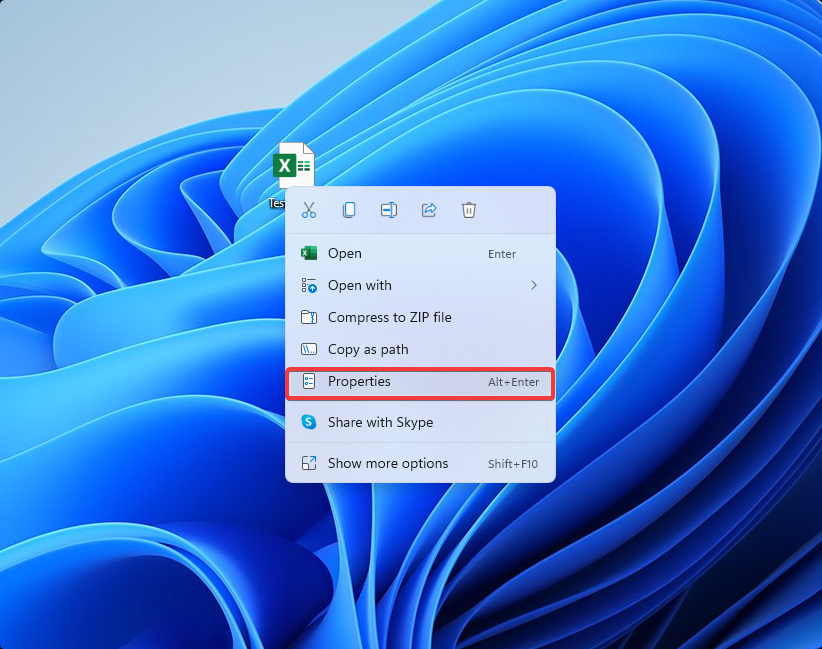
- Right-click on the overwritten Excel file and go to Properties.
- Now head over to the Previous Versions tab.
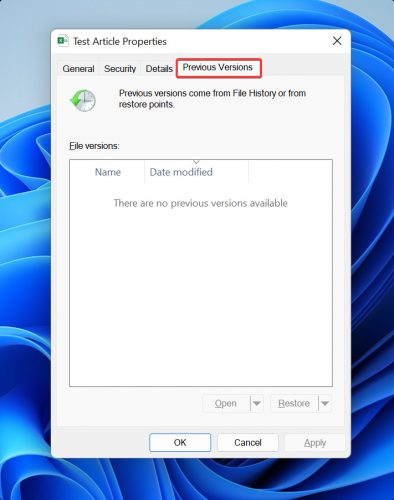
- Select the desired version and hit Restore. To keep the current file too, click Open first, look the older version over, then use Save As to store it under a new name.
Method 2: Use OneDrive Version History
If your Excel file lives in OneDrive, then the cloud service maintains multiple versions you can roll back to, even after you’ve written over your data. OneDrive keeps this history on its own for files in your OneDrive or OneDrive for Business folder, which makes it one of the most reliable ways to undo an overwrite.
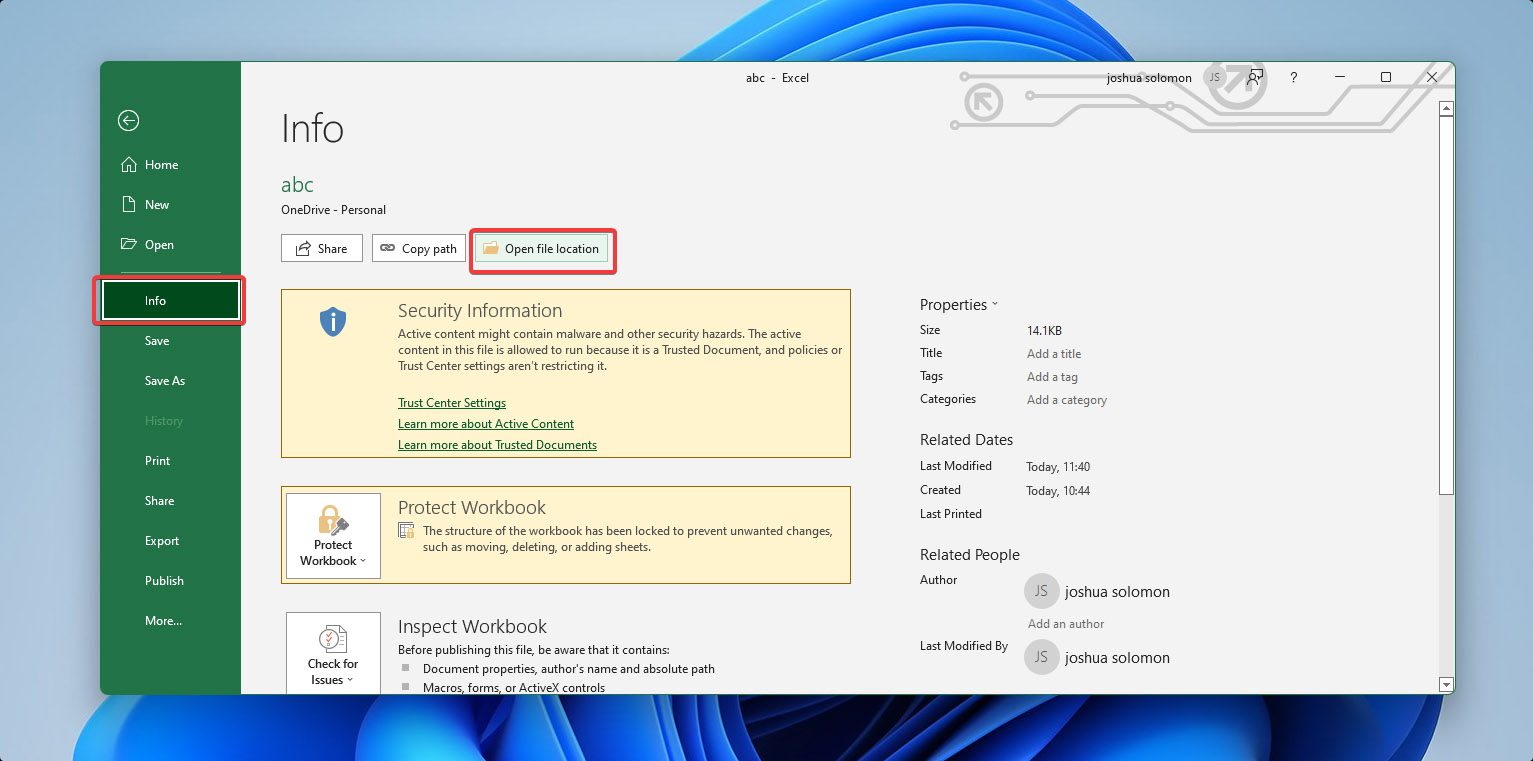
- In Excel, go to File > Info > Open File Location to open the file’s OneDrive folder.
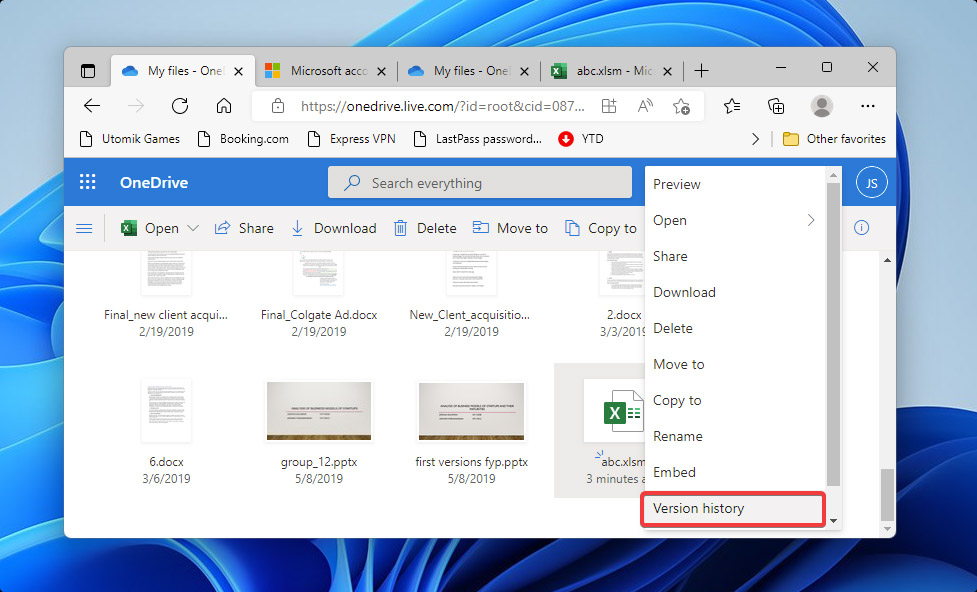
- Right-click the file and choose Version history. You can also open the file in OneDrive on the web, then use the … menu > Version history.
- Look through the earlier versions, open the one you want, and save it. Restoring a version leaves the others in place, so you can compare a few before you decide.
How to Repair a Corrupted Excel File That Will Not Open
Sometimes the file is right where you left it, but it opens to an error like “Excel cannot open the file” or “The file format or extension is not valid,” or it won’t open at all. A common cause of issues with Excel files not opening is corruption, so the fix is to repair the damaged files.
Method 1: Use Excel’s Open and Repair
Open and Repair is a tool created to fix a lot of damaged workbooks, and it’s built into Excel, so there’s nothing for you to download or install.
To be extra safe when repairing your corrupted Excel file, we recommend you create a copy of it and work on it instead of the original.
- Open Excel and go to File > Open > Browse.
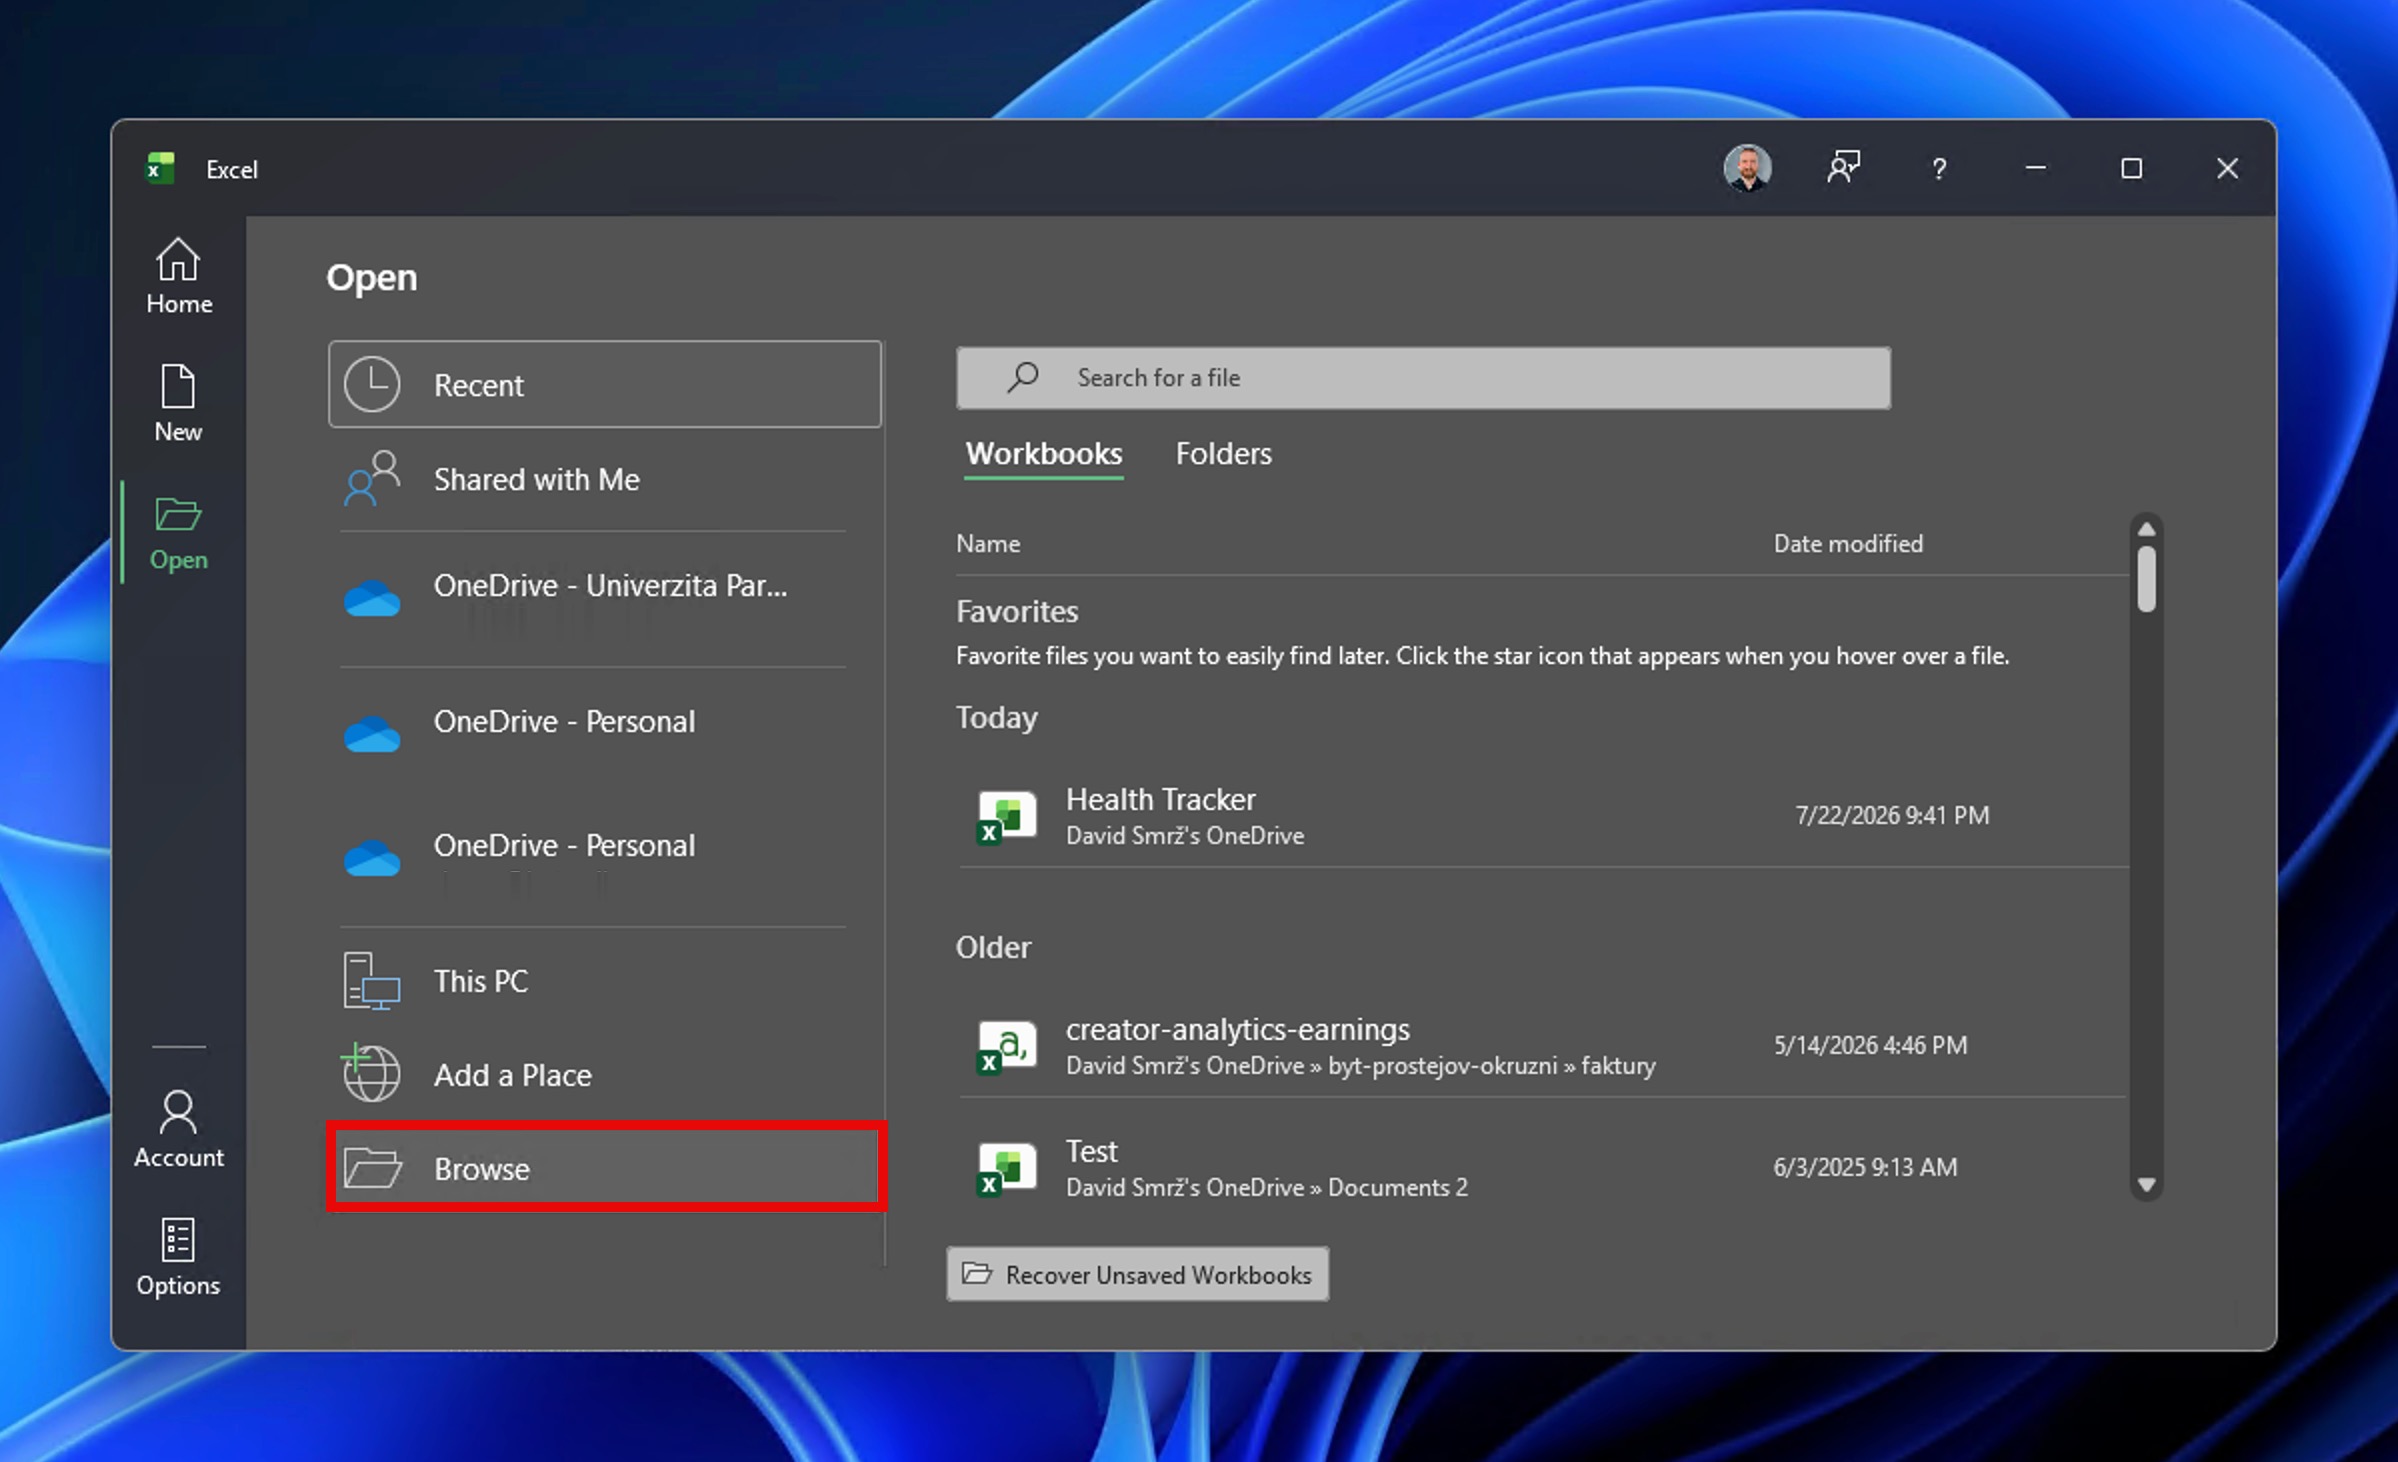
- Click the corrupted file once to select it. Don’t double-click it.
- Click the small arrow next to Open, then choose Open and Repair.
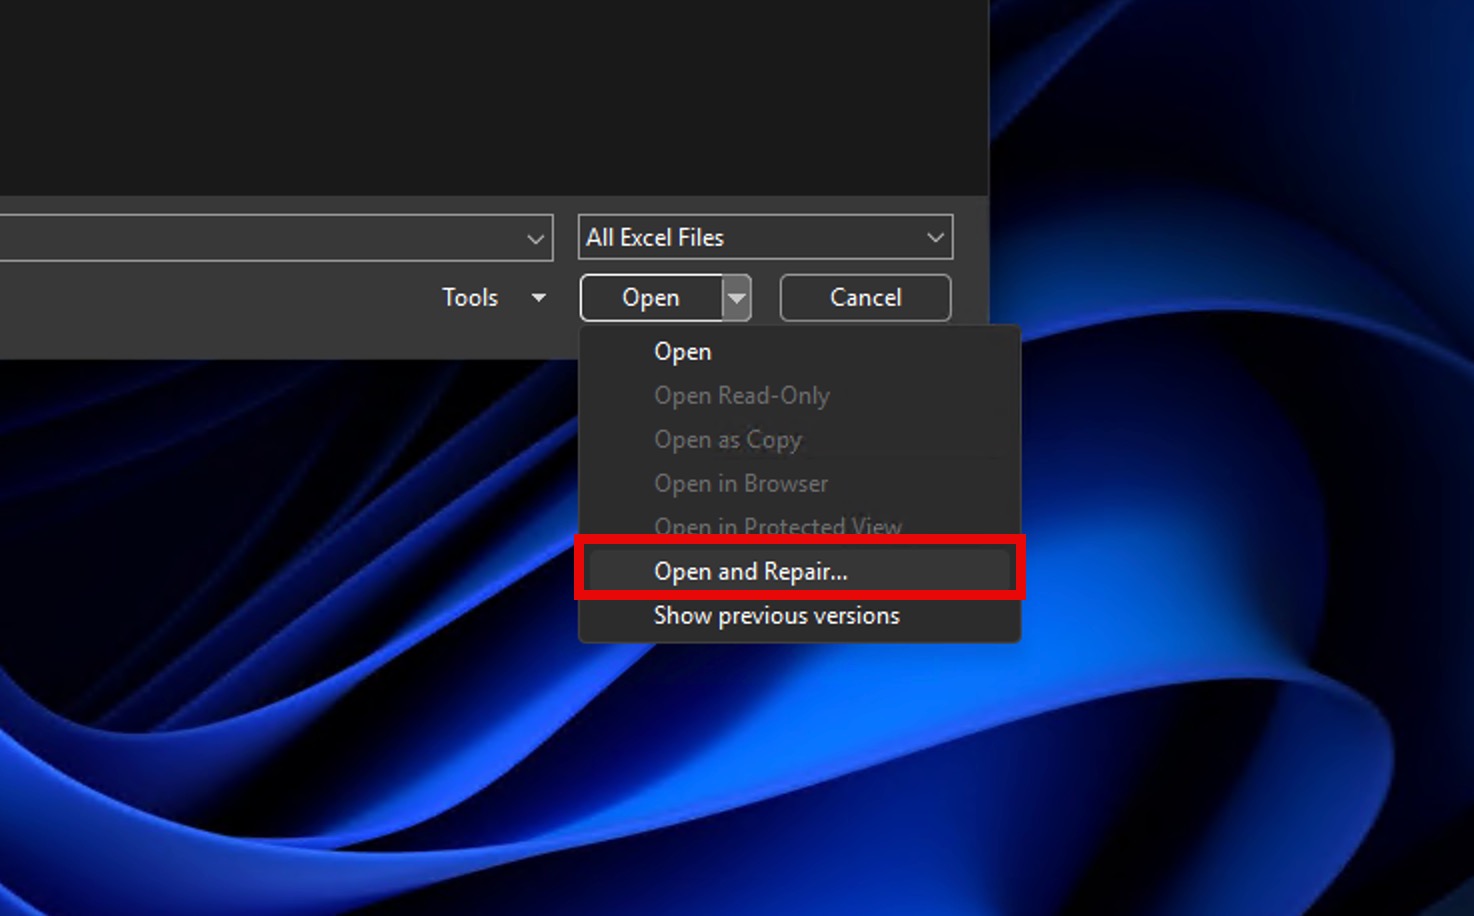
- Choose Repair to recover as much of the workbook as Excel can. If Repair won’t open it, run it again and choose Extract Data to pull out the values and formulas instead.
If Excel still refuses to open the file, go to File > Options > Formulas and select Manual under Workbook Calculation first, so it doesn’t try to recalculate a broken sheet while opening.
Method 2: Restore an Earlier Version
If Open and Repair can’t save the file, a clean copy from before the corruption may still exist. Use Previous Versions in File History or OneDrive Version History, both covered above, to roll back to a version that still opens.
Conclusion
So which method should you use? It comes down to how the file went missing. For a deleted or lost Excel file (the most common case by far), recovery software like Disk Drill is usually the quickest route. You just need to point the software at the drive or storage device that held the file, run a scan, and save the recovered copy somewhere safe (a different drive is best).
For the other situations, match the fix to the cause:
- File History or Previous Versions for files that were backed up before they were deleted or saved over.
- Excel’s Recover Unsaved Workbooks option for a workbook you closed without saving.
- OneDrive or SharePoint Version History for files synced to the cloud.
- Excel’s Open and Repair for a file that opens to an error or won’t open at all.
Whatever went wrong, the sooner you stop using the affected drive, the better your odds. When there’s no backup to lean on, Disk Drill is still our pick for Windows and Mac. It handles around 400 file formats, Excel files among them.
Read also:
- Recover Deleted Files in Windows 10 With/Without Software
- Best Ways to Recover Deleted Files on Windows 11
FAQ
Usually, you can recover it from the Recycle Bin, from a File History or cloud backup, or with recovery software. The two main threats that can prevent you from retrieving your Excel file are new data and TRIM. Saving new files to the same drive can put them right on the space your deleted file used to hold, overwriting it for good. And on an SSD, the TRIM command clears deleted data on its own, often within minutes, which leaves nothing to recover. Both are why you should stop using the drive the moment you notice the file is gone.
That depends on how you deleted them. Delete a file the normal way from an internal Windows drive and it drops into the Recycle Bin, where it waits until you empty it. From there, you can restore your XLSX or XLS in a click. Delete it with Shift + Delete, or remove it from a USB stick, SD card, or network share, and it skips the Recycle Bin. To recover files that don’t end up in the Recycle Bin, you’ll need a backup or recovery software like Disk Drill.
If File History was on, open File Explorer, go to the folder that held the file, right-click the folder, and select Show more options > Restore previous versions. Choose a version from before the file was deleted and click Restore. If File History was off, that method can’t help, so use recovery software like Disk Drill instead to scan the drive for permanently deleted XLSX and XLS files that haven’t been overwritten yet.
You can check the Recycle Bin or your backups. Open the Recycle Bin, find your file, and click Restore, or just drag it into a folder. If it’s not there, right-click the folder that held the file and select Show more options > Restore previous versions, or look in your cloud storage’s version history.
If File History or Previous Versions was running, the older copy could still be available. Right-click the folder that held the file, open Properties, and switch to the Previous Versions tab. Pick the version by its date and click Restore. If you’ve kept the file in OneDrive instead, then open it in your web browser and find the Excel file you want to restore. Right-click it, choose Version history, and open and save an earlier copy from the cloud.
Previous Versions only show copies if Windows Backup, File History, or another compatible backup source was already running when the file was lost. With none active, you’ll need to rely on another backup or third-party recovery software. To have versions on hand next time, switch File History on through Control Panel > System and Security > File History.
