


Did you accidentally delete an important file or folder that was too big for the Recycle Bin? If so, you’ll no longer be able to find them in File Explorer, and you can’t restore them as you normally would.
This special folder has a lot of unexpected behaviors, which we’ve covered in several different articles. In this guide, we specifically address deleted files that skipped the Recycle Bin due to their size, how to restore the lost data, and how to avoid the same situation next time.
Why Windows Says ‘This File Is Too Big to Recycle’?
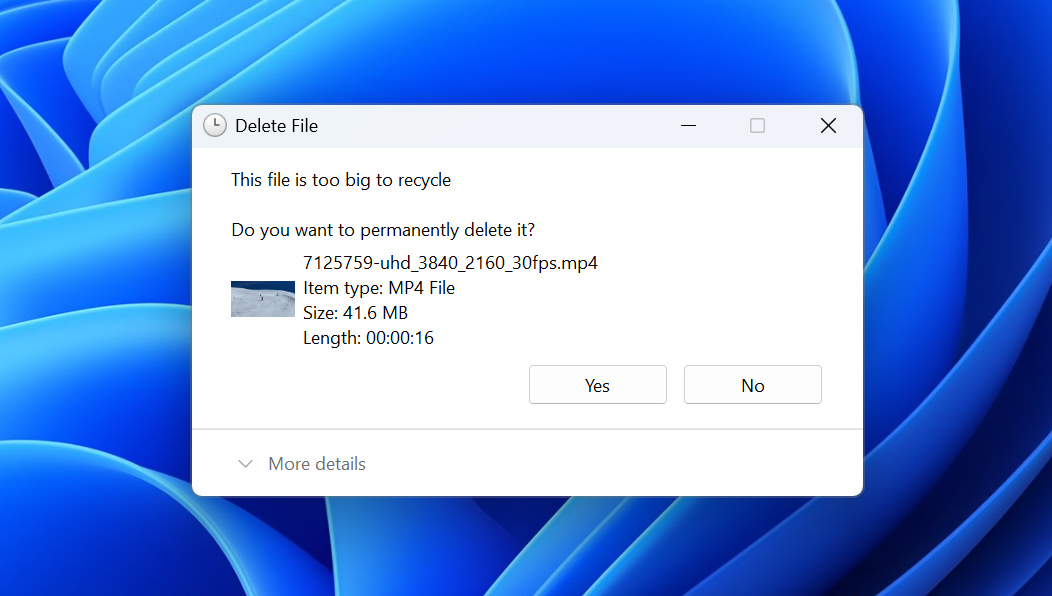
The default behavior of Windows when deleting files is to send them to the Recycle Bin, which gives you another chance to restore them (or choose to delete them permanently). However, the Recycle Bin can’t store unlimited files–in fact, it has a limited capacity.
The warning, “This file is too big to recycle” (or “This folder is too big to recycle”), means that the file you’re trying to delete is bigger than the Recycle Bin’s capacity to store it. You’ll encounter this warning when deleting large amounts of data at once, such as game folders, media projects, RAW files, etc. The problem is that the warning also has a prompt that asks you to permanently delete the file instead–unfortunately, many users make that mistake.
Here’s a brief list of other lesser-known behaviors of Windows’ Recycle Bin that you might have encountered while cleaning up your files:
- Each drive has its own Recycle Bin. Windows creates a Recycle Bin folder for each storage device on your PC with different storage limits, depending on the total capacity of the drive. Files that you can safely delete on your system drive might be too big for the Recycle Bin of a smaller disk.
- You can adjust the size limit of each drive’s Recycle Bin. You can change your “main” Recycle Bin’s size, as well as those on different drives.
- Files deleted from external storage devices, such as USB drives, SD cards, and network locations, can bypass the Recycle Bin entirely.
- Recovering deleted files from HDDs is easier than from SSDs. Files that are permanently deleted from HDDs typically leave their physical data behind on the disk until it gets overwritten by new data. SSDs, on the other hand, have a feature called TRIM that results in more immediate erasure. When TRIM strikes, recovery chances are much lower–but not always impossible, so it’s still worth a try.
How to Recover Large Permanently Deleted Files
For most cases, data recovery software is the best immediate solution to recover deleted files too big for the Recycle Bin (unless you have backups). It can scan the physical location on your drive where the files previously existed; if data is found, it gets extracted to a safe location.
To demonstrate how this works, we’ll be using an app called Disk Drill. Specifically, one of its main capabilities is recovering recently deleted files, including data from an emptied Recycle Bin or files that were too large to be placed in it. It also supports hundreds of file types, including most known formats of photos, videos, documents, archives, and project files.
It’s also very easy to use for beginners and has some of the best file browsing features of this kind of software. You can filter file types and sort scan results, search for specific files, folders, and file extensions, and, most importantly, you can preview the contents of any found file (including videos) to confirm that it’s recoverable and still works.
Here’s how to recover large, permanently deleted files using Disk Drill:
- Connect a different storage device to your PC to save the recovered files.
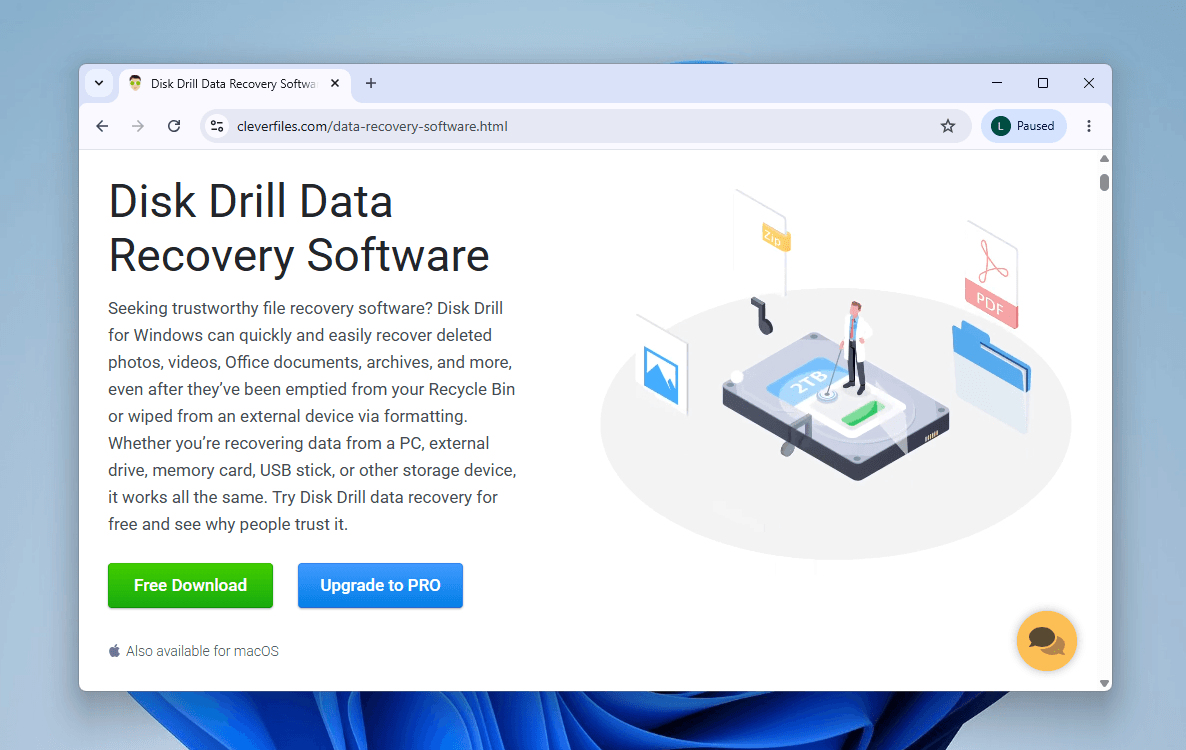
- Download Disk Drill. If you’re scanning your system drive, we recommend downloading and installing the app on the drive you connected in step 1 to prevent any deleted files from getting overwritten. We’ll show you how to do it in the next steps.
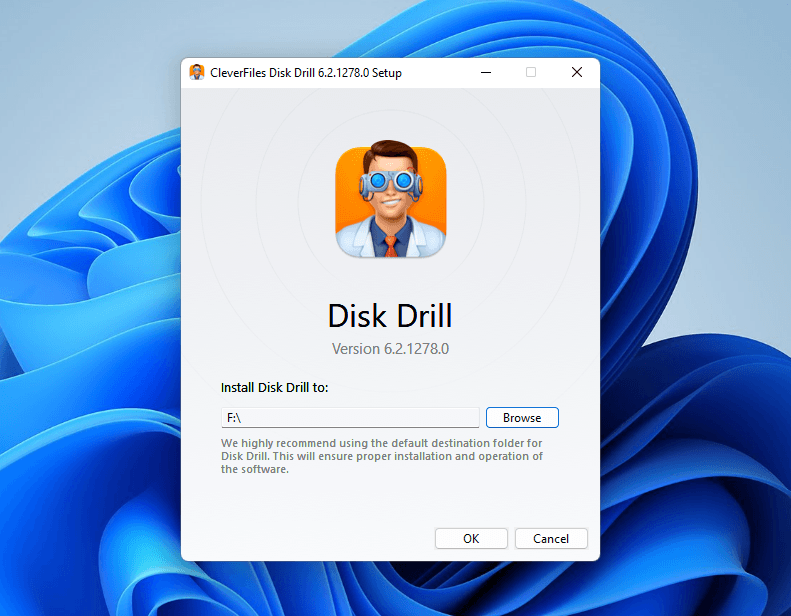
- Open the installer file and click Options. Then, click Browse to set the installation path to the drive you connected in step 1.
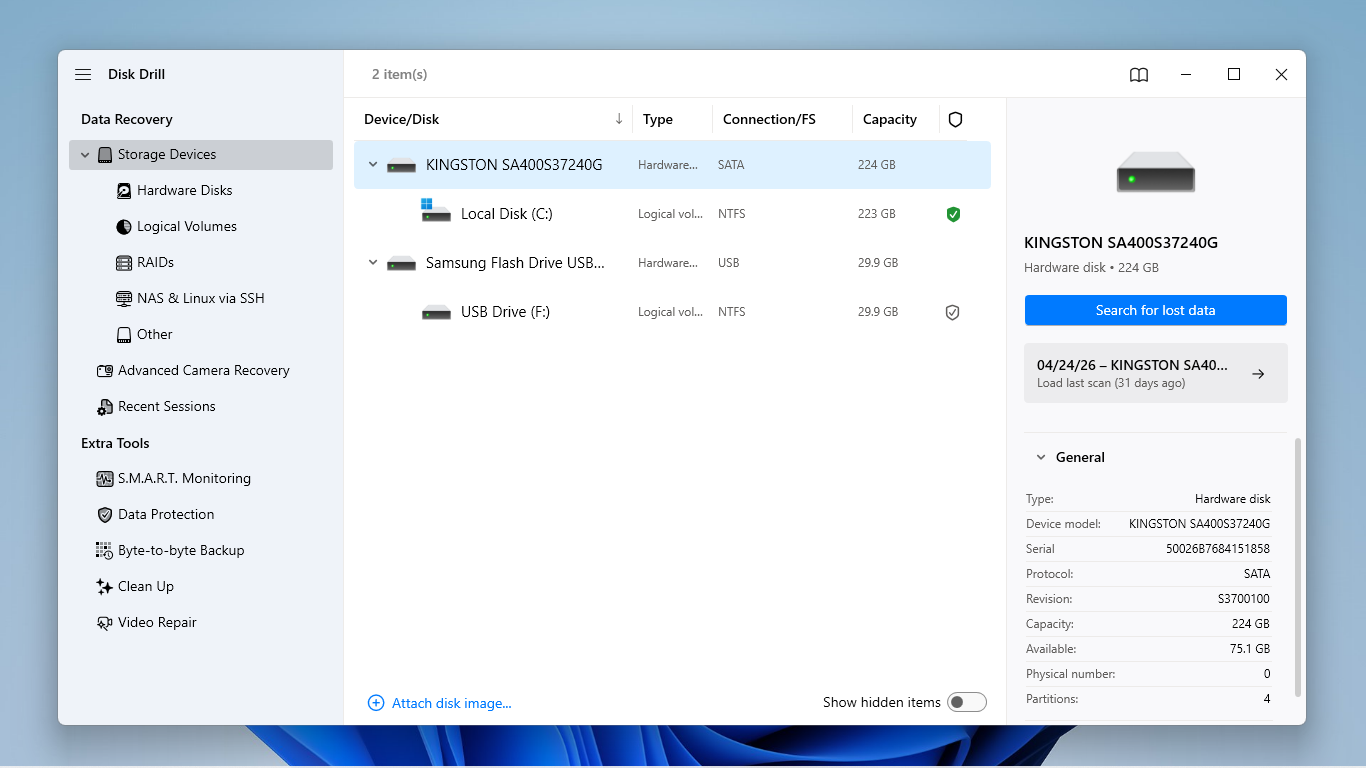
- Once installed, run Disk Drill. In the main recovery menu, select the drive that stored your files before you deleted them. Then, click Search for lost data.
- Wait for a dialog box that says the scan is complete. Then, click Review found items.
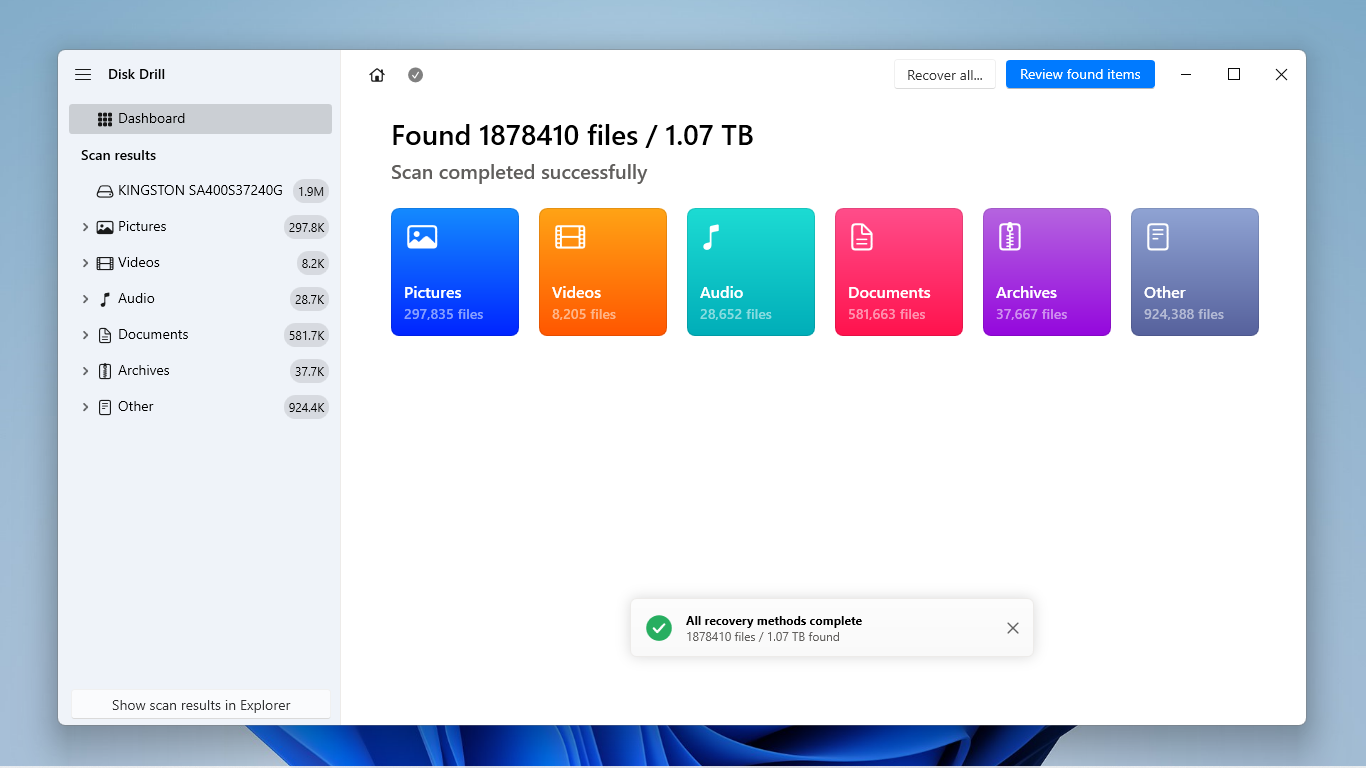
- Expand the Deleted or lost section first, as it keeps the original folder structure of the scanned drive. If your files aren’t there, check the Reconstructed section next. You can use the filters in the left sidebar and the search bar in the top right corner to help you find your files more easily.
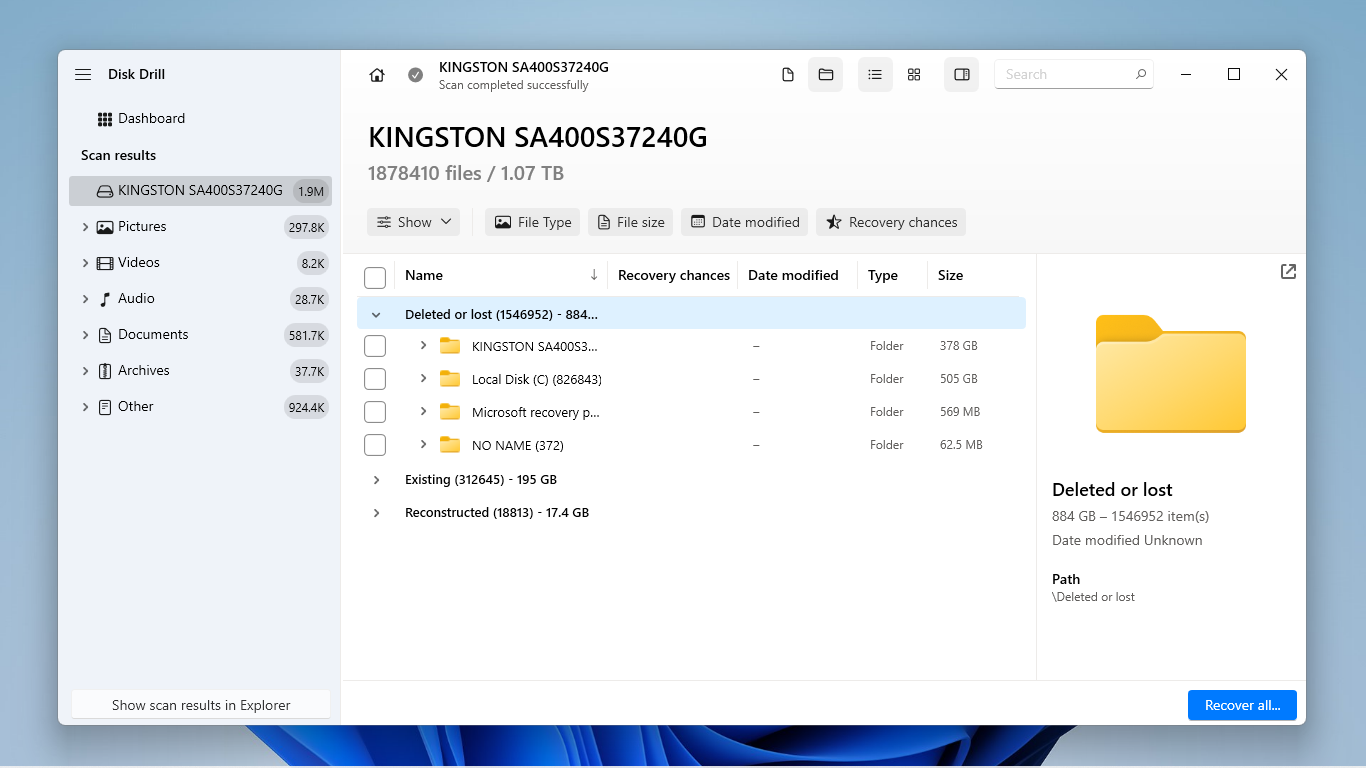
- Once you locate your deleted files, click on each of them once to preview their contents. This allows you to discern which files are actually recoverable. Then, select the files you want to restore and click the Recover button.
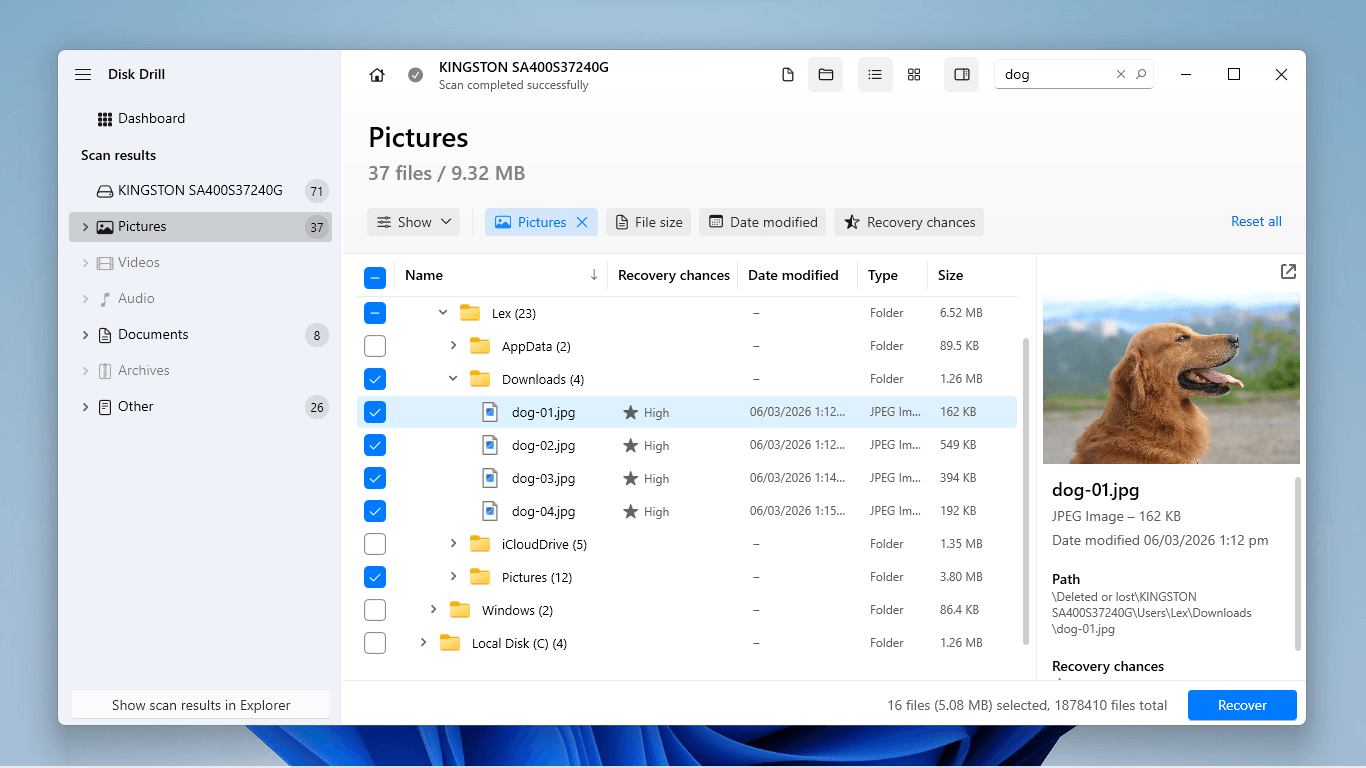
- Select a folder for Disk Drill to save the recovered files. Make sure to choose a location on a different drive than the one you scanned (e.g., if you scanned your system drive, save the files to the drive you connected in step 1). Finally, click Next.
Other Ways to Recover Files Too Large for the Recycle Bin
Aside from data recovery software, there are other methods you can try to recover files too large for the Recycle Bin. But they rely on backups, which are only useful if you created them before the files were deleted.
That said, in case you set up File History some time ago, you may have an older version of your files that you can restore. We’ll show you 2 ways to access them, and you can choose which one best suits your needs.
Method 1: Restore from File History
If you want to pick and choose which deleted files you want to restore from your backup, we recommend using File History’s interface. It has its own graphical file explorer that lets you view the contents of the folder you want to revert.
For example, if your files were last stored on your Desktop before they were deleted, you can use File History to view a previous version of your Desktop folder. Your files should reappear, and you can restore the ones you want to your computer.
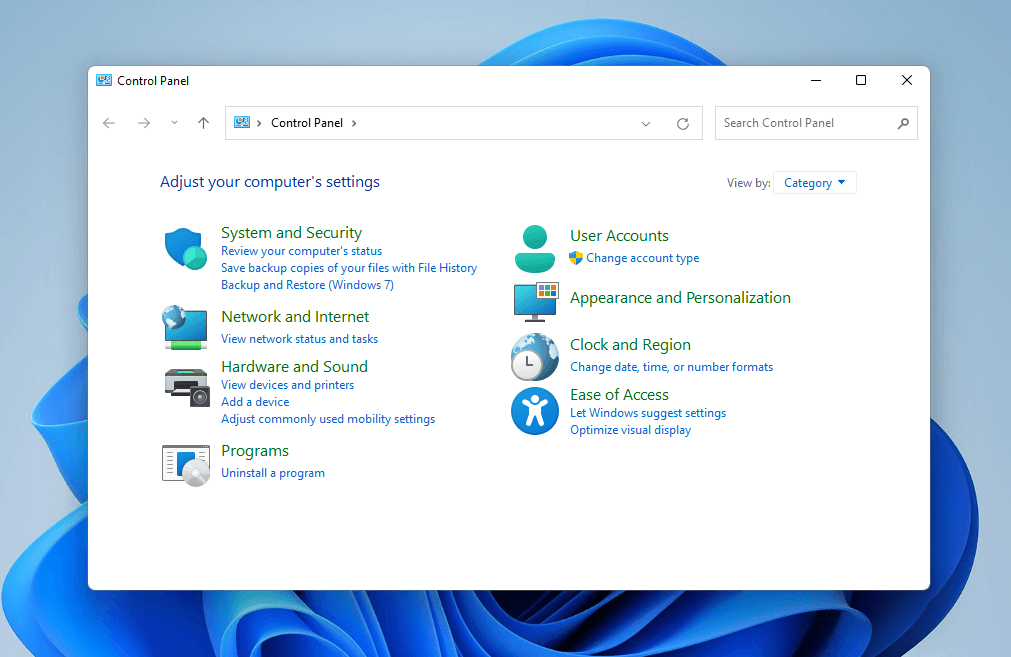
- Open Control Panel.
- Click System and Security.
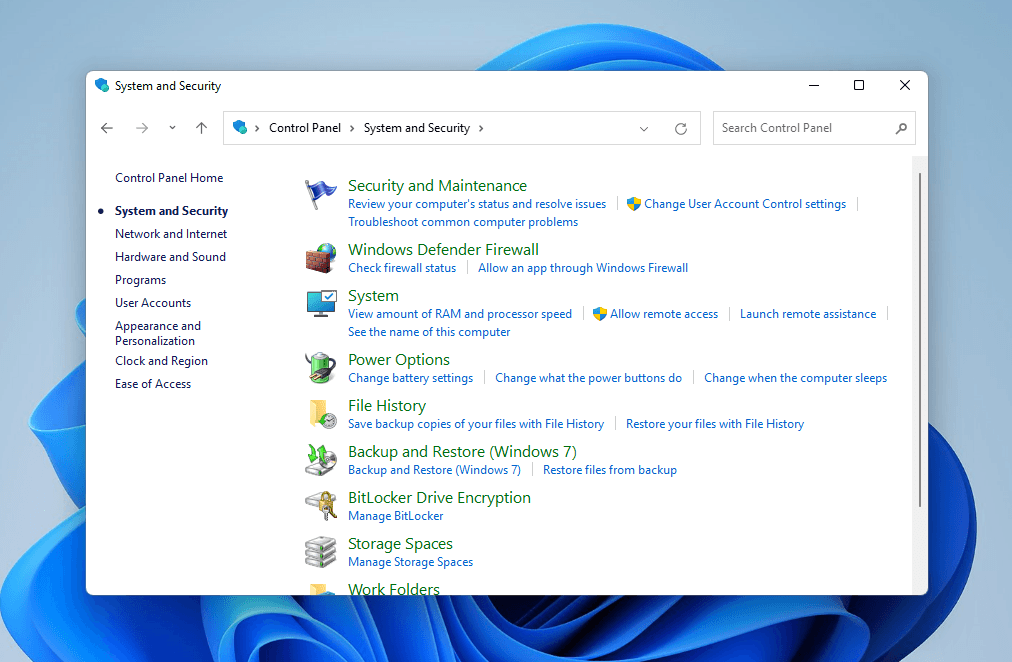
- In the System and Security page, select File History.
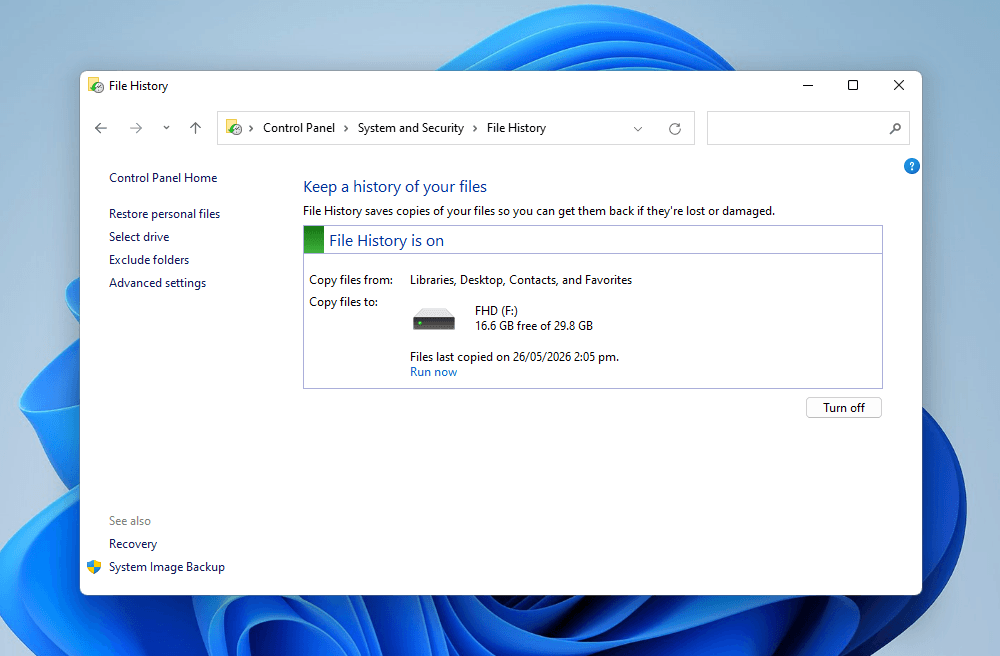
- In the left sidebar, click Restore personal files.
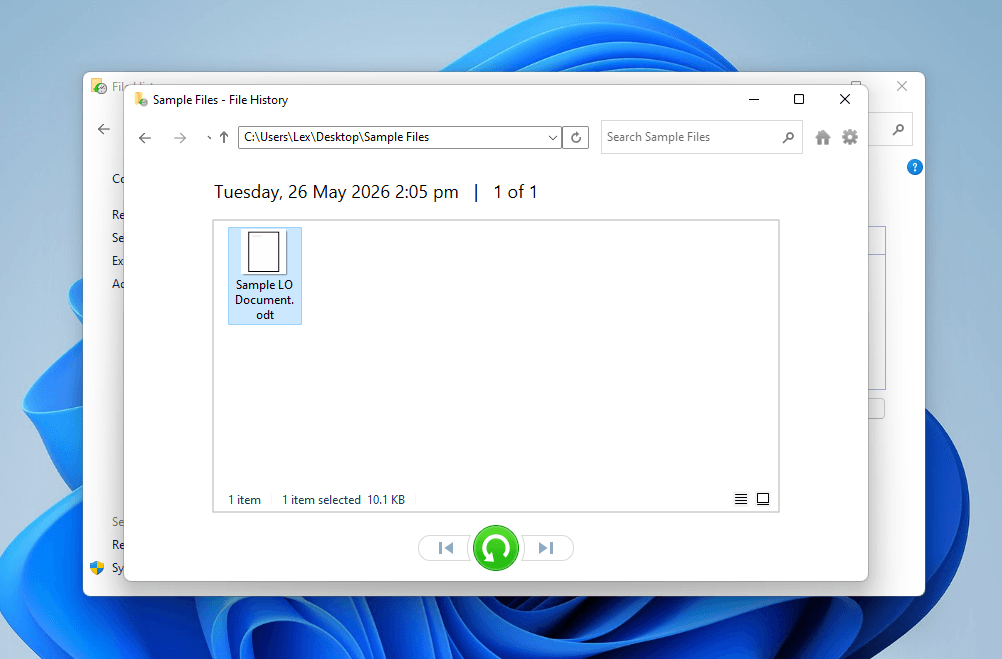
- Navigate to the folder where your deleted files were last stored. Then, at the bottom of the window, use the left and right arrow buttons to view previous iterations of the folder. Once your files appear in the window, select them with your cursor and click the green restore button.
Method 2: Restore from Previous Versions
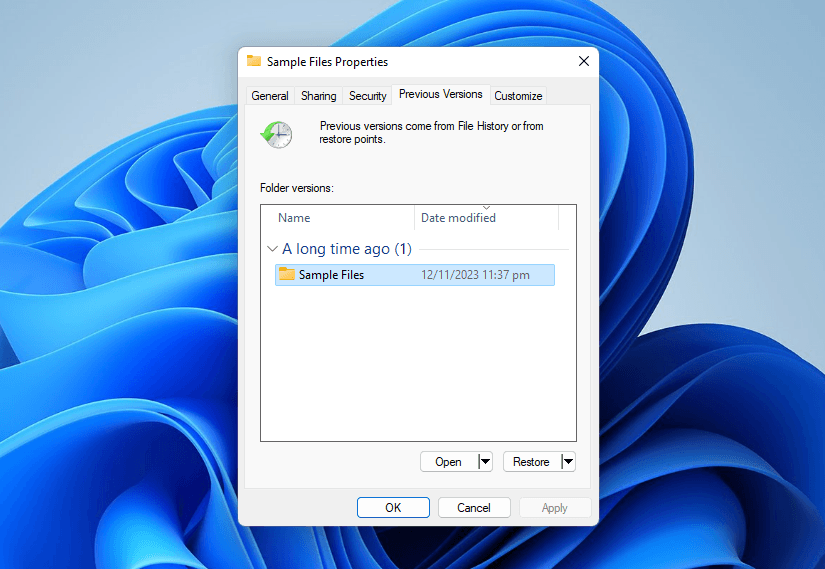
If you want to restore everything you deleted at once, a faster way to access your File History backup is by opening it directly on the folder where your files were last stored (using the right-click menu). Here’s a brief demonstration on how it works:
- Open File Explorer.
- Locate the folder that stored your files before you deleted them. Then, right-click the folder and select Show more options > Restore previous versions from the context menu.
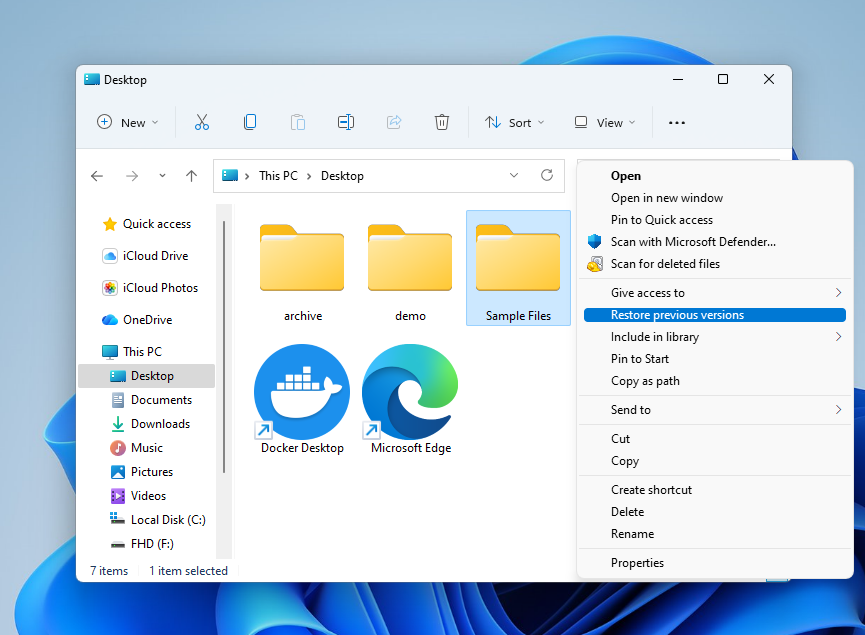
- Navigate to the Previous Versions tab. Then, select a backup with a date and time from before your files were deleted. Finally, click Restore.
Got Your Files Back? Here’s How to Avoid This Next Time
The only thing worse than losing your files is losing them again after getting them back–and this error will probably jumpscare you again in the future, especially if you work with a lot of big files (such as project documents or RAW videos).
Fortunately, there are several things you can do to either decrease the likelihood of it happening or at least limit its collateral damage by setting up a few simple safety nets.
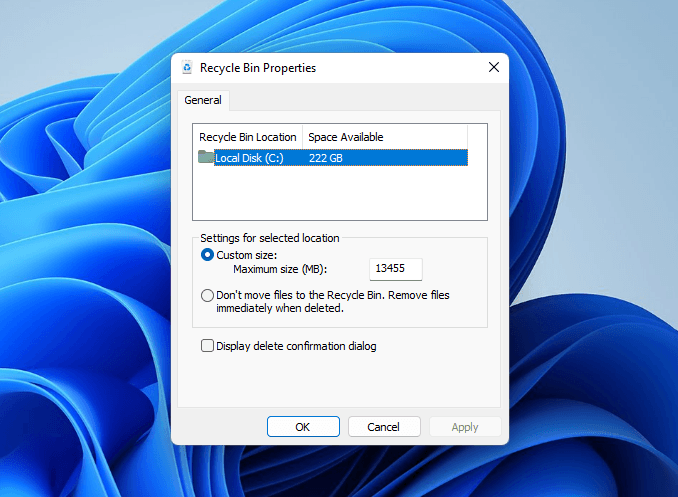
- Tip #1: Increase Recycle Bin’s size limit. Right-click the Recycle Bin icon on your Desktop, then click Properties. Then, select Custom size and type the new limit (in megabytes) in the field beside Maximum size (MB). Don’t forget to click Apply.
- Tip #2: Follow the 3-2-1 backup rule. Have 3 total copies of your most important data: one on your computer (the original files), another copy on an external storage device, and one more copy on an off-site location (e.g., cloud backup or another storage device in a friend or relative’s house. You have several built-in options, like File History and Backup and Restore (Windows 7), as well as free third-party tools like Veeam Agent and Teracopy. Some data recovery tools, like Disk Drill, also have built-in recovery features.
- Tip #3: Create your own “temp” folder. If you have to process a lot of large data daily (e.g., video clips, RAW images, etc.), consider making your own temporary folder as a “holding location” for your files. Instead of deleting files immediately, save them to your temp folder; only delete them after reviewing the folder at the end of each day.
Conclusion
Here’s a quick summary of the most important advice from this guide, so you have an easy reference to come back to:
- Backups like File History and its previous versions feature give you the best guarantee of recovery, but the backup needs to have been created before you deleted your files.
- No backups? Data recovery software is your strongest option, as long as the deleted files weren’t wiped out by TRIM (on SSDs). Disk Drill is beginner-friendly and lets you recover up to 100 MB of data for free (covered in the recovery section).
- While we didn’t mention them in the guide because of their cost, professional data recovery services are another option; if you have more money than time for this task (or the missing files are critical to your personal life or place of work), you can ask specialists to recover your data for you.
FAQ
Yes, you can restore the files that skipped the Recycle Bin without using software, but the only method available to you is backup recovery. However, this requires that: (1) you created a backup before the files were deleted, and (2) the files you want to recover were included in the backup. Most backups only include pre-selected files and folders–not everything on your PC.
If you don’t have another drive for recovery software, and you need to restore data from your system drive, you have 4 options:
- Option 1: Postpone recovery until you acquire another drive (but you can’t use your system drive in the meantime).
- Option 2: Install data recovery software on another PC or Mac computer, then convert your system drive to an external storage device using an enclosure. This way, you connect the drive to the other PC and scan it as an external drive.
- Option 3: Use a professional data recovery service. It’s less effort, but takes more time and money.
- Option 4: Proceed with installing data recovery software on your system drive and hope for the best; it’s not a guarantee that the data you specifically need to restore gets overwritten.
The Recycle Bin Properties window shows different drives because each drive has its own dedicated “Bin”, and you can adjust their size limits individually. Whenever you double-click the Recycle Bin icon on your computer, you’re simply opening an aggregated view of all the deleted data from all your drives.
There are several possible reasons why you encounter a storage-related file deletion error, even after increasing the Recycle Bin’s maximum storage size:
- Reason 1: The file is larger than the Recycle Bin’s free space. Even if you increased the limit, the existing deleted files may already be consuming too much space to accommodate the large file.
- Reason 2: You increased the Recycle Bin size of a different drive. Recycle Bin’s Properties menu allows you to change storage limits on any drive connected to your PC.
- Reason 3: The Recycle Bin is too cluttered. Even if it technically has available space, Windows may be struggling to index its contents and calculate storage allocation reliably.
