Are you trying to mount the drive or boot your computer, but get the error “Disk structure is corrupted and unreadable”? This means that the file system is damaged; you won’t be able to use it as normal, but its contents (your files) could still be intact.
We’ve analyzed hundreds of user cases over time and recreated this exact problem on our own devices. From that research, here’s the most complete and effective guide on how to fix disk structure errors without losing your data.
Do’s and Don’ts When the Disk Structure is Corrupted and Unreadable
When you encounter the error on your system drive or external hard drive, “the disk structure is corrupted and unreadable” (or “disc structure is corrupted and unreadable”), what you do next matters a lot, especially if you need the files on that drive. Read this section fully before proceeding.
- ❌ Do not format the disk (yet). Formatting wipes everything on your drive; do it after backup or recovery, or if you don’t need your files back (even if your drive asks to be formatted).
- ❌ Do not perform repairs without backing up or recovering your data first. Repairs can also cause data loss indirectly.
- ✔ Do make a disk image. A disk image is a complete copy of your entire disk. In case anything goes wrong during the repair (or even recovery) attempt, your files are safe in the disk image. We show you how to do it as part of our recovery guide.
- ✔ Do mount the drive on another PC or use bootable media if the affected disk is your system drive.
If you want a clearer course of action, we prepared a menu of what you should do next, based on what you need from your drive:
| Scenario | What to do |
| You don’t need to recover any data from the affected disk. | If you only want to fix your drive, and you don’t need any of the data it contains, you can skip the recovery section and jump straight to repairs. |
| You want to recover your data. | If you need to recover the files on your drive, start by backing up and recovering your data before you do anything else. Otherwise, you risk losing your files during the repair attempt itself. Once your data is restored, you can repair your drive. |
| You want to recover your data, but you’re not ready to attempt it yet. | Although we recommend data recovery as soon as possible, you can delay the attempt and create an image backup instead. We show you one way to do it in the recovery section. After backing up your data, you can repair your drive. |
| You’re trying to recover your data, but the software can’t detect your disk. | Check the physical connections of your drive–here’s a quick troubleshooting guide. Once your drive appears (at least in Disk Management), return to this menu. If it still doesn’t, see our dead drive recovery guide. |
Alternatively, you can just follow this guide as it’s written. We designed it based on the safest pathway to resolution for this specific error, assuming that the files on your drive are important to you.
How to Recover Data From a Drive With a Corrupted Structure
If the files on the affected drive are important to you, hard drive data recovery should be your first step (even minor repair operations can cause permanent data loss on your drive). Since you can’t access your files through File Explorer, you need to use data recovery software to directly scan your disk for the files.
For this guide, we’ll be using a program called Disk Drill. It’s very easy to use, even for beginners, and it has a feature called Byte-to-byte backup that can generate a complete copy of your drive and save it as an image file (which you can scan with the data recovery feature later). This is a great way to secure your data even before recovery, especially if you’re trying to restore files from crashed hard drives.
- If you’re recovering data from an external drive, securely connect it to your PC with the appropriate cable.
- Download and install Disk Drill from the CleverFiles website, and make sure to grant it the necessary permissions.
- If you want to skip creating a backup, proceed to step 6. To create an image backup (recommended), click Byte-to-byte backup on the left sidebar. Then, select your drive from the list and click Create backup.
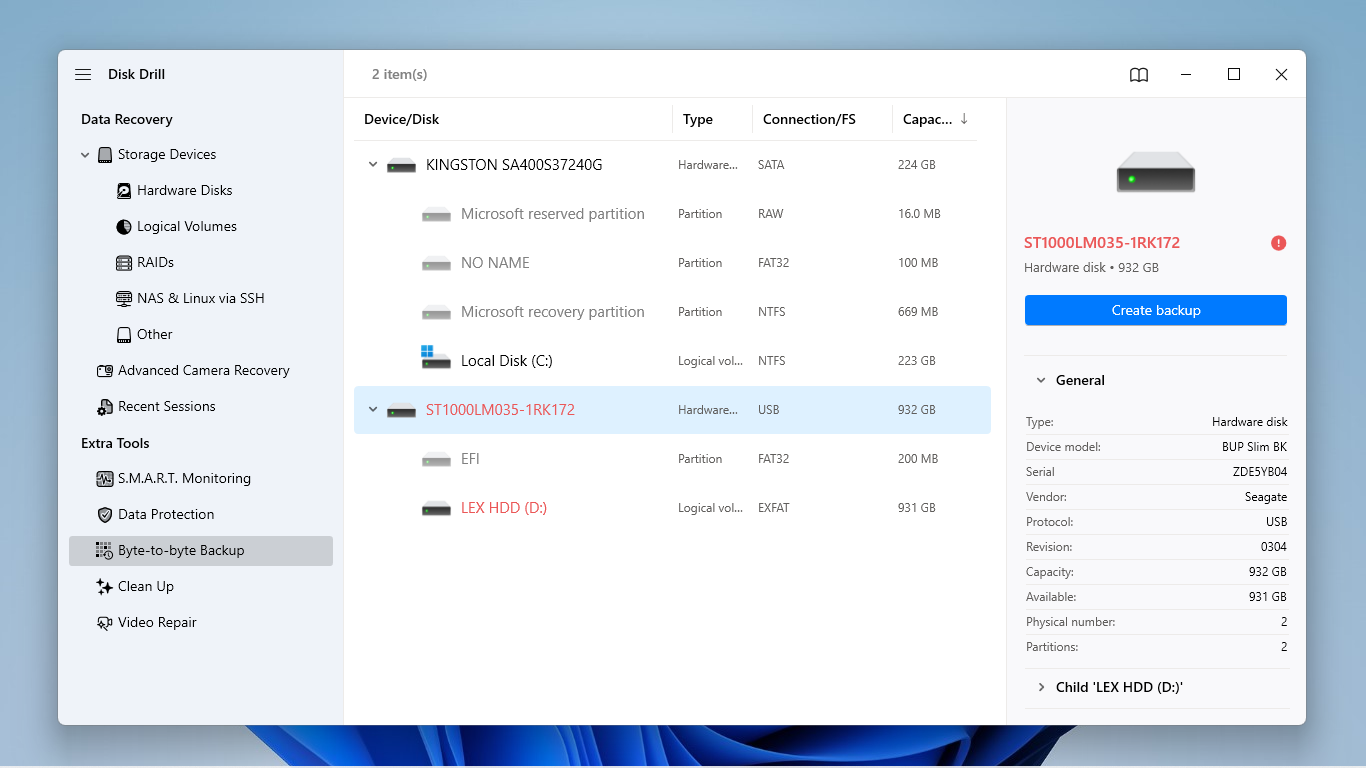
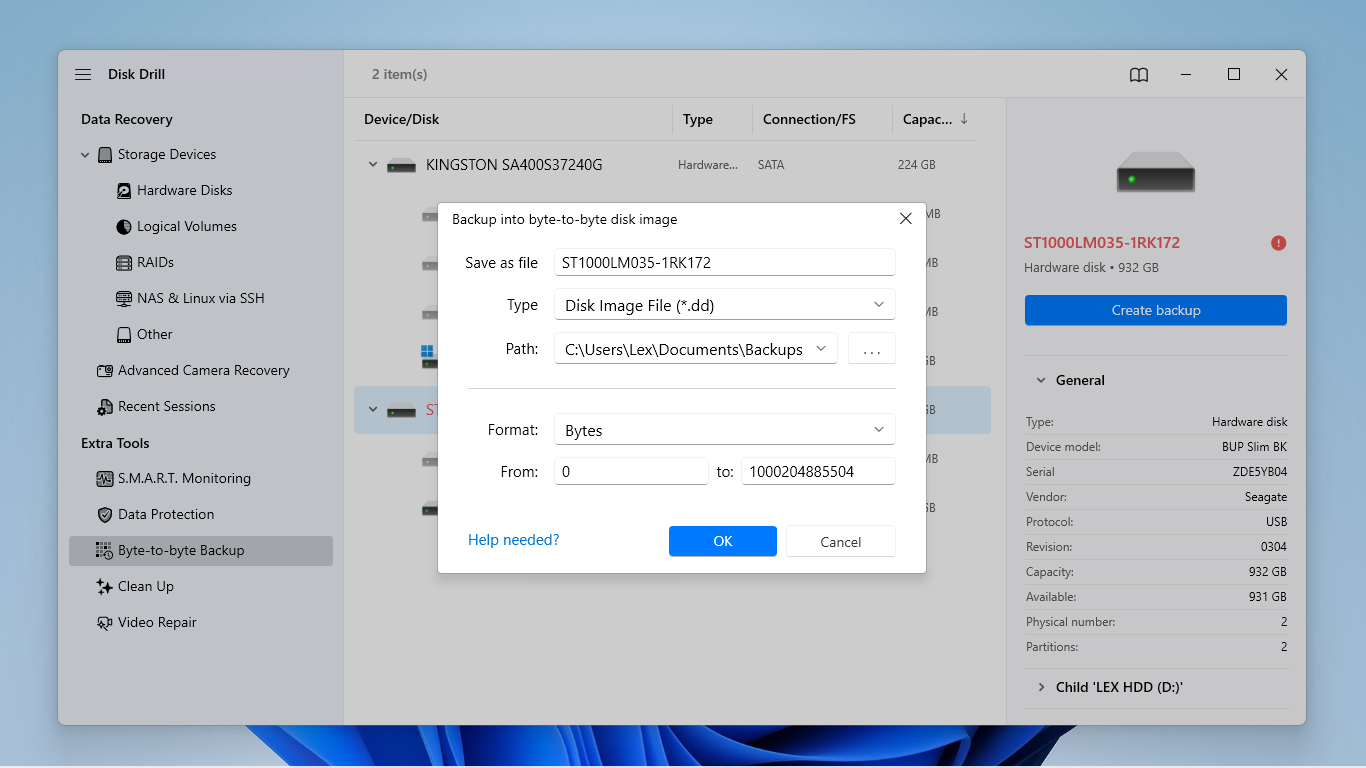
- Choose a folder to save the backup file, but make sure it’s on a different drive than the one you’re trying to recover (which should have enough free space for the image). Then, click OK.
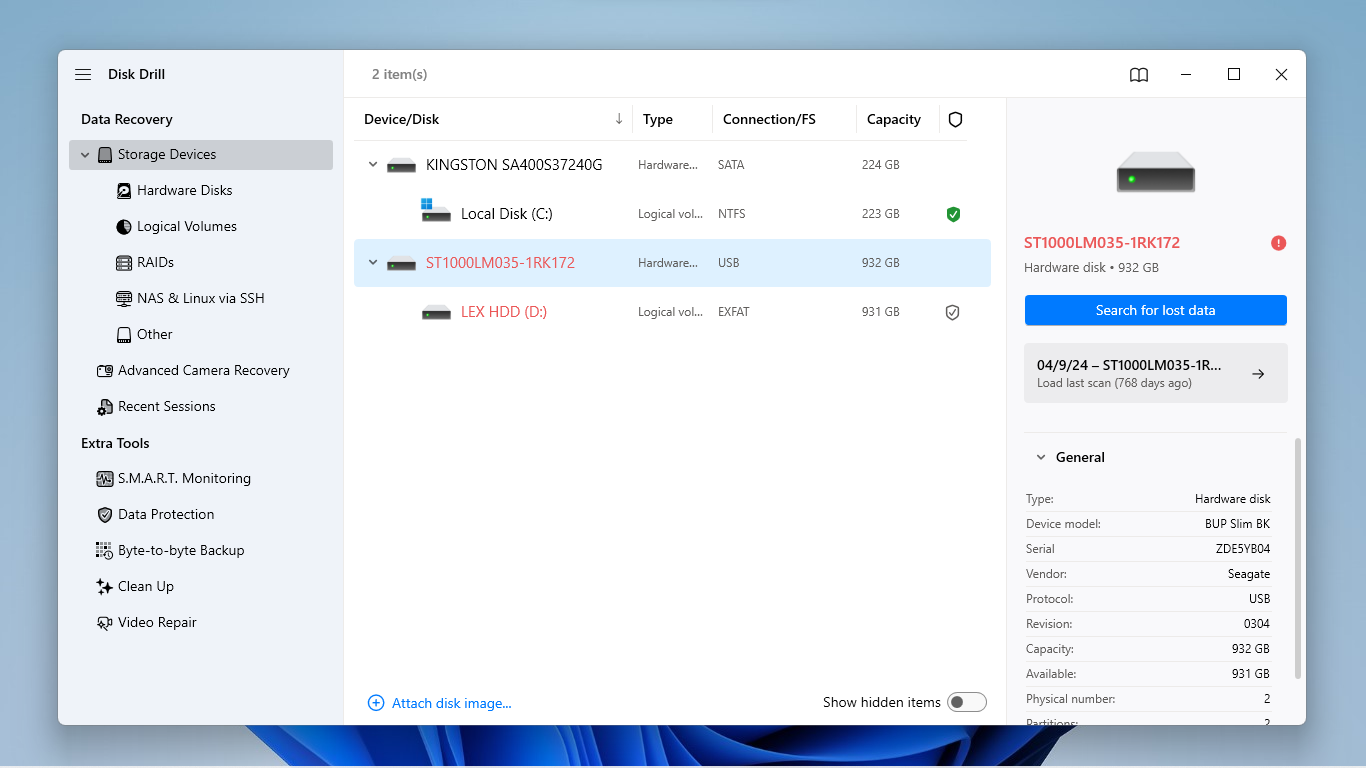
- Wait for Disk Drill to finish creating the backup, and note the colored squares appearing on-screen; these indicate sectors on your drive, which should give you an indication of its condition. Once the backup is created, click the home button to return to Disk Drill’s main interface. Then, click Storage devices in the left sidebar.
- If you didn’t create a backup file, select your drive and click Search for lost data. If you did, click Attach disk image at the bottom of the window to add it. Then, select the disk image and click Search for lost data.
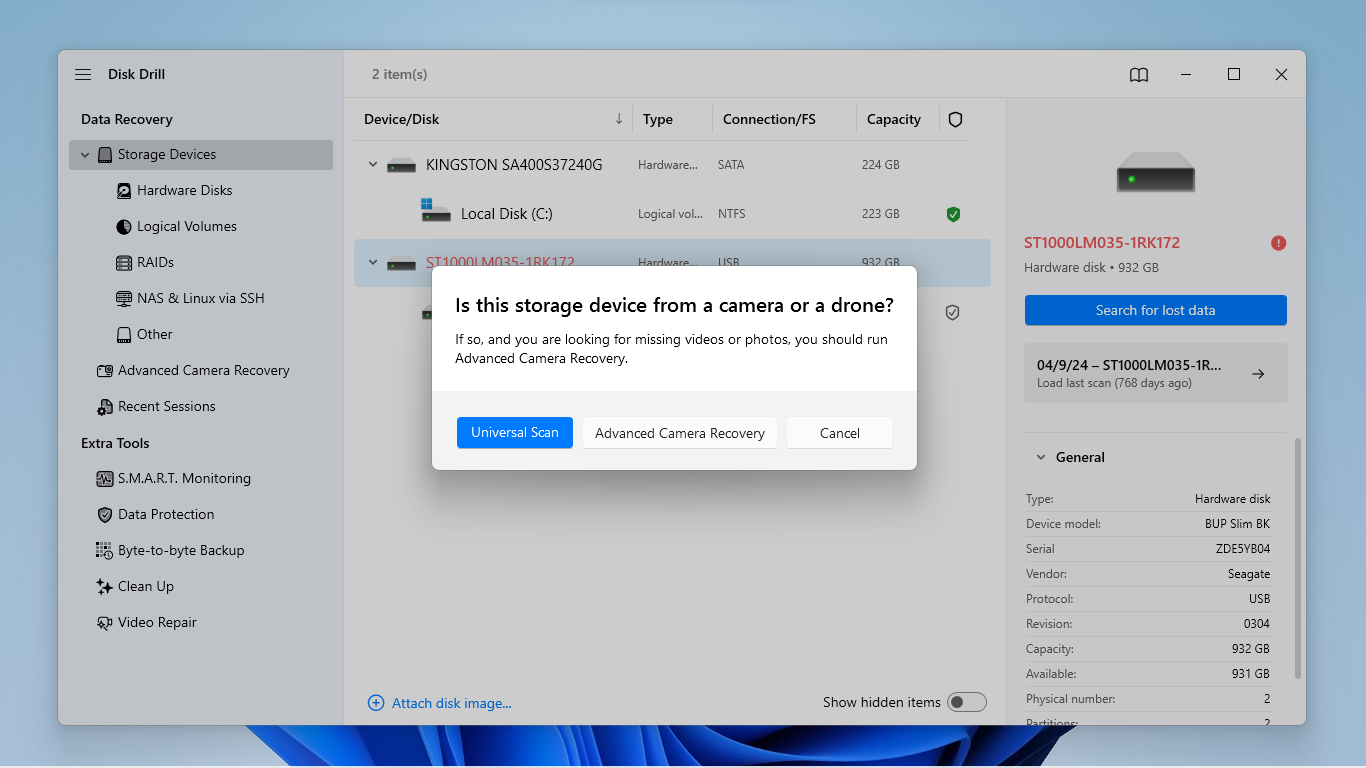
- You may be prompted to select a scan type–choose Universal scan the first time you run Disk Drill. If you manage to restore lost videos, but they appear unplayable or show errors, run the scan again with Advanced camera recovery. If this prompt doesn’t appear at all for you, you can just proceed to step 8.
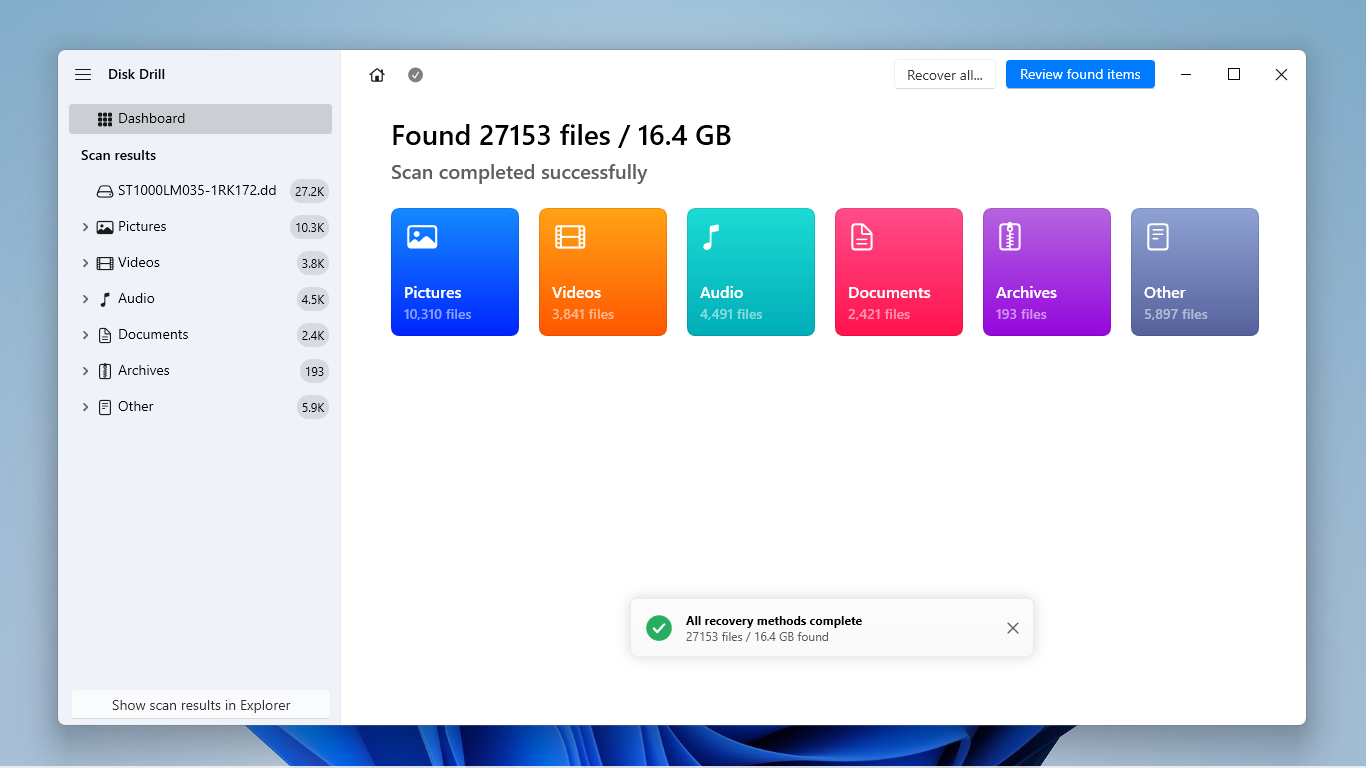
- Wait for Disk Drill to finish scanning your drive. If you want to immediately restore all the files Disk Drill found, click Recover All and proceed to step 9. Otherwise, click Review found items (recommended so you can preview your files).
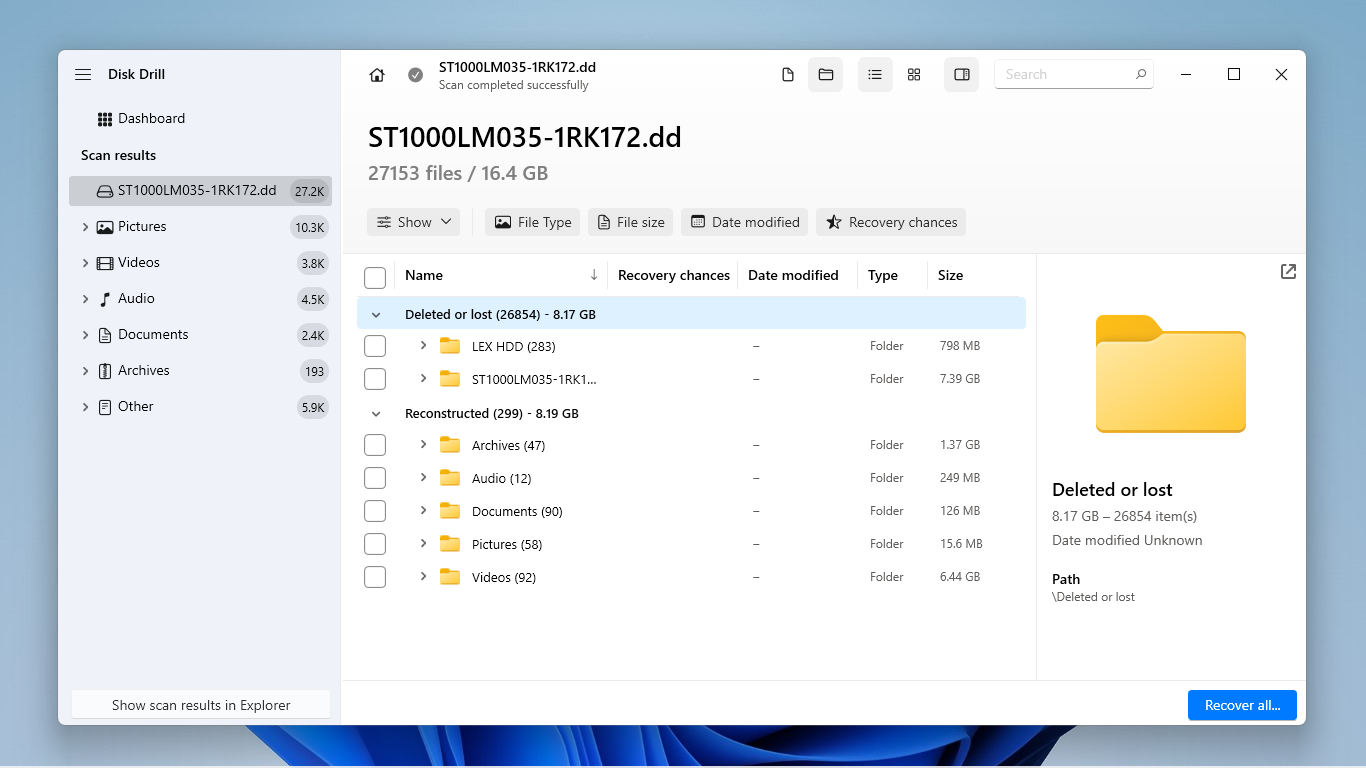
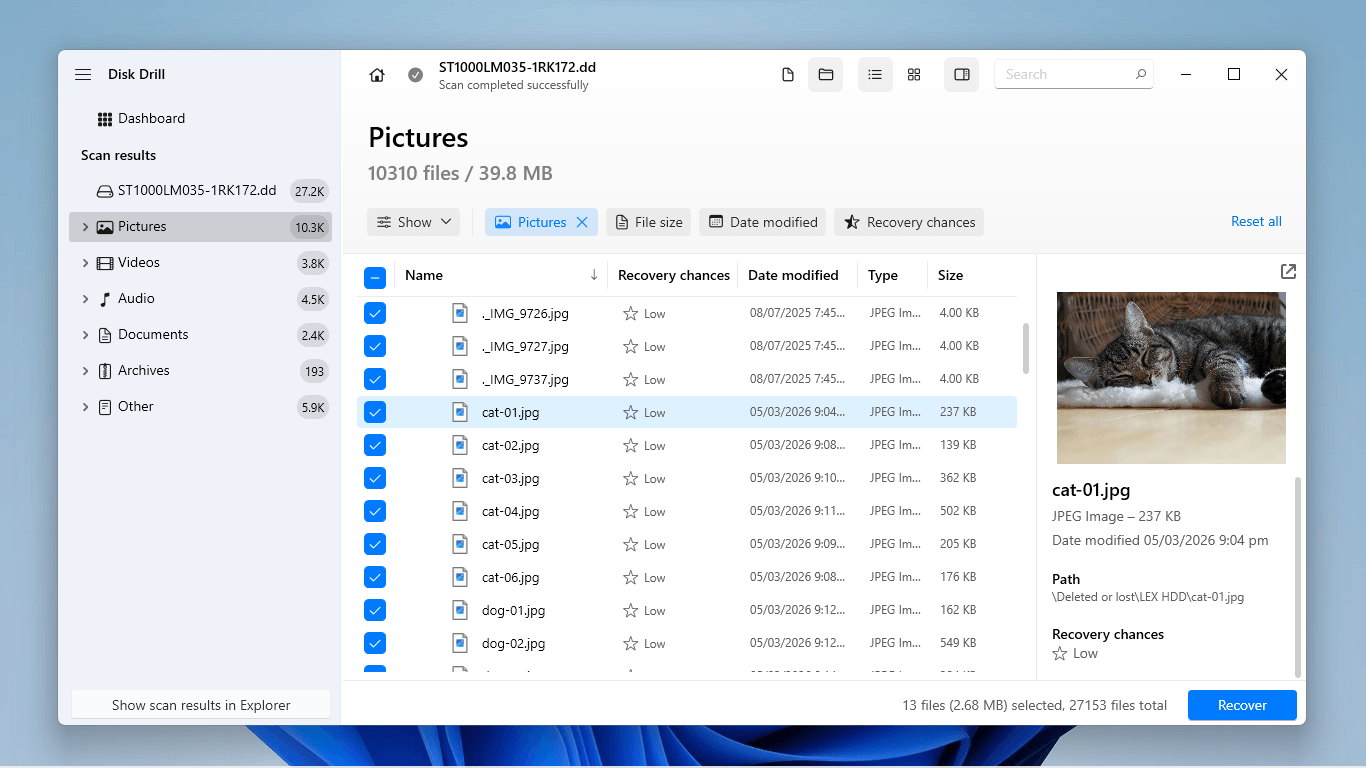
- In Disk Drill’s file browsing page, you’ll see up to 3 recovery categories that you can expand. Existing contains files that weren’t deleted or lost from the drive, which is usually the case for corrupted drives. Reconstructed and Deleted or lost contain missing files that were restored using their metadata or raw file signatures. Start with Existing, then move on to the other two categories only if your files don’t appear.
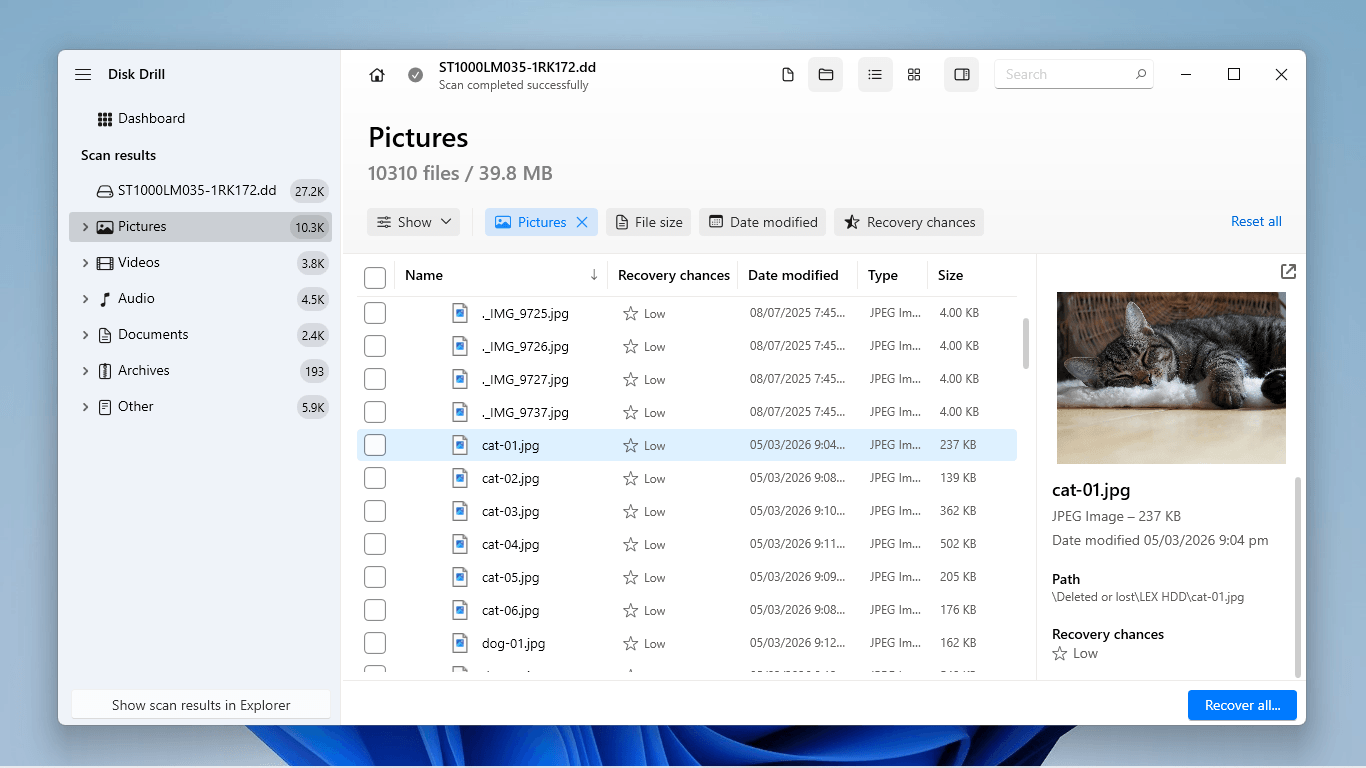
- If you only want to restore specific files or file types, use the filters in the left sidebar and the search bar in the top right corner to narrow down the scan results. Once you locate your files, make sure to click them once to preview them (and make sure they work).
- Select the files you want to restore. Then, click Recover.
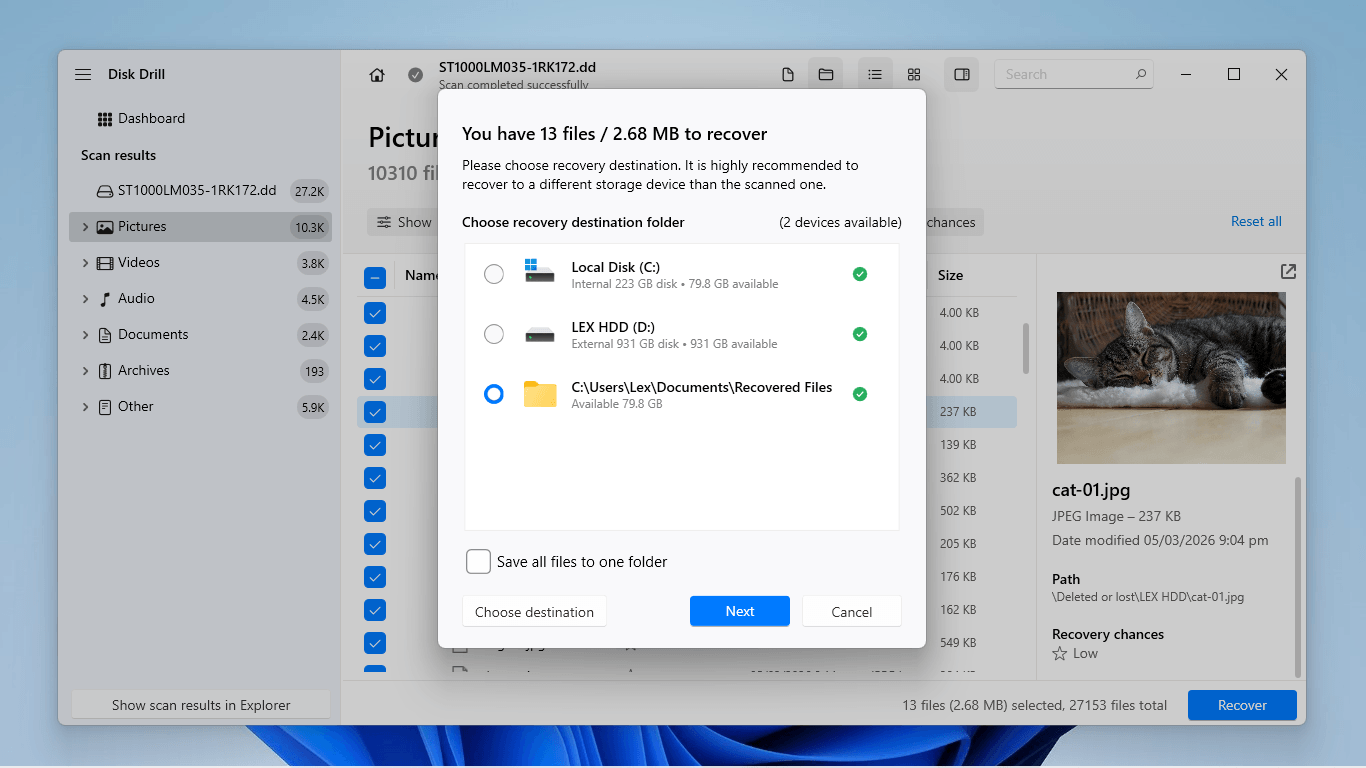
- Finally, choose a location on a completely different drive (e.g., if you’re recovering data from a pen drive or an external hard drive, you can save the files to your PC). Then, click Next to proceed with the recovery process.
Once your data is secure, you can safely proceed with the next section, which is fixing the drive. Data loss is an inherent risk at this stage, so make sure that your recovered or backed-up files are safe on a different device and working properly.
How to Fix the “Disk Structure Is Corrupted and Unreadable” Error
In this section, we’ll cover 5 different “disk structure is corrupted and unreadable” fixes. We start you off on the simplest and least intrusive methods first, so we recommend attempting them in order.
Method 1: Check Cables, Ports, Enclosure, and Power
Hardware instability is an extremely common and, fortunately, easily fixable cause for the disk structure corruption error. Issues can range from power issues to dusty ports, and the solution can be as simple as changing your cable. This method is a great place to start before diving into more complex solutions.
- Check your connections. Make sure that your cables are securely connected to the appropriate ports, and that there is no debris in the way (e.g., lint, caked dust, etc.).
- Change ports. Test different ports on your PC to check if your drive behaves differently. Pay attention to the color of the port in particular; blue ports are usually better for resource-intensive drives.
- Swap accessories. Accessories degrade over time or may suffer wear and tear that goes unnoticed. Try replacing your accessories and check if the same problem occurs.
- Connect to another PC. If the above troubleshooting steps fail, try connecting your drive to another PC if you have one–this is a surefire way to tell if your drive is really the problem.
Method 2: Run CHKDSK
CHKDSK is a built-in Windows tool that you can run as a (single) command in Command Prompt. CHKDSK is particularly effective for this error; it can repair a corrupted drive and its disk structure by rebuilding the Master File Table or MFT (which is what Windows needs to mount and read your drive) and locking away bad sectors.
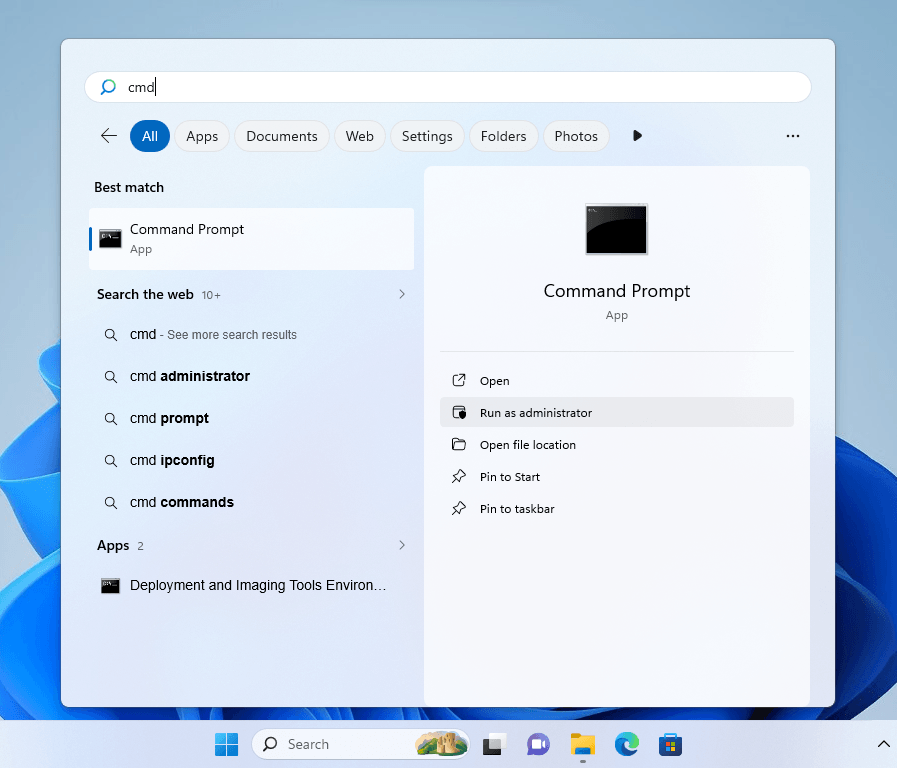
- Open the Start Menu and use the search bar to find Command Prompt. Then, hover over the program and click Run as administrator.
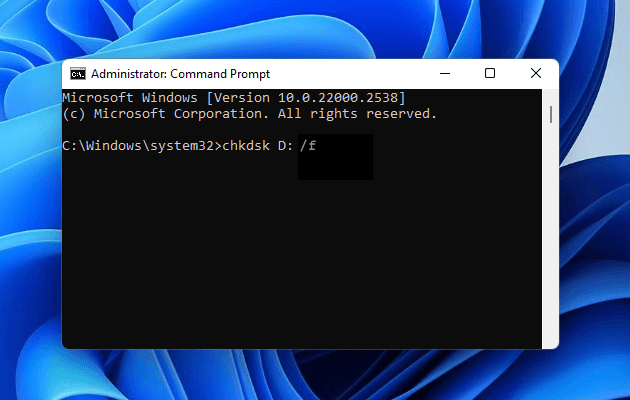
- Once Command Prompt is ready for input, run the following command, modified with your own drive letter (which you can find in File Explorer’s sidebar or in Disk Management):
chkdsk D: /f
Method 3: Rebuild the Partition Table with TestDisk
The “Disk structure is corrupted and unreadable” is often rooted in a corrupted partition table, which is what your PC uses to understand the drive’s file system structure. TestDisk, which is a completely free and open-source tool, is capable of rebuilding new partition tables and overwriting corrupted ones.
The only problem with TestDisk is that it lacks a modern user interface; it looks like Command Prompt, but you only navigate using your arrow keys and the Enter key. You don’t need to know any commands. And while somewhat outdated, the app officially supports Windows 10 and Windows 11 PCs. Here’s how to use it:
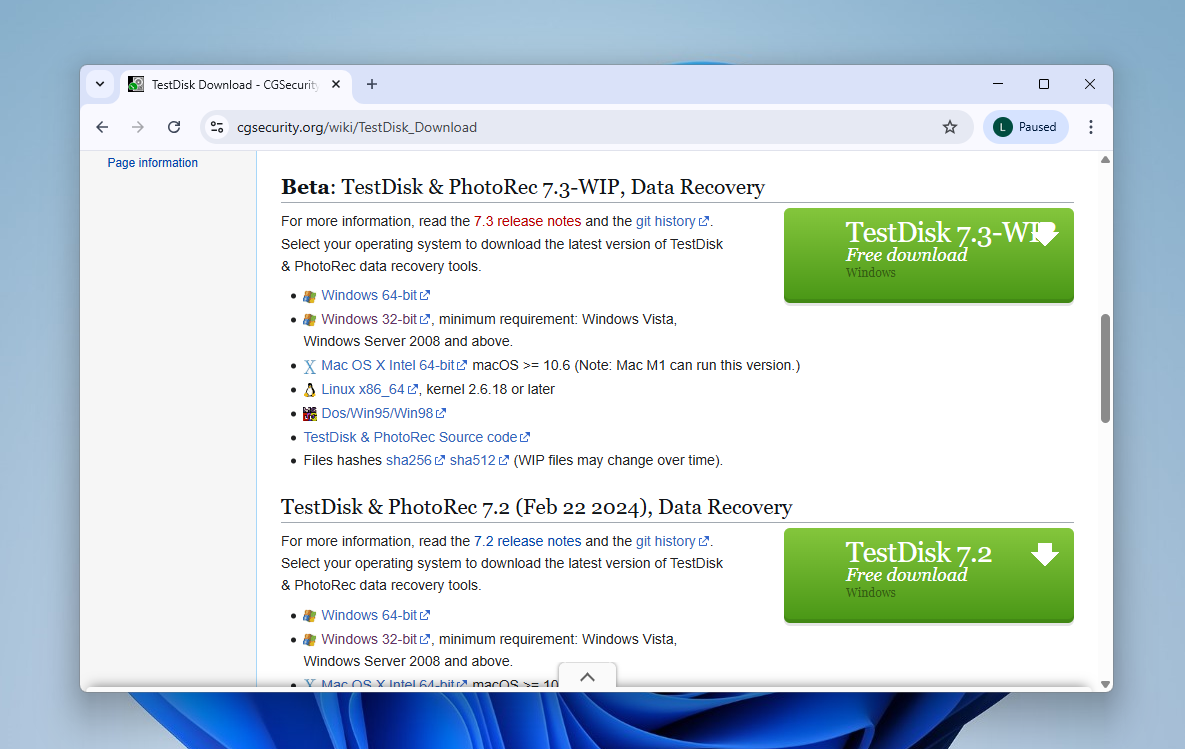
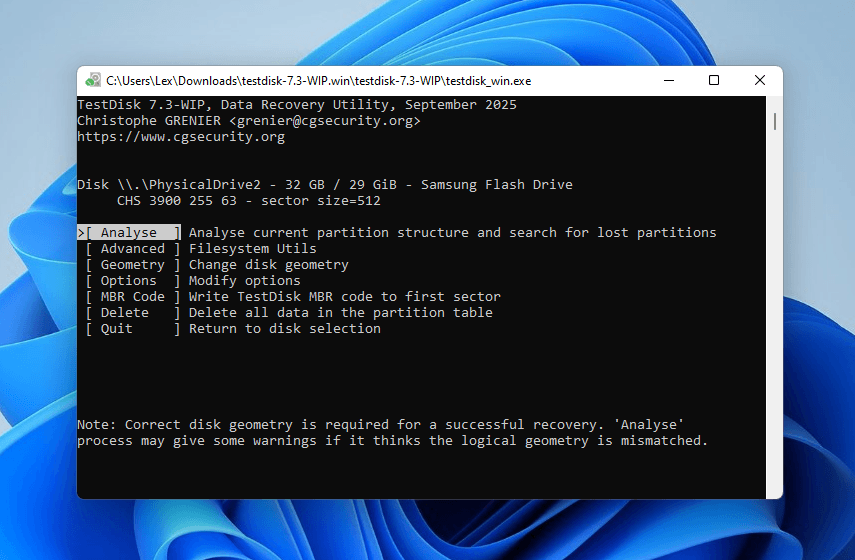
- Download TestDisk from CGSecurity’s website. Then, run TestDisk (no need to install it).
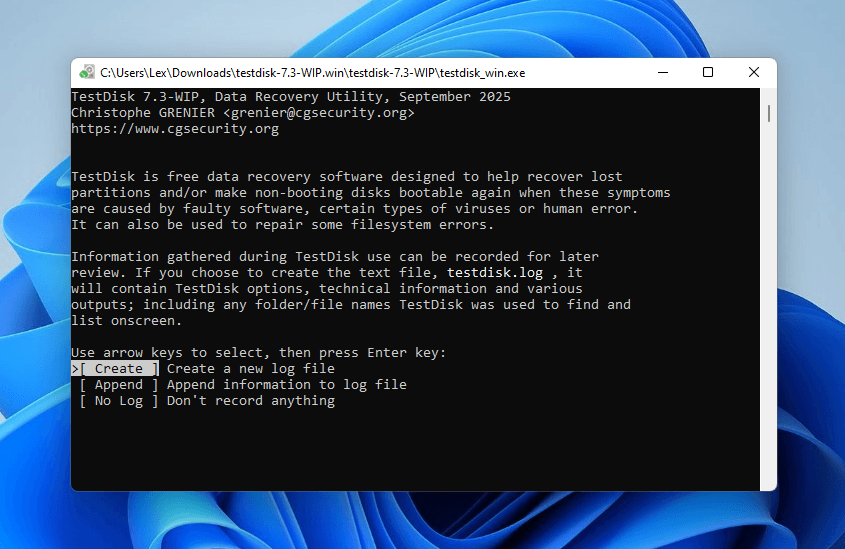
- In TestDisk’s main menu, use your keyboard’s arrow keys to select Create. Then, press the Enter key. This is how most of your interaction with TestDisk will go.
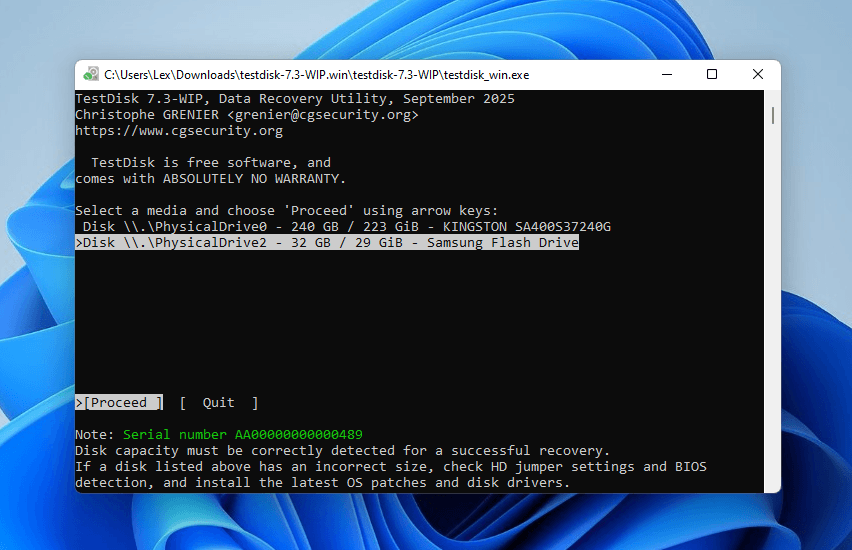
- Use your arrow keys again to choose the correct disk from the list. Then, select Proceed and press Enter.
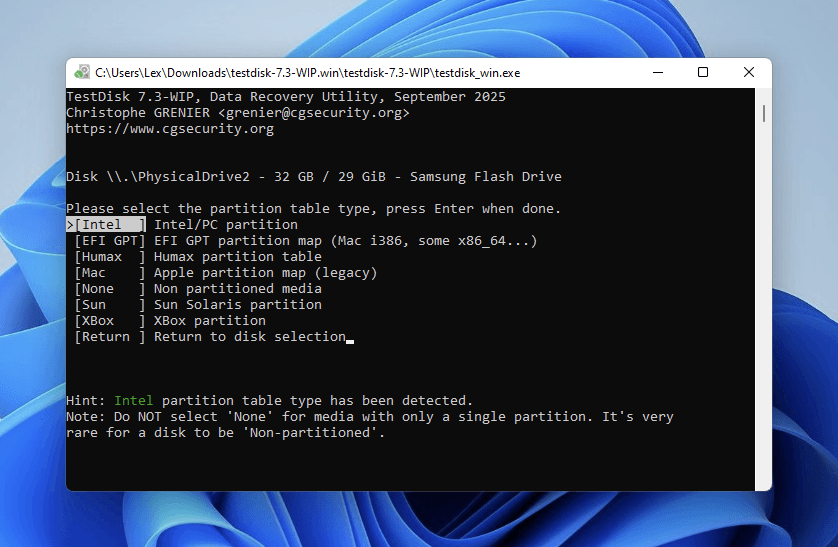
- Select your drive’s partition table type. Alternatively, go with TestDisk’s automatic selection, which is usually correct. Then, press Enter.
- Select the Analyse option and press Enter.
- Then, choose Quick Search and press Enter to begin the partition scan.
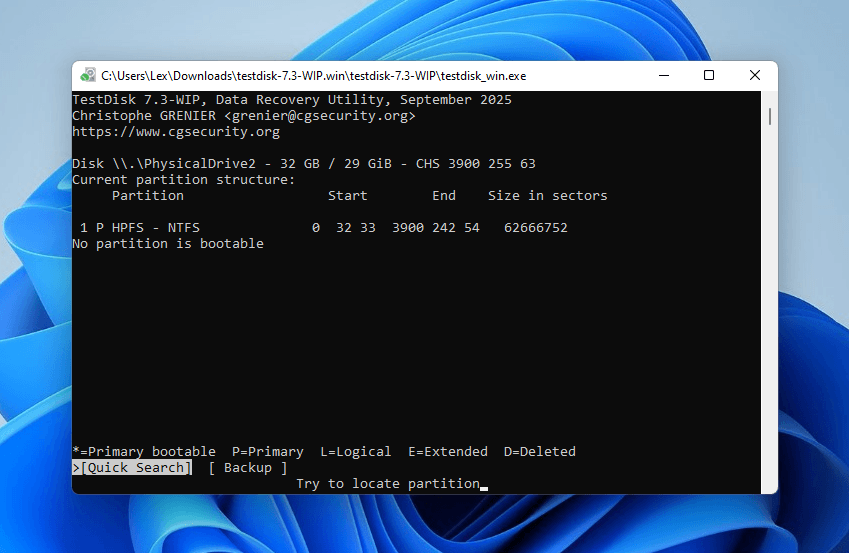
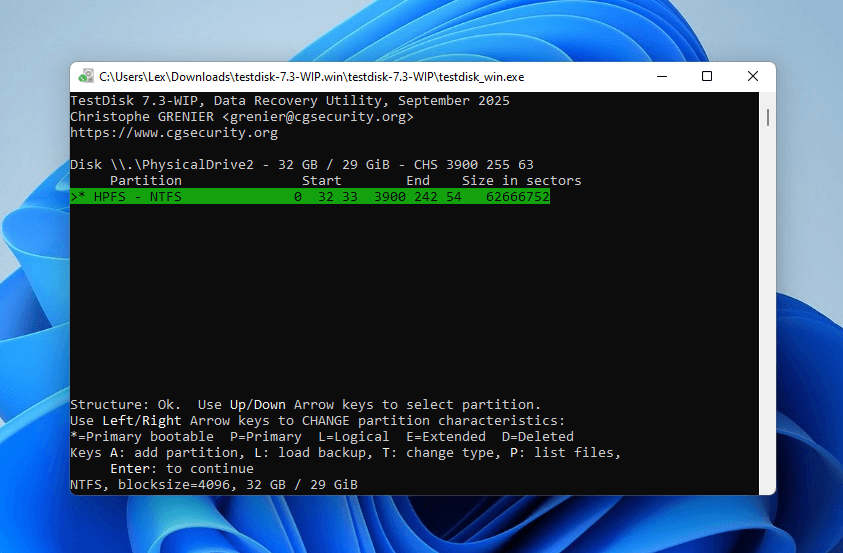
- TestDisk will display any partitions it found. Use your arrow keys to select the partition you want to rebuild and press Enter. Note that you can use the P key to view the selected partition’s files and make sure it’s the right one.
- Finally, select the Write option and press Enter to allow TestDisk to proceed with rebuilding the partition. If you didn’t find the right partition during the initial scan, you can try using the Deeper Search option.
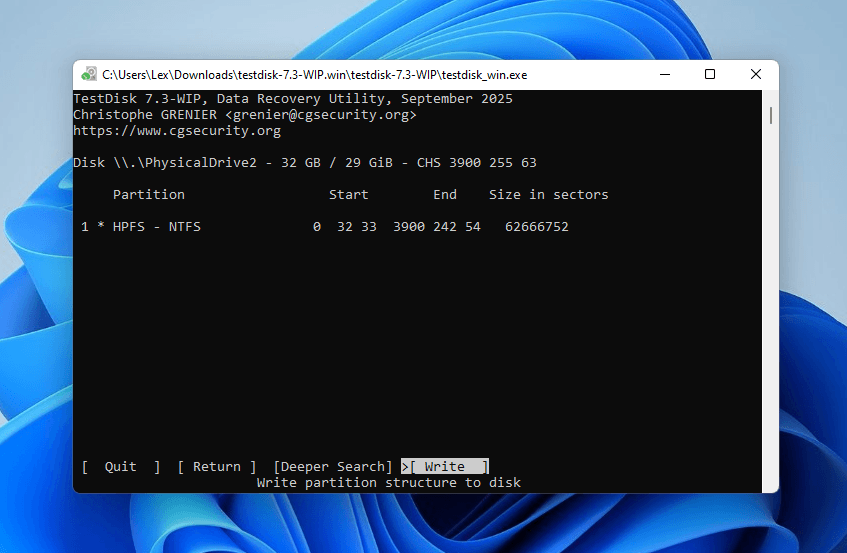
Once TestDisk is done writing the partition to your drive, restart your computer without disconnecting your drive to avoid potential errors or complications. Then, check if you can mount and read your drive properly.
Method 4: Use SFC/DISM
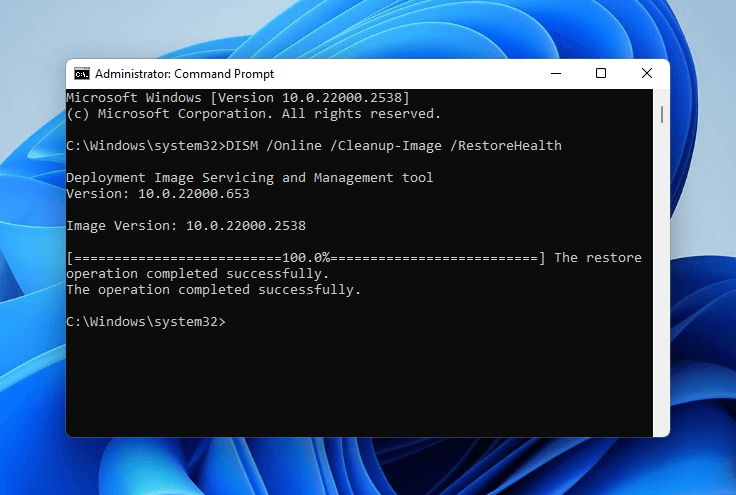
The System File Checker (SFC) and the Deployment Image Servicing and Management (DISM) are another set of built-in Windows tools that can fix corrupted drives. DISM ensures the integrity of the packages that the SFC needs to restore corrupted or missing system files.
This method is most effective for drives that got corrupted by a BSOD (blue screen of death) or after a janky Windows update.
- Use the Start Menu to run Command Prompt as Administrator.
- Run this command to use the DISM tool:
DISM /Online /Cleanup-Image /RestoreHealth
- Once you see a log that says “The operation completed successfully”, and Command Prompt is accepting new input, run the SFC command next:
sfc /scannow
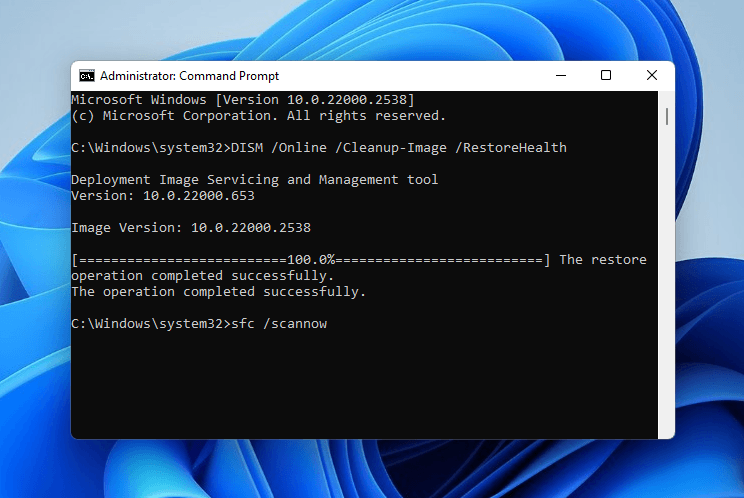
Once the SFC scan is done (you see “Verification 100% complete”), make sure to reboot your computer without disconnecting your drive. Rebooting allows Windows to finalize repairs done by the SFC tool, and disconnecting your drive can result in corruption.
Method 5: Try Formatting the Drive
Formatting a drive recreates a completely fresh file system with new metadata, wiping existing data in the process. This means that any instances of corruption or conflict will be instantly wiped out–along with all of your files.
With all that considered, formatting should be your last resort or the ideal next step after recovering your data or creating a backup of your disk. As long as you secure your data, this method is the most effective “the disk structure is corrupted and unreadable” solution.
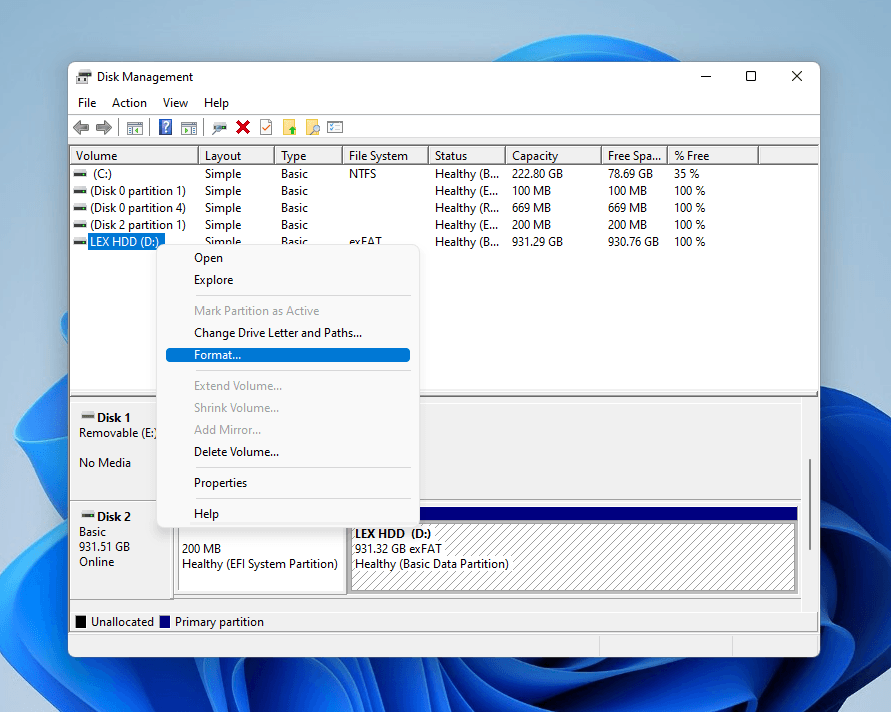
- Make sure your drive is securely connected to your computer.
- Using the Start Menu, locate and run Disk Management.
- Right-click your corrupted drive and select Format… from the context menu.
- Choose a name and select a file system for your drive (we recommend ExFAT for maximum compatibility). Then, check the box beside Perform a quick format if you don’t want to perform a full format of your drive. Click OK to proceed.
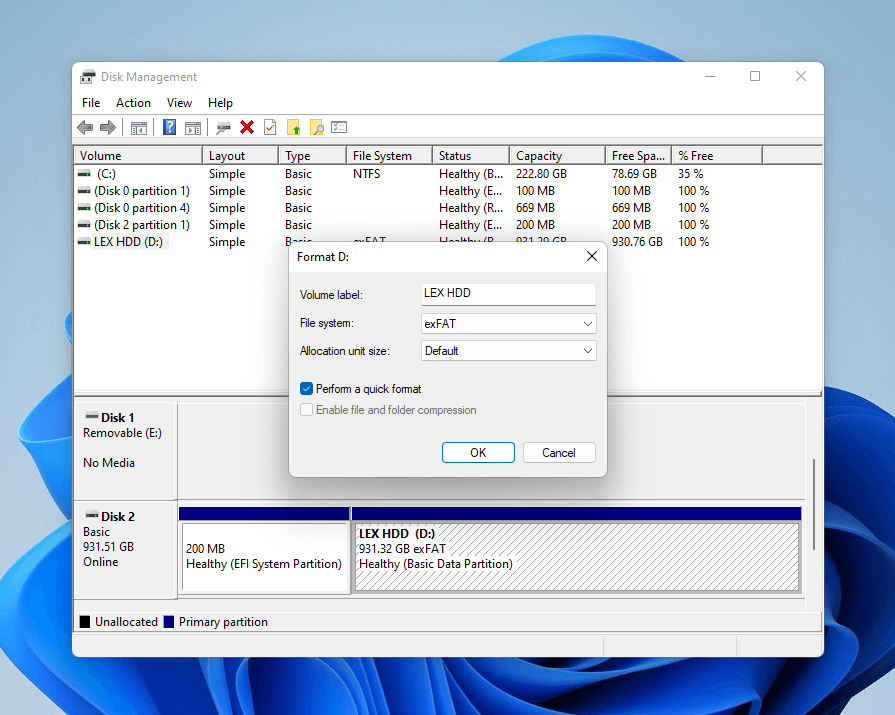
Note that we used Disk Management for the guide because it works for drives that don’t appear in File Explorer. However, if yours does, you can right-click your drive in the sidebar and select Format instead.
FAQ
Here are several tips to avoid a “disk structure is corrupted and unreadable” USB error:
- Always safely remove external devices. Use the Safely Eject feature on your PC whenever disconnecting a drive–don’t just yank it out. If it fails to eject, you can shut down your PC and disconnect it when the power is completely gone.
- Avoid improper shutdown of your PC. Improper shutdowns can corrupt both your system drive and any external storage devices connected to your PC. Stick with the standard procedure (Start > Power icon > Shut down).
- Scan files for malware before saving. Scan files with programs like Windows Defender, Malwarebytes, and ClamWin to prevent malware from corrupting your drive.
- Monitor your drive’s health. Use apps like CrystalDiskInfo or Disk Drill’s S.M.A.R.T. tool (both free) to help you identify any potential health issues on your drive before corruption occurs.
- Avoid using power hubs (or invest in a good one). External drives require constant, sufficient power to operate properly; if your power hub fails to provide enough resources or suddenly disconnects during a read/write process, corruption soon follows.
If CHKDSK reports that it’s unable to determine the volume version and state, it means that it can’t properly access the file system or its metadata, so it doesn’t even have a “model” for the repair operation. Follow these steps:
- Recover your data or create an image backup ASAP (if the files on your drive are important).
- Once your files are secure, format your drive. If it fails during the format, replace it.
Yes, as long as you don’t hear any clicking or grinding noises or notice other forms of physical damage, your drive is safe to use after repair. We still recommend backing up any new saved data regularly (e.g., via RAID) because drives with a history of corruption are usually more vulnerable throughout the rest of their lifecycle.