


If you got the “iPhone memory is full” message, you’re about to run out of storage space. Not only does this prevent you from saving new data, but it can also cause your iPhone to malfunction.
We analyzed dozens of stories about how users resolved this warning, and we honed in on the most efficient methods to free up a LOT of storage space quickly and safely.
How to Pinpoint the Cause of the ‘iPhone Storage Is Full’ Message
Before you jump into deleting random files or optimizing iOS, analyze your device’s storage allocation. Fortunately, iOS does most of the heavy lifting for you; not only does it calculate how much storage space you have, but it also shows how it’s being used. With this information, you can prioritize your most resource-intensive data and find potential clutter.
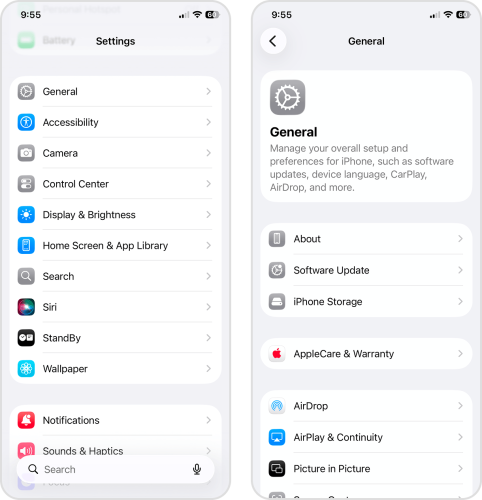
- Open the Settings app.
- Tap General.
- In the General menu, select iPhone Storage.
- The colorful bar at the top of the page represents your iPhone’s local storage space and how it’s being allocated to different types of data. Take note of which categories (except for iOS and System Data) consume the most storage, and prioritize them during the cleanup.
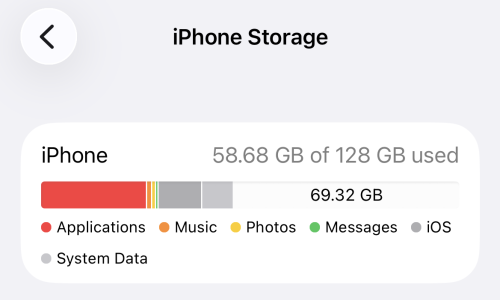
The iOS category isn’t accessible to users, so you can’t influence its size. System Data is also a protected category, but there are a few workarounds that can indirectly clean it up. If this category takes up a lot of space on your device, check out our guide on clearing System Data on iPhones.
How to Remove the ‘iPhone Storage Is Full’ Message
Every method in this guide boils down to deleting unnecessary files on your iPhone to reclaim storage space–that’s the only way to fix the “iPhone Memory Full” message (except for bugs). But we can show you how to do it faster and way more conveniently.
To help you stay organized in your efforts, we focused on the three main categories: your photo library, apps, and messages (and their attachments). While all iPhones are unique, this should give you a good starting point.
1. Clean Up Your Photos Library
Most iPhone users have a massive photo library, whether or not they realize it–especially if iCloud optimization for Photos isn’t being utilized. Old screenshots, similar-looking selfies, Live Photos that don’t need to be live, and high-resolution videos can quickly eat up your storage space. So in this section, we’ll show you how to get rid of the “iPhone Memory Full” pop-up and clean your library as efficiently as possible.
Delete Unwanted Photos and Videos
While you can use the native Photos app to manually delete photos and videos, we strongly recommend using a third-party cleaning app–especially if you have a massive library. Third-party apps are specially designed to make cleanup faster and more convenient, especially compared to native features.
There are several you can choose from in the App Store, but we’ll be featuring Clever Cleaner: AI Cleanup App in this guide. The app is small enough not to overwhelm your storage, it covers the most notorious media clutter generated in your library, and it’s completely free (and ad-free) as of this writing.
Here’s a quick rundown of Clever Cleaner’s main features:
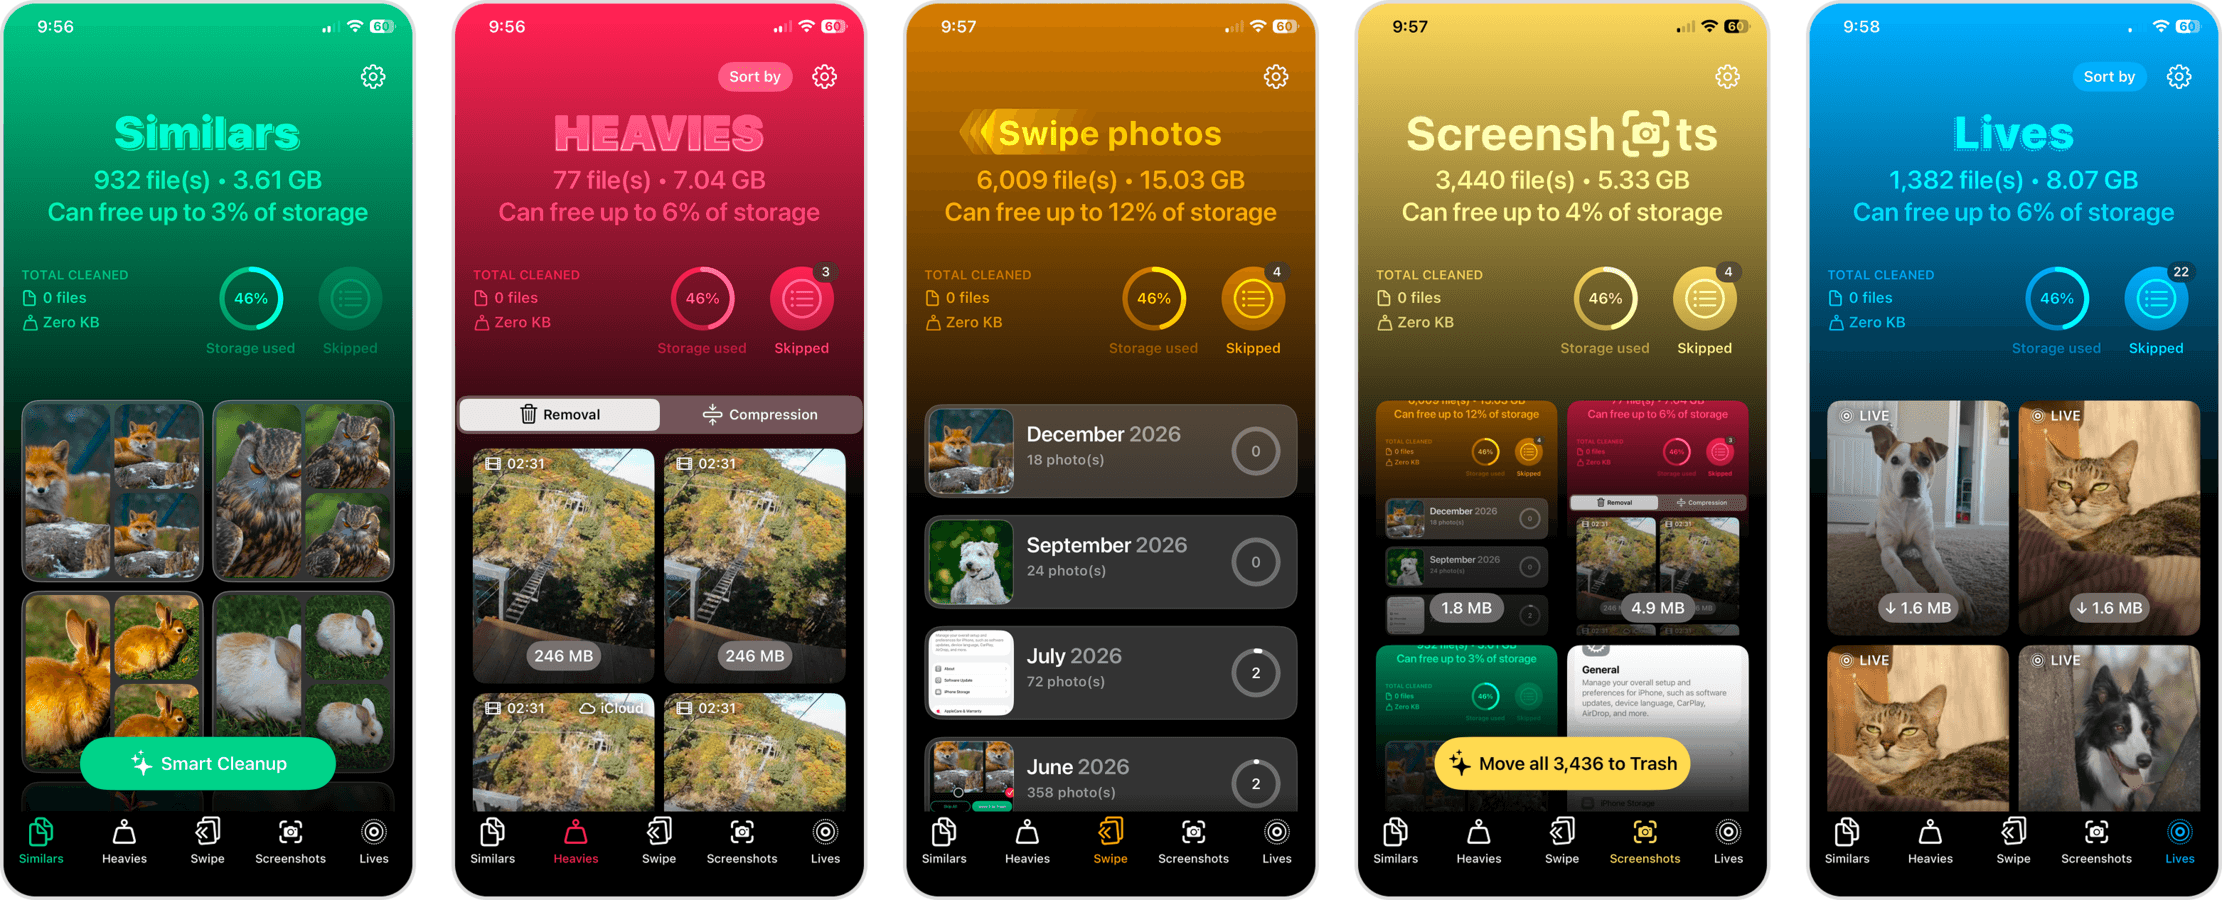
- Similars: Unlike the native Photos app, Clever Cleaner can remove duplicate photos and similar photos from your iPhone.
- Heavies: Also missing from native iOS, you can sort videos by size and by date, as well as compress videos to reduce their file size (if you don’t want to delete them, which is also an option).
- Swipe: All your photos are sorted by month; you can then review them individually and use swipe gestures to keep or delete each one as they appear.
- Screenshots: Your screenshots are all compiled in the app and you can instantly remove them with one button.
- Live Photos: You can remove the “Live” part from your Live Photos, which greatly reduces their file size, one by one or all at once.
- Download Clever Cleaner: AI Cleanup App from the App Store.
- Run Clever Cleaner. Then, tap Manage access and grant the app full access to your photo library.
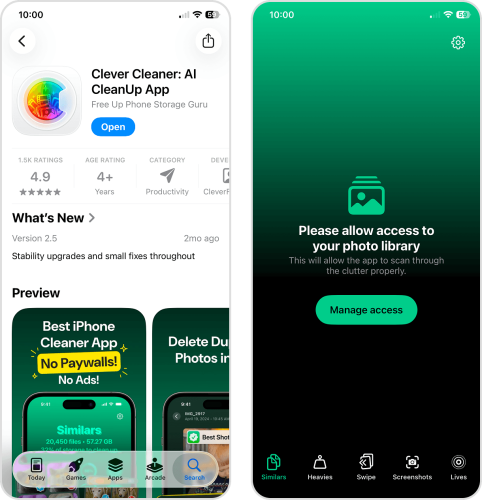
- The Similars tool will show up automatically. Tap any group of photos to review it. Alternatively, you can tap Smart Cleanup to instantly remove all the duplicate and similar photos in your library.
- When you review a group of similars, Clever Cleaner will automatically choose the “Best Copy” for you (the rest are selected for deletion). Alternatively, you can manually select which photos you want to delete. To proceed, tap Move to Trash.
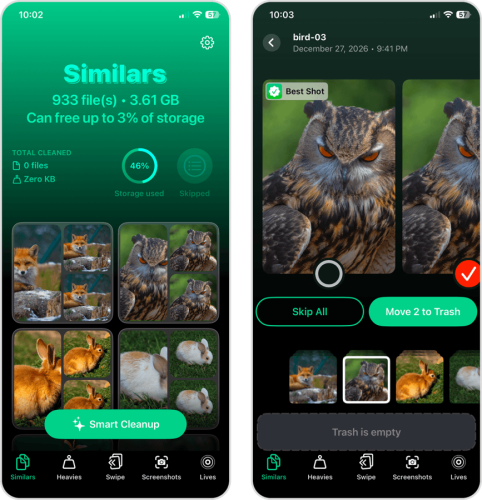
- Once you’ve deleted all the duplicate and similar photos in your library, tap the Empty Trash button at the bottom of the screen.
- Finally, tap Delete in the pop-up dialog to confirm the action. Don’t forget to delete your photos again from the Recently Deleted album in the Photos app (Collections > Utilities).
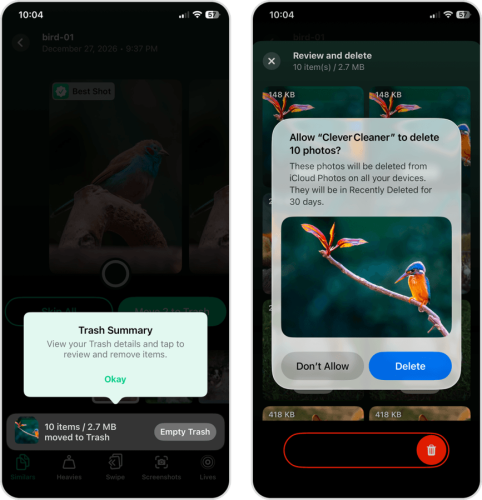
After eliminating your similar and duplicate photos, make sure to try out Clever Cleaner’s other features; on each tool page, you’ll see how much storage is being used by each media type. You might just free up a few dozen gigabytes after using it once!
Empty the Recently Deleted Album
Whenever you delete photos and videos, whether you’re using the native Photos app or a third-party alternative, they don’t get erased immediately. First, they stay in the Recently Deleted album (in the Photos app) for 30 days before getting automatically deleted. Here’s how to get rid of them automatically:
- Open the Photos app.
- Navigate to the Collections page, then scroll down to the Utilities section. Tap Recently Deleted (you’ll need your biometrics data or passcode to open it).
- Tap Select in the top right corner of the screen.
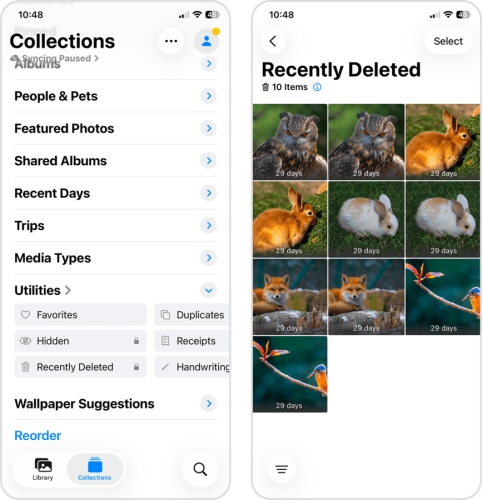
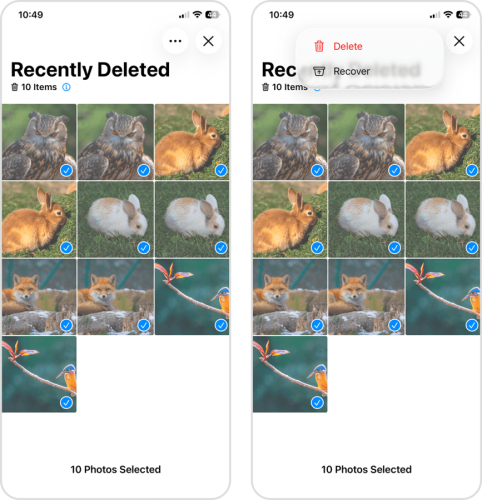
- Select the files you want to delete. Then, tap the menu button > Delete.
- Finally, tap Delete From All Devices to confirm the action.
2. Review Your Apps and Their Data
Many iPhone applications end up consuming dozens of gigabytes over time–mobile games with multiple huge maps (like Call of Duty), media streaming apps that let you download offline content, messaging and social media apps with large caches, etc. This makes them primary cleanup targets for fixing the “iPhone memory is full” pop-up.
This section covers not just how to delete unwanted apps, but also how to clean up apps you don’t necessarily want to get rid of (so you can reduce their total size).
Delete Unused Apps
Eliminate old and unused apps without mercy–that old puzzle game you only played until level 3 might just give you back 1 or 2 GB. And some apps can silently accumulate more and more data, even if you never open them (through automatic updates). Here’s the fastest way to delete an app from your iPhone:
- On your home screen or App Library, find the app you want to delete.
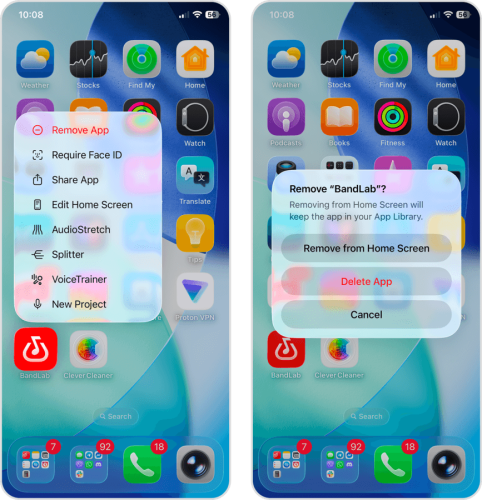
- Tap and hold its icon until a context menu appears, then select Remove App.
- Finally, in the pop-up dialog that appears, select Delete App.
Remove Offline Downloads From Streaming Apps
Most popular media streaming apps, like Netflix, YouTube, and Spotify, let you download or save content to your iPhone’s local storage device so you can access it offline. This takes up disk space unnecessarily, especially if you don’t plan on accessing the content anytime soon.
- Open the Music app (or whatever streaming app you want to clean up).
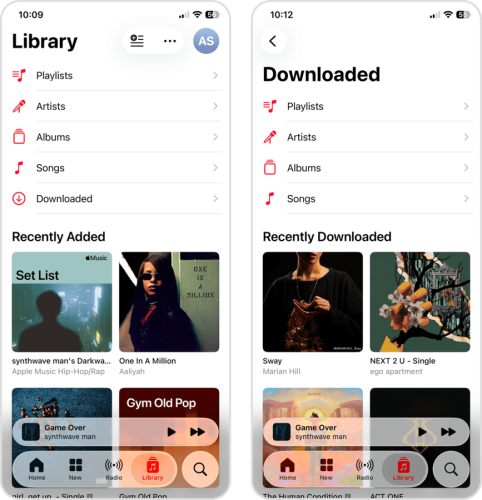
- From the bottom menu, select Library. Then, tap Downloaded.
- Tap Songs or Playlists.
- Beside the song or playlist you want to remove from your downloads, tap the meatball menu.
- Finally, in the context menu that appears, tap Delete from Library (you might have to scroll down the menu a bit).
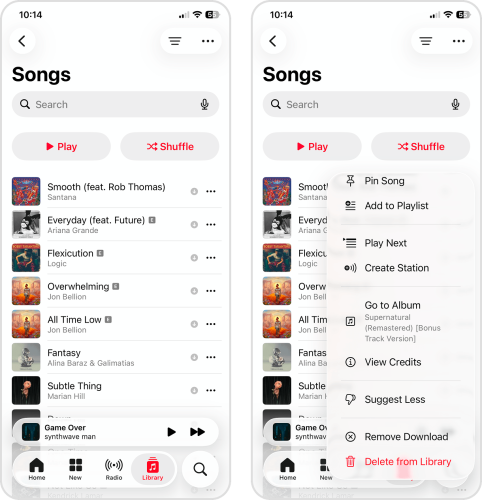
While these instructions cover Apple Music, most streaming apps have a similar interface, so the process should look pretty much the same elsewhere.
Clear App Cache
App caches are the hidden killers of storage space on mobile devices. You won’t notice it immediately, but over time, many of your favorite social apps can end up 10x their original size after accumulating hundreds of temporary files (mostly composed of images and videos).
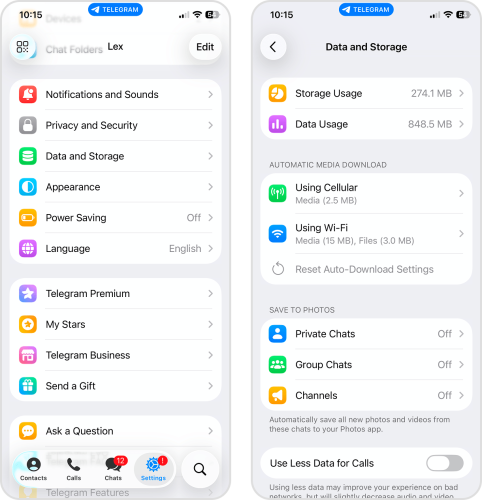
Fortunately, most commonly used apps have built-in cache management features that you can use to manually clear temporary files. We’ll demonstrate how it works in the Telegram app:
- Open the Telegram app (or whichever app you want to clean up).
- Navigate to the Settings page.
- Scroll down and select Data and Storage.
- At the top of the Data and Storage page, tap Storage Usage.
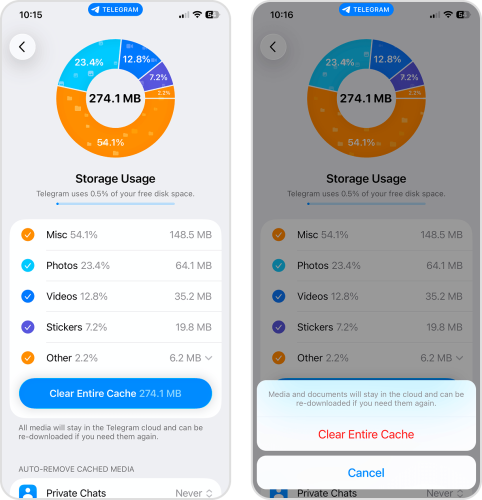
- Tap the Clear Entire Cache button.
- Finally, tap Clear Entire Cache again to confirm the action.
3. Clear Space Taken Up by Messages
iPhone messages can take up way more storage space than you think! But the text data itself is not the problem–attachments are. Attachments are the photos, videos, and other media you send and receive through the Messages app, and they can reach up to 100 MB per file. We’ll show you two ways to clean them up and get rid of the “iPhone storage is full” message.
Delete Old Conversations
The fastest way to clean up your messages and attachments is to delete the messages themselves. We recommend starting with the oldest ones first, which should be located at the very bottom of the pile.
- Open the Messages app.
- In the top left corner of the screen, tap Edit.
- Tap Select Messages.
- Choose the messages you want to delete, then tap the trash button 🗑️.
- Finally, in the context menu that appears, tap Delete.
Remove Only Attachments From Messages
If you don’t want to get rid of the messages themselves, you can opt to delete only the attachments–which take up way more storage space than the text itself anyway. We’ll show you the fastest way to eliminate the largest attachments in your inbox.
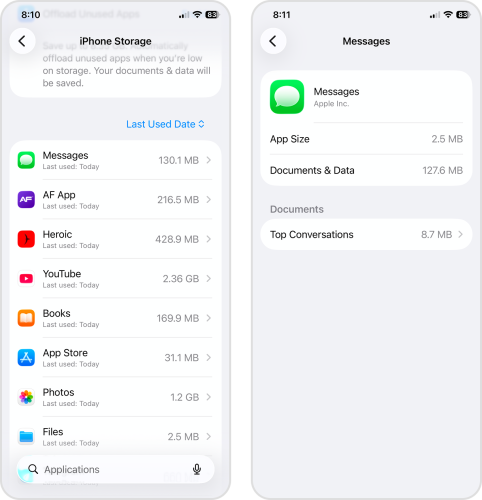
- Open the Settings app.
- Tap General.
- In the General settings page, select iPhone Storage.
- Scroll down to your list of apps. Then, find and select Messages (you can use the search bar at the bottom to find it faster).
- In the Messages app menu, tap one of the featured conversations.
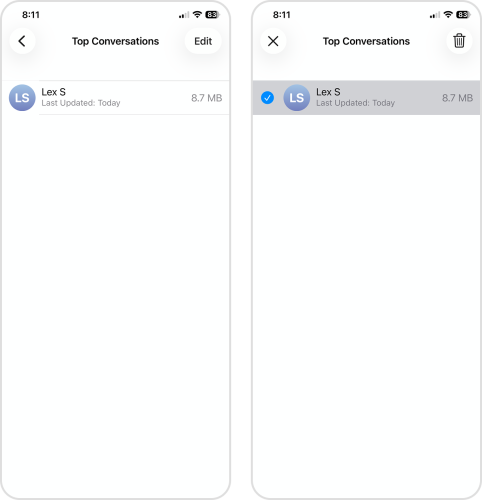
- Tap Edit in the top right corner of the screen.
- Finally, select the items you want to delete, then tap the trash button 🗑️.
How to Fix an ‘iPhone Storage Is Full’ Warning That Keeps Coming Back
If you already used the methods in this guide, and you’re still getting “iPhone memory is full” message spam, iOS might be experiencing a bug. In this section, we’ll cover two ways to fix the error.
Restart Your iPhone to Refresh Storage Calculations
The simplest and most common reason why you still see “iPhone Storage is Full”, even after cleaning up, is because iOS hasn’t recalculated its available storage space yet. You can “force” iOS to run its calculation by rebooting your iPhone:
- Open the Settings app.
- Tap General.
- Scroll down to the bottom of the General settings page, then tap Shut Down.
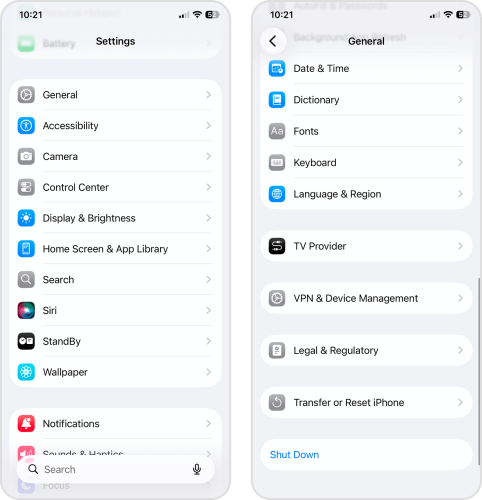
- Drag the slider rightward to start the shutdown process and wait for your iPhone to fully shut off. Then, press and hold the power button until it turns back on.
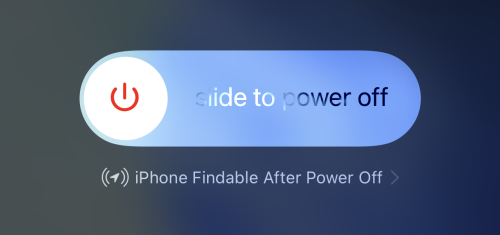
After restarting your iPhone, give it a few minutes to reindex your data. Then, check the iPhone Storage page if the storage calculation has changed.
Perform a Full iPhone Reset
While much less common than indexing lag, iOS can occasionally experience software corruption that either impacts storage calculation or prevents unwanted files from getting deleted.
The only way to reliably solve this issue is to perform a “factory reset” of your iPhone. Don’t worry—any user data that isn’t backed up to iCloud already will automatically be saved to Apple’s servers, so you can download your files again after resetting your device.
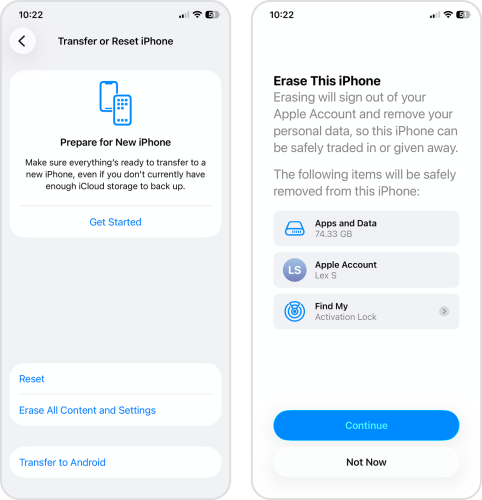
- Open the Settings app.
- Tap General.
- Scroll down to the bottom of the page and select Transfer or Reset iPhone.
- Tap Erase All Content and Settings.
- Review the data that will get wiped by the reset. Then, tap Continue and follow the rest of the wizard.
How to Avoid Seeing the ‘iPhone Storage Is Full’ Message Again
Don’t stop after cleaning your iPhone. If you know that you’ll have to face this warning again in the near future, we recommend taking the steps now to optimize your device. In this section, we’ll show you how to reduce how much storage gets consumed by the data types we previously discussed.
Enable iCloud Photos and Optimize iPhone Storage
iCloud is Apple’s cloud data storage and synchronization tool. It has an optional feature called “Optimize iPhone Storage”, which keeps the high-resolution copies of your photos and videos in the cloud. Only lower-resolution versions are stored on your device—which are MUCH smaller.
- Open the Settings app.
- Tap your Apple ID.
- Tap iCloud.
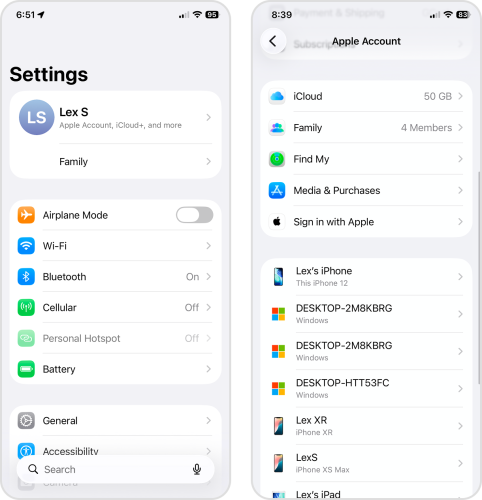
- In the Saved to iCloud section, select Photos.
- Enable the Sync this iPhone and Optimize iPhone Storage settings.
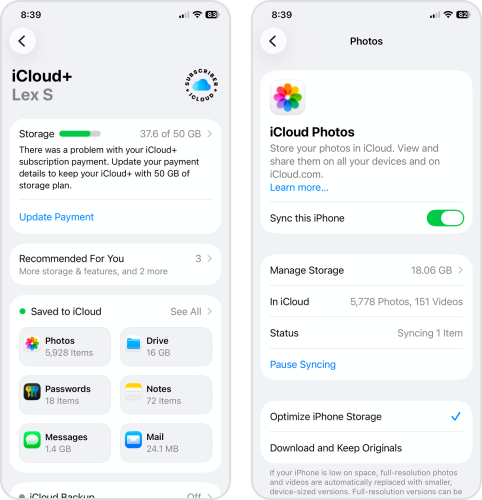
After activating iCloud, make sure that your iPhone is connected to a stable network, then keep it locked and charged for a while. This allows iOS enough time and resources to upload your library, reindex your data, and adjust its storage calculations.
Turn On Offload Unused Apps
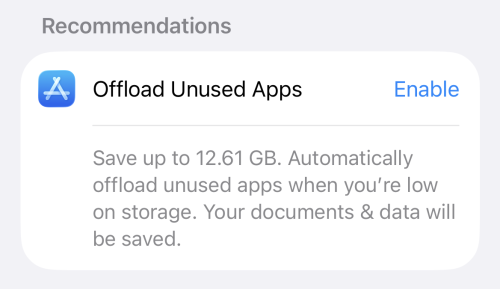
“Offloading” an app means deleting the application itself, while keeping your user data stored on the device. This is useful if you need to use the app again later, but want to reclaim as much storage space as possible right now.
We’ll show you a useful setting called Offload Unused Apps, which automatically does this for your least-used applications.
- Open the Settings app.
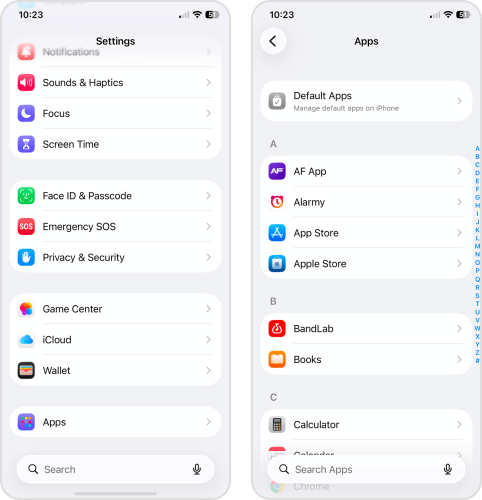
- Scroll down to the bottom of the page and tap Apps.
- Find and select the App Store app (it should be near the top of the list).
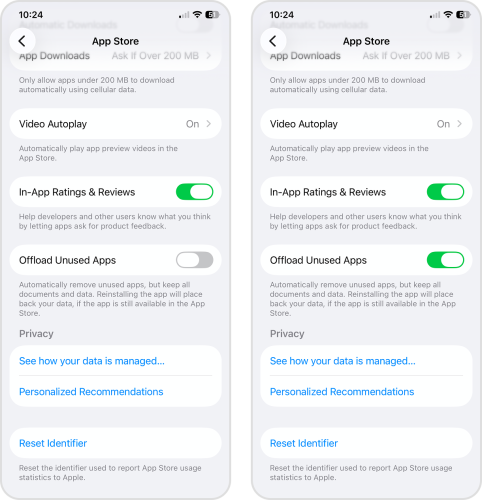
- Scroll down to the bottom of the page and activate the toggle switch beside Offload Unused Apps.
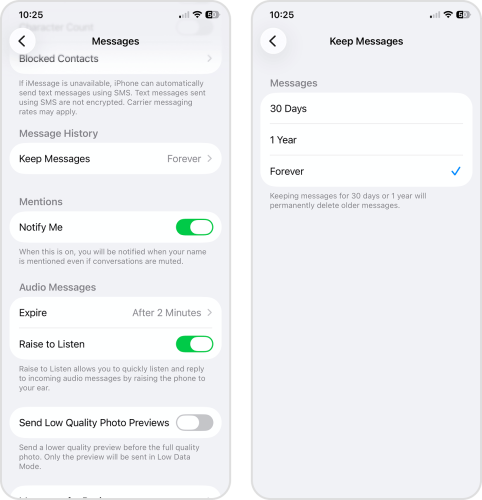
Set Messages to Delete Automatically
If you tend to receive a lot of messages and media attachments, you can set the Messages app to delete old ones automatically. Just note that activating this setting will immediately delete any existing messages past the selected range.
- Open the Settings app.
- Scroll all the way down and select Apps.
- Find and select the Messages app.
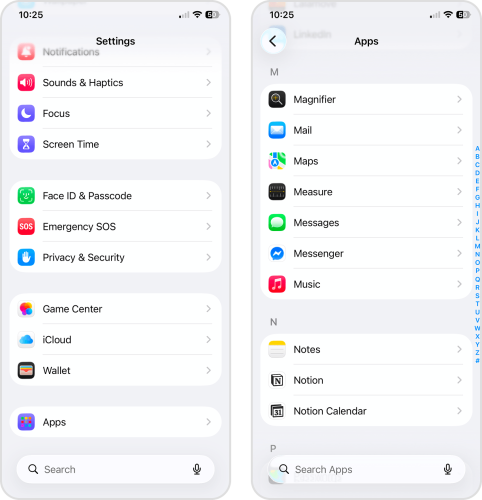
- Scroll down to the Message History section and tap Keep Messages.
- Select the option you want. Note that choosing 30 Days or 1 Year will automatically delete old messages.
Conclusion
Since we covered a lot of cleanup and optimization tips in this guide, here’s a summary of every method we covered, along with their links:
- First, clean up your photo library. If you use iCloud for Photos, consider using the Optimize iPhone Storage feature.
- Next, review your apps. Delete unwanted apps, remove offline downloads, and clear their caches.
- Finally, clear unwanted messages and attachments. You can set the Message app to auto-delete old messages.
- If you still get the warning after cleaning your iPhone, start troubleshooting.
FAQ
Here are common reasons why your iPhone incorrectly says your storage is full, and how to troubleshoot each issue:
- iOS hasn’t reindexed your data or updated its storage calculation. Keep your iPhone charged and screen-locked for a few minutes to a few hours (depending on how much data you have).
- Your iPhone’s system cache hasn’t been cleared. Restart your iPhone. If you still get the warning, perform a “hard reset” using the following button combination: press Volume Up, press Volume Down, press and hold the power button (until you see the Apple logo).
- iCloud storage is full, not your local storage. If the warning refers to your iCloud storage, you’ll either need to disable iCloud (Settings app > Apple ID > Sign Out) or upgrade your subscription (Settings app > Apple ID > iCloud).
Yes, using iCloud (especially with its Optimize iPhone Storage feature) can help prevent your device’s local storage from filling up by offloading your data to Apple’s servers. However, iCloud also has its own storage limitations; if you have a lot of data, you’ll probably need iCloud+.
Here are the immediate steps you should take if your iPhone memory gets so full that it stops working:
- If your iPhone won’t boot properly, perform a hard reset with this button combination: press Volume Up, press Volume Down, then press and hold the power button until you see the Apple logo.
- Once your iPhone boots up, immediately delete your biggest apps.
- After deleting unwanted apps, clean up your library; we recommend using an app like Clever Cleaner (free).
If your iPhone still won’t boot properly, you’ll need a Mac or a PC with iTunes to perform a DFU Restore. Plug your iPhone into your computer, open it in Finder (Mac) or iTunes (Windows), and choose Restore. Just make sure your data is backed up to iCloud, as this process wipes your device clean.
Your iPhone slows down when your storage is full because iOS requires free storage space to run system operations. For example, it sometimes uses storage as temporary RAM or cache space. Try deleting a few large apps and library media, then check if your iPhone speeds up.
Yes, a full iPhone storage will prevent iOS from updating. Updating iOS requires enough space to download the package files, as well as free storage to be utilized for temporary files that get generated during the installation. If you’re struggling to update iOS, clean up your iPhone first–we recommend deleting your apps and clearing large media from your library.
