As a demanding professional, you don’t want your gear to be a limiting factor, but the transparent enabler that allows your work to shine. That’s why you’re using high-end cameras paired with top-of-the-line, high-speed, and capacious CFast cards to store your snaps and videos. Or, rather, “were”, because now your precious media are inaccessible or gone.
And yet, as our data recovery experts have proven by recreating the most common data loss scenarios in our labs, it’s usually possible to recover most (if not all) of the valuable data from CFast cards. In this guide, equipped with that knowledge, we’ll see:
- 💾 The ways CFast cards differ from other storage media, and why that matters when you need to recover your media from them.
- 🧑⚕️ How you, too, can perform CFast card recovery like an expert, to save your files from the clutches of an accidental deletion or file system corruption.
- 💊 Methods for dealing with corrupted, unreadable, and “invisible” CFast cards.
- 📖 Information and solutions for common CFast card hardware-related issues.
We’ll cover everything a professional photographer/videographer might need to get out of a sticky data loss situation where their very work is at stake, but that doesn’t exclude hobbyists from following along to salvage media from any CFast card.
What Makes Data Recovery from CFast Memory Cards Different?
As with every case of data loss, there are two ways you can approach CFast data recovery: DIY or delegating the recovery to professionals, each with its pros and cons:
- 🔨 DIY approach: more affordable and faster (hours vs. weeks). However, it requires specialized software and hardware, technical knowledge, time investment, and carries the risk of worsening data loss with one wrong move. It also cannot help when dealing with extensive corruption where conventional data recovery tools cannot locate any files, or when CFast cards have physical damage.
- 🖼️ Professional data recovery services: the best option when DIY fails or when dealing with physical damage. They offer the highest chances of successfully recovering most lost files. Still, they cost more and take longer because the media is physically shipped back and forth and because of waiting in a queue for analysis and recovery.
When following the DIY path, it’s especially crucial to keep in mind how CFast cards differ compared to other media. Unlike more limited options, like SD and Memory Stick cards, CFast cards, and their siblings, CFexpress cards rely on technology that’s usually found in the dominant storage solutions for computers. This grants them ultra-fast transfer speeds but also complicates attempts to recover data from them.
Although those aspects make them look alike, CFast and CFexpress cards are far from the same, since they rely on vastly different ways of connecting and transferring data:
- 🏍️ CFast cards work like SATA devices, and can reach bus speeds up to 600 MB/s.
- 🏎️ CFexpress cards use PCIe/NVMe technology, which allows them to reach even higher speeds.
This means you must use the appropriate adapter to connect your memory card to your computer, depending on its type. Otherwise, your computer won’t be able to detect and access it, or worse, your card could be damaged.
It’s equally important that your computer and the recovery software you use support your CFast card’s file system. That depends on where and how you were using your CFast card. Here are some examples of camera brands and the formats they “prefer”:
| Platform | Format(s) |
| RED KOMODO | exFAT |
| Canon | FAT up to 128GBs, exFAT over that |
| Blackmagic | exFAT & HFS+ |
| ARRI | ARRI UDF |
To maximize the chances for a successful recovery, as soon as you realize you need to recover some files from your CFast card:
- 🛑 Stop using your CFast card immediately.
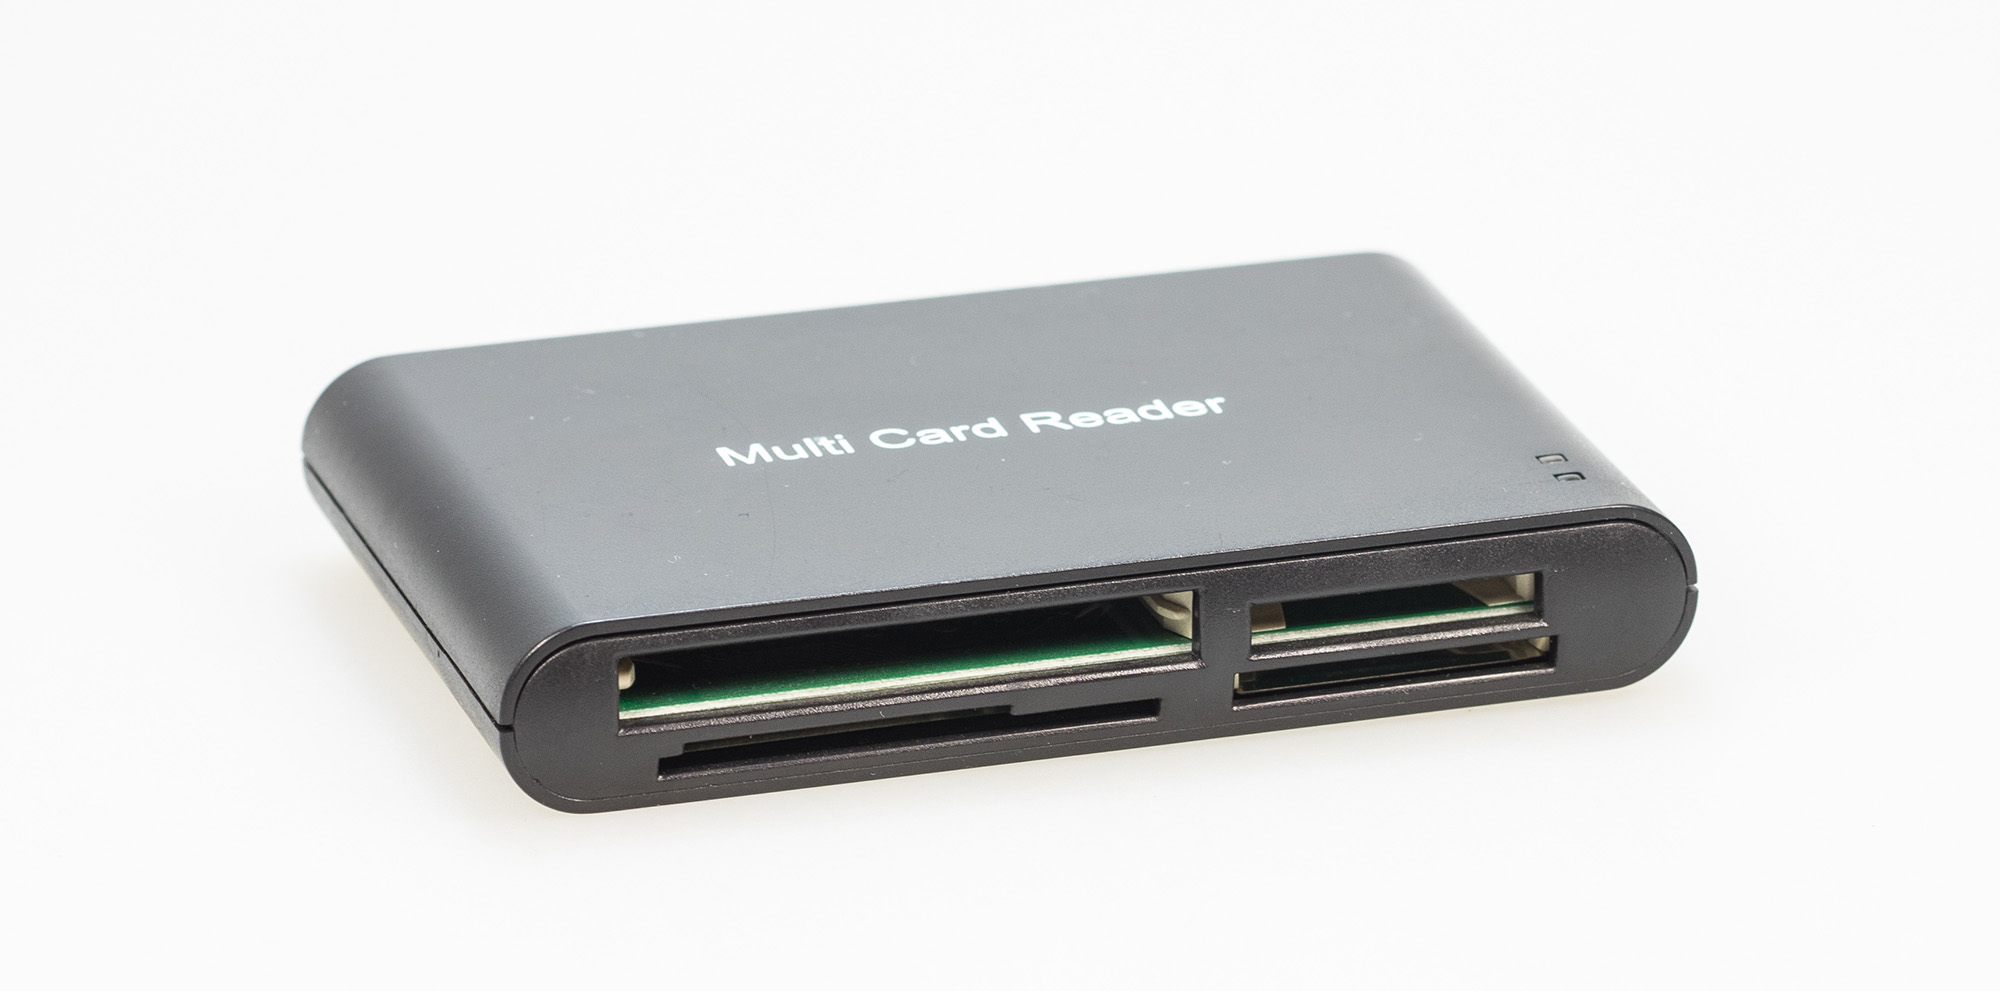
- 🟰 Use a compatible CFast 2.0 reader to connect your CFast card to your computer.
- 🪛 Do not perform any actions before the actual recovery, such as formatting, initialization, repair, or running CHKDSK/First Aid, even if your computer suggests doing so.
CFast Card Data Recovery Step-by-Step
For the vast majority of users, including demanding professionals, when dealing with data loss, salvaging your files from your CFast card with memory card recovery software like Disk Drill is the most sensible option.
That’s because the best recovery apps can natively handle the complex file systems often used with CFast cards, and even work with severely corrupted or damaged file systems that aren’t really recognizable or “usable” anymore (and appear non-existent or “RAW”). From there, they can locate and bring your important videos and photos back from the brink of extinction, even when their bits are scattered all over the memory card’s storage space.
To find your files on your CFast card using Disk Drill:
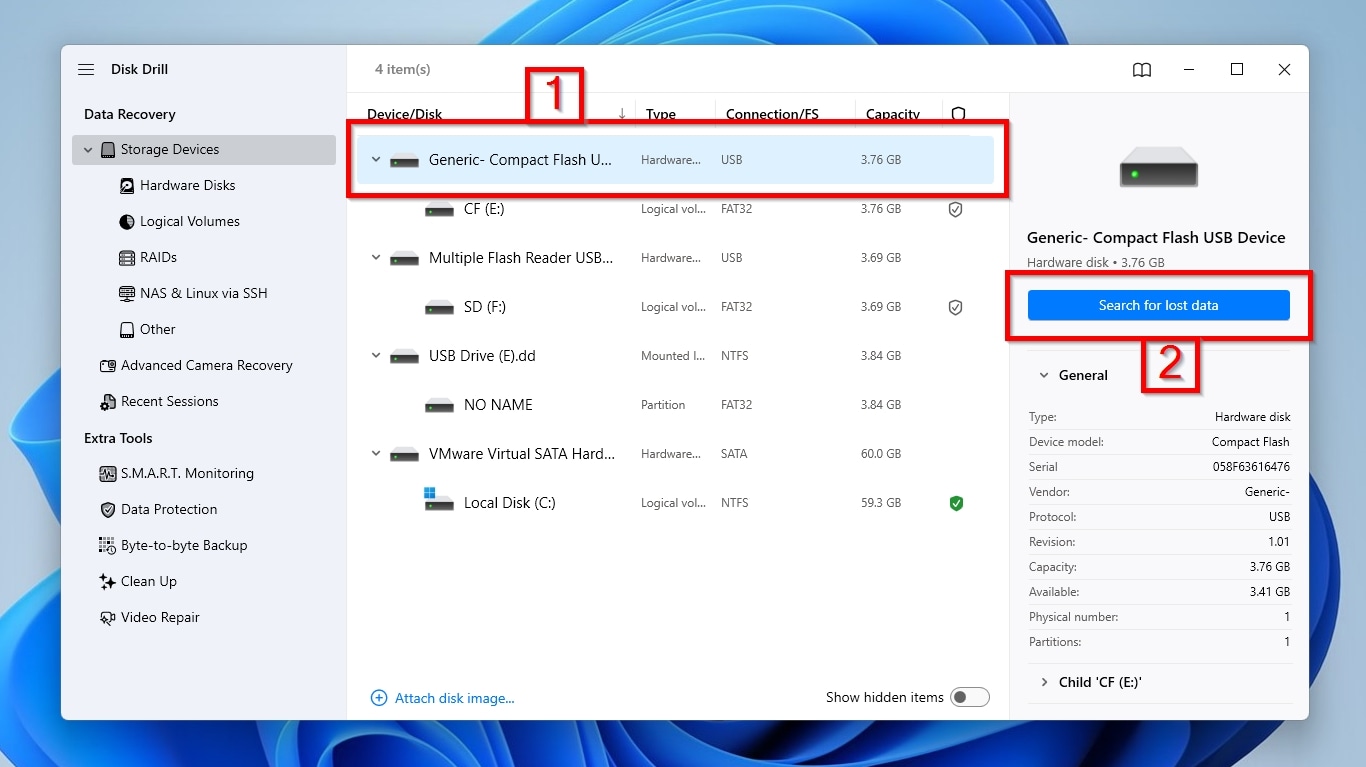
- Insert your CFast card into a compatible CFast 2.0 reader, connect it to your computer, and make sure it is detected. Download Disk Drill, install it, and run it. Move to the Storage Devices entry from the Data Recovery list on the left. Select your CFast card from the Device/Disk list (1) and click Search for lost data (2).
- Disk Drill has an established track record of recovering photos and videos from the most popular camera file formats, including MOV, MP4, MXF, R3D, CinemaDNG, ProRes, and RAW photo formats. However, the latest versions of Disk Drill include a new Advanced Camera Recovery module that excels at recovering such files (especially videos) when their data is fragmented. You can find more about that here. The app will ask you to select a scan mode. Choose the option best suited to the type of files you want to recover: if you prioritize potentially fragmented videos, go with Advanced Camera Recovery mode. To recover more file types, stick to its classic Universal Scan mode.

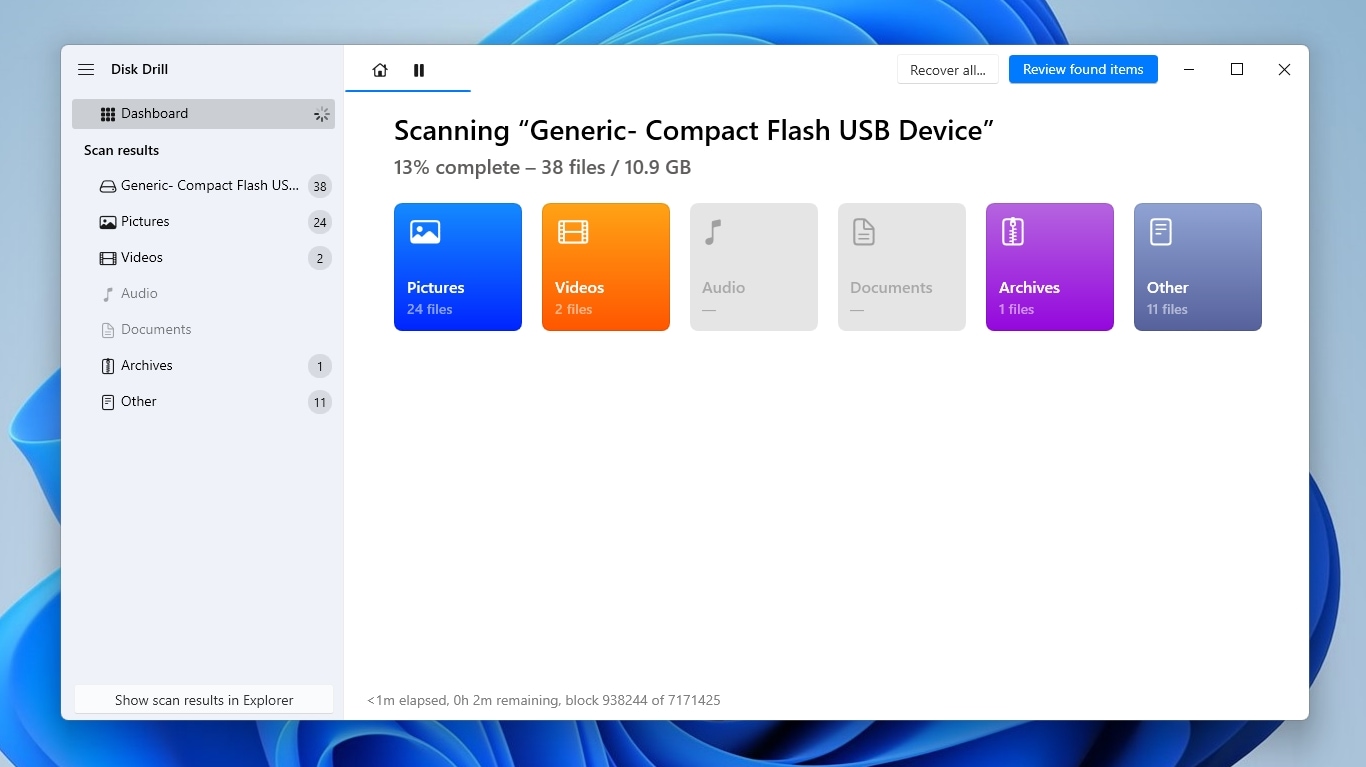
- Disk Drill will start scanning for files, and the process shouldn’t take long since CFast cards are quite zippy. The required time will depend primarily on your CFast card’s capacity and condition.
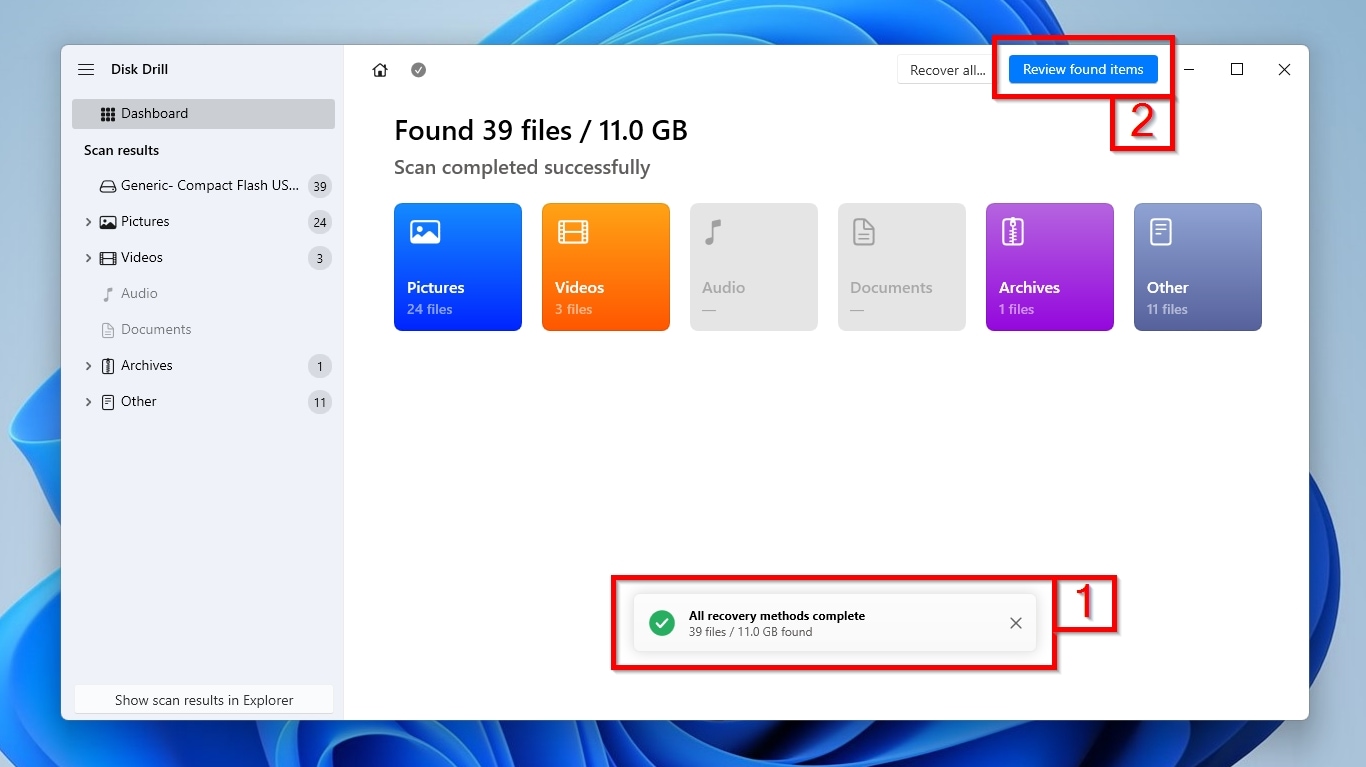
- When Disk Drill finishes scanning your CFast card, it will display a pop-up window stating “All recovery methods complete” (1). You can safely close that window and click Review found items (2) to see all the files the app located.
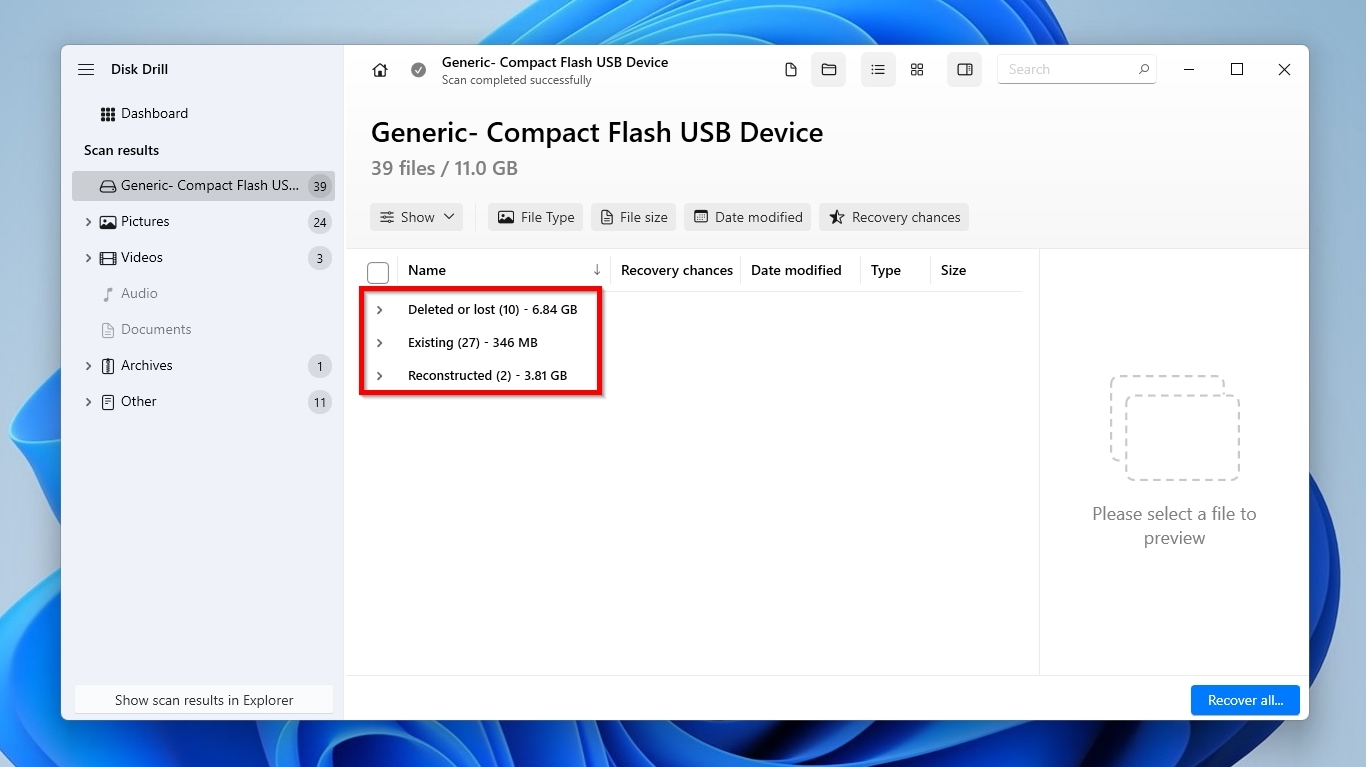
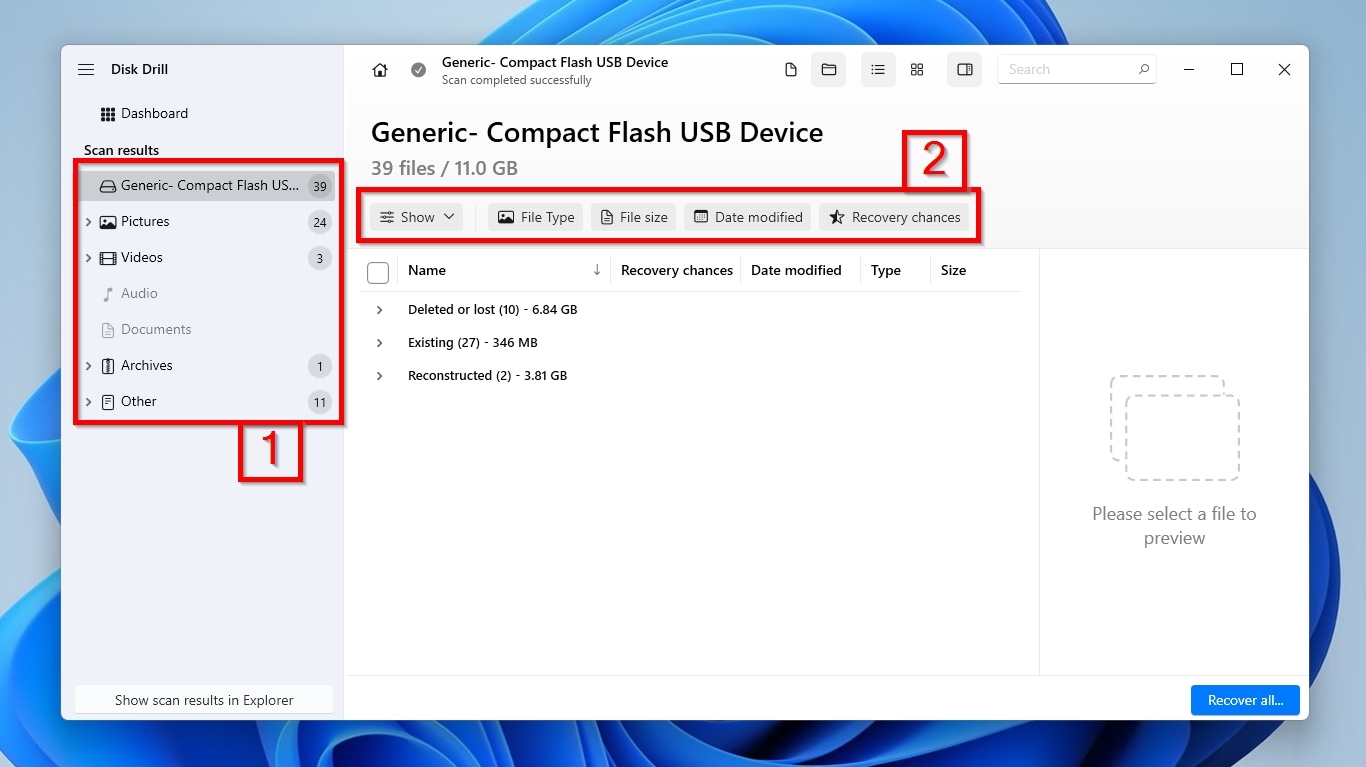
- To help make better sense of its results, Disk Drill organizes everything it finds into three groups: Deleted or lost are files that still exist on the storage card but aren’t normally accessible, as well as files the app located based on the file system’s metadata. The files that remain “visible” on the CFast card, for example, when using an app like Windows File Explorer, can be found under the Existing group. Finally, the hardest cases are files whose bits and pieces are scattered all over the CFast card, and the app has to reassemble them to make them accessible, classifying them as members of team Reconstructed.
- Still, even those groups may not help much on capacious CFast cards that house thousands of files. In such scenarios, you can turn to the app’s categories (1), which are accessible from the list on the left under Scan results, or its filters (2), which are conveniently placed over the results. Those let you reduce file clutter by seeing only files that match specific criteria, such as pictures or videos, or files within a specific size range.
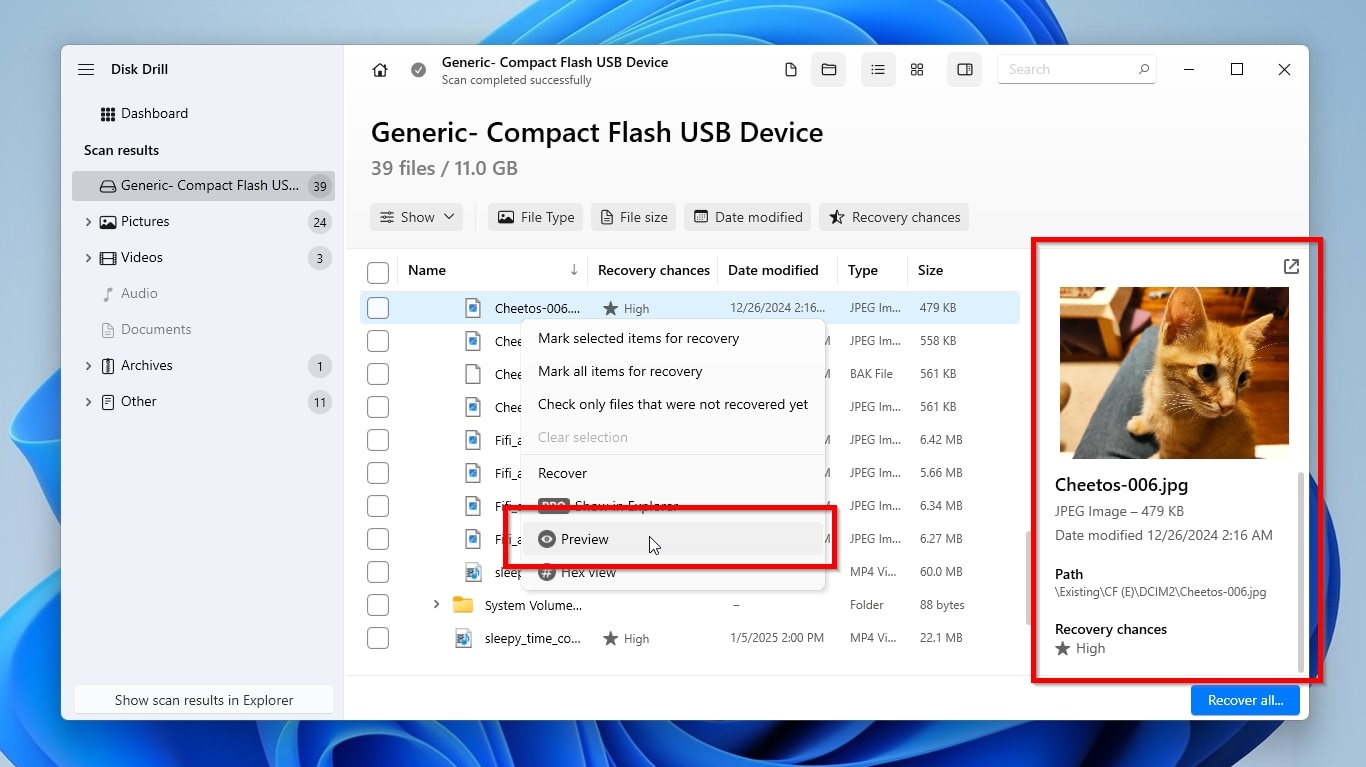
- For most of us, it’s usually impossible to recognize files purely based on their filenames to decide whether to recover them. Thankfully, Disk Drill allows us to preview many file types it recognizes natively, or for which viewers are installed on the operating system. The app’s preview pane should be visible by default on the right side of its window and update when you click any supported file, displaying a preview of its contents. If it isn’t, you can summon it by clicking on the hovering icon with the little eye that shows up when you point at any file, or by right-clicking on an entry and selecting Preview.
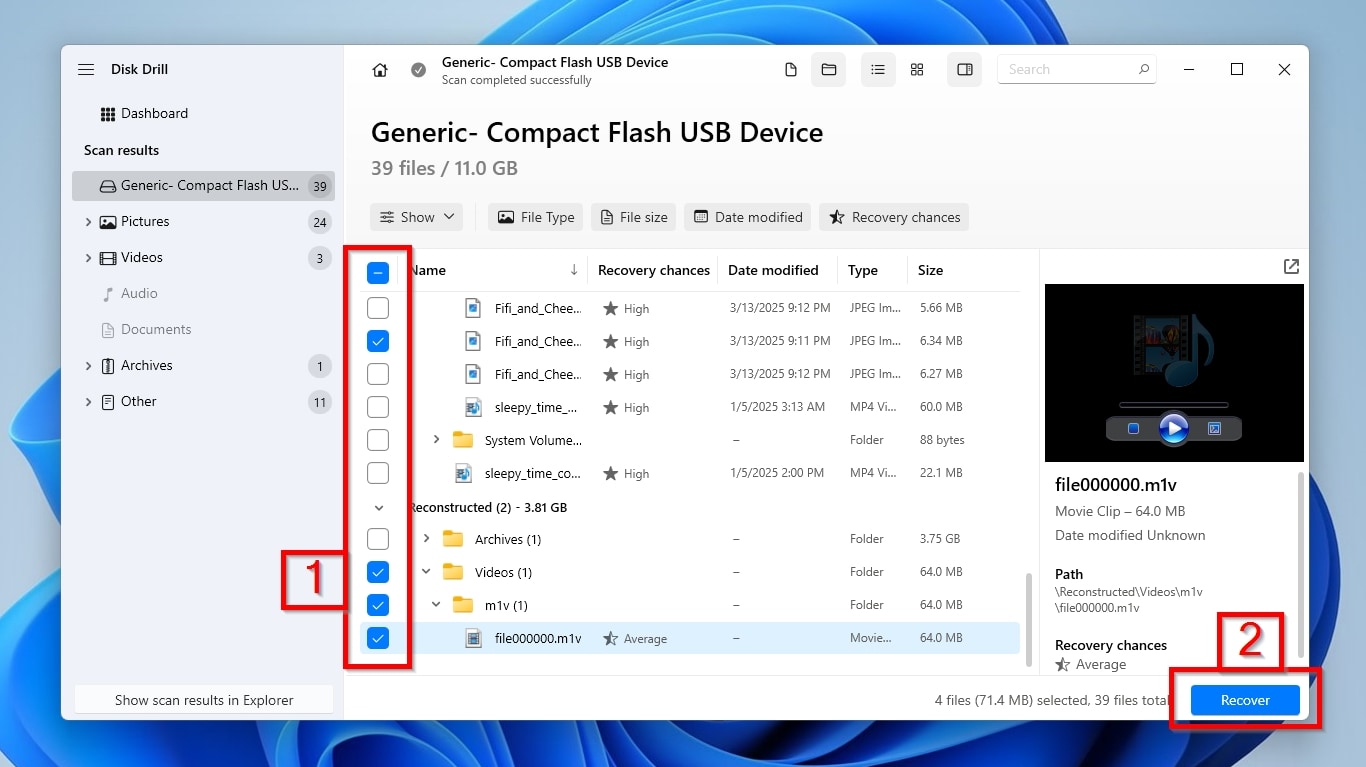
- To mark files for recovery, place a check mark on their left (1). When you have selected all the files you want to get back, click Recover.
- Disk Drill will ask you where you want to store the recovered files, presenting a list of default locations. Among them, you may see folders you had selected in past runs (1) if you had used the app before. If the folder where you want to store the recovered files isn’t among them, click Choose destination (2) and select it from the file requester that shows up. When done, click Next (3).

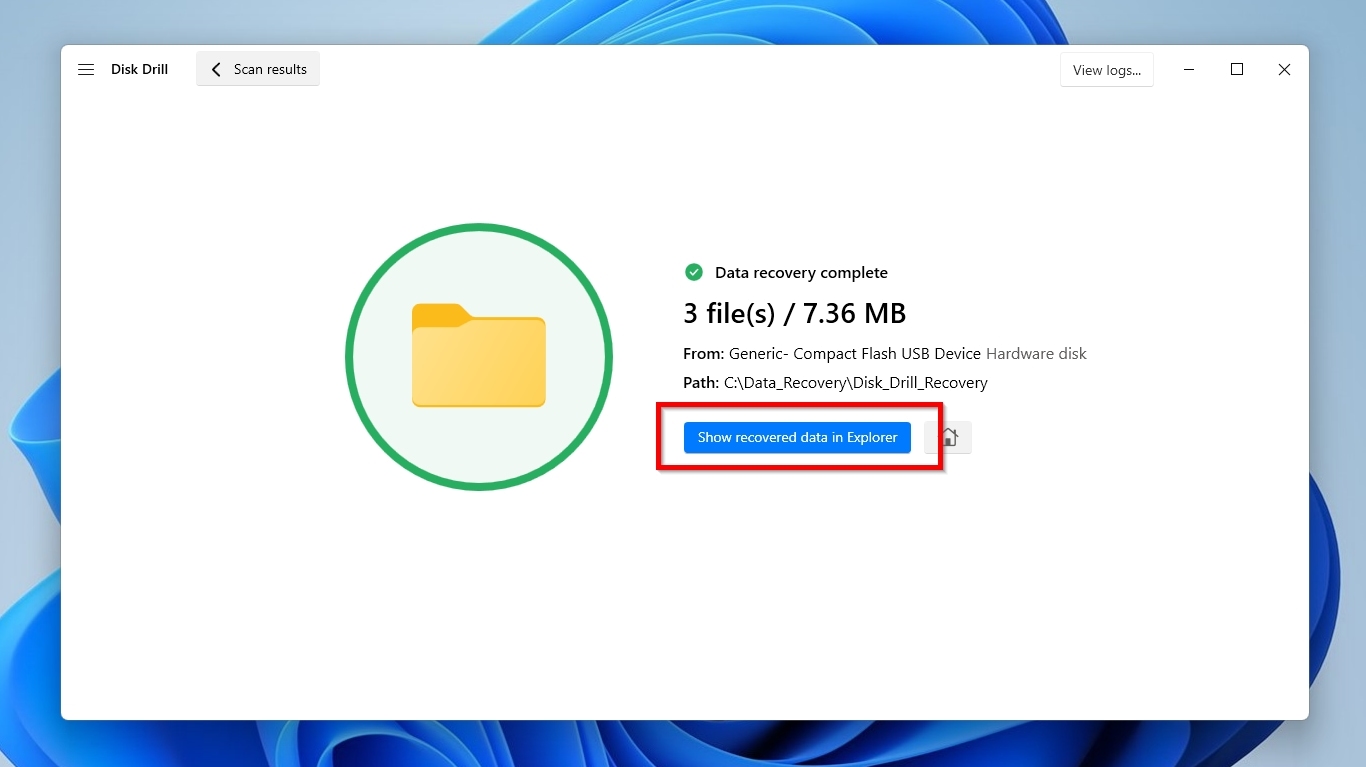
- Soon after, Disk Drill will have recovered your check-marked files to the target folder you selected, and report that Data recovery (is) complete. You can click the friendly, blue Show Recovered Data in Explorer button to view your files in the default file manager.
Some may wonder, in a sea of great data recovery solutions, why choose Disk Drill for CFast card data recovery? Here are some of the reasons Disk Drill is one of the best options for the task:
- The app replicates its user-friendly workflow across Windows and Mac, offering the same familiar experience.
- Disk Drill doesn’t treat memory cards and removable storage devices, including CFast cards connected via a reader, as an afterthought, but as first-class citizens alongside the rest of the storage devices it supports.
- As long as your card is visible to your computer and operating system, Disk Drill can scan it and recover your files, even if its filesystem is damaged or the OS asks to format it.
- Disk Drill lets you preview the files it locates, so you can make sure you’re marking the correct ones for recovery. As a bonus, this also serves as a preliminary test of their recoverability (since if a file is previewable, it’s likely intact).
- The app includes an additional byte-to-byte backup/imaging tool, which is especially useful for unstable or rapidly failing cards.
- Its camera and video-focused recovery capabilities can prove a lifesaver when dealing with large or fragmented footage that might otherwise be deemed unrecoverable.
How to Address Other CFast Card Issues
DIY CFast data recovery may be the best approach when you cannot access the files on your card, but it isn’t a panacea for every single issue that may plague a CFast memory card. Sometimes you should take some extra steps beforehand, or choose an alternative solution. Such scenarios include:
- ⛓️💥 Corrupted filesystems.
- 👁️ The computer or OS not detecting the CFast card, or not recognizing it as a storage device.
- ❌ Truly deleted files (whose data has been partially or entirely removed from the CFast card).
- 🔨 Physically damaged CFast memory cards.
If you’re dealing with one of those cases, you can skip any data recovery attempts, at least temporarily. Instead, check the following three sections for information and solutions that could help with such adventures.
CFast Card Corrupted or Unreadable
Your computer or camera detecting your CFast card doesn’t guarantee its faultless operation. The operating system might fail to recognize or access the CFast card. Even if you meet alarming errors like “The volume is not recognized” or “You need to format the disk”, you can still recover data from a formatted SD card or CFast card. But what if some folders insist on being unreadable, and no matter how thoroughly you search, you are unable to locate some vanished files? Making sense of a damaged directory structure can prove impossible, or your camera or computer may keep stumbling when attempting to open one or more photos or videos.
Those are usually signs of file system corruption, a common issue that requires you to fix a corrupted SD card or CFast card to regain access to the photos and videos on it. Thankfully, this problem usually leaves (most of) your files unscathed. Data recovery solutions can’t fix it, but can help with the “accessing your files” part, and should be your first stop as long as your CFast card is correctly detected.
Start by following the steps we saw in the CFast card data recovery section of this article to recover your photos and videos from it. With your files safely copied to another storage device, you can address the actual issue using one of the following methods to make your CFast card usable again.
👍 Formatting: Formatting your CFast card can recreate its filesystem records from scratch and render it accessible again.
To format your CFast card on Windows 11:
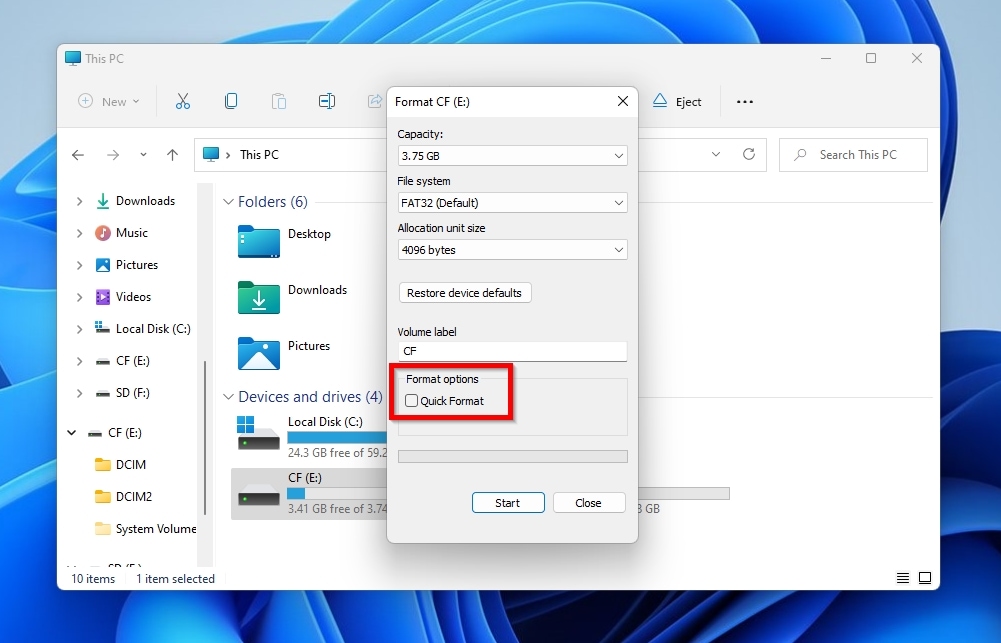
- Open Windows File Explorer, right-click your CFast card, and select Format.

- To make sure the process detects bad blocks, skip the Quick Format and perform a full format. This is a thorough process that goes over all of your CFast card’s storage to ensure that all its sectors are erased and ready for use.
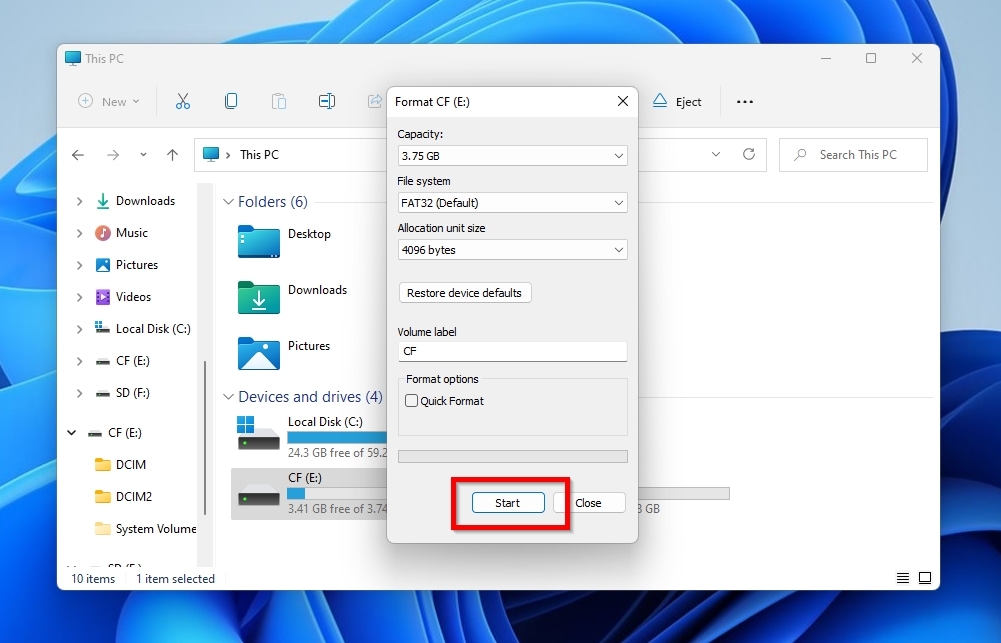
- Click Start, acknowledge any warnings, and soon your CFast card will be as good as new again.
🔍 TestDisk: A popular app among those that find themselves on data-loss-related adventures, and often for all the wrong reasons, TestDisk isn’t the best option for recovering your inaccessible photos and videos. What it is, first and foremost, is a tool for recovering lost partitions, hopefully with their contents intact. TestDisk can also try rewriting the Master Boot Record, rebuilding the boot sectors of devices formatted with either FAT or NTFS, and locating EXT2/3/4 superblocks. All those processes inadvertently write data to your CFast card and alter its existing data structures, reducing the chances of successful photo or video recovery.
💥 CHKDSK: Windows’ built-in tool for fixing corrupted files and dealing with file allocation errors is, in many regards, a relic from ancient times. We’re not referring to its nonexistent interface, but to how CHKDSK has failed to keep up with modern technology and is best used on old mechanical HDDs. On modern NVMe and somewhat older SSD storage solutions, CHKDSK can make things worse. Such memory-based storage solutions rely on TRIM to optimally restructure all data on them daily and can withstand a finite number of writes before failing. As a result of its typical operation, CHKDSK can perform a large number of writes to them, reducing their lifespan, while coming up empty-handed because of TRIM.
CFast Card Not Showing Up
A prerequisite for all the solutions we saw so far is that your CFast card is detected and accessible. What can you do, though, when your CFast card is nowhere to be found?
Let’s go over some of the reasons this might happen and what you can do about it.
Connection Issues
An imperfect or outright incompatible connection can prevent your CFast card from being detected by your computer. To rule such issues out:
- Make sure you are using a compatible CFast 2.0 reader. Remember that CFast and CFexpress have a similar form factor but rely on different technologies, so you need a different type of card reader for each.
- Not all USB ports on a PC are identical, and some may even rely on different storage controllers. If your CFast card reader doesn’t work in one USB port, try connecting it to another.
- Like the USB ports themselves, USB cables are built for different standards. If you’ve tried connecting your card reader to all the USB ports on your computer and your CFast card still isn’t detected, it’s worth trying another cable (or two).
System Visibility Problems
Sometimes your computer may have detected your CFast card, and Windows may have acknowledged its existence, but it may not have mounted it “behind” a letter. Some causes for that are:
- The CFast card is offline.
- The OS thinks your CFast memory card is uninitialized.
- Windows cannot recognize the CFast card’s filesystem, or believes its space is unallocated or RAW. Note that specialized RAW SD card recovery software can often help with such issues.
As a result, the CFast card won’t only be inaccessible through Windows File Explorer, but may not even appear among other storage devices.
In the first case, you can try “bringing the CFast card online” by:
- Pressing the Windows Key + X combination and selecting Disk Management.
- Right-clicking on the CFast card’s entry and choosing Online.
For the second and third groups of causes, though, you shouldn’t try to initialize, format, check for errors, or perform any other action on your CFast card, even if the OS suggests it. Doing so could overwrite any data that already exists on it. Instead, if you can see your CFast memory card in the Disk Management panel, but cannot access it normally, refer to our step-by-step guide for recovering your files to another storage device.
Hardware Shenanigans
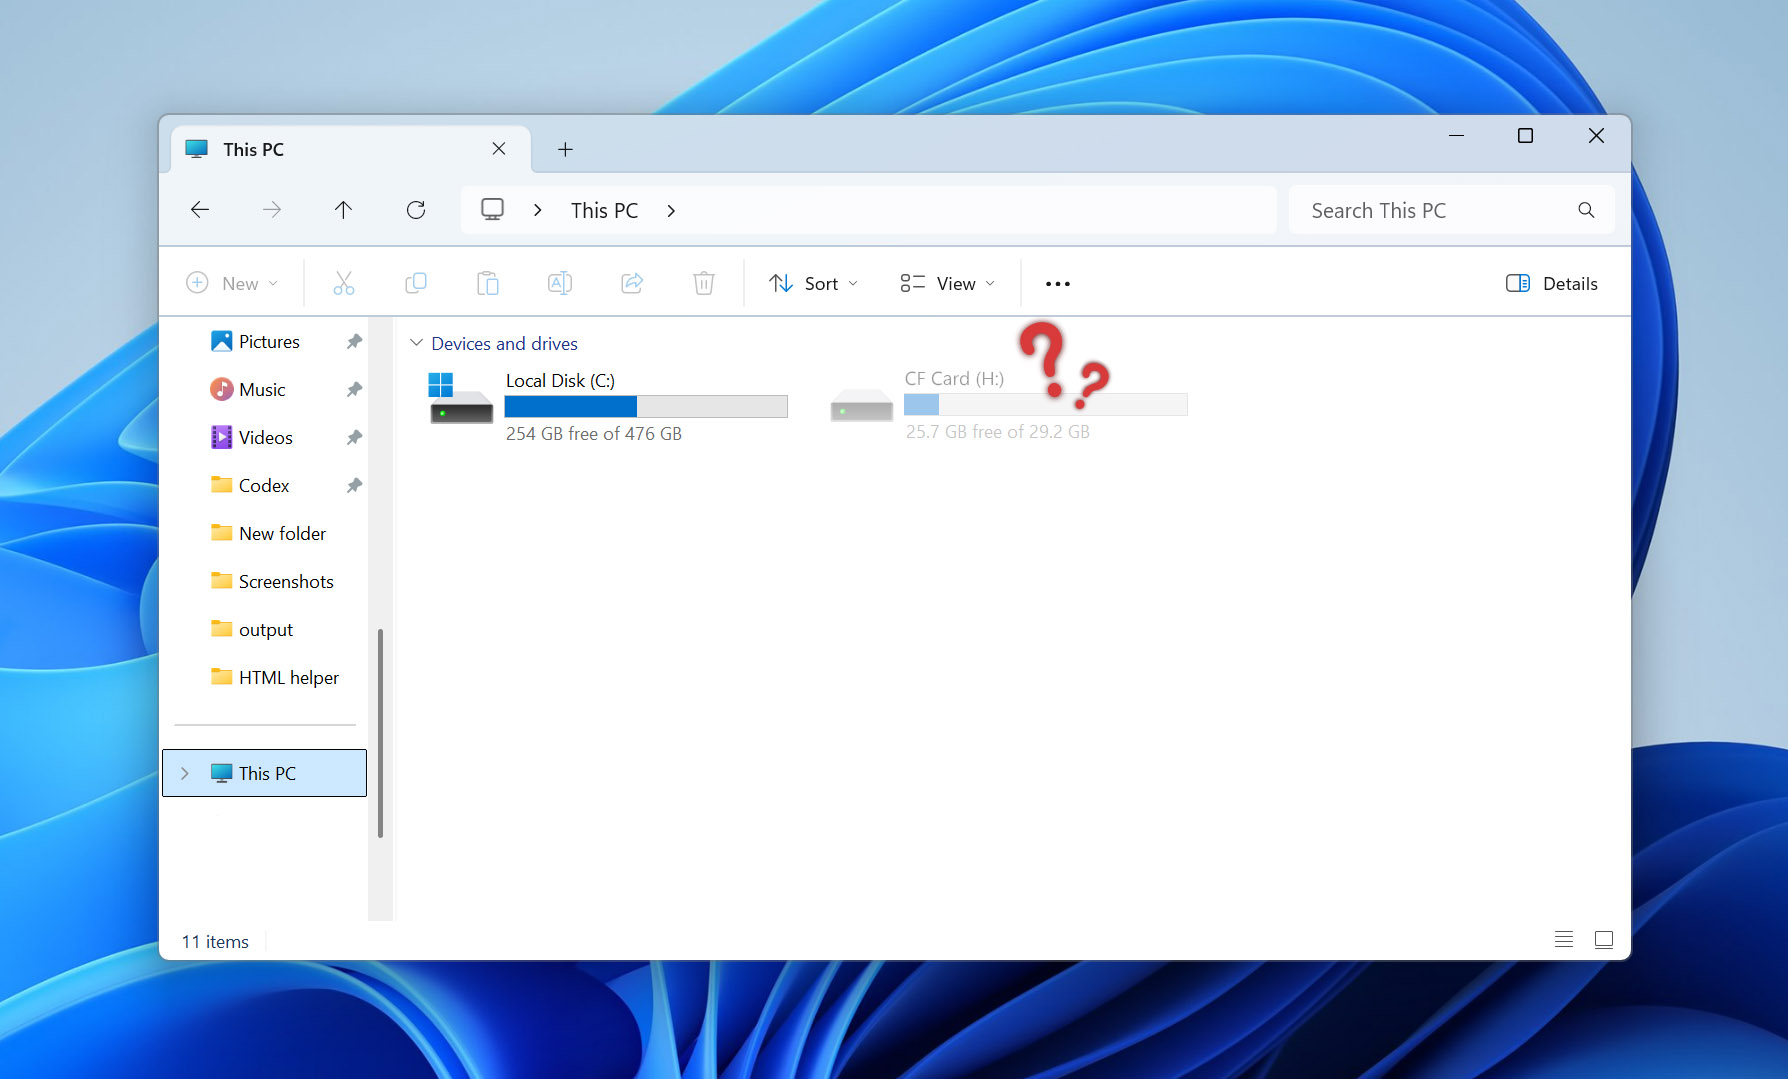
Does Windows recognize your CFast card, but it…
- Shows up as an empty drive with no media inside it?
- Presents a wrong capacity?
- Has a newfound tendency to randomly and repeatedly disappear?
Those can be signs of problems with its memory chips or its controller, which usually indicate its eventual failure. With no way to predict when that will happen, you should act as soon as possible and use a cloning/backup solution to create a pristine, byte-to-byte image of your CFast card’s contents.
Did imaging fail, or is your CFast card not detected by any device where you’ve tried it? There’s not much more you can do with the DIY approach, even when equipped with the most capable software. When you reach that point, it’s best to stop trying to access your CFast card, since every action could make things worse. However, a professional data recovery service like CleverFiles Data Recovery Center may still be able to bring your files back.
Physically Damaged CFast Card
A positive mindset can help when dealing with the worst possible scenarios, like CFast memory cards with…
- 🩼 Bent or broken connectors.
- ⛑️ Impact damage/cracked casing.
- 🧫 Visible corrosion.
- 💦 Water damage.
- 🔥 Deformation after exposure to heat.
…including those that were forced into the wrong slot/reader. As for what could be positive about such critical problems, the very knowledge that the average user can’t do much about them can strangely be calming. No reason to worry if the data recovery solution you chose will manage to find your lost files on your CFast card, if they’ll be intact, or if an alternative approach could reap better results. No wasting your time and effort on an endeavor that could prove disappointingly fruitless.
In such cases, it’s best to move directly to the acceptance stage and stop any attempts at DIY CFast card data recovery. No reason to repeatedly disconnect and reconnect the CFast card using multiple card readers, USB ports, cables, computers, and cameras. Nor to try to aggressively clean its contacts, to pry it open to test your skills as a digital surgeon, or to attempt other improvised repairs.
The path leads to a trustworthy data recovery center, where specialists who know their craft will treat your CFast memory card as a patient, not a guinea pig. And it’s one of many (potential paths), since even when DIY is out of the picture and data recovery professionals are the only remaining choice, you still have options, as evident in our guide to the best data recovery services.
Bottom Line
As we saw in this guide, it’s usually possible to safely recover your files from a CFast memory card as long as you’re dealing with logical data loss (as in “not physical”, AKA: hardware problems). However, you should spring into action at the first sign of issues, and proceed carefully while remembering the following:
- 🛑 Stop using your CFast card until your files are safely recovered from it onto another stored device.
- 🤝 Use a compatible CFast card reader.
- 🪛 Do not format, repair, or perform any other action that could write data on your CFast card before recovery.
- 🪞 Are the problems worsening, and your CFast card acting unstable, actively failing before your eyes? Prioritize taking a complete byte-to-byte backup image of all its contents before trying anything else.
- 🎣 If your computer can detect your CFast card and the operating system allows access to its contents, you can use data recovery software to extract your files with a DIY approach.
- 🧑⚕️ If your CFast card is physically damaged, cannot be detected, or all your recovery attempts have failed, leave the DIY approach behind and use a professional data recovery service.
More importantly, never give up hope: even when DIY fails, the worst-case scenario is that, for a relatively affordable fee, and some wait, a professional data recovery service can return your precious files to you.
FAQ
Although CFast cards sit in a strange spot, where they share just as much with portable memory cards as with larger computer-based storage solutions, they’re still storage devices from which you can recover data. However, you have to take their quirks into account, use a compatible card reader, and make sure that the recovery software and your operating system support their file system for optimal results.
Although they share a similar form factor and, at a glance, may seem identical, CFast and CFexpress memory cards actually use different technologies. CFast cards use the same tech and connectivity as older, established SSDs. In contrast, CFexpress cards rely on newer but incompatible tech and connectors that are closer to those found in highly performant NVMe drives.
Make sure you’re using a compatible CFast card reader and that you’ve tried it on all available USB ports on your computer. To eliminate any chance of incompatibility, also try other USB cables and, if available, another CFast card reader or a second computer. If none of that helps and your card still isn’t recognized, it’s best to call it quits on any DIY data recovery and contact a professional data recovery service.