


Is your iPhone photo library completely overwhelmed by photos and videos? iPhone media files are huge, making them a great cleanup target for reclaiming storage space. But cleanup can be slow and frustrating—especially if you’re just manually going through your library.
After researching how other users clean up their iPhones, and testing different methods on our team’s own devices, we compiled a detailed guide on the most efficient and systematic way to clear photo storage on your iPhone.
Why Do My Photos Take Up So Much Space on iPhone?
After applications, photos and videos take up the majority of your device’s storage space. In fact, even a few photos and videos can “cost” a lot of storage space on a modern iPhone, because of the advanced camera features and complex media file types available on newer devices.
Here’s a quick breakdown of the types of media we’ll be cleaning up throughout this guide:
- High-resolution media: iPhones capture photos and videos in stunning quality–but that also means they hold more data. For example, an Apple ProRAW image can “cost” over 100 MB of storage. Full-resolution images and 4K videos also cost a lot of storage space, with the latter potentially exceeding 100 GB based on duration.
- Complex media types: iPhone photos can be more than just simple images; a Live Photo, for example, is a media file that combines a still image, a short video clip, and an audio clip. Burst Photos are a collection of pictures captured rapidly in succession. These media types take up far more space than simple images.
- Media clutter: Your photo library can also get inundated with clutter. Similar or duplicate photos, blurry pictures, old screenshots, snapshots of receipts, and other types of “digital junk” can slowly take up dozens (or even hundreds) of gigabytes over time.
At the end of the guide, we’ll show how to change a few settings on your iPhone so that your media takes up less space. But first, we’ll show you how to verify how much your photos actually use on your device.
How to Check How Much Space Photos Use on Your iPhone
The Settings app on your iPhone has a page dedicated to analyzing how your device’s storage space is being used–including your photos and videos. Here’s how to find it:
- Open the Settings app.
- Scroll down and select General.
- In the General page, tap iPhone Storage.
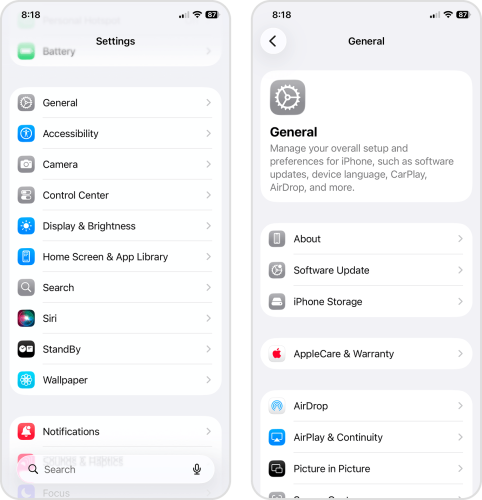
- At the top of the page, you’ll notice a colorful storage bar. This indicates what type of data is using up storage space on your device, as well as how that space is distributed.
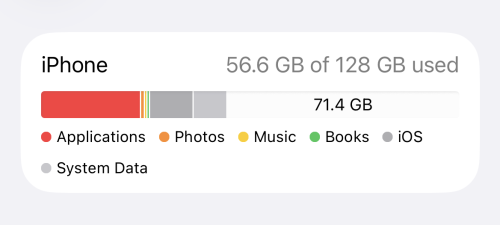
The orange Photos category represents your photo library or gallery–in other words, all the media (both photos and videos) that resides in the Photos app. If it makes up a huge chunk of the storage bar, that’s your sign to clean up your library. Fortunately, that’s the topic we’re covering today.
How to Free Up Photo Space on iPhone
In this section, we’ll cover 5 ways to clear photo storage on iPhone. We start with the fastest and most effective methods first, but we recommend going through every section to make sure you reclaim as much wasted storage as possible.
Method 1: Clean Up Your Photo Library with an App
After testing several different methods (which we’ve also included in this guide), we found that using third-party cleaning apps is the fastest and most efficient way to clear up photo storage on iPhones. They’ve got way more features than the built-in Photos app, and they’re specifically designed to make cleanup more convenient. Some apps even help you organize your library better than the native Collections, which makes maintaining your media a lot easier.
For this guide, we’ll be using an app called Clever Cleaner. It has a small but powerful set of cleaning features that cover the most common cleanup targets in your library, including Live Photos, large videos, similar and duplicate photos, and more.
It also has a very generous free version (compared to many similar apps); even if you plan to use it routinely to maintain your iPhone’s storage, most users will never need to subscribe. And we won’t be using the Pro for this guide, so anyone should be able to follow along.
- Download Clever Cleaner from the iOS App Store.
- Run Clever Cleaner.
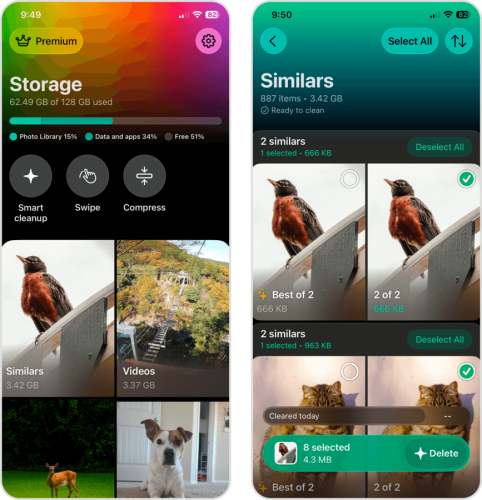
- The app’s main menu appears first. At this point, you can choose Smart cleanup and process your entire library at once. If you want to review your photos first, tap Similars.
- All the similar and duplicate photos should already be selected by Clever Cleaner for you–just tap Delete at the bottom. The “Best Shot” for each group is also chosen and saved automatically (although you can still select photos manually).
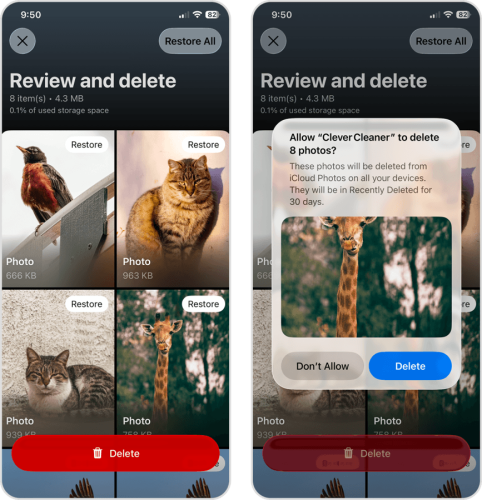
- The Review and delete menu will appear–make sure you didn’t get rid of anything important. Then, tap the Delete button.
- Finally, tap Delete again in the pop-up dialog box to confirm the action.
Aside from the Similars tool, Clever Cleaner has other very effective features that can help you manage your iPhone photos and videos, as well as free up storage space. Here’s a quick rundown of the app’s other tools:
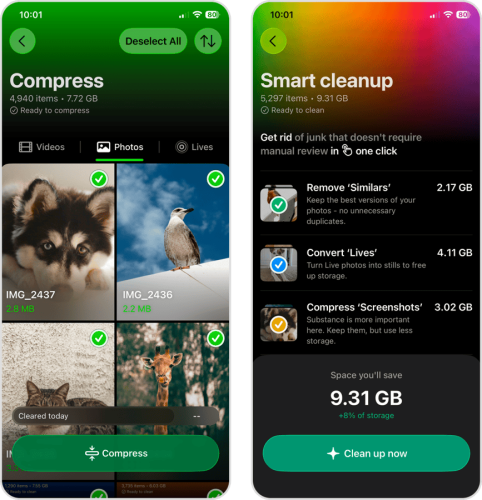
- Videos: If you have a lot of large videos, Clever Cleaner can compress multiple at once (which shrinks their file size in exchange for a small impact on visual quality). You can also delete unwanted videos more easily by sorting them by size or date.
- Swipe: The Swipe tool organizes all your photos and videos into monthly albums and other useful categories (e.g., Recent, Favorites, etc.), where you can easily save or delete items with swipe gestures. Swipe is completely free and unlimited for all users.
- Screenshots: Like with videos, Clever Cleaner can also compress screenshots (and other photos), which reduces their file size.
- Live Photos: Clever Cleaner’s Lives tool can instantly convert all Live Photos in your library into still images, which consume far less storage space (or just delete them).
- Compress: As a standalone tool, Compress brings all your media to one place and lets you apply compression to multiple photos at once (videos can only be compressed individually).
- Smart cleanup: Smart cleanup is a bulk applicator for the app’s other features. From the Smart cleanup page, you can: Remove Similars, Convert Lives, and Compress Screenshots, without having to manually review or select anything.
Method 2: Clear Up Photo Storage on iPhone by Removing Duplicates
If you don’t want to use a third-party app (or you don’t have enough storage space to download one), iOS provides a feature called the Duplicates utility. It automatically detects duplicate photos in your library, then groups them together so you can easily find them. You can then Merge your duplicate photos, which combines them into a single high-quality image.
- Open the Photos app.
- At the bottom of the screen, tap Collections. Then, scroll down to the Utilities section and tap Duplicates.
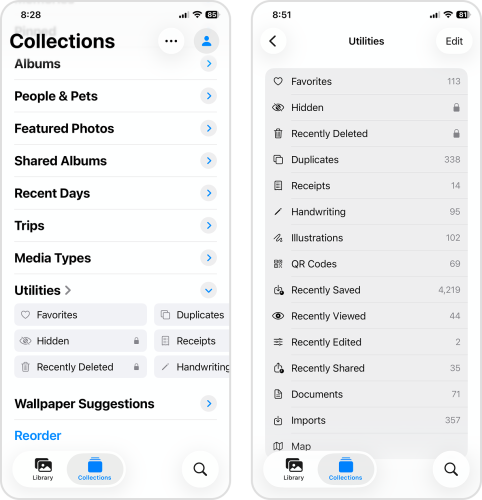
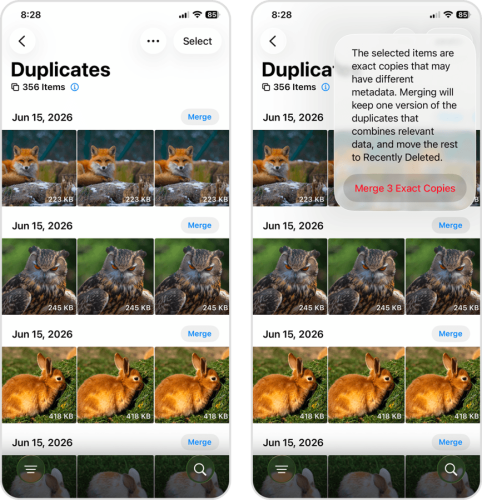
- Your duplicate photos will appear in groups, along with a Merge button. Tap Merge to combine all the duplicates in each group into one high-quality image.
- Tap Merge Exact Copies in the pop-up dialog window to confirm the action.
Method 3: Clean Up Screenshots (and Other Media Types)
Aside from the Duplicates utility, iOS has other ways to make cleaning up your library a bit easier. There are various Collections, Utilities, and Media Types that iOS creates to automatically group specific photos and videos together.
In this method, we’ll be covering categories that tend to accumulate clutter over time, as well as those that use up a lot of storage space. Consider them your primary “cleanup targets” to review if you want to free up photo space on your iPhone.
- Screenshots and screen recordings: We usually take screenshots and screen recordings to remember important details or take note of something, then forget about them shortly after. At the same time, it’s easy to accidentally trigger these features by pressing the side buttons.
- Bursts: Burst Photos contain many photos captured in immediate succession, as a way to capture a subject in movement in different frames. Then, all those photos are combined into one large file. Like screenshots, it’s easy to take Burst Photos by accident or without knowing you’re doing it.
- Live Photos: Unlike regular photos, Live Photos contain multiple types of data to create the effect of a “moving picture”; this includes a short video clip, an audio clip, and a still image that also acts as the thumbnail.
- RAW: RAW photos and videos are super high-quality because they save their original data without putting it through processing or compression (unlike processed formats like PNG). This is why RAW media can instantly obliterate dozens of gigabytes from your storage, even if you only have a few of them.
- Personal favorites: There are several other utilities and collections in your library that you probably use more than others. For example, maybe you take a lot of Selfies or Portraits (found in Media Types), or maybe you keep copies of old Receipts (found in Utilities).
Method 4: Free Up Photo Space with Optimize iPhone Storage
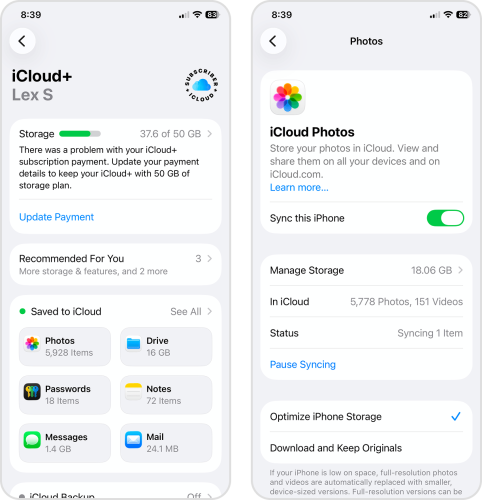
Aside from deleting unwanted photos and videos, another way to easily free up library space is by activating iCloud’s Optimize iPhone Storage feature. When you enable this setting for the Photos app, iOS automatically uploads high-resolution copies of all your media to iCloud.
Lower-resolution copies are then saved to your device’s local storage, which “cost” much less storage space than their high-quality counterparts. The local “low-quality” copies of your media are not even that bad, and iOS automatically downloads the high-resolution versions whenever you try to view a photo or video.
- Open the Settings app.
- Tap your Apple Account.
- On your Apple Account page, tap iCloud.
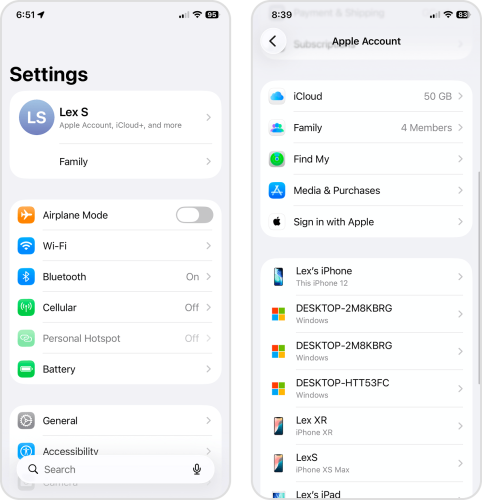
- In the Saved to iCloud section, tap Photos.
- Beside Sync this iPhone, slide the toggle switch to ON (green). Then, tap the Optimize iPhone Storage button to activate it (checked).
Method 5: Empty Recently Deleted
After cleaning up your photos (using any method), make sure to stop by the Recently Deleted utility in the Photos app. It stores all of your deleted media for up to 30 days before permanently deleting them, allowing you to restore anything that may have been important.
While your photos remain in Recently Deleted, they’ll continue to take up storage space until you remove them. We’ll show you how to manually clear your photos, without waiting for 30 days.
- Open the Photos app.
- At the bottom of the screen, tap Collections. Then, scroll down to the Utilities section and tap Recently Deleted.
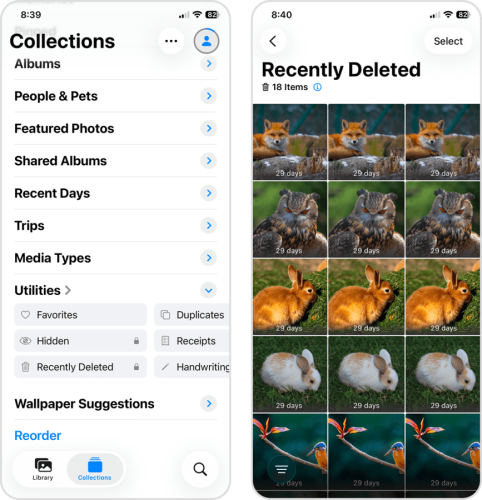
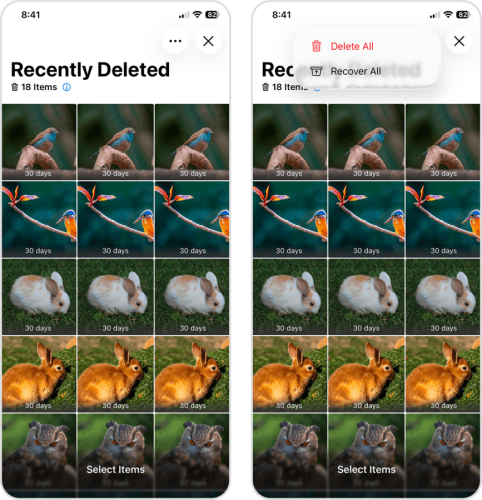
- Tap Select.
- Tap the photos and videos you want to remove. Then, tap the meatball menu and select Delete. Alternatively, tap the meatball menu and select Delete All if you simply want to erase everything.
How to Clear Photo Cache on iPhone
Your iPhone’s photo cache is a system feature that can store temporary media files, which allows your library to run more smoothly. Some examples of cache photo data include thumbnails, synced photo data, previews, and other local files.
iOS tries to manage its cache automatically, especially when storage gets low–which is why there aren’t a lot of options for manual cleaning. However, iOS doesn’t always pull it off flawlessly, so users have had to find indirect ways to reduce photo cache data manually.
Here are some examples of what you can do:
- Restart your iPhone. If you haven’t restarted your iPhone in a while, and you’ve downloaded or captured a lot of data, a reboot can force iOS to clear any temporary files that may have piled up. Restarting your iPhone also recalculates your storage, which updates the bar in the iPhone Storage menu (covered earlier in the guide).
- Update iOS. iOS updates can sometimes result in storage calculation bugs or indexing issues; updating iOS can help if the number seems stuck or vastly incorrect.
- Clear third-party app caches. Third-party apps that process a lot of media files, like messengers, cloud storage apps, social apps, and photo editors, tend to accumulate their own cache data (which is stored inside the app itself). Some apps, like Telegram, have built-in cache management features–you can usually find them in the settings.
- Clear browser caches. Browsers also generate photo cache data, such as header images on frequently visited sites. Safari’s cache management feature is found in iOS Settings (Settings > Apps > Safari), while Google Chrome, Firefox, Brave, and other third-party browsers have these options in their in-app settings.
Best Way to Keep iPhone Photo Storage Low Long-Term
After cleaning up your iPhone’s photo library, you can go one step further and reduce how much storage space future photos and videos end up using. In some cases, it’s as easy as changing a setting. Here’s what you can do if your iPhone photos are taking up too much space:
- Turn off auto-save in messaging and social apps. WhatsApp, Telegram, Instagram, Messenger, and other similar apps save media to your photo library automatically by default.
- Modify your iPhone’s camera settings. You can set your iPhone camera to capture more efficient image and video formats, with a minor cost to visual quality. Go to the Settings app > Camera and review the Record Video, Record Slo-mo, and Formats options.
- Disable Live Photos. Live Photos are enabled by default, which means even pictures of random receipts turn into “moving images.” You can enable and disable Live Photos by tapping its icon while the Camera app is running. To prevent Live Photos from being enabled again automatically, go to the Settings app > Camera > Preserve Settings.
- Run a cleaner app once a month. You can’t completely eliminate the generation of photo clutter on your iPhone; instead, create a habit of using a cleaning app (like Clever Cleaner from Method 1) at least once a month. This helps you manage your library before it gets bloated.
If you’ve done all you can to reduce storage consumption on your iPhone, and you’re still running out of space, you might need to increase its capacity instead. There are several ways to do this depending on your needs, but you can learn more through our guide on how to get more storage on your iPhone.
Conclusion
Let’s wrap up this guide as clean as your photo storage should now be. Here’s a stripped-down guide that condenses this article into a few bullets; you can click the links to quickly jump to the appropriate sections.
- Before cleaning your library, verify how much storage space Photos actually consumes on your iPhone.
- The fastest and most convenient way to clear photo storage is by using a third-party cleaning app.
- You can still efficiently clean up your photos without a third-party app, using the Duplicates utility and iOS’ own auto-generated collections, utilities, and media types.
- If you have no media left to erase, utilize iCloud’s Optimize iPhone Storage feature.
- After cleaning up your library, make sure to clear Recently Deleted in the Photos app to permanently remove them from your device and reclaim storage space.
FAQ
There are a few possible reasons why Photos is consuming a lot of storage space on your device. Here’s what to do about it:
- You’re capturing high-resolution photos and videos, which have large file sizes. Lower your camera settings via the Settings app > Camera.
- iOS hasn’t reindexed your library or recalculated your device storage. Keep your iPhone charged and put it away for a while, or restart your iPhone.
- You have a lot of photo cache data. Restart your iPhone, clear third-party app caches (through the app’s settings page), and clear your browser caches.
The fastest way to get rid of photo storage on your iPhone depends on the type of media you typically generate:
- Use a third-party cleaning app like Clever Cleaner (for automated general cleaning)
- Delete large videos
- Convert Live Photos to still images
- Erase old screenshots and screen recordings
- Delete Burst Photos or only keep one image from each set
- Clear the caches of third-party social and messaging apps, like Telegram, Instagram, TikTok, Messenger, etc.
- Enable iCloud’s Optimize iPhone Storage setting for Photos.
No, cleaner apps can’t clear your iPhone’s photo cache data. You also can’t directly clear your cache manually. Instead, do the following to manage your cache indirectly:
- Restart your iPhone.
- Update iOS.
- Clear third-party app caches (usually found in the app’s settings page).
- Clear your browser caches. For Safari, it’s in Settings > Apps > Safari. Other browsers provide this option in their in-app settings.
Cleaning up your photo cache is a different process from deleting photos and videos from your library. Your iPhone also generates photo cache data that isn’t part of the Photos app, like from downloaded pictures in a social or messaging app. You can try indirectly clearing your photo cache by restarting your iPhone, updating iOS, checking third-party app settings for cache management features, and clearing your browser caches.
