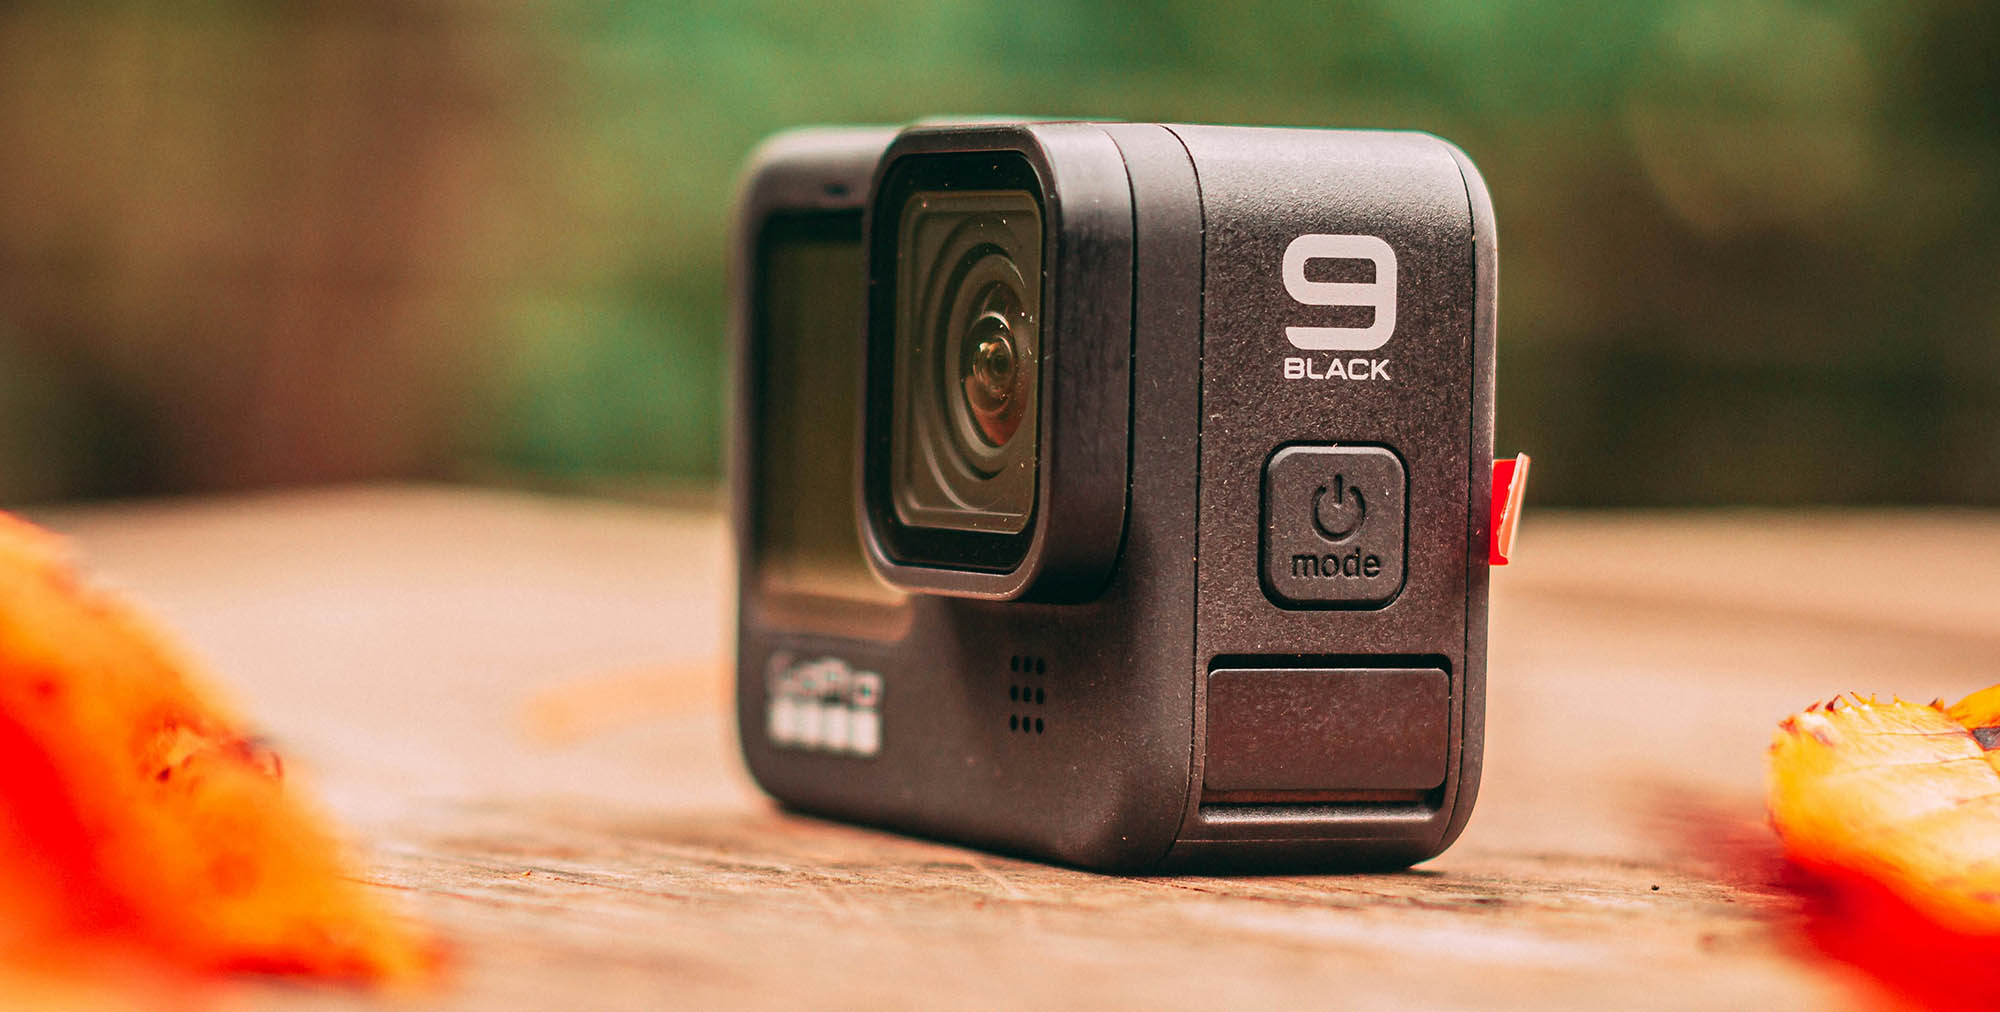
Does your GoPro HERO13, GoPro MAX2, or any other camera from GoPro’s range, often display errors like “SD ERR” or “NO SD”? Does it refuse to “collaborate” with your SD card, saying that it’s “too slow”, or do your recordings stop unexpectedly and your clips fail to play?
In this article, we will see how to fix such GoPro SD card errors, tackling all issues one by one, how to protect the files on your memory card if necessary, and how to get your videos back in working order.
Our in-house team of data recovery specialists has tested the methods we’ll cover on real memory cards and cameras to present you with the exact steps that consistently fix those problems.
GoPro Memory Card Error Troubleshooting Steps
Let’s see some of the most common reasons your GoPro might act wonky, present strange GoPro 11 Mini SD card errors, and you may lose access to the photos and videos on it.
Step 1: Inspect Power and Connections
✅ When this helps: Your GoPro stops responding and freezes, keeps restarting unexpectedly, or often shows messages like “repairing file/file repaired”.
Are you trying to troubleshoot your GoPro HERO 5 SD card’s errors? It’s easier to begin by checking for two of the commonest but also simplest problems to rule out: loose card connections and unstable power sources.
To check for connectivity issues:
- Closely inspect your SD card’s connector. Is there any visible damage? Can you see any marks or discoloration?
- Insert your SD card into your camera and check whether it stays put or feels wiggly. Does the camera detect it if you push it towards different angles with your finger?
- To rule out GoPro HERO 8 SD card errors caused by its SD connector, test your SD card in other devices, such as an external USB card reader on your computer.
- If your SD card isn’t detected, try diagnosing why.
To check for power-related issues:
- Try connecting it to the same port using a different cable.
- Check if your GoPro HERO 5 SD card’s errors also appear when on battery power.
- If available, try connecting it to another USB port.
- Test if the issues persist when a dedicated charger powers your GoPro.
If the problems appear only on a particular SD card, or you’ve deduced it’s the culprit:
- Connect your SD card to a computer equipped with an SD card slot or a standalone SD card reader.
- Use a data recovery solution to copy your files out of your SD card to another storage device.
- Try formatting your SD card, and if that doesn’t solve the issues, replace it.
What are the most probable causes for such problems?
One of the decisive factors in SD cards’ dominance is their manufacturing in accordance with standard specifications. Still, they’re not absolutely identical, and even a hair-thin micro-difference in their size may prevent a 100% connection between your SD card and your GoPro camera. Friction from repeated use can also wear down an SD card’s pins or loosen a GoPro camera’s SD slot connector.
Since GoPro cameras are the go-to option for sports fans, where bumps are a given, an imperfect connection can lead to disconnections and interrupted recordings.
As for the power-related issues? Unstable, underpowered, and fluctuating power sources, and the occasional incompatible (or “wiggly”) cable, can lead to GoPro HERO 4 SD card errors, recurring attempts from your camera to fix your SD card, and constant “repairing file” messages.
Some claim this can happen especially when using a GoPro as a dashcam connected to a car’s USB port, because it can overheat, and suggest removing its battery. Others believe that a car’s USB port may confuse a GoPro camera, causing it to repeatedly switch between data transfer and charging modes.
A more realistic take is that an older car’s USB ports may be underpowered for a power-hungry modern GoPro camera, failing to charge it as quickly as its battery depletes while in use as a dashcam. When that happens repeatedly, it can lead to unexpected restarts, interrupted recordings and write operations, and data corruption that requires a repair to keep using the SD card or accessing any affected files.
Step 2: Check SD Card Health and Authenticity
✅ When this helps: Making sure that errors like SD ERR, SD ERROR, or NO SD, strange behavior, and slow speeds, are not caused by a bad or counterfeit SD card (especially if it’s brand new).
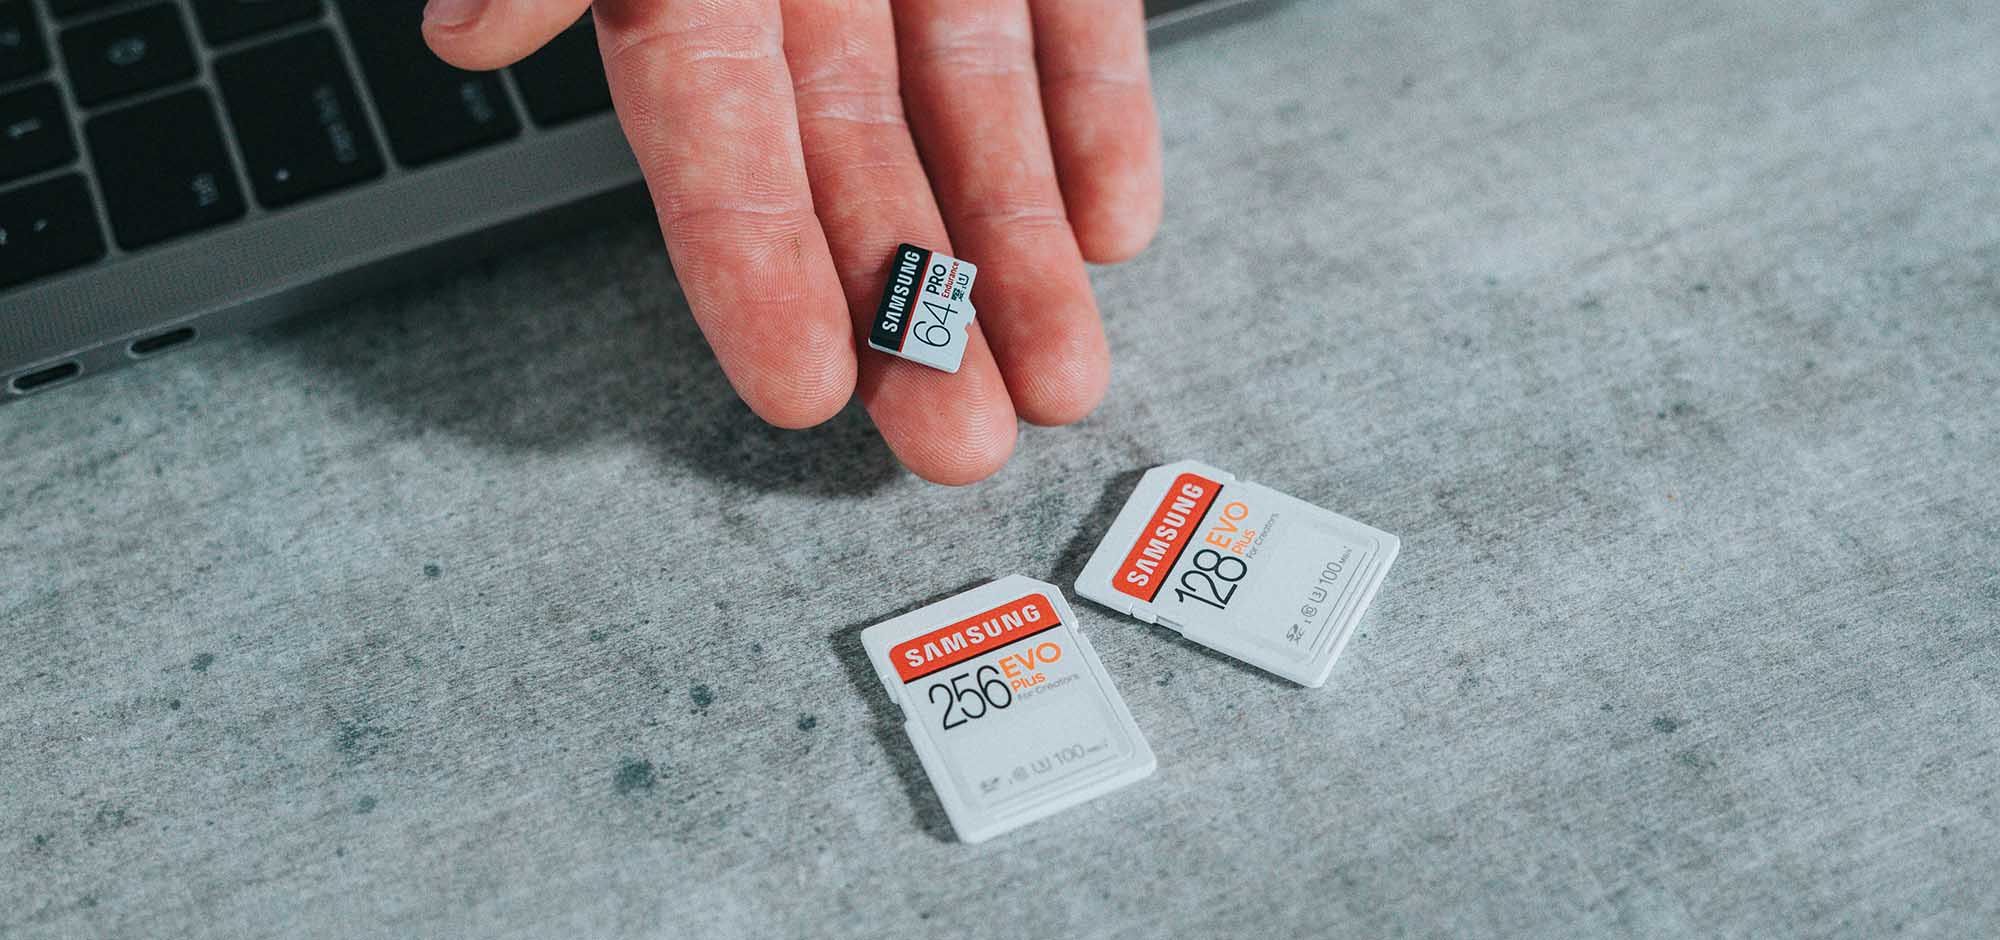
Many problems can occur when using damaged, inauthentic, or “low-grade” SD cards.
Start by inspecting your SD card to ensure there’s no visible damage.
- 🖼️ Are there any broken parts or scratches? Does it look “chipped”?
- 🔨 Does your SD card seem as if it’s splitting into separate parts, like you could pull its two “sides” apart?
- ☀️ Was it left in a sunny spot and now it looks somewhat bent or outright melted?
- ⚡ Is there any discoloration on its connector, does it look dirty, or as if a part of it went missing?
After ruling out damage, check your SD card’s authenticity.
- 🔍 If you’re not familiar with your SD card’s brand and you don’t have others to compare, search for it online, visit its official site, and take a look at its logo.
- 📝 Can you see any striking typos on it, like “Sundisk” or “Kinstone”?
- 🏷️ Does the logo on your SD card look identical to the one on the official site in shape, font, and color?
While on the manufacturer’s site, also compare your SD card’s specs with what’s listed there. If you can’t find it there, compare it with other online sources. If your SD card underperforms compared to the stated specs or keeps throwing errors, it’s time for some testing. H2TestW can help with that.
Since H2TestW is a Windows app, you will need a PC running Windows with an SD card slot or an additional SD card reader to use it.
To test your SD card with H2TestW, connect it to your computer and then…:
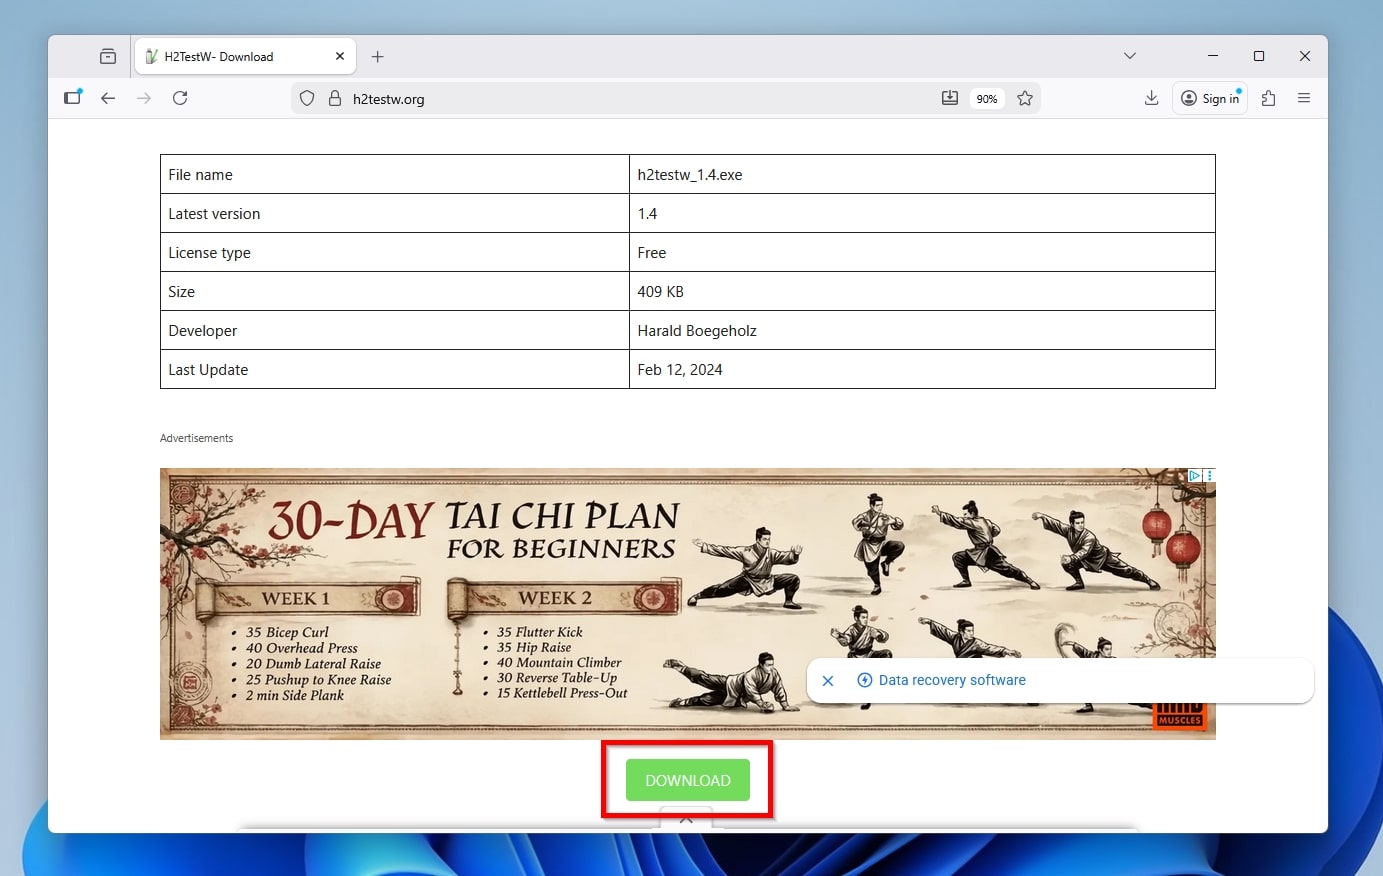
- Download the app from H2TestW’s official site. You may have to skip past some fake download links and scroll down until you see the table in our screenshot, under which is the real green-colored download button.
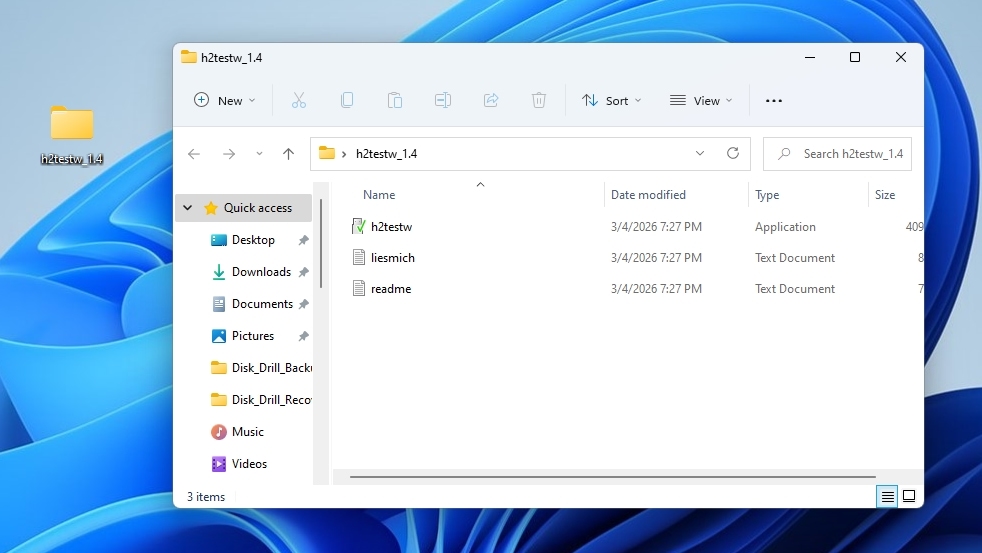
- Extract the downloaded archive, then find the h2testw.exe executable among the produced files, and run it.
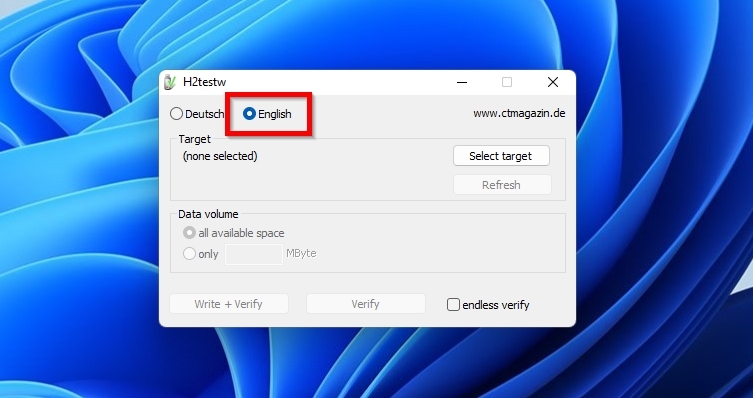
- The app comes with built-in support for two languages, and the non-German-speaking folks among us will probably want to switch to the second one, English.
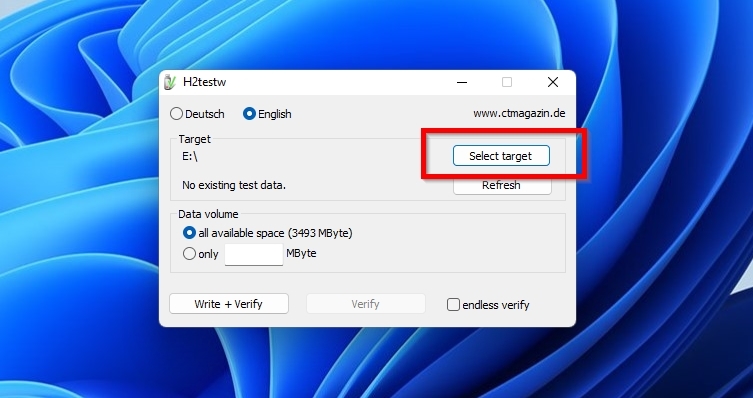
- Click Select Target, then go through the listed storage devices, and choose the SD card that you want to test.
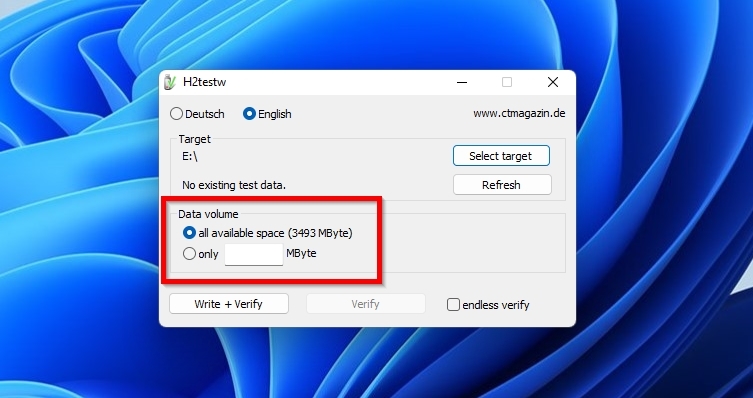
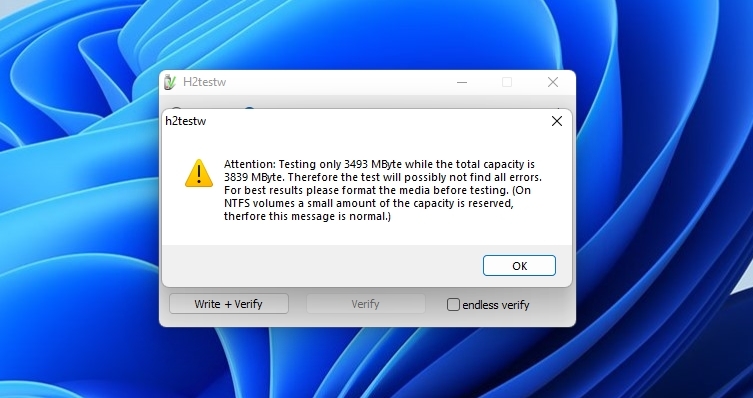
- H2TestW can test the available space on your SD card, or a specific amount of data that you can define by selecting the second option, Only X MByte. If you want to test your whole SD card, you must format it before testing it with H2TestW.
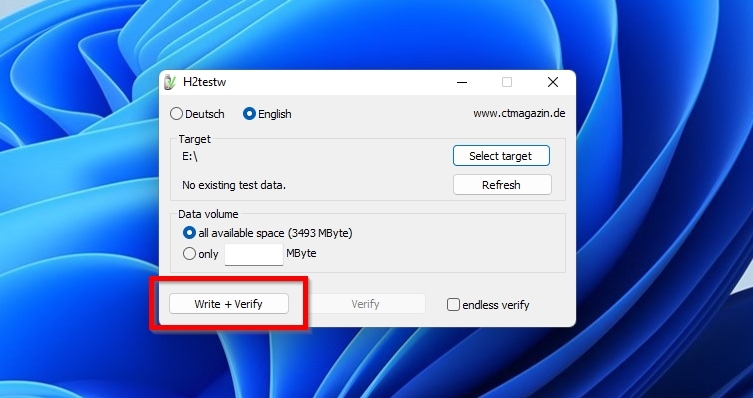
- To start testing your SD card with H2TestW, click on Write + Verify.
- If you didn’t format your SD card beforehand, H2TestW will display a warning that it cannot test the card’s total capacity. You can ignore that warning if the files you have already stored on your SD card are normally accessible and you only want to test the rest of its storage capacity.
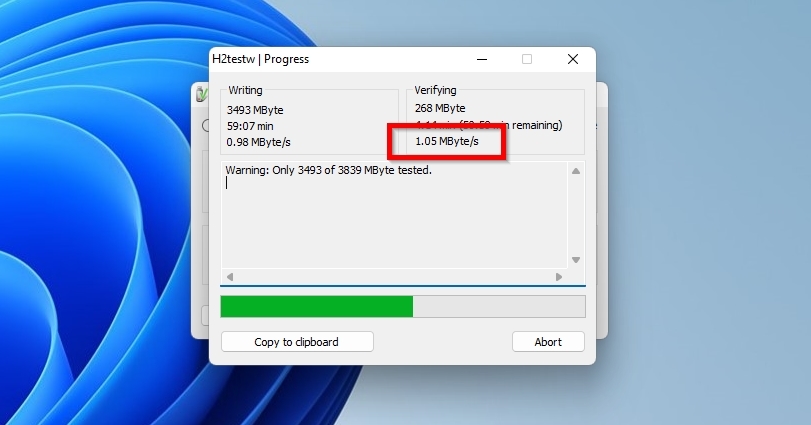
- The app will display a progress window showing the status of its writing test.

- After completing its write test, the app will proceed to a second step, verifying the data it wrote to your SD card.
- When the app completes its tests, it will present a report of its findings. It’s worth noting the reported writing and reading speeds, since if they’re much lower than the ones stated in your SD card’s official specs, that’s a major indicator of a bad or counterfeit card.
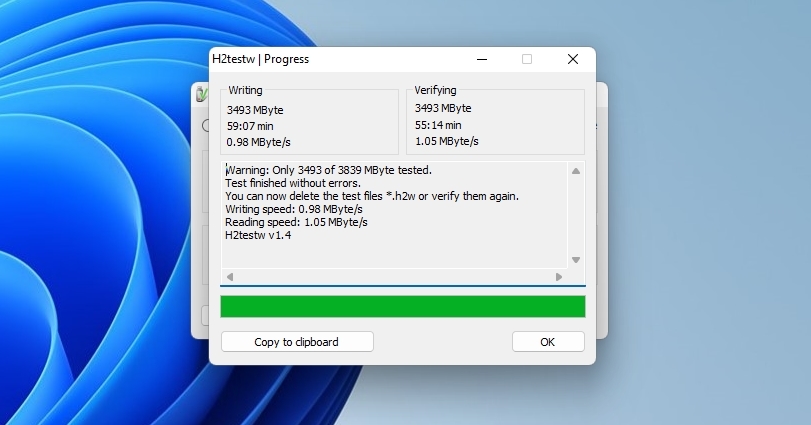
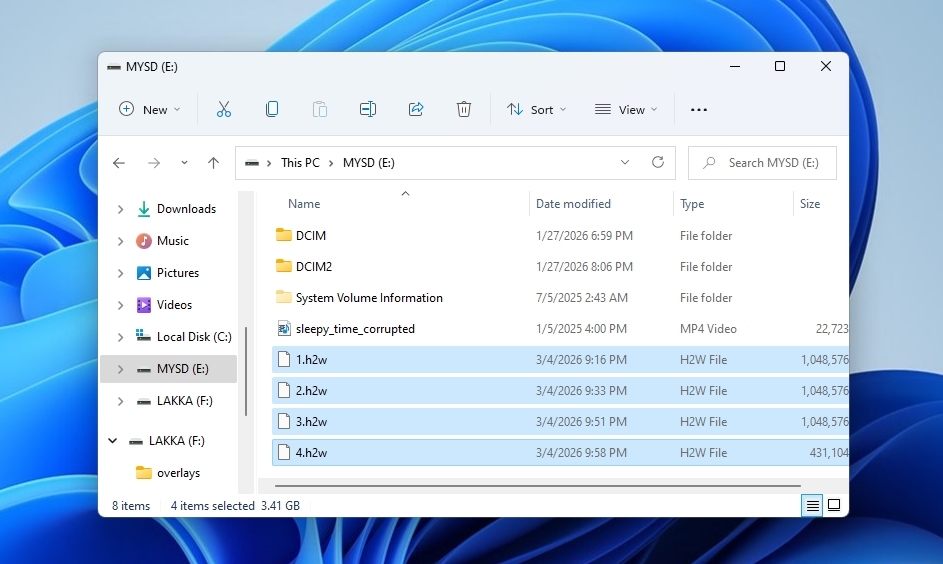
- After using H2TestW, remember to delete the files the app created on the SD card (they are all numbered and have an “H2W” extension) to reclaim the space they occupy.
If H2-TestW didn’t reveal any issues, your card is likely misbehaving because of file system corruption. The easiest way to deal with that is by formatting it.
Step 3: Confirm SD Card Compatibility
✅ When this helps: Your GoPro camera suggests that your SD card is too slow, that you should upgrade it, or it fails to save recordings at high bit rates or the maximum supported resolution and quality settings.
The higher the quality, resolution, and bitrate of the video and audio streams your GoPro camera captures and tries to save to your SD card, the more data it has to write in real time. As some users in GoPro’s community have found out the hard way, when your SD card can’t keep up with the camera’s data throughput, demanding recordings may break and not get saved, or the camera might present error messages about the SD card being too slow or that you should upgrade it.
You aren’t using a budget card that fails to meet GoPro’s V30/U3 minimum requirements, and you are sure it isn’t counterfeit? Then, check it with H2TestW’s speed test that we saw earlier to make sure it performs according to its specs. Even if it does, it may still underperform when used for demanding GoPro recordings, unless it’s included in GoPro’s official compatibility list and guaranteed to work.
Step 4: Format Memory Card Properly
✅ When this helps: Your GoPro camera fails to detect or access your SD card with SD ERR or NO SD errors, or your footage almost always comes out corrupted.
Formatting isn’t useful only for new, unformatted storage devices, but also for addressing various problems with older ones and “rejuvenating” them. That’s why it’s also one of the official recommendations for tackling SD ERR or NO SD errors on GoPro cameras. A new format reestablishes from scratch the necessary “structures” that define how files are stored on an SD card. This eliminates issues with the current file system that, apart from the aforementioned errors that may show up directly on your GoPro camera, can also:
- Make Windows and macOS throw error messages whenever you try to access your memory card and its contents.
- Produce videos and photos that, even if they initially look fine, often turn out corrupted and unusable.
Crucially, there are two different ways you can format your memory card:
- A quick format only deletes an SD card’s file system index, making it appear empty. It achieves this “being quick” by not actually removing any data from the memory card, but only deleting the file system’s index.
- A full format erases everything on an SD card, a process that takes some time depending on the card’s speed and capacity, and then re-establishes a file system from scratch.
It’s best to avoid using a GoPro to reformat an SD card, since they usually perform a quick format, which isn’t optimal for dealing with corruption or other major issues (like bad blocks). Thus, formatting your SD card directly in your GoPro camera won’t solve many problems, and you should prefer to perform a full format using a computer.
Although there are many ways you can format an SD card, there is nothing more official than SD Card Formatter. The app is available on both Windows and Macs and, as we will see, is quite easy to use.
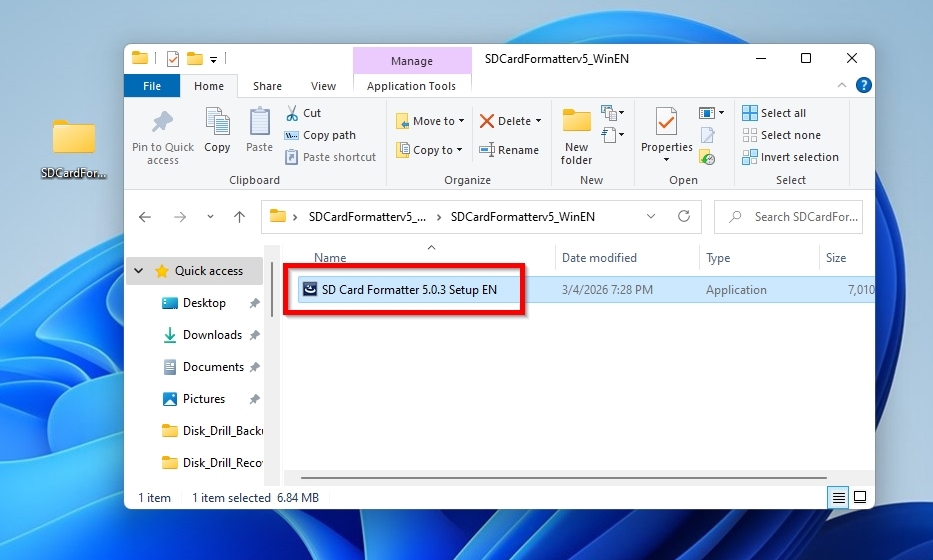
- Download the app from SD Card Formatter’s official site and extract the downloaded archive to a folder on your computer.

- Run the installer in that folder and follow its wizard’s steps to install the app on your computer.
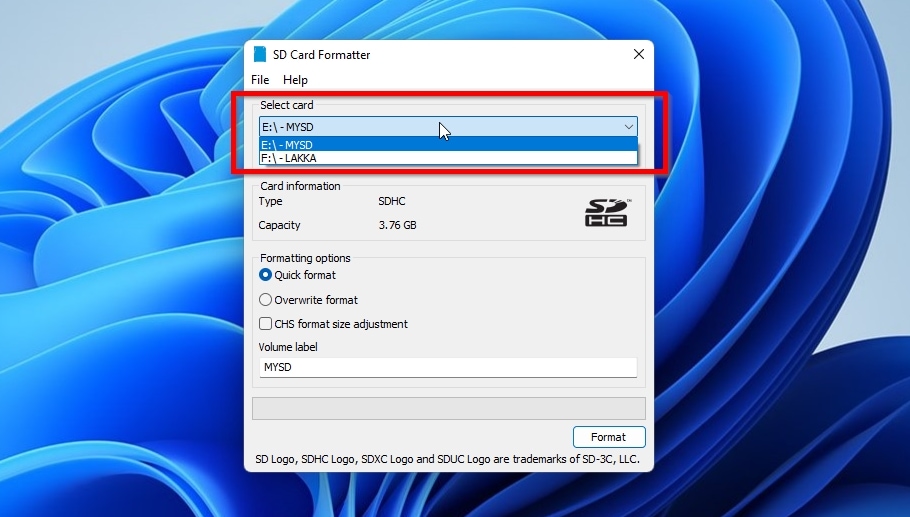
- Launch the app and select your SD card from the drop-down menu at the top of its window.
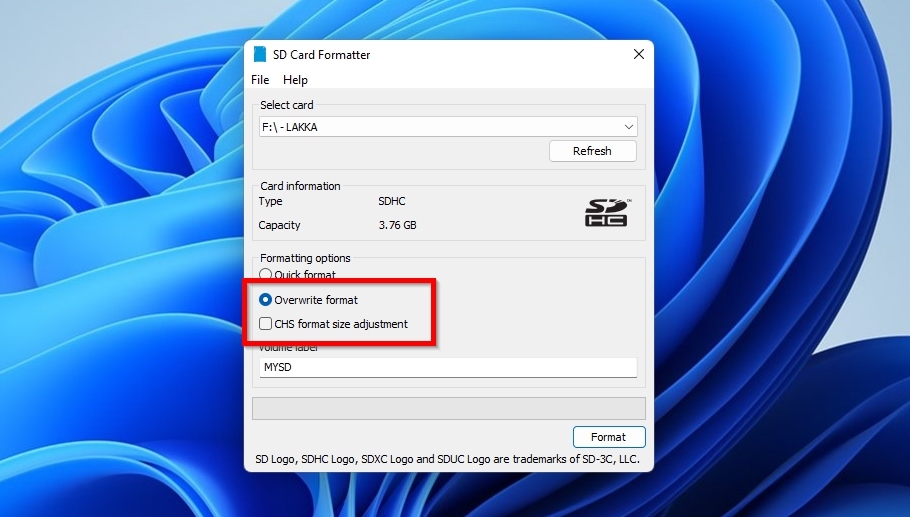
- Use “Overwrite format” rather than “Quick format” to make sure that everything on your SD card will be erased, and it will be completely “rebooted”. For SD cards under 8GB, you can also enable “CHS format size adjustment”, which adjusts the formatted capacity based on the SD card’s cylinders, heads, and sectors.
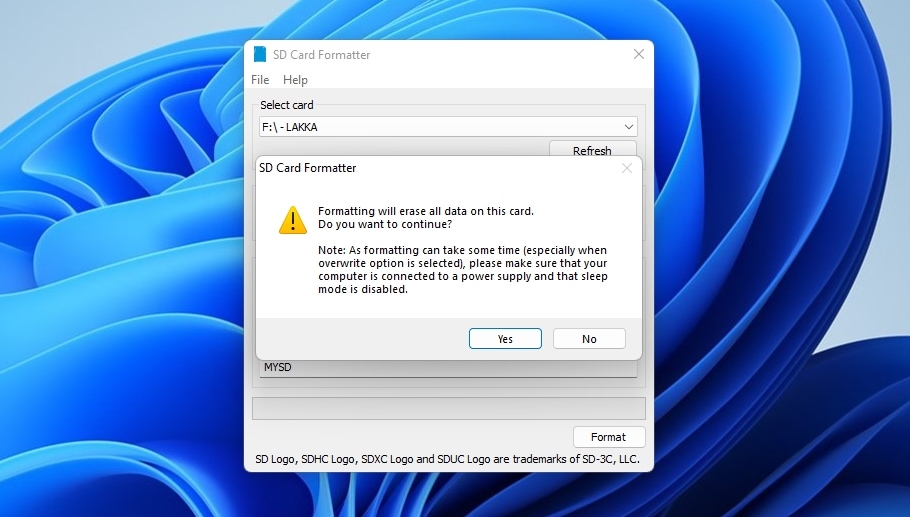
- If you want, you can assign a name for your SD card under Volume label. Finally, click on the Format button.
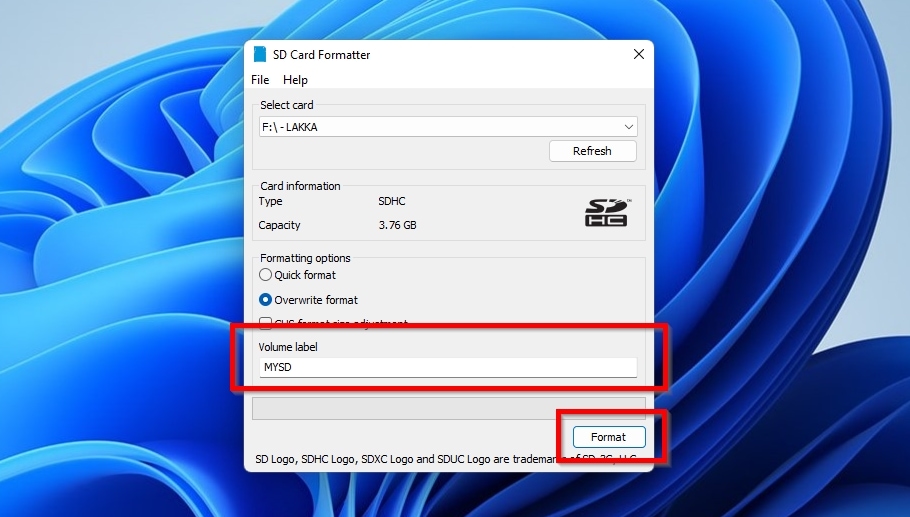
- SD Card Formatter will show a warning that all the data on your SD card will be erased. Answer positively if you are sure you’ve copied or recovered all the files you need from it.
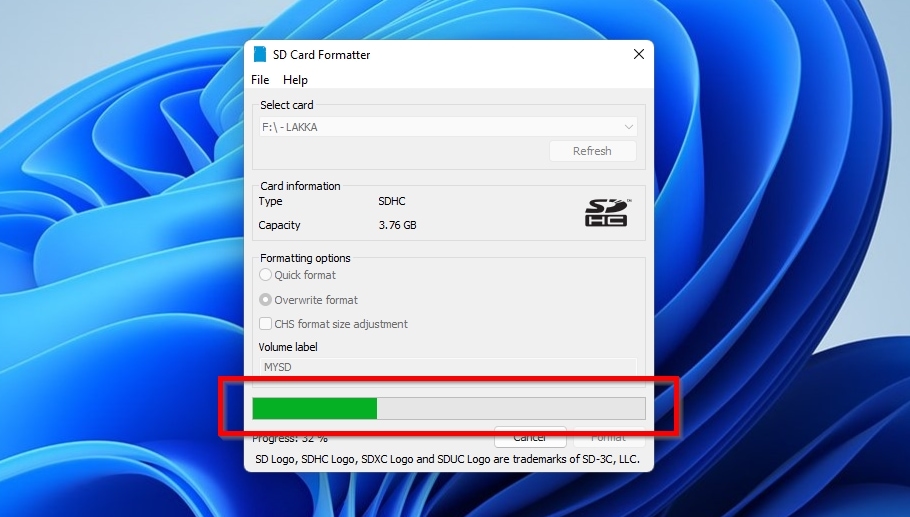
- The app will show a progress bar reflecting the state of the formatting process.
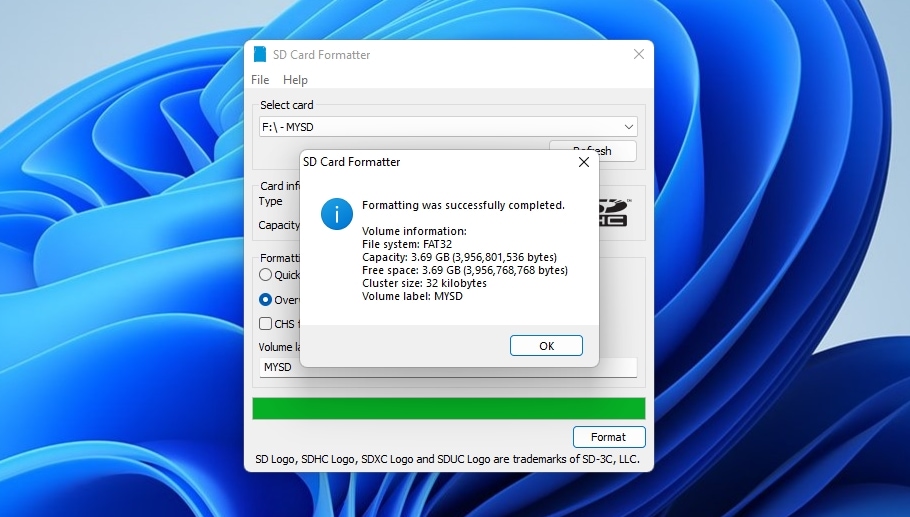
- When the process completes, SD Card Formatter will display a summary with details. After that, you can safely close the app.
Step 5: Update or Reset Firmware
✅ When this helps: You have completed the previous steps successfully, and your SD card checks out, but it still behaves oddly, or you notice other potentially unrelated glitches.
Did you go through what we saw so far and are sure your SD card should work correctly in your GoPro camera, or have you replaced it with a new memory card you know is 100% compatible, but the issues persist? Then it’s time to bring out the big guns and try updating your camera’s firmware.
There are two ways to update your GoPro camera’s firmware: a quick, easy solution works on newer GoPro models and requires a smartphone, while a manual solution requires a computer. In this article, we’ll look at both approaches for a GoPro HERO13 Black camera.
For both cases, start by making sure that your camera is at least 50% charged. Then…
To update your GoPro camera’s firmware using your smartphone:
- Download and install GoPro’s Quik App on your smartphone.
- Enable Bluetooth on both your camera and your smartphone, and pair them. Then, launch Quick App.
- When it connects to your camera, the Quick App will let you know if a firmware update is available. Follow the app’s instructions to apply it to your GoPro camera.
For the manual approach, it’s worth checking beforehand whether a new firmware is available for your camera to avoid downloading, extracting, and starting the update only to find there’s no point in the process. You can find a list of the available firmware updates for all supported cameras on GoPro’s Software and Firmware Releases Notes page.
The method for checking the current firmware of your camera varies by model.
- On HERO9/10/11/12 Black cameras, swipe downwards from the top, then left, and visit Preferences>About>Camera Info.
- On HERO11 Black Mini, hit the Status/Pair Button six times to navigate to About, and select it with a click of the shutter button.
- You’ll find the same info on MAX, HERO7, and HERO8 Black GoPros by swiping down and selecting Preferences>About>Camera Info.
- On HERO5 Black/HERO6 Black, find the firmware version by swiping down and selecting Preferences > About this GoPro.
- On the older HERO, HERO+, HERO+LCD, HERO3, HERO3+, and HERO4, you can see the firmware version on the display under the logo when you turn them on.
If there’s a newer firmware version available for your GoPro…
To update your GoPro camera’s firmware manually using your computer:
- Connect your SD card to your computer.
- Download the latest GoPro HERO13 Black’s firmware here, and extract its contents to a folder. We must emphasize that we’re only using the GoPro HERO13 Black as an example, and you should use the latest firmware for your specific GoPro model.
- Visit that folder using Windows File Explorer or another file manager, and copy the UPDATE subfolder you will find inside to your SD card’s “root” (you should see the new UPDATE folder next to the DCIM and MISC folders).
- Eject your SD card from your computer (use “Safe Remove Hardware” before disconnecting it), then plug it into your GoPro HERO13 Black.
- Turn the camera on, and it should update automatically. Note that it might restart sometimes, and you will have to reconfigure it after the process completes.
- After the process completes successfully, to keep using this SD card with your GoPro camera, remember to remove the UPDATE folder.
How to Perform GoPro SD Card Error Recovery without Losing Data
Does your GoPro camera show errors, or can’t you access your photos and videos on its SD card, but before trying any of the solutions we saw (especially formatting), you want to make sure you won’t lose any of the files stored on it? Then, your first step should be to use a data recovery app to safely copy as many files as you can from your GoPro’s SD card to another storage device.
It’s worth prioritizing this move, since even if your GoPro’s SD card appears empty, there might still be photos and videos on it. For example, if a video recording is interrupted before your GoPro camera stores all necessary metadata on the SD card, the video might not appear on the card.
Recovering your files is a straightforward process that requires no technical background, thanks to modern memory card recovery software. There’s also no need to pay for tools to check if there are files still on your SD card and if they are recoverable – the best modern data recovery apps do that for you.
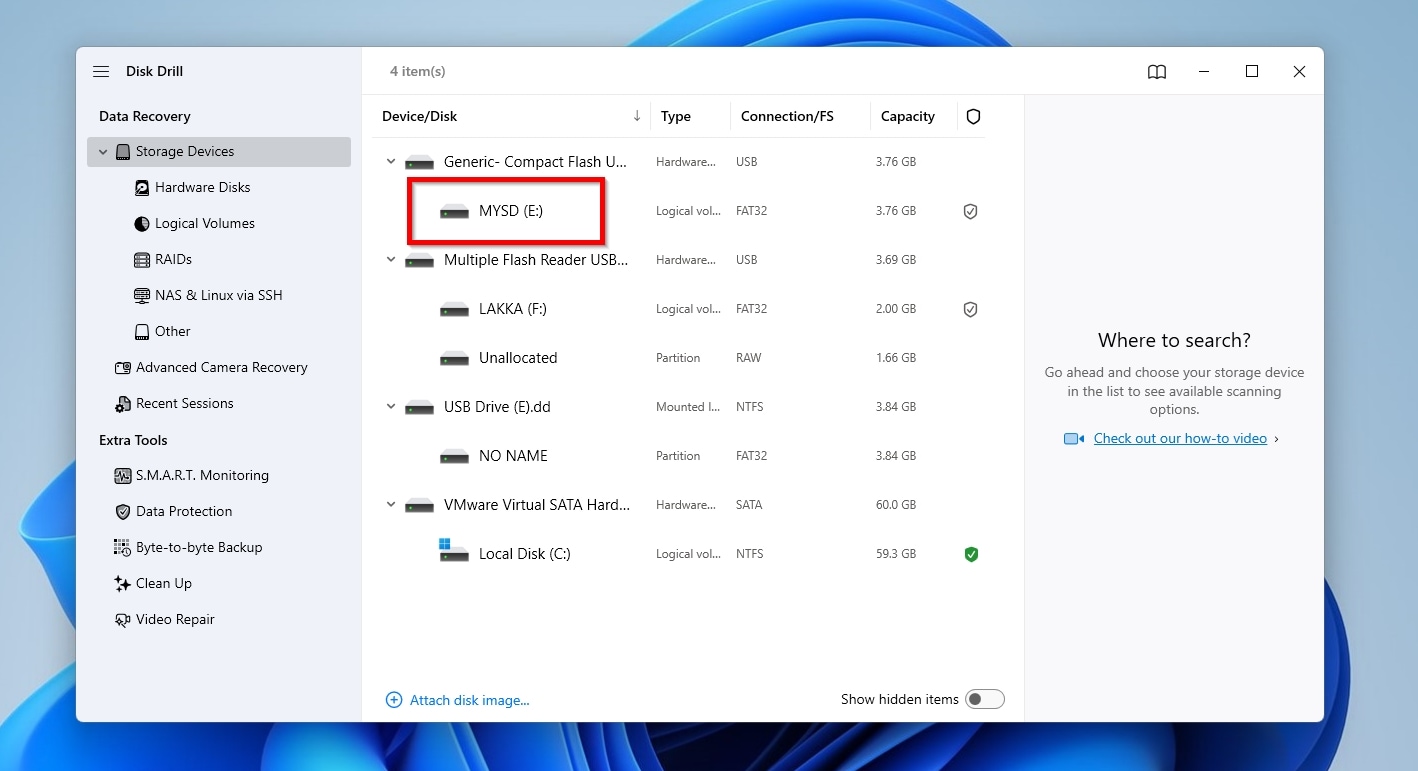
To recover your GoPro SD card’s photos and videos using Disk Drill:
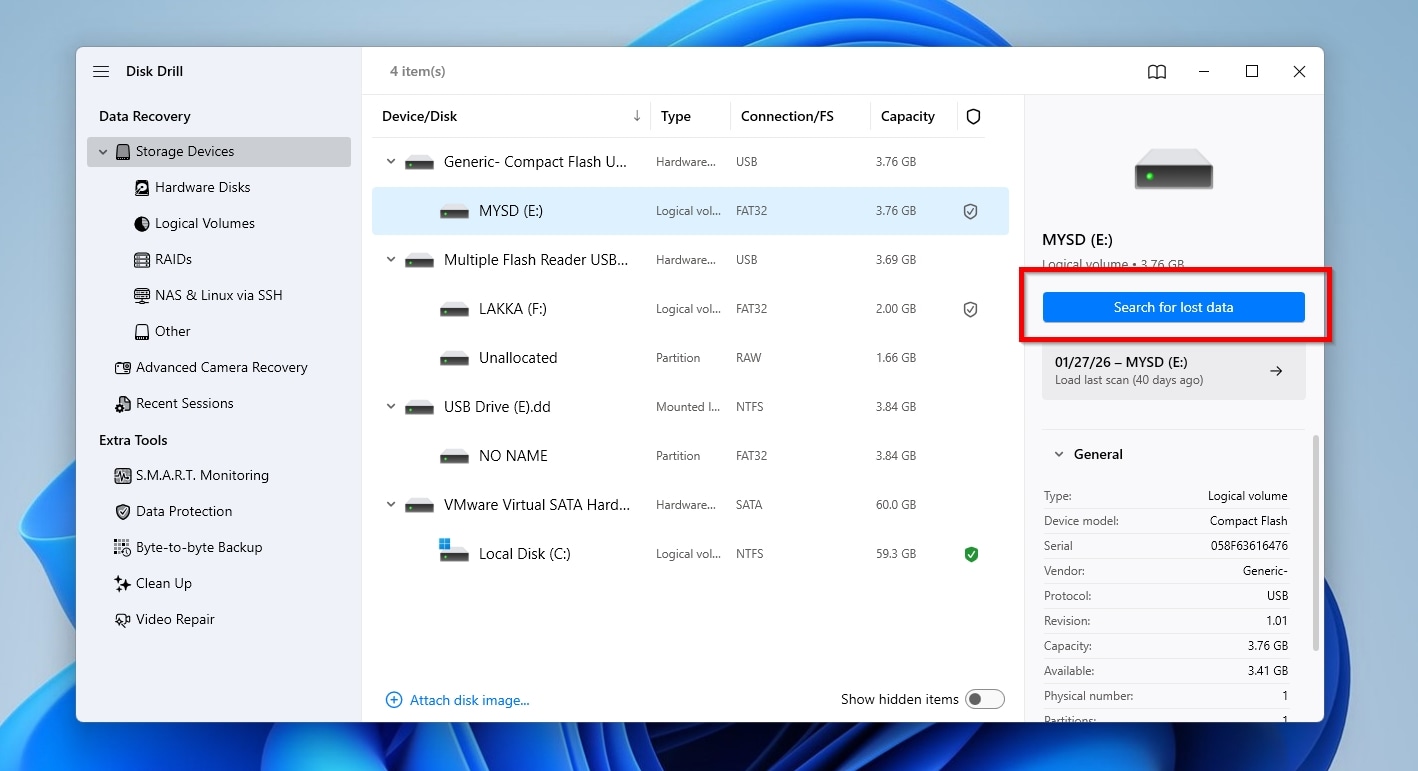
- Connect your GoPro’s SD card to your PC. Download the app from Disk Drill’s official site, install it, and run it. While on the Data Recovery > Storage Devices page, select your SD card from the Device/Disk list.
- Click Search for lost data to have Disk Drill analyze your SD card.
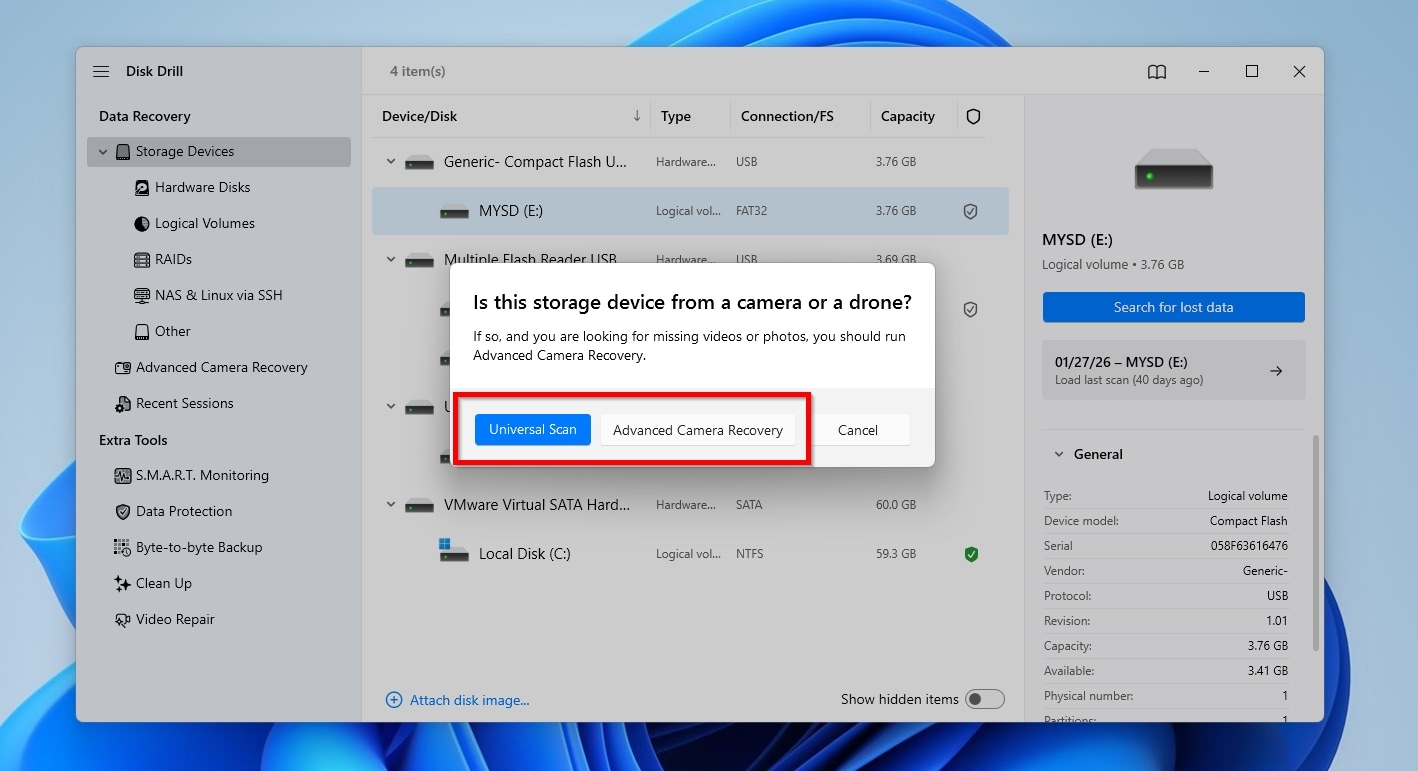
- The latest versions of Disk Drill come with an Advanced Camera Recovery mode that specializes in locating and recovering media files from cameras and their storage media. Normally, you should scan your GoPro’s SD card using this mode. However, if the SD card is corrupted, go for the more versatile Universal Scan, and perform an Advanced Camera Recovery scan if your recovered footage is still corrupted after that.
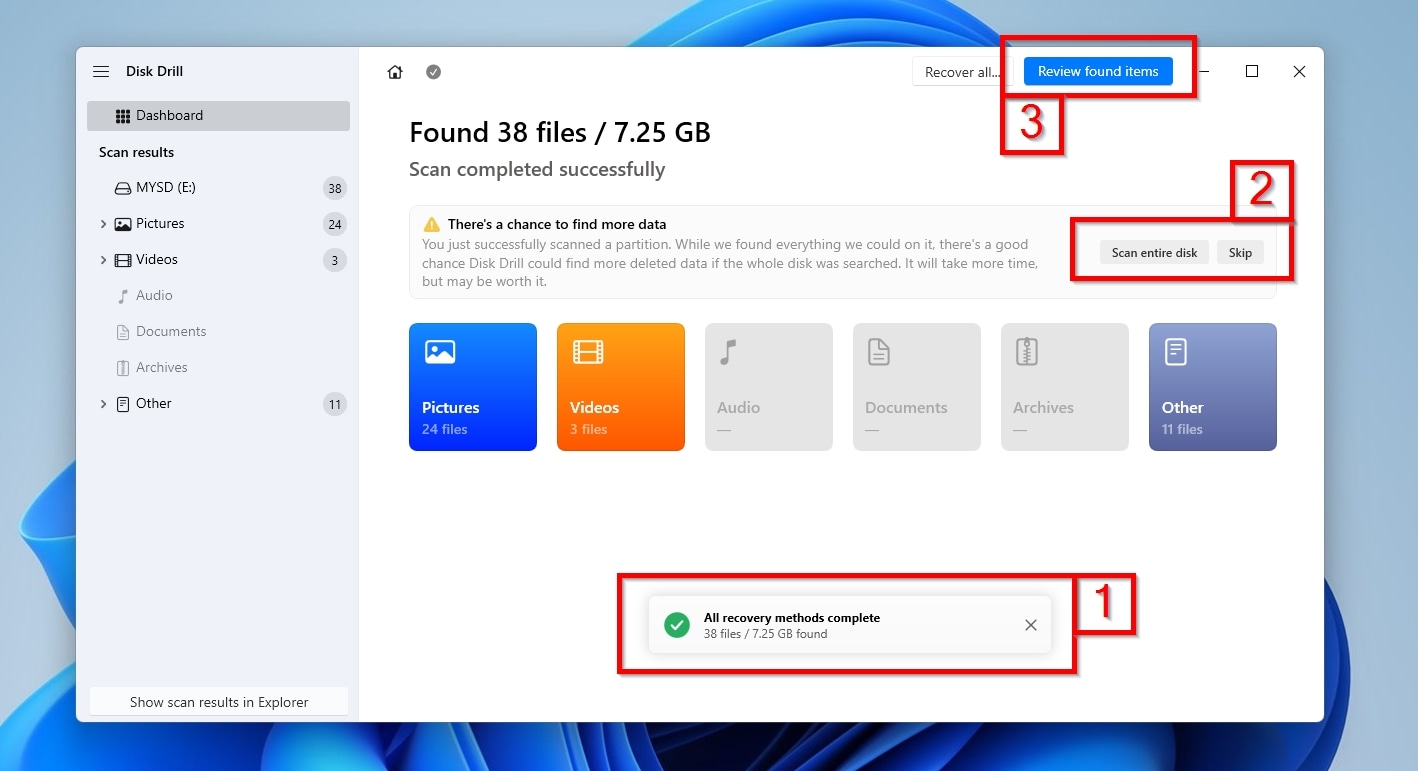
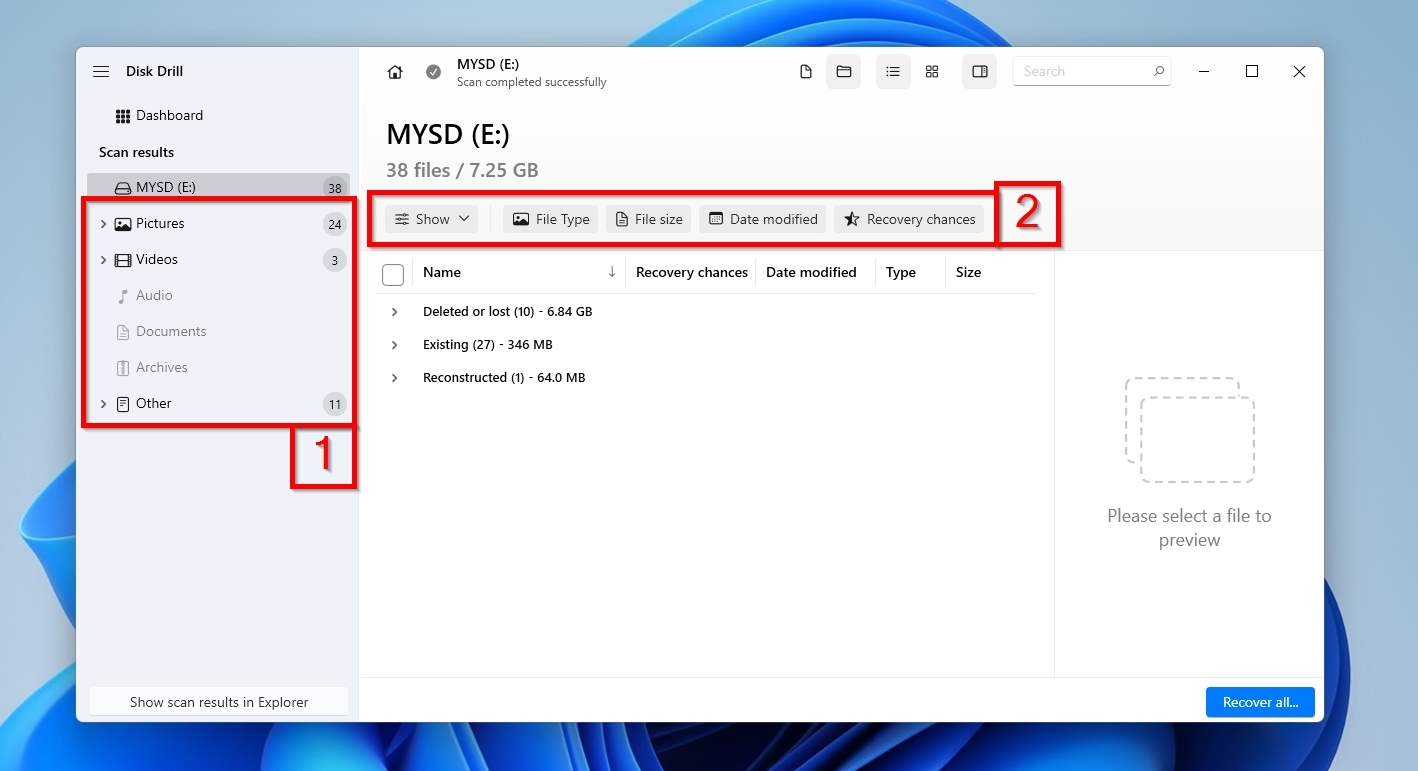
- The time required by Disk Drill to analyze your SD card depends primarily on its speed, capacity, and condition. When it’s done, it will report “All recovery methods complete” in a mini pop-up window (1) that you can safely close. If you only scanned a partition of your SD card and Disk Drill believes that scanning the whole card will find more files, it will inform you and offer that option (2). To check out everything Disk Drill found in its scan, click Review found items (3).
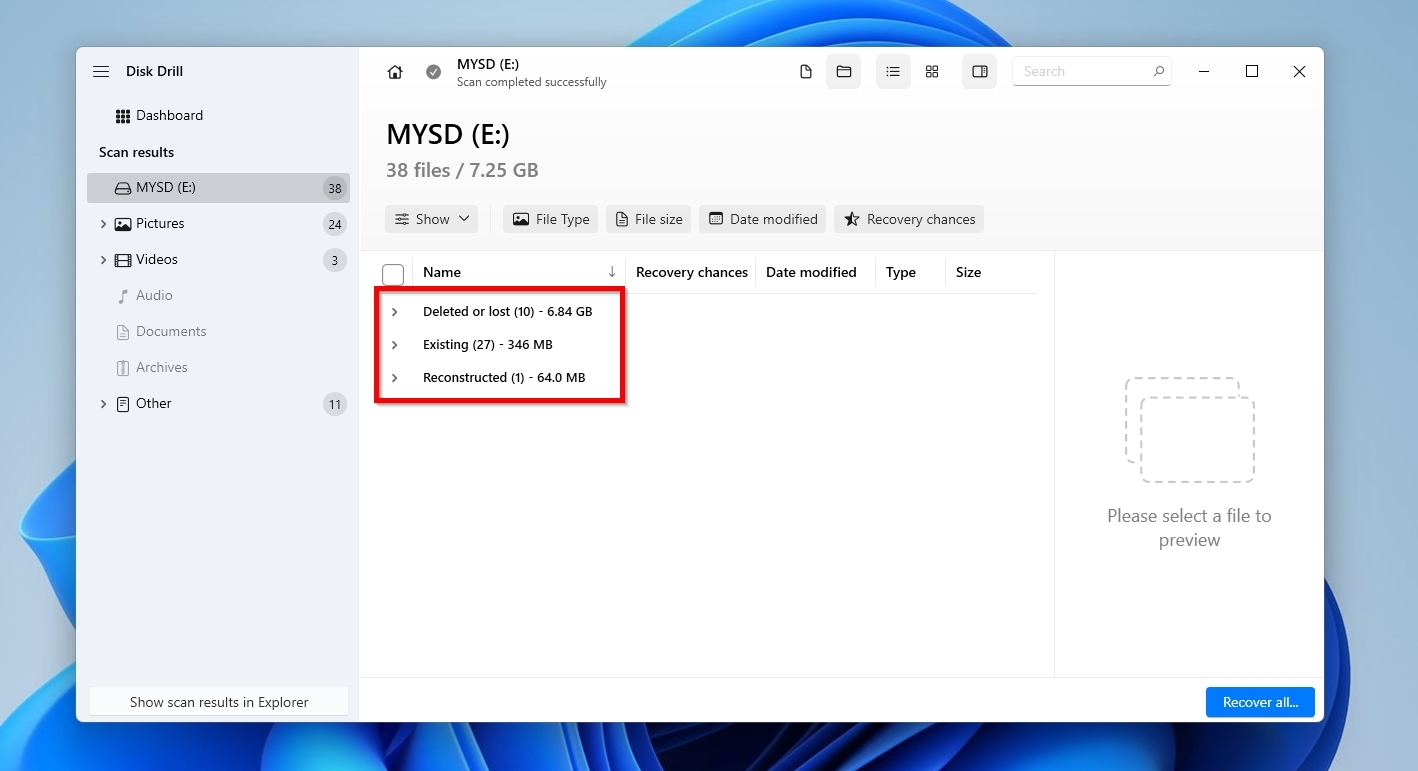
- Disk Drill presents the results of its scan in three groups: Deleted or lost are the files that have been removed from the SD card and cannot be normally accessed. Existing are the files that can still be found on the SD card, but some of which might be corrupted. Reconstructed are fragmented files that Disk Drill reassembled from their scattered bits and pieces.
- You can easily find specific file types using the categories (1) on the left of the results window. The filters above the results (2) allow you to find files based on other characteristics, like the file size or the last time they were modified.
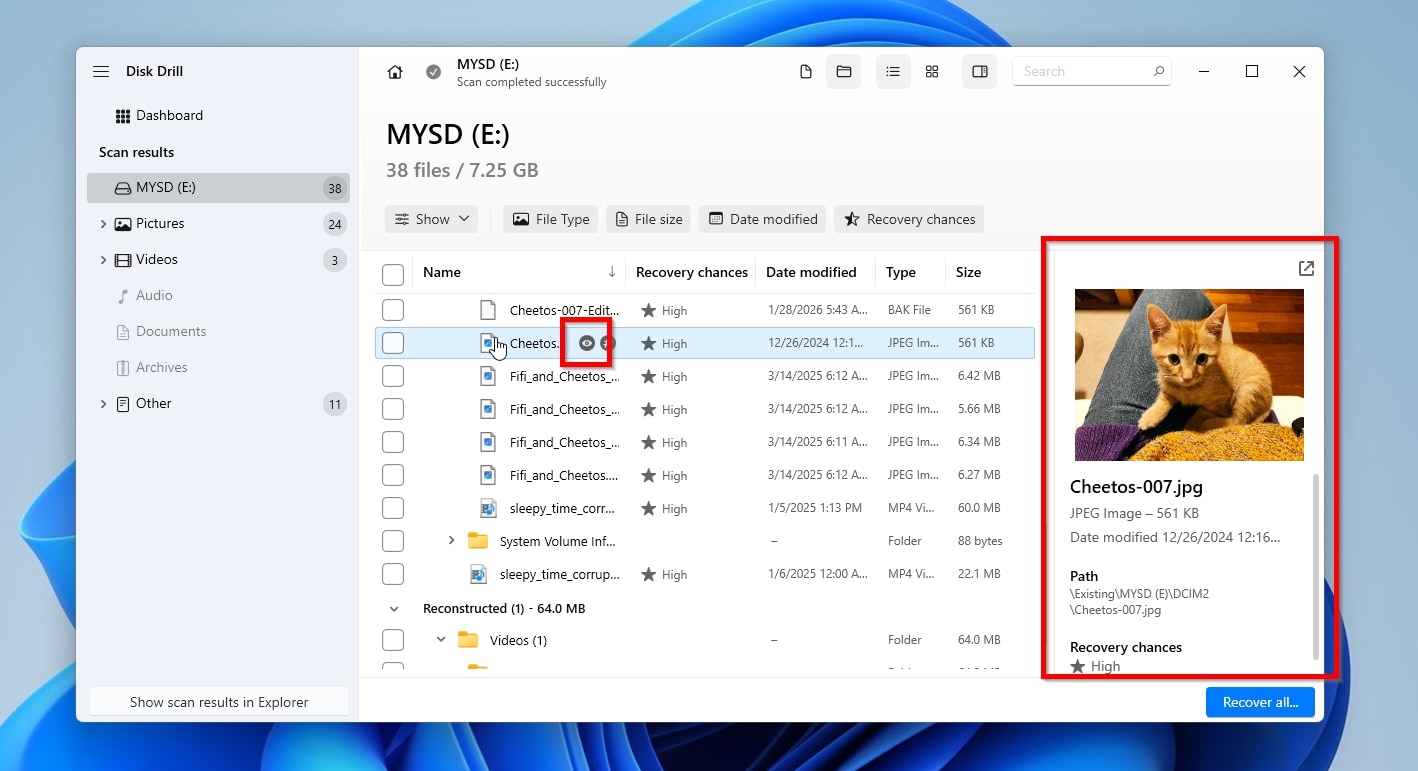
- You can preview the contents of many files that Disk Drill knows about or for which a viewer app is installed, such as TXT files and JPG images. The preview pane should be visible by default on the left of the results window when you click on a file. If it isn’t, click the hovering eye icon that appears when you point at a file, or right-click on a file and choose Preview.
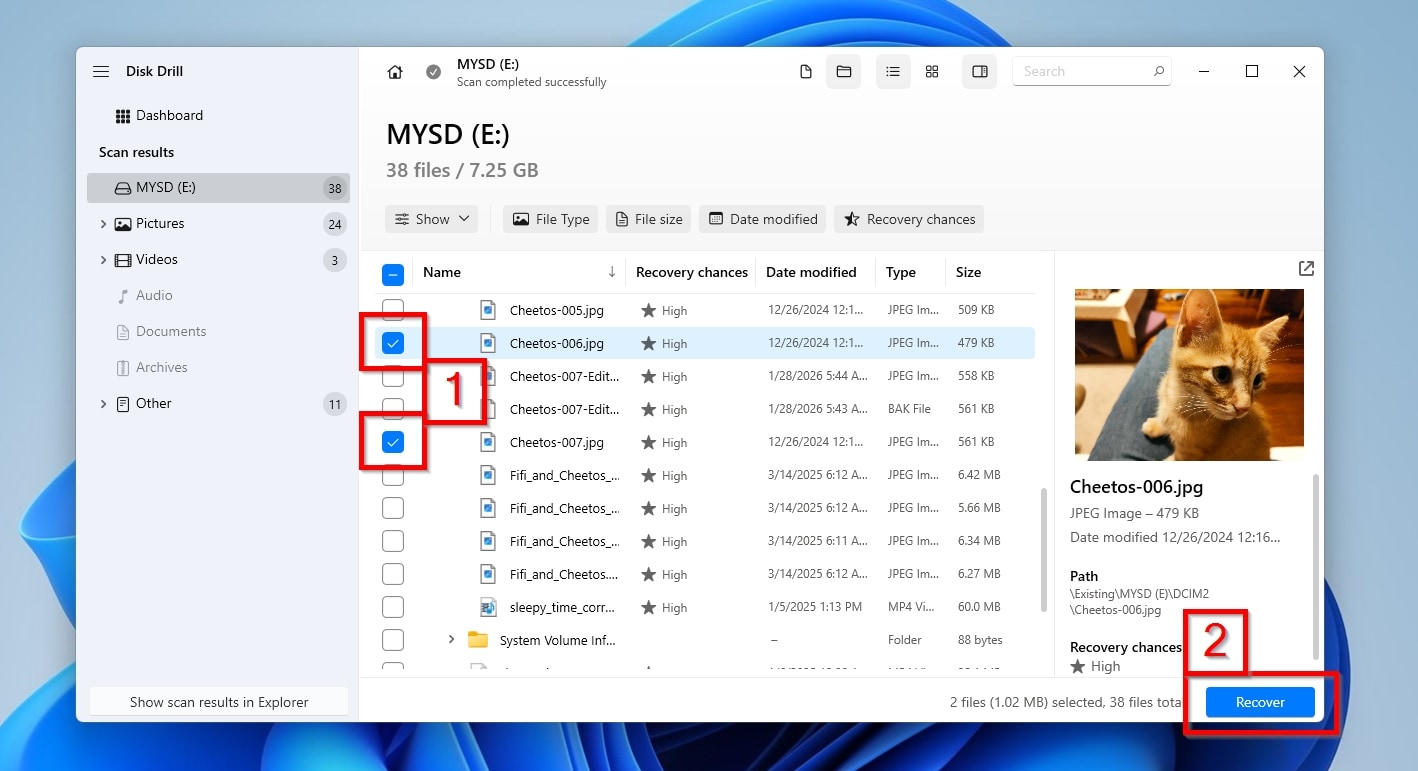
- Mark the files you want to recover by placing a check mark on the left of their file name (1). When you have marked all the files you want to recover from your GoPro’s SD card, click Recover (2).
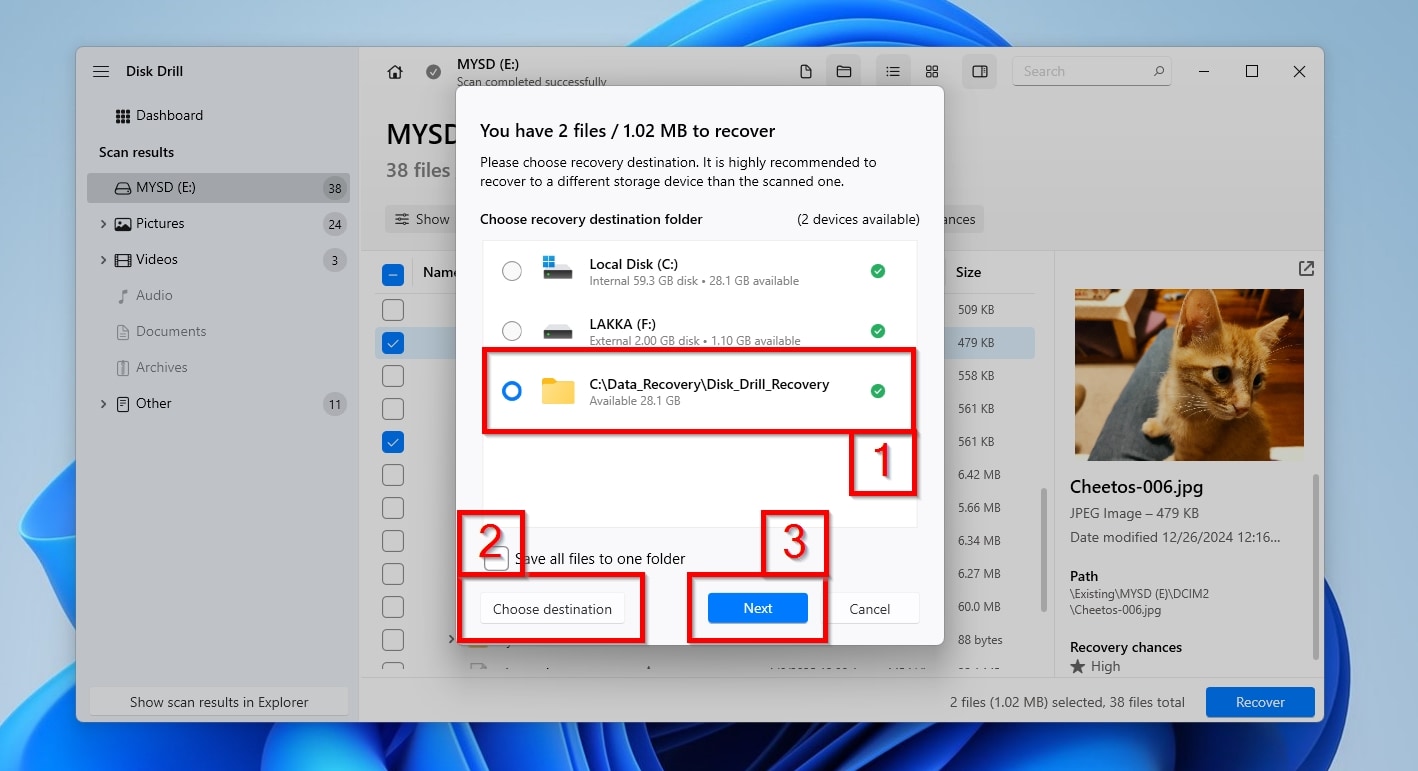
- Disk Drill will present a list of potential destinations for your recovered files, including those you might have used in previous scans (1). If the one you want to use isn’t among them this time, click Choose Destination and select it (2). After selecting a recovery destination, click Next to proceed to the actual recovery (3).
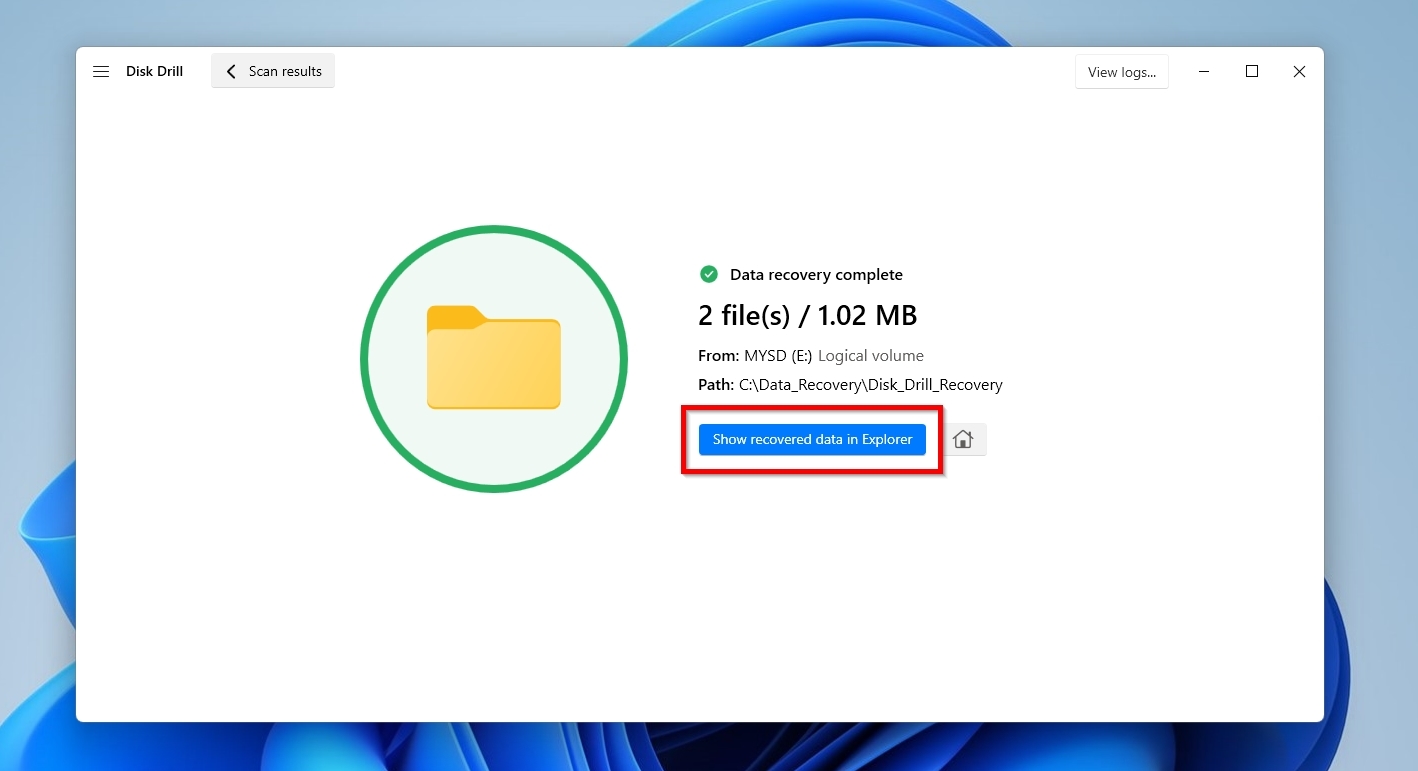
- When it’s done, Disk Drill will report “Data recovery complete”. Click Show recovered data in Explorer to check out the recovered files using the operating system’s default file manager.
📝 Additional Info: Disk Drill is one of the best options for such tasks, especially when dealing with GoPro cameras, because it supports all necessary file formats and then some. It can successfully scan for, find, and recover 360 and MP4 videos, as well as JPEG and RAW photos, which are the file formats natively supported by most GoPro cameras. However, if you’re also using it with other cameras or for storing other types of files from your computer, it can help find and recover most of those, too – from AVI and MKV videos, to TXT and DOCX documents, and 7Z and RAR archives.
Disk Drill can also be useful when dealing with failing SD cards, since it allows you to take byte-to-byte backups of their contents that you can then scan whenever you like, even after your SD card has failed.
The app’s Windows version, that we saw here, comes with a minor restriction, since it can recover up to 100MB for free, but that should be more than enough for restoring short clips, your most important photos, and verifying that it can find and save all the files you care about before committing to a purchase.
Still, GoPro cameras’ specific file formats and segmented video recording approach can complicate things further, warranting a visit to our dedicated guide on GoPro recovery for all fans of those little digital wonders.
Fix Unplayable Clips After a GoPro SD Card Error
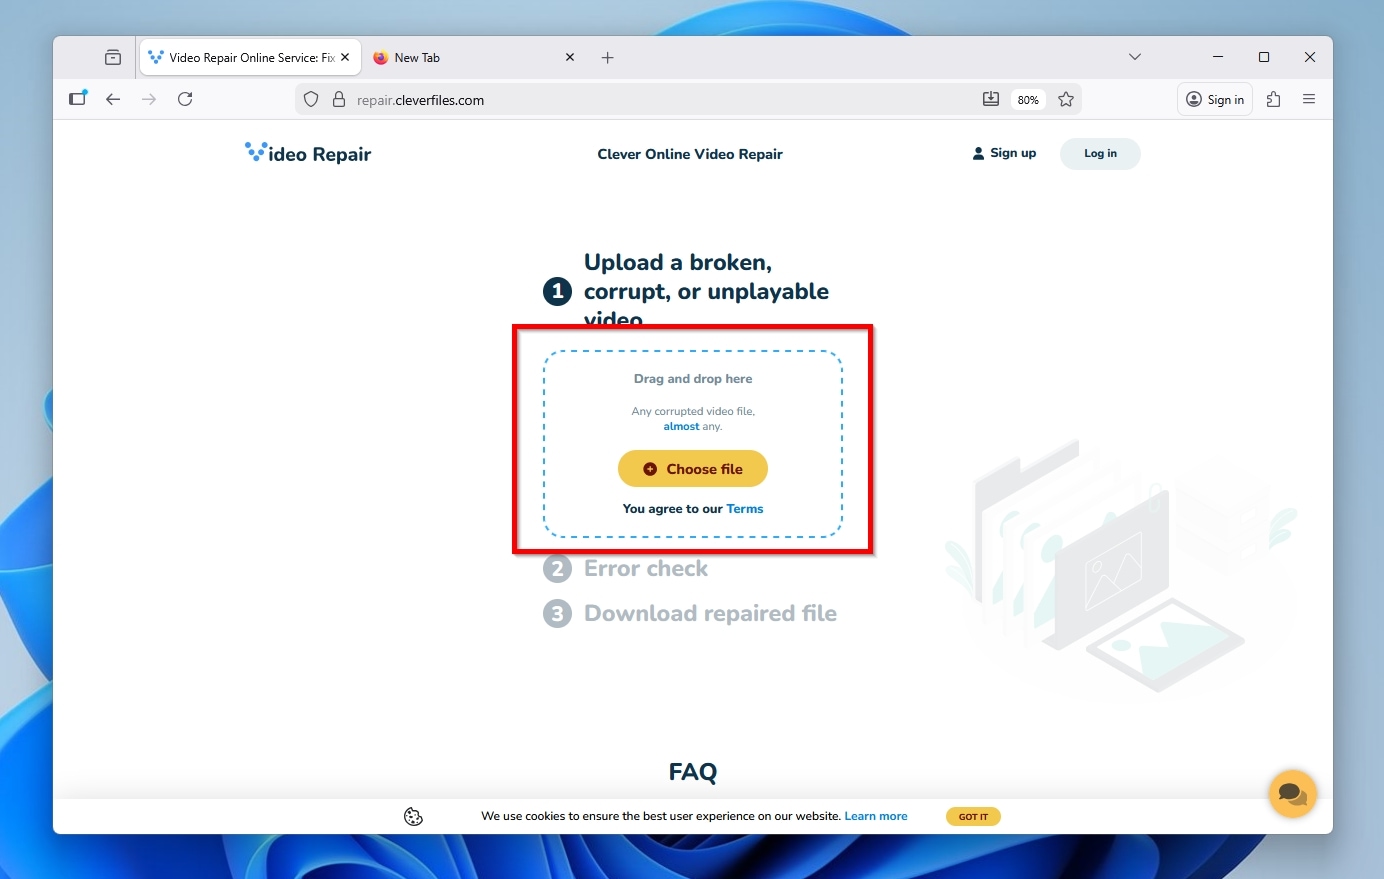
GoPros are designed from the get-go to be the best cameras for sports, made to operate continuously with minimal interaction and to take a beating while doing so. However, precisely because of those factors, the footage recorded with them is also more prone to corruption. Was a bump harder than what your GoPro could tolerate, or did its battery go flying during a face-off with Tony Hawk, cutting a recording short? The resulting footage could end up corrupted, and the typical data recovery solution can’t help with that – but specialized video repair tools like Clever Online Video Repair (usually) can!
Unlike data recovery apps, Clever Online Video Repair is an online tool that doesn’t require installation and doesn’t even attempt to recover deleted videos from an SD card, since it specializes in video reconstruction. Designed to be accessible to everyone, Clever Online Video Repair rebuilds video files using its built-in knowledge base or, for even better results, another undamaged file from the same camera as a healthy reference model. Since it can salvage half-recorded footage from abruptly interrupted GoPro recordings, and supports their native MP4 file format with H.264 or H.264/HEVC video encoding, it’s a great addition to what we already saw in this article. However, it requires the actual video to work, and you’ll have to turn to other solutions if what you need is to recover deleted MP4s.
To repair your “broken” GoPro videos using Clever Online Video Repair:
- Visit the tool’s site. Click Choose file, then select your non-playing GoPro video, or drag and drop it into the rectangular area at the top of the page. Note that, at the time of writing, Clever Online Video Repair supports files up to 20 GB.
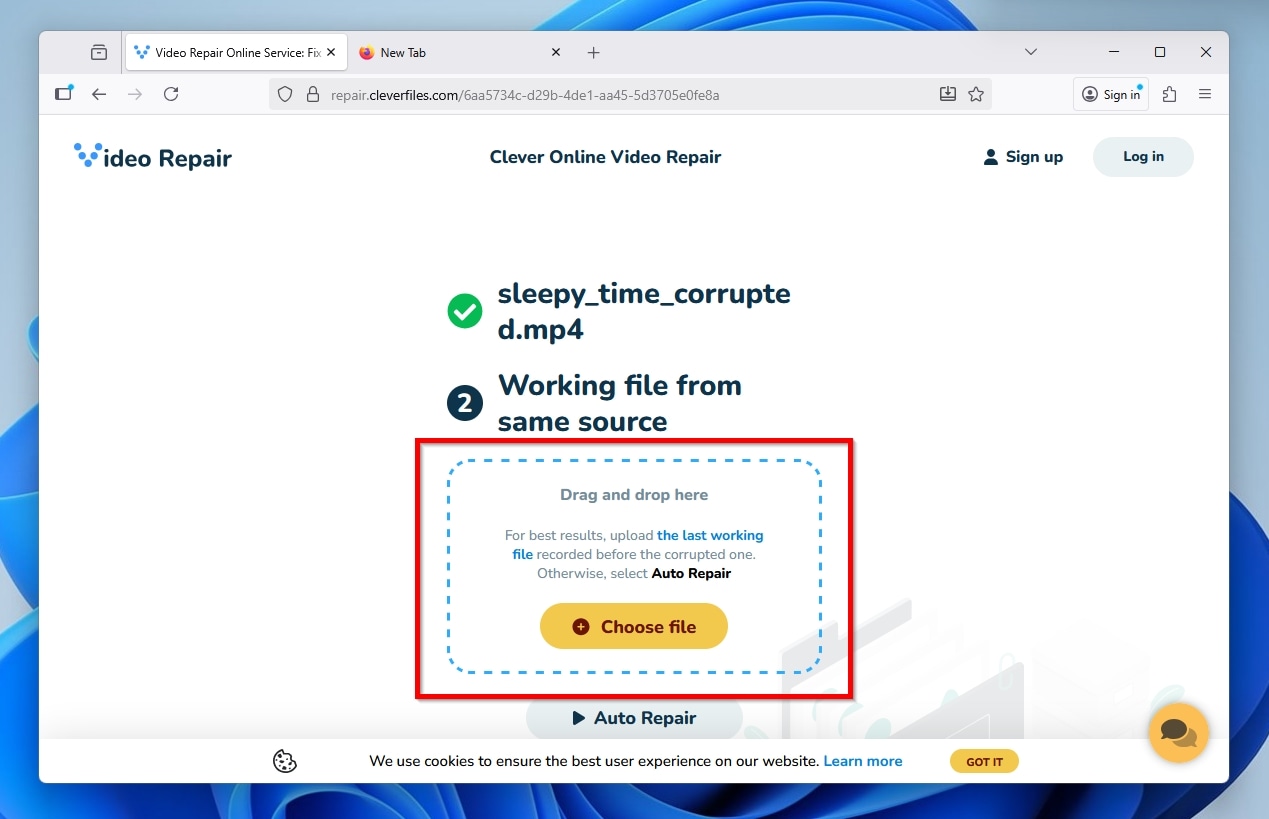
- When asked, and if available, provide another healthy video you recorded on your GoPro. It’s best to choose a video file with the same settings as your corrupted one, so Clever Online Video Repair can use it as a healthy basis for its reconstruction.
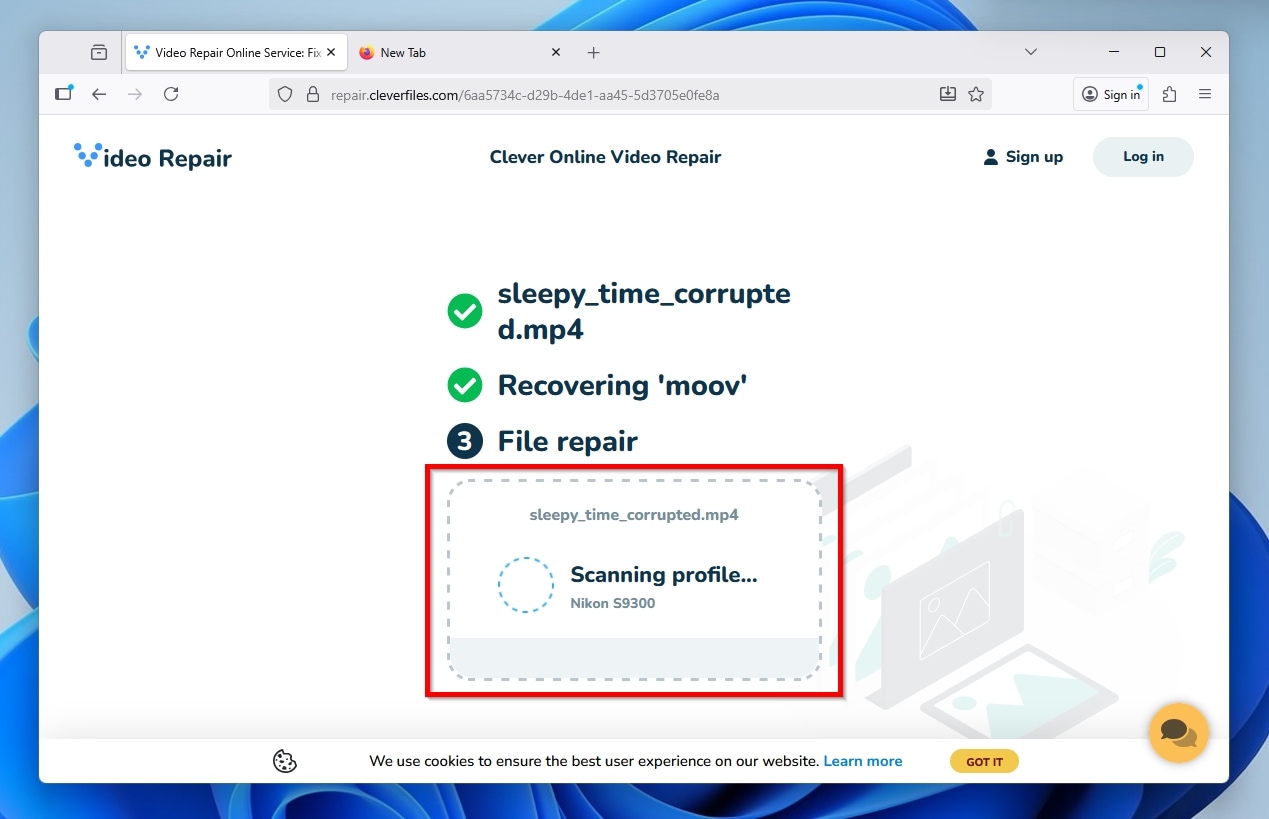
- After a while, when it’s done analyzing the files and rebuilding the problematic one, Clever Online Video Repair will provide a link to your newly reconstructed video.
FAQ
Moisture can lead to condensation, and that’s bad news for anything relying on conductivity, like an SD card’s connector. Similarly, dirt can lead to oxidation, which can reduce the surface area of the SD card’s connector “pins”.
The good news is that you can avoid both issues by keeping your SD cards clean and dry. If you suspect your SD card’s connector has been negatively affected by those or other factors, you can clean it with a Q-tip lightly dampened with 90% isopropyl alcohol. Allow some time (around 10 to 15 minutes should suffice) for the alcohol to evaporate before trying to use your SD card. If the problem persists, also try cleaning the contacts on your camera or card reader.
A quick format should be almost instant since it only deletes and recreates the file system’s main index. Since it doesn’t try to erase everything on the SD card bit by bit, it depends more on the computer’s or camera’s performance than on the SD card’s capacity, speed, and status. However, even on a 10-year-old PC, it shouldn’t take more than 30 seconds.
In contrast, a full format mainly depends on the SD card’s specifications, since it overwrites every single bit of the SD card’s capacity. A 256GB SD card may take 10 times as long to format as an 8GB SD card.
Also, all those factors accumulate and pile up. Also, formatting a brand-new ultra-fast 64GB card on a new laptop should be much quicker than formatting a 1TB SD card filled with bad sectors on an ancient PC from the Windows XP era.
Like everything, external USB card readers are far from perfect and come with their own issues. Some of the most common sources of the problems you might face when using a USB card reader are:
- A bad USB cable or a worn-out connector on the USB card reader can interrupt its communication with a computer. Solving that problem can be as easy as using another USB cable and checking it up close to see if it’s “wiggling” in the USB card reader’s port.
- An incompatible controller that conflicts with other hardware of the computer, making the USB card reader “misbehave” in seemingly strange ways. It might disconnect and reconnect to the computer at random or in a specific pattern (like whenever you try to write more than a specific amount of data to the SD card), or fail to perform specific operations. In that scenario, though, it’s usually more common for the computer to fail to “see” either the USB card reader or the SD cards you plug into it. You can check if that’s the issue by trying it out on another computer.
- Although most USB card readers are designed to work within the 5V specification supported by almost all USB ports, “most” doesn’t mean “all”. If your card reader is powered by its USB connection to the PC, try it on another port. If it comes with a power adapter, you can test it with a compatible power adapter from another low-powered device (like a pair of small desktop speakers), but triple-check that it provides a similar connector and identical Volt and Amp specifications to the one that came with your USB card reader.
SD cards cost a fraction of the price of a GoPro camera, so it makes more sense to replace a problematic SD card than to upgrade to a newer GoPro model. However, replacing the camera itself makes sense when:
- You’re meeting SD errors on a GoPro HERO 4 or a similar camera that’s relatively old, and also riddled with other issues, like occasionally producing unfocused footage, or its buttons failing to respond to your keypresses.
- You’ve already tried multiple SD cards, and your GoPro still presents error messages with many (or worse, all) of them.
- Its physical condition, maybe with some holes or dangling parts, makes it painfully apparent that its days are numbered.
The question about servicing is more nuanced, as you have to consider multiple factors. Is the only issue a problematic SD card connector that would not cost as much as a new camera to fix? Are there multiple problems that should be addressed, which could make the servicing cost skyrocket? Unfortunately, there is no clear-cut answer to that question since it depends on the specifics of each case.