In this review, we’ll evaluate TestDisk data recovery software features, ease of use, recovery performance, how it stacks up against similar tools, and what everyday users have to say about it. We’ll score each area and use that to determine our final verdict.
📌 Here’s our brief summary:
If you’re tech-savvy and need a tool that can recover lost partitions, repair boot sectors, or fix corrupted partition tables, TestDisk is hard to beat – especially considering it’s completely free and open-source. But make no mistake: this is not a tool built for beginners, and it’s not great for recovering deleted individual files. For that, you’d want to pair it with PhotoRec – or just use a more modern tool like Disk Drill.
In our tests, TestDisk successfully restored a corrupted partition and rebuilt the NTFS boot sector. It didn’t take long but the lack of graphical interface and step-by-step guidance makes it a tough sell for casual users.
| 👍 Strengths | 👎 Weaknesses |
|---|---|
|
|
🔎 Why You Can Trust Us:
Every app review is the result of a hands-on, multi-step process run by team experts. Our QA specialists run recovery tests on real drives. Then, lab engineers verify the results to make sure every text is accurate. Experienced technical editors present the results in a clear, reader‑friendly format.
Main Recovery Features in TestDisk
TestDisk is a freeware data recovery tool developed and maintained by Christophe Grenier. It is fully Open-Source software and is distributed under the terms of the GNU General Public License. The application’s main purpose is to recover lost disk partitions and fix bootable disks that are no longer booting correctly. You can also use TestDisk to generate information concerning a corrupted drive which can be used for troubleshooting by technical support specialists.
| Key Info | Details |
| 💻 Platform Support | Windows, macOS, Linux, DOS |
| 🆓 Free Version | Yes (fully open source) |
| ⚙️ Interface Type | Text-based (command-line interface) |
| 🧰 Main Capabilities | Partition recovery, boot sector repair, undelete FAT/NTFS/ext2 files |
| 📂 File System Support | FAT12/16/32, exFAT, NTFS, ext2/3/4, HFS+, ReiserFS, XFS, and more |
| 💾 Storage Devices | HDDs, SSDs, USB drives, SD cards, CF cards |
| 📈 Best Use Case | Recovering lost partitions or fixing broken file systems |
| 📦 Portable | Yes (no installation required) |
| 🌍 Developer | Christophe Grenier (since 1998) |
| 📜 License | GNU General Public License |
OS Compatibility & File System Coverage
TestDisk is fully cross-platform. It runs on Windows, Linux, macOS, FreeBSD, NetBSD, OpenBSD, and even DOS. It’s one of the few recovery tools that doesn’t care what system you’re using – it just works, provided you’re comfortable in a terminal window.
Here’s a breakdown of what it can recognize and work with:
- Windows: FAT12/16/32, exFAT, NTFS, ReFS
- Linux: ext2/ext3/ext4, XFS, JFS, ReiserFS 3/4, Btrfs, GFS2, LUKS, Linux Swap, LVM/LVM2
- macOS: HFS, HFS+, HFSX, APFS
- BSD/Unix: UFS/UFS2, ZFS
- Other: BeFS (BeOS), WBFS (Wii), CramFS, and more
- RAID: Supports detection and basic handling of RAID metadata (RAID 1/4/5/6 with mdadm), as well as LVM and partition maps (MBR, GPT, Mac, etc.)
That gives it coverage across most common drives and removable storage, especially those formatted on Windows or Linux. However, keep in mind that it doesn’t offer full metadata-based recovery for all these file systems – its primary role is still partition and structure repair, not content-level recovery.
Partition Recovery & File System Repairs
This is where TestDisk earns its reputation. Its primary focus isn’t on recovering individual files – it’s built to recover lost partitions and repair file system structures when things go sideways.
If your drive suddenly shows up as RAW, won’t mount, or seems like the partition table just vanished – TestDisk is the kind of tool that can bring it back. It supports:
- Rebuilding partition tables (MBR, GPT, and others)
- Recovering deleted partitions
- Fixing corrupted file system structures
- Repairing NTFS boot sectors and MFTs
Restoring FAT32 boot sectors and FAT tables - Locating and restoring ext2/ext3/ext4 superblocks
It doesn’t scan blindly – it reads the disk structure, identifies known partition signatures, and lets you manually recover or rewrite broken records.
Boot Sector Repair & Undelete Capability
Another thing TestDisk is capable of is repairing boot sectors – something many recovery tools overlook. If your system refuses to boot because the boot sector’s damaged or missing, TestDisk can often bring it back to life. It can:
- Rebuild NTFS, FAT12/16/32 boot sectors
Recover backup boot sectors - Fix MFT using its mirror (NTFS)
And while its main job isn’t recovering individual files, it can undelete files from several file systems, including FAT12/16/32, exFAT, NTFS, and ext2. But this isn’t its strong suit – it’s rather rudimentary and basic. You won’t find many people using TestDisk specifically to recover a few accidentally deleted files. That’s just not what it’s built for. It can do it, yes – but overall workflow makes it a last resort rather than a go-to.
And the first score in our TestDisk review is 4 out of 5.
TestDisk isn’t overflowing with bells and whistles – but it nails what it sets out to do. Its support for a huge range of operating systems and file systems is unmatched in the free recovery space. The ability to rebuild boot sectors, repair partition tables, and even recover deleted partitions is genuinely impressive, especially for a tool that’s 100% free and open-source.
That said, we’re holding back the full score because it doesn’t handle content-level file recovery as smoothly as modern GUI tools, and its feature set, while powerful, is clearly geared toward users who already know what they’re doing. Still, for structural drive repair and partition recovery? It’s one of the best.
How to Recover Data Using TestDisk
We’re breaking this section down into three parts: Testing Process, Installation & Scanning, and Recovery Results.
First, we’ll explain how we set up our environment to test TestDisk – what kind of hardware and scenarios we used. Then, we’ll walk through the actual recovery process step by step so you’ll know exactly what to expect if you decide to use it yourself. Finally, we’ll wrap things up with our recovery results: what worked, what didn’t, and how well the tool performed in real-world use.
Testing Process
For our TestDisk review, we used a 16GB USB 3.0 flash drive formatted with two partitions. Each one had around 4GB of mixed files – photos, PDFs, videos, Office docs, and a few larger formats. We basically mimicked a realistic flash drive setup: everyday data scattered across two partitions.
Then came the intentional “oops.” We erased the second partition using Disk Management on Windows (since it’s way easier to model a situation like this on Windows, we went with that). Just like that, half the drive was gone. No file table—just blank space where the data used to be. As you can see in the screenshot below, it now shows up as Unallocated. You can’t open it in File Explorer, you can’t access the files—Windows treats it like it never existed.
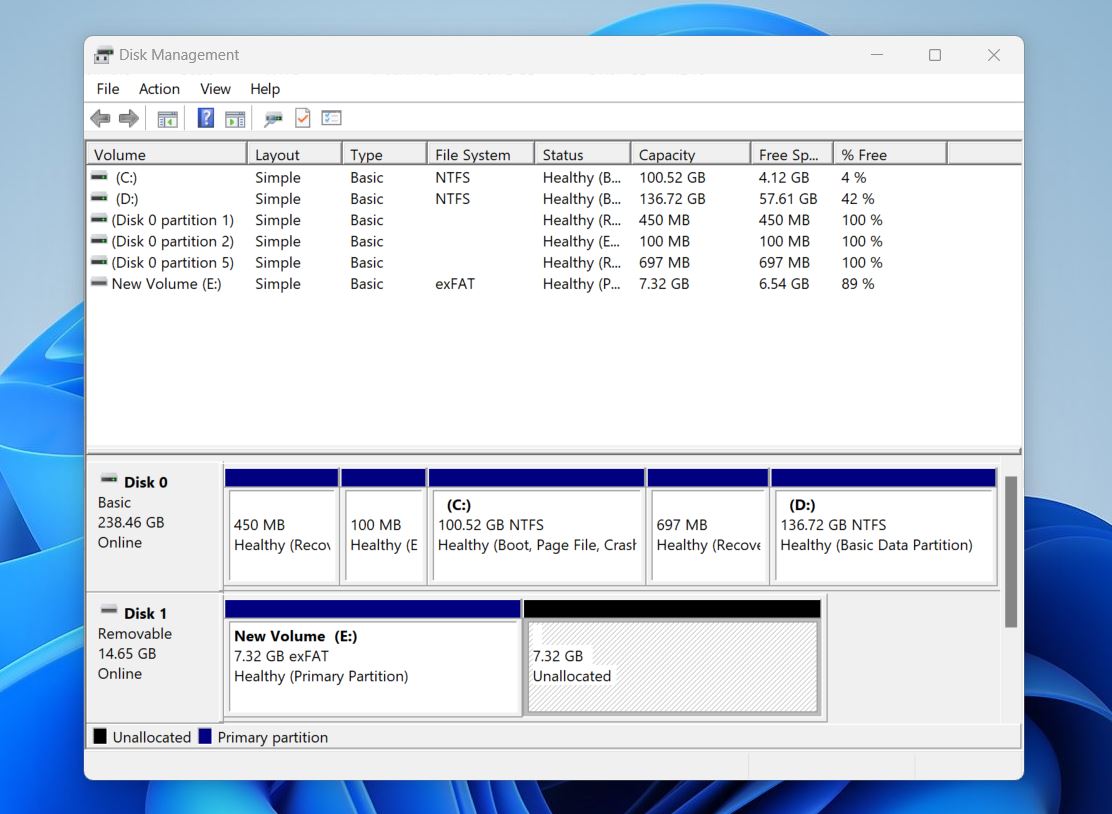
That’s the scenario we set up: one partition still intact, the other accidentally wiped. The goal? See if TestDisk could bring the lost partition – and the files inside – back to life. No ideal conditions, no cherry-picked scenarios. Just a basic user error and a real test of what the software can do.
Here’s the setup we used to run our TestDisk recovery test:
- 💻 OS: Windows 11 Pro (latest version at time of testing)
- ⚡ CPU: Intel Core i7-11800H
- 🧠 RAM: 16 GB
- 🧱 Test Device: 16GB Kingston USB 3.0 flash drive
- 💾 Drive Setup: Two ~8GB partitions (both exFAT), one deleted
- 📁 Test Files: ~4GB of mixed content per partition (JPG, DOCX, PDF, MP4, MP3, MKV, TIFF)
Installation & Scanning
Okay, first things first – how do you download TestDisk?
You’ll see two versions on the official site: the stable release TestDisk 7.2 (Feb 22, 2024) and a 7.3-WIP beta (Work In Progress). While the beta includes some newer features, we decided to stick with the latest stable version – 7.2 – since that’s what most users will be downloading for reliability.
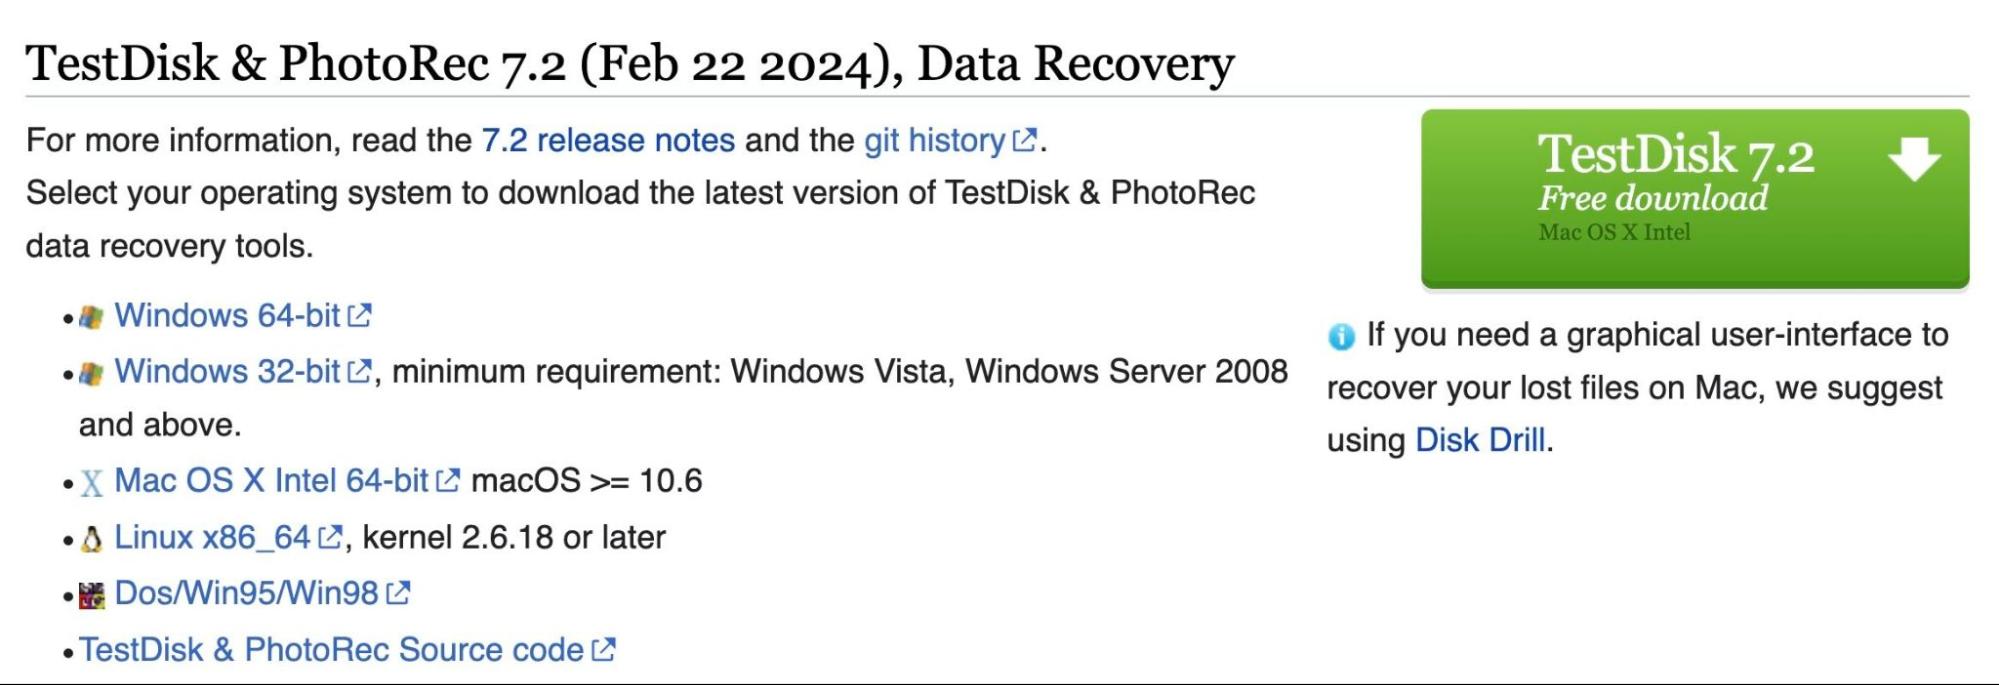
We tested on Windows, so we grabbed the Windows 64-bit archive. If you’re on a Mac, go for the TestDisk for Mac OS X Intel 64-bit build—it covers all macOS versions from 10.6 and up.
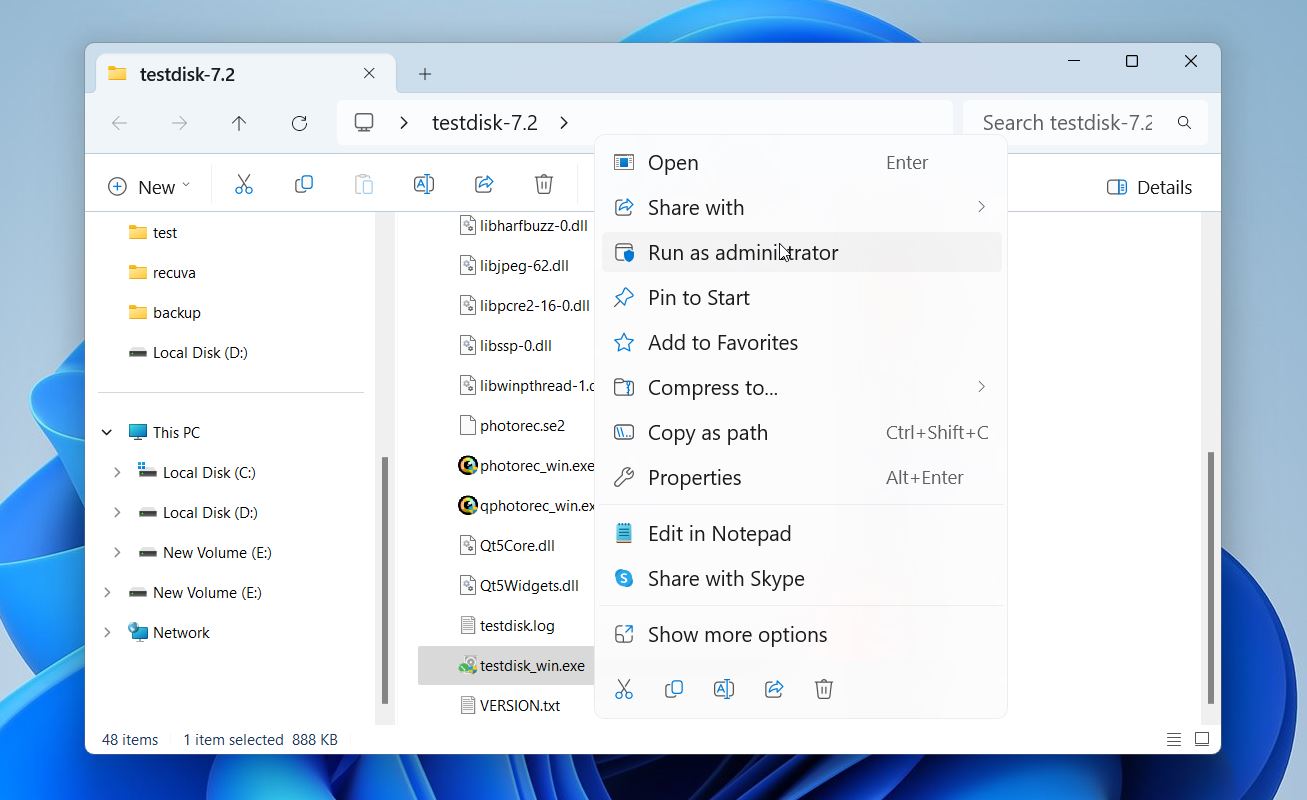
- Once downloaded, all you need to do is extract the archive, open the folder, and run testdisk_win.exe. Make sure to right-click and choose Run as administrator—that’s important. Without admin rights, TestDisk might not have the access it needs to detect all connected drives properly.
- From here, TestDisk launches in a terminal window. Yep – all text-based. You navigate with arrow keys and hit Enter to select options. There’s no scanning animation or progress bar – just a very old-school menu flow.
- Next, we were asked to select the storage device we wanted to scan. TestDisk listed our Kingston 16GB flash drive, and we picked it using the arrow keys.
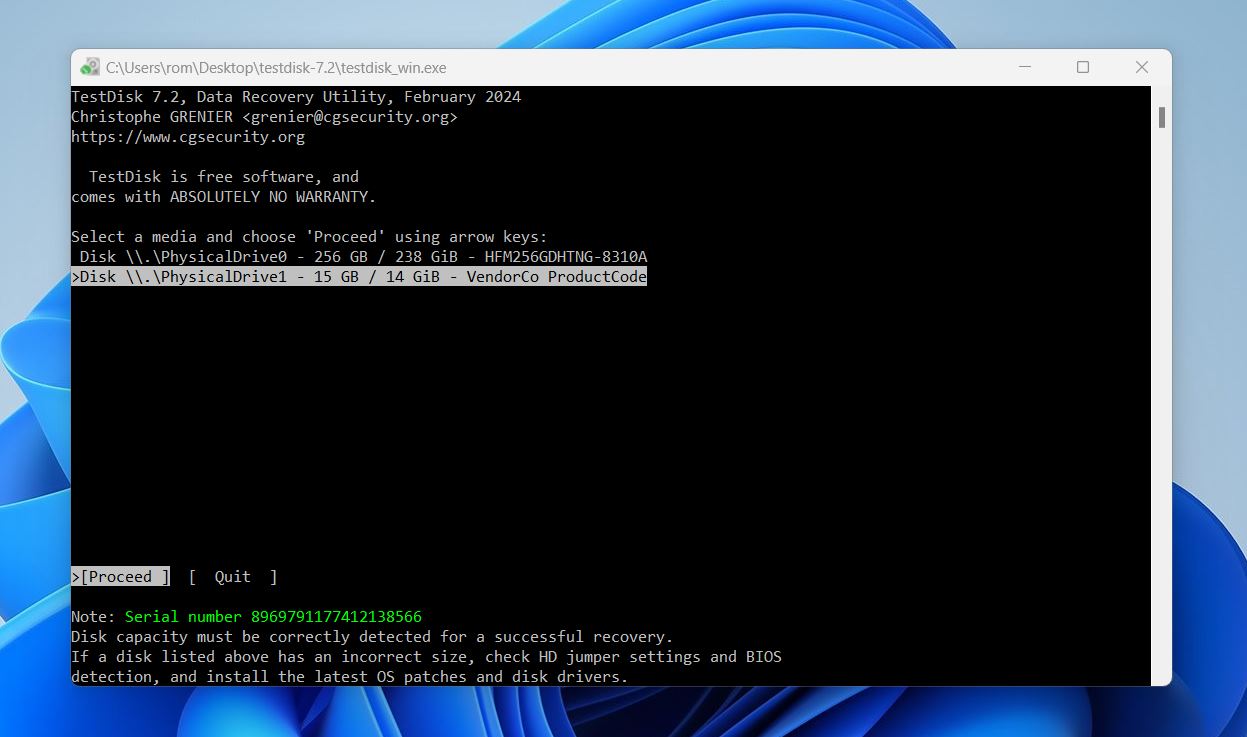
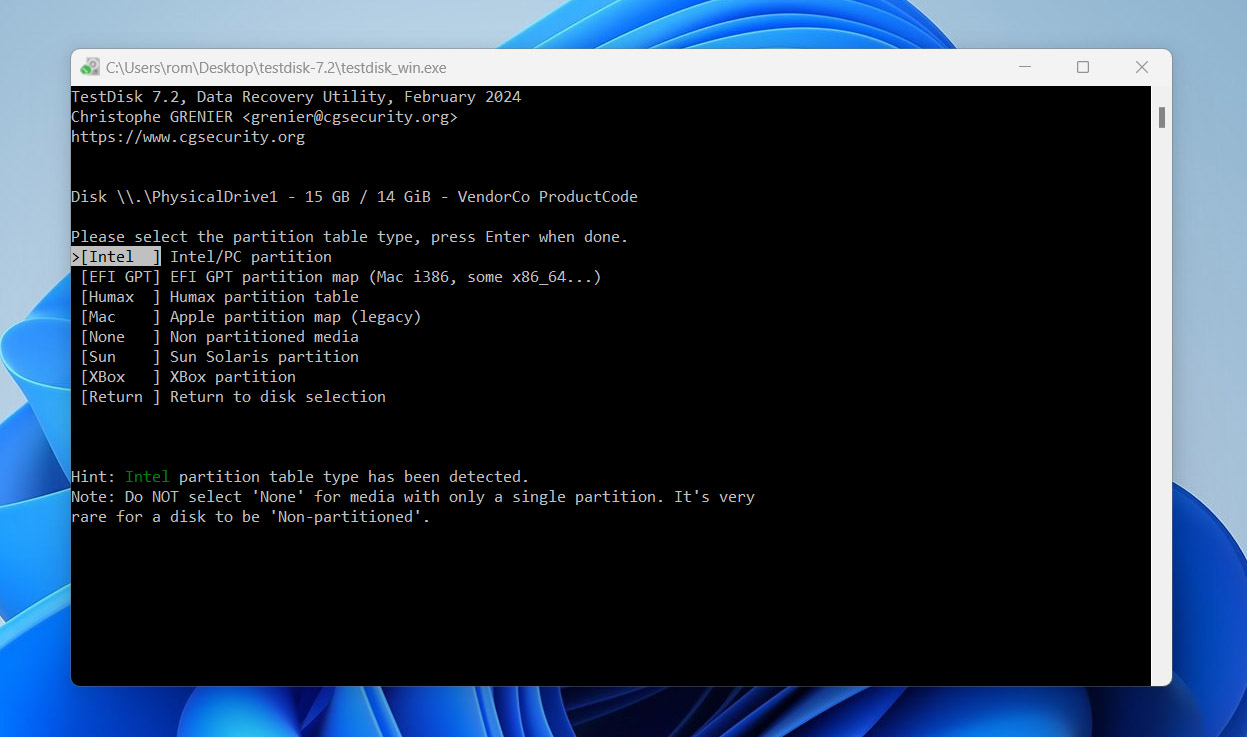
- Once selected, TestDisk automatically detected the partition table as Intel, which matched our setup, so we stuck with the default.
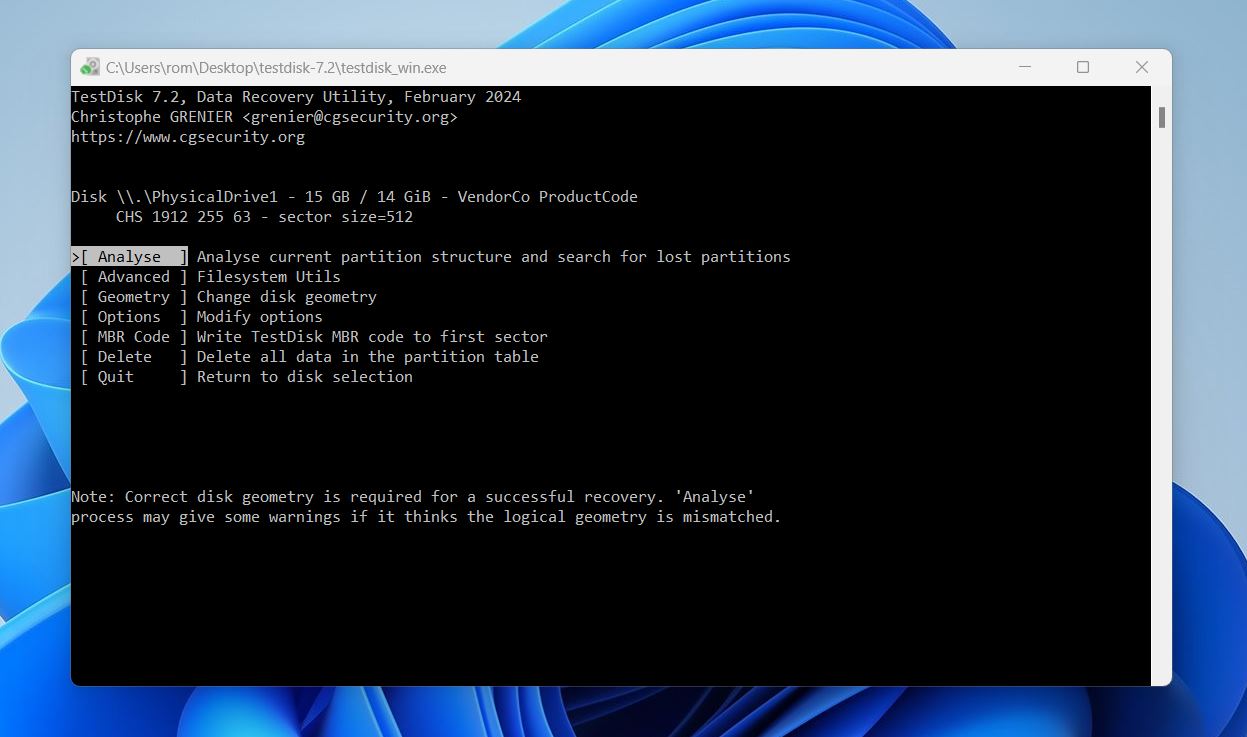
- From there, we hit “Analyze” to begin checking the current structure of the disk. TestDisk showed that the second partition was missing – just as we expected after wiping it in Disk Utility.
- We selected “Quick Search” to look for lost partitions. No luck – it didn’t find anything.
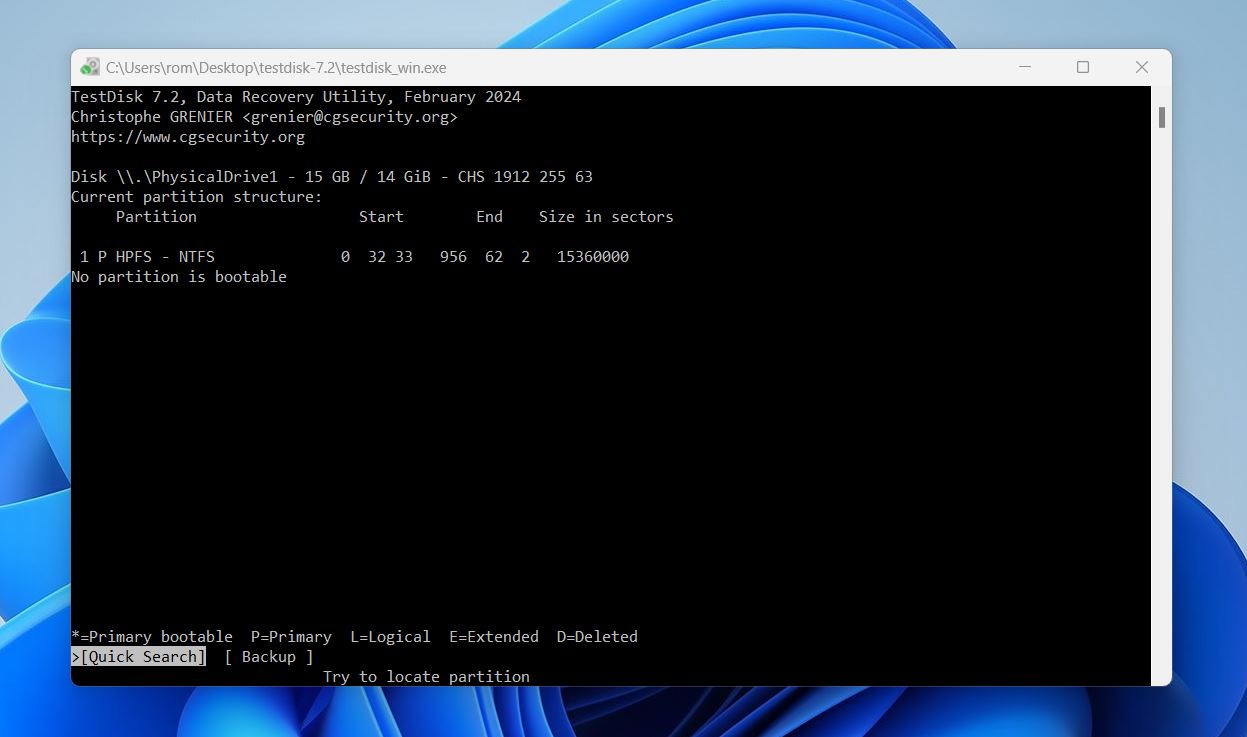
- So we chose “Deeper Search”.
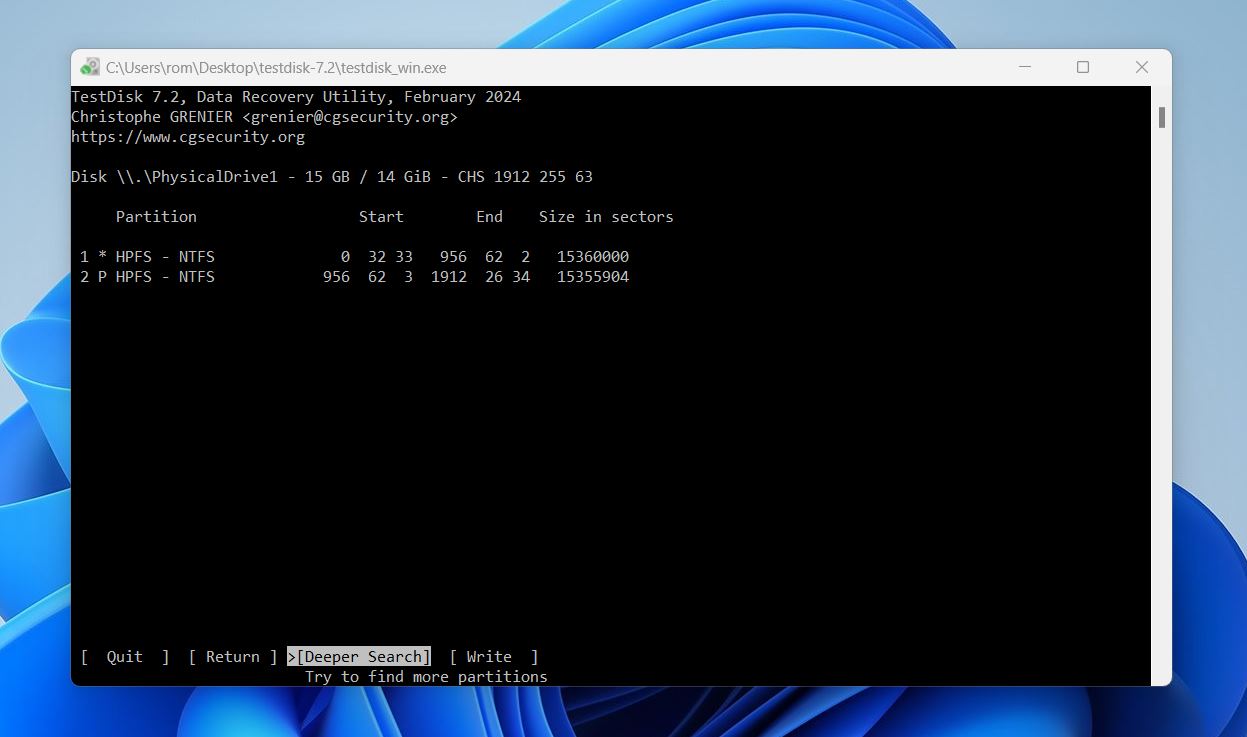 TestDisk dug through the disk sector by sector, and after a few minutes, it found the lost partition. We checked the partition by hitting P to list its contents – and sure enough, there were our lost files.
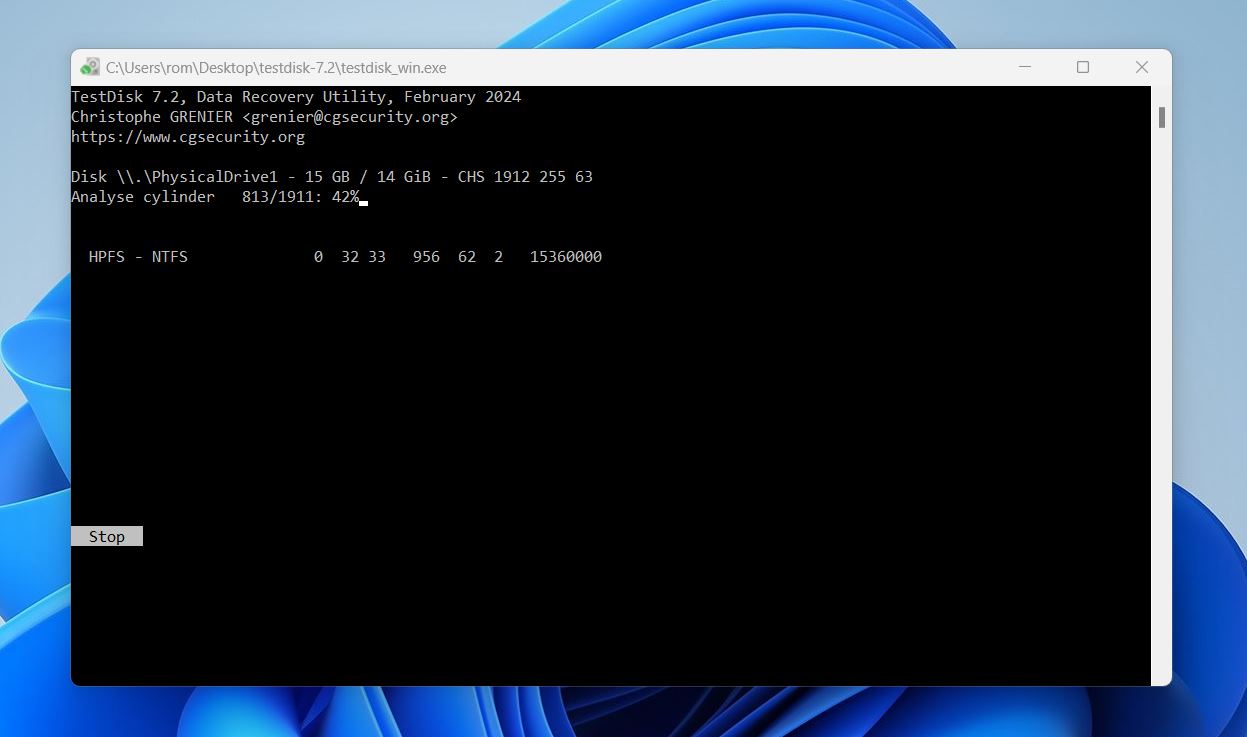
- To lock it in, we marked the partition as Primary and selected “Write” to restore it. TestDisk asked for confirmation, and once approved, the tool wrote the partition structure back to the drive.
- A quick reboot (or just replugging the flash drive) and… there it was. Our test files were accessible again.
That’s how an average TestDisk recovery session looks. Yeah, it’s not the simplest process – but if you’ve got a bit of command-line experience and you follow step-by-step guides, it can be a powerful tool. Thankfully, the official site has a ton of helpful documentation, like the TestDisk Step by Step guide.
That said, TestDisk doesn’t hold your hand. There’s no TestDisk GUI, no additional safety prompts, no training wheels. You’re working directly with your disks, so if you don’t have at least a ballpark idea of what you’re doing, it’s easy to make things worse instead of better. You have to be careful – TestDisk won’t stop you from restoring to the wrong partition or writing over important data. It’s a capable tool, but it assumes you know how to use it.
Recovery Results
Well, recovery – as you’ve probably gathered – was a success. We were able to restore our lost partition and all the data it contained using TestDisk.
TestDisk was able to detect the deleted partition almost immediately with the Deeper Search option (the Quick Search didn’t find anything). From launching the program to fully recovering the partition took around 8 minutes. Some of those minutes weren’t even about the scan itself – it was us double-checking whether we chose the right command (since, you know, one wrong move and you could overwrite something for good).
Then came watching the scan progress bar crawl. But hey, the result speaks for itself: clean recovery, no missing files, no errors. Just a slightly nerve-wracking ride to get there.
Once restored, all the files were intact and readable. We double-checked everything, and yes, everything survived.
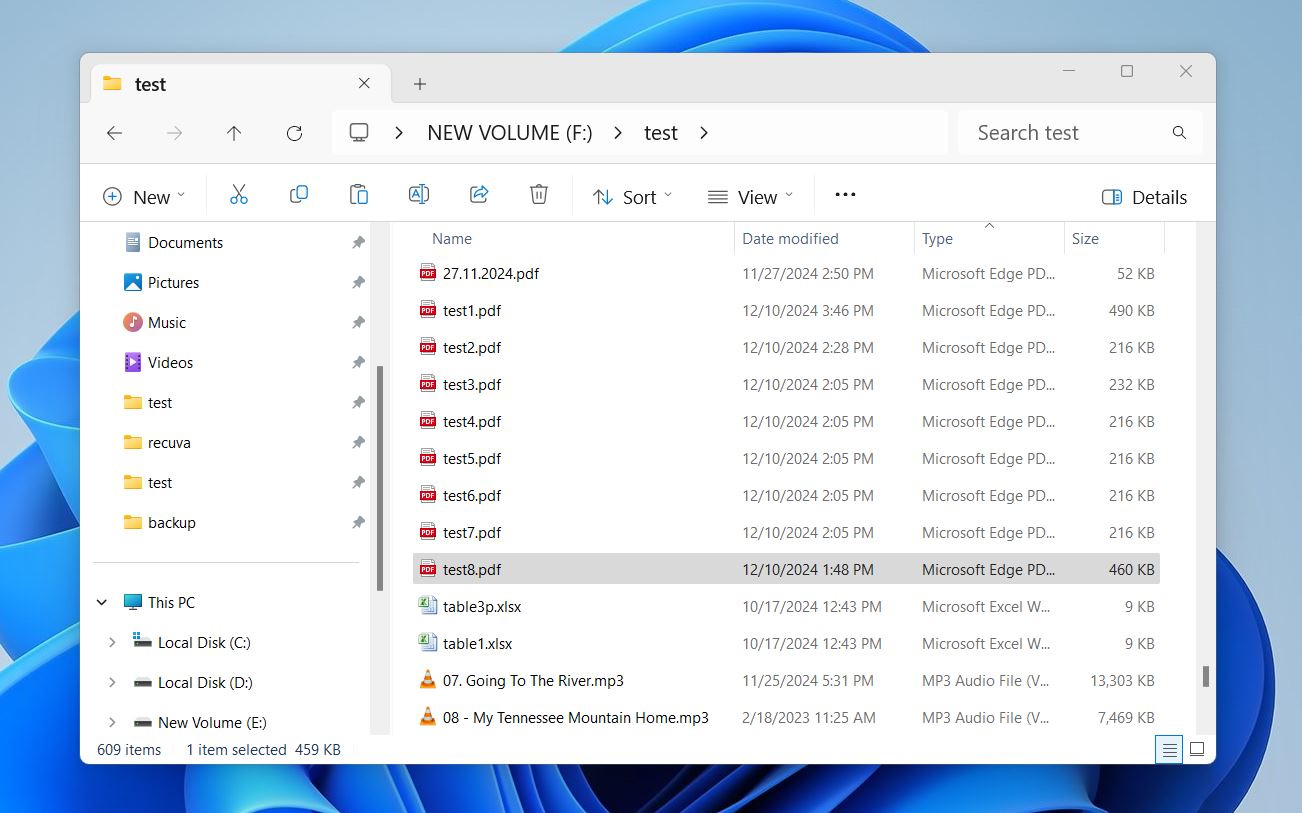
In total, we got back:
- 1 partition
- 609 files
- Roughly 3.86 GB of data
TestDisk earned a solid 4 out of 5 here – and honestly, that’s us judging it for what it is, not what it’s not. If you’re asking how does TestDisk work, the answer is: it works well, as long as your goal is to fix structural disk issues. Lost partitions, busted boot sectors, corrupted file tables – that’s where it shines.
But let’s be real: it’s not the right tool for undeleting individual files. That’s why we didn’t test or score it in that context. it’s just not really cut out for that job. And while the GUI-less process isn’t exactly fun, it delivers results (assuming you know what you’re doing and don’t mind stepping through prompts like it’s year 2000).
So yeah, if you’re okay with a little terminal work and you’ve got a partition to recover, TestDisk is more than capable. Just don’t expect modern UX – or much hand-holding.
TestDisk Alternatives
Look, we respect what TestDisk brings to the table. It’s free, open-source, and wildly powerful for fixing lost partitions or boot sector issues. But let’s be honest – it’s not for everyone. The command-line interface alone is enough to make some users run for the hills. And if your goal is recovering specific deleted files, TestDisk just isn’t the best fit.
Here’s a comparison between TestDisk and popular alternatives to help put things into perspective:
| Tool | Type | Main Strength | GUI | File Recovery | Partition Recovery | Ease of Use | Cross-Platform | Price |
| TestDisk | Free, Open Source | Partition repair & boot sector fixes | No (Text-based only) | Limited (structural focus) | Yes | Low | Yes (Win/Linux/macOS) | Free |
| Disk Drill | Freemium / Paid | File recovery with modern UI, disk imaging, RAID support | Yes (Modern UI) | Advanced file recovery | Partial | High | Yes (Win/macOS) | Free up to 100MB (Windows) / Pro $89 |
| Recuva | Freemium / Paid | Simple file undelete for FAT/NTFS | Yes (Simple UI) | Basic file recovery | No | High | Windows only | Free / Pro $24.95 |
| DiskGenius | Freemium / Paid | All-in-one disk and partition manager with recovery features | Yes (Classic Windows UI) | Yes (file preview and recovery) | Yes (direct partition table edits) | Medium | Windows only | Free / Standard $69.95 one-time / Pro $99.90 one-time |
There are definitely more beginner-friendly and feature-rich alternatives to TestDisk – especially if you need both file recovery and partition recovery in one package. Tools like Disk Drill not only help locate lost partitions, but also let you browse and preview the files inside them before recovery. DiskGenius brings together a partition manager and file recovery engine, which allows you to directly edit partition tables and recover data. Neither tool is fully free, but they offer freemium tiers: Disk Drill gives Windows users up to 100 MB of recovery without an upgrade (with unlimited preview), often sufficient for minor incidents. While DiskGenius lets you recover files smaller than 64 KB, a limit that’s rarely practical in real use.
If we talk about unlimited free recovery there’s also Recuva, which doesn’t limit anything in the free version. However, it’s a basic file undelete utility and won’t help if your issue involves lost or corrupted partitions.
So to wrap it up: TestDisk is kind of its own thing. While there are clearly more advanced recovery apps that include partition repair as part of the package, almost none of them are 100% free – and those that are tend to be much more limited in scope.
We’ll give TestDisk a solid 4 out of 5 for value. It’s 100% free and open-source, with no limitations, no upsells. You get full access to powerful low-level recovery features. The only reason it doesn’t get a perfect score is the usability gap – unless you’re comfortable in a terminal and understand partition structures, you’ll probably struggle. Still, in terms of what it delivers for zero dollars? It’s one of the better deals out there.
TestDisk Users Reviews
Now to wrap things up, we wanted to go beyond specs, features, and testing – and get a feel for what real users think of TestDisk. So we scanned through forums, Reddit threads, and niche recovery communities to see what people are actually saying.
Here are a couple of takes:
💬 One reviewer on G2 says:
“Lets you recover deleted files. Cross-platform, so I can run it on Windows, Mac, or Linux. Pretty straightforward to use. Can fix non-booting partitions.
I just wish it had a GUI – especially on Linux – so I could install it through the Software Center.”
💬 Trustpilot is a bit more poetic:
“The expertise and innovation infused into this tool are evident… A standing ovation for the developers! TestDisk is a testament to the unmatched power of open-source solutions.”
💬 From Reddit’s /r/sysadmin:
“It’s a fantastic program. Useful for whenever you have filesystem read errors or general hard drive failure woes.
I once used it to recover data from a drive set up for RAID1 mirroring in Windows Server 2003. TestDisk handled it.”
💬 And this one’s probably our favorite – from a user who shared this story:
“My father (idiotically) deleted and overwrote someone’s Windows Vista partition with Linux. Then realized he needed data from the original Windows partition.
He managed to get TestDisk working on his own – which is itself amazing – and actually recovered a good amount of the data.”
The people who get the most out of TestDisk tend to be a bit technical – or at least comfortable following detailed, step-by-step guides. Those who manage to get a handle on it often praise it highly. Most complaints, unsurprisingly, are about the UI – or more accurately, the fact that there isn’t one. And it’s understandable. Most users today just won’t bother with command-line tools.
So, overall? The feedback aligns with everything we’ve seen ourselves. The tool works, but it’s not for everyone. Which is why we’re giving it a solid 4 out of 5 for user feedback.
Final Verdict
Since all previous scores were 4s, the final score is (unsurprisingly) 4 out of 5.
TestDisk isn’t a sleek commercial product. There’s no GUI, no automation, and definitely no handholding. But it knows exactly what it is: a powerful, no-cost structural recovery tool made for people who aren’t afraid of a terminal window.
For those who just want to get some files back after a format or accidental deletion, there are better options. Tools that give you big buttons, clean design, and walk you through the process. Some of them are even free.
But if you’re dealing with partition loss, boot issues, or corrupted tables – and you’re comfortable with command-line prompts – TestDisk is one of the most capable tools you can get. Just don’t go in blind. Read the manual. Skim the how-to guides. Know what you’re clicking. Because it can fix things, but it can just as easily make things worse if you don’t.