


What if you sent the wrong files to the Recycle Bin, meant to restore them later, but emptied the bin instead? Or deleted something, moved on, and only realized days later that you need to recover files from Recycle Bin after empty?
Can You Restore the Recycle Bin After Emptying It?
Yes, it’s possible to restore emptied Recycle Bin, but it helps to understand what actually happens first.
When you delete a file normally, Windows does not move the file’s contents into some separate “Recycle Bin storage area.” It changes how the file is referenced by the file system and shows it inside the Recycle Bin, so you can restore it if needed.
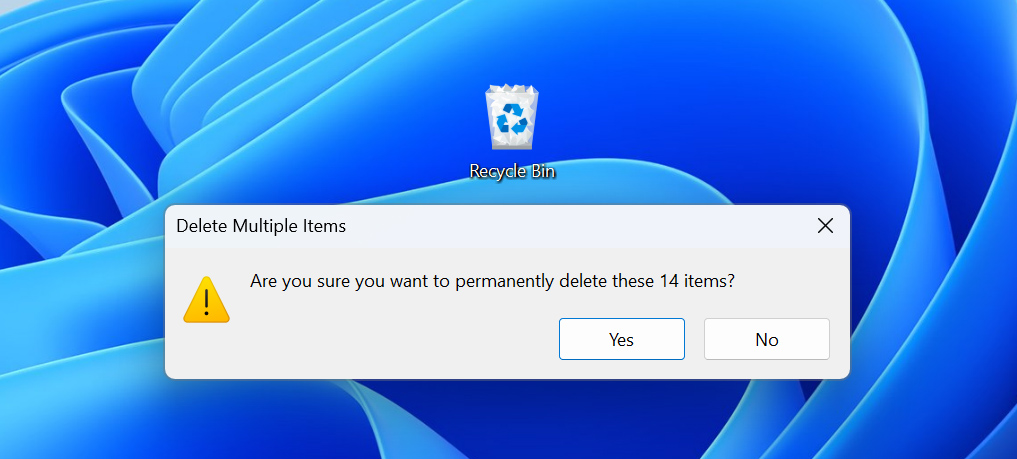
When you finally empty the Recycle Bin in Windows 11, Windows 10, Windows 8, Windows 7, and older, the storage space that was occupied by the files gets marked as available, which means that other applications can use it to store data. However, until some application uses the freed storage space, the original files are still there intact, which is why it’s possible to recover files from Recycle Bin after empty. That is why new activity on the same drive matters so much; some of that new data may be written over the deleted files. Once that happens, recovery becomes much harder or impossible.
Set your expectations before you start. Your recovery chances depend mostly on two things: how much the original drive was used after deletion, and what type of drive the files were stored on.
If the files were on an HDD, recovery is often possible as long as new data has not overwritten them. If they were on an SSD, the chances would be lower because TRIM may have already cleared deleted data in the background. Either way, stop using the drive as soon as you notice the loss and go through the steps below. The only way to know for sure if something is still recoverable is to scan the drive and check the results for yourself.
How to Restore Deleted Files After Emptying the Recycle Bin
Technically, there are several ways how to recover deleted files, but realistically, in most cases, you are going to need data recovery software. So we’ll start there and use Disk Drill for our walkthrough. It can scan the drive where the files were stored before deletion, find recoverable data, and help you save those files back to a location of your choice.
Even though Disk Drill is designed with regular home users in mind, it is not a basic tool under the hood. It supports a wide range of file formats and combines multiple scan methods to find deleted or lost files.
Disk Drill for Windows is available in Free, Pro, and Enterprise. The Free version provides up to 100 MB of recovery across all methods, so you can validate results on real files from the emptied Recycle Bin before upgrading.
Step 1: Download Disk Drill and Install It on Your PC
Download the free version of Disk Drill from its website and install it just like you would any other Windows application. All modern versions of Windows are supported, and there’s also a separate version of Disk Drill available for computers running macOS.

Step 2: Launch Disk Drill and Select the Drive That Contained the Deleted Files
Next, you need to launch Disk Drill and tell it to analyze the storage device where the files were located before you deleted them by clicking on the Search for lost data button next to it. In most cases, the system drive, which is the drive that contains the operating system and all related system files, is marked with the letter C, while other storage devices are marked with letters D, E, F, G, and so on.
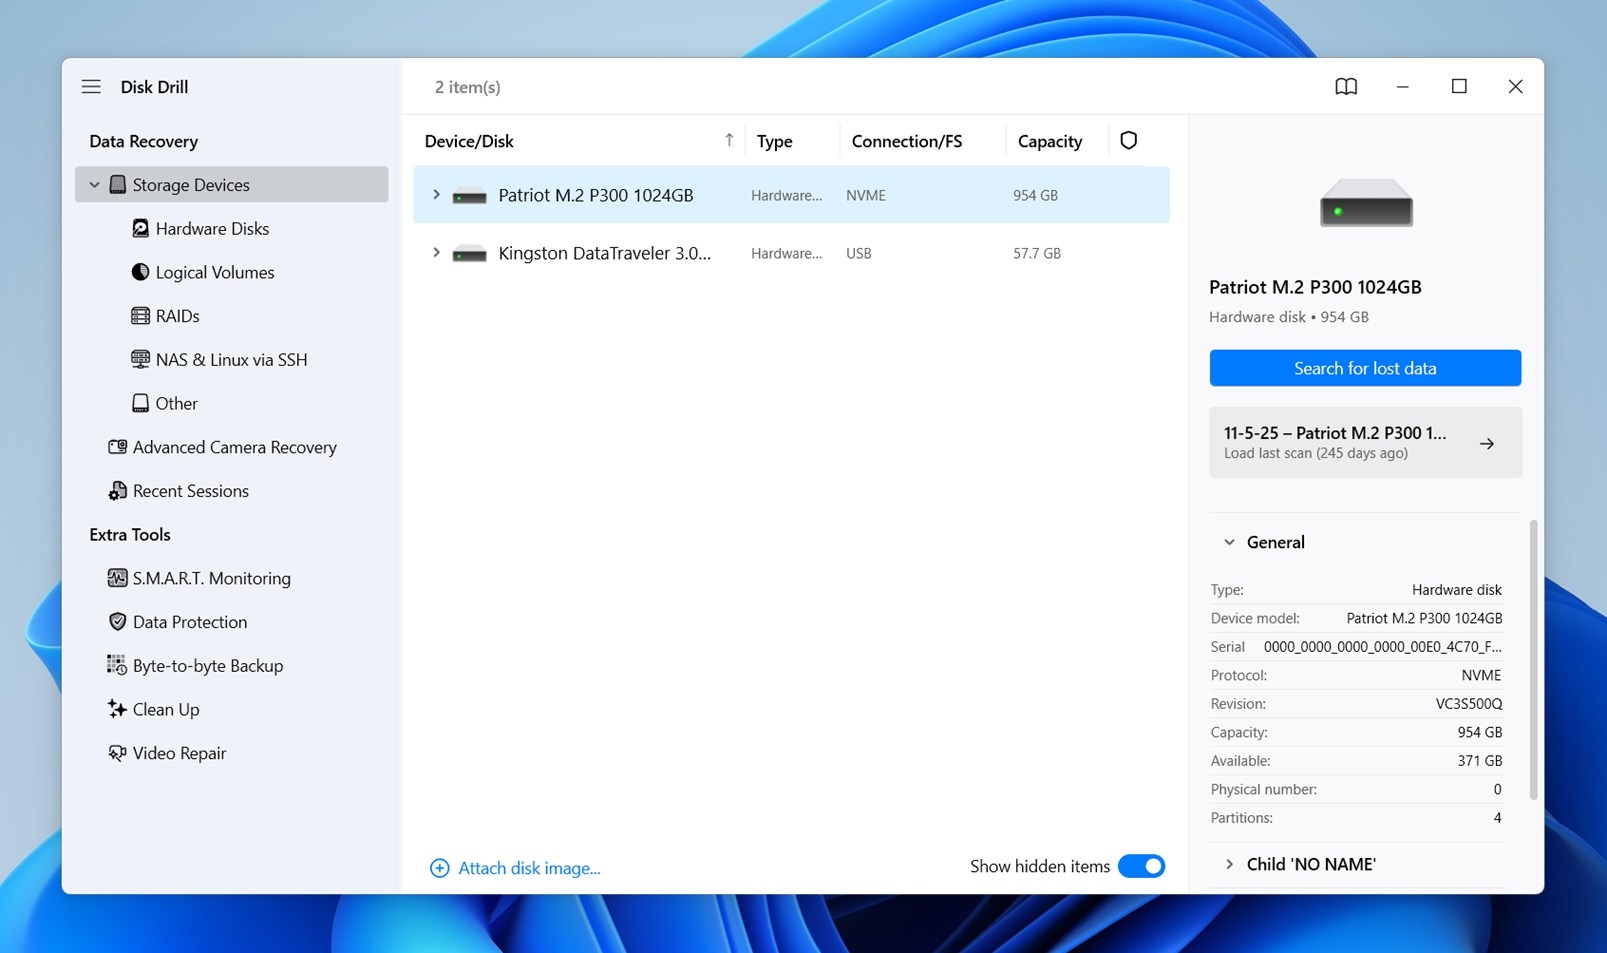
If Disk Drill shows a window asking you to choose a scan mode, select Universal Scan. The name says it all: this mode is the best starting point for most Recycle Bin recovery cases.
Step 3: Select the Files You Want to Restore from the Recycle Bin
Depending on the size and condition of your drive, the scan can take anywhere from a few minutes to much longer. You do not have to wait for it to finish, though. Disk Drill starts showing found files while the scan is still running, so you can see the results right away.
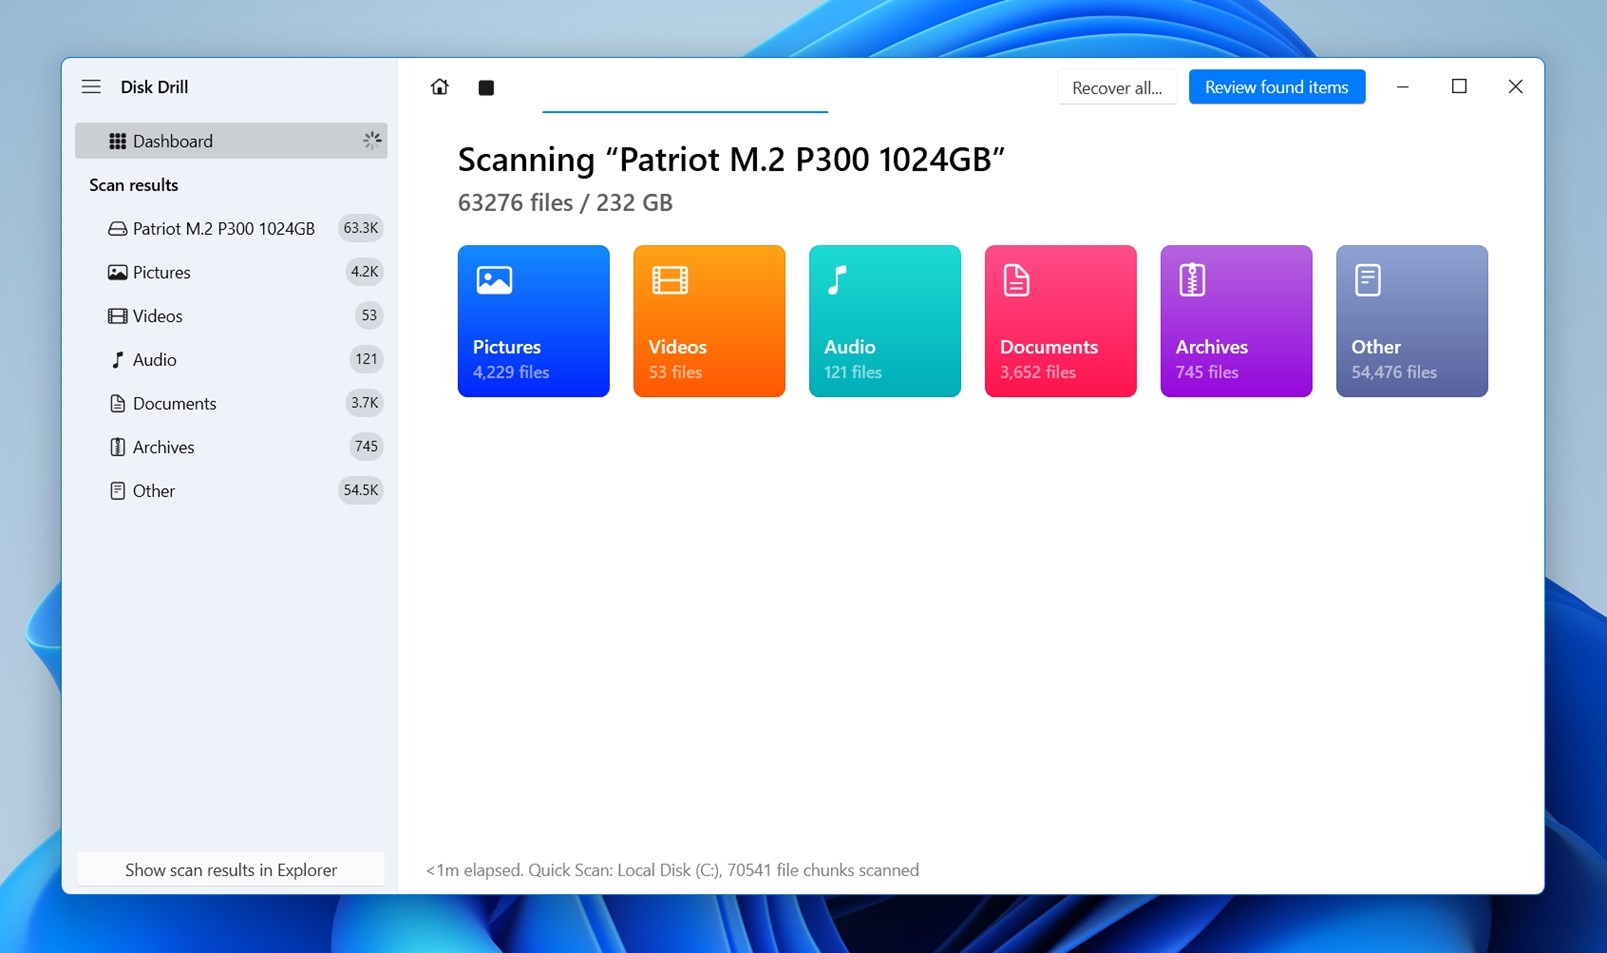
Click Review found items at the top to open the full results view (or if you need to recover deleted photos from Recycle Bin after empty, open the Pictures category). Here, you’ll see all files found so far, organized into subcategories.
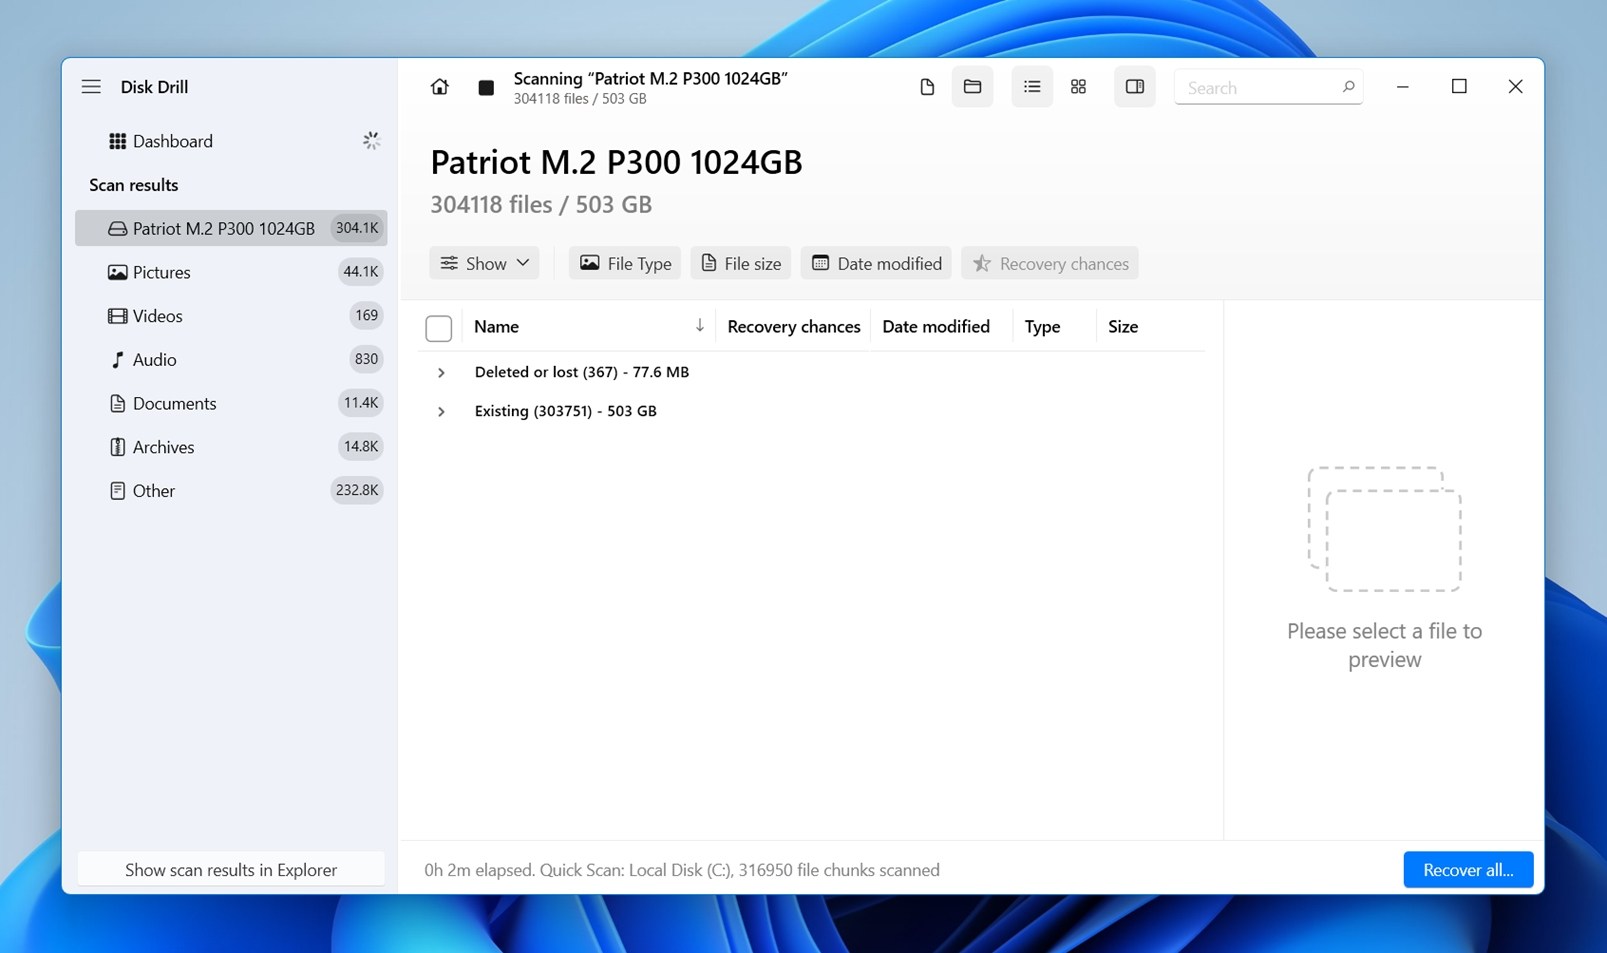
For a Recycle Bin recovery case, start with Deleted or lost. This is usually where files deleted from the Recycle Bin are most likely to appear. You may also see a Reconstructed section. These are files Disk Drill found by their file signatures rather than original file system records.
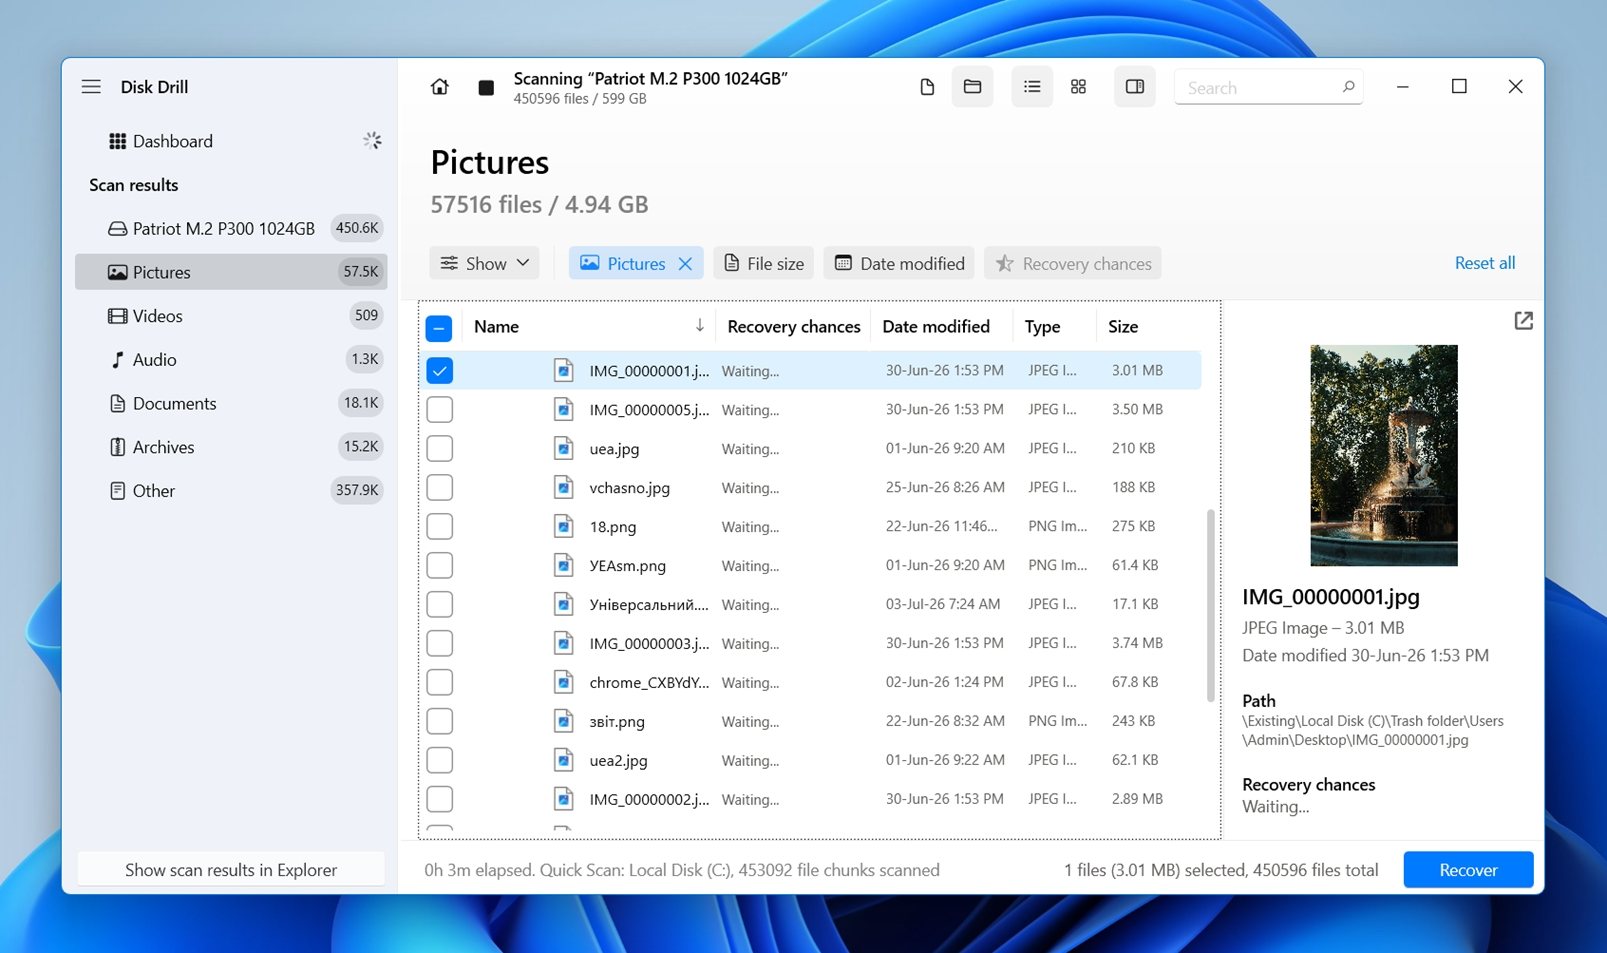
When you click a file, check the preview pane on the right. Disk Drill can preview many file formats, though preview support also depends on what Windows can open and which third-party viewers are installed on your system.
If you see a correct preview, that is an excellent sign. It means the file survived and should recover properly. But the opposite is not always true: if there is no preview, the file may still be recoverable. Recover it and open manually to check.
Select the files you want to restore by marking the checkboxes next to them.
Step 4: Choose Where to Save the Recovered Files
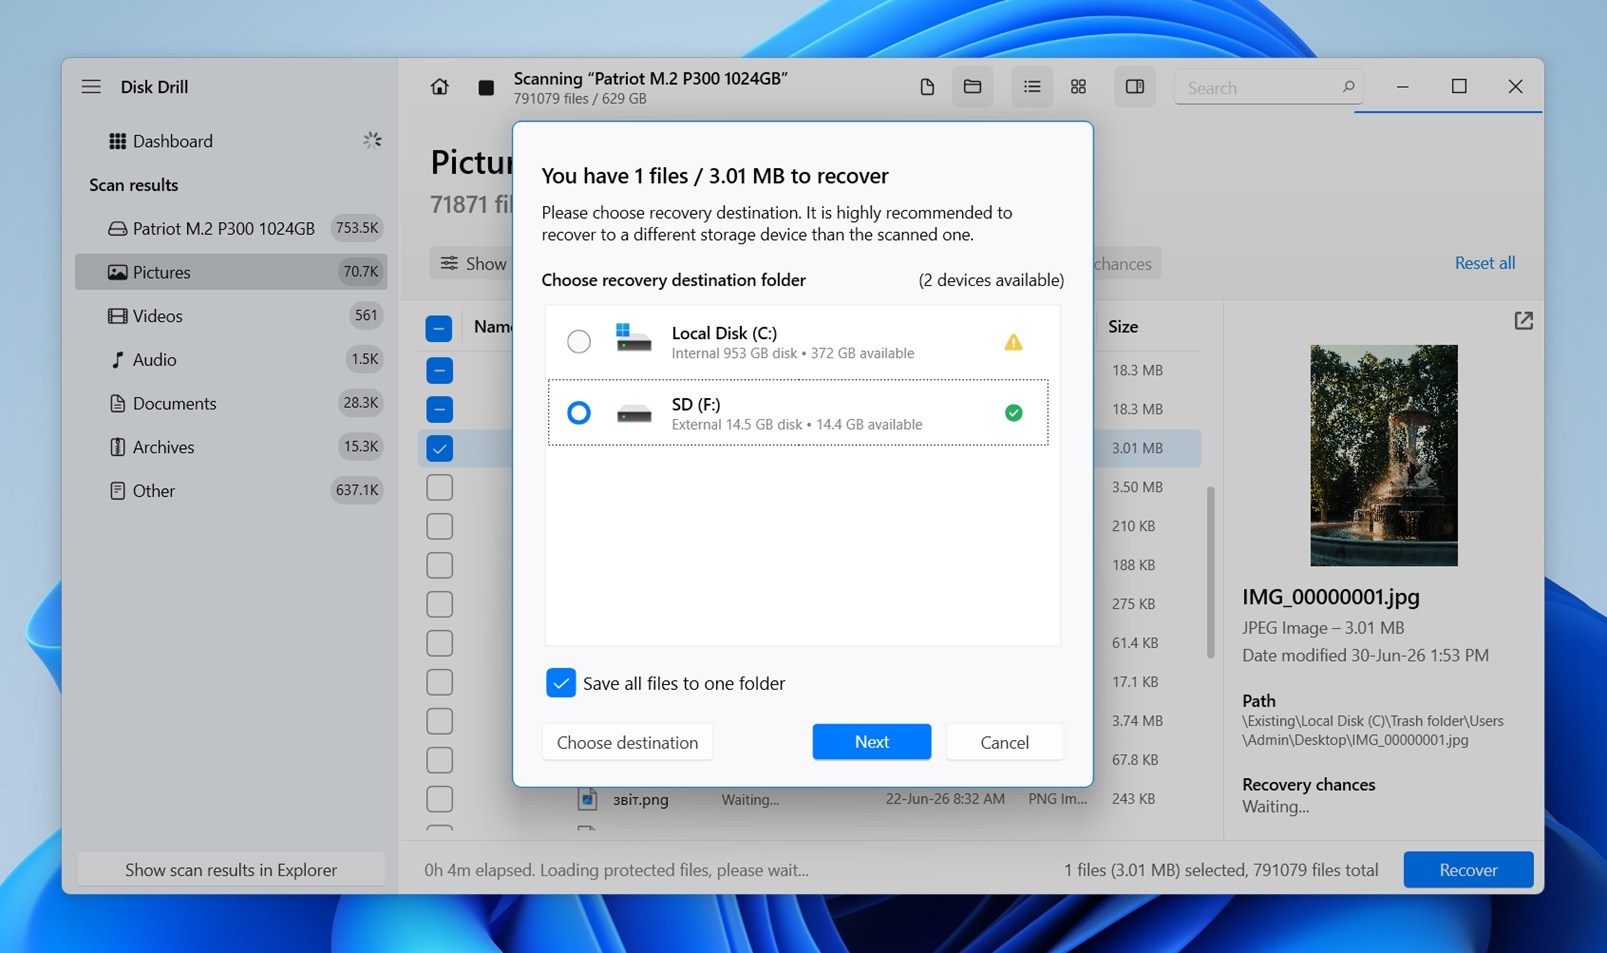
When ready, click Recover. Disk Drill allows you to choose where you want to restore the deleted files, and it’s highly advisable to select a recovery directory that’s not on the same storage device as the files you want to recover. The reason is the same as before: every new file written to that drive can overwrite deleted data that may still be recoverable.
Step 5: Finish the Recovery and Check Your Files
With your files selected and the recovery directory specified, all that is left is to click Next and let Disk Drill restore the files. The actual recovery shouldn’t take more than a few moments to complete.
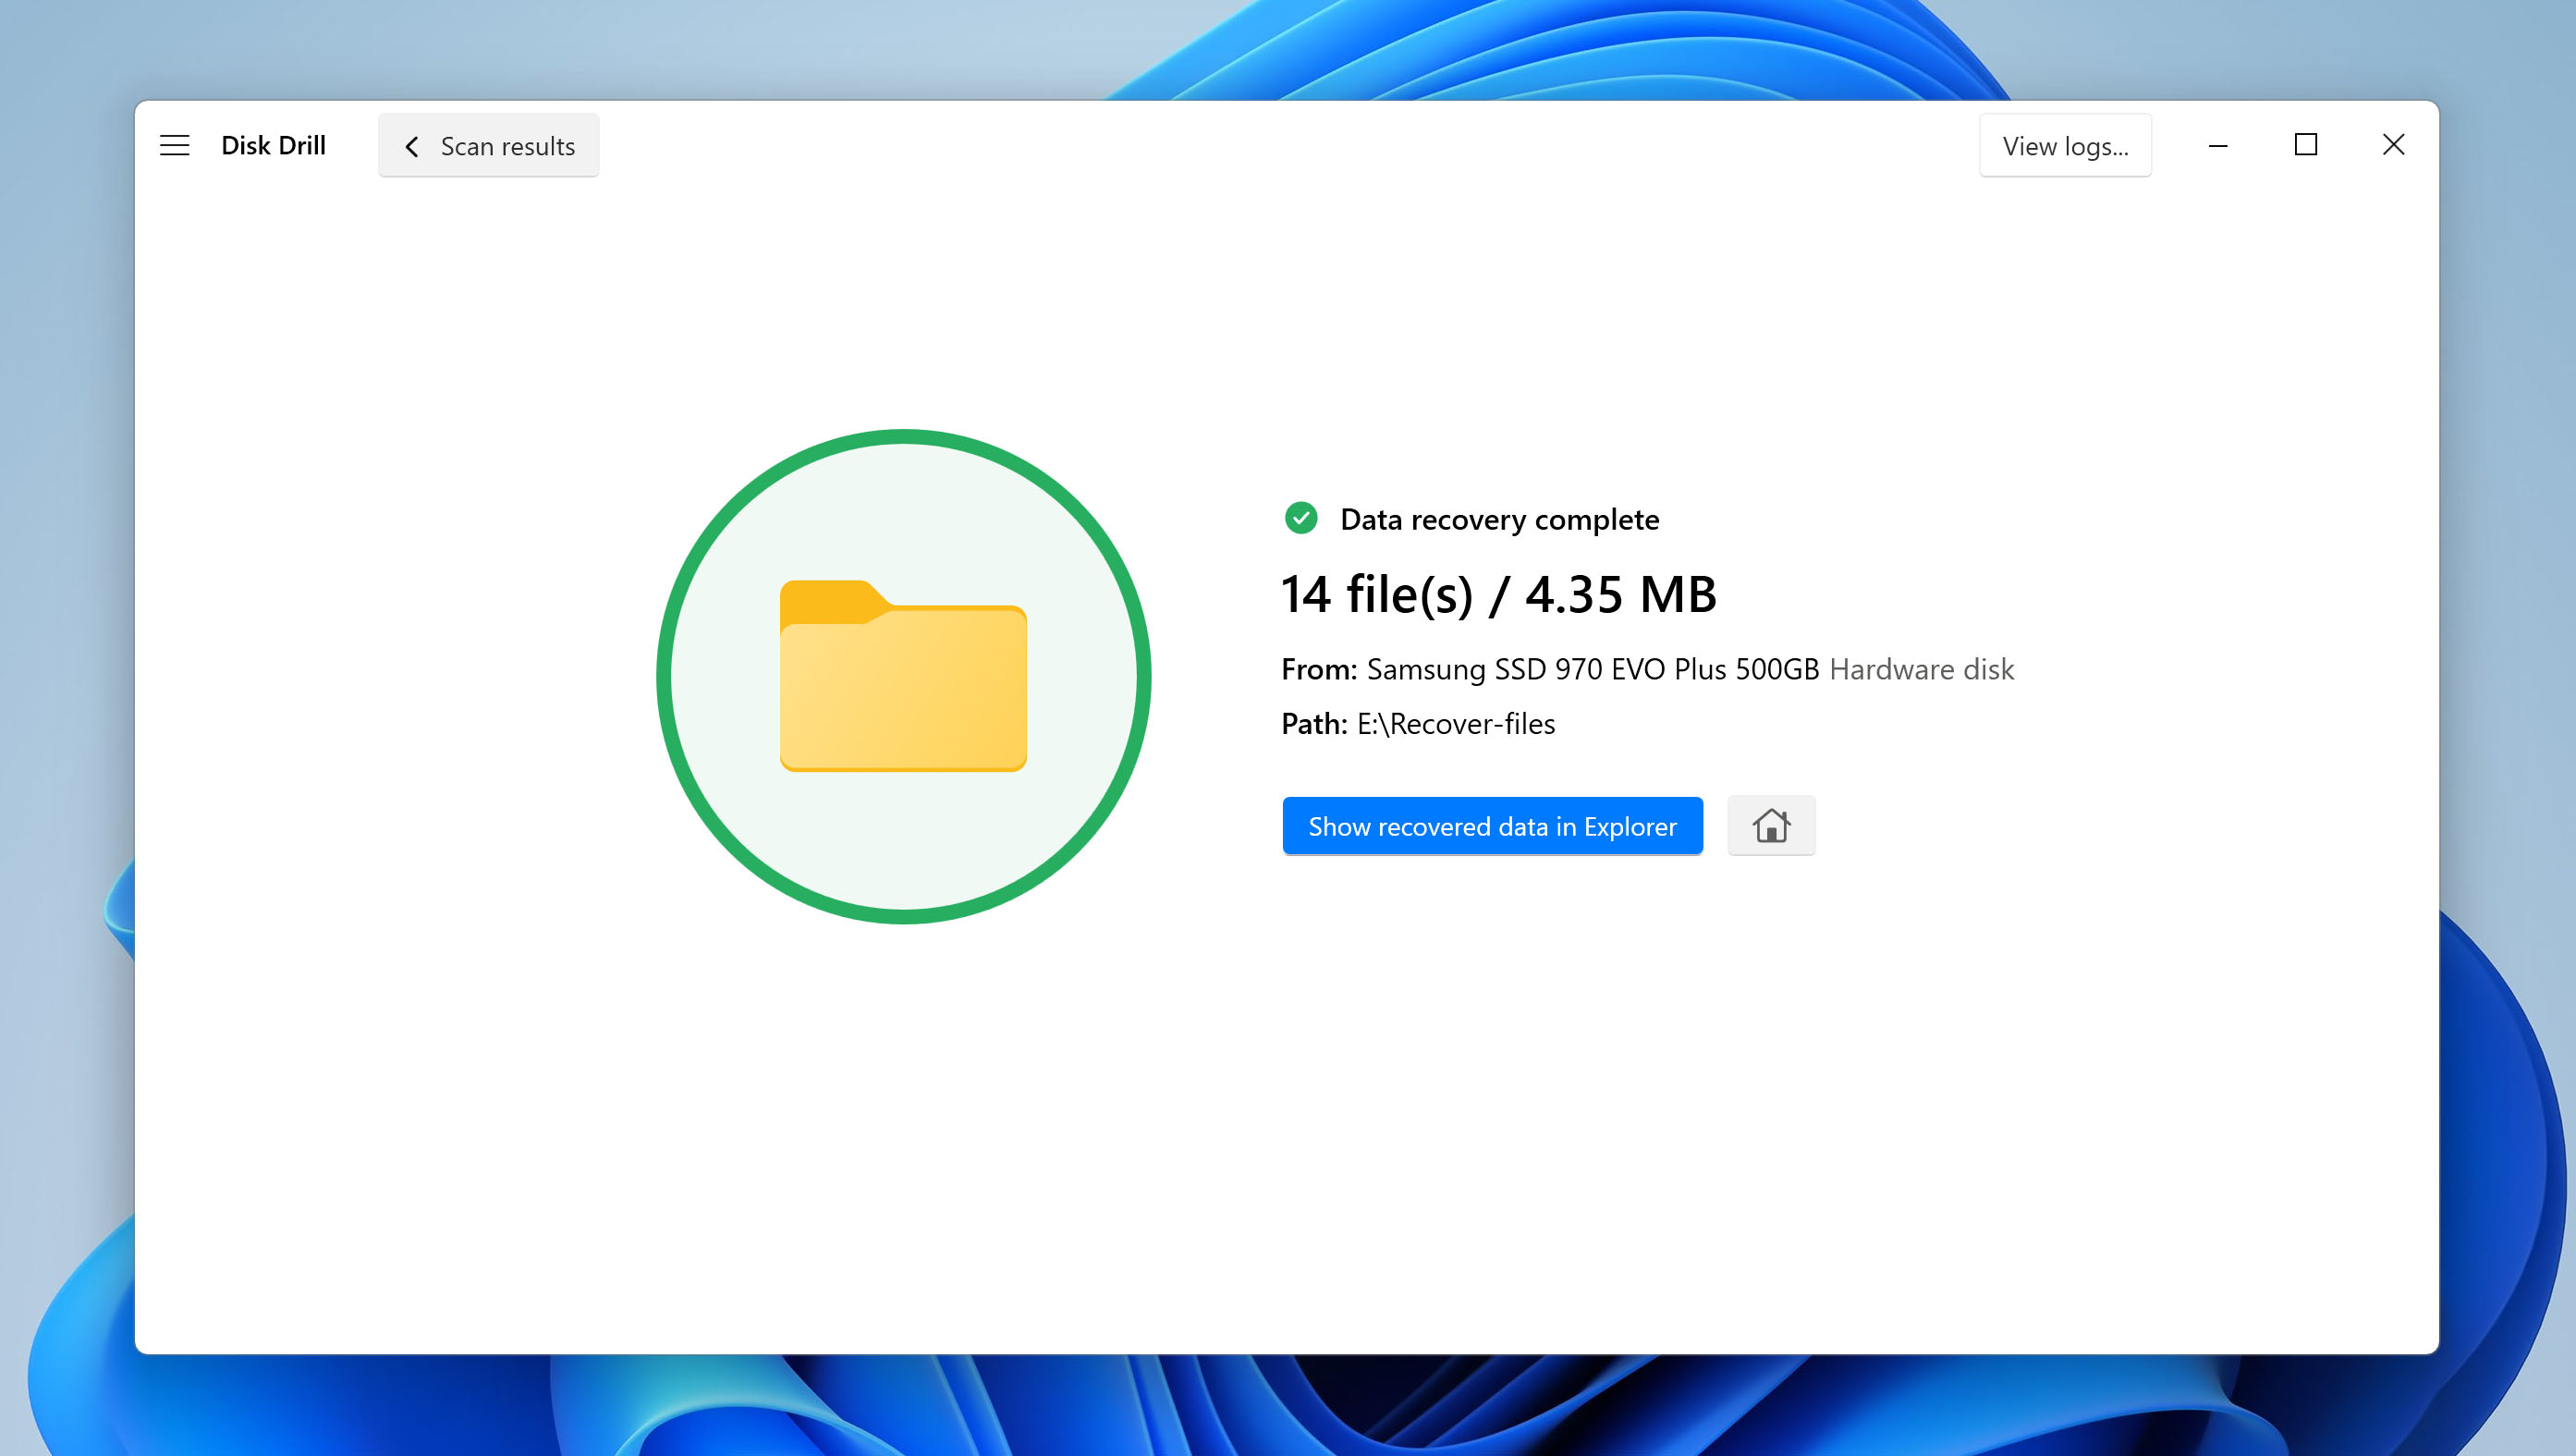
Once Disk Drill finishes, it will show a completion window with a Show recovered data in Explorer button. Click it to open the folder where your files were saved, then check the files one by one to make sure they are fine.
Video Tutorial
4 Methods to Retrieve Emptied Recycle Bin Files without Software
Data recovery software is usually the most practical option to recover files after emptying the Recycle Bin, but it is not the only one; depending on how much time has passed and how actively the drive was used, software may not always find what you need. This is especially true for SSDs. That is why you should also check any backups or cloud services that may have stored a copy of the files before deletion.
These methods will not help everyone because they depend on preexisting backups. But when they are available, they can be faster than scanning the drive.
Method 1: Recover Deleted Files from Recycle Bin after Empty via Previous Versions
Ever since Windows 8, Windows has included an incremental backup feature called File History. When enabled, it backs up files from your Libraries and other selected folders to an external drive or network location.
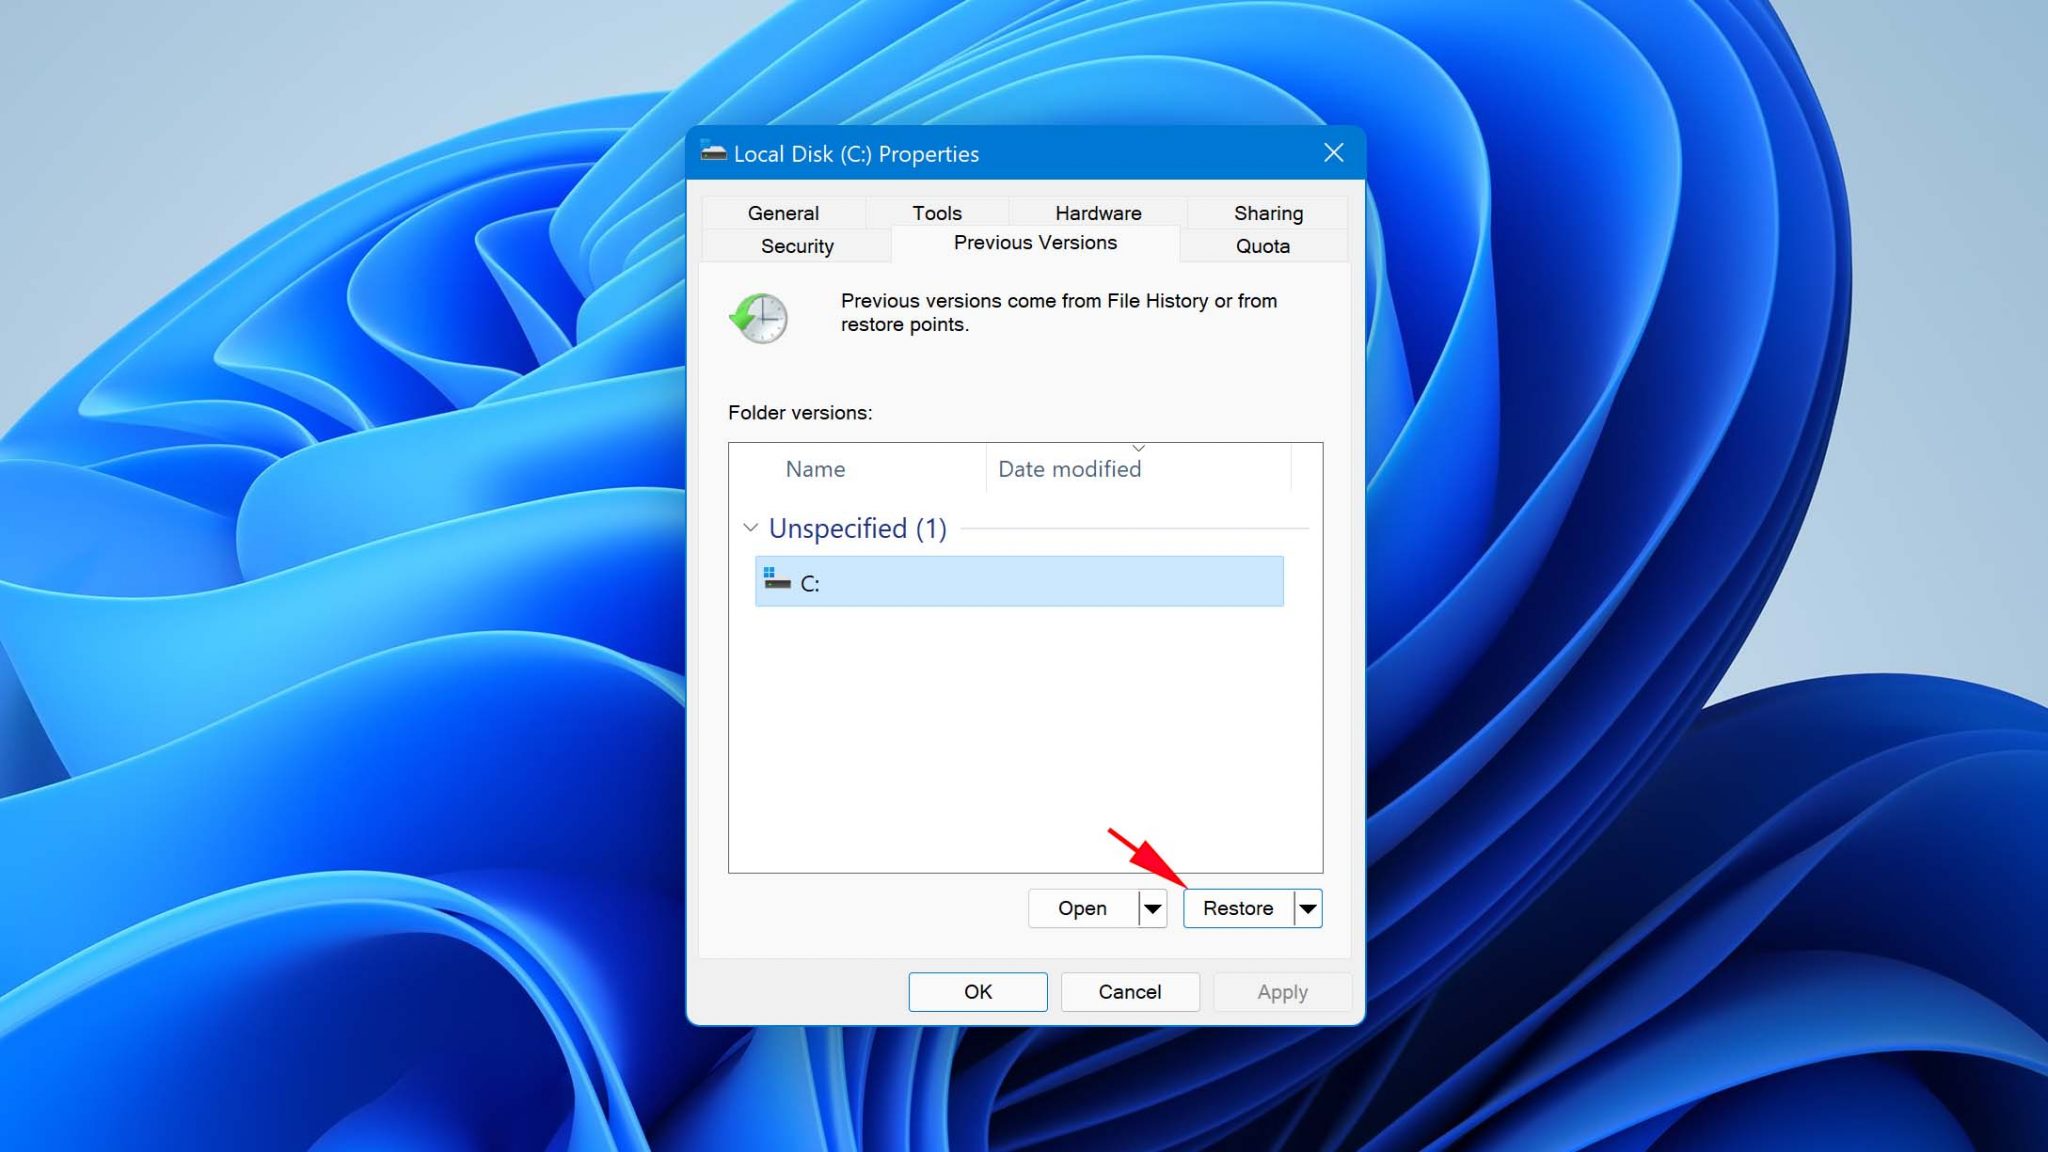
So if File History was enabled on your computer and configured to back up the location where your lost files were last seen (before actual deletion happened), then you should be able to get files back after emptying the Recycle Bin with ease by following these steps:
- Launch File Explorer.
- Navigate to the folder where your lost files were located before their deletion.
- Right-click on the empty space in the folder and select the Properties option.
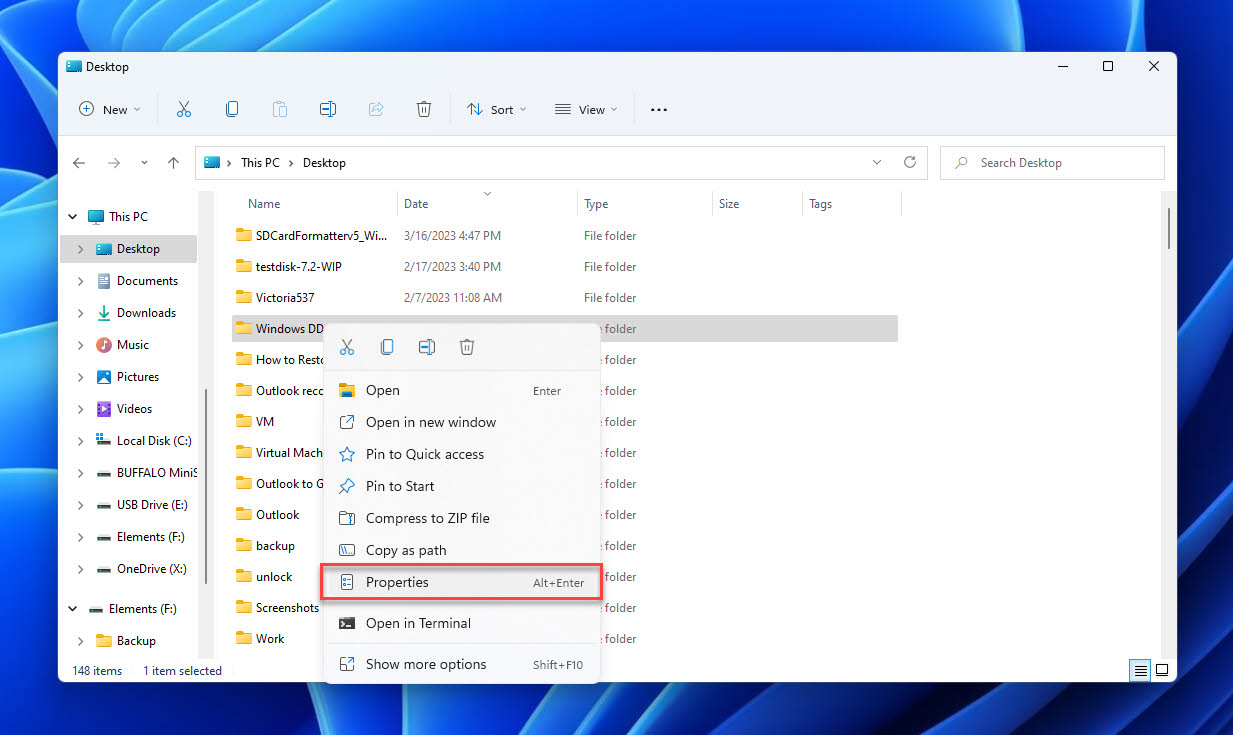
- Navigate to the Previous Versions tab.
- Select a previous version of the folder and click Open.
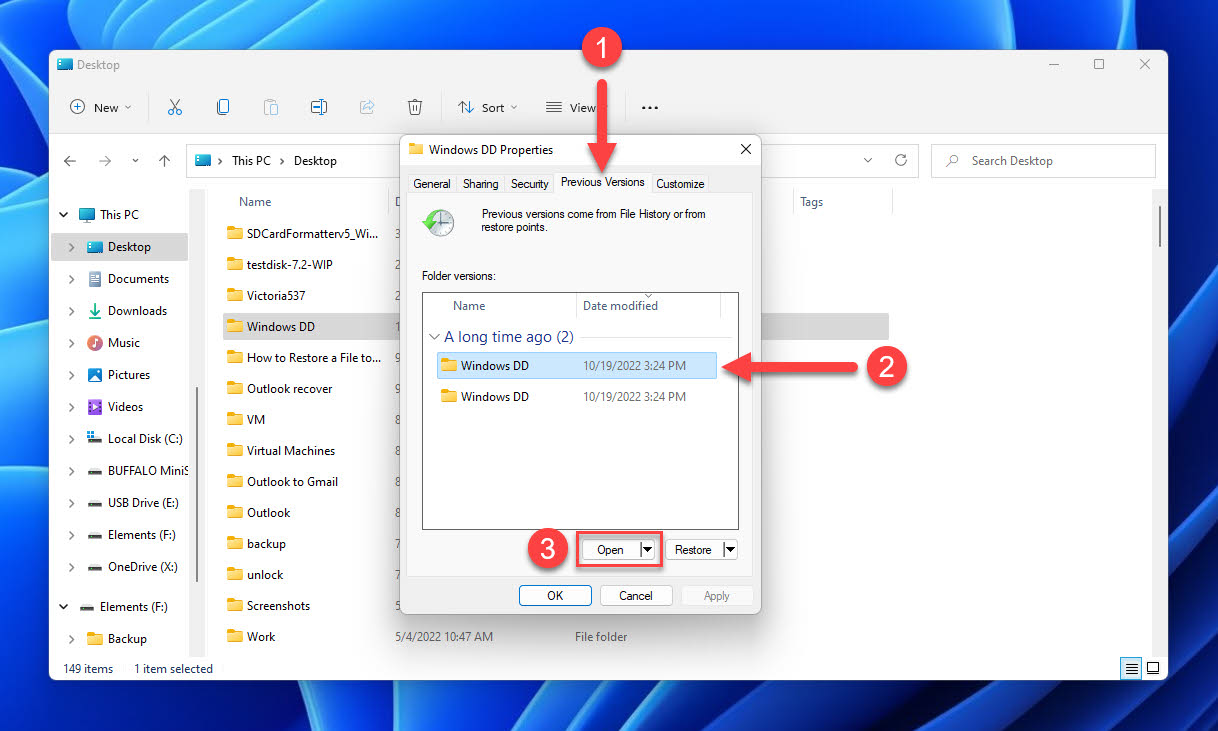
- Locate the missing files and move them to a safe location.
Method 2: Restore Recycle Bin Data Using Backup & Restore
Is your Windows machine using Backup & Restore, the predecessor to File History? Then you might be able to recover your deleted files with this feature.
The catch is the same as with any backup-based method: it only helps if the backup existed before the deletion happened. If Backup and Restore was never set up (or if it did not include the folder where your files were stored) there will be nothing useful to restore from.
But if it was, you can follow these steps to restore deleted files using Backup and Restore:
- Bring up the Start menu and search for Control Panel. Then, open the relevant result.
- Navigate to System and Security > Backup and Restore.
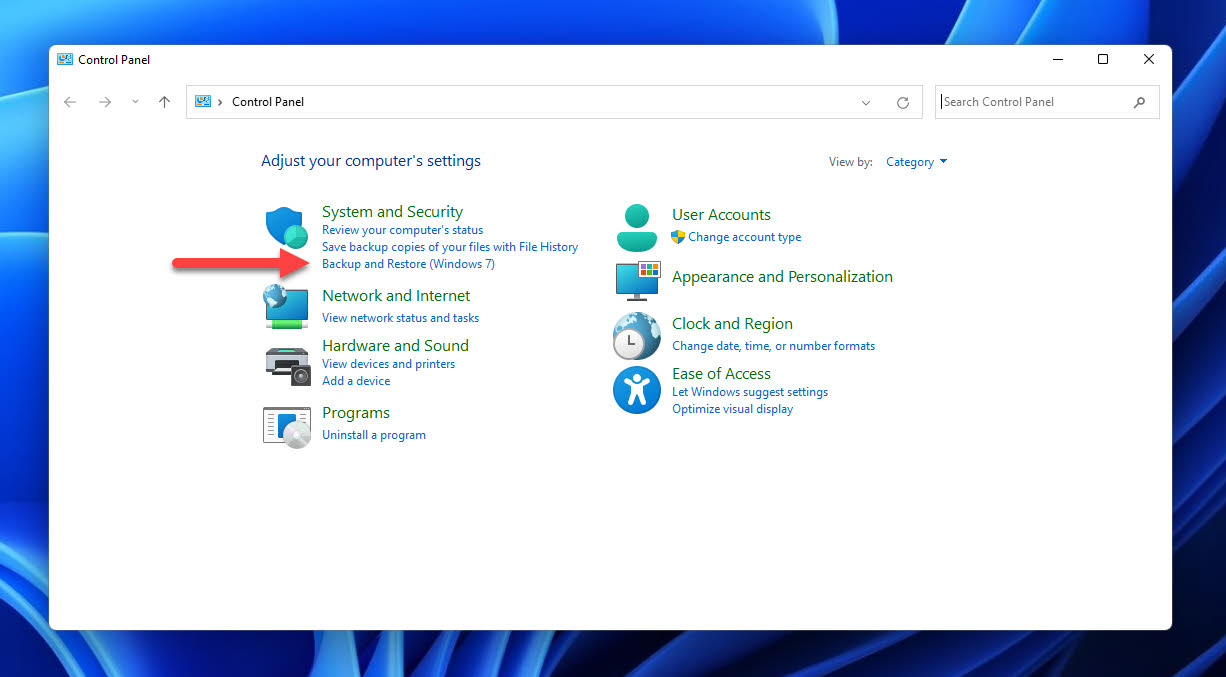
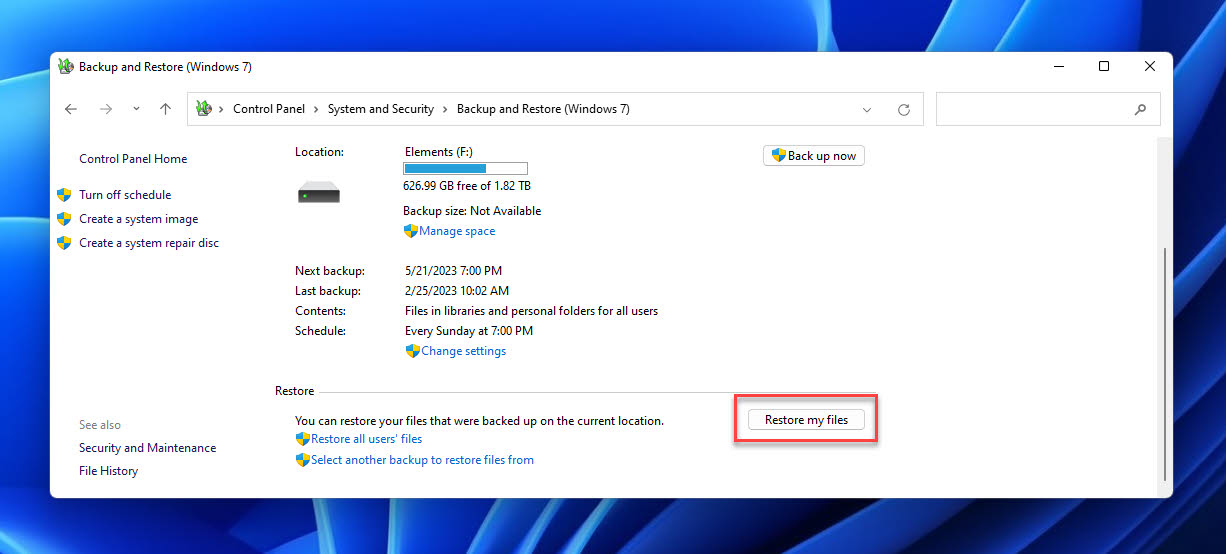
- Click the Restore my files option. If the option isn’t available, click Select another backup to restore files from option instead and then pick your backup location.
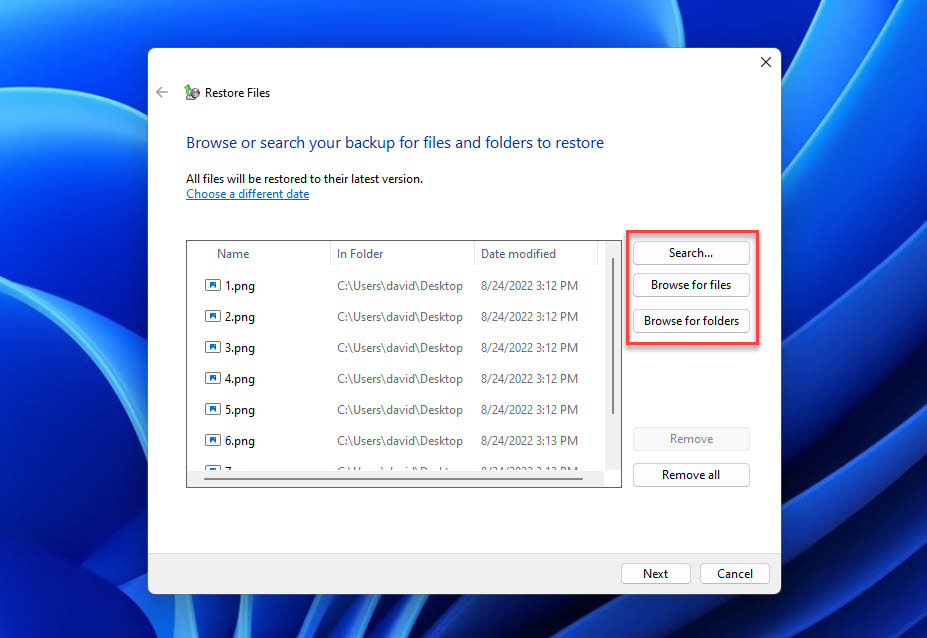
- Locate the deleted files or folders you want to restore and continue.
- Choose the location where you want to restore the files and continue.
- Restore your files and close the window.
Method 3: Restore Deleted Files from OneDrive
Newer versions of Windows integrate OneDrive, Microsoft’s cloud storage service, as a default application, so there’s a good chance you have it enabled (especially if you signed in with a Microsoft account during Windows setup). If you do, then your lost files may still be in the cloud and recoverable from any device with a few simple clicks, helping you recover files after emptying the Recycle Bin:
- Launch your favorite web browser and go to: https://onedrive.live.com/
- Sign in to your Microsoft account.
- In the left sidebar, click Recycle bin.
- Look for the deleted files or folders.
- Select the items you want to recover.
- Click Restore.
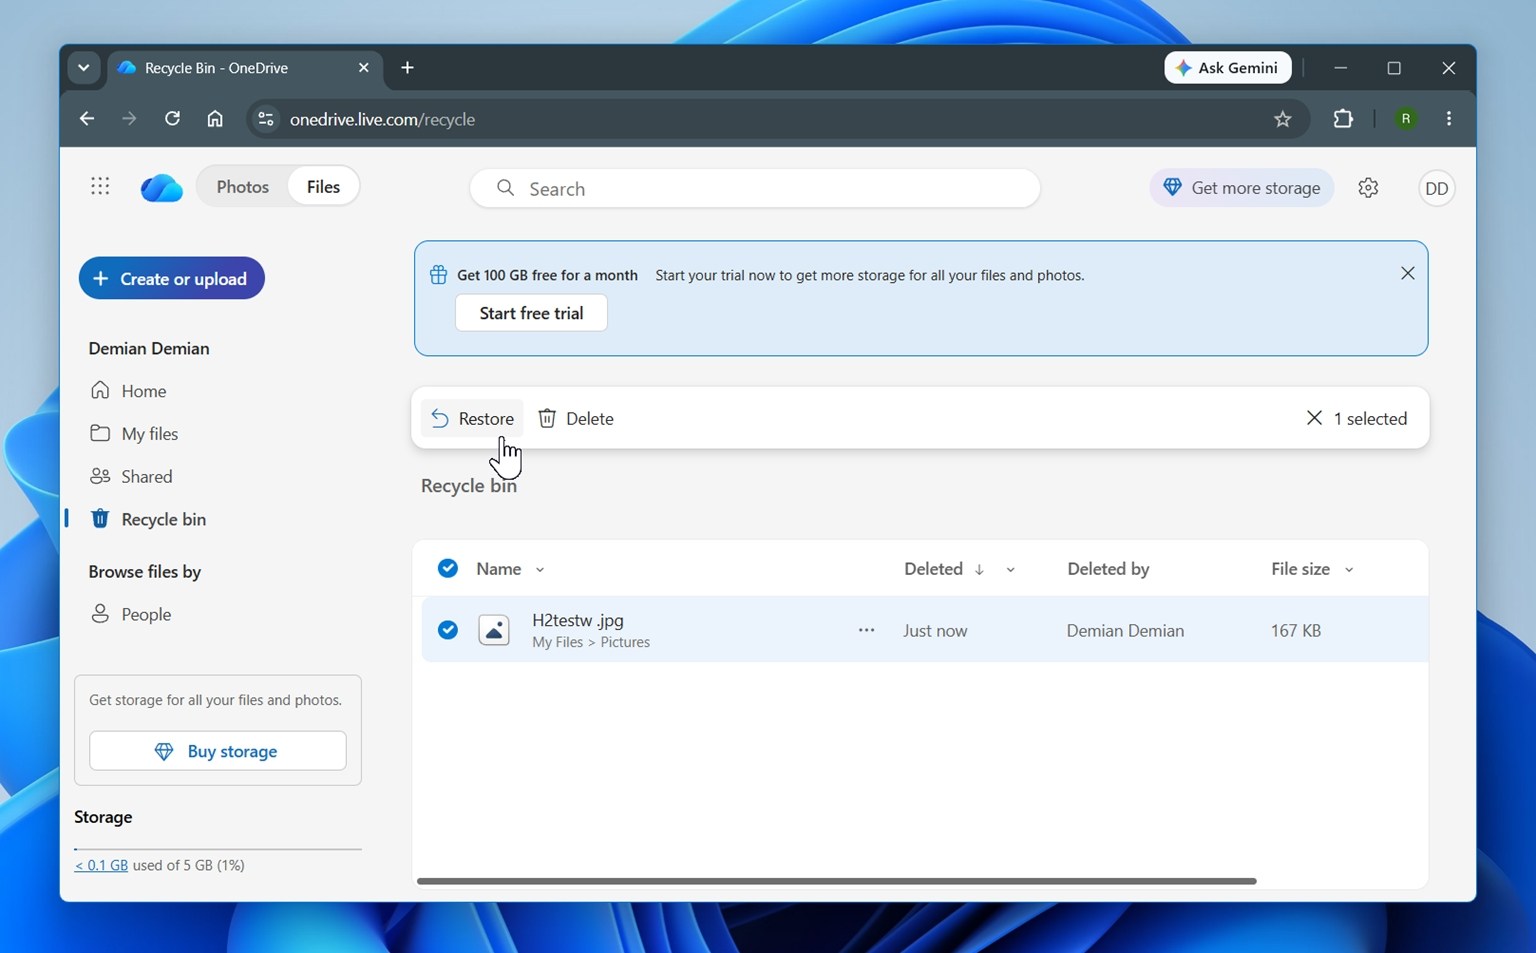
OneDrive is worth checking, but keep one thing in mind: cloud sync is not the same as a traditional backup. If OneDrive was syncing the folder where your files were stored, deleting those files on your PC may also delete them from the cloud.
We mention OneDrive here because it is built into modern Windows and many people have it running without thinking about it. But the same idea applies to other cloud sync services too. If you had Google Drive, Dropbox, or another sync app connected, check it as well. Cloud sync services on Windows usually sync file deletion, but they do not treat the Windows Recycle Bin as the final stop for the cloud copy.
This means that if a synced file was deleted from your PC, it may also disappear from the synced folder in OneDrive, Google Drive, Dropbox, or another cloud service. But that cloud service may move the file to its own online Recycle Bin. Even if you later empty the Windows Recycle Bin, the cloud copy can still remain recoverable from the cloud service’s deleted files section.
The same applies to files deleted with Shift + Delete. If the file was inside a synced folder, it may skip the Windows Recycle Bin, but the cloud service may still place its copy in the online Trash.
One important exception – iCloud sync on macOS can also sync Trash emptying behavior.
Method 4: Recover Lost Files from Backup Storage
Still no luck? Before you throw in the towel and move on, you should check all backup storage devices you have. There’s a non-zero percent chance that your lost data are backed up on an external hard drive, USB flash drive, or some other storage device without you even realizing it.
The built-in search feature in File Explorer or a third-party search utility like Everything can help you locate the backups on your storage devices in no time.
The Bottom Line
If we had to summarize our whole guide in one practical answer, it would be this: the best way to undo an empty Recycle Bin in most real cases is to use data recovery software like Disk Drill. The process is simple. Select the drive where the files were stored before they went to the Recycle Bin, run a scan, locate the files, select what you want back, and recover everything to a safe location.
That is the method that usually gives you the best shot when you do not already have a backup in place.
The other methods are still worth checking: File History, Backup and Restore, OneDrive, Google Drive, Dropbox, or an external drive where you may have copied the same files earlier. But those options all depend on something that had to exist before the deletion happened. File History had to be enabled. Backup and Restore had to be configured. An external backup had to contain the files. Most people only find this out after something goes wrong. That is why recovery software is usually the most practical answer here.


FAQ
If you haven’t emptied the Recycle Bin after deleting a file on your computer, you can easily recover the file from it for free and without additional software. Follow these steps immediately after realizing that you deleted a file by mistake:
- Double-click the Recycle Bin icon on your Desktop to open it.
- Look through the files to find the needed one.
- Right-click the file you wish to restore and choose Restore from the drop-down menu. Or simply drag and drop the file to a different folder.
All recent versions of Windows come with a useful backup feature called File History, which automatically backs up selected directories. Provided you’ve activated File History before you deleted your files, you should be able to easily access their backups.
To recover deleted files from the Recycle Bin without software:
- Open the Start menu and type “file history”.
- Select the “Restore your files with File History” option.
- Click the History button to show all your backed up folders.
- Select what you want to restore and click the Restore button.
The sooner you act, the better. But the answer is not measured only in minutes or hours. It depends more on the type of drive you used and how much new data was written to it after the Recycle Bin was emptied.
- On an HDD, deleted files can stay recoverable for a while if nothing overwrites the same space. That could mean minutes, days, or longer, depending on how much you use the drive. But every download, app install, Windows update, copied file, or browser cache write can reduce your chances.
- On an SSD, the situation is less forgiving. Windows may use TRIM to tell the SSD that deleted data is no longer needed. Once TRIM clears those blocks, recovery software may have nothing left to recover, even if very little time has passed.
So the best rule is simple: stop using the drive immediately, do not install anything to it if you can avoid it, and scan it as soon as possible.
Yes, you can recover deleted files from emptied Trash Bin on Mac with Disk Drill. Time Machine backup can also be used to try to get your files back without using third-party software.
Many users mistakenly think that files will disappear forever if you empty the Recycle Bin. But actually, only the reference of the file gets removed
This means that you will no longer be able to locate the file on your computer manually. However, it will still be present on the hard drive until Windows saves another file to the same location. So, technically, the file won’t permanently disappear until it gets overwritten with other data.
Only in specific cases. Windows can help if you had File History or Backup and Restore enabled before the files were deleted, and if those backups included the folder where the files were originally stored. In that case, you can restore an earlier copy without using third-party recovery software.
If those backup features were not active, Windows does not have a built-in Recycle Bin “undo” tool that can recover emptied-bin files on its own. The closest Microsoft option is Windows File Recovery. It is not built into Windows, but you can download it from the Microsoft Store and use it to scan a drive for deleted files. It is free, but it uses a command-line interface, so it is less beginner-friendly than tools with a visual file browser and preview.
Photos do not require a special method. The same recovery options still apply. You can try data recovery software, File History, Backup and Restore, OneDrive or another cloud service, or any external drive where the photos may have been copied before.
In most cases, recovery software is the main option if you do not already have a backup. Launch Disk Drill, select the drive where the photos were stored before deletion, scan it, open the Pictures category, preview the found images, select the ones you want to restore, and recover them to a safe location.
