
What’s the first thing you do when you need some extra storage space? If you’re like most people, you empty the Windows Recycle Bin, which can be done by right-clicking on its icon and selecting the Empty Recycle Bin option. But what if you later need to recover files from Recycle Bin after empty? In this article, we explain why it’s possible to restore emptied Recycle Bin, and we provide step-by-step instructions on how to do it.
Is Recycle Bin Recovery Possible?
Yes, it’s possible to restore emptied Recycle Bin, but not without a few special tricks. You see, the Recycle Bin is essentially a temporary storage area for deleted files. Instead of being immediately removed from your computer, deleted files are first moved to the Recycle Bin, where they sit and wait to be either automatically or manually removed. Of course, you can delete files immediately using the Shift + Delete key combination, but most users are not even aware that the Shift + Delete key combination exists.
When you finally empty the Recycle Bin in Windows 11, Windows 10, Windows 8, Windows 7, and older, the storage space that was occupied by the files gets marked as available, which means that other applications can use it to store data. However, until some application uses the freed storage space, the original files are still there intact, which is why it’s possible to recover files from Recycle Bin after empty.

Generally, it’s best to close all non-essential applications and focus exclusively on Recycle Bin recovery. In the next section of this article, we introduce the most reliable way on how to recover deleted files from the Recycle Bin after empty and provide step-by-step instructions on how to do it.
How to Recover Deleted Files from the Recycle Bin After Empty
There are several ways how to recover deleted files from the Recycle Bin, each with its own advantages and disadvantages. Some require you to have backups of the deleted files, while others are so cumbersome that even professional data recovery specialists dislike using them. The one method that is guaranteed to deliver excellent results and can be recommended even to complete beginners is Disk Drill.
Disk Drill for Windows is available in Free, Pro, and Enterprise. The Free version provides up to 100 MB of recovery across all methods, so you can validate results on real files from the emptied Recycle Bin before upgrading. Recovery Vault and disk backup are included.
The Pro version is aimed at those who want unlimited personal recovery, and it costs only $89/year (or $149 for a lifetime license), which is nothing compared with the price of most professional data recovery services. Finally, the Enterprise version is for unlimited commercial recovery, and it includes all Pro features plus priority support.
Step 1: Download Disk Drill and install it on your PC.
Download the Free version of Disk Drill from its website and install it just like you would any other Windows application. All modern versions of Windows are supported, and there’s also a separate version of Disk Drill available for computers running macOS.

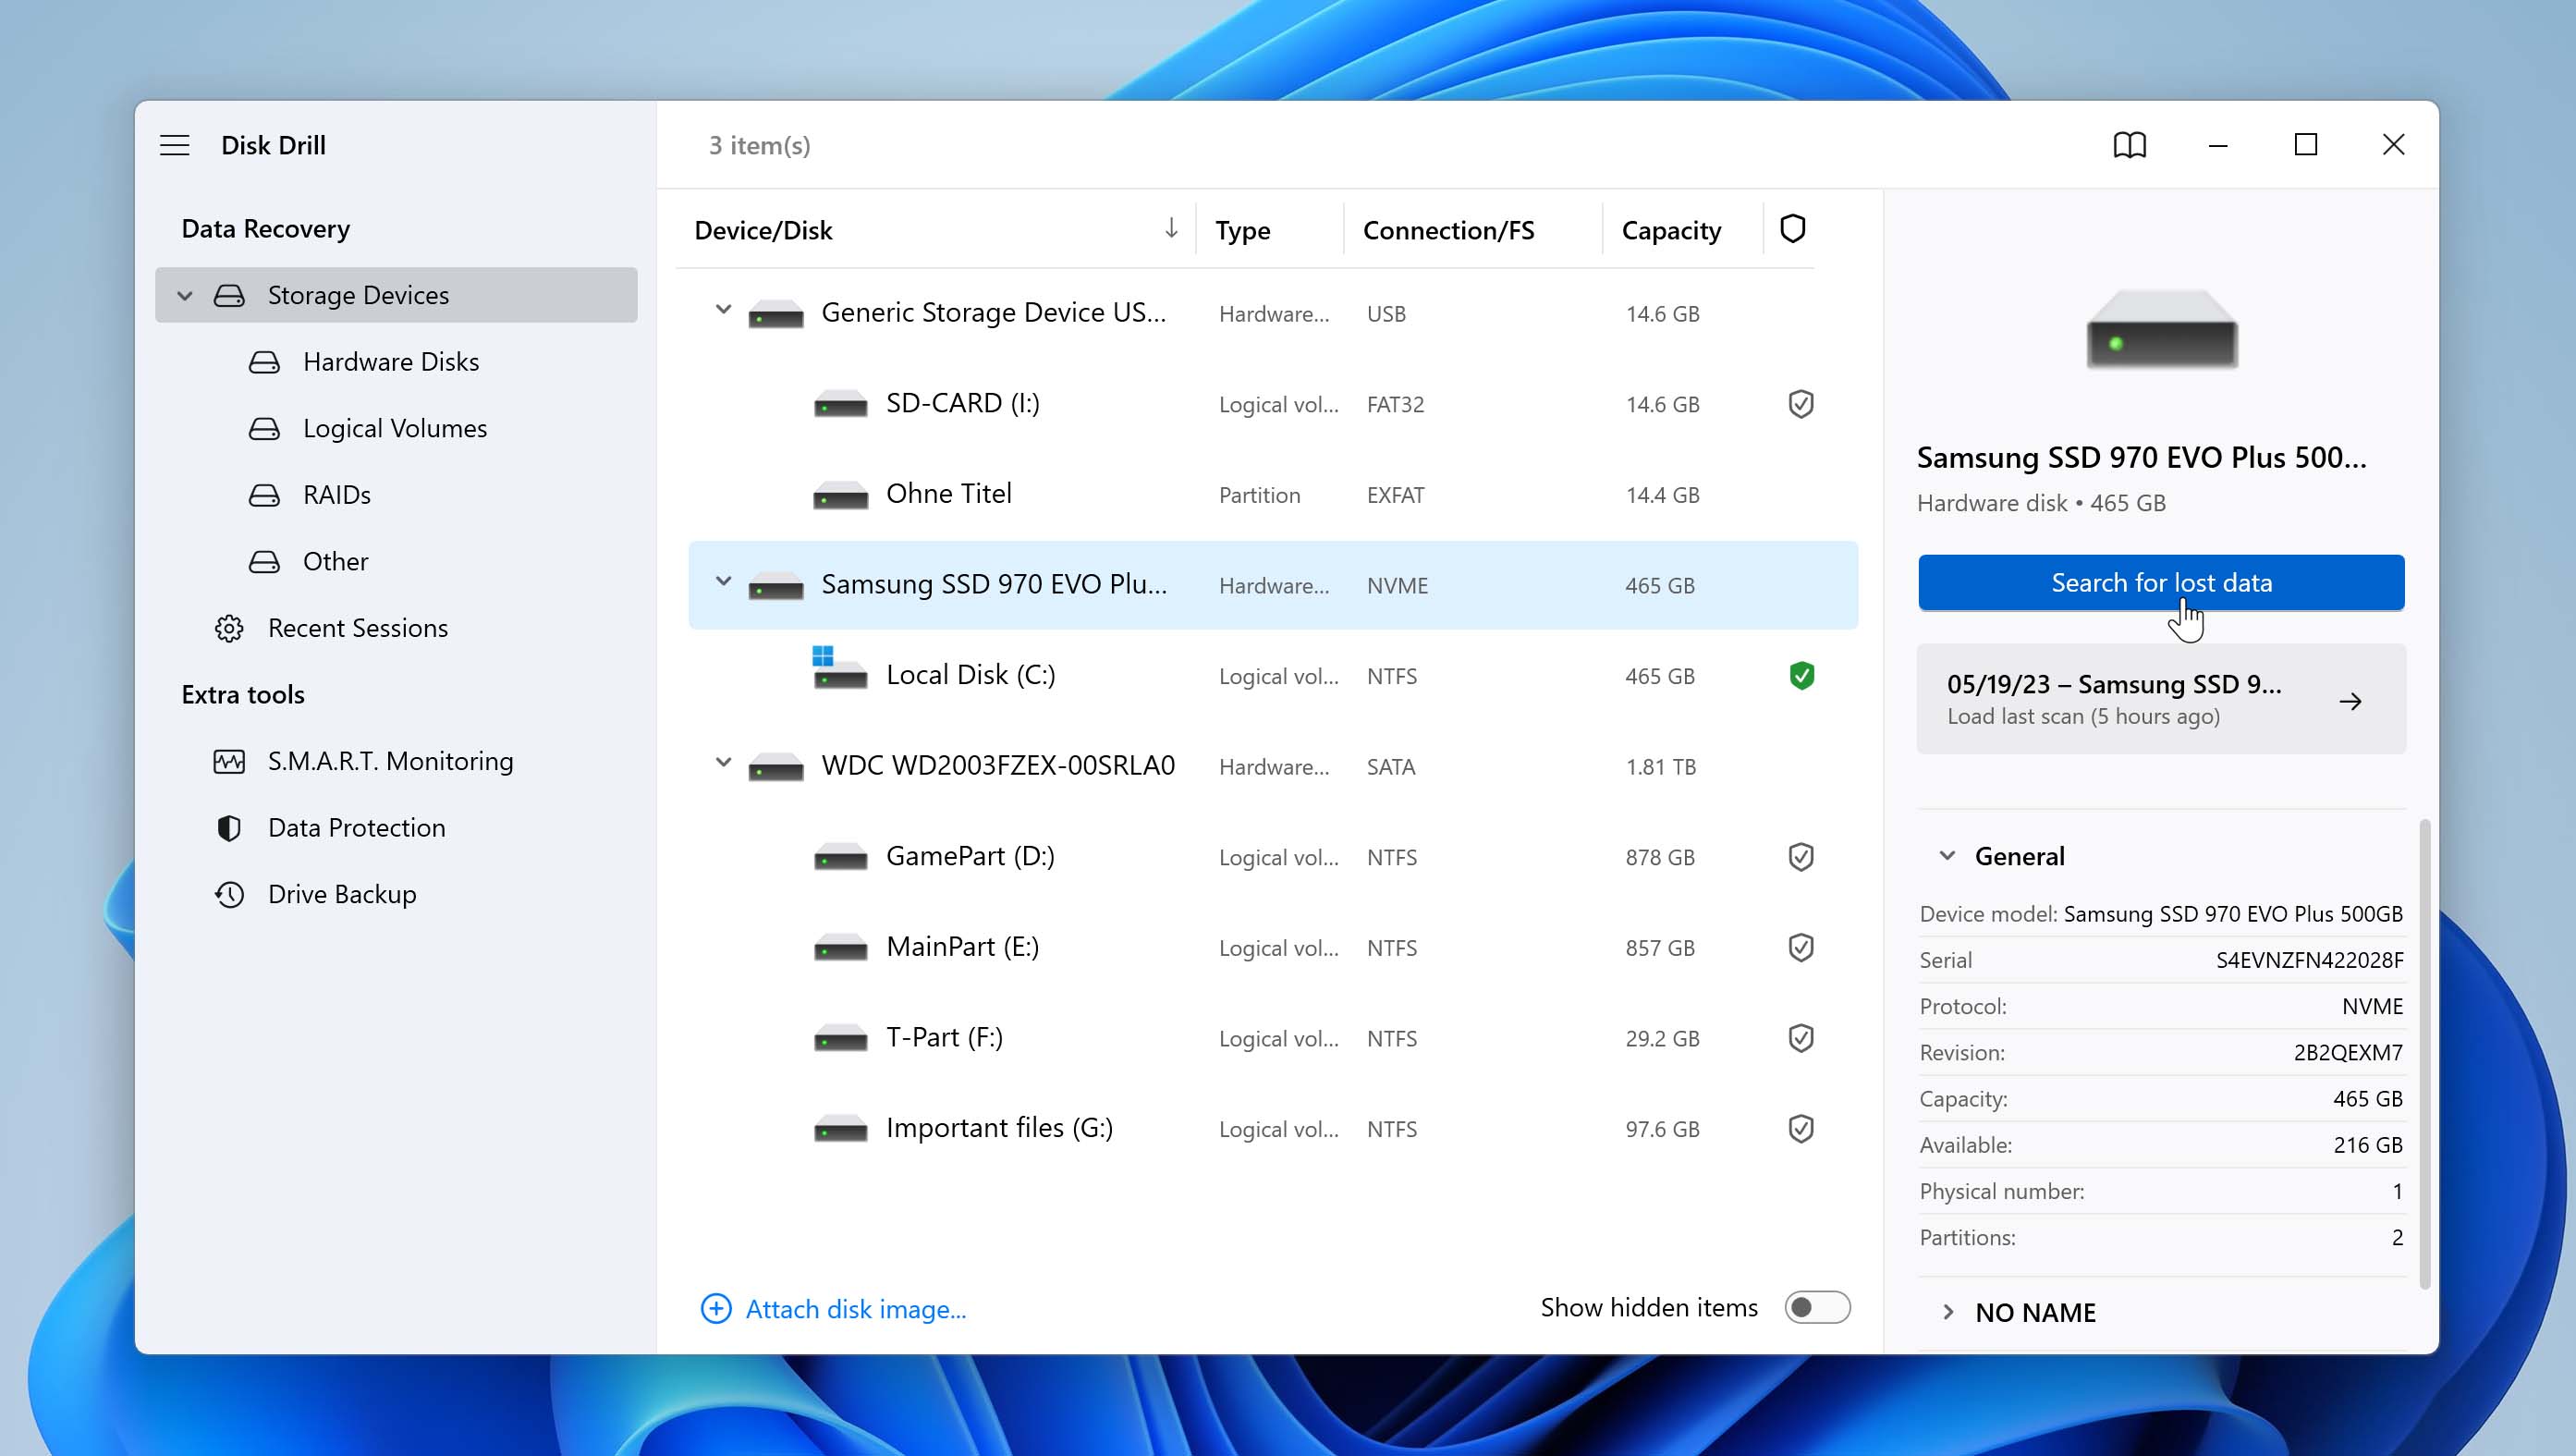
Step 2: Launch Disk Drill and select a disk that contains the Recycle Bin.
Next, you need to launch Disk Drill and tell it to analyze the storage device where the files were located before you deleted them by clicking on the Search for lost data button next to it. In most cases, the system drive, which is the drive that contains the operating system and all related system files, is marked with the letter C, while other storage devices are marked with letters D, E, F, G, and so on.
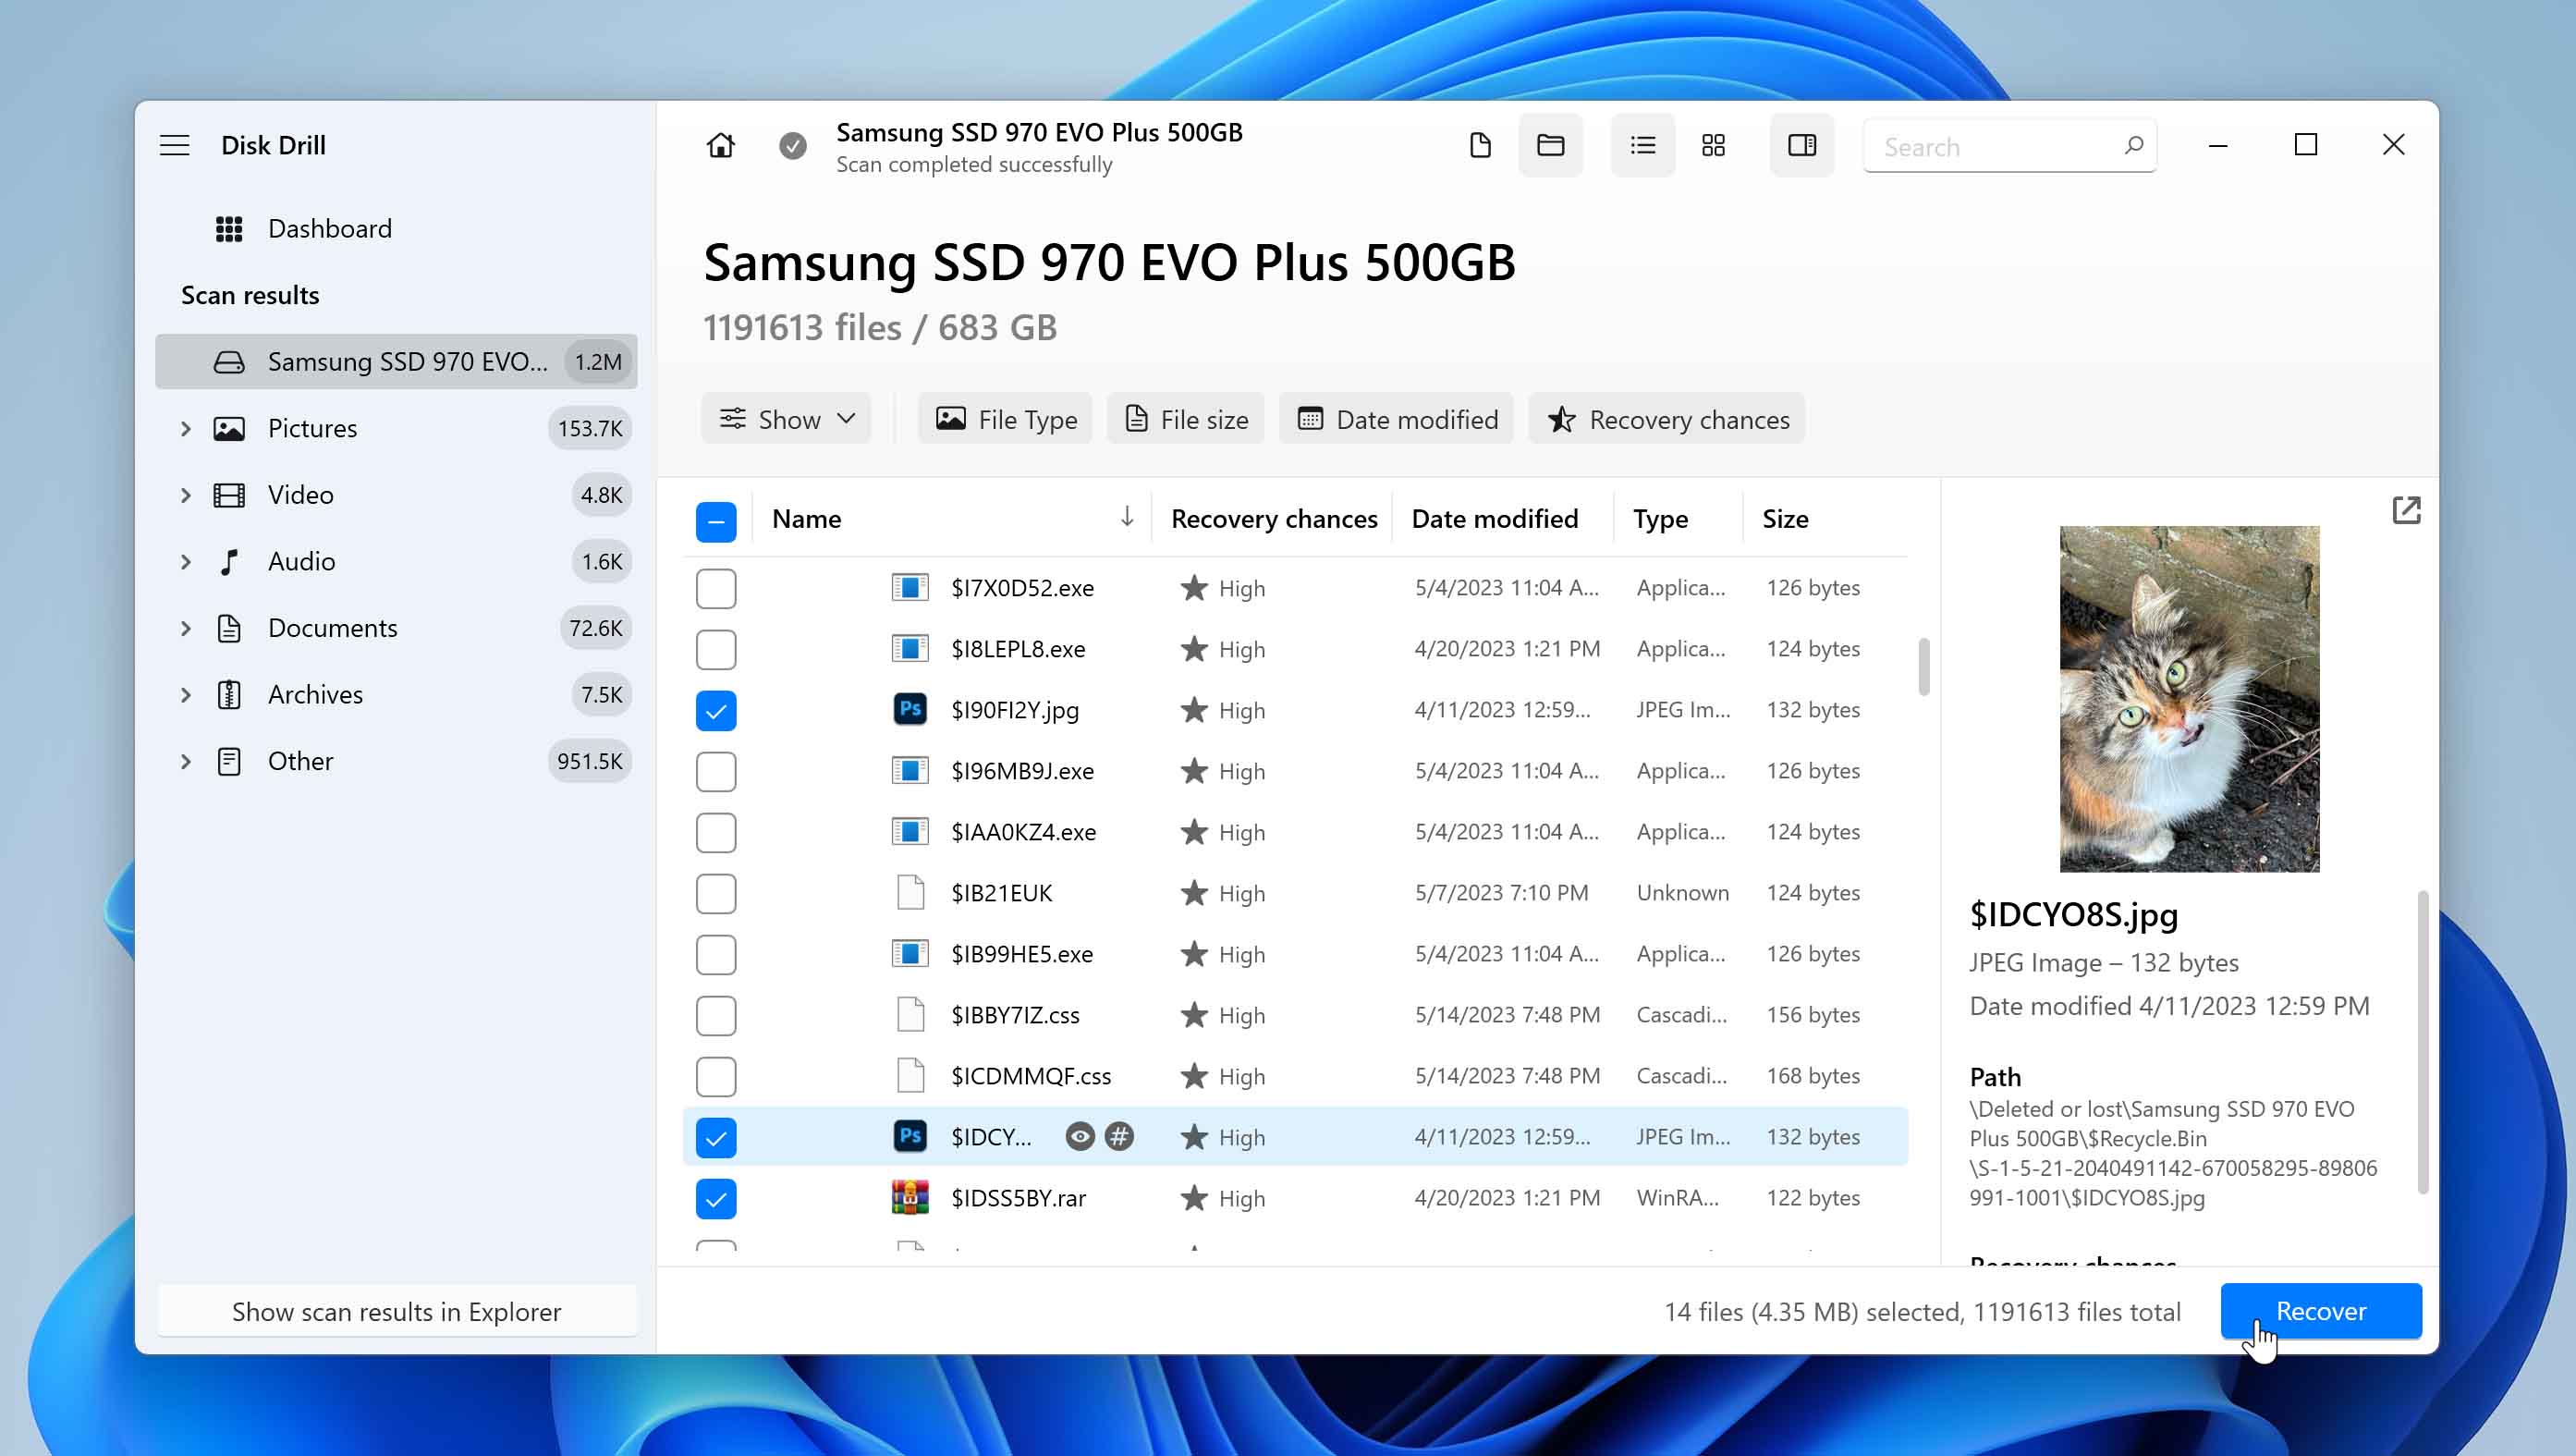
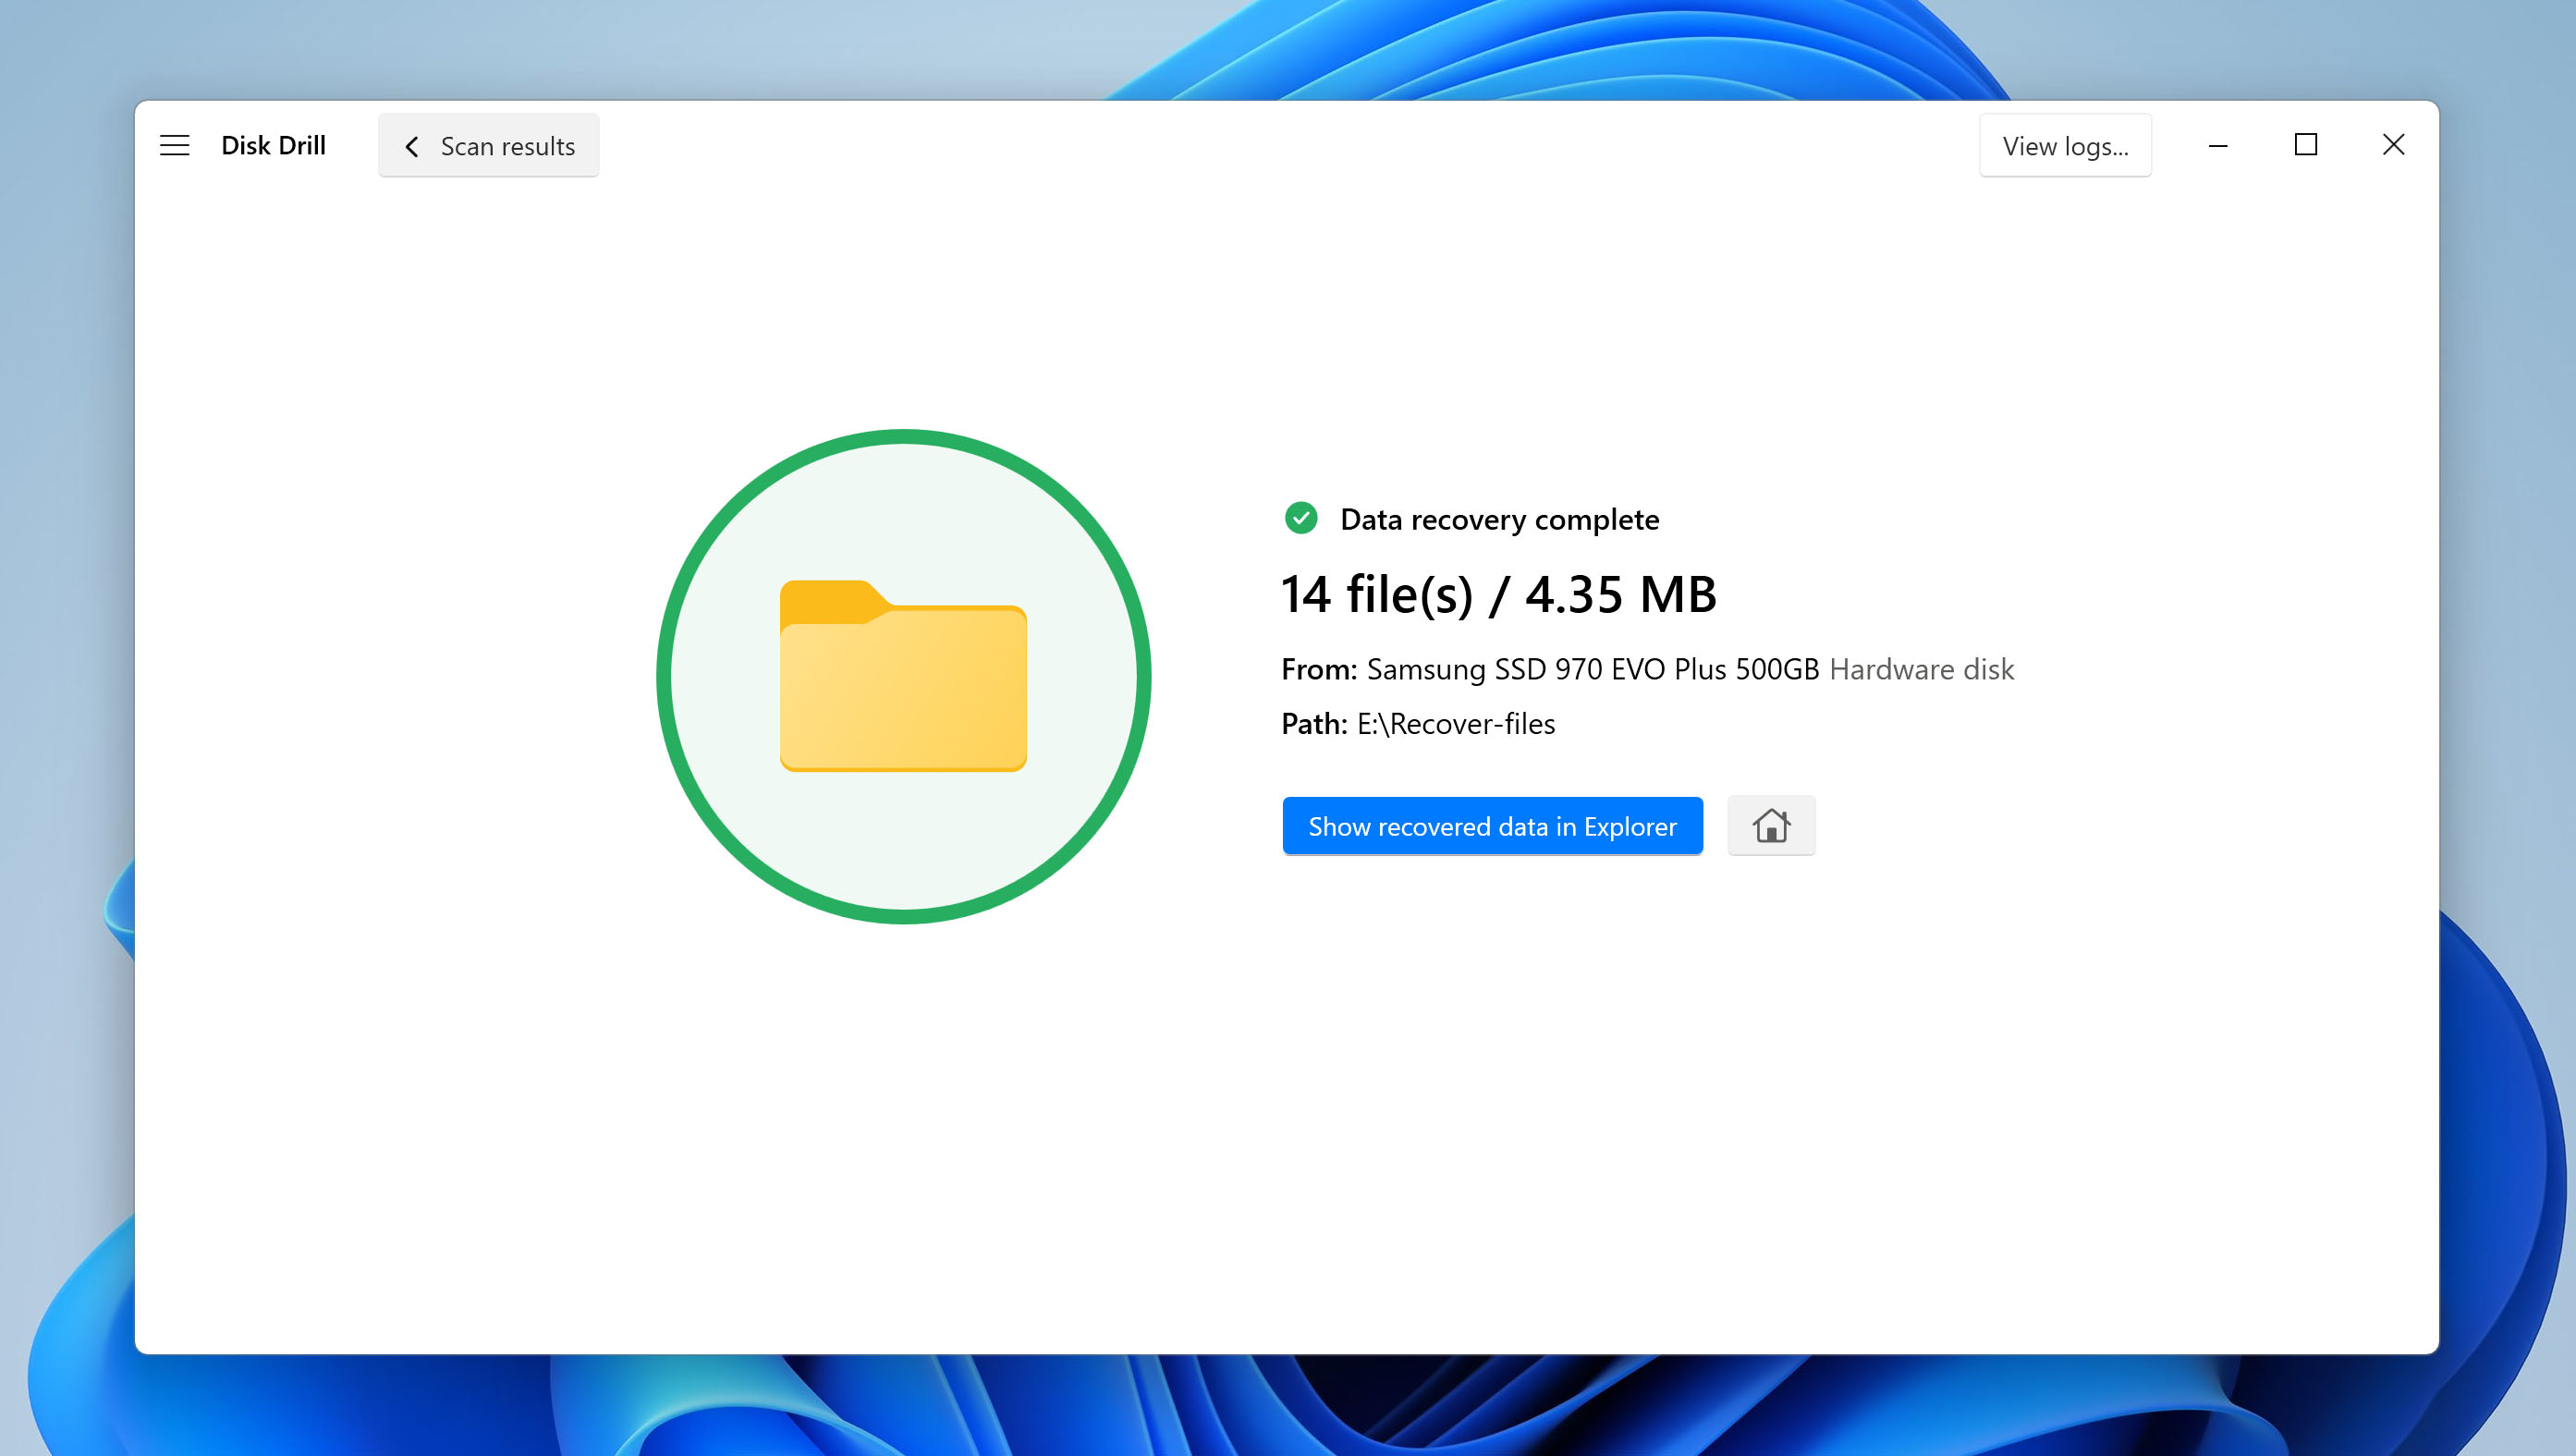
Step 3: Select files to restore from Recycle Bin.
Depending on the size of your storage device, it may take Disk Drill a few minutes to finish scanning. Once it’s done, you will be presented with a list of deleted files. Using the filters on the left, you can narrow down the scan results so that you have an easier time marking the files you want to recover. Then click on the Recover button.
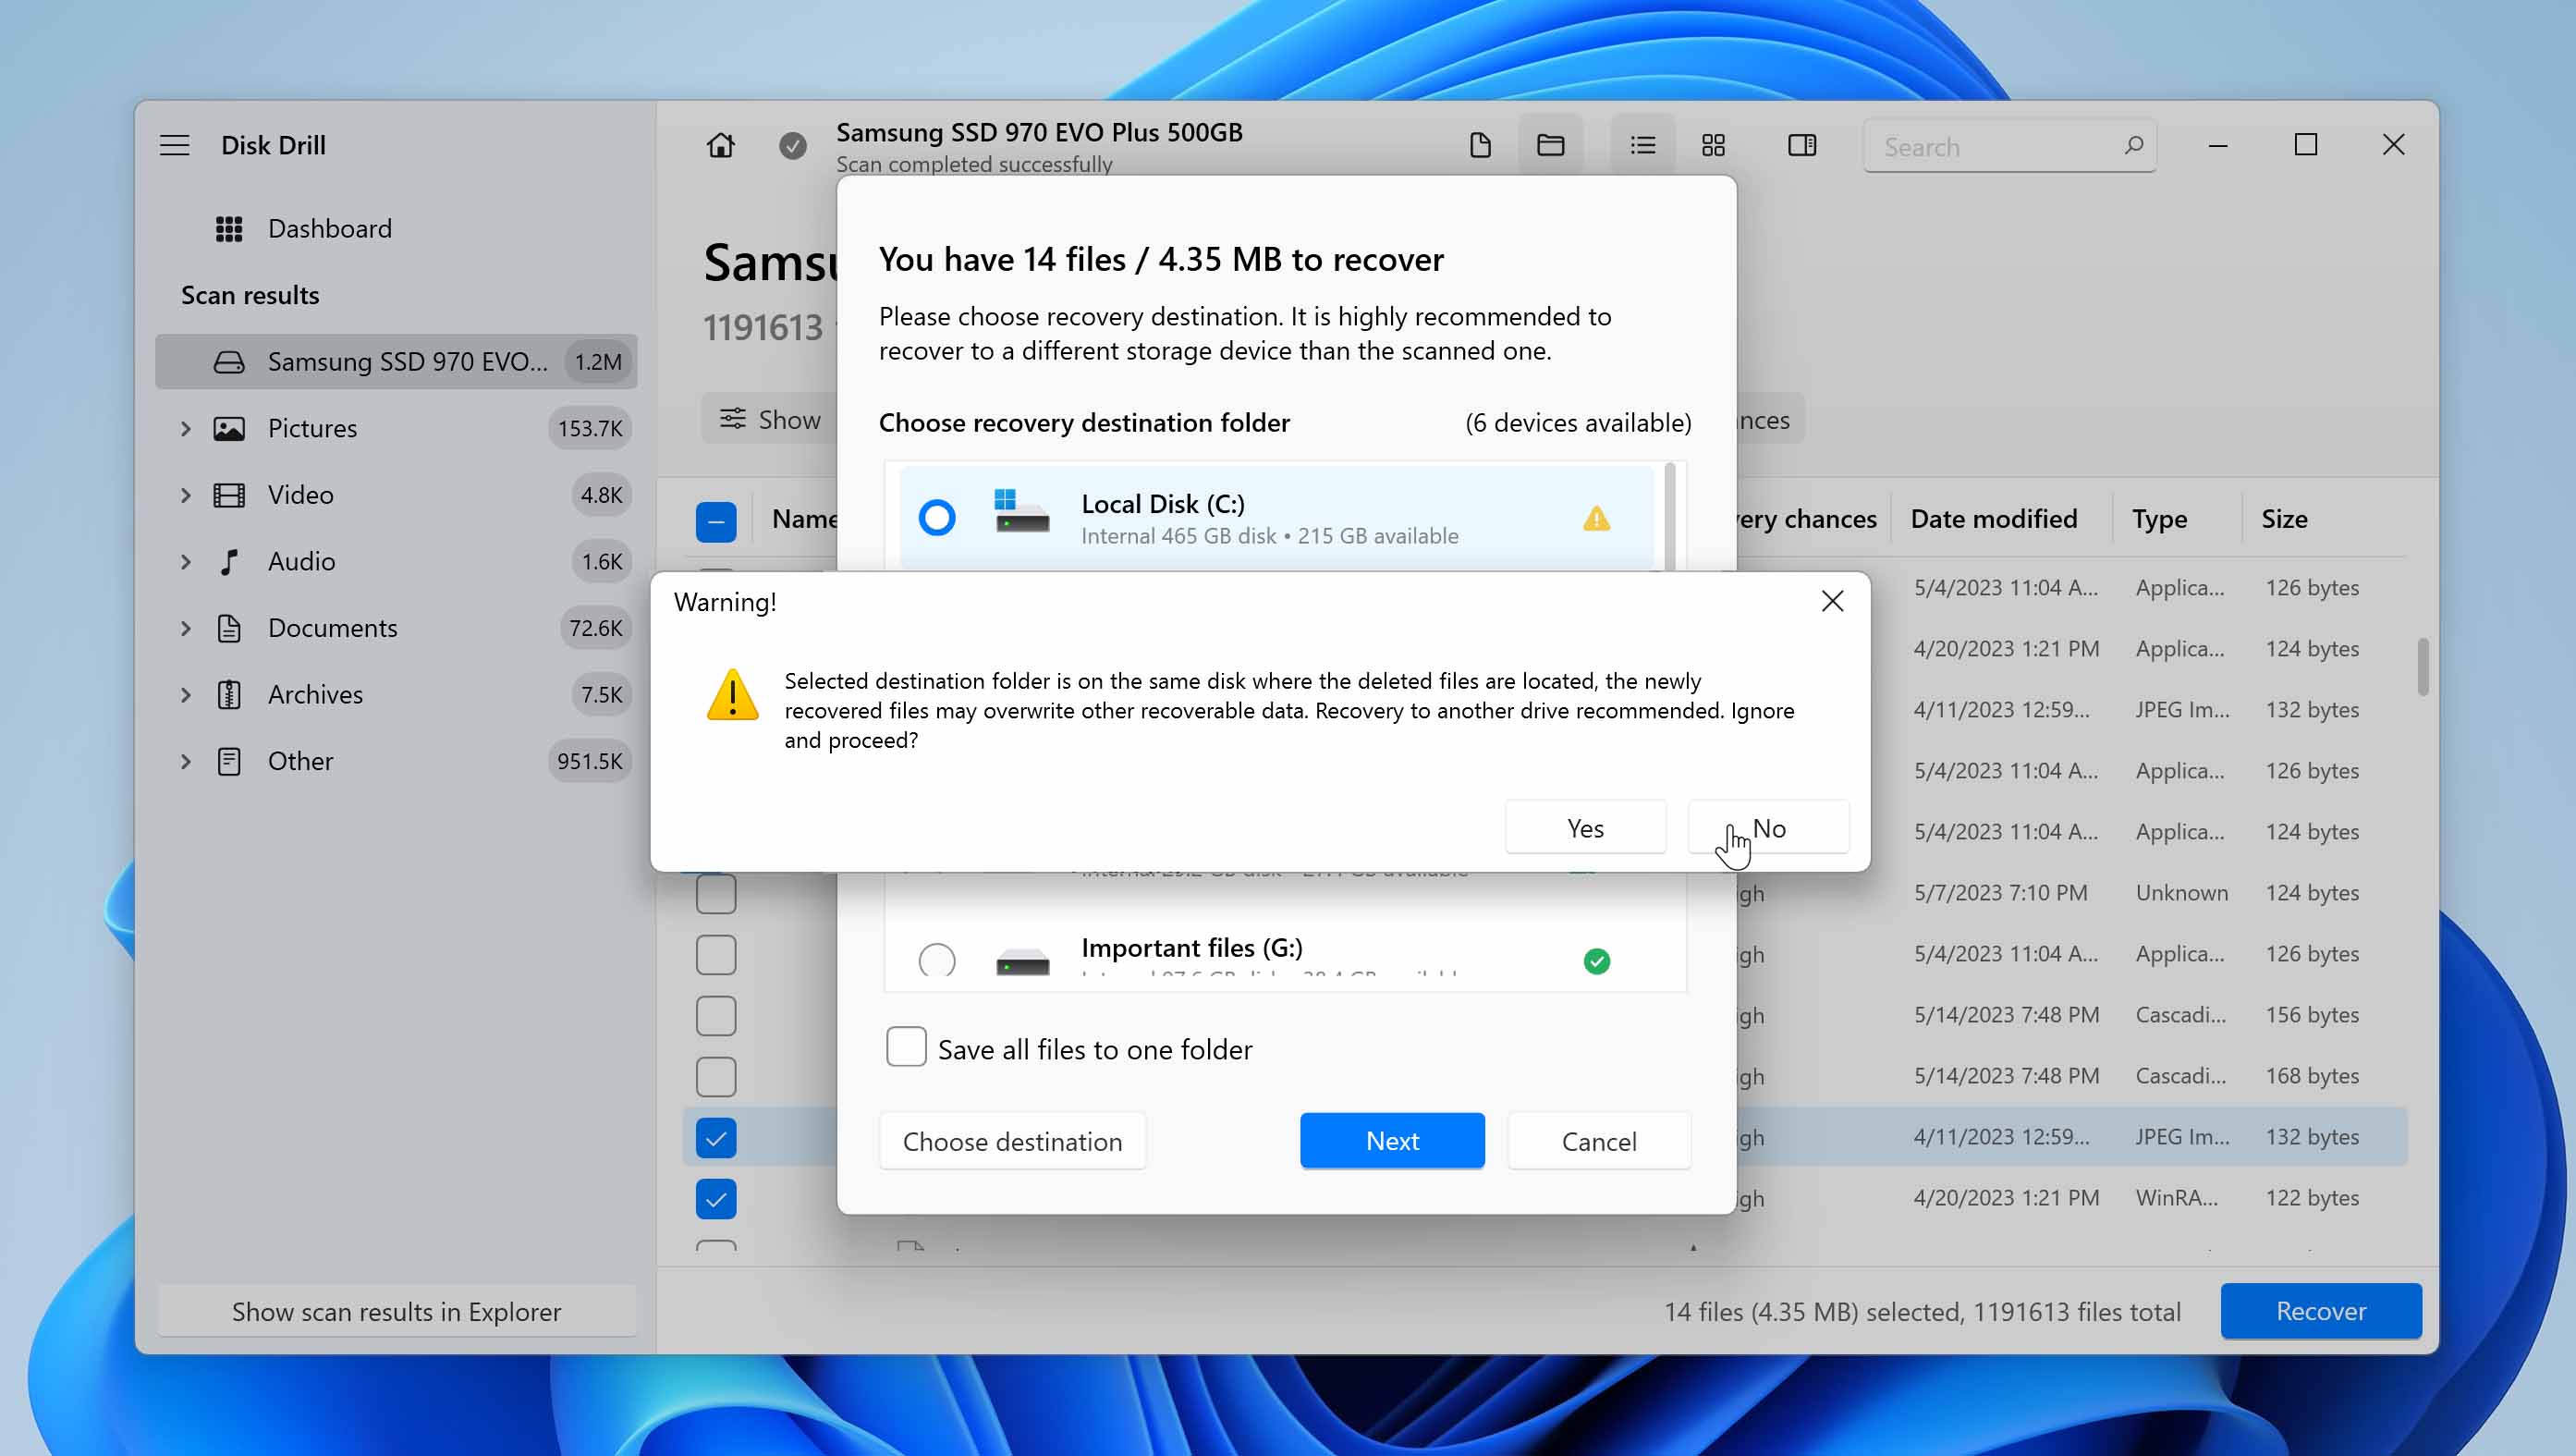
Step 4: Specify the recovery directory.
Disk Drill allows you to choose where you want to restore the deleted files, and it’s highly advisable to select a recovery directory that’s not on the same storage device as the files you want to recover.
Step 5: Begin the recovery process.
With your files selected and the recovery directory specified, you can begin the recovery process. The actual recovery shouldn’t take more than a few moments to complete.
Video Tutorial
Methods to Retrieve Emptied Recycle Bin Files without Software
Don’t want to use third-party software to retrieve files from your accidentally emptied Recycle Bin? That’s okay! There are other methods that can help you recover files after emptying the Recycle Bin in some circumstances. Let’s explore them below.
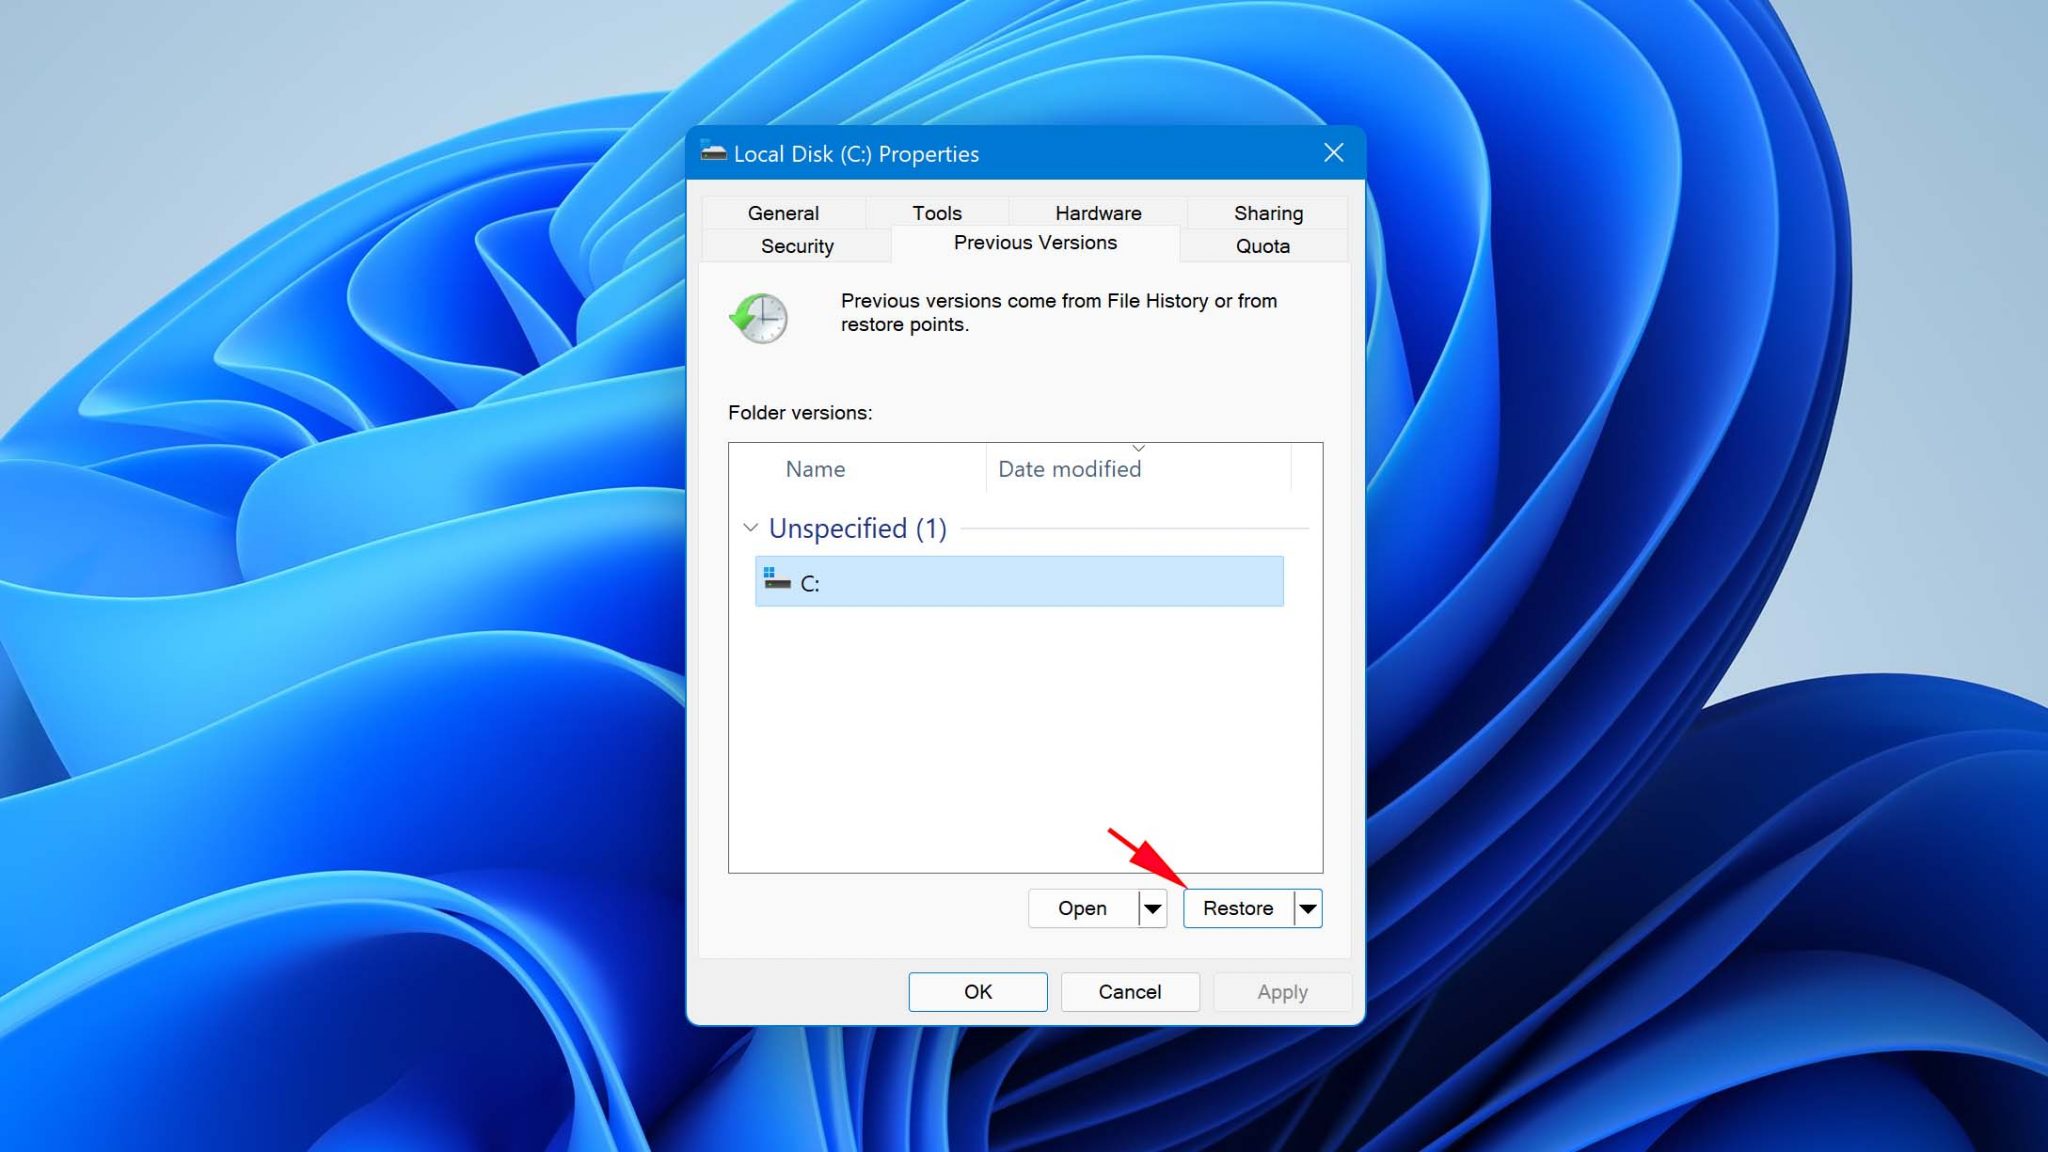
Method 1: Recover Deleted Files from Recycle Bin after Empty via Previous Versions.
Windows 8 build 7878 and newer come with an incremental backup feature called File History. When enabled, this feature backs up the files in your Libraries, on your desktop, and in several other locations on an external drive or network location.
If File History is enabled on your computer and configured to back up the location where your lost files were last seen, then you should be able to get files back after emptying the Recycle Bin with ease by following these steps:
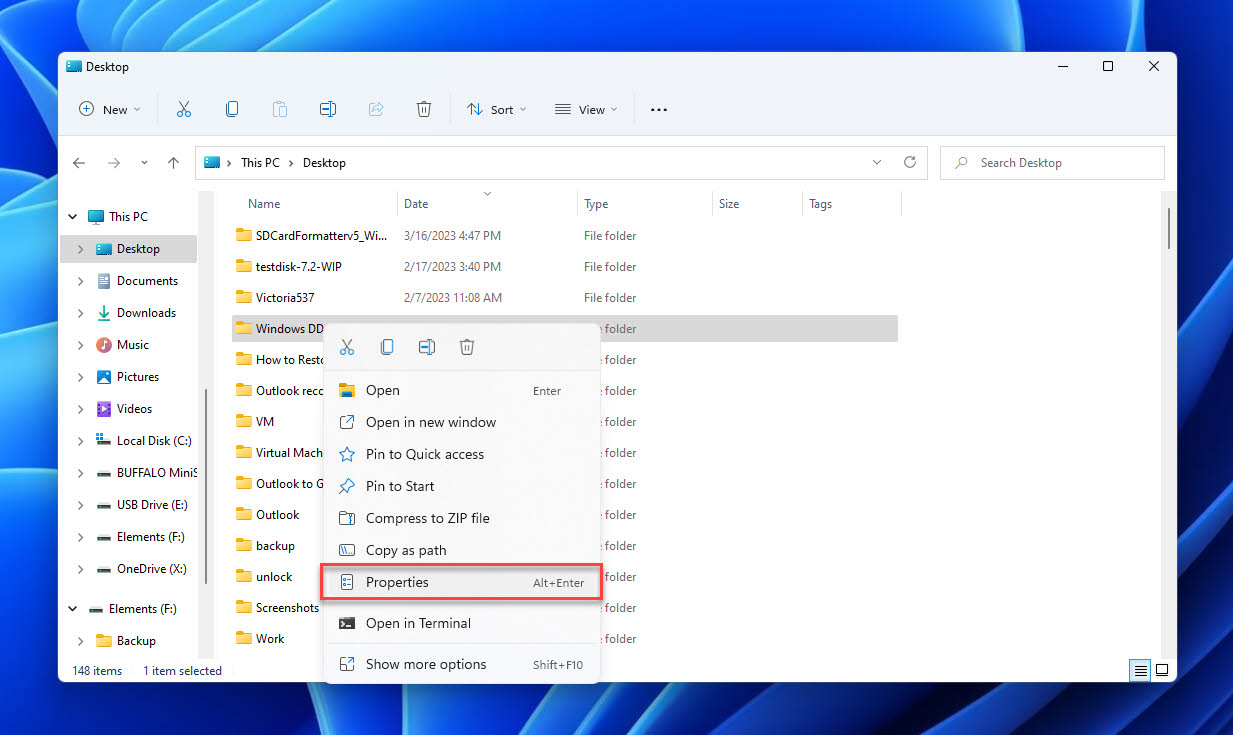
- Launch File Explorer.
- Navigate to the folder where your lost files were located before their deletion.
- Right-click on the empty space in the folder and select the Properties option.
- Navigate to the Previous Versions tab.
- Select a previous version of the folder and click Open.
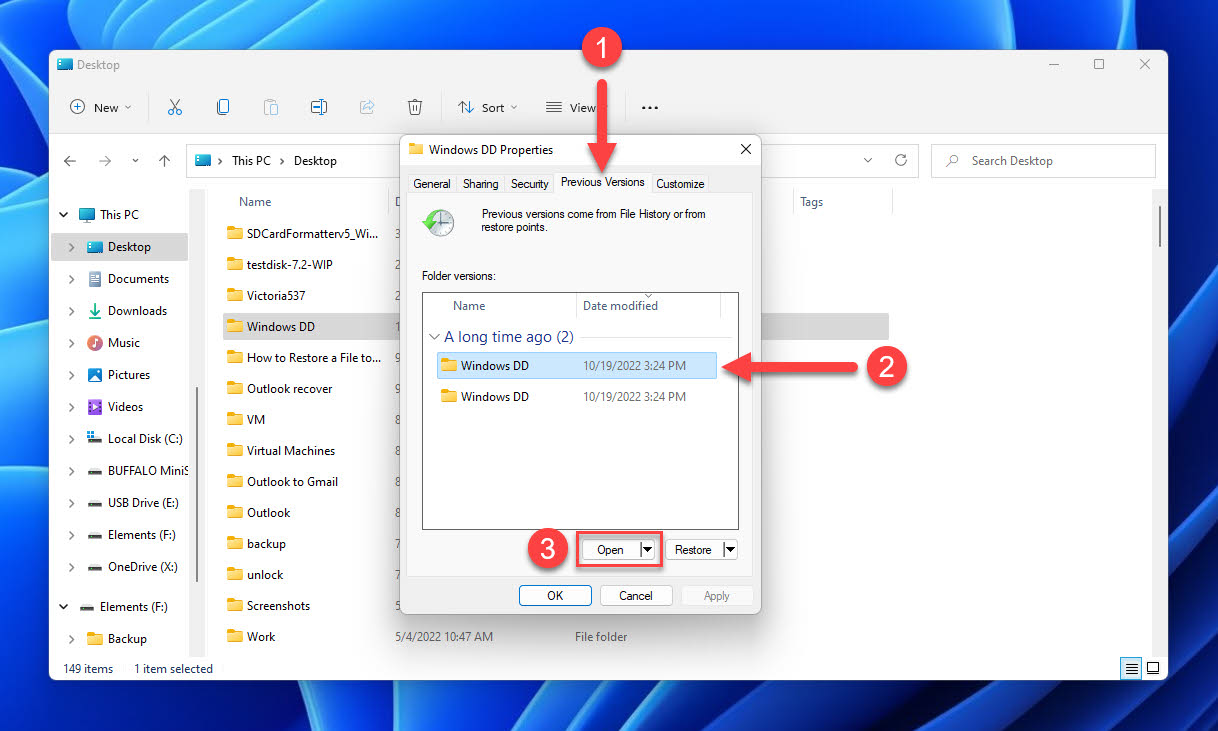
- Locate the missing files and move them to a safe location.
Method 2: Restore Recycle Bin Data Using Backup & Restore.
Is your Windows machine using Backup & Restore, the predecessor to File History? Then you might be able to recover your deleted files with this feature, which is included in Windows Vista and newer. Of course, this recovery feature can help you only if you’ve backed up your data with it at least once.
If you have, then you can follow these steps to restore deleted files using Backup and Restore:
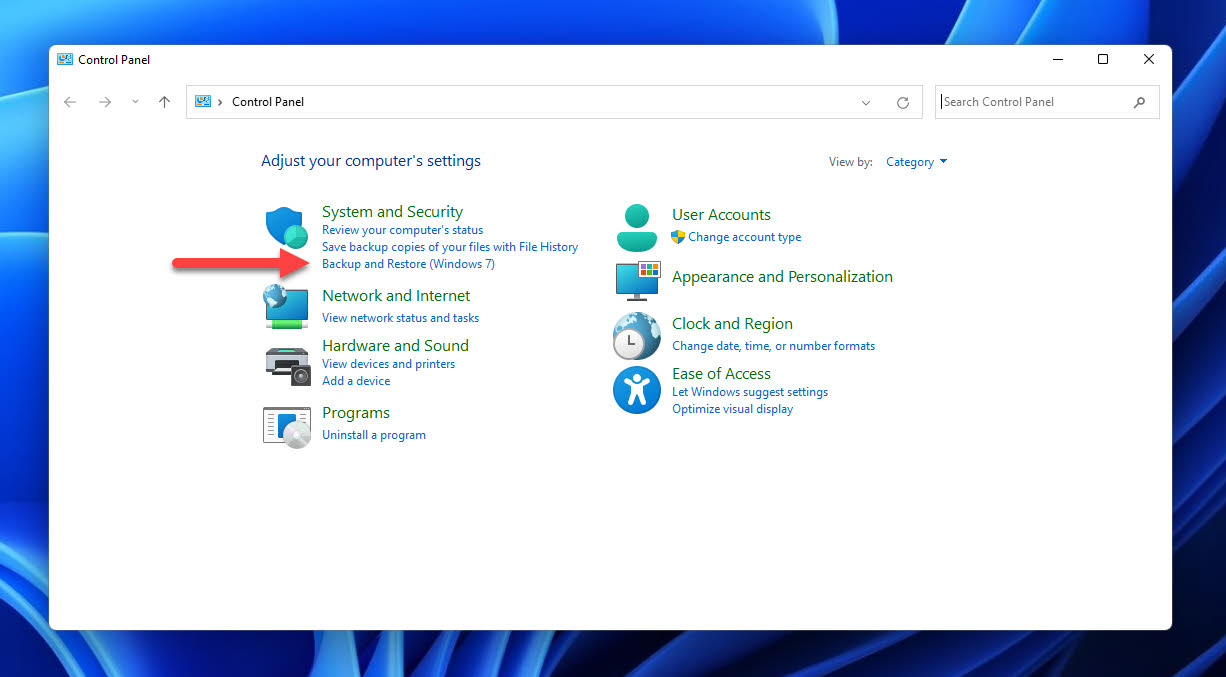
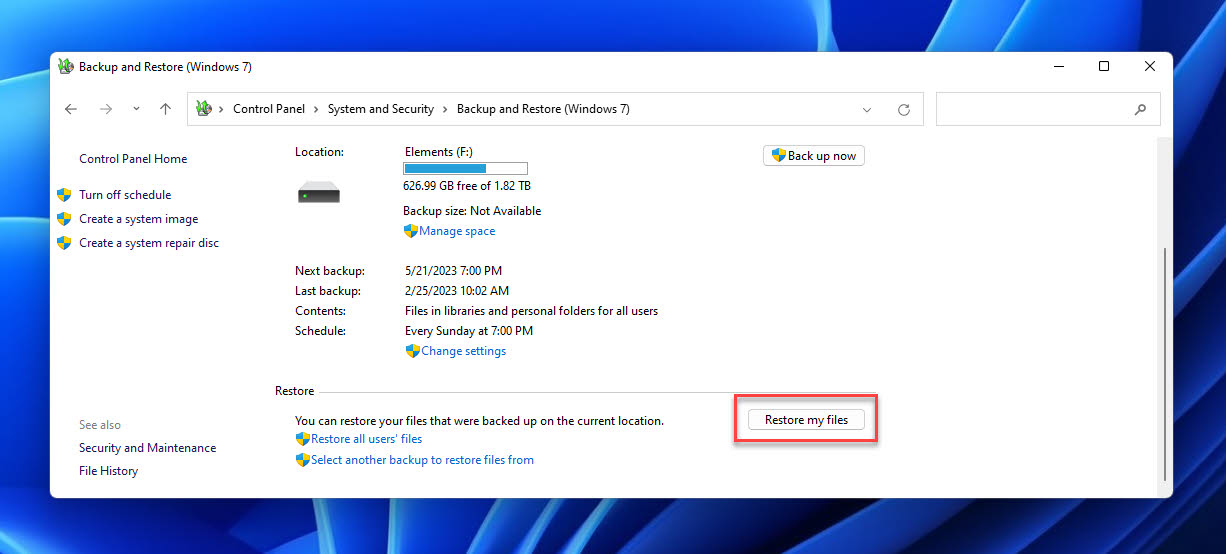
- Bring up the Start menu and search for Control Panel. Then, open the relevant result.
- Navigate to System and Security > Backup and Restore.
- Click the Restore my files option. If the option isn’t available, click Select another backup to restore files from option instead and then pick your backup location.
- Locate the deleted files or folders you want to restore and continue.
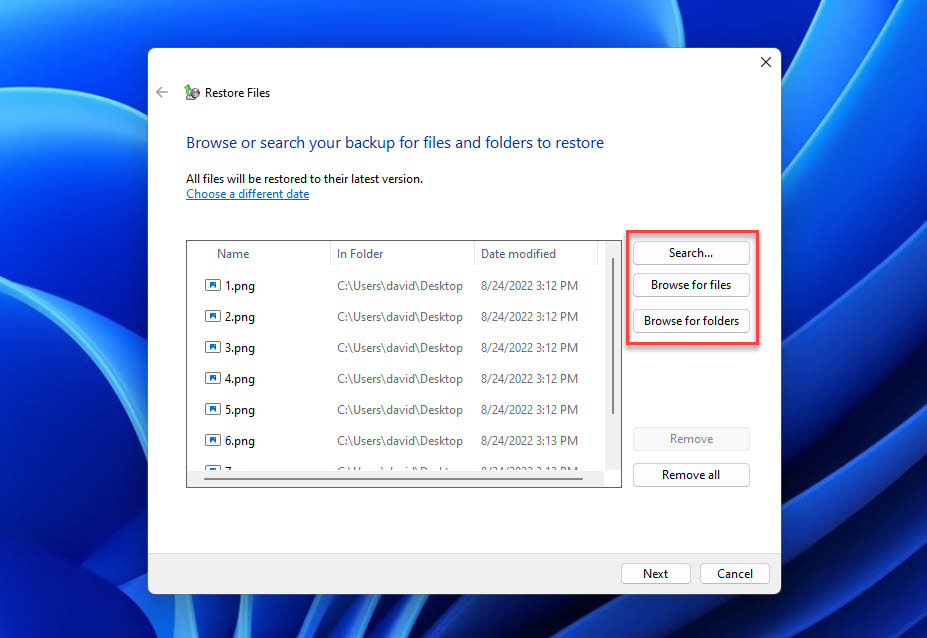
- Choose the location where you want to restore the files and continue.
- Restore your files and close the window.
Method 3: Restore Deleted Files from OneDrive.
Newer versions of Windows integrate OneDrive, Microsoft’s cloud storage service, as a default application, so there’s a good chance you have it enabled. If you do, then your lost files may still be in the cloud and recoverable from any device with a few simple clicks, helping you recover files after emptying the Recycle Bin:
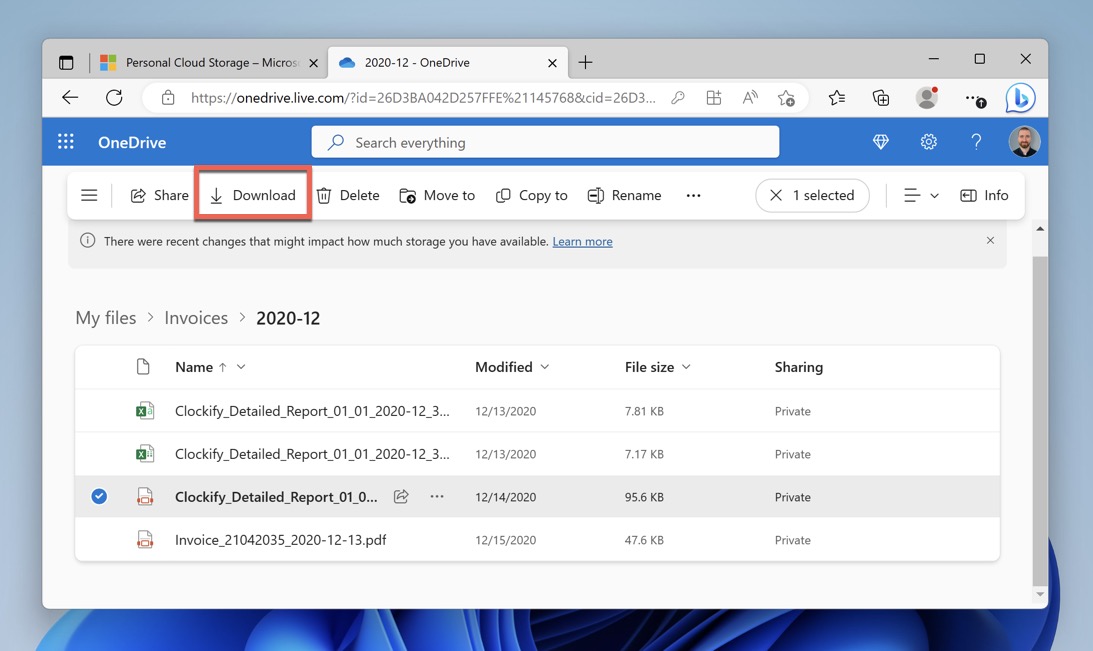
- Launch your favorite web browser and go to: https://onedrive.live.com/
- Sign in to your Microsoft account.
- Navigate to the folder where your lost files were located.
- Select the files you want to recover.
- Click Download to download them from Microsoft’s cloud to your computer.
If the missing files are not in the expected location, then you should take a peek inside the Recycle bin tab (found in the left pane). That’s where OneDrive keeps deleted files before it gets rid of them permanently after 30 days.
Method 4: Retrieve Lost Recycle Bin Files Using Microsoft’s Recovery Tool
In 2020, Microsoft finally released its own data recovery tool, called Windows File Recovery. While certainly basic (only the most common file formats are supported, and there’s no graphical user interface), Windows File Recovery can be downloaded for free from the Microsoft Store and used to recover an unlimited amount of data, so there’s no reason not to give it a shot.
Microsoft explains in detail how Windows File Recovery works on its website, but here’s a simplified step-by-step guide to get you started:
- Download and install Windows File Recovery from the Microsoft Store.
- Launch Windows Terminal as administrator.
- Enter the following command to recover your Downloads folder to an external drive: Winfr C: E: /regular /n \Users\your-username\Downloads\
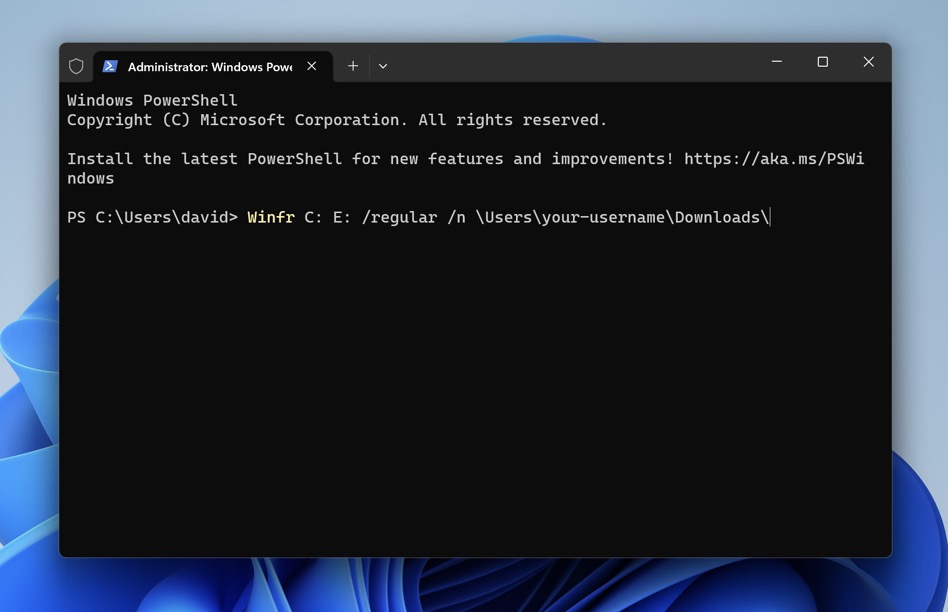
You can easily modify the command above to recover any folder you want to any external storage device (the recovery destination should never be the same as the source location to avoid overwriting).
Method 5: Recover Lost Files from Backup Storage.

Still no luck? Before you throw in the towel and move on, you should check all backup storage devices you have. There’s a non-zero percent chance that your lost data are backed up on an external hard drive, USB flash drive, or some other storage device without you even realizing it.
The built-in search feature in File Explorer or a third-party search utility like Everything can help you locate the backups on your storage devices in no time.


FAQ
If you haven’t emptied the Recycle Bin after deleting a file on your computer, you can easily recover the file from it for free and without additional software. Follow these steps immediately after realizing that you deleted a file by mistake:
- Double-click the Recycle Bin icon on your Desktop to open it.
- Look through the files to find the needed one.
- Right-click the file you wish to restore and choose Restore from the drop-down menu. Or simply drag and drop the file to a different folder.
All recent versions of Windows come with a useful backup feature called File History, which automatically backs up selected directories. Provided you’ve activated File History before you deleted your files, you should be able to easily access their backups.
To recover deleted files from the Recycle Bin without software:
- Open the Start menu and type "file history".
- Select the "Restore your files with File History" option.
- Click the History button to show all your backed up folders.
- Select what you want to restore and click the Restore button.
Yes, there are plenty. But Disk Drill remains a strong first pick data recovery solution thanks to its clean workflow and stable results. On Windows, you can recover up to 100 MB at no cost, often enough to undo a small Recycle Bin purge and confirm it works for your case.
The amount of time you have to recover your data after emptying the Recycle Bin depends on several factors, mainly the size of your storage device and the number of read/write operations performed every minute. To maximize it, you should close all running applications and focus your attention exclusively on data recovery.
Yes, you can recover deleted files from emptied Trash Bin on Mac with Disk Drill. Time Machine backup can also be used to try to get your files back without using third-party software.
Many users mistakenly think that files will disappear forever if you empty the Recycle Bin. But actually, only the reference of the file gets removed
This means that you will no longer be able to locate the file on your computer manually. However, it will still be present on the hard drive until Windows saves another file to the same location. So, technically, the file won’t permanently disappear until it gets overwritten with other data.
If you want to recover deleted files from the Recycle Bin, it is best to use data recovery software. Our choice is Disk Drill since it has proven to be able to effectively and quickly handle such a task. Follow these steps to recover deleted files from Recycle Bin via Disk Drill:
- Download Disk Drill for Mac and follow the onscreen instructions to install the app.
- Click the Disk Drill icon to open the app.
- From the list of devices, choose the one containing the Recycle Bin.
- Click the Search for lost data button to start the scan.
- Look through the files found by Disk Drill. Once you find the needed file, click the box near it to place a checkmark.
- When ready, click the Recover button. Once prompted, choose a location where you want to store the files (it is recommended to recover the files either to an external disk or a flash drive to avoid data overwriting).
If you have the File History feature enabled on your computer, then you should be able to access the backups of the deleted photos and therefore easily recover them. Here’s how to recover deleted photos even after you’ve emptied the Recycle Bin using File History:
- Select the Start icon on the taskbar. In the search field, type file history.
- Click Restore your files with File History.
- Click History to view all of your backed up files and use the arrows to look through their different versions. Or type in the name of the needed picture in the search field.
- Once you’ve found the needed photo, select it, and click the Restore button.