Mac users should be very familiar with the macOS Trash Bin. It’s a special folder that is designed to temporarily hold recently deleted files. If you have accidentally deleted files, the Trash is the first place you should look to try and recover your lost data.
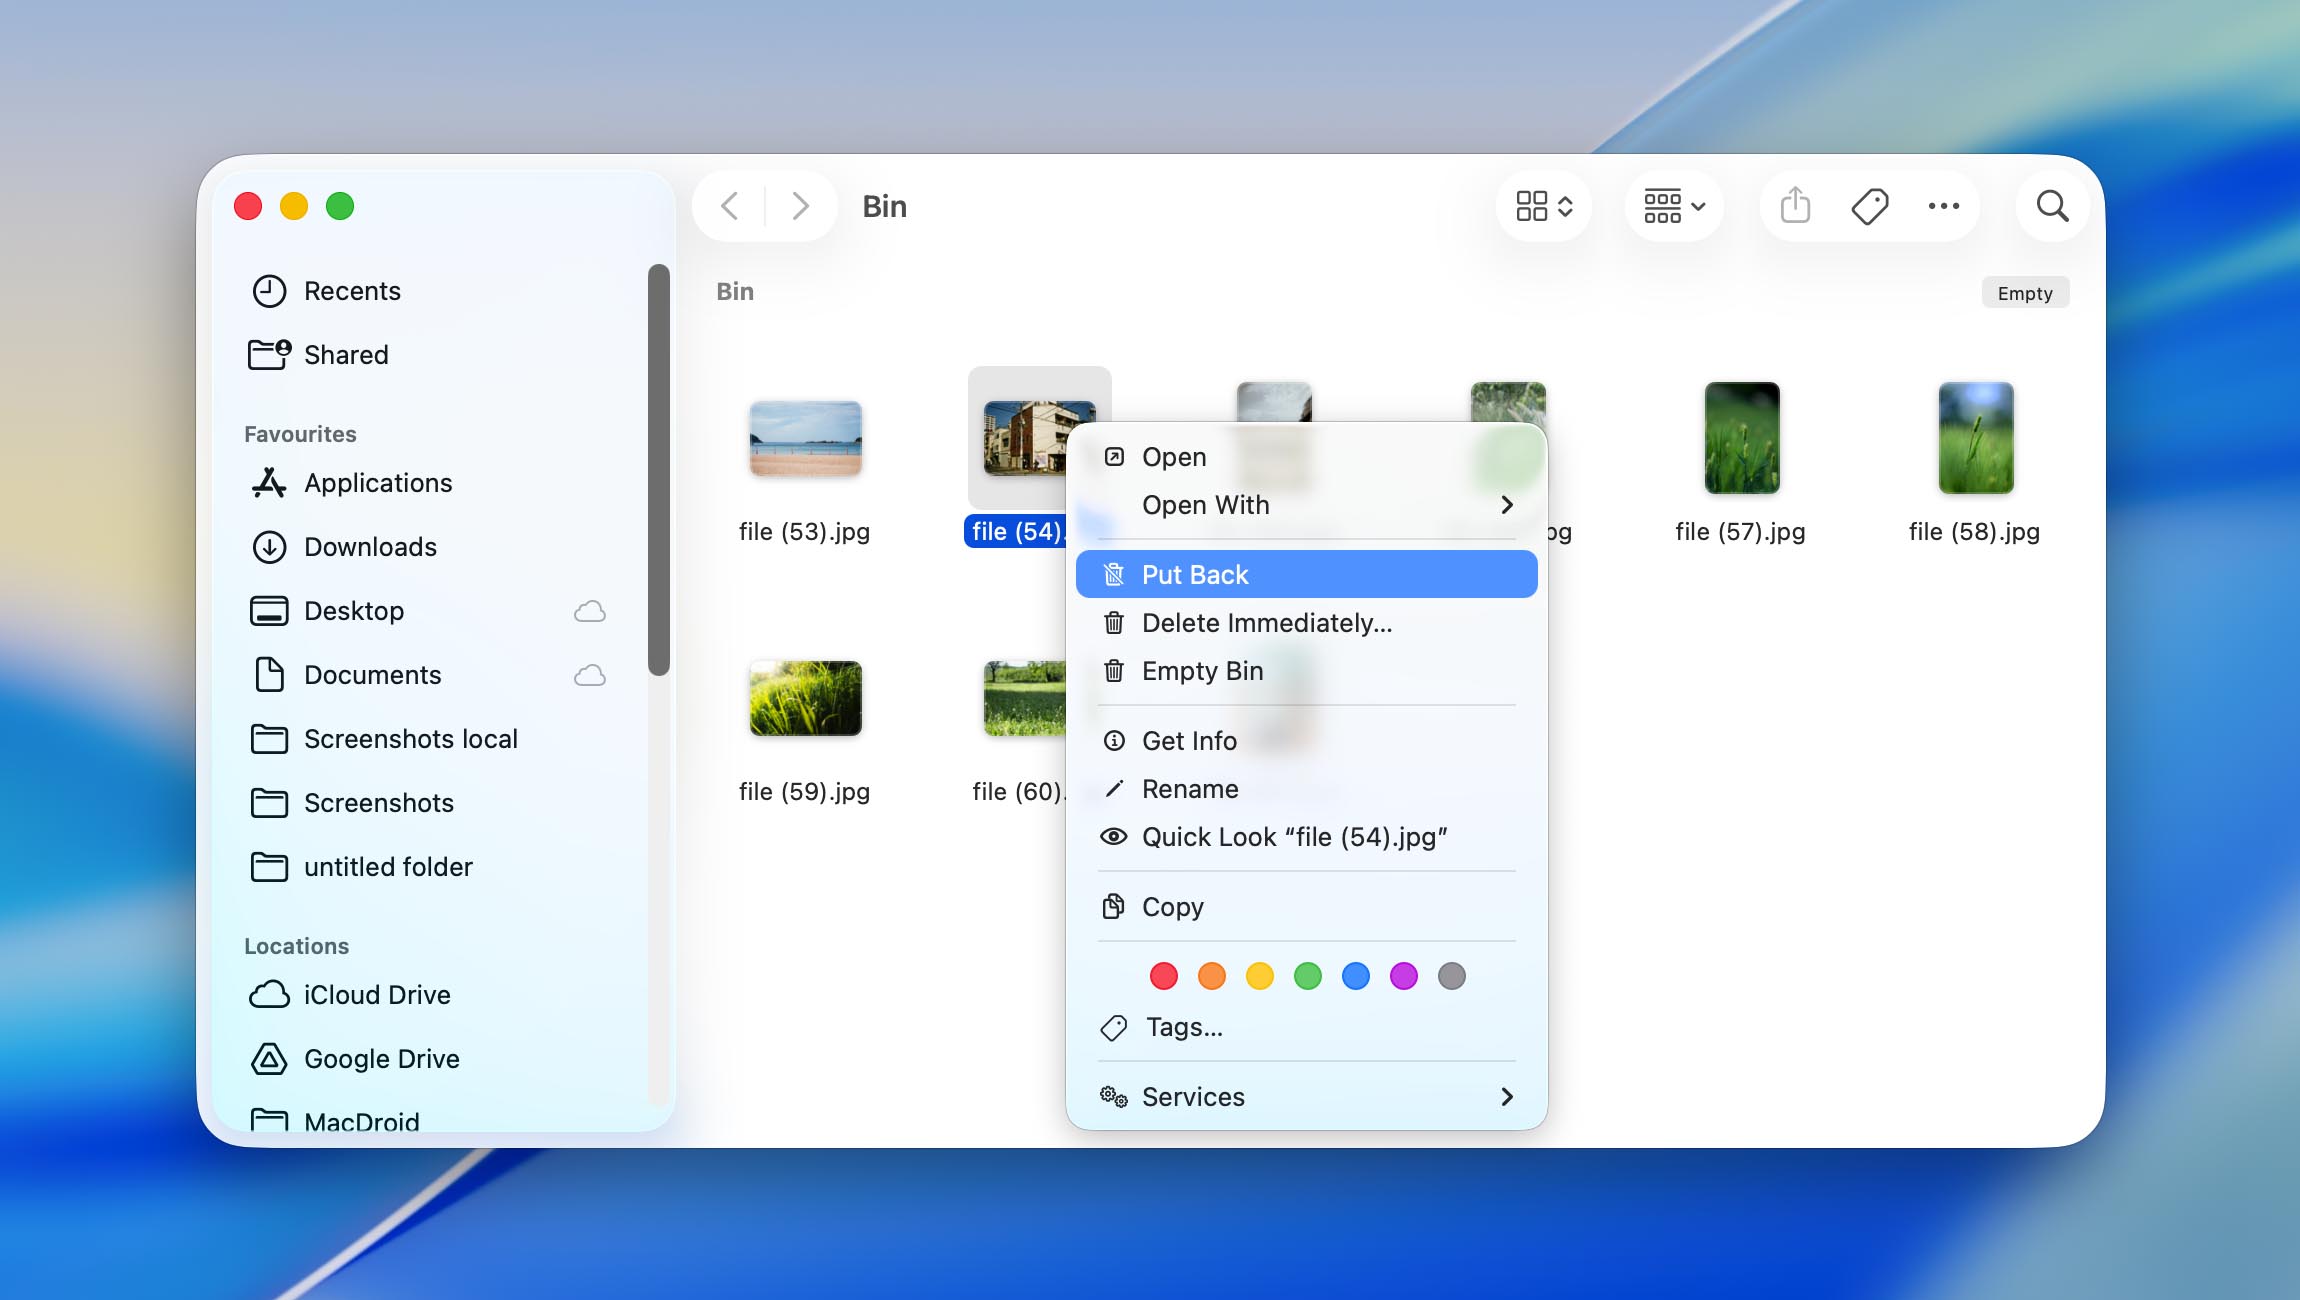
To recover deleted files from Trash on Mac: click on the Trash icon and choose deleted files or folders, then Right-click or Control-click on the item. A drop-down menu will appear. Click Put Back to restore files.
But what if you’ve already emptied the Trash, or the files are not there for some other reason (maybe the Trash has emptied itself automatically)? Fortunately, there are several methods you can try to recover files from emptied Trash on your Mac, whether you’re using a MacBook Pro, MacBook Air, or any other Mac device.
Is There a Way to Recover Emptied Trash on a Mac?
Is it possible to recover lost files even after the Trash Bin has been emptied on your Mac? Absolutely. However, the key to success lies in immediate action and the right approach:
- 🗑️ Check Trash again: Even if you’ve done so already once, we strongly recommend you double-check your Trash Bin to verify the files aren’t there. All versions of macOS released in recent years, such as Ventura, Sonoma, Sequoia, and Tahoe, include an option that automatically deletes files from Trash after 30 days. This option is often the reason why Mac users can’t find lost files in Trash despite not emptying it manually. Also worth noting: if you deleted files from an external drive, that drive needs to be connected to your Mac for those files to appear in Trash. Each external volume keeps its own hidden .Trashes folder, and macOS won’t show those items unless the drive is plugged in.
- 💽 Attempt to recover from backups: Time Machine and iCloud backups are your most reliable options for recovering files from emptied trash. Our Time Machine recovery guide below provides step-by-step instructions to restore any version of your deleted files. For iCloud users, check our cloud recovery section to learn how to access previously synced files. Of course, backups will save you only if you have them. If not, then you can skip to the next step right away.
- 🧰 Use specialized data recovery software: When backups aren’t available, your best chance to recover deleted files from Trash on Mac is through dedicated recovery tools, applications that can scan your drive and locate files based on file system information or file signatures. See our software recovery walkthrough for the exact steps to recover recently emptied trash on your Mac using Disk Drill.
- ☎️ (Situational) Consider professional data recovery services: If software solutions fail or if you suspect a technical malfunction or hardware issue, then you should consider contacting a professional data recovery service.
Your ability to recover files from emptied trash decreases with each passing minute. The sooner you take action, the higher your chances of successful recovery. Follow the steps above immediately for the best results when trying to recover deleted files on a Mac after the Trash has been emptied.
Method 1: Recover Deleted Files on a Mac with Data Recovery Software
The fact that files remain physically present on their storage media until being overwritten allows Mac data recovery software to restore them. The best part? A good recovery tool like Disk Drill for Mac lets you scan your entire drive and preview every recoverable file completely free of charge, so you can verify what’s actually salvageable before spending a cent.
To recover deleted files from an emptied Trash on Mac:
- Download Disk Drill and install it like any other app.
⚠️ Important: If the deleted files were on your Mac’s internal drive (which is the case for most MacBook users), be aware that installing any software on that same drive carries a small risk of overwriting recoverable data. If possible, install Disk Drill on an external drive, or at the very least, download and install it as quickly as you can before doing anything else on the computer.
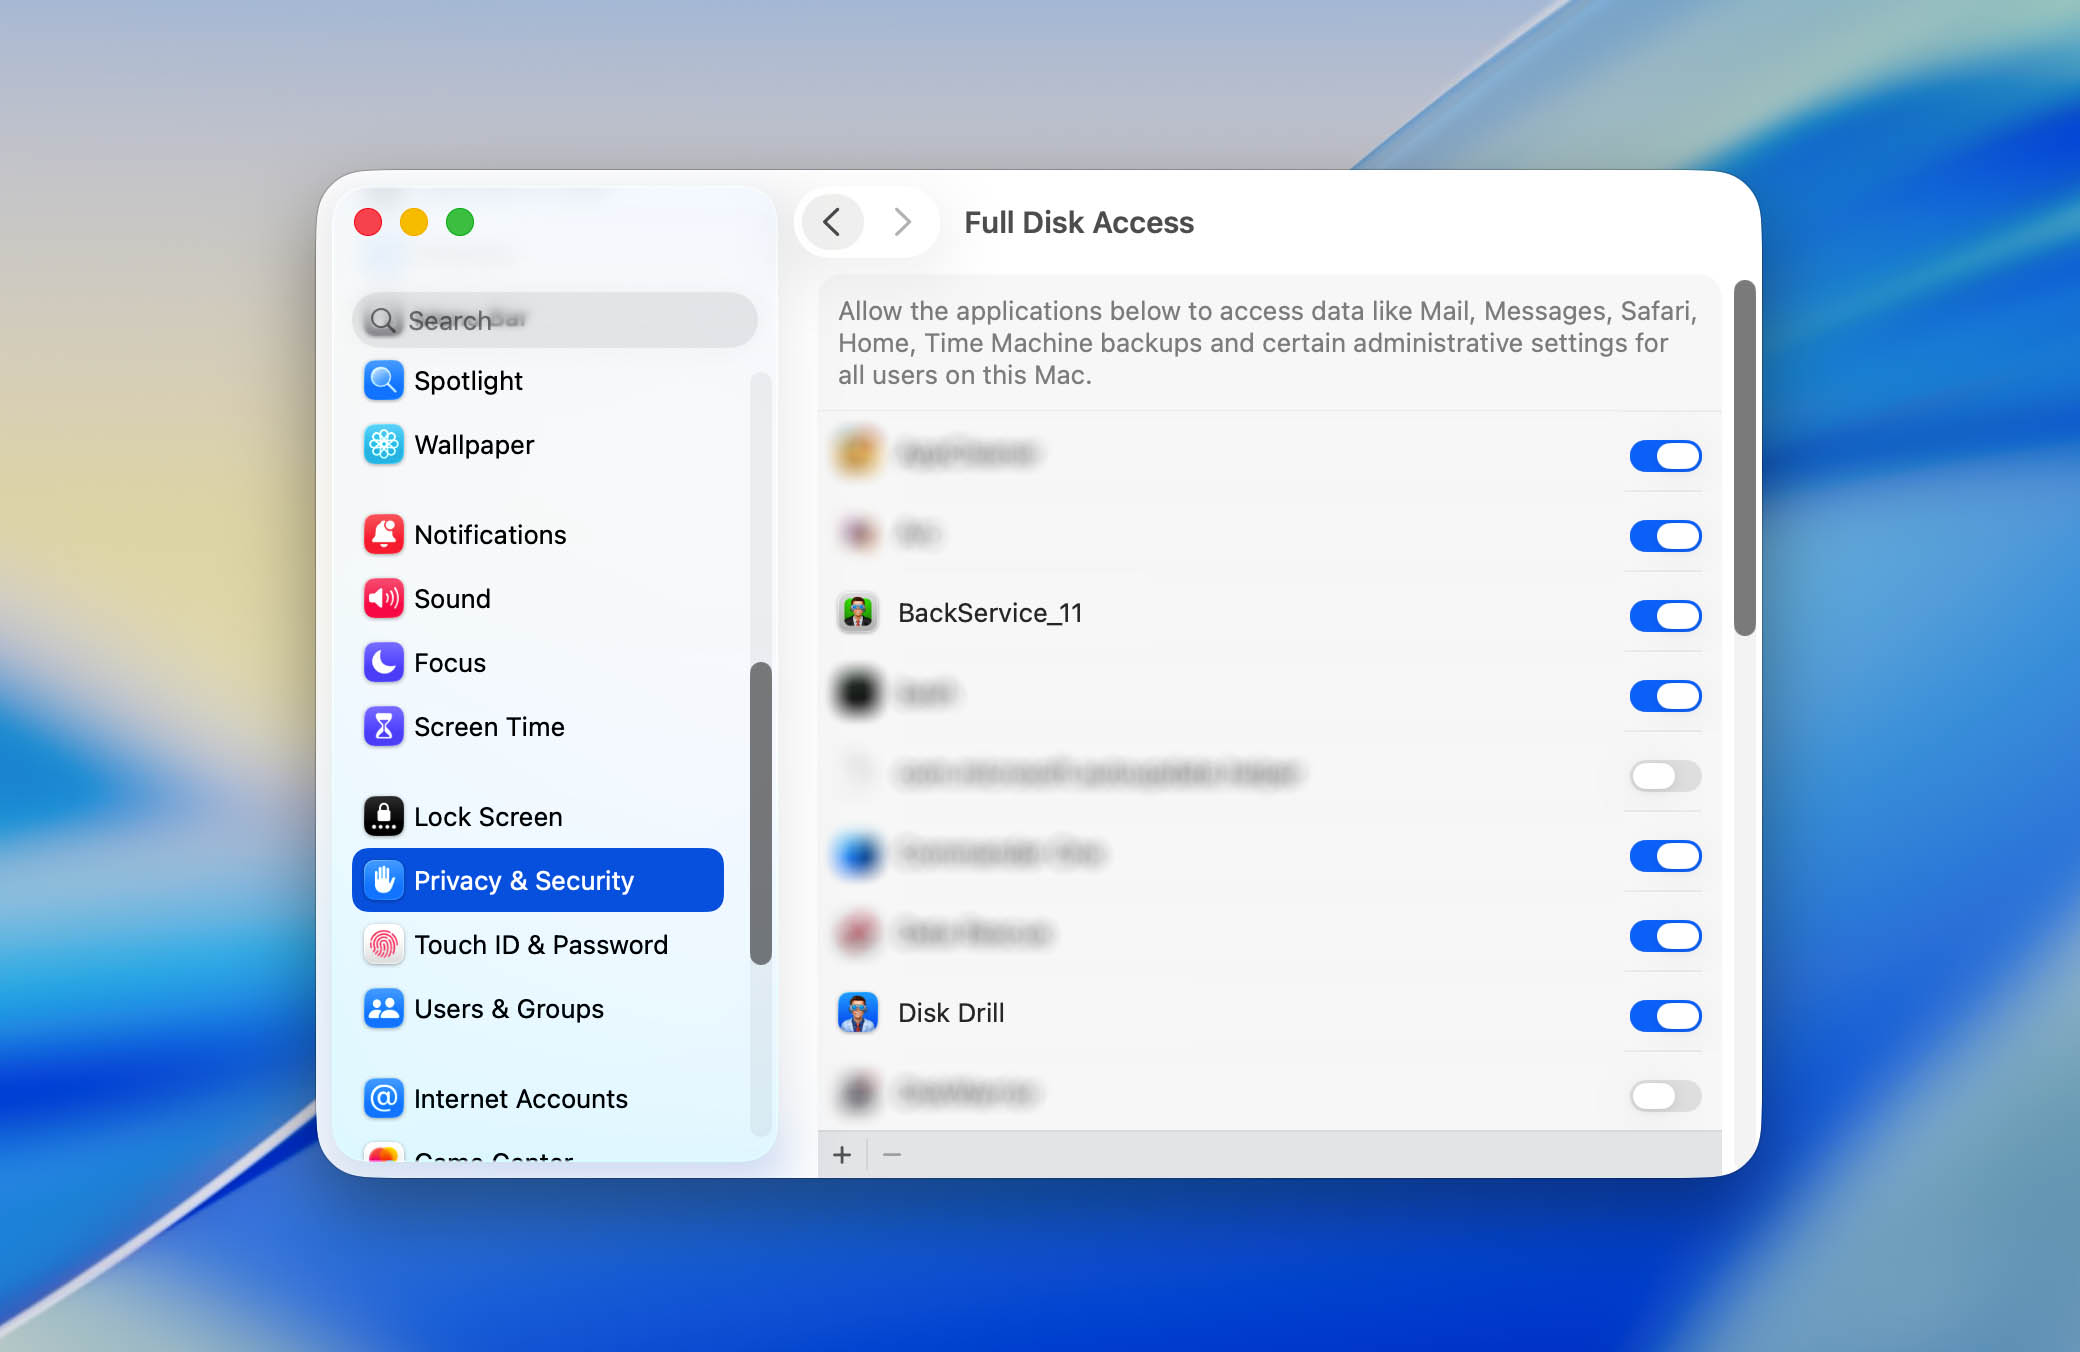
- Before scanning, you’ll need to grant Disk Drill Full Disk Access. Open System Settings > Privacy & Security > Full Disk Access, find Disk Drill in the list, and toggle it on. Enter your admin password if prompted. If you’re scanning your Mac’s system disk and want the deepest possible access, you may also need to install a kernel extension (kext) because macOS locks down raw, sector-level access to the system disk for every app on the market, and a kext is the only way Apple lets recovery tools reach those lower layers. You can find detailed kext installation instructions here. That said, even without the kext, Disk Drill can still scan your system disk and recover files from local snapshots, existing files, and its built-in protection features (Recovery Vault and Guaranteed Recovery).
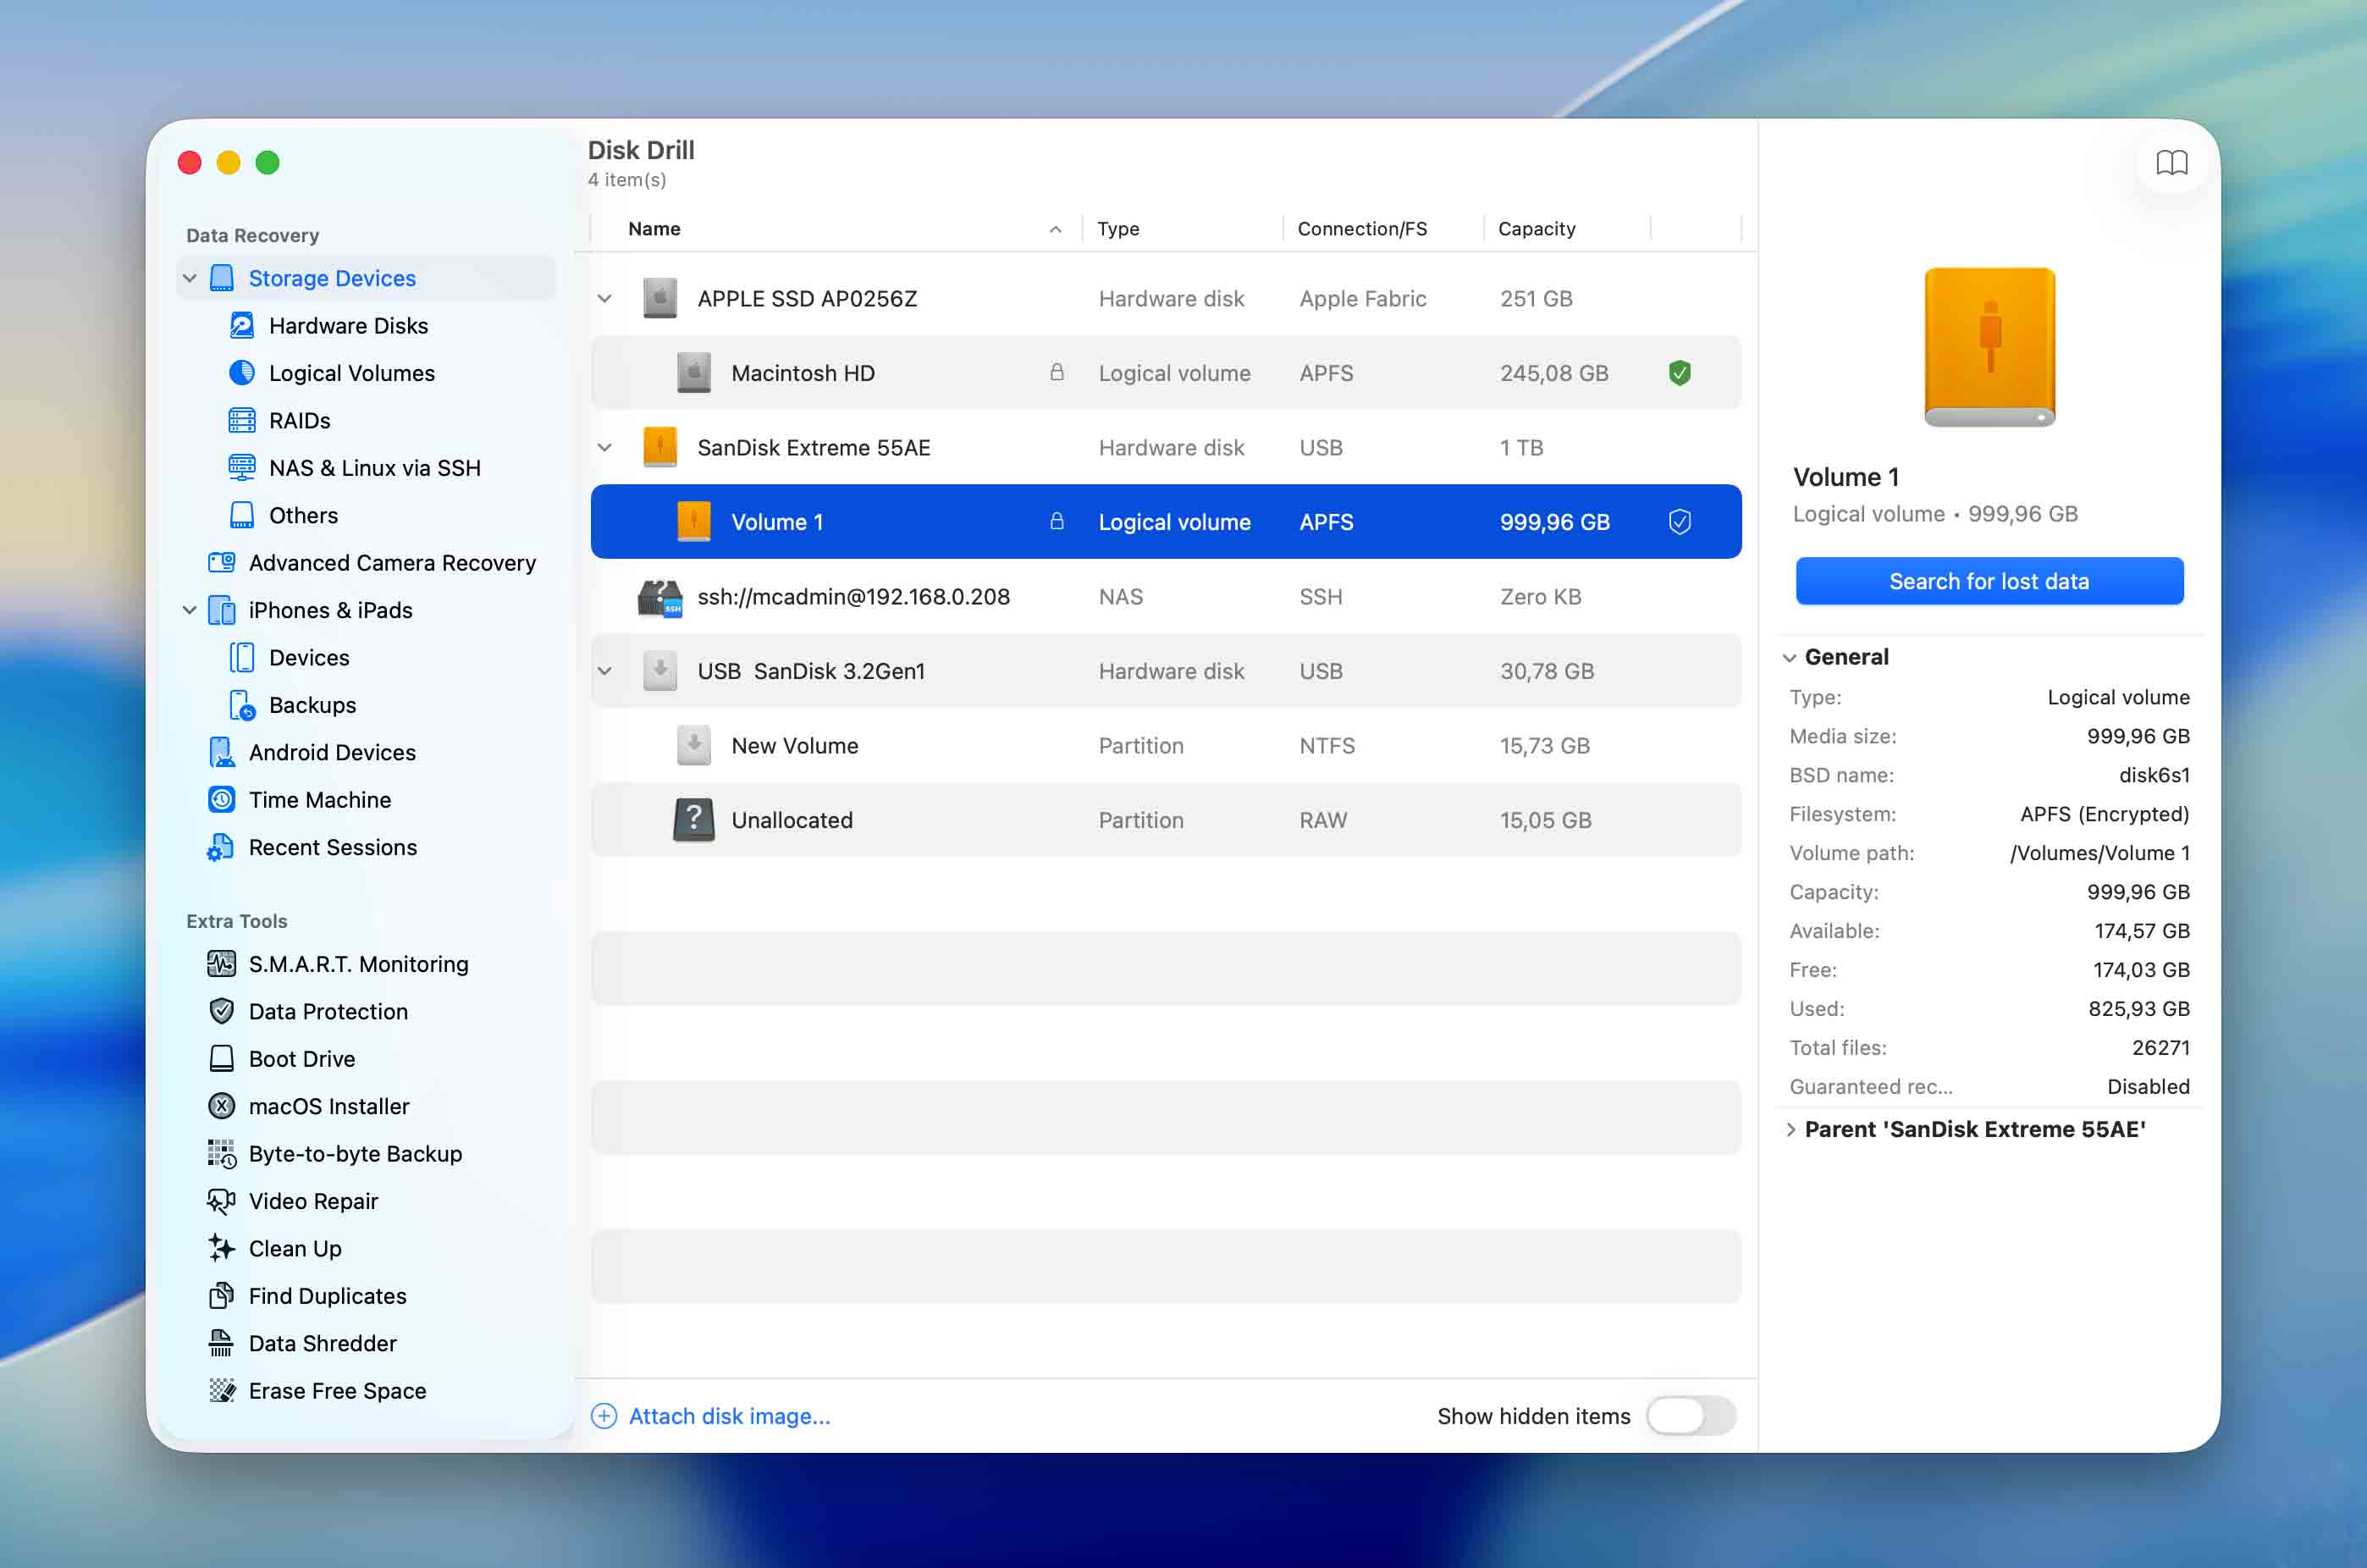
- Open Disk Drill and choose the drive that originally held your deleted files. Click the Search for lost data button to start the scan. For non-system disks, Disk Drill will let you choose between different scanning methods, so you can pick the one that best fits your situation. If you’re not sure which one fits your situation, just pick the default Universal Scan. Advanced Camera Recovery (ACR) is suitable for the recovery of fragmented, deleted, or corrupted video files from drones and digital cameras.
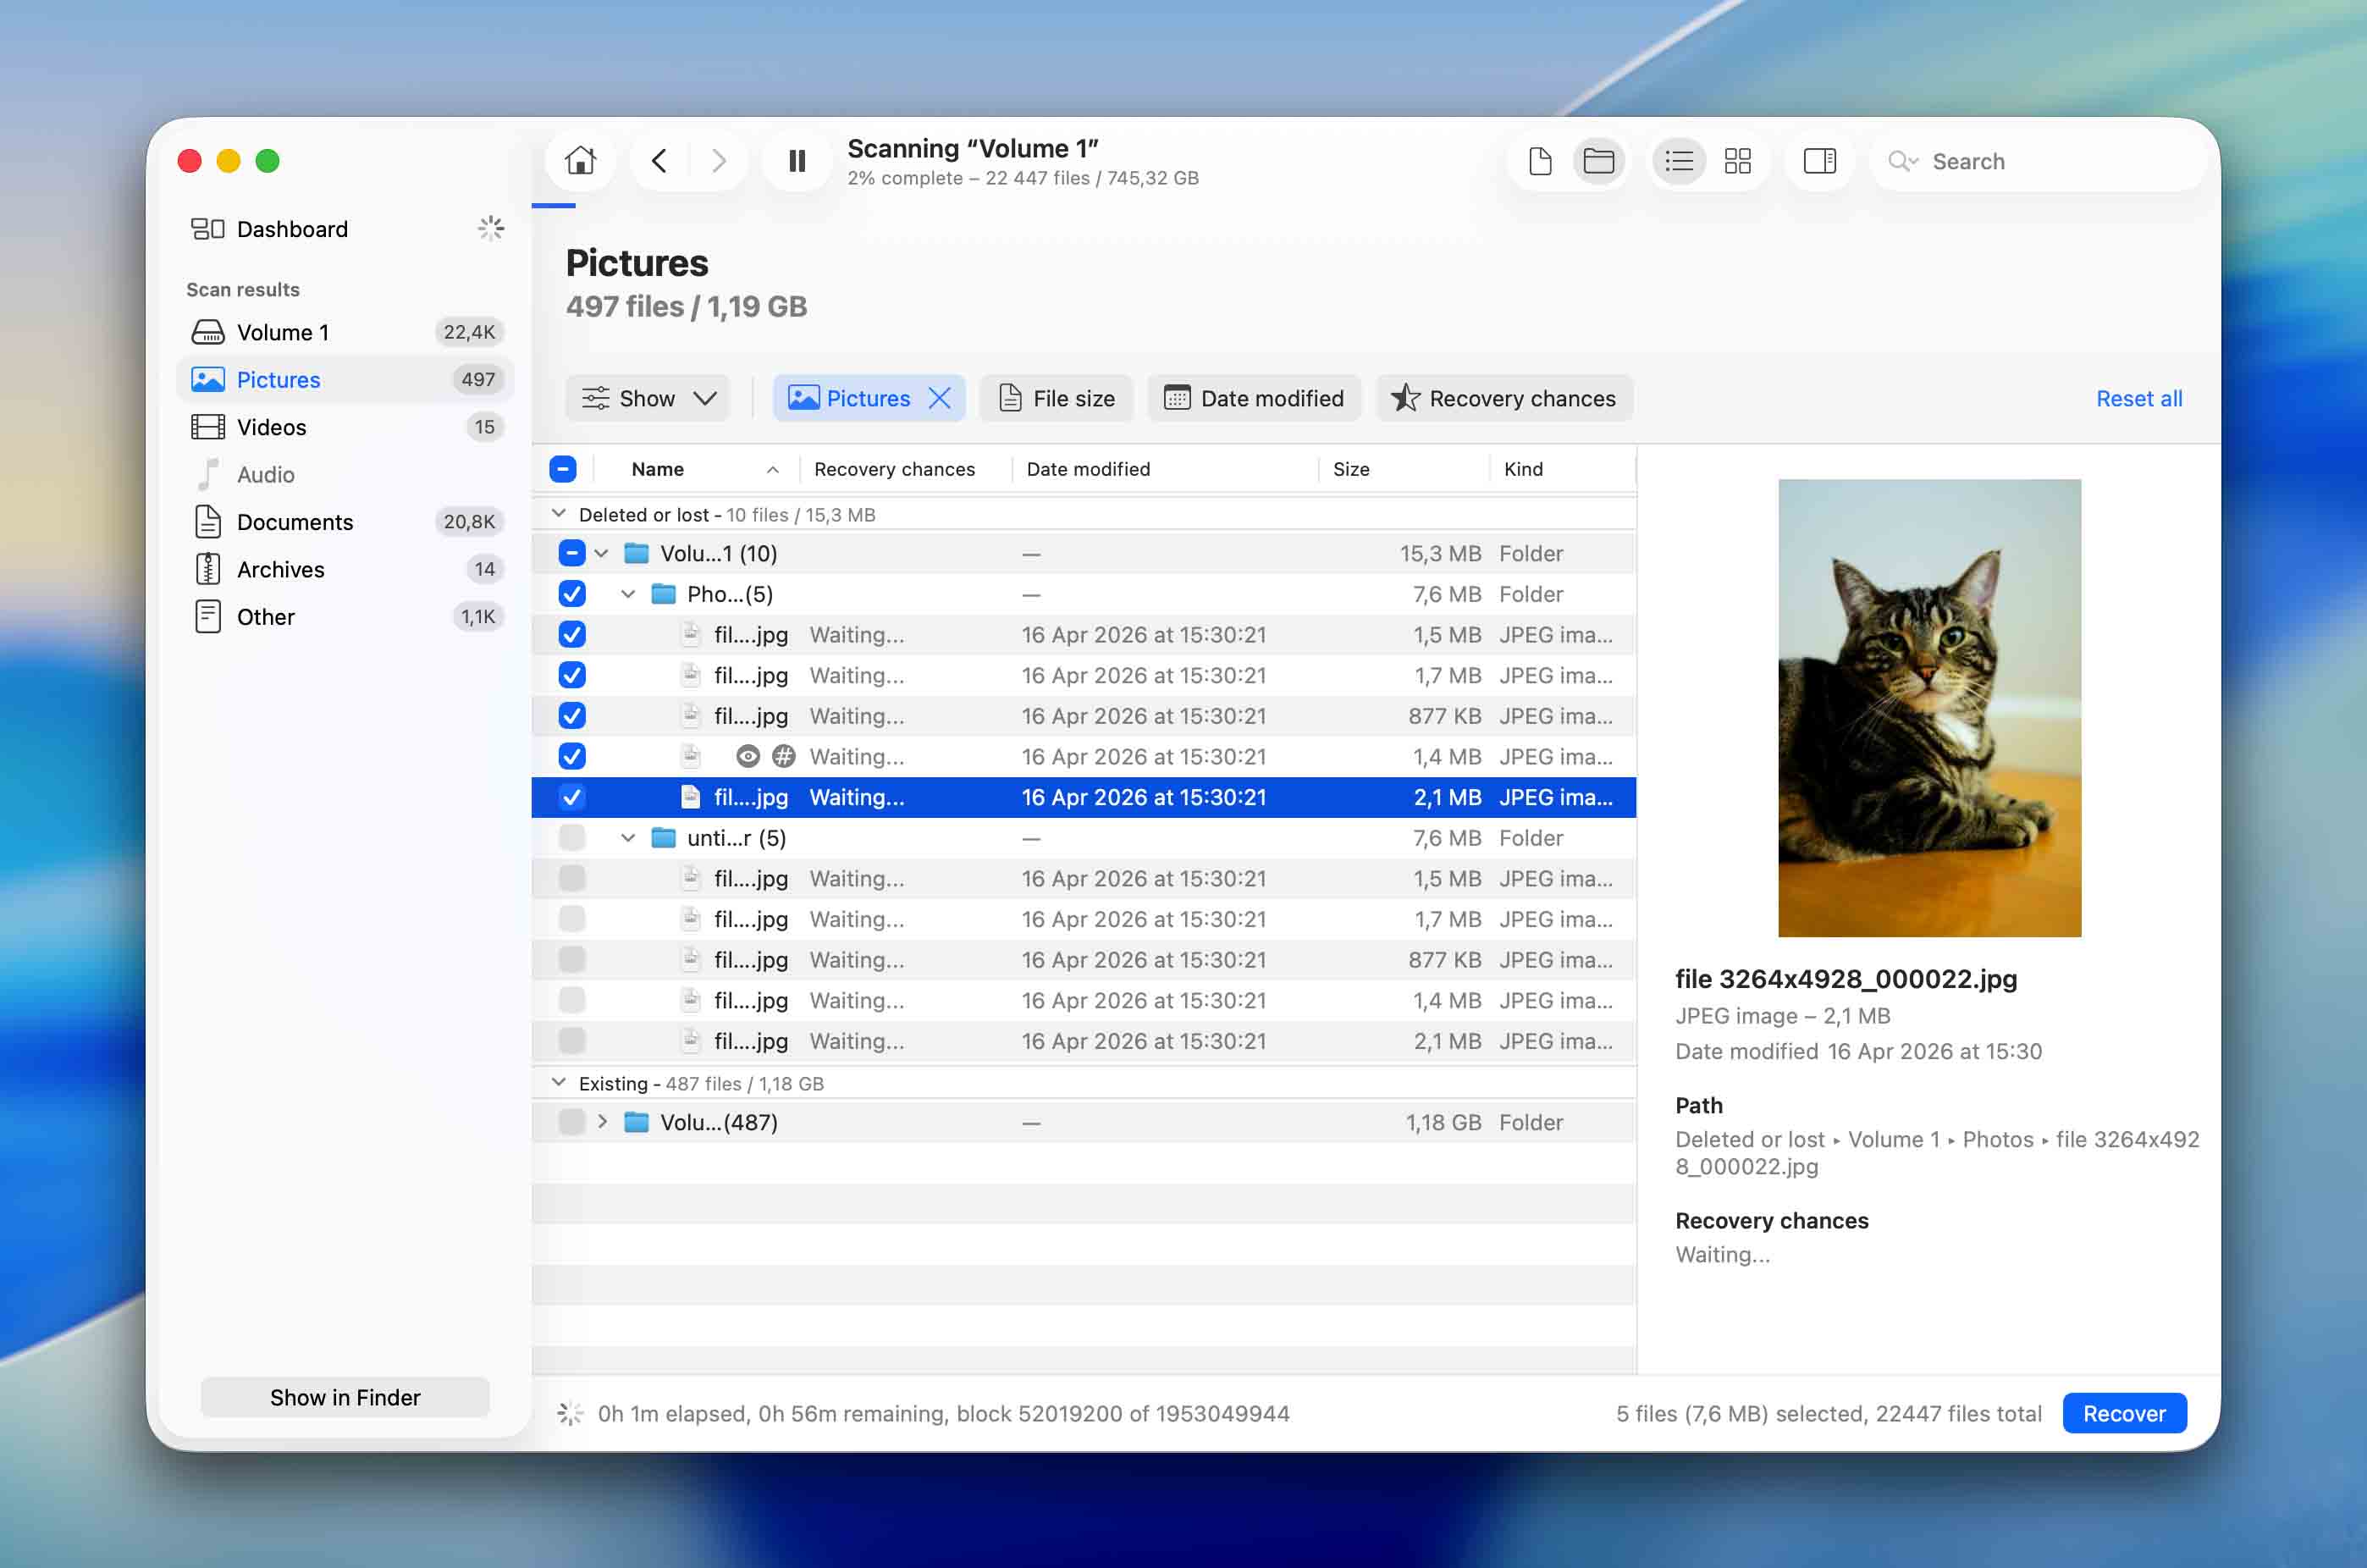
- Use Disk Drill’s filters (file type, size, modification date, recovery likelihood) to narrow down the results so that you can select the files you want to restore. You can even preview files to check their condition. If a file shows a working preview, you can count on it being recoverable. Keep in mind that not every file type can be previewed natively (things like archives, databases, or less common formats won’t show a thumbnail), so a missing preview doesn’t automatically mean the file is broken.
- Click Recover and pick a new save location, ideally an external drive. Avoid saving back to the original drive if at all possible, since this risks overwriting other data you might still want to recover. Hit Next to complete the recovery.


Disk Drill’s free version lets you scan and preview recoverable files. It works by analyzing your hard disk at a deep level to locate files that are no longer visible to macOS but still physically intact on the storage medium. The success of recovery depends on two things: the quality of the scanning algorithms and how many file types the tool recognizes. Disk Drill uses both a Quick Scan (which checks file system records) and a Deep Scan (which analyzes raw data sector by sector) to maximize what it can find.
Other reasons why Disk Drill is an excellent choice to recover deleted files from an emptied Trash on Mac include:
- Excellent APFS and HFS+ recovery performance. Disk Drill flawlessly supports Apple’s proprietary file systems, APFS and HFS+. Whether dealing with simple file deletions or more complex data loss scenarios like partition damage or system crashes, Disk Drill’s understanding of APFS and HFS+ means it can recover data that other tools might miss.
- Time Machine backup scanning. Another useful feature of Disk Drill is its ability to scan and recover data from Time Machine backups and include found files in scan results. You can then easily locate specific files with the help of Disk Drill’s scan result filters and preview capabilities.
- Automatic Quick and Deep algorithms that can address any lost file issue. If a Quick scan does not find the missing files, then a Deep scan can finish the job by analyzing your drive at the sector level to find file fragments that can be reconstructed into recoverable files.
- Extensive knowledge of file types. Disk Drill can recover just about any file type that might be present on your Mac, and its intuitive interface makes it easy to scan your disks and recover what you need.
- Advanced data protection and disk maintenance features. Free tools included with Disk Drill allow you to create a disk map and identify files that can be removed to regain valuable storage space. Easily find duplicate and unnecessary files that can be deleted from your system. You can also protect your files from accidental deletion with the Recovery Vault and Guaranteed Recovery features built into the app.
Method 2: Recover Emptied Trash on a Mac for Free without Software
Don’t want to use third-party software? You still have options, but they only work if you set them up before the data loss happened. macOS comes with built-in backup tools like Time Machine, and many Mac users also sync files through iCloud or other cloud services. Beyond that, several native Apple apps keep their own “Recently Deleted” folders that can save you in a pinch. Here’s how to take advantage of each approach.
Way 1: Time Machine Backup
Apple users should be taking advantage of the built-in backup tool known as Time Machine to regularly back up their data. Now is the time for those backups to prove their worth by enabling you to recover accidentally deleted files.
- Launch Time Machine on your Mac. You can access Time Machine by clicking on the clock icon located on the Mac’s menubar. You can also use the Terminal app, which allows you to control Time Machine through a command-line interface. Using Terminal will allow you to remotely manage other computers and obtain many statistics regarding the backups that Time Machine has taken.

- Locate your file. Make sure your Time Machine backup drive is connected and powered on before you start. Once Time Machine is open, you can browse through your saved backups and navigate to the folder where your deleted file used to live.
- Search for the desired files in their original locations. Identify the files that were inadvertently deleted from a backup that occurred prior to the deletion date.
- Select the file you want to restore. After you have found the requested files, simply click restore to recover them to your hard drive.
Don’t have your Time Machine backup drive handy? You might still be able to recover recently emptied trash Mac using Time Machine’s local snapshots feature. Unlike full Time Machine backups, local snapshots are stored every hour directly on your Mac’s internal storage and don’t require an external backup drive. The biggest limitation is that local snapshots are kept only for the past 24 hours.
The process to recover emptied Trash Mac files from local snapshots is exactly the same as from an external Time Machine backup drive, so you can follow the instructions above.
Way 2: Recovering from an Emptied Trash with iCloud Backup
For many Mac users, iCloud serves as an alternative or supplement to Time Machine backups. Some choose to synchronize files to iCloud automatically, while others prefer to save space by manually uploading only the most important files.
For synced files, deletions propagate across devices unless you act fast, so you’ll enjoy the best chance of success if your Mac wasn’t connected to the internet at the time of the deletion and hasn’t connected to it since. Manually uploaded files, however, are never deleted automatically, so there’s no rush there.
In either case, you can use the following steps to retrieve files from an emptied Trash using iCloud:
- Go to iCloud.com and sign in with your account credentials. If your Mac was offline when the deletion happened, use a different device (like your phone or another computer) to access iCloud so you don’t trigger synchronization by reconnecting your Mac to the internet.
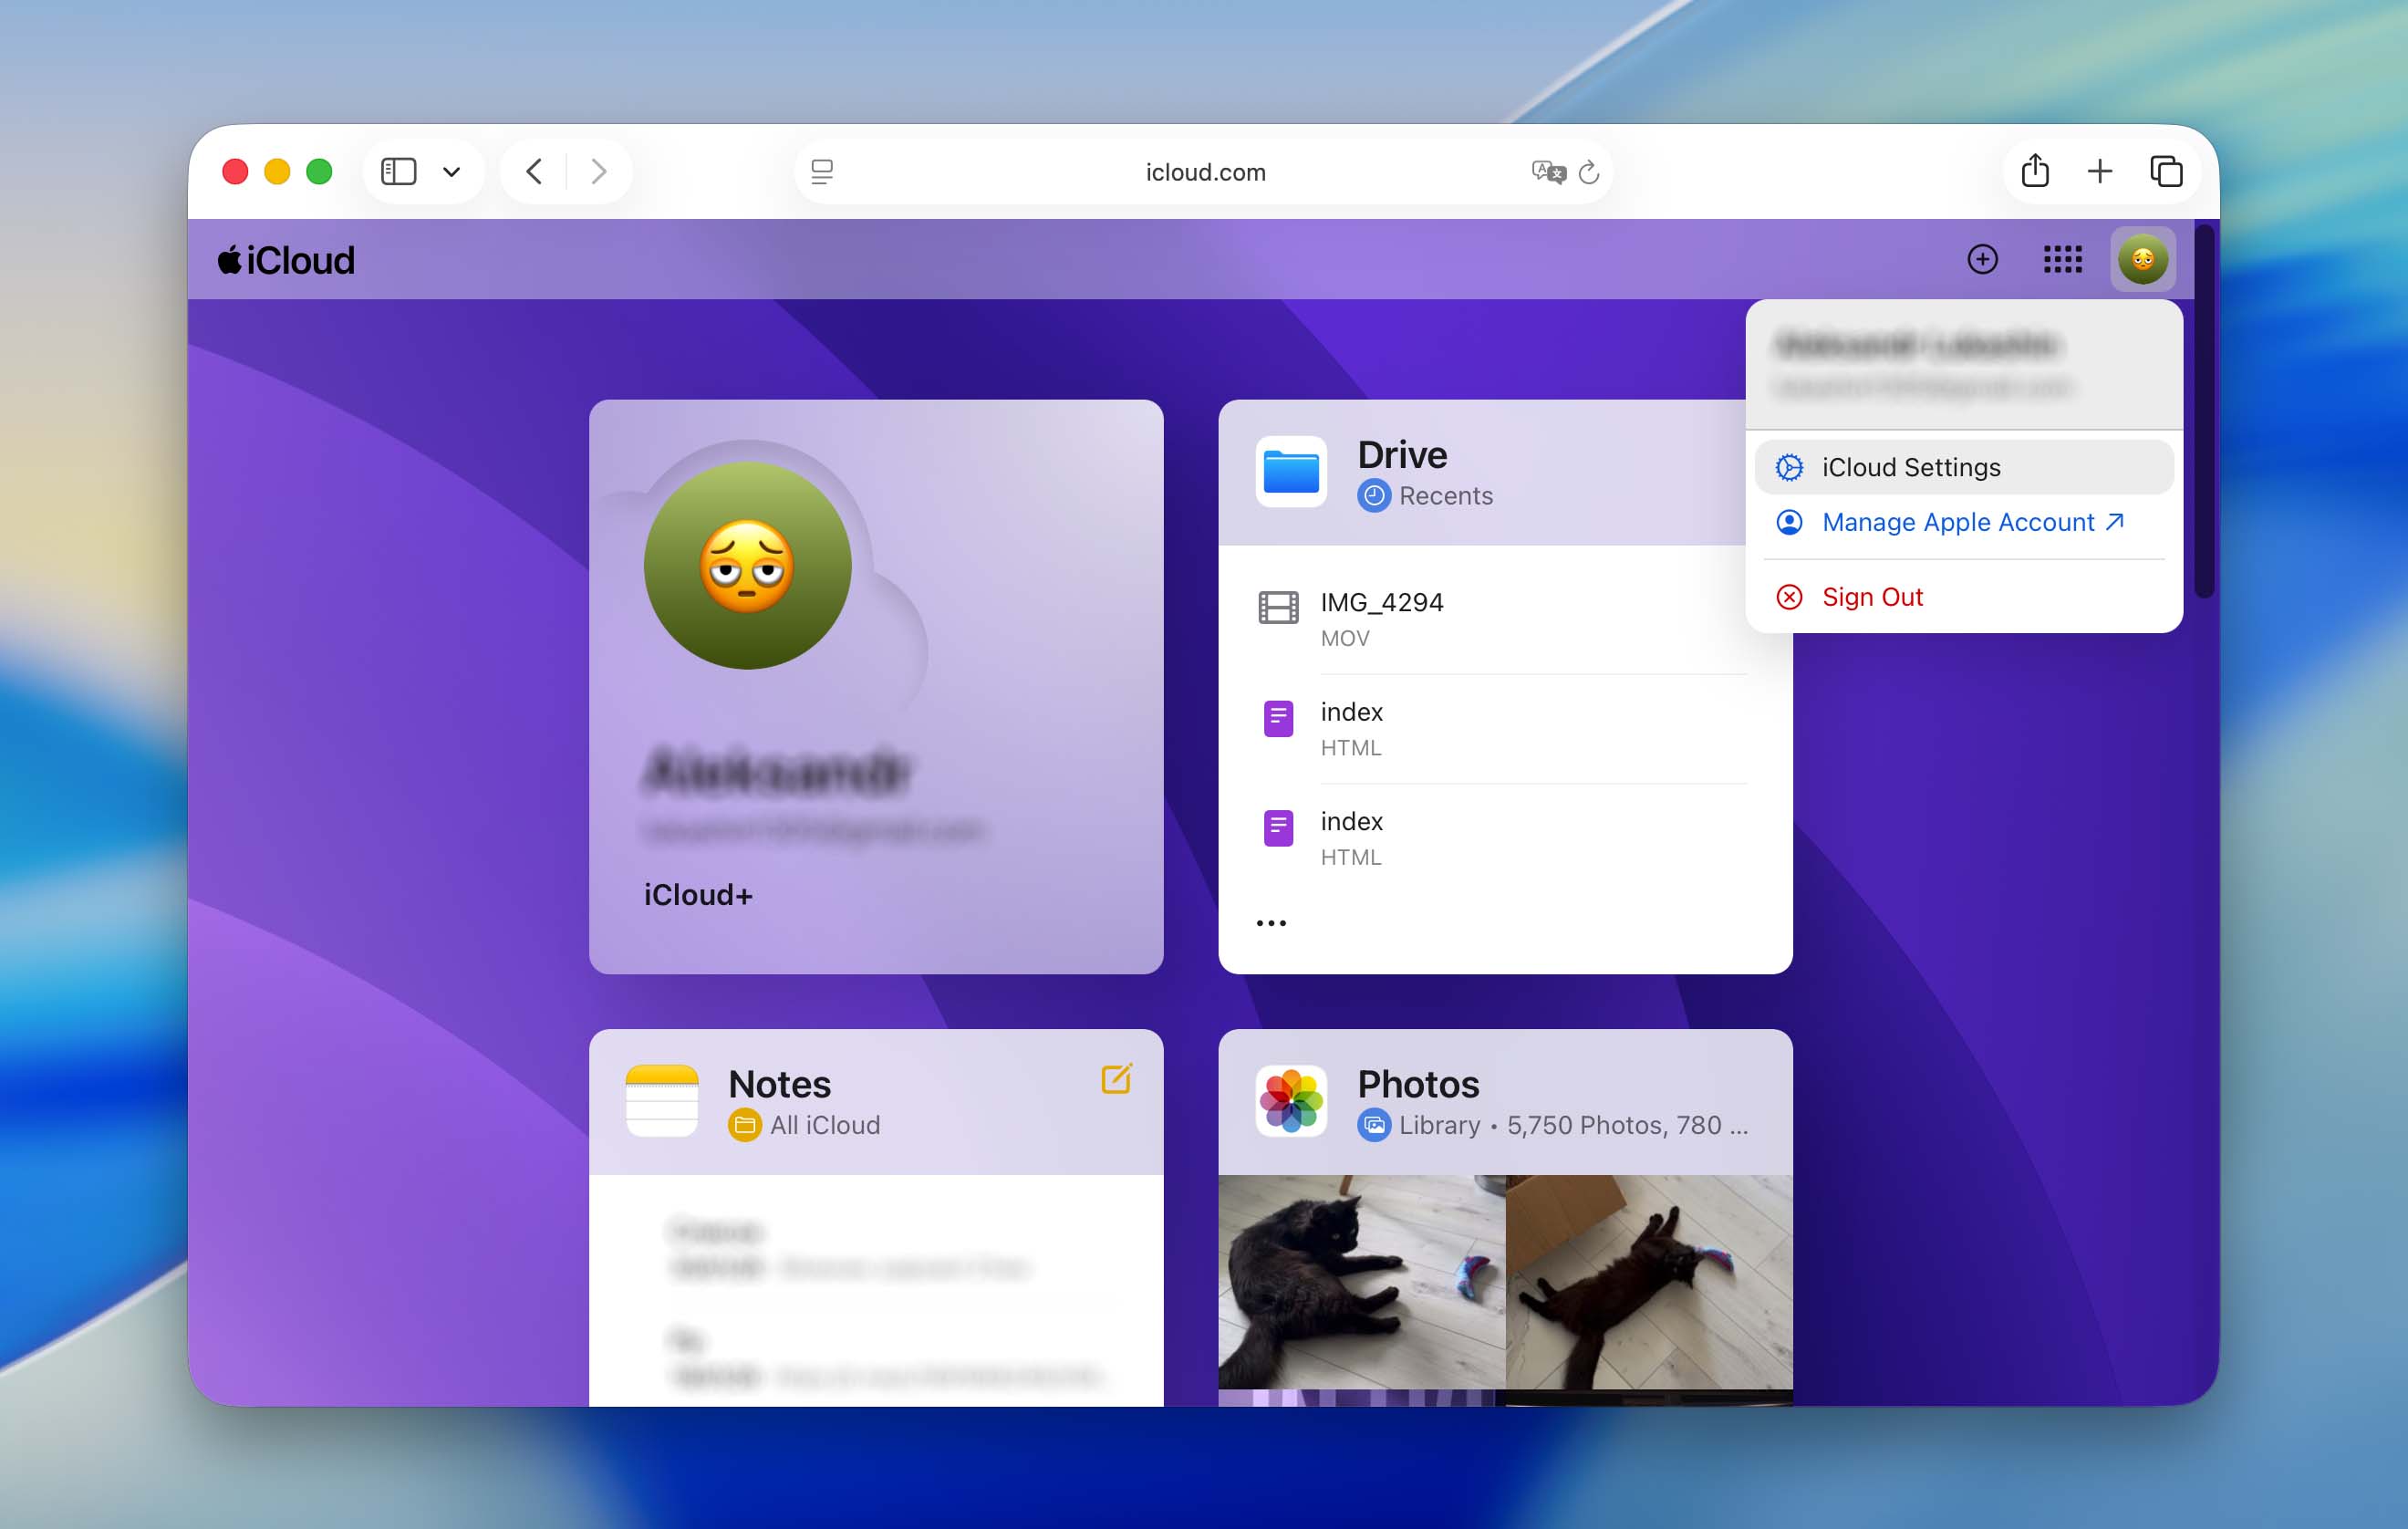
- Click on Account icon > iCloud Settings.
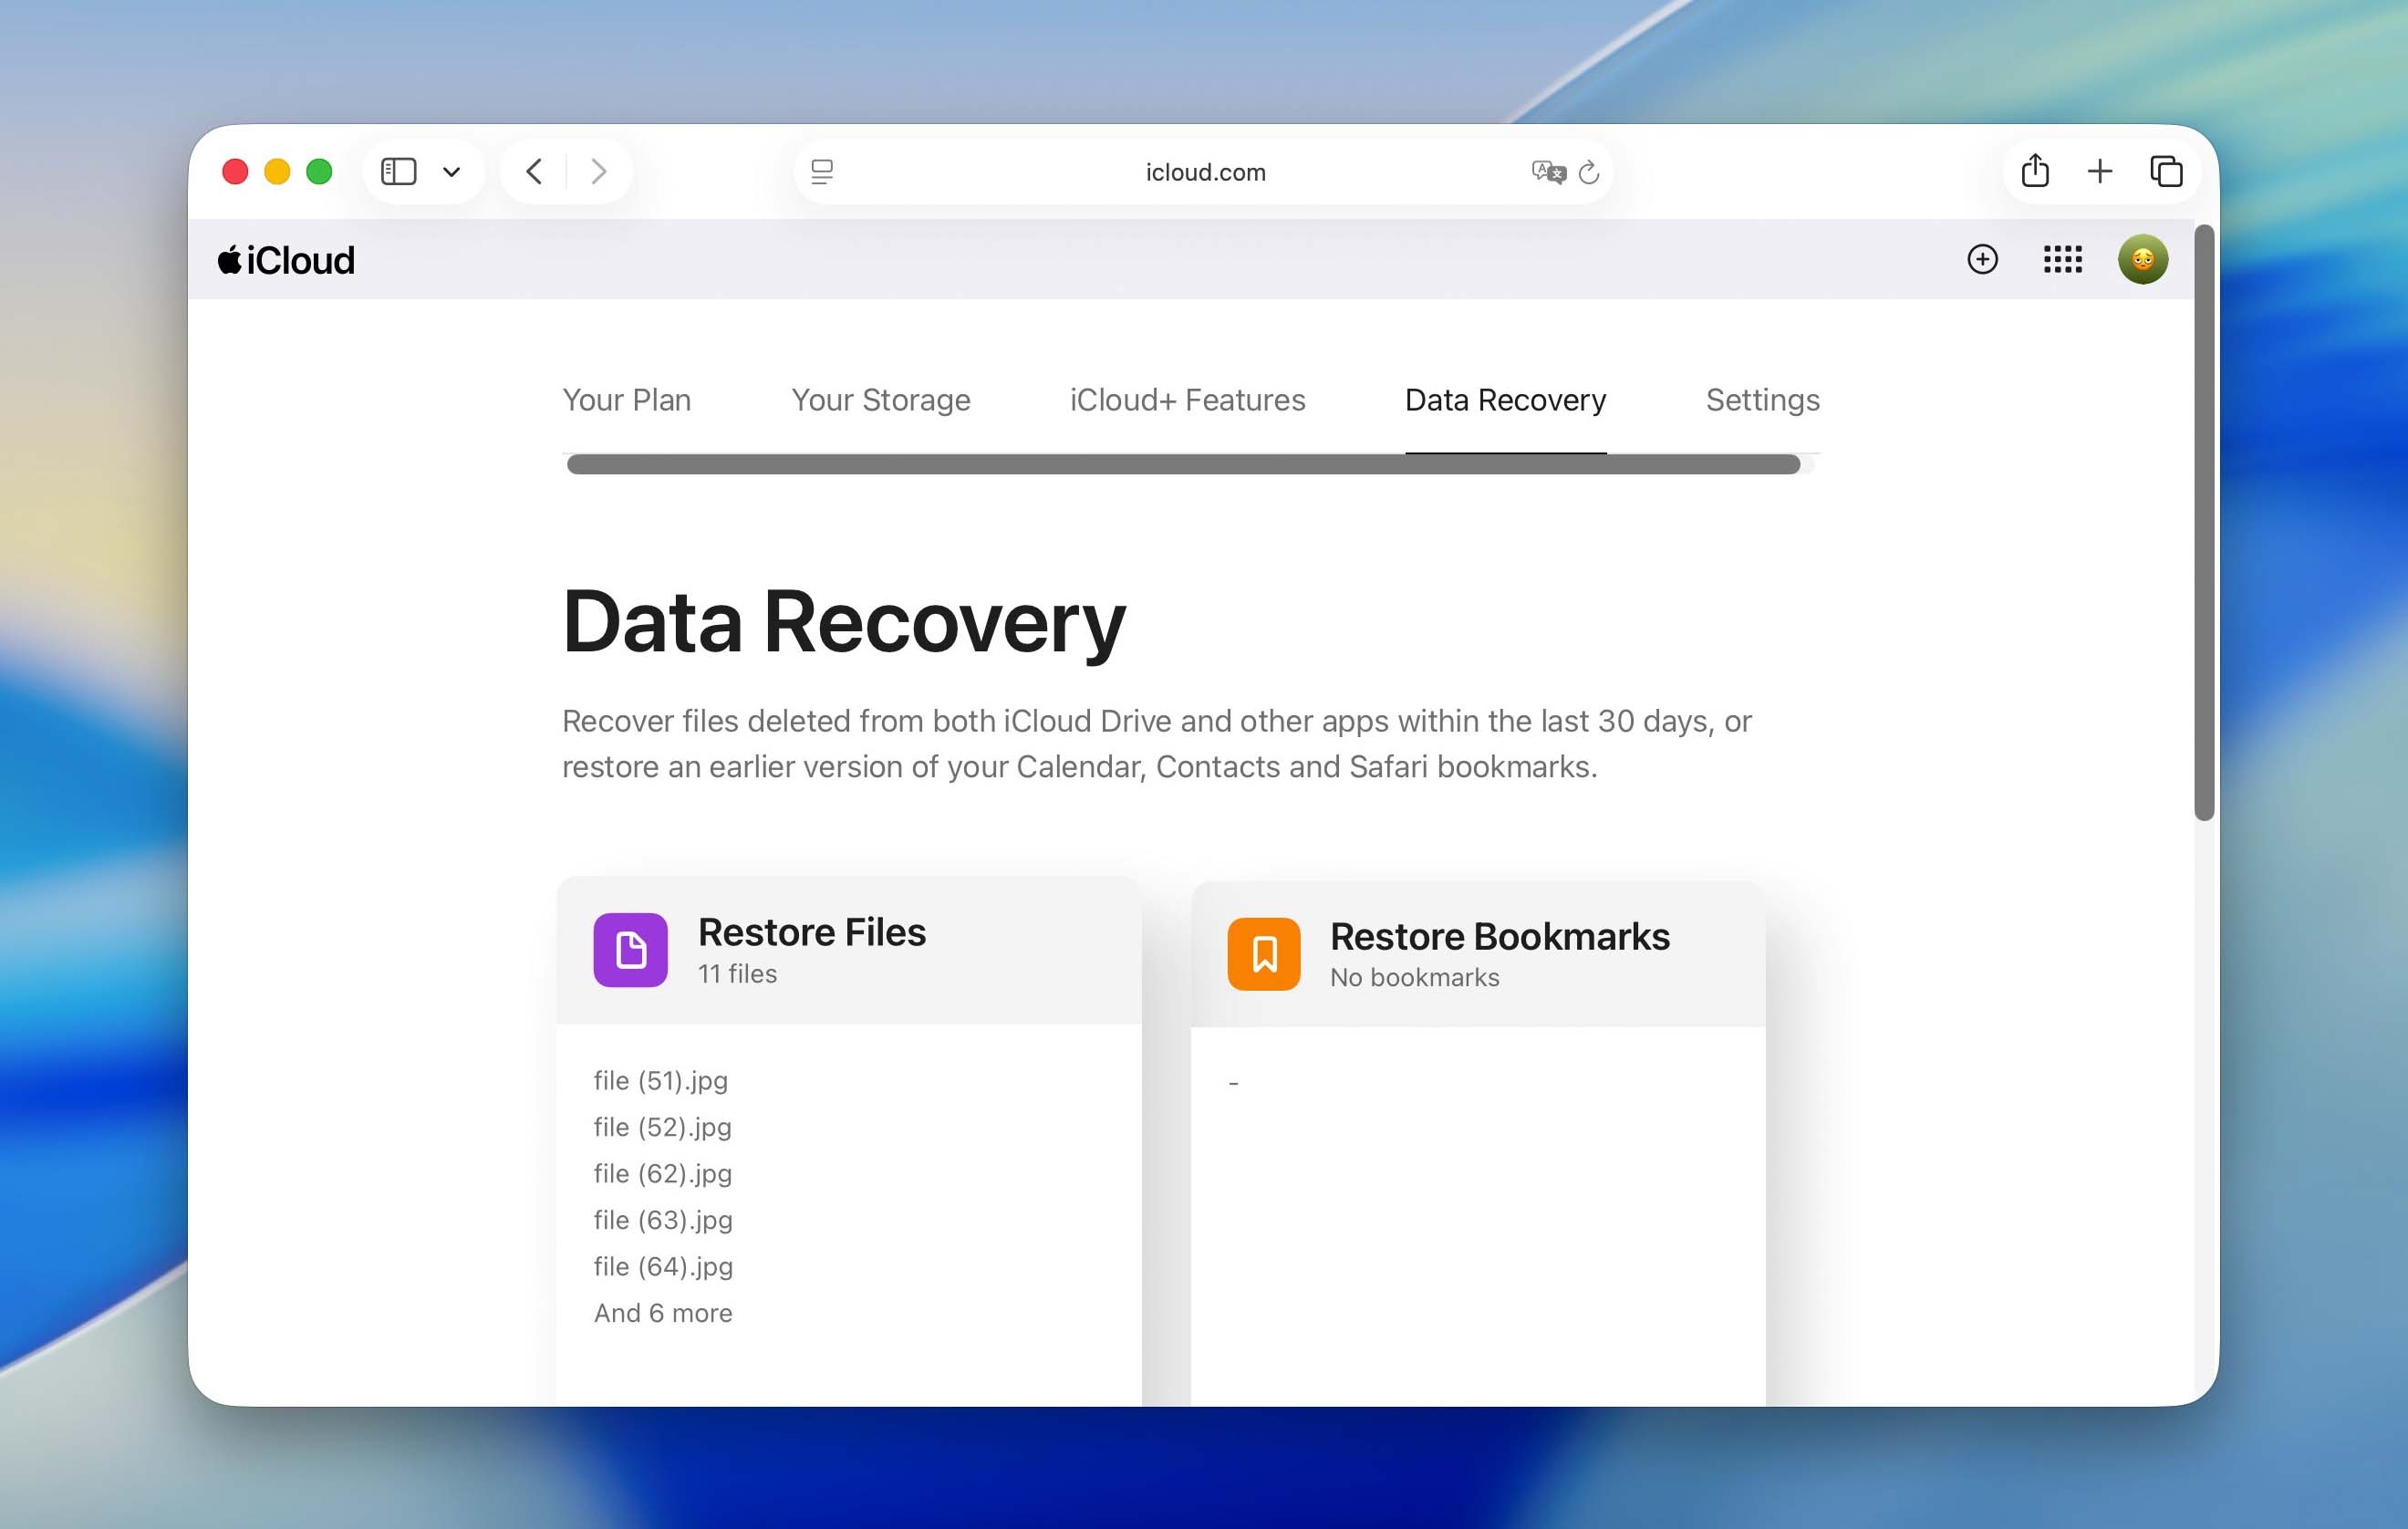
- Click on the Restore Files option, which can be found in the Data Recovery section.
- Find the files you want to recover and denote them by checking the boxes to the left of the file names. Everything can be restored at once by choosing the Select All option.
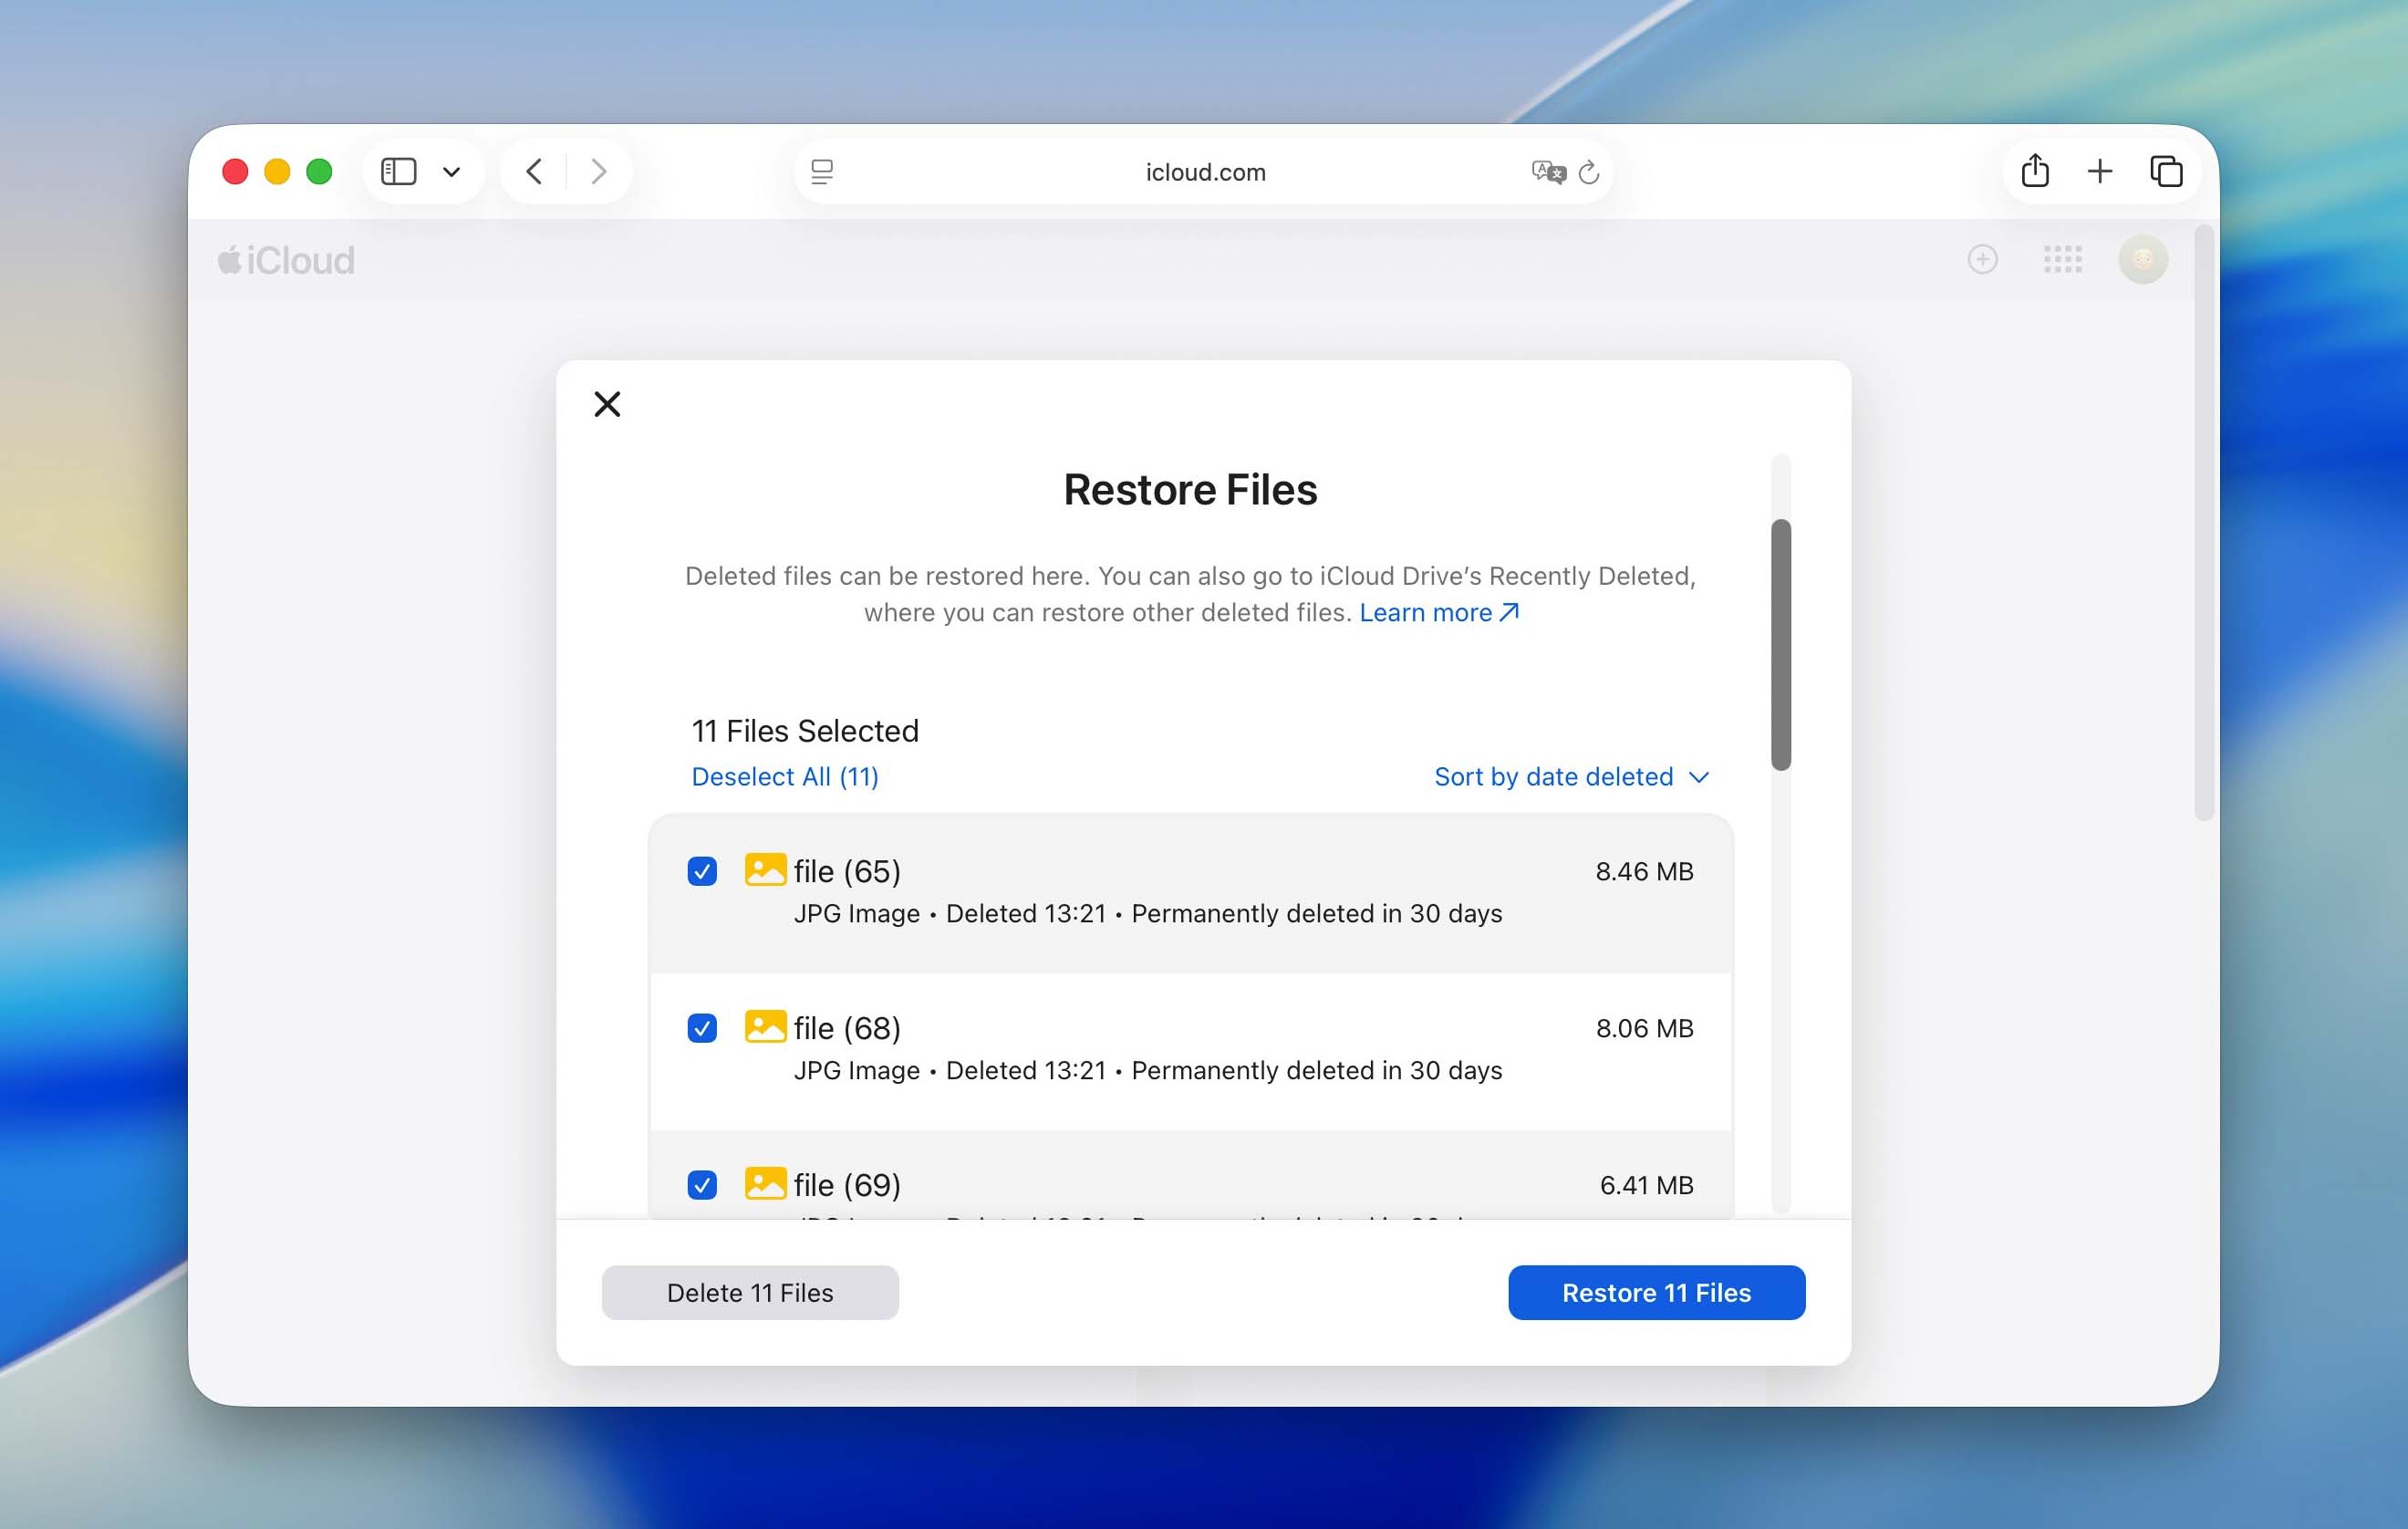
- If your files are still in iCloud (because they were manually uploaded or the deletion hadn’t synced yet), you can simply download them directly. If the files have already been deleted from iCloud, check the Recently Deleted folder, where iCloud keeps removed files for 30 days before permanently erasing them.
Way 3: Check Alternative Recovery Locations
Not every deleted file goes through the Trash. Many built-in macOS apps maintain their own “Recently Deleted” folders, and these can be lifesavers when you’ve lost photos, notes, or other app-specific data. These recovery folders typically hold deleted items for 30 to 40 days before permanently removing them.
Here’s where to look in the most common Apple apps:
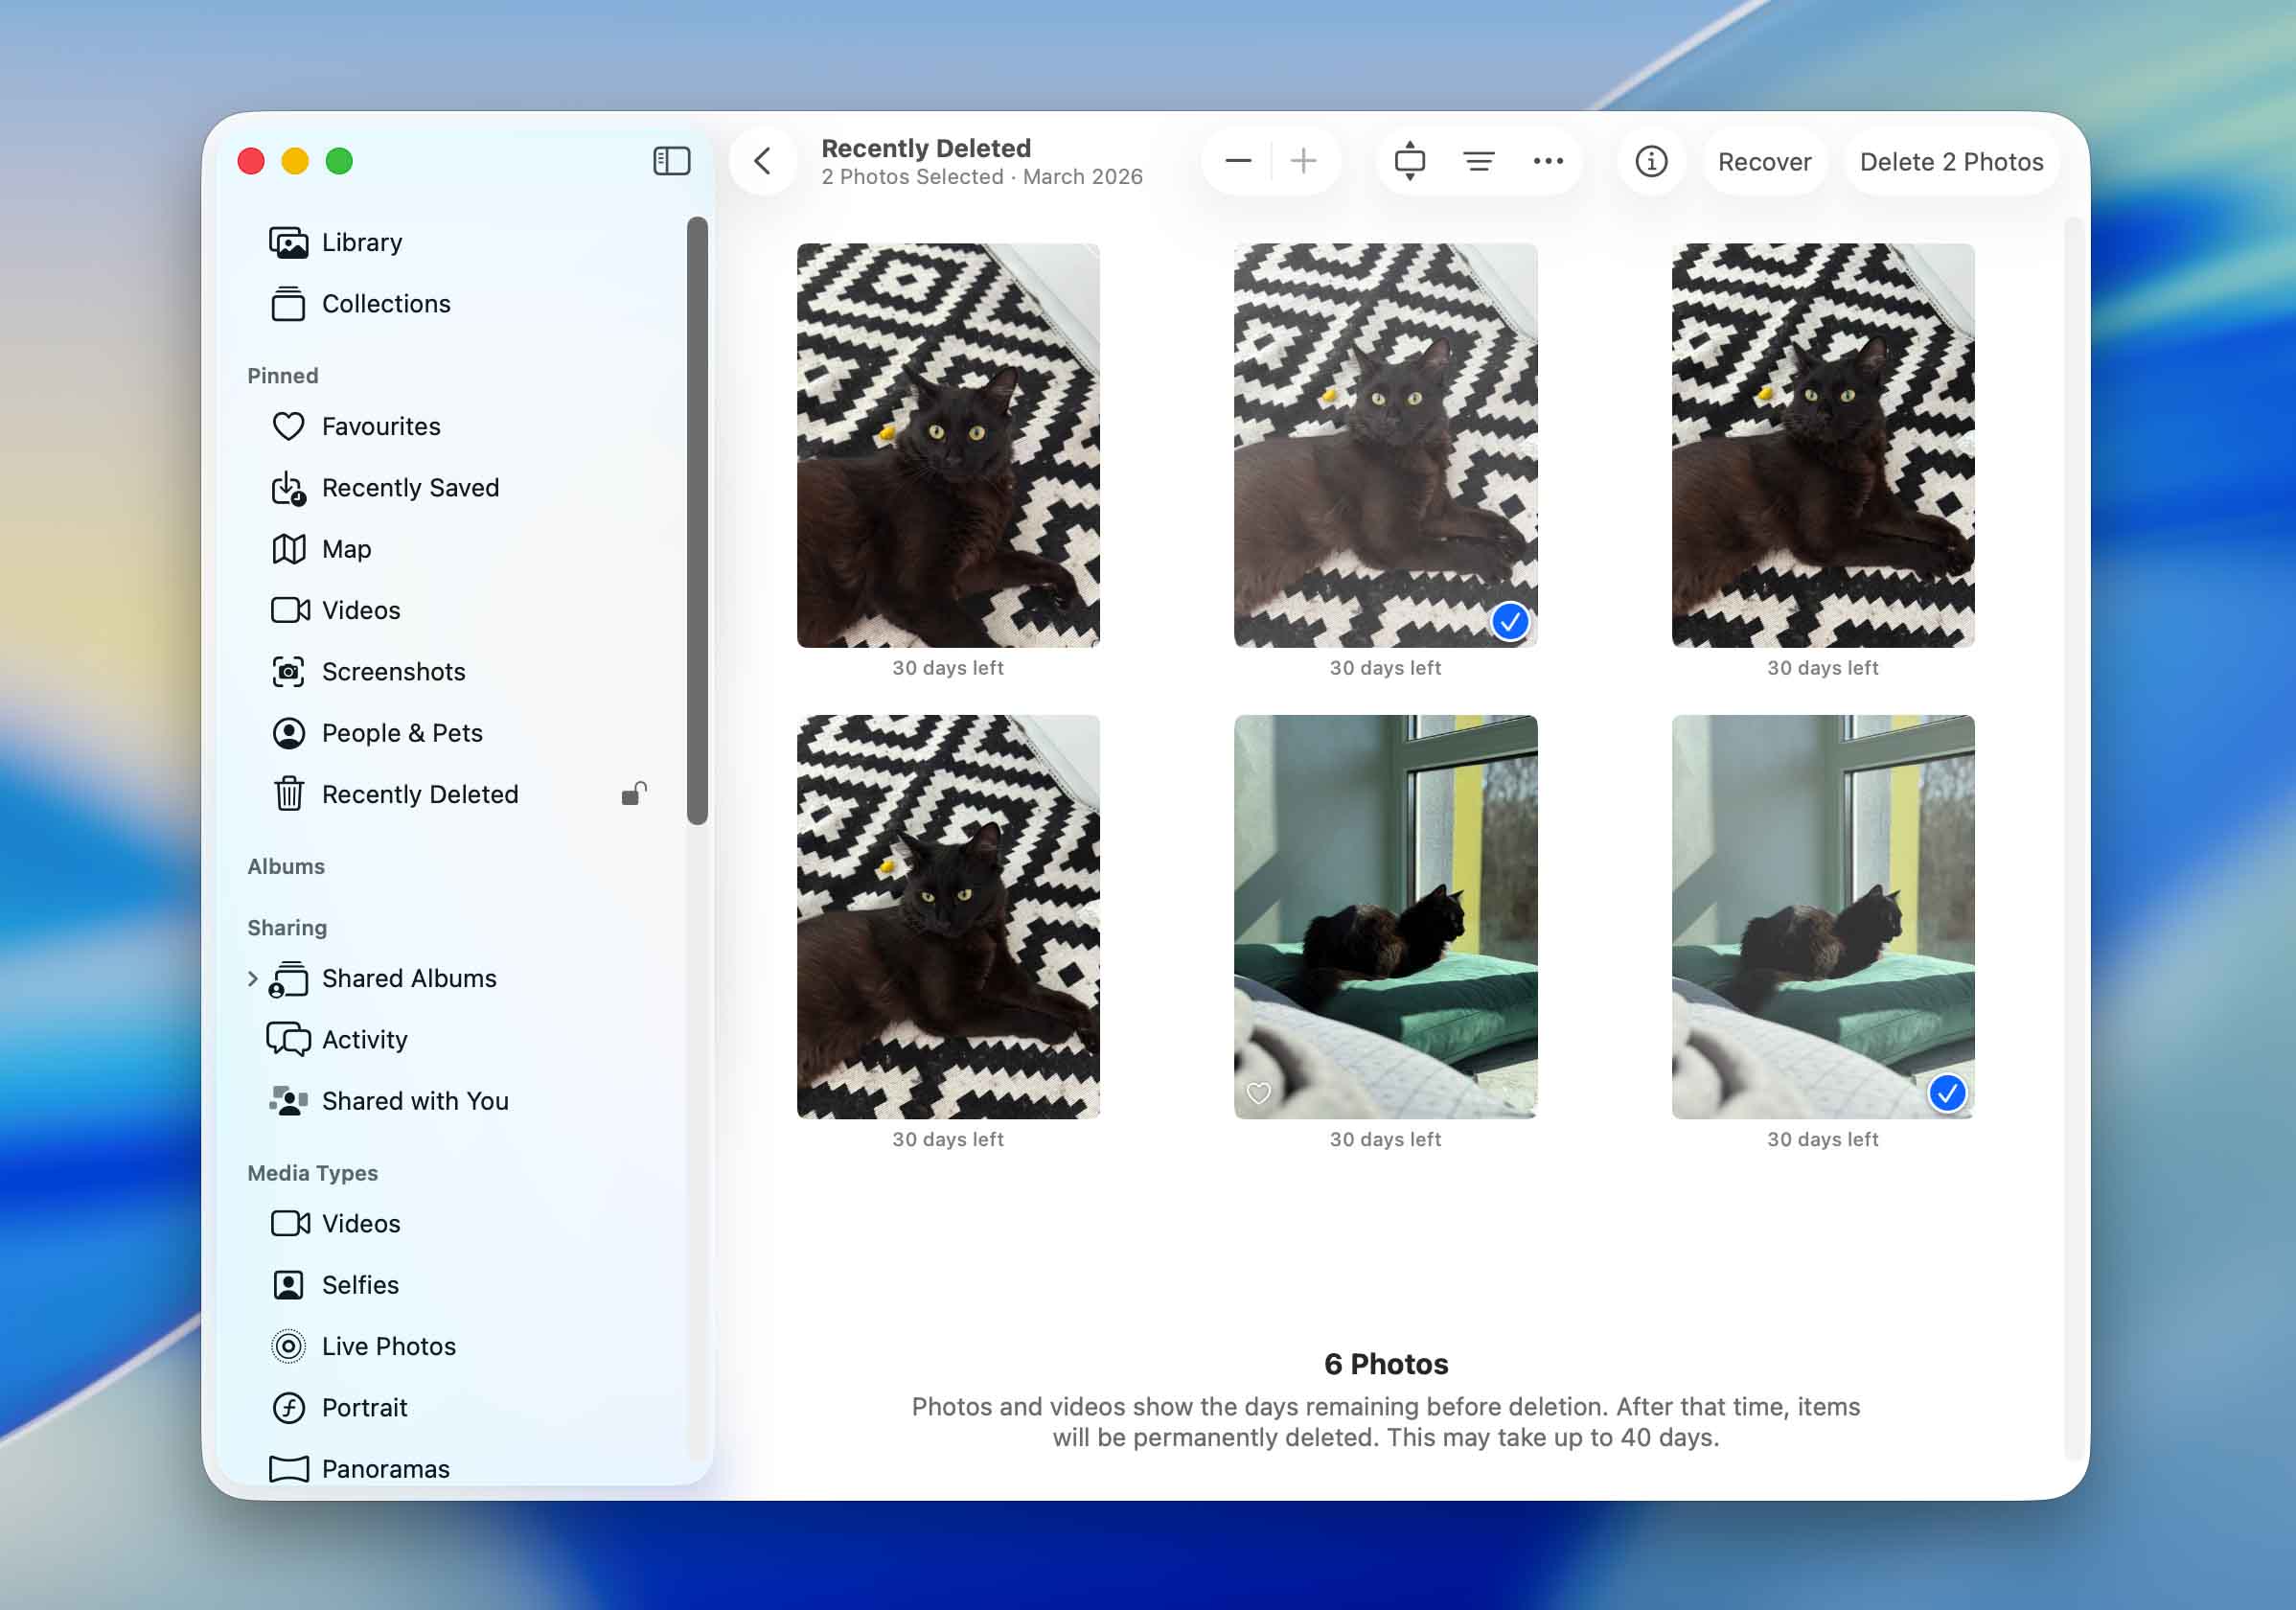
- Photos is probably the most well-known example. When you delete an image or video, it goes to a Recently Deleted album and stays there for up to 40 days. To recover from it, open Photos, click Recently Deleted in the sidebar, select the items you want back, and click Recover. They’ll return to your library right where they were.
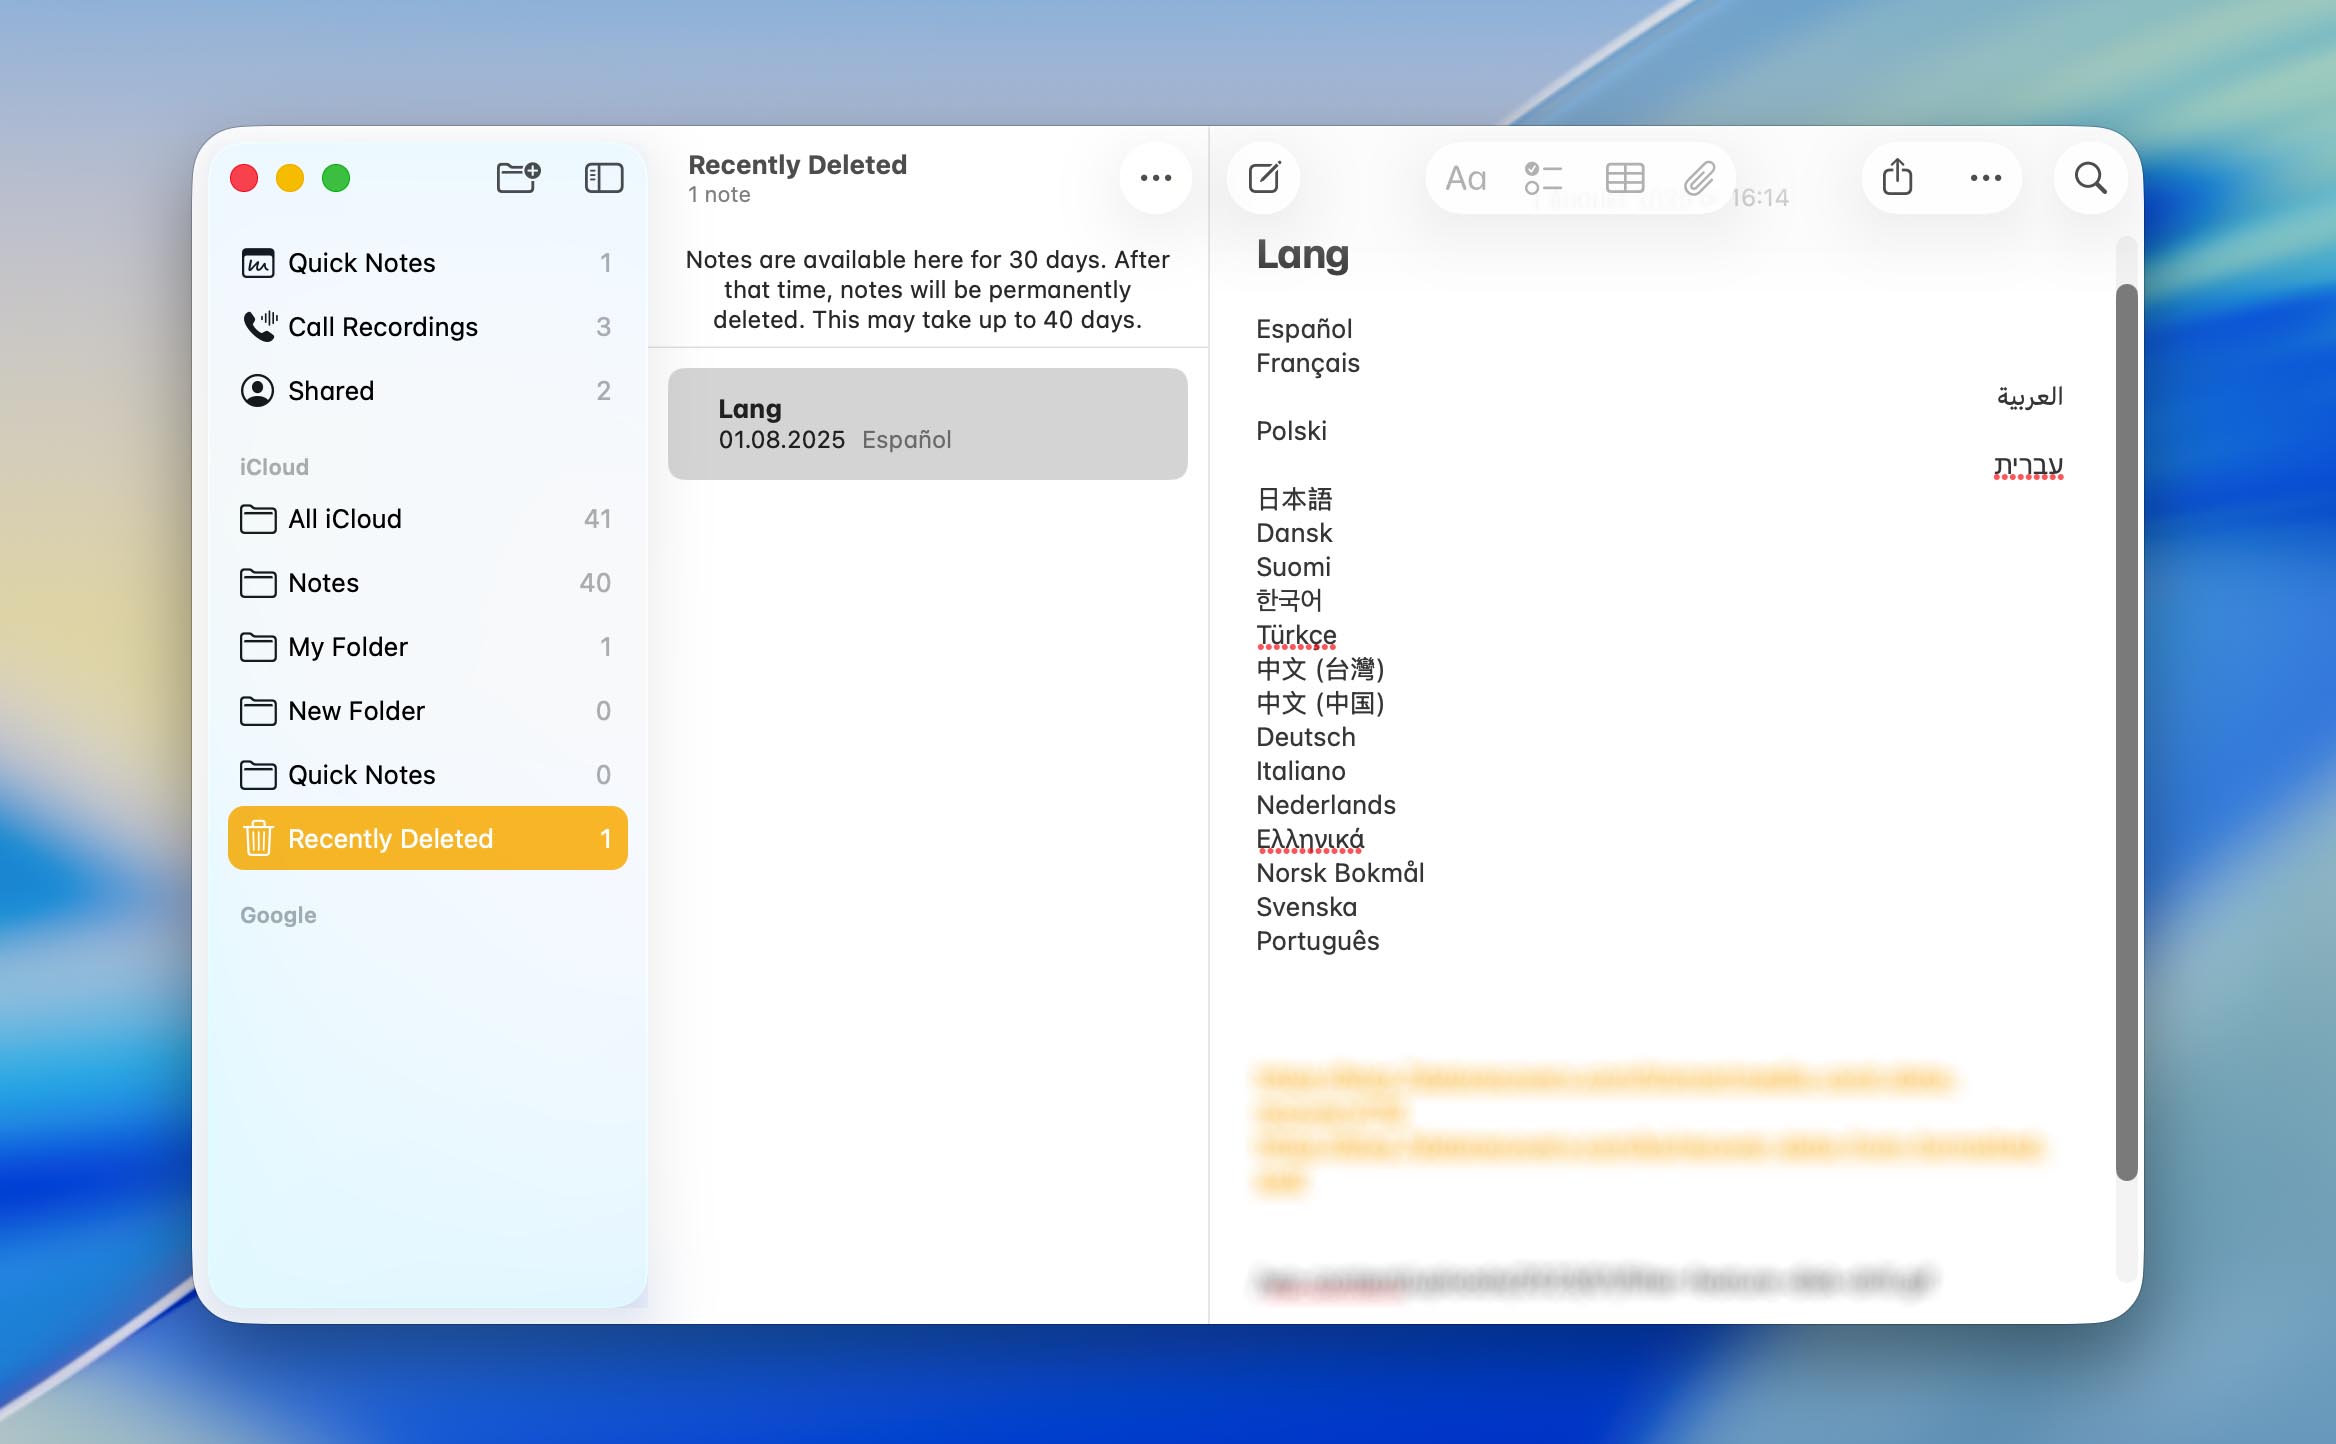
- The Notes app works similarly. Deleted notes land in a Recently Deleted folder within the Notes app, and they stick around for 30 days. Just open Notes, navigate to Recently Deleted in the sidebar, right-click the note you need, and choose Move to send it back to the folder of your choice.
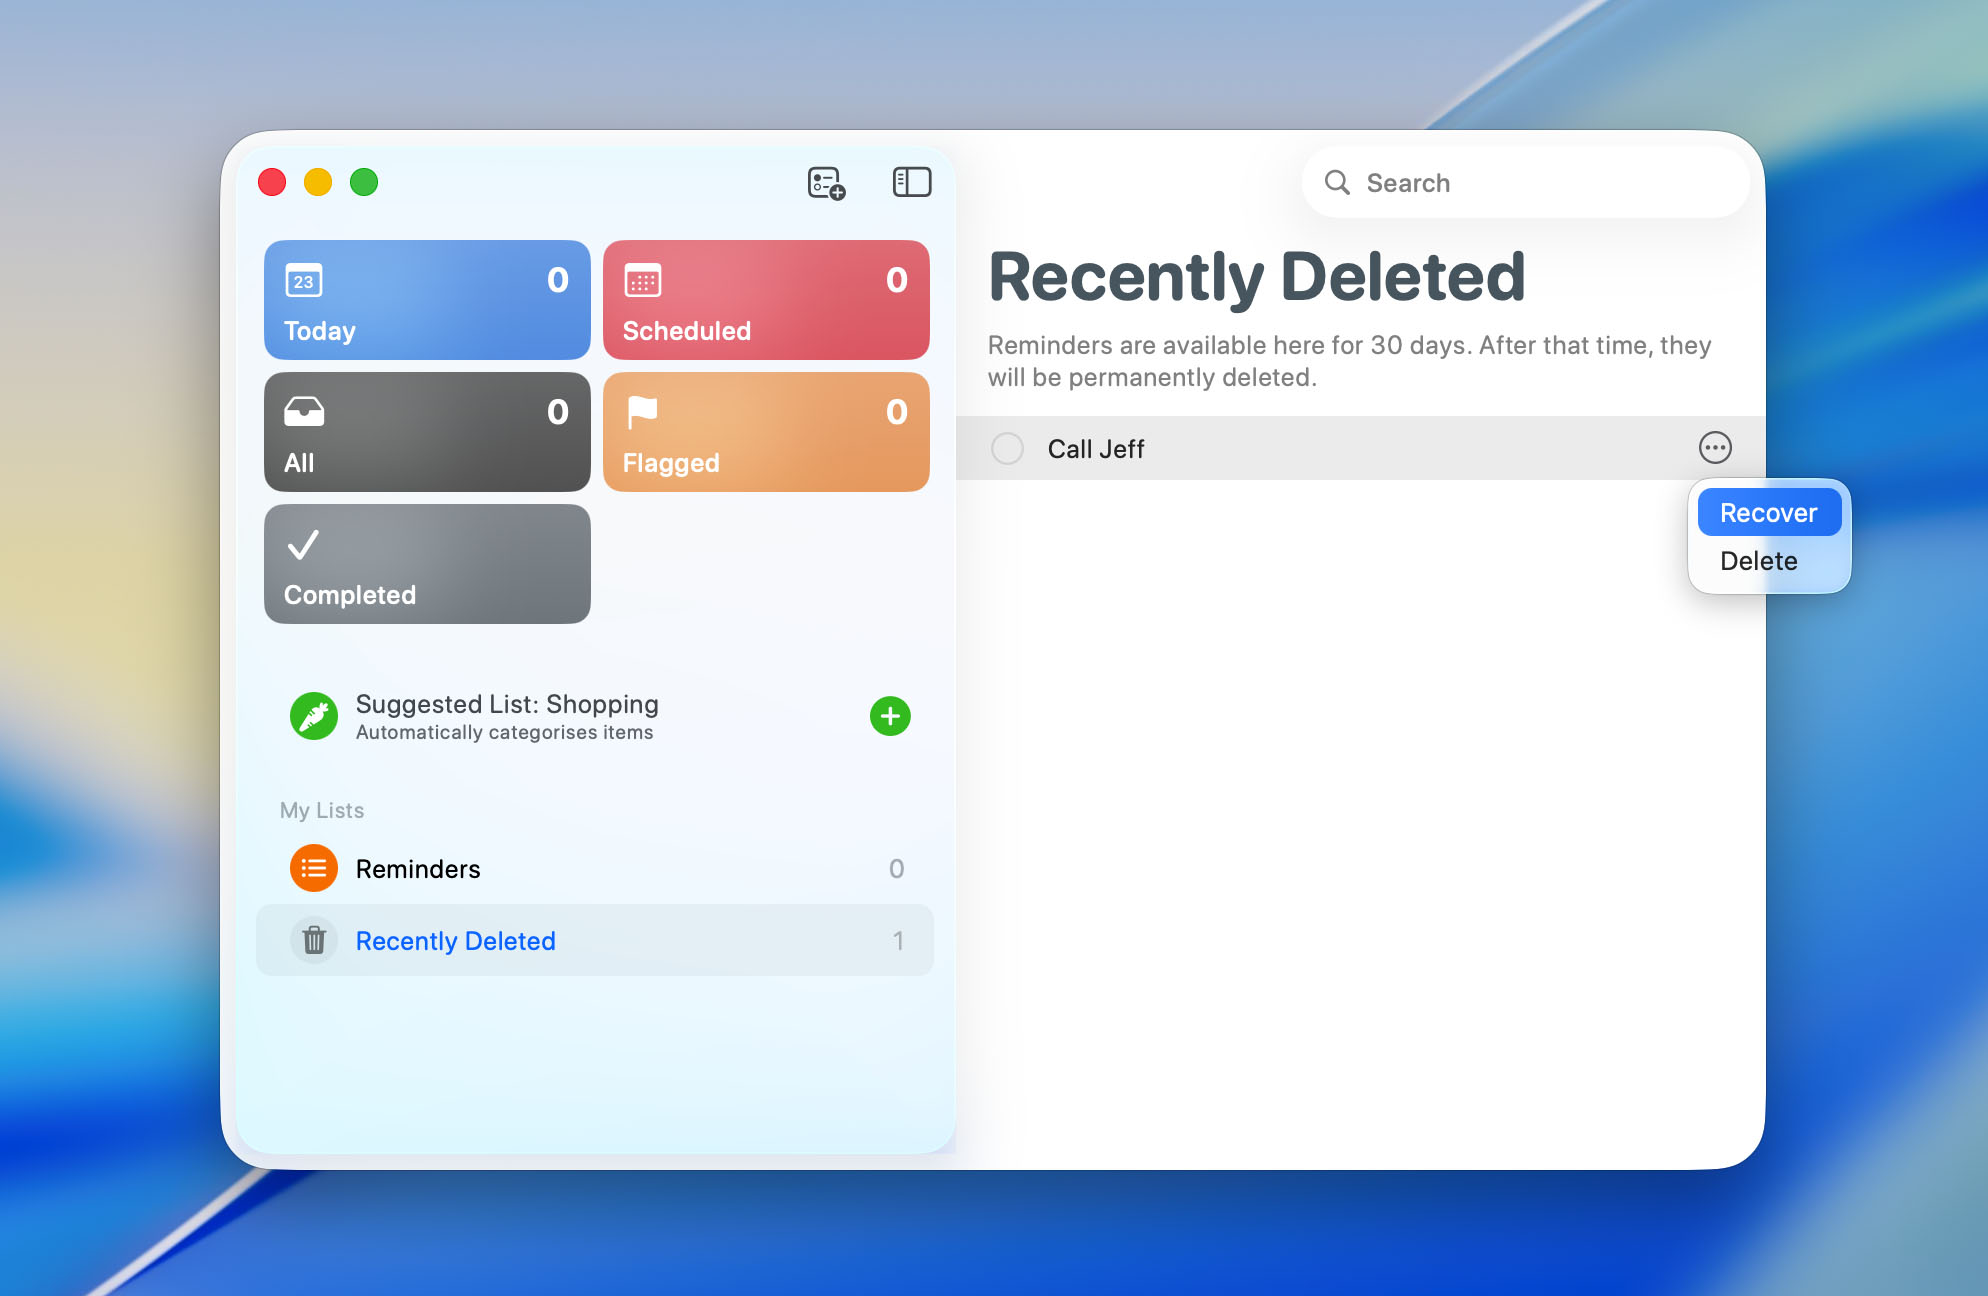
- The same general pattern applies across other Apple apps. Reminders, Voice Memos, and Messages all have their own recently deleted or recovery mechanisms, though the specifics vary slightly. In most cases, you’ll find a “Recently Deleted” section within the app’s interface.
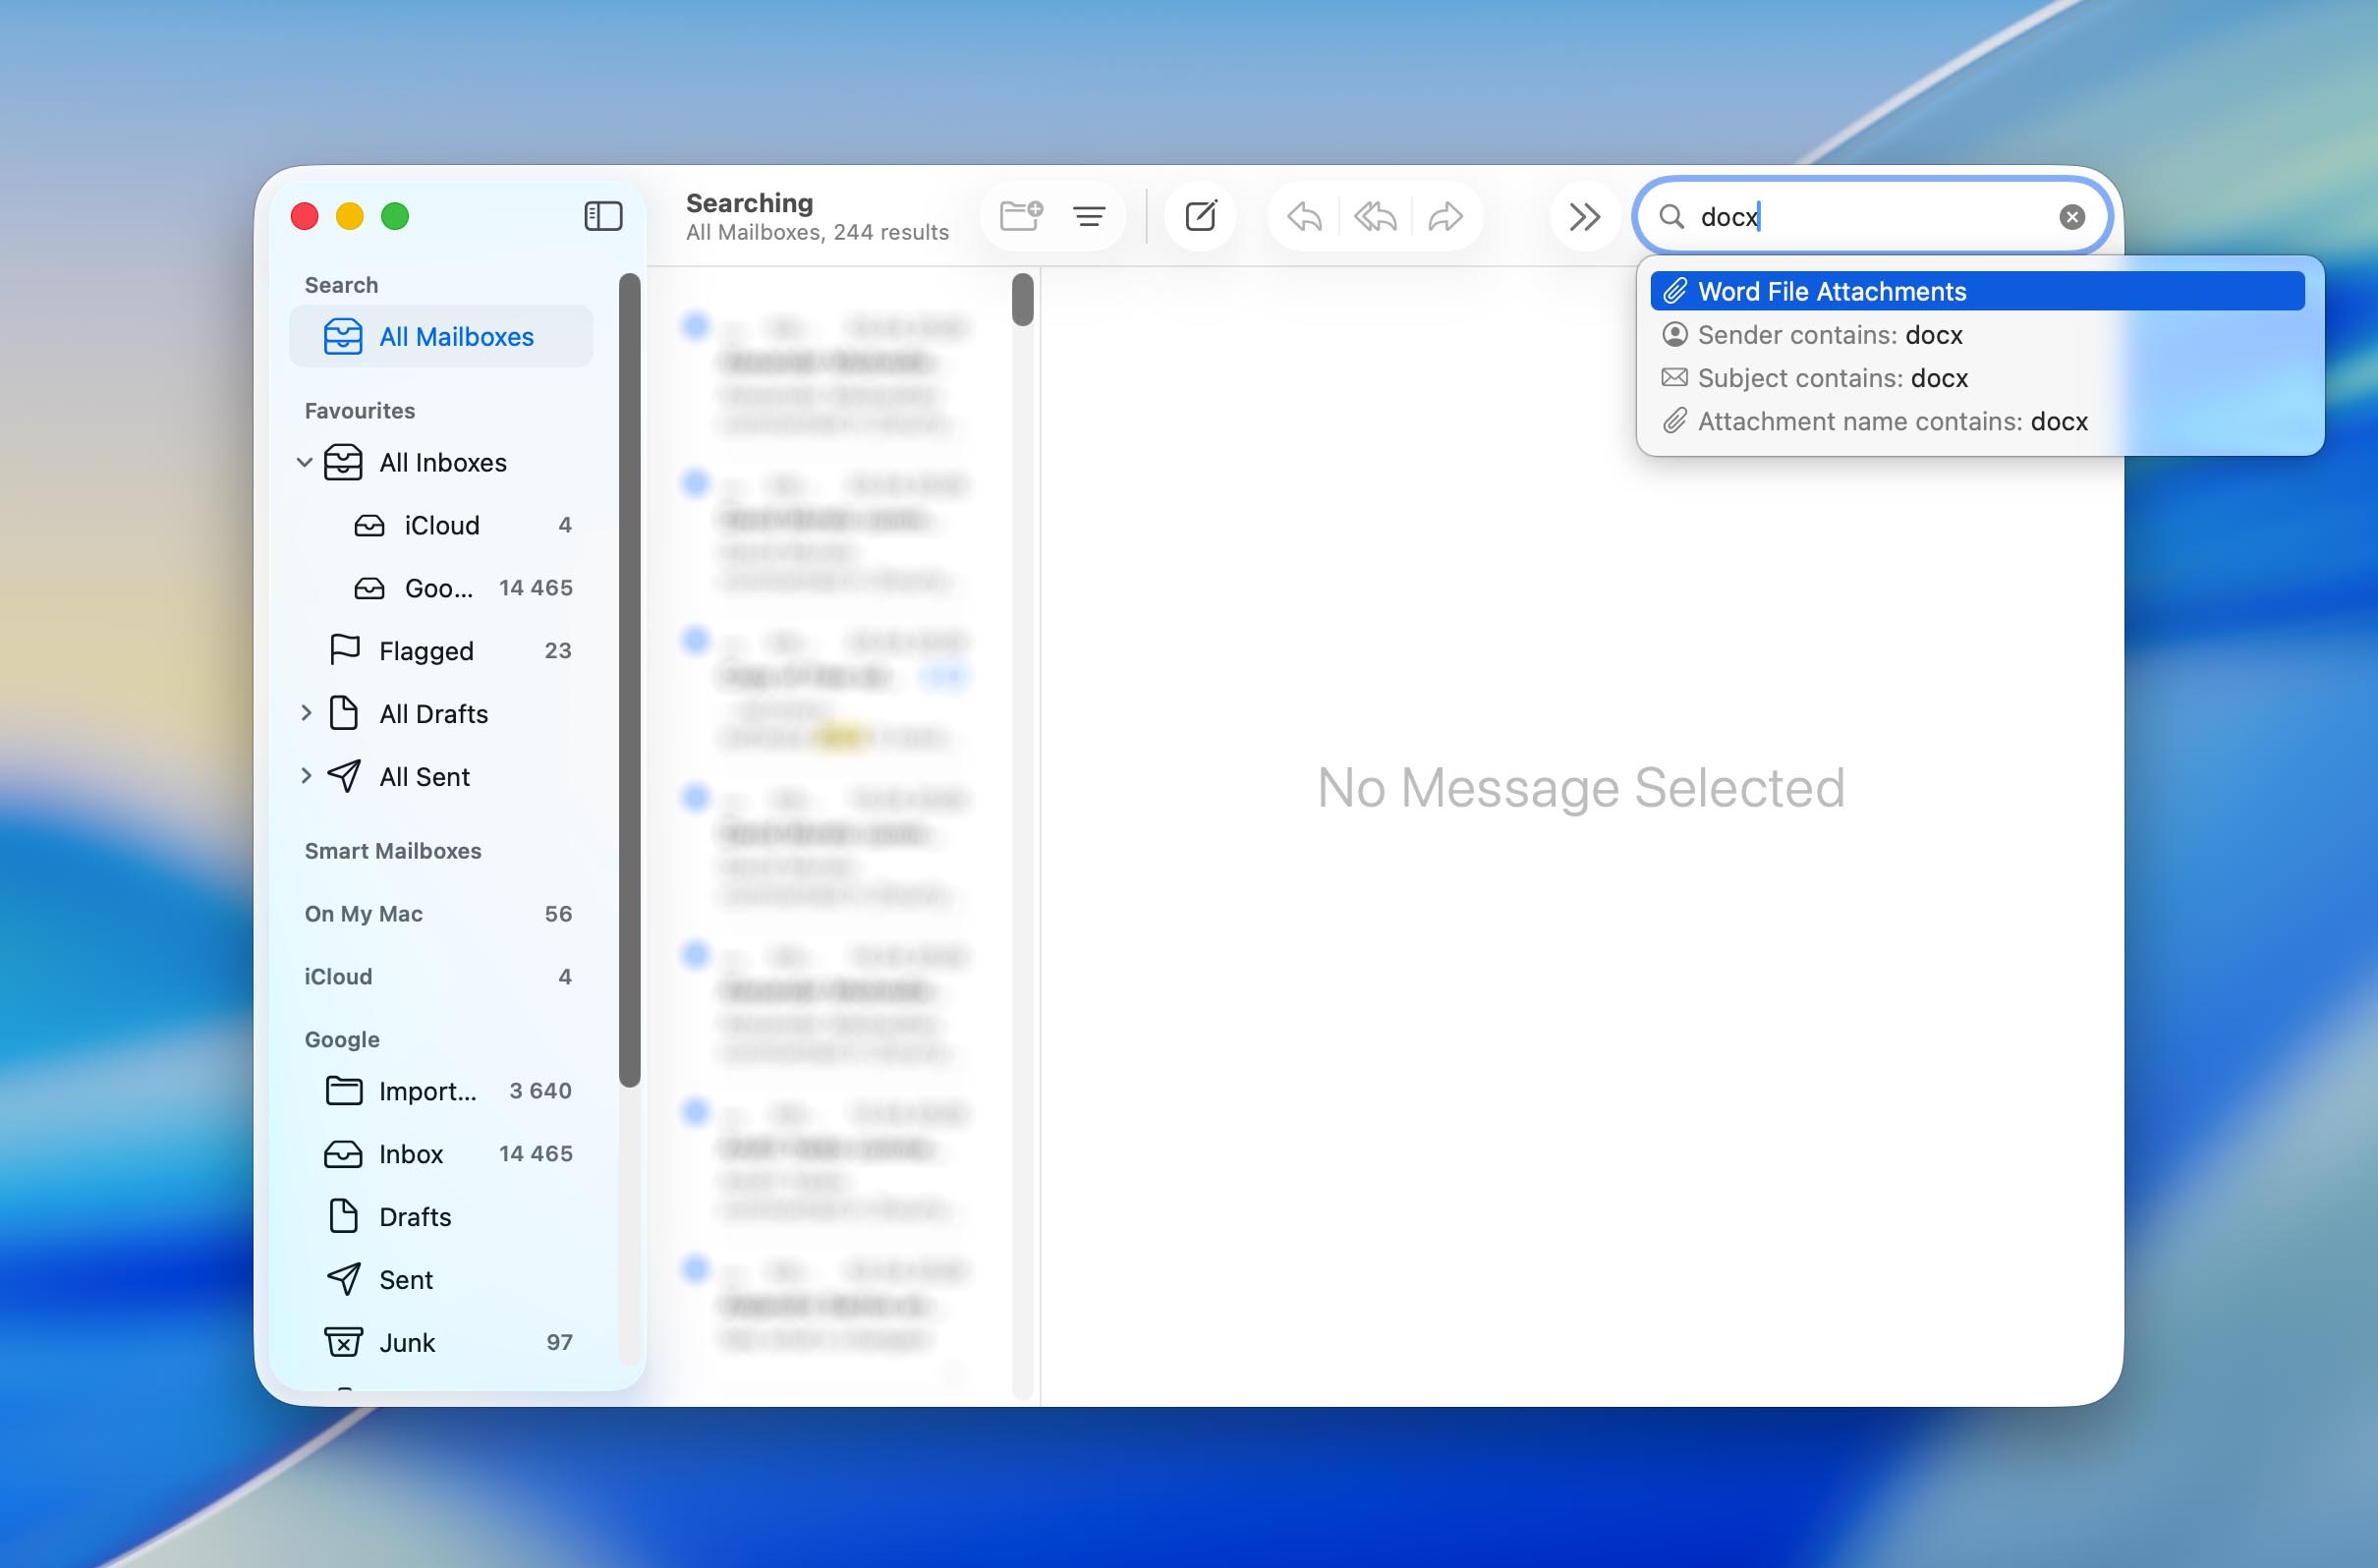
- If you’ve shared important files as email attachments in the Mail app, those attachments still live in your sent or received messages. Searching your mailbox for the file name or the recipient’s address can turn up copies of files you thought were gone for good. Mail also has its own Trash folder that holds deleted messages for a period before permanent removal.
Way 4: Restore with Other Backup and Recovery Solutions
Beyond Time Machine and iCloud, other backup and recovery solutions, both offline (like external drives) and online (such as Google Drive or Dropbox), can help you recover files from emptied Trash on your Mac.
While each non-Apple cloud backup solution is slightly different, the recovery process follows a general outline. For cloud services, synchronization plays a role: files synced in real-time may vanish from the cloud if deleted locally unless preserved in a trash folder or version history, but manually uploaded files are unaffected by sync.
One advantage of third-party services like Dropbox and Google Drive over iCloud Drive is that they don’t sync the Trash-emptying action. So if you empty the Trash on your Mac, iCloud Drive will reflect that deletion, but Dropbox and Google Drive will typically still have the files in their own trash or version history for the standard retention period.
Here’s how recovery from Dropbox looks for Mac users:
- Visit dropbox.com and sign in with your account credentials.
- Locate your missing files. On the left sidebar, you can click Deleted files to view items removed within the last 30 days (or longer with premium plans).
- Check the boxes next to the files or folders you want to recover and then click Download or Restore, depending on if you’re recovering existing or deleted files.

Method 3: Restore Data from an Emptied Trash with the Assistance of a Professional Data Recovery Service

When all other methods fail to recover files deleted from Recycle Bin Mac, professional data recovery services offer a final solution. While this is the most expensive option, professional services may be your only recourse for recovering highly important data in complex situations where it’s impossible to undo empty Trash on Mac using software or built-in tools.
The situations where professional data recovery services are most valuable include:
- Physical damage to your storage device.
- Severely corrupted file systems.
- Encrypted drives with FileVault.
- Recovery attempts that failed with software solutions.
- Apple Silicon (M1-M5) or T2 chip security complications.
We recommend you pick an Apple Authorized Service Provider whenever possible, as they have met Apple’s standards for quality and security. You should also verify that the service is equipped to handle your specific Mac model and storage device, such as:
- Devices: MacBook, MacBook Air, MacBook Pro, iMac, iMac Pro, Mac Pro, Mac mini, Mac Studio, Mac Pro Tower
- Storage types: Hard disk drives (HDD), Solid-state drives (SSD), Fusion drives, NAND flash memory, External storage devices, USB flash drives
- File systems: HFS (Hierarchical File System), HFS+ (HFS Plus), APFS (Apple File System), FAT32, exFAT, NTFS (for Windows external drives).
Once you’ve decided on a reputable service (CleverFiles is a great choice), you need to contact them for an initial estimate and shipping details. After reaching out via their website or phone, ship your device to their facility following their instructions. Upon arrival, their technicians will assess the device and provide a detailed recovery quote. Once you approve the cost, they’ll use advanced tools to recover files from emptied Trash on your Mac.
Lesson Learned: Data Backups Are Important
An emptied Trash on your MacBook Pro or MacBook Air is just one misstep away from disaster. As this article shows, recovering deleted files is always easiest when you have backups ready to go. Alarmingly, only 33% back up their data regularly, and a shocking 63% of respondents confuse syncing with cloud storage for actual backup, according to a Handy Recovery Advisor survey of 1,000 U.S. users. A follow-up survey from the same team found that 71% of Americans have experienced data loss at least once, with accidental deletion (34%) and hardware failure (30%) being the top causes.
If you had to rely on recovery software like Disk Drill to get your files back this time, treat it as a wake-up call. Here’s how to protect yourself going forward. First, consider implementing the 3-2-1 backup rule: keep three copies of all important data on two different storage types, with one copy stored off-site (cloud storage works great for this).
Second, make sure Time Machine is running with a dedicated external drive. And third, take advantage of Disk Drill’s built-in protection features. Recovery Vault keeps a record of deleted file metadata so that files can be recovered with their original names and folder structure intact, while Guaranteed Recovery saves a full copy of every file you send to the Trash. Both features are free and can mean the difference between a quick restore and a stressful recovery process.
FAQ
Yes, it’s possible to recover files from an emptied Trash on a Mac with an SSD, but it’s significantly more challenging than with traditional hard drives due to the TRIM function. When files are deleted from an SSD, the TRIM command quickly marks those blocks as available for use, often making them unrecoverable within minutes or hours. The only solution is to be fast enough and keep the drive disconnected (or your computer turned off) until you’re ready to begin the recovery process. That said, your most reliable option for SSD recovery is restoring from a Time Machine or iCloud backup, since those copies aren’t affected by TRIM at all.
Apple Silicon (M1 through M5) and T2 security chips introduce hardware-level encryption and secure boot processes that restrict low-level access to storage devices, both of which complicate file recovery. When recovering files from Macs with these chips, you’ll need specialized recovery software that supports system extensions and kernel extensions to access protected areas of the drive, such as Disk Drill. It’s also worth noting that newer Macs exclusively ship with internal SSDs, which means TRIM will likely wipe deleted data before any recovery tool can reach it. For this reason, backups (Time Machine, iCloud, or any other backup solution) are by far the most dependable way to recover lost files on these machines.
Yes, FileVault encryption significantly complicates the recovery of deleted files after emptying the Trash. When FileVault is enabled, all data on your drive is encrypted, and deleted file recovery becomes nearly impossible without access to the encryption keys. Recovery software like Disk Drill can only work if you have the password to decrypt the drive.
Unfortunately, macOS doesn’t offer built-in utilities specifically designed to recover files after emptying the Trash. While Terminal commands like mdfind can help locate files still present on the system, they can’t recover completely deleted files. The closest built-in option is using Time Machine’s local snapshots, which are created automatically and are accessible through the Time Machine interface even without an external backup drive connected.
Undeleting files from Trash to their original locations is easy. Open Trash on your Mac, select the files you want to undelete, right-click on the item, and click the Put Back option to restore files.
Each Mac external drive has its own hidden Trash folder, and you can access it by navigating to the .Trashes folder on the external drive. Open Finder, choose Go to Folder from the Finder’s Go menu, and enter .Trashes as the path.
On Mac computers, the Recycle Bin is called Trash, and you should be able to find it at the right end of the Dock. You can also open it from Terminal by issuing the following command: open .trash