


If you’re like me, your iPhone’s photo library probably resembles a digital junk drawer – pictures of friends and family mixed with random screenshots and saved memes. Not only is an unorganized photo library a pain to use, but it also takes up an unnecessarily large amount of storage space. If you’ve had enough and want to learn how to mass delete photos from your iPhone, I’ll walk you through five proven methods to get it done.
Is There a Way to Delete Multiple Photos on an iPhone at Once?
The only problem is that Apple has kept things nice and simple, so the native features are objectively limited when dealing with large photo collections, lacking truly efficient methods to delete a lot of photos at once on iPhone when you’re trying to clear significant space or organize your way out of a terrible mess.
While numerous changes and improvements to the Photos app have been introduced in iOS 16, iOS 17, iOS 18, and now iOS 26, the core photo management functionality still hasn’t changed dramatically in this regard. This is why I’ve compiled several alternative approaches to help you reclaim storage space more efficiently and tested them on iPhone 15, iPhone 16, and iPhone 17 models (they should also work perfectly fine on any modern iPad):
- The native Photos app selection tool
- Third-party apps designed specifically for photo management ✨
- Custom Shortcuts to automate deletion of specific types of photos
- iCloud and sync options to delete multiple pictures on iPhone but manage them elsewhere
- Mass deleting photos from iPhone on a computer
Each method has its own advantages depending on your specific needs, so it’s best to familiarize yourself with all of them so that you can combine them when cleaning junk image (and other) files.
How to Delete Multiple Pictures on iPhone
Now let’s explore the practical methods to clean up your iPhone photo library. This section will offer step-by-step instructions for each approach, making it easy for you to put it to put them all to good use on your own device.
Method 1: Delete Photos Manually from the Photos App
The most straightforward way to delete multiple photos at once on an iPhone is by using the built-in Photos app. I’ve been using this method ever since I became an iPhone user (how long ago was that?), and while it isn’t the most efficient for massive libraries, it’s perfect for regular maintenance.
Follow these steps to bulk delete photos in the Photos app:
- Open the Photos app on your device (look for the multicolored flower icon on your home screen).
- You should see your entire library. If you would like to see only a specific media type, such as screenshots, or a single album, then you switch to the Collections tab and select it in the Media Types and Albums sections, respectively.

- Tap the Select button in the top-right corner and select the images you want to delete by tapping them. You can also tap and drag without releasing your finger to select a large number of consecutive images quickly. If you happen to be in an album, then a Select All button becomes visible when you tap the Select button.
- Once you’ve made your selection, you can tap the Trash icon in the bottom-right corner.

- A confirmation dialog will ask if you’re sure – tap Delete to confirm.
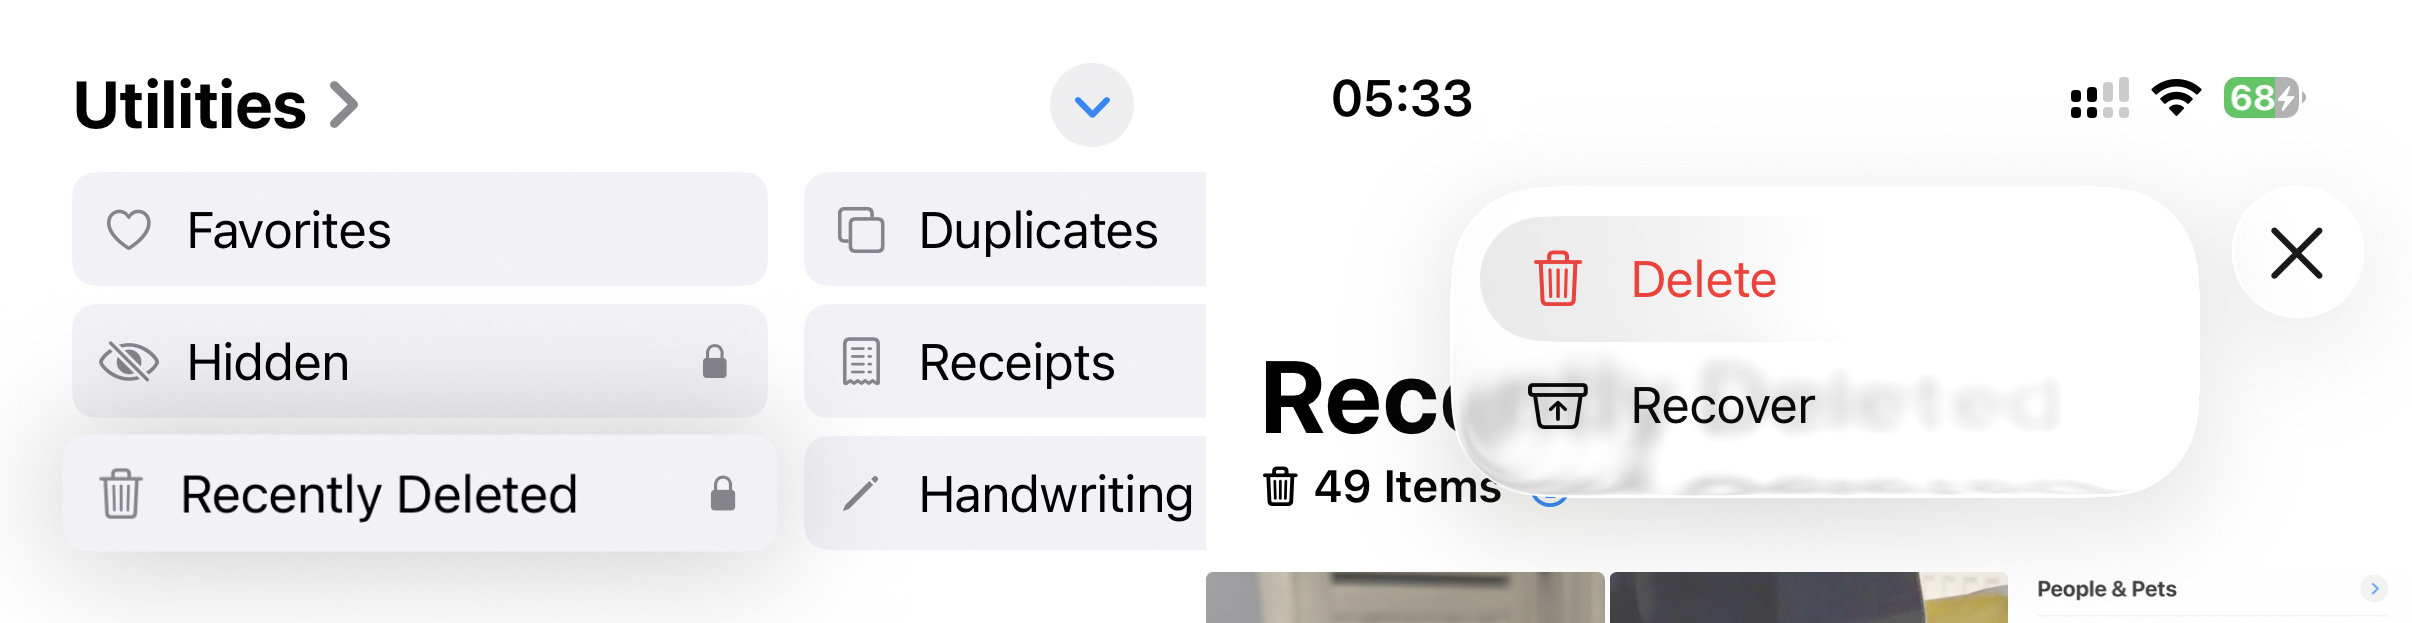
Your photos aren’t completely gone yet! They’re moved to the “Recently Deleted” album, where they’ll stay for 30 days before being permanently removed. To delete a lot of photos at once on your iPhone and free up space immediately, go to Utilities → Recently Deleted → Select (top right) → Three dots → Delete.
By the way, if you’re trying to mass delete photos by deleting an entire Album – it’s not gonna work. Because albums in iOS are essentially just collections of references to your photos, not the actual photos themselves. When you delete an album, you’re only removing the organizational structure, not the photos within it, so don’t be surprised when those photos remain in your library even after you’ve deleted the album they were in!
Method 2: Remove Photos Using a Third-Party Cleaner App
While the built-in Photos app works for basic cleanup, the best iPhone cleaner apps can dramatically improve the efficiency of managing your photo library. After testing many photo management solutions, Clever Cleaner has emerged as my favorite because:
- Its free version lets you clean up a generous amount of data each day without a required subscription or ads.
- Its AI-powered scanning automatically identifies duplicate and similar images.
- It can target screenshots specifically, which tend to accumulate rapidly on most iPhones (they certainly do on my device).
- Smart Cleanup can remove all similar photos and compress Live Photos and screenshots in one go.
- The unlimited Swipe mode lets you review and clean your gallery by month or use filters such as Recent, Favorites, and many more.
- All processing happens locally on your device, keeping your private photos secure.
To remove multiple pictures on iPhone using Clever Cleaner:
- Go to the App Store and search for “Clever Cleaner” (it’s developed by CleverFiles, the same company behind the popular Disk Drill recovery software). You can also click the following links to visit the app’s App Store page directly: Clever Cleaner. Give Clever Cleaner access to your photo library. On my device, the initial scan took around a minute.
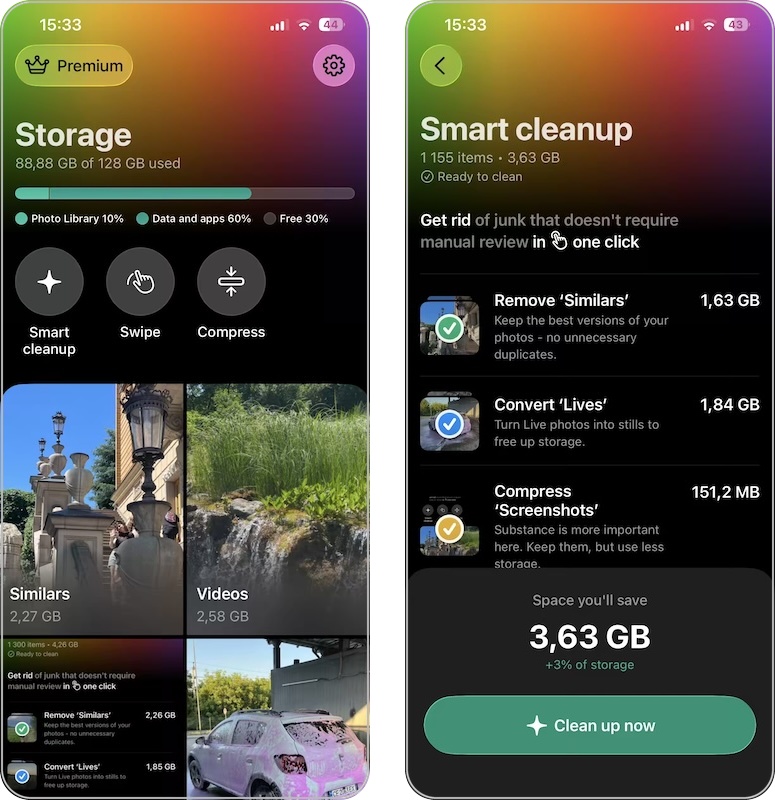
- Now you can explore the app’s cleanup tools: Similars (for nearly identical photos), Videos (for large videos consuming the most space), Swipe (for manual cleanup), Screenshots (for those quick grabs you probably don’t need), Live photos (for converting animated shots to still images), Compress (for reducing video and photo file sizes), and Smart Cleanup.
- Select a category. I typically start with Similars since that’s where I find the most unnecessary duplicates. The app will show you groups of similar photos. You can review everything manually, but I usually return to Smart Cleanup, select Remove ‘Similars,’ and let the app handle the rest.
- With the less automatic approach, in Similars you can select/deselect any group you want to keep, or choose a different photo as the best shot. (The app’s AI usually makes a solid choice, but the final decision is in your hands.)
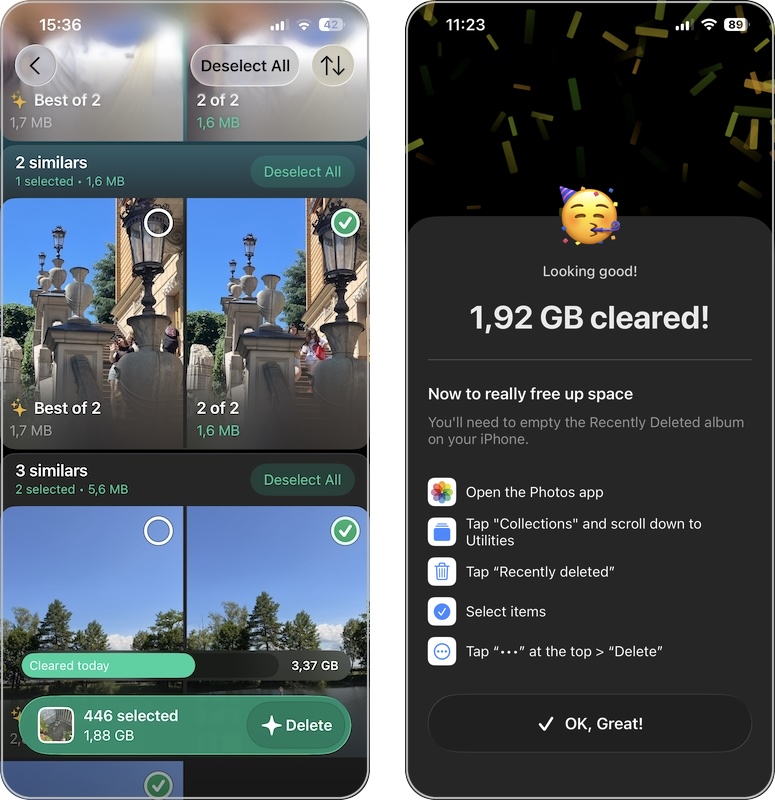
- Review the photos, and when you’re ready, tap Delete at the bottom.
Confirm the deletion, then let the app process the selected files.
Photos deleted through Clever Cleaner are moved to the “Recently Deleted” album in your Photos app, just like when you delete them manually. To permanently delete them and free up space on iPhone immediately, open your Photos app, go to Utilities → Recently Deleted → Select → Delete All.
For those with extremely cluttered libraries, this approach can save hours of tedious sorting and helps you reclaim significant storage space in minutes rather than hours. I was able to free up nearly 5 GB of storage the first time I used Clever Cleaner on my own iPhone, which is significantly more than I could with other leading photo organizer apps.
Method 3: Use Shortcuts to Delete Photos
Apple’s Shortcuts app offers automation capabilities that can help you delete multiple photos at once on an iPhone based on specific criteria. What’s great about Shortcuts is that it’s built right into iOS, so you don’t need to download anything extra – though you might need to grab or create a specific shortcut to get started.
Their shortcut shows you batches of photos from your library (starting with the oldest), allowing you to quickly review and select which ones to keep or delete. It’s perfect for methodically working through a cluttered photo library without feeling overwhelmed.
To start cleaning up your photo library with this shortcut:
- Visit this link on your iPhone.
- Tap Add Shortcut when prompted.
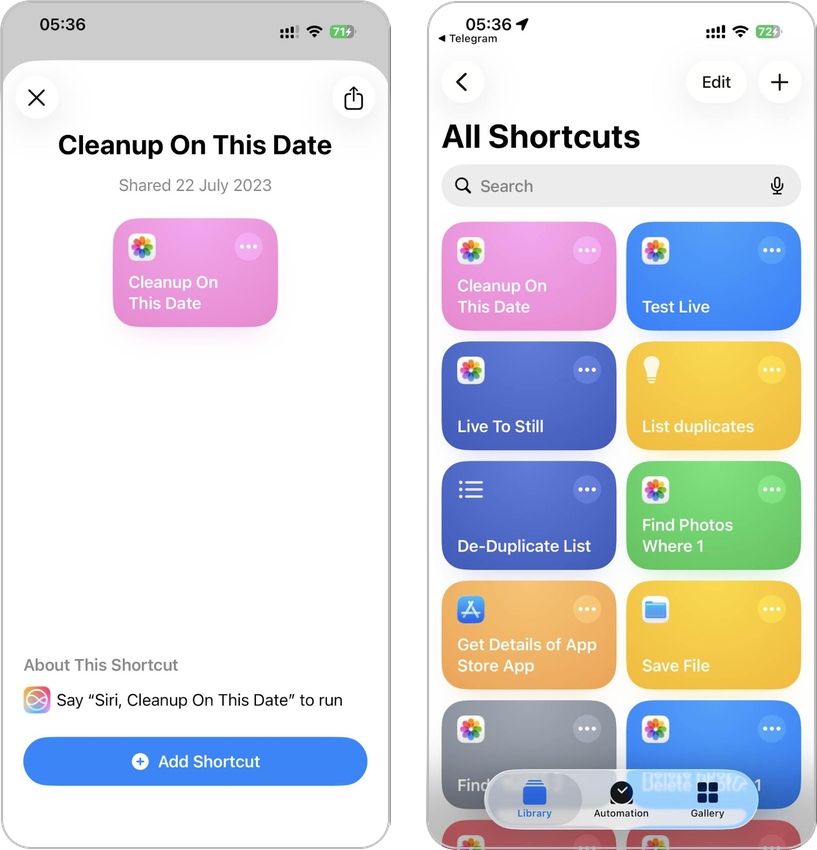
- Open the Shortcuts app and find the shortcut in your library.
- Tap to run it.
- Select photos for cleanup and confirm.
If you’re interested in creating your own custom shortcuts, start by exploring the Find Photos and Delete Photos actions in the Shortcuts editor. You can combine these with date filters, album filters, or even media type filters to create highly specific cleanup tools. The official Shortcuts guide is packed with great advice, so make sure to check it out.
Method 4: Delete Photos from the iCloud Web Interface
If you’re using iCloud Photos, there’s another option for managing your photo library that takes advantage of the fact that iCloud Photos syncs your entire photo library across all your Apple devices, so that changes made on one device reflect everywhere.
This synchronization works both ways – adding new photos updates your library across devices, but deleting photos also removes them from all connected devices.
To delete photos from all devices at once using iCloud Photos:
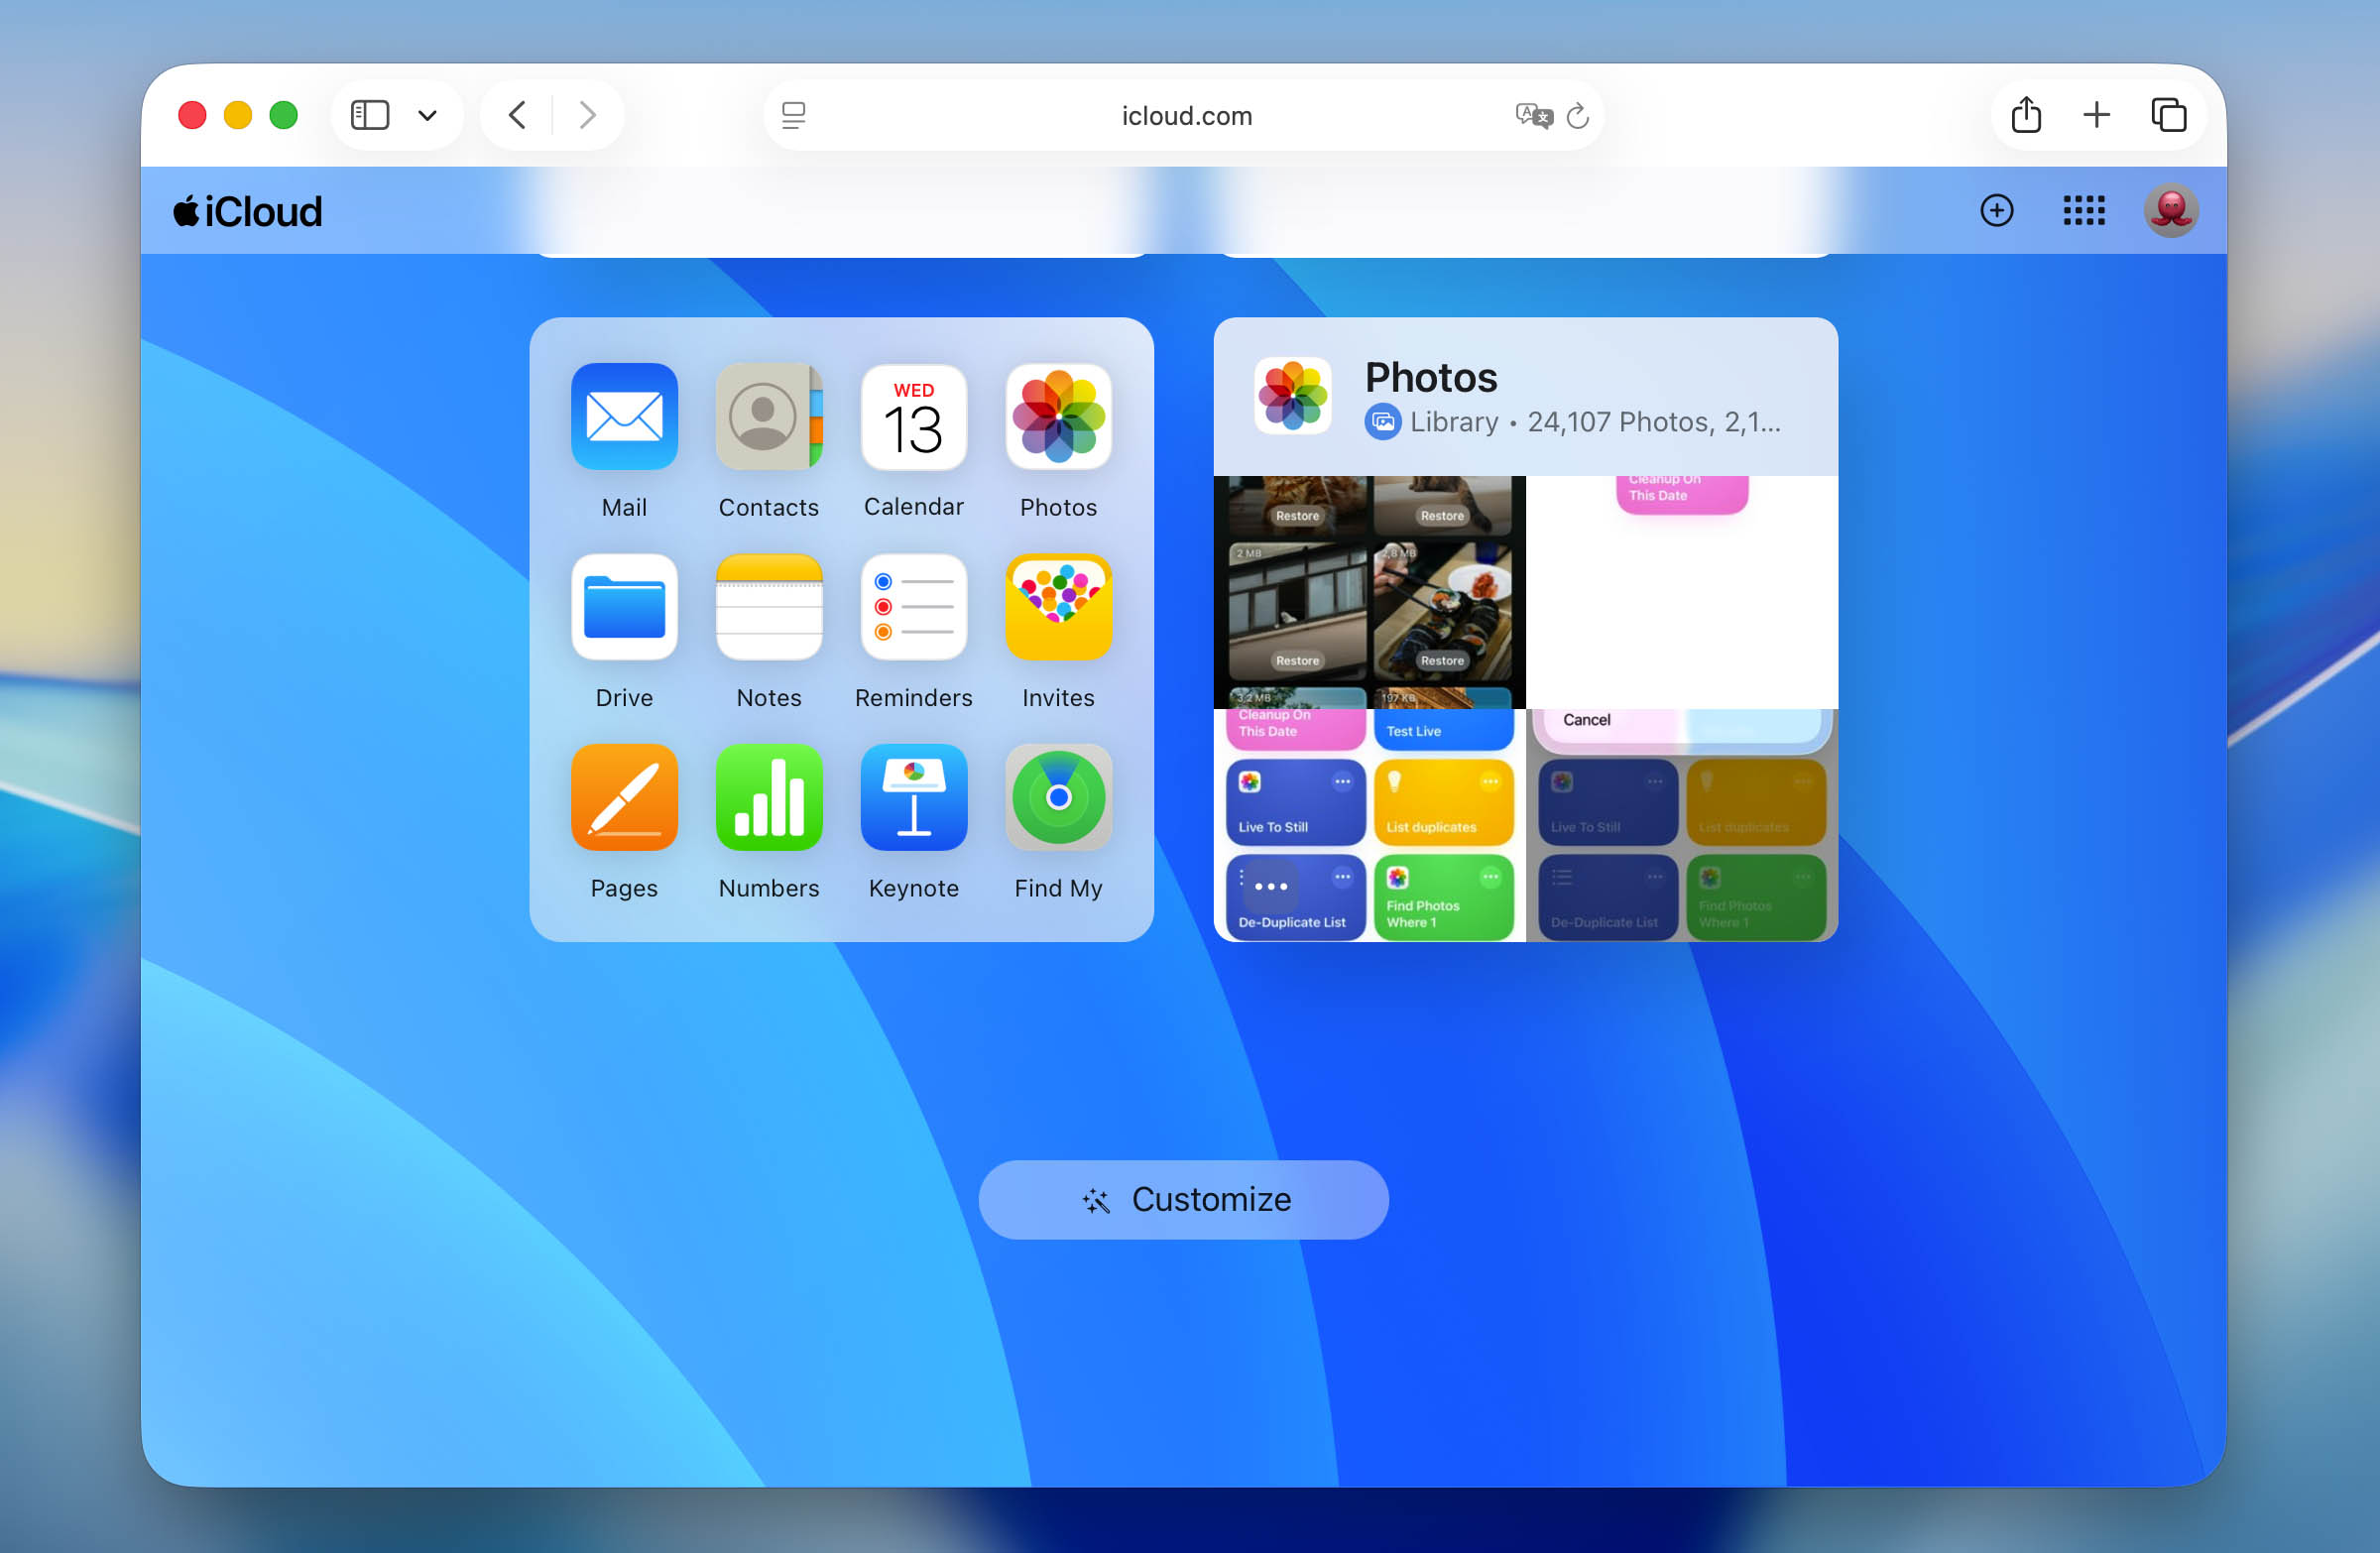
- On your computer, visit iCloud.com and sign in with your Apple ID. This gives you a larger screen to work with, which makes selecting multiple photos much easier than on the smaller iPhone screen.
- Click on the Photos icon from the iCloud dashboard. You’ll see your entire photo library displayed in a familiar grid layout, similar to what you’d see on your iPhone.
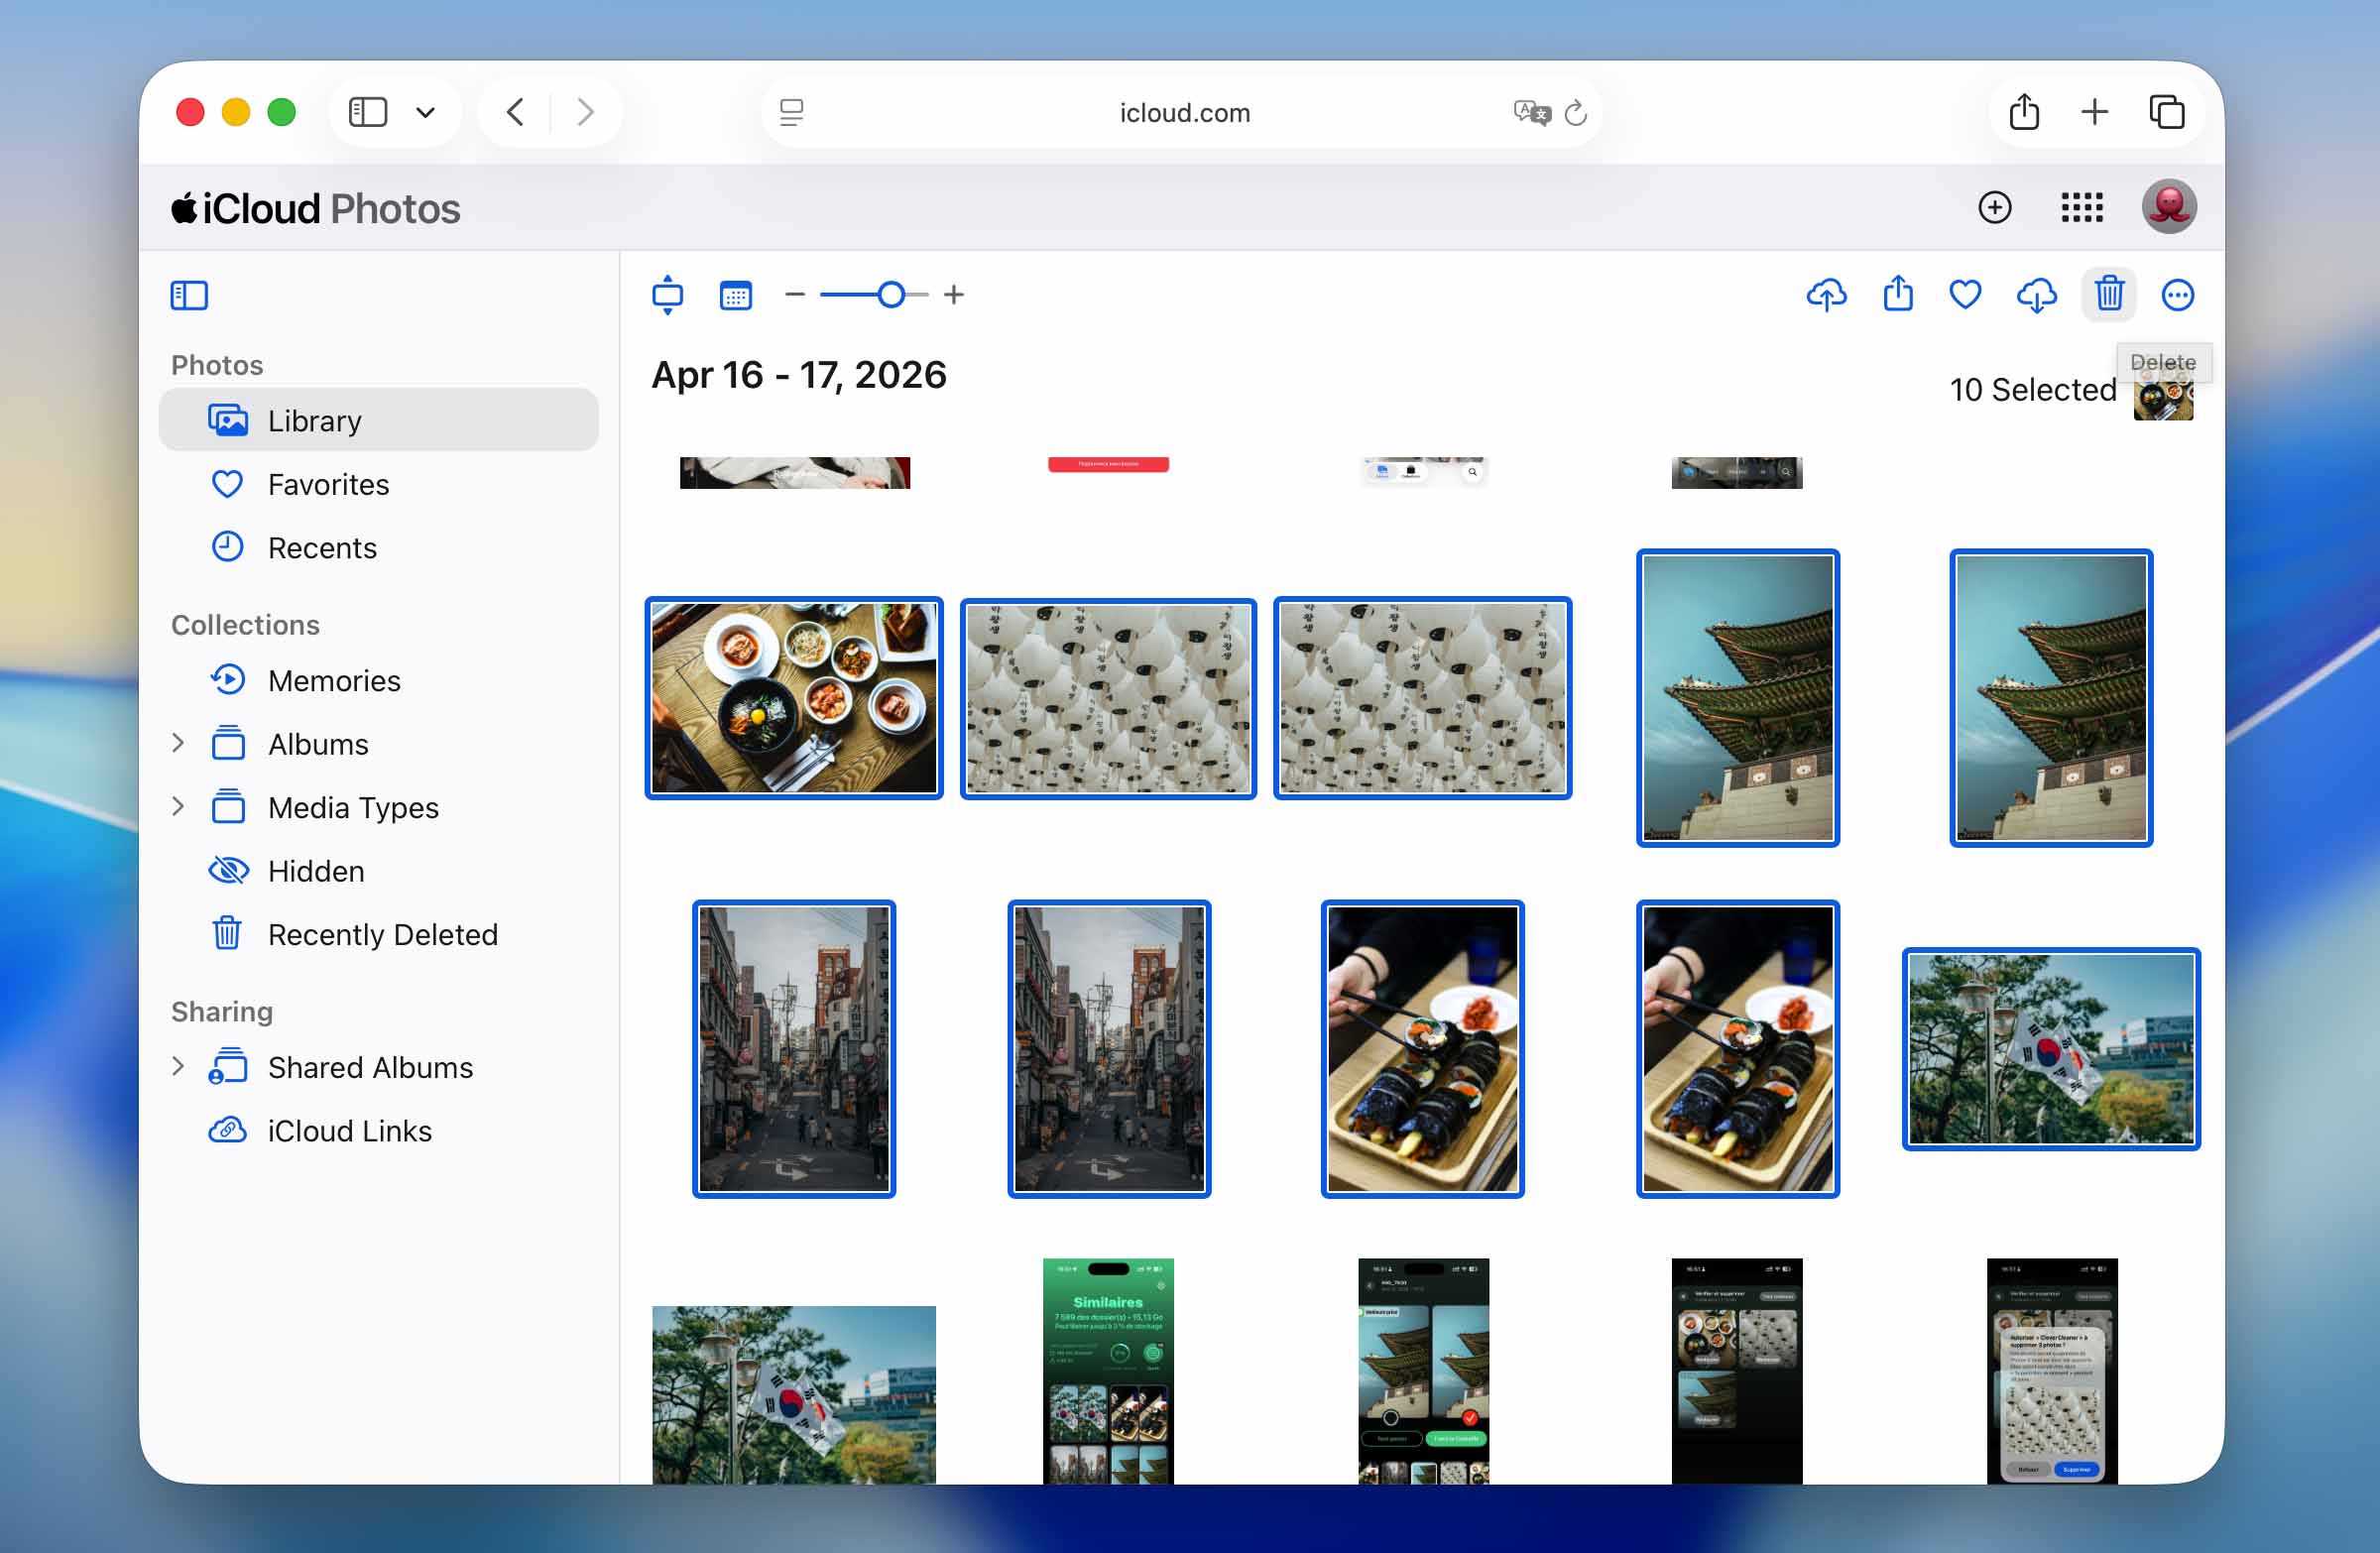
- Select batches of photos by holding down Shift (to select a range) or Command/Ctrl (to select non-adjacent photos).
- After choosing your photos, simply click the trash icon at the top-right corner. A popup will ask you to confirm your selection – click Delete to confirm.
Method 5: Manage Your Photos from Computer
The previous method shows how you can delete photos using the iCloud web interface. Well, if you’re a Mac user and have iCloud synchronization enabled on your computer, then you have another option: the Photos app.
The key advantage here is that the Mac Photos app provides a larger screen and more comprehensive selection tools than both the iPhone and the iCloud web interface, so it can make large deletions easier.
To delete iPhone photos using the Photos app on macOS:
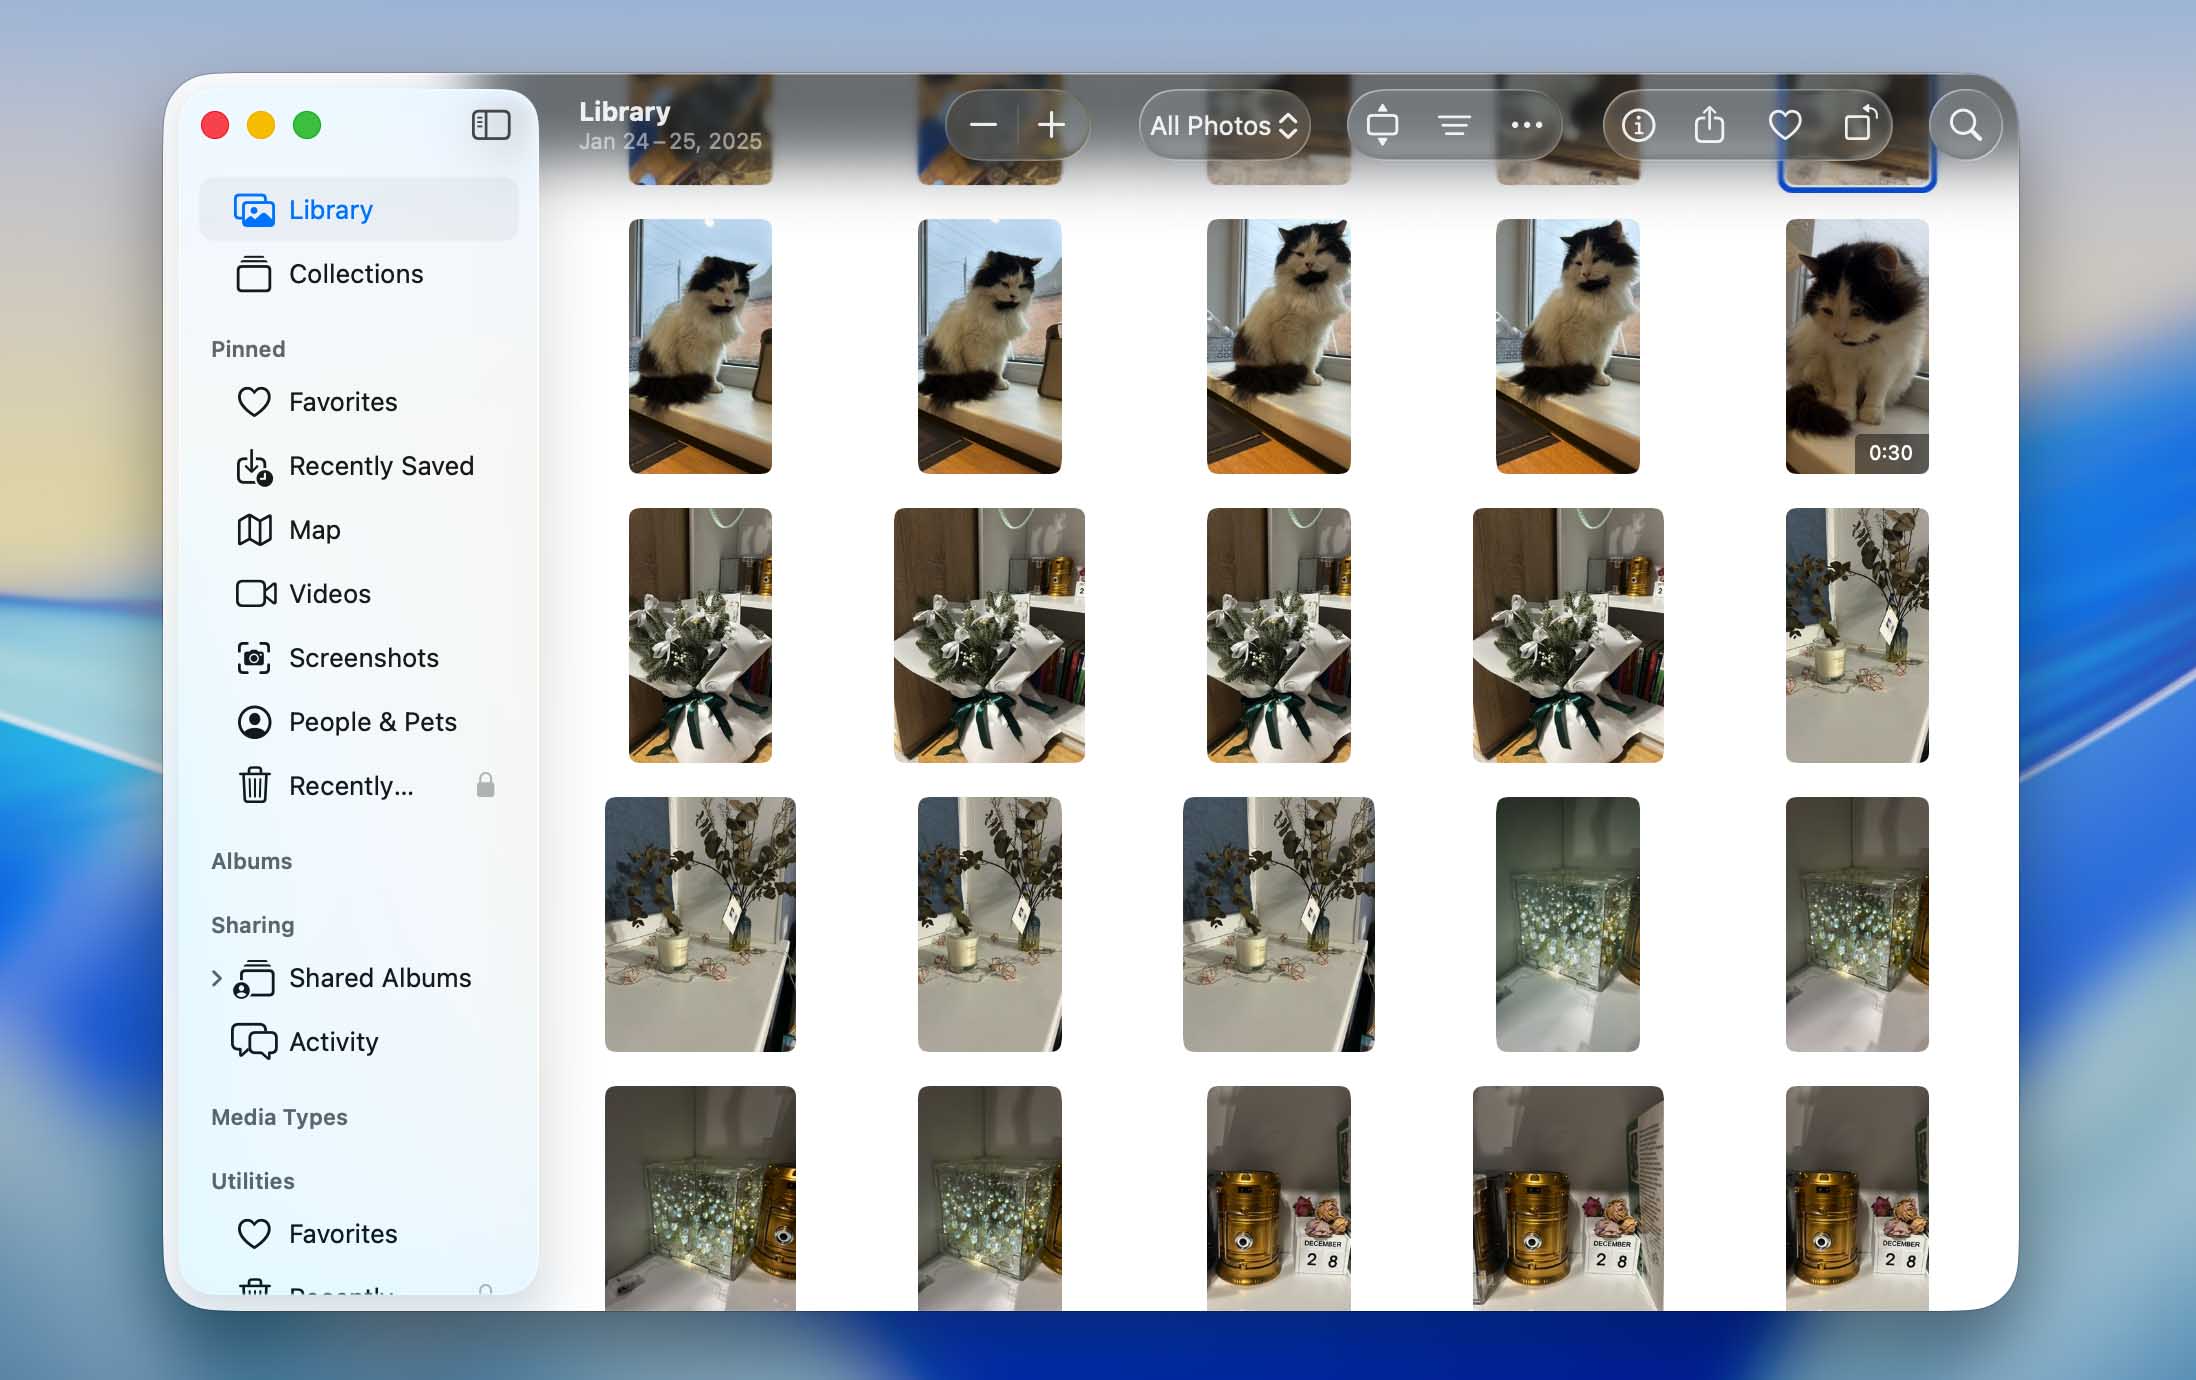
- Open the Photos app on your Mac. You’ll see your entire photo library synced across all devices.
- Select the photos you want to delete. You can use Command+click to select non-adjacent photos, use Shift+click to select ranges of photos, or even use the Smart Albums feature to automatically group similar photos. Don’t forget that you also have the option to sort by date, size, or type to quickly identify photos you don’t need.
- Once you’ve selected the photos you want to remove, right-click any of the selected photos and choose the Delete option.
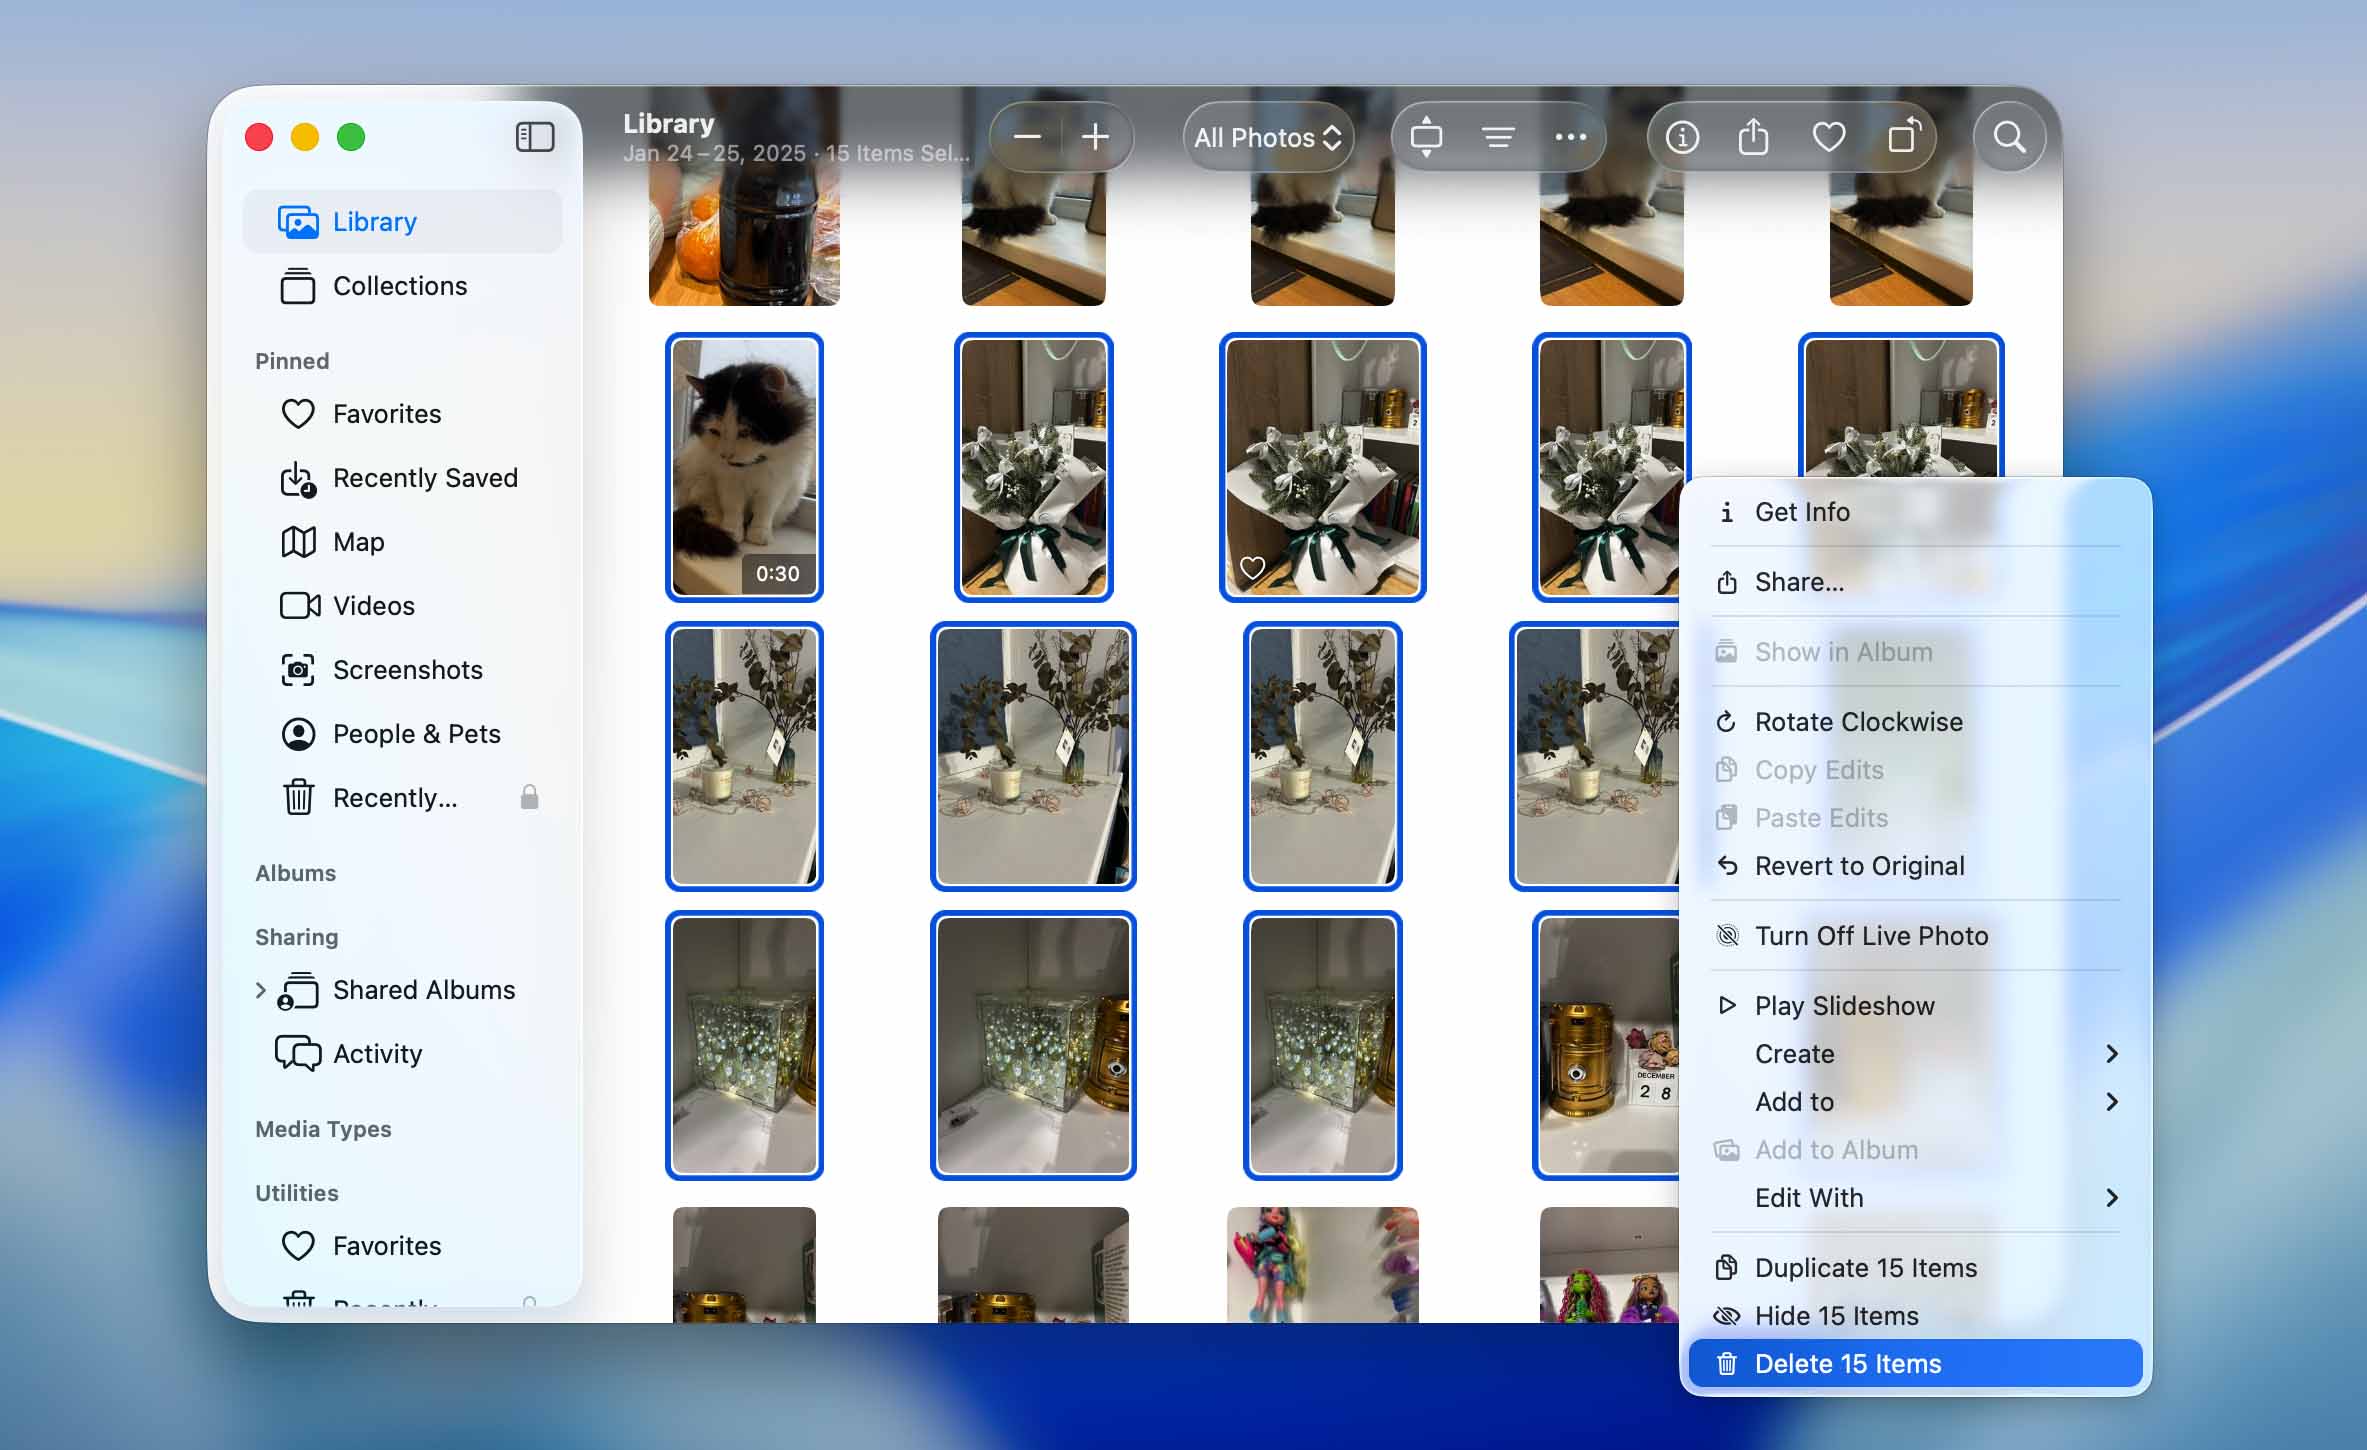
- Confirm the deletion when prompted.
The photos will be moved to the Recently Deleted album. To free up space immediately, select the Recently Deleted album in the sidebar, click Delete All, and confirm.
How Do I Remove Photos from an iPhone But Keep them on iCloud?
One of the most common questions I receive from readers is how to delete multiple pictures on iPhone but keep on iCloud. The short answer is that you need to disconnect your iPhone from iCloud Photos before deleting anything locally.
Specifically, I recommend you follow these steps:
- Go to Settings → [your name] → iCloud → Photos → toggle off Sync this iPhone. When prompted, choose to keep photos on your iPhone rather than removing them.
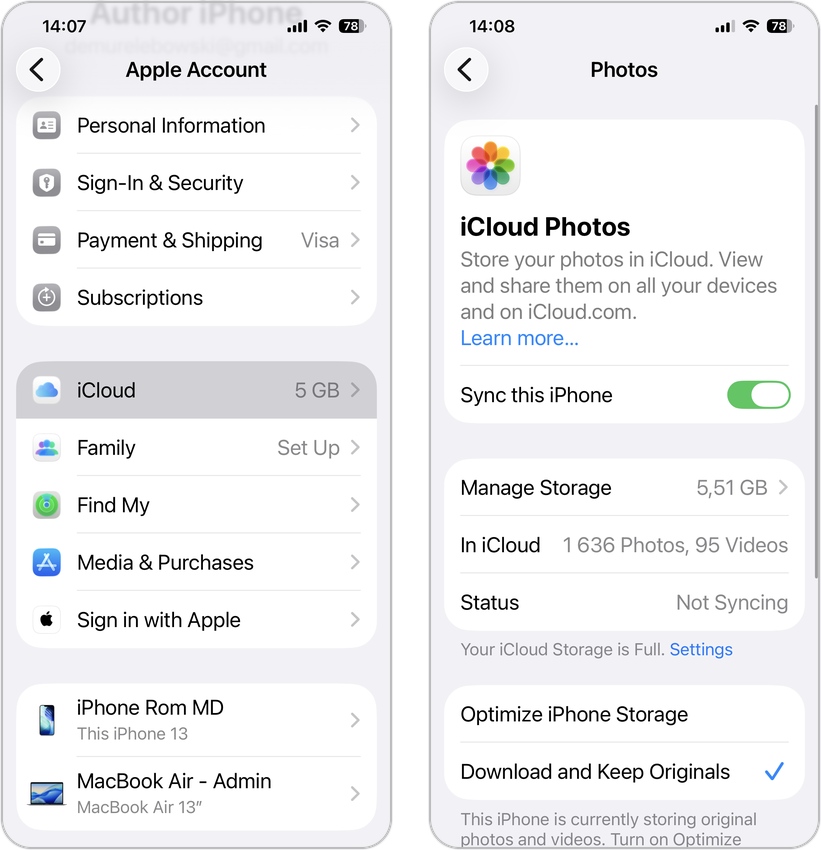
- Now that iCloud sync is turned off, you can delete photos on your iPhone, and it won’t affect iCloud.
Wrap-Up
For day-to-day maintenance, the built-in Photos app works perfectly fine. However, third-party apps like Clever Cleaner or custom Shortcuts can dramatically speed up the process when your library grows unwieldy or you need to get more storage on your iPhone.
Before you permanently delete any images, I highly recommend creating backups either in iCloud or on your Mac so that you don’t lose anything important in case you make a mistake. While the recovery of deleted photos is sometimes possible, it’s always best to prevent data loss.
FAQ
To delete multiple photos at once on your iPhone:
- Open the Photos app
- Tap Select in the top-right corner
- Tap each photo you want to delete, or slide your finger across multiple photos to select them quickly
- Tap the Trash icon at the bottom-right
- Confirm by tapping Delete X Photos
Remember that deleted photos remain in the Recently Deleted album for 30 days before being permanently removed.
The fastest ways to delete thousands of photos from iPhone are:
- Use a third-party app like Clever Cleaner that can identify and batch delete similar photos, screenshots, and large files
- Use the iCloud.com web interface or Mac Photos app for easier selection of large batches of photos
- Create or use a custom Shortcut that can identify and help you batch delete photos
For truly massive libraries, the computer-based methods (iCloud.com or Mac Photos app) typically offer the best combination of speed and control.
To delete all photos from your iPhone at once:
- Open Photos and display your full library.
- Tap Select.
- Drag your finger across several photos and keep it pressed against the screen.
- Without lifting that finger, use another finger to tap the top of the screen near the clock. The library will scroll toward the top while continuing to select photos.
- Once everything is selected, tap the Trash icon and confirm the deletion.
- Open Recently Deleted and select Delete All to remove the photos permanently and free up storage immediately.
Alternatively, you can use iCloud.com or the Mac Photos app to select all photos (using Cmd+A) and delete them in one operation.
Yes, if you have Sync this iPhone enabled, deleting photos from your iPhone will also delete them from iCloud and any other devices connected to the same Apple ID. This is because iCloud Photos synchronizes your photo library across all your devices.
If you want to delete photos from your iPhone but keep them in iCloud, you need to first turn off iCloud Photos sync on your iPhone by going to Settings → Photos → toggle off “Sync this iPhone”. Choose to keep the photos on your iPhone when prompted, then you can safely delete photos from your device without affecting your iCloud library.
To permanently delete photos from your iPhone:
- Delete the photos from your Photos app
- Go to Utilities → Recently Deleted
- Tap Select in the top-right corner
- Tap the three dots in the top right corner and select Delete All.
- Confirm by tapping Delete X Items
After completing these steps, the photos will be permanently deleted from your device and cannot be recovered through regular means. If you have iCloud Photos enabled, the photos will also be permanently deleted from iCloud and all your connected devices.
