If you lost data on your card or found yourself in a situation where you can’t get to the files the usual way, this Sony SD card recovery walkthrough will show you a simple, tested way to get them back. You only need about 5 minutes, a card reader, and your computer. Whether files vanished after deletion, formatting, or an error message, there’s still a solid chance your photos and videos are recoverable.
In What Cases Is Sony Memory Card Recovery Possible
Many Sony memory card problems are recoverable. We’ve seen cards that looked empty, asked to be formatted, or had entire folders disappear, yet the files were still there underneath. What matters most is what happened after the data loss and whether new data replaced the old sectors.
- Simple deletion is the easiest case. If you erased photos or videos by mistake in-camera or on a computer, the files often remain on the card until something new uses that space. Stop shooting immediately, remove the card, and your odds stay strong.
- Formatting is also recoverable more often than people think. A quick format usually rebuilds file system structures and marks space as free, but it may leave the actual data in place. SD recovery tools can scan that leftover data.
- Full formatting is tougher because it may overwrite more of the card during the process. There’s also another layer with SD cards specifically: secure erase commands such as CMD32, CMD33, CMD38 (often grouped under SD_ERASE behavior). Some cameras, devices, or low-level tools can use these commands to wipe blocks more aggressively than a normal (quick) format. When that happens, recovery chances drop hard because the flash memory was actively cleared.
- File system corruption is another common case. Maybe the card suddenly shows RAW or “damaged”, asks to be formatted, or opens with empty folders and strange filenames. That often means the file system metadata took damage, not necessarily the files themselves. In many cases, a proper scan can still pull the files out.
- Cards with minor connection issues can also be recoverable. Sometimes the problem is the reader, USB port, or unstable contact pins. We’ve seen “dead” cards come back to life after switching readers.
No matter what your case looks like, if the card isn’t physically damaged, it almost always makes sense to run a scan first. And that’s exactly what we’ll show next.
How to Recover Files from a Sony SD Card (Main Method)
To scan the card for deleted, lost, or missing data, you’ll need SD card data recovery software. One of the best options for Sony cards is Disk Drill, which we’ll use in the step-by-step guide below. It’s easy to use, strong in real-world recovery cases, and especially handy for memory cards used in cameras.
Why it works for Sony SD cards:
- Supports the file systems you’re most likely to see on Sony memory cards, including FAT32, exFAT, and others.
- Recognizes the common file types stored on these cards: JPEG, PNG, MP4, MOV, RAW photo formats, and many more.
- Includes an Advanced Camera Recovery module designed for fragmented or harder-to-rebuild video files – serious help with camera footage.
- Fast previews let you open photos or test videos before recovery.
- Smart filters sort results by file type, date, size, and more.
- Built-in disk imaging lets you create a byte-for-byte backup of the card first, which is ideal for unstable cards.
In short, it gives you quick answers fast, and it also has the deeper tools you need when the card turns into a stubborn case.
Here’s how to recover deleted files from a Sony SD card:
- Download and install Disk Drill SD Card recovery software with administrator privileges.
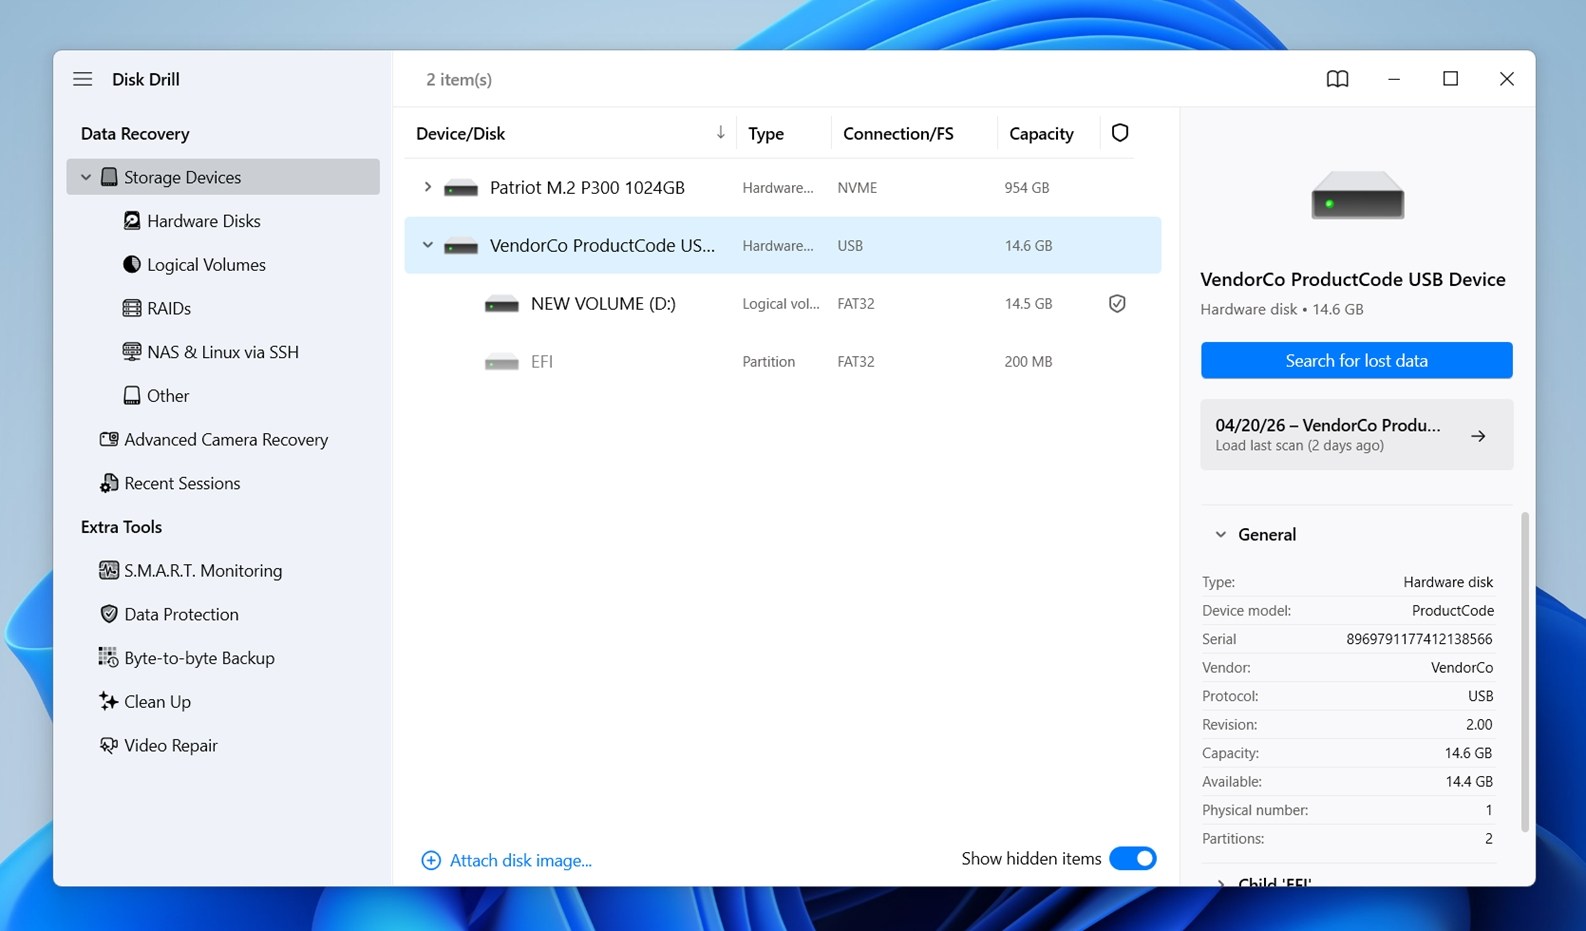
- Connect your Sony SD card to your computer.
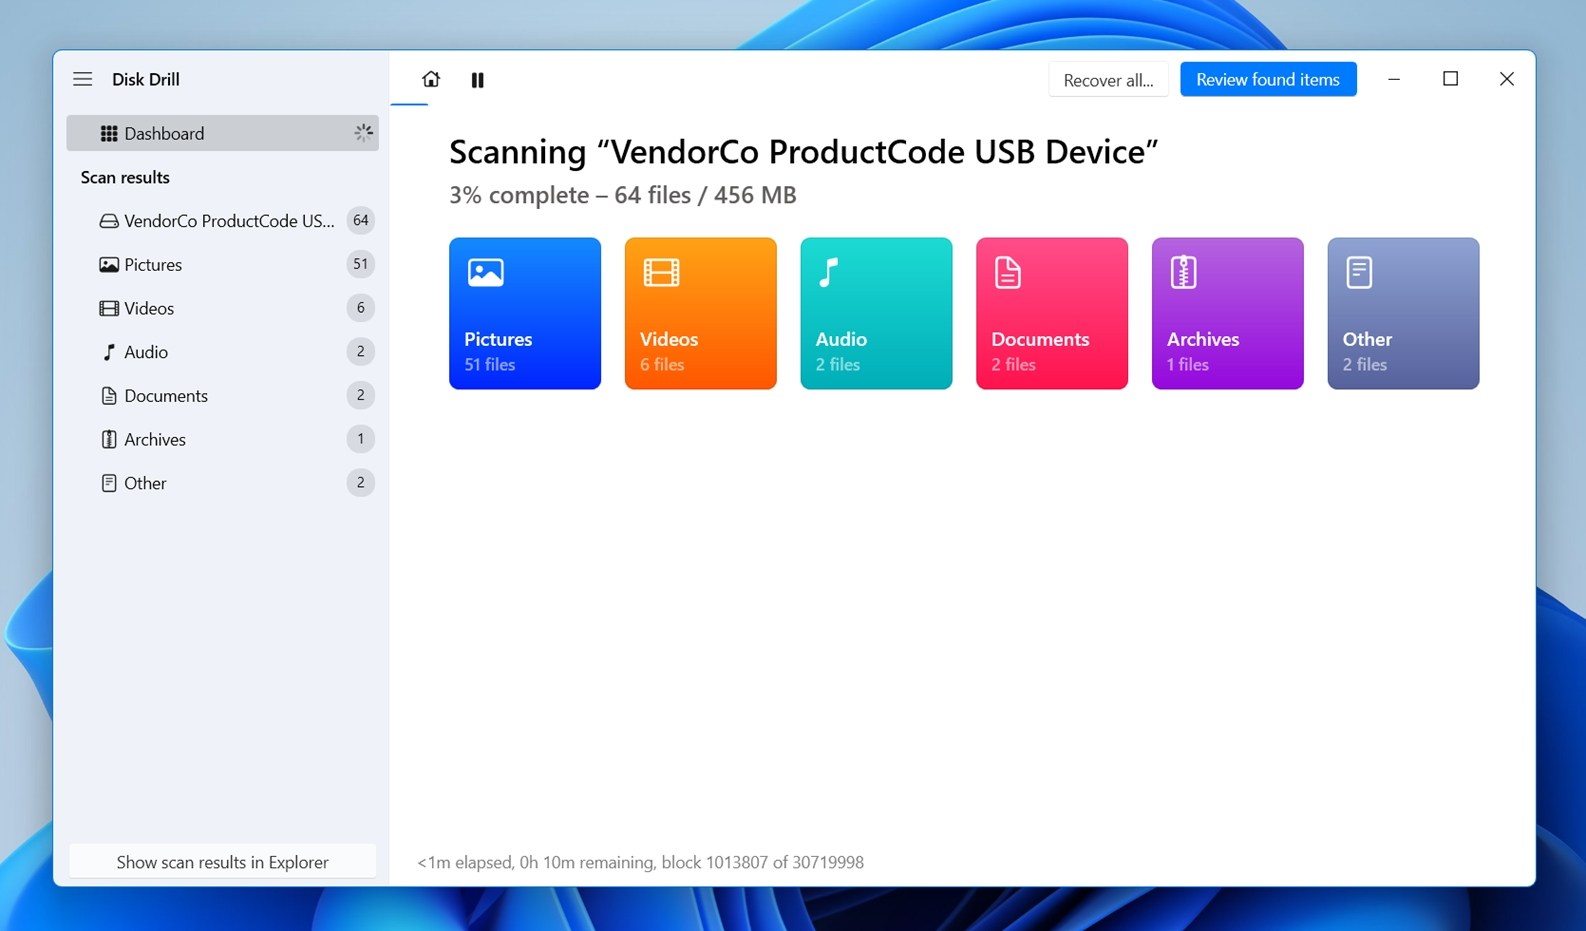
- Launch Disk Drill and find your card in the list of connected devices. Once you spot it, select it and click Search for lost data.
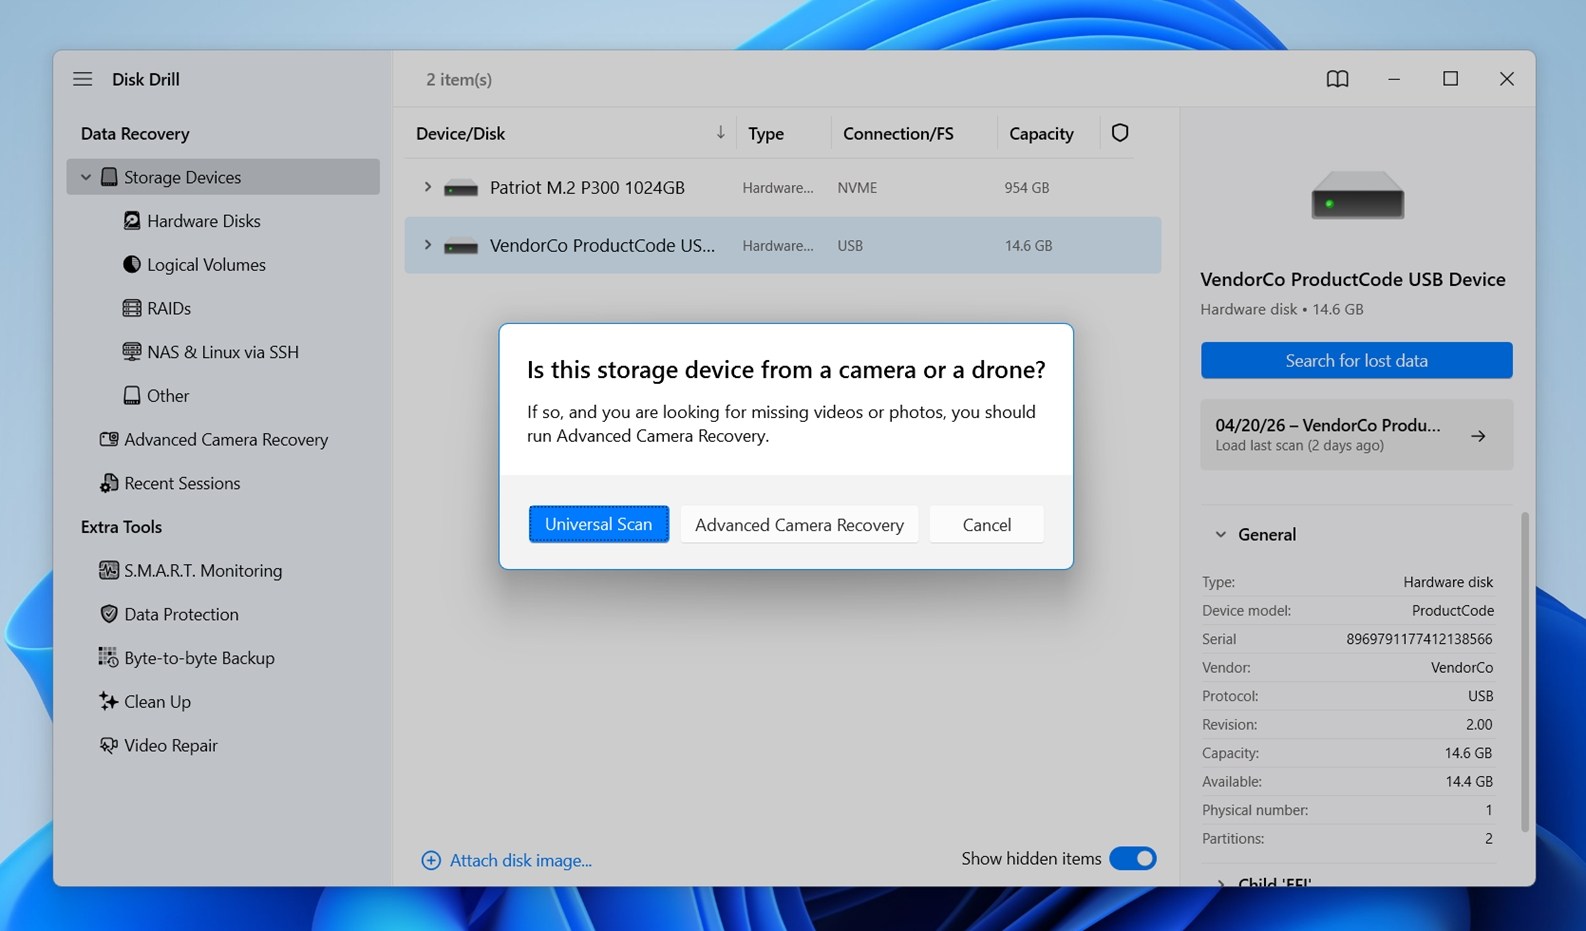
- Choose Universal Scan. That’s the best starting point for most Sony SD card recovery cases, whether the files were deleted, the card was formatted, or the file system got messed up. If the scan doesn’t find the videos that you’ve wanted, run Advanced Camera Recovery after that. This mode is better for video footage.
- Let Disk Drill scan the card. You’ll see the progress at the top of the window with a percentage along with categories of files found so far (Pictures, Videos, and more), so you can keep an eye on what it’s finding. Once the scan finishes, click Review found items.
- You’ll see a neatly organized list of files divided into categories: Deleted or lost, Existing, and Reconstructed.
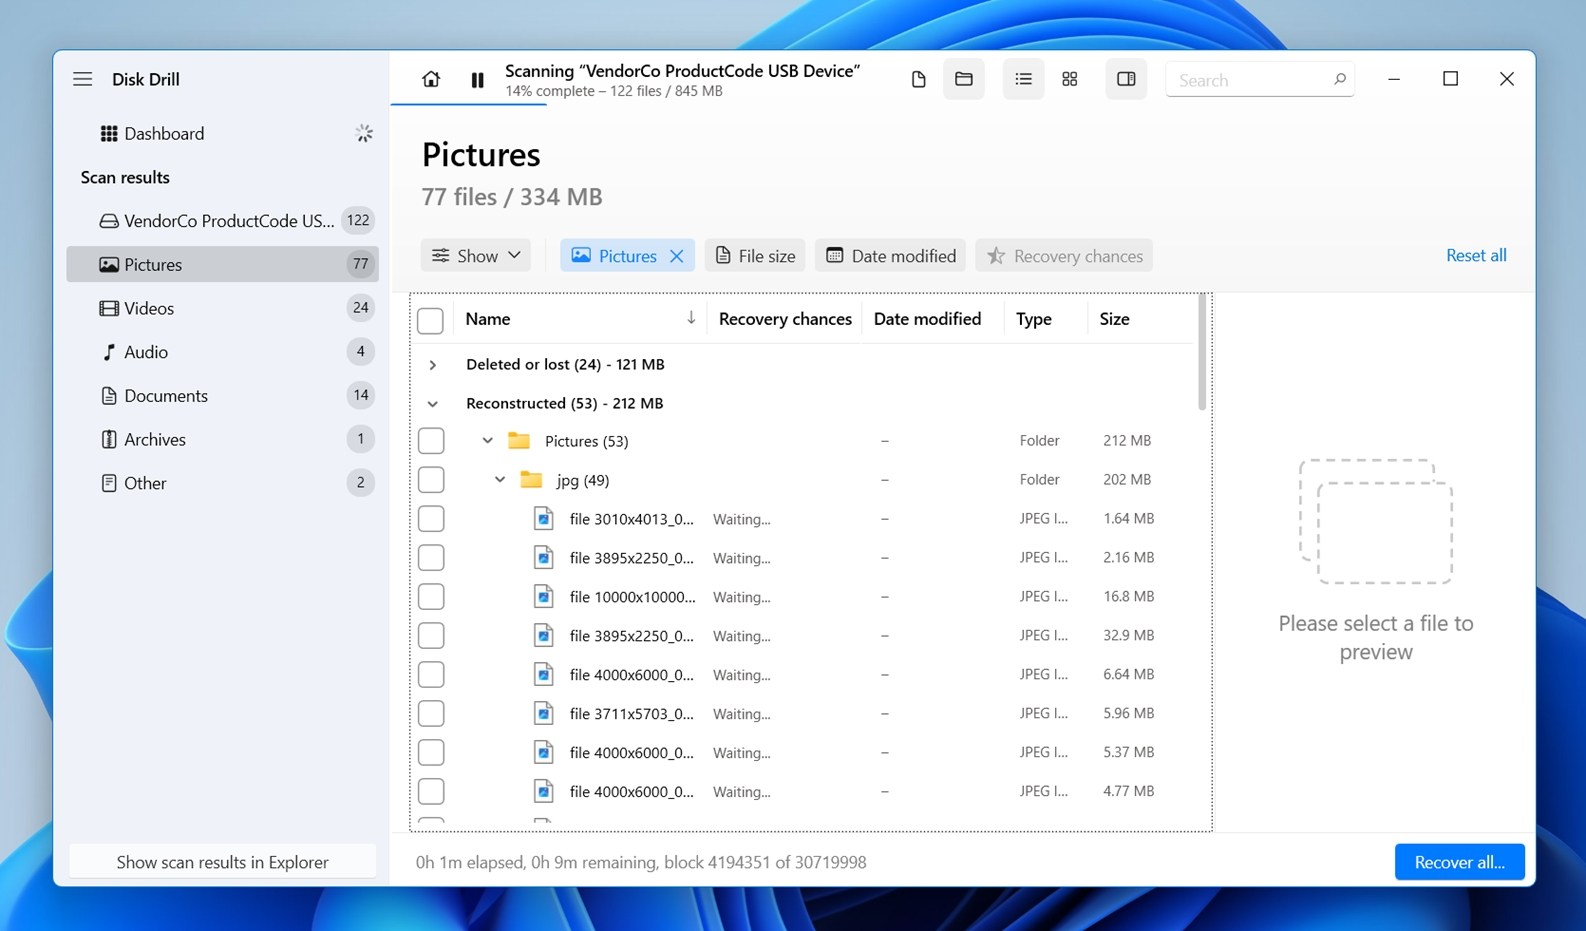
💡 Check the Reconstructed section too. These files were found by signature scan, not through file system metadata. Because of that, the files can appear with generic names (but valid extensions). Preview them first, then rename anything important after recovery. - Use the search bar and filters to narrow things down. If you know part of the file name, you can type it into the search bar. For file types, use the built-in filters like Pictures, Videos, and Audio. (You can also drill down into subcategories, for example JPG under Pictures).
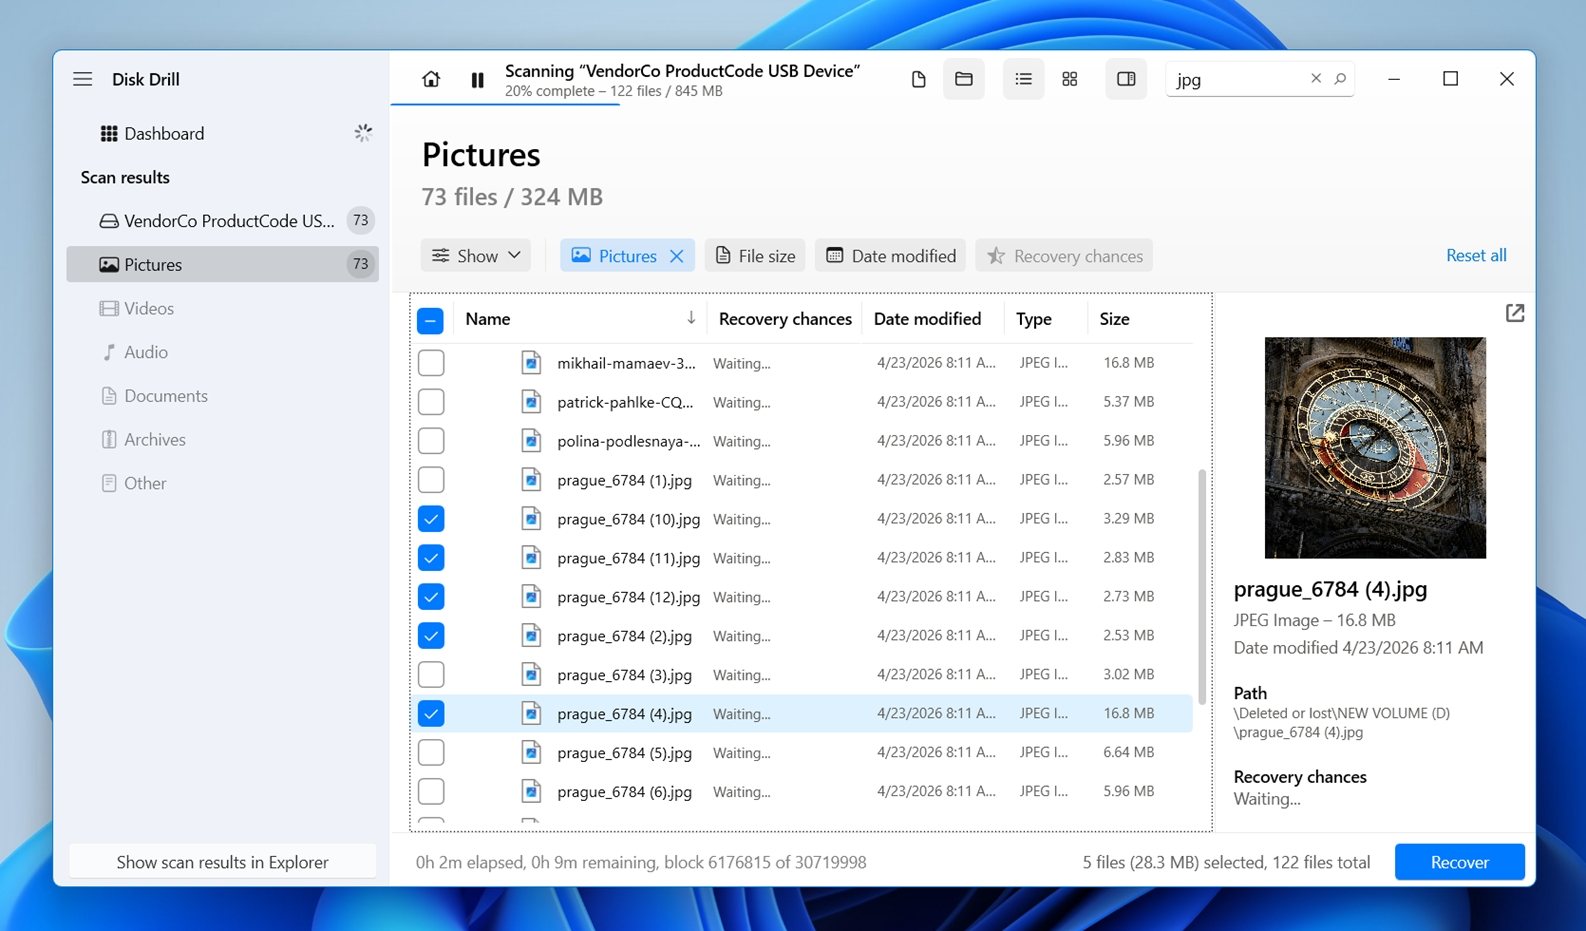
- Preview the files before recovery. Click a photo to open a preview, or test a video. If the preview panel is hidden, just click on the eye icon next to the file name. This is one of the easiest ways to check whether a file is fine. If the preview works, it’s 100% healthy file.
- Select the files you want to get back, then click Recover.
- Choose a recovery destination on your computer or another external drive.
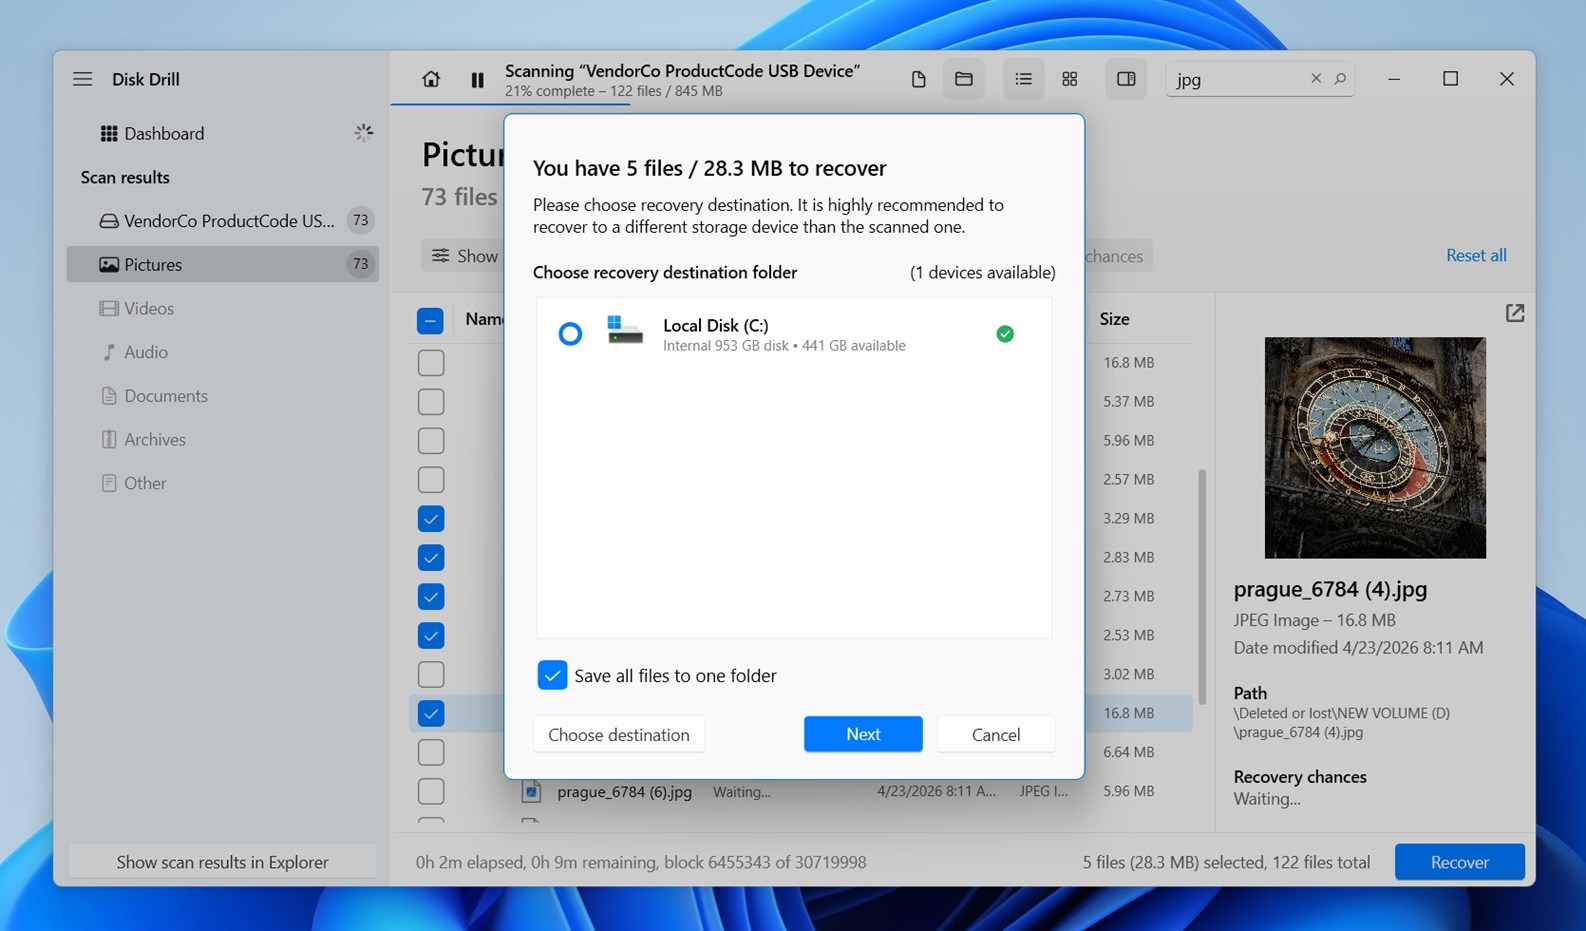 Don’t save them to the SD card that suffered data loss, or you may cause file corruption during the recovery process. When recovery is complete, you can move the files to the location of your choice.
For most Sony memory card file rescue jobs, the step-by-step above should do the trick. But some Sony cards turn into stubborn cases: the card may freeze mid-scan, disconnect at random, slow to a crawl. When that happens, there’s one method that’s absolutely worth trying: create a backup image of the card first, then scan that image instead.
Disk Drill makes this pretty simple:
- Open Disk Drill and choose Byte-to-byte Backup from the tools list.
- Select your Sony card from the device list.
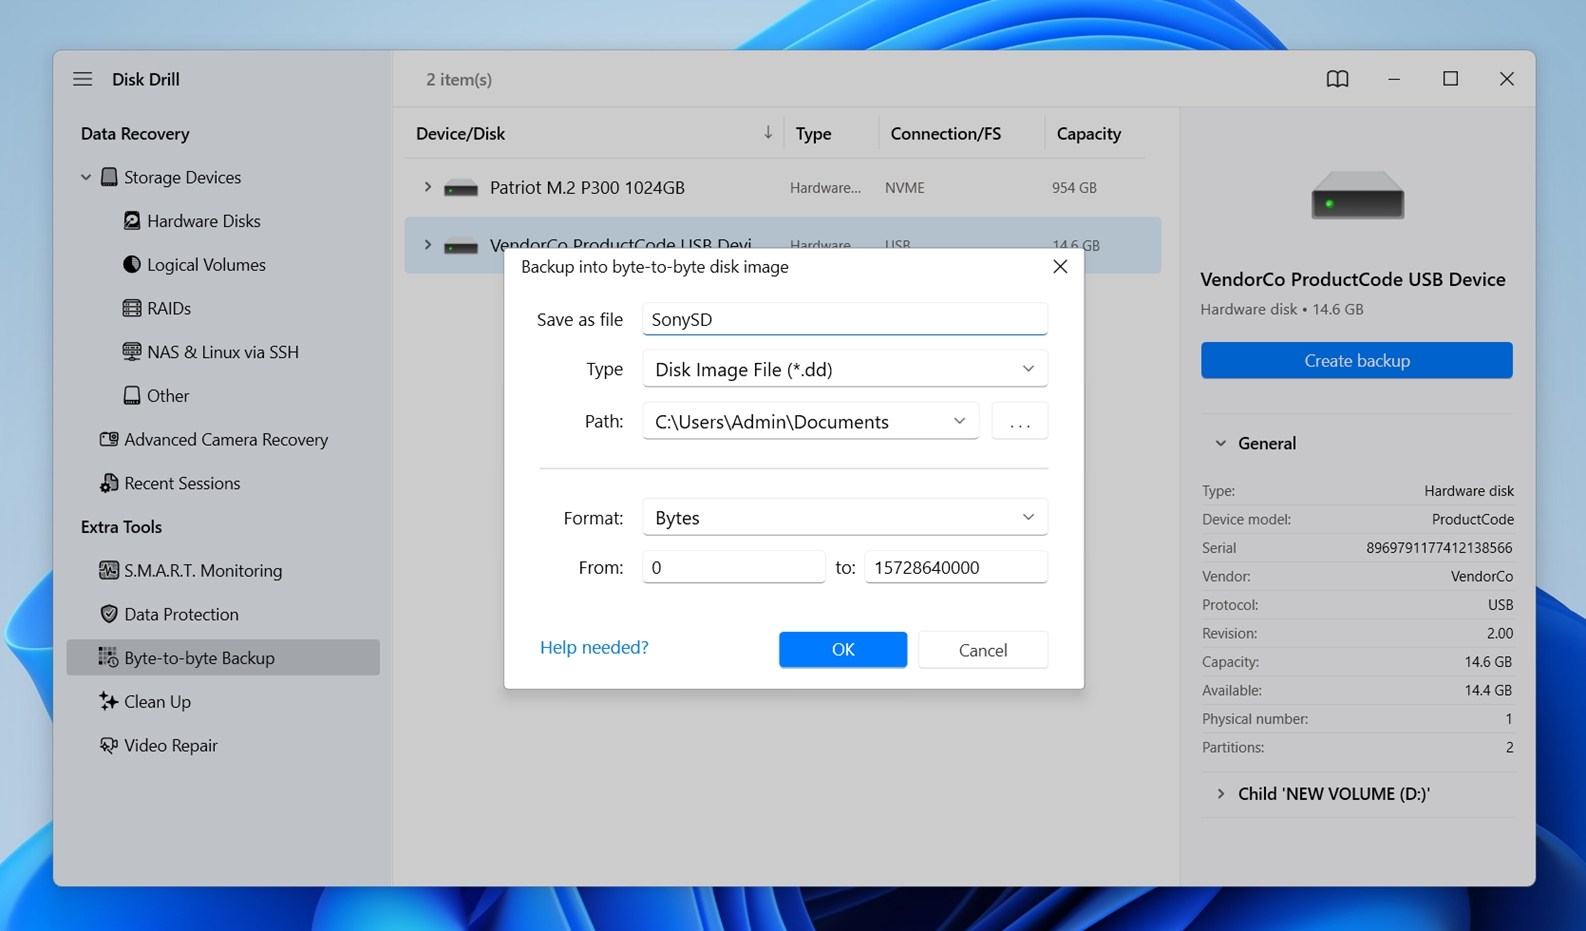
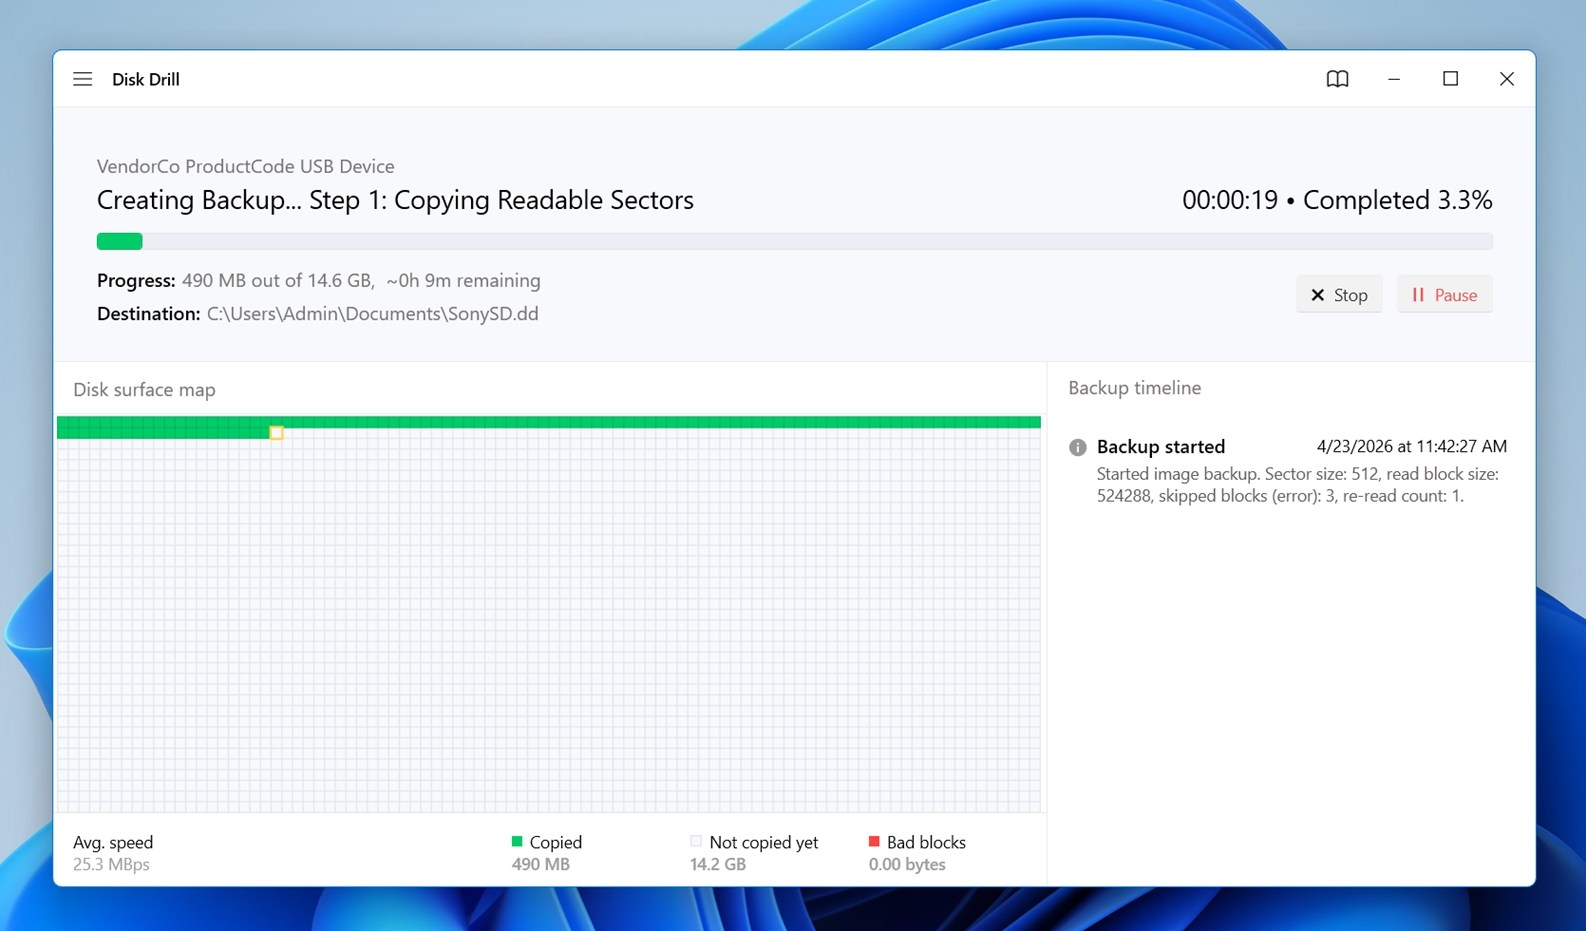
- Click Create Backup, then choose a save location on a different drive and press OK. Disk Drill will create a full image of the card, sector by sector, which gives you a safer copy to work with.
- Once the backup is ready, go back to Storage Devices.
- Click Attach disk image in Disk Drill, then open the image file you just created. This will load the backup as if it were a real storage device, and from there you can scan it the same way as we showed above.
This is often the smarter move for unstable cards because it reduces repeated stress on the original one. If the card still has enough life left to be copied once, you may get a much smoother recovery from the image.
Other Sony Card Recovery Methods
We showed you the main method we’d use to save files from a Sony card, and for most situations, that’s the one that makes the most sense. But there are a few other tools and methods worth knowing because some Sony card recovery jobs come with their own quirks.
Each option fits a different kind of problem. These are not always necessary. If your card works normally and you already recovered your data, you probably won’t need any of them.
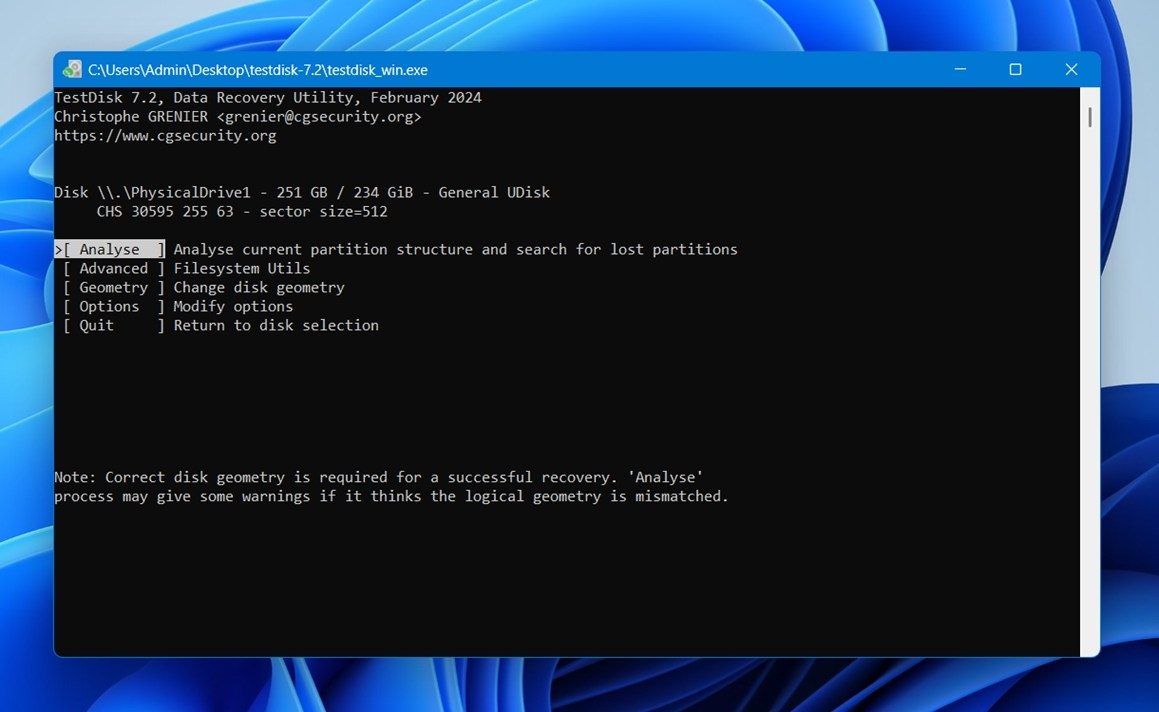
Method 1: Use TestDisk
TestDisk can be useful when the Sony card shows as RAW, has a damaged partition table, or suddenly asks to be formatted even though the files were there before. In some Sony card cases, TestDisk can rebuild partition data and restore access to your card again so you can copy files normally. When it works, it can save a lot of time.
But, we still wouldn’t recommend starting with it. TestDisk is powerful, but it’s also a command-line style tool with choices that matter. Pick the wrong option, and you can make recovery harder. That’s why the Disk Drill method we showed earlier is the safer first move: scan the card, recover what matters, then think about repairs later.
Here’s how to attempt Sony memory card recovery with the help of TestDisk:
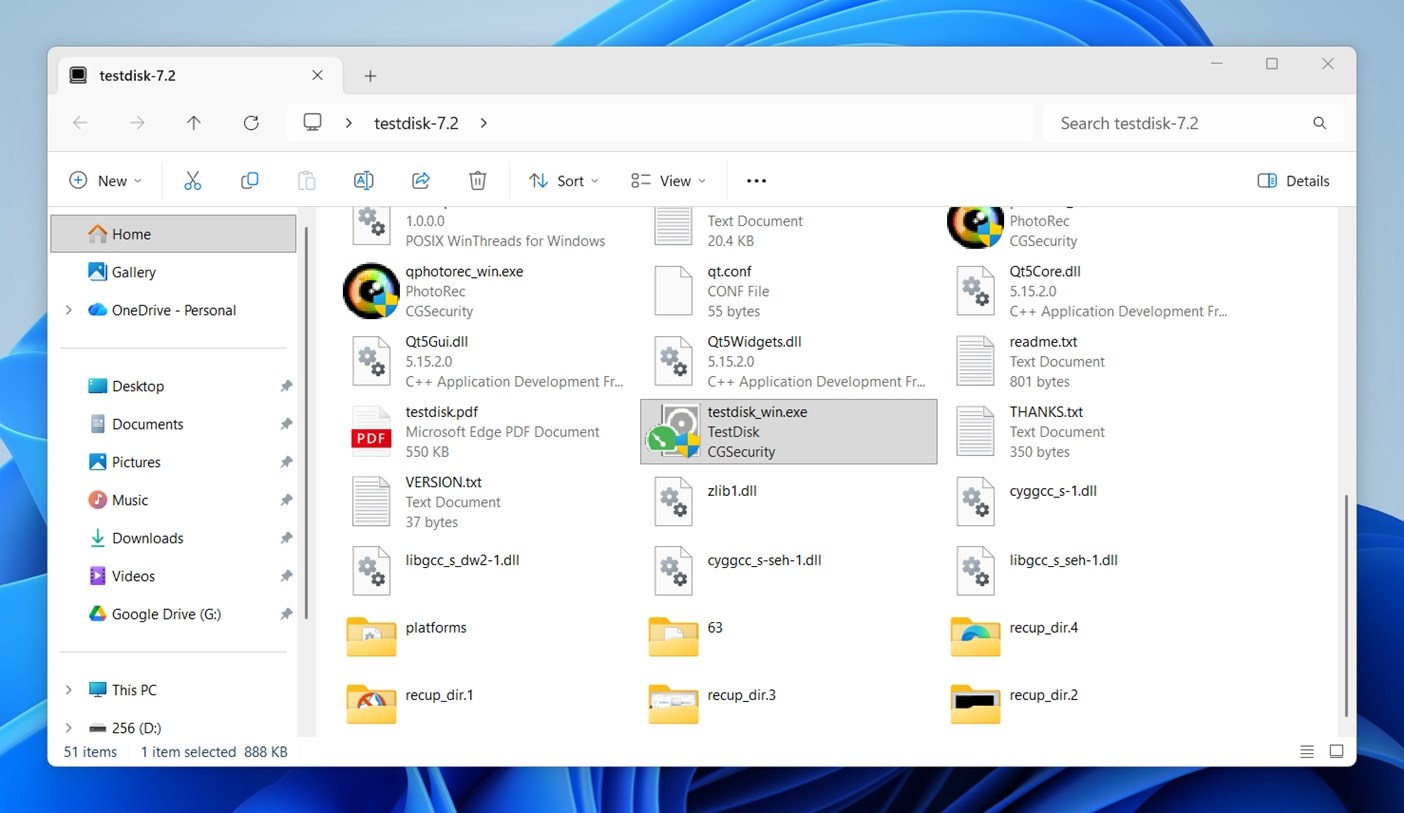
- Download TestDisk from its official website, then extract the ZIP archive to a folder on your computer.
- Open the extracted folder and run testdisk_win.exe.
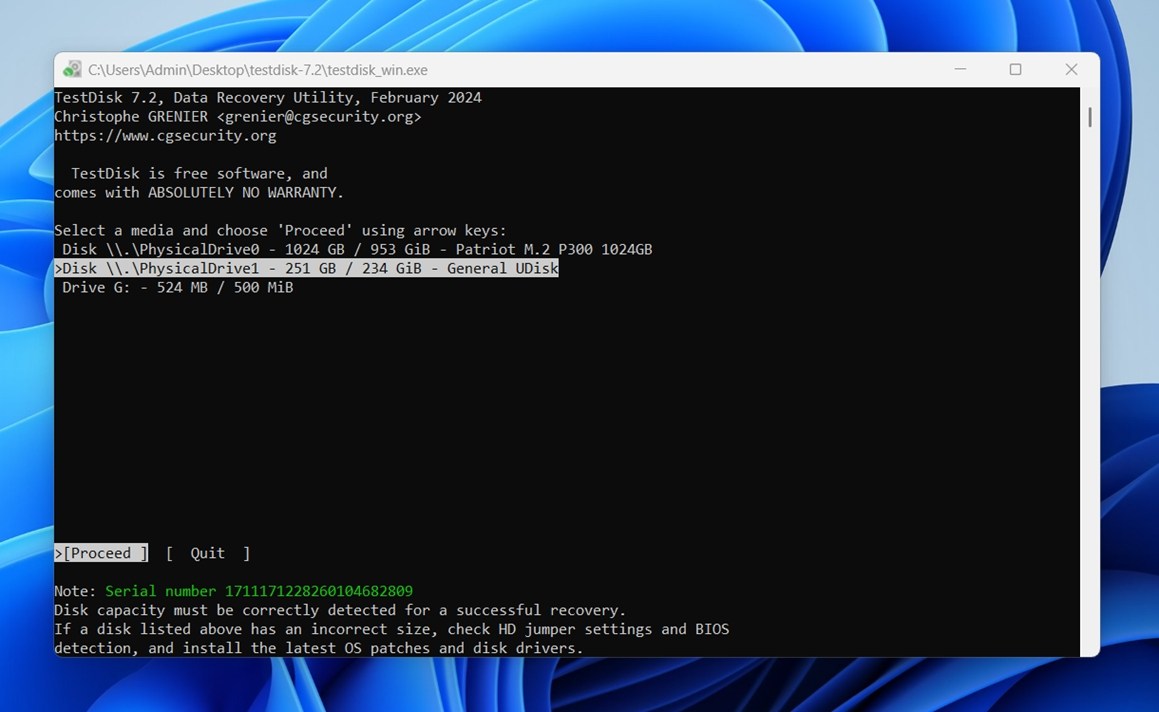
- Choose Create when asked about a log file. After that, you’ll see a list of connected drives.
- Use the arrow keys to select your Sony SD card. Match it by storage size so you pick the right device, then press Enter.
- Accept the suggested partition table type. For most SD cards, the default option is the correct one.
- Choose Analyse, then run Quick Search. TestDisk will scan for lost or damaged partitions.
- If it finds a partition, highlight it and press P to view files inside. If you can see your photos or videos, that’s a strong sign the partition can be restored.
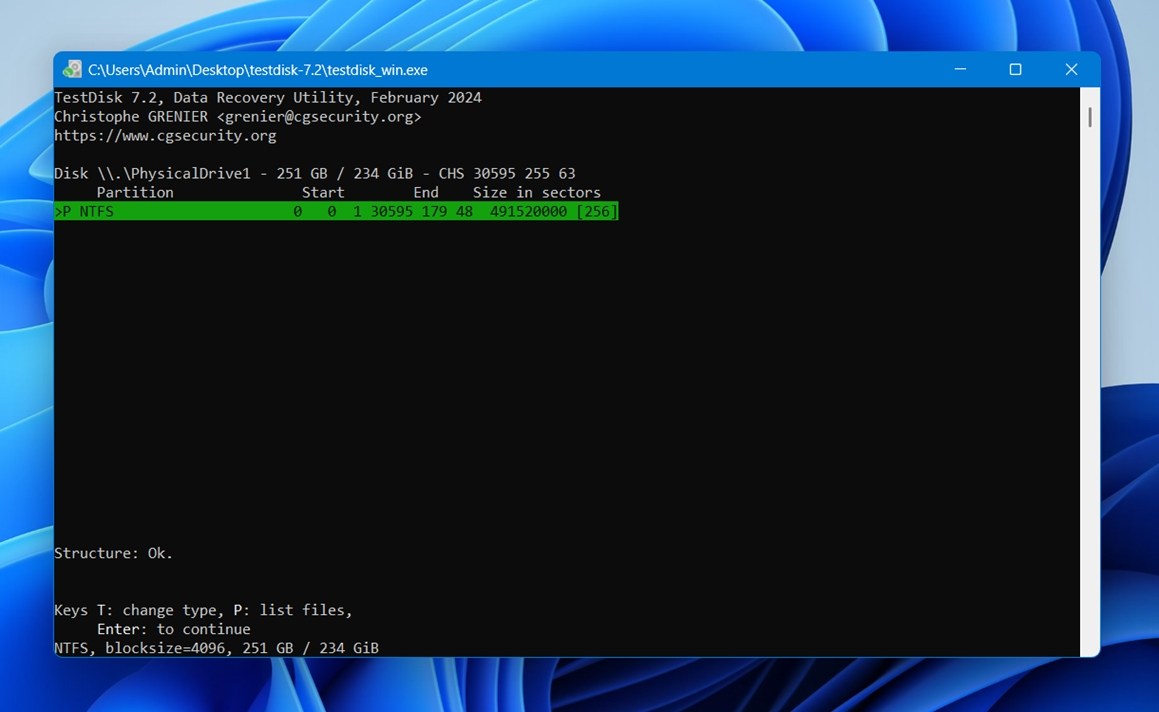
- Go back to the previous screen, mark the found partition as Primary, then choose Write to save the repaired partition table. Confirm when prompted.
- Close TestDisk when it finishes.
- Safely eject the Sony card, reconnect it, and check whether your computer now opens it normally with the files visible.
Method 2: Use CHKDSK
If your Sony SD card is detected by Windows but won’t open properly or reports errors, CHKDSK can sometimes help. It’s a built-in Windows repair tool that checks the file system for (logical) damage and attempts to fix it.
In some cases, that’s enough to make the card readable again. But this method needs a warning first.
CHKDSK changes file system structures while it repairs them; the process can lead to further data loss, that’s why we strongly prefer recovering important data first with Disk Drill, then using CHKDSK afterward if needed.
Here’s how to attempt a repair:
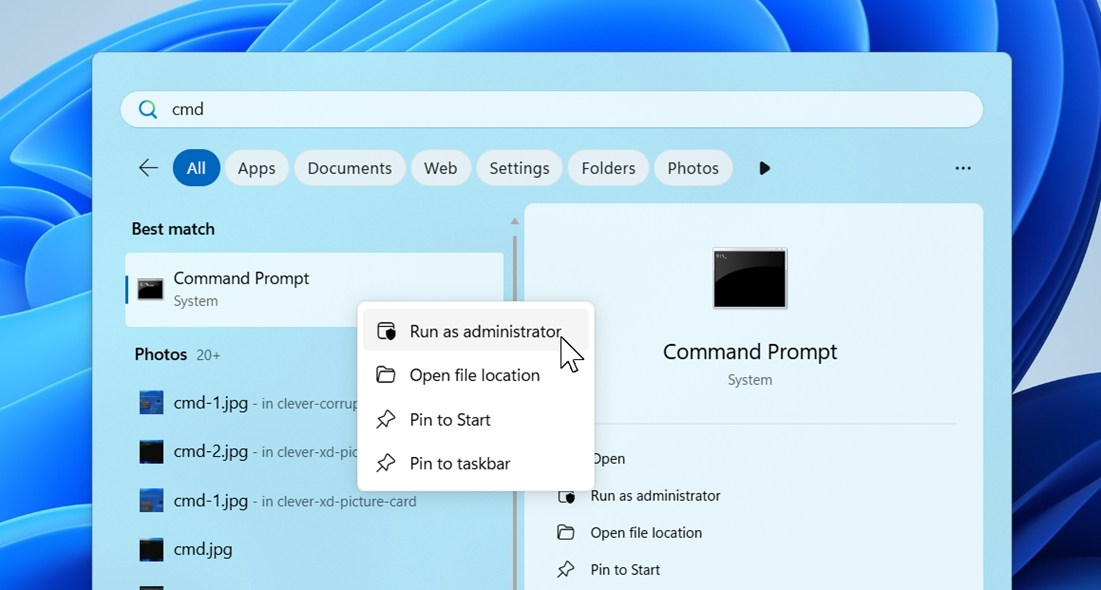
- Open Command Prompt as Administrator (type “cmd” in Start menu).
- Type: chkdsk X: /f
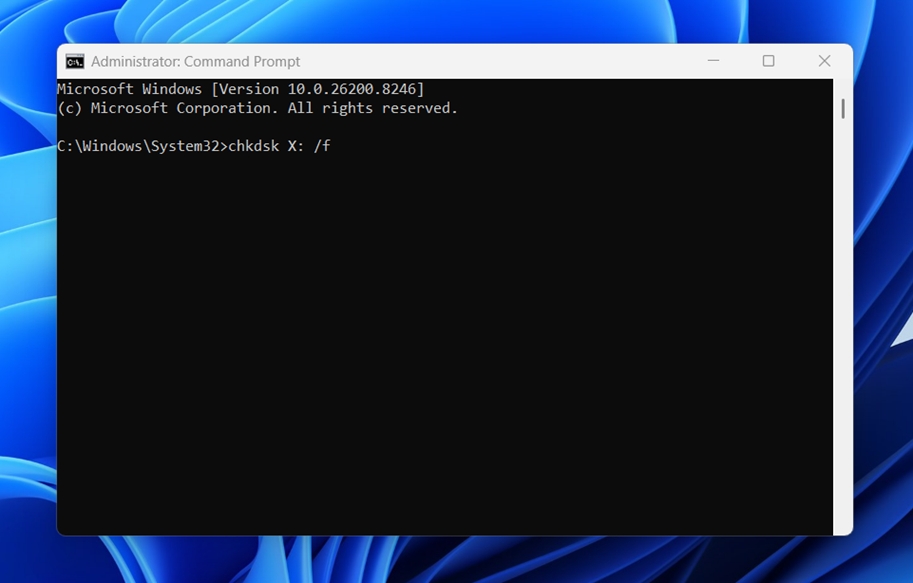
(Replace X with the drive letter of your Sony SD card) - Press Enter and let Windows scan the card.
- If the process completes, safely remove the card, reconnect it, and check whether the files are accessible again.
Once access returns, copy everything off the card immediately. Don’t trust a card that needed repair until you’ve tested it thoroughly or replaced it.
Method 3: Use FakeFlashTest
This method won’t repair the card or recover deleted files, but it can explain why some Sony cards behave strangely. We’ve seen cases where a “Sony” card reports 128 GB, then starts corrupting photos after 16 GB of use or randomly loses files. Sometimes the issue isn’t damage at all – it’s a fake card.
Counterfeit flash media often has modified firmware that lies about real capacity. Your camera or computer keeps writing data past the true limit, and older files get overwritten or corrupted. That’s where FakeFlashTest can help.
Here’s how to check the card:
- Download FakeFlashTest from its official source.
- Insert the Sony SD card into a card reader.
- Open FakeFlashTest.
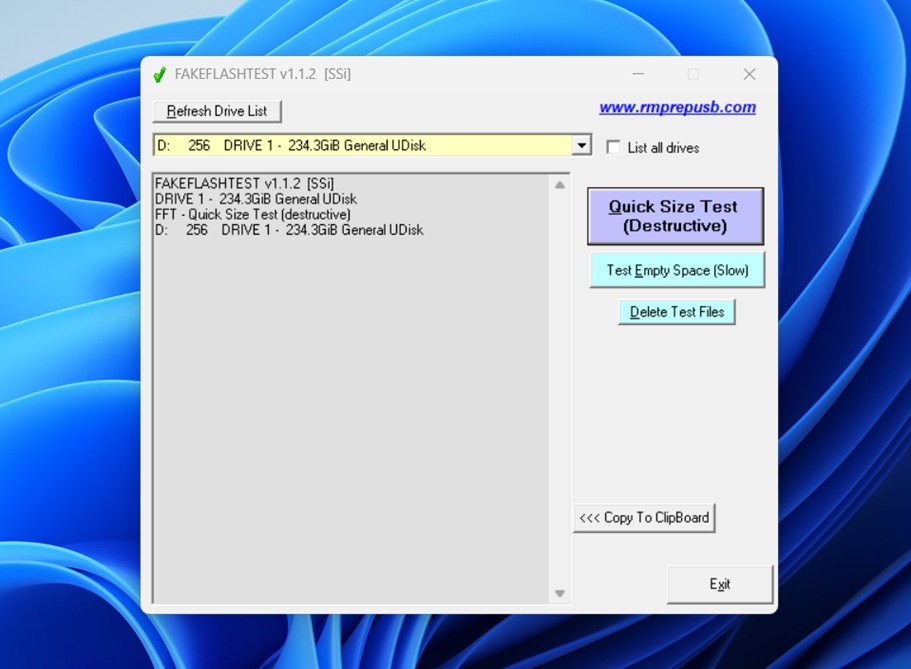
- Open the dropdown menu near the top and choose your Sony card. Double-check the drive letter and size.
- Click Quick Size Test (Destructive) if you want the fastest way to verify whether the reported capacity is real. This writes test data, so it can erase existing files. Only use it after data recovery or when the card is empty.
- Read the final report carefully.
If the reported usable capacity is far lower than advertised, or the tool shows write/read failures across the card, the media may be counterfeit (or defective). If that happens, stop trusting the card for future use and buy the next one from a reputable seller.
Method 4: Reformat the Sony Card
If you already recovered your files and the Sony card still throws errors, asks to be formatted, or behaves unpredictably, reformatting can be a practical final step. This is a maintenance move meant to return the card to working order.
The best place to format the card is often inside the device you plan to use it with. That way, the camera creates the folder structure and settings it expects. But if that isn’t an option, you can format it in Windows Disk Management instead. Here’s how:
- Open Disk Management on your PC.
- Find your Sony SD card in the list of drives.
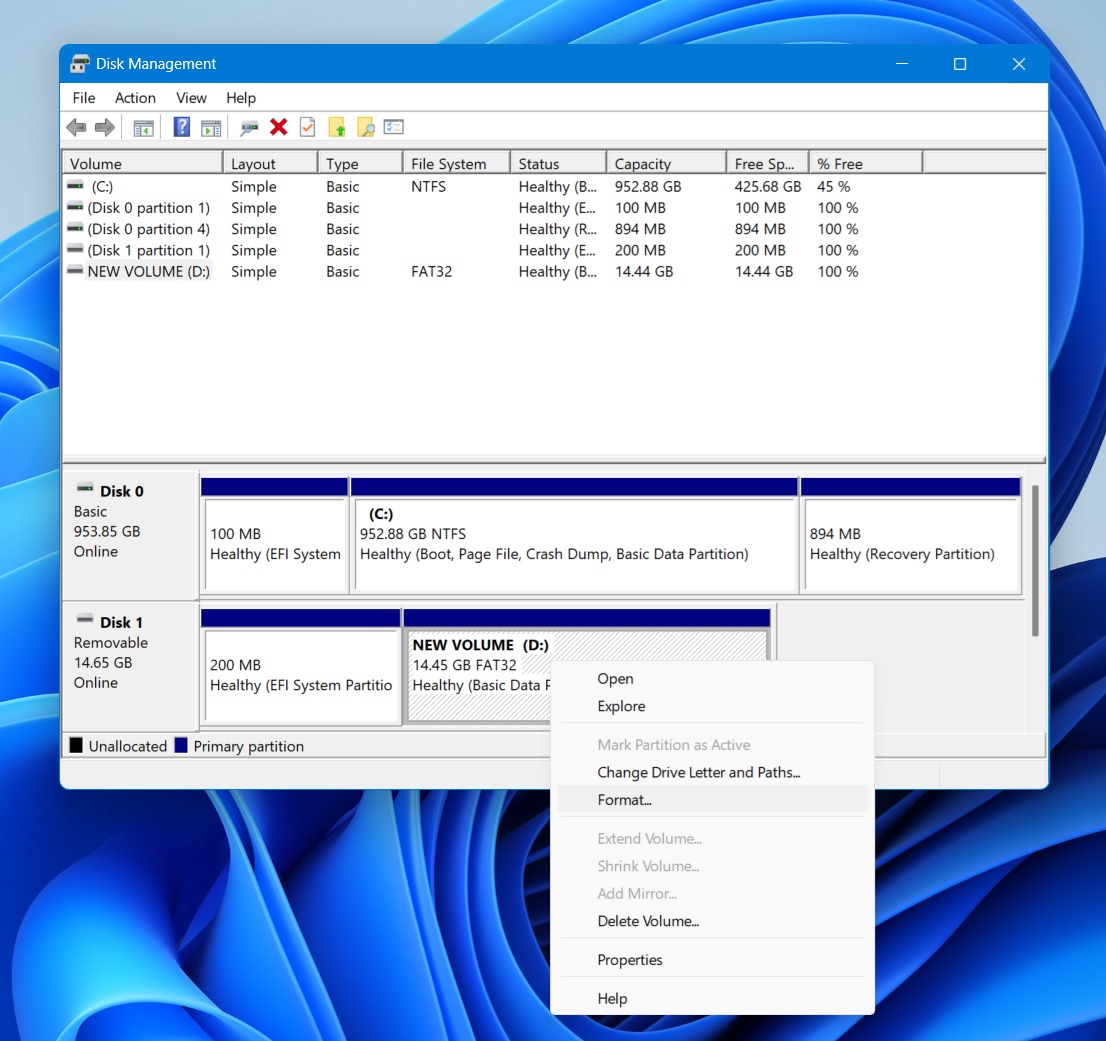
- Right-click the main partition on the card and choose Format.
- Pick a file system. Use FAT32 for smaller cards and exFAT for larger ones.
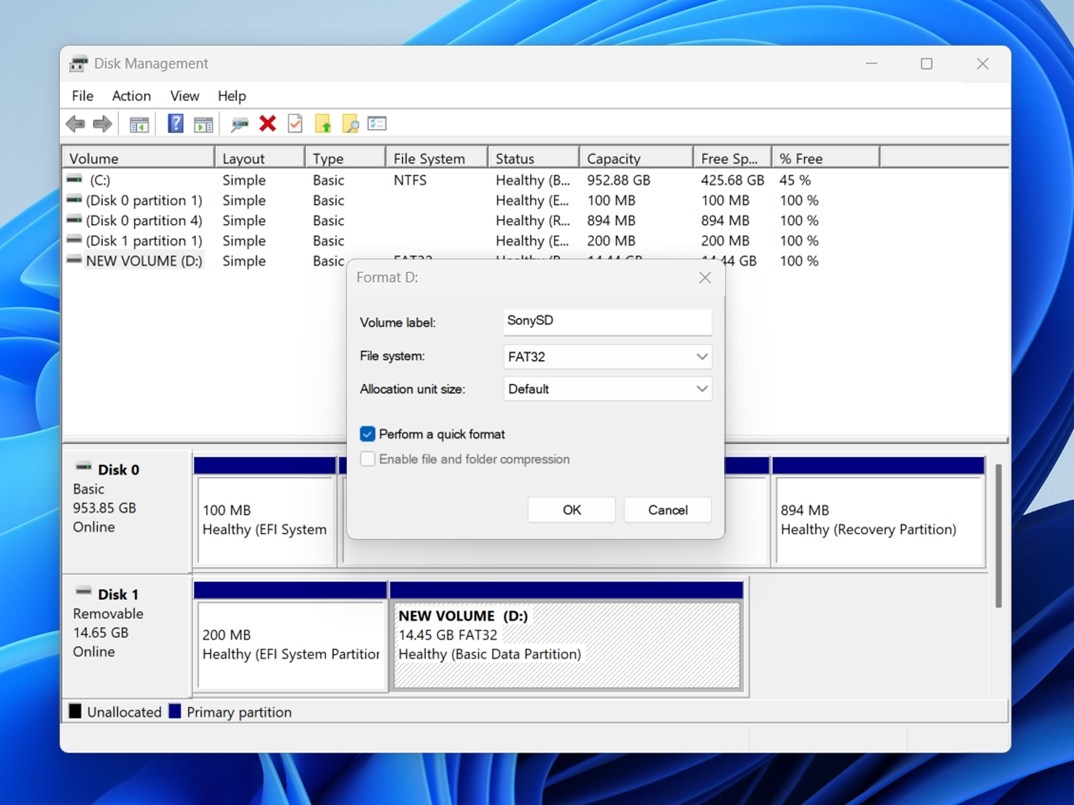
- Leave Quick Format enabled unless you have a specific reason not to.
- Click OK and let Windows finish the process.
Once it’s done, safely eject the card, reinsert it, and test it in your device. If the camera still complains after a clean format, the card itself may be the issue.
When It Makes Sense to Seek Professional Help
You always have the option to hand your Sony memory card to a professional recovery lab. Sometimes that’s the right move. But in most everyday Sony card data loss cases, it isn’t the first move we’d recommend.
If the card is physically fine, inserts normally, and still shows up on a computer with the correct capacity (you can check it in Disk Management), then most cases are still solid DIY territory. Deleted photos, accidental formatting, RAW/file system errors, missing folders, interrupted transfers – these are often recoverable at home with good software often in under an hour.
That route is usually quicker, cheaper, and more convenient. No shipping. No quote. You plug the card in, run a scan, preview what’s there, and recover what you need.
The reality is that many labs begin with software-based recovery when the card is readable. If the hardware still works, their first step may look similar to what you can already do yourself.
Where professional labs earn their cost is hardware failure.
That includes:
- Cracked or snapped cards
- Water/fire damage
- Burned components
- Broken controller chips
- Bent or damaged contacts
- Cards detected with the wrong size
- Cards not appearing in Disk Management at all
Those cases may need chip-off recovery, donor parts, specialized readers, and tools home users simply don’t have.
Conclusion
Sony SD card recovery is very much possible, and hopefully that’s clear by the time you’ve made it down here. In most everyday cases – deleted files, accidental formatting, file system trouble – do not mean your photos and videos are gone for good.
If we had to sum it up, Disk Drill is one of the simplest (and most effective) ways to recover files from Sony SD cards at home. You connect the card to your computer, run a scan, preview what was found, and recover the files to a safe location. That covers a huge share of real-world cases. After that, if the card still gives you trouble, you can reformat it and test it again. If the issue was logical rather than physical, that often solves it. In most cases, that’s all there is to it.
The big thing is timing. Stop using the card, scan it ASAP, and save recovered files somewhere else. That gives you the best shot.
FAQs
The best Sony memory card recovery software is usually the same software that ranks among the best memory card recovery tools overall. The Sony brand name itself doesn’t create a special requirement here. What matters is whether the tool supports SD card file systems, common photo and video formats, and reliable scanning methods.
If you want the strongest options currently available, we have a list of the best data recovery software we consider worth using right now. Those tools work with Sony SD cards without issue (as long as the card is still detectable by your computer).
Download and install the data recovery software. Of the many available, such as Recuva, Stellar, and EaseUS, Disk Drill is the one we prefer. Its intuitive user interface makes it easy to recover your lost files. Moreover, it is available free of cost. Here’s a super quick walkthrough:
- Connect your Sony SD card to the computer.
- Select the SD Card from the data recovery app.
- Start scanning the SD Card.
- Select the files you would like to recover.
- Choose a desirable destination to save the restored files.
Stop using the card right away, connect it to a computer with a card reader, and scan it with recovery software such as Disk Drill. Preview the found photos, then recover them to your computer or another drive (not back to the same card).